RAK3272-SiP Breakout Board Interface Access Using RUI3
This guide shows how to use RUI3 APIs to access the pinouts of RAK3272-SiP Breakout Board. It includes code examples for digital I/O, analog input, UART, and I2C, as well as pinout information for SPI.
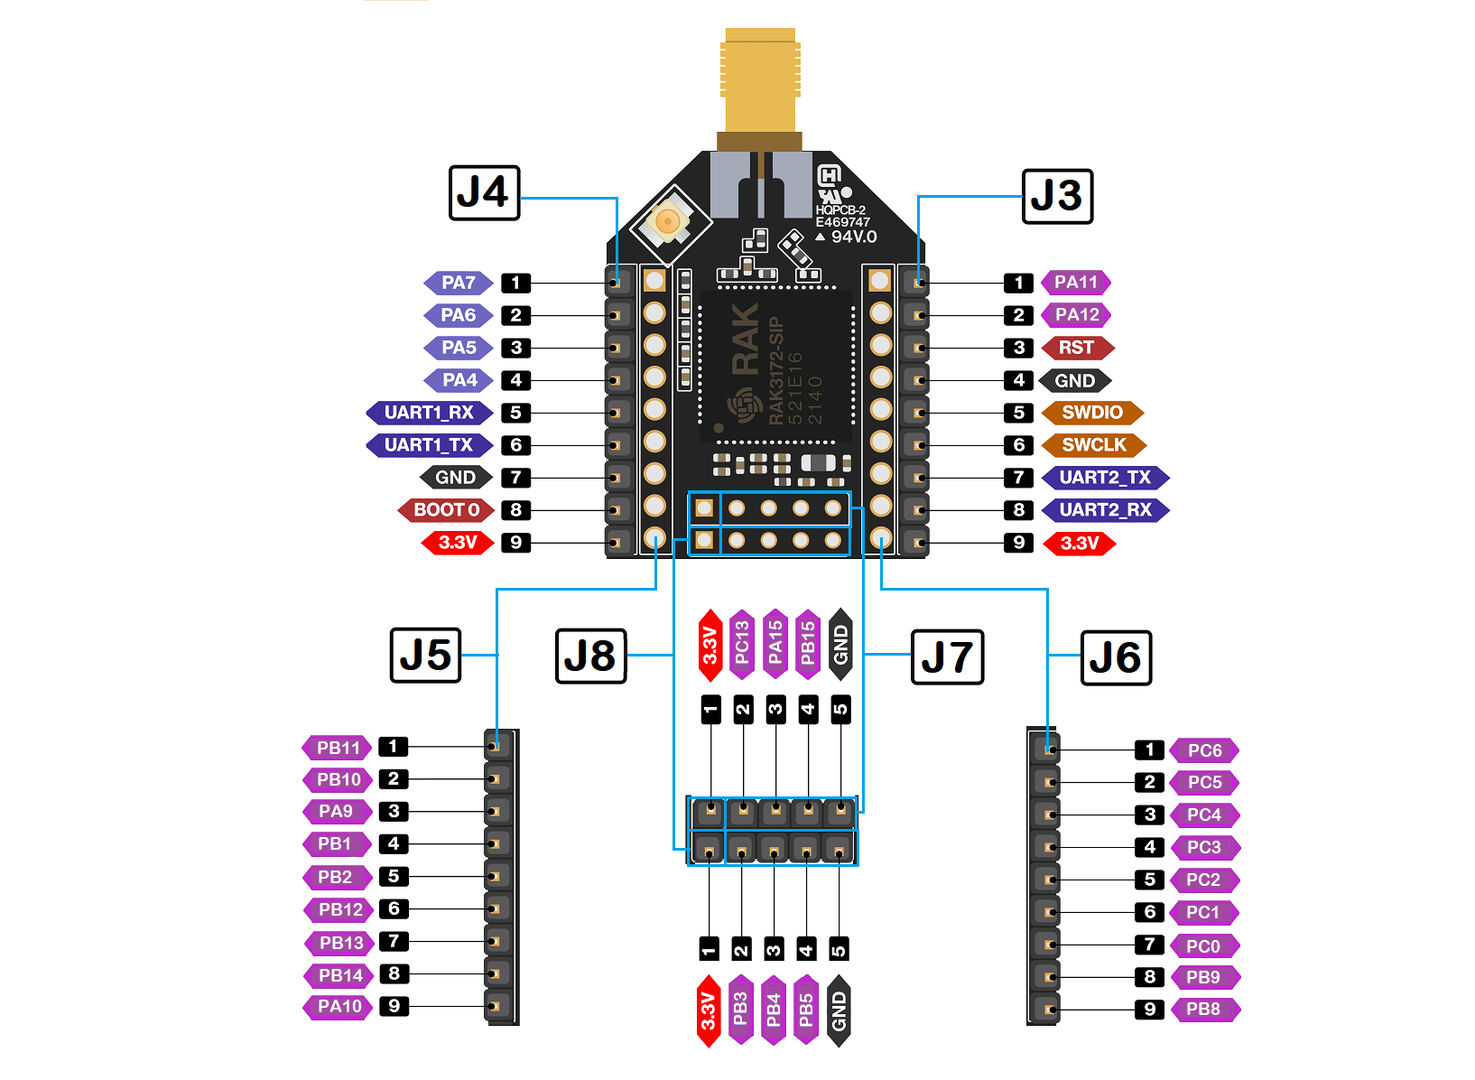 Figure 1: Available Peripherals and Digital I/O pins in RAK3272-SiP Breakout Board
Before using the examples in this guide, make sure you have completed the hardware setup and Arduino IDE installation described in the RAK3272-SiP Breakout Board Quick Start Guide .
Digital I/O Pins
Here‘s the available digital I/O pins in RAK3272-SiP breakout board.
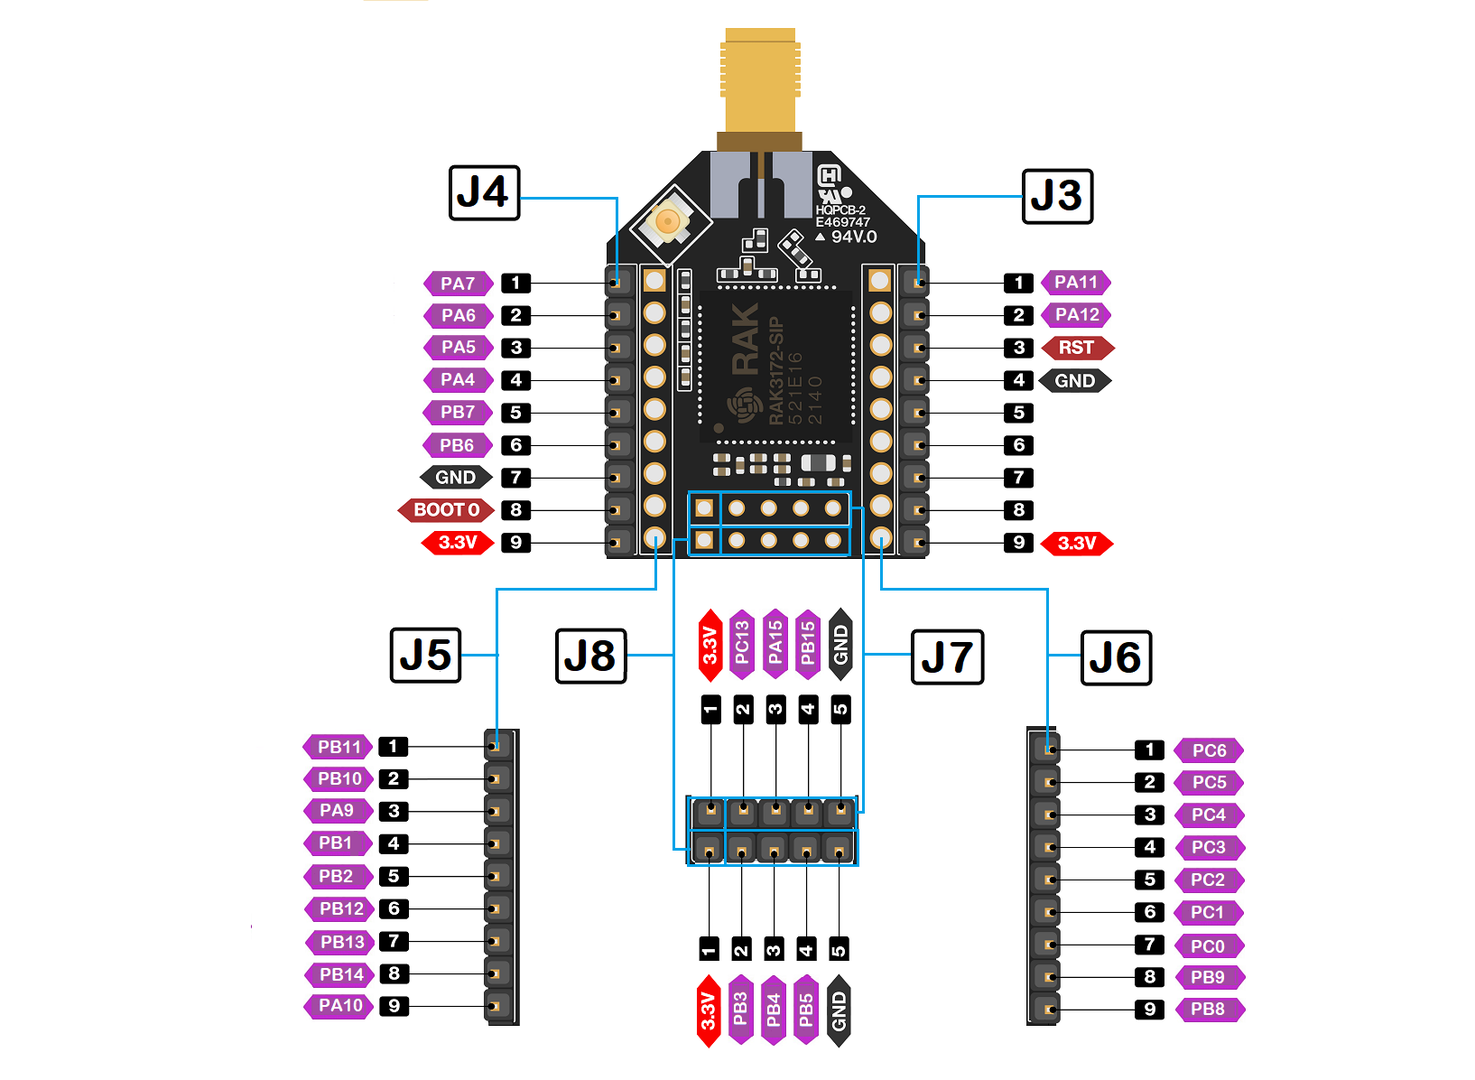 Figure 1: Available Digital I/O pins in RAK3172-SiP Breakout Board
| Pin Name | Alternative Pin Usage |
|---|---|
| PA4 | SPI1_NSS |
| PA5 | SPI1_CLK |
| PA6 | SPI1_MISO |
| PA7 | SPI1_MOSI |
| PA8 | |
| PA9 | |
| PA10 | |
| PA11 | I2C_SCL |
| PA12 | I2C_SDA |
| PA15 | |
| PB1 | |
| PB2 | |
| PB3 | ADC0 |
| PB4 | ADC1 |
| PB5 | |
| PB6 | UART1_TX |
| PB7 | UART1_RX |
| PB8 | |
| PB9 | |
| PB10 | |
| PB11 | |
| PB12 | |
| PB13 | |
| PB14 | |
| PB15 | |
| PC0 | |
| PC1 | |
| PC2 | |
| PC3 | |
| PC4 | |
| PC5 | |
| PC6 | |
| PC13 |
The pins listed below must not be used.
| Pin name | Pin Location | Pin Usage |
|---|---|---|
| PA2 | J3 pin 7 | UART2_TX |
| PA3 | J3 pin 8 | UART2_RX |
| PA13 | J3 pin 5 | SWDIO |
| PA14 | J3 pin 6 | SWCLK |
- Use Arduino digitalRead to read the value from a specified Digital I/O pin, either HIGH or LOW.
- Use Arduino digitalWrite to write a HIGH or a LOW value to a Digital I/O pin.
The GPIO Pin Name is the one to be used on the digitalRead and digitalWrite and NOT the pin numbers.
Example code
void setup()
{
  pinMode(PA9, OUTPUT); //Change the PA9 to any digital pin you want. Also, you can set this to INPUT or OUTPUT
}

void loop()
{
  digitalWrite(PA9,HIGH); //Change the PA9 to any digital pin you want. Also, you can set this to HIGH or LOW state.
  delay(1000); // delay for 1 second
  digitalWrite(PA9,LOW); //Change the PA9 to any digital pin you want. Also, you can set this to HIGH or LOW state.
  delay(1000); // delay for 1 second
}
Analog Input Pins
Here‘s the available pins for Analog Input on RAK3272-SiP breakout board.
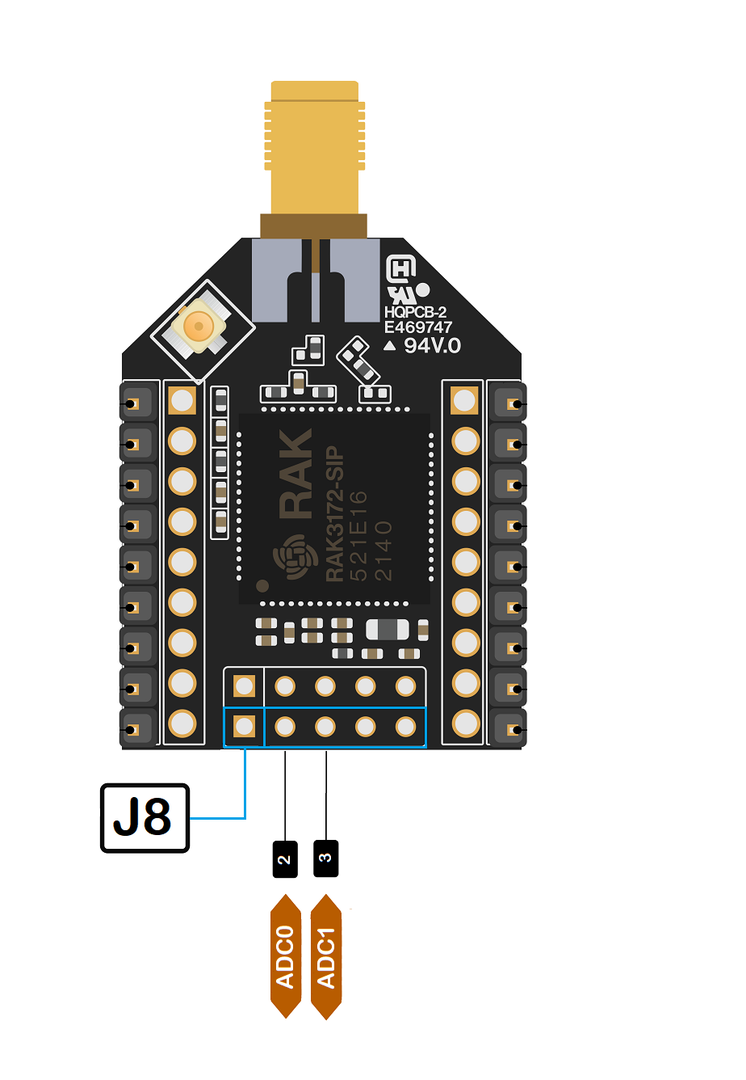 Figure 1: Available Analog pins in RAK3272-SiP Breakout Board
| Pin Location | Analog Port | Pin Name |
|---|---|---|
| J8 pin 2 | ADC0 | PB3 |
| J8 pin 3 | ADC1 | PB4 |
- Use Arduino analogRead to read the value from the specified Analog Input pin.
Example code
#define analogPin PB3

int val = 0;  // variable to store the value read

void setup()
{
  Serial.begin(115200);
}

void loop()
{
  val = analogRead(analogPin);  // read the input pin
  Serial.println(val);          // debug value
  delay(100);
}
Serial Interfaces
UART
There are two UART peripherals available on the RAK3172 module. There are also different Serial Operating Modes possible in RUI3, namely Binary Mode, AT Mode, and Custom Mode.
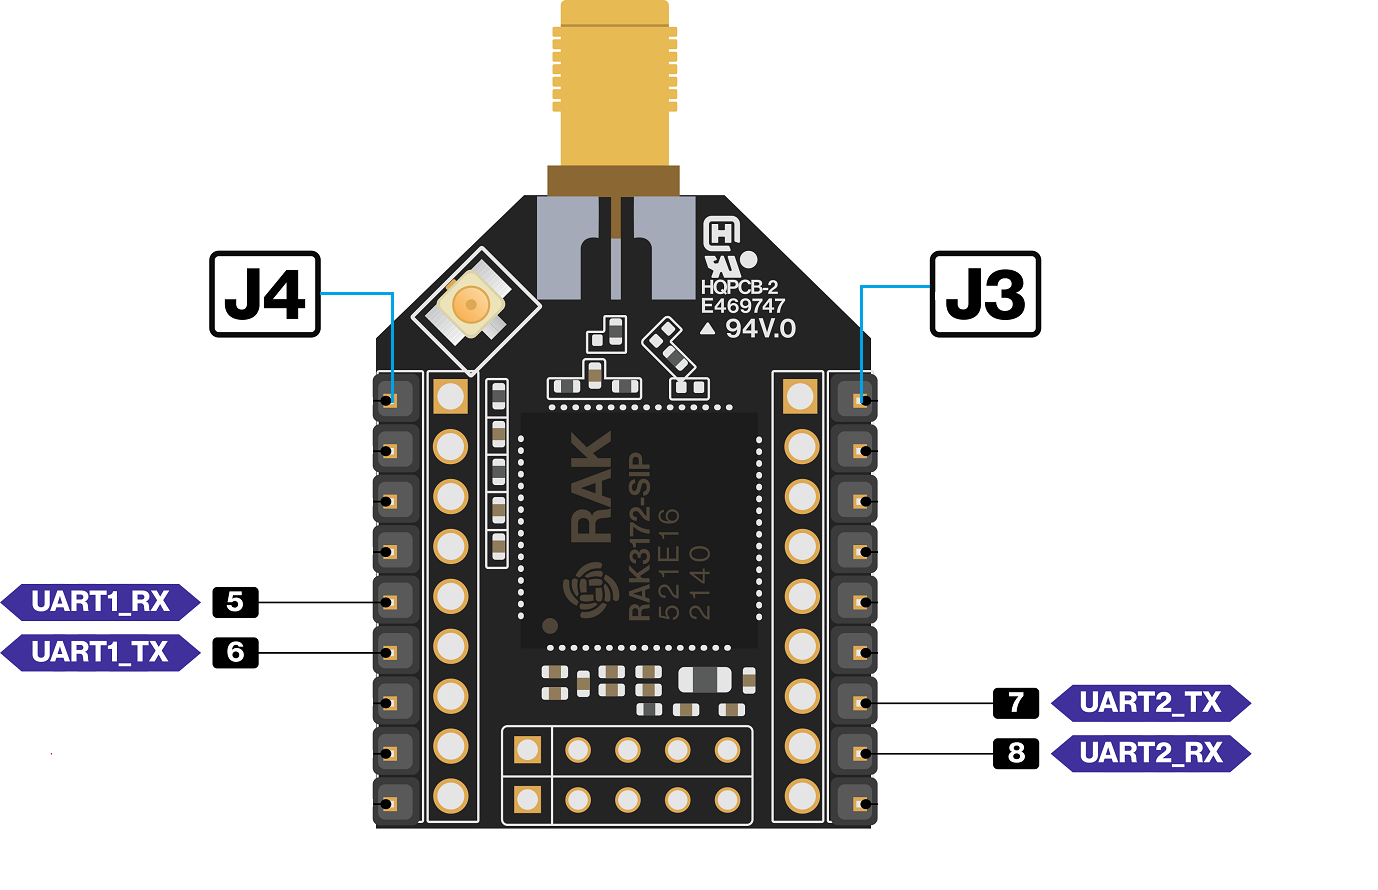 Figure 1: Available UART pins in RAK3272-SiP Breakout Board
| Pin Location | Serial Port | Serial Instance Assignment | Default Mode |
|---|---|---|---|
| J4 pin 5 | UART1_RX | Serial1 | Custom Mode |
| J4 pin 6 | UART1_TX | Serial1 | Custom Mode |
| J3 pin 8 | UART2_RX | Serial | AT Command |
| J3 pin 7 | UART2_TX | Serial | AT Command |
Example Code
void setup()
{
  Serial1.begin(115200); // use Serial1 for UART1 and Serial for UART2
                         // you can designate separate baudrate for each.
  Serial.begin(115200);
}

void loop()
{
  Serial1.println("RAK3272-SiP UART1 TEST!");
  Serial.println("RAK3272-SiP UART2 TEST!");
  delay(1000); // delay for 1 second
}
I2C
There is one I2C peripheral available on RAK3272-SiP. Make sure you have an I2C device connected to specified I2C pins to run the I2C scanner code.
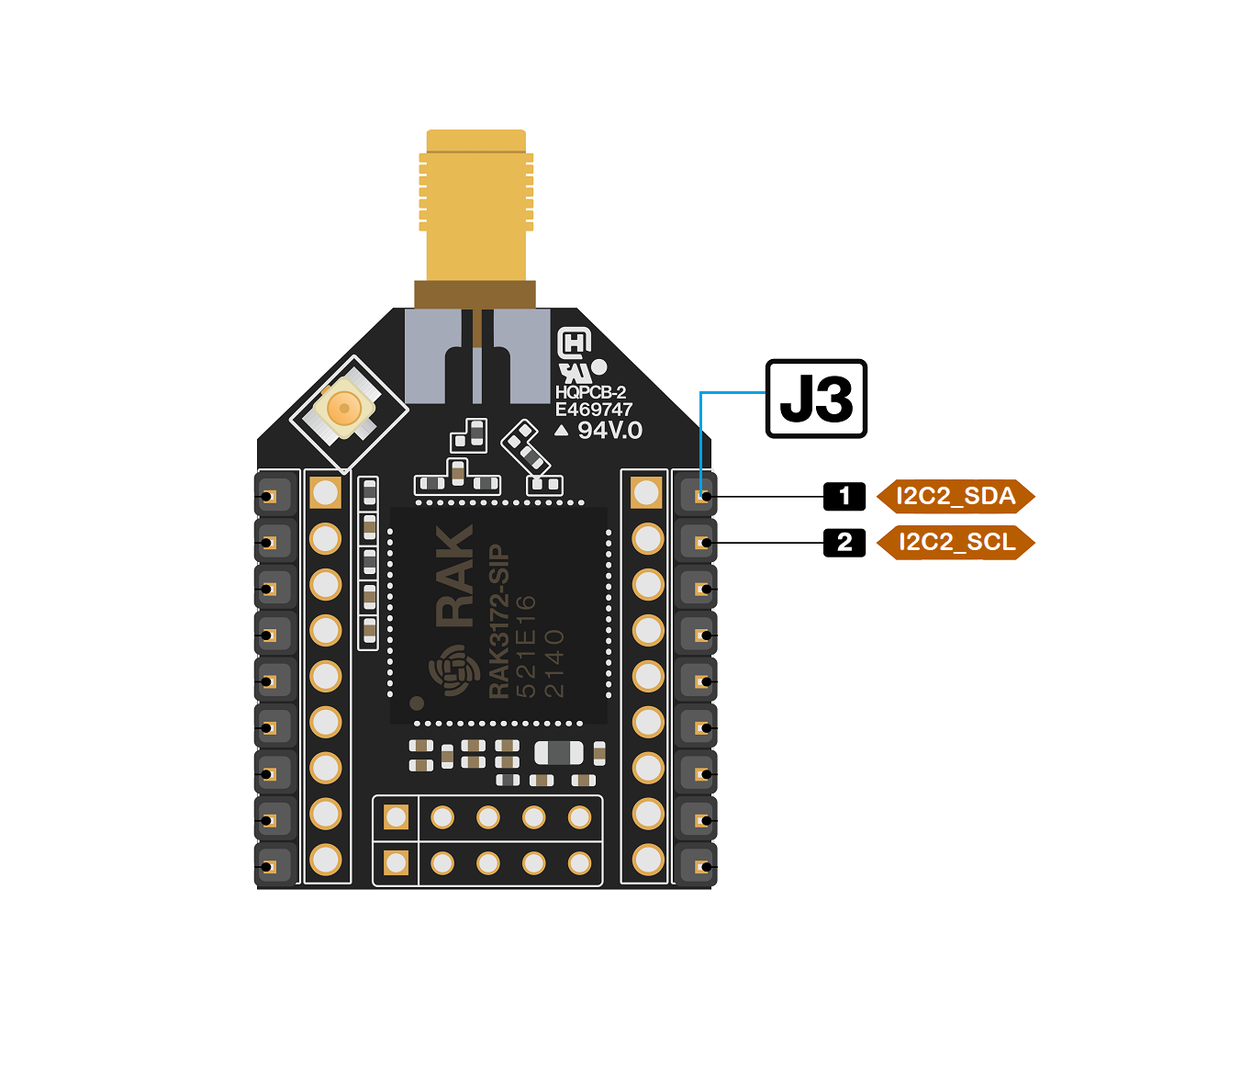 Figure 1: Available I2C pins in RAK3272-SiP Breakout Board
| I2C Port | Pin Location | Pin Name |
|---|---|---|
| I2C_SCL | J3 pin 1 | PA11 |
| I2C_SDA | J3 pin 2 | PA12 |
- Use Arduino Wire library to communicate with I2C devices.
Example Code
#include <Wire.h>

void setup()
{
  Wire.begin();

  Serial.begin(115200);
  while (!Serial);
  Serial.println("\nI2C Scanner");
}


void loop()
{
  byte error, address;
  int nDevices;

  Serial.println("Scanning...");

  nDevices = 0;
  for(address = 1; address < 127; address++ )
  {
    // The i2c_scanner uses the return value of
    // the Write.endTransmission to see if
    // a device did acknowledge to the address.
    Wire.beginTransmission(address);
    error = Wire.endTransmission();

    if (error == 0)
    {
      Serial.print("I2C device found at address 0x");
      if (address<16)
        Serial.print("0");
      Serial.print(address,HEX);
      Serial.println("  !");

      nDevices++;
    }
    else if (error==4)
    {
      Serial.print("Unknown error at address 0x");
      if (address<16)
        Serial.print("0");
      Serial.println(address,HEX);
    }
  }
  if (nDevices == 0)
    Serial.println("No I2C devices found\n");
  else
    Serial.println("done\n");

  delay(5000);           // wait 5 seconds for next scan
}
The Arduino Serial Monitor shows the I2C device found.
17:29:15.690 -> Scanning...
17:29:15.738 -> I2C device found at address 0x28  !
17:29:15.831 -> done
17:29:15.831 ->
17:29:20.686 -> Scanning...
17:29:20.733 -> I2C device found at address 0x28  !
17:29:20.814 -> done
17:29:20.814 ->
SPI
If your RUI3 project uses SPI, then J4 pins 1 to 4 are reserved for the RUI3 SPI interface.
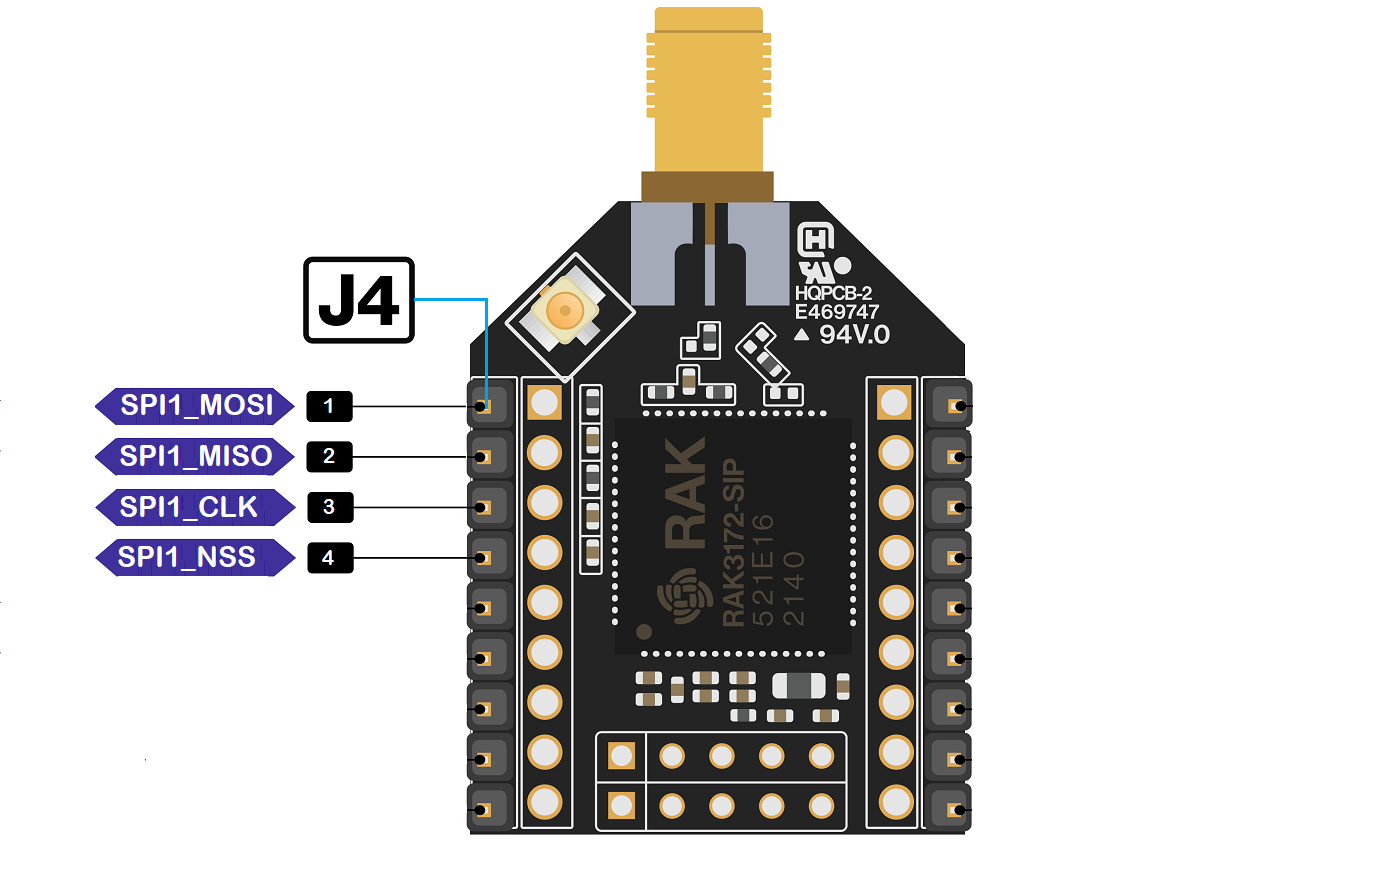 Figure 1: Available SPI pins in RAK3272-SiP Breakout Board
More examples for the RAK3172-SiP can be found in the RUI3-Best-Practices on Github.


