index
Prerequisites
- The RAK gateway must operate in Built-in Network Server mode.
- Your LoRaWAN end devices and the gateway must use the same regional frequency band.
Access the Extension
-
Open your browser and log in to the gateway's web UI. If necessary, refer to the Quick Start Guide section of the gateway’s user manual.
-
Once logged in, navigate to Extensions in the left menu.
NOTEClick the WisGate logo to expand the left menu and view all available tabs.
-
Under the Installed tab, you will see the BACnet Gateway extension. Click Launch.
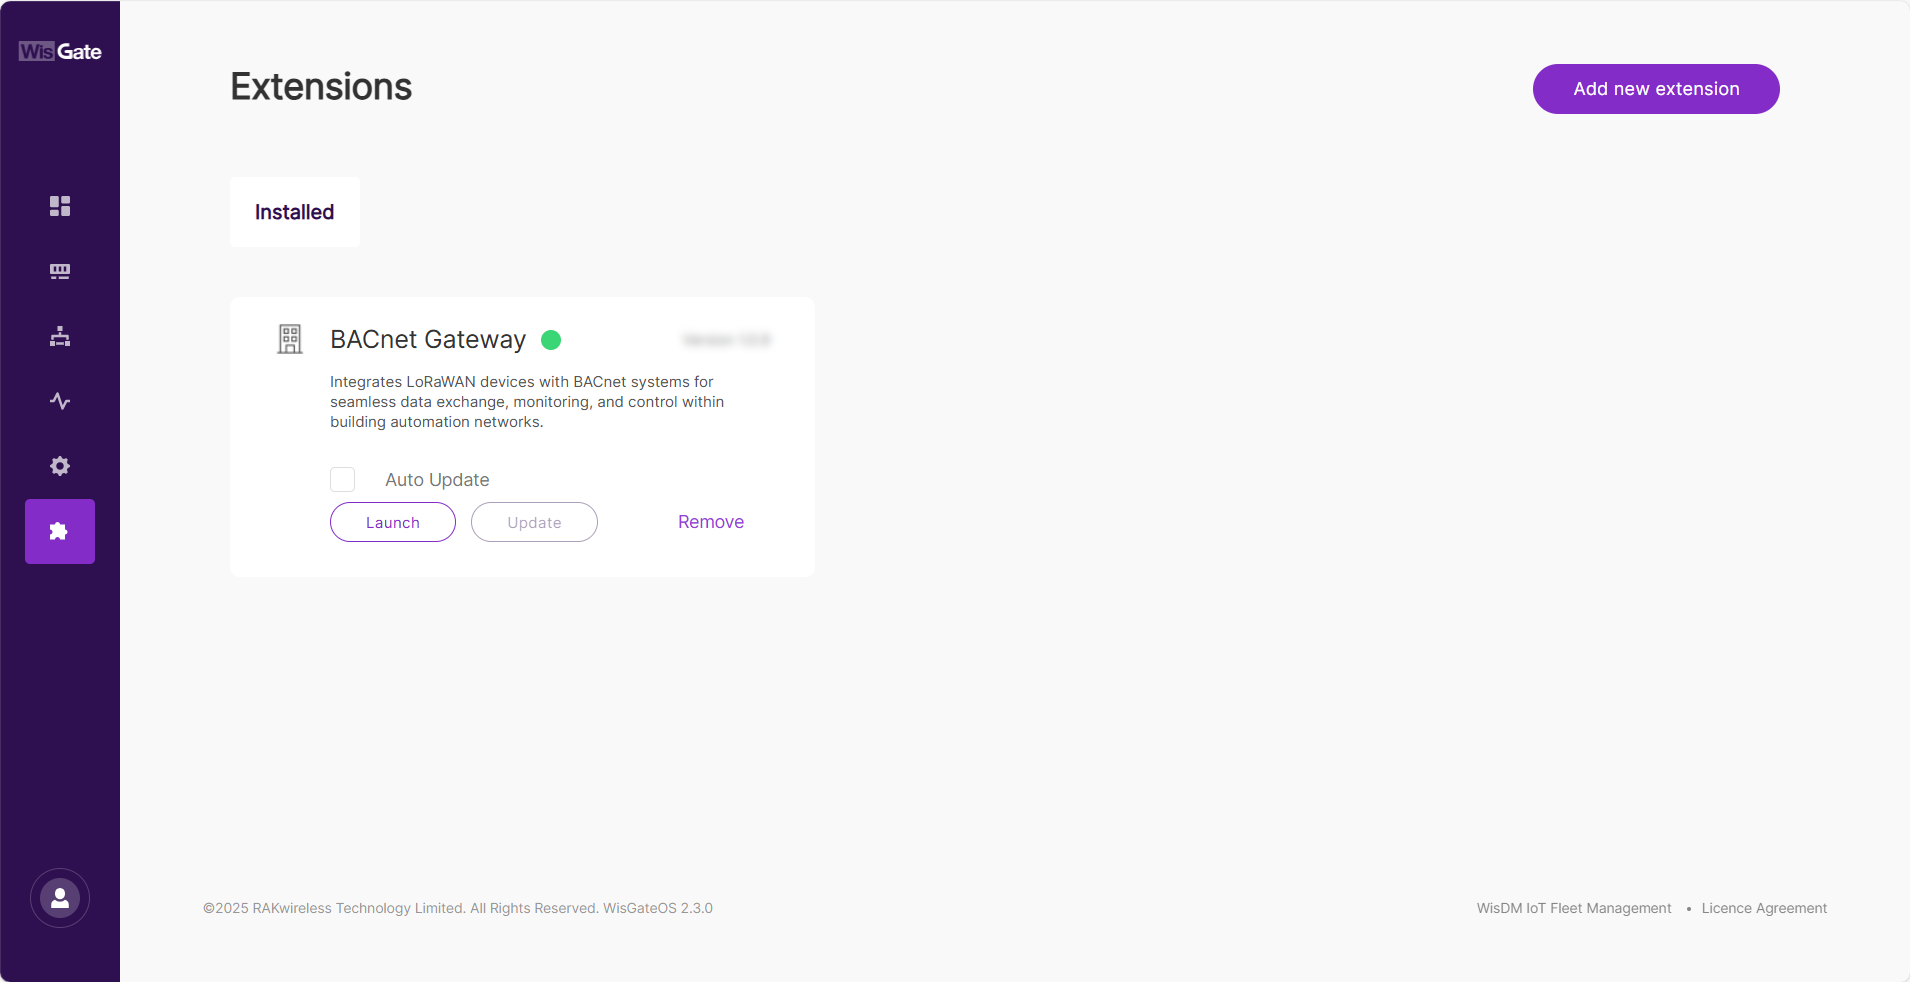 Figure 1: Extensions Tab
BACnet Configuration
This section enables you to configure the basic settings for the BACnet Gateway.
- In the Configuration tab, set up the basic information for the BACnet Gateway, including the following:
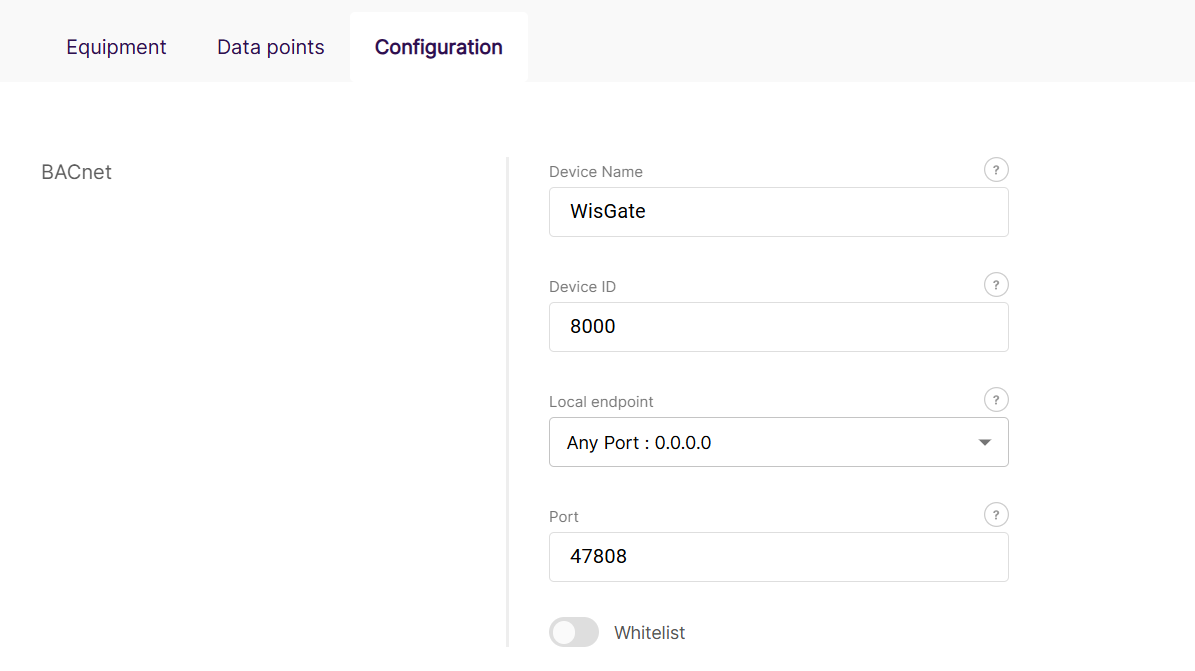 Figure 1: BACnet Configuration
-
Device Name: The name of the gateway as it will appear in the BACnet network.
-
Device ID: A unique Device Instance for the BACnet network. The ID range is 1 to 4194303.
-
Local Endpoint: Specifies the IP interface that the BACnet Gateway uses for UDP communication.
NOTEYou can either select a specific network interface to bind the BACnet Gateway to a particular IP address assigned by the connected network or choose Any Port: 0.0.0.0 for automatic IP selection.
If you select Any Port: 0.0.0.0, the BACnet Gateway will dynamically select the IP address of the network interface with the highest priority based on the available connections.
-
Port : The UDP port for the BACnet Gateway, ranges from 2000 to 65535, with the default set to 47808 (BAC0).
-
Whitelist : Enables the Whitelist feature, which allows you to specify a list of allowed BACnet Servers (BMS) IP addresses.
-
Source IP address: Specifies the list of IP addresses for BACnet Servers (BMS) that are allowed to communicate with the BACnet Gateway.
- Click Save changes.
Prepare an Equipment Profile
Before adding equipment to the BACnet Gateway, make sure that a matching equipment profile is available for your LoRaWAN device.
An equipment profile defines how the LoRaWAN payload from a device is decoded and mapped to BACnet objects. The BACnet Gateway uses the profile to expose LoRaWAN device data correctly in the BACnet network.
Depending on your device, use one of the following methods to prepare a profile:
- If your device is already supported by a Default profile, no additional action is required. You can proceed directly to Add Your Equipment.
- If your device is not supported by the default profiles, check the RAK BACnet Profile Library and import a matching profile.
- If an existing profile is similar to your device, you can download the profile, customize it, and import it as a Custom profile.
- If no matching or reusable profile is available, submit a new profile request.
Check Existing Profiles
Go to the Profiles tab to view all equipment profiles available on the BACnet Gateway.
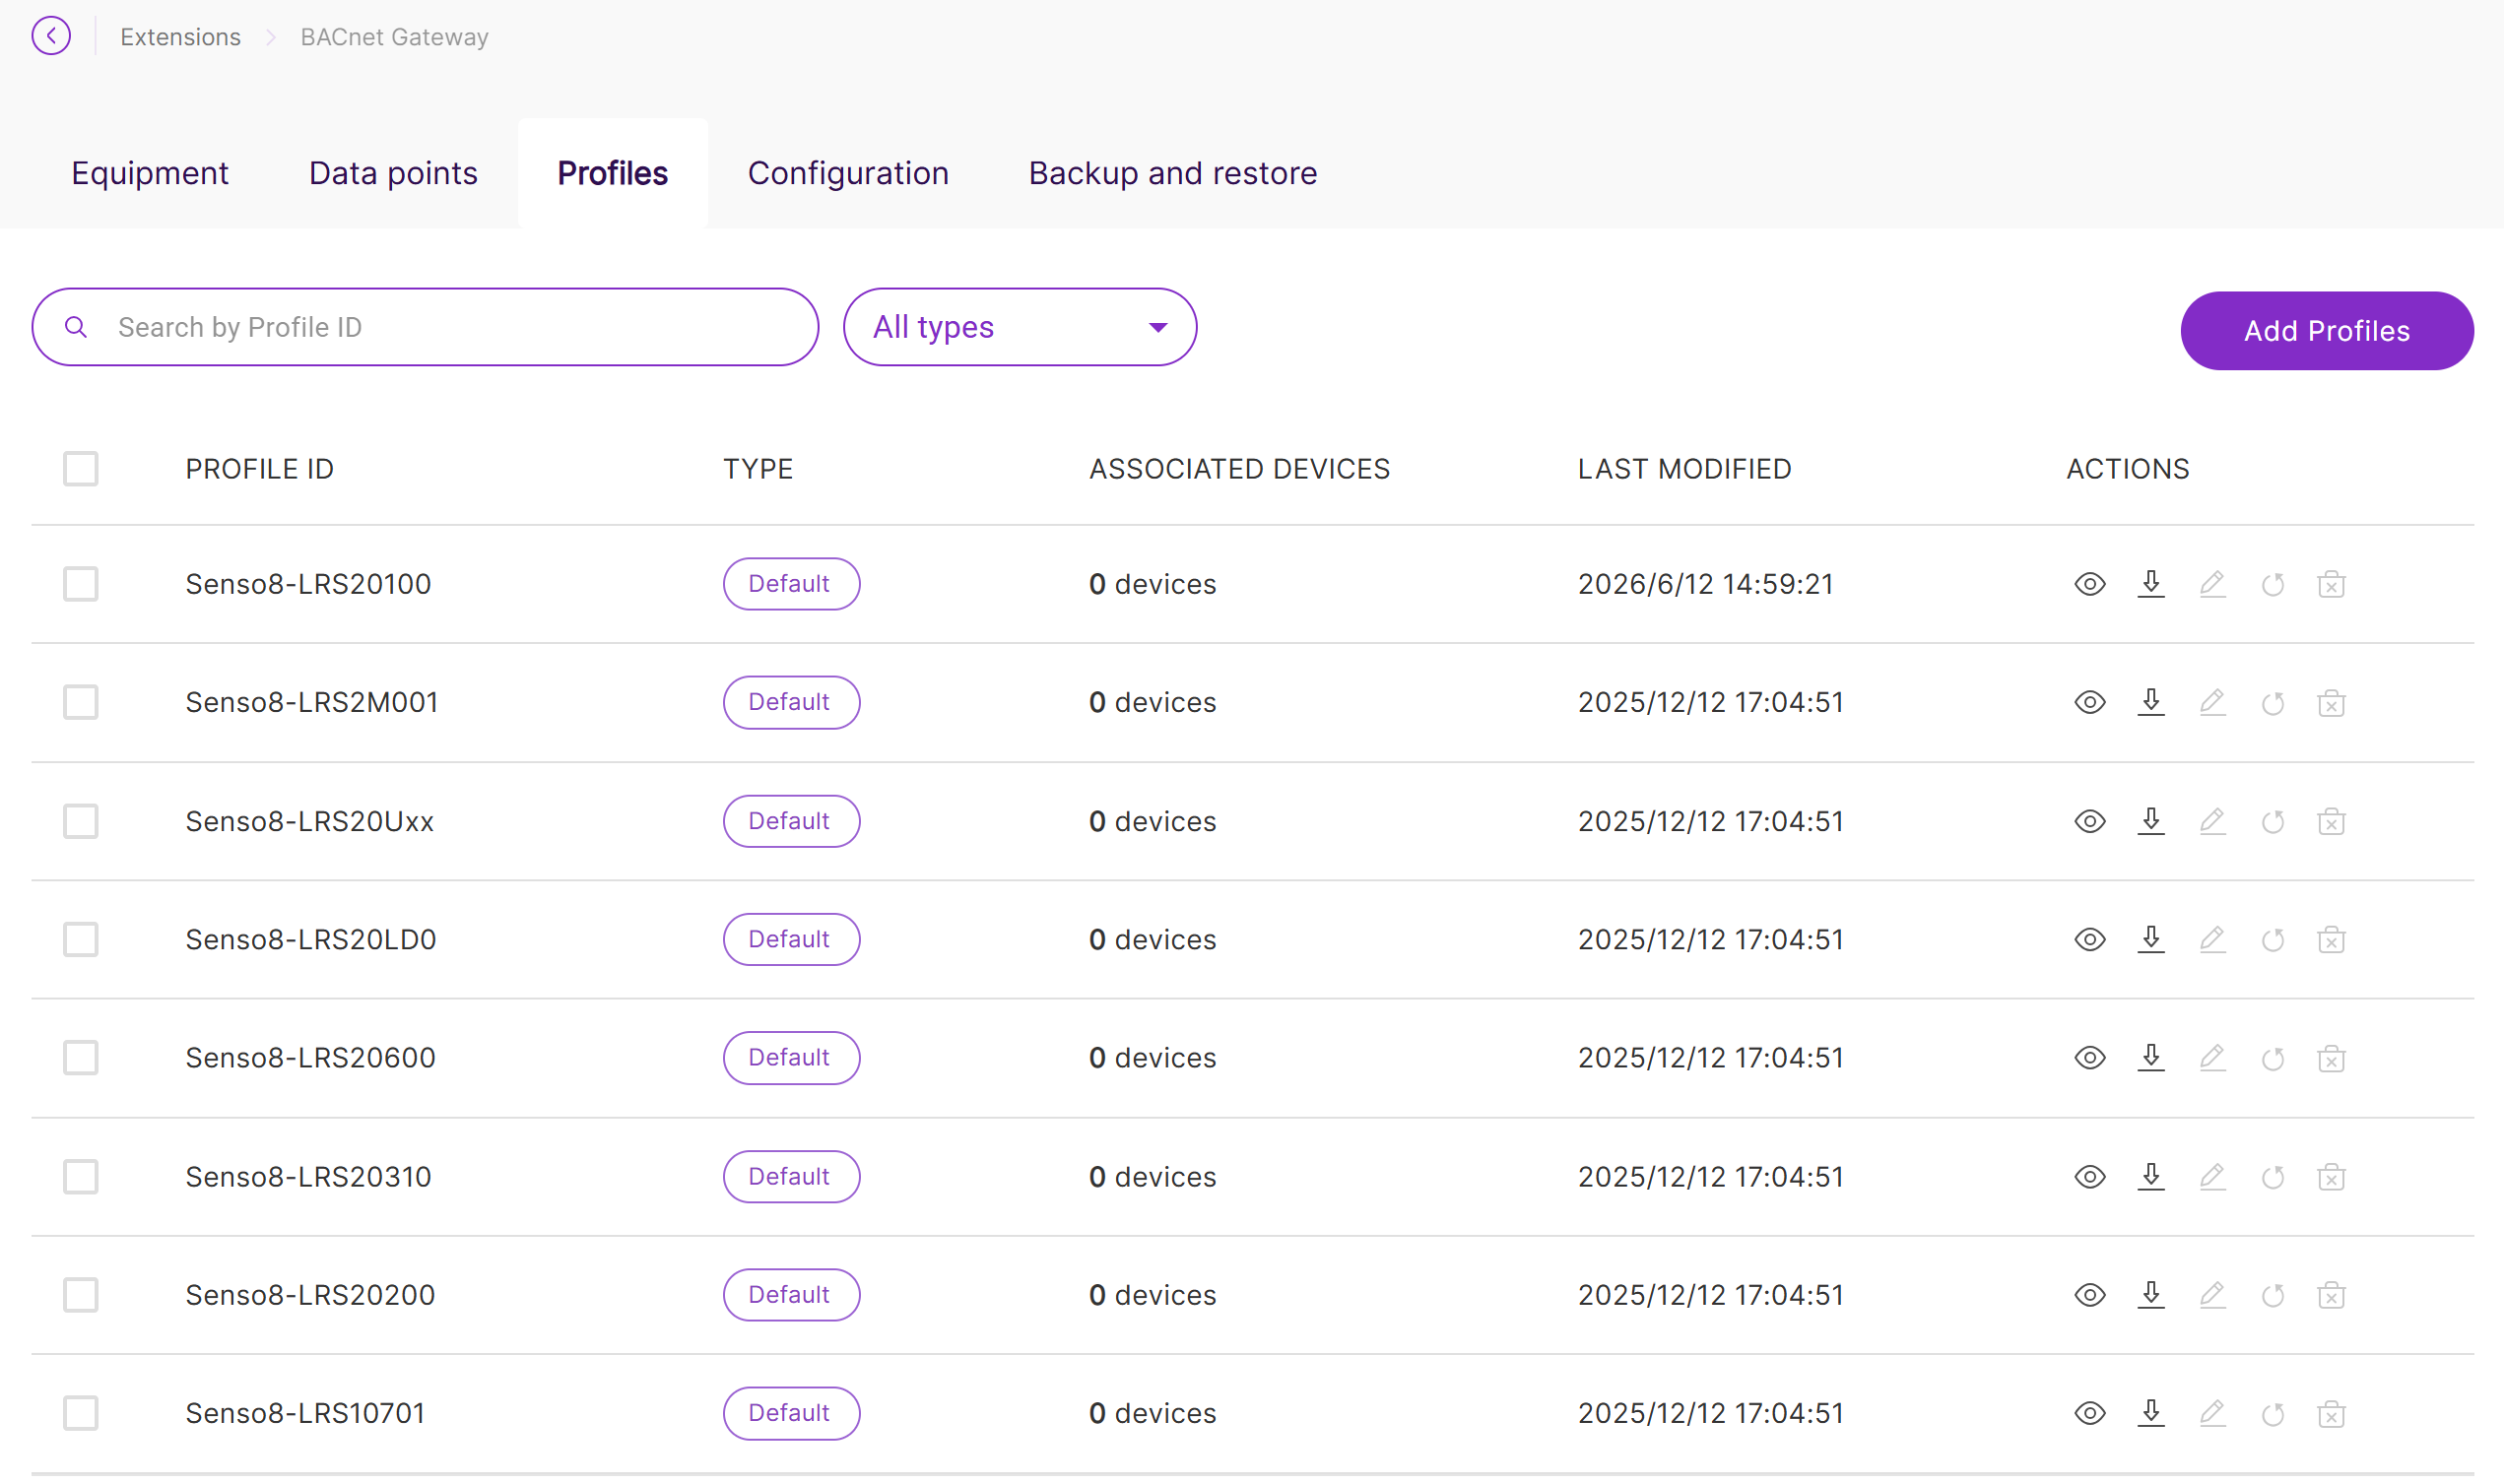 Figure 1: Profiles
Before importing a new profile, check whether a matching profile already exists. You can use the Search by Profile ID field to search for a specific profile, or use the All types drop-down list to filter profiles by type.
The Type column indicates the profile type:
| Type | Description |
|---|---|
| Default | A predefined profile built into the BACnet Gateway. Default profiles cannot be deleted. |
| Custom | A user-imported or user-created profile. Custom profiles can be managed based on the available actions and usage status. |
The profile list also shows the number of Associated Devices and the Last Modified time. This helps you check whether a profile is already in use and when it was last updated.
Use a Default Profile
Default profiles are predefined profiles provided by the BACnet Gateway.
If your device is already supported by a default profile, no additional profile import or configuration is required. You can proceed directly to Add Your Equipment.
To view only default profiles, open the All types drop-down list and select Default.
Import a Profile
If your device is not supported by the default profiles, check the RAK BACnet Profile Library for a matching profile. The library provides additional profiles for different LoRaWAN sensor.
After downloading the matching profile, import it into the BACnet Gateway.
-
Go to the Profiles tab.
-
Click Add Profiles. The Import Profile(s) window appears.
-
Click Choose Files or drag and drop the downloaded profile files into the upload area. Supported file formats include
.bacprof,.yaml, and.yml.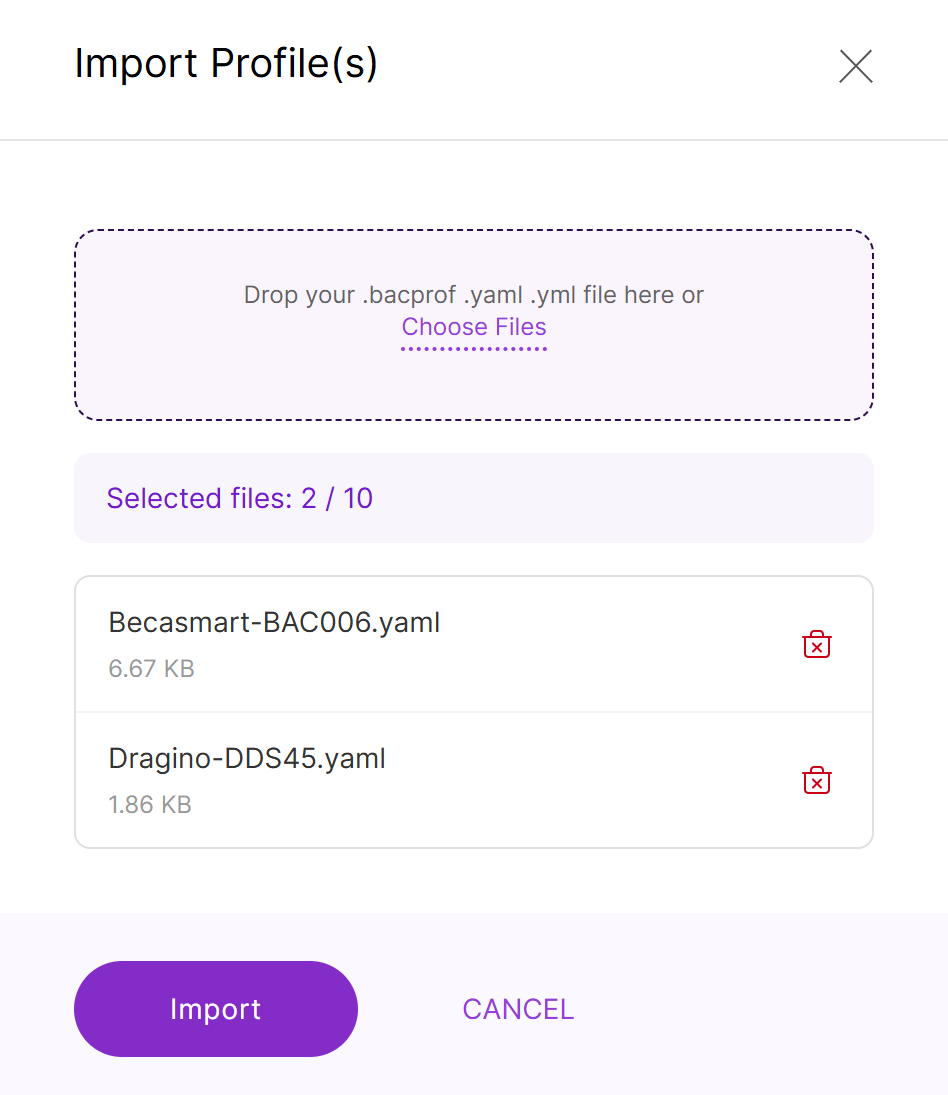 Figure 1: Add downloaded profilesNOTE
- You can import up to 10 profile files at a time.
- To remove a selected file before importing, click the delete icon next to the file.
-
Click Import to upload the selected profile files to the gateway.
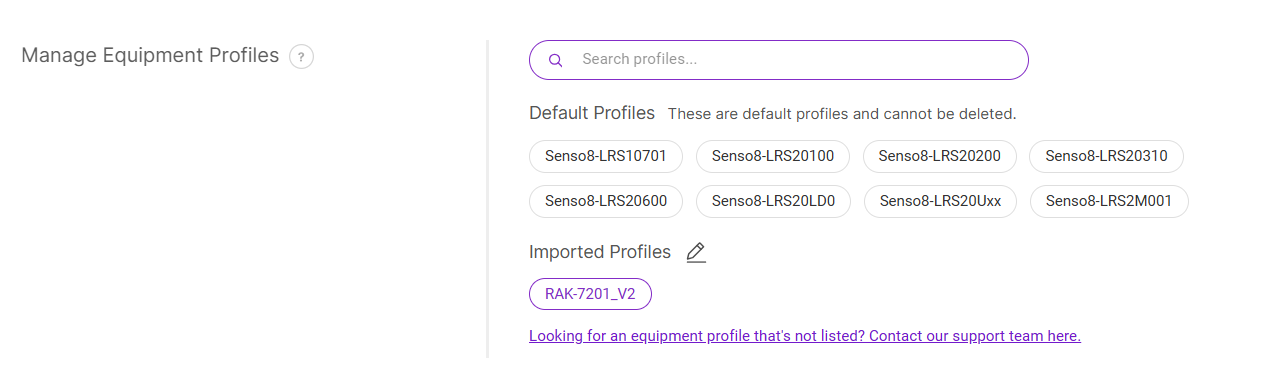 Figure 1: Uploaded Profile
After the profile is imported successfully, it appears in the Profiles tab as a Custom profile and can be selected when you add equipment.
Customize an Existing Profile
You can also use an existing profile as a template and customize it for your own device.
This method is useful when your device is similar to an existing profile, but some payload decoding logic, BACnet object mapping, units, object names, or LoRaWAN parameters need to be adjusted.
- Go to the Profiles tab.
- Find a profile that is similar to your device.
- In the Actions column, click the download icon to download the profile file.
- Edit the downloaded profile file based on your device specifications.
- Import the modified file by following Import a Profile.
After the modified profile is imported, it is displayed as a Custom profile. You can then edit the custom profile online, download it, view its version history, roll back to a previous version, or delete it if it is no longer needed.
Only customize a profile when you understand the device payload format and the required BACnet object mapping. An incorrect profile may cause wrong sensor values, missing BACnet objects, or failed downlink control. For more information about the profile format and customization rules, refer to the RAK7437 BACnet Profiles.
(Optional) Edit a Custom Profile
You can edit a custom profile directly from the Profiles tab.
- Go to the Profiles tab.
- Find the target custom profile.
- In the Actions column, click the edit icon.
- Modify the profile content in the editor.
- Click Save to apply the changes.
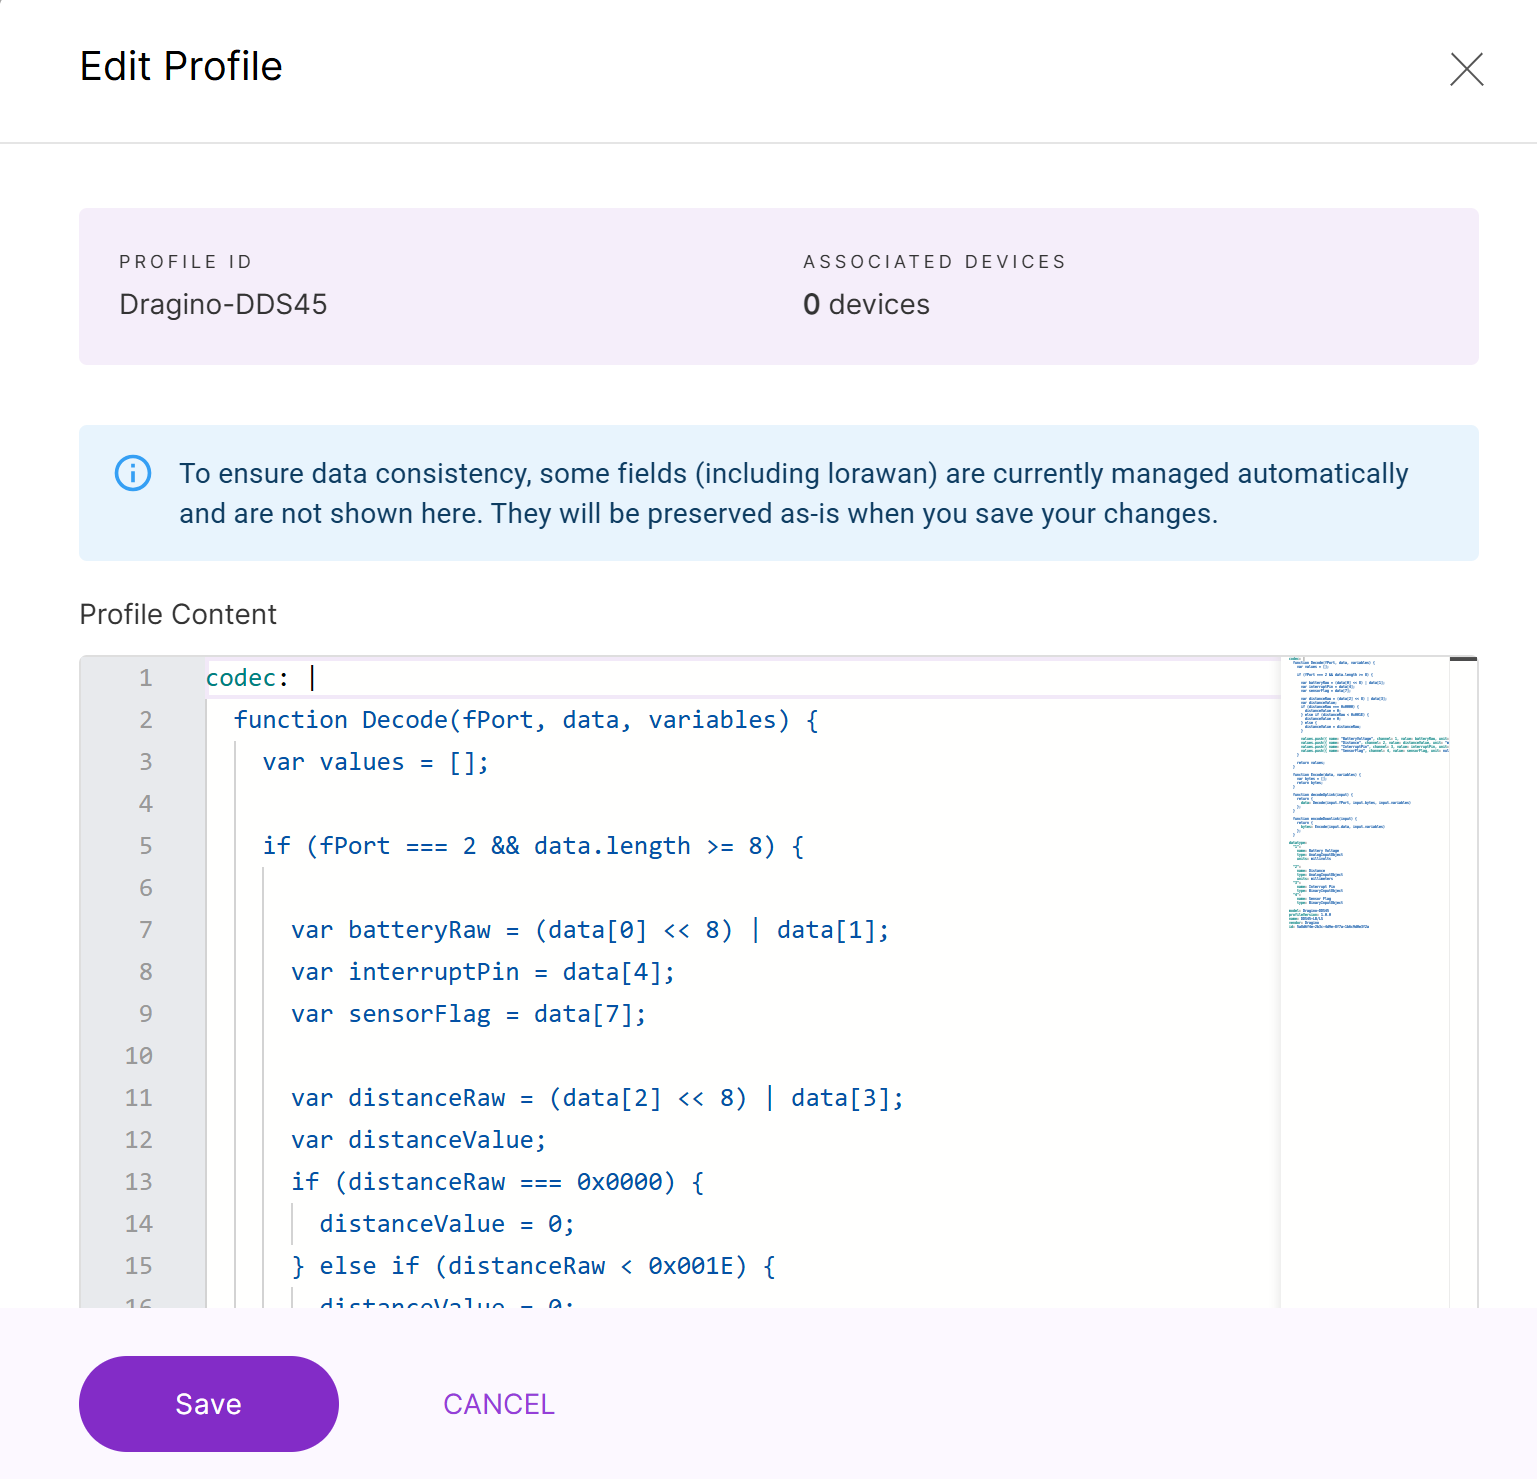 Figure 1: Edit Custom Profile
Editing a custom profile may affect all equipment associated with this profile. Before saving changes, make sure the payload codec, BACnet object mapping, units, object types, and downlink settings are correct.
(Optional) Roll Back Profile Version
When you edit and save a custom profile, the system automatically creates a backup version. You can view the profile version history and roll back to a previous version if needed.
- Go to the Profiles tab.
- Find the target custom profile.
- In the Actions column, click the rollback icon.
- In the Profile Version History window, review the available backup versions.
- Click the view icon to check a backup version, or click the rollback icon to restore a previous version.
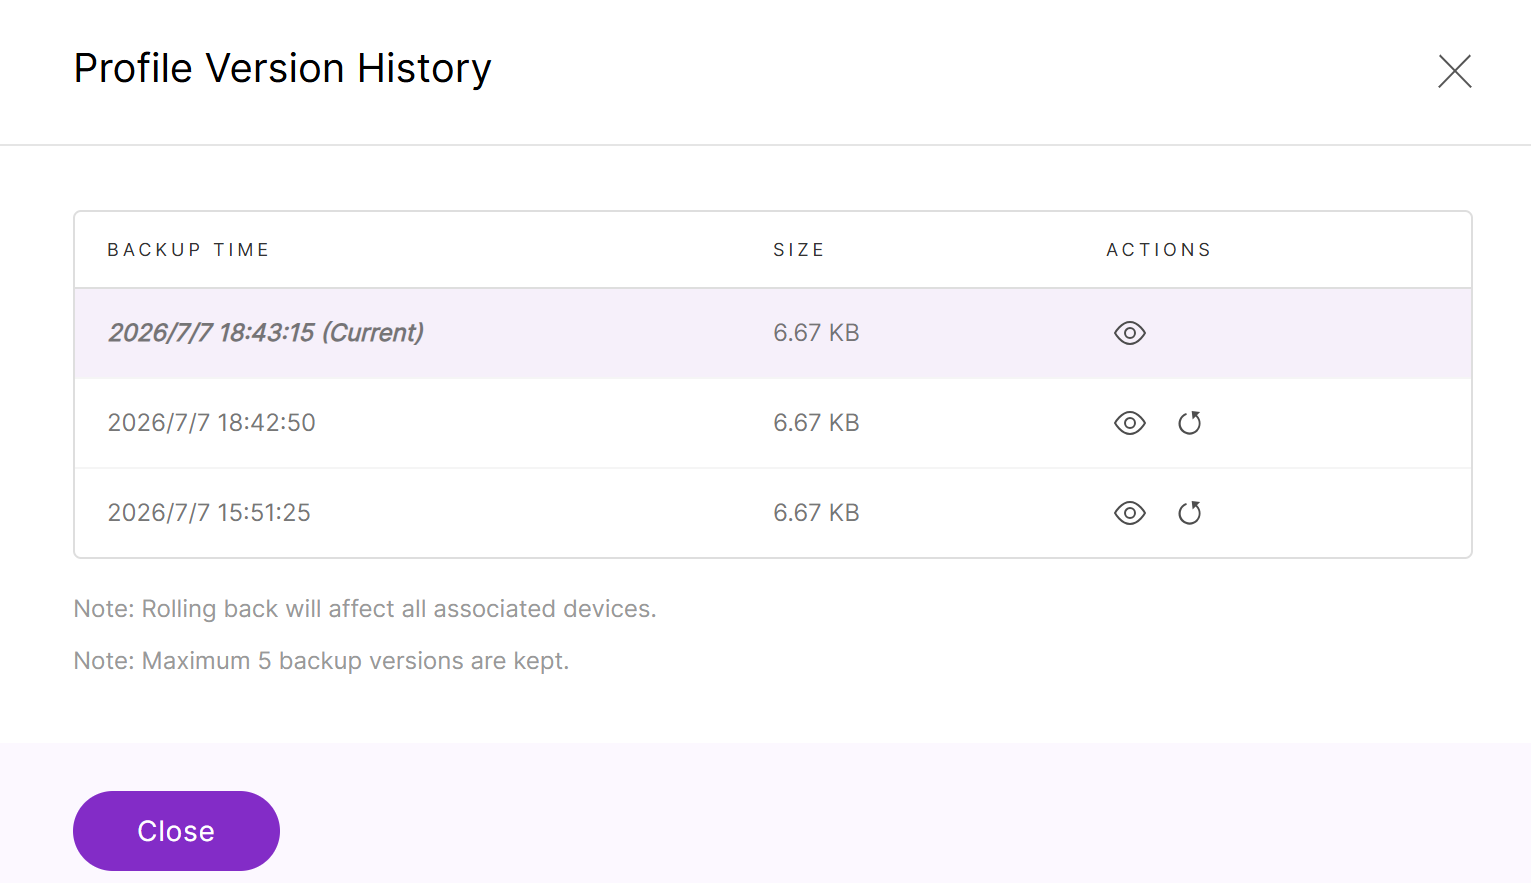 Figure 1: Profile Version History
If the profile has not been edited before, no backup version is available. Backup versions are created automatically after you edit and save the profile.
- A maximum of five backup versions are kept for each custom profile.
- Rolling back a profile affects all equipment associated with this profile. After rollback, review the related data points and verify that the BACnet object mapping is still correct.
Request a New Profile
If no matching profile is available in the default profiles or the RAK BACnet Profile Library, you can request a new device profile for your sensor.
- Visit the RAK BACnet Profile Library.
- Navigate to the Issues tab.
- Click New issue, and select Device Profile Request in the pop-up window.
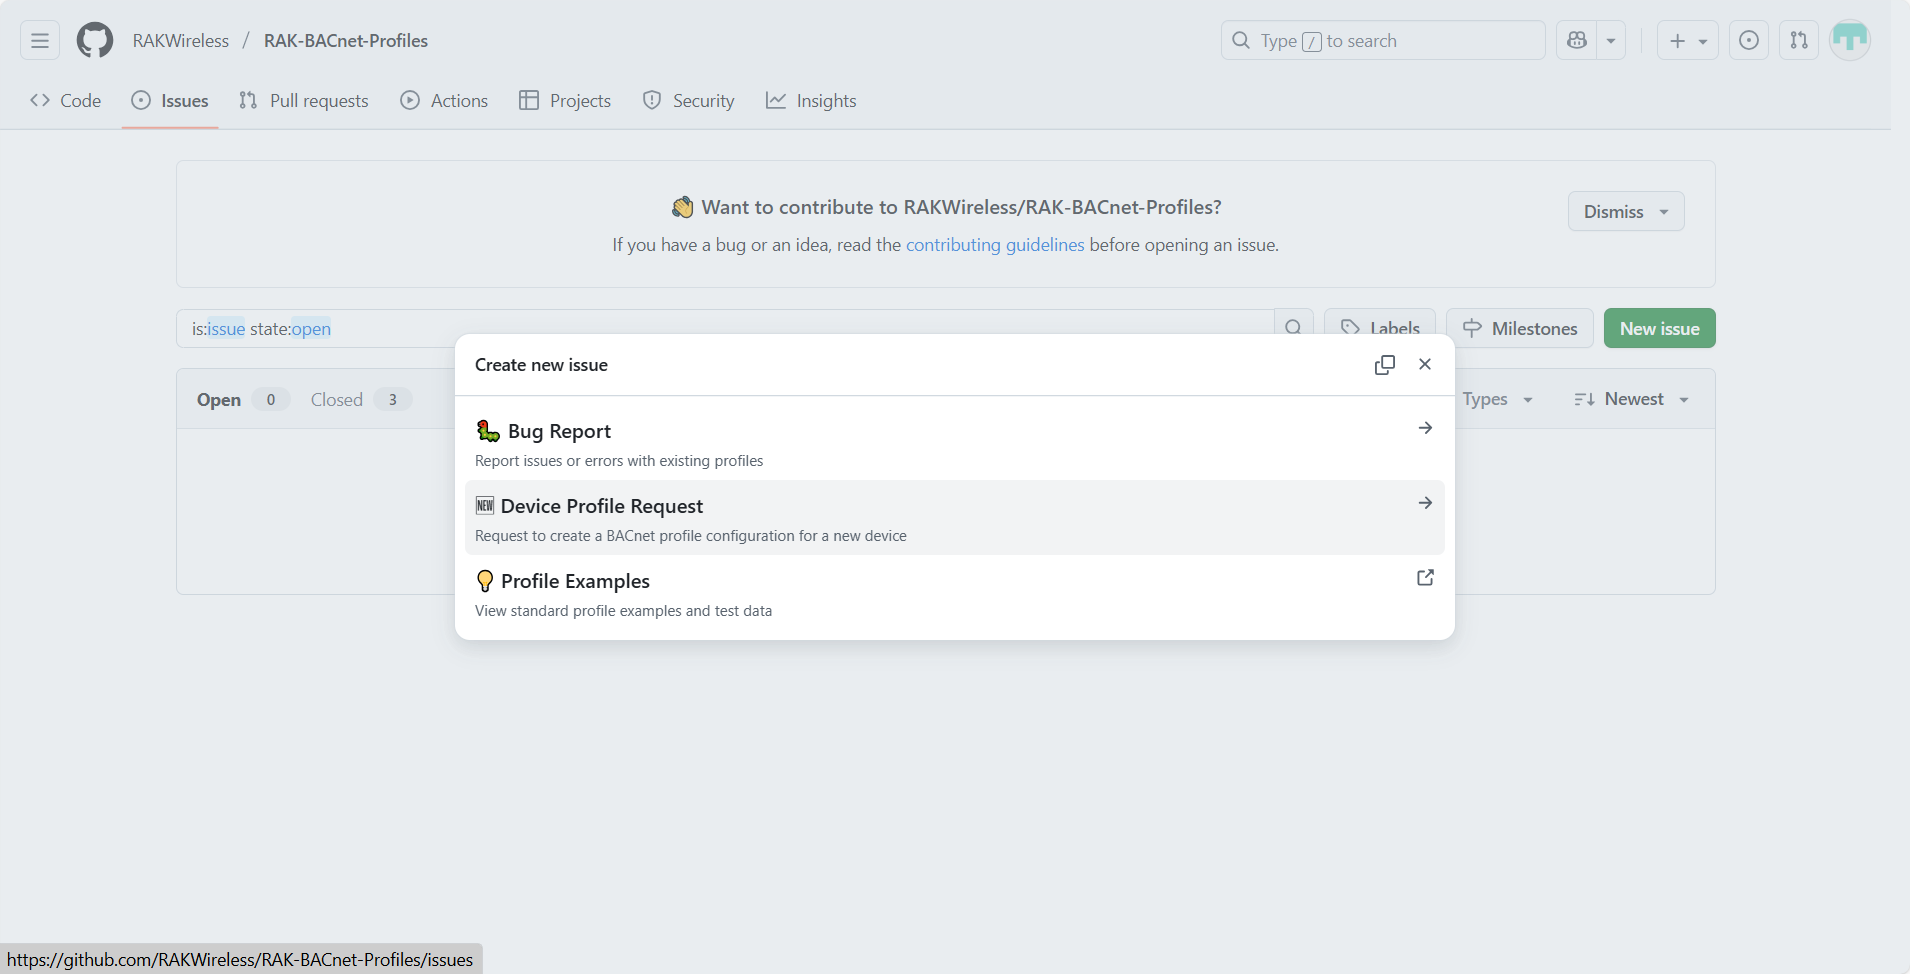 Figure 1: Create a new issue
- Fill out the request form with the required information:
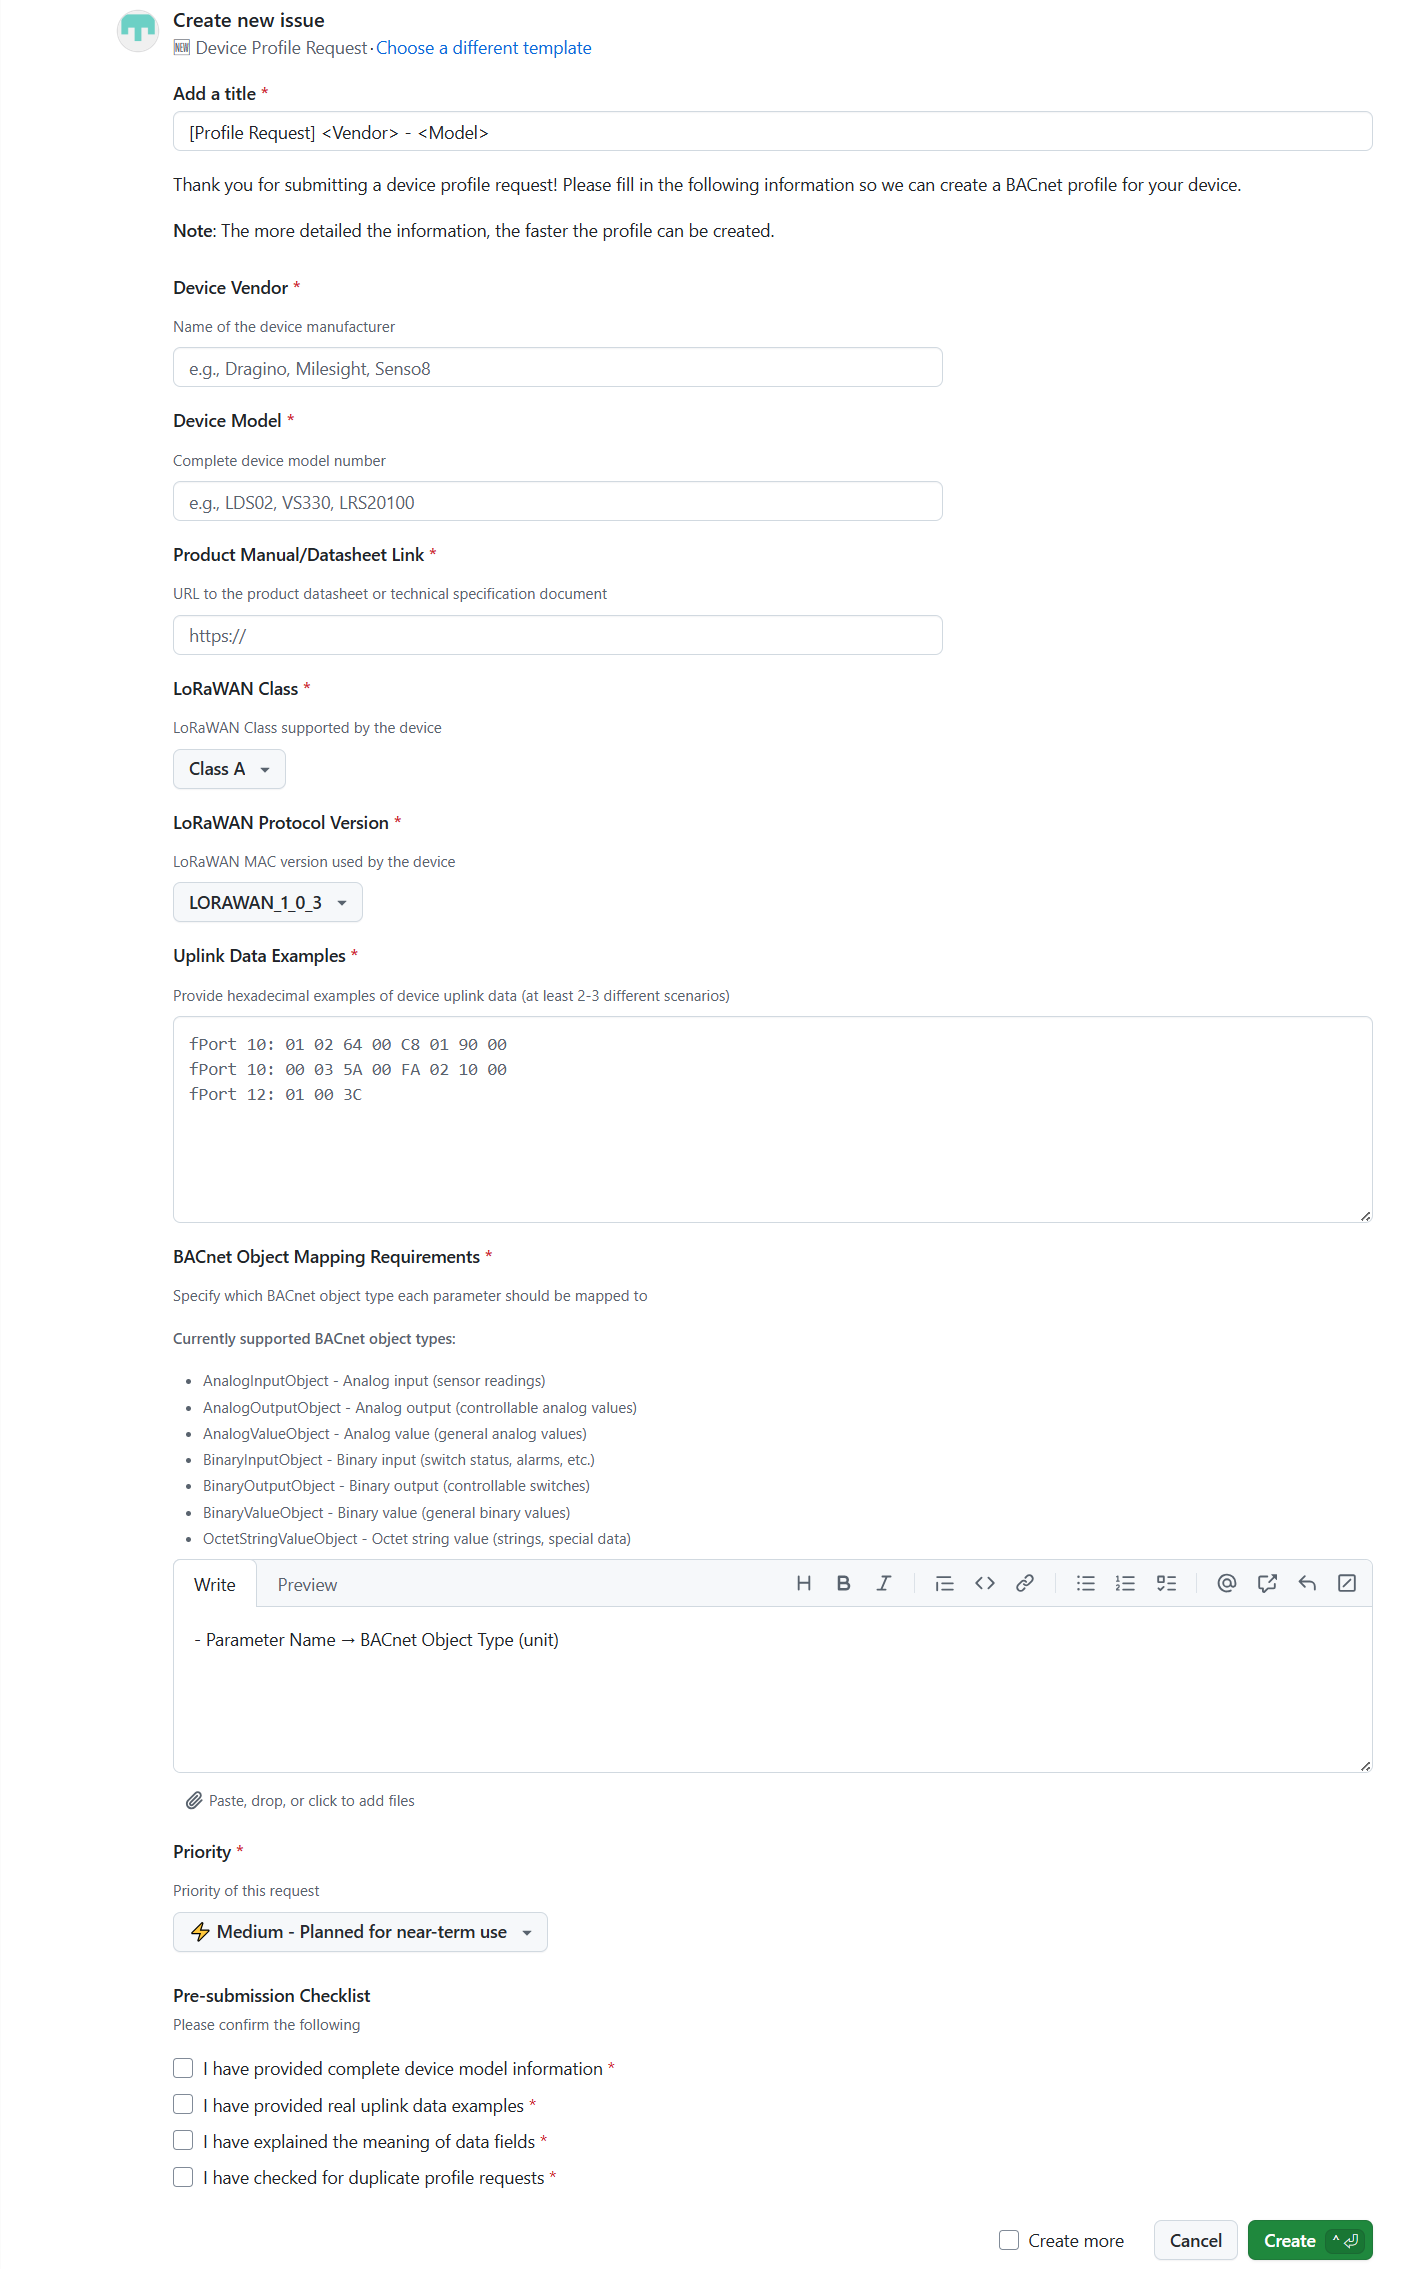 Figure 1: New Device Template Request Form
-
Add a title: Provide a clear and descriptive title using the format
[Profile Request] <Vendor> – <Model>. -
Device Vendor: Name of the device manufacturer.
-
Device Model: Full device model number.
-
Product Manual/Datasheet Link: URL link to the device datasheet or technical specifications.
-
LoRaWAN Class: The LoRaWAN class supported by the device.
-
LoRaWAN Protocol Version: The LoRaWAN MAC version used by the device.
-
Uplink Data Examples: Provide several hexadecimal uplink data samples from your device.
-
BACnet Object Mapping Requirements: Specify how each parameter from the device payload should be mapped to BACnet object types.
Supported BACnet object types include:
- AnalogInputObject - Analog input (sensor readings)
- AnalogOutputObject - Analog output (controllable analog values)
- AnalogValueObject - Analog value (general analog values)
- BinaryInputObject - Binary input (switch status, alarms, etc.)
- BinaryOutputObject - Binary output (controllable switches)
- BinaryValueObject - Binary value (general binary values)
- OctetStringValueObject - Octet string value (strings, special data)
Examples:
Temperature → AnalogInputObject ( ℃)
Humidity → AnalogInputObject (%RH)
EC (Electrical Conductivity) → AnalogInputObject (µS/cm) -
Priority: Select the urgency level for your request.
-
Pre-submission Checklist: Ensure that all checklist items are confirmed before submitting your request.
- After reviewing your information, click Create to submit the request.
RAK technical support will review the details and create a new device profile accordingly. Once the profile is published, download it from the repository and import it into your gateway using Import a Profile.
Add Equipment
Add and configure LoRaWAN end devices (equipment) and associate them with profiles to expose BACnet objects. You can add devices manually or in bulk via CSV, depending on your needs.
Add Device Manually
- In the Equipment tab, click Add Equipment to open the New Equipment page.
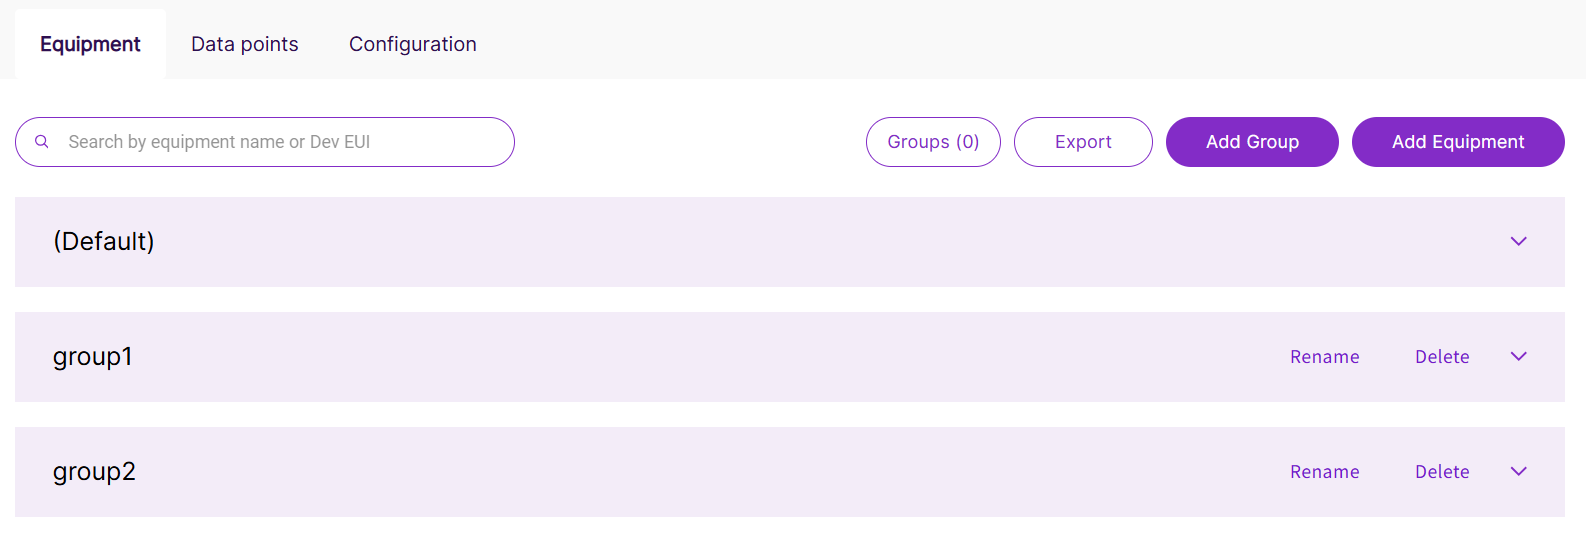 Figure 1: Add Equipment
- In the Manually add a new equipment section, configure the following parameters:
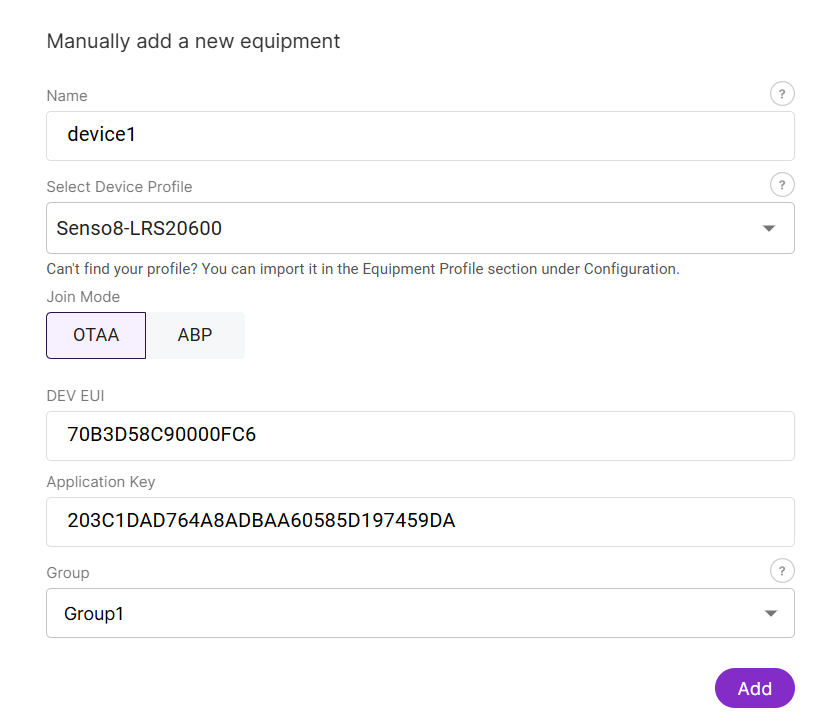 Figure 1: Configure parameters
- Name: Enter the name of the device.
- Select Device Profile: Choose the device profile. If the profile is not listed, ensure you have added the relevant configuration file for your device in the Prepare an Equipment Profile section.
- Join Mode: Select the device join mode (e.g., OTAA).
- DEV EUI: Enter the Device EUI (Unique Identifier).
- Application Key: Enter the AppKey for OTAA.
- Group: Choose Create a new group and provide a name for the group to help organize devices into logical groups.
- Click Add to register the device. Once successfully added, it will appear in the device list.
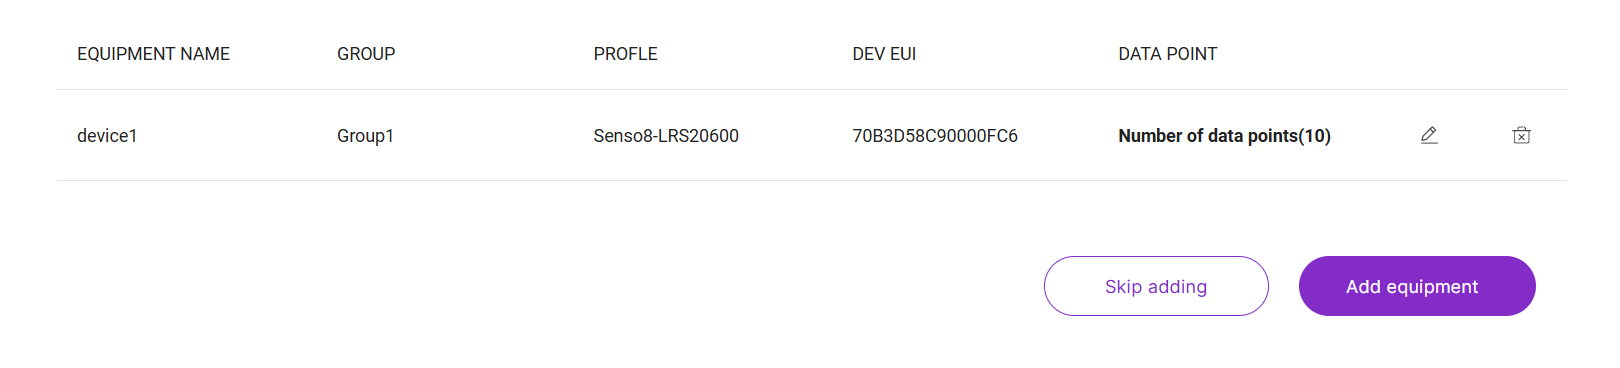 Figure 1: Device List
- (Optional) To customize the data points displayed in the Data Points tab, click the Edit icon in the DATA POINT column.
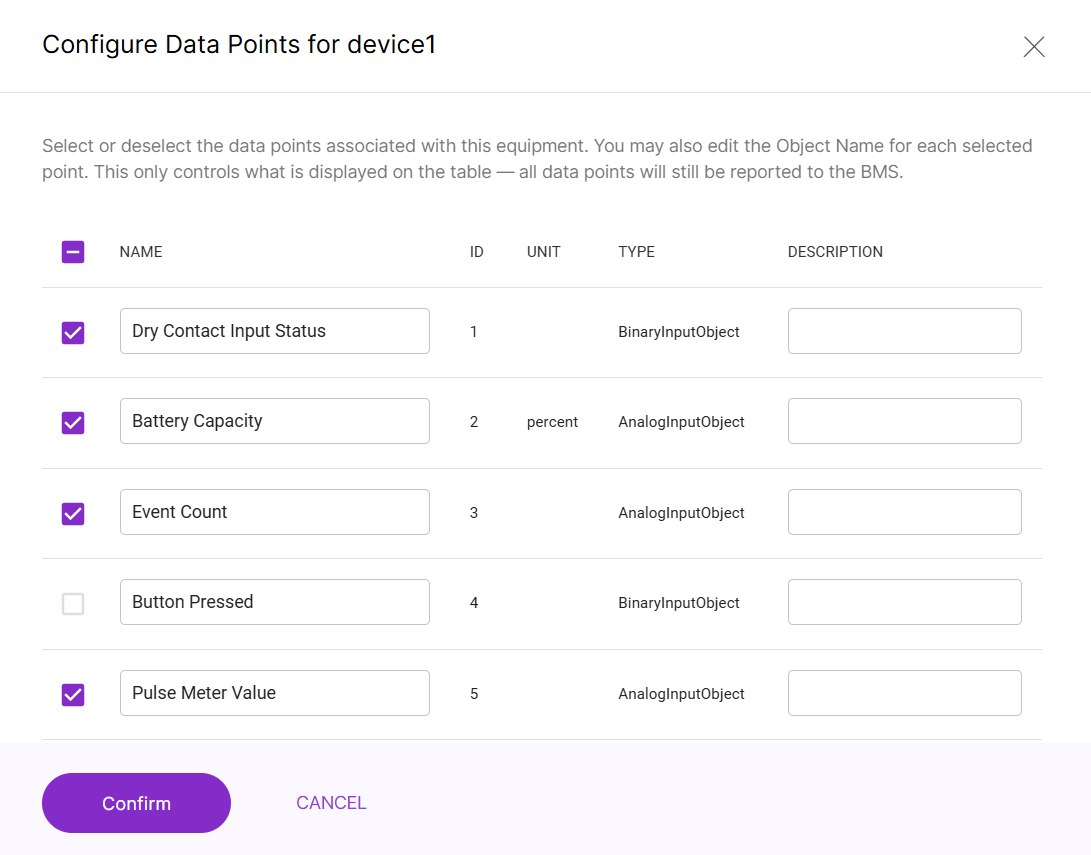 Figure 1: Configure Data Points
- You can select which data points to display in the BACnet Gateway's Data Points tab; however, all data points will still be reported to the integrated BMS.
- You can also customize the object Name and Description of each data point.
- Once finished, click Confirm to apply the changes.
- Click Add equipment to finalize the equipment addition.
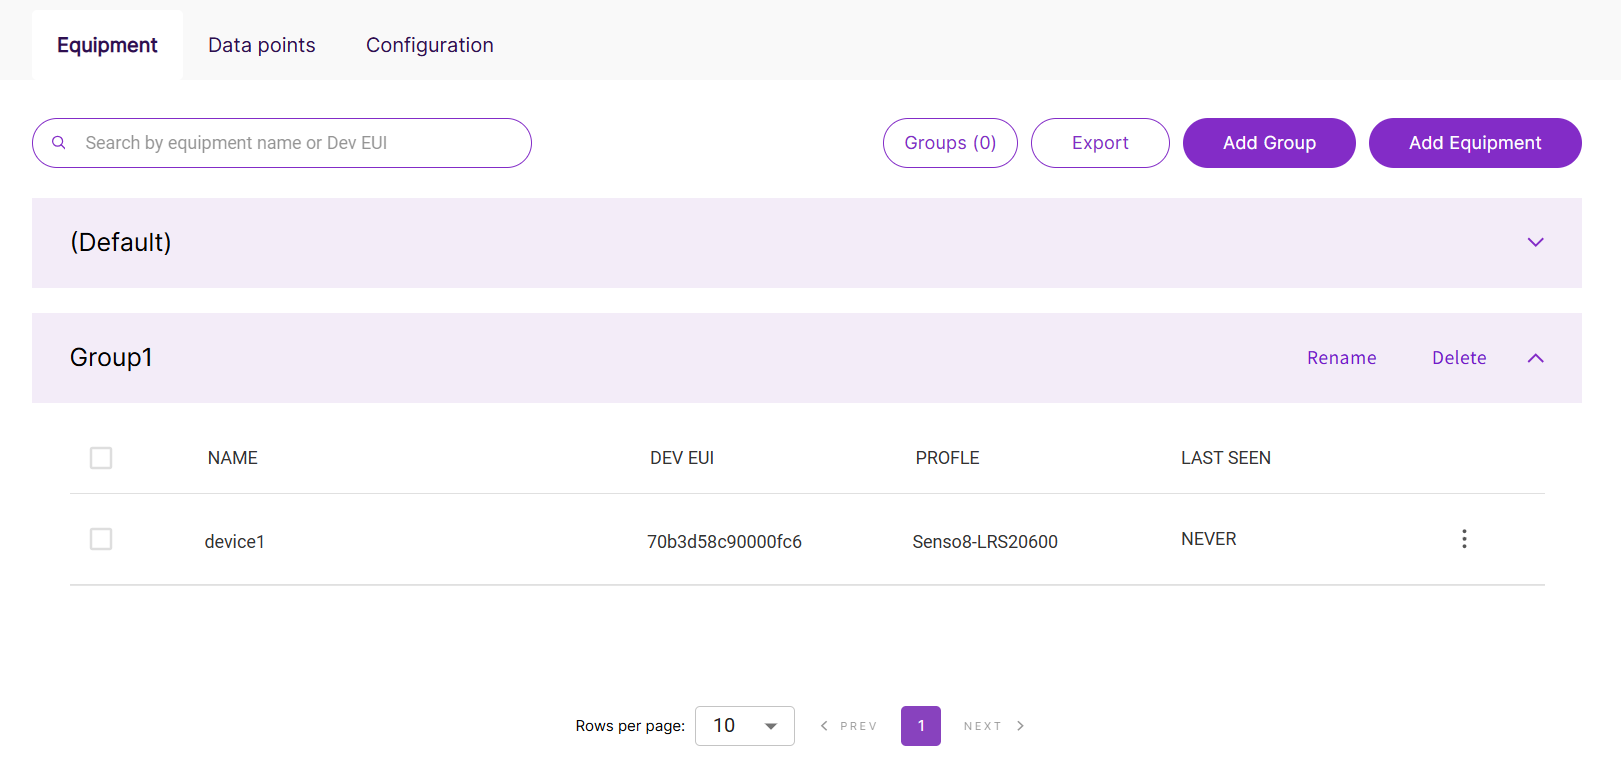 Figure 1: Successfully Added Equipment
Bulk Add Devices (CSV)
Bulk addition of equipment is only available for LoRaWAN® devices that are compatible with the RAKwireless profile database. The equipment list must follow a specific format.
- In the Equipment tab, click Add Equipment to open the New Equipment page.
Figure 1: Add Equipment- In the Upload a list of equipment section, click Download this template to obtain the CSV template.
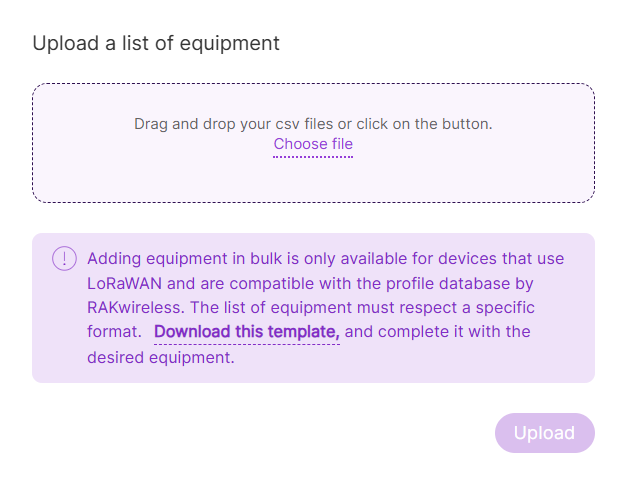 Figure 1: Add Equipment via CSV
- Fill in the device information in the template file:
-
JoinMode
- OTAA (Over-The-Air Activation)
- ABP (Activation By Personalization)
-
Group: Select or create a group to categorize the device, which helps in organizing devices into logical categories.
-
Name: The name assigned to the device.
-
Profile: The device profile that corresponds to the sensor's configuration. For details, refer to Prepare an Equipment Profile section.
-
DevEUI: The unique Device EUI (Extended Unique Identifier) for the device.
-
AppKey: The Application Key used in OTAA for the device to join the network.
-
DevAddr: The Device Address for ABP devices.
-
AppSKey: The Application Session Key used to encrypt and decrypt application payloads for ABP devices.
-
NwkSKey: The Network Session Key used for network-level security in ABP devices.
NOTEEnsure the device profiles are supported and properly formatted. Incorrect or duplicate device information will prevent successful import.
- Click choose file or drag and drop your completed CSV file into the upload box.
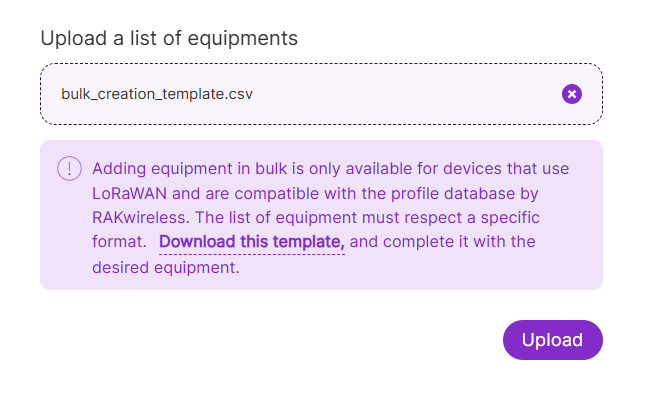 Figure 1: Upload CSV Template
- Click Upload.
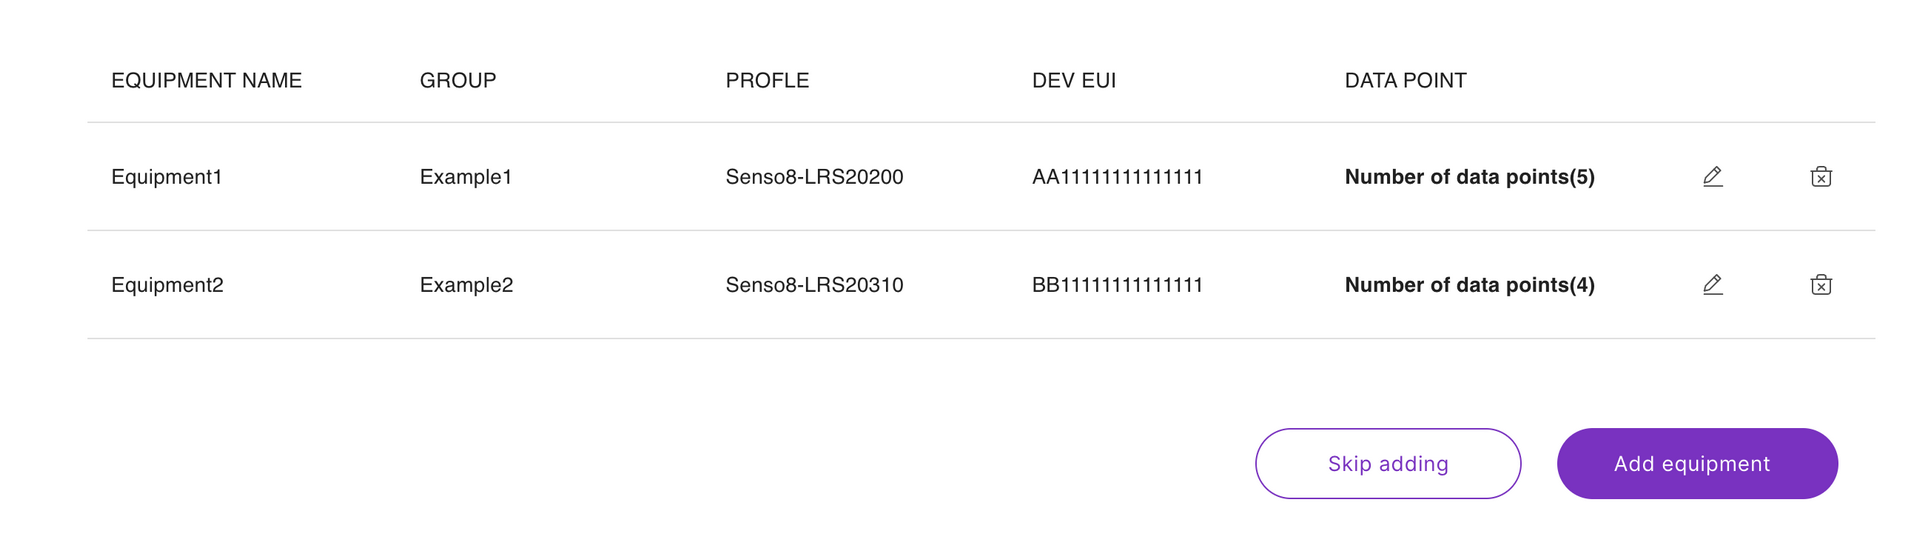 Figure 1: Upload Device Information
- (Optional) To customize the data points displayed in the Data Points tab, click the Edit icon in the DATA POINT column.
Figure 1: Configure Data Points- You can select which data points to display in the BACnet Gateway's Data Points tab; however, all data points will still be reported to the integrated BMS.
- You can customize the object Name and Description of each data point.
- Once finished, click Confirm to apply the changes.
- Click Add equipment to finalize the equipment addition.
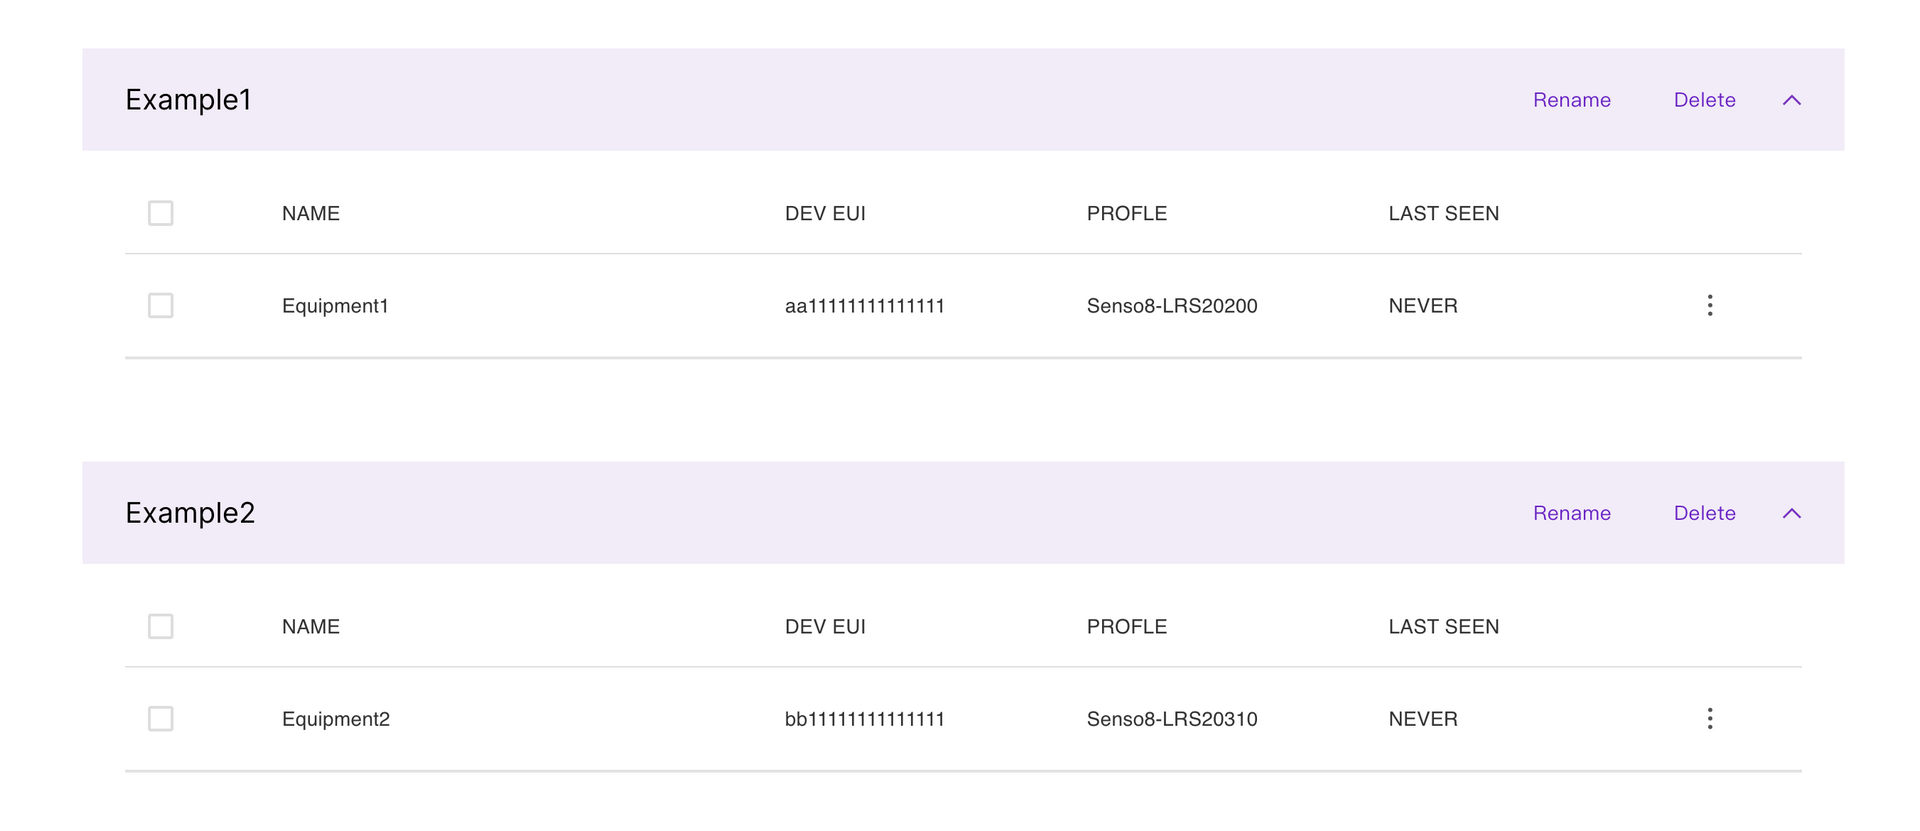 Figure 1: Successfully Added Equipment
Verify Device Join Status
Once the device is registered, you can check its status in the group. If LAST SEEN displays NEVER, it means the device has not yet joined the network.
Next, set your LoRaWAN device join information. Once the device joins, its status will be updated accordingly.
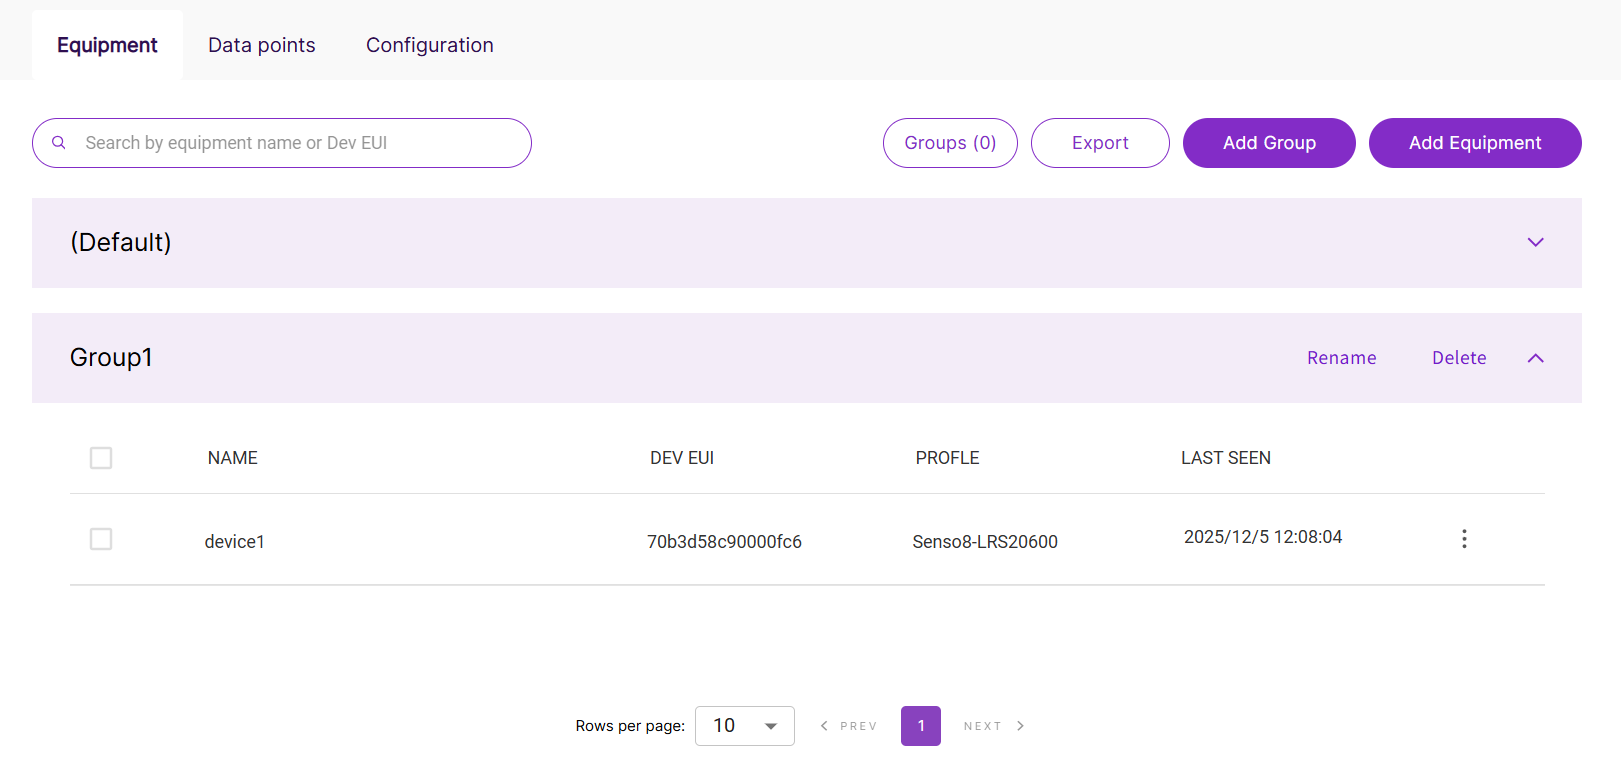 Figure 1: Join Network


