WisGateOS 2 User Manual
Before using WisGateOS 2, ensure that your gateway has been physically installed and connected to a power source. Follow the setup instructions in the user manual for installation, powering on, and logging in to the Web UI.
Overview of WisGateOS 2
This document provides a detailed overview of WisGateOS 2, an operating system built on OpenWrt and designed to run on all RAK WisGate Edge V2 gateways. It covers general information, configuration guides, and detailed instructions for setting up the gateway. Serving as a reference for several products with similar functionality, some sections may be relevant only to specific models. WisGateOS 2 enables efficient management of LoRaWAN networks and offers flexible features for IoT applications.
Supported WisGate Gateway Models
The following table lists the WisGate Gateway models supported by WisGateOS2:
| Product | Model |
|---|---|
| WisGate Edge Lite 2 | RAK7268V2 / RAK7268CV2 |
| WisGate Edge Pro V2 | RAK7289V2 / RAK7289CV2 |
| WisGate Edge Prime V2 | RAK7240V2 / RAK7240CV2 |
| WisGate Edge Ultra | RAK7285 / RAK7285C |
| WisGate Soho Pro | RAK7267 |
| WisGate Soho Lite | RAK7266 |
WisGateOS 2 is compatible only with V2 hardware models. V1 models are not supported due to hardware differences.
Supported Features
The table below outlines the full feature set supported by WisGateOS 2, including core functionalities and optional features available via the Extension System. These features enhance the gateway’s connectivity, network management, and integration capabilities for various LoRaWAN applications.
| Feature | Description |
|---|---|
| Built-in Network Server (LNS) | Local LoRaWAN network management with device activation, application routing, and data forwarding. This is the RAK gateway's integrated network server. |
| Packet Forwarder | Legacy Semtech packet forwarder mode that transmits LoRa packets via UDP to a LoRa Network Server. |
| Basics™ Station | A modern packet forwarder using WebSocket (CUPS/LNS) to connect to LNS or CUPS. |
| Gateway Backend | Used in multi-gateway setups where the built-in network server acts as the Central Gateway. Forwards LoRa packets from extender gateways in the same LAN to the internal LNS for centralized processing. |
| MQTT Integrations | Enables MQTT client integration for forwarding uplink data to an external MQTT broker and receiving downlink commands from subscribed topics. |
| HTTP Integrations | Allows each application to forward uplinks and event notifications to external HTTP/HTTPS endpoints via POST requests. |
| Multi-WAN Support | Configure multiple WAN interfaces (Ethernet, LTE, Wi-Fi) with backup and failover. |
| WisDM Integration | Enables remote management, monitoring, and upgrades via the WisDM cloud platform. |
| OpenWrt Security Enhancements | Built on OpenWrt with regular security patches and system-level hardening. |
| Secure Activation from WisDM | Secure remote onboarding and provisioning via WisDM. |
| Extensions | Supports installation and management of modular extensions such as OpenVPN, WireGuard, Failover, Country Code setting, and more. |
| Fake GPS (Manual Location) | Set GPS coordinates manually when GPS signal is unavailable. |
| Country Code Setting | Select country-specific presets for regulatory compliance. |
| Set Private Channel | Manually configure a private LoRa channel for dedicated communication. |
| Auto Device Registration | Automatically adds unknown LoRa nodes upon receiving their uplinks. |
| Automatic Data Recovery | A feature that allows LoRa frames to be stored on the SD card (provided there is one in the slot). If the gateway loses connection to the LoRa Network Server, upon restoring the connection, the buffered messages will be forwarded, so no data is lost. This is done in blocks of 8 (FIFO) until all are cleared from the buffer. |
| Batch Device Registration | Import and register multiple devices at once. |
| Advanced Packet Filtering | Create rules to control which LoRa packets are forwarded to the network server. |
| Fine Timestamp | Provides high-precision timestamps for advanced location and network analytics. |
| Remote Syslog Support | Send system logs to a centralized syslog server for analysis and debugging. |
| Log Rotation | Automatically rotates log files to prevent storage overflow and improve manageability. |
| Encrypted Backup | Create and download encrypted backups of system settings and configuration for secure recovery. |
| Firmware OTA Upgrades | Supports firmware upgrades via local file upload or remote OTA updates. |
| LBT (Listen Before Talk) | Comply with spectrum regulations by checking channel availability before transmission. 💡 NOTE LBT is available on certain gateway models depending on specific hardware functionality. |
Dashboard
The Dashboard provides real-time monitoring of the gateway’s performance and LoRa traffic statistics. This section offers an overview of key network metrics, helping users analyze the gateway’s behavior, connected devices, and message traffic.
LoRa Statistics
The LoRa Statistics page presents an organized view of essential LoRaWAN network parameters, displayed in multiple blocks to help users track packet transmissions, channel utilization, and traffic patterns.
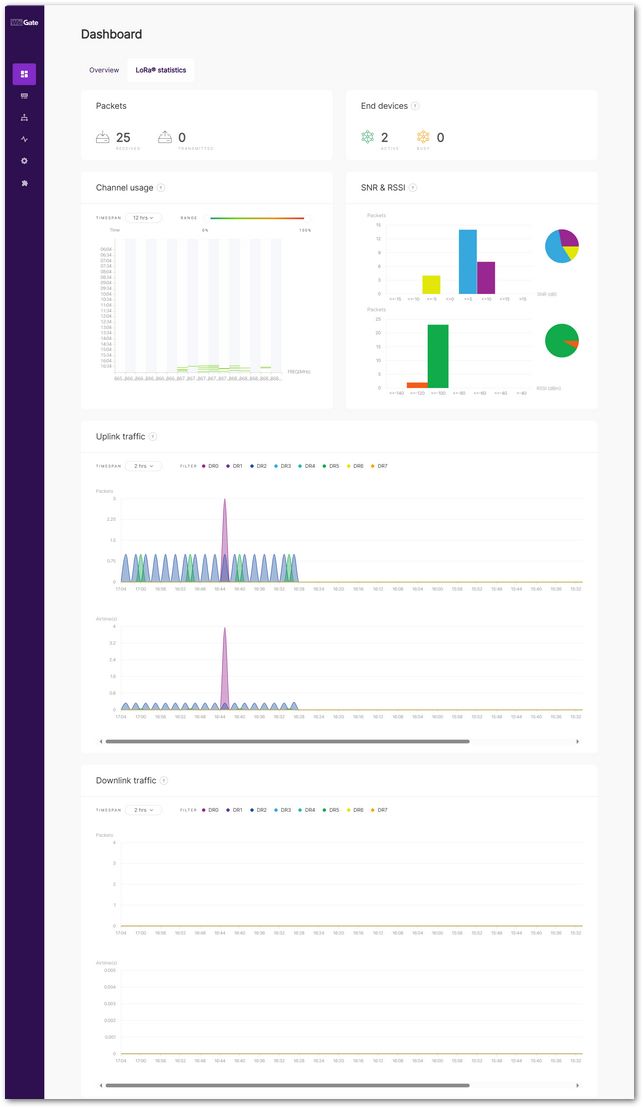 Figure 1: LoRaWAN Statistics
-
Packets
Displays the total number of uplink (received) and downlink (transmitted) packets handled by the gateway. This includes messages from devices connected to the gateway as well as any LoRa-enabled device within its coverage area.
-
End devices
Shows the number of active end devices detected by the gateway:
- Active: Devices that have transmitted data within the last hour.
- Busy: Devices that have sent an average of one uplink packet per minute over the past 10 minutes.
-
Channel Usage
Visualizes frequency channel load. Green indicates low usage, while red signifies high congestion. Users can adjust the Timespan and Range filters to analyze specific timeframes.
-
SNR & RSSI
Displays Signal-to-Noise Ratio (SNR) and Received Signal Strength Indicator (RSSI) values across received packets. The data is presented in both bar graphs and pie charts for easy comparison.
-
Uplink Traffic
Tracks the number of uplink packets per minute and their corresponding airtime. The color-coded data rates (DR0–DR7) allow users to identify variations in network traffic. The Timespan filter lets users refine the displayed period.
-
Downlink Traffic
Similar to uplink traffic, this section displays downlink packet transmission rates and airtime. Users can adjust the Timespan to focus on specific intervals.
Overview
The Overview page provides a comprehensive snapshot of the gateway's current status, including hardware information, network configuration, system performance, and uptime. It allows users to quickly assess the health and connectivity of the device.
 Figure 1: Overview
Basic Information
- MODEL: Displays the gateway model (e.g., RAK7289CV2H).
- SERIAL NUMBER: Unique serial number of the device.
- EUI: LoRa Gateway EUI identifier.
- REPORTED COORDINATES: Coordinates of the gateway.
- MAC ADDRESS: The MAC address used for network identification.
- FREQUENCY BAND: Indicates the LoRa frequency band in use (e.g., 915 MHz).
- NUMBER OF CHANNELS: Shows the number of LoRa channels supported.
- UPTIME: Displays how long the device has been running continuously.
- LOCAL TIME: The current system time on the gateway.
- SD CARD: Indicates whether the SD card is functioning properly (used for log storage and backups).
Firmware Information
- FIRMWARE: Shows the currently installed WisGateOS version (e.g., WisGateOS_2.2.12_RAK).
- Firmware details: The Firmware details button will redirect you to the Settings > Firmware.
Packet Capture
Allows users to capture and analyze LoRaWAN packets transmitted over the network for debugging and diagnostics.
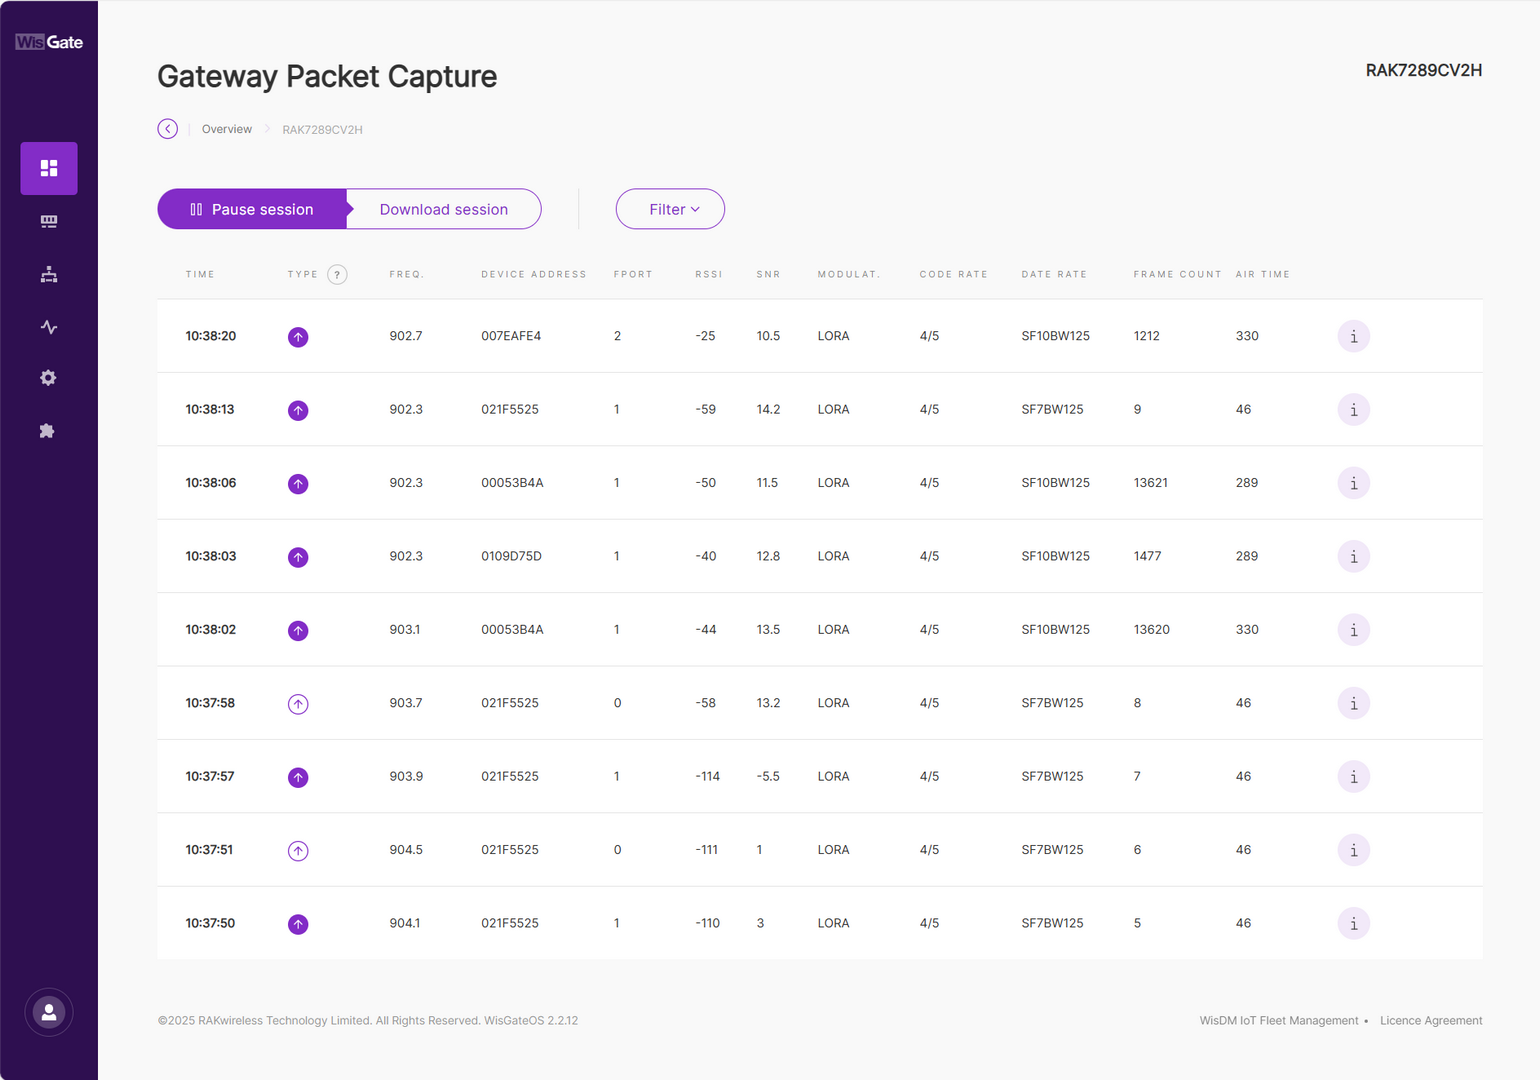 Figure 1: Gateway Packet Capture page
- Pause/Restart session: Тhe button pauses or restarts the session.
- Download session: Тhe button downloads a
.jsonfile with packets data in it. - Filter: The button drops-down a filter menu.
- Type: LoRaWAN message type.
- Frequency: The frequency on which the packet is received/sent.
- RSSI: Range of the RSSI.
- SNR: Range of the SNR.
- Hide CRC_ERR Packets: When enabled, the filter will hide all packets with CRC Error.
- Reset filter: Reset the filter to default.
System Performance
- CPU: Displays the current CPU usage percentage.
- MEMORY: Shows the amount of memory currently in use.
WAN Interfaces
Displays the status and IP address (if available) of the gateway's wide area network interfaces:
- Ethernet: Wired WAN connection with IP address shown.
- Wi-Fi: Indicates whether Wi-Fi WAN is enabled and connected.
- Cellular (LTE): Shows the status of the LTE connection.
LAN Interfaces
Displays the configuration and status of local area network interfaces:
- DHCP Server: Shows the LAN IP address and subnet mask provided by the DHCP service.
- Ethernet: Status of the LAN Ethernet interface.
- Wi-Fi: SSID and encryption status of the local Wi-Fi network broadcast by the gateway.
LoRa Configuration
In WisGateOS2, LoRa configuration supports three operating modes, allowing the gateway to connect to different LoRa network severs and manage LoRa communication efficiently:
- Built-in Network Server
The gateway acts as a central LoRa Network Server (LNS), processing packets locally and managing devices directly. It supports multi-gateway networking by allowing extender gateways to join the network and be managed locally from the gateway interface. This mode enables independent operation without relying on external services.
- Packet Forwarder
The gateway forwards packets to an external network server (e.g., TTN, ChirpStack) without local processing. The external network server handles packet processing, device management, and data routing. Suitable for integrating the gateway into an existing LoRaWAN network infrastructure.
- Basic Station
The gateway uses a secure WebSocket (WSS) to communicate with a remote LoRaWAN network server. This mode offers enhanced security and stable connectivity, supporting dynamic updates and secure cloud-based communication.
| Work Mode | Protocol/Server Type | Supported external network servers |
|---|---|---|
| Built-in Network Server | Built-in LNS | No external server required |
| Packet Forwarder | Semtech UDP GWMP Protocol LoRa Gateway MQTT Bridge | UDP: TTN Loriot ChirpStack V3 ChirpStack V4 MQTT: MQTT for Built-in LNS ChirpStack V2 ChirpStack V3-JSON ChirpStack V3-protobuf ChirpStack V4-protobuf |
| Basic Station | CUPS-BOOT Server CUPS Server LNS Server | LNS Server: AWS IoT Core TTN ChirpStack V3 ChirpStack V4 CUPS Server: Actility(Things Park) AWS IoT Core TTN |
Built-in Network Server
In WisGateOS2, the gateway can operate as a Built-in Network Server (LNS), processing packets locally and managing LoRa devices directly without needing an external server.
In this section, you will learn how to:
- Configure the gateway as a Built-in Network Server – Set up frequency, data rate, and other LoRa parameters to enable the gateway to operate as an independent LNS.
- Add and manage devices – Register LoRa end devices to the built-in LNS.
- Set up multi-gateway networking – Add extender gateways to expand network coverage and capacity, allowing them to be managed locally through the central gateway interface.
Configuration
This section covers how to configure the gateway as a Built-in Network Server, including setting up the server and configuring its parameters.
Configuration Guide Based on Use Case
Before diving into the specific features, start with the following basic configuration steps that apply to all use cases:
- Work Mode: Set to Built-in Network Server
- Frequency Plan / Region: Choose based on your country or deployment region
- Log Level: Optional, used for debugging and monitoring
Once the basic configuration is complete, refer to the table below to determine which additional configuration sections are relevant to your use case.
| Use Case | Additional Configuration Sections |
|---|---|
| Basic local testing / data reception | None required beyond the basic setup |
| Sending data to a cloud platform (MQTT, AWS IoT) | Integration Interface Choose and configure one of the following:
|
| Multi-gateway deployment (central + extenders) | Gateway Backend Configure MQTT broker, topics, and sync between gateways |
| Custom/private LoRaWAN frequency requirements | View Detailed Regional Parameters (e.g., sub-band, private sync word) |
| Class B end device support | Class B Settings (only visible if GPS is available) Configure beaconing, ping slots, and transmission parameters |
| Network behavior tuning / compliance | Network Server Parameters (ADR, RX window, dwell time, etc.) |
Packet Filter is optional and can be used in multiple scenarios to limit device access, reduce bandwidth, or control uplink behavior. It is not required for basic operation but useful in large-scale or security-sensitive deployments.
Configuration Options Overview
Based on your use case, this section provides detailed explanations for each configuration module. You can follow along step by step, or skip to the sections that are relevant to your specific scenario.
Work Mode
By default, the gateway is configured to work in Built-in network server.
 Figure 1: Work mode
Log Level
Configure the log level for debugging and monitoring purposes.
 Figure 1: Log level
- Error: Shows only error logs.
- Warning: Shows warnings logs.
- Notice: Shows notice logs.
- Info: Shows all notice, error, and warning logs.
- Debug: This is full log, it shows all types of logs, it is used for debugging.
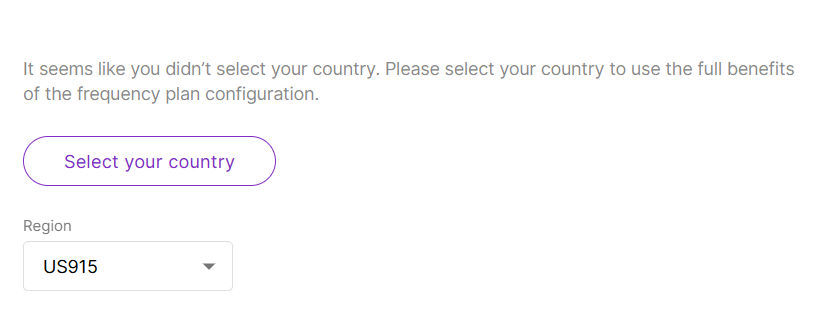 Figure 1: Select your country & regin
Country Code Setting: (Optional) Selecting the correct country ensures that the gateway operates in compliance with local regulations. The gateway’s transmit power will be set to the maximum allowed by local regulations, and the LBT (Listen Before Talk) feature will be enabled if required.
Regin: Set the region here. You can switch the frequency plan in the following regions:
- US915, AS923, KR920, AS923
- EU868, RU864, IN865
- EU433
- CN470
- If you have already selected a country, the corresponding frequency plan will be automatically applied in the Region settings. Manual changes to the frequency plan are not allowed if the country selection has been made.
- Different hardware supports different LoRaWAN regions.
- If your Region is set to AS923, you need to configure the Variation option, such as AS923-1/AS923-2/AS923-3/AS923-4.
View Detailed Regional Parameters
The default frequency settings will work for most deployments.
If needed, you can click "View detailed regional parameters of the frequency plan" to further customize frequency sub-bands or channel settings based on your deployment requirements.
Click on View detailed regional parameters of the frequency plan to expand the options.
- LoRaWAN Public: When enabled (by default), the gateway will process data from all end devices. If you want to create a private network, you can to turn it off. The gateway will process the data only from the end devices, which sync word is changed to private.
LoRaWAN network frequency settings vary by region due to different radio regulations and frequency allocations. This affects the available channel types:
- Frequency Sub-Band: Select the specific frequency sub-band based on the region's frequency plan.
- Multi-SF LoRa Channel Frequency (MHz): Set the frequency for the Multi-SF LoRa channel. To remove it, click the X next to it. To add a new frequency, enter the value and click Add.
- Standard LoRa Channel Frequency (MHz): Set the frequency for the standard LoRa channel.
- FSK Channel Frequency (MHz): Set the frequency for the FSK channel.
Network Server Parameters
Click on Network server parameters are used to configure general setup for your LoRa built-in server. This section is required for filling-in. to expand the settings menu.
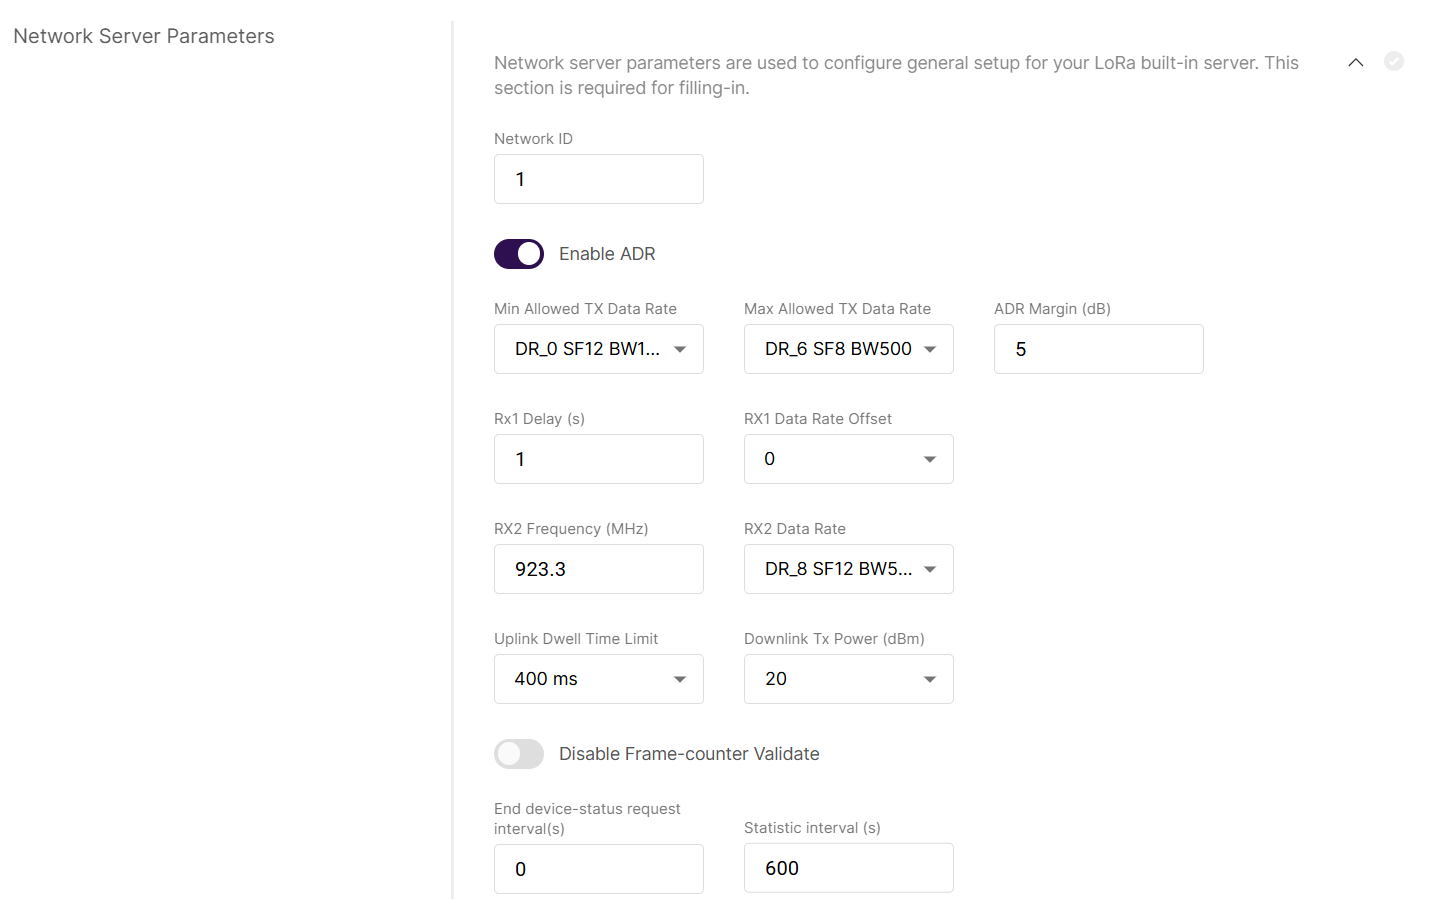 Figure 1: Network Server Parameters
- Network ID: This is a decimal number to distinguish between networks if deploying multiple ones.
- Enable ADR: Enables or disables Adaptive Data Rate (ADR). When enabled, the server will automatically adjust data rates, airtime, and energy consumption based on current network conditions.
- Min Allowed TX Data-Rate: Sets the minimum transmission data rate. Depends on the Region.
- Max Allowed TX Data-Rate: Sets the maximum transmission data rate. Depends on the Region.
- ADR Margin (dB): Only visible when ADR is enabled. This sets the margin value in dB to avoid overestimating the data rate, which could lead to performance issues (e.g., increased error rate and reduced range).
- Rx1 Delay (s): Delay of the first receive window (RX1) in seconds.
- RX1 Data Rate Offset: Determines the data rate for downlink frames sent in the RX1 window. By default, it is 0 – identical to the uplink.
- RX2 Frequency (MHz): Sets the frequency of the second receive window (RX2).
- RX2 Data Rate: Sets the data rate for frames sent in the second receive window.
- Uplink / Downlink Dwell Time Limit: Set the uplink / downlink Dwell Time limit. Note that these two configuration options are only valid for specific regions.
- Downlink Tx Power (dBm): It is useful, if you want to use a larger antenna with more gain. Values from -6 to 20 are permissible.
- Disable Frame-counter Validate: This function turns on/off the Frame counter validation.
- End device-status request interval (s): This shows how often should the end-devices be polled for their status log level.
- Statistic interval (s): This shows how often the statistics will be gathered.
Packet Filter
Set a filter for the packets from chosen devices (disabled by default). Click on Allows to optimize bandwidth by filtering and forwarding packets from chosen end devices to expand packet filter settings. If White List Mode and Auto Filter are enabled, these are the following options:
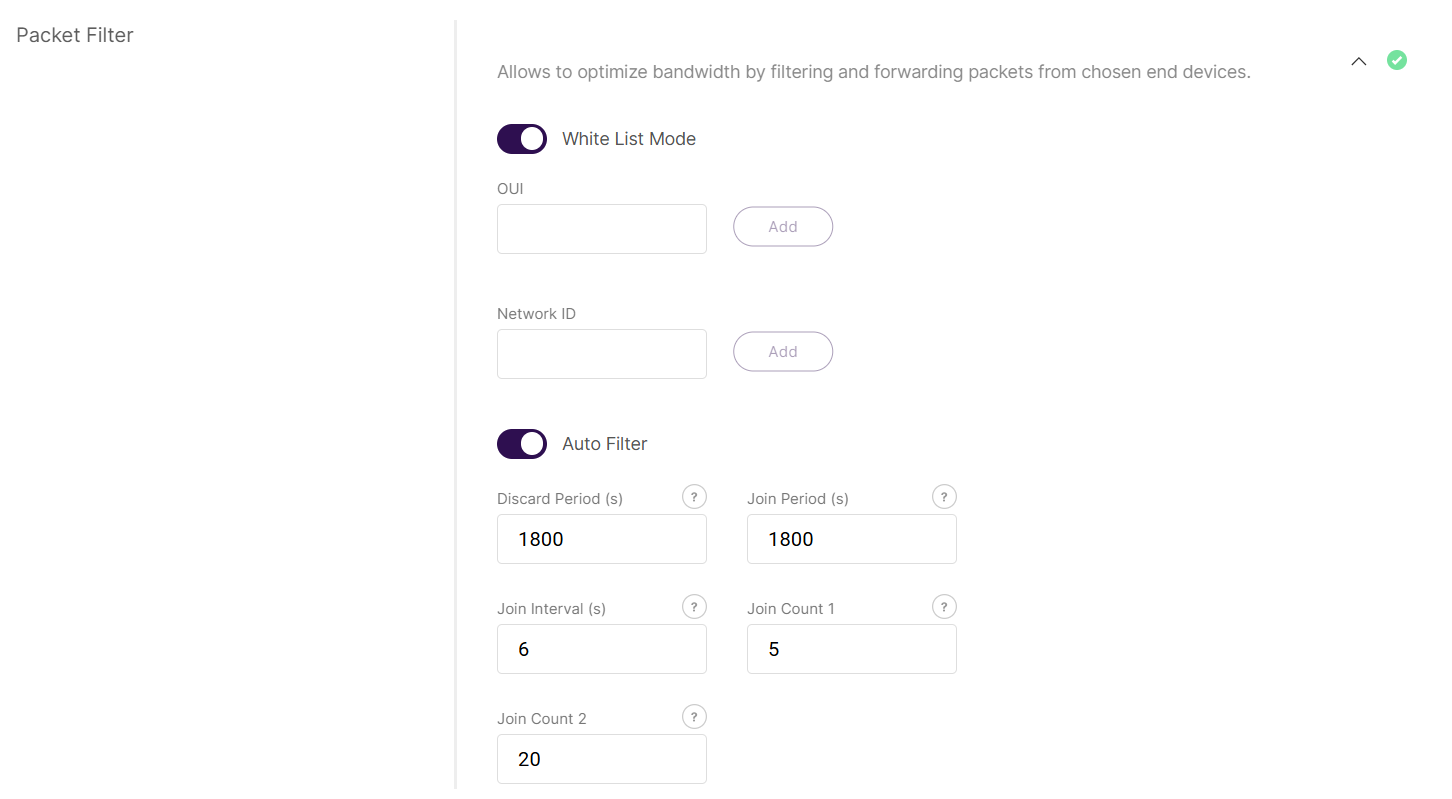 Figure 1: Packet Filter
- OUI: This is white list filtering option to filter by Organizationally Unique Identifier of the end device.
- Network ID: This is a white list filtering option to filter by Network ID.
- Discard Period (s): This is a period threshold of discard time for nodes (in seconds).
- Join Period (s): This is a period threshold of Statistics on the latest join request (in seconds).
- Join Interval (s): This is a time interval threshold of the same device EUI twice-consecutive join request (in seconds).
- Join Count 1: This is the maximum count of join requests allowed during Join Interval.
- Join Count 2: This is the maximum count of join requests allowed during the Join Period.
The Gateway Backend allows the central gateway to communicate with extender gateways using the MQTT protocol. This enables data transfer and coordination within a multi-gateway network.
To extend the settings field, click on Configure the Gateway Backend to allow the central gateway and extenders to communicate via MQTT.
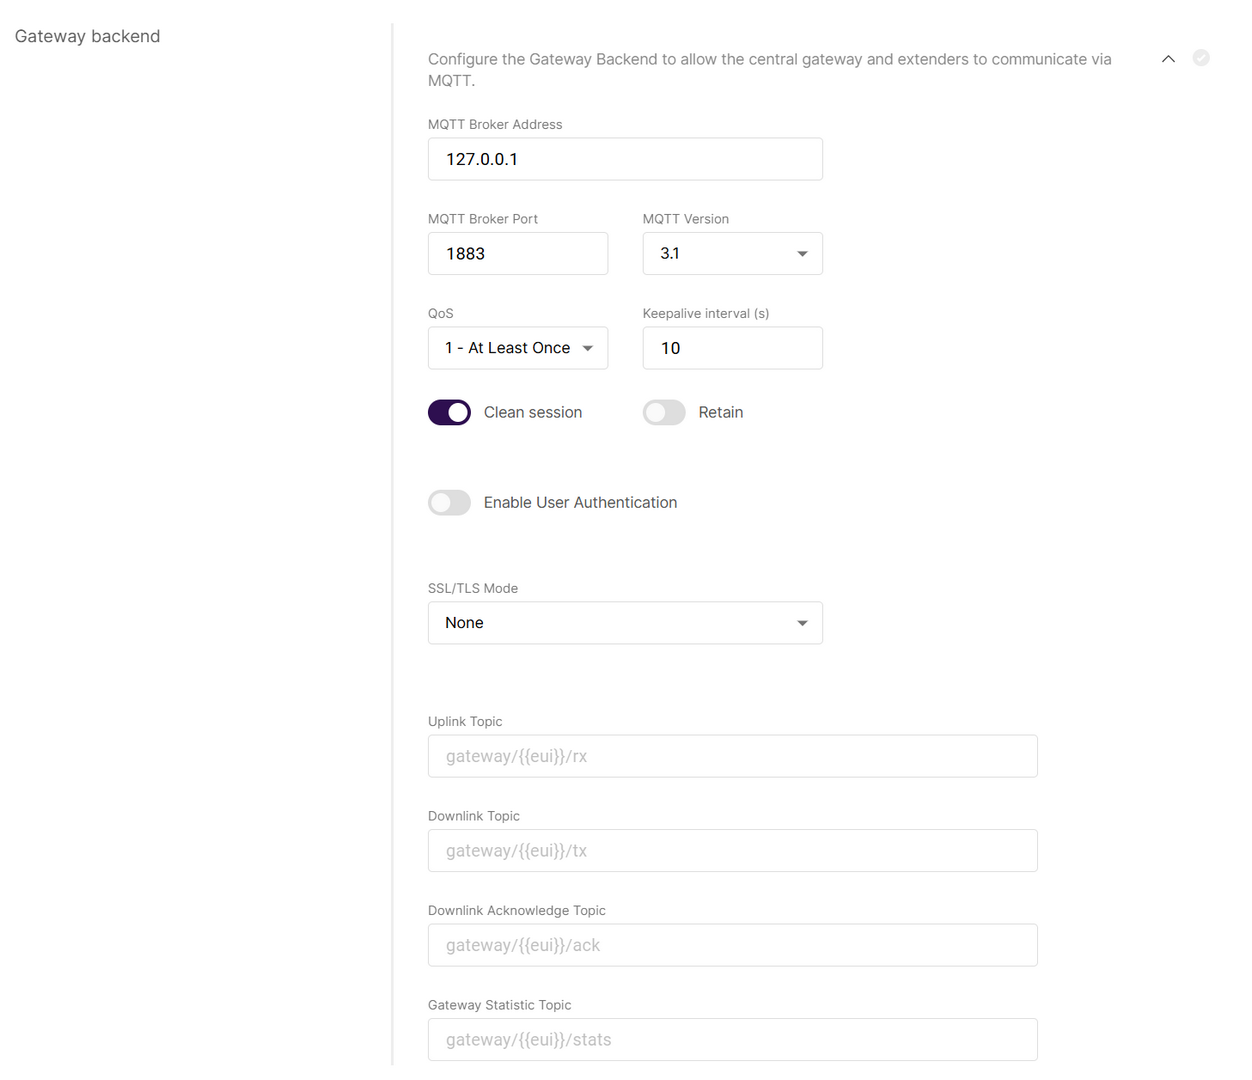 Figure 1: Gateway backend
- MQTT Broker Address: The IP address of the MQTT broker (default:
127.0.0.1for the built-in broker). - MQTT Broker Port: The port used by the broker (default:
1883). - MQTT Version: Choose between V3.1 and V3.1.1. There is very little difference between them, more information can be found on GitHub repo.
- QoS (Quality of Service):
- 0 - At Most Once
- 1 - At Least Once
- 2 - Exactly Once
- Keepalive interval (s): Interval in seconds to keep the connection alive (default:
10). - Clean session: When enabled, the broker does not store subscription or undelivered messages.
- Retain: When enabled, the last message will be retained.
- Enable User Authentication: Enable authentication using username and password (disabled by default).
- SSL/TLS Mode: Configure secure connection
- None
- CA signed server certification
- Self-signed server certification
- Self-signed server & client certification
- TLS Version: Choose between TLS v1.1 and TLS v1.2.
- Uplink Topic/Downlink Topic/Downlink Acknowledge Topic/Gateway Statistic Topic: Predefined MQTT topics for uplink, downlink, and status updates.
Class B Settings
Enable/disable the class B beaconing. To expand the menu, click on Configure the beacon period and ping slots of class B devices to use time-sync beacons sent by the gateways.
 Figure 1: Class B Settings
- Enable Beacon: The switch enables/disables Class B beaconing.
- PingSlot Channel Frequency: The frequency used for the beacon ping.
- PingSlot Datarate: The minimum duration of each beacon ping slot.
- Enable Hopping: Enables/disables Class B hopping as the class B beacon is transmitted following a frequency hopping pattern.
- Beacon Frequency (MHz): The frequency of the beacon. If frequency hopping is enabled, this option does not appear.
- Beacon TX Power: This is the transmit power of the beacon ping.
The Integration Interface forwards received data to an external network server (e.g., external MQTT broker or AWS IoT Core).
To expand the menu, click on Configure the Integration Interface to forward all received data to an external network server. The settings change depending on the chosen Integration mode.
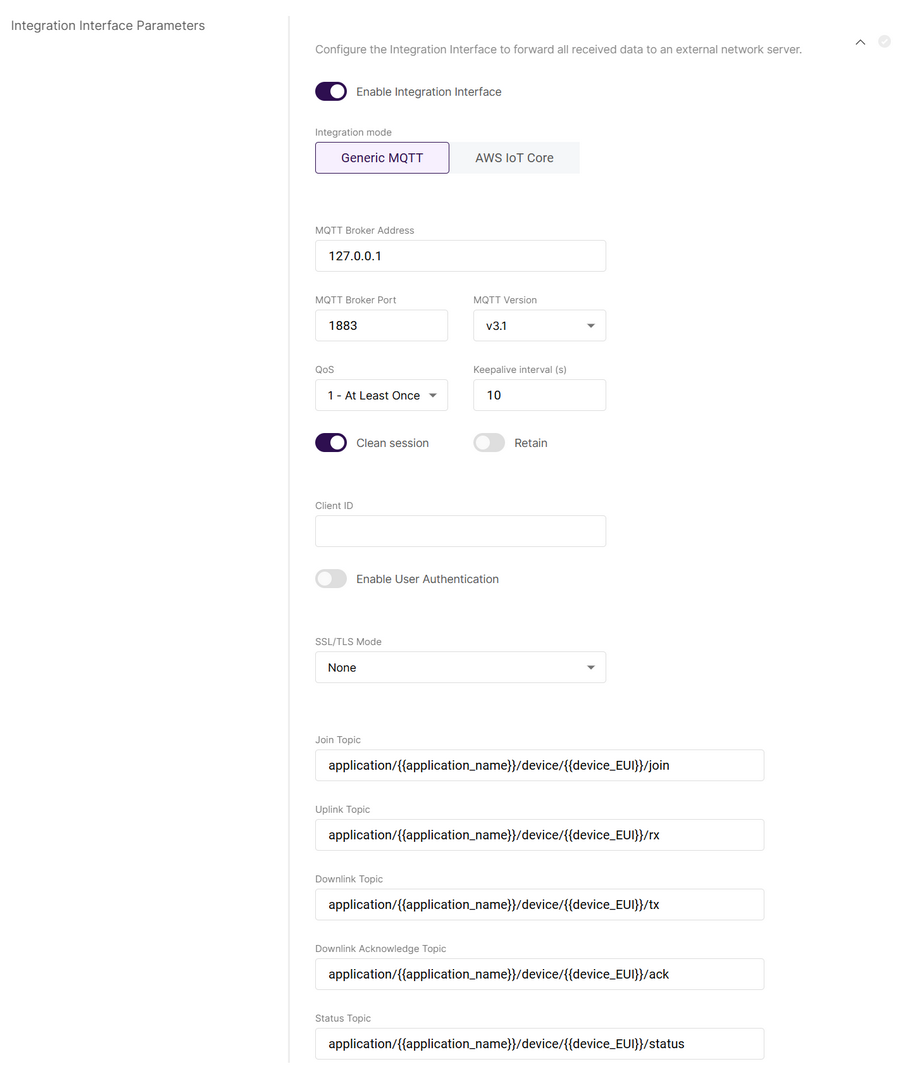 Figure 1: Integration Interface Parameters
- Enable Integration Interface: Enables the integration interface.
- Generic MQTT integration mode:
- MQTT Broker Address: The IP address of the MQTT broker (default:
127.0.0.1).- MQTT Broker Port: The port used by the broker (default:
1883).
- MQTT Broker Port: The port used by the broker (default:
- MQTT Version: Choose between V3.1 and V3.1.1. There is very little difference between them, more information can be found on GitHub repo.
- QoS: Quality of Service level:
- 0 - At Most Once
- 1 - At Least Once
- 2 - Exactly Once
- Keepalive interval (s): Interval in seconds to keep the connection alive (default:
10). - Clean session: When enabled, the broker does not store session data.
- Retain: If enabled, the last published message is retained.
- Client ID: ID used to associate with the topic (auto-generated if left empty).
- Enable User Authentication: Enable authentication using username and password.
- SSL/TLS Mode: Configure secure connection
- None
- CA signed server certification
- Self-signed server certification
- Self-signed server & client certification
- TLS Version: Choose between TLS v1.1 and TLS v1.2.
- Join Topic / Uplink Topic / Downlink Topic / Downlink Acknowledge Topic / Status Topic: Predefined MQTT topics for uplink, downlink, and status updates.
- AWS IoT Core integration mode:
- AWS IoT Core endpoint URL: The AWS endpoint address.
- QoS: Quality of Service level:
- AWS IoT Core endpoint Port: The port used by the AWS server.
- Root CA: CA certificate provided by AWS IoT Core.
- Certificate: Gateway certificate generated by AWS IoT Core.
- Key: Private key for the gateway, generated by AWS IoT Core.
Applications
This tab is available only when the gateway is in Built-in Network Server mode. In this tab, you can create an application and register end devices in the Built-in Network Server.
Create an Application
Applications group LoRaWAN devices for management.
- Navigate to the LoRa > Applications tab.
- To add a new application, click Add application or add one now.
 Figure 1: Applications tab
- Set the following parameters:
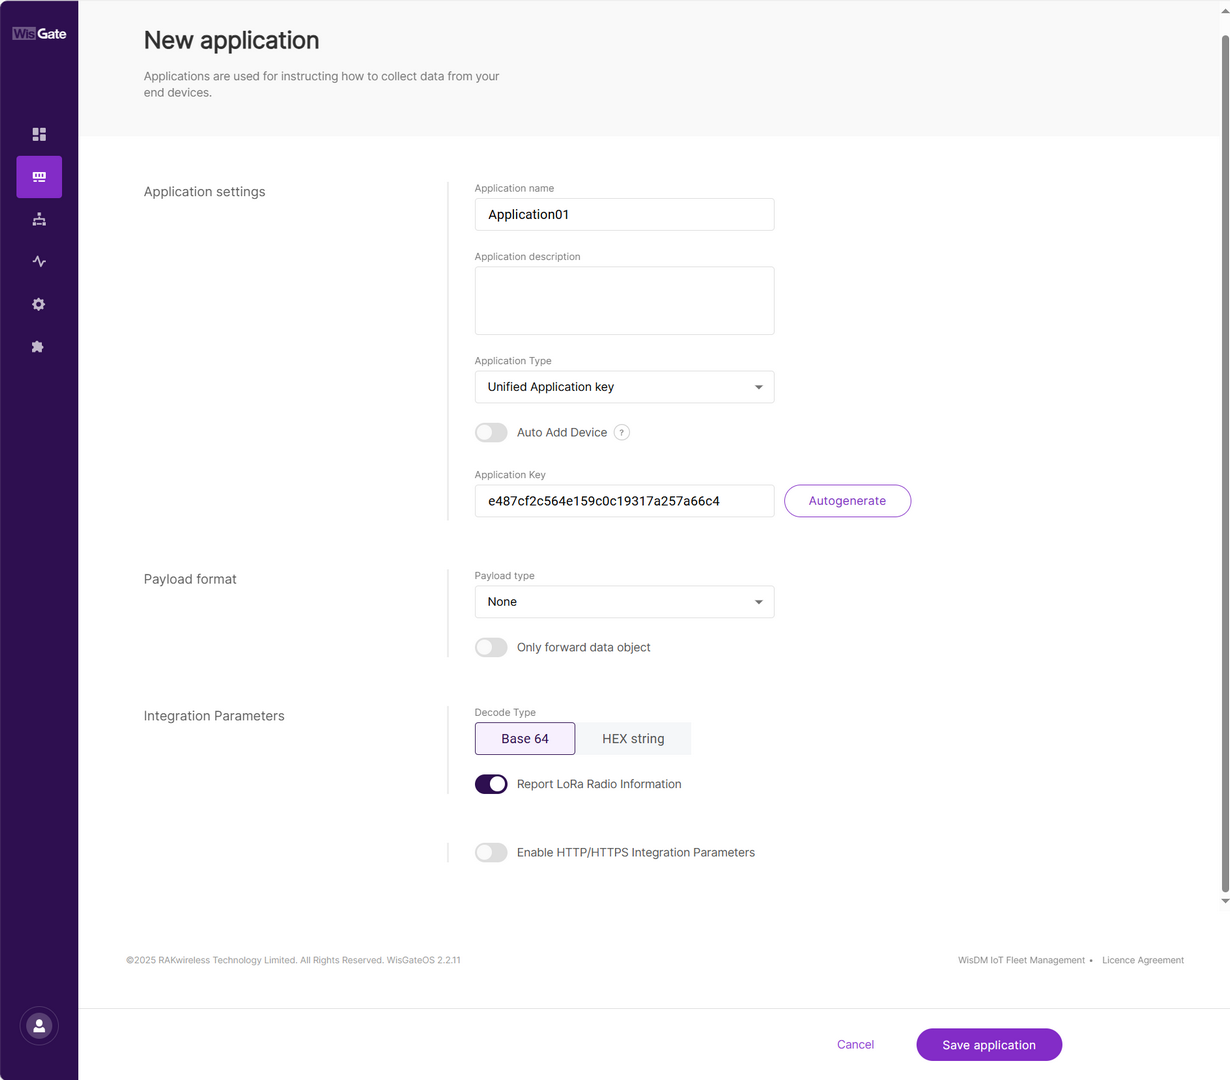 Figure 1: Set parameters
-
Application name: A unique name for the application.
-
Application description: (Optional) description of the application.
-
Application Type
-
Unified Application key: All devices will use the same application key.
- Separate Application keys: Each device or group of devices has a unique key.
-
-
Auto Add Device: When enabled, devices with matching AppKey and Application EUI will be added automatically after a successful join request. This is useful for mass deployment of identical devices.
-
Application Key: Required for Unified Application Key setup.
-
Application EUI: Required for automatic device registration when Auto Add Device is enabled.
-
Payload type
- None: No specific payload format.
- CayenneLPP: Payload format based on the Cayenne Low Power Payload (LPP) standard.
-
Only forward data object: If enabled, the gateway will only forward the raw data object to the server without processing or decoding it.
-
Decode Type
- Base 64
- HEX string
-
Report LoRa Radio Information: If enabled, the gateway will include LoRa signal data (RSSI, SNR, etc.) in the payload sent to the server. This may increase packet size.
-
Enable HTTP/HTTPS Integration Parameters: If enabled, allows forwarding of uplink data and events to external HTTP/HTTPS endpoints.
- Header name
- Header value
- Uplink data URL
- Join notification URL
- Ack notification URL
- Device-status notification URL
- Maximum number of concurrent connections
- Maximum length of queue
- Click Save Application.
Add Devices
If Auto Add Device is enabled in the application settings, devices will automatically register upon initiating a join request. Otherwise, you can add devices manually or using a CSV file. Both methods support batch device registration.
Configure Device Information
-
Navigate to the LoRa > Applications.
-
Click on the application where the device should be added.
 Figure 1: Application listNOTE
You can also click "Add end devices" in the END DEVICES list. (This button will only appear if no end devices are registered.)
-
In the End devices tab, click Add end device.
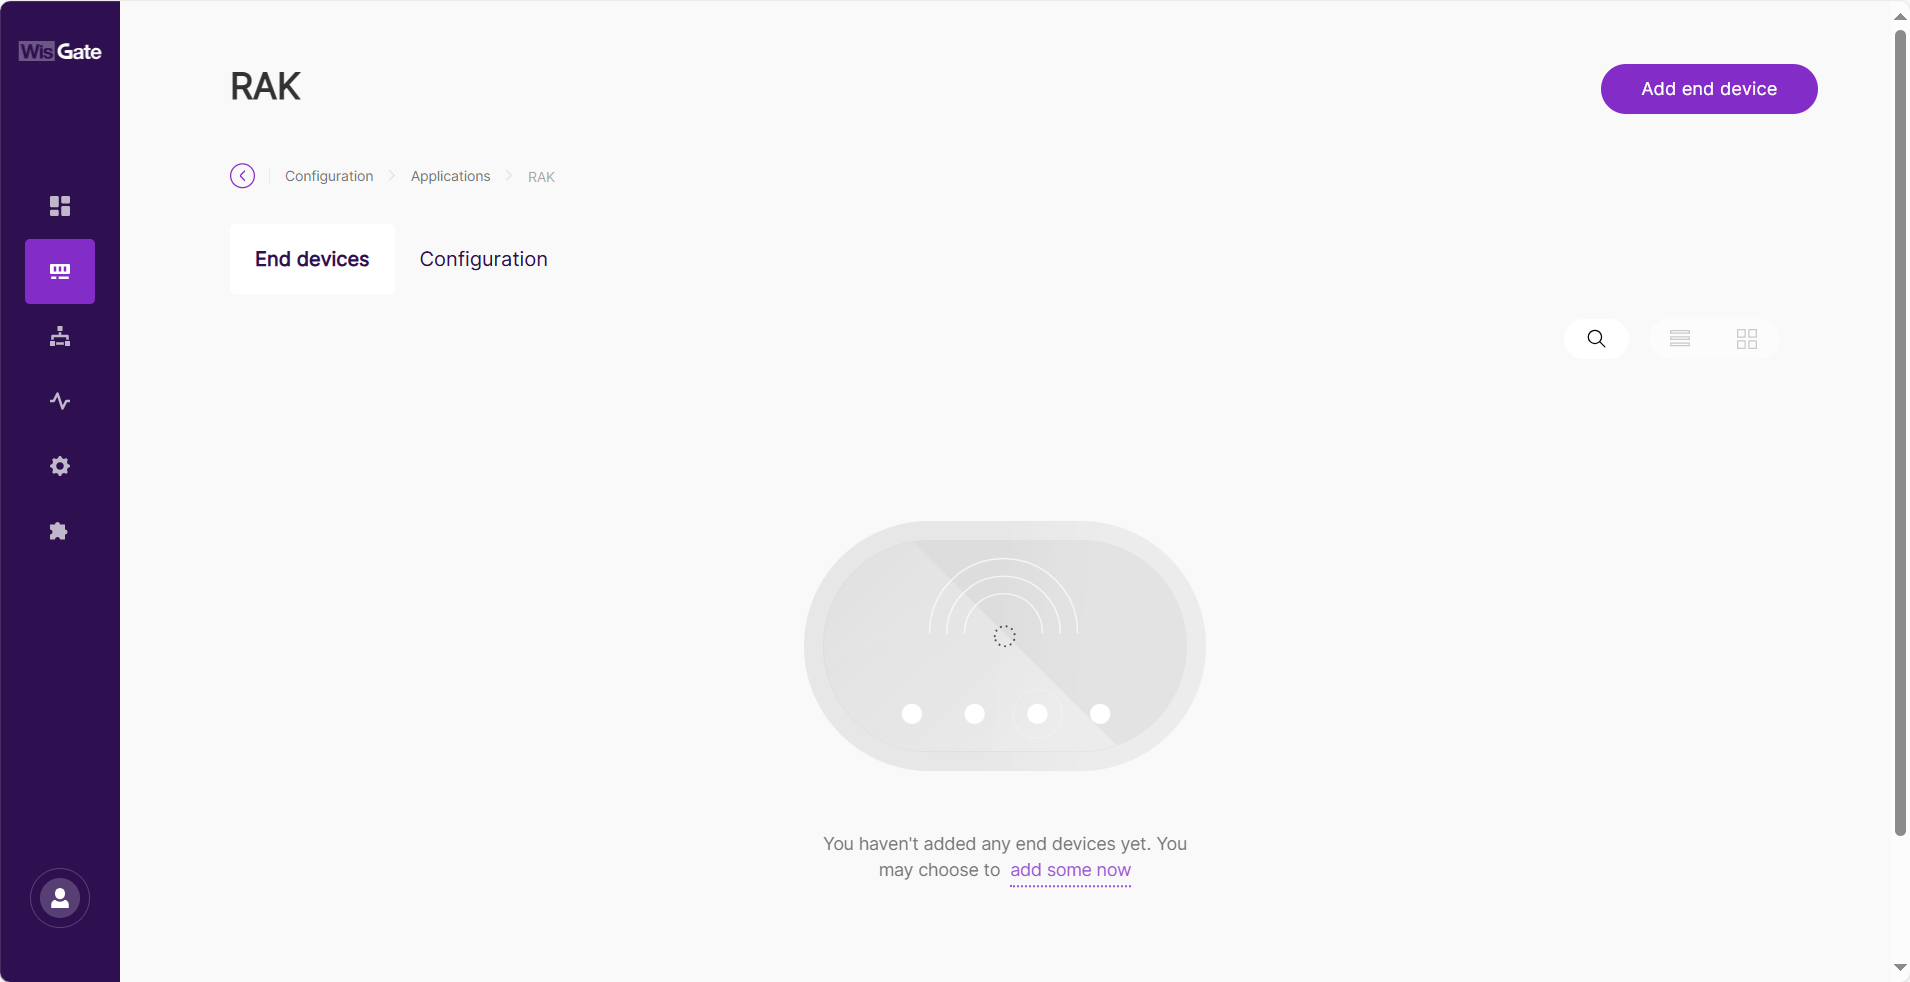 Figure 1: Add an end device
- Set the following device parameters:
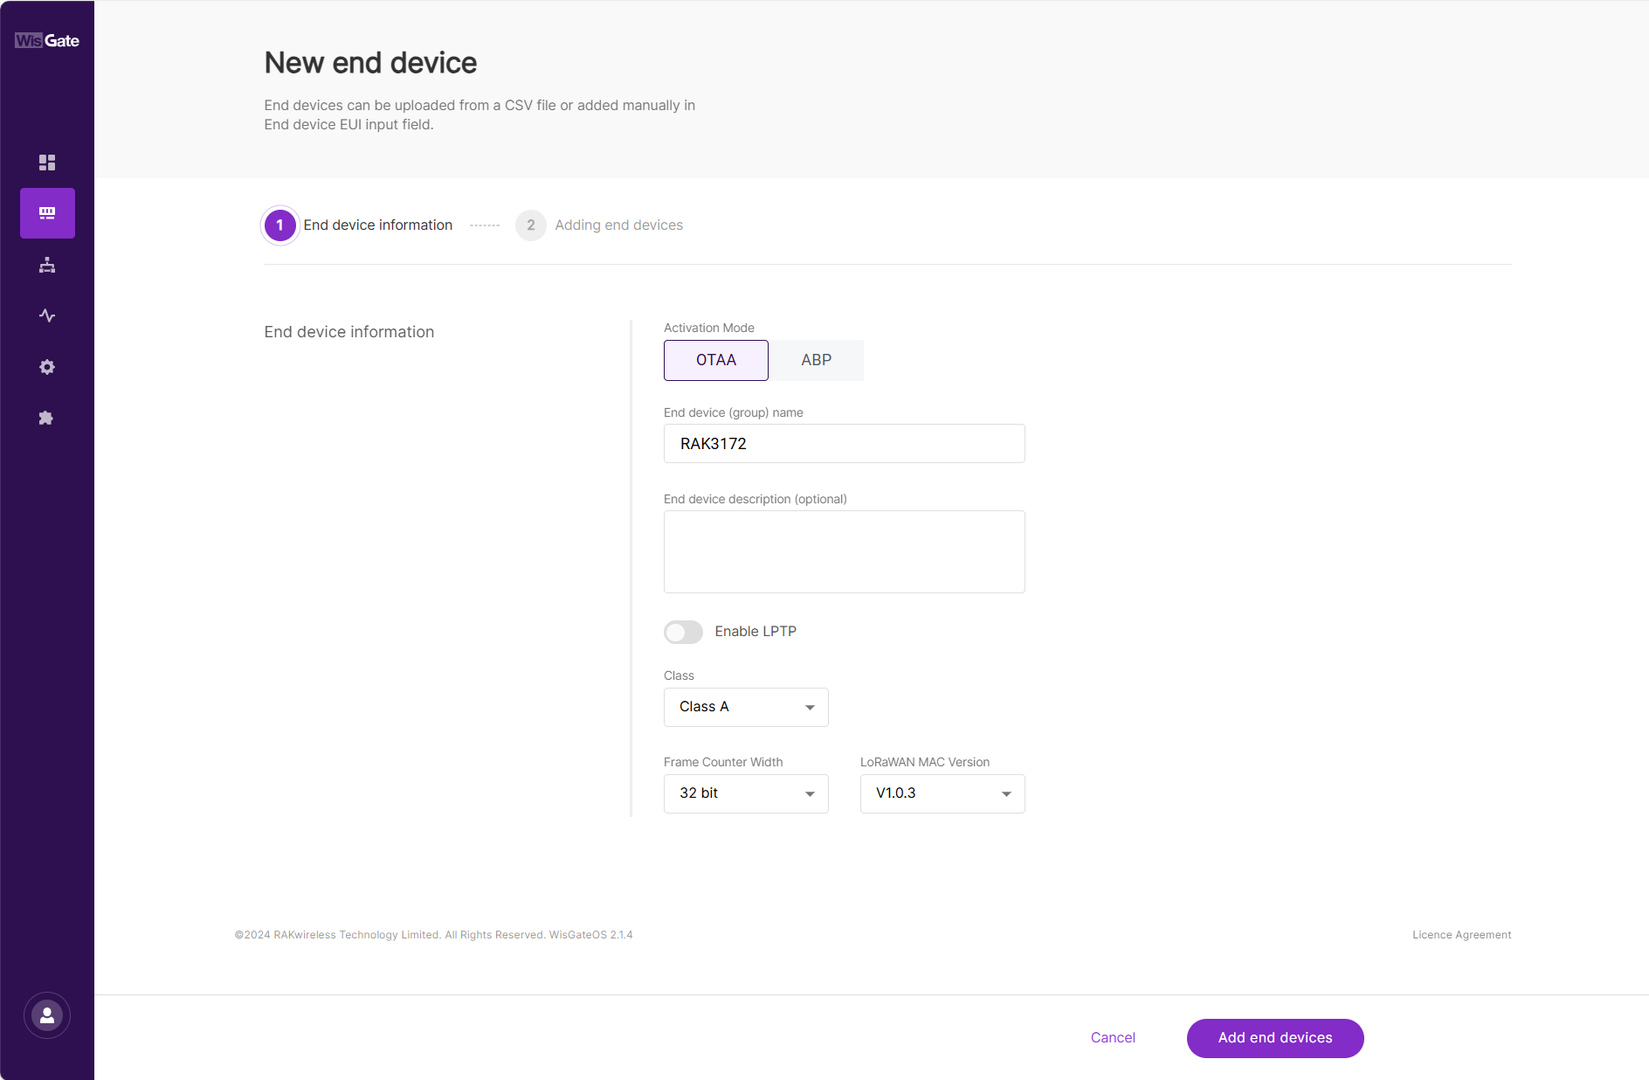 Figure 1: Configuration page
- Activation Mode
- OTAA: Over-The-Air-Activation (OTAA).
- ABP: Activation-By-Personalization (ABP).
- End device (group) name: Enter a name for the device or group of devices.
- End device description (optional): Provide a brief description of the device or group of devices.
- Enable LPTP: LoRa Private Transport Protocol (LPTP) is a RAK proprietary message splitting protocol, which can send data with a length exceeding the maximum permissible size, using multiple messages.
- Application Key: The parameter for the LoRaWAN OTAA mode.
- Class
- Class A
- Class B
- Class C
NOTEIf the end device is configured as Class B, ensure that the gateway supports time synchronization (e.g., GPS) and has Class B beaconing enabled. Otherwise, the device may not function properly in Class B mode.
- Application Key: Required for OTAA devices when Separate Application Key is selected.
- Application Session Key: Required for ABP devices.
- Network Session Key: Required for ABP devices.
- Frame Counter Width: Defines the frame counter size for message tracking.
- LoRaWAN MAC Version
- V1.0.2
- V1.0.3
- LoRaWAN Regional Parameters reversion
- A
- B
- To save the changes, click Add end devices.
Manually Add Devices
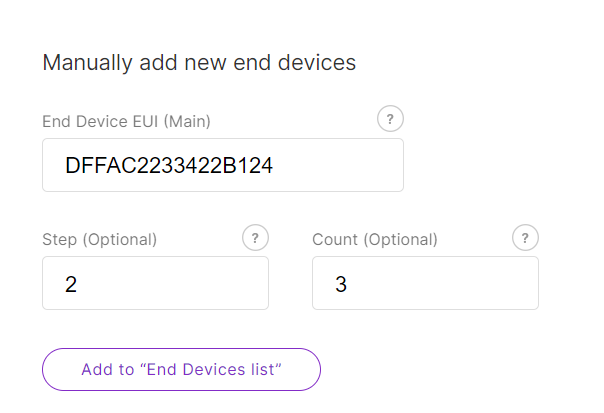 Figure 1: Manual Method
- Enter the following:
- End Device EUI (Main): Fill in the device's unique EUI (Required).
- End device address (Main): Fill in the device's unique address (Required for ABP mode).
- Step (Optional): Use this to auto-generate multiple devices in sequence. (Supports batch adding)
- Count (Optional): Number of devices to generate. (Supports batch adding)
- Click Add to "End Devices List" and the system will automatically verify the device information.
- Correct devices will appear under End devices list.
- Duplicate devices will appear under End devices with error for correction.
 Figure 1: Add devices to the List
- To add the uploaded devices, click Add end devices.
- Click Add to confirm and proceed.
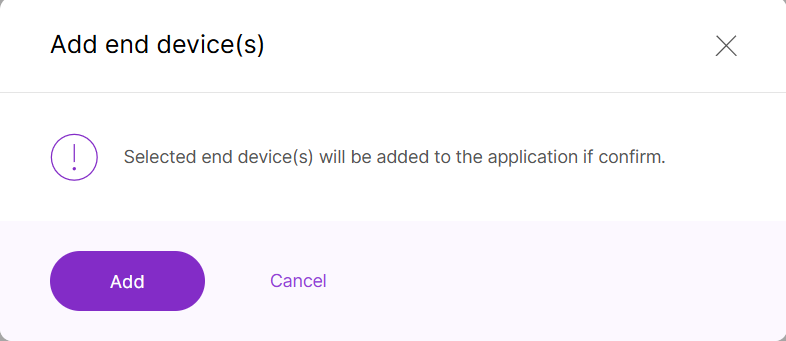 Figure 1: Confirm adding devices
Add Devices Using CSV File
For batch registration of multiple devices, using a CSV file is more efficient.
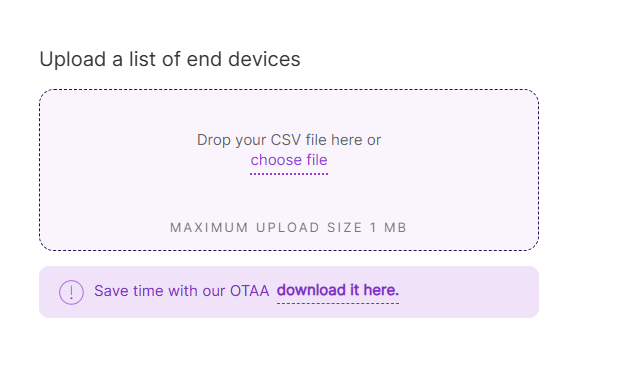 Figure 1: CSV Method
- You can create a CSV file in two ways:
-
Download the template by clicking download it here.
-
Or create your CSV file manually.
NOTE-
The CSV file must include:
Mode Required Fields Parameter Format OTAA end device EUI EUI: Add the unique 16-digit number from the product label. ABP end device EUI
end device addressEUI: Add the unique 16-digit number from the product label.
address: Add the unique 8-digit number from the product label.- Ensure the file size does not exceed 1 MB.
-
-
Click choose file or drag and drop your CSV file into the upload box.
-
After importing the CSV file, the system will automatically verify the device information.
- Correct devices will appear under End devices list.
- Duplicate devices and devices with invalid fields will appear under End devices with error.
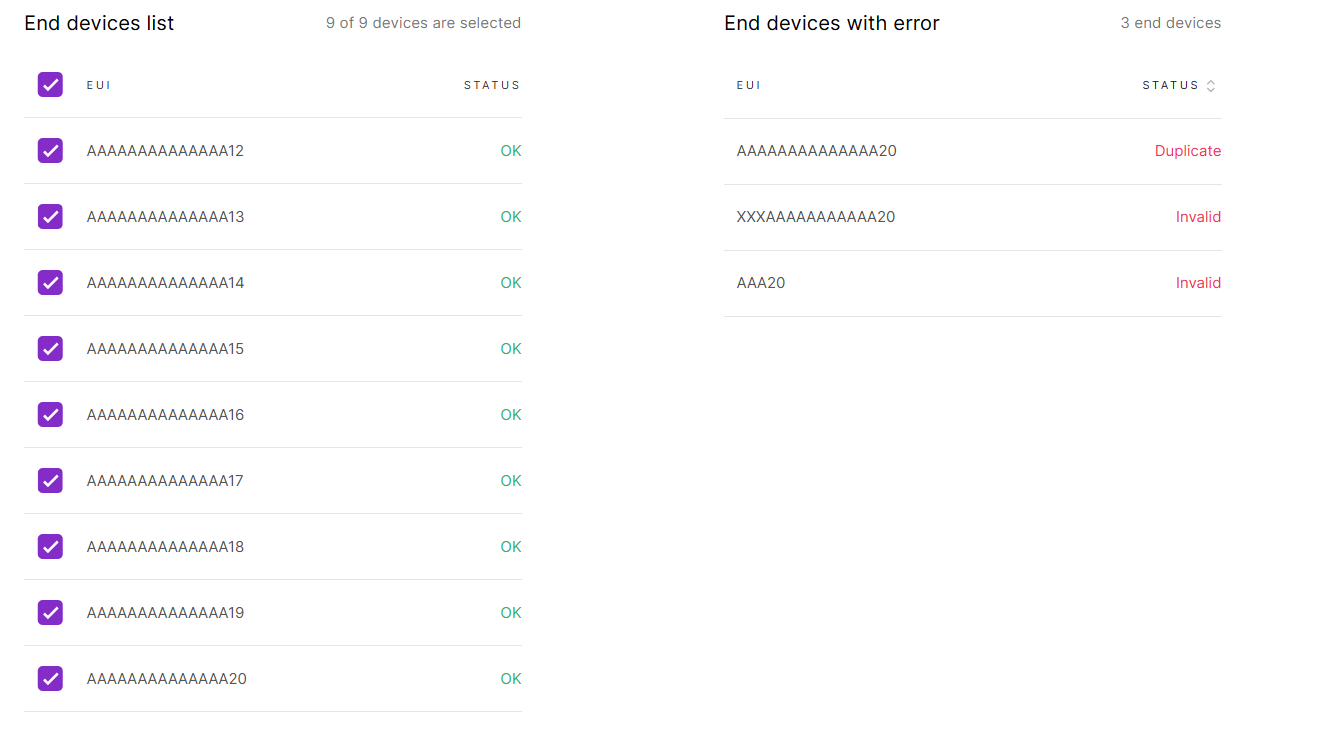 Figure 1: Add devices to the List
- To add the uploaded devices, click Add end devices.
- Click Add to confirm and proceed.
 Figure 1: Confirm adding devices
After adding the end device(s), make sure they initiate a join request (for OTAA) or start transmitting data (for ABP) to connect to the network.
Once the device successfully joins or communicates, its "LAST SEEN" status will be updated in the End Devices List, indicating it is online and active.
Manage Applications
View/Modify Application Settings
- Navigate to the LoRa > Applications. View all added applications in this panel.
- Click the target application to go to its Configuration tab, or click
 and choose Edit Configuration.
 Figure 1: Application list
- In the Configuration tab, you can view and modify the application settings.
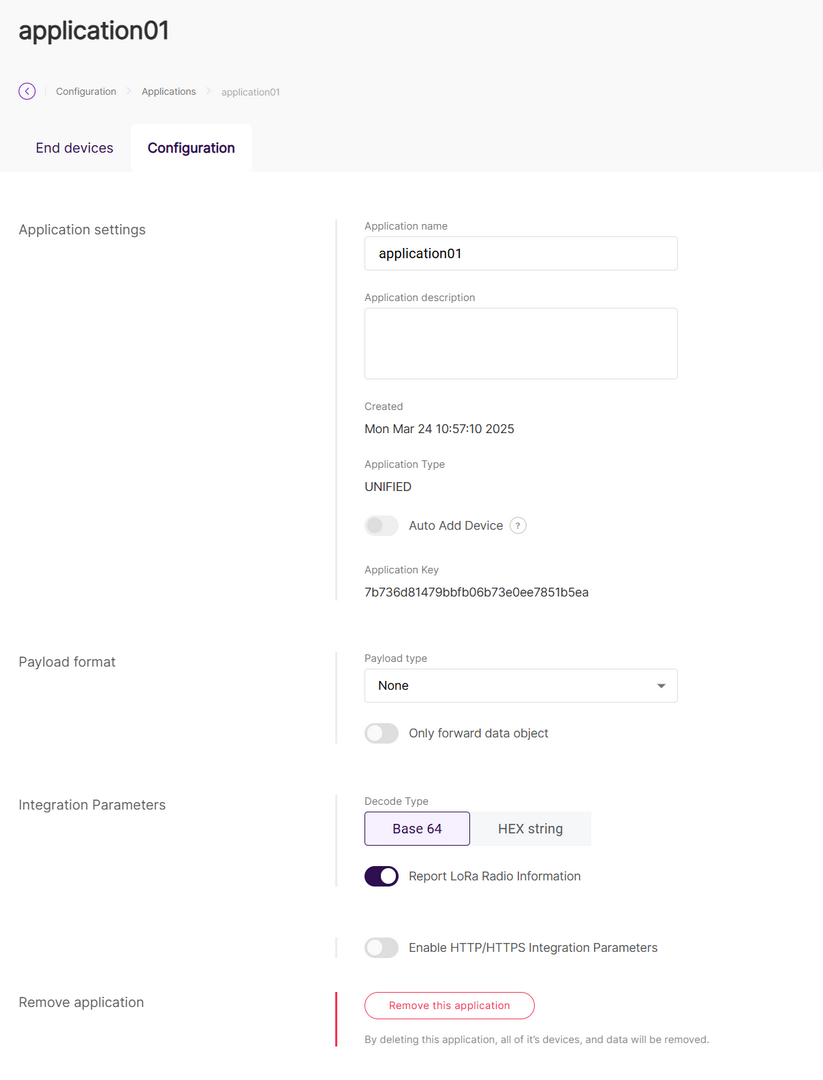 Figure 1: Application configuration
Delete Application
Once deleted, the applications cannot be recovered. Proceed with caution.
- Delete a Single Application
- Navigate to the target application's Configuration tab.
- Click Remove this application.
- Batch Delete Applications
- Go to LoRa > Applications.
- Select checkbox(es) for target application(s).
- Click Delete.
Manage Devices
View/Modify Device Settings
-
Navigate to the LoRa > Applications.
-
Click the target application to go to its End devices tab, or click
 and choose View end devices.
 -
In the End devices tab, all devices in the application can be viewed here.
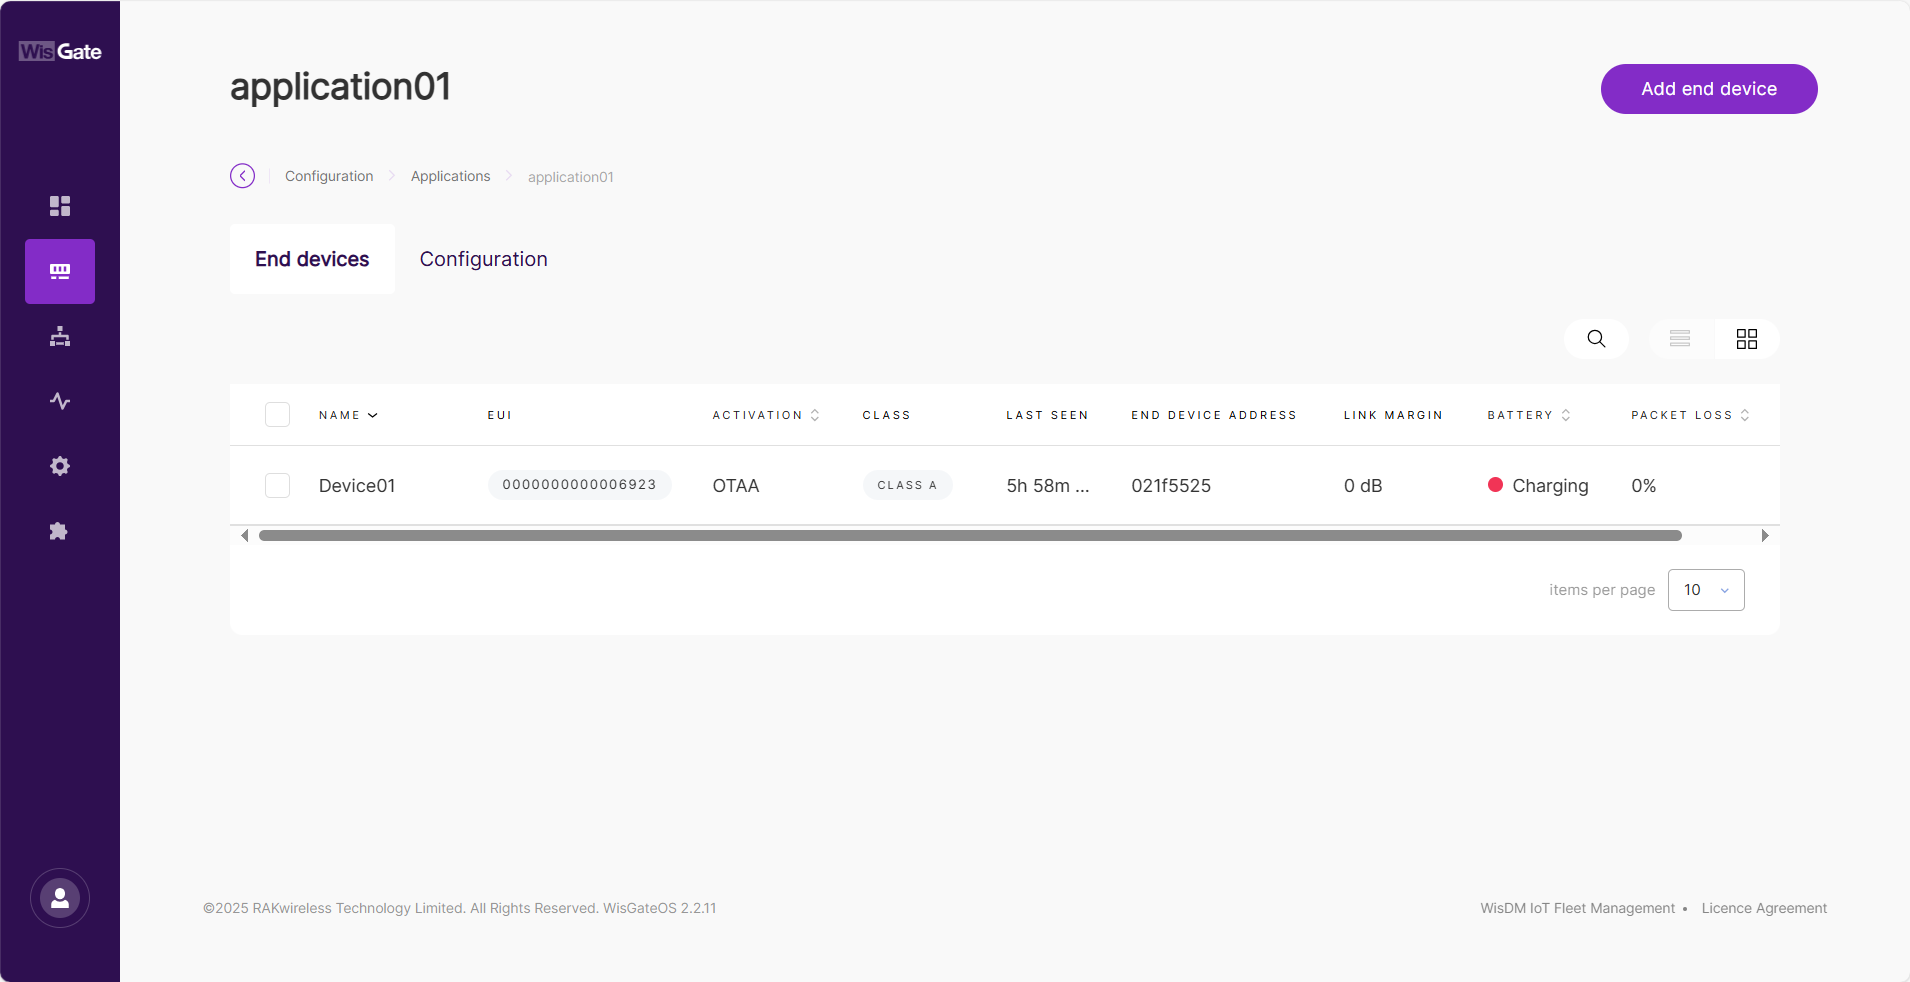 Figure 1: Device list
- Click the target device to view or modify its information under the Configuration tab.
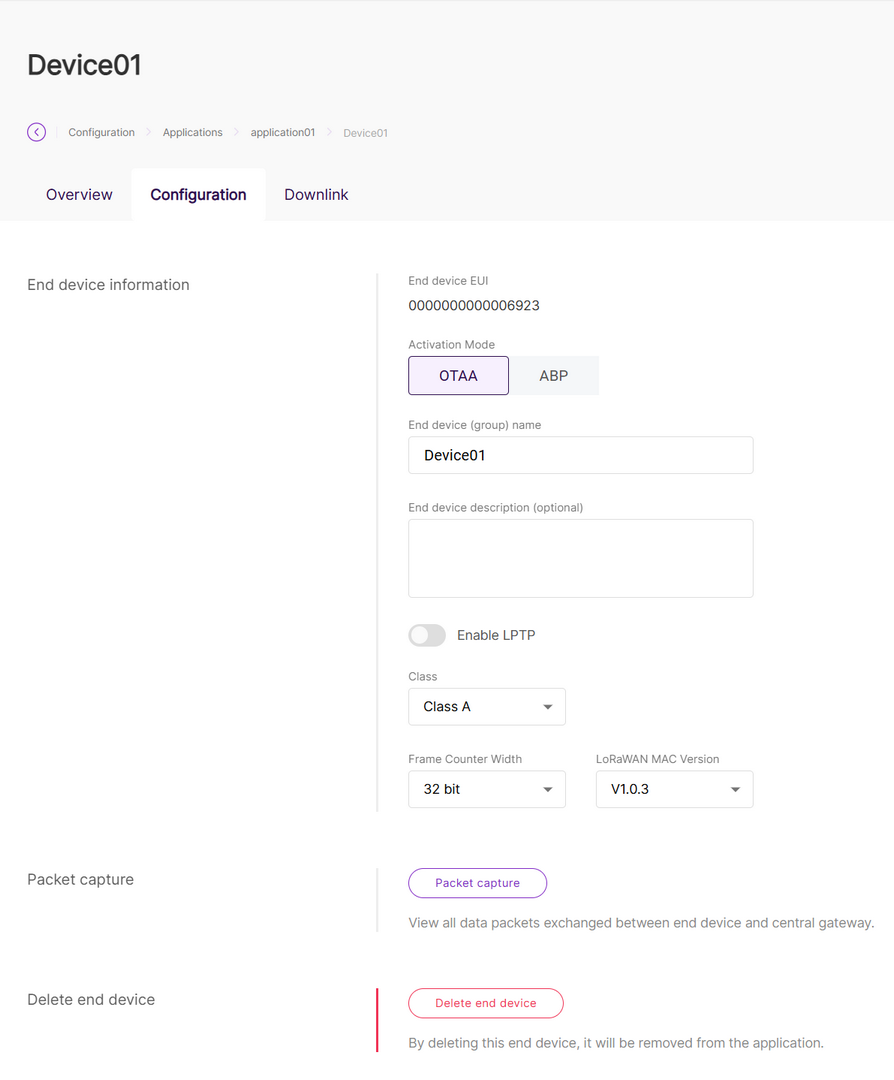 Figure 1: Device configuration
View Device Packets
View all data packets exchanged between end device and central gateway.
- Go to the Configuration tab of the device, then click Packet capture.
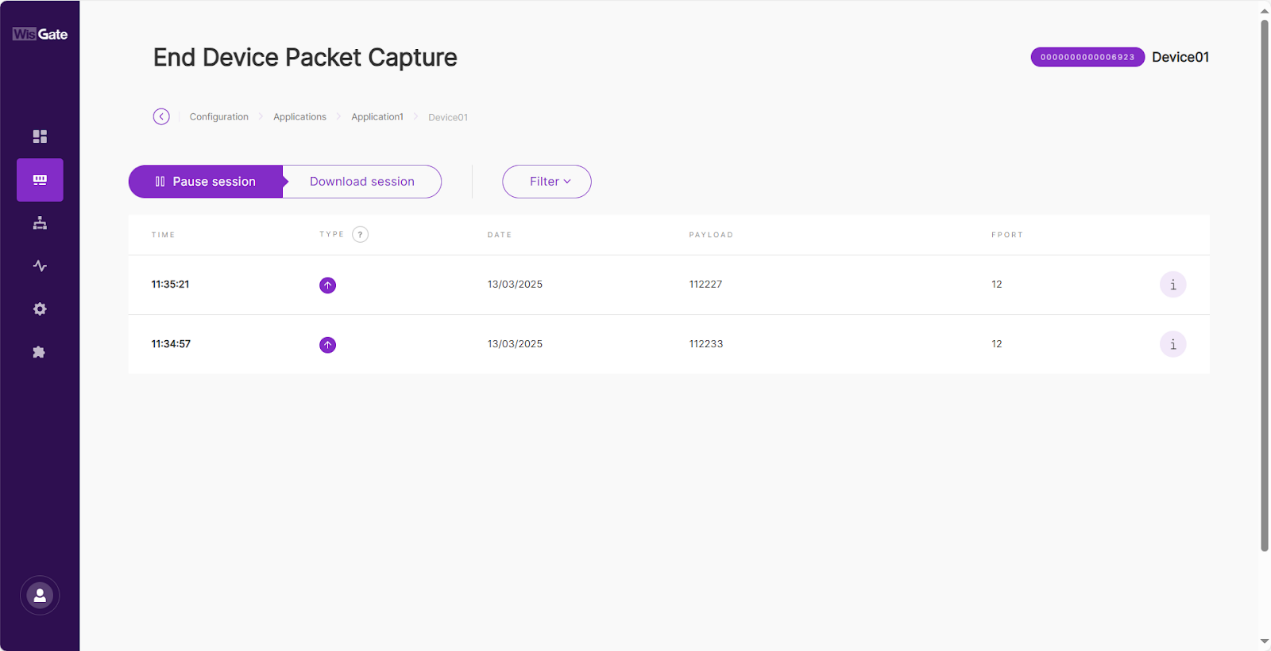 Figure 1: Packet capture
- Pause/Restart session: Тhe button pauses or restarts the session.
- Download session: Тhe button downloads a
.jsonfile with packets data in it. - Filter: The button drops-down a filter menu.
- Type: LoRaWAN message type.
- Frequency: The frequency on which the packet is received/sent.
- RSSI: Range of the RSSI.
- SNR: Range of the SNR.
- Hide CRC_ERR Packets: When enabled, the filter will hide all packets with CRC Error.
- Reset filter: Reset the filter to default.
Export end device information
Export device profiles including:
- End Device EUI
- Device Name
- Activation Mode (OTAA/ABP)
- DevAddr
- AppKey (encrypted)
- Go to LoRa > Applications > Your Application > End devices.
- Select target device(s).
- Click Export end device info.
Downlink
Send downlink messages to the end device.
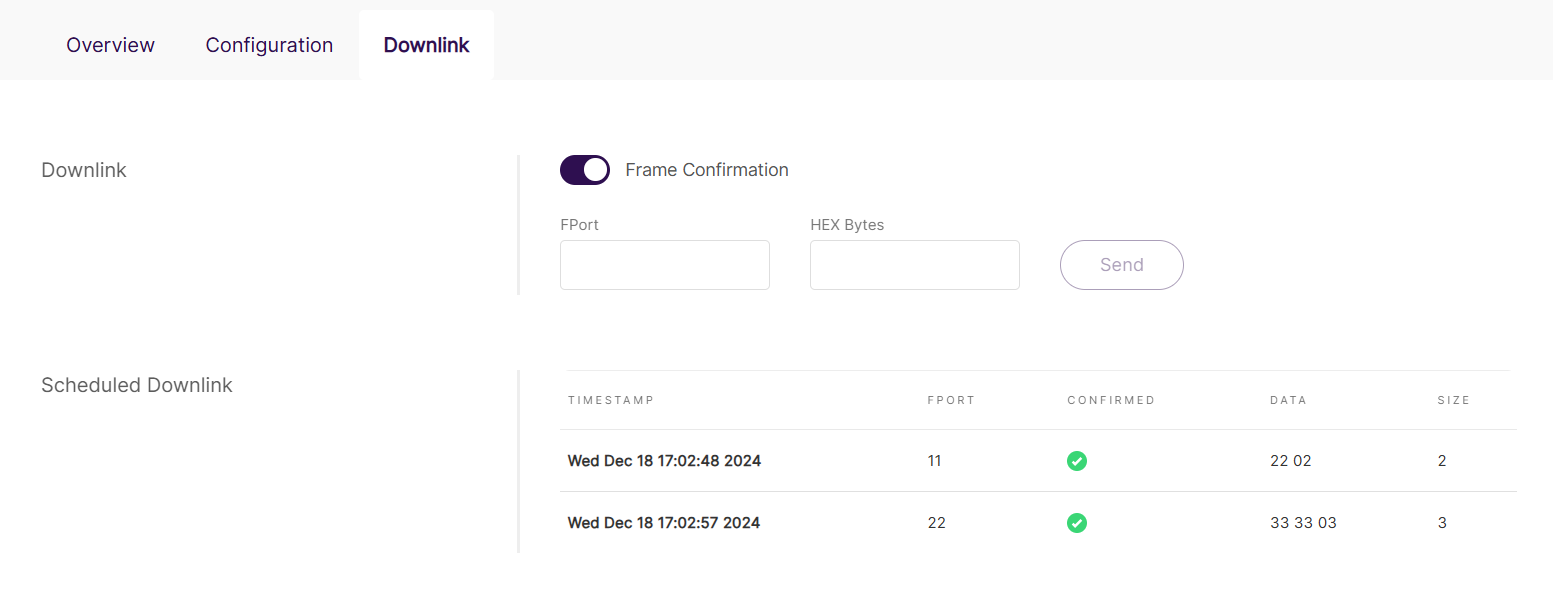 Figure 1: Downlink
- Frame Confirmation: Enable or disable frame confirmation for the downlink message.
- FPort: Port number used for the downlink message.
- HEX Bytes: Hexadecimal-encoded message content.
- Scheduled Downlink: List of sent downlink data.
- TIMESTAMP: Time the downlink message was sent.
- FPORT: Port number used for the message.
- CONFIRMED: Indicates whether the downlink message was confirmed.
- DATA: Content of the downlink message in hexadecimal format.
- SIZE: Size of the downlink message in bytes.
Overview
The Overview tab provides a summary of the device's current status and performance. It includes key metrics and visualizations to monitor network activity and signal quality.
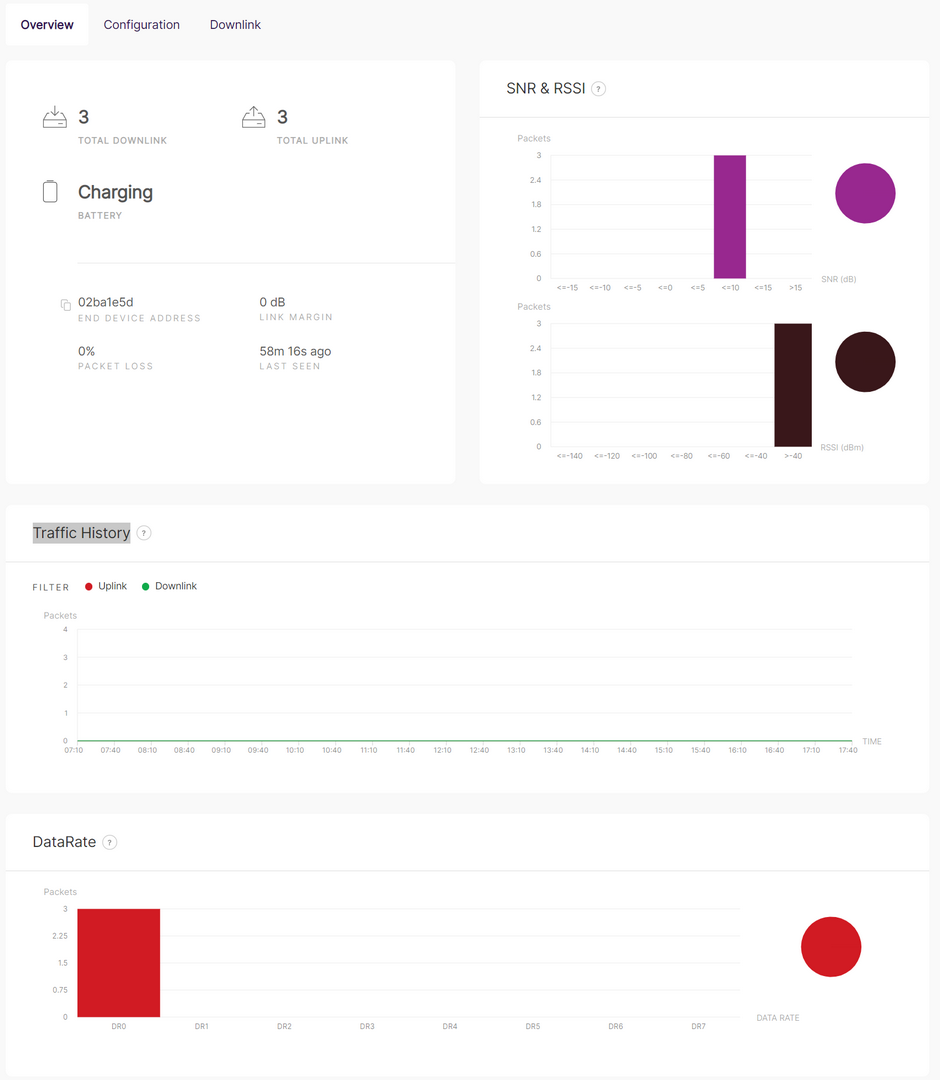 Figure 1: Overview
Device Status and Summary
- TOTAL DOWNLINK: Number of downlink messages sent to the device.
- TOTAL UPLINK: Number of uplink messages received from the device.
- BATTERY: Current battery status (e.g., charging).
- END DEVICE ADDRESS: Unique identifier of the end device.
- LINK MARGIN: Signal-to-noise ratio (SNR) margin in dB.
- PACKET LOSS: Percentage of lost packets during transmission.
- LAST SEEN: Time since the last communication with the device.
SNR & RSSI
Displays signal quality metrics through bar graphs:
- SNR (Signal-to-Noise Ratio): Distribution of SNR values for received packets (in dB).
- RSSI (Received Signal Strength Indicator): Distribution of RSSI values for received packets (in dBm).
Traffic History
Tracks uplink and downlink message activity over time:
Data Rate
Shows the distribution of packets sent and received at different data rates:
Delete Device
Once deleted, the devices cannot be recovered. Proceed with caution.
- Delete a Single Device
- Navigate to device's Configuration tab.
- Click Delete end device.
- Batch Delete Devices
- Go to LoRa > Applications > Your Application > End devices.
- Select target device checkbox(es).
- Click Delete.
Gateways
- The Gateways tab is only applicable when building a multi-gateway network using a central + extender architecture.
- If you're using the built-in network server on a standalone gateway, you can safely skip this section.
- This feature is used to register and manage extender gateways, which are coordinated by the current gateway acting as the central controller.
The Gateways tab is available only when the gateway is operating in Built-in Network Server mode. It allows the current gateway to function as the central gateway, managing a network of extender gateways to expand LoRaWAN® coverage and capacity. All extender gateways added through this interface are fully integrated into the local network and can be managed directly from the central gateway’s Web UI.
Add Extender Gateways
- Navigate to the LoRa > Gateways tab.
 Figure 1: Gateways tab
-
To add an extender gateway, click the Add extender gateway.
-
In the new window, configure the following information.
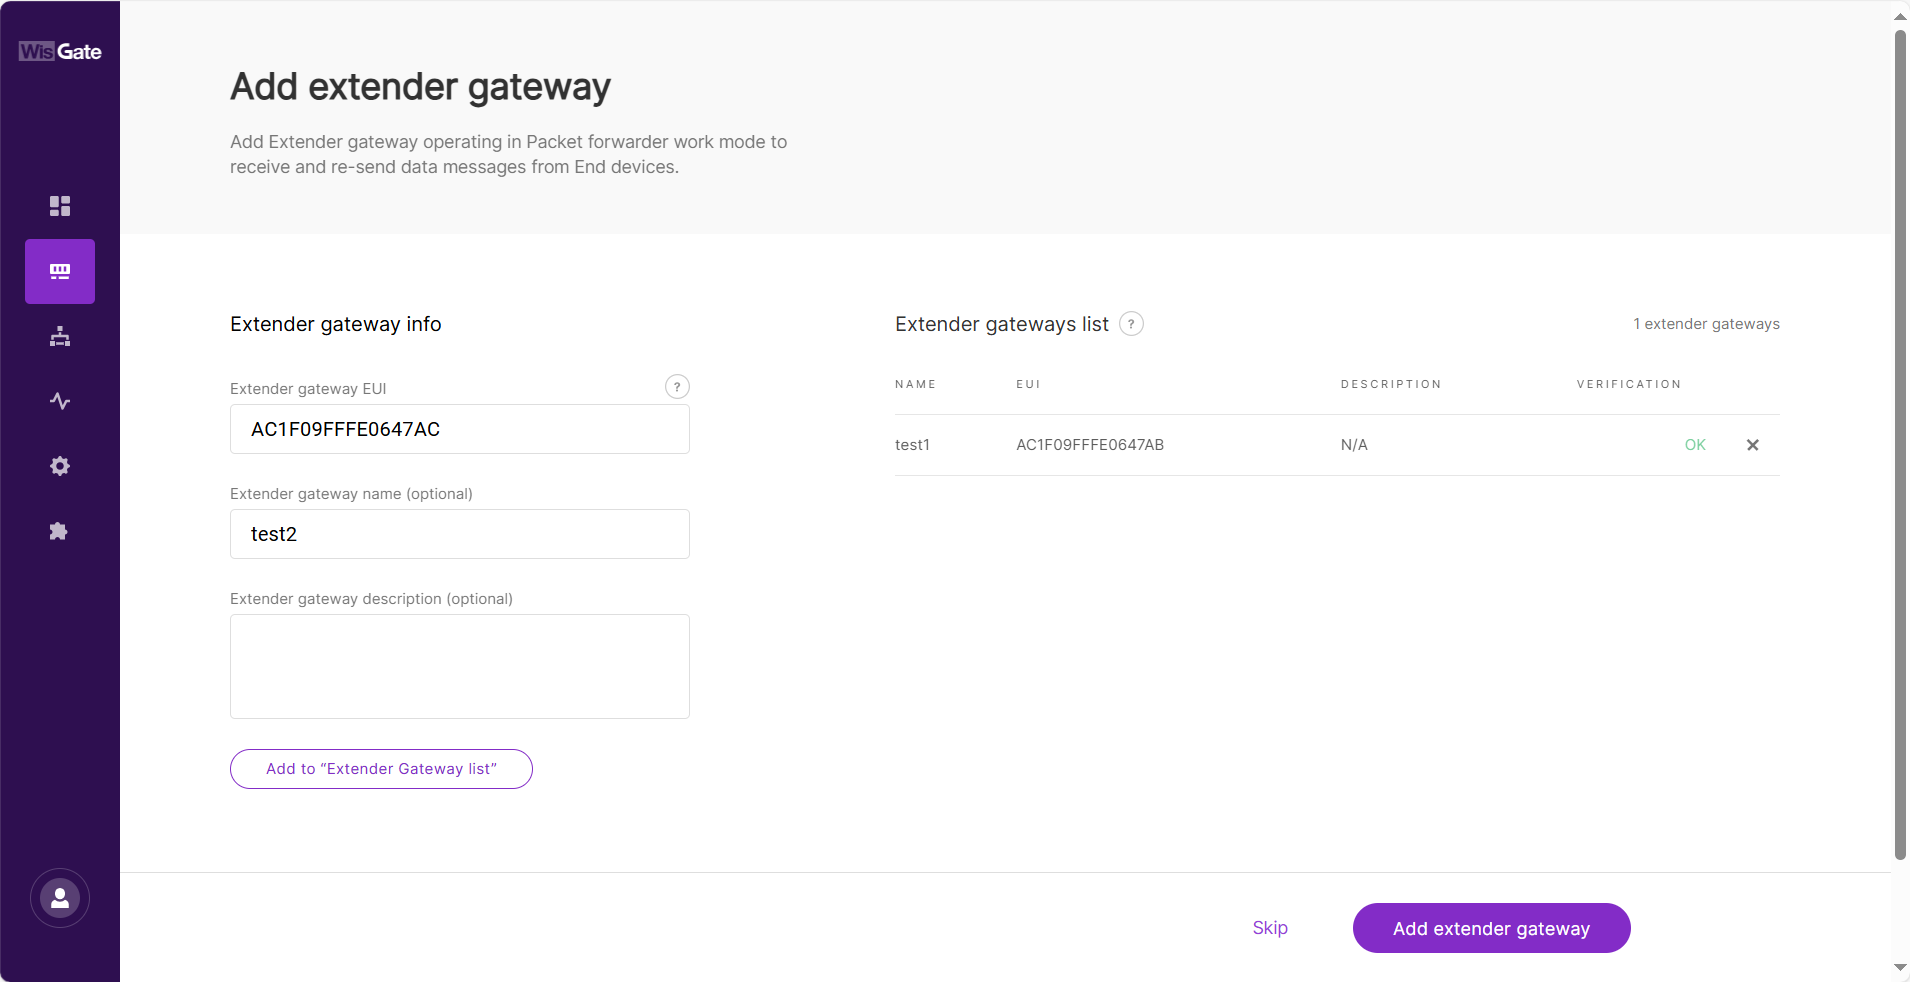 Figure 1: Add gateway
- Extender gateway EUI: Enter the gateway's EUI (Extended Unique Identifier).
- Extender gateway name (optional): Name of the gateway.
- Extender gateway description (optional): A description of the gateway.
-
To save the changes, click the Add to "Extender Gateway list". The extender gateway will now appear in the Extender Gateway list.
NOTEYou can also click the X icon to delete the extender gateway.
-
Click Add extender gateway to successfully add the extender gateway to the built-in server.
NOTEIf you choose Skip, the extender gateway will not be added successfully, and the page will redirect to the gateway list.
 Figure 1: Added gateway
To verify whether the extender gateway is successfully integrated, additional configuration is required on the extender side based on the selected connection protocol.
- Adding extender gateways here only registers them on the central gateway.
- To enable actual LoRa packet forwarding, you must configure each extender gateway to connect to the central gateway using the appropriate protocol:
- UDP: Set the central gateway's IP address in the extender's Packet Forwarder settings.
- MQTT: Set the central gateway's MQTT broker IP address in the extender's configuration.
Do not use127.0.0.1, as this should be the LAN IP of the central gateway.
- These configuration steps are performed on the extender gateway side.
Manage Extender Gateways
View/Modify Extender gateway Settings
- Navigate to the LoRa > Gateways. View all added extender gateways in this panel.
- Click the target extender gateway, or click
 and choose View gateway details.
 Figure 1: View or delete the gateway
- In the details tab, you can view and modify the extender settings.
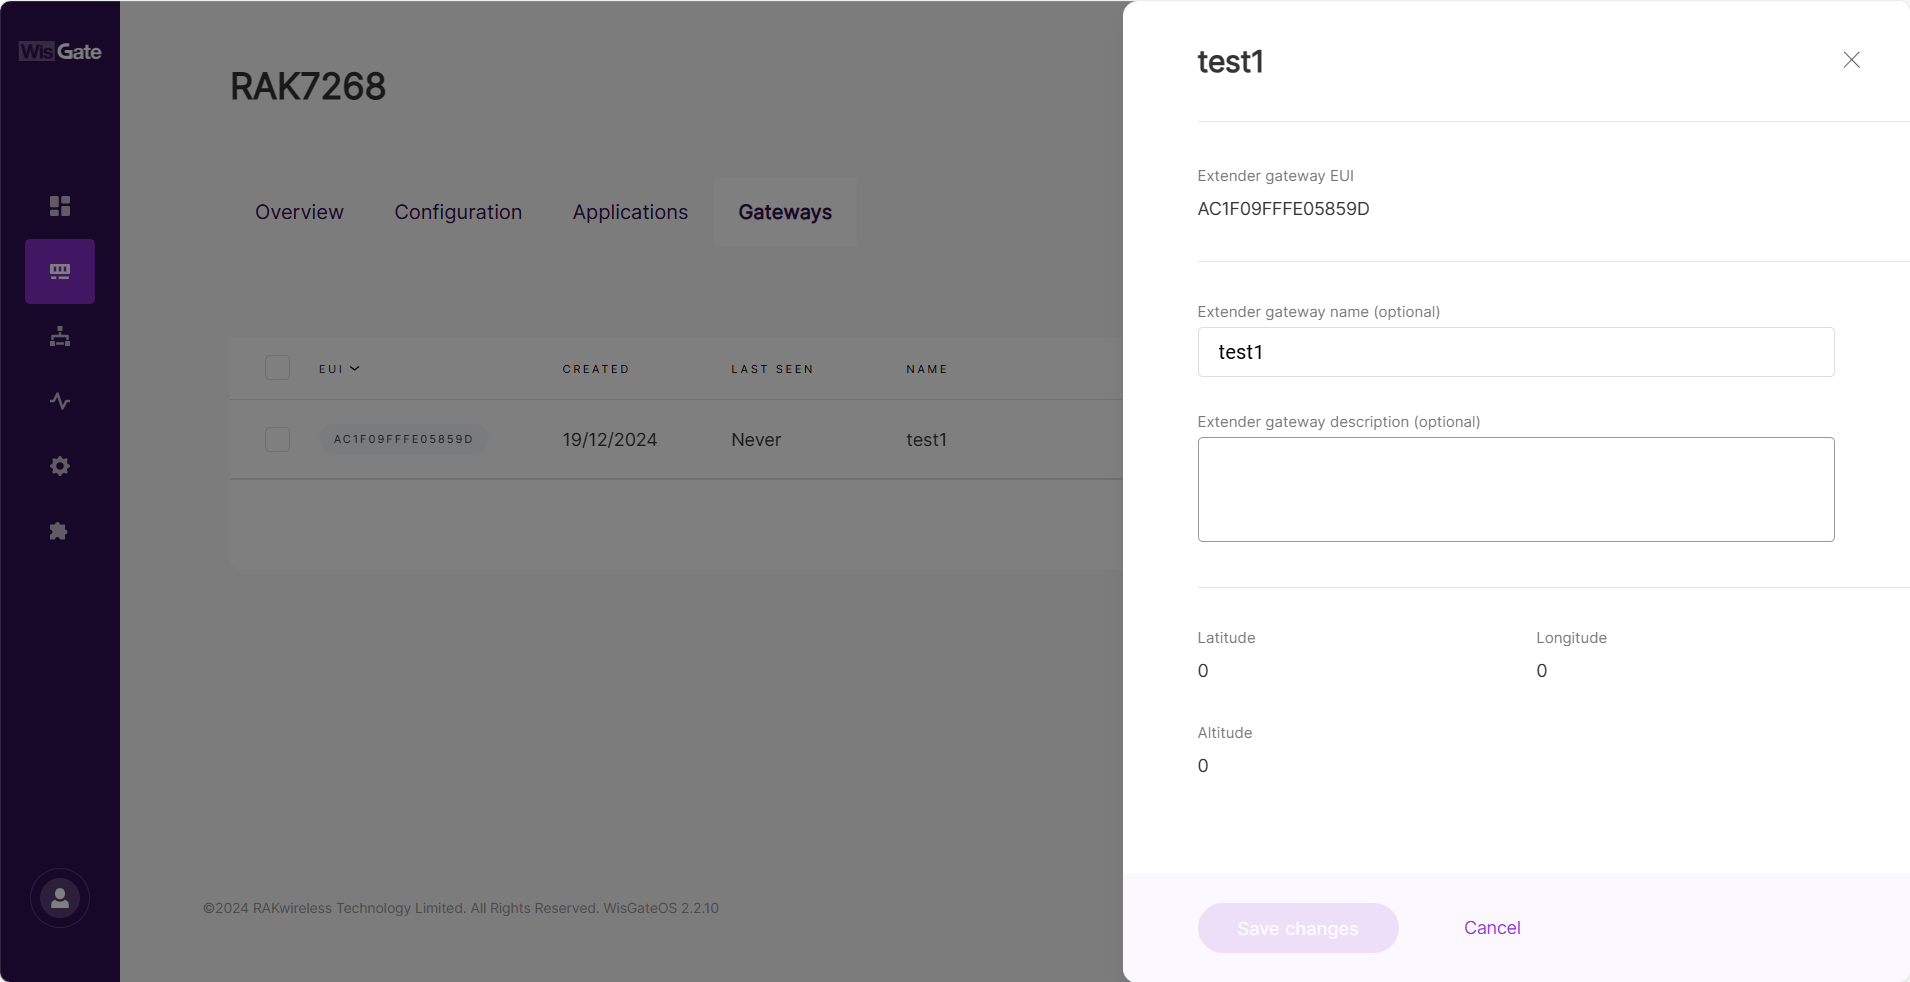 Figure 1: Extender gateway details
Delete Extender gateway
Once deleted, the extender gateways cannot be recovered. Proceed with caution.
- Delete a Single Extender Gateway
- Navigate to LoRa > Gateways.
- In the target extender gateway's information section, click
 and choose Delete extender gateway.
- Batch Delete Applications
- Go to LoRa > Gateways.
- Select checkbox(es) for target extender gateway(s).
- Click Delete.
Overview
The Overview tab provides a real-time summary of the traffic and connected end devices for both the central gateway and any extender gateways. This tab is available only when the gateway is set to Built-in Network Server mode.
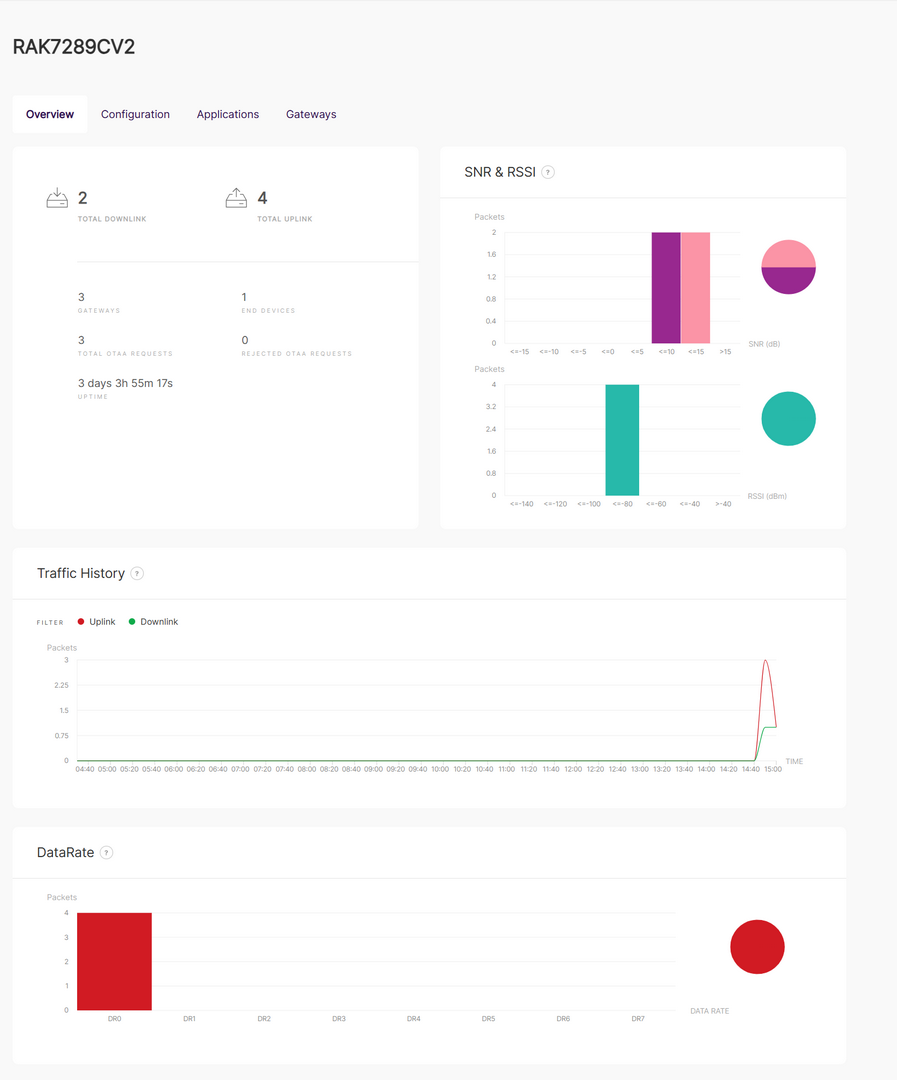 Figure 1: Overview
General Status
Displays key status information for the central gateway and extender gateways:
- Total Downlink: Total number of downlink frames transmitted.
- Total Uplink: Total number of uplink frames transmitted.
- Gateways: Total number of extender gateways connected to the built-in server, including the central gateway.
- End Devices: Total number of authenticated end devices connected to the server.
- Total OTAA Requests: Total number of authentication requests from end devices.
- Rejected OTAA Requests: Total number of authentication requests rejected by the server.
- Uptime: Total time the built-in server has been running without interruption.
SNR & RSSI:
Displays the Signal-to-Noise Ratio (SNR) and Received Signal Strength Indicator (RSSI) values in a graphical format.
Traffic History
Provides a graph showing the number of packets transmitted over time.
DataRate
Displays the number of packets transmitted at each data rate (DR0 to DR7).
Packet Forwarder
The gateway forwards packets to an external network server (e.g., TTN, ChirpStack) without local processing. The external network server handles packet processing, device management, and data routing. This mode is suitable for integrating the gateway into an existing LoRaWAN network infrastructure.
When configuring Packet Forwarder mode, you can choose between two protocols:
Semtech UDP GWMP Protocol
-
The Semtech UDP Packet Forwarder is the traditional and widely used protocol for LoRaWAN gateways.
-
The gateway sends uplinks as raw UDP packets to the LNS (LoRaWAN Network Server) and receives downlinks via UDP.
LoRa Gateway MQTT Bridge
- The MQTT-based Packet Forwarder allows LoRaWAN traffic to be encapsulated in MQTT messages instead of raw UDP packets.
- Provides better security than UDP by supporting TLS encryption and authentication.
Configuration Guide Based on Use Case
Before applying scenario-specific settings, begin with the following basic configuration steps required for all Packet Forwarder use cases:
- Work Mode: Set to Packet Forwarder
- Protocol Type and Corresponding Configuration Options
- Semtech UDP GWMP – for raw UDP packet forwarding
- LoRa Gateway MQTT Bridge – for MQTT-based forwarding with enhanced security
- Frequency Plan / Region: Choose based on your country or deployment region
- Log Level: Optional, used for debugging and monitoring
Once these basic settings are complete, refer to the configuration guide table to determine which additional features you may need to enable depending on your application.
| Use Case | Additional Configuration Sections |
|---|---|
| Basic packet forwarding to external LNS | None required beyond the basic setup (Work Mode, Protocol, Server Address, Region) |
| Custom/private LoRaWAN frequency requirements | View Detailed Regional Parameters (e.g., sub-band, private sync word) |
| Large-scale deployment / bandwidth optimization | Packet Filter – Filter by OUI, Network ID, join requests to reduce uplink noise and optimize load |
| Unstable network environments | Auto Data Recovery – Enable SD card buffering and resend on reconnection |
| TDoA-based positioning (e.g., asset tracking) | Fine Timestamp GPS Info – Configure manually via Fake GPS |
| Class B end device support | Class B Settings (only available when real GPS is present and locked) – Configure beaconing, ping slot timing, and transmission parameters |
Configuration Options Overview
Based on your use case, this section provides detailed explanations for each configuration module. You can follow along step by step, or skip to the sections that are relevant to your specific scenario.
Work Mode
Set the Work Mode to Packet Forwarder.
 Figure 1: Work mode
Log Level
Configure the log level for debugging and monitoring purposes.
 Figure 1: Log level
- Error: Shows only error logs.
- Warning: Shows warnings logs.
- Notice: Shows notice logs.
- Info: Shows all notice, error, and warning logs.
- Debug: This is full log, it shows all types of logs, it is used for debugging.
Select Your Country & Regin
 Figure 1: Select your country & regin
Country Code Setting: (Optional) Selecting the correct country ensures that the gateway operates in compliance with local regulations. The gateway’s transmit power will be set to the maximum allowed by local regulations, and the LBT (Listen Before Talk) feature will be enabled if required.
Regin: Set the region here. You can switch the frequency plan in the following regions:
- US915, AS923, KR920, AS923
- EU868, RU864, IN865
- EU433
- CN470
- If you have already selected a country, the corresponding frequency plan will be automatically applied in the Region settings. Manual changes to the frequency plan are not allowed if the country selection has been made.
- Different hardware supports different LoRaWAN regions.
- If your Region is set to AS923, you need to configure the Variation option, such as AS923-1/AS923-2/AS923-3/AS923-4.
View Detailed Regional Parameters
Click on View detailed regional parameters of the frequency plan to expand the options.
- Conform to LoRaWAN: When enabled (default), the gateway adheres to the LoRaWAN protocol. If you need to customize LoRaWAN channels, disable this option.
- LoRaWAN Public: When enabled (by default), the gateway will process data from all end devices. If you want to create a private network, you can to turn it off. The gateway will process the data only from the end devices, which sync word is changed to private.
LoRaWAN network frequency settings vary by region due to different radio regulations and frequency allocations. This affects the available channel types:
- Frequency Sub-Band:vSelect the specific frequency sub-band based on the region's frequency plan.
- Multi-SF LoRa Channel Frequency (MHz):vSet the frequency for the Multi-SF LoRa channel. To remove it, click the X next to it. To add a new frequency, enter the value and click Add.
- Standard LoRa Channel Frequency (MHz): Set the frequency for the standard LoRa channel.
- FSK Channel Frequency (MHz): Set the frequency for the FSK channel.
Protocol
The gateway supports multiple packet forwarder protocols to communicate with an LNS (LoRa Network Server). You can select the appropriate protocol based on your network architecture and security requirements.
-
Semtech UDP GWMP Protocol: A UDP-based protocol for forwarding LoRa packets.
-
LoRa Gateway MQTT Bridge: An MQTT-based protocol for secure cloud integration.
-
Static Interval (s): Defines the interval (in seconds) at which the gateway sends status reports containing operational and packet processing statistics.
UDP Protocol Parameters
Configure UDP protocol settings for connecting the gateway to an LNS.
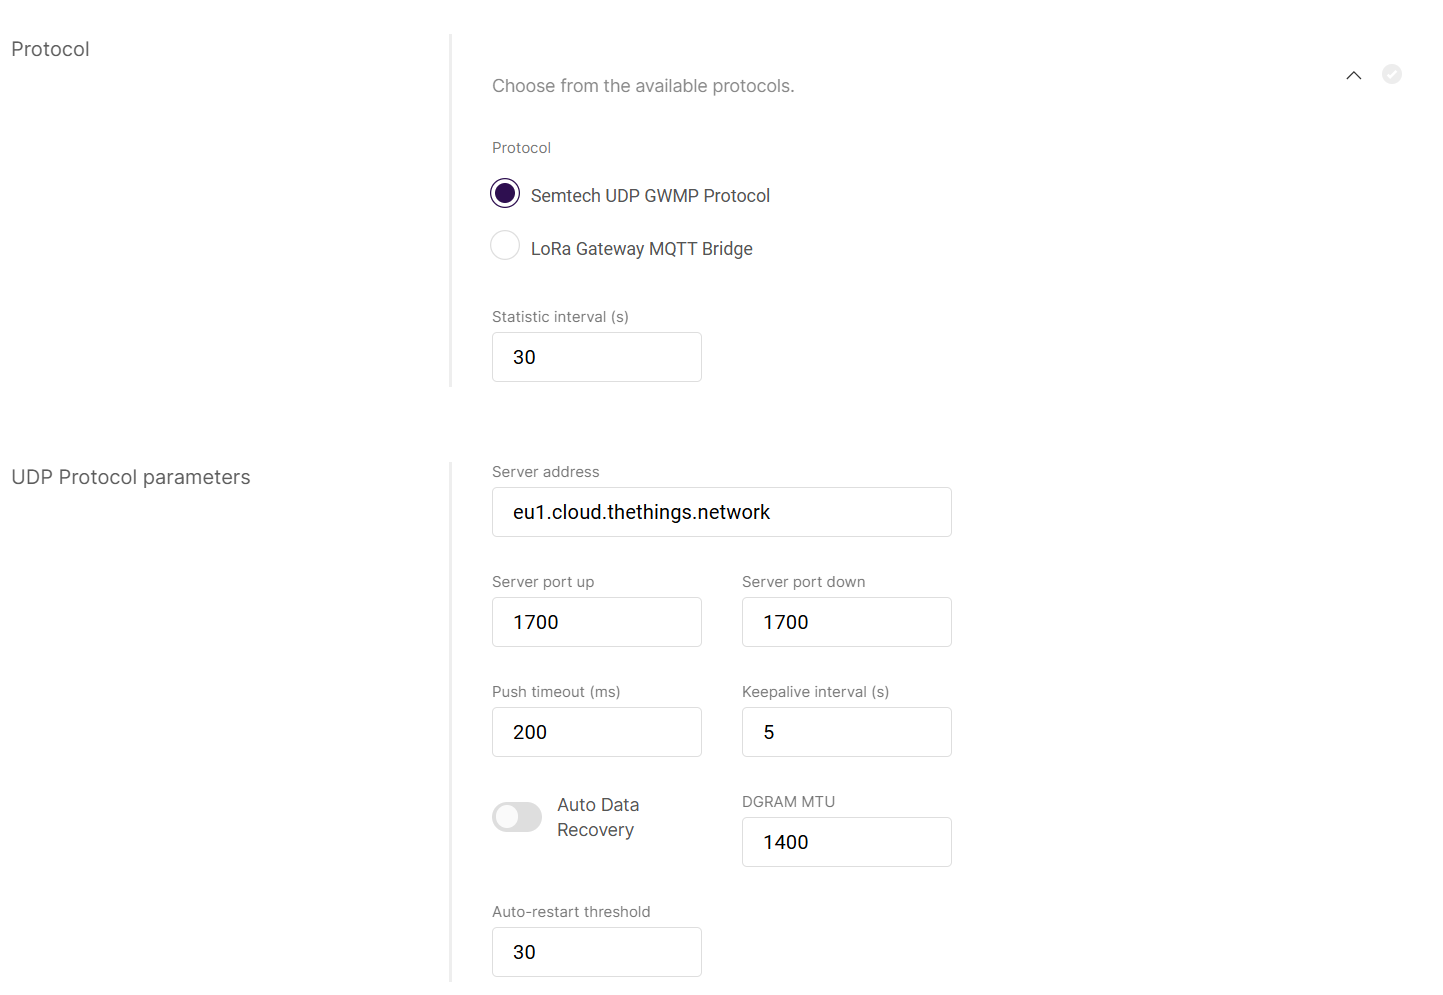 Figure 1: UDP Protocol Parameters
- Server address: The address of the LoRa Network Server (LNS).
- Server port up/down: The ports of the LoRa Server that are going to be used for inbound and outbound traffic.
- Push timeout (ms): The maximum response time for the LNS after receiving uplink data.
- Keepalive interval (s): The interval at which the gateway sends keepalive messages to confirm connectivity.
- Automatic Data Recovery: A feature that allows LoRa frames to be stored on the SD card (provided there is one in the slot). If the gateway loses connection to the LoRa Network Server, upon restoring the connection, the buffered messages will be forwarded, so no data is lost. This is done in blocks of 8 (FIFO) until all are cleared from the buffer.
- DGRAM MTU: The maximum transmission unit size (default: 1400).
- Auto-restart threshold: Defines the number of missed keepalive intervals before restarting the Packet Forwarder.
LoRa Gateway MQTT Bridge
Configure MQTT bridge settings for connecting to an LNS.
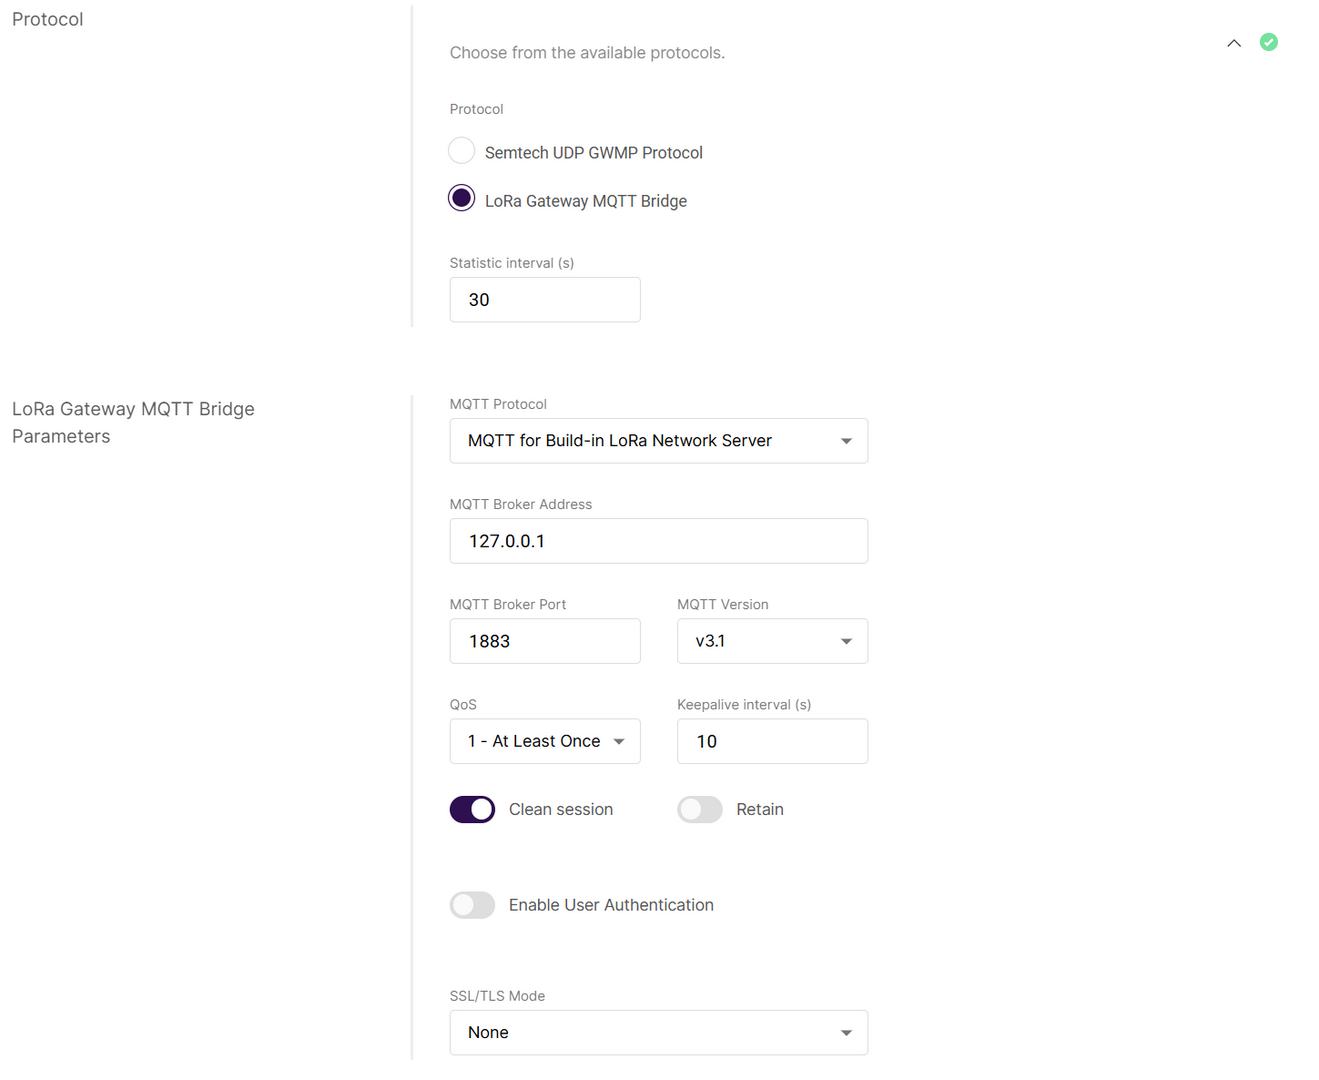 Figure 1: LoRa Gateway MQTT Bridge Parameters
- MQTT Protocol
- MQTT for Built-in LoRa Network Server
- MQTT for ChirpStack 2.x
- MQTT for ChirpStack 3.x (JSON)
- MQTT for ChirpStack 3.x (Protobuf)
- MQTT for ChirpStack 4.x (Protobuf)
- MQTT Broker Address: IP address of the MQTT broker.
- MQTT Broker Port: Default 1883.
- MQTT Version: Choose between V3.1 and V3.1.1. There is very little difference between them, more information can be found on GitHub repo.
- QoS (Quality of Service):
- 0 - At Most Once
- 1 - At Least Once
- 2 - Exactly Once
- Keepalive interval (s): Interval in seconds to keep the connection alive (default:
10). - Clean Session: When enabled, the broker does not store session data.
- Retain: If enabled, the last published message is retained.
- Enable User Authentication: Enable authentication using username and password (disabled by default).
- SSL/TLS Mode: Configure secure connection
- None
- CA signed server certification
- Self-signed server certification
- Self-signed server & client certification
- TLS Version: Choose between TLS v1.1 and TLS v1.2.
- Uplink Topic/Downlink Topic/Downlink Acknowledge Topic/Gateway Statistic Topic: Predefined MQTT topics for uplink, downlink, and status updates.
Class B Settings
Enable/disable the class B beaconing. To expand the menu, click on Configure the beacon period and ping slots of class B devices to use time-sync beacons sent by the gateways.
 Figure 1: Class B Settings
- Enable Beacon: The switch enables/disables Class B beaconing.
- PingSlot Channel Frequency: The frequency used for the beacon ping.
- PingSlot Datarate: The minimum duration of each beacon ping slot.
- Enable Hopping: Enables/disables Class B hopping as the class B beacon is transmitted following a frequency hopping pattern.
- Beacon Frequency (MHz): The frequency of the beacon. If frequency hopping is enabled, this option does not appear.
- Beacon TX Power: This is the transmit power of the beacon ping.
Set fake GPS coordinates (disabled by default). Click Add your GPS info manually to expand the GPS settings and enable Fake GPS using the switch.
Once enabled, the gateway will use the manually configured GPS coordinates even if it can receive actual GPS signals.
 Figure 1: GPS Information
- Latitude: Enter the latitude value.
- Longitude: Enter the longitude value.
- Altitude: Enter the altitude value.
Enable timestamp (disabled by default). Click on Include fine timestamp in uplink packet for TDoA positioning to expand the fine timestamp setting.
 Figure 1: Fine Timestamp
Set up a packet filter to optimize bandwidth by forwarding packets only from selected devices (disabled by default). Click Allows to optimize bandwidth by filtering and forwarding packets from chosen end devices to expand packet filter settings.
If White List Mode and Auto Filter are enabled, you can configure the following options:
 Figure 1: Packet Filter
- OUI (Organizationally Unique Identifier): Filter devices by their OUI.
- Network ID: Filter devices by their Network ID.
- Discard Period (s): The threshold period for discarding packets from nodes (in seconds).
- Join Period (s): The time window for tracking the most recent join requests (in seconds).
- Join Interval (s): The minimum interval between consecutive join requests from the same device EUI (in seconds).
- Join Count 1: The maximum number of join requests allowed within the Join Interval.
- Join Count 2: The maximum number of join requests allowed within the Join Period.
Basics Station
Basics Station is a modern communication protocol that ensures secure and stable communication between your LoRaWAN gateway and the network server via WebSockets. It allows the gateway to dynamically connect to various cloud-based LoRaWAN network servers while maintaining high security.
When configuring Basics Station mode, you can select from the following server types:
CUPS-BOOT Server
- Acts as an initial connection point for the gateway.
- Retrieves the actual CUPS Server details, including its URL, port, and authentication settings.
CUPS Server
- Automates the gateway’s configuration for connecting to the correct LNS Server.
- The gateway periodically contacts the CUPS Server to receive updates on LNS settings, security credentials, and connection parameters.
LNS Server
- The gateway directly connects to a LoRaWAN Network Server (LNS) without using CUPS for configuration.
- Requires manual setup of the LNS URL, port, and authentication settings.
Configuration
When the Basics station work mode is chosen, the corresponding settings pop up replacing the ones for other work modes.
Work Mode
Set the Work Mode to Basics station.
 Figure 1: Work mode
Log Level
Configure the log level for debugging and monitoring purposes.
 Figure 1: Log level
- Error: Shows only error logs.
- Warning: Shows warnings logs.
- Notice: Shows notice logs.
- Info: Shows all notice, error, and warning logs.
- Debug: This is full log, it shows all types of logs, it is used for debugging.
Basics station server setup
Click on Configure Basics Station server setup to expand the Basics station server setup menu.
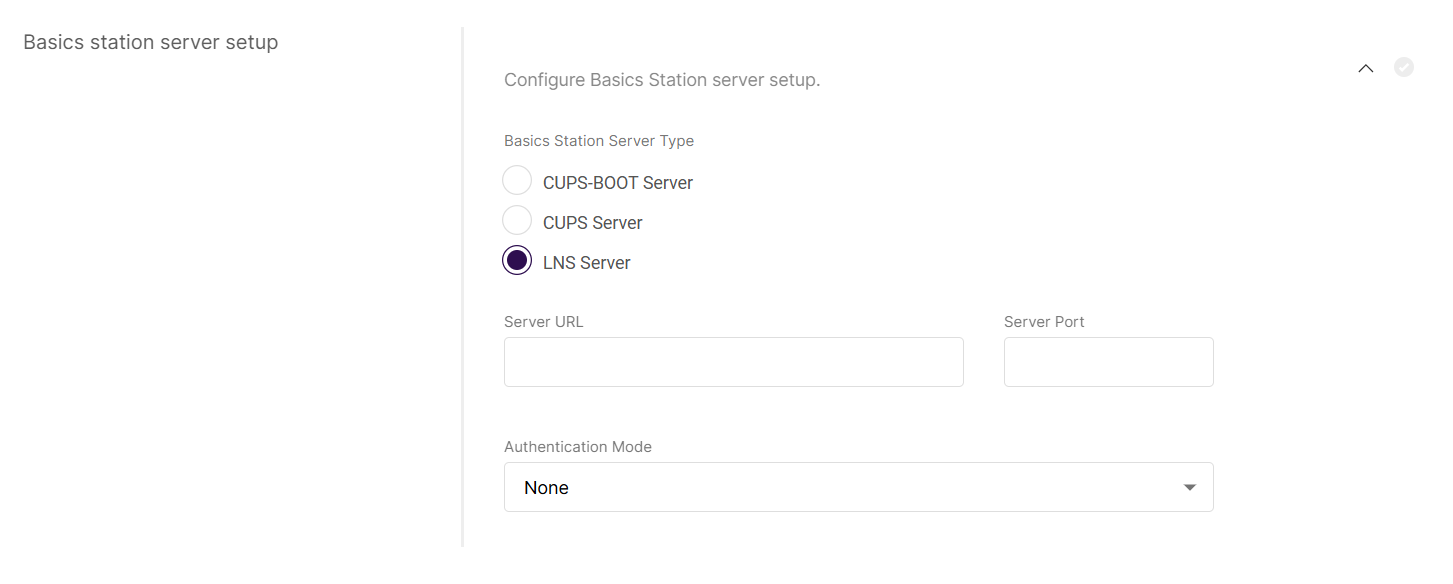 Figure 1: Basics station server setup
-
Basics Station Server Type: When configuring Basics Station mode, you can select from the following server types.
- CUPS-BOOT Server
- CUPS Server
- LNS Server
-
Server URL: Enter the URL of the server that the gateway will connect to.
-
Server Port: Enter the server's port number.
-
Authentication Mode: Choose the appropriate authentication mode, based on your server's requirements.
- No Authentication: The server does not require authentication.
- TLS Server Authentication: The server requires a trust file for authentication.
- TLS Server and Client Authentication: The server requires a trust file, certificate, and key files for authentication.
- TLS Server Authentication and Client Token: The server requires a trust file and a client token.
-
Trust (CA Certificate): A file that contains the root certificate authority (CA) used to verify the server's identity.
-
Client certificate: A digital certificate used to identify the client (gateway) to the server.
-
Client key: A private key used in combination with the certificate for mutual TLS authentication.
-
Client Token: A unique identifier used to authenticate the client without using certificates.
Network
In the Network menu, you can configure both WAN (Wide Area Network) and LAN (Local Area Network) interfaces. The WAN section handles the settings for connecting to external networks (e.g., the internet), while the LAN section manages local network connections within your environment.
WAN
In the WAN menu, you can manage the priority of the WAN interfaces. If the highest-priority interface goes down, the gateway will automatically switch to the next available interface for Internet access. The status of each interface is indicated by a red/green light next to the interface name, showing whether the interface is available or not.
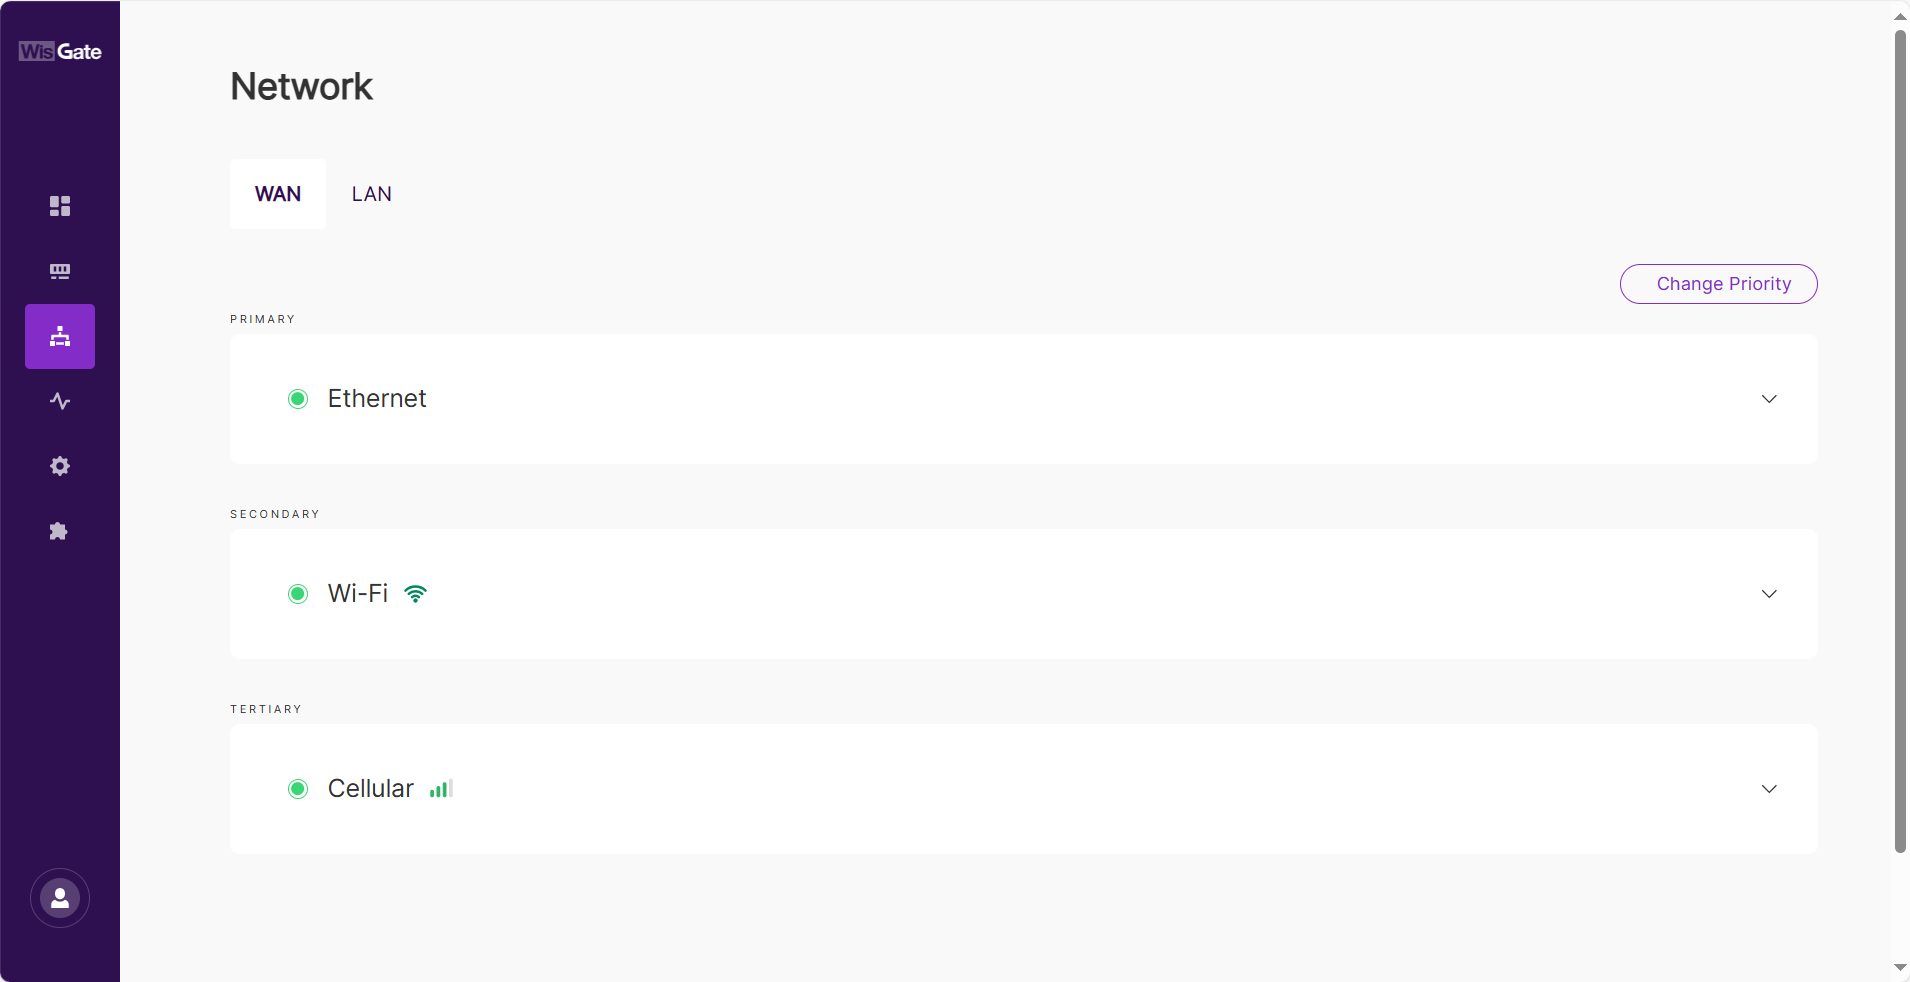 Figure 1: WAN tab
Change Priority
In a Multi-Network setup, managing WAN interface priorities ensures that the gateway seamlessly switches between available networks based on their priority, enabling continuous connectivity even in the event of network failures. This is particularly useful for providing backup connectivity when the primary network is unavailable.
You can adjust the priority of each WAN interface to control the preferred network connection. Follow the steps below to modify the interface priority:
- Click the Change Priority button.
- Use the arrows (
 ) next to each interface name to change its priority.
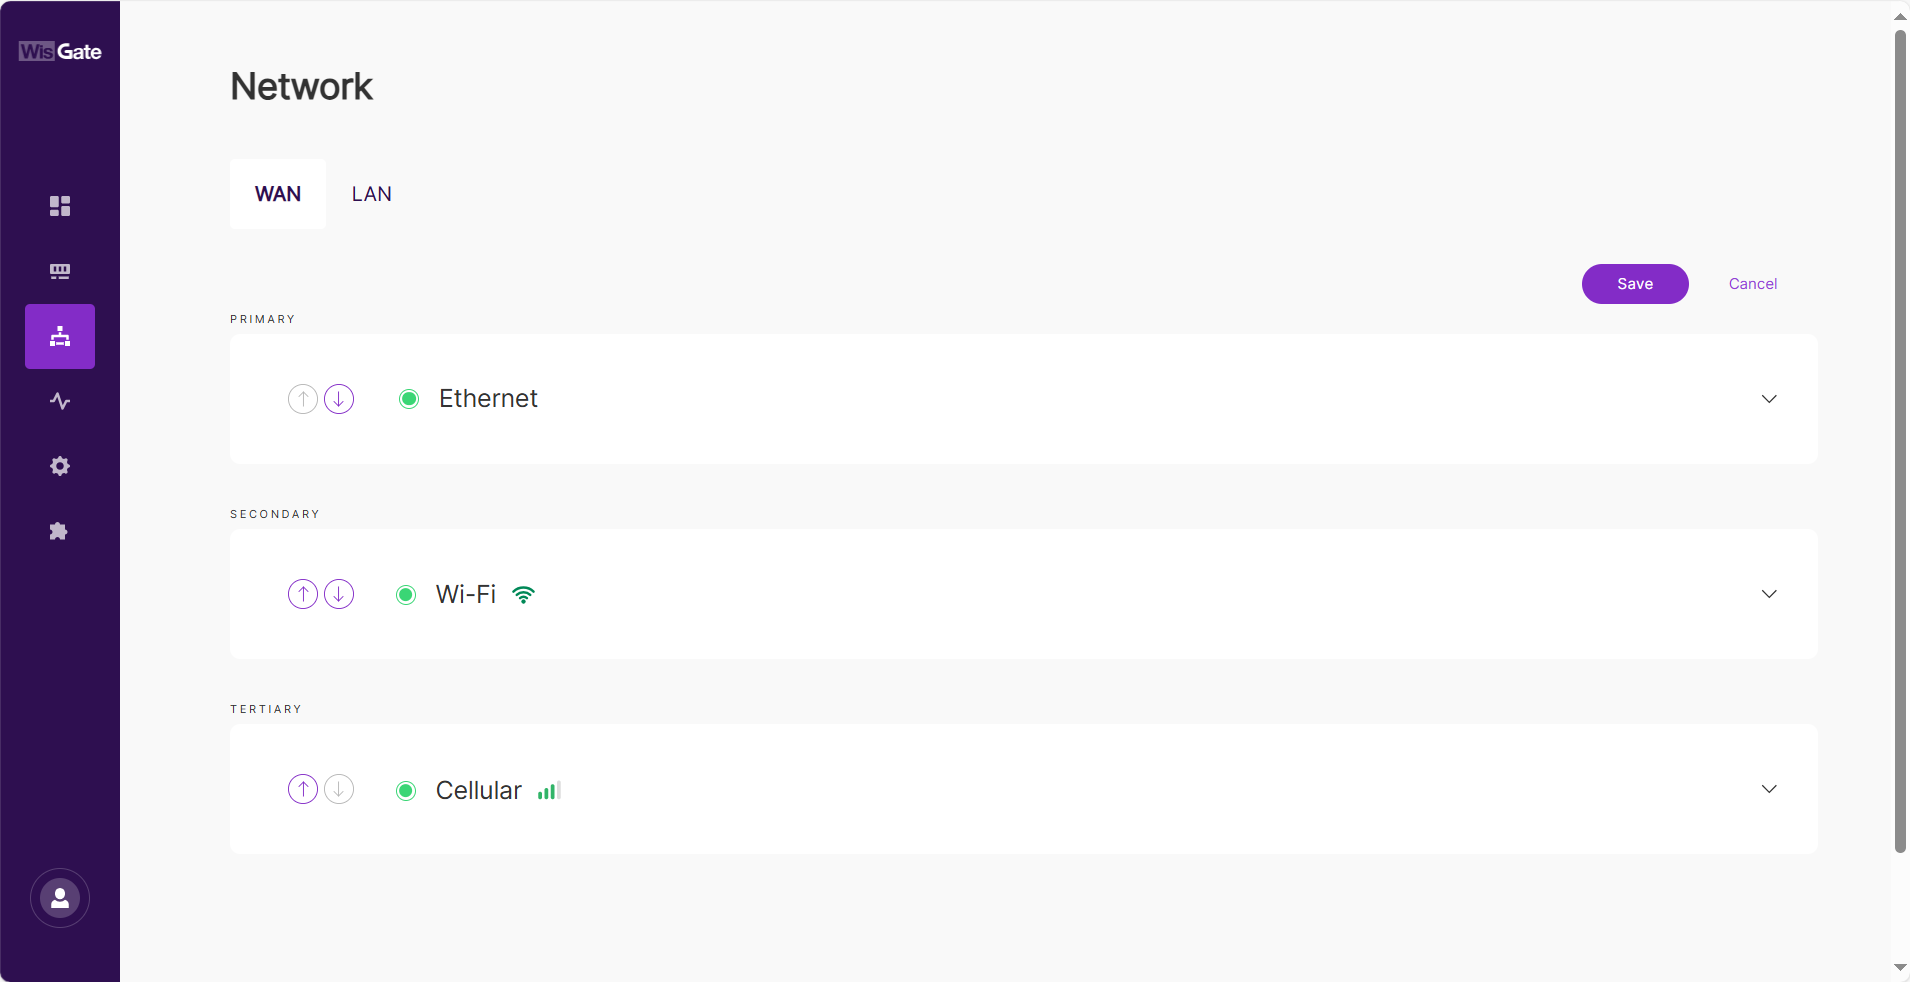 Figure 1: Editing WAN interface's priority
- The upward arrow increases the priority, making that network the preferred one.
- The downward arrow decreases the priority, making it a secondary or backup network.
- Click Save.
Ethernet
Displays information for the selected Ethernet interface. Expand the interface details by clicking on the interface name or the arrow to the left of it ( ).
).
 Figure 1: Ethernet
-
Protocol type: Specifies the protocol type.
-
IP Address: The IP address assigned to the gateway.
-
Netmask: The gateway's network mask.
-
Connection time: The duration the gateway has been connected to the interface.
-
RX: Received packets.
-
TX: Sent packets.
-
DNS: DNS server addresses.
-
Settings: Network interface and tracking preferences for ethernet mode.
-
General: Ensure that the Ethernet interface is configured correctly with static IP, DHCP, or PPPoE settings, giving the gateway a stable and predictable network connection.
 Figure 1: Ethernet settings General tab
- Enable WAN and disable LAN: Enabling this option activates the WAN interface and disables LAN.
- Static address: Configure a static address for the gateway.
- IPv4 Address: The static IPv4 address for the gateway.
- IPv4 Netmask: The netmask for the gateway.
- IPv4 Router: The IPv4 router address.
- DNS Server: Custom DNS server address.
- DHCP client: Use the router’s DHCP server to assign an IP address.
- Use DNS servers advertised by router: Enable this to assign DNS from the router.
- DNS Server: Add custom DNS addresses.
- PPPoE: Set Point-to-Point Protocol over Ethernet, with PAP/CHAP Username and Password provided by the internet provider. The DNS server advertised by router switch allows the gateway to assign DNS address from the router. If you want to use custom one, you need to disable it.
-
Tracking: Provide the mechanism for the gateway to continuously monitor the network interface's stability and automatically failover to another available interface when necessary, ensuring continuous connectivity even in case of network issues.
 Figure 1: Ethernet settings Tracking tab
- IP: Set an IP address for the ping test.
- Reliability: Define the minimum number of IP addresses that need to respond to confirm a successful ping.
- Ping count: The number of pings to send.
- Ping timeout (s): The time allowed for each ping.
- Ping interval: The interval between pings.
- Down: The number of consecutive ping failures required to confirm that the interface is down.
- Up: The number of consecutive ping successes required to confirm that the interface is up.
-
Wi-Fi
Displays information about the selected Wi-Fi interface. Expand the interface details by clicking on the interface name or the arrow to the left of it ( ).
).
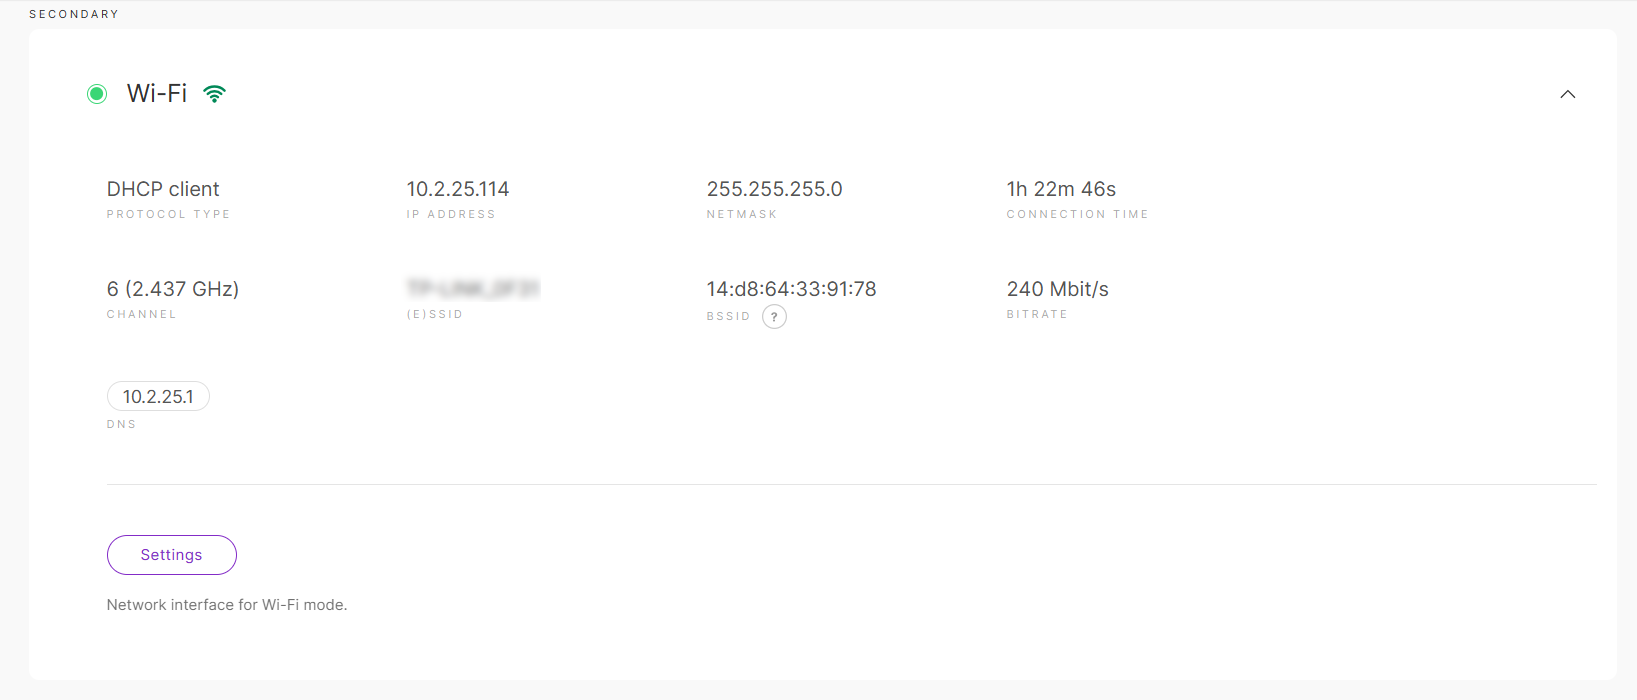 Figure 1: Wi-Fi
-
Protocol Type: Specifies the protocol type.
-
IP Address: The IP address assigned to the gateway.
-
Netmask: The netmask assigned to the gateway.
-
Connection time: The duration the gateway has been connected to the Wi-Fi interface.
-
Channel: The operating frequency used by the Wi-Fi network.
-
(E)SSID: The SSID of the Wi-Fi network.
-
BSSID: The MAC address of the Wi-Fi access point or router.
-
Bitrate: The bitrate of the Wi-Fi network.
-
DNS: DNS server addresses.
-
Settings: Set the network interface and tracking preferences for Wi-Fi mode.
-
General: Ensure the Wi-Fi interface is set up properly with either static or dynamic (DHCP) addressing, SSID, encryption, and network settings. It helps the gateway connect securely and consistently to the Wi-Fi network.
 Figure 1: Wi-Fi settings General tab
-
Enabled/Disabled: Enable or disable the Wi-Fi interface.
-
Available (E)SSID networks: Scan for available Wi-Fi networks and select one, or manually enter the details.
-
(E)SSID: Extended Service Set Identifier.
-
Encryption: Select the type of encryption used by the network and enter the password. Options include No Encryption, WPA-PSK, WPA2-PSK, and WPA-PSK/WPA2-PSK Mixed Mode (recommended).
-
Static address: Configure a static address for the gateway.
- IPv4 Address: The desired static IPv4 address.
- IPv4 Netmask: The netmask.
- IPv4 Router: The IPv4 router address.
- DNS Server: Custom DNS address.
-
DHCP client: Use the router's DHCP server to assign an IP.
- Use DNS servers advertised by router: Enable to assign DNS from the router or specify a custom DNS.
- DNS Server: Add custom DNS addresses.
-
-
Tracking: Monitor the health of the Wi-Fi interface by performing periodic ping tests. If the interface becomes unstable (fails too many pings), it will failover to another interface. Once it becomes stable again, the gateway can switch back to the Wi-Fi network.
 Figure 1: Wi-Fi settings Tracking tab
-
IP: Set an IP address for the ping test.
-
Reliability: Define the minimum number of IP addresses that need to respond to confirm a successful ping.
-
Ping count: The number of pings to send.
-
Ping timeout (s): The time allowed for each ping.
-
Ping interval: The interval between pings.
-
Down: The number of consecutive ping failures required to confirm that the interface is down.
-
Up: The number of consecutive ping successes required to confirm that the interface is up.
-
-
Cellular
Displays information for the selected cellular interface. Expand the interface details by clicking on the interface name or the arrow to the left of it ( ).
).
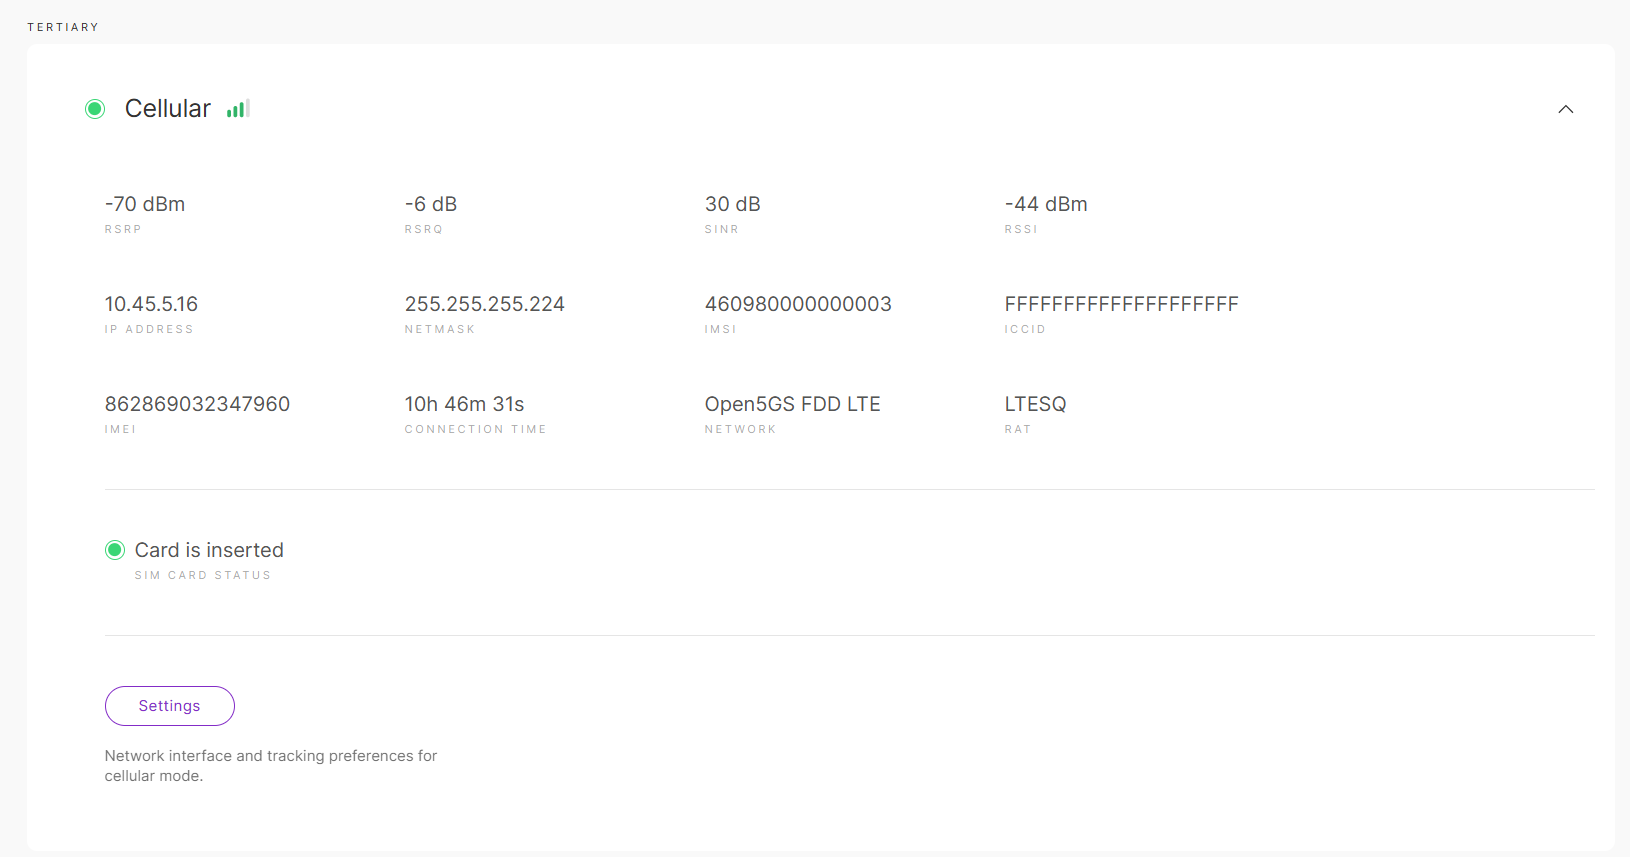 Figure 1: Cellular
-
IP Address: The IP assigned to the gateway.
-
Netmask: The netmask assigned to the gateway.
-
IMSI: International Mobile Subscriber Identity.
-
ICCID: Integrated Circuit Card Identifier.
-
IMEI: International Mobile Equipment Identity.
-
Connection time: The duration the gateway has been connected to the interface.
-
Network: The cellular network standard.
-
SIM Card Status: The status of the SIM card.
-
Settings: Set the network interface and tracking preferences for cellular mode
-
General: The purpose of the General settings is to configure the cellular connection (APN, username, password, PIN) to ensure the gateway can properly connect to the cellular network.
 Figure 1: Cellular settings General tab
- Enabled/Disabled: Enable or disable the cellular interface.
- APN (optional): he Access Point Name for the connection.
- User (optional): Username for authentication (leave empty if not required).
- Password (optional): Password for authentication (leave empty if not required).
- PIN code (optional): The SIM card's PIN code (leave empty if not required).
-
Tracking: The Tracking settings ensure the gateway maintains stable connectivity by regularly testing the cellular network. If the network becomes unreliable (fails pings consecutively), the gateway will automatically switch to another available interface, ensuring continuous service.
 Figure 1: Cellular settings Tracking tab
- IP: Set an IP address for the ping test.
- Reliability: Define the minimum number of IP addresses that need to respond to confirm a successful ping.
- Ping count: The number of pings to send.
- Ping timeout (s): The time allowed for each ping.
- Ping interval: The interval between pings.
- Down: The number of consecutive ping failures required to confirm that the interface is down.
- Up: The number of consecutive ping successes required to confirm that the interface is up.
-
LAN
In the LAN tab, you can view and configure the settings for your Local Area Network (LAN) interfaces. The status of each interface is indicated by a red/green light, showing whether the interface is enabled or disabled.
 Figure 1: LAN tab
DHCP Server
The DHCP Server section allows you to configure the gateway's LAN IP settings. By default, the gateway has a preconfigured DHCP server that assigns IP addresses to connected devices. You can modify these settings as needed. Expand the interface details by clicking on the interface name or the arrow to the left of it ( ).
).
 Figure 1: DHCP Server
-
IP Address: The default IP address of the gateway's DHCP server.
-
Netmask: The subnet mask for the DHCP server.
-
Settings: Set the network interface preferences for DHCP server.
 Figure 1: DHCP Settings
- Address: The IPv4 address of the LAN DHCP server.
- Netmask: The subnet mask for the DHCP server.
Ethernet
The field only shows if the interface is active. Expand the interface details by clicking on the interface name or the arrow to the left of it ( ).
).
 Figure 1: Ethernet
-
Enable LAN and disable WAN: Toggle this option to enable the LAN Ethernet interface and disable the WAN Ethernet interface.
 Figure 1: Ethernet settings
Wi-Fi
Manage the settings for the Wi-Fi LAN interface in this section. The Wi-Fi interface allows the gateway to create a wireless access point (AP) for local devices to connect. Expand the interface details by clicking on the interface name or the arrow to the left of it ( ).
).
 Figure 1: Wi-Fi
-
(E)SSID: The name of the Access Point (AP) provided by the gateway.
-
Encryption: The encryption method used to secure the Wi-Fi connection.
-
Settings: Set the network interface and tracking preferences for Wi-Fi mode.
 Figure 1: Wi-Fi settings
- Enabled/Disabled: Enable or disable the Wi-Fi LAN interface.
- Channel: Set the Wi-Fi channel. The default is Auto, which allows the gateway to automatically choose the optimal channel.
- (E)SSID: The SSID for the wireless AP.
- Encryption: Select the encryption type for the Wi-Fi AP. Available options include No Encryption, WPA-PSK, WPA2-PSK, and WPA-PSK/WPA2-PSK Mixed Mode
- Hidden: Option to hide the SSID, making the AP invisible to devices scanning for networks.
Diagnostics
In the Diagnostics menu, review the logs on the gateway and perform checks.
System Log
On this page, you can see the complete system logs, primarily used for debugging purposes. The System Log provides both system-related information and actual data from LoRa frames received from end nodes.
At the top right corner, there is the Auto Refresh button. Depending on its state (ON or OFF), auto-refresh will either be enabled or disabled.
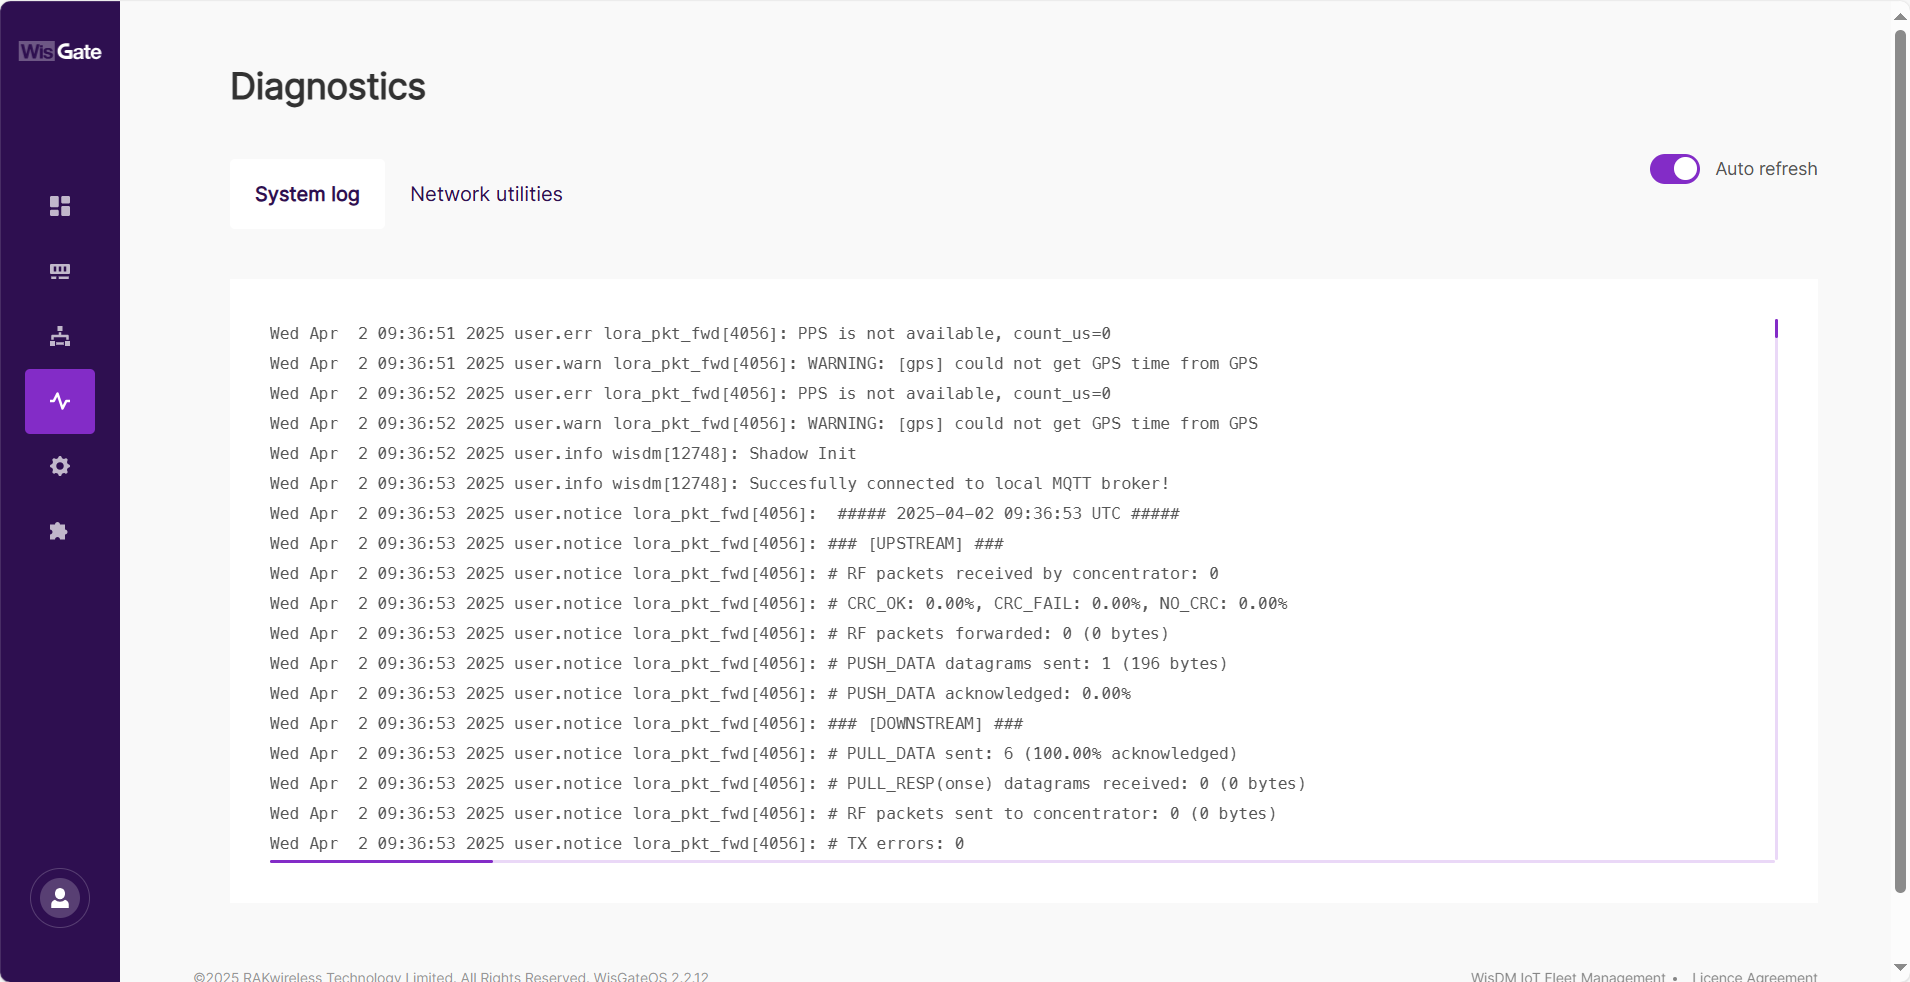 Figure 1: System log tab
Other Ways to Access System Logs
WisDM
If your device is managed through WisDM, you can view the gateway’s system logs remotely. For detailed steps, refer to the WisDM User Guide.
SSH
You can also access logs via SSH.
External Log Server
If system logs are configured to be forwarded to an external log server, you can access them from the designated server. For setup instructions, refer to the Configuring System Log section below.
Download System Log
To download system logs, follow these steps:
- Navigate to Settings > File Browser.
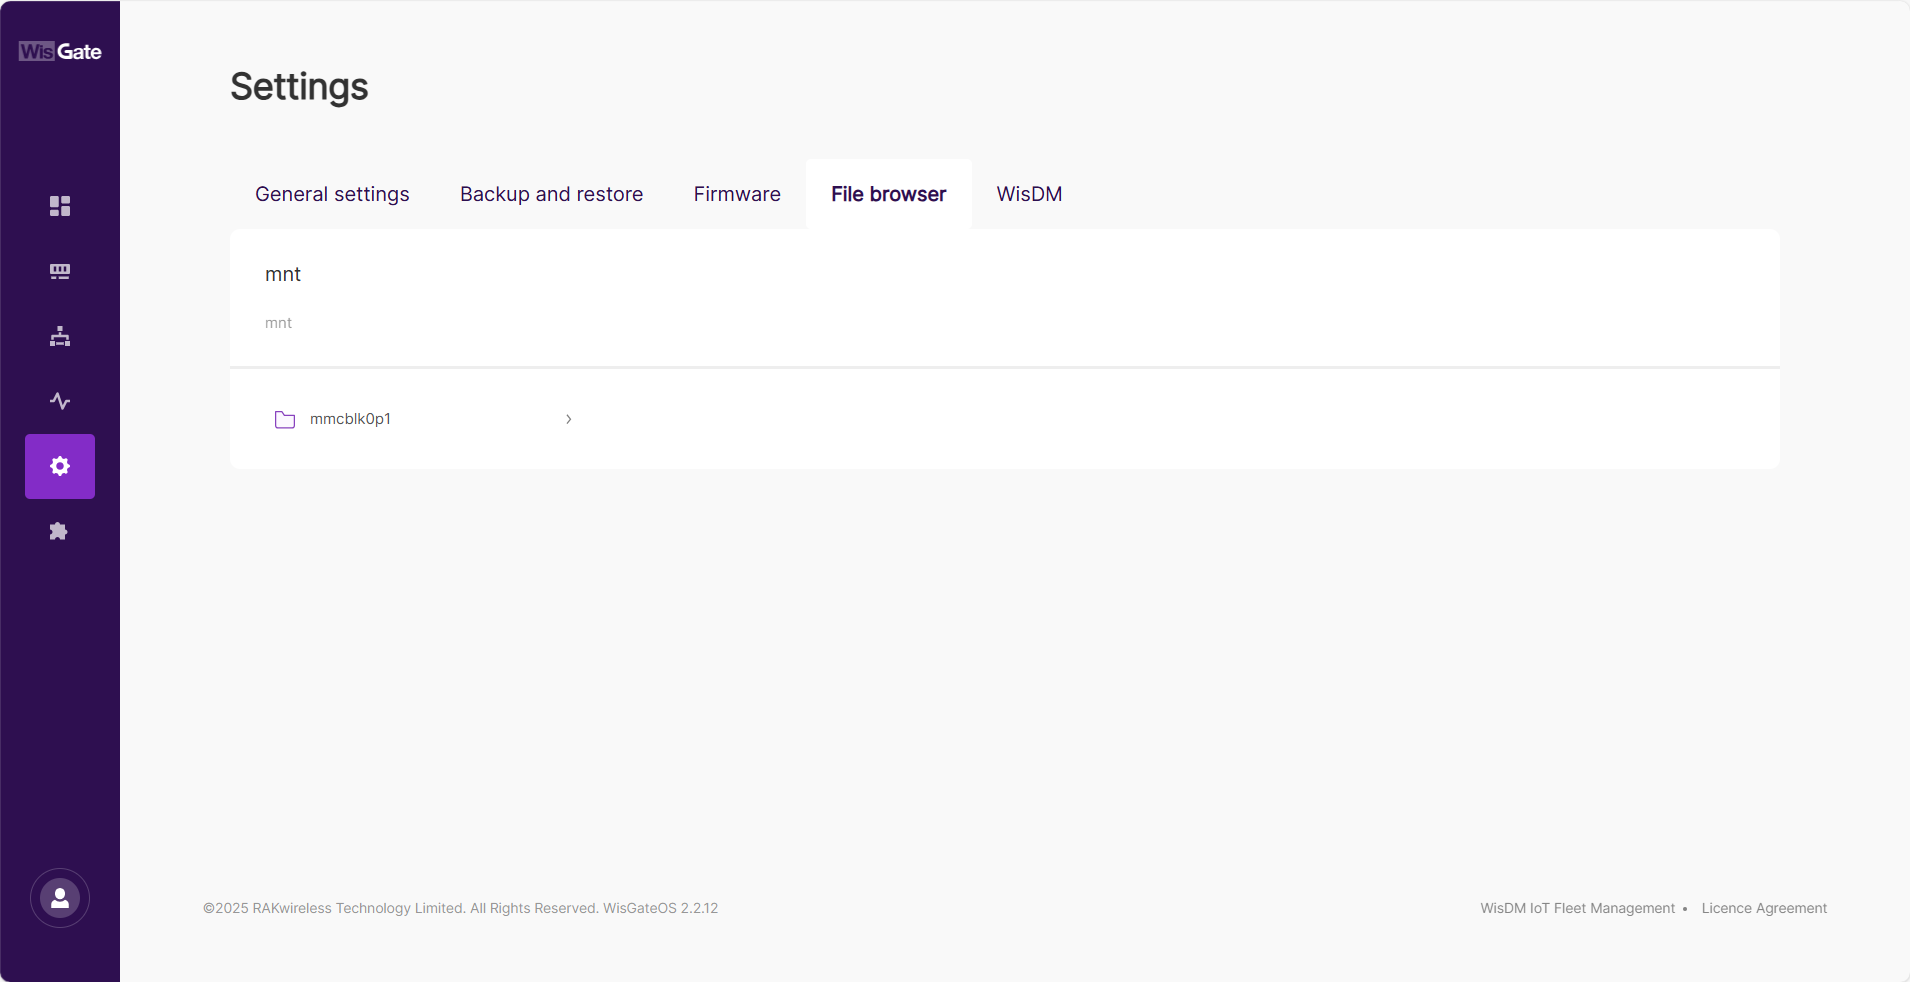 Figure 1: File browser
- Go to mmcblk0p1 > syslog.
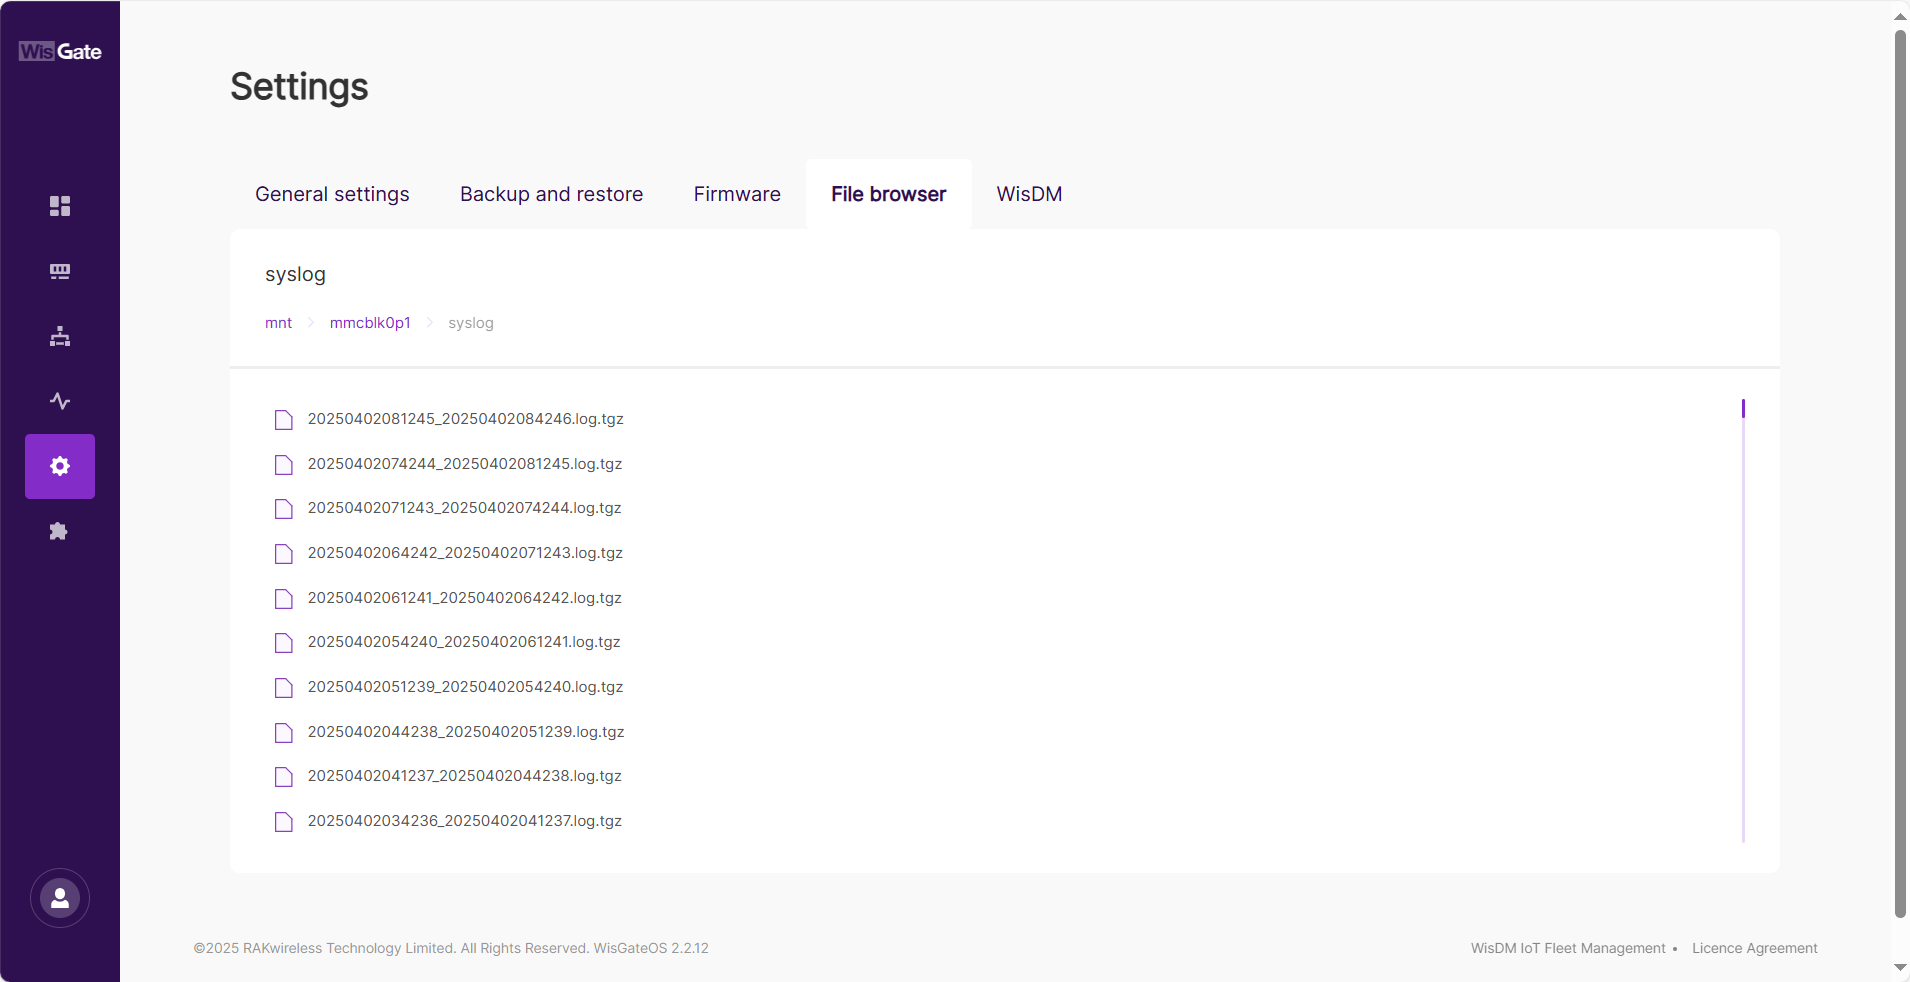 Figure 1: syslog
- Select the log file based on the timestamp and click to download.
Configure System Log
If you need to configure log storage settings or forward logs to an external server, refer to the Configuring System Log section below.
Network Utilities
The Network Utilities page provides built-in diagnostic tools for network troubleshooting. These tools allow you to check connectivity, trace network routes, and perform DNS lookups directly from the gateway.
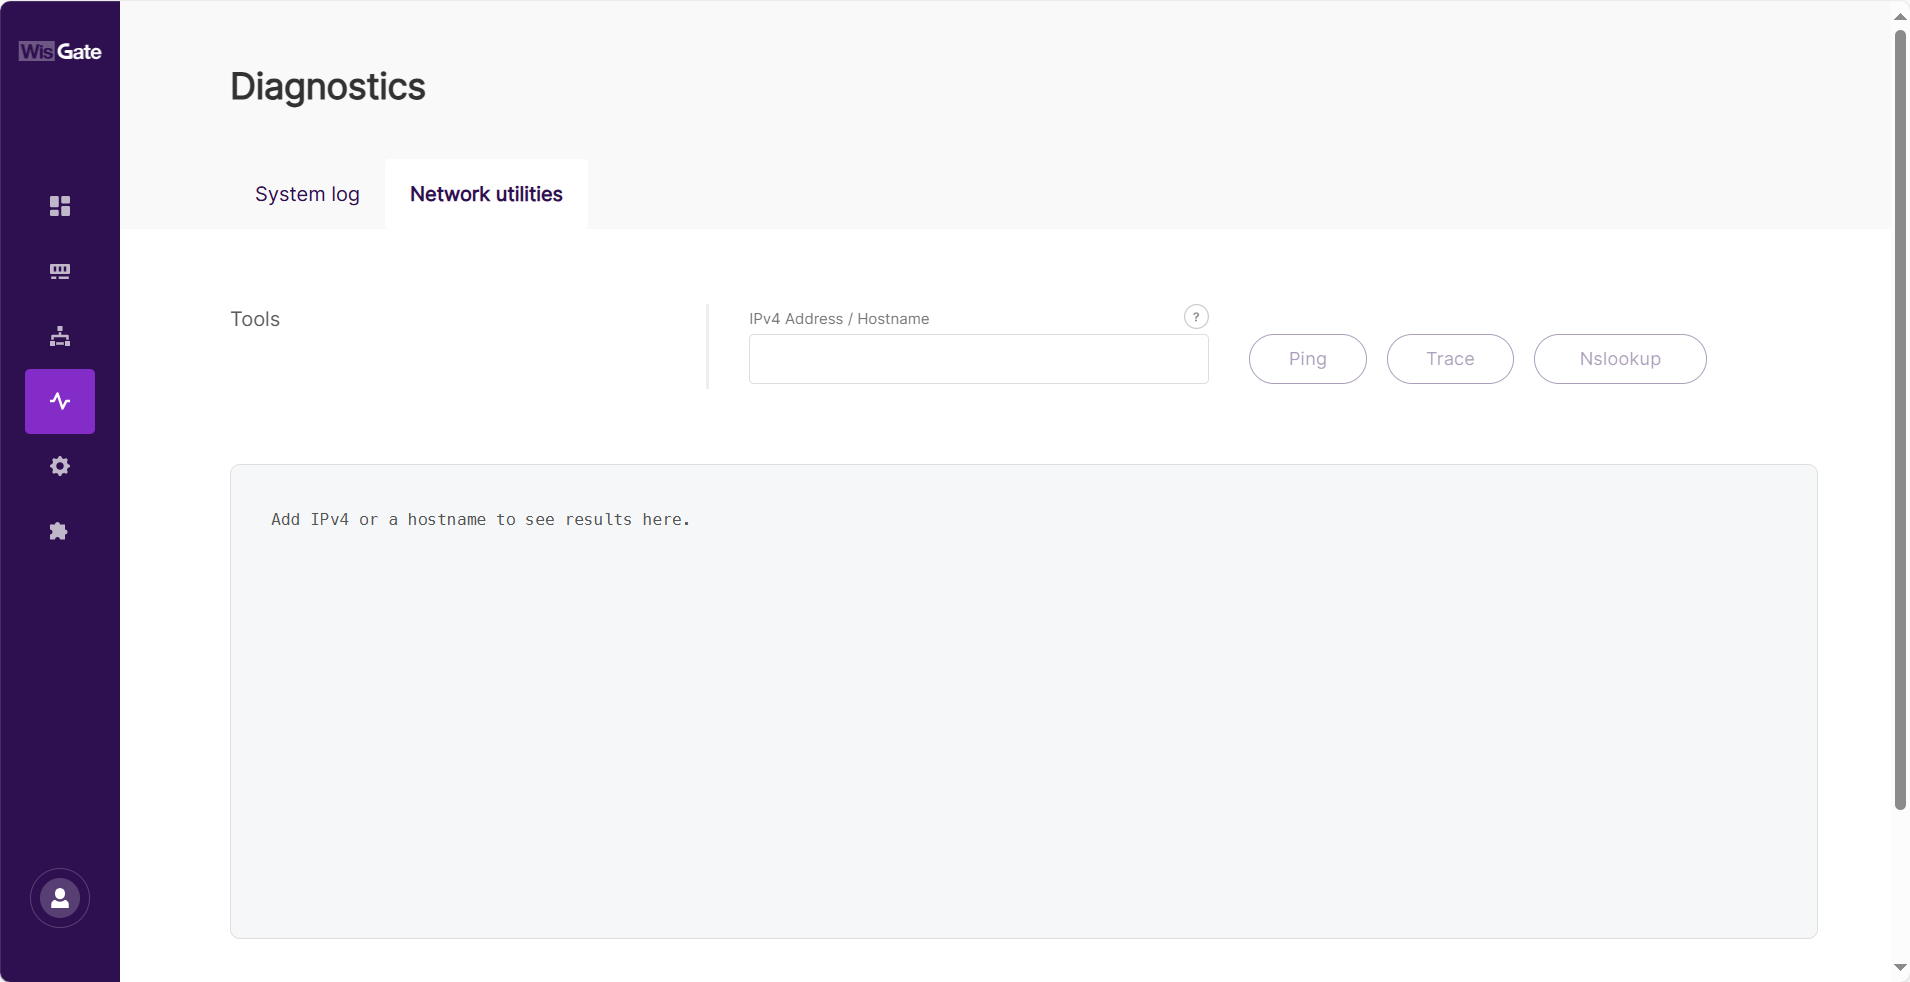 Figure 1: Network utilities tab
Available Tools
- Ping: Tests the reachability of a host by sending ICMP echo request packets and measuring response times. This helps determine if a device or server is online.
- Trace: Displays the route packets take to reach a destination, showing the intermediate hops. Useful for identifying network latency or connection issues.
- Nslookup: Queries the Domain Name System (DNS) to obtain the IP address corresponding to a domain name or vice versa.
How to Use
-
Enter an IPv4 Address or Hostname in the input field.
NOTEFor Nslookup, only a domain name is allowed.
-
Click the desired tool:
- Ping to check connectivity.
- Trace to view the routing path.
- Nslookup to resolve domain names.
-
The results will be displayed in the console output area below.
Settings
General Settings
The General Settings tab allows you to modify the gateway’s name, configure system logs, synchronize time via an NTP server, and reboot the device.
Change the Gateway Name
You can modify the default name of the gateway to improve identification within a network.
 Figure 1: Changing the gateway name
- Navigate to Settings > General Settings.
- Enter the desired name in the Name field.
- Click the Save button to apply the change.
Configure the System Log
The System Log settings allow you to manage log storage and send logs to an external log server for monitoring, troubleshooting, and long-term analysis.
 Figure 1: Configure the System Log
- Navigate to Settings > General Settings.
- Set Log Buffer Size: Enter the maximum log buffer size (in KiB) in the Buffer size (KiB) field (e.g., 64 KiB).
- Choose Log Retention Period: Select a duration from the Log expiration dropdown:
- 14 days
- 1 month
- 3 months
- 6 months
- 12 months
- Configure External Log Storage (Optional):
- Enter the External system log server IP address if remote log storage is required.
- Specify the Port number used by the external log server.
- Click Save to apply changes.
Time Synchronization
The gateway supports Network Time Protocol (NTP) to maintain accurate system time.
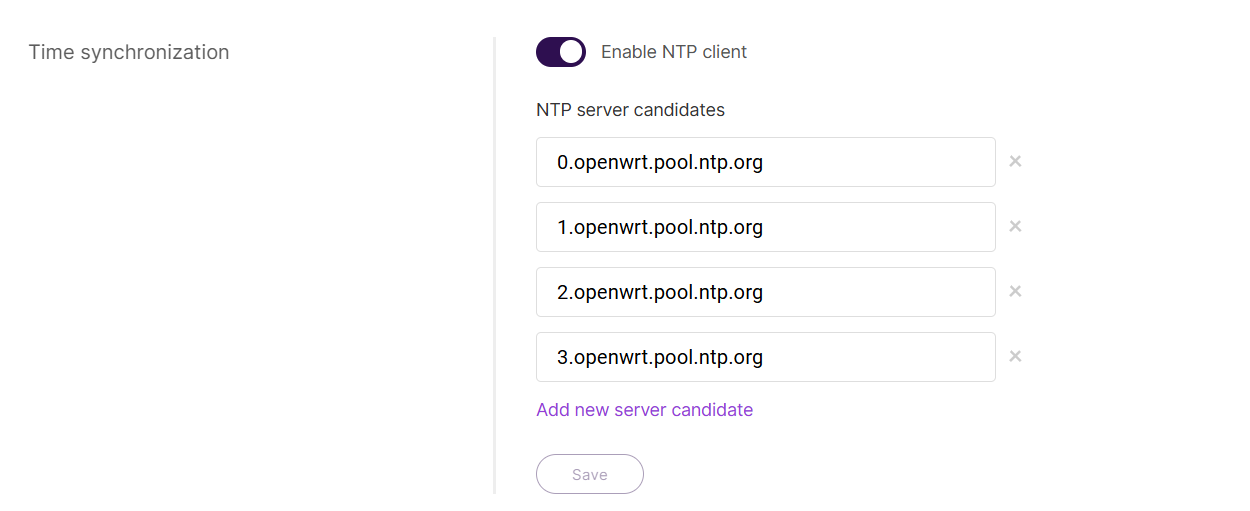 Figure 1: Time synchronization
- Navigate to Settings > General Settings.
- Toggle Enable NTP client to activate time synchronization.
- Configure NTP servers in the NTP server candidates list:
- Click Add new server candidate to add an NTP server (e.g.,
pool.ntp.org). - To remove an NTP server, click the × button next to it.
- Click Add new server candidate to add an NTP server (e.g.,
- Click Save to apply the settings.
Reboot the Gateway
This option allows you to restart the gateway. Note that all unsaved changes will be lost.
 Figure 1: Reboot the Gateway
- Navigate to Settings > General Settings.
- Click the Reboot button.
- In the confirmation dialog, click Confirm to restart the gateway.
Backup and Restore
In this tab, you can backup, restore, or reset the gateway's settings to ensure configuration management and recovery.
Backup Configuration
This function enables you to create a backup of the gateway's current configuration, allowing for easy restoration when needed. For enhanced security, you can encrypt the backup file with a password.
 Figure 1: Backup configuration
-
(Optional) Enable Backup Encryption:
- Check the Set password to protect the backup archive box.
- Enter a secure password to encrypt the backup file.
-
Click Generate and download backup to create and download the backup archive.
-
Store the backup file in a secure location for future use.
Restore Configuration
This function allows you to revert the gateway settings using a previously saved backup file.
 Figure 1: Restore configuration
Restoring a backup will overwrite the current settings. Make sure you are using the correct file.
- Click choose file or drag and drop the backup archive into the designated upload area.
- Click Restore to apply the backup configuration.
- Wait for the process to complete, and ensure the gateway restarts properly.
Reset to Factory Defaults
This function resets the gateway to its original factory settings, permanently erasing all configurations.
 Figure 1: Reset to factory defaults
This action is irreversible. Ensure you have a backup before proceeding.
- Click the Reset button.
- In the confirmation dialog, click Reset to reset the gateway.
- Wait for the gateway to reboot with factory default settings.
Firmware
The Firmware tab allows you to check the current firmware version and update it when needed.
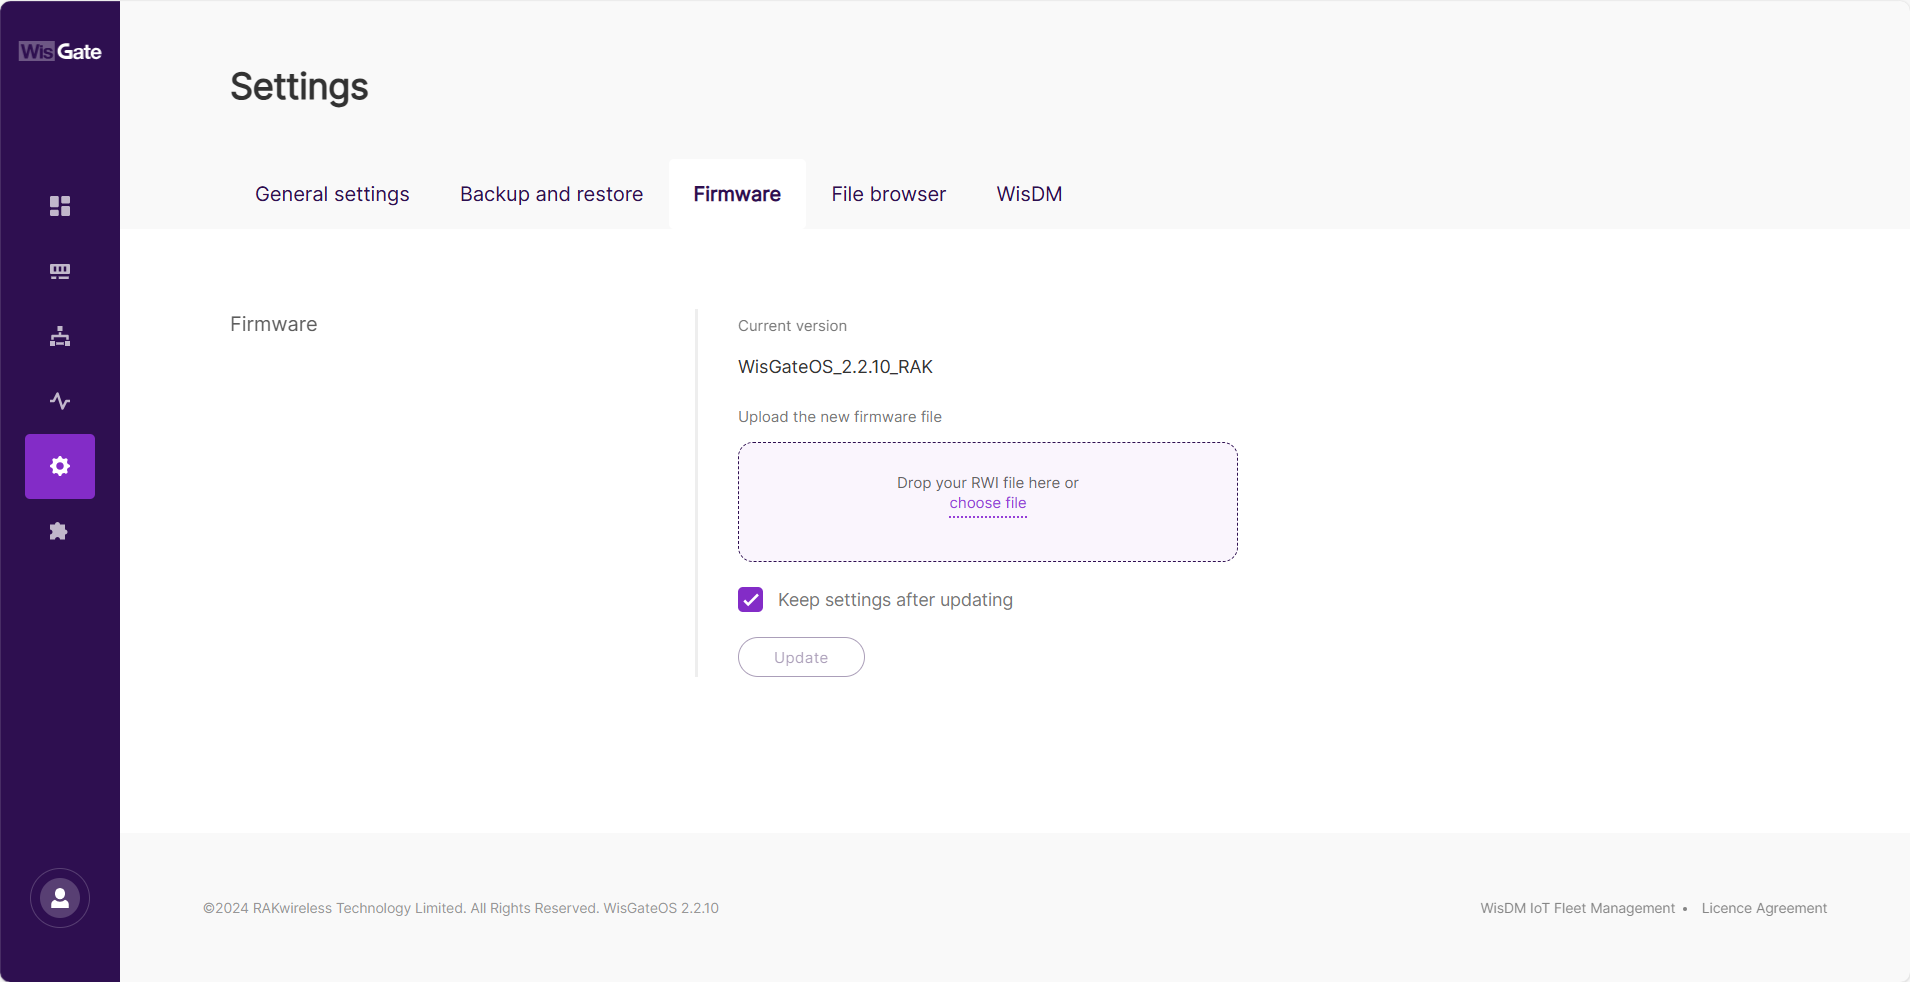 Figure 1: Firmware tab
Before You Upgrade
Backup Before Any Upgrade
Before performing any firmware upgrade, it is highly recommended to create a full backup of your configuration. This ensures that you can restore your settings in case of unexpected issues or if a reset is needed.
For detailed steps on how to back up your configuration, refer to Backup Configuration.
Upgrade to WisGateOS 2.2.x
If you are upgrading to WisGateOS 2.2.x, please review the following important considerations:
-
Downgrading Restrictions
Once you upgrade to WisGateOS 2 2.2.x, you will not be able to revert to version 2.1.x using the standard downgrade (WebUI). Make sure to back up and secure all critical data before proceeding with the upgrade. Only through a recovery procedure will a downgrade be possible. You can find the steps on RAK Learn site: OpenWRT Recovery Procedure .
-
Extension Signature Requirement
All extensions for WisGateOS 2 2.2.x now require a signature for increased security and compatibility. Extensions for WisGateOS 2 2.0.x/2.1.x without a valid signature will not be installable on 2.2.x. Some extensions, such as WireGuard, require manual installation after upgrading.
-
Internet Connection Requirement An Internet connection is required during the update to verify the new firmware and extension signatures.
-
Dual Firmware Support Both 2.1.x and 2.2.x will be supported, but you must use the correct extensions for each version to avoid compatibility issues.
How to Upgrade Firmware
-
Download the latest firmware of the gateway and unzip it.
-
Drag and drop the
.rwifile in the Drop your RWI file here or choose file form, or click the choose file link to browse for the file. Figure 1: Upload the firmware file
 -
Check the Keep settings after updating option.
NOTEThe Keep settings after updating check box is selected by default. Unchecking it will reset the gateway to stock settings after the upgrade.
-
Click Update to initiate the flashing process.
 Figure 1: Upgrading
 -
After the upgrade is complete, log in to the gateway and check the Firmware tab to confirm that the installed firmware version is correct.
Why Can't I Upgrade?
If you are unable to update the firmware from the Firmware tab, it may be because the update is managed by WisDM.
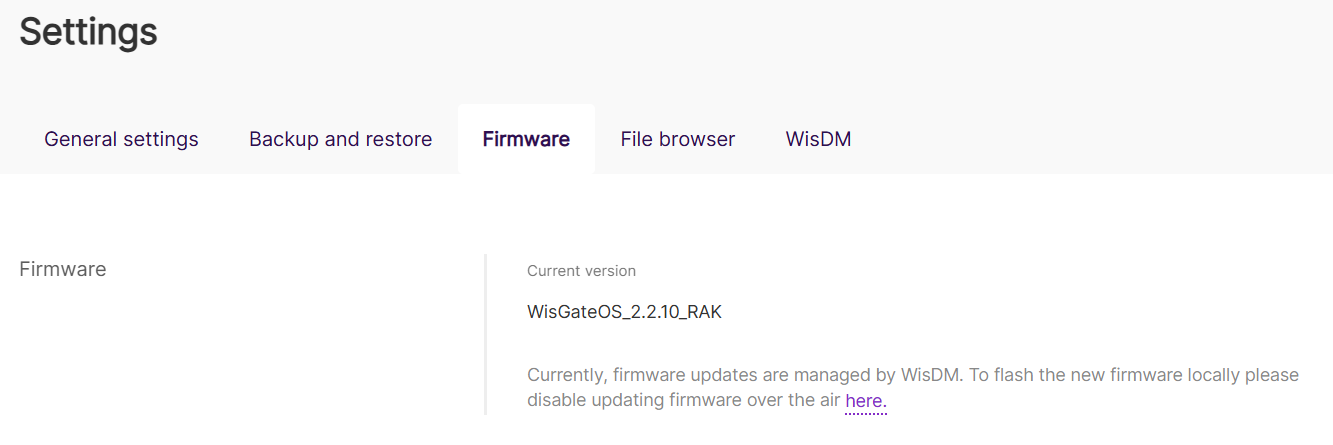 Figure 1: Firmware tab inactive
If the gateway is:
- Registered in WisDM
- Allow WisDM Integration is enabled
- Enable FOTA is turned on
The firmware update option will be locked because it is centrally managed by WisDM.
To enable manual firmware updates:
- Go to WisDM tab.
- Turn off Enable FOTA.
- Save the settings.
Once FOTA is disabled, the firmware update option in the Firmware tab will be unlocked, and you can proceed with the manual update.
When FOTA is disabled, your gateway won't receive any firmware updates from WisDM and can only be managed via the WisGateOS.
File Browser
The File Browser allows users to view and download files stored on the gateway. This feature is useful for accessing log files, firmware images, configuration data, and other stored resources.
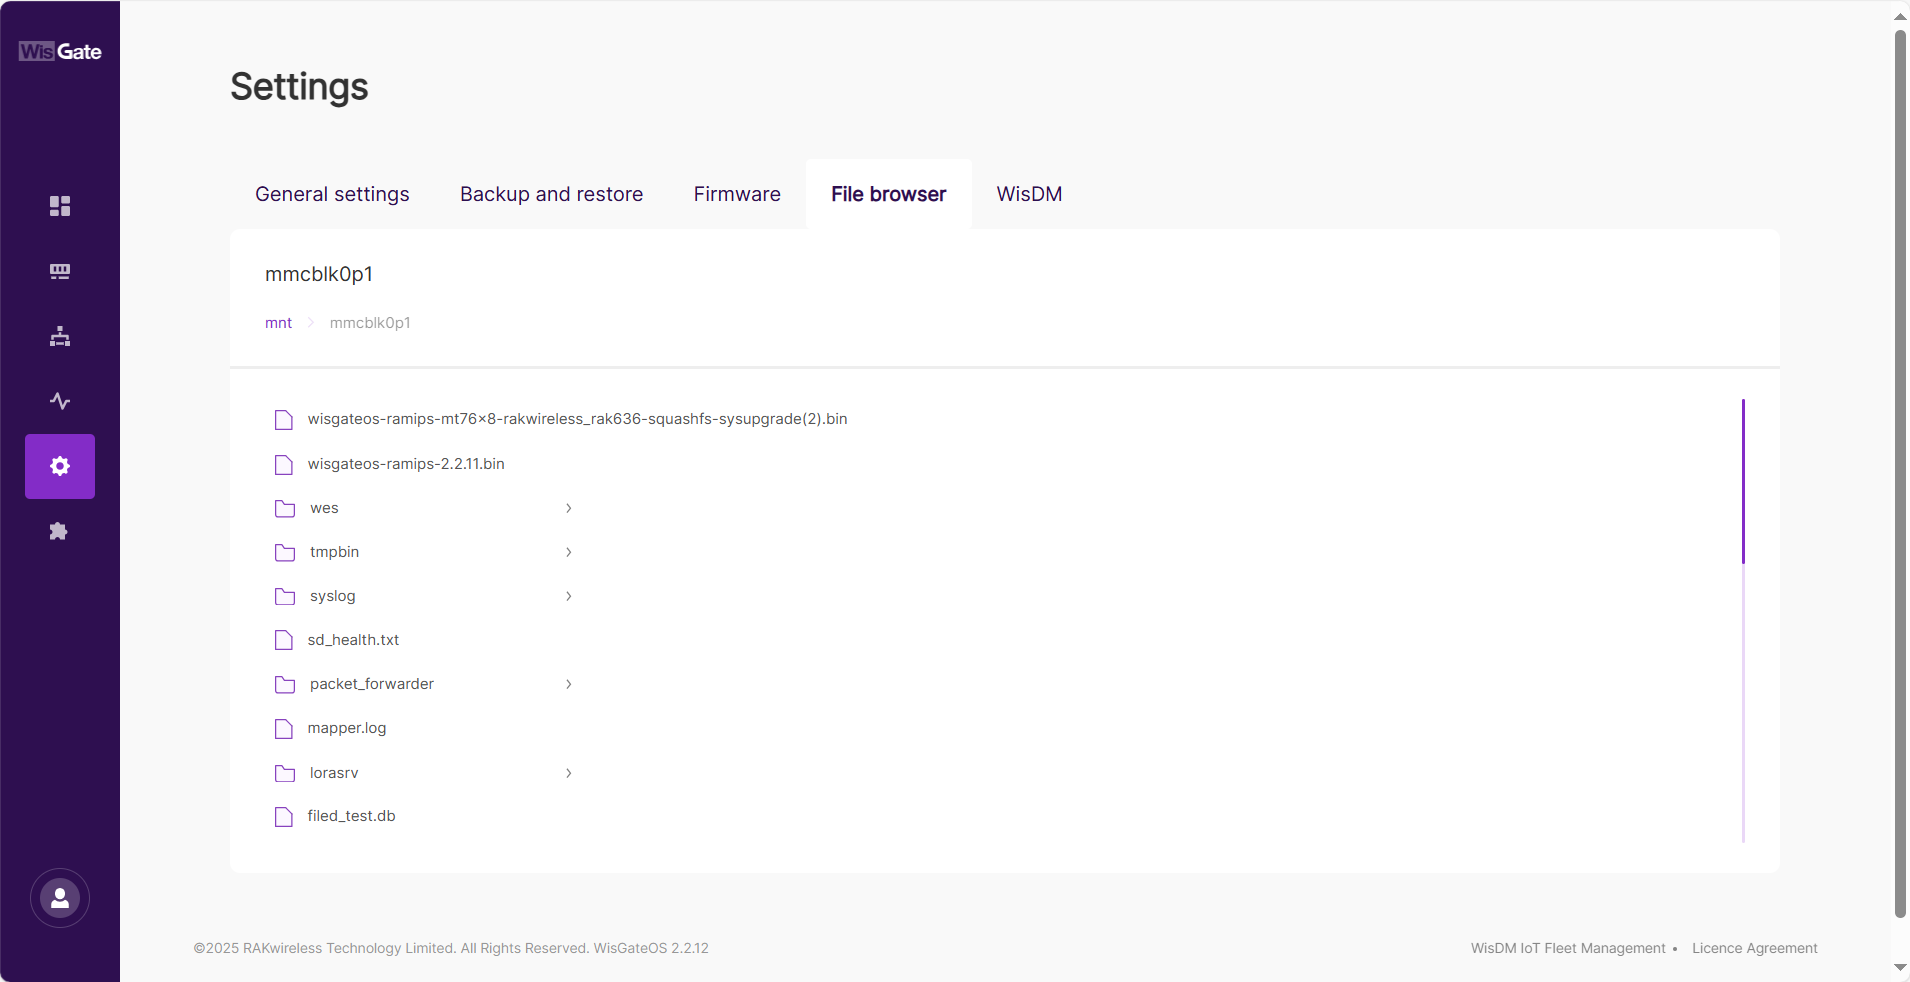 Figure 1: File browser tab
-
Navigate through the file system using the interface.
-
Click on a file to download it to your local device.
WisDM
The WisDM tab allows you to integrate your gateway with WisDM, a cloud-based remote management platform, and enable FOTA (Firmware Over-The-Air) updates.
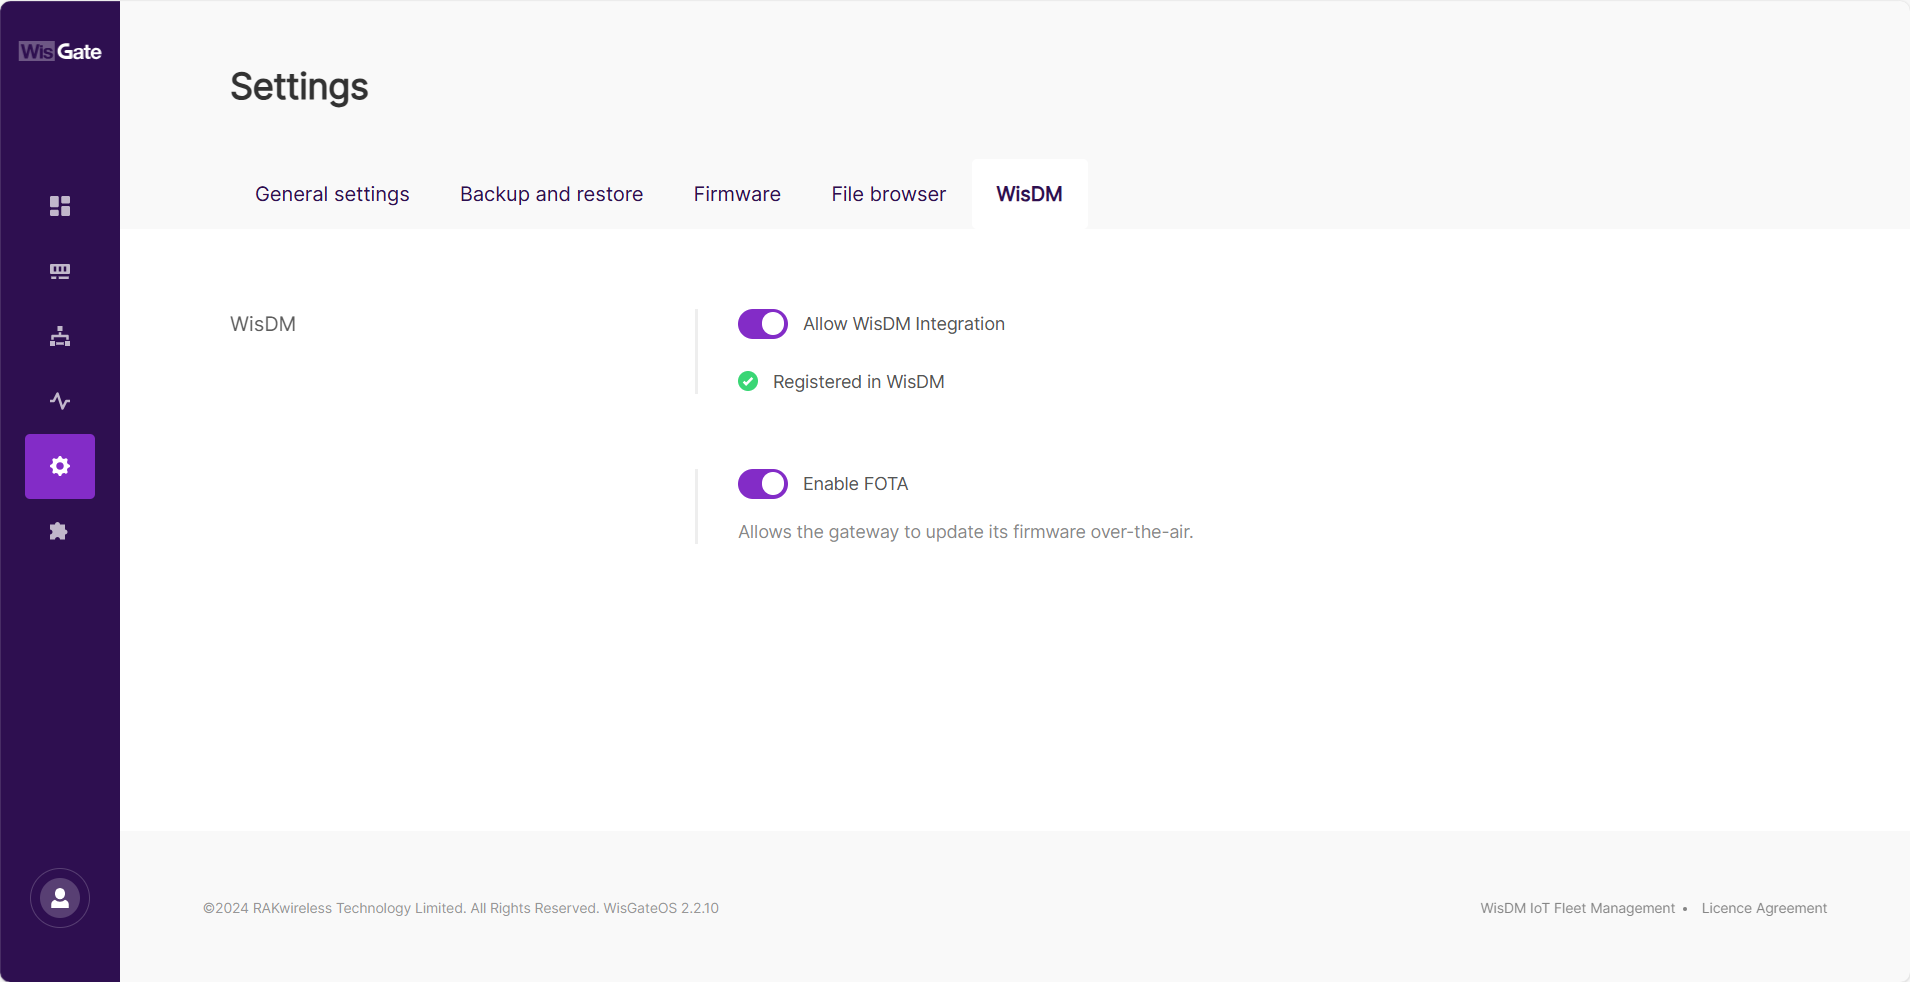 Figure 1: WisDM tab
Allow WisDM Integration
Enable this option to connect the gateway to the WisDM Platform for remote management.
Simply enabling this option does not automatically register your gateway in WisDM. You must register it in WisDM separately to fully manage and monitor it remotely.
Registered in WisDM
This indicator shows whether the gateway is successfully registered in WisDM, enabling full remote management capabilities.
 : The gateway is successfully registered in WisDM and can be monitored, configured, and managed remotely.
 : The gateway has not been registered in WisDM yet. Remote management and FOTA are not available until registration is completed.
Enable FOTA (Firmware Over-The-Air)
When enabled, the gateway can receive automatic firmware updates via WisDM, ensuring it stays up to date with the latest security patches and feature enhancements.
If you prefer to update the firmware manually through the WisGateOS 2 Web UI, this feature must be disabled.
Fleet Management
What is WisDM?
WisDM is a cloud-based gateway management platform designed to simplify the deployment, configuration, and monitoring of RAK WisGate Edge gateways. It provides a centralized and efficient solution for managing IoT gateway fleets, offering the following key features:
- Remote Configuration – Secure cloud-based configuration and management of gateways.
- Mass Deployment – Group-based provisioning and batch configuration for multiple devices.
- Live Monitoring – Real-time performance metrics, system logs, and device health monitoring.
- Automated Alerts – Email notifications for abnormal gateway behavior or status changes.
- Over-the-Air (OTA) Updates – Remote firmware upgrades without manual intervention.
- Secure Remote Access – Web-based SSH terminal for full gateway control.
Why Use WisDM for Fleet Management?
Managing a large number of gateways manually can be inefficient and costly. WisDM offers a scalable, cost-effective, and VPN-free approach to remote gateway management.
Zero-Touch Remote Management (No VPN Required)
Traditionally, configuring and managing gateways remotely required a VPN connection to each device’s local UI. With WisDM, users can remotely configure and monitor thousands of gateways seamlessly—without the need for a VPN.
Reduced Operational Costs & Increased Stability By eliminating the need for on-site visits, WisDM reduces installation and maintenance costs while ensuring a more stable and secure remote management experience.
Multi-Tiered Access Control Unlike traditional VPN-based solutions, WisDM allows businesses to assign different user roles with varying levels of access permissions. This is particularly beneficial for system integrators, network operators, and enterprises managing large-scale deployments.
How to Integrate Gateways with WisDM?
To manage your WisGate devices through WisDM, integration must be completed both on the gateway and in the WisDM platform.
- On the gateway, go to Settings > WisDM, and enable the "Allow WisDM integration" option.
- For registration steps the WisDM platform, refer to the WisDM Documentation.
Extensions
WisGateOS 2 features an extension functionality, which provides additional features and functions that can be added, removed, or updated based on your needs.
 Figure 1: Extensions
Supported Extensions
| Extensions | Descriptions | Remarks |
|---|---|---|
| Breathing Light | This extension allows you to customize the LED light’s behavior, including working modes, frequency, and color. | |
| Custom Logo | Enables uploading a custom logo to the Web UI for branding purposes. This extension works across all gateways supporting WisGateOS 2. | |
| Country Settings | The Country Settings extension allows you to set the gateway’s country code to comply with local LoRaWAN frequency regulations and ISM Band allocation. LBT (Listen Before Talk) is required in some regions to prevent signal collisions by checking channel availability before transmission. The gateway automatically enables or disables LBT based on the selected country. WisGateOS 2 provides a predefined country table to ensure compliance with regional transmission rules, including power limits, frequency plans, and LBT enforcement where applicable. | |
| Open/Close Port | Allows adding or removing packet traffic management rules for specific IPs from designated subnets to communicate through the gateway’s ports. | |
| Solar Battery | Provides real-time operational data of the gateway’s solar battery, including performance metrics, health status, cycle period, battery capacity, and charging/discharging modes. | Compatible with any WisGateOS 2 gateway equipped with solar power systems. |
| WireGuard | A fast and efficient VPN protocol, offering better performance than traditional options like OpenVPN. This extension enables WireGuard VPN on RAKwireless gateways. | |
| Open VPN Client | Allows the gateway to connect to a VPN server, enabling secure communication with customer devices via Ethernet, Wi-Fi, or LTE. For LTE, ensure the gateway has a static public IP. | |
| Operation and Maintenance | A tool for managing device operations, including scheduled reboots and automatic recovery of the 4G network connection through cellular module restart. | Compatible with WisGateOS 2 2.2.2 and later. |
| Field Test Data Processor | This extension provides backend computing services for Field Tester, enabling data retrieval and visualization. It subscribes to the LoRaWAN network server via MQTT, supporting both the built-in server in RAK gateways and third-party LoRaWAN servers. Users can view and download Field Tester measurement data within the extension. | Compatible with WisGateOS 2 2.2.2 and later. |
| Failover Reboot | Monitors all network connections (LTE/Ethernet/Wi-Fi) and triggers a reboot to restore connectivity if all links go offline. | Compatible with WisGateOS 2 2.2.2 and later. |
Install and Use
To install and use extensions, refer to the Extension User Guide for detailed instructions.
User Preferences
The User Preferences section allows you to customize personal settings for the gateway, including password management, timezone, and language selection.
Accessing User Preferences
To modify your preferences, navigate to the User Preferences option in the bottom-left corner of the interface.
- In the bottom left corner, choose User preferences to set your personal preferences for the gateway.
 Figure 1: User button
- Selecting this option will redirect you to the User Preferences page.
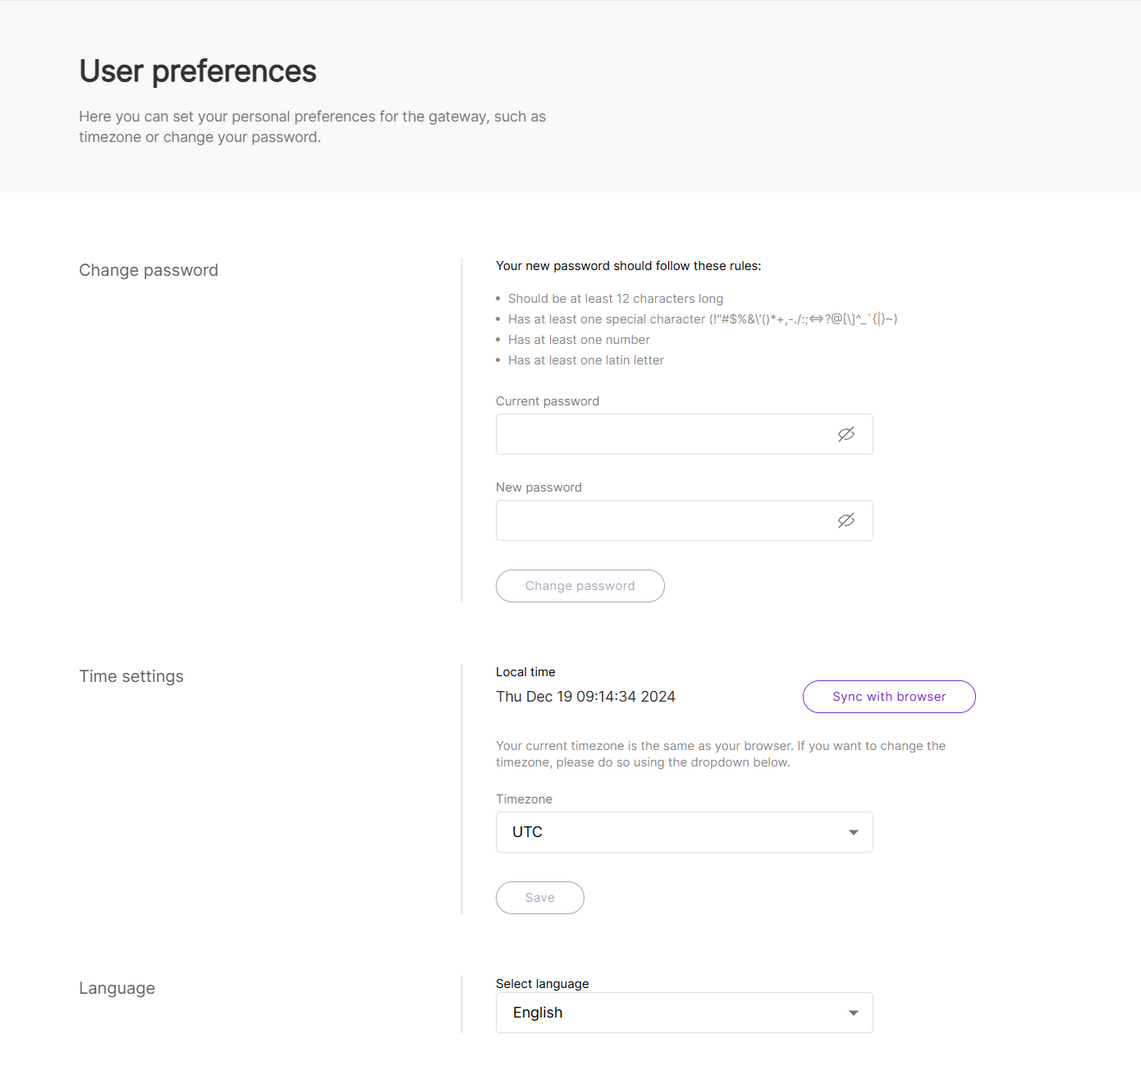 Figure 1: User preferences
Available Settings
- Change Password – Update your Web UI access password following the security requirements.
- Time Settings – Configure the gateway’s local time and synchronize it with your browser if needed.
- Language – Select the system language for the Web UI.
Log Out
To log out of the Web UI, click Logout in the bottom-left corner.
