RAK18003 WisBlock Audio Interposer Module Quick Start Guide
Prerequisite
What Do You Need?
Before going through each and every step on using the RAK18003 WisBlock module, make sure to prepare the necessary items listed below:
Hardware
- RAK18003 WisBlock Audio Interposer Module
- Your choice of WisBlock Base with IO slot
- Your choice of WisBlock Core
- Your choice of WisBlock Audio Module compatible with Interposer
- USB Cable
- Li-Ion/LiPo battery (optional)
- Solar charger (optional)
Software
- Download and install the Arduino IDE.
- To add the RAKwireless Core boards on your Arduino Board Manager, install the RAKwireless Arduino BSP. Follow the steps in the GitHub repo.
Product Configuration
Hardware Setup
RAK18003 is an interposer module, part of the WisBlock Audio Series.
For more information about RAK18003, refer to the Datasheet.
RAK18003 module can be connected to the IO slot of the WisBlock Base to communicate with the WisBlock Core. Always secure the connection of the WisBlock module by using compatible screws.
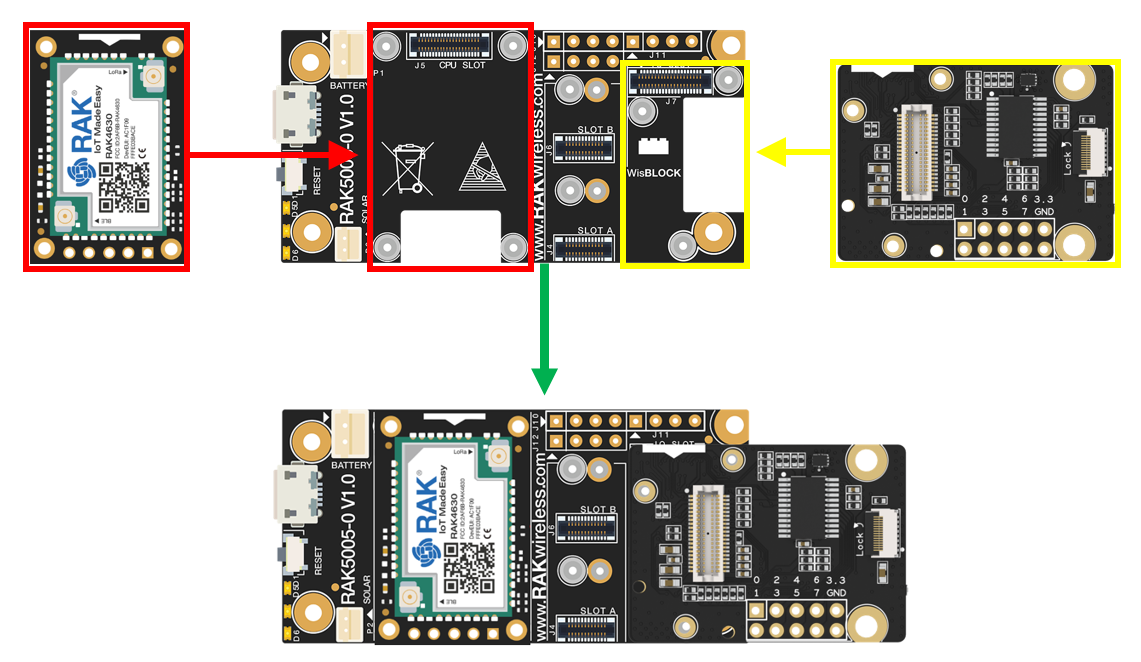 Figure 1: RAK18003 connection to WisBlock Base
Assembling and Disassembling of WisBlock Modules
Assembling
As shown in Figure 2, the location for the IO slot is properly marked by silkscreen. Follow carefully the procedure defined in WisBlock Base board assembly/disassembly instructions to attach a WisBlock module. Once attached, carefully fix the module with one or more pieces of M1.2 x 3 mm screws depending on the module.
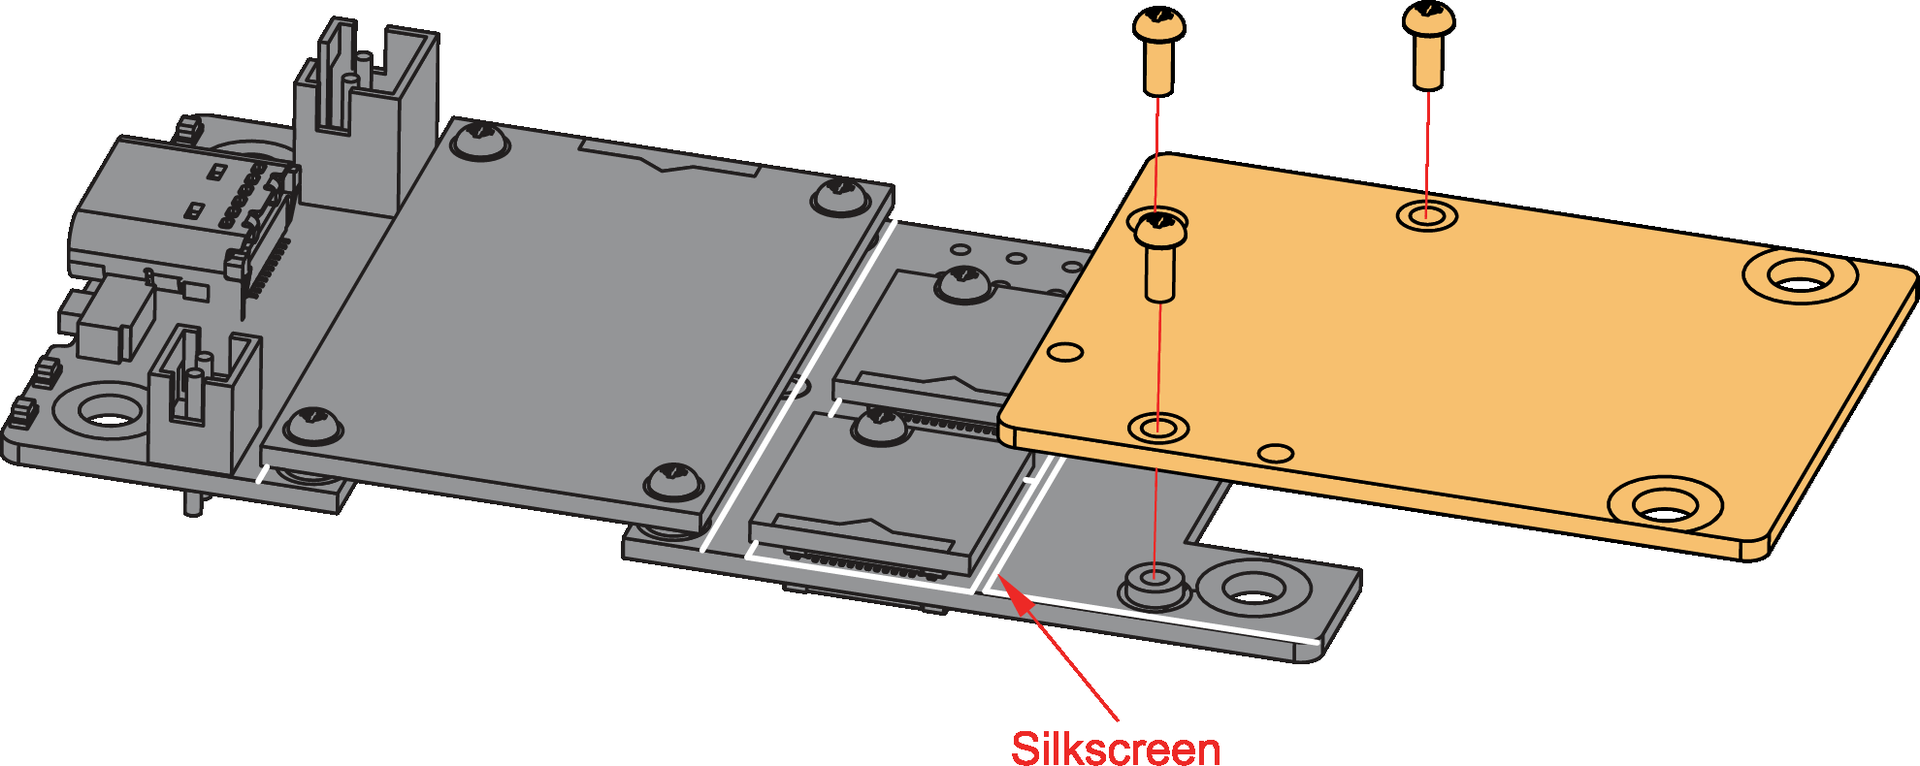 Figure 1: RAK18003 connection to WisBlock Base
When using the RAK4631 board, connect the LoRa and BLE antennas to avoid damage to the board.
.png) Figure 1: LoRa and BLE antennas connection to RAK4631 module
Figure 1: LoRa and BLE antennas connection to RAK4631 moduleDisassembling
The procedure in disassembling any type of WisBlock module is the same.
- First, remove the screws.
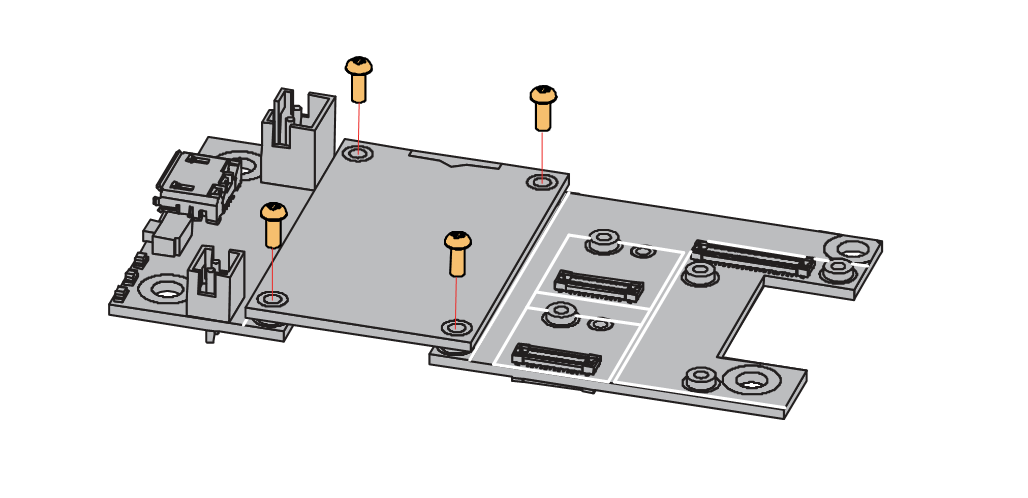 Figure 1: Removing screws from the WisBlock module
- Once the screws are removed, check the silkscreen of the module to find the correct location where force can be applied.
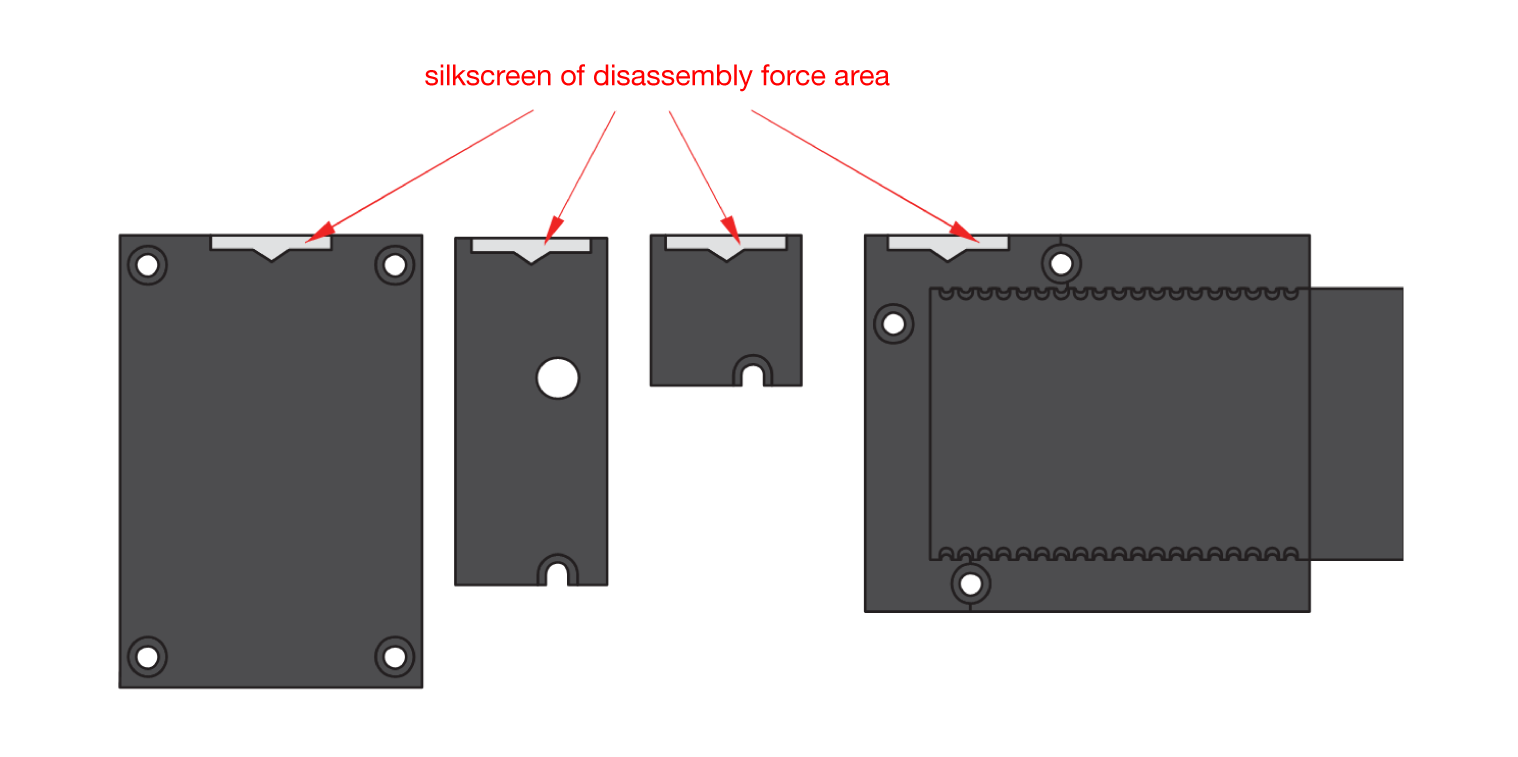 Figure 1: Detaching silkscreen on the WisBlock module
- Apply force to the module at the position of the connector, as shown in Figure 6, to detach the module from the baseboard.
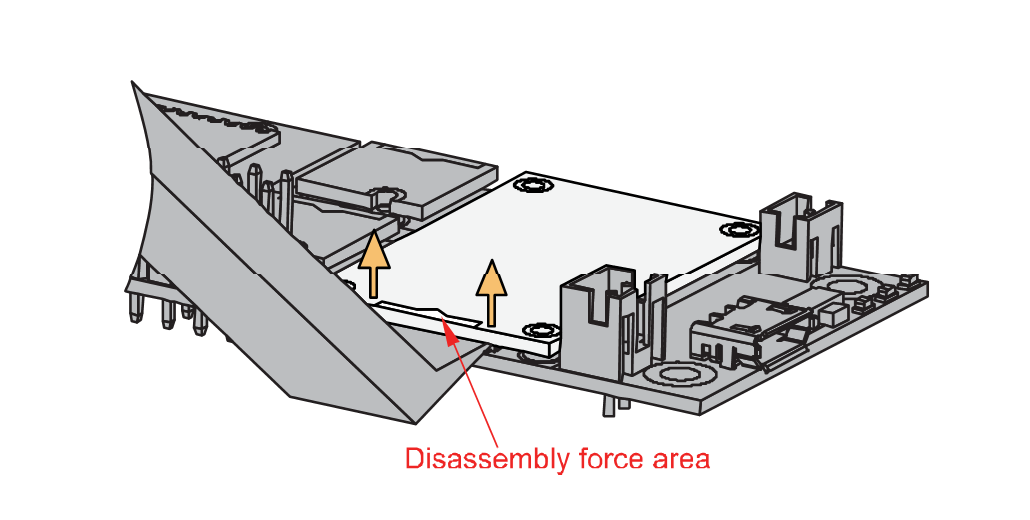 Figure 1: Applying even forces on the proper location of a WisBlock module
- If you will connect other modules to the remaining WisBlock Base slots, check on the WisBlock Pin Mapper tool for possible conflicts.
- RAK18003 uses I2C communication lines, and it can cause possible conflict, especially on other WisBlock Modules connected to Slot A to D of the WisBlock Base.
After all this setup, you can now connect the battery and USB cable to start programming your WisBlock Core.
- Batteries can cause harm if not handled properly.
- Only 3.7-4.2 V rechargeable LiPo batteries are supported. It is highly recommended not to use other types of batteries with the system unless you know what you are doing.
- If a non-rechargeable battery is used, it has to be unplugged first before connecting the USB cable to the USB port of the board to configure the device. Not doing so might damage the battery or cause a fire.
- Only 5 V solar panels are supported. Do not use 12 V solar panels. It will destroy the charging unit and eventually other electronic parts.
- Make sure the battery wires match the polarity on the WisBlock Base board. Not all batteries have the same wiring.
Software Configuration and Examples
RAK18003 is an interposer module, part of the WisBlock Audio Series. Its design allows multiple WisBlock Audio modules to be used together on a single IO slot. It consists of two IO expanders (TPT29555-TS5R), one signal switch (5223YWQ10/TR), and connectors where other WisBlock Audio modules can be interfaced. It also has a usable TF card slot. RAK18003 module can be used with RAK18030 PDM Microphone or RAK18060 Amplifier Module. Their sample applications are detailed below.
Sample Code Test of the RAK18030 Module with RAK18003 Interposer Module
- To test the RAK18003 (Audio Interposer) with RAK4631 (WisBlock Core) and RAK18030 (PDM Microphone), you need to assemble them first, as shown in Figure 7.
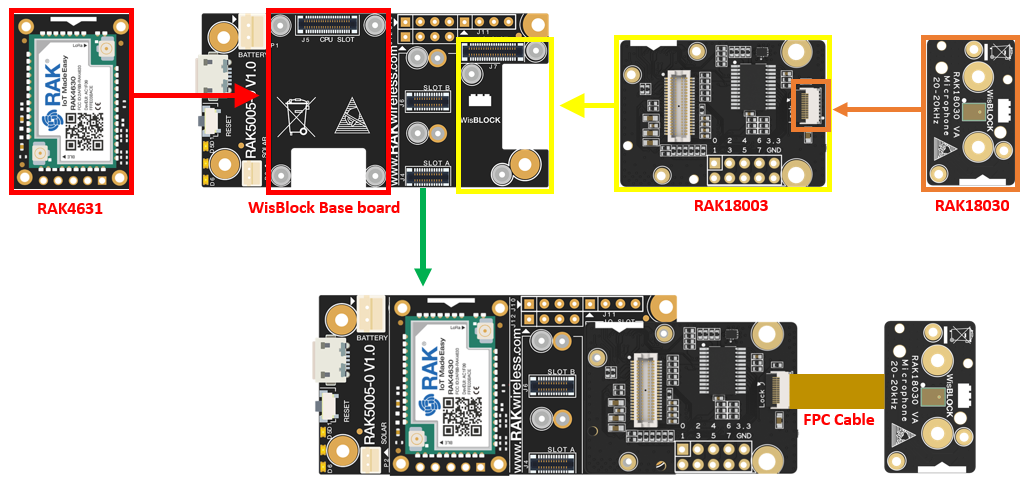 Figure 1: Assembling together the RAK4631, RAK18030, and RAK18003
- Then install the RAKwireless Arduino BSP for WisBlock by using the
package_rakwireless_index.jsonboard installation package. The WisBlock Core should now be available on the Arduino IDE.
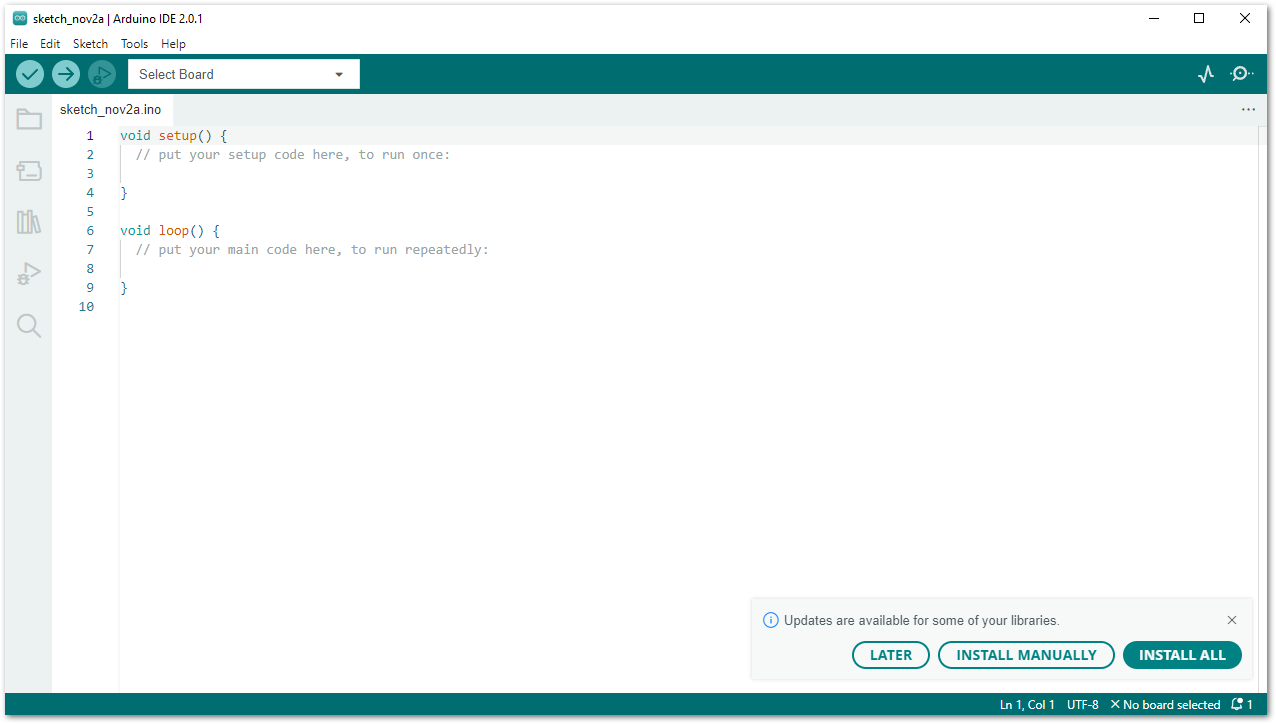 Figure 1: Arduino IDE
- Install the latest RAKwireless Audio Library using the Library Manager of Arduino IDE.
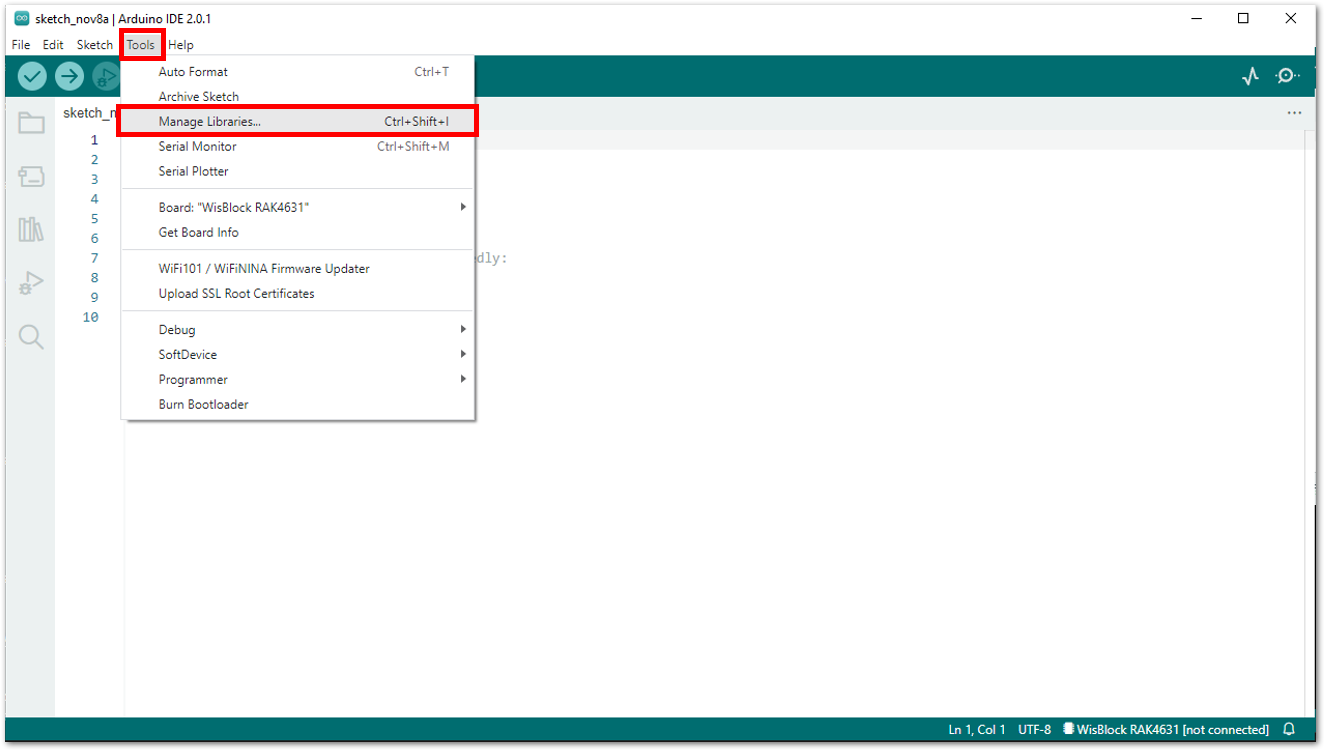 Figure 1: RAKwireless Audio Library
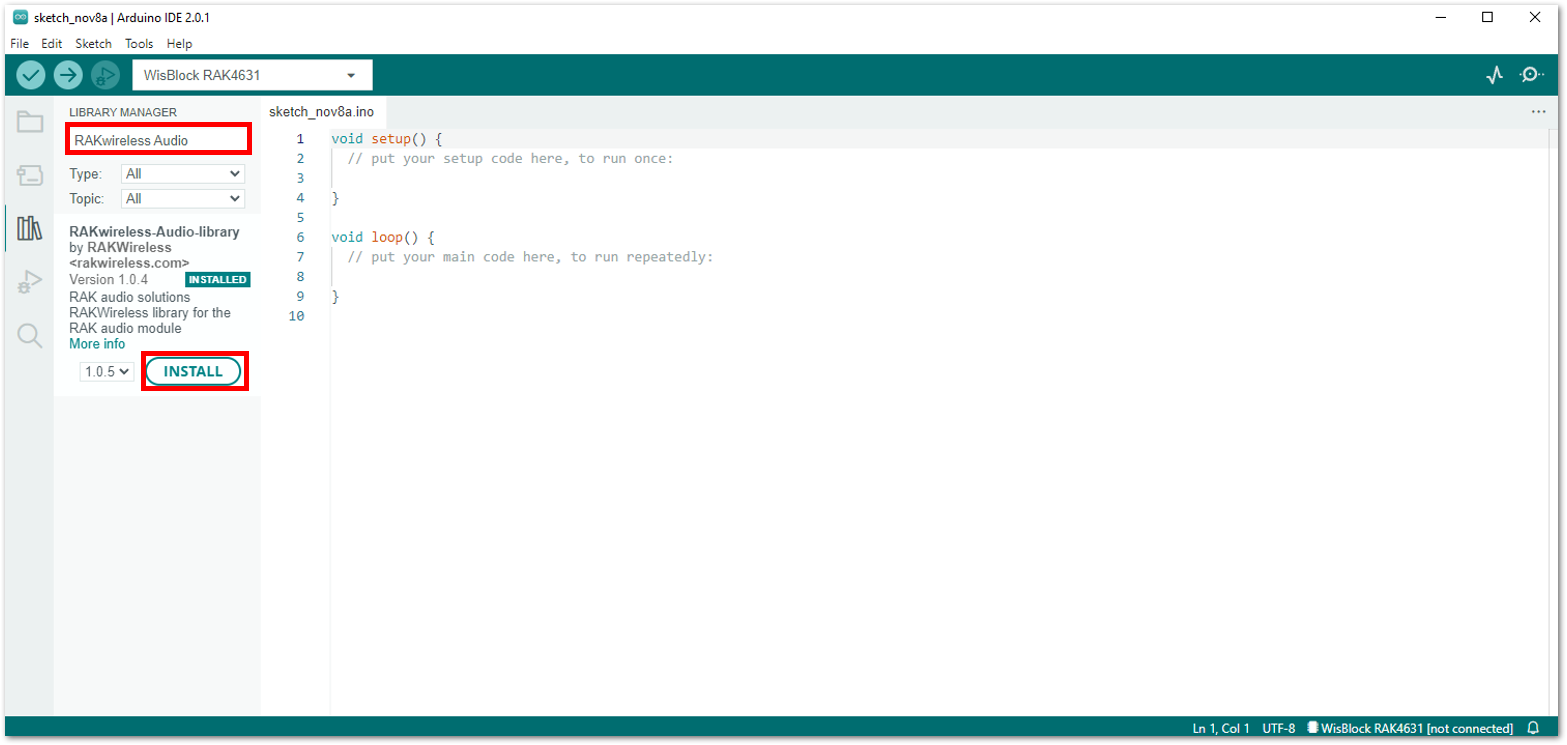 Figure 1: RAKwireless Audio Library
- Open the sample code for RAK18003.
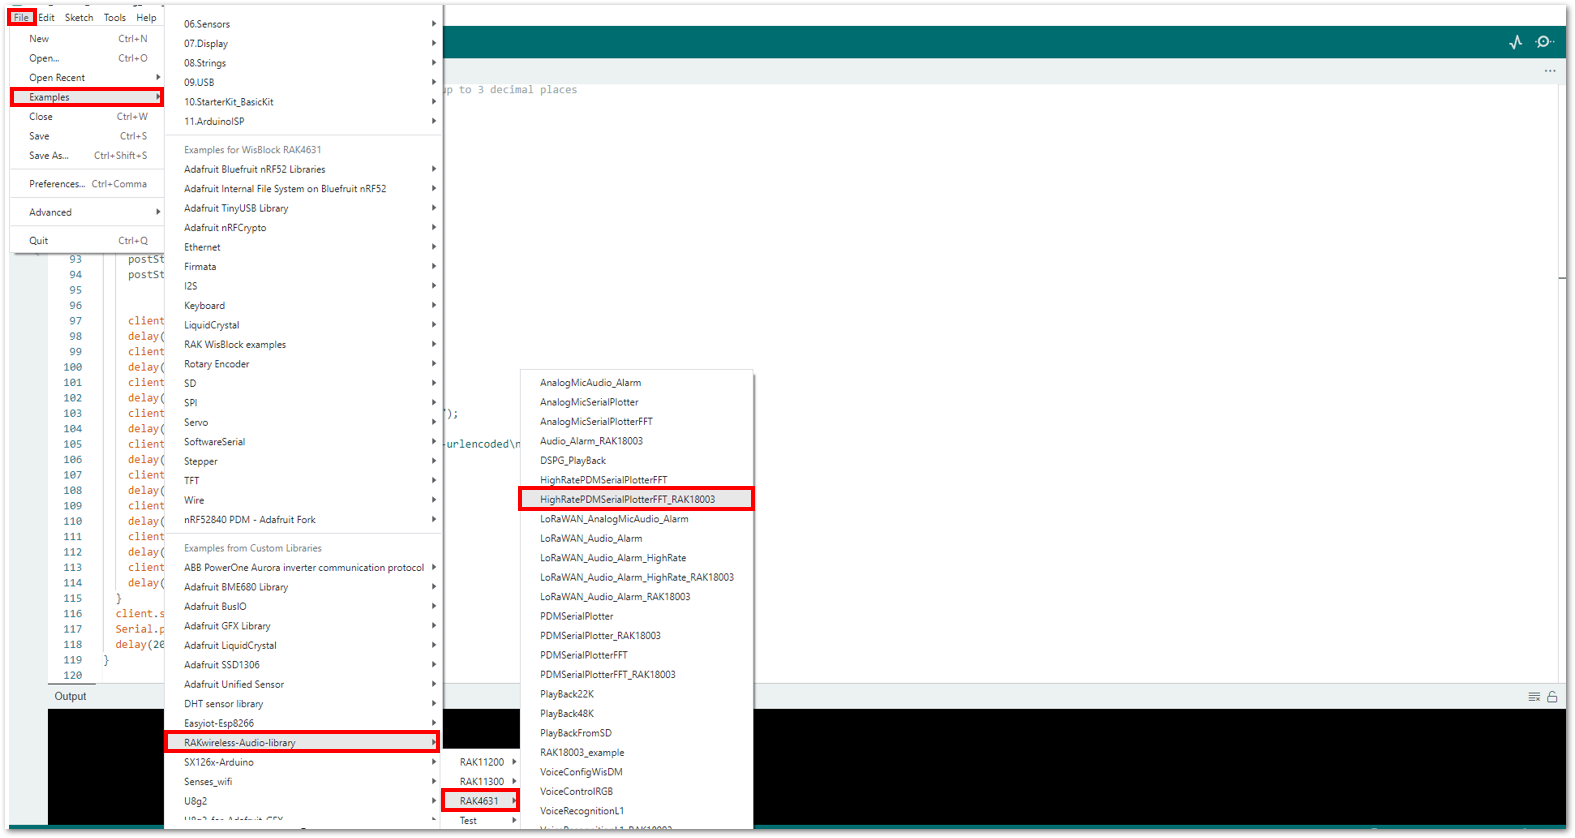 Figure 1: Selecting the sample code for RAK18003
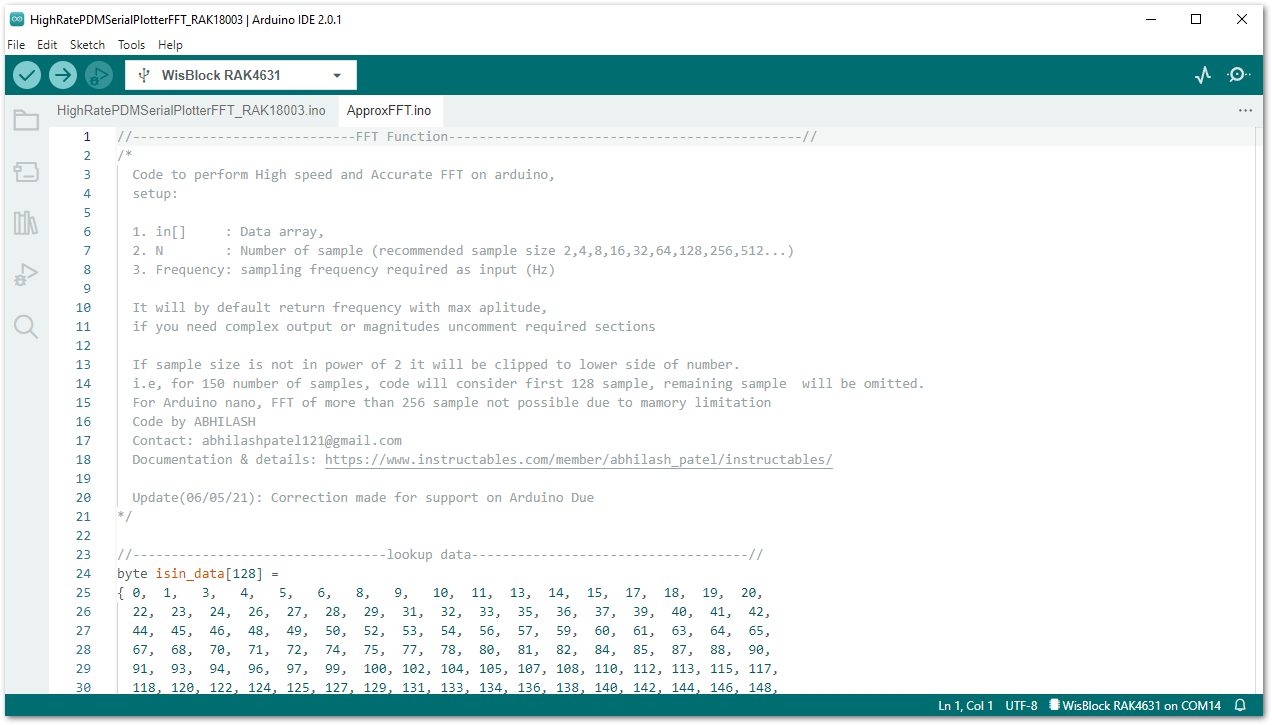 Figure 1: Sample code for RAK18003
The example codes of RAKwireless Audio Library are compatible with specific WisBlock Core. You have to select the correct WisBlock Core based on what core you used in your application.
- Select the RAK4631 board and its serial port, as shown in Figure 13 and Figure 14.
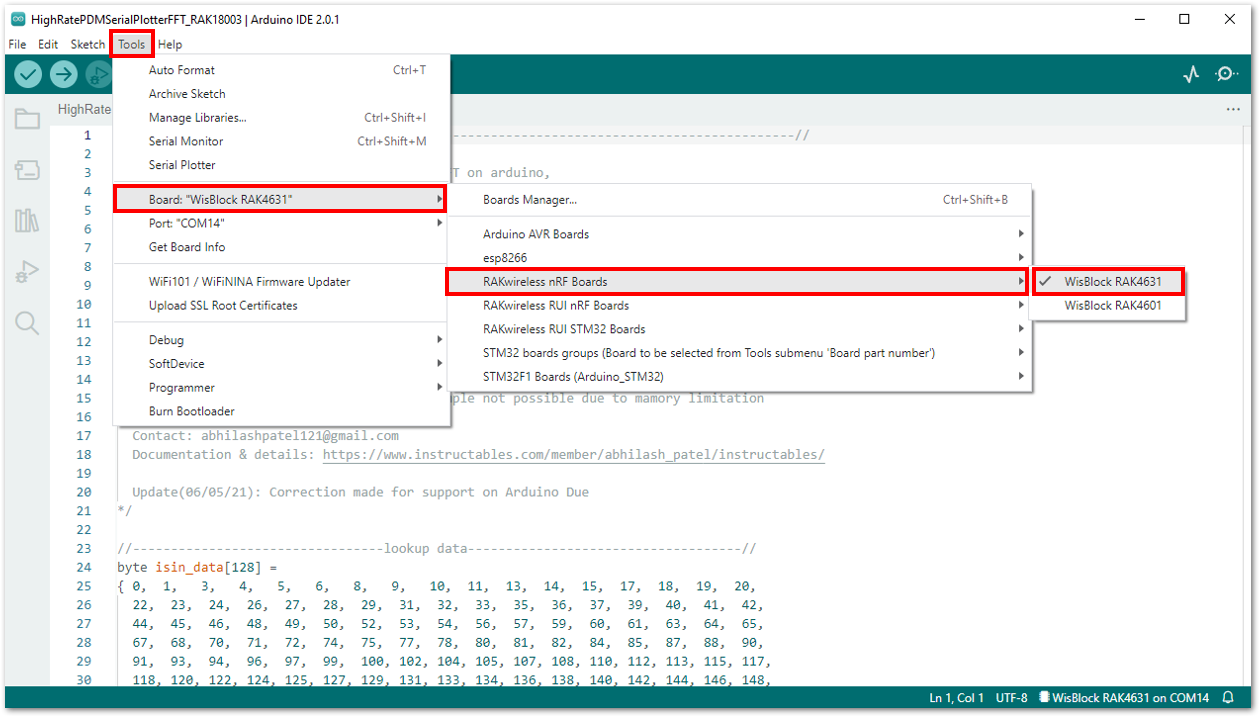 Figure 1: Selecting RAK4631 board as the WisBlock Core
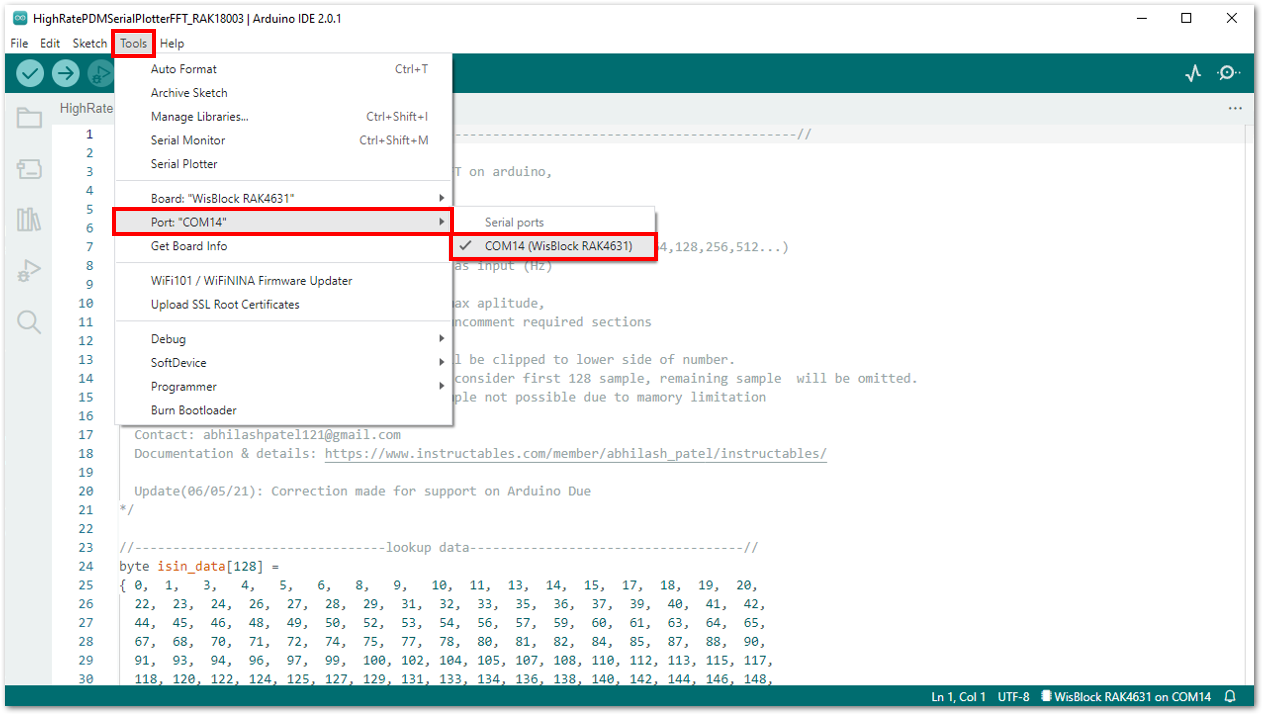 Figure 1: Selecting the serial port of RAK4631 WisBlock Core
- Upload the code, as shown in Figure 15 and Figure 16.
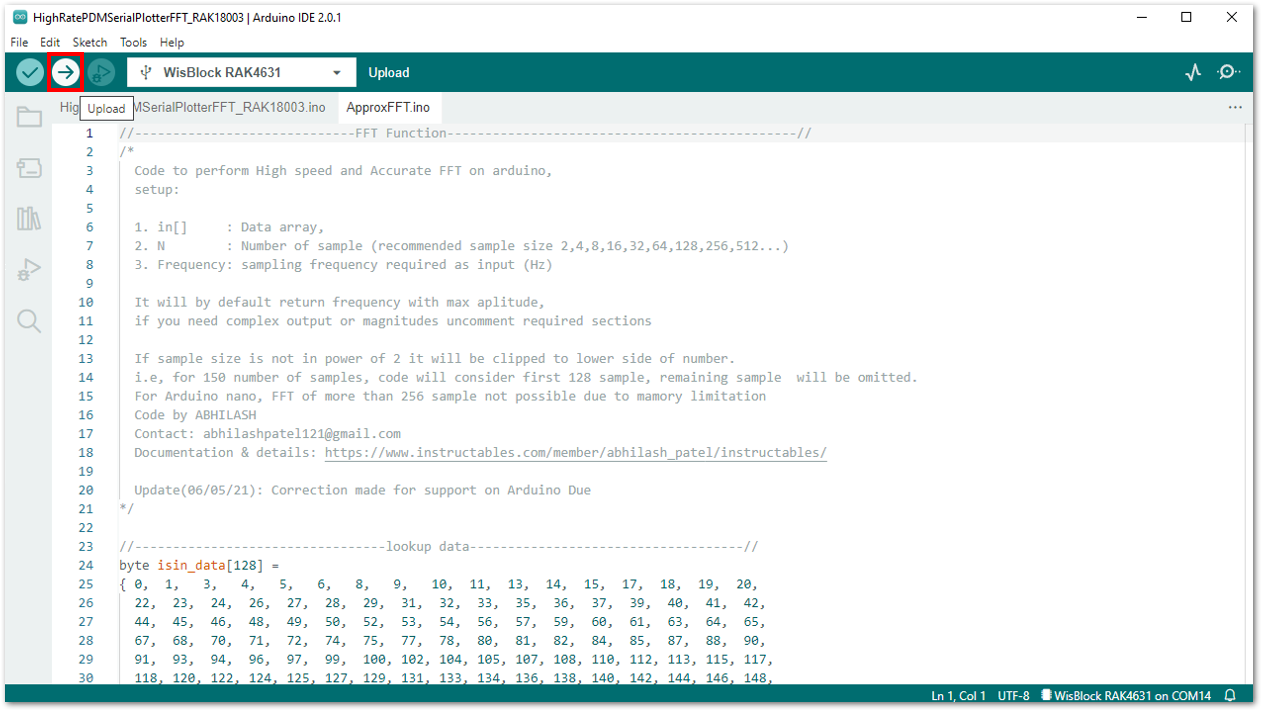 Figure 1: Uploading the RAK18030 code
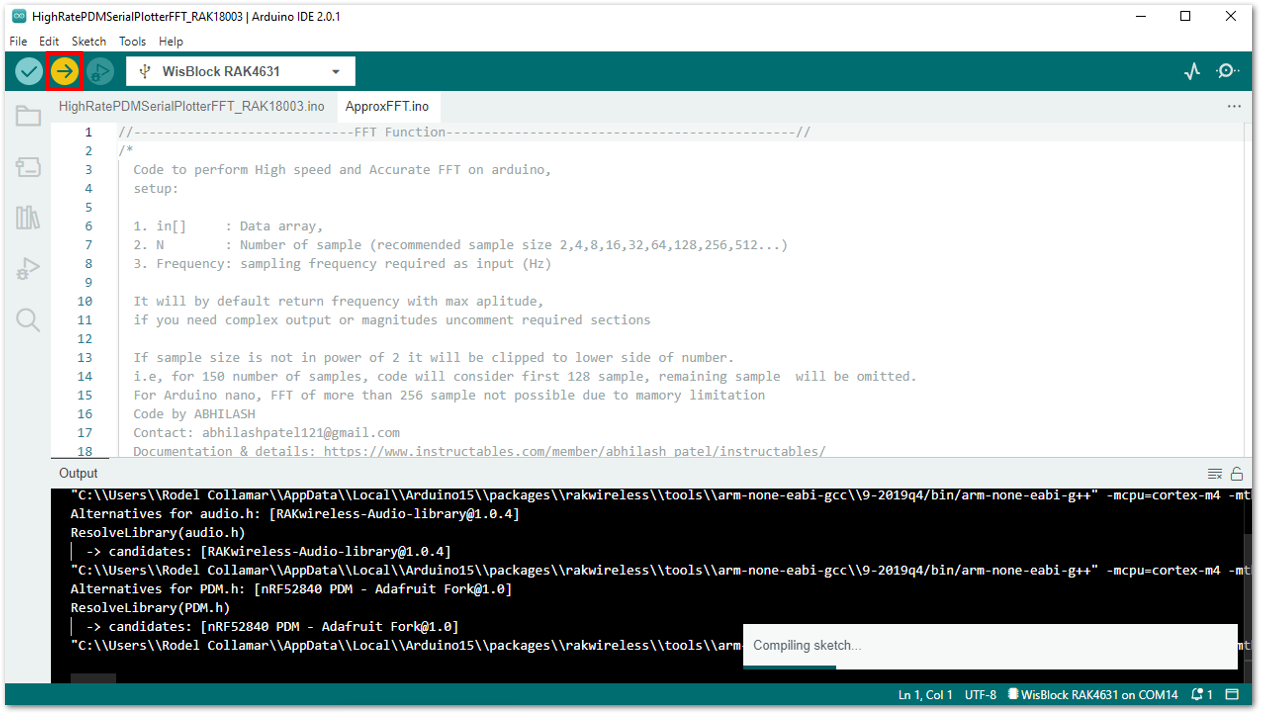 Figure 1: Uploading the RAK18030 code
If you experience any error in compiling the example sketch, check the updated example code for your WisBlock Core Module that can be found on the RAKwireless Audio Library.
- When you successfully uploaded the sample code, open the Serial Plotter of the Arduino IDE to see the sensor's reading logs. To test the sound detection, you can download a sound-generating app on your smartphone and sweep frequencies starting from 1000 Hz to 10000 Hz. If you see the logs, then your RAK18030 and RAK18003 are communicating to the WisBlock core.
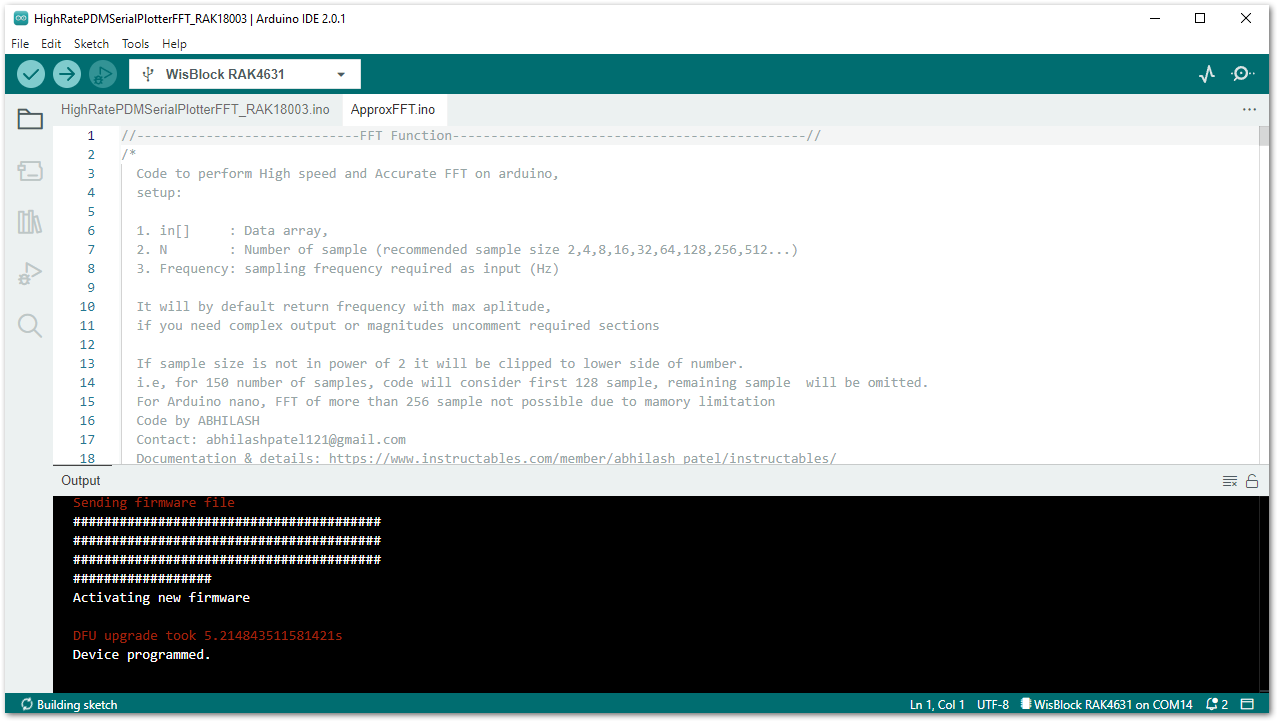 Figure 1: Sample code successfully uploaded to RAK4631
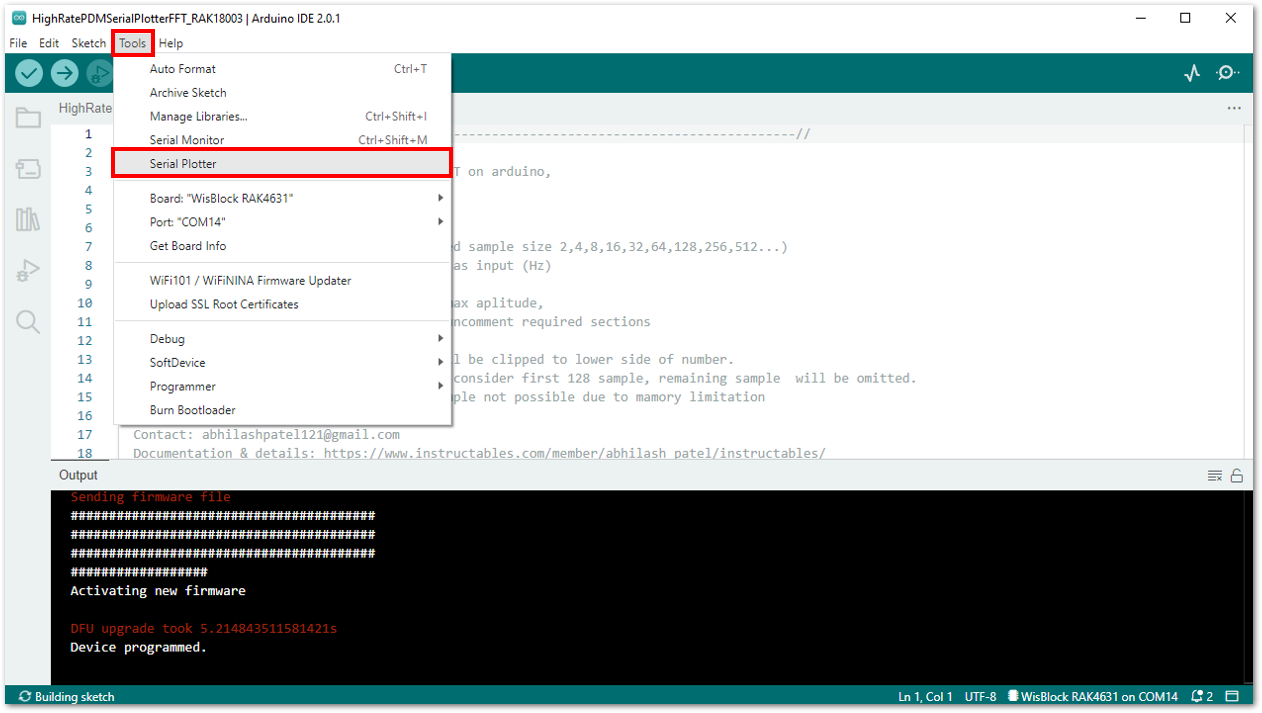 Figure 1: Opening the Serial Plotter
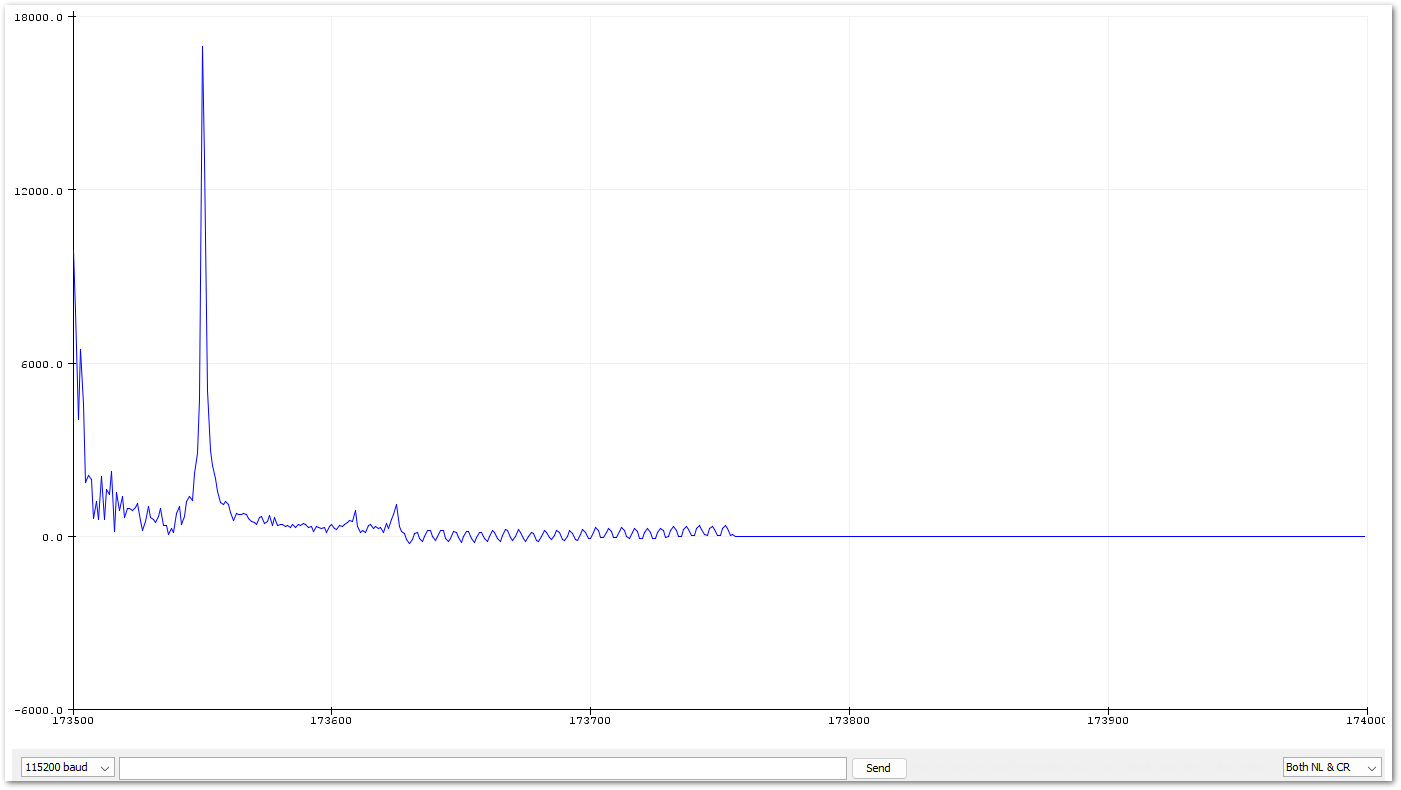 Figure 1: FFT Plot of 10kHz sample signal
If there is no serial plot graph shown in Arduino 2.0.x, you can try the serial plotter of the legacy Arduino 1.8.x IDE.
Sample Code Test of the RAK18060 Module with RAK18003 Interposer Module
- To test the RAK18003 (Audio Interposer) with RAK4631 (WisBlock Core) and RAK18060 (Stereo Amplifier), you need to assemble them first as shown in Figure 20. Also, you'll be needing the following:
- Li-Ion/LiPo battery
- Speakers
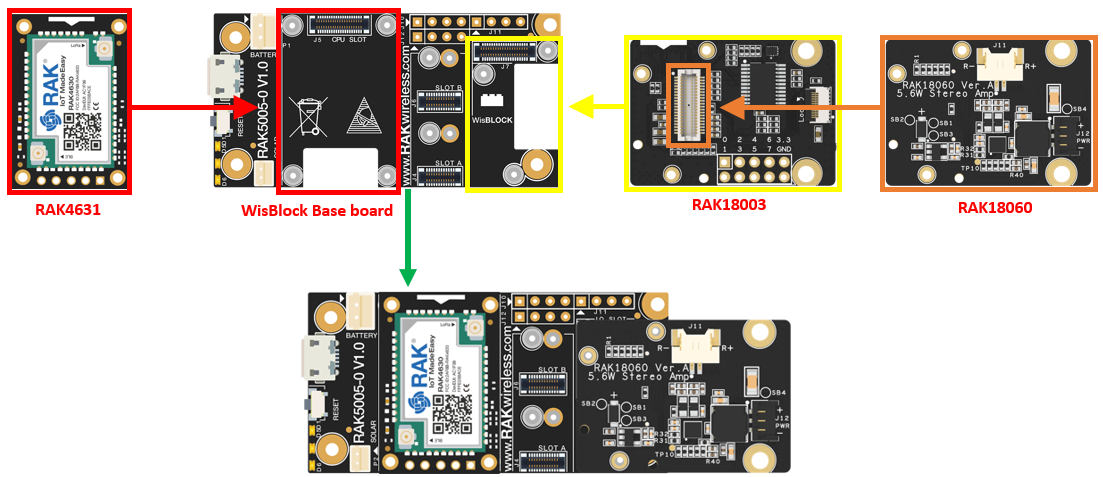 Figure 1: Assembling together the RAK4631, RAK18060, and RAK18003
- The RAK18060 module is powered via SB2 (battery) by default. If you wish to use another DC power source, refer to Figures 21 to 24.
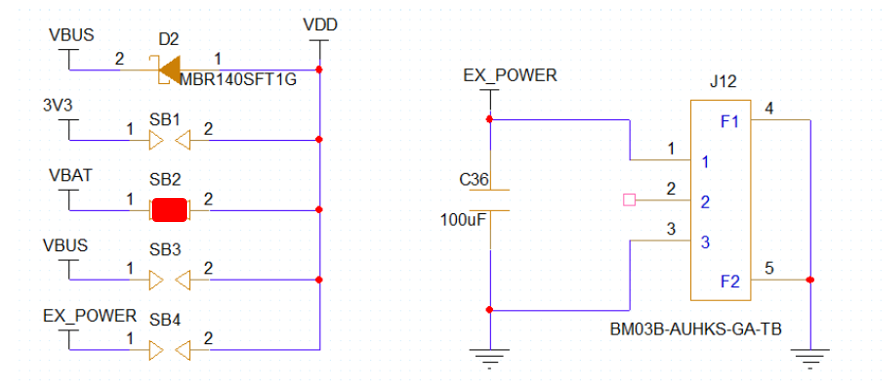 Figure 1: Power Select Diagram for RAK18060 with SB2 as default
3V3
If you want to use 3V3, desolder SB2 and solder SB1.
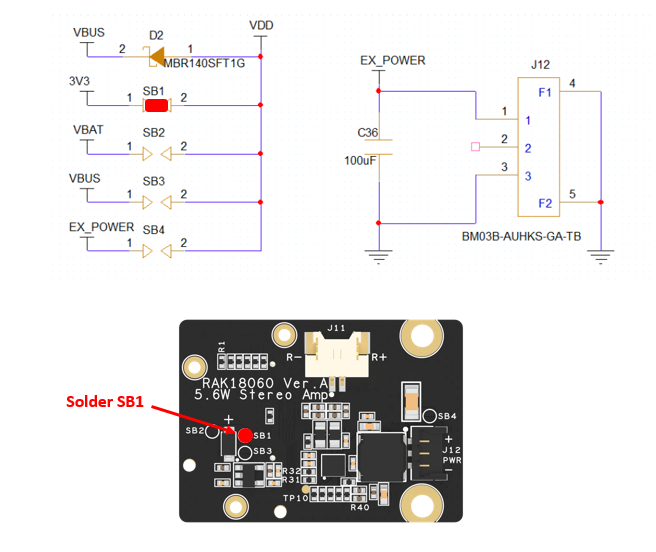 Figure 1: Solder portion for SB1
VBUS
If you want to use VBUS, desolder SB2 and solder SB3.
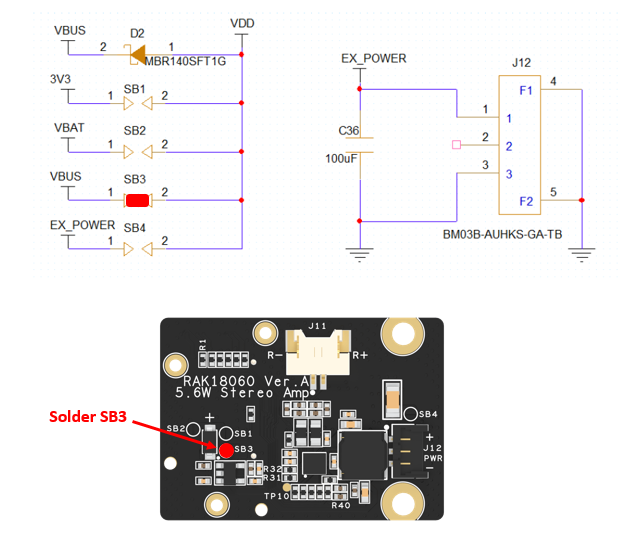 Figure 1: Solder portion for SB3
EX_POWER
If you want to use EX_POWER, desolder SB2, and solder SB4.
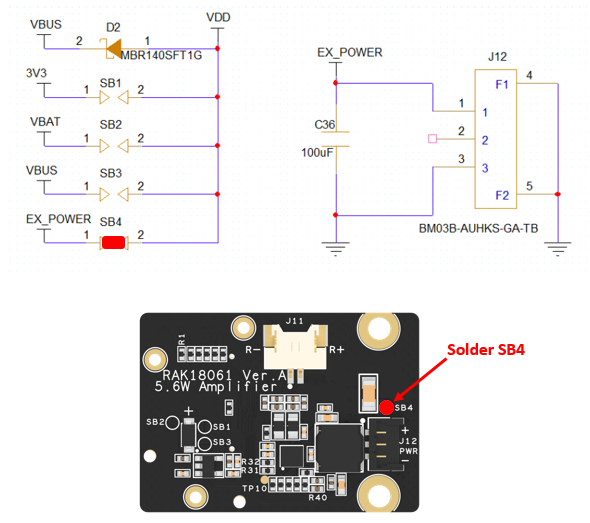 Figure 1: Solder portion for SB4
- You can now connect the speaker on either output of the RAK18060 module.
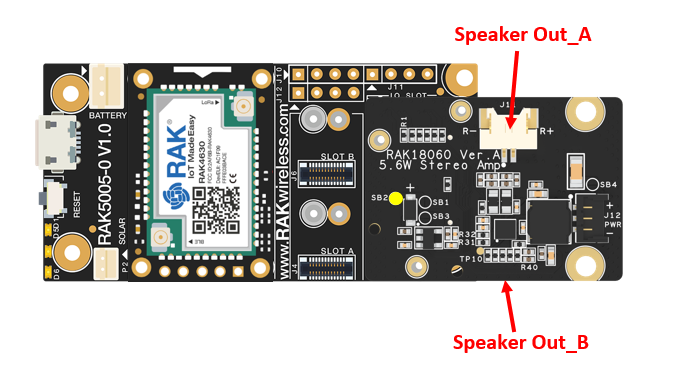 Figure 1: Speaker output portions of RAK18060 module
-
Install the RAKwireless Arduino BSP for WisBlock by using the
package_rakwireless_index.jsonboard installation package. The WisBlock Core should now be available on the Arduino IDE. -
Then install the latest RAKwireless Audio Library using the Library Manager of Arduino IDE.
 Figure 1: RAKwireless Audio Library
 Figure 1: RAKwireless Audio Library
-
Plug in your integrated module RAK4631 + RAK18003 + RAK18060 into your PC through the USB cable.
-
Then open your Arduino IDE and open the PlayBack48K sample code for RAK18060, as shown in Figures 28 to 30.
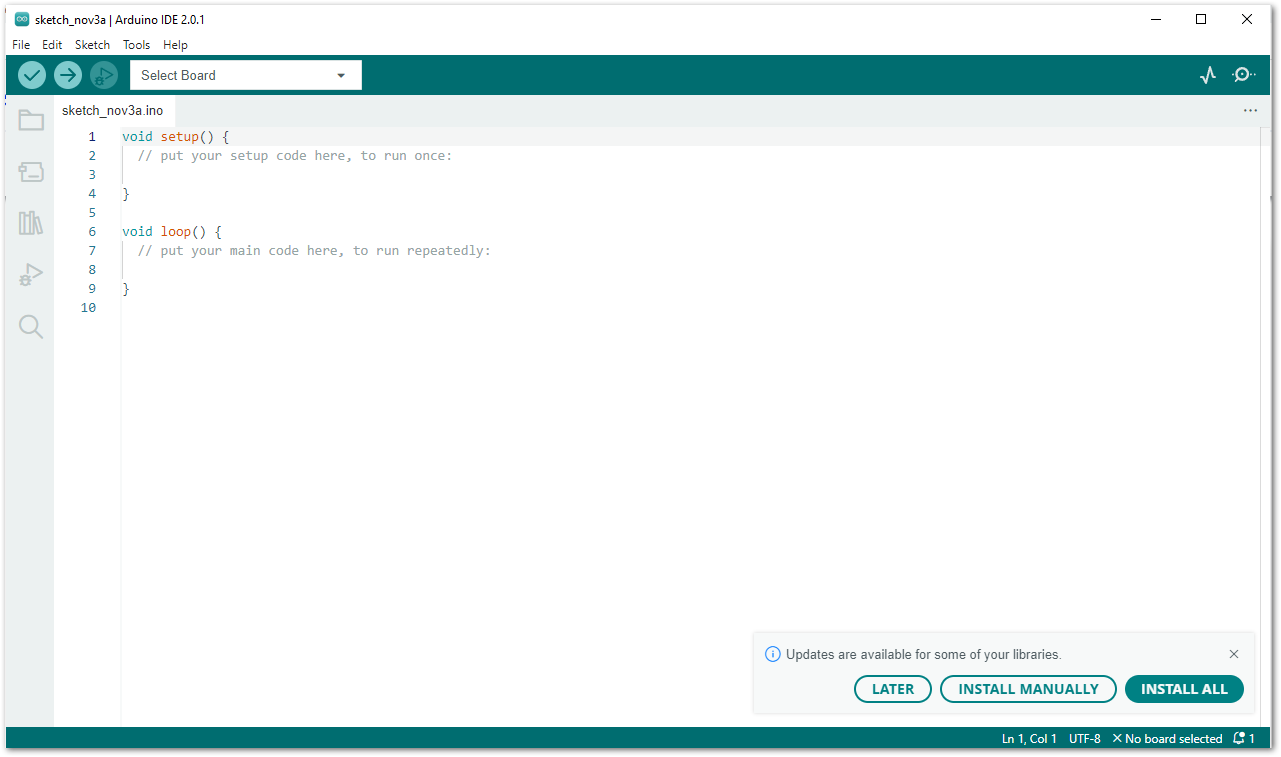 Figure 1: Arduino IDE
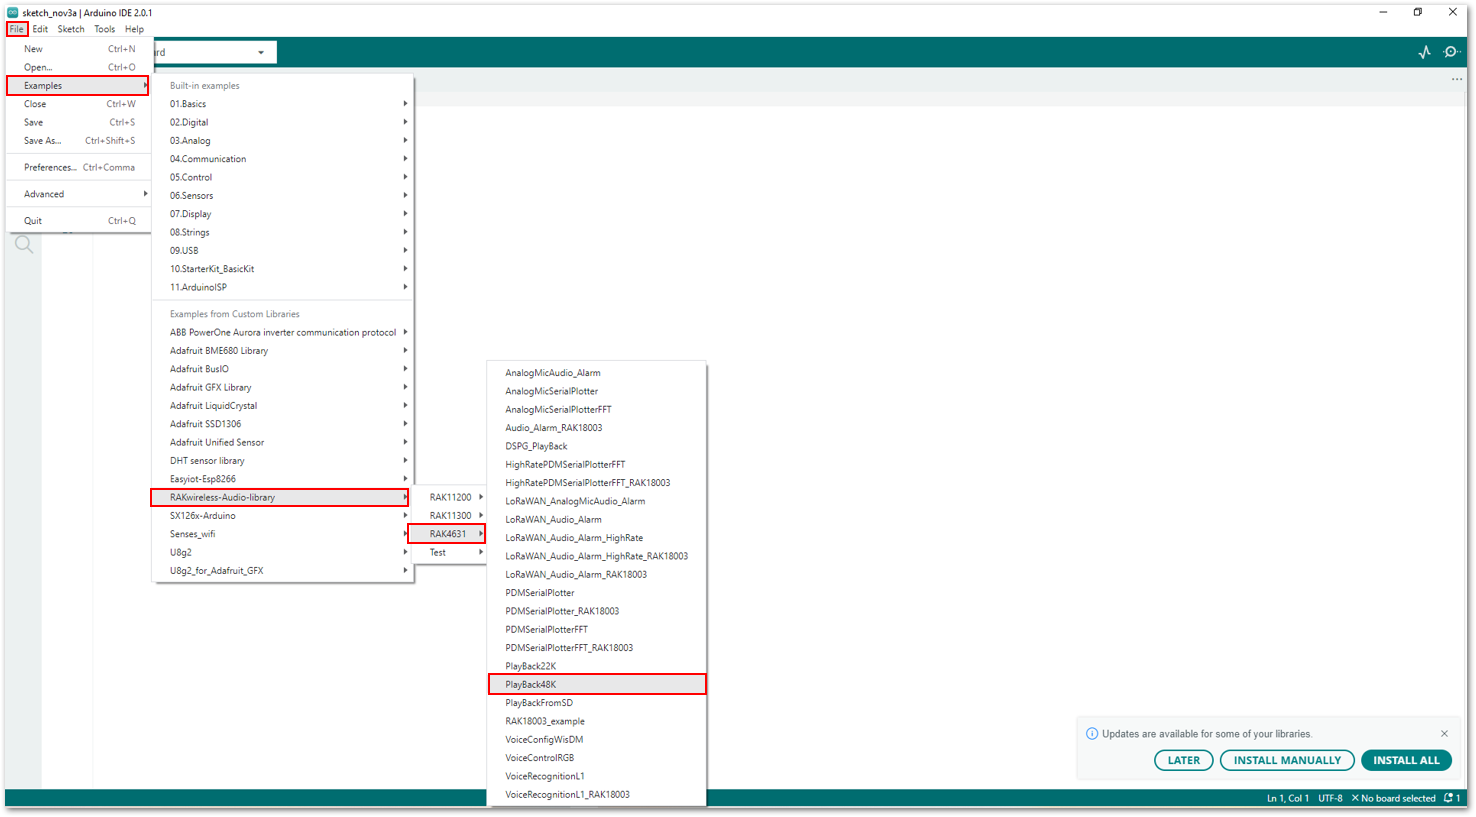 Figure 1: Selecting the PlayBack48K Sample Code
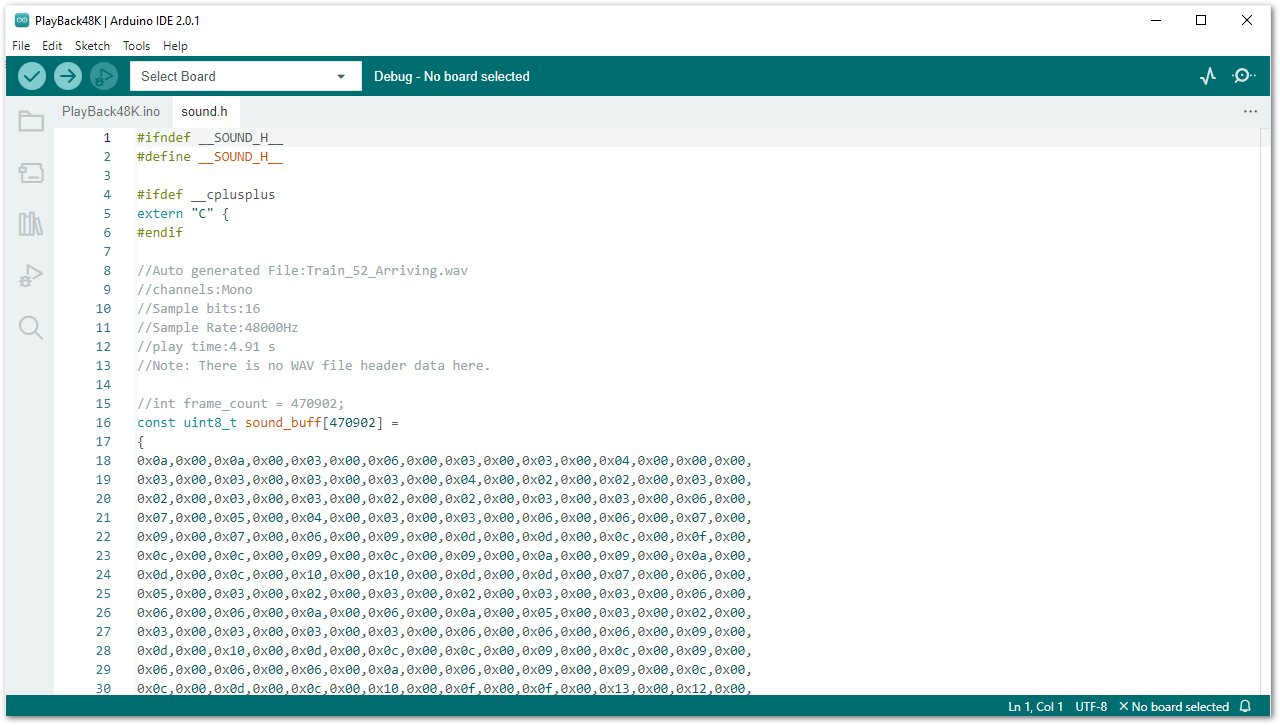 Figure 1: PlayBack48K Sample Code
The example codes of RAKwireless Audio Library are compatible with specific WisBlock Core. You have to select the correct WisBlock Core based on what core you used in your application.
- Select your WisBlock Core RAK4631, as shown in Figure 31.
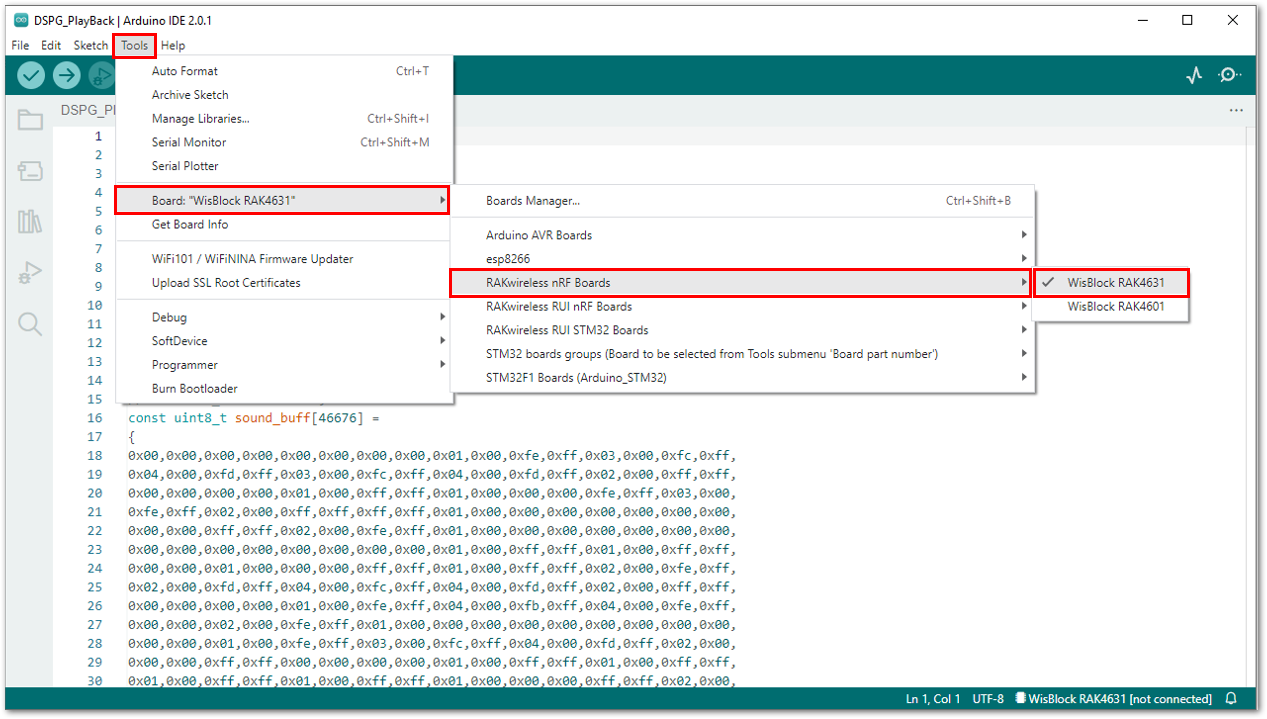 Figure 1: Selecting the RAK4631 WisBlock Core board
- Then select the corresponding port of your WisBlock Core RAK4631.
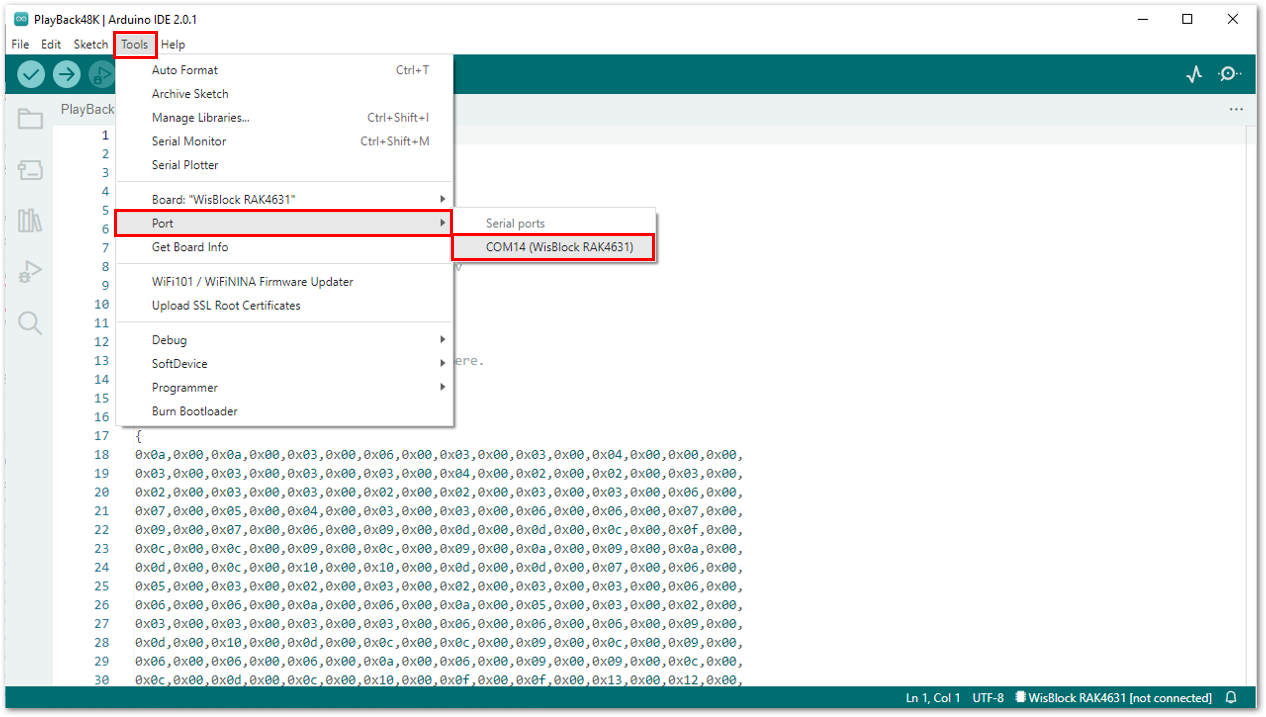 Figure 1: Selecting the serial port of RAK4631 WisBlock Core
- Once done, it should look the same with Figure 33.
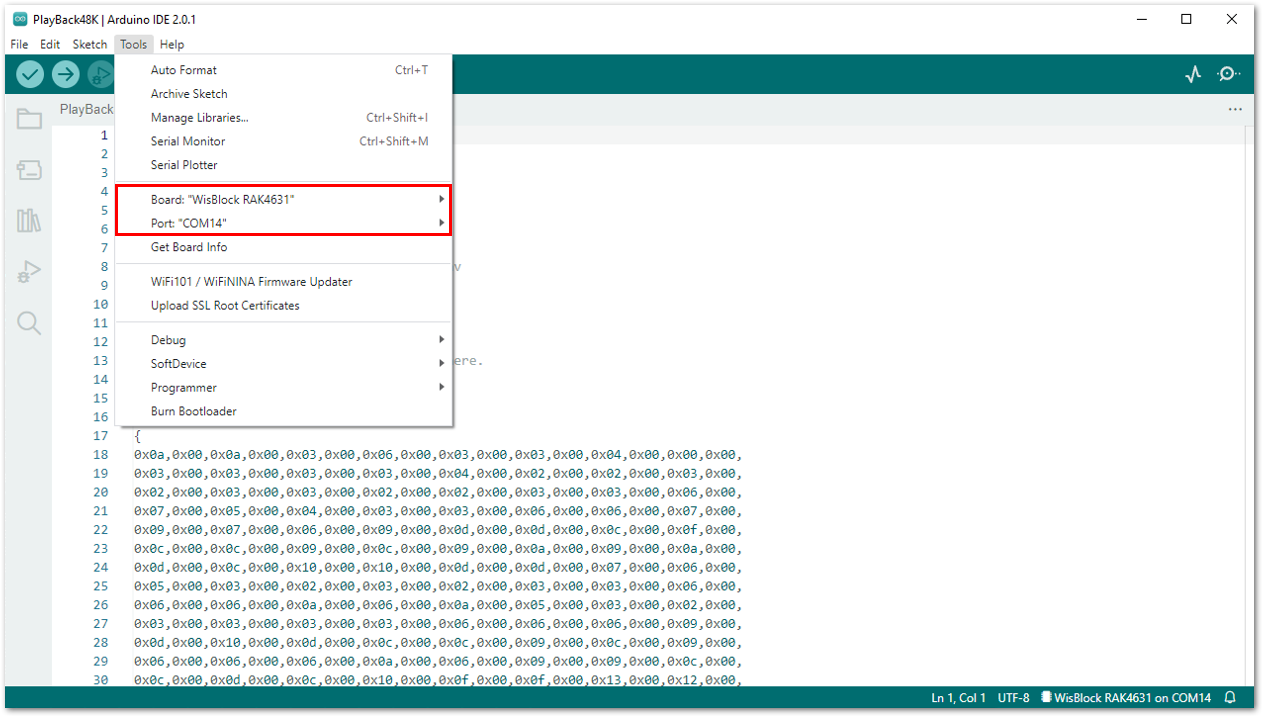 Figure 1: Selected board and port of RAK4631
- Then tick the right arrow at the top leftmost part of the Arduino IDE to upload the sample code to your RAK4631 module.
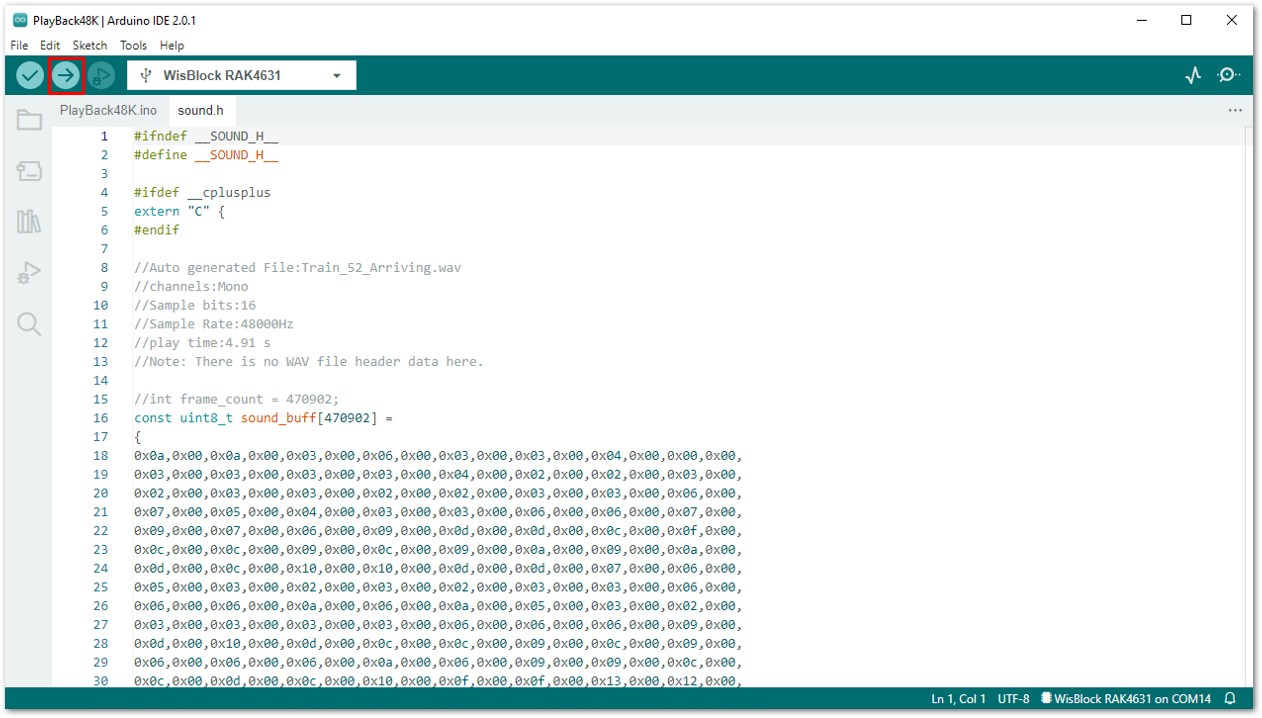 Figure 1: Uploading the PlayBack48K sample code to your RAK4631
If you experience any error in compiling the example sketch, check the updated example code for your WisBlock Core Module that can be found on the RAKwireless Audio Library.
- Once done uploading, it should look the same with Figure 35. At this moment, you will hear "Train 52 from Amsterdam is now arriving" from your speaker playing repetitively.
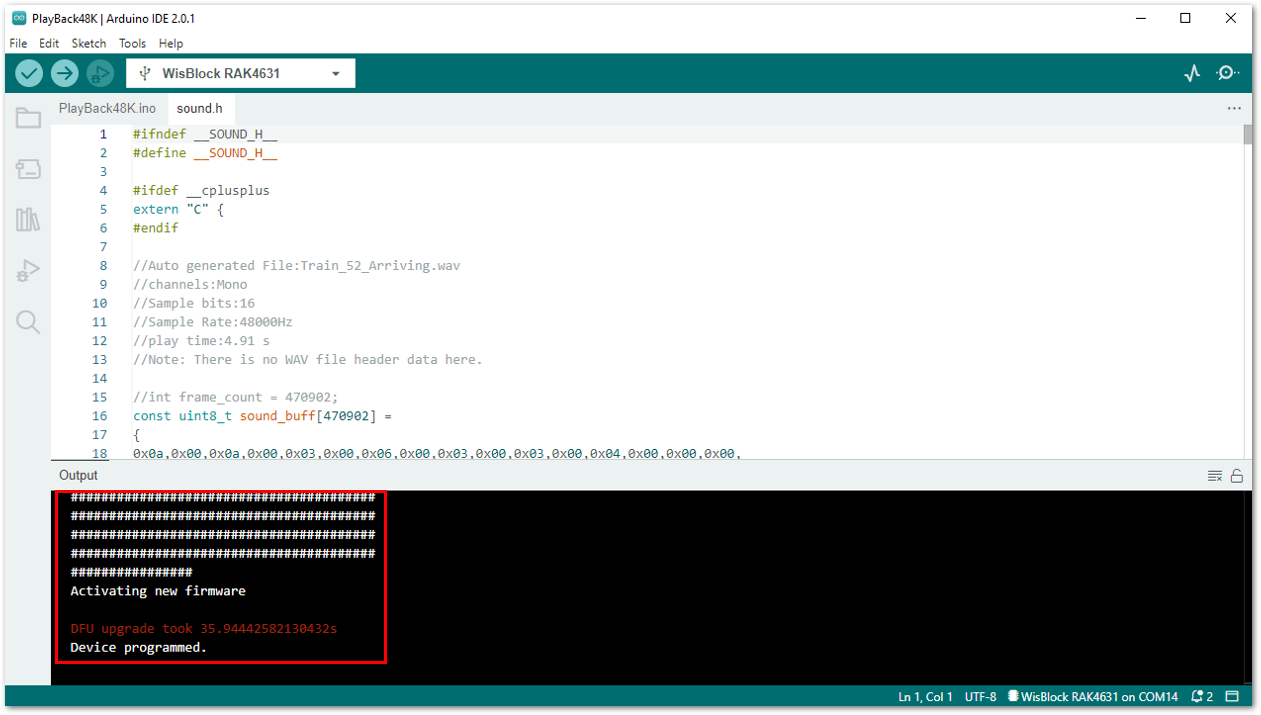 Figure 1: Programmed RAK4631