RAK4631 WisBlock LoRaWAN Module Amazon Sidewalk Starter Kit
The Sidewalk Starter Kit simplifies the setup and testing of a RAKwireless device with Amazon Sidewalk. It comes with all of the necessary hardware, including a temperature and humidity sensor. There are also tools for flashing the Amazon Sidewalk firmware onto the device.
Amazon Sidewalk is a free-to-connect community network that provides secure and reliable connectivity for billions of devices. The Sidewalk Starter Kit is based on the WisBlock Core RAK4631, which incorporates the WisDuo RAK4630 Stamp Module. Furthermore, Amazon has certified the RAK4630 as a Sidewalk-compatible device, implying that it can be used to easily build Sidewalk devices.
The WisBlock modules in the kit eliminate the need for a prototype board. Just plug the modules together and power them via a USB port or another power source.
Amazon Sidewalk is only available in selected areas in the USA, including the testing or use of a Sidewalk device. Check out the coverage map at Amazon Sidewalk Coverage.
For development, any Sidewalk gateway functionality might be used outside of the US, but it should be used ONLY for Amazon Sidewalk endpoint development purposes. Developers are solely responsible for ensuring compliance with local regulations. Please consult with your local regulatory bodies and check if the gateway is allowed to operate its radio in your locale, as US license-free band devices, only for development. Developers will also need to use a VPN router that supports OpenVPN Client functionality in conjunction with a cloud VPN service provider, to enable operation outside of the US for your development.
To connect the device to the Sidewalk network, an Amazon Sidewalk compatible device is required. Check the Amazon Sidewalk Documentation for more information.
This guide will help you test a RAK4630-based device with Amazon Sidewalk, including sensor data visualization in AWS. It offers fast access to connect the RAK4630 to Amazon Sidewalk. Also, it comes with pre-compiled firmware that you can flash on our WisBlock Core module.
The application used in this guide is based on the Nordics Sidewalk Sensor Monitoring example code. Then, the code was modified to work with the WisBlock Core module (nRF52840 + SX1262 LoRa transceiver) and the RAK1901 temperature and humidity sensor.
For details about the Sidewalk application for RAK4630, refer to RAK4630-Amazon-Sidewalk-Example repo.
Prerequisite
What Do You Need?
Before going through each and every step of using the RAK4631 Amazon Sidewalk Starter Kit, make sure to prepare the necessary items listed below:
Hardware
- Sidewalk Starter Kit
- RAK4631 WisBlock Core module
- RAK19007 WisBlock Base Board
- RAK1901 Temperature and Humidity sensor
- USB cable
- BLE and LoRa antennas
- RAKDAP1 DAPlink adapter to flash the demo firmware to the RAK4631
Other Requirements
To test the Sidewalk Starter Kit, the following environment is required:
- AWS Account
- The location is in the coverage area of Amazon Sidewalk in the US. Check the coverage map in the Amazon Sidewalk Coverage.
- An Amazon Sidewalk-compatible device is required. You can find a list of compatible devices in the Amazon Sidewalk Documentation.
- The Amazon Sidewalk-compatible device connected to the internet and within the coverage of Sidewalk.
- Mobile phone with the Alexa app, to set up the Echo.
- Should be a US Amazon account with a US internet connection.
Product Configuration
AWS Setup
Before anything else, set up AWS to receive the sensor data and display them.
Sign Up for an AWS Account
Here are the steps to follow to create your AWS account:
- Go to the AWS Amazon website.
- Sign up and fill in your account information.
- Click on Verify email address to receive a verification code in your email address.
- Check your email and enter the verification code, then click Verify.
- Create a strong password for your root user, then click Continue.
- Choose either Business or Personal account. Both account types have the same features and functions.
- Read and accept the AWS Customer Agreement. It's important to read and understand the terms of the agreement before accepting it.
- Click Continue. You'll receive an email message to confirm that your AWS account is ready to use.
You can sign in to your new account by using the email address and password you provided during sign up. However, you can't use any AWS services until you finish activating your account.
- Enter your payment method and click Verify and Continue. If you wish to use a different billing address, select Use a new address. You can't proceed with the sign-up process until you add a valid payment method.
- Choose your country or region code from the list and enter your phone number. Make sure that it stays reachable in the next few minutes.
- Enter the code displayed in the CAPTCHA and submit it.
- Once the automated system contacts you, enter the PIN you receive and submit it.
- Choose one of the available AWS Support plans. For a detailed description of the plans and their benefits, refer to Compare AWS Support plans.
- Click on Complete sign up. A confirmation page will appear, indicating that your account is being activated.
- Check your email and spam folder for a confirmation message that your account has been activated. The activation process usually takes a few minutes, but it can sometimes take up to 24 hours.
Create an Administrative User
- Create an administrative user so that you don't use the root user for everyday tasks.
- Sign in to the AWS Management Console as the account owner by choosing Root user.
- Go to Identity and Access Management (IAM).
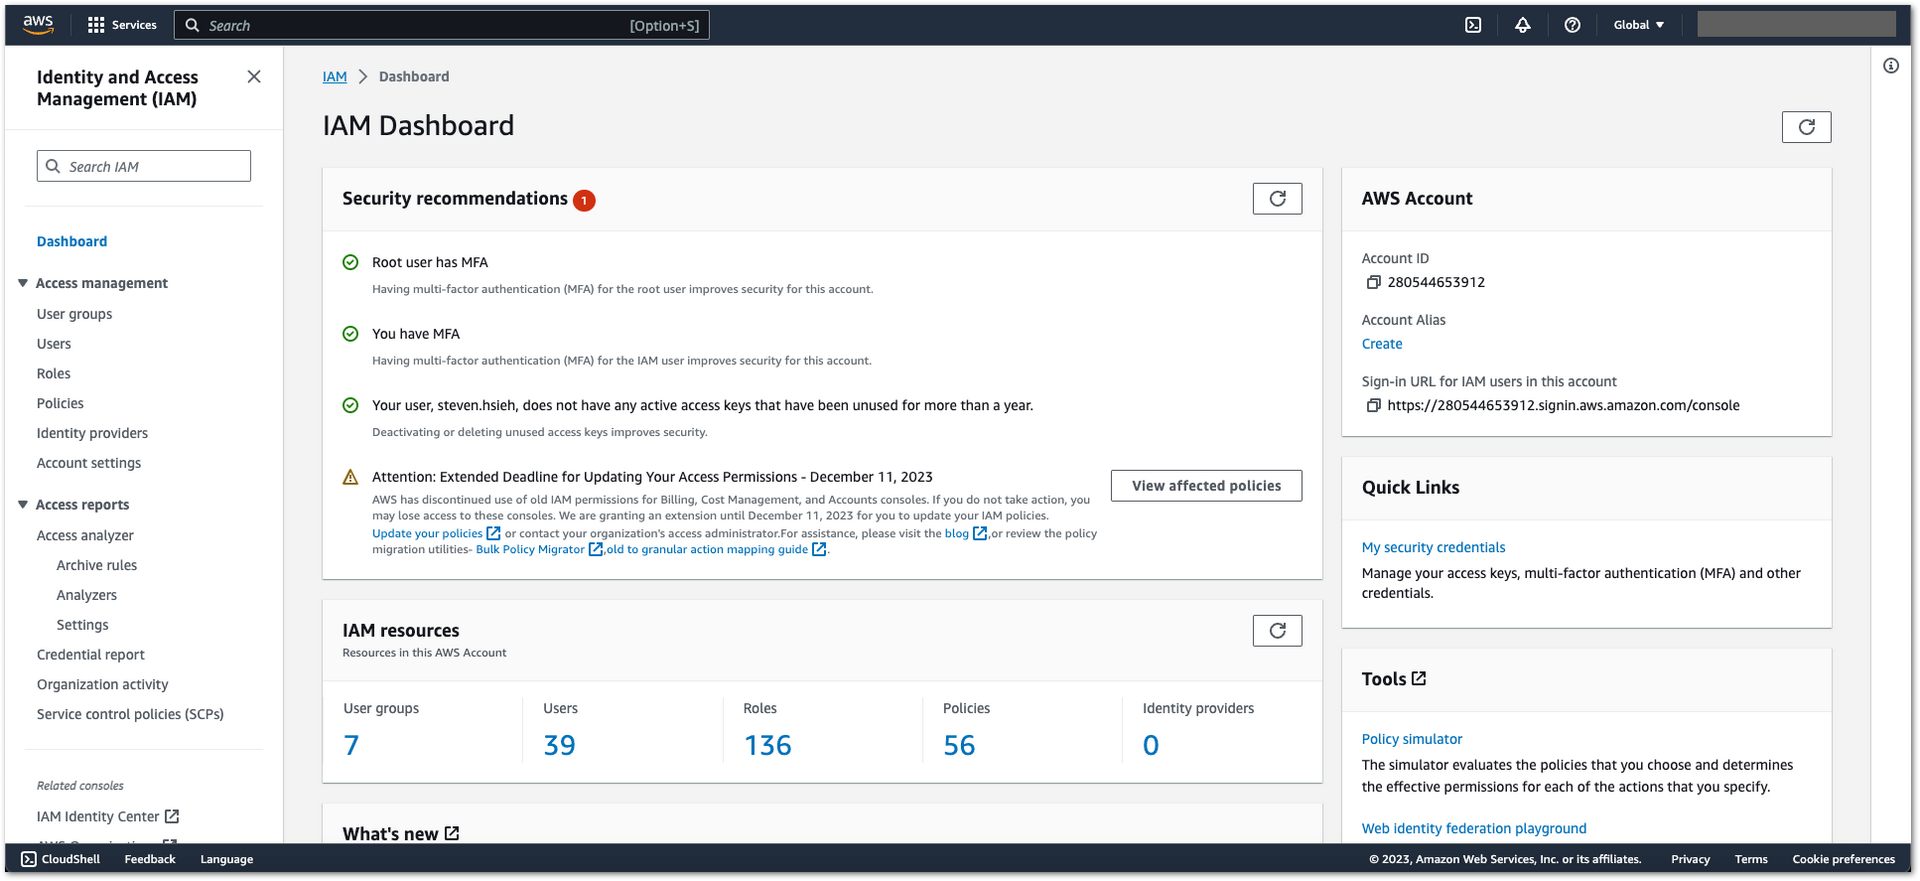 Figure 1: AWS Admin User Creation
- Click Users then Create user
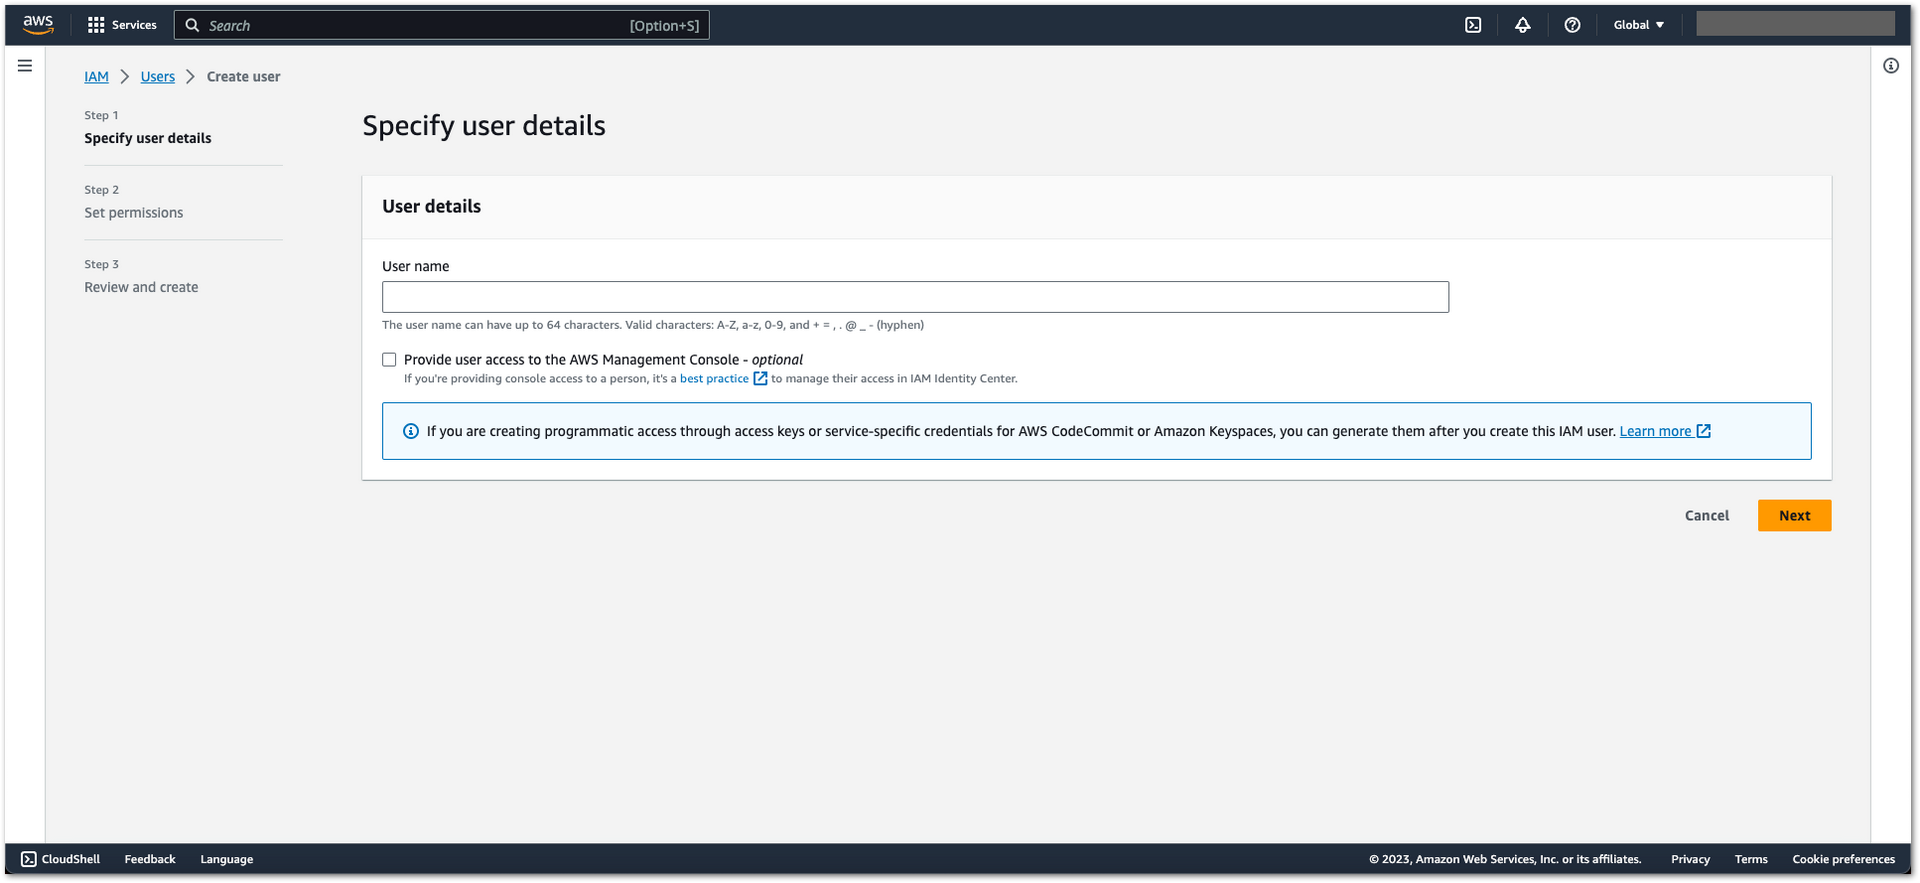 Figure 1: AWS Admin User Creation
- Enter your user name, then Next.
- Under Set permissions, navigate to the following fields, then click Next:
- Permissions options: Select Attach policies directly.
- Permission policies: Choose AdministratorAccess
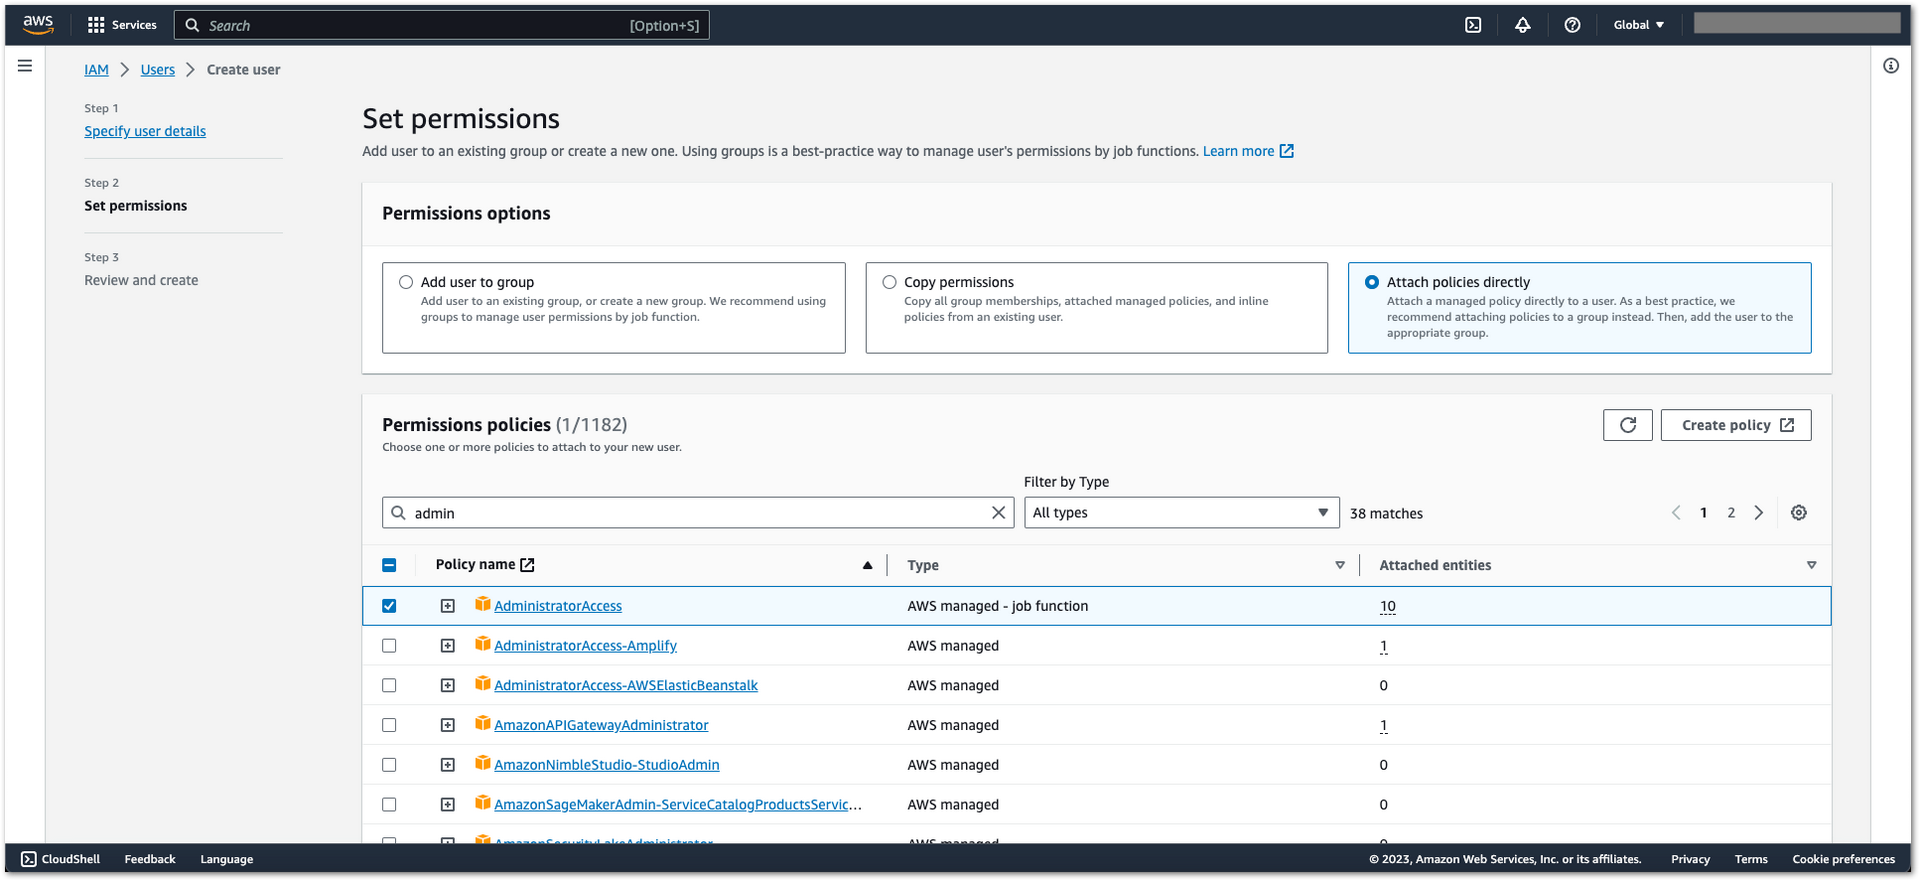 Figure 1: AWS Admin User Creation
- Once done setting up the user details and permission, you will be redirected to Review and create page. Check the details, and then click Create user.
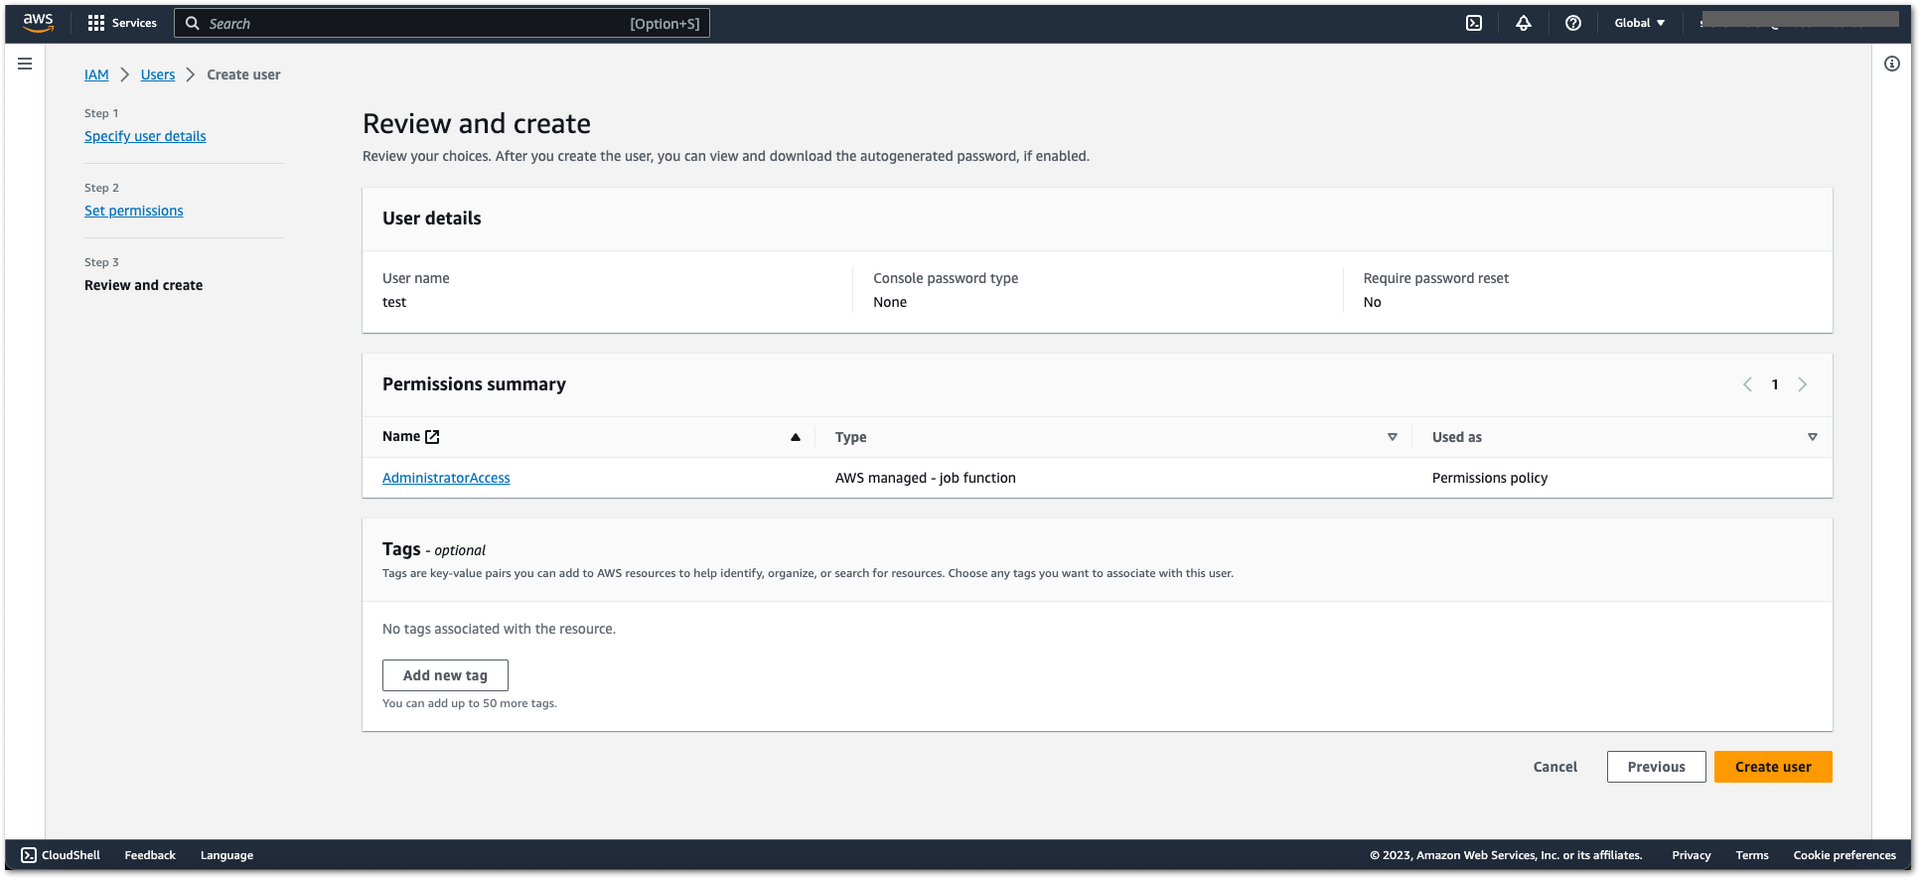 Figure 1: AWS Admin User Creation
- Select the user you just created and click the Security credentials tab.
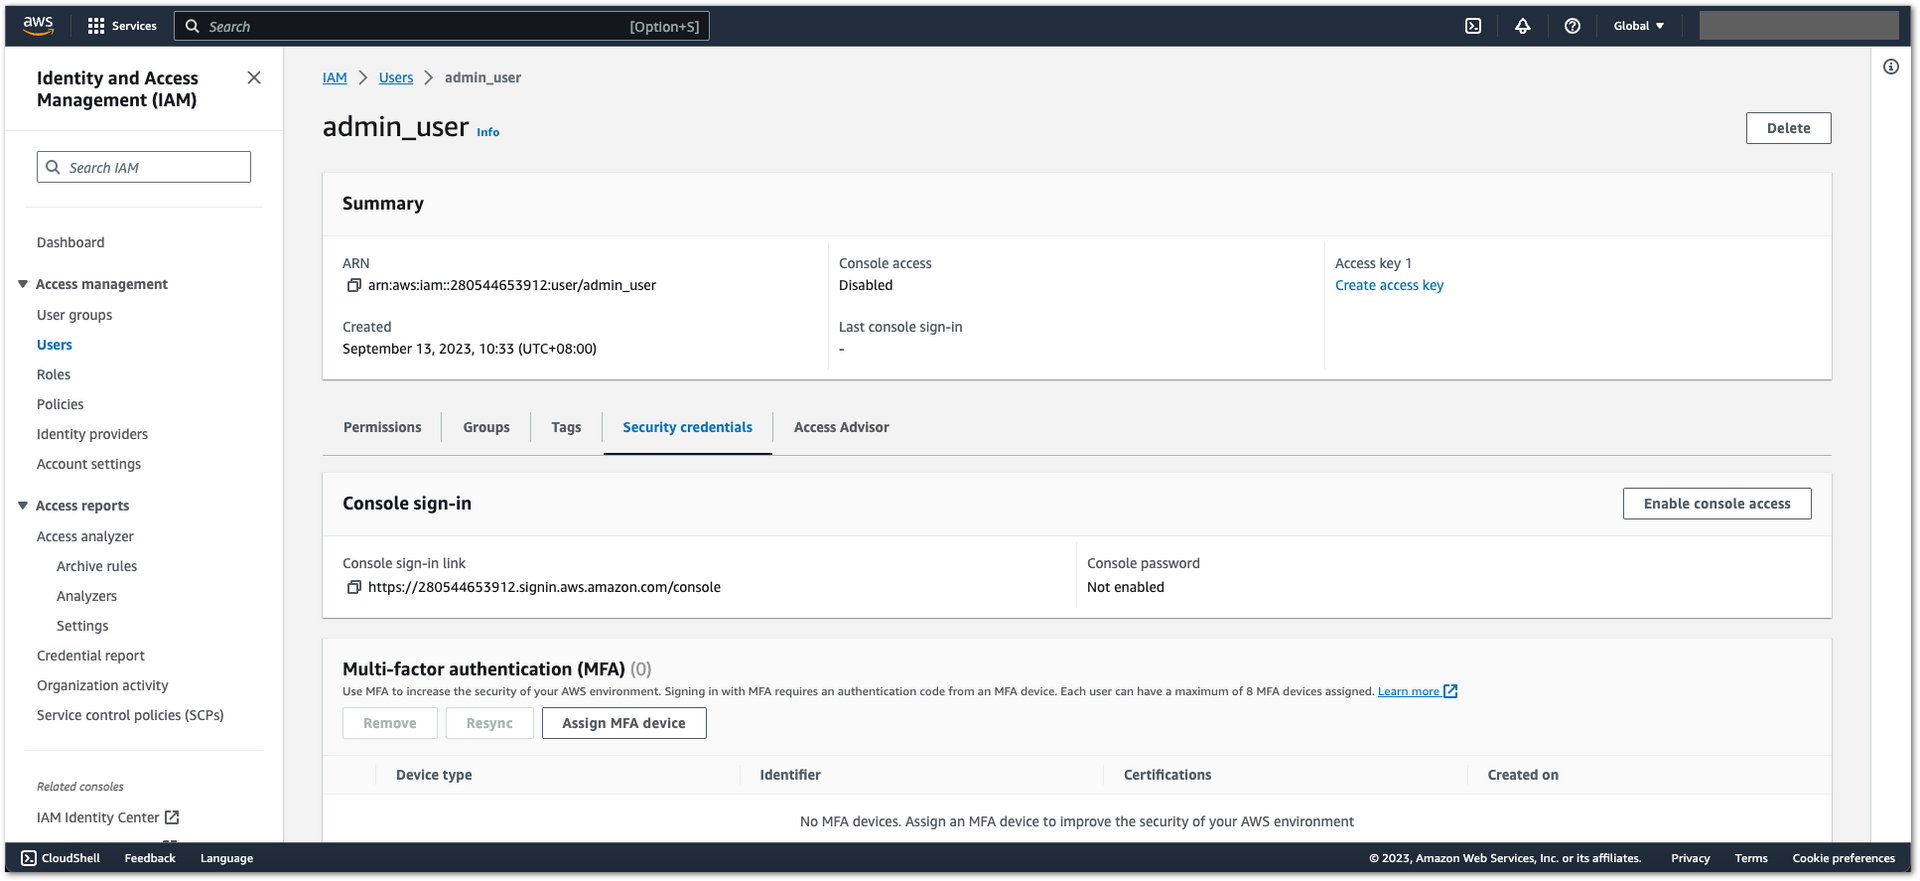 Figure 1: AWS Admin User Creation
- Under the Access keys section, click Create access key.
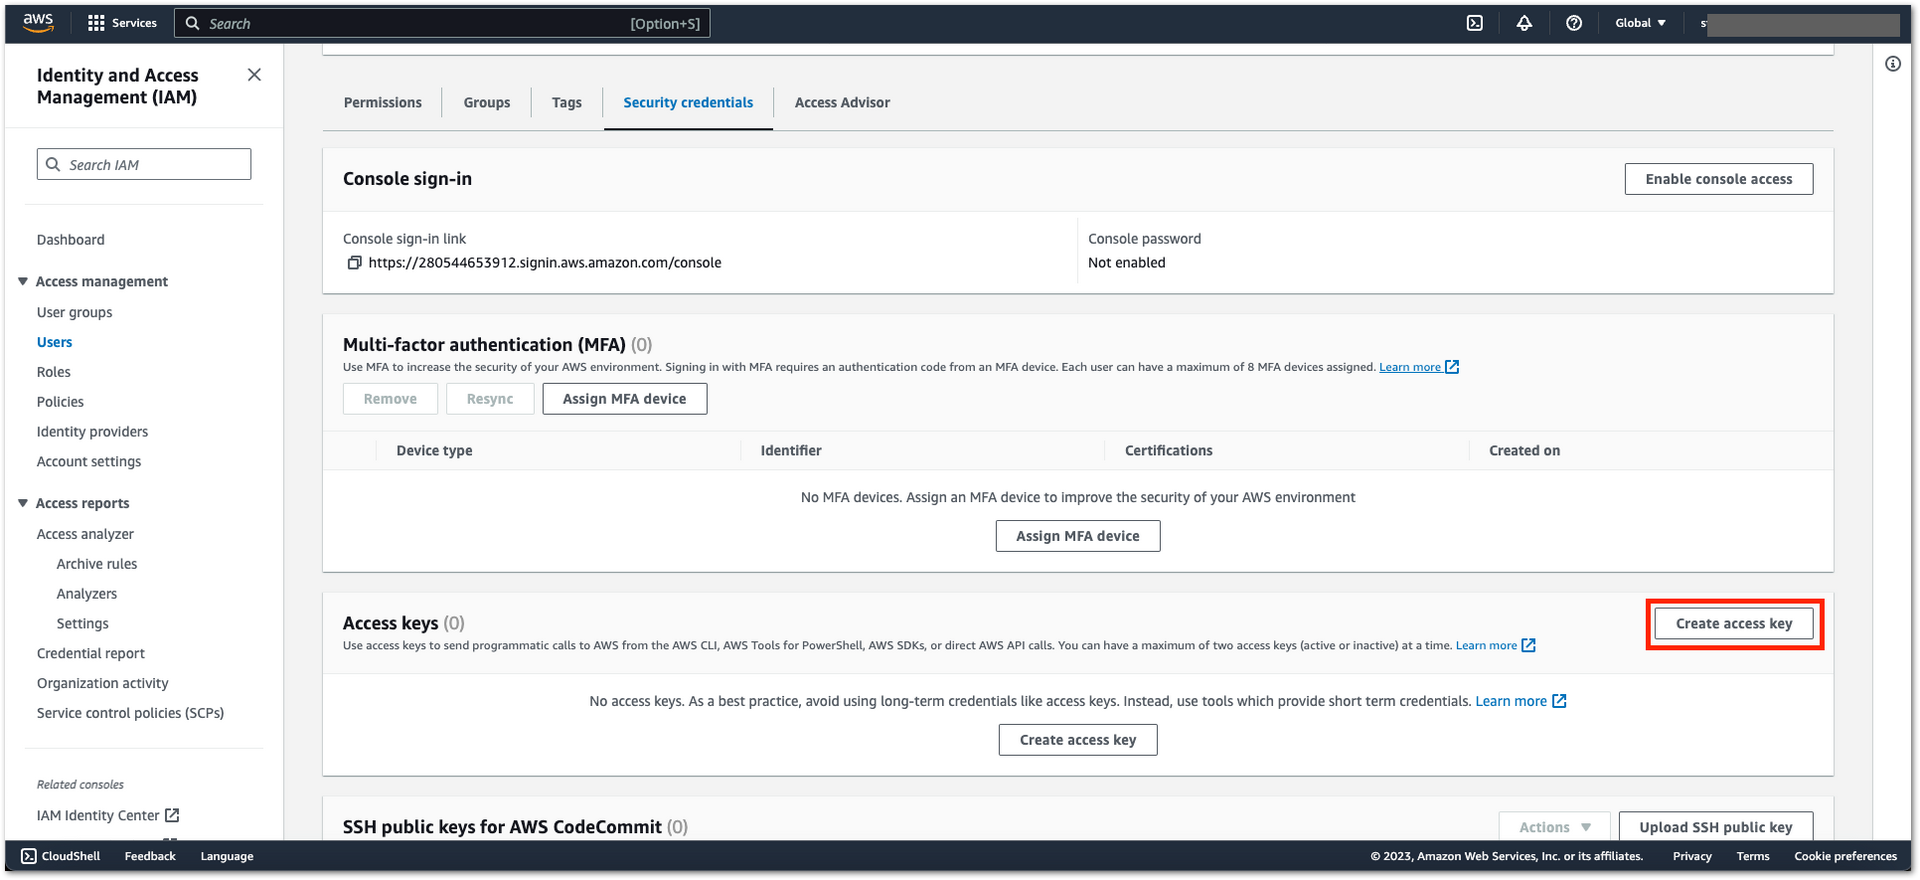 Figure 1: AWS Admin User Creation
- In the Use case page, select Command Line Interface (CLI), then click Next.
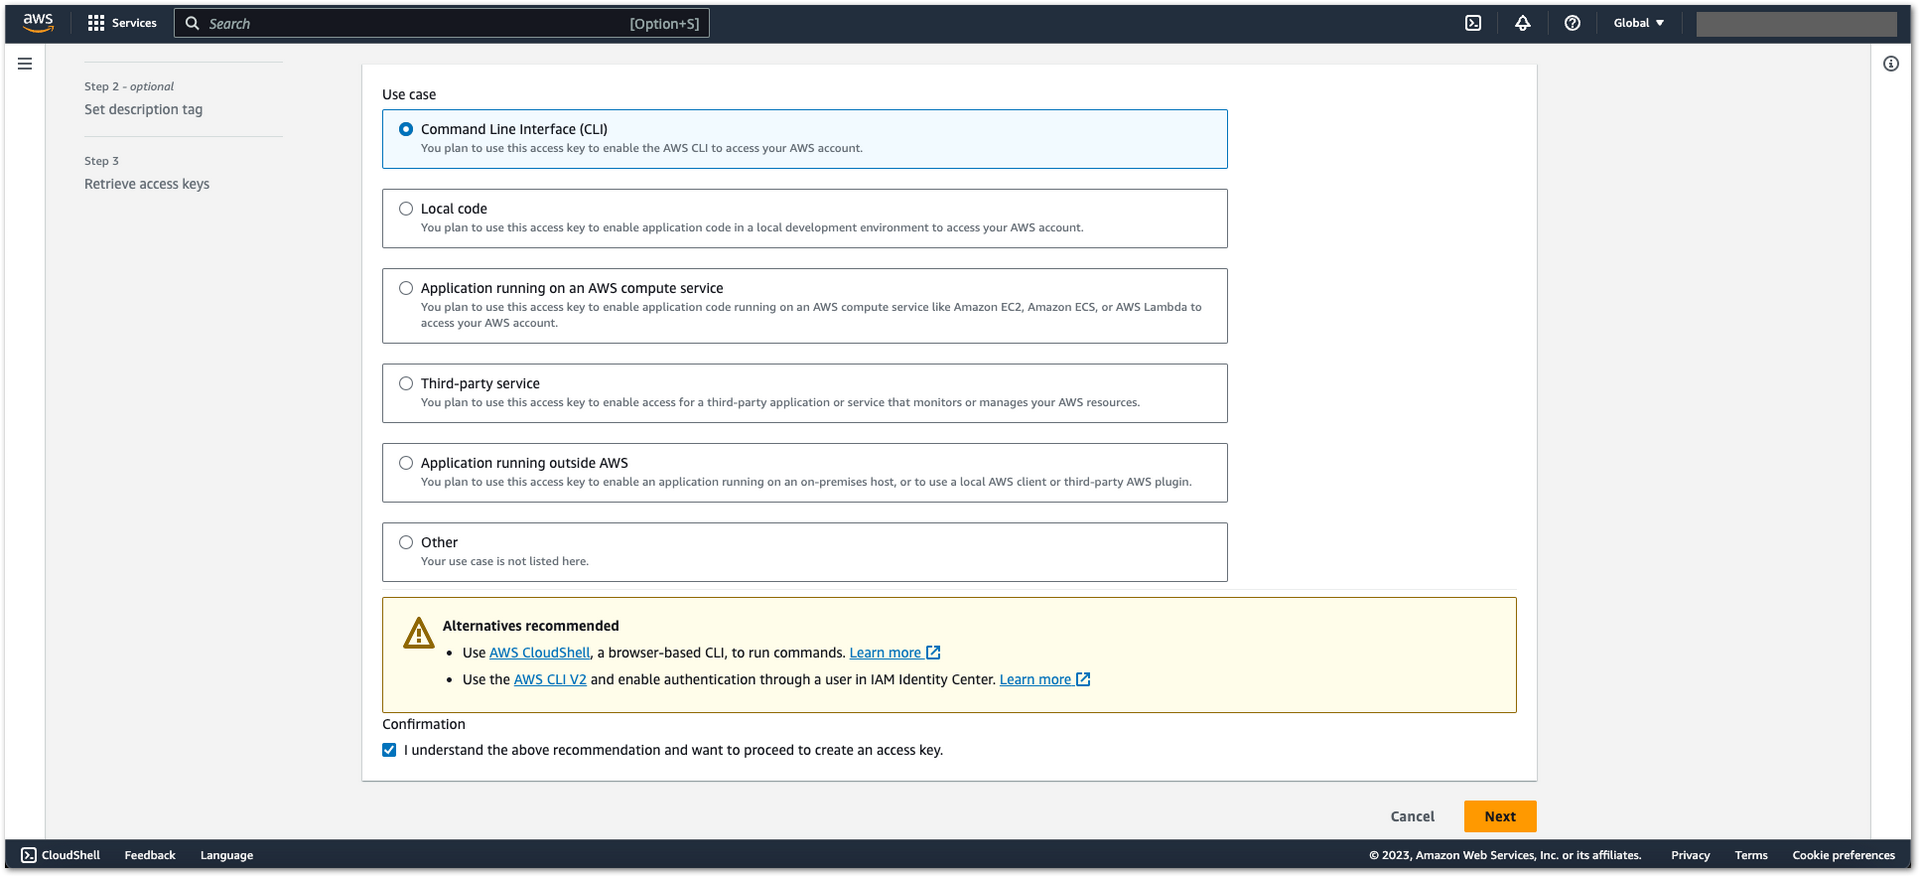 Figure 1: AWS Admin User Creation
- Add a description in the Description tag.
- Click Create access key.
- Download the generated .csv file with the access key. This key will be needed later.
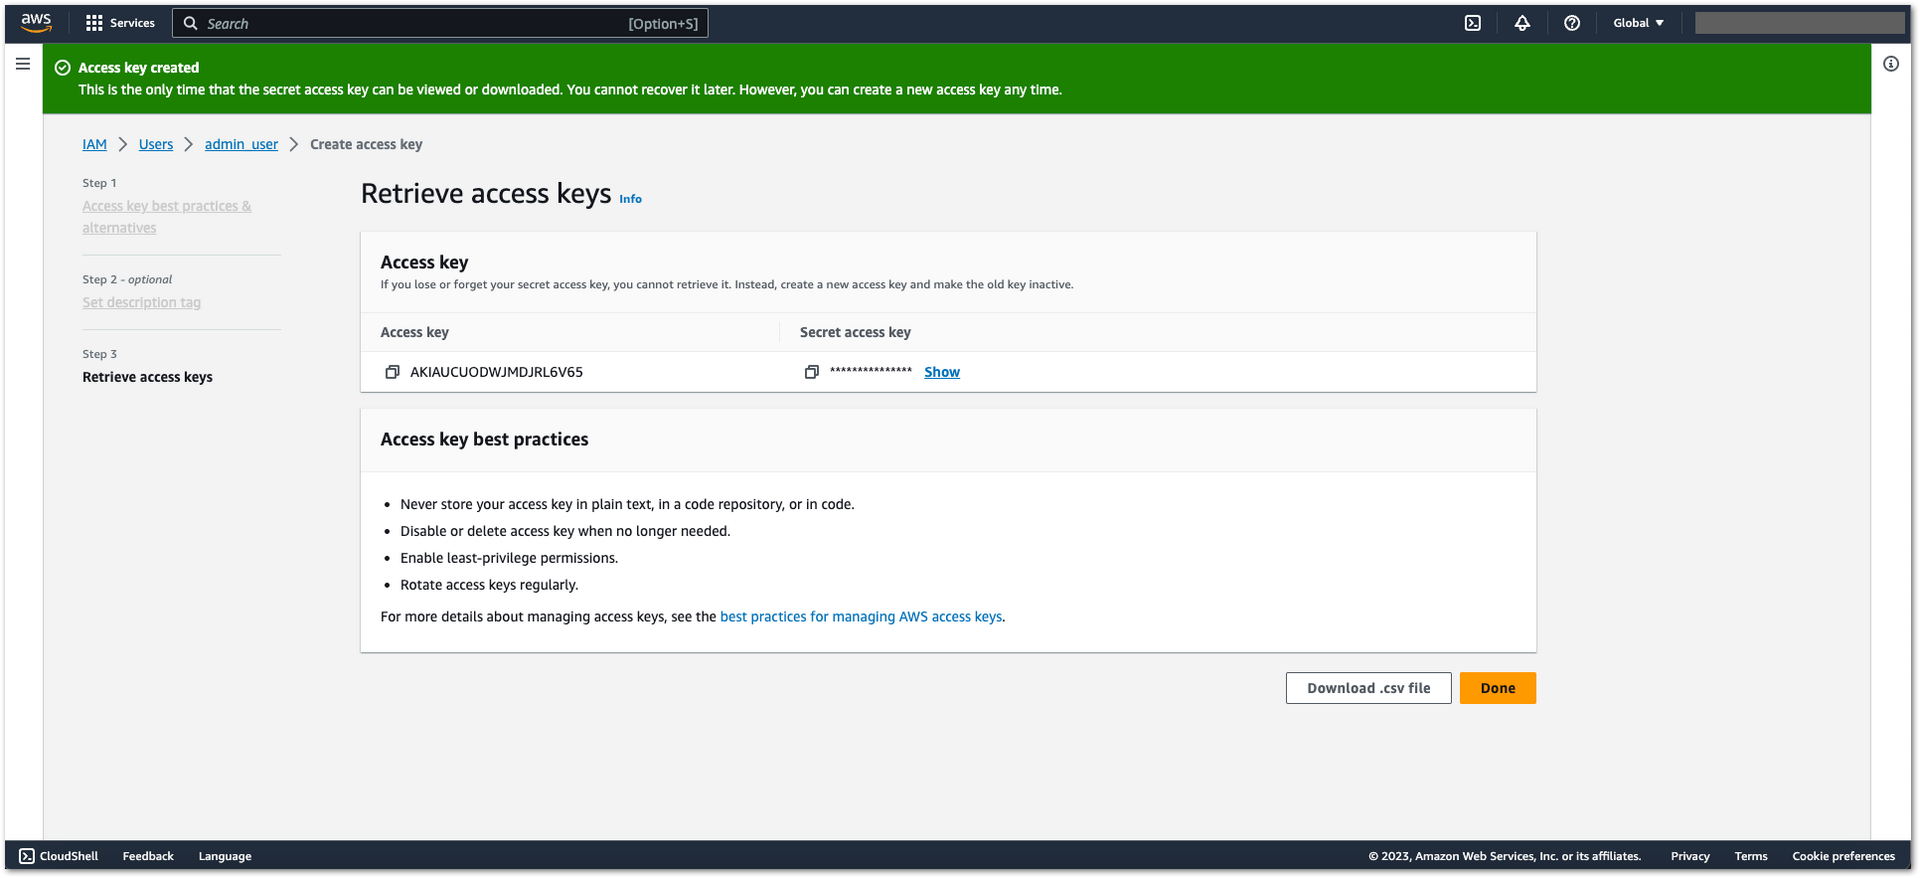 Figure 1: AWS Admin User Creation
Deployment of the Infrastructure and the Device Profile
-
Download and install Python 3.6 or above from Python.org. For the installation steps, refer to the Sidewalk documentation.
-
Install AWS CLI. Execute the listed commands depending on your OS:
- Linux :
curl "https://awscli.amazonaws.com/awscli-exe-linux-x86_64.zip" -o "awscliv2.zip"unzip awscliv2.zipsudo ./aws/install
- macOS :
curl "https://awscli.amazonaws.com/AWSCLIV2.pkg" -o "AWSCLIV2.pkg"sudo installer -pkg AWSCLIV2.pkg -target /
- Windows :
C:\> msiexec.exe /i https://awscli.amazonaws.com/AWSCLIV2.msi
- Linux :
-
Configure AWS credential:
-
Linux and macOS
- Create the credentials file.
- Location:
~/.aws/credentials. - Content :
[default]aws_access_key_id = YOUR_ACCESS_KEYaws_secret_access_key = YOUR_SECRET_KEY
- Location:
- Create the region file.
- Location:
~/.aws/config. - Content :
[default]region=us-east-1
- Location:
- Create the credentials file.
-
Windows
- Create the credentials file.
- Location:
C:\Users\USERNAME\.aws\credentials - Content :
[default]aws_access_key_id = YOUR_ACCESS_KEYaws_secret_access_key = YOUR_SECRET_KEY
- Location:
- Create the region file.
- Location:
C:\Users\USERNAME\.aws\config - Content :
[default]region=us-east-1
- Location:
- Create the credentials file.
-
-
Install a virtual environment.
-
git clone git@github.com:aws-samples/aws-iot-core-for-amazon-sidewalk-sample-app.git -
Open the command line terminal and navigate to the project's top-level directory.
-
Linux and macOS
python3 -m pip install --user virtualenv
python3 -m venv sample-app-env
source sample-app-env/bin/activate
python3 -m pip install --upgrade pip
python3 -m pip install -r requirements.txt
python3 -m pip install pyjwt -t ./ApplicationServerDeployment/lambda/authLibs- Windows
python -m pip install --user virtualenv
python -m venv sample-app-env
sample-app-env\Scripts\activate.bat
python -m pip install --upgrade pip
python -m pip install -r requirements.txt
python -m pip install pyjwt -t .\ApplicationServerDeployment\lambda\authLibs -
-
Fill out the configuration file
config.yamlwith your details.
Ensure that USERNAME and PASSWORD have been changed to your login credentials, as they will be used for logging into the Sensor Monitor app.
| Field | Default Value | Description |
|---|---|---|
| AWS_PROFILE | Default | Name of your AWS profile from .aws/credentials |
| DESTINATION_NAME | SensorAppDestination | The Sidewalk destination used for uplink traffic routing. Can be any string. |
| HARDWARE_PLATFORM | NORDIC | |
| USERNAME | Null (need to be overwritten) | User for the WebApp |
| PASSWORD | Null (need to be overwritten) | User for the WebApp |
| INTERACTIVE_MODE | True | Enables interactive mode (confirmation prompts). |
- Run a helper
env_check.pyscript to sanity check your environment against the most common errors.
python3 env_check.py
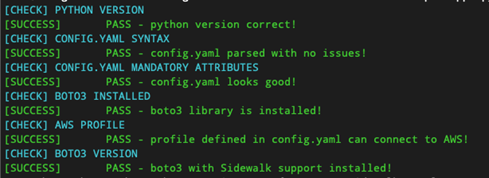 Figure 1: Environment Test Script
- Run a deployment script.
python3 ApplicationServerDeployment/deploy_stack.py
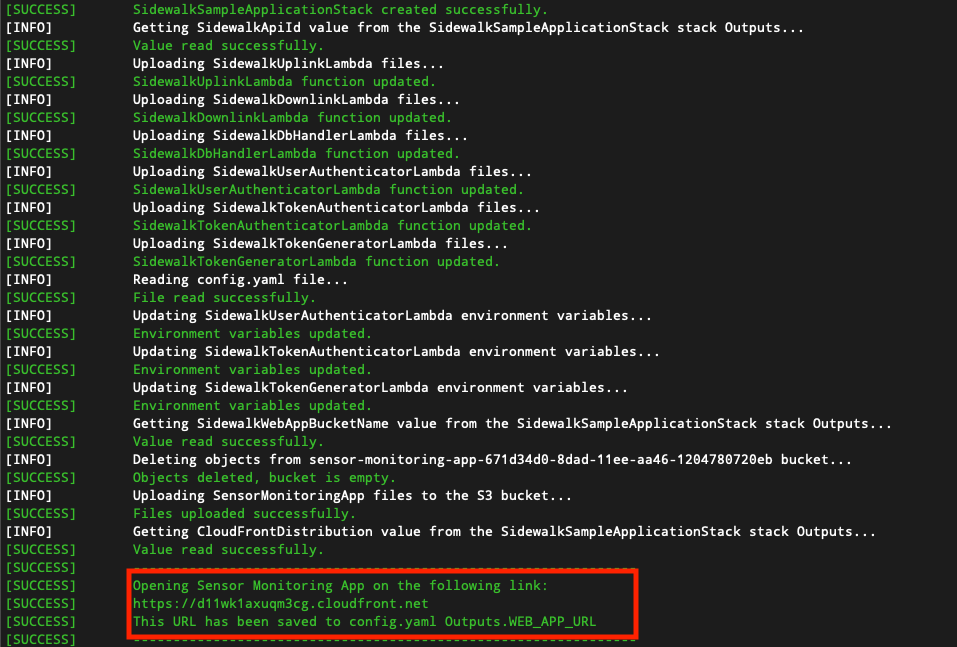 Figure 1: Deployment of Sidewalk Stack
Create the Device Profile
You can create a device profile on your own or let the system create it for you. If you choose to have the system create it, proceed directly the next section: Create the Device Provisioning Key.
- Login to AWS as the admin user.
- Make sure to set the region to us-east-1, and click IoT Core.
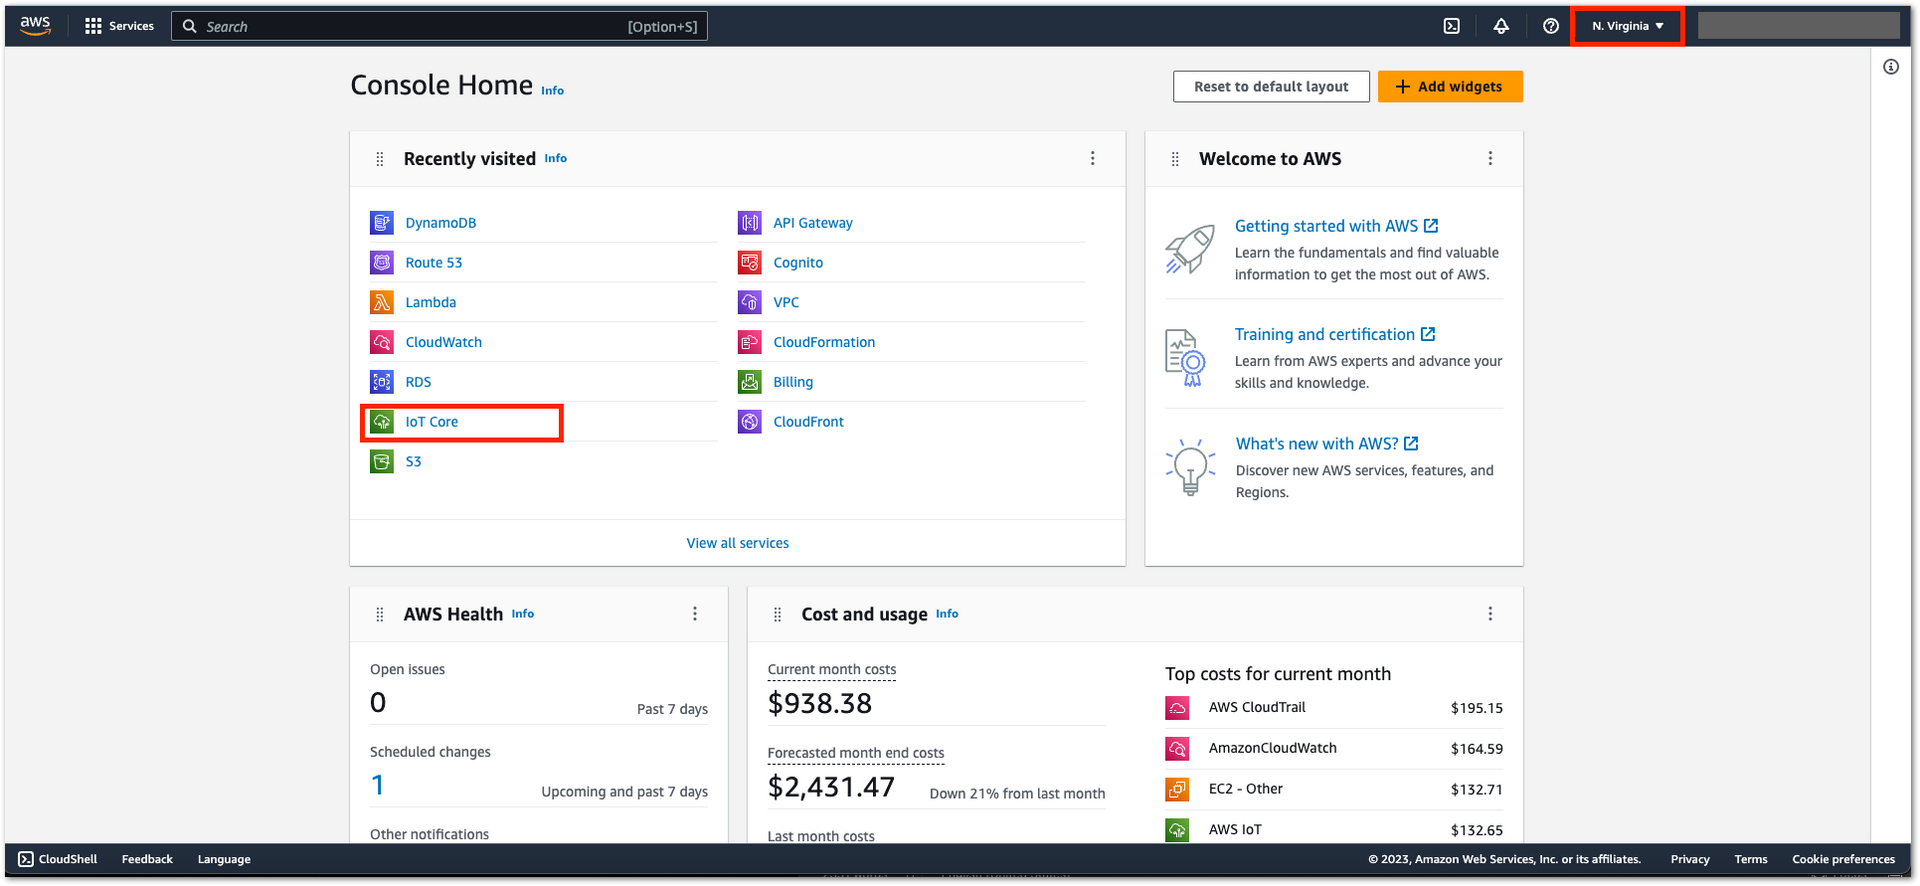 Figure 1: Device Profile Creation
- Navigate to LPWAN devices > Devices > Add device profile.
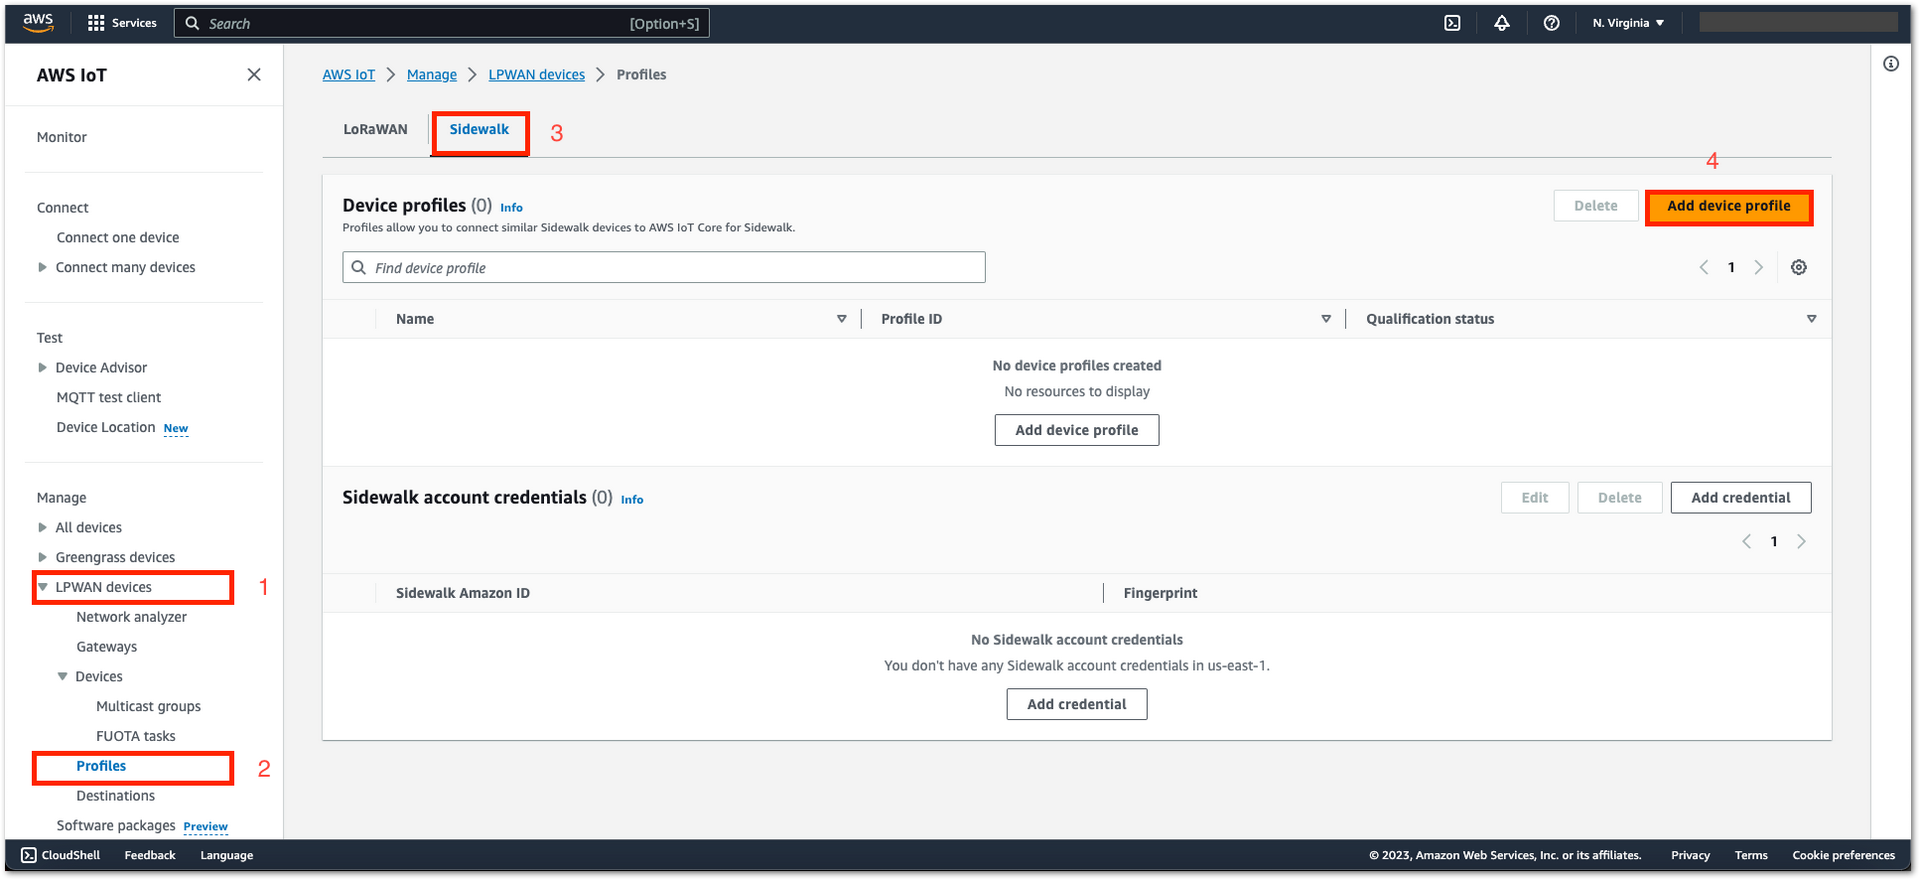 Figure 1: Device Profile Creation
- Enter your profile name, then click Submit.
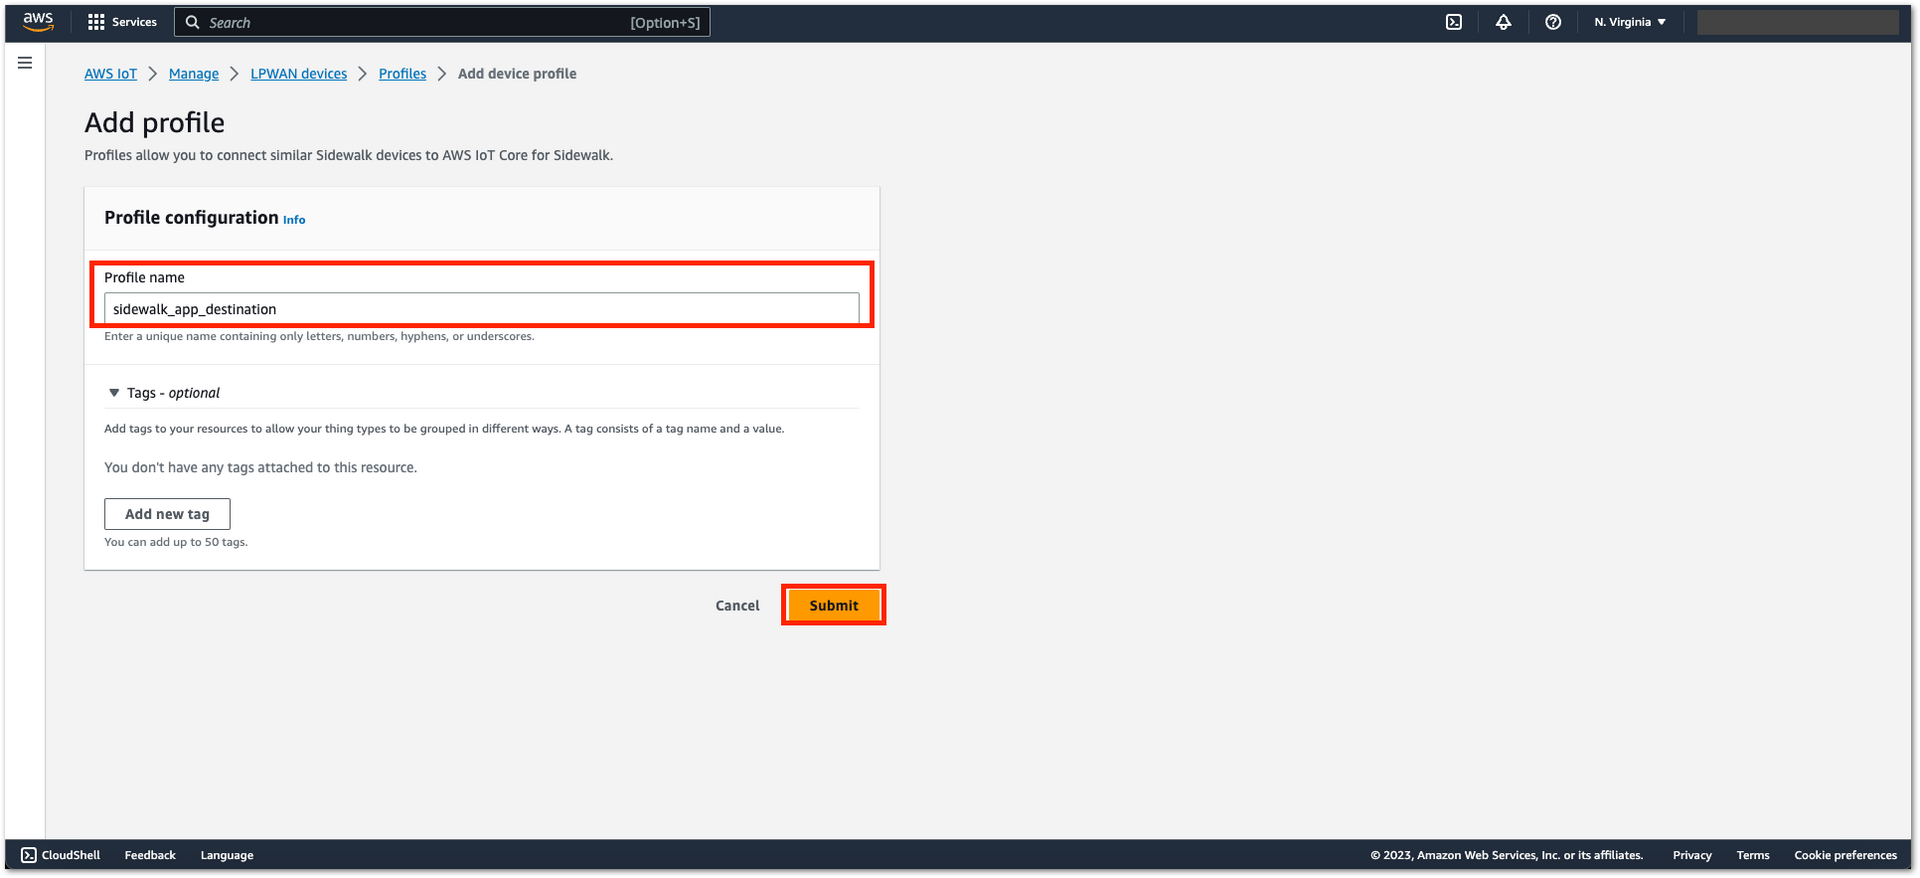 Figure 1: Device Profile Creation
- You should see the newly added device profile.
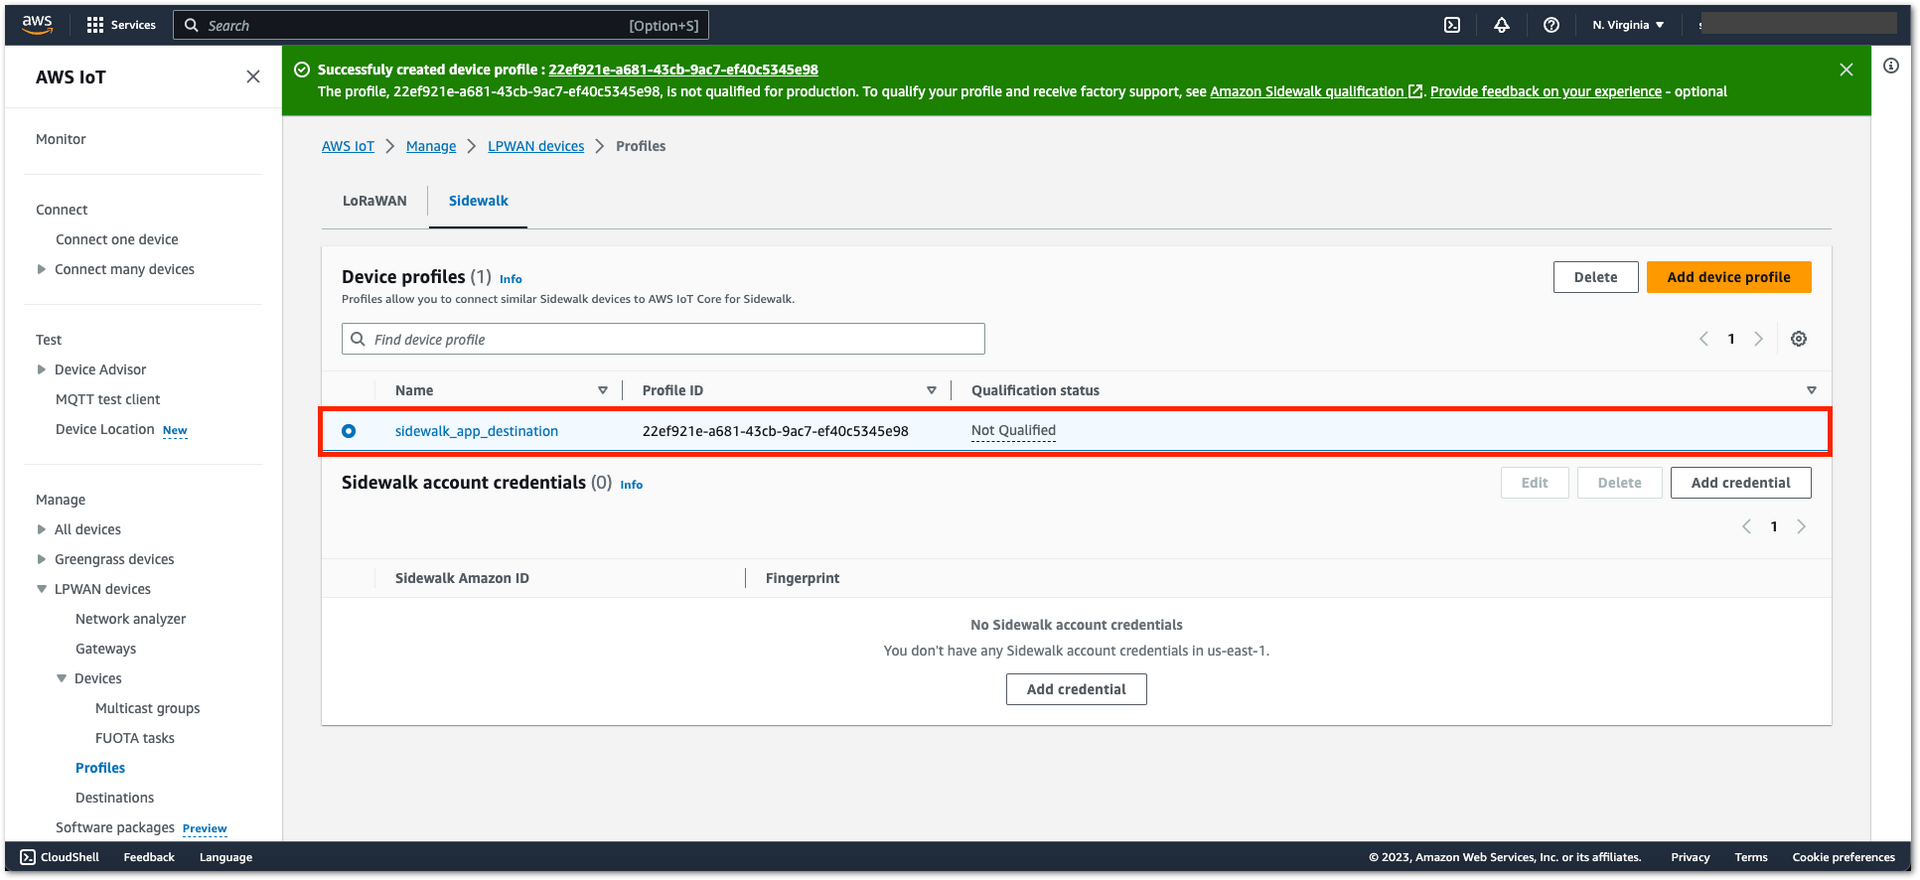 Figure 1: Device Profile Creation
- Copy the Profile ID to the config.yaml.
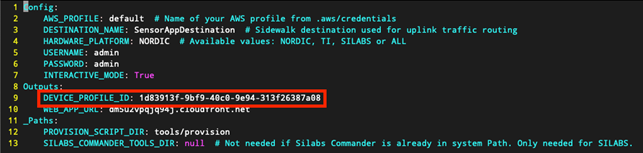 Figure 1: Device Profile Creation
Create the Device Provisioning Key
- Ensure that you are using the Python virtual environment
sample-app-env. Otherwise, execute the following commands:
- Linux and macOS
source sample-app-env/bin/activate
python3 -m pip install --upgrade pip
python3 -m pip install -r requirements.txt
python3 -m pip install pyjwt -t ./ApplicationServerDeployment/lambda/authLibs
- Windows
sample-app-env\Scripts\activate.bat
python -m pip install --upgrade pip
python -m pip install -r requirements.txt
python -m pip install pyjwt -t .\ApplicationServerDeployment\lambda\authLibs
- Run the device provisioning script:
- Single device:
python3 EdgeDeviceProvisioning/provision_sidewalk_end_device.py - Multiple devices:
python3 EdgeDeviceProvisioning/provision_sidewalk_end_device.py --instances 5 - You will receive a response when the provisioning script is complete.
- Single device:
INFO:root:Status: 200
INFO:root:Saving wireless device to file
INFO:root:Generating MFG by calling provision.py
INFO:root:Generating MFG.hex for Nordic
INFO:root:Done!
- Login to AWS as the admin user. Make sure to set the region to us-east-1, then click IoT Core.
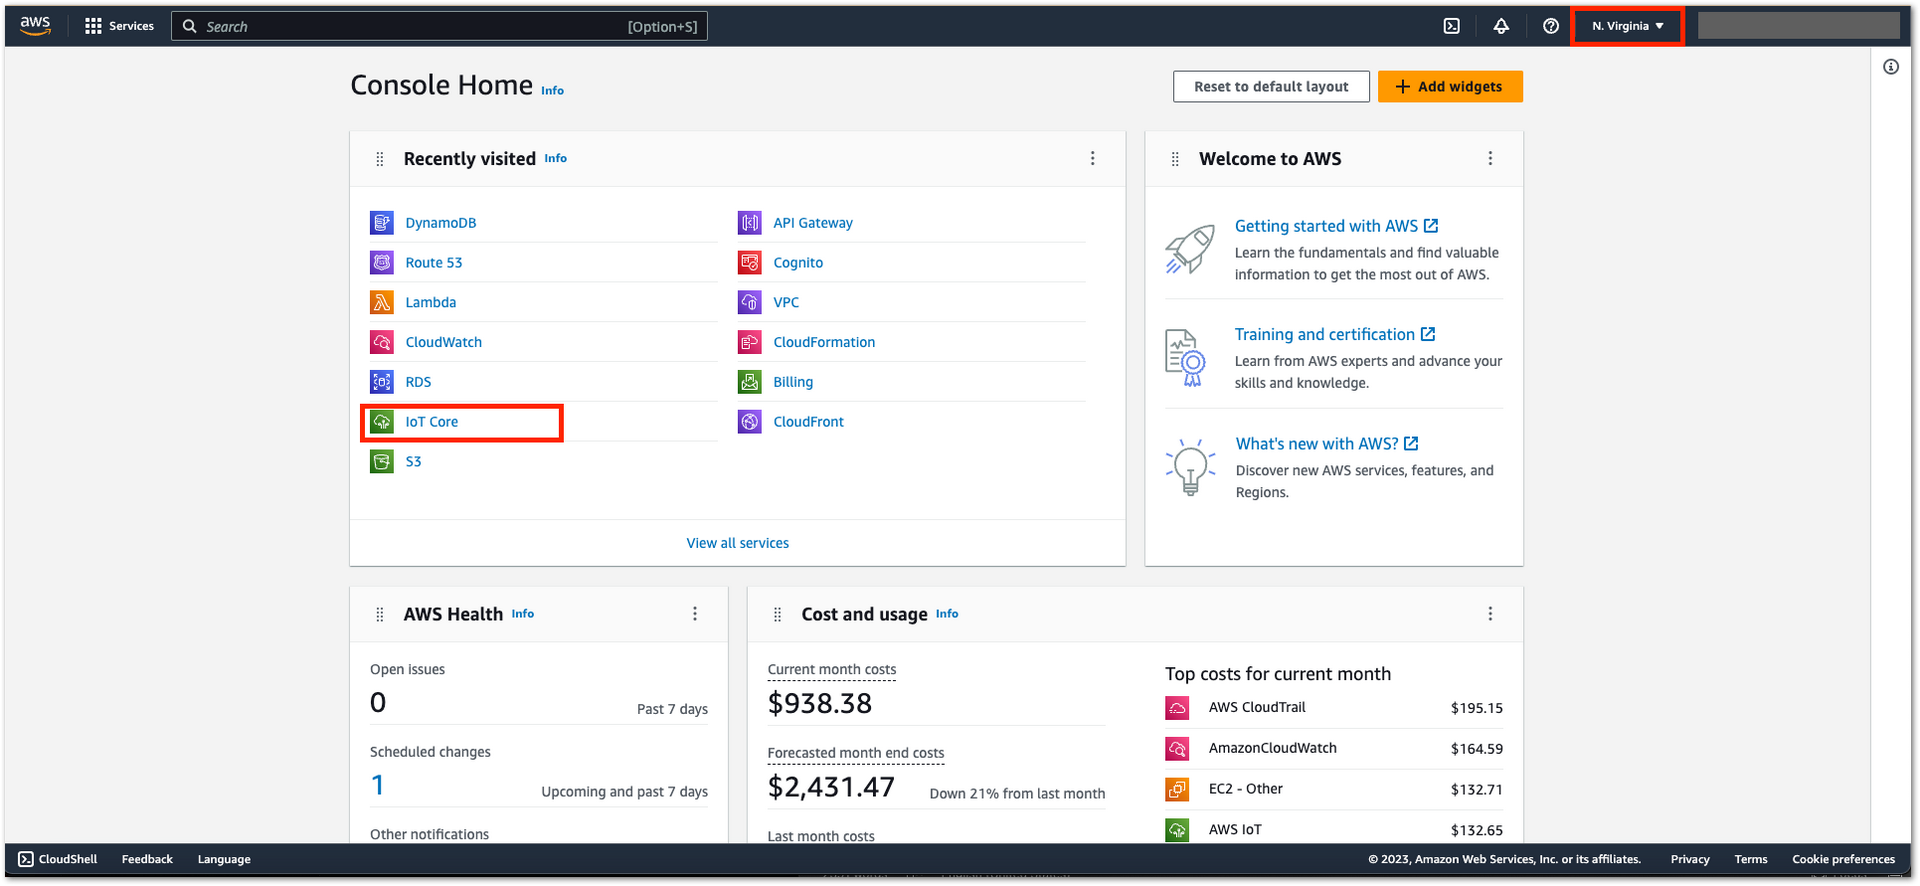 Figure 1: Device provisioning
- For provisioning and managing all your Sidewalk devices, navigate to LPWAN devices > Devices > Sidewalk.
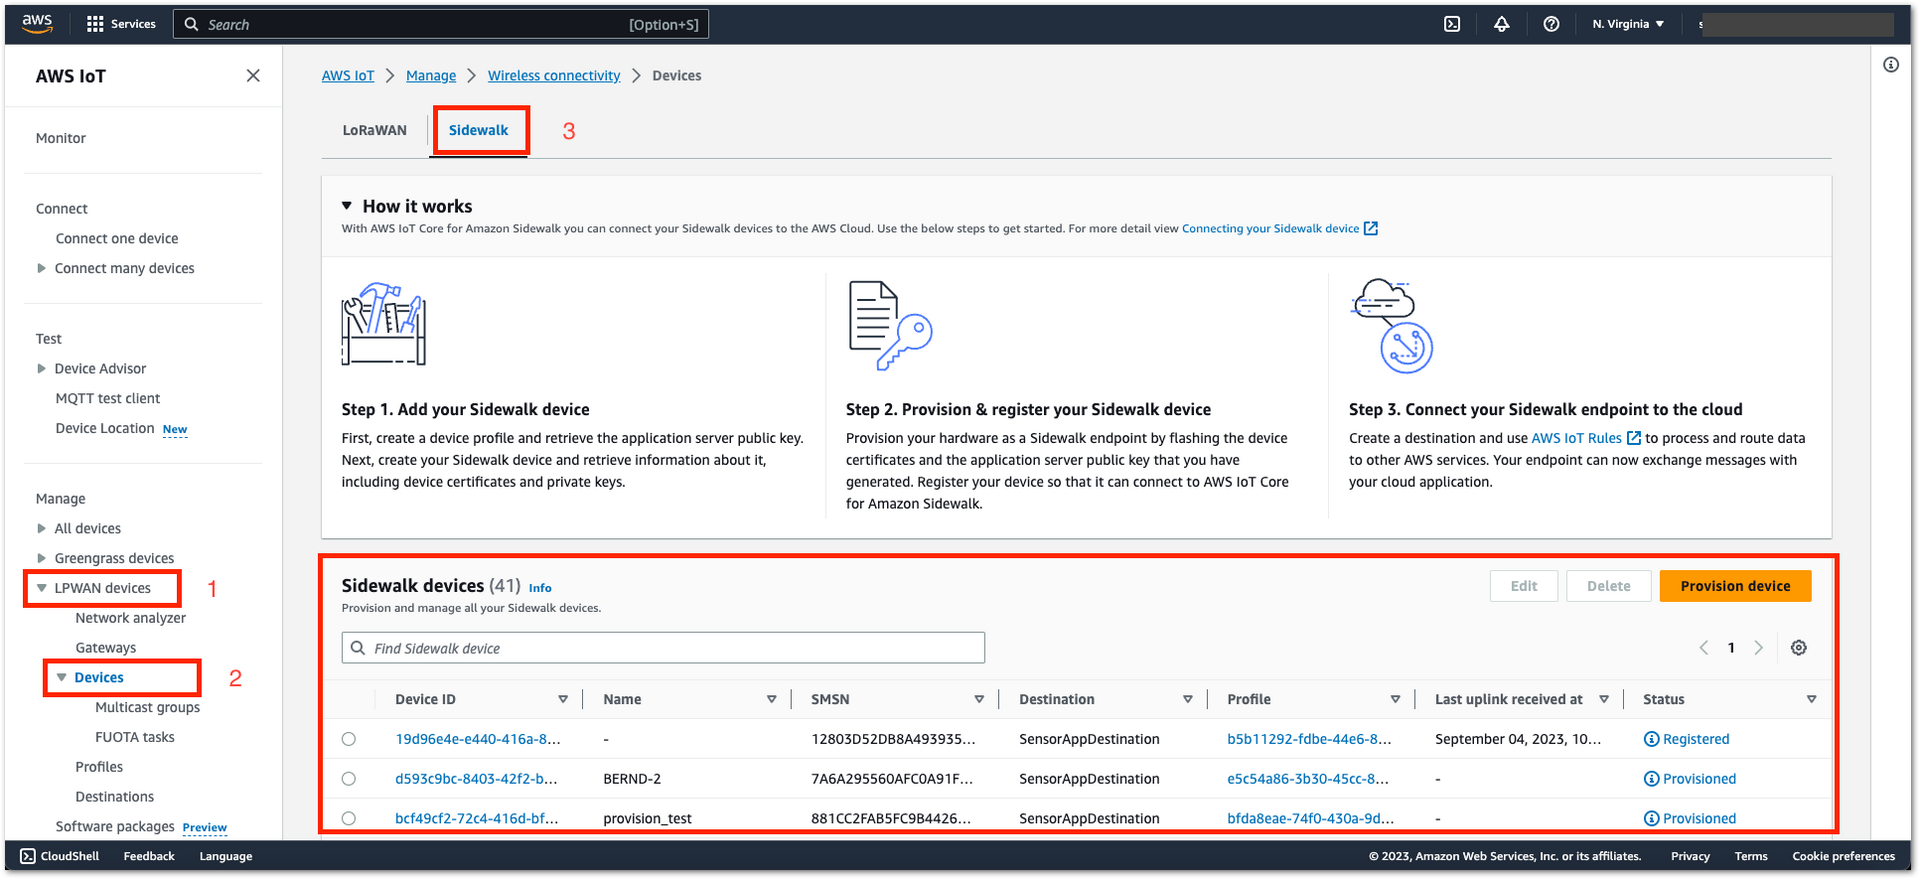 Figure 1: Provisioned devices
You should see the provisioned devices in the Sidewalk Devices section.
Update Lambda to Match the Decoding Method of RAKwireless
- Login to AWS as the admin user.
- Make sure to set the region to us-east-1, then click IoT Core.
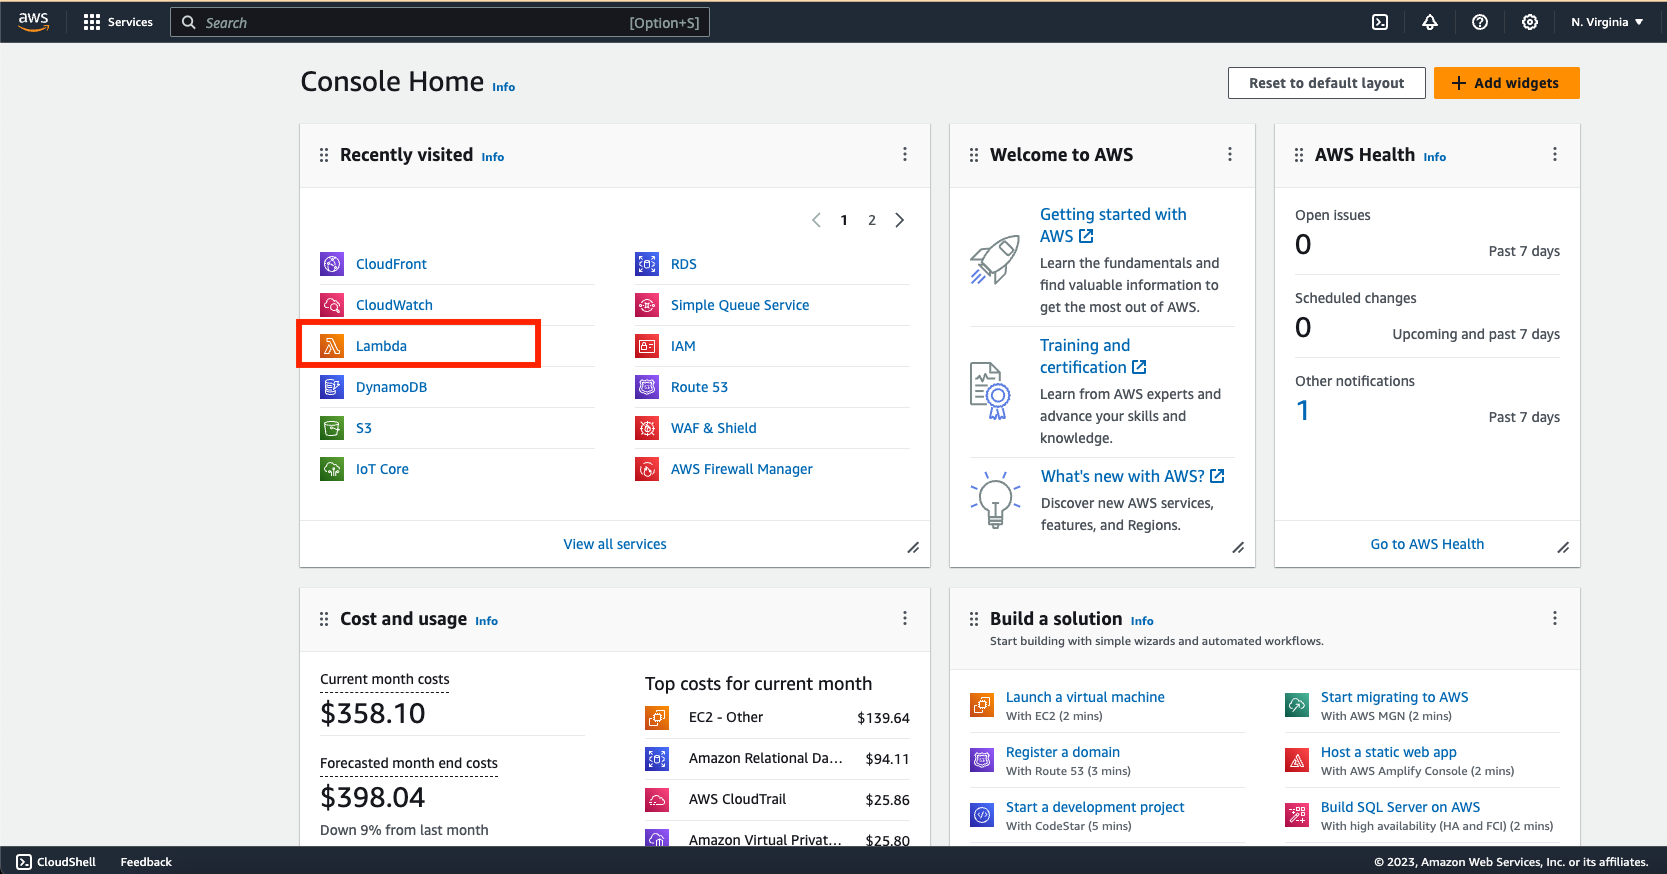 Figure 1: Lambda
- Click SidewalkUplinkLambda.
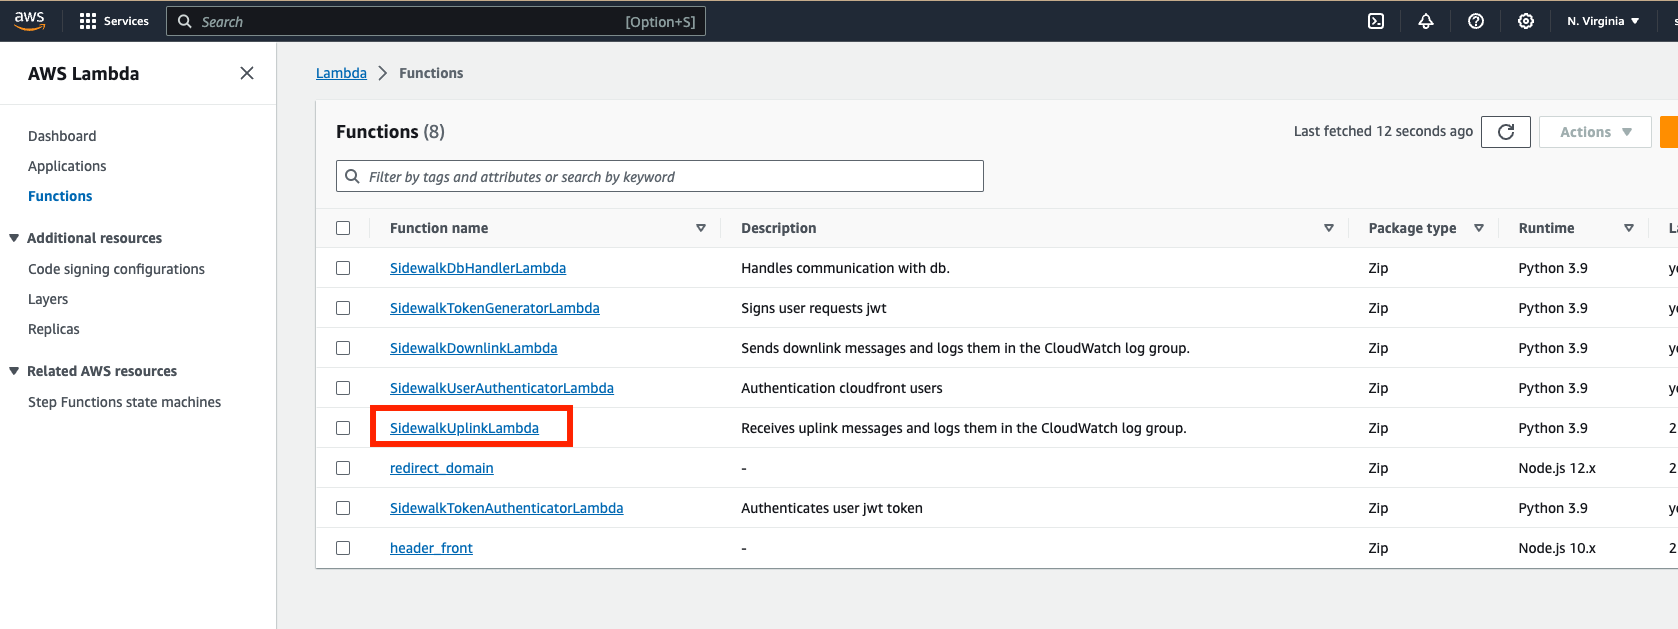 Figure 1: SidewalkUplinkLambda
- Replace the contents in
uplink_lambda_handler.pywith the following code:
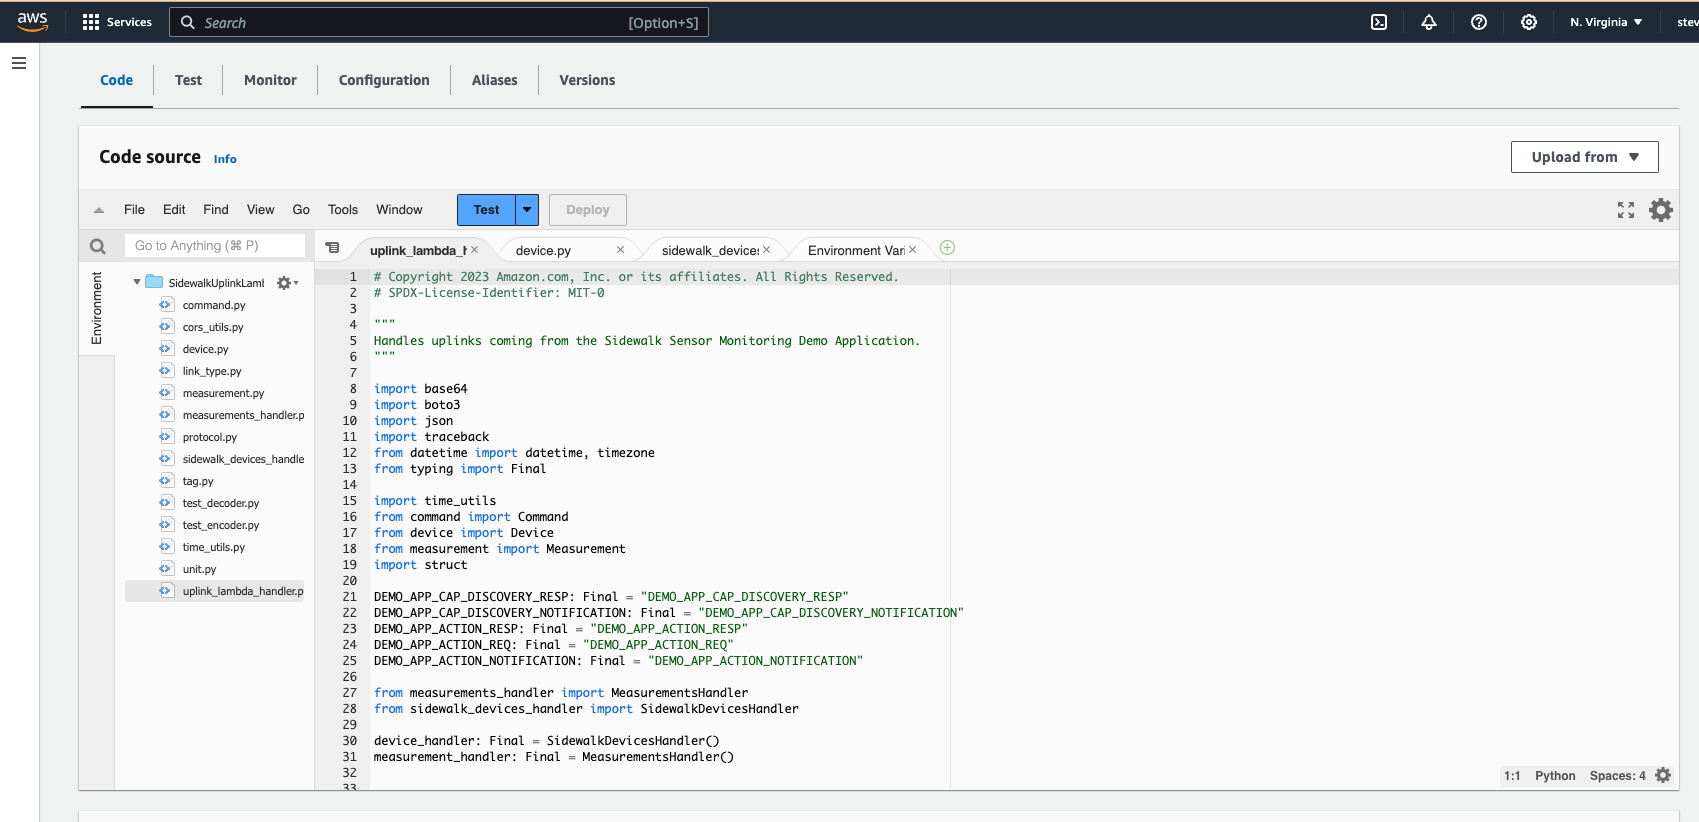 Figure 1: SidewalkUplinkLambda
# Copyright 2023 Amazon.com, Inc. or its affiliates. All Rights Reserved.
# SPDX-License-Identifier: MIT-0
"""
Handles uplinks coming from the Sidewalk Sensor Monitoring Demo Application.
"""
import base64
import boto3
import json
import traceback
from datetime import datetime, timezone
from typing import Final
import time_utils
from command import Command
from device import Device
from measurement import Measurement
import struct
DEMO_APP_CAP_DISCOVERY_RESP: Final = "DEMO_APP_CAP_DISCOVERY_RESP"
DEMO_APP_CAP_DISCOVERY_NOTIFICATION: Final = "DEMO_APP_CAP_DISCOVERY_NOTIFICATION"
DEMO_APP_ACTION_RESP: Final = "DEMO_APP_ACTION_RESP"
DEMO_APP_ACTION_REQ: Final = "DEMO_APP_ACTION_REQ"
DEMO_APP_ACTION_NOTIFICATION: Final = "DEMO_APP_ACTION_NOTIFICATION"
from measurements_handler import MeasurementsHandler
from sidewalk_devices_handler import SidewalkDevicesHandler
device_handler: Final = SidewalkDevicesHandler()
measurement_handler: Final = MeasurementsHandler()
def decode_payload_rak(payload):
try:
decoded_data = base64.b64decode(payload).decode('ascii')
hex_array = [decoded_data[i:i+2] for i in range(0, len(decoded_data), 2)]
hex_array = hex_array[3:-7]
reverse_string = ''.join(hex_array[1:5][::-1])
temp = struct.unpack('!f', bytes.fromhex(reverse_string))[0]
print(temp)
return temp
except Exception as e:
print("Error decoding payload:", e)
def send_payload_to_downlink_lambda(command: str, wireless_device_id: str, button_pressed=None):
"""
Sends commands to the SidewalkDownlinkLambda.
:param command: Command to be sent.
:param wireless_device_id: Id of the wireless device.
:param button_pressed: List of indices of the buttons being pressed.
:return: Response from the SidewalkDownlinkLambda.
"""
client = boto3.client('lambda')
downlink_payload = '{"body": {' \
' "command":"' + command + '",' \
' "deviceId":"' + wireless_device_id + '"'
if button_pressed is not None:
downlink_payload += ', "button_press":' + str(button_pressed)
downlink_payload += '}, ' \
'"httpMethod": "POST"' \
'}'
json_body = json.dumps(downlink_payload).encode('utf-8')
response = client.invoke(FunctionName='SidewalkDownlinkLambda',
Payload=json_body)
response_body = response["Payload"].read().decode()
print(f'Response from SidewalkDownlinkLambda: {response_body}')
return response_body
def lambda_handler(event, context):
"""
Handles events triggered by incoming uplink messages or notifications.
"""
try:
# ---------------------------------------------------------------
# Receive and record incoming event in the CloudWatch log group.
# Read its metadata.
# Decode payload data.
# ---------------------------------------------------------------
print(f'Received event: {event}')
notification = event.get("notification")
if notification is not None:
return {
'statusCode': 200,
'body': json.dumps('Notification received')
}
uplink = event.get("uplink")
if uplink is None:
print("Unsupported request received {}".format(event))
return {
'statusCode': 400,
'body': json.dumps('Unsupported request received. Only uplink and notification are supported')
}
wireless_metadata = uplink.get("WirelessMetadata")
wireless_device_id = uplink.get("WirelessDeviceId")
sidewalk = wireless_metadata.get("Sidewalk")
data = uplink.get("PayloadData")
data_bytes = data.encode('ascii')
decoded_data = base64.b64decode(data_bytes).decode('ascii')
# ---------------------------------------------
# Decode and handle demo app specific commands
# ---------------------------------------------
decoder = Command()
decoded_payload = decoder.decode(decoded_data).decoded_cmd
ul_time = decoded_payload.get("gps_time")
ul_latency = 'no latency info'
datetime_now = datetime.now(timezone.utc)
if ul_time is not None:
ul_latency = str((datetime_now - time_utils.convert_gps_to_utc(ul_time)).total_seconds())
print(f'WirelessDeviceId: {wireless_device_id} DecodedPayload: {decoded_payload} Seqn: {sidewalk.get("Seq")} '
f'Uplink latency: {ul_latency}')
command = decoded_payload["id"]
if command is None or command == "":
return {
'statusCode': 400,
'body': json.dumps('Received no command from request ' + decoded_payload)
}
elif command == DEMO_APP_CAP_DISCOVERY_NOTIFICATION:
led = decoded_payload.get("leds", [])
buttons = decoded_payload.get("buttons", [])
sensor = decoded_payload.get("sensor", False)
sensor_units = decoded_payload.get("sensor_units")
link_type = decoded_payload.get("link_type")
button_pressed = []
seq_n = sidewalk.get("Seq")
for button in buttons:
button_info = {"id": button, "seqN": seq_n, "state": 0}
button_pressed.append(button_info)
device = Device(wireless_device_id=wireless_device_id,
led=led, led_on=[],
button=buttons, button_pressed=button_pressed,
link_type=link_type,
sensor=sensor, sensor_unit=sensor_units)
device_handler.add_device(device)
response_body = send_payload_to_downlink_lambda(DEMO_APP_CAP_DISCOVERY_RESP, wireless_device_id)
return {
'statusCode': 200,
'body': json.dumps('Hello from DEMO_APP_CAP_DISCOVERY_NOTIFICATION! Resp' +
' Body: ' + response_body)
}
elif command == DEMO_APP_ACTION_RESP:
dl_latency = decoded_payload.get("dl_latency", 0)
led_on = decoded_payload.get("led_on_resp", [])
led_off = decoded_payload.get("led_off_resp", [])
# get device
device = device_handler.get_device(wireless_device_id)
led_on_set = set(device.get_led_on())
# update leds
led_on_set.update(led_on)
led_on_set.difference_update(led_off)
device.set_led_on(list(led_on_set))
device_handler.update_led_and_last_uplink(
device.get_wireless_device_id(),
device.get_led_on()
)
print(f'Downlink latency: {dl_latency if dl_latency < 1000 else 0}') # 'if' introduced in case of edge device time drift
return {
'statusCode': 200,
'body': json.dumps('Hello from DEMO_APP_ACTION_RESP!')
}
elif command == DEMO_APP_ACTION_NOTIFICATION:
if "sensor_data" in decoded_payload:
#sensor_data = decoded_payload["sensor_data"]
sensor_data = decode_payload_rak(data)
link_type = decoded_payload["link_type"]
device = Device(wireless_device_id, link_type=link_type)
device_handler.update_link_type_and_last_uplink(
device.get_wireless_device_id(),
device.get_link_type()
)
time_now = datetime_now.timestamp()
measurement = Measurement(wireless_device_id=wireless_device_id,
temperature=sensor_data,
timestamp=int(round(time_now * 1000)))
measurement_handler.add_measurement(measurement)
if "button_press" in decoded_payload:
buttons_pressed = decoded_payload.get("button_press", [])
seq_n = sidewalk.get("Seq")
# get device
device = device_handler.get_device(wireless_device_id)
device_buttons = device.get_button_pressed()
for button in device_buttons:
if button["id"] in buttons_pressed:
if button["seqN"] < seq_n:
button["state"] = 1 - button["state"]
button["seqN"] = seq_n
device.button_pressed = device_buttons
device_handler.update_button_and_last_uplink(
device.get_wireless_device_id(),
device.button_pressed
)
response_body = send_payload_to_downlink_lambda(DEMO_APP_ACTION_RESP, wireless_device_id,
button_pressed=buttons_pressed)
return {
'statusCode': 200,
'body': json.dumps('Hello from DEMO_APP_ACTION_NOTIFICATION! Resp' +
' Body: ' + response_body)
}
return {
'statusCode': 200,
'body': json.dumps('Hello from DEMO_APP_ACTION_NOTIFICATION!')
}
else:
return {
'statusCode': 400,
'body': json.dumps('Command ' + command + 'is not supported. Payload ' + decoded_payload)
}
except Exception:
print(f'Unexpected error occurred: {traceback.format_exc()}')
return {
'statusCode': 500,
'body': json.dumps('Unexpected error occurred: ' + traceback.format_exc())
}
- Click Deploy.
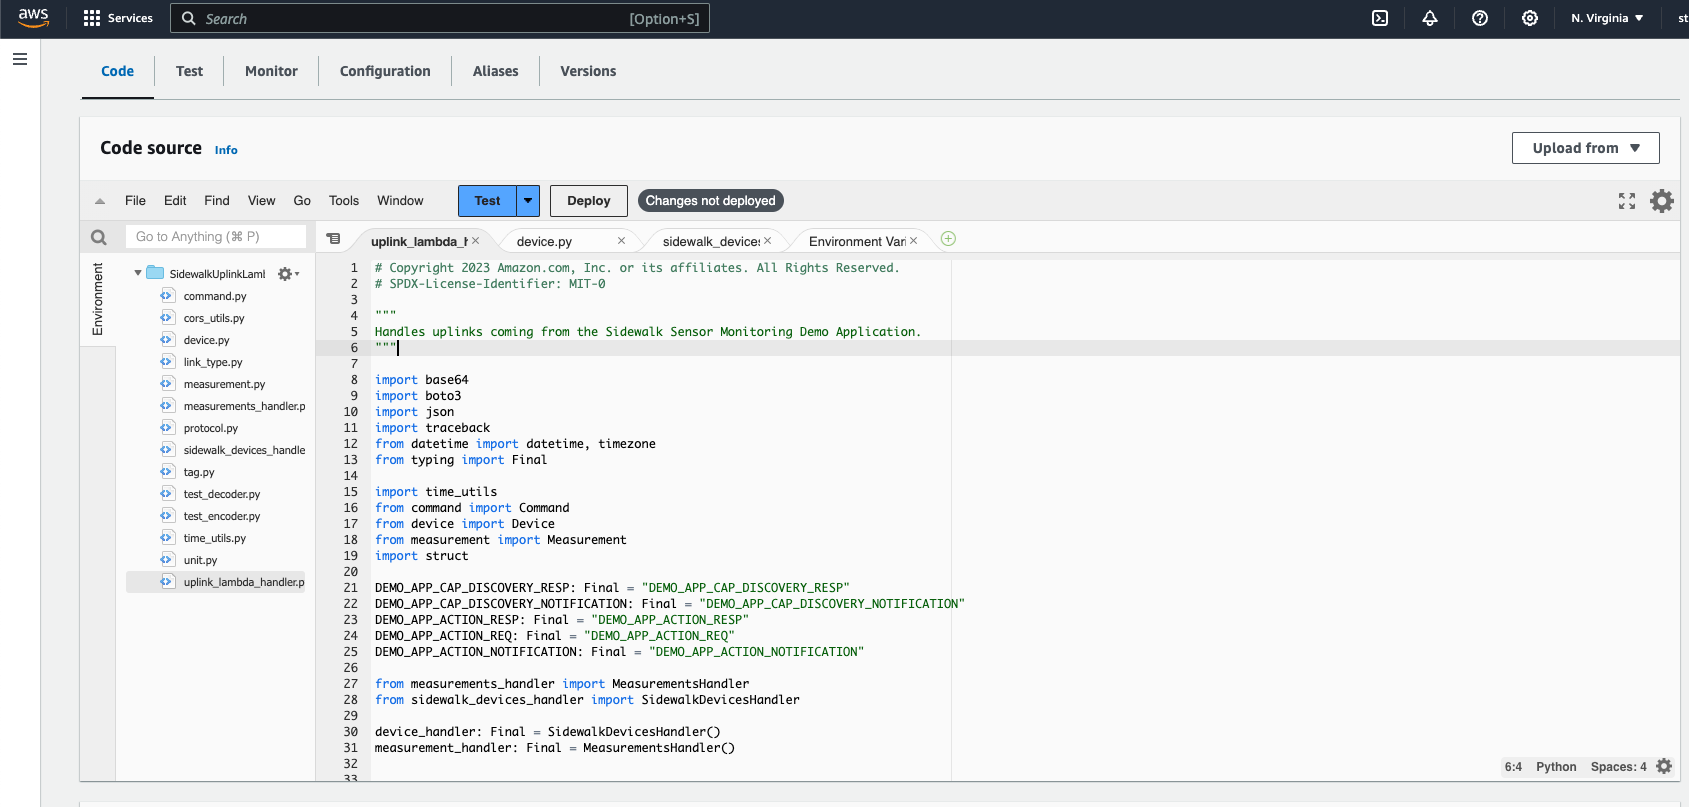 Figure 1: Deploy Lambda
Monitor the Device Using the Application
- Ensure the device is powered on and registered with AWS Sidewalk.
- Open the Sensor Monitoring APP URL generated in step Deployment of the Infrastructure and the Device Profile
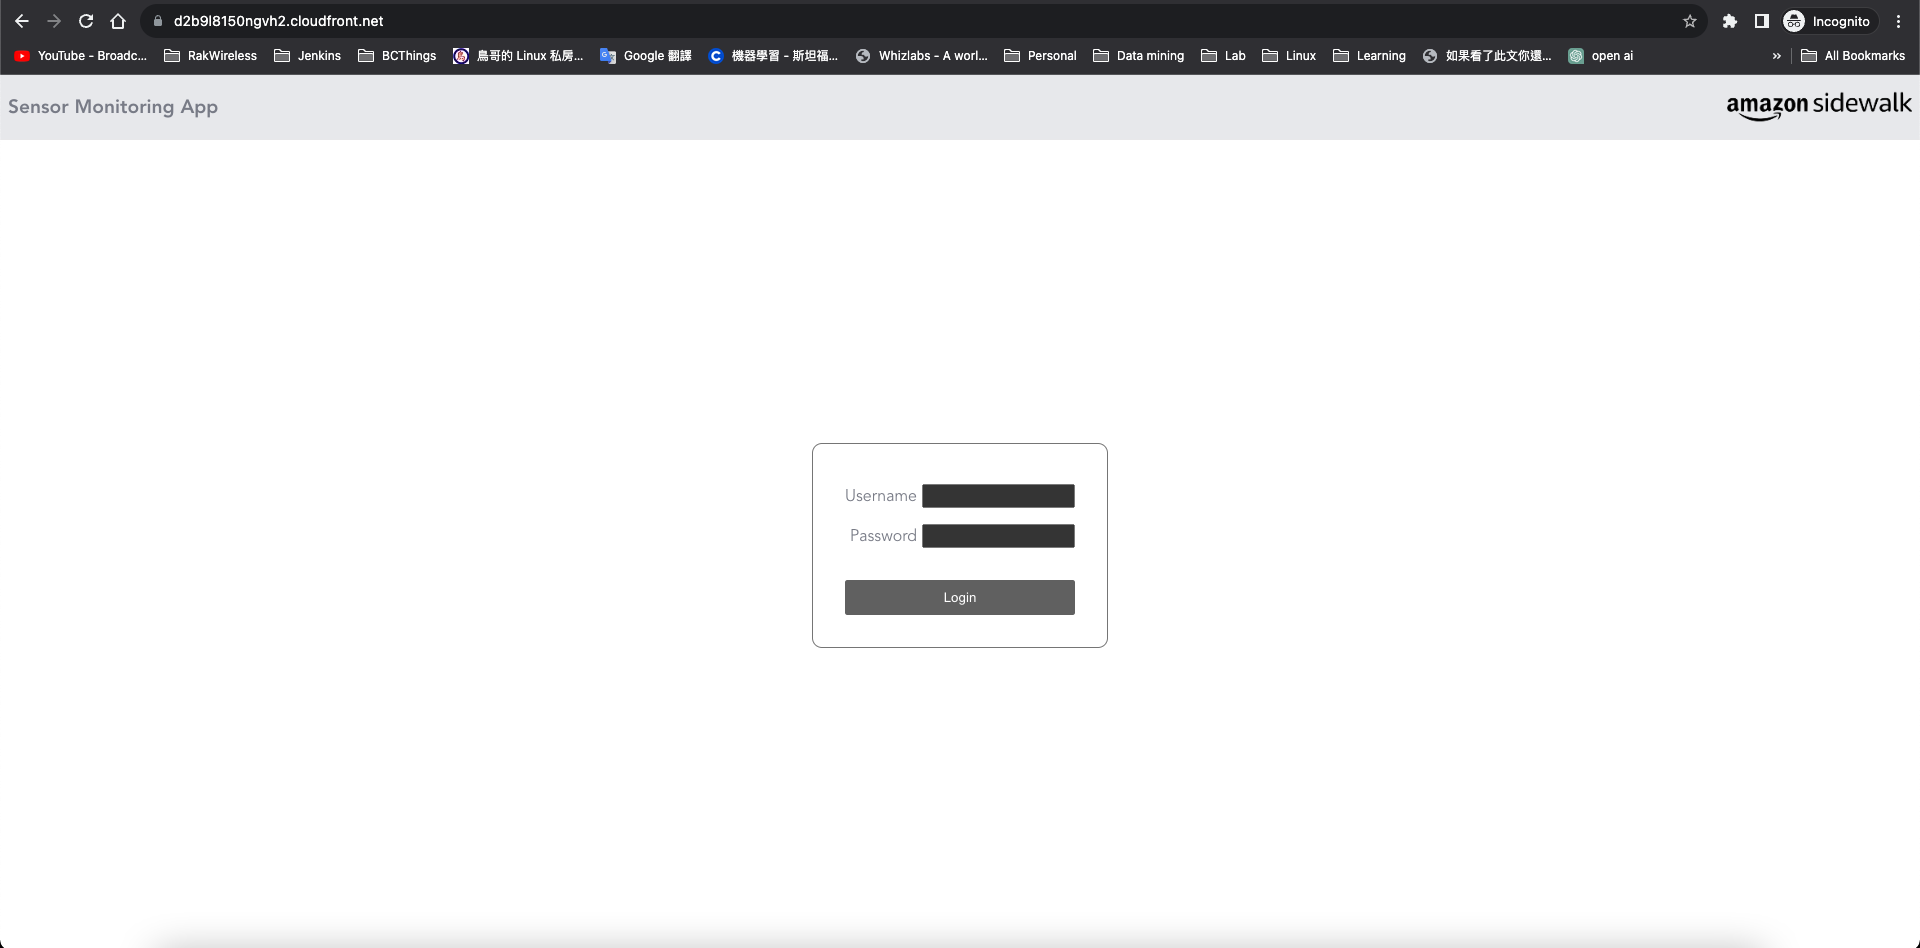 Figure 1: Sensor Monitoring APP
- Enter the username and password that was setup in the
config.yamlfile.
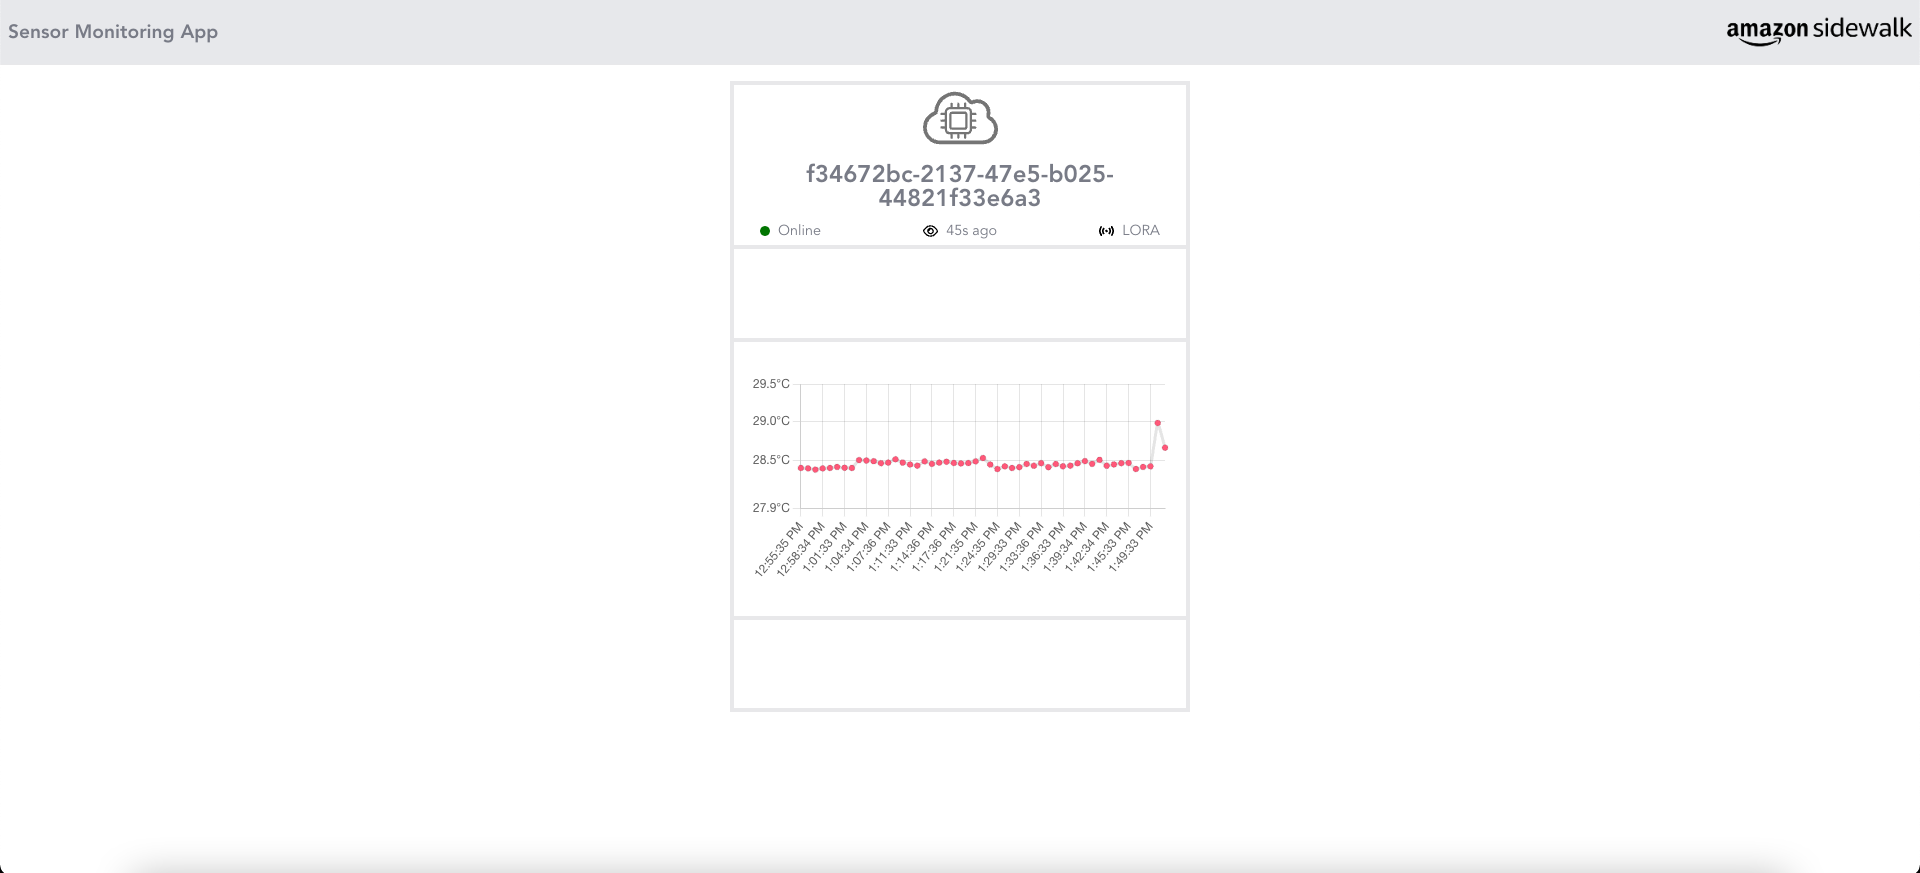 Figure 1: Login
Registration Status and Upload History of the Device
- Login to AWS as the admin user.
- Make sure to set the region to
us-east-1, then click DynamoDB.
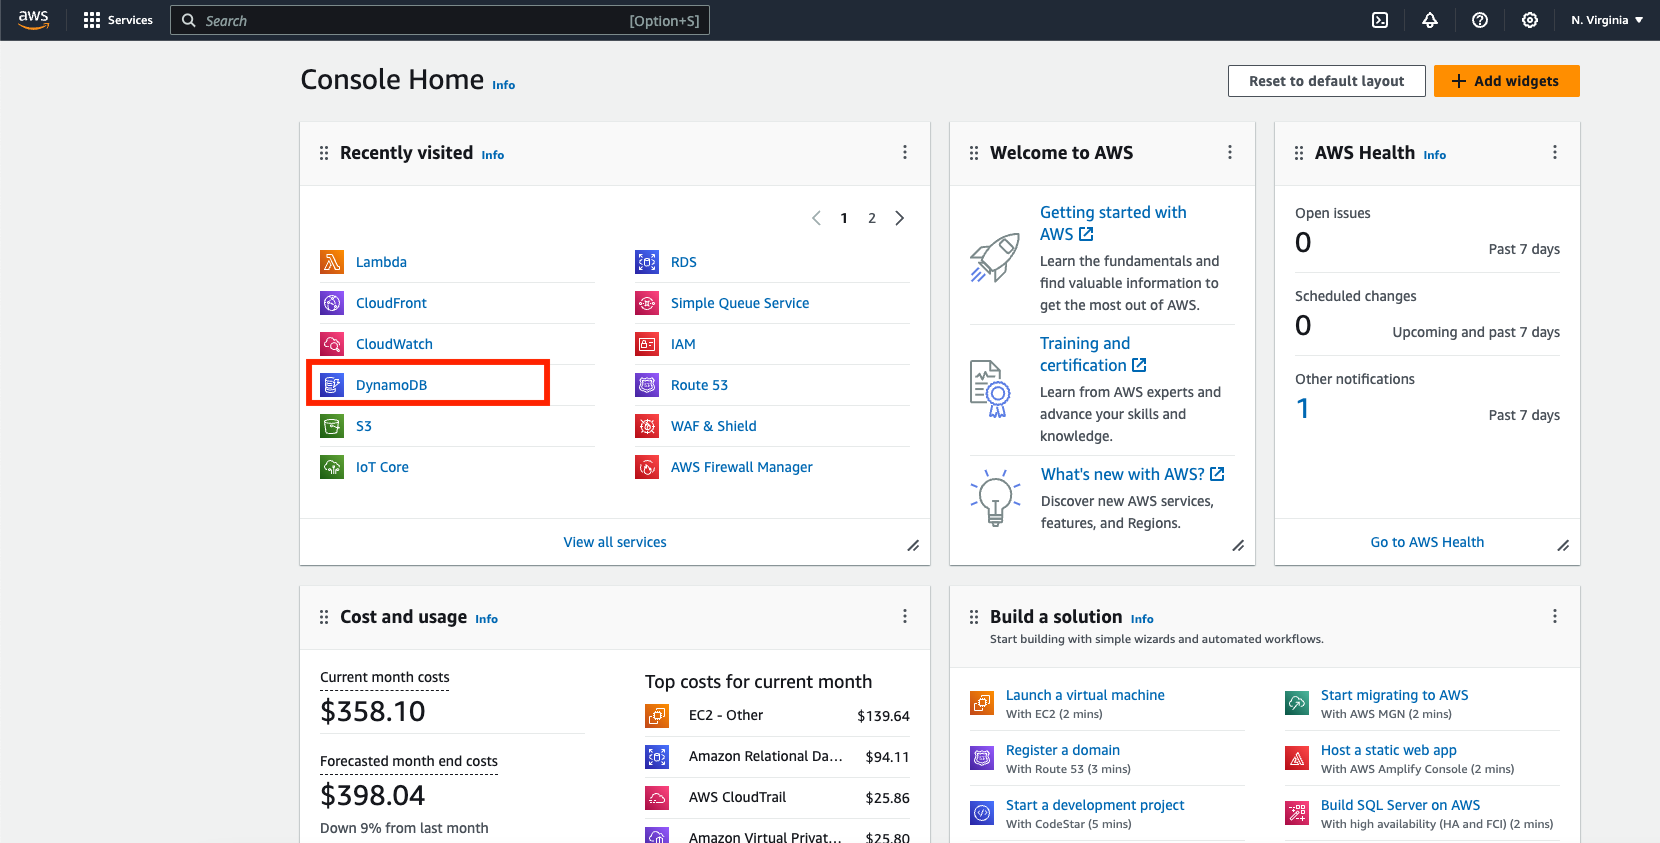 Figure 1: Open DynamoDB
- Navigate through Tables > SidewalkDevices > Explore table items, then check registration status.
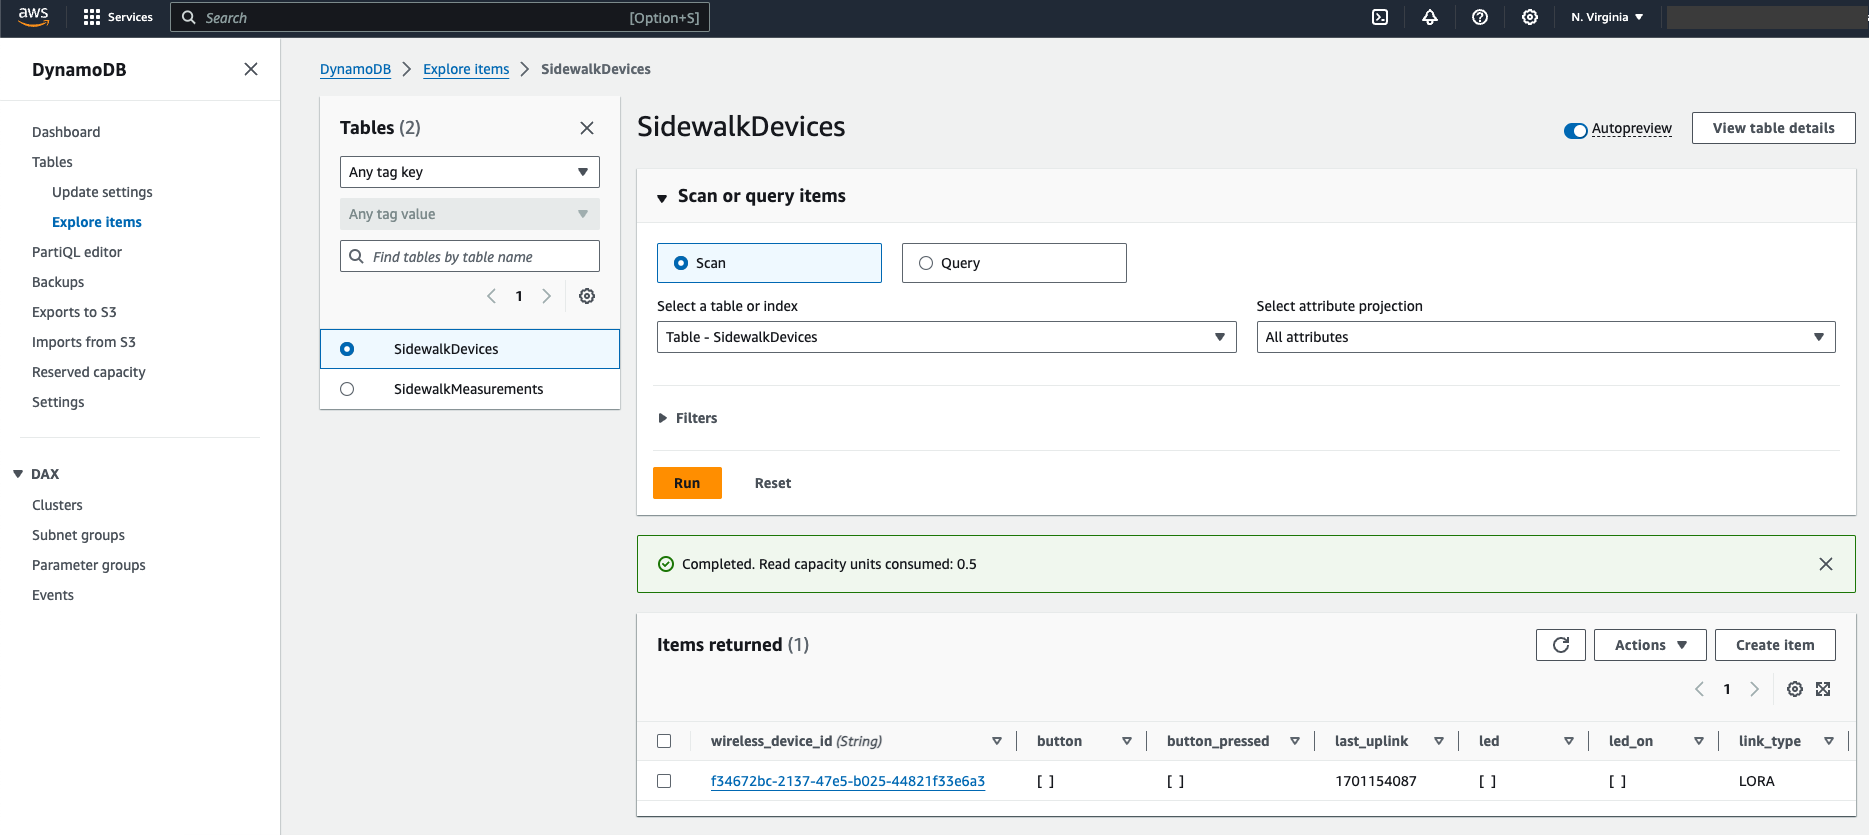 Figure 1: Status
- To check the upload history, head on to Tables > SidewalkMeasurements and then click Explore table items.
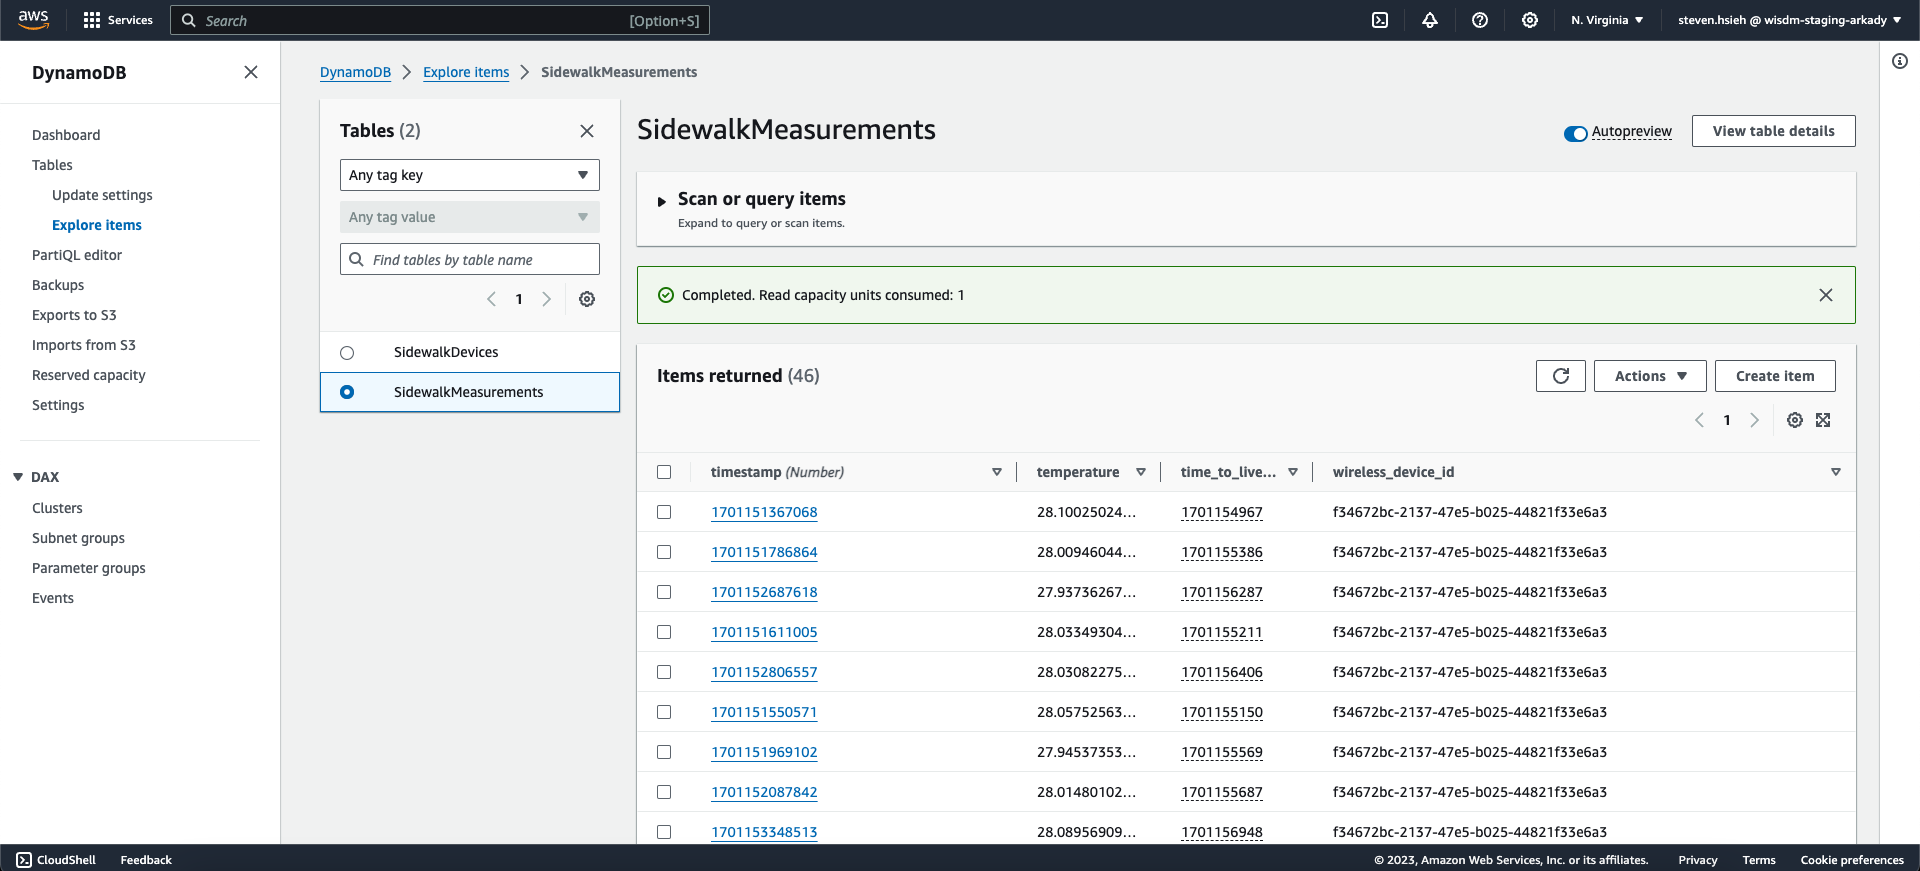 Figure 1: History
Device Setup
Flash the Sidewalk Starter Kit with the example firmware and device credentials.
Connect the Sidewalk Starter Kit and the RAKDAP1 Device
The RAKDAP1 device is used to flash firmware and provision keys to the RAK4630 module. The programming pins of the WisBlock RAK4631 Core module are exposed on one side. The following is the link between the RAKDAP1 and the RAK4631:
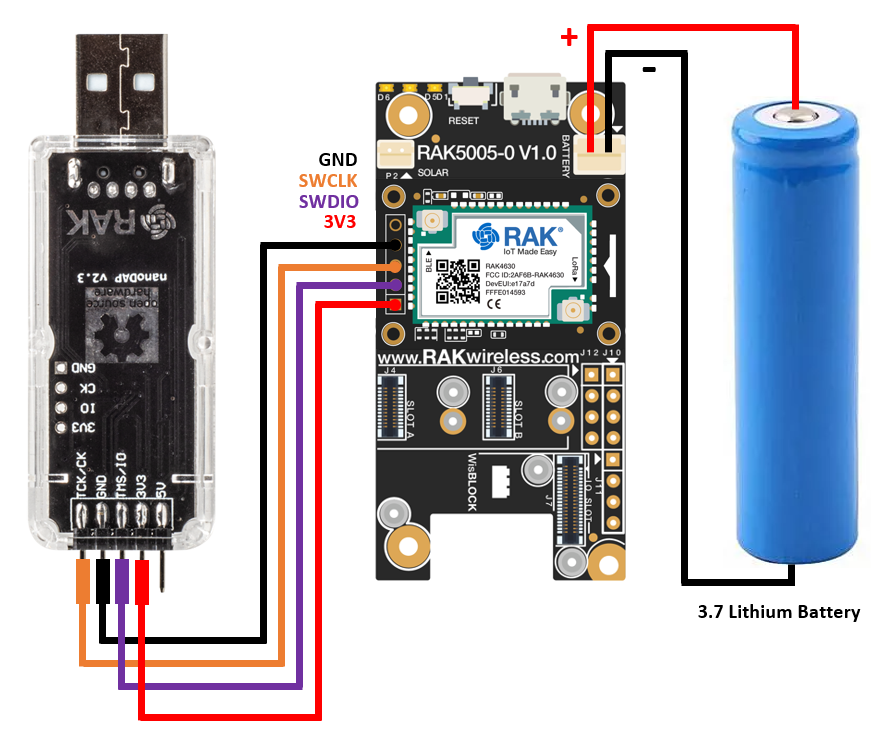 Figure 1: RAK4630 and RAKDAP1 Connection
The WisBlock modules must be powered by a battery or via a USB connector to avoid problems during the process.
Install the Required Software Tools
Python 3 Installation
RAKDAP1 requires a Python 3 installation before it can be used. Download the latest Python 3 from the official Python website. Go to their Python Downloads page (opens a new window) and select an installer based on your system.
Windows
- Choose the Python installer for Windows.
- Once downloaded, start the installation process.
- Make sure to check the Add python.exe to PATH. Otherwise, you will have to add it manually later.
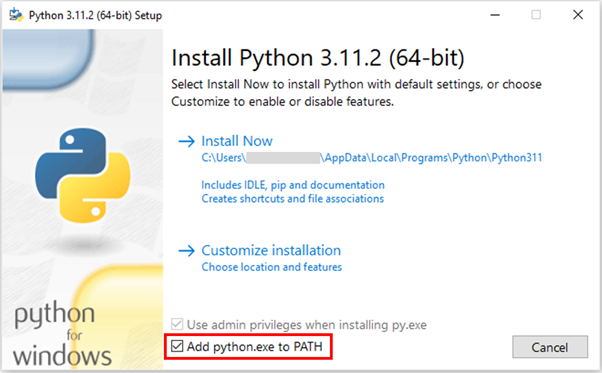 Figure 1: Python Installation
- Wait until the installation is finished.
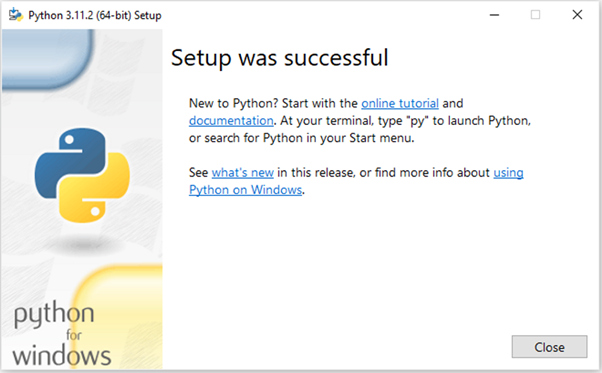 Figure 1: Python Installation
- After the installation is complete, open the command prompt window. Use the following command to verify the versions of Python and pip3:
python --version
pip --version
pip3 is required to install additional Python packages.
macOS
Open the terminal on your Mac machine and type the following commands:
ruby -e $(curl -fsSL https://raw.githubusercontent.com/Homebrew/install/master/install.sh)
export PATH="/usr/local/opt/python/libexec/bin:$PATH"
If your macOS is based on Apple M chips, you might need to use this path:
export PATH="/opt/homebrew/opt/python/libexec/bin:$PATH" or export PATH="/opt/homebrew/opt/python@3/libexec/bin:$PATH"
brew install python
python --version
brew install libusb
After the installation has finished, open a command prompt window. Check the versions of Python and pip3 using the following command listed below.
python --version
pip --version
Linux
Open the terminal on your Linux machine and type the following command:
sudo apt-get install python3
After the installation has finished, open a command prompt window. Check the versions of Python and pip3 using the following command listed below:
python --version
pip --version
pyOCD Installation
The next step is to install pyOCD, the software tool required for flashing bootloaders and application software.
- To start the installation, open the command prompt and use the following command:
pip3 install pyocd
- After the installation is finished, verify the version.
pyocd --version
Support Packages Installation
To flash and debug MCU, DAPLink needs support packages. These support packages are MDK files. For more details, you can refer to the supporting list of MDK.
- To install the support package, use the following command:
pyocd pack --i <PACKAGE>
- For the Sidewalk Starter Kit, install the MDK for the RAK4630 module. Enter the following command:
pyocd pack --i nrf52840
- To check installed packages, you can use the command:
pyocd pack -s
Before flashing a new firmware, you can also perform the erase command.
Erasing the flash memory will remove the current flashed firmware, and it will also erase the device provisioning information.
pyocd erase -t nrf52840 --chip
Flash Example Firmware and Device Credentials with RAKDAP1
The RAK4630 in the Sidewalk Starter Kit is already flashed with the right firmware. However, it cannot connect to the Sidewalk network without the correct provisioning key that you created in the previous step.
- To flash the provisioning key, use RAKDAP1 adapter and run the following command to flash the HEX file you created.
You must be in the directory or location where the hex files are located before proceeding with flashing. Otherwise, the process will not proceed.
pyocd flash -t nrf52840 YOUR_PROVISIONING_KEY.hex
-
Disconnect the RAKDAP1 adapter, connect a terminal application, and reset the starter kit to check if the application is starting normally.
-
If you have replaced the original firmware of the RAK4630 with a custom firmware, you have to flash the provisioning key every time AFTER you flash a custom firmware.
pyocd flash -t nrf52840 YOUR_CUSTOM_FIRMWARE.hex
pyocd flash -t nrf52840 YOUR_PROVISIONING_KEY.hex
- After flashing the Sidewalk Starter Kit, disconnect both the kit and the RAKDAP1 tool from power and from each other.
- Then power up the Sidewalk Starter Kit through its USB connector.
If the device is in range of an Amazon ECHO Gen4 (or another Sidewalk compatible Amazon device), it will automatically connect to Sidewalk and send the sensor's measured data to AWS.
- A device profile created for prototyping through the AWS console can only be used with one device.
- A device profile created for manufacturing and linked with HSM applies to all products of that product type. However, if you have four different products (Sensor A, B, C, and D), you will need to load four different device profiles onto your HSM.
- A provisioning key is for a single device, and each device needs its own unique key.
After flashing the firmware, the device should be powered up. You can view the device log output by opening a Serial Terminal application on your computer. If you encounter error messages, it is likely due to one of the following reasons:
- missing provisioning key
- incorrect provisioning key or device profile
- no Sidewalk device in range
Firmware Source Code
The source code for the RAK4631 Sidewalk Starter Kit is available as open source on Github: RAK4630-Amazon-Sidewalk-Example repo.
To install the necessary development tools, refer to the installation guides available in the Amazon Sidewalk Documentation.


