RAK3172 WisDuo LoRaWAN Module Low Level Development Reference
Overview
The RAK3172 module utilizes an RF System-on-Chip IC from STMicroelectronics, specifically the STM32WL series, which finds application in various LPWAN IoT devices.
STM32WL microcontrollers incorporate a sub-GHz radio based on Semtech SX126x, catering to the demands of a diverse range of Low-Power Wide Area Network (LPWAN) wireless applications in industrial and consumer Internet-of-Things (IoT) domains. The specific STM32WL microcontroller employed in the RAK3172 is the STM32WLE5CCU6.
While the RAK3172 has a built-in default firmware with a set of AT commands that can be interfaced with an external host like other microcontrollers, it can also be used by developing custom firmware directly on its chip using the STM32WL SDK from STMicroelectronics. Taking this approach will reduce the overall cost of the device because there will be no need for an external microcontroller, but it will require extra software development effort.
This guide will illustrate how to generate custom firmware for the STM32WLE5CCU6, which is inside the RAK3172 module. It supports three STM32WL SDK versions: v1.0.0, v1.2.0, and v1.3.0.
- STM32CubeIDE guide with STM32WL SDK v1.0.0
- STM32CubeIDE guide with STM32WL SDK v1.2.0
- STM32CubeIDE guide with STM32WL SDK v1.3.0
- STM32WL SDK v1.0.0 was tested on STM32CubeIDE v1.7.0.
- STM32WL SDK v1.2.0 was tested on STM32CubeIDE v1.10.0.
- STM32WL SDK v1.3.0 was tested on STM32CubeIDE v1.10.0 and v1.14.0.
Guide on Using STM32WL SDK Using STM32CubeIDE
Installation of STM32Cube IDE
- Download the STM32Cube IDE from the STMicroelectronics website. Then select the latest version compatible with your computer.
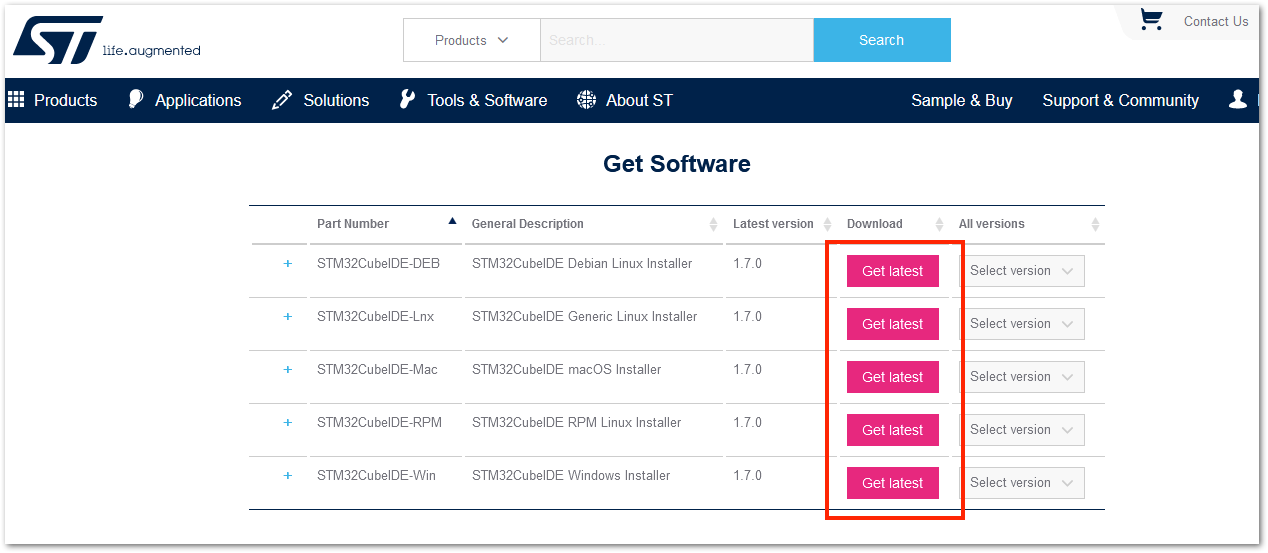 Figure 1: STM32CubeIDE Software Download
-
A license agreement from STMicroelectronics will be displayed, and you must agree to log in using your STMicroelectronics account. Create an account if you do not already have one.
-
After downloading, unzip the installer file and begin the installation process. Simply click Next on the initial installation window and accept the license agreement.
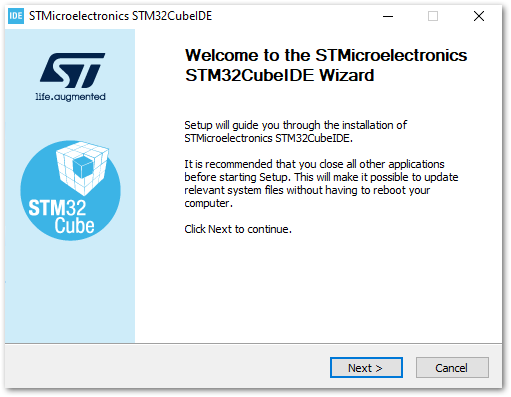 Figure 1: STM32CubeIDE Installation
 Figure 1: STM32CubeIDE License Agreement
- The next step is to determine the directory where you want the STM32CubeIDE software to be installed. Simply click Next to use the default folder, or you can select a different location.
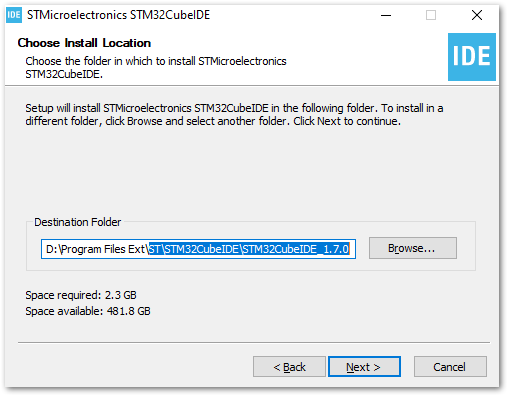 Figure 1: STM32CubeIDE Directory Location
- Select optional components for installation, such as J-Link and ST-Link drivers. It is highly recommended to include these drivers, as they will be useful for debugging and uploading binary firmware files to the STM32WL chip.
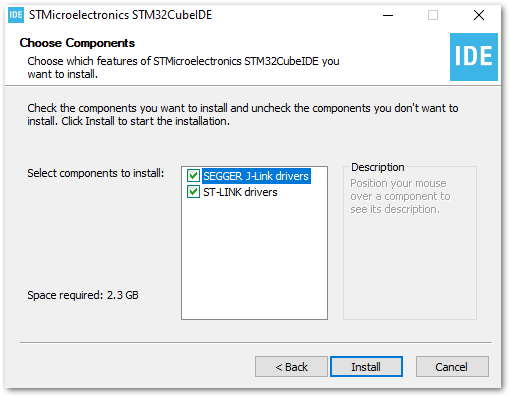 Figure 1: STM32CubeIDE Drivers
- The progress bar will be displayed as the installation begins.
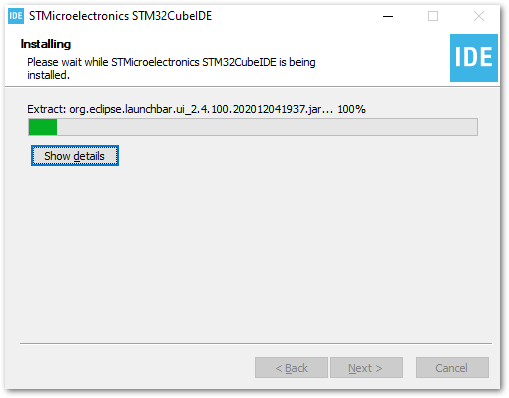 Figure 1: STM32CubeIDE On-going Installation
- During installation, STMicroelectronics device drivers may appear. These are not required for STM32WL, so you can leave them uninstalled.
 Figure 1: STM32CubeIDE Optional Device Drivers
- If there are no issues during the installation process, you should be finished and can now create a desktop shortcut for the STM32CubeIDE application.
 Figure 1: STM32CubeIDE Installation Successful
 Figure 1: STM32CubeIDE Installation Finished
- Check if the installation of STM32CubeIDE was successful by trying to run the application. It should be free of errors. The application will prompt you for the workspace, and you can accept the default location if you do not want to specify a different one. You also have the option to create multiple workspaces, but only one can be active at a time.
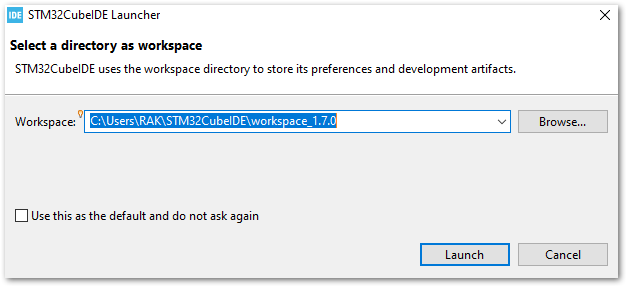 Figure 1: STM32CubeIDE Workspace Selection
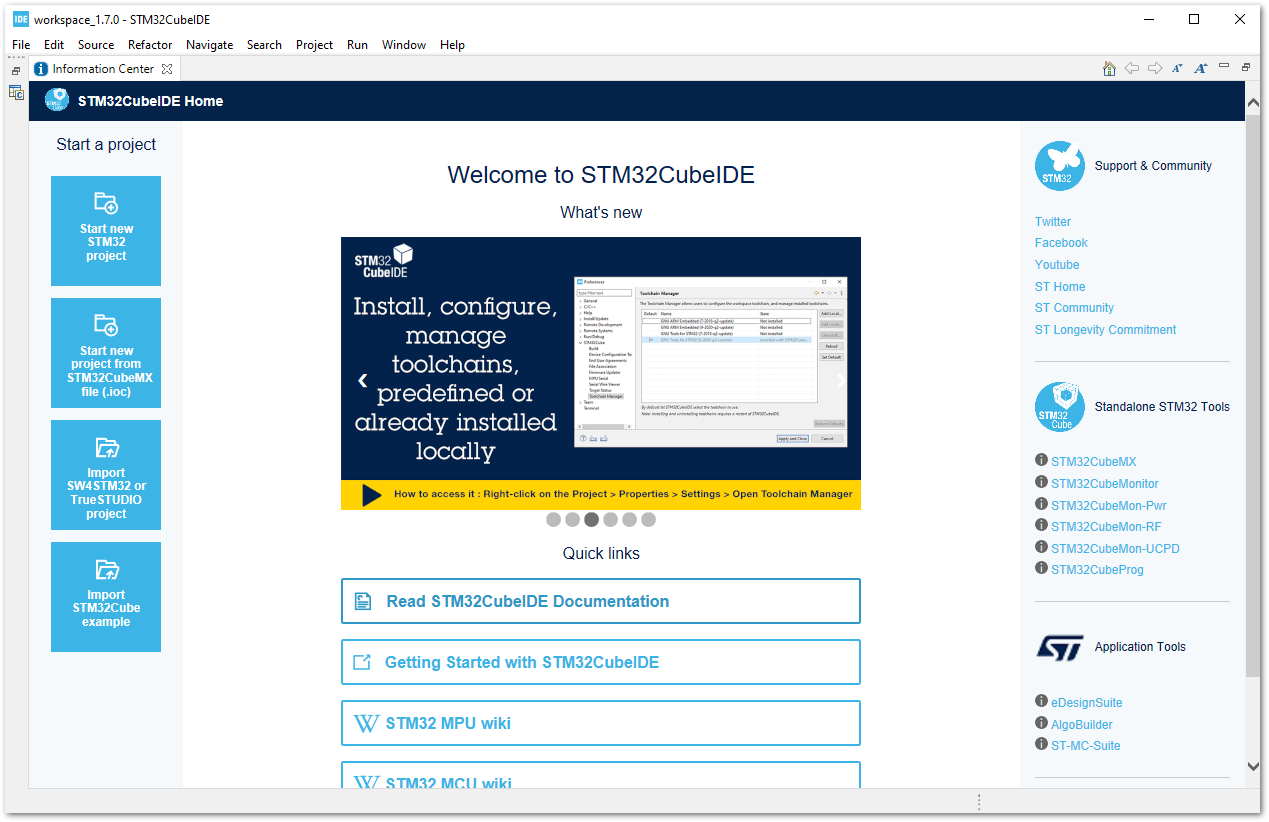 Figure 1: STM32CubeIDE Application Running
RAK3172 on STM32CubeIDE with STM32WL SDK v1.0.0
STMicroelectronics provides a free IDE called STM32CubeIDE, which you can use to develop firmware for various STM32 microcontrollers, including the STM32WL series. Based on Eclipse, it is a complete software IDE where you can easily debug your code with built-in integration to tools like ST-Link and other features like STM32CubeMX. It is multiplatform software that can run on Windows, Linux, and macOS.
You cannot directly select RAK3172 on the STM32CubeIDE, but you can use the STM32WLE5CCU6 inside it with the STM32WL SDK from STMicroelectronics to start your own custom firmware. This guide is only applicable to STM32WL SDK v1.0.0.
Getting STM32WL SDK v1.0.0
This guide only works on v1.0.0 of the SDK.
- If you already have the STM32CubeIDE running on your machine, the next step is to download the STM32WL SDK v1.0.0 from the STMicroelectronics website.
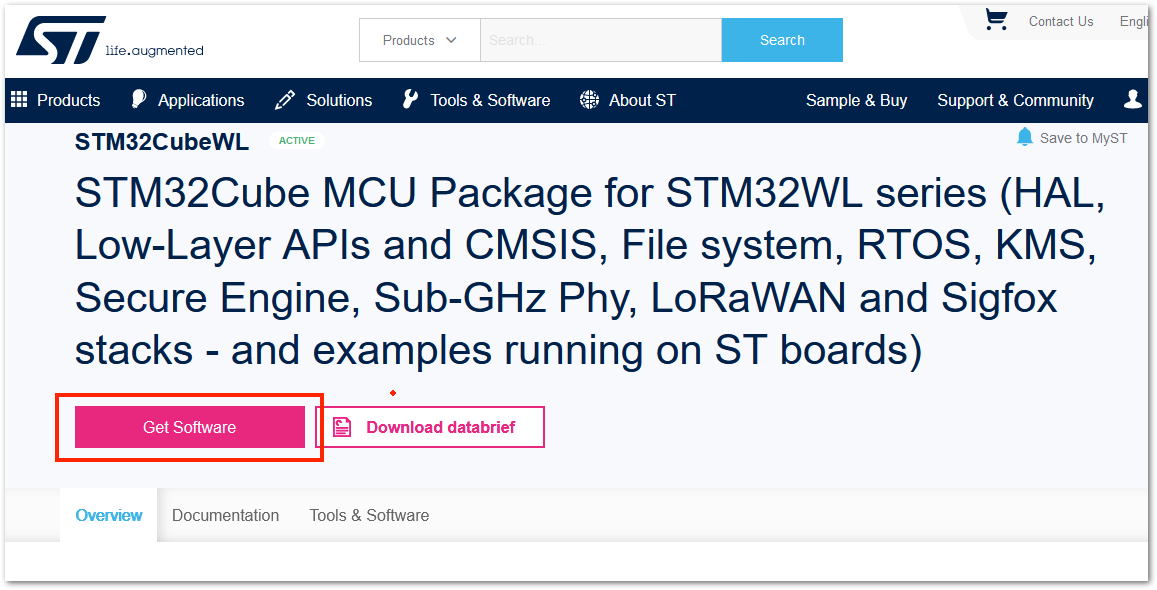 Figure 1: STM32WL SDK Download Page
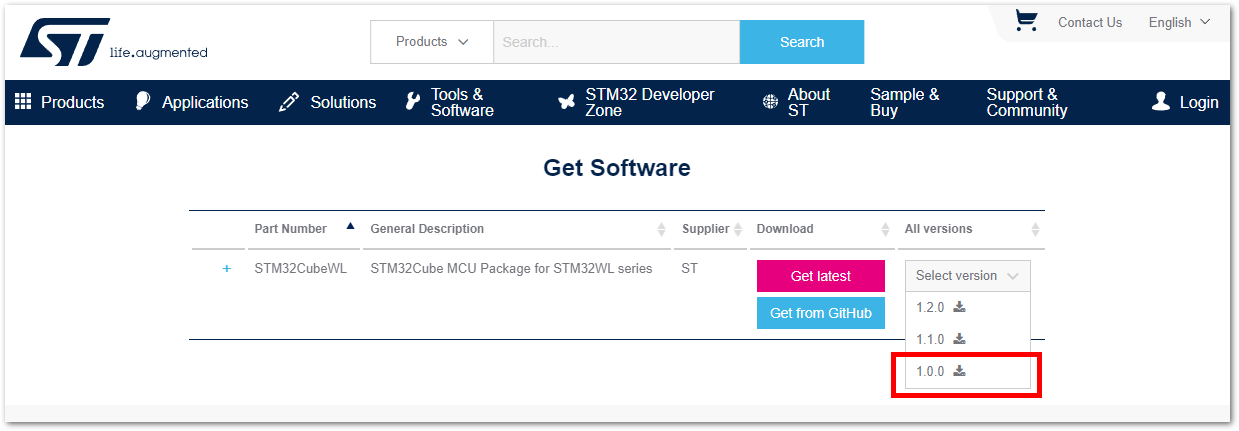 Figure 1: STM32WL V1.0.0 Download
- The downloaded files usually go to the downloads folder. You need to extract it, and then you will see the STM32WL SDK firmware folder.
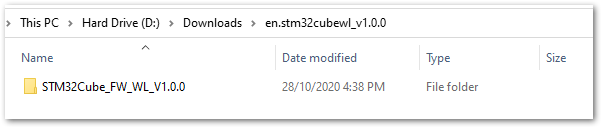 Figure 1: STM32WL V1.0.0
- The structure of the extracted files should be the same as shown in Figure 15. Do not change this folder structure. It contains many examples related to the STM32WL chip.
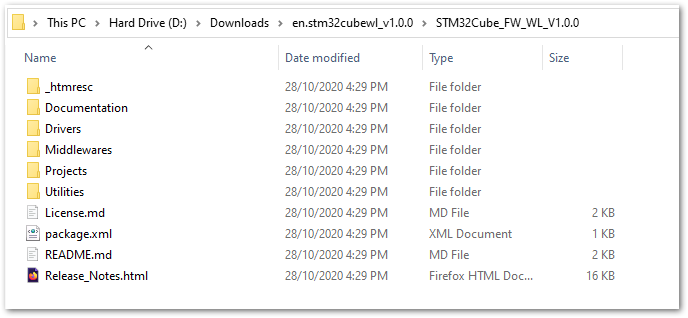 Figure 1: STM32WL V1.0.0 Folder Structure
Modifications for the RAK3172
Files Modification Needed to Run STM32WL SDK LoRaWAN Examples to RAK3172
If you already have the STM32WL V1.0.0 SDK folder, there are only a few files that you need to update to be able to create firmware that will run on the RAK3172.
STM32 microcontroller firmware created using STM32CubeIDE (with the help of STM32CubeMX) has a .ioc file. This is a configuration file created by the STM32CubeMX tool. This is a useful tool in setting up peripherals and drivers quickly in the STM32 development ecosystem. However, once you make the file modifications mentioned in this guide, you cannot create a new .ioc file or modify it via STM32CubeMX. Otherwise, the modified files needed by the RAK3172 will be overwritten and will revert to their original state in the .ioc file.
In cases where you need to use STM32CubeMX to set up peripherals or drivers, you just need to repeat the same modifications mentioned in this section.
- Download the Low Level Development zip file from the RAK downloads site. Extract the zip file and inside the folder are four files that need to be copy-pasted on specific locations of the STM32WL V1.0.0 folder to make it compatible with RAK3172.
The majority of these files are for setting up the RF channel front end of the radio section on the STM32WL chip. Also, the startup file must be changed because the default startup on STM32WL SDK V1.0.0 is for the STM32WL55 series and not for STM32WLE5. The RAK3172 is based on STM32WLE5CCU6.
This guide will demonstrate how to run the LoRaWAN_End_Node example of the STM32WL SDK to RAK3172. If you need to run other LoRaWAN-related examples like LoRaWAN_AT_Slave, you need to update the files on that folder.
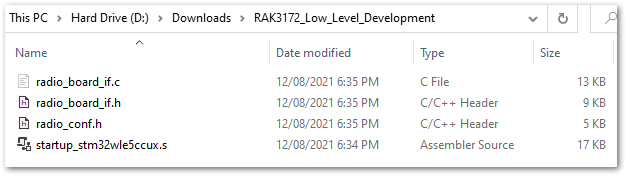 Figure 1: RAK3172 Low Level Development Files
- The radio related files
radio_board_if.c,radio_board_if.h, andradio_confmust be placed in this location of the STM32WL SDK folder\STM32Cube_FW_WL_V1.0.0\Projects\NUCLEO-WL55JC\Applications\LoRaWAN\LoRaWAN_End_Node\LoRaWAN\Target. You have to overwrite or replace the old files.
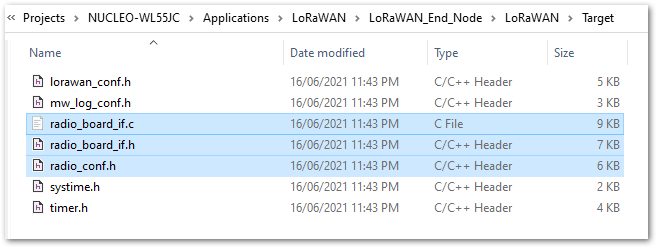 Figure 1: RAK3172 Radio Related Files for Modification
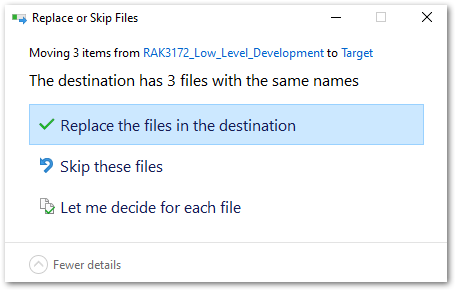 Figure 1: RAK3172 Radio Related Files Replaced
- You also need to update the startup file. Place the
startup_stm32wle5ccux.sfile in this location:\STM32Cube_FW_WL_V1.0.0\Projects\NUCLEO-WL55JC\Applications\LoRaWAN\LoRaWAN_End_Node\STM32CubeIDE\Application\Startup. There is a default startup file in that directory namedstartup_stm32wl55jcix.s. Delete that file.
The updated startup folder should be the same, as shown in Figure 19.
 Figure 1: RAK3172 Radio Related Files Replaced
Initial Build Test for the RAK3172 Custom Firmware
- After making the file modifications, the next step is to test if the LoRaWAN_End_Node example can be built without errors.
If this is your first time using STM32CubeIDE, it shows the Information Center by default. Just close it and access the project in the left panel.
- Open the STM32CubeIDE and click on
FilethenOpen Projects from File System.
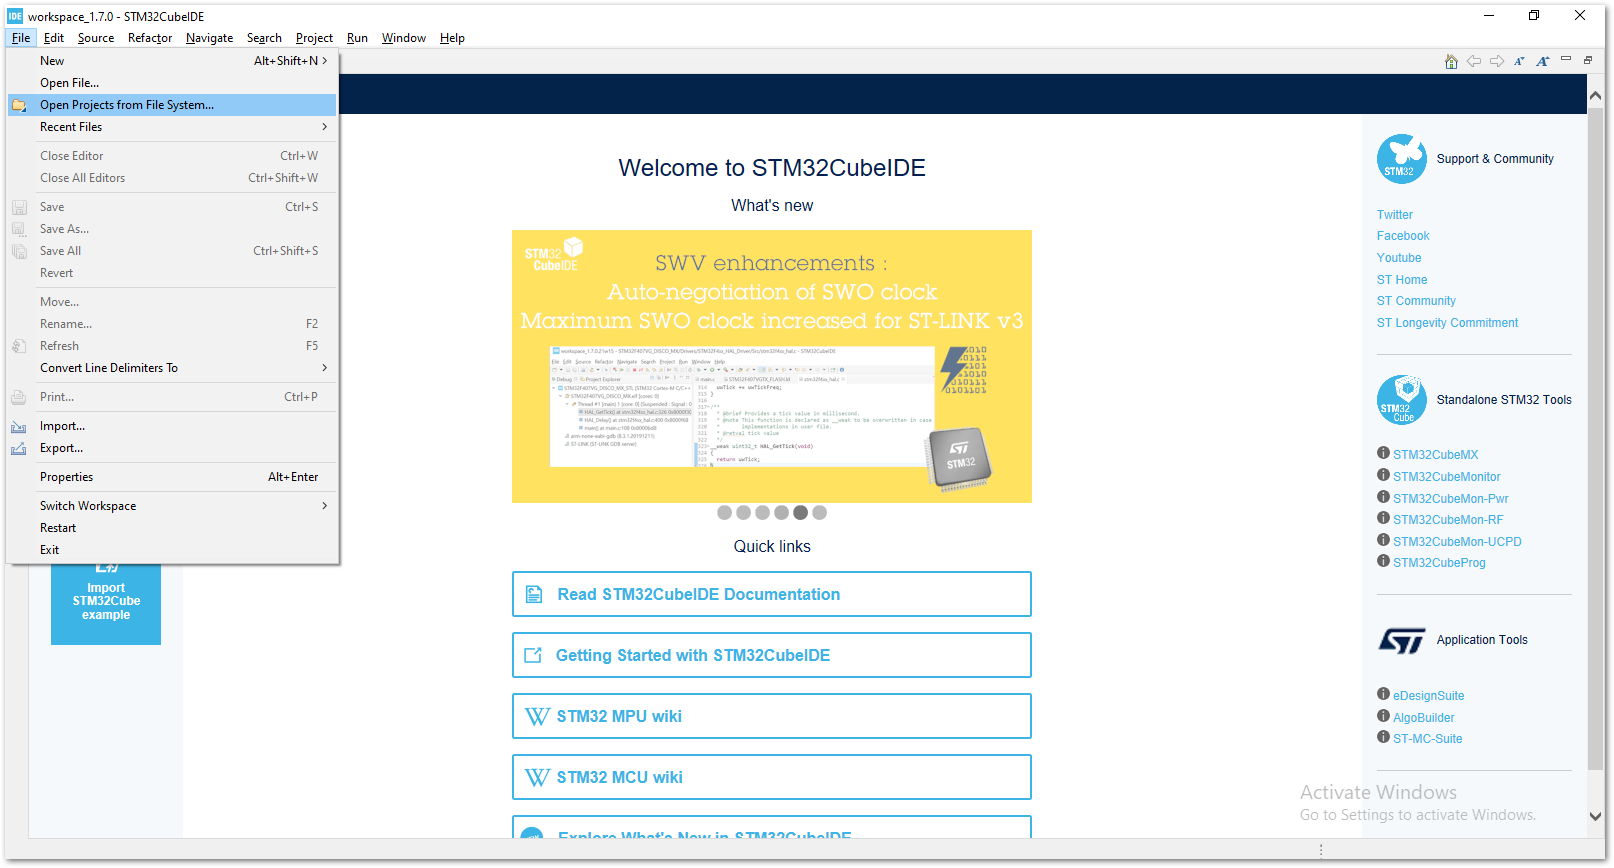 Figure 1: Open the Project in STM32CubeIDE
- You then need to browse to the project folder location by clicking the Directory button.
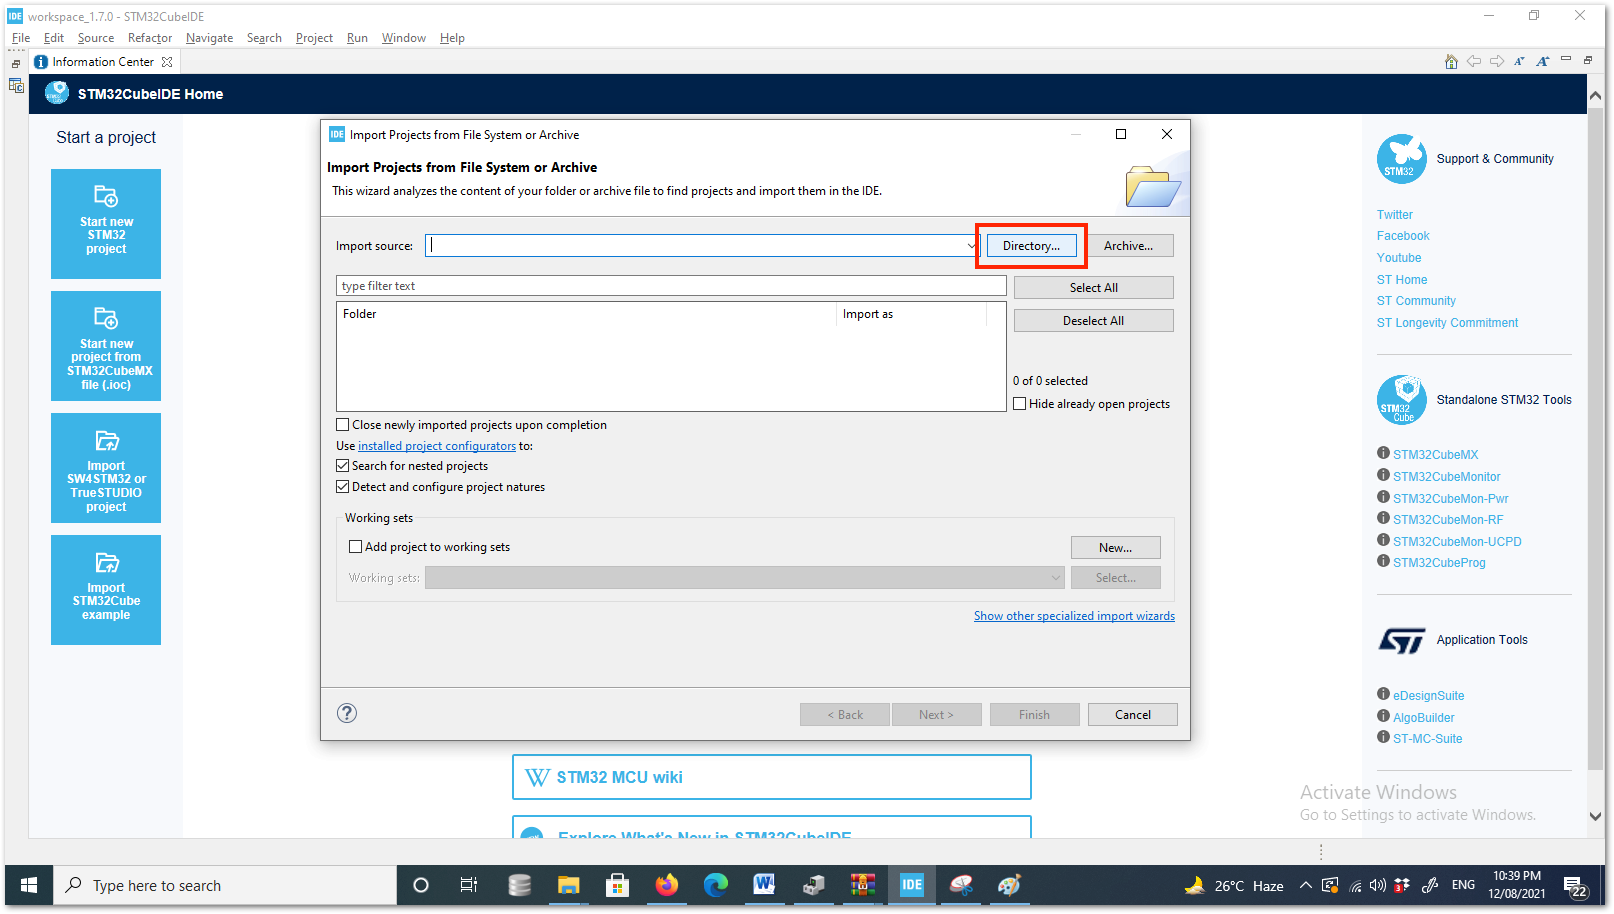 Figure 1: Locate the Project Directory in STM32CubeIDE
- You should locate this directory
\STM32Cube_FW_WL_V1.0.0\Projects\NUCLEO-WL55JC\Applications\LoRaWAN\LoRaWAN_End_Node. Click on STM32CubeIDE folder once, then click the Select Folder.
 Figure 1: Select the STM32CubeIDE Project Folder
- You should now see STM32CubeIDE checked and ready to be imported as an Eclipse project. If not checked, click the checkbox and then the Finish button. It will take some time to fully import the entire project.
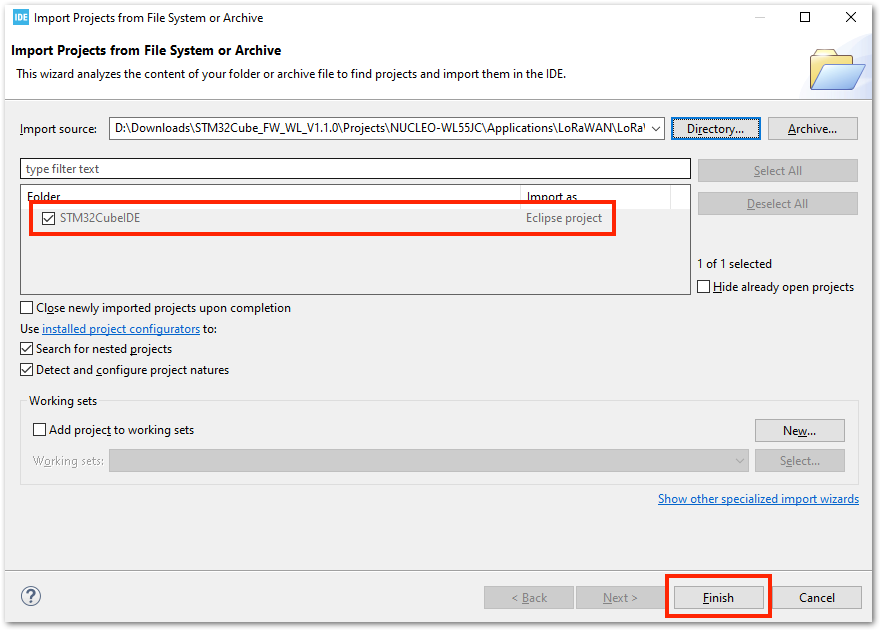 Figure 1: Open the LoRaWAN_End_Node Project
- After the successful import, you should now see the LoRaWAN_End_Node project structure on the left side of the STM32CubeIDE.
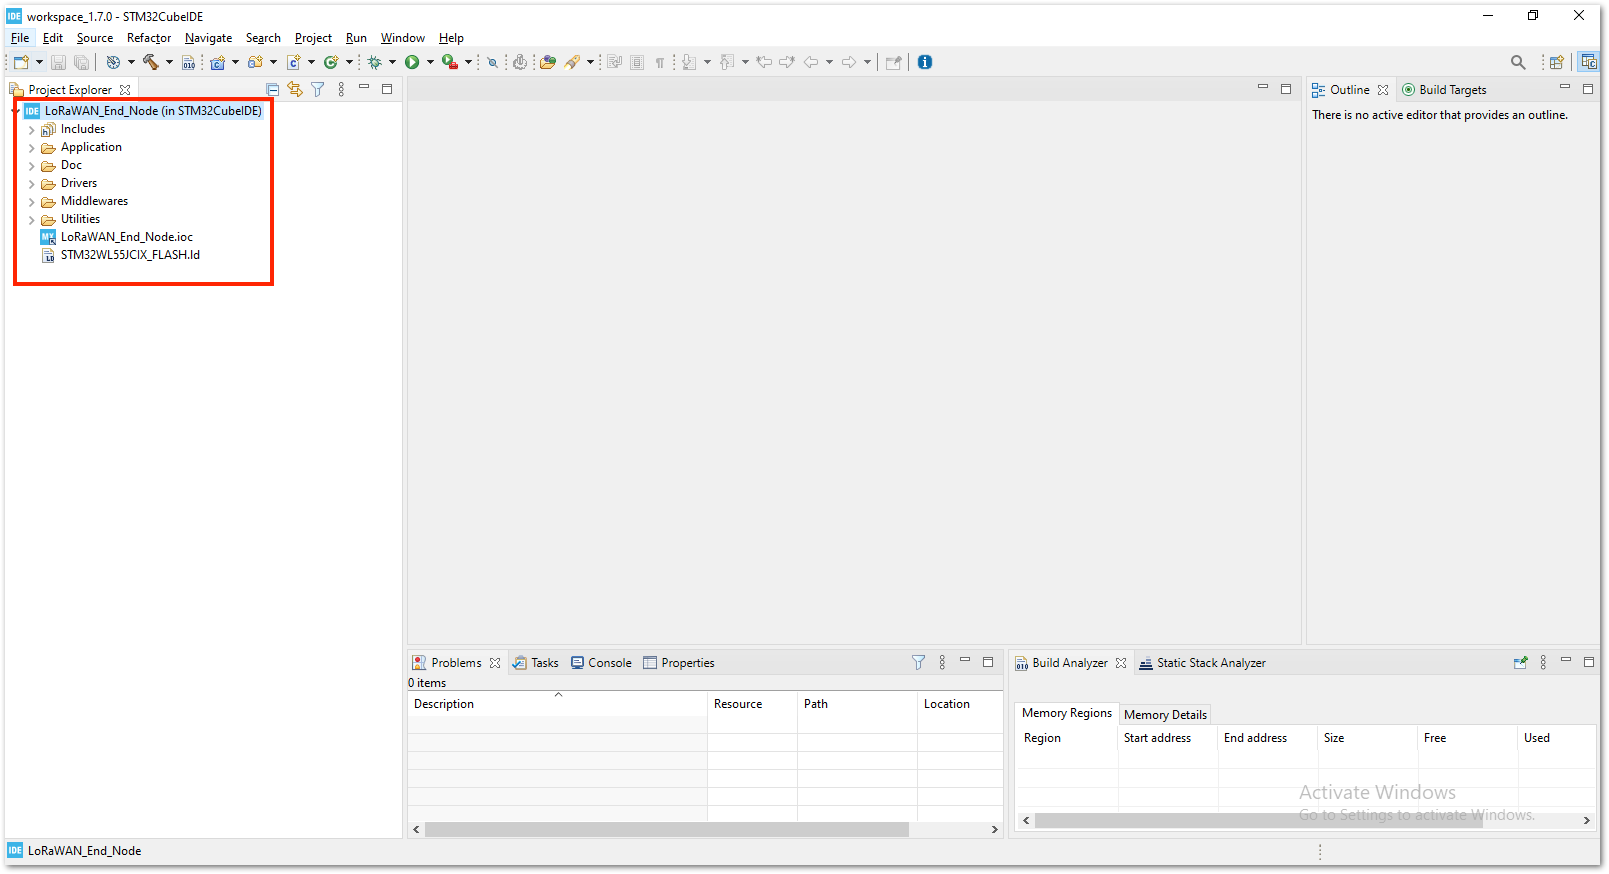 Figure 1: Open the STM32CubeIDE Project
- With the modified files already implemented, you can check if the files are updated by checking the startup file
startup_stm32wle5ccux.sand theradio_board_if.c. The startup file must be updated to showstartup_stm32wle5ccux.s. You should see#if defined(RAK3172_RF_CHANNEL_SWITCH)on line 72 of theradio_board_if.cfile, as shown in Figure 25. If not, then you were not successful in changing these files with the Low Level Development required modification.
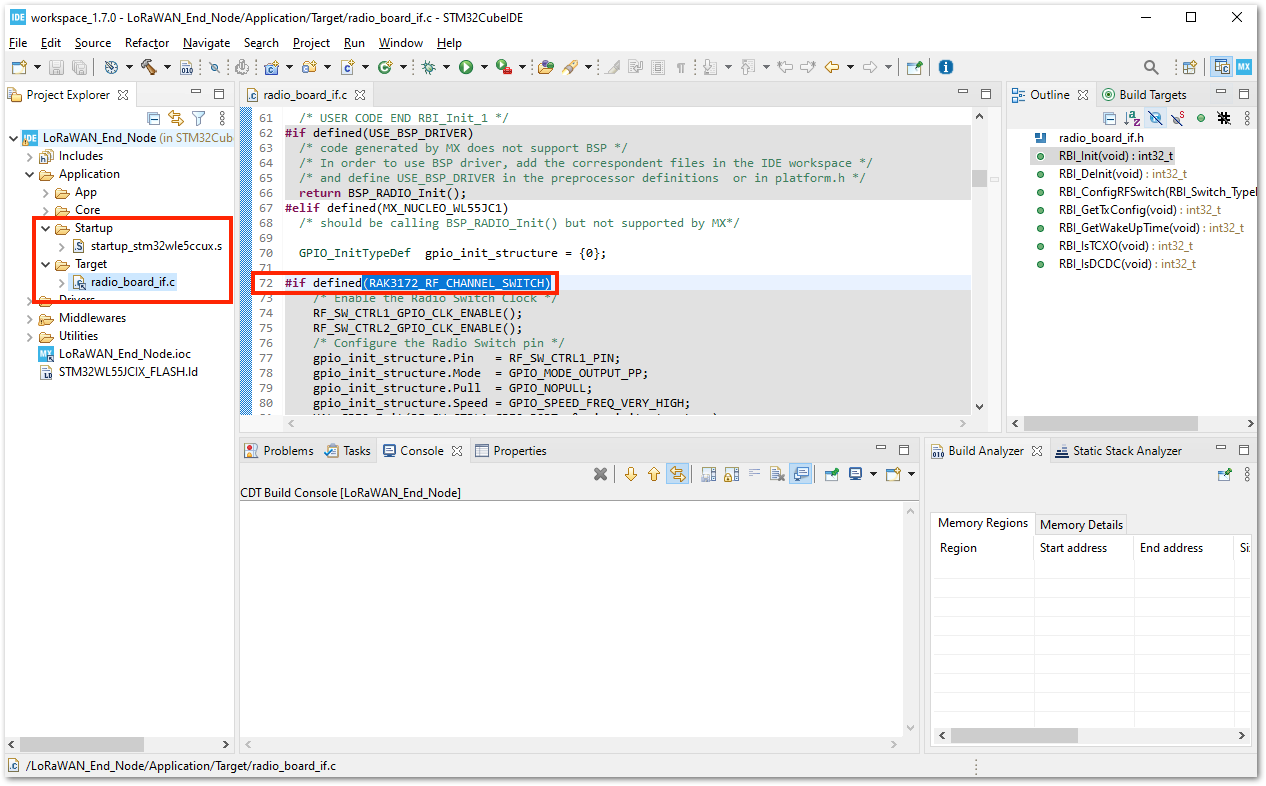 Figure 1: Open the STM32CubeIDE Project
- You can now attempt to build the project by setting the build configuration to release, which will generate a
.binfile.
If you have an ST-LINK debugging tool, you can also choose Debug instead of Release.
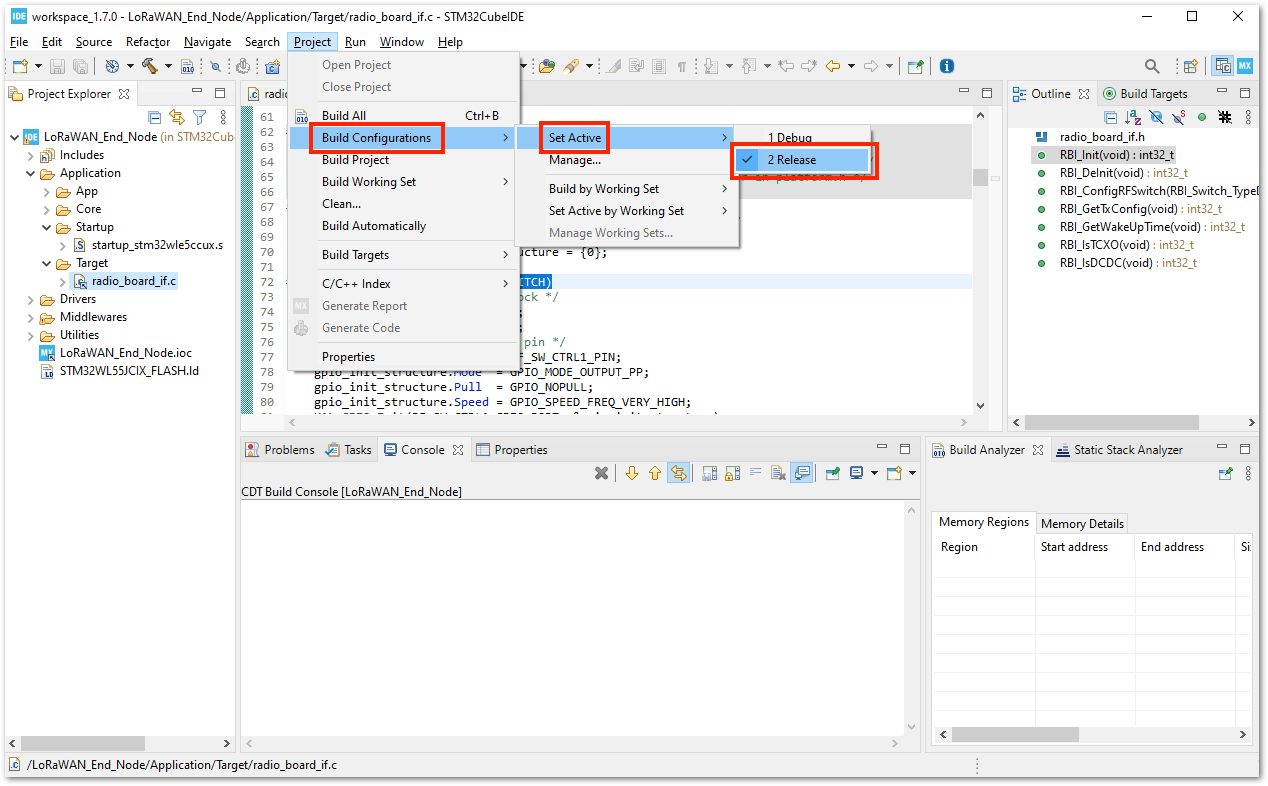 Figure 1: Configure Build to Release
- After setting the build configuration, you are now ready to build the project. You should see a successful compilation and generation of a
.binfile.
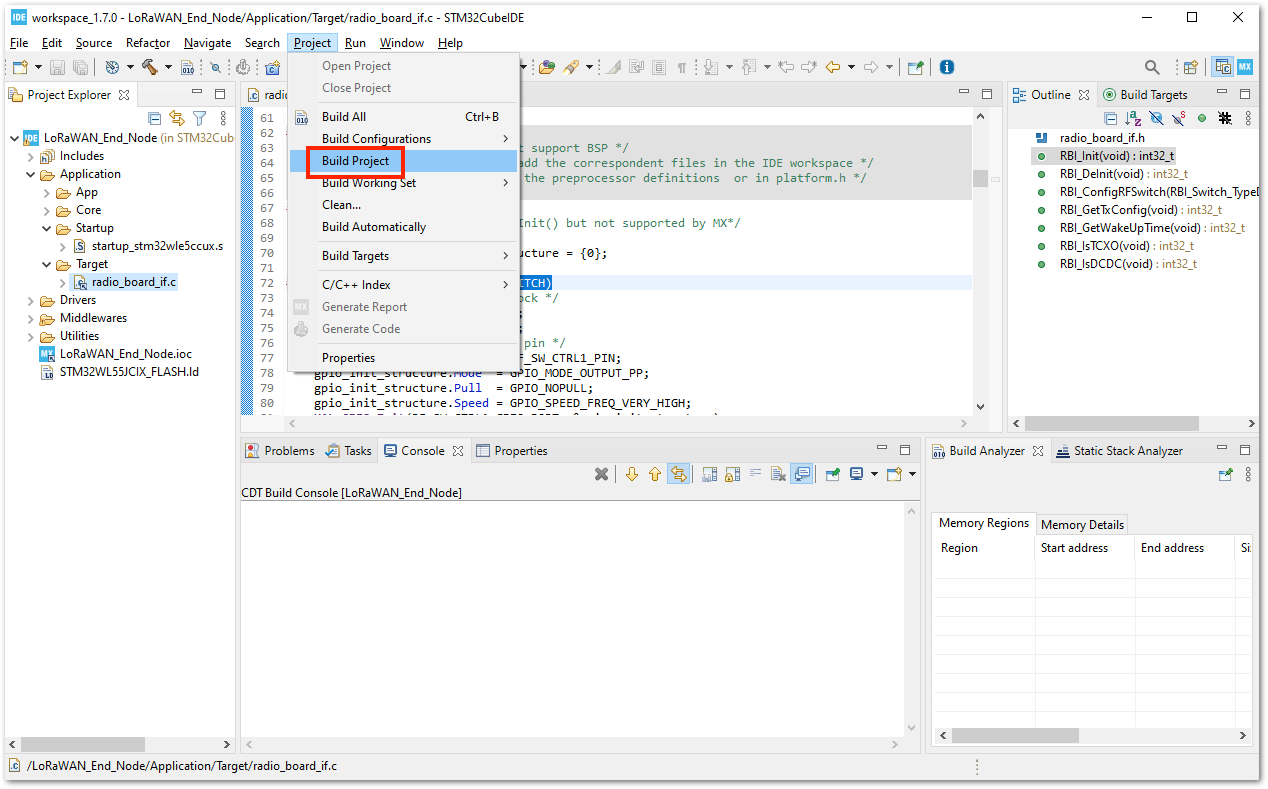 Figure 1: Build the Project
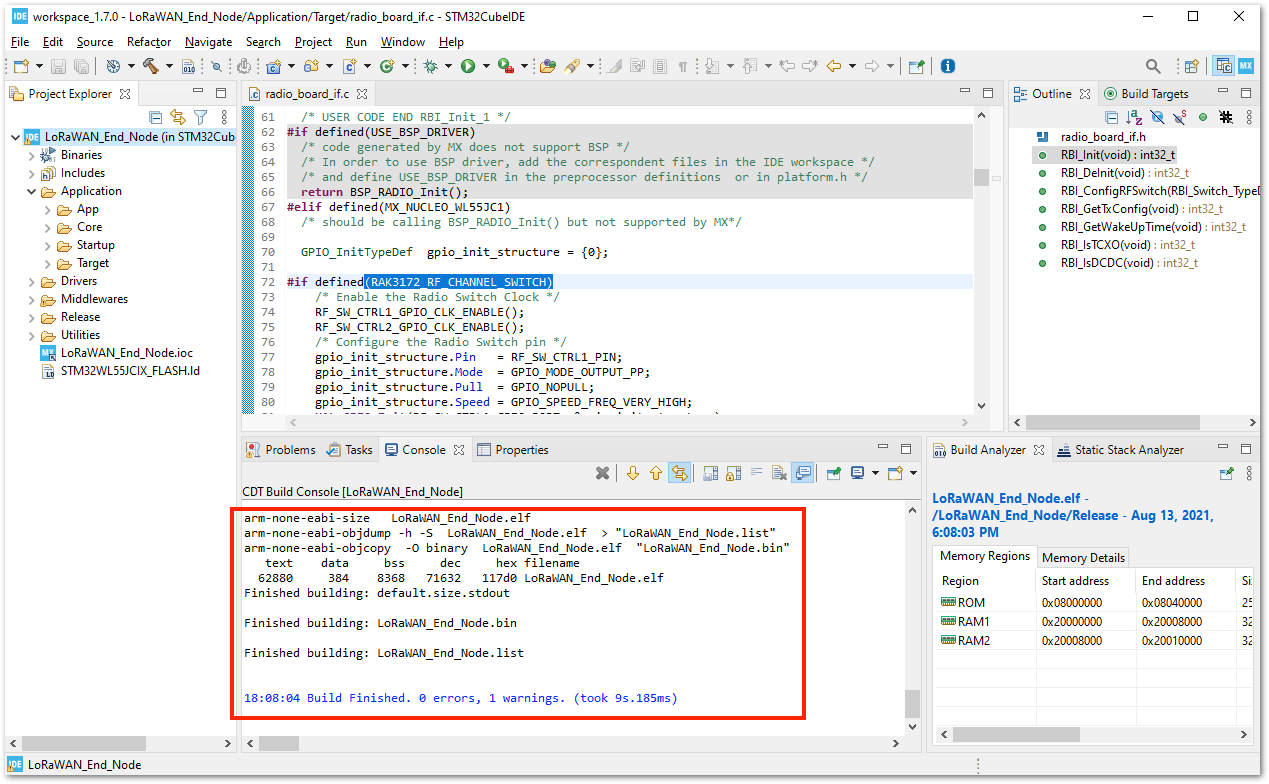 Figure 1: Successful Project Build
RAK3172 on STM32CubeIDE with STM32WL SDK v1.2.0
The previous guide is for STM32WL SDK version 1.0.0. This guide is compatible with STM32WL SDK v1.2.0 and v1.3.0.
Getting STM32WL SDK v1.2.0
- If you already have the STM32CubeIDE running on your machine, the next step is to download the STM32WL SDK v1.2.0 from the STMicroelectronics website.
Figure 1: STM32WL SDK Download Page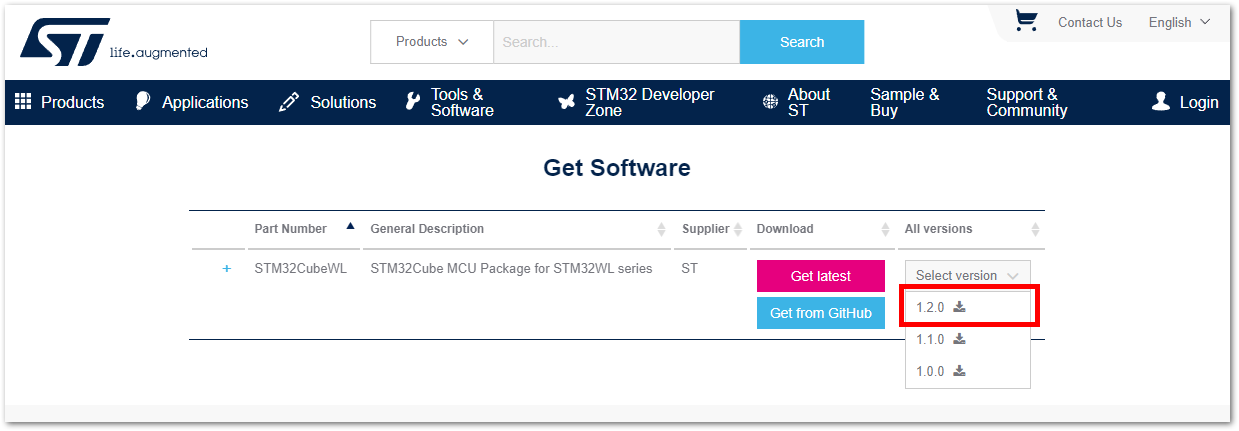 Figure 1: STM32WL V1.2.0 Download
- The downloaded files usually go to the downloads folder. You need to extract it, and then you will see the STM32WL SDK firmware folder.
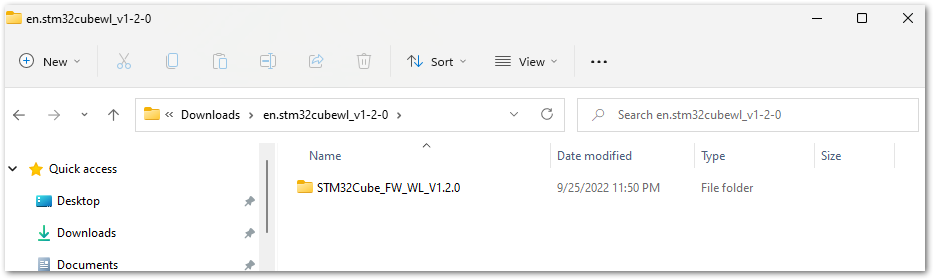 Figure 1: STM32WL V1.2.0
- The structure of the extracted files should be the same as shown in Figure 32. Do not change this folder structure. It contains many examples related to the STM32WL chip.
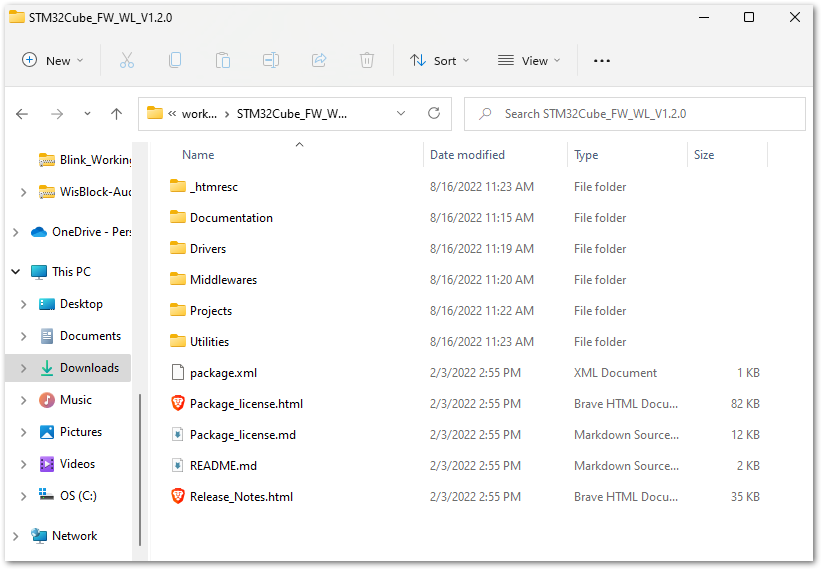 Figure 1: STM32WL V1.2.0 Folder Structure
Modifications for the RAK3172
Files Modification Needed to Run STM32WL SDK LoRaWAN Examples to RAK3172
If you already have the STM32WL V1.2.0 SDK folder, there are only a few files that you need to update to create firmware that will run on the RAK3172.
STM32 microcontroller firmware created using STM32CubeIDE (with the help of STM32CubeMX) has a .ioc file. This is a configuration file created by the STM32CubeMX tool. This is a useful tool in setting up peripherals and drivers quickly in the STM32 development ecosystem. However, once you make the file modifications mentioned in this guide, you cannot create a new .ioc file or modify it via STM32CubeMX. Otherwise, the modified files needed by the RAK3172 will be overwritten and will revert to their original state in the .ioc file.
In cases where you need to use STM32CubeMX to set up peripherals or drivers, you just need to repeat the same modifications mentioned in this section.
- Download the Low-Level Development zip file for v1.2.0 from the RAK downloads site. Extract the zip file, and inside the folder are four files that need to be copied and pasted to specific locations in the STM32WL V1.2.0 folder to make it compatible with RAK3172.
The majority of these files are for setting up the RF channel front end of the radio section on the STM32WL chip. Also, the startup file must be changed because the default startup on STM32WL SDK V1.2.0 is for the STM32WL55 series and not for STM32WLE5. The RAK3172 is based on STM32WLE5CCU6.
This guide will demonstrate how to run the LoRaWAN_End_Node example of the STM32WL SDK to RAK3172. If you need to run other LoRaWAN-related examples like LoRaWAN_AT_Slave, you need to update the files on that folder.
Figure 1: RAK3172 Low Level Development Files- The radio related files
radio_board_if.c,radio_board_if.h, andradio_confmust be placed in this location of the STM32WL SDK folder\STM32Cube_FW_WL_V1.2.0\Projects\NUCLEO-WL55JC\Applications\LoRaWAN\LoRaWAN_End_Node\LoRaWAN\Target. You have to overwrite or replace the old files.
Figure 1: RAK3172 Radio Related Files for ModificationFigure 1: RAK3172 Radio Related Files Replaced- You also need to update the startup file. Move the
startup_stm32wle5ccux.sfile to this location:\STM32Cube_FW_WL_V1.2.0\Projects\NUCLEO-WL55JC\Applications\LoRaWAN\LoRaWAN_End_Node\STM32CubeIDE\Application\User\Startup. Delete the default startup file in that directory, namedstartup_stm32wl55jcix.s.
The updated startup folder should look like the one shown in Figure 36.
Figure 1: RAK3172 Radio Related Files Replaced- After the modifications above, there are minor changes needed to be adjusted on other source files.
- On \STM32Cube_FW_WL_V1.2.0\Projects\NUCLEO-WL55JC\Applications\LoRaWAN\LoRaWAN_End_Node\Core\Inc\platform.h, you need to comment out
#define USE_BSP_DRIVER. It should be//#define USE_BSP_DRIVER. - On \STM32Cube_FW_WL_V1.2.0\Projects\NUCLEO-WL55JC\Applications\LoRaWAN\LoRaWAN_End_Node\LoRaWAN\Target\lorawan_conf.h, you need to change the version of LoRaWAN to 1.0.3 which is the commonly used LNS version at the moment of this writing. To do this, you have to change LORAMAC_SPECIFICATION_VERSION to 0x01000300. It should look like this
#define LORAMAC_SPECIFICATION_VERSION 0x01000300. However, if you are using LoRaWAN version 1.0.4 on your LNS, you do not need to perform this step since the DevNonce will be handled correctly.
Initial Build Test for the RAK3172 Custom Firmware
- After making the file modifications, the next step is to test if the LoRaWAN_End_Node example can be built without errors.
If this is your first time using STM32CubeIDE, it shows the Information Center by default. Just close it and access the project in the left panel.
- Open the STM32CubeIDE and click on
FilethenOpen Projects from File System.
Figure 1: Open the Project in STM32CubeIDE- You then need to browse to the project folder location by clicking the Directory button.
Figure 1: Locate the Project Directory in STM32CubeIDE- You should locate this directory
\STM32Cube_FW_WL_V1.2.0\Projects\NUCLEO-WL55JC\Applications\LoRaWAN\LoRaWAN_End_Node. Click on STM32CubeIDE folder once, then click the Select Folder.
Figure 1: Select the STM32CubeIDE Project Folder- You should now see the STM32CubeIDE checked and ready to be imported as an Eclipse project. If not checked, select the checkbox and then click the Finish button. It will take some time to fully import the entire project.
Figure 1: Open the LoRaWAN_End_Node Project- After the successful import, you should now see the LoRaWAN_End_Node project structure on the left side of the STM32CubeIDE.
Figure 1: Open the STM32CubeIDE Project- With the modified files already implemented, you can check if the files are updated by checking the startup file
startup_stm32wle5ccux.sand theradio_board_if.c. The startup file must be updated to showstartup_stm32wle5ccux.s. You should see#if defined(RAK3172_RF_CHANNEL_SWITCH)on line 72 of theradio_board_if.cfile, as shown in Figure 42. If not, then you were not successful in changing these files with the Low Level Development required modification.
Figure 1: Open the STM32CubeIDE Project- The next step is to ensure that a bin file will be generated for your release build. Go to the properties and ensure that Convert to binary file (-O binary) is checked.
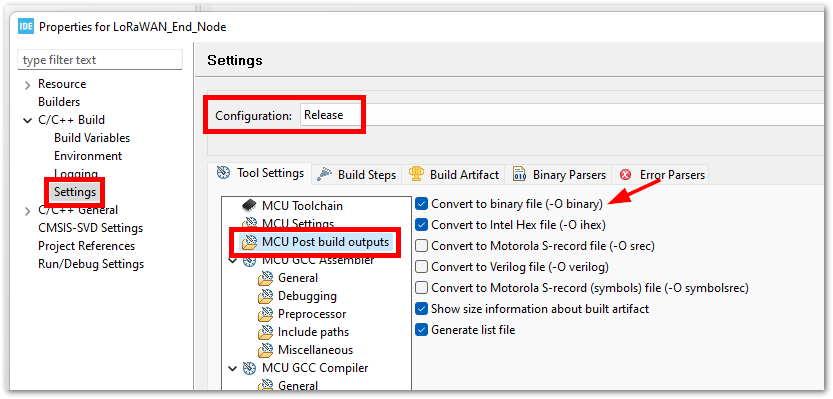 Figure 1: Bin generation settings
- You can now attempt to build the project by setting the build configuration to release, which will generate a
.binfile.
If you have an ST-LINK debugging tool, you can also choose Debug instead of Release.
Figure 1: Configure Build to Release- After setting the build configuration, you are now ready to build the project. You should see a successful compilation and generation of a
.binfile.
Figure 1: Build the ProjectFigure 1: Successful Project BuildRAK3172 on STM32CubeIDE with STM32WL SDK v1.3.0
The STM32WL SDK v1.3.0 guide is nearly identical to the guide for v1.2.0.
Follow the same procedure for changing the radio-related source files and startup file. You can also use the same RF source files used in v1.2.0 for v1.3.0. However, you must work with v1.3.0 of the STM32WL SDK package instead of the older version (v1.2.0).
Running the LoRaWAN_End_Node Example of STM32WL SDK on RAK3172
Configuration to Connect the LoRaWAN Network Server
Once you have a working project and have been able to build with no errors in the STM32CubeIDE, the next step is to configure the LoRaWAN parameters to be able to run the LoRaWAN_End_Node example code with the RAK3172.
- First, you need to register the device to the network server. You can follow the guide on how to register a device in TTN V3 or Chirpstack using the procedure discussed in the RAK3172 TTN V3 OTAA Quick Start Guide or in the RAK3172 Chirpstack OTAA Quick Start Guide respectively.
By default, the LoRaWAN_End_Node example will work on the EU868 region. This is set in the lora_app.h that can be found in this location /STM32Cube_FW_WL_V1.0.0/Projects/NUCLEO-WL55JC/Applications/LoRaWAN/LoRaWAN_End_Node/LoRaWAN/App/(for v1.0.0), /STM32Cube_FW_WL_V1.2.0/Projects/NUCLEO-WL55JC/Applications/LoRaWAN/LoRaWAN_End_Node/LoRaWAN/App/(for v1.2.0) and /STM32Cube_FW_WL_V1.3.0/Projects/NUCLEO-WL55JC/Applications/LoRaWAN/LoRaWAN_End_Node/LoRaWAN/App/(for v1.3.0).
- To activate and connect your device via OTAA, you need to obtain the following parameters: DEVEUI, APPEUI, and APPKEY.
Once you successfully register your device with TTN V3, you should see these parameters, as shown in Figure 47.
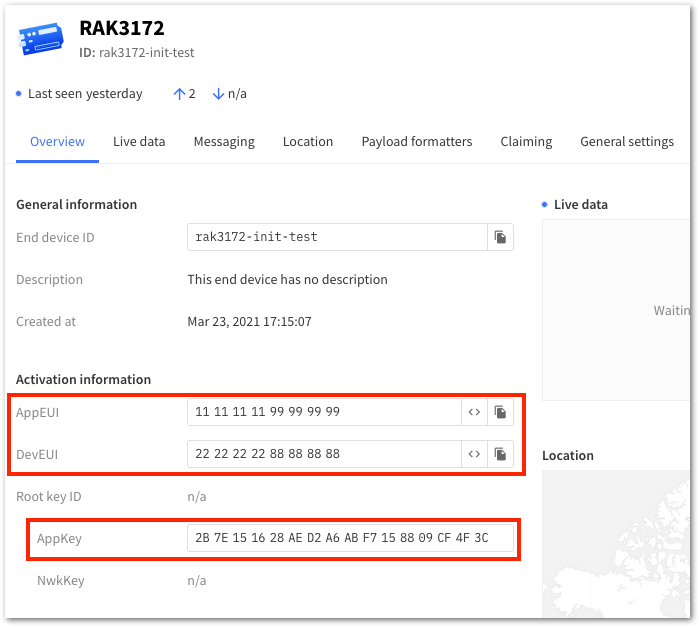 Figure 1: OTAA device registration in TTN V3
- With the device registered to TTN V3, you should edit the
se-identity.hfile to update the required OTAA parameters. On the STM32CubeIDE, click File and select Open File.... You should navigate to this directory\STM32Cube_FW_WL_Vx.y.z\Projects\NUCLEO-WL55JC\Applications\LoRaWAN\LoRaWAN_End_Node\LoRaWAN\App(where Vx.y.z represents the version number of the SDK, such as v1.0.0, v1.2.0, or v1.3.0) to find these-identity.hfile, then click Open.
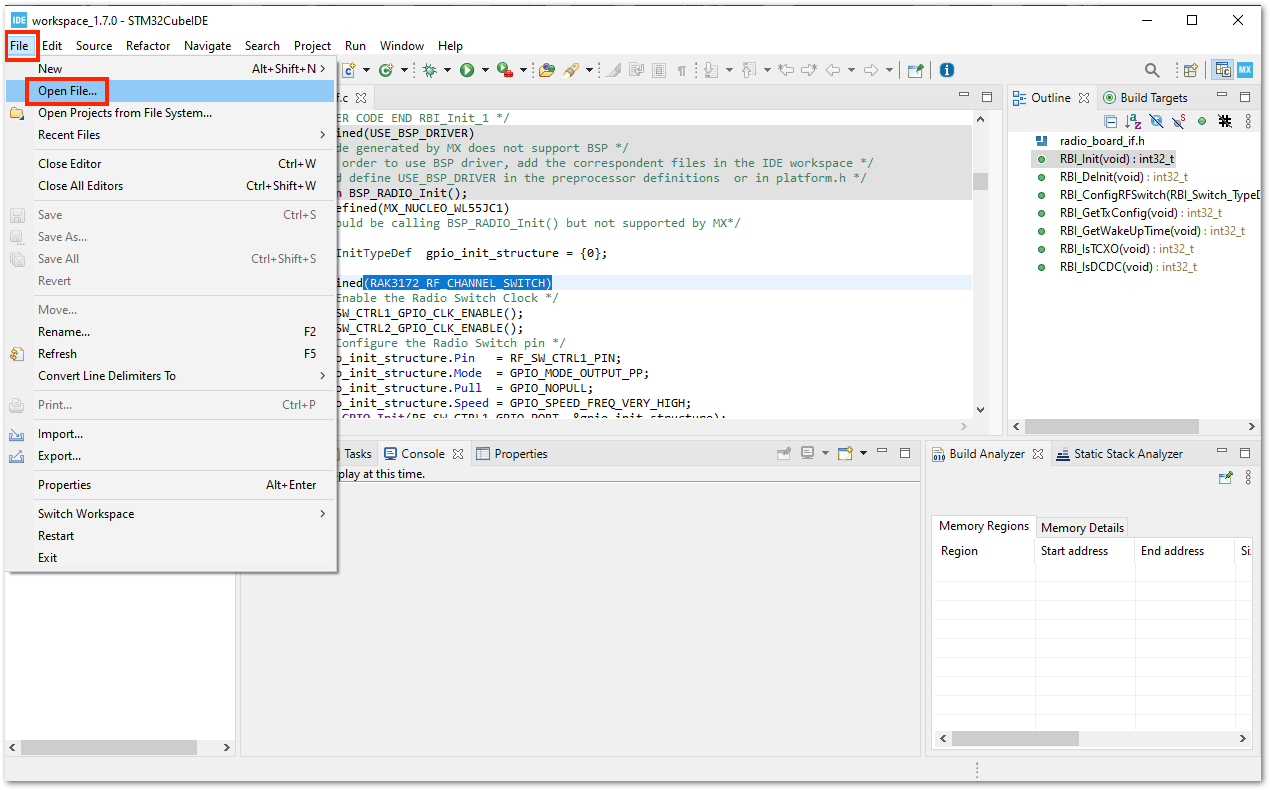 Figure 1: Open the File Needed to Modify with OTAA Parameters
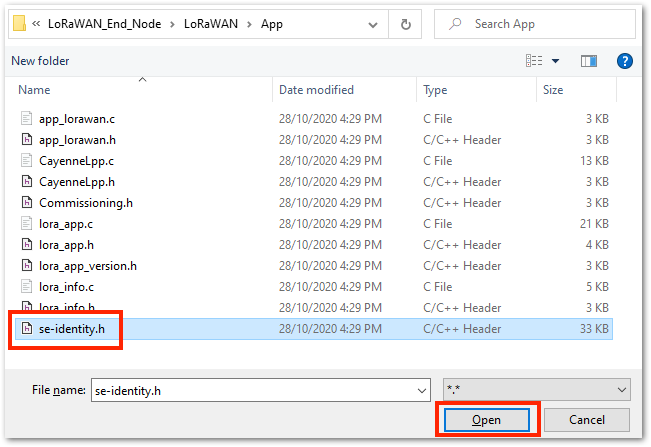 Figure 1: Open the se-identity.h File
- The
se-identity.hheader file must be updated with the common DEVEUI, APPEUI, and APPKEY parameters in the device registration on the network server. In this example, you can see that theLORAWAN_DEVEUI_EUI,LORAWAN_JOIN_EUI, andLORAWAN_APP_KEYare updated, as shown in Figure 50. These values are based on the TTN V3 registration in Figure 47.
The LORAWAN_JOIN_EUI is the same as the App_EUI in this guide which is the term that adheres to the LoRaWAN Specification V1.1.
To ensure that your device works on both LoRaWAN versions (LoRaWAN Specifications V1.0.x and V1.1), make sure that the application root key LORAWAN_APP_KEY and the network root key LORAWAN_NWK_KEY of the se-identity.h file are exactly the same. Otherwise, you might encounter MIC-related errors while joining the network.
/*!
 * Application root key
 */
#define LORAWAN_APP_KEY                                    2B,7E,15,16,28,AE,D2,A6,AB,F7,15,88,09,CF,4F,3C

/*!
 * Network root key
 */
#define LORAWAN_NWK_KEY                                    2B,7E,15,16,28,AE,D2,A6,AB,F7,15,88,09,CF,4F,3C
The macro STATIC_DEVICE_EUI is also updated to 1 instead of 0 because a generated DEVEUI in TTN V3 is used in this guide instead of the embedded DEVEUI of the device.
STM32WL SDK v1.3.0 has different structure of se-identity.h file. It does not have STATIC_DEVICE_EUI and is available only on lower versions of the SDK.
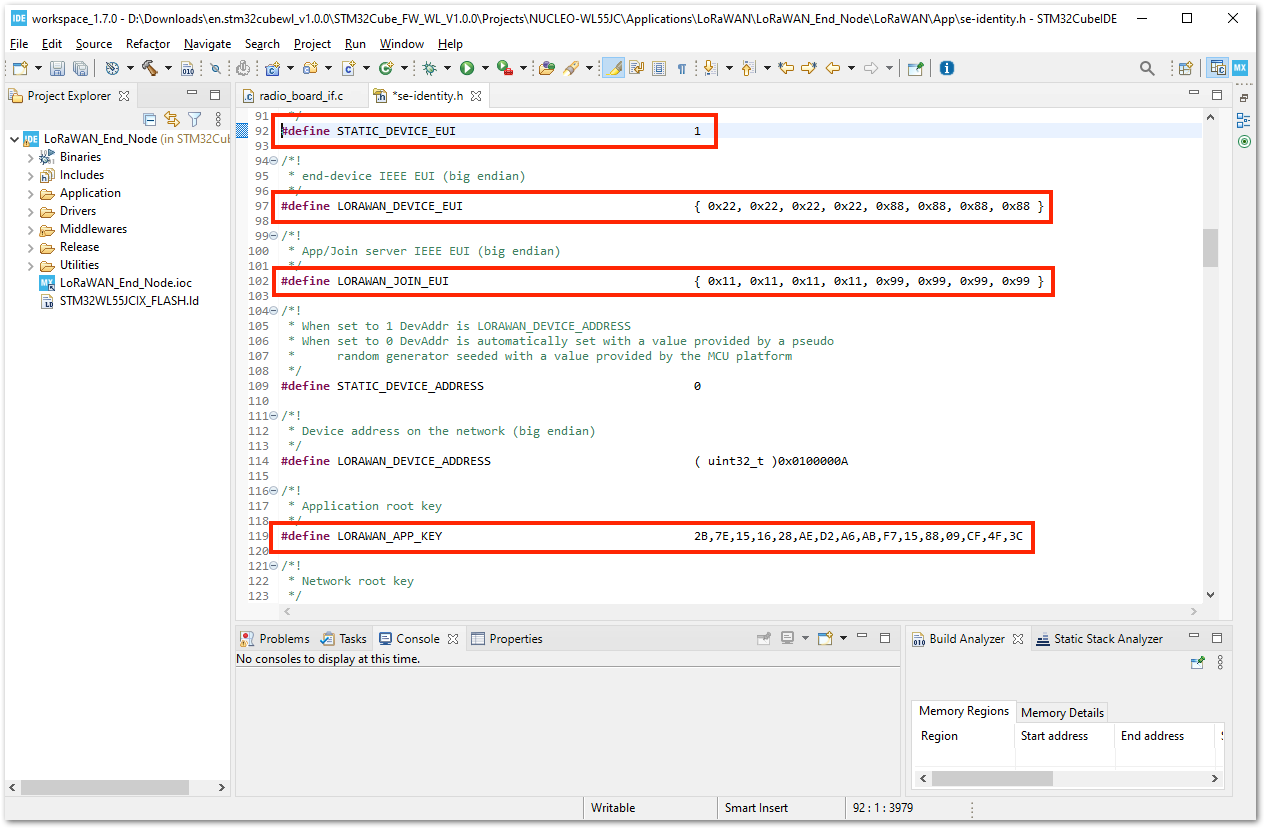 Figure 1: Modified se-identity.h File
These parameters are usually set and code generated in the .ioc file via STM32CubeMX. However, that method is not possible since a direct modification of the radio-related source files is done in this guide. Any further code generation via STM32CubeMX after the modifications in the previous steps in this guide will override all the changes that are required to run the LoRaWAN_End_Node project example for the RAK3172 module.
Generation of BIN file
With all the necessary files modified and edited, you can now generate your .bin FW file and upload it to your RAK3172 module.
- The first step is to first clean the project to remove any outdated binary files in the project folder, followed by building it. Sometimes, Build Project is not clickable, so you can use Build All as an alternative. You only have one project as of now, so that should work fine as well.
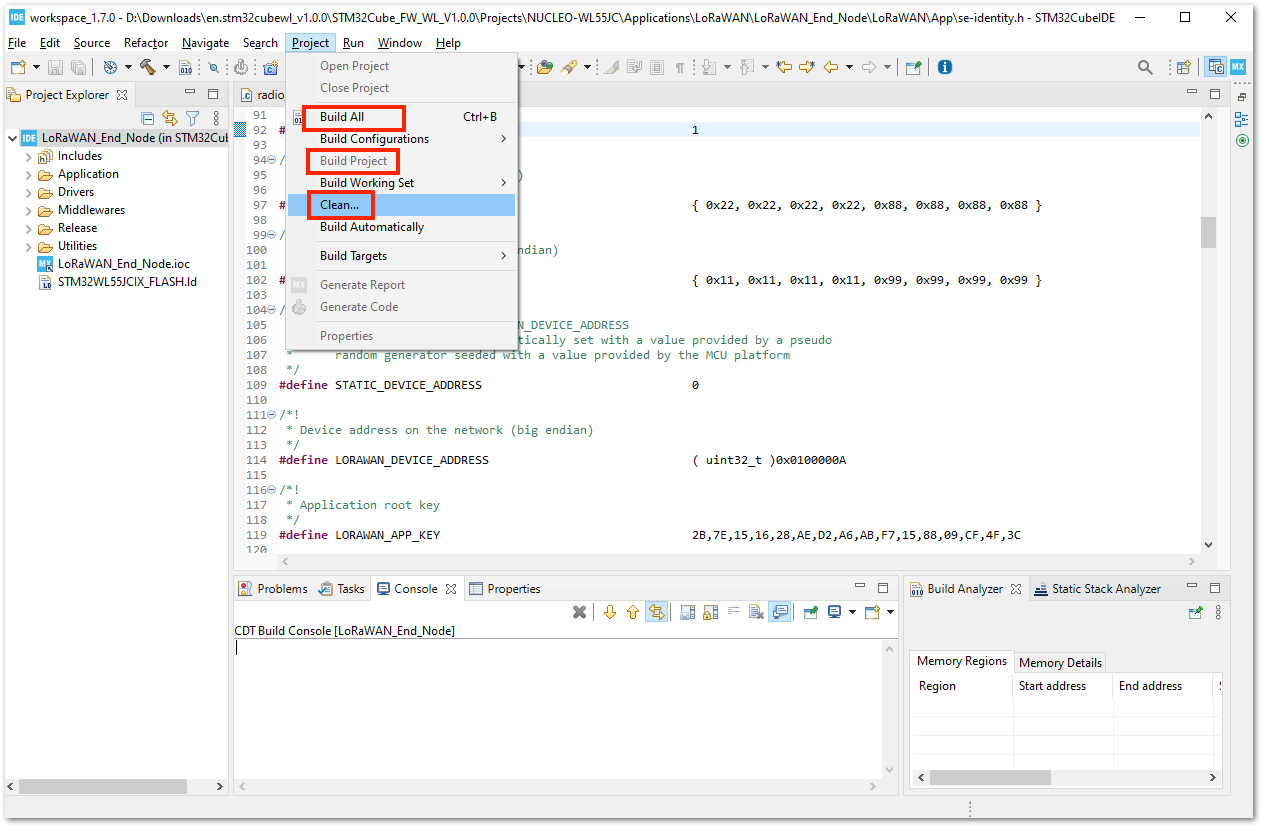 Figure 1: Clean and Build the STM32CubeIDE Project
- After a successful build, you should see in console Finished building: LoRaWAN_End_Node.bin. Also, check if there's a generated
LoRaWAN_End_Node.binfirmware file in the following folder location:\STM32Cube_FW_WL_Vx.y.z\Projects\NUCLEO-WL55JC\Applications\LoRaWAN\LoRaWAN_End_Node\STM32CubeIDE\Release(Vx.y.z means the version number of the SDK - v1.0.0, v1.2.0 or v1.3.0). The bin file is the firmware binary that you need to upload to your RAK3172 module.
For the generated compiled files, hex format is also acceptable.
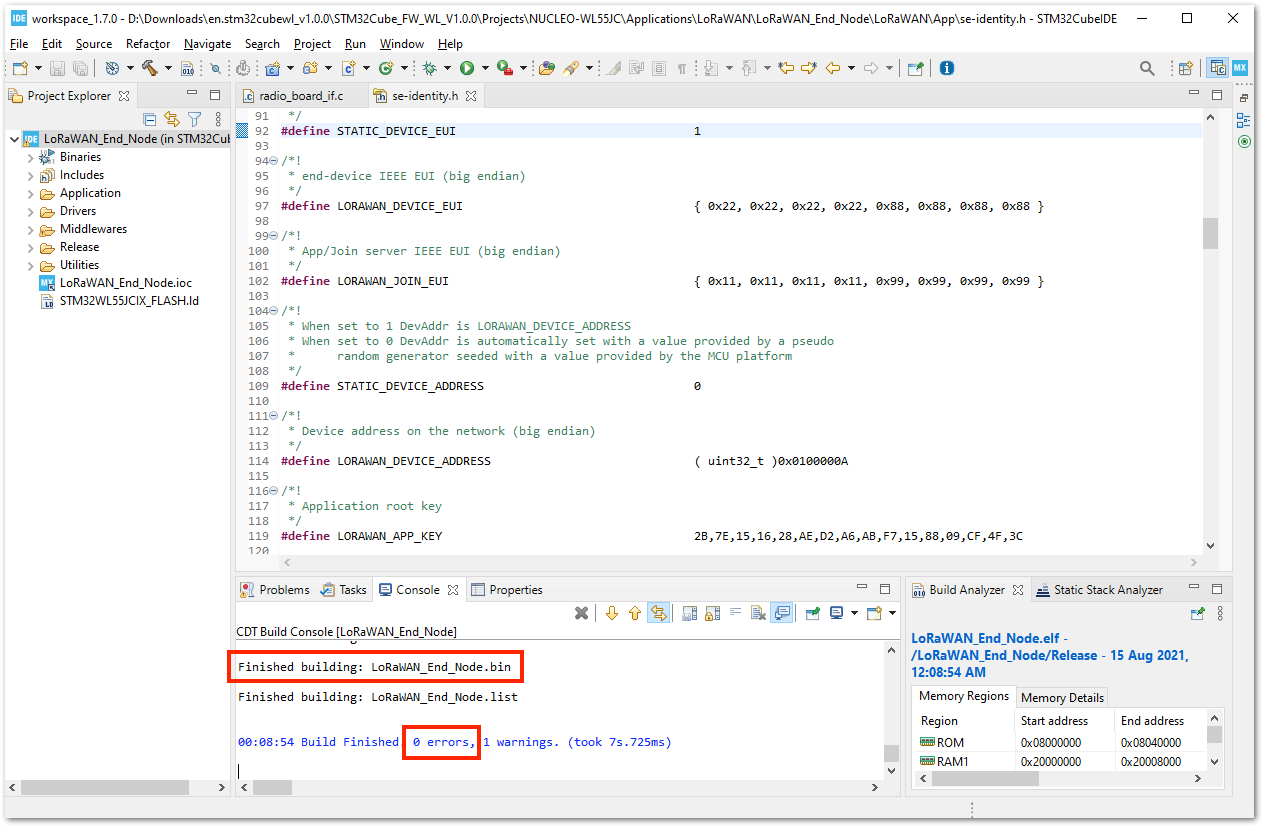 Figure 1: Successful Build with BIN File for RAK3172
Uploading the FW Generated Using STM32CubeProgrammer
The generated binary (.bin) firmware file is ready to be uploaded to the RAK3172.
To upload this binary file, you will need to use STM32CubeProgrammer, created by STMicroelectronics.
Download the latest version STM32CubeProgrammer and the one compatible with your computer.
In this guide, you will use the internal UART bootloader of the STM32WL and connect the RAK3172 to a USB to Serial converter tool. You need to connect five pins: power supply pins (3.3 V and GND), UART2 pins (TX and RX), and the Boot0 pin (connected to 3.3 V), as shown in Figure 53.
RAKDAP1 hardware debugger DOES NOT work with STM32CubeProgrammer. It is advisable to use an alternative USB-UART converter when using the UART bootloader of STM32WL to upload a .bin nor .hex file.
 Figure 1: RAK3172 Connection to USB-UART Converter with Boot0 Pin at 3.3V Level
You can also use an ST-LINK to upload the .bin file to RAK3172.
- Once the hardware is now ready, you can open the STM32CubeProgrammer. Then you need to open the
LoRaWAN_End_Node.binFW file from this folder location\STM32Cube_FW_WL_V1.0.0\Projects\NUCLEO-WL55JC\Applications\LoRaWAN\LoRaWAN_End_Node\STM32CubeIDE\Release(for v1.0.0) or\STM32Cube_FW_WL_V1.2.0\Projects\NUCLEO-WL55JC\Applications\LoRaWAN\LoRaWAN_End_Node\STM32CubeIDE\Release(for v1.2.0).
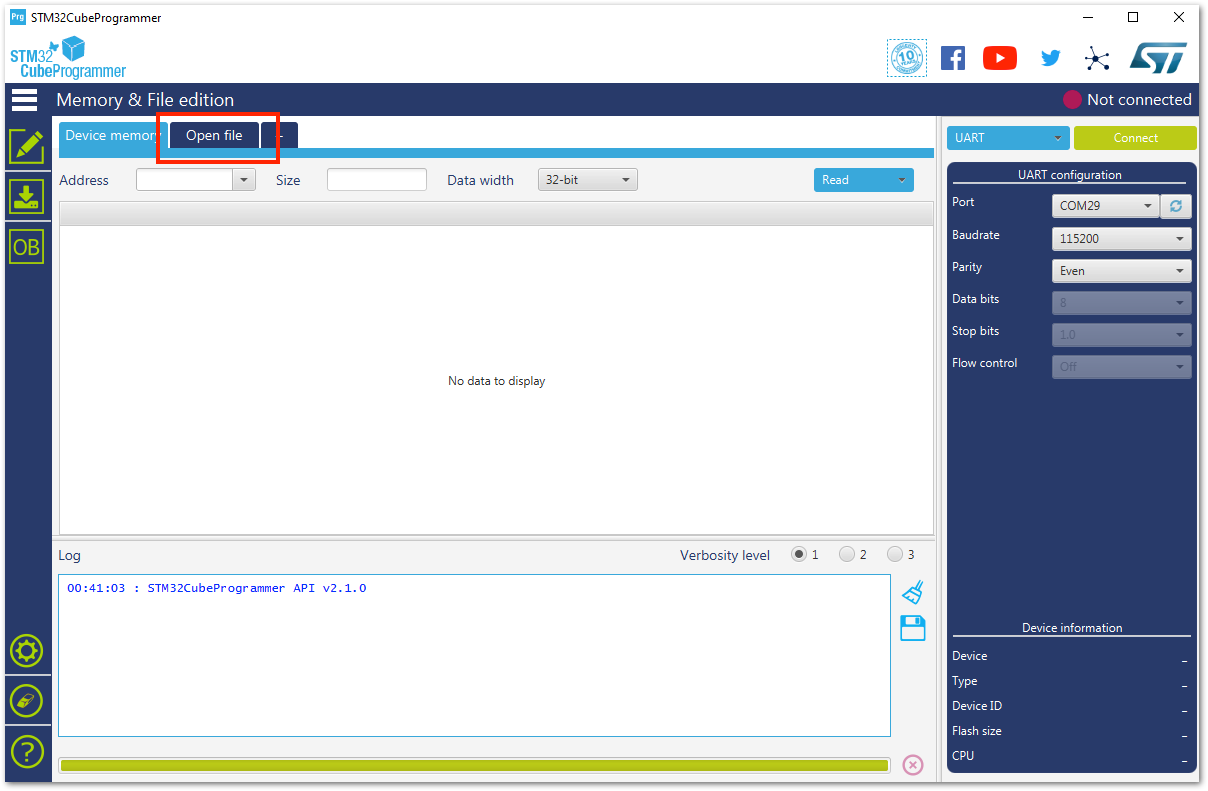 Figure 1: STM32CubeProgrammer Application
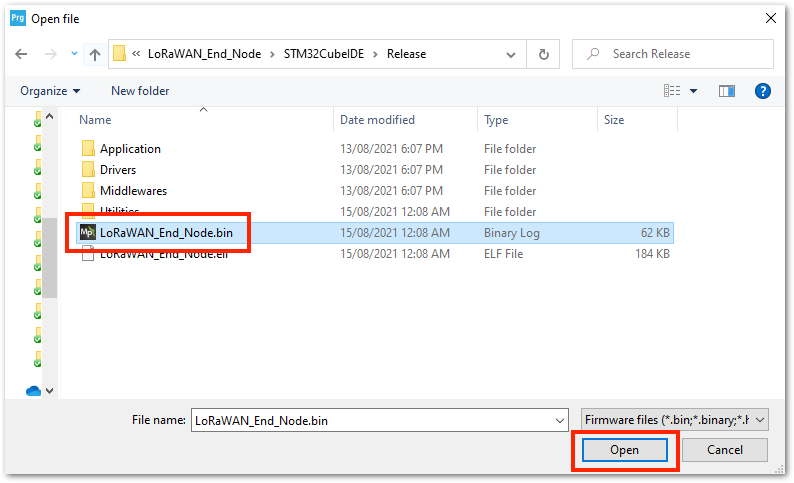 Figure 1: Locating the .bin Firmware File
- If everything is successful, you should now see the
LoRaWAN_End_Node.binFW file in the STM32CubeProgrammer.
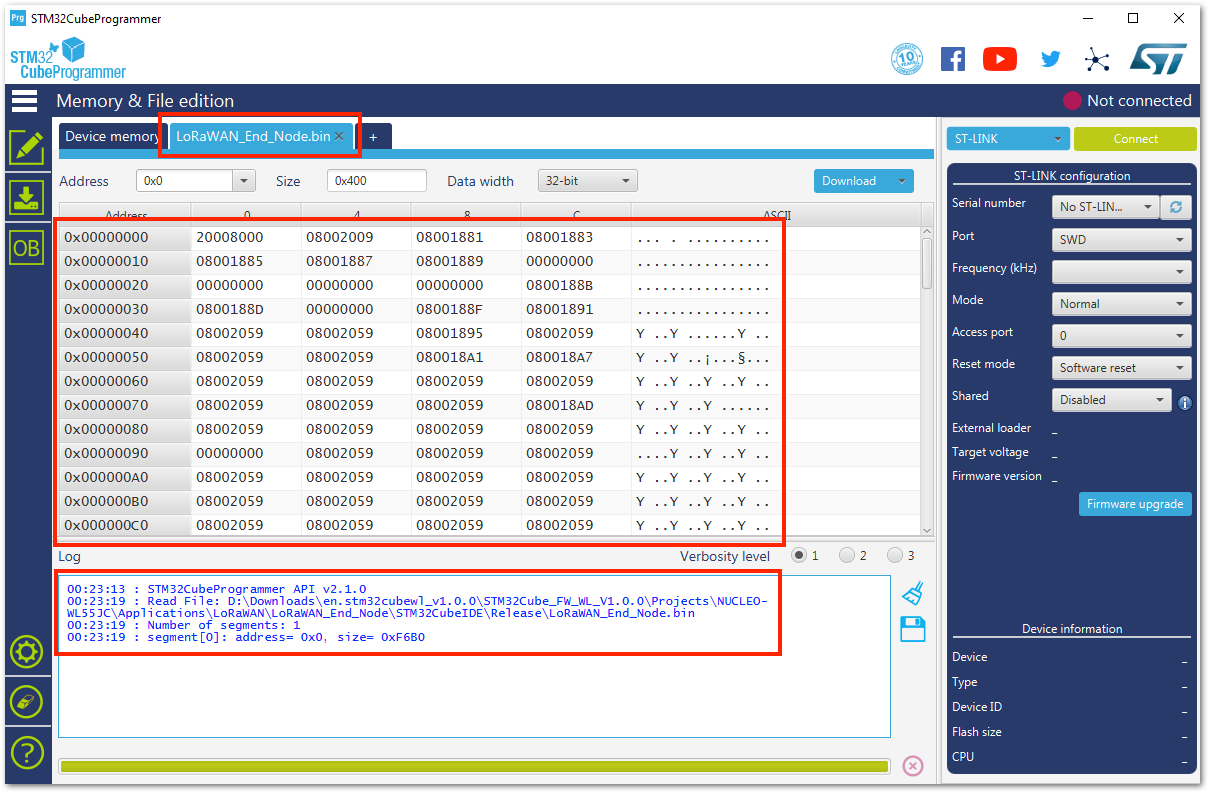 Figure 1: Loaded .bin Firmware File to the STM32CubeProgrammer
- By default, the STM32CubeProgrammer selects ST-LINK as the upload interface. Therefore, you need to change it to UART and select the correct COM port. After setting up the UART connection, you can now connect and see that the device has been detected.
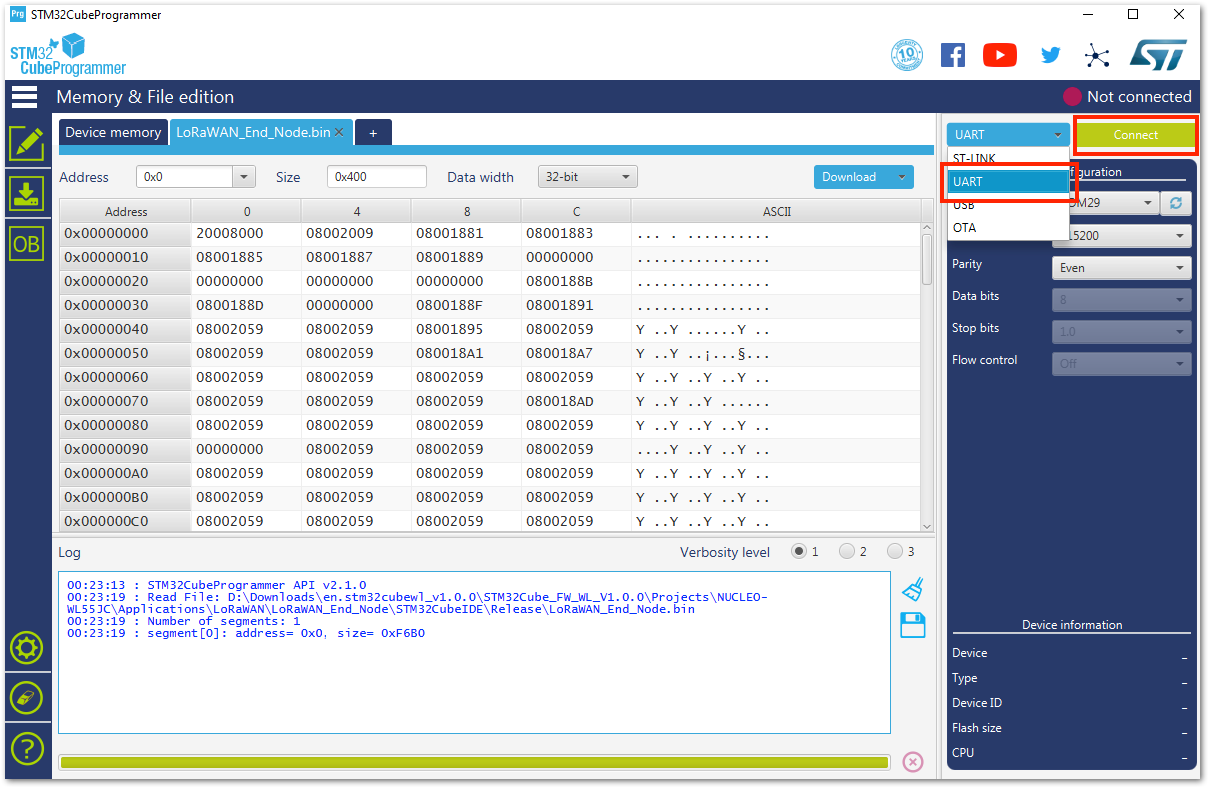 Figure 1: Selecting UART as Programming Interface
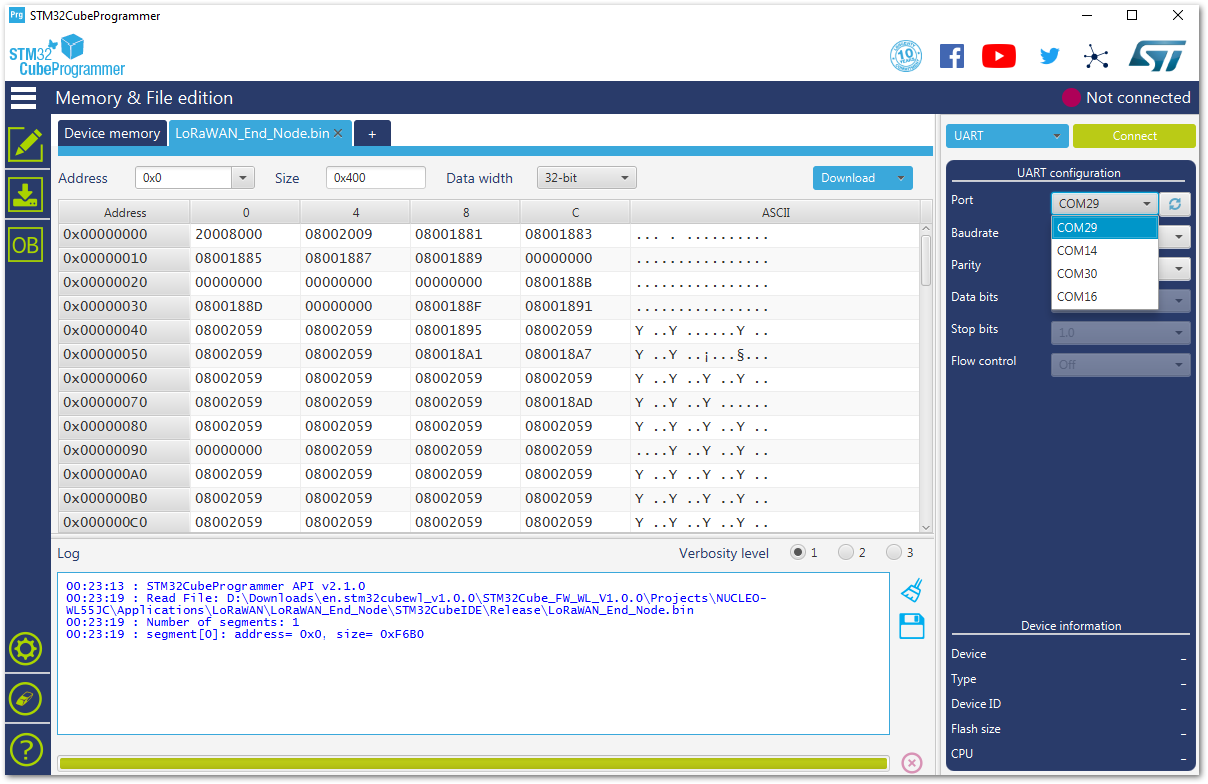 Figure 1: Selecting the Right COM Port
- You need to ensure that the
Boot0is connected to VDD (3.3 V) when the device is powered up, else, the STM32CubeProgrammer might not detect the device. The logs of a detected device are shown in Figure 59.
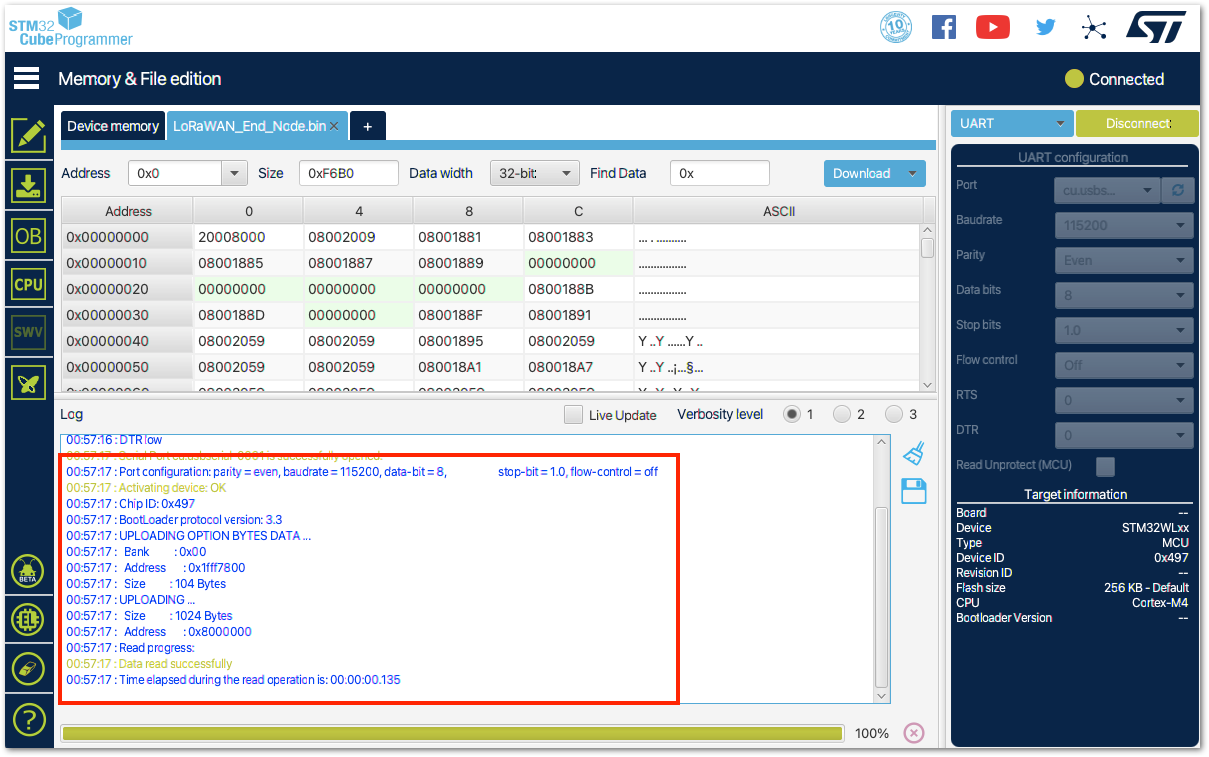 Figure 1: RAK3172 Detected by STM32CubeProgrammer
- If the device is detected by the STM32CubeProgrammer, you can now upload the firmware by clicking Download.
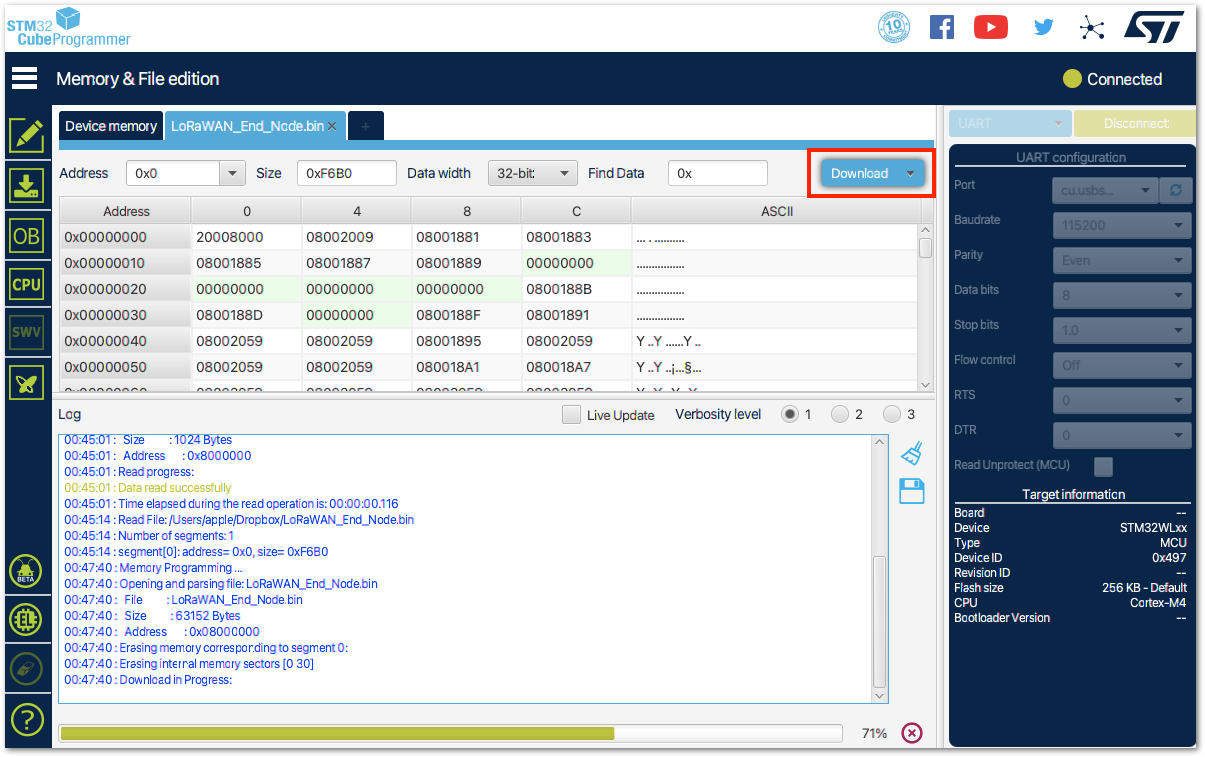 Figure 1: Firmware Uploading in Progress
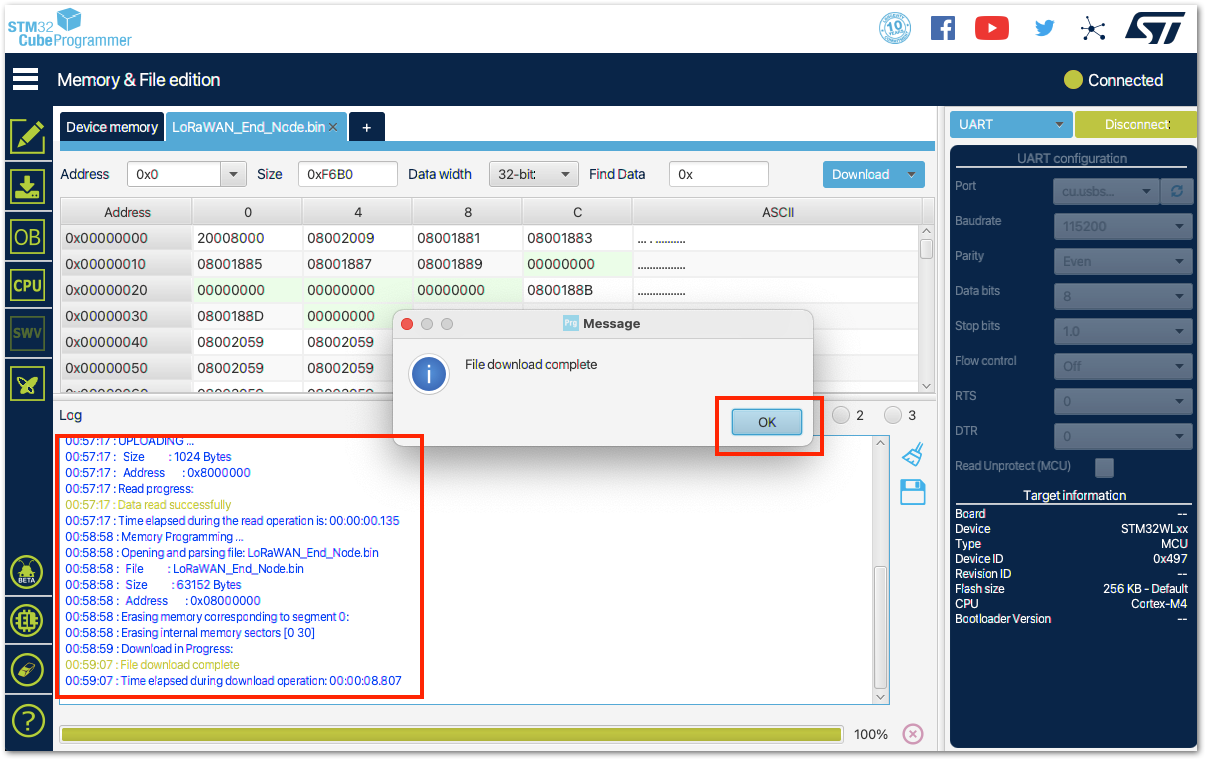 Figure 1: Firmware Successfully Uploaded
- After the successful download, restart the device and remove the connection of the Boot0 pin to VDD (3.3 V), leaving you only with four-pin connections (power supply lines and UART2) as shown in Figure 62.
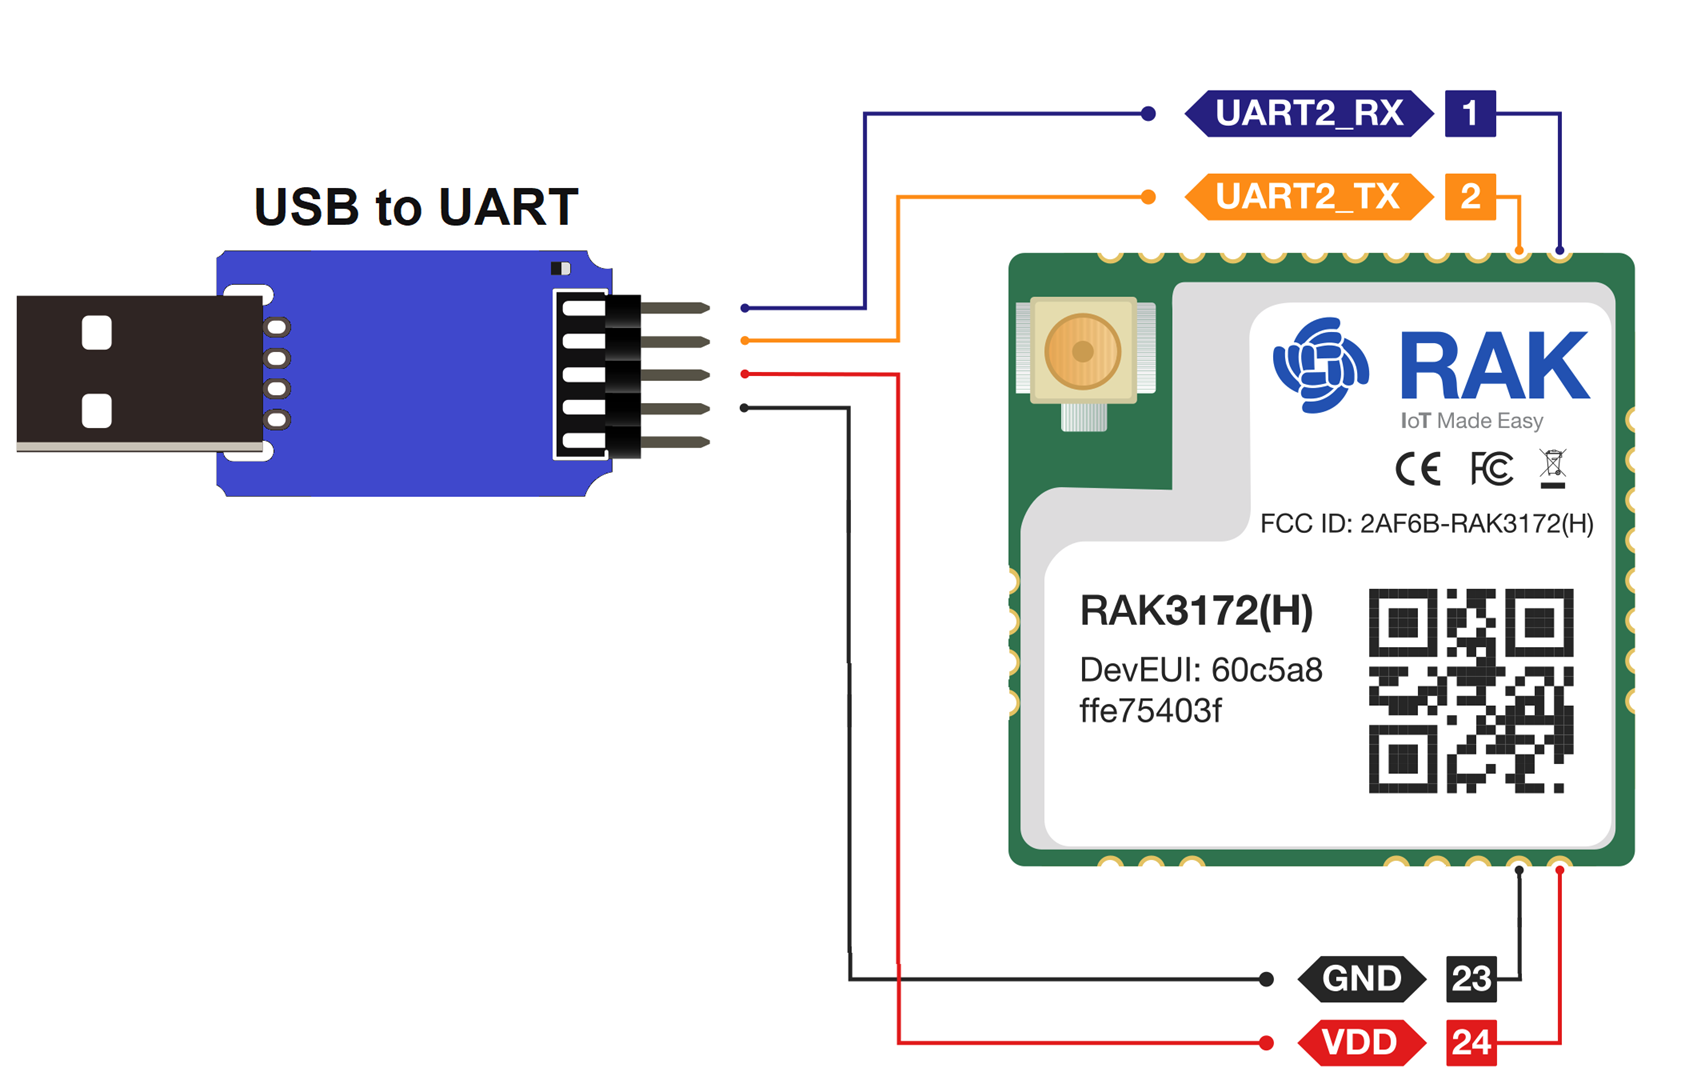 Figure 1: RAK3172 Connection to UART
- By using serial terminal software, check the serial output logs of the RAK3172 with the newly uploaded firmware with the baud rate set to 115200. You should be able to see the serial logs, as shown in Figure 63.
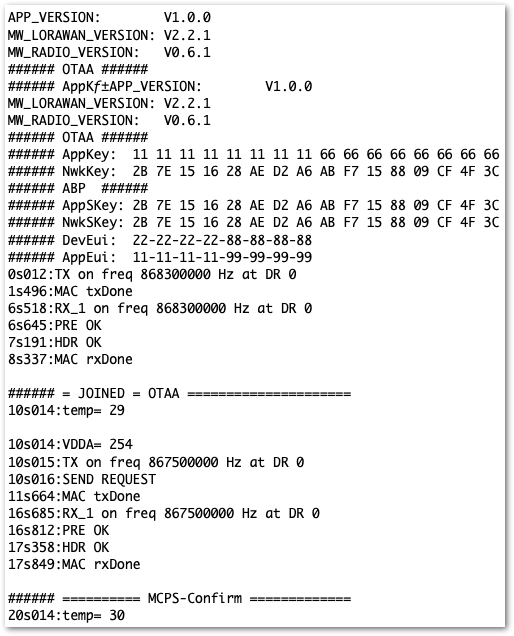 Figure 1: RAK3172 UART2 Logs
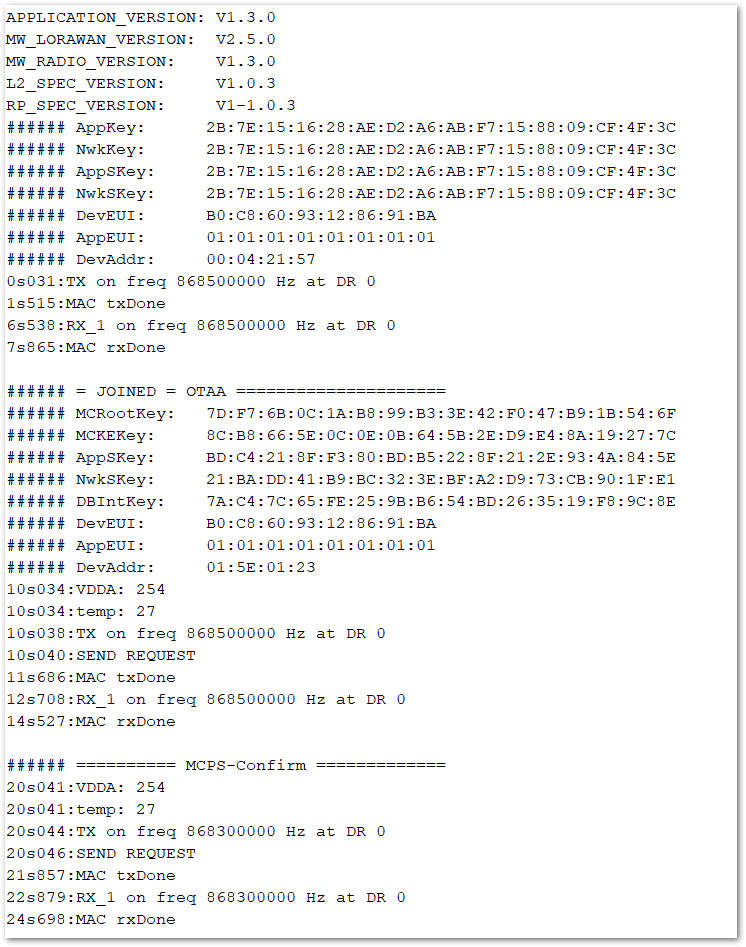 Figure 1: RAK3172 UART2 Logs for SDK version 1.3.0
- With the device registered with TTN, you should now see a successful join and LoRaWAN device uplink.
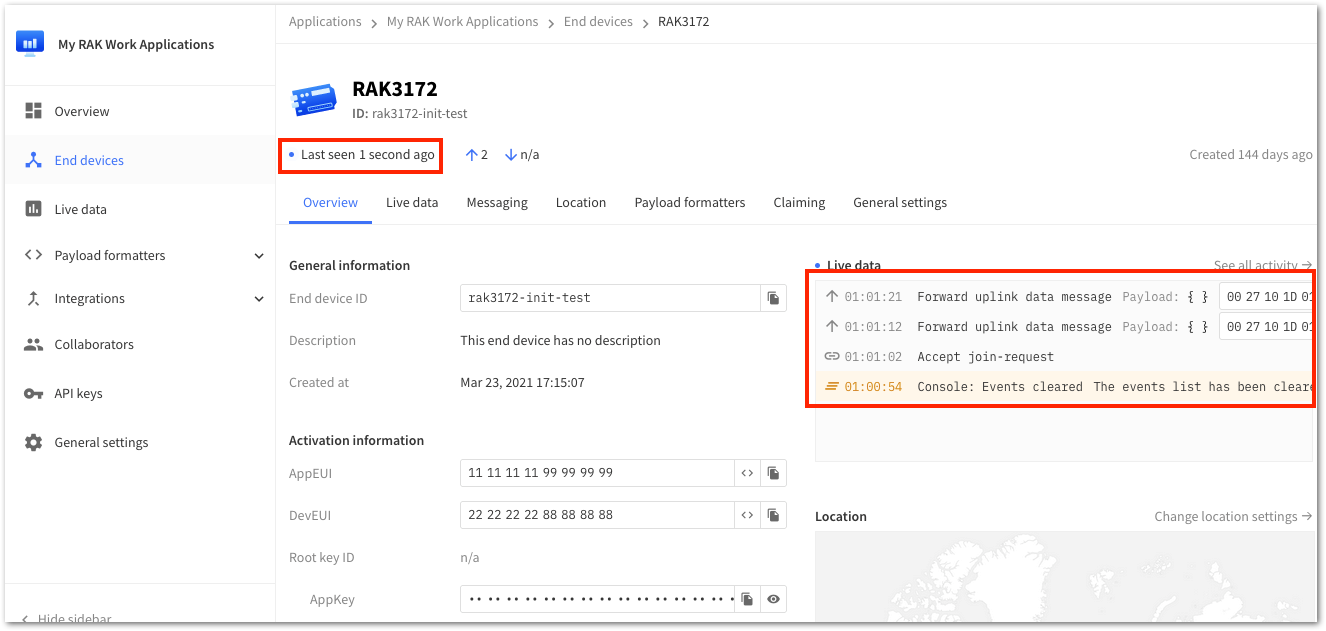 Figure 1: RAK3172 in TTN V3 Join and Uplink