RAK815 WisTrio LPWAN Tracker Quick Start Guide
Prerequisite
- RAK815 WisTrio LPWAN Tracker
- Emulator Kit w/ Debugging Tool
- Micro - USB Cable
- Gateway in Range for Testing
- Raspberry Pi
- A Windows/Mac OS/Linux Computer
- Android phone/ iPhone
This device released by RAKwireless is already pre-loaded with its latest firmware upon manufacturing. If you want to have your device's firmware burned or upgraded, refer to the following sections:
What's Included in the Package?
- 1-pc RAK815 WisTrio LPWAN Tracker
- 1-pc Micro USB Cable
- 1-pc GPS Antenna
- 1-pc LoRa Antenna
- 1-pc Rod Antenna
- 10-pcs Dupont Lines
- 5-pcs Jumping Caps
- Battery Port Line
Product Configuration
Interfacing with RAK815 WisTrio LPWAN Tracker
To interface with the RAK815 WisTrio LPWAN Tracker with your Windows Machine, you need to download the RAK Serial Port Tool.
Before powering the RAK815 WisTrio LPWAN Tracker, you should install the LoRa antenna first. Not doing so might damage the board.
- Using a standard Micro - USB Cable, connect your RAK815 WisTrio LPWAN Tracker to your computer.
If this is your first time to connecting your RAK815 WisTrio LPWAN Tracker to your computer, it should automatically download the USB - Serial Port Chip CP2102 for them to communicate properly. Make sure to have internet access if you want such automatic installation to be successful. If such process fails, re-plug your Micro - USB cord and proceed to the next step.
- Go to your Device Manager by pressing : Windows + R and type
devmgmt.mscor search in Start Menu or right click "My Computer" or "This PC" and click Manage. Look for Other Devices.
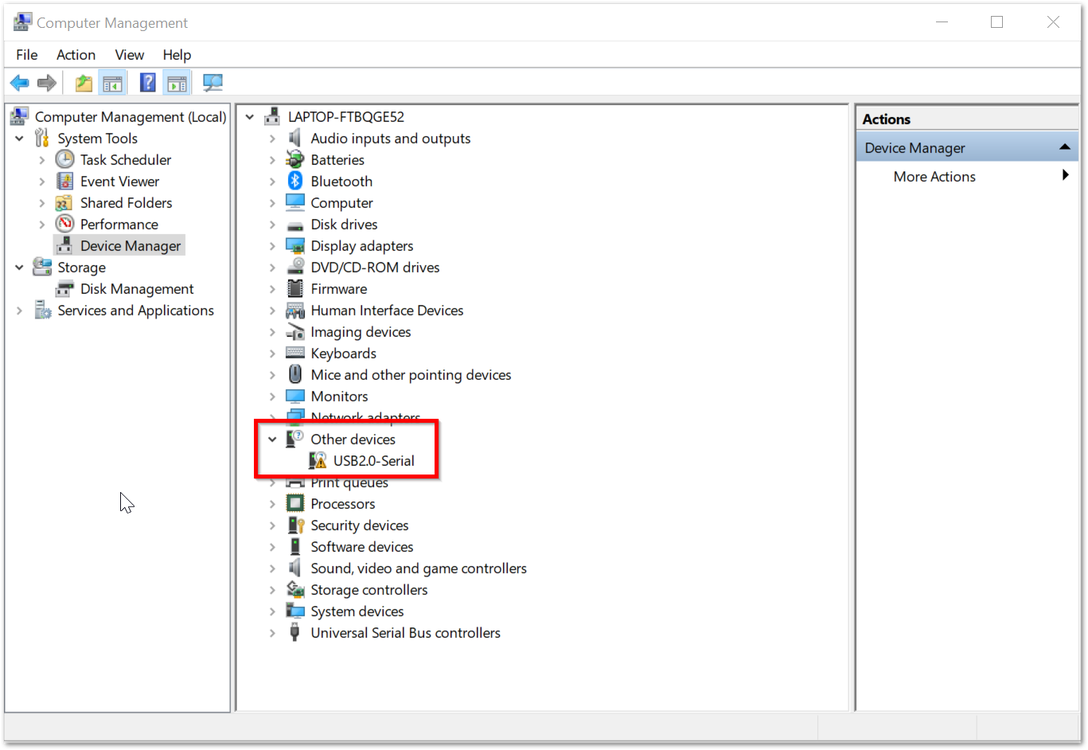 Figure 1: Missing Driver for the RAK815 WisTrio LPWAN Tracker
- Under the "Other devices" drop-down list, an unknown USB2.0-Serial driver must appear. Right click on it and choose "Search automaticaLly for updated driver software". Again, before doing so, make sure to have internet access, or it will fail.
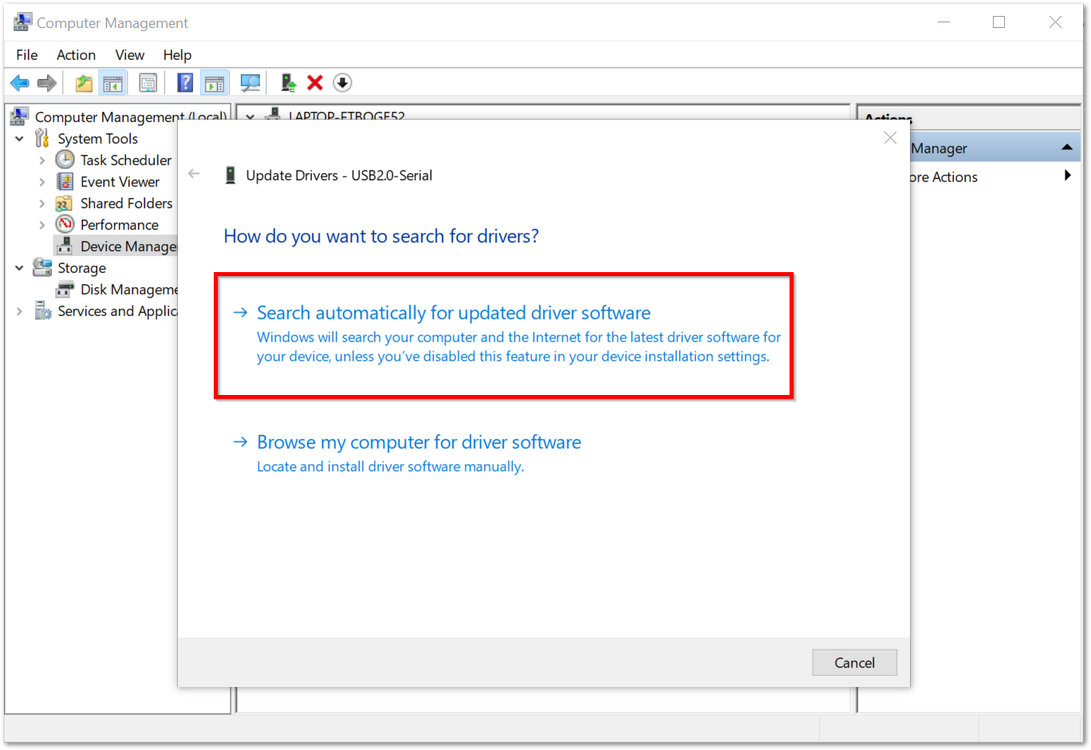 Figure 1: Automatic Driver Installation via Internet
- Wait for it to automatically download and install the missing driver. Once installation is done, "Silicon Labs CP210x USB to UART Bridge" must appear in the Ports (COM & LPT) drop-down list. COM port associated with the driver as it will be used in the succeeding steps. For this sample process, the COM Port used by the USB - Serial Port Chip CP2102 driver is COM41.
 Figure 1: USB - Serial Port Chip CP2102 Driver Successfully Installed
In case the previous measures mentioned beforehand do not install the needed driver, go to the USB - Serial Port Chip CP2102 website to manually download and install it.
Now, you have successfully interfaced your RAK815 WisTrio LPWAN Tracker with your computer.
Configuring the LoRaWAN
Project Structure
Because IAR 8.11 and Keil5 has similar project structure, you will be using the IAR 8.11 structure throughout the configuration settings. Visit the IAR Embedded Workbench IDE website to know more.
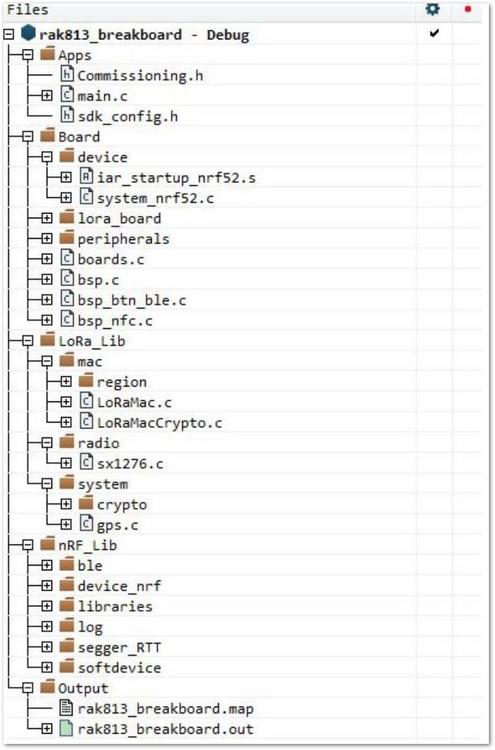 Figure 1: IAR Project Structure
Application Switch
There are three application cases in the GitHub Open Source projects. You only need to replace the main.c and app_lora.c files in the project to switch between different applications.
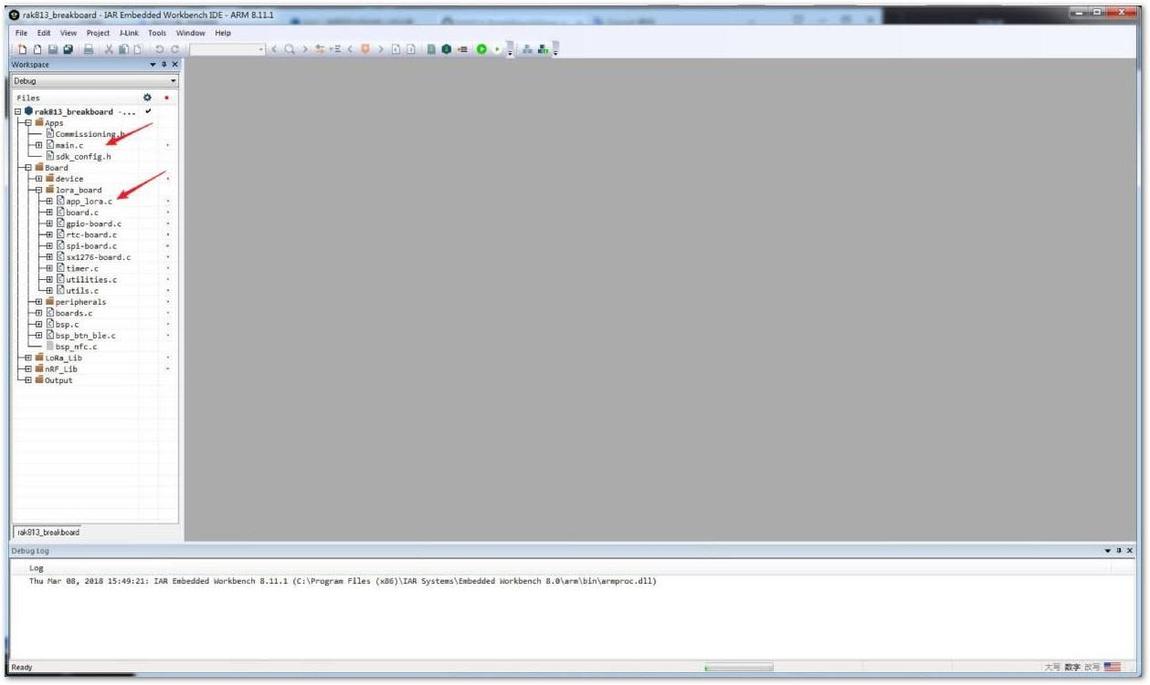 Figure 1: Switching Applications in IAR
The applications are made available in the open-source code by clicking the following file directory: RAK813-BreakBoard-master>>Doc>>hex
 Figure 1: Application Demo Directory
Configuration of LoRaWAN Parameters
This Board can be connected to LoRaWAN through Over-the-Air-Activation (OTAA) or Activation-By-Personalization (ABP) activation modes. It can be modified through the Commissioning.h file available in the open-source code.
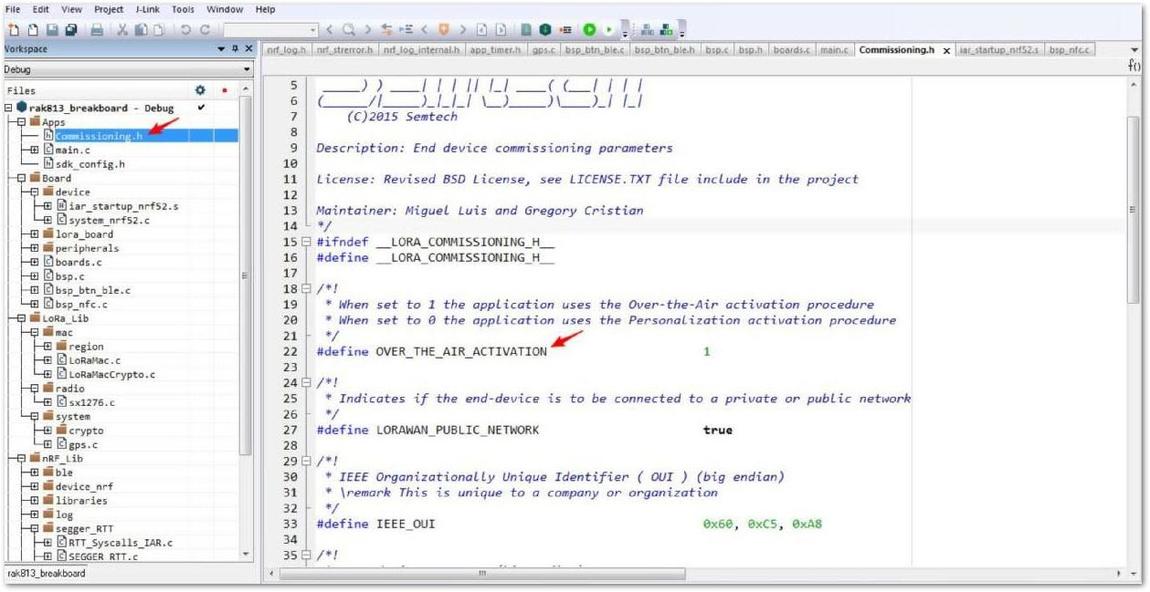 Figure 1: Configuring LoRaWAN Activation Mode in OTAA
Each mode has the following parameters:
- For OTAA
- Device EUI
- Application EUI
- App Key
- For ABP
- Device Address
- Network Address
- Application Key
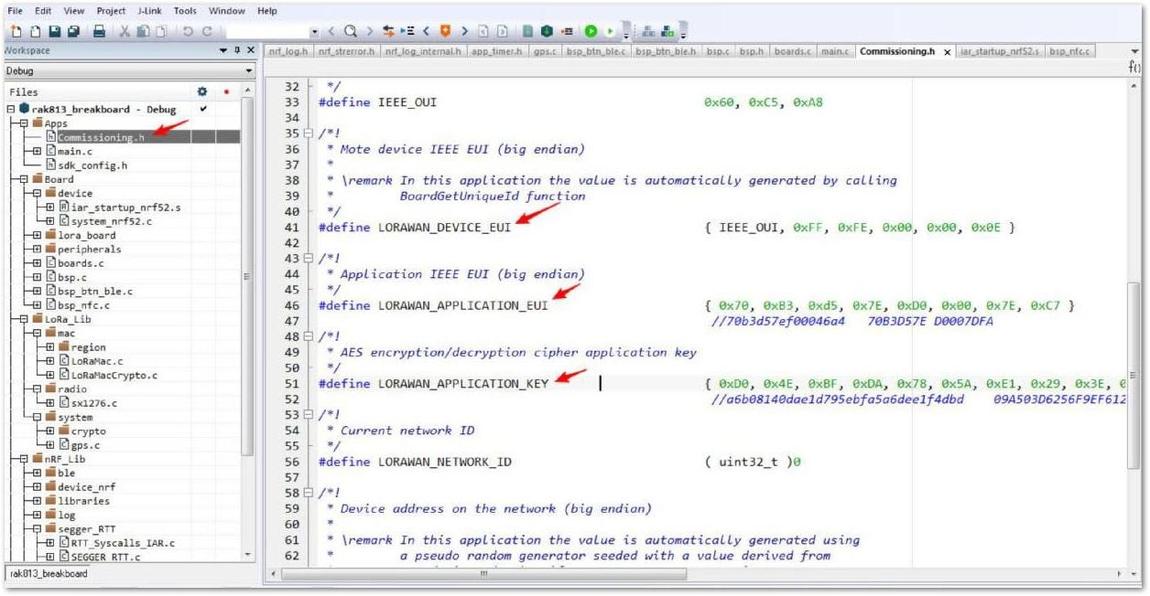 Figure 1: Configuring Application Parameters
Modify LoRaWAN Region
The open-source code is based on LoRaWAN 1.0.2 modified, so the supported regions are EU868, US915, AS923, AU915, IN865, and KR920. If you want to modify the region, you can modify the macro definition.
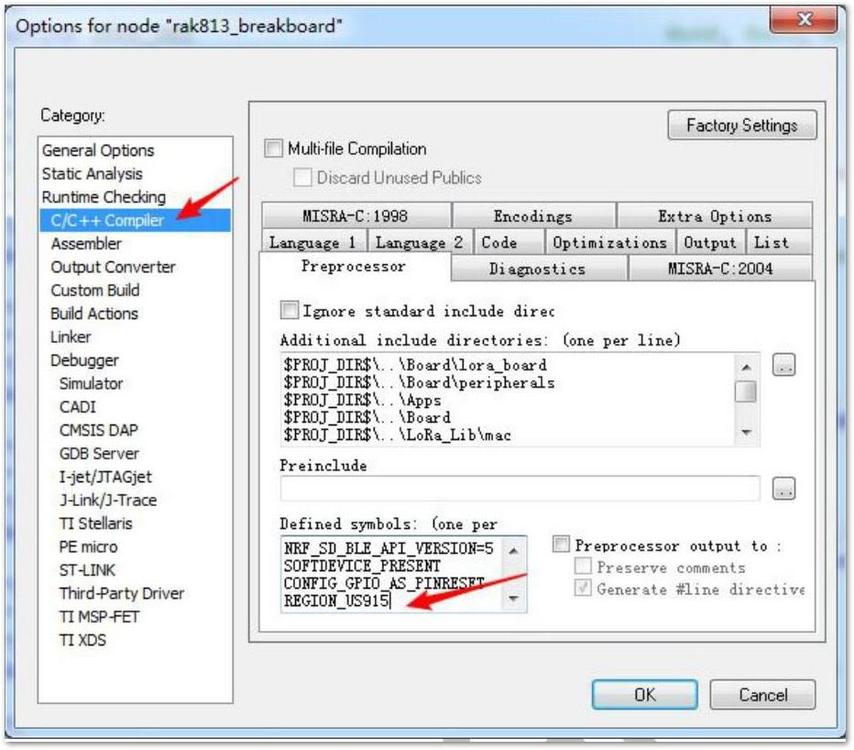 Figure 1: Configuring Application Parameters
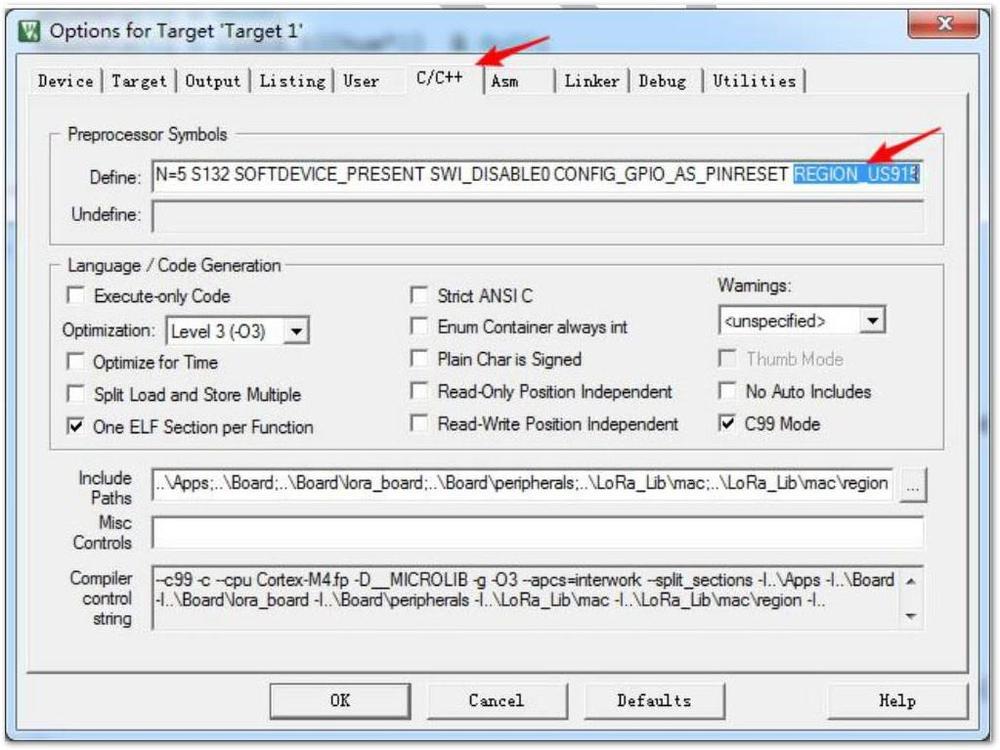 Figure 1: Modifying the LoRaWAN Region in Keil
Now, you now have successfully modified your LoRaWAN parameters.
Application Demonstration
In this section, you will learn the three different open-source application demo of the RAK815 WisTrio LPWAN Tracker.
Log Information
After you finish downloading the application, you can view the Log Information through the serial port defined by the firmware. But first, you need to connect Pin3 -> Pin5, Pin4 -> Pin6 on the UART switch Interface. Refer to the Datasheet for the proper reference.
The serial program used in this demonstration is CommUart Assistant, although you may use other serial terminals.
See Log Information
After successfully installing the driver, connect the device to the PC via the MicroUSB connector. Then reset (reset Button is defined as SW3) service will see the following log information in the serial port.
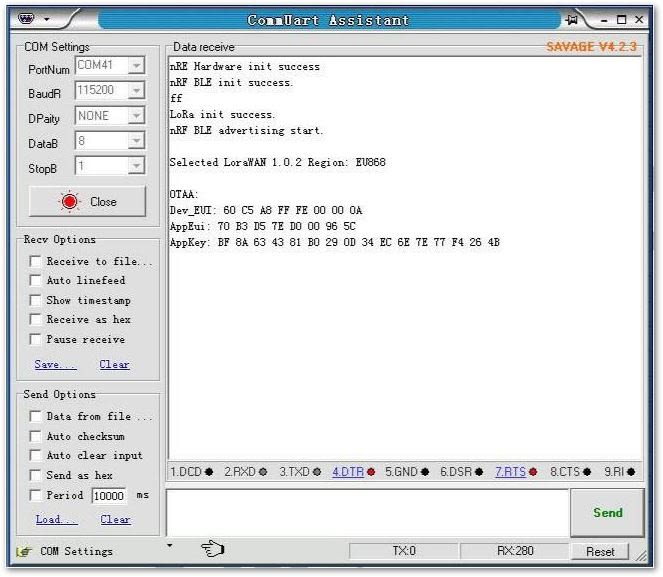 Figure 1: CommUart Assistant Serial Terminal
LoRaWAN Demo
- Turn on your RAK815 and download the LoRaWAN Demonstration.
- Navigate to the Bluetooth settings of your mobile phone and check for "RAK815 LPWAN Demo".
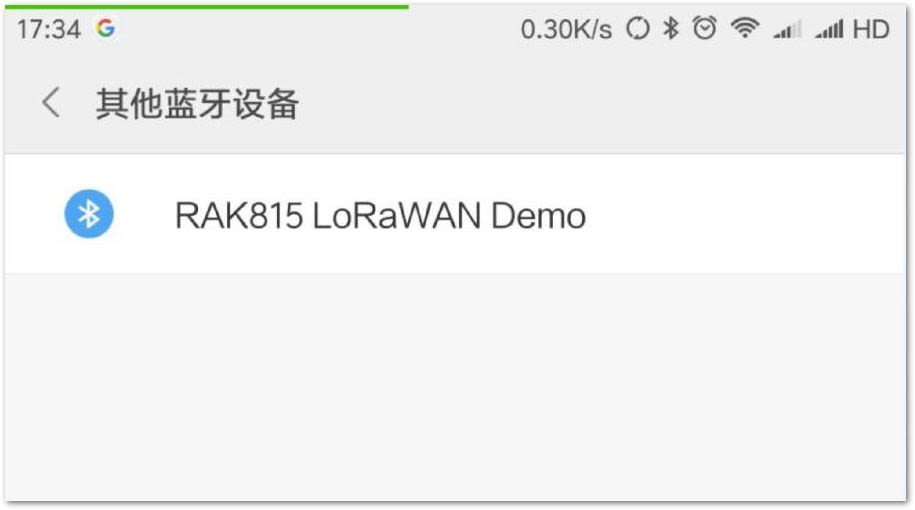 Figure 1: Bluetooth Radio Status in Mobile Phone
- Using your mobile devices, search for "nordic" in Apple Store or Google Play Store, and install the nRF Connect App.
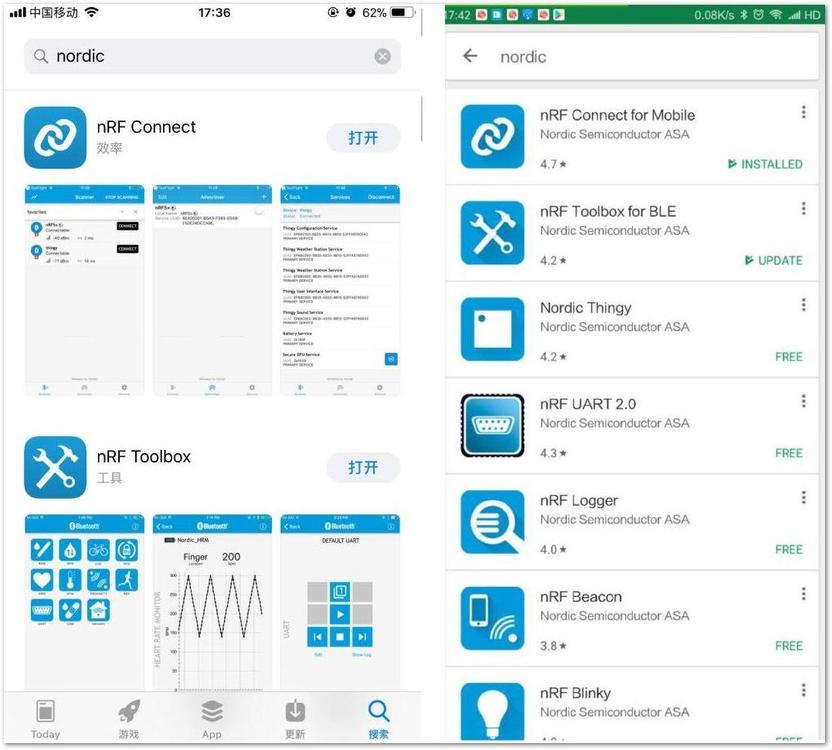 Figure 1: nRF Connect App
- Open the app and connect to the device's Bluetooth radio "RAK813 LPWAN Demo", then click RX Characteristic to send data.
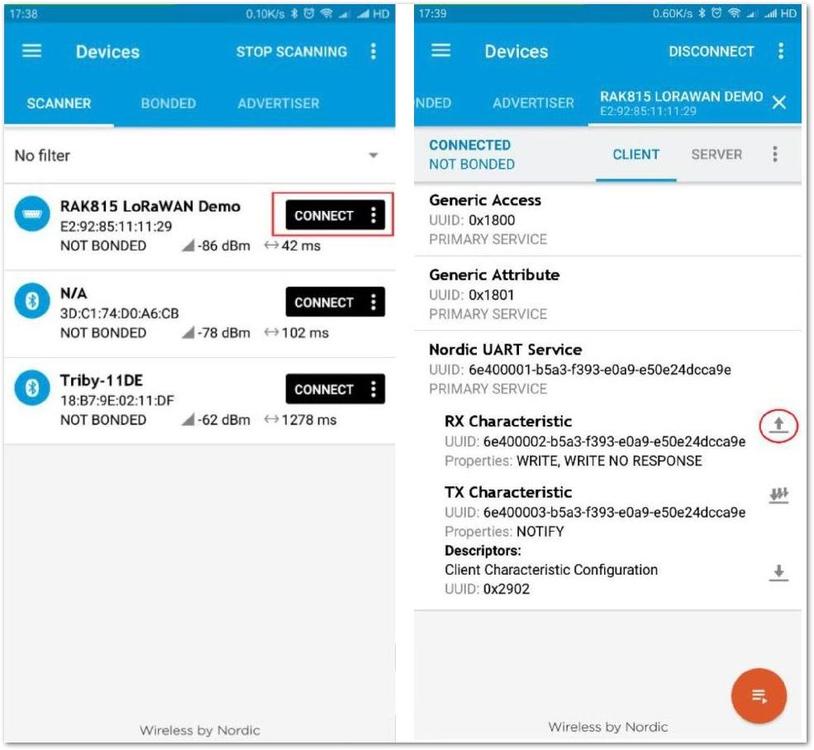 Figure 1: Connecting to RAK815 Bluetooth through nRF Connect
- Type the value
123456, as a sample message, and click "send".
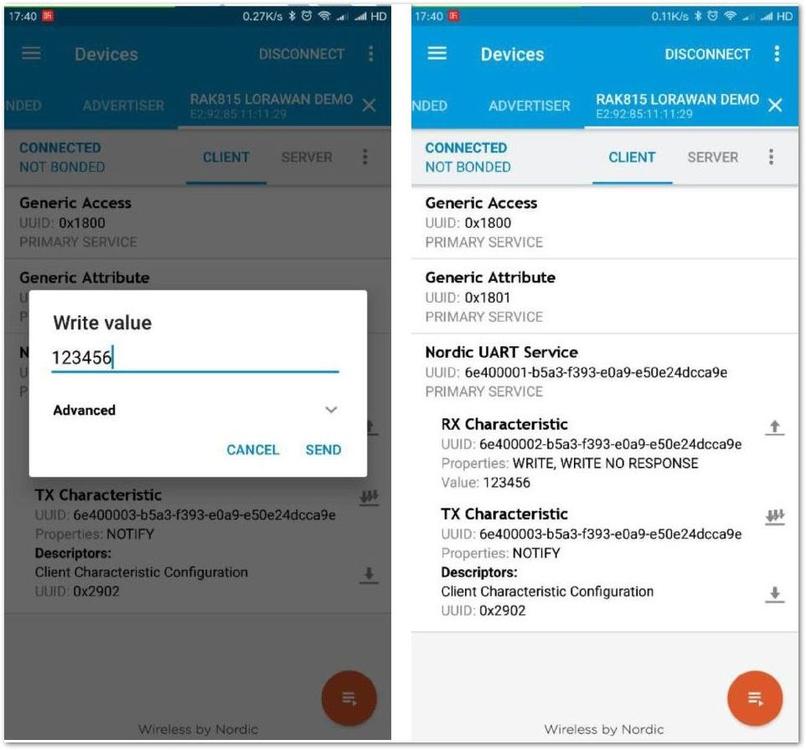 Figure 1: Sending Message through nRF Connect
- After sending, you can see the message in the serial port's Log information.
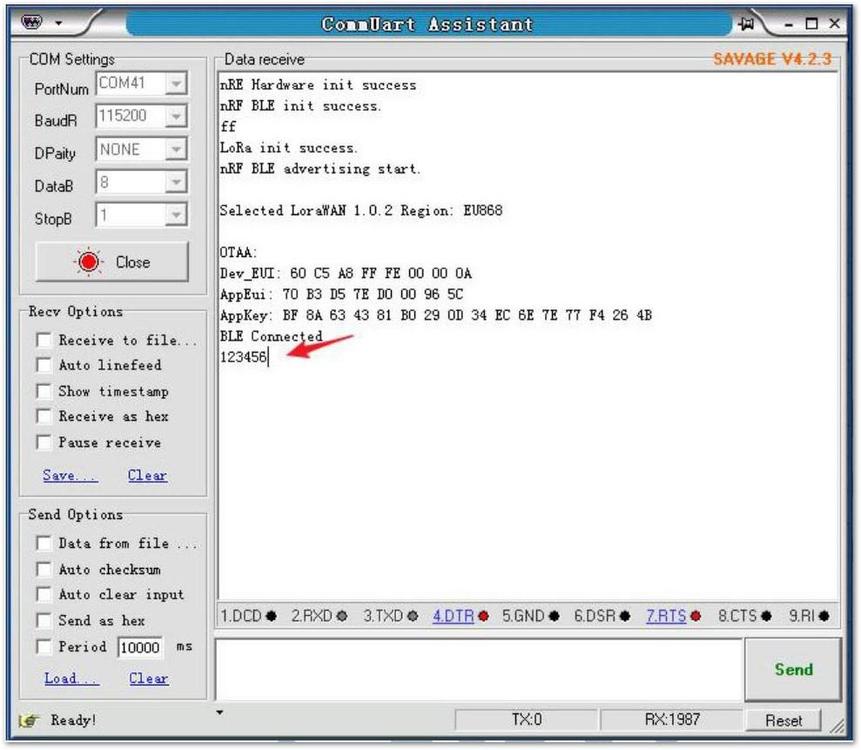 Figure 1: Message shown in the Serial Port log Information
Parameters Using LoRaWAN Demo
The LoRaWAN web server provider selected to use for this case is The Things Network (TTN). To know more about setting up your LoRa Gateway device, refer to The Things Network document.
- After getting the OTAA or ABP parameters of the device from TTN, you can write data into the flash of RAK815 by transmitting data through Bluetooth. The format of the data you are sending must be the same, as shown below:
lora_cfg:dev_eui=xxxxxxxxxxxxxxxx&app_eui=xxxxxxxxxxxxxxxx&app_key=xxxxxxxxxxx xxxxxxxxxxxxxxxxxxxxx&dev_addr=xxxxxxxx&nwkskey=xxxxxxxxxxxxxxxxxxxxxxxxxxxxx xxx&appskey=xxxxxxxxxxxxxxxxxxxxxxxxxxxxxxxx"
Because the information is too long, the serial port won't show the details of the configuration.
-
After successfully configuring your device parameters, a message will be shown in your serial port saying: "LoRaWAN® parameters configured successfully".
-
Then, Reset the device. If your gateway device is ready, RAK815 will send a join request to the LoRaWAN network server. You can see the successful information in the terminal.
 Figure 1: LoRaWAN Parameters Configuration Status
- You can also see the data sent by the device on the TTN:
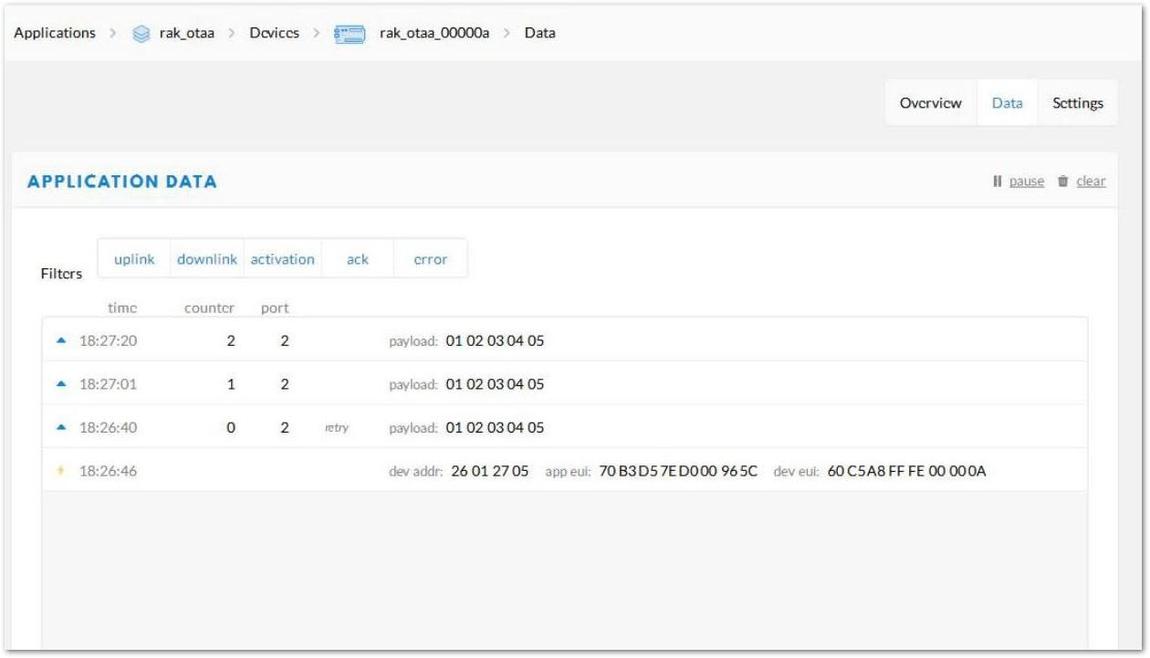 Figure 1: LoRaWAN Parameter Settings in TTN
Peripherals Demo
- Download the Peripherals Demo into your RAK815.
- Navigate to the Bluetooth settings of your mobile phone and check for "RAK815 Peripherals Demo".
- The device's log information serial port will print the device's sensor information every five seconds.
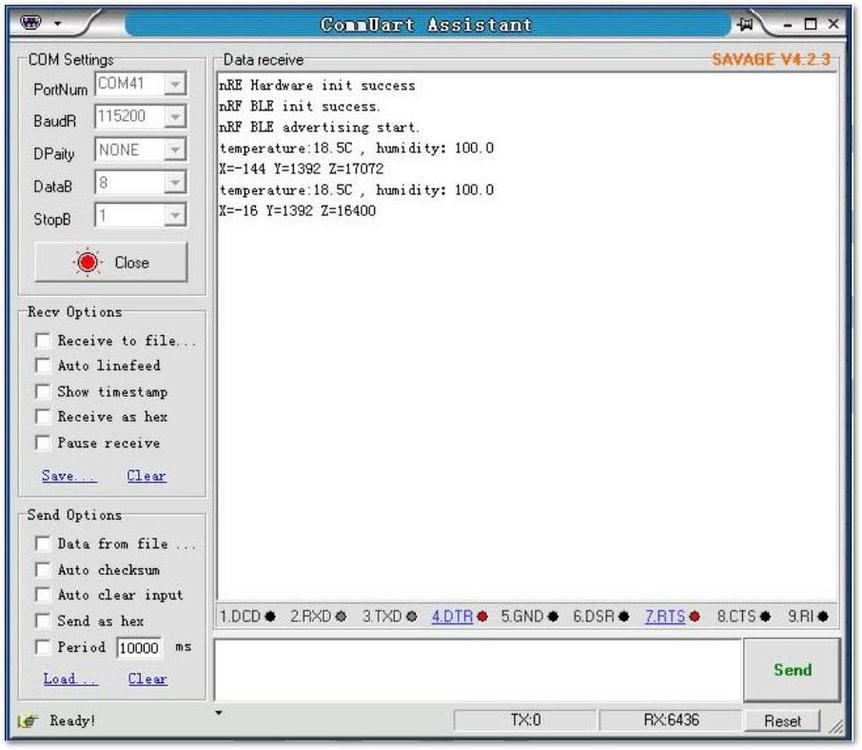 Figure 1: Device Information Status
- Similarly with the LoRaWAN Demo, you can also send a message through the nRF Connect app you installed. The message can be viewed on our serial terminal, as shown in Figure 20.
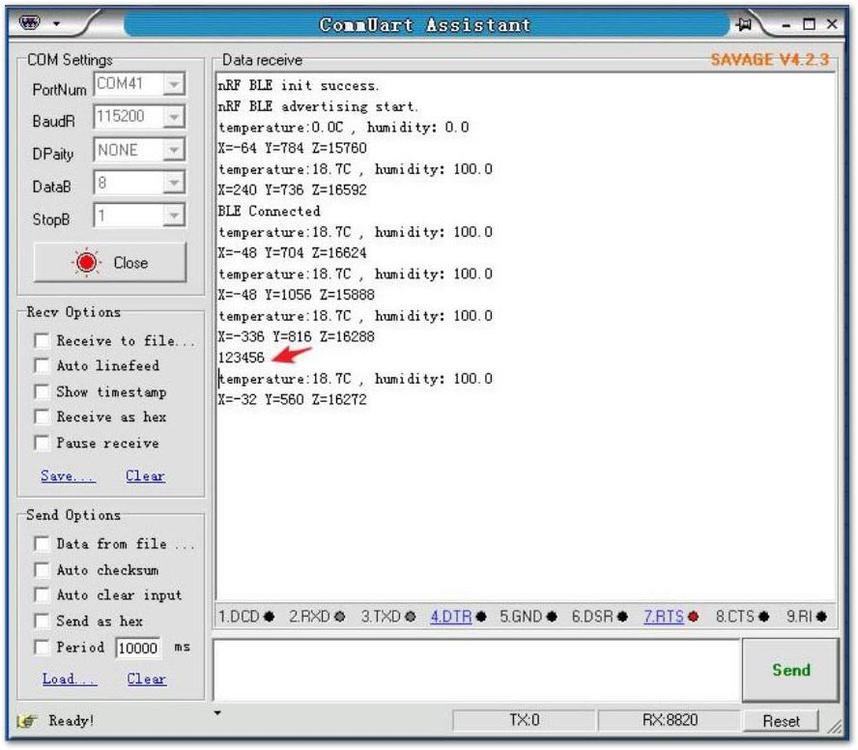 Figure 1: Message Received shown in Serial Port
- If you connect the LCD to the LCD's expansion interface, you can also see the data for each sensor on the LCD display.
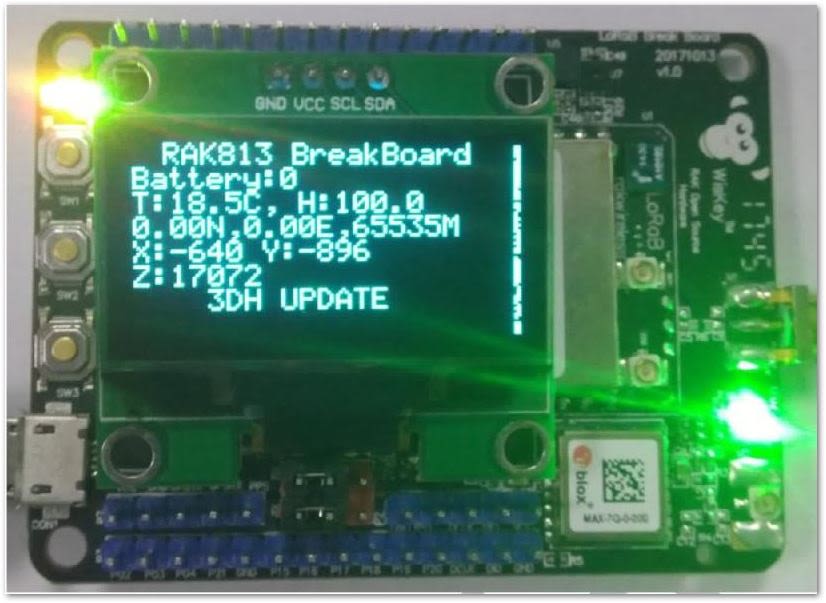 Figure 1: Message Status shown in LCD
Scan Demo
- Download the Scan Demo into your RAK815.
- Navigate to the Bluetooth settings of your mobile phone and check for "RAK815 Scan Demo".
- Same with the previous application, open the nRF Connect app and connect to the Bluetooth named "RAK815 Scan Demo"; configure the device by sending the LoRaWAN parameters. The configuration status can be seen in the serial port, as shown in Figure 22.
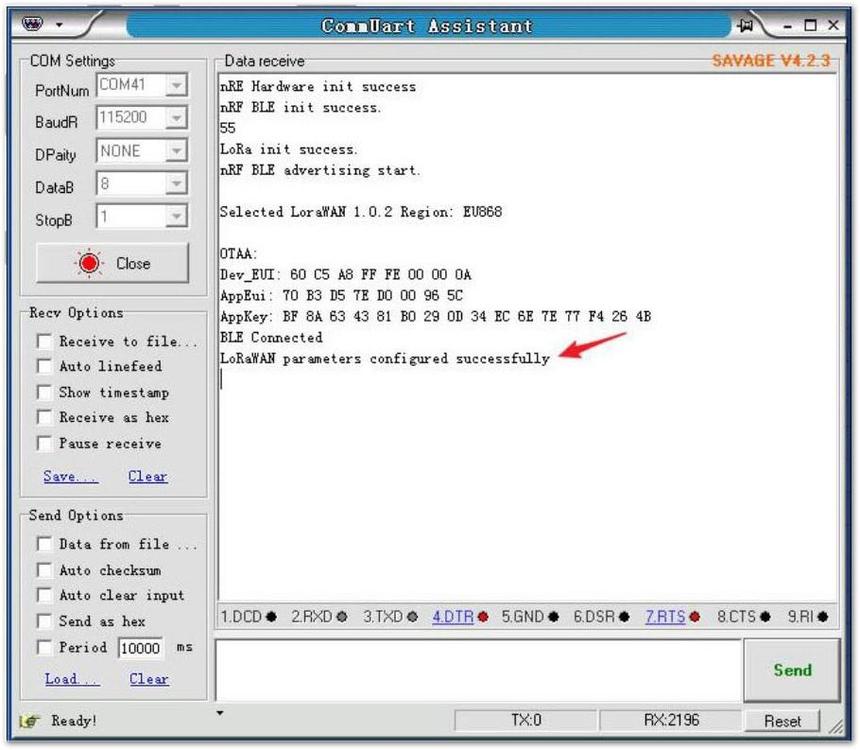 Figure 1: LoRaWAN Parameters Configuration Status
- After successfully configuring the parameters, check if your gateway has been set in advance. Reset the device and a message will be sent to your terminal that the device has successfully joined OTAA.
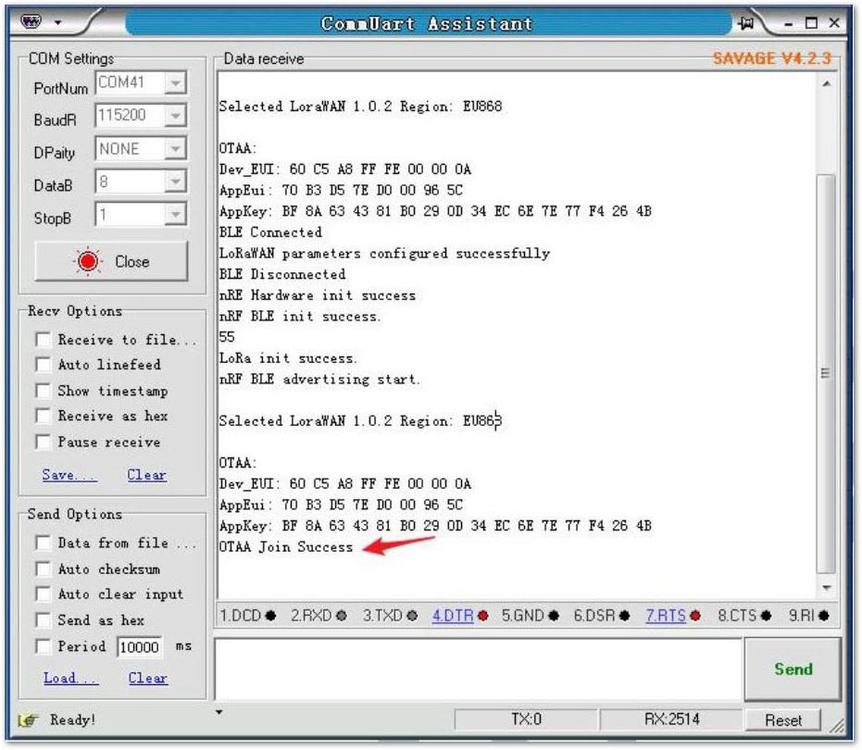 Figure 1: OTAA Activation Message
- Next, if you press the first button of the device, see Figure 24. The device will scan the surrounding Bluetooth device for 1s.
This device can only scan Bluetooth BLE devices.
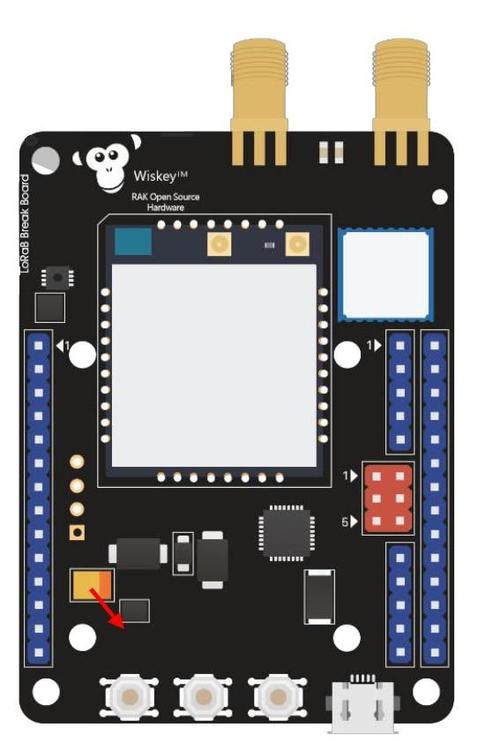 Figure 1: Pressing the Button to Scan BLE
- If the device scans a Bluetooth BLE device, the scanned device information is printed out from the log information serial port.
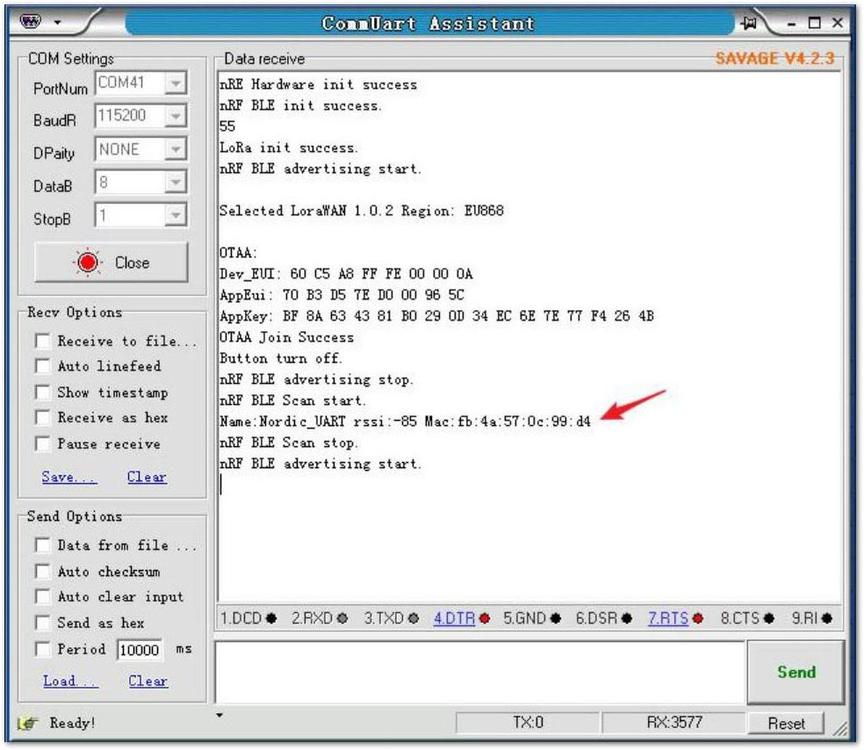 Figure 1: Scanned BLE Information Status
- If your device is in a LoRaWAN connection state, at this point your device will send the Bluetooth BLE device information you scanned to the LoRaWAN server.
 Figure 1: Scanned BLE Device Information shown in TTN
- In addition, if you connect the LCD to the device LCD expansion interface, you can view the real-time status of the device on the LCD
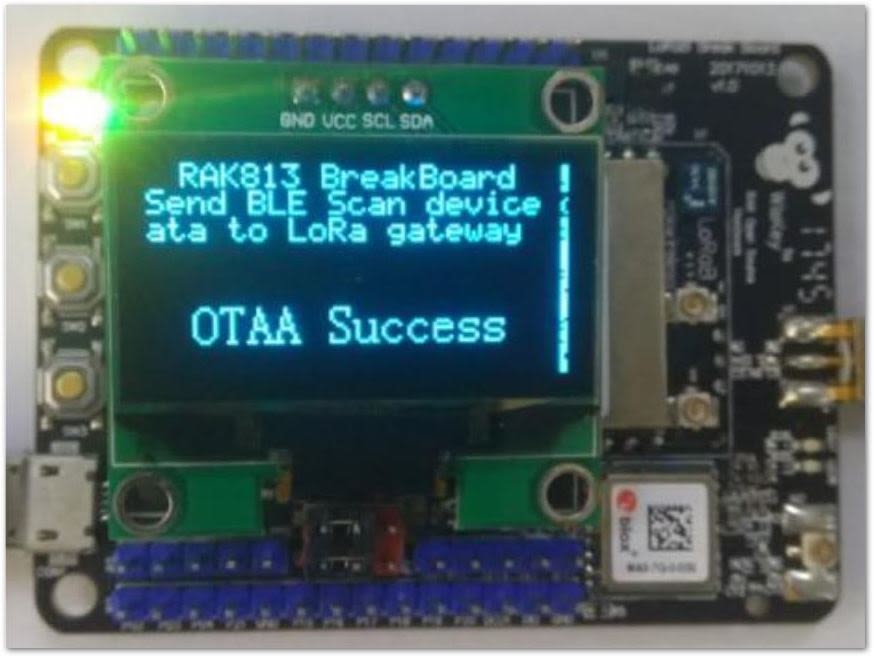 Figure 1: Status Update shown in LCD
Miscellaneous
Device Firmware Setup
Open-Source Directory
The RAK815 WisTrio LPWAN Tracker is an open-source hardware where you can get all the information about the product. It includes schematic diagrams, program codes, and other references which could help build your RAK815 projects.
This open-source project is based on the official code LoRaWAN 1.0.2 and Nordic nRF5 SDK 14.0.0, modified to support IAR8.11 and Keil5 Compiler.
- To start with, download the files in this open-source directory.
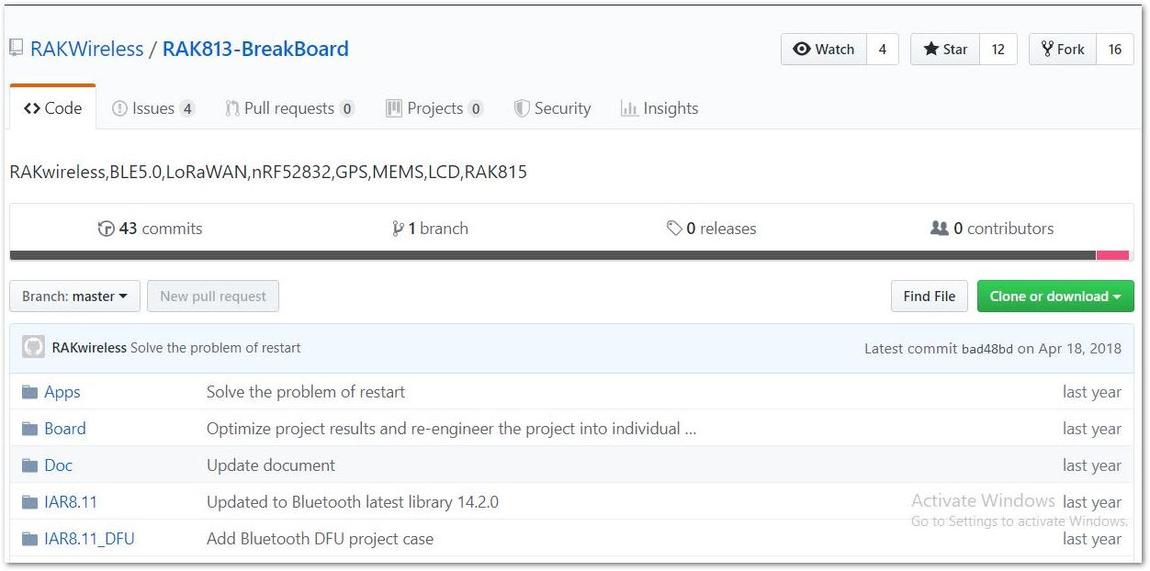 Figure 1: Open Source Directory for RAK815
Firmware
To enable the Bluetooth functionality of our device, you must first write the Bluetooth protocol stack using the official nRFgo Studio Tool.
- Download and install the nRFgo Studio Tool through the Nordic Official Site or the RAKwireless Downloads.
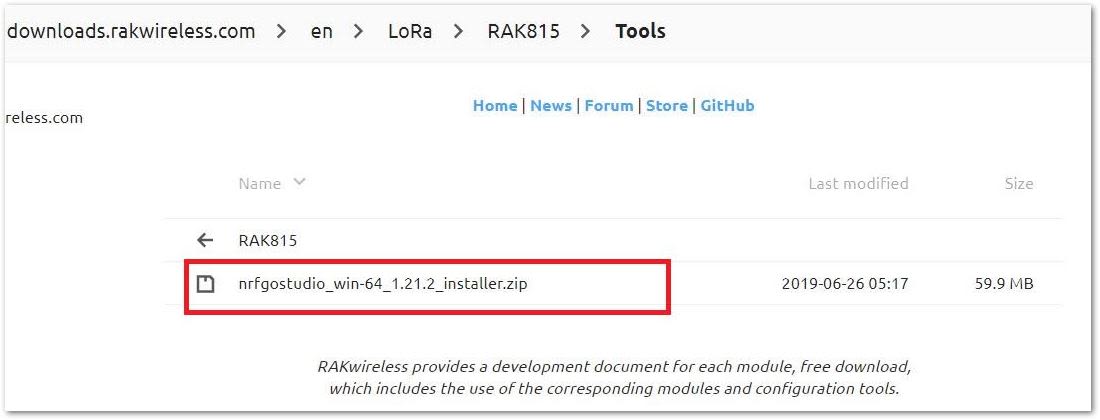 Figure 1: RFgo Studio tool Installer
Installing the J-Link Driver
- Navigate to the J-Link Site.
- Click the “Click for downloads” under “J-Link Software and Documentation Pack”.
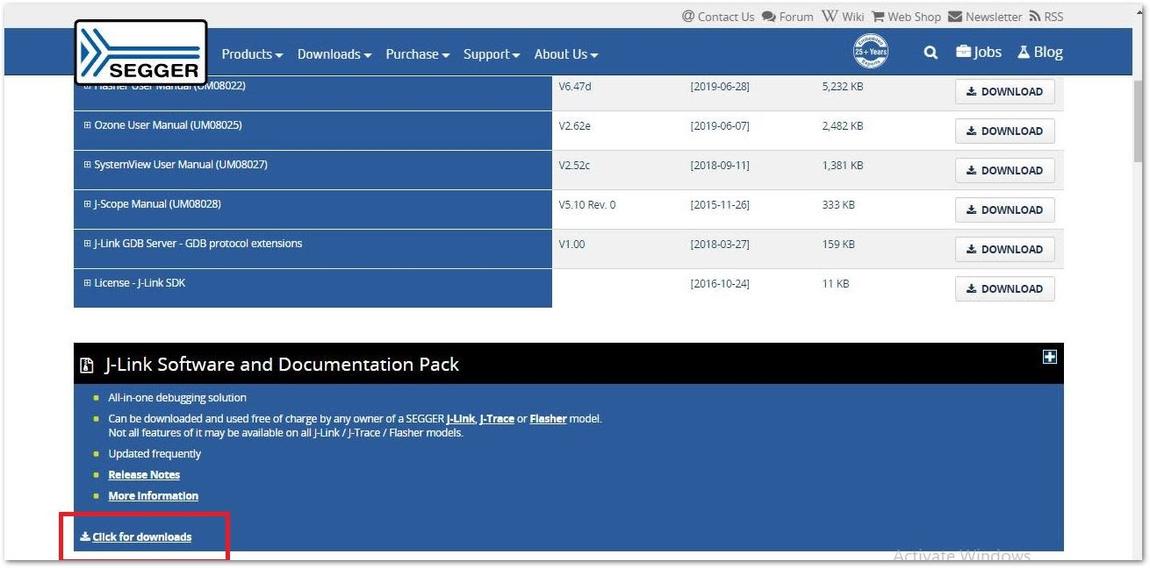 Figure 1: Downloading J-Link Software
- Download the appropriate package for your OS.
- Accept the License Agreement.
- Run the installation program with default configurations.
Downloading the Bluetooth Protocol Stack
- Connect the RAK815 SWD interface (refer to the Datasheet) with the J-Link device SWD interface. Then, connect the J-Link device to the PC through the USB port.
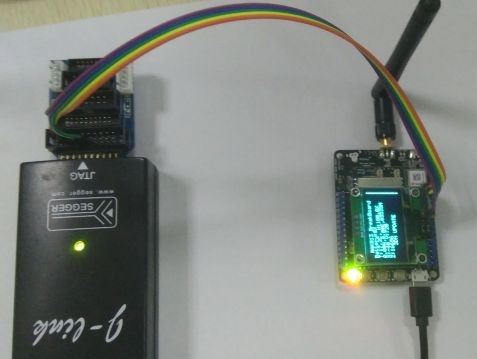 Figure 1: RAK815 connected to J-TAG Debugger
- Open the nRFgo Studio Tool, then select "nRF5X Programming" under the Device Manager.
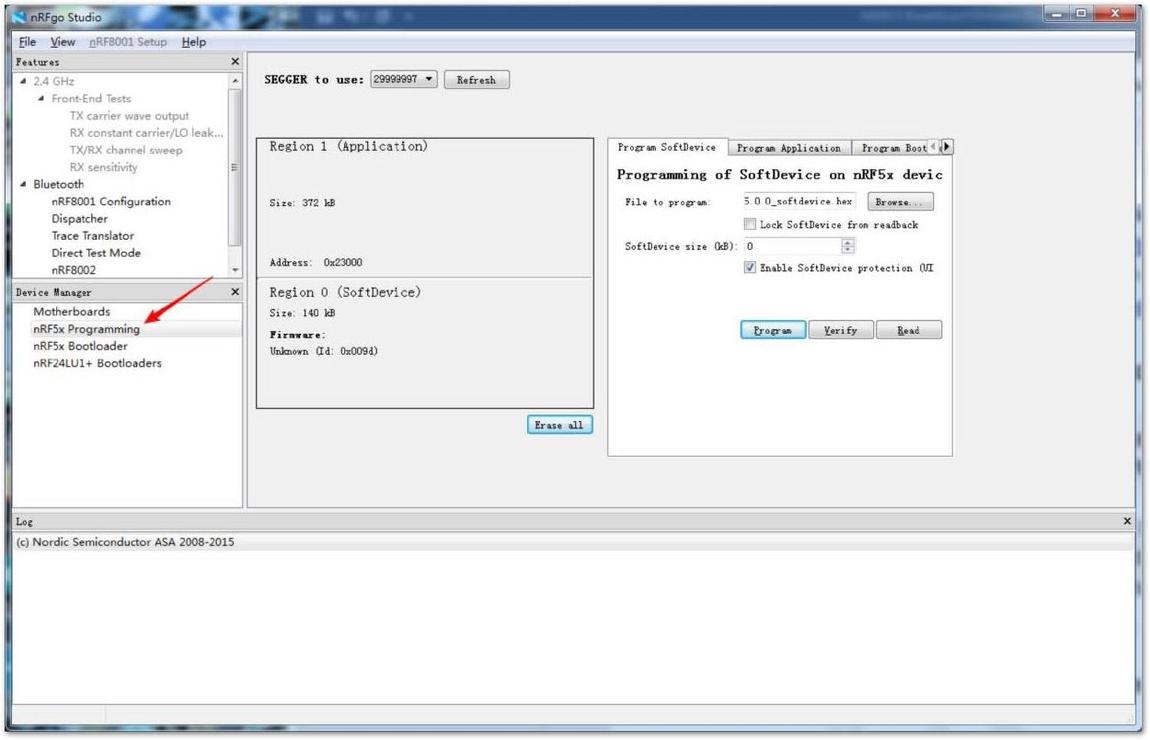 Figure 1: nRF5x Programming in nRFgo Studio Tool
- Click "Erase all" and select the "Program SoftDevice".
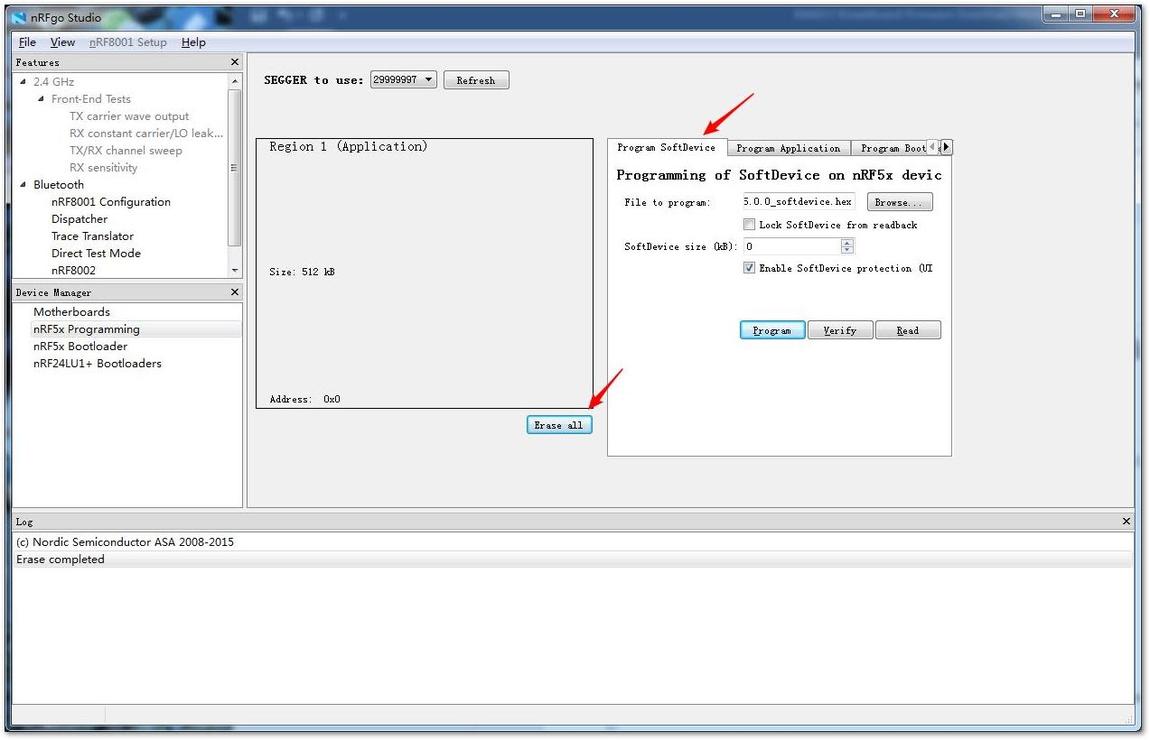 Figure 1: Erasing all and Program SoftDevice Function
- Browse the Bluetooth protocol stack file from the open source code through this directory:
RAK813-Breakboard-master>>nRFLib>>components>>softdevice>>s132>>hex
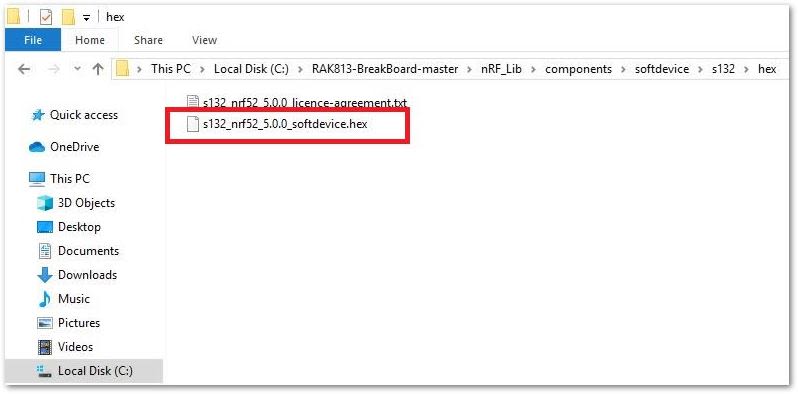 Figure 1: Bluetooth Protocol Stack Directory
- Click "Program" to complete the download.
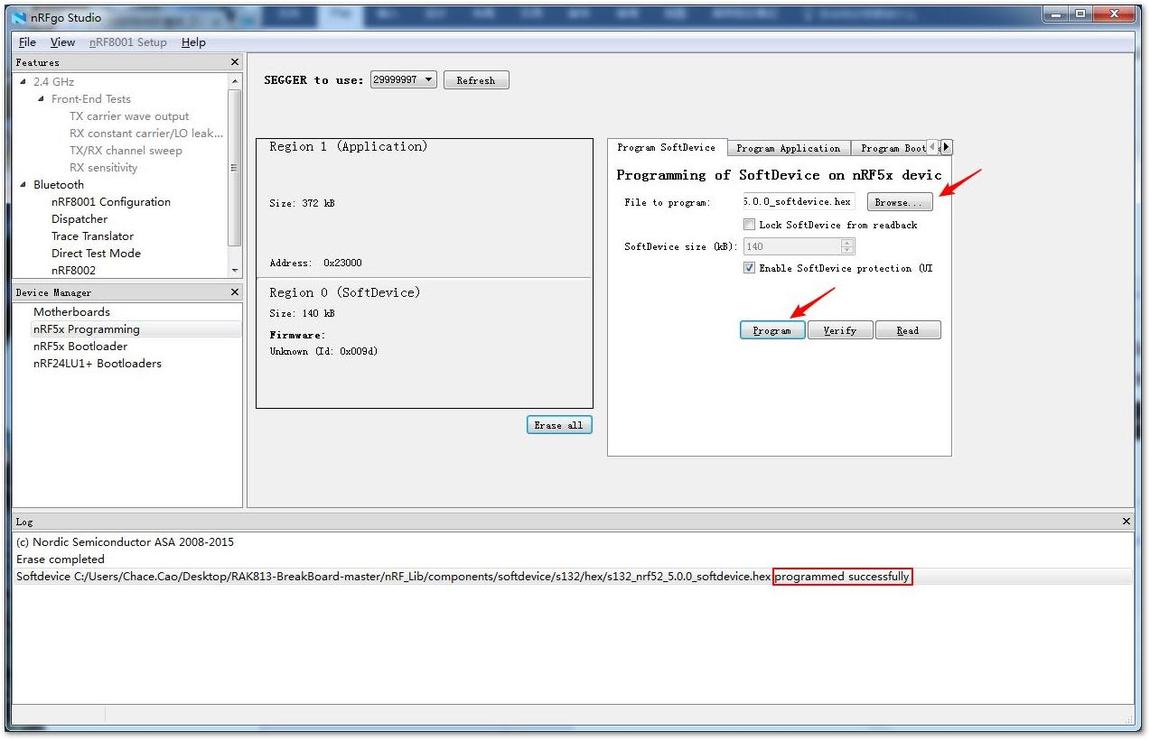 Figure 1: Browsing Stack File and Clicking Program
Downloading the Application Code
There are three ways to download your application code on your device: nRFgo Studio Tool, Keil Compiler, and IAR compiler.
Using nRFgo Studio Tool
- After completing the Bluetooth protocol station, click the "Program Application".
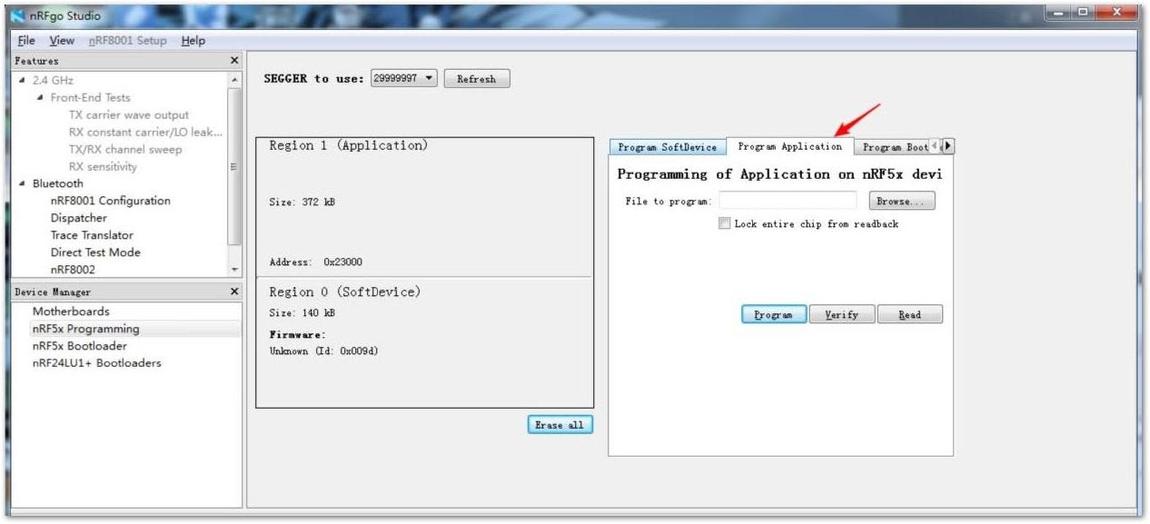 Figure 1: Downloading Program Application
- Browse for the application code and click "Program". Sample programs are made available in the open-source code, follow this directory:
RAK813-BreakBoard-master>>Doc>>hex
 Figure 1: Application Demo Location
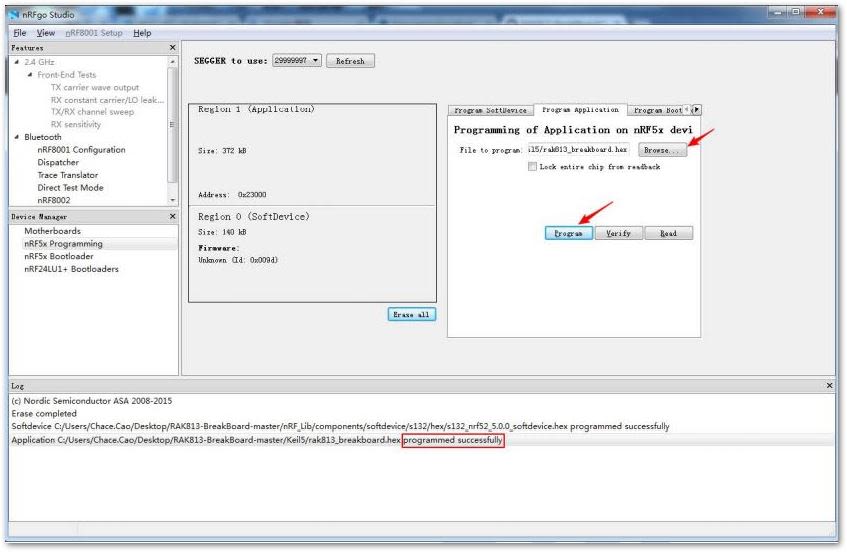 Figure 1: Browsing Application and Click
Using Keil Compiler
- Download and install the latest version of Keil Compiler through the Keil Website.
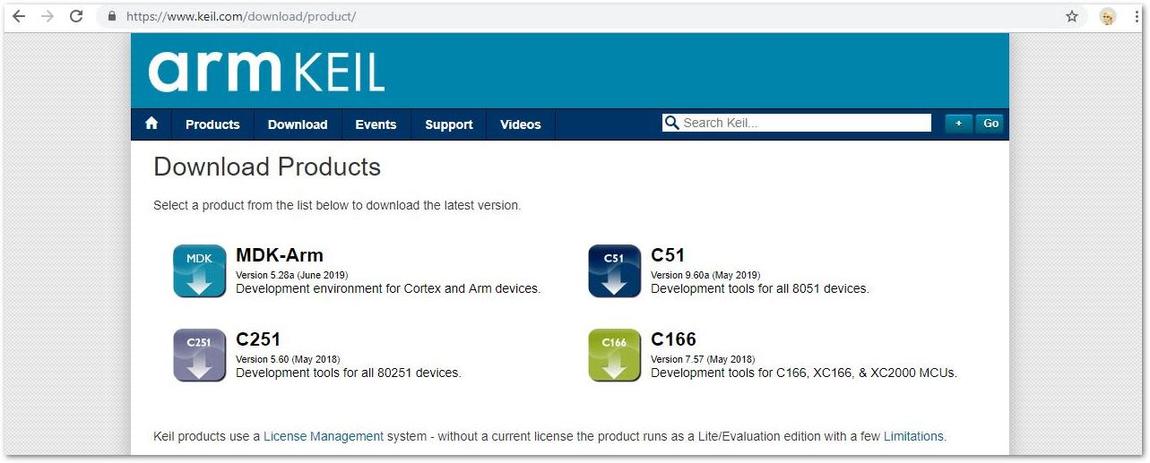 Figure 1: ARM KEIL Homepage
The best version of Keil Compiler is version 5.5 or above. If your installed Keil compiler supports the nRF52832 environment, then it is not necessary to install the nRF52832 environment.
- Install the nRF52832 compiler environment for Keil5 from our repository:
RAK813-Breakboard-master>>Keil5
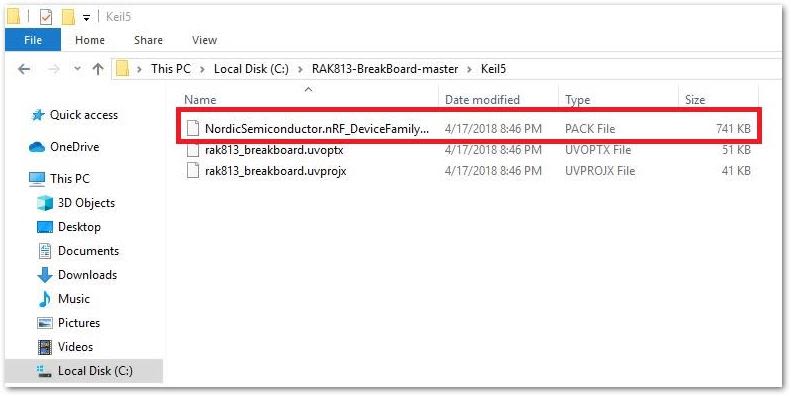 Figure 1: Compiler Environment for Keil5 Directory
- After installing it, you can see the Nordic chip information from
Options -> Device.
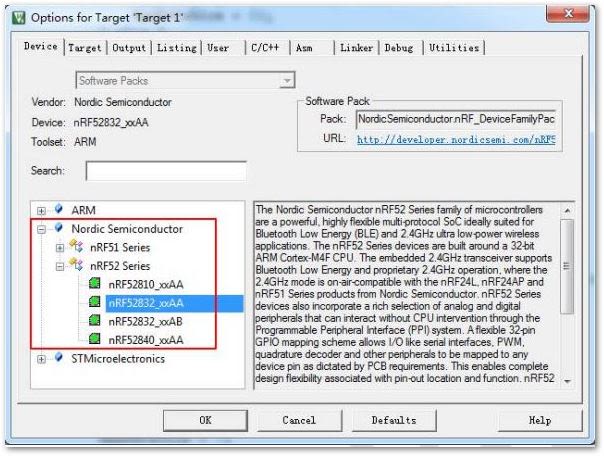 Figure 1: Selecting the Nordic Chip Information
- Use the J-Link device to connect your RAK815 and PC, then write your project. You can open sample projects available in this directory:
RAK813-BreakBoard-master>>Keil5
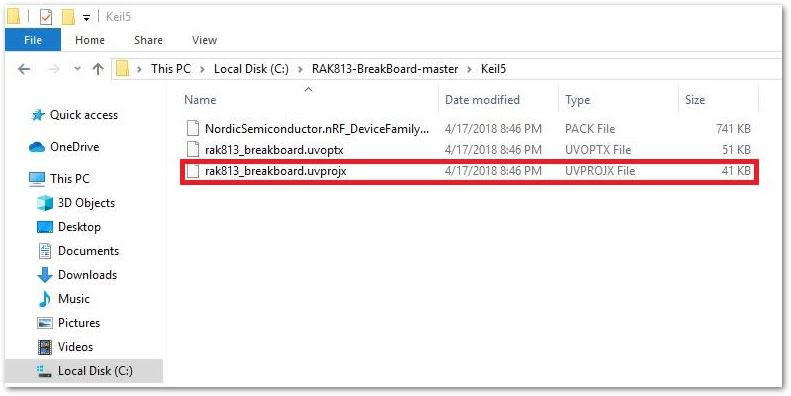 Figure 1: Project Sample Location
- Click "Build", then "Download" to download your application code.
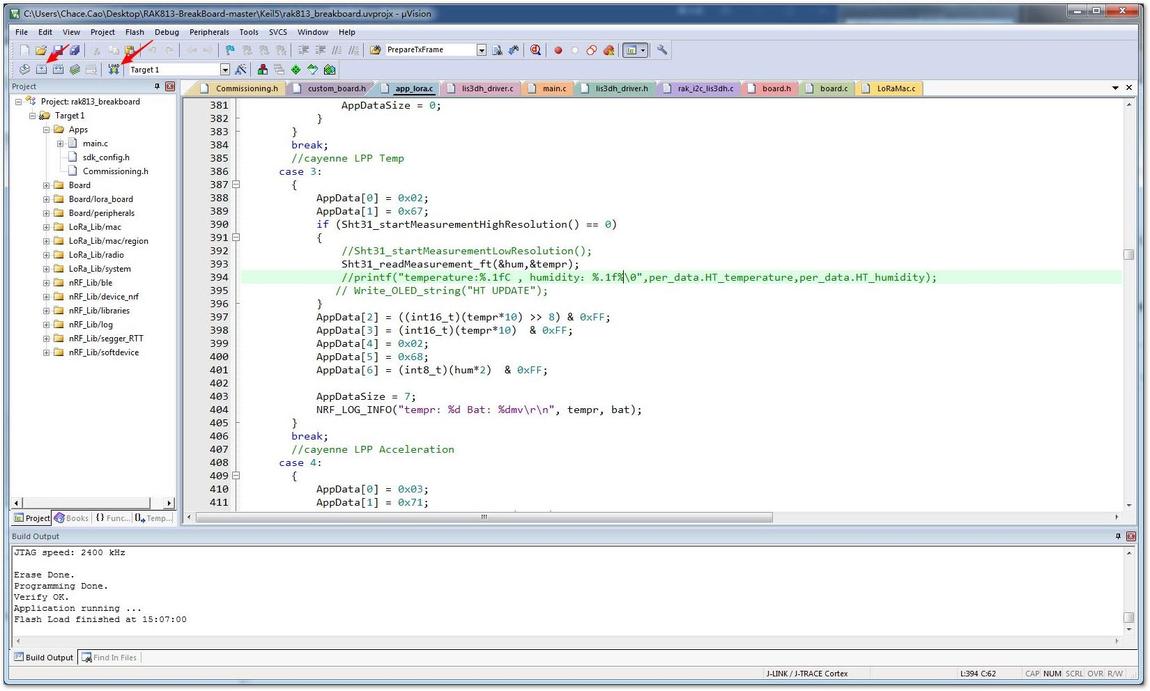 Figure 1: Building and Downloading the Application Code
- If you choose to “Create HEX file” in the Keil tool's options, then you can see the HEX file in Keil's output directory. This file can also be used by the nRFgo Stdio Tool.
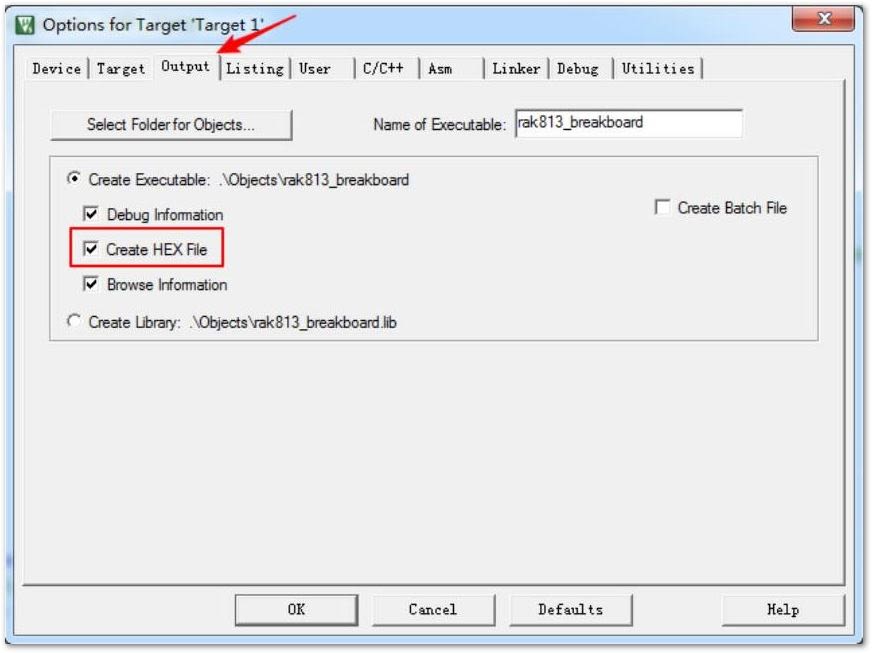 Figure 1: Allowing HEX Files in KEIL5
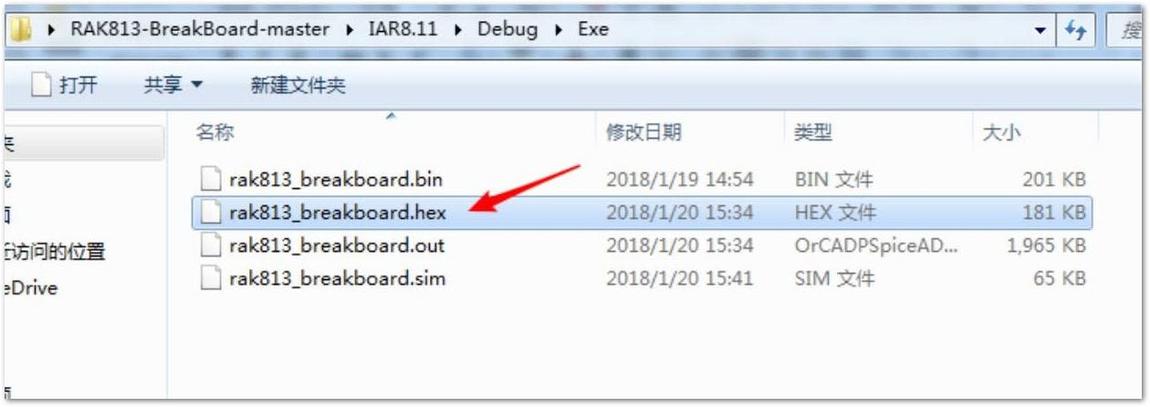 Figure 1: Sample Hex File Location
Using IAR Compiler
The writing of programs using the IAR Compiler has the same steps as the Keil Compiler with different tools but the same functions.
- First, download and install the latest version of IAR Compiler through the IAR Website.
- Open the IAR project and click the "Make" menu.
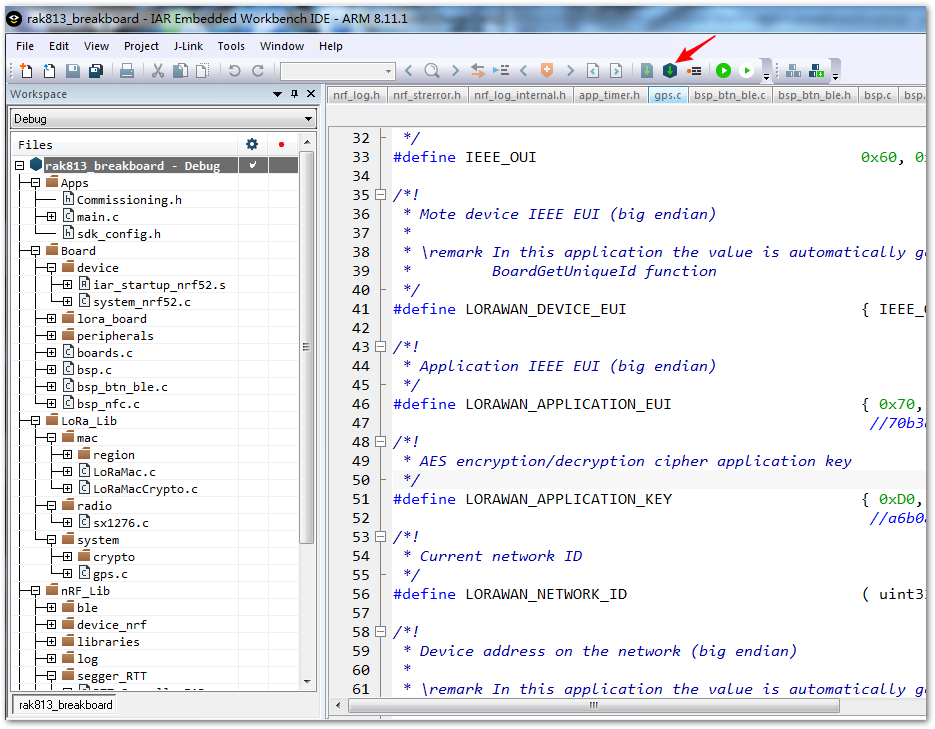 Figure 1: Make Tool in IAR Compiler
- Then, click the "Project" menu and select the download directory in the "Download Activities Application" option to complete the download.
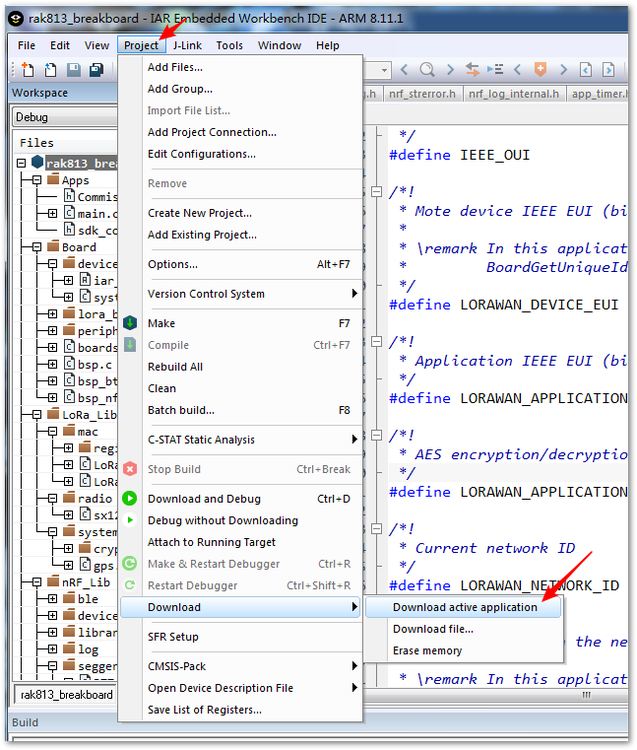 Figure 1: Downloading Application Code to the Device
- If you choose to export the HEX file in the IAR options menu, you can also see the HEX file in the IAR output folder. This file can also be used by the nRFgo Stdio Tool.
 Figure 1: Allowing HEX File Exports in IAR
 Figure 1: Sample Hex File Directory
Now, you have completed your firmware setup. Up next will be the configuration of your LoRaWAN settings.
Upgrading the Firmware
Device Firmware Upgrade (DFU) is a tool for upgrading your firmware. It is part of the GitHub Open Source project you downloaded for upgrading the firmware of your IAR and Keil Compiler.
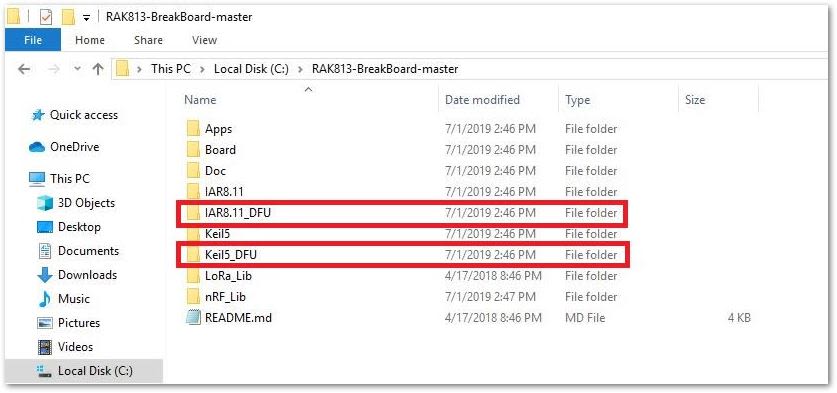 Figure 1: DFU File Location
- Hex files are already provided and can be found in the open-source project Doc folder:
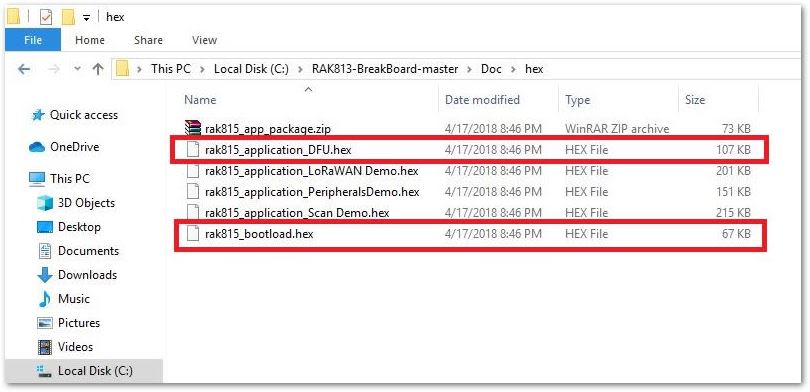 Figure 1: DFU Hex Files
-
Using the DFU function of the nRF, unlike the previous firmware programming method, the bootloader firmware must be programmed. Therefore, three firmware need to be programmed to use the DFU function. They are the Bluetooth protocol stack firmware, the DFU application firmware, and the bootload firmware. Bootload firmware can be found in open-source functions.
-
For details on how to program the Bluetooth protocol stack and application firmware, review the Device Firmware Setup.
- Figure 52 shows how to program bootloader firmware:
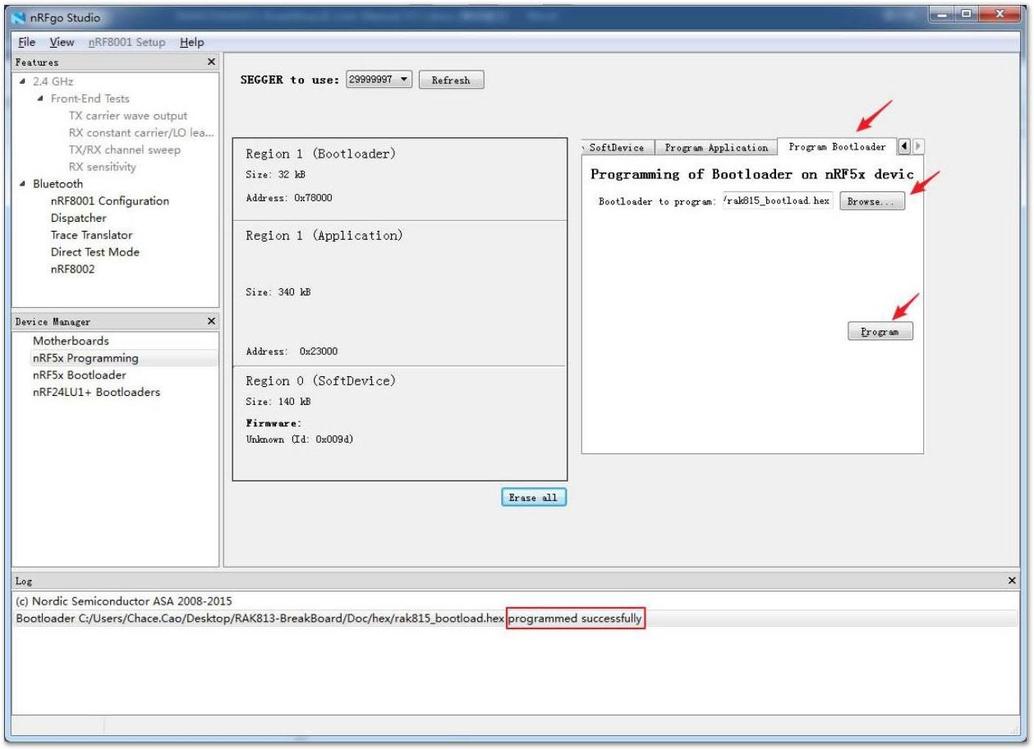 Figure 1: Programming Bootloader Firmware
- After all the firmware is written, the device will automatically restart. At this time, use your mobile phone Bluetooth scan, and you will see a device named "RAK813_DFU".
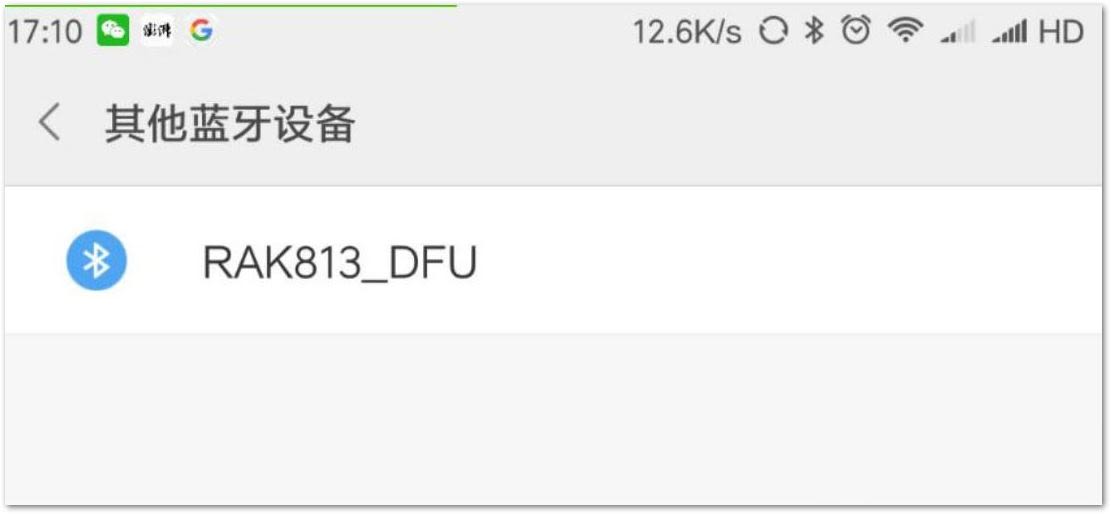 Figure 1: RAK813 DFU Bluetooth Radio
-
Use the nRF official phone app nRF Connect to connect the device's Bluetooth.
-
To upgrade the firmware, you need to import the upgraded firmware to your mobile phone. The upgrade file, a zip file, is accessible from the downloaded open-source code by following this directory: RAK813-BreakBoard-master>> Doc>> Hex>> rak815_app_package.zip. Copy this sample upgrade file to your mobile phone.
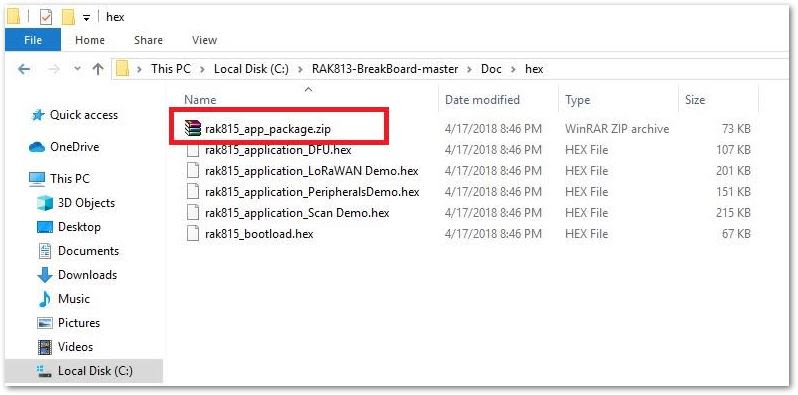 Figure 1: DFU App Package Zip File
Visit RAK Forum for detailed instructions on how to make an upgraded zip file and how to program DFU. Interested parties can also view the Nordic document.
- Open the nRF app and press the "CONNECT" button in the RAK813_DFU Bluetooth. Then, click the DFU icon in the upper right corner.
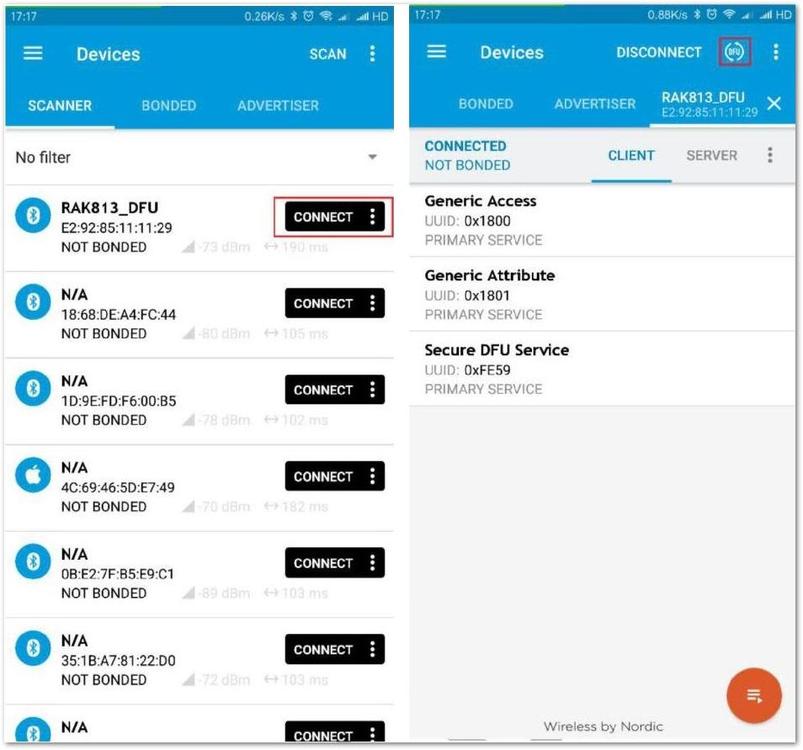 Figure 1: Connecting to RAK813 DFU
- Select the rak815_app_package.zip file, and the device will automatically start upgrading the firmware.
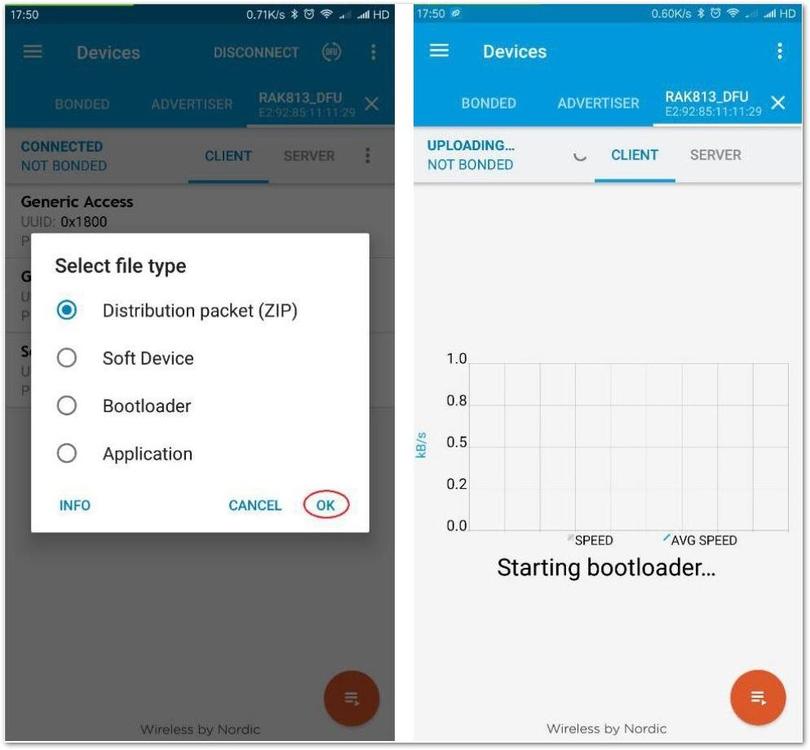 Figure 1: Importing the Upgrade Zip File
- At this point, the program will jump to the bootload and execute the bootload. Then click on the RAK813_DFU, as highlighted in Figure 57. You can see the progress of the program sent.
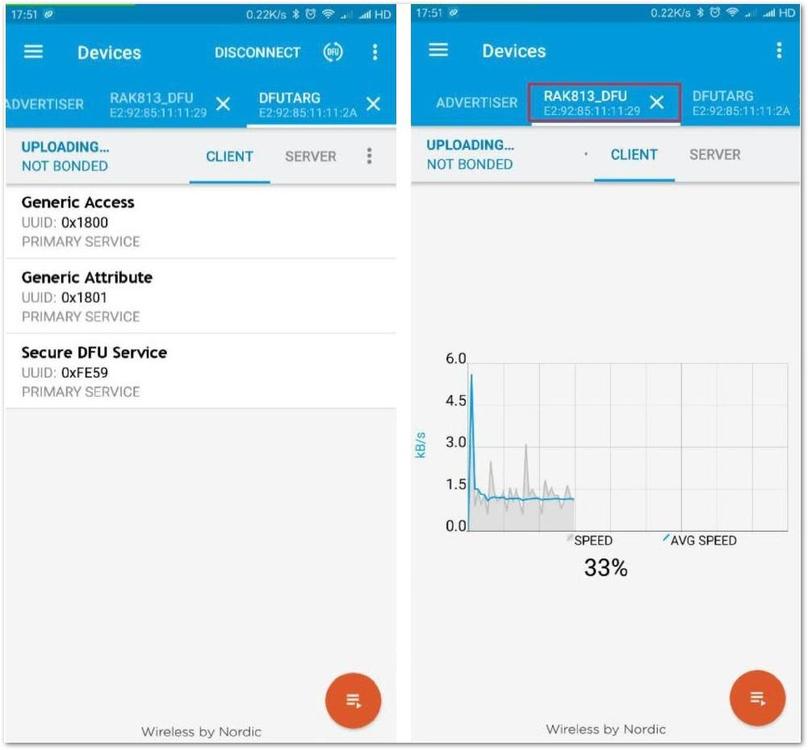 Figure 1: Upgrade Progress Chart
- After the program upgrade is complete, reset the device and you will see that your device's Bluetooth broadcast name has changed.
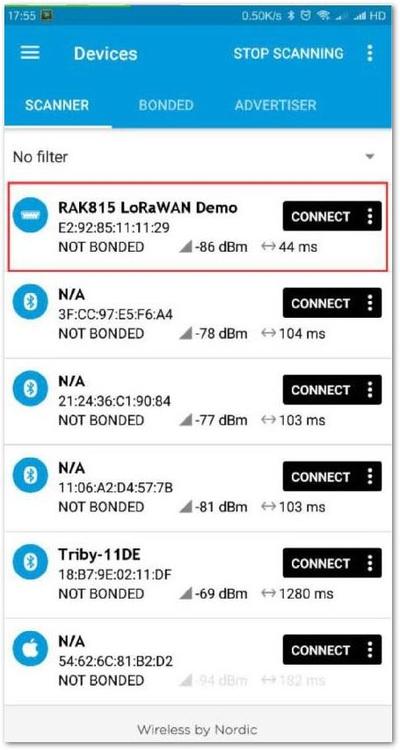 Figure 1: Device's Bluetooth Broadcast Changes
You have completed the RAK815 WisTrio LPWAN Tracker Configuration and successfully upgraded the firmware. You are now ready to try your own projects using the device.