RAK8212 WisTrio iTracker Pro Quick Start Guide
Prerequisite
Before going through each and every step in the installation guide of the RAK8212 WisTrio iTracker Pro Module, make sure to prepare the necessary items listed below:
- RAK8212 WisTrio iTracker Pro
- Emulator Kit
- Connector Wires
- 3.3 V Battery Power Supply
- Windows PC
- Android/IOS Mobile Device
This device released by RAKwireless is already pre-loaded with its latest firmware upon manufacturing. If you want to have your device's firmware burned or upgraded, refer to the sections below:
Package Inclusions
- 1 pc - RAK8212 Developer Board
- 1 pc - GPS Antenna
- 1 pc - PCB Antenna
- 1 pc - Battery Line
- 5 pcs - Dupont Line
Product Configuration
Checking Device Logs
You can check the logs for debugging purposes on your RAK8212 WisTrio iTracker Pro through J-link RTT Viewer
Through J-link RTT Viewer
- If you want to check the logs of RAK8212 WisTrio iTracker Pro using this method, make sure you have connected the RAK8212 with your PC through JTAG like the following diagram below:
You still have to connect the battery to the RAK8212 to power the board.
- Go to the Official Website of Segger where you can Download the J-Flash software. Open the program J-Link RTT Viewer V6.60f and choose "USB" for the type of connection to J-Link. After which, press OK.
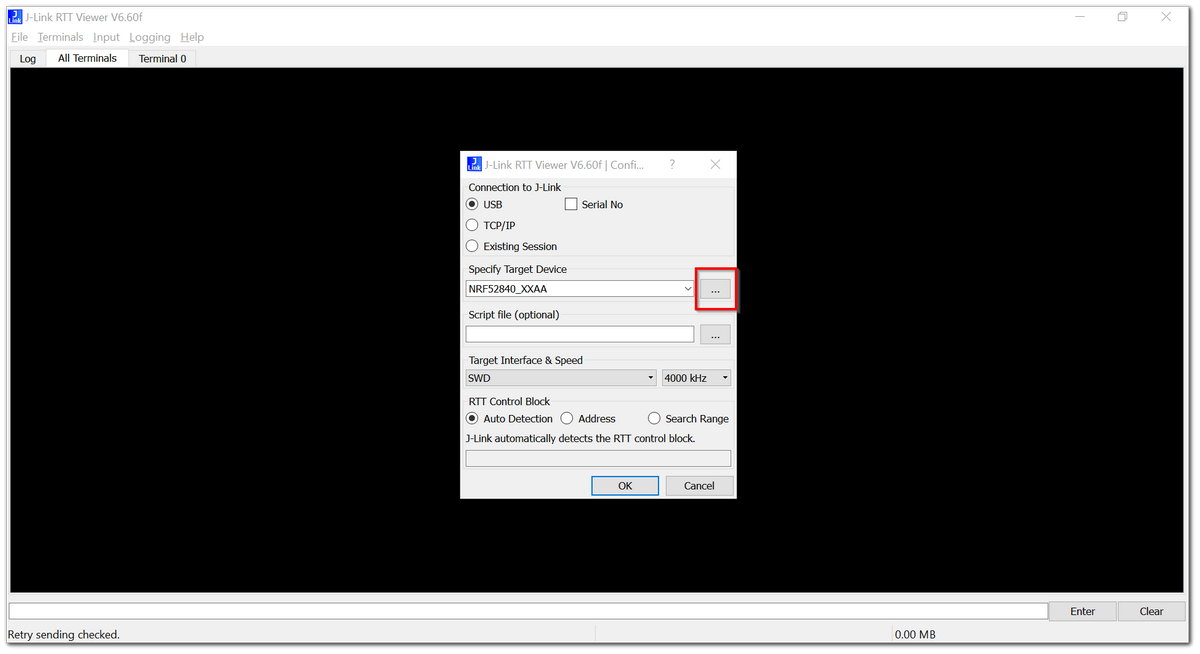 Figure 1: J-Link RTT Viewer
- Choose the device parameters as the following picture shows and press OK.
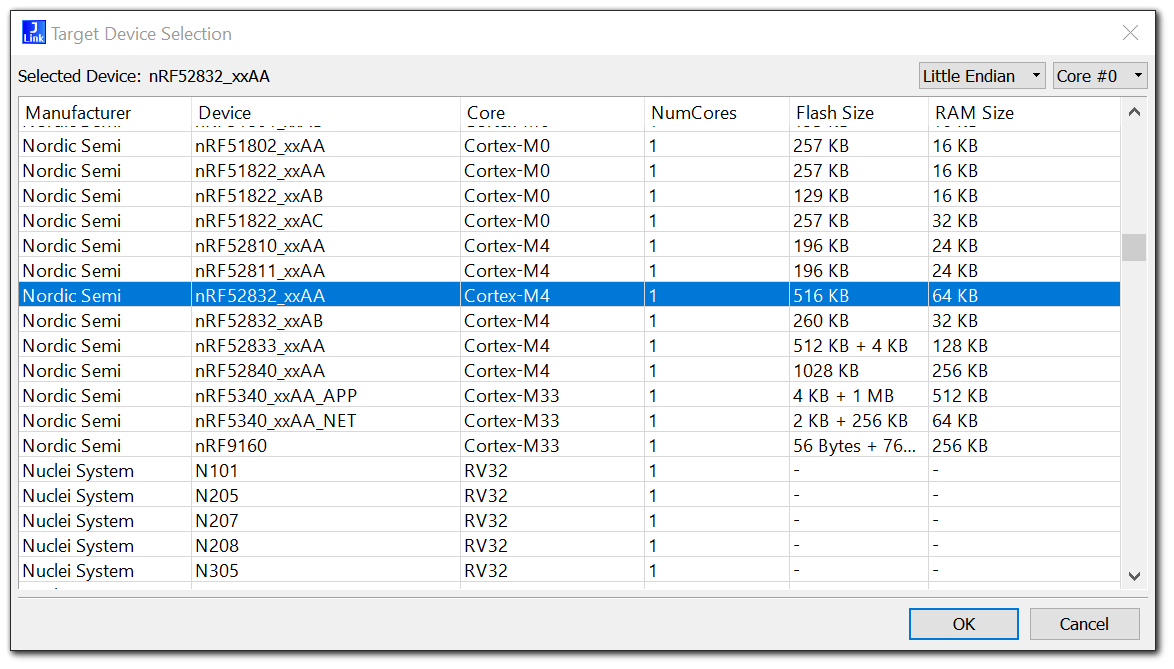 Figure 1: J-Link RTT Viewer Connection Parameters
- Connect to your RAK8212 WisTrio iTracker Pro by navigating through File > Connect in the Main Menu. Alternatively, you could just press F2 to do the same process.
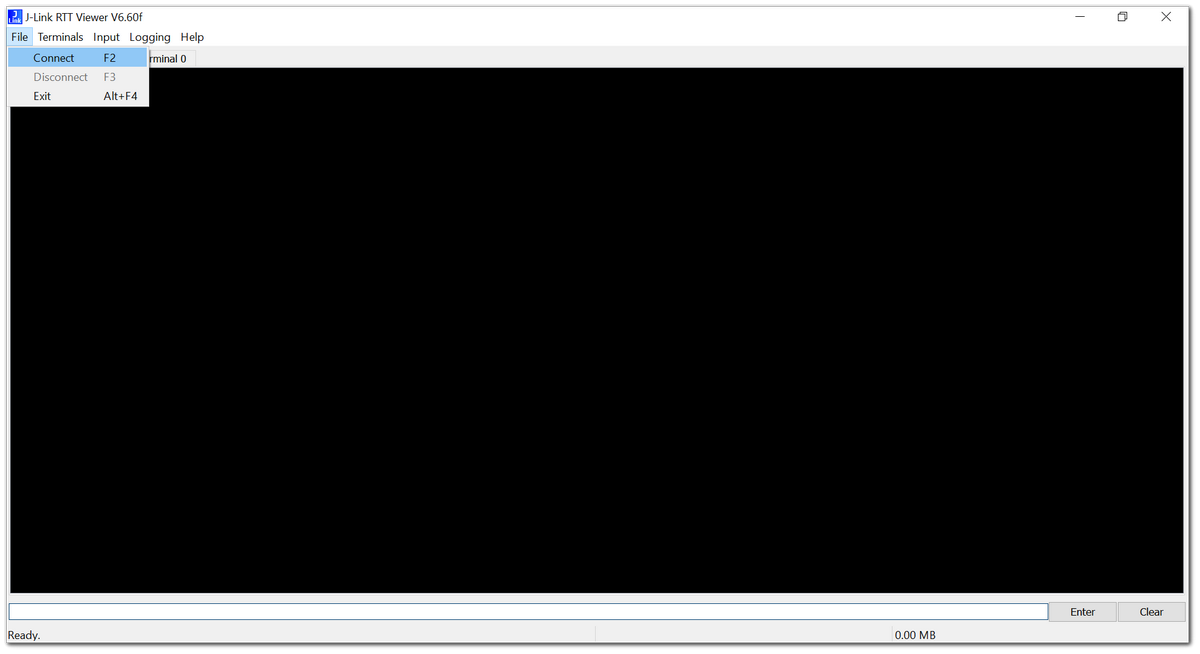 Figure 1: Connecting to J-Link
- Once connection is obtained, you should see the same log as shown in the image below:
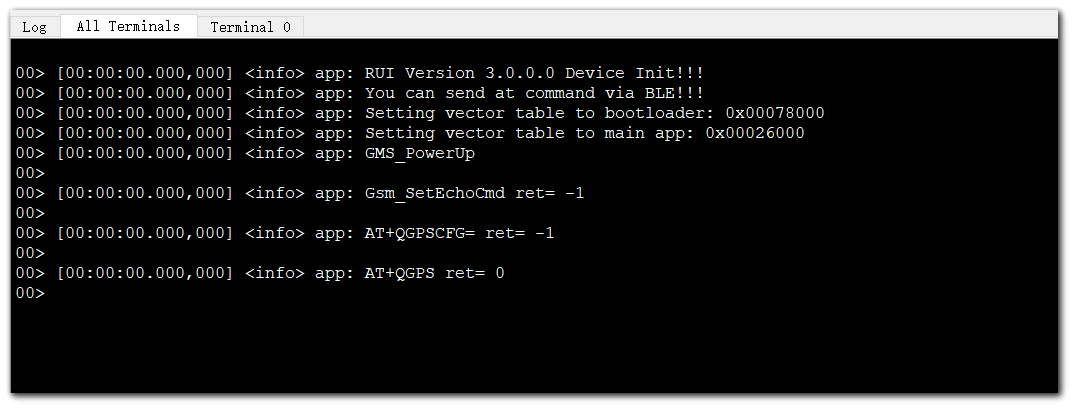 Figure 1: Log Checking through J-Link RTT Viewer
Configuring RAK8212 WisTrio iTracker Pro
You can configure your RAK8212 WisTrio iTracker Pro by sending AT Commands through Bluetooth.
For the complete list of AT Commands available for configuring your RAK8212 WisTrio iTracker Pro, kindly check the AT Commands for iTracker Pro section.
Through BLE
- In order to configure the RAK8212 WisTrio iTracker Pro through BLE, download and install nRF Connect which is developed by Nordic Semiconductor and is also available in both App Store and Google Play Store.
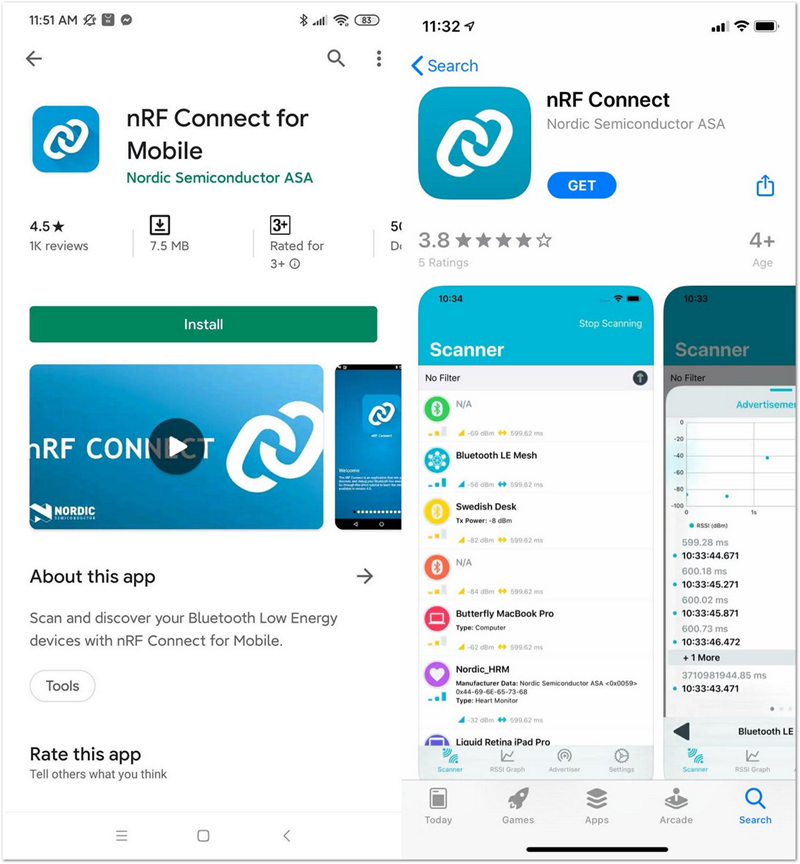 Figure 1: nRF Connect App in Android and IOS
- Make sure the Bluetooth on your mobile is turned on. Open the application and you will see all BLE devices in range in the scan list:
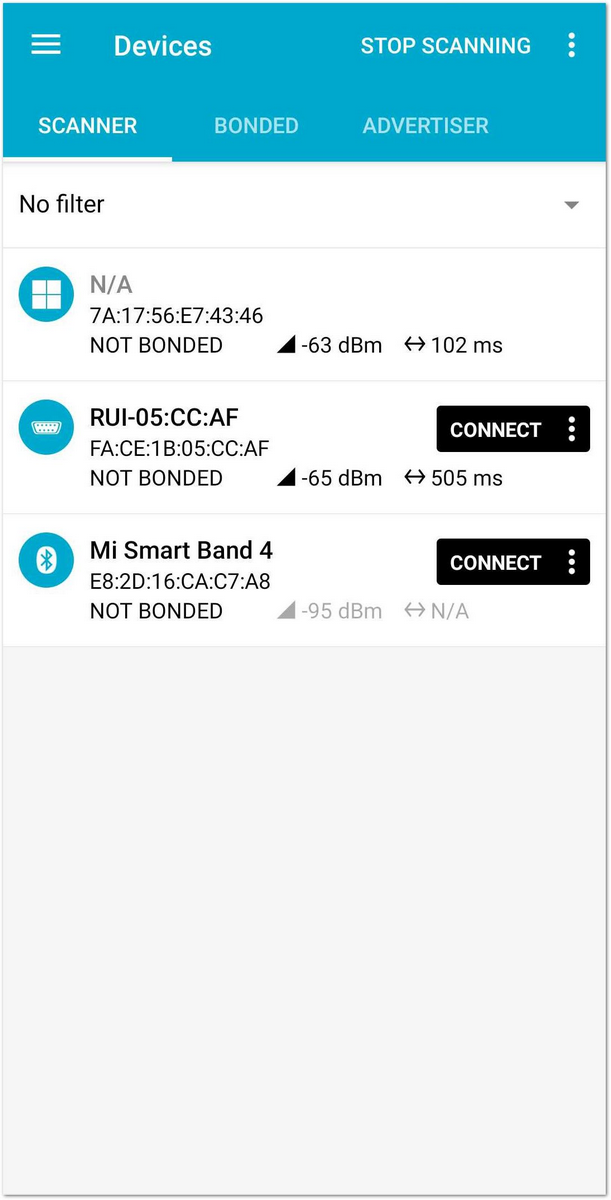 Figure 1: nRF Master Control Panel (BLE) device connecting
- Upon connecting, a pop-up window displays and in the third item "Nordic UART Service", click the arrow marked in the red box which enables you to write commands through BLE.
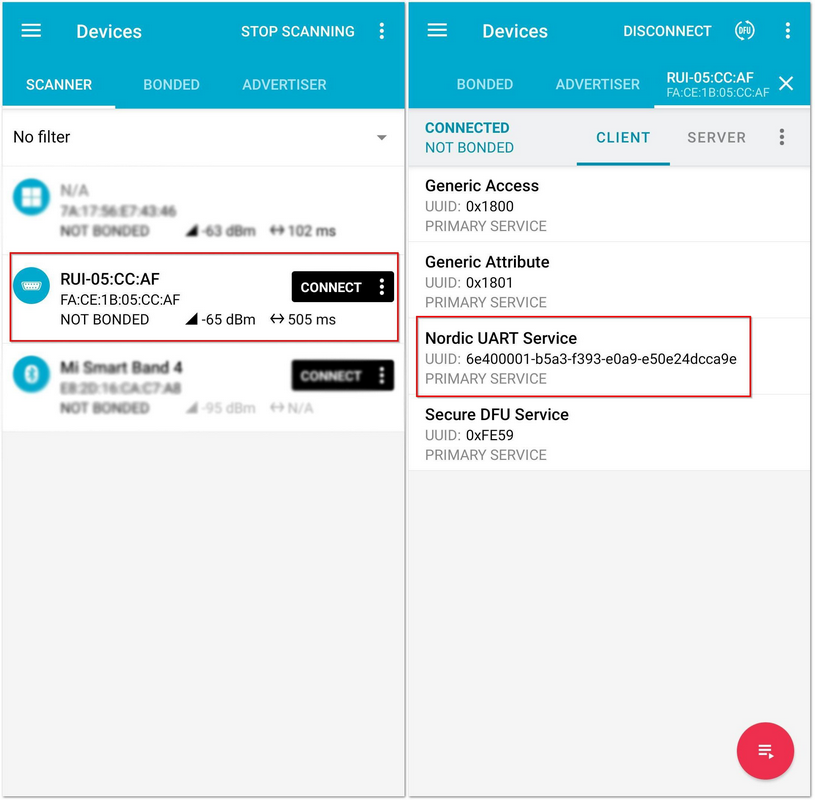 Figure 1: AT+command sending through BLE
- Click the arrow which is marked by the red box in the picture below, you will see the following page:
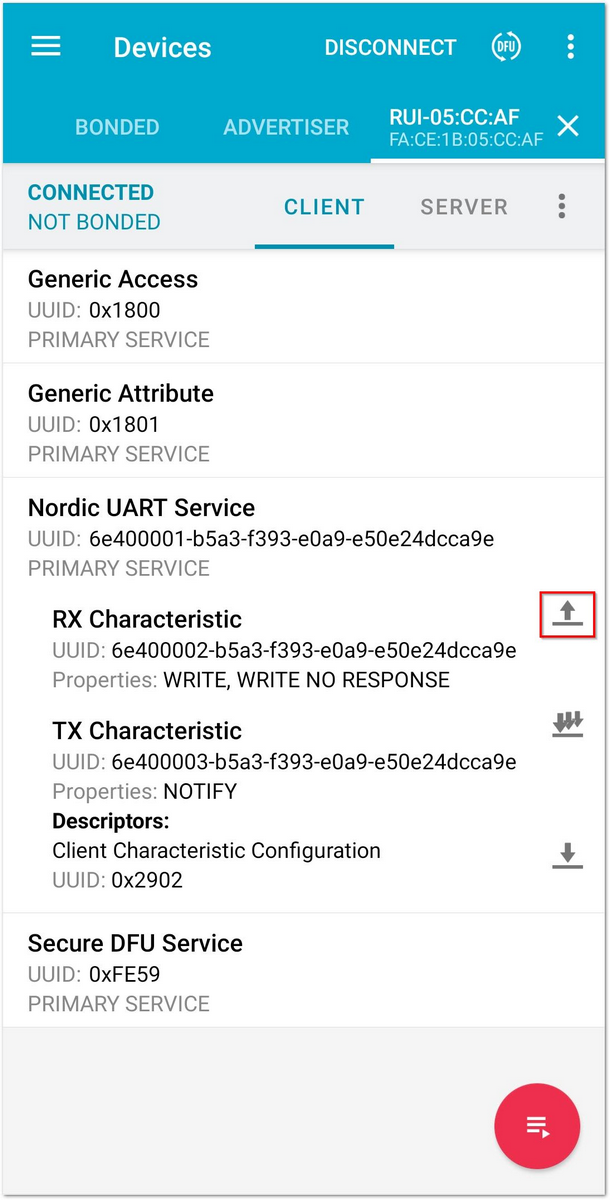 Figure 1: Nordic UART Service RX Characteristics
- You can now then send AT commands to the RAK8212 WisTrio iTracker Pro. Meanwhile, you can also see log information in RTT Viewer as discussed in Checking Device Logs section.
- For example, if you want to check the current firmware’s version send the following command:
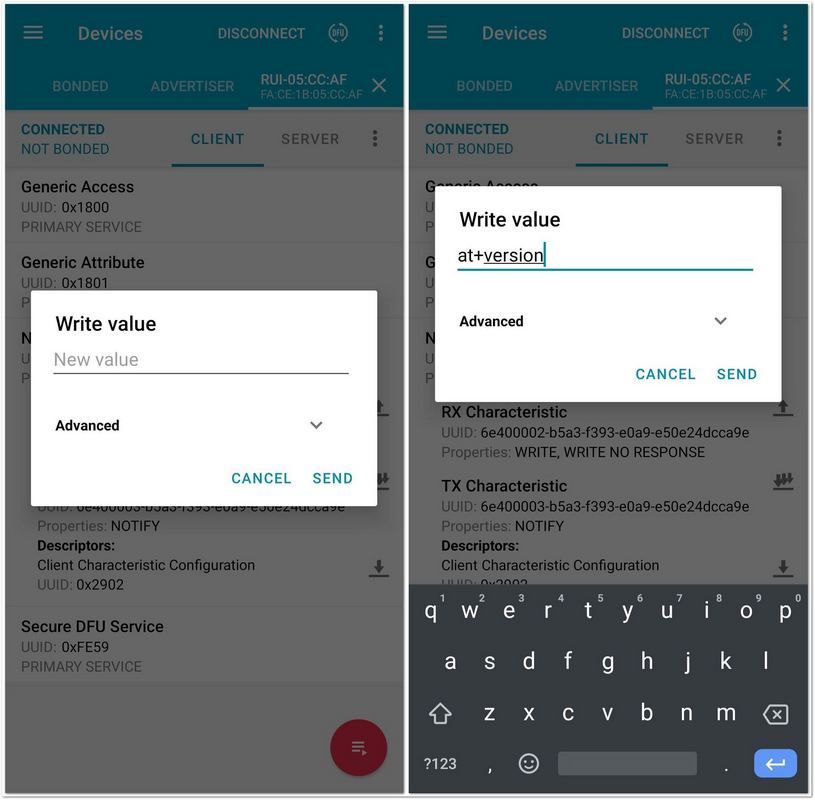 Figure 1: AT+command for RAK8212 Firmware Version
- Then, you can see the version number in RTT Viewer tool:
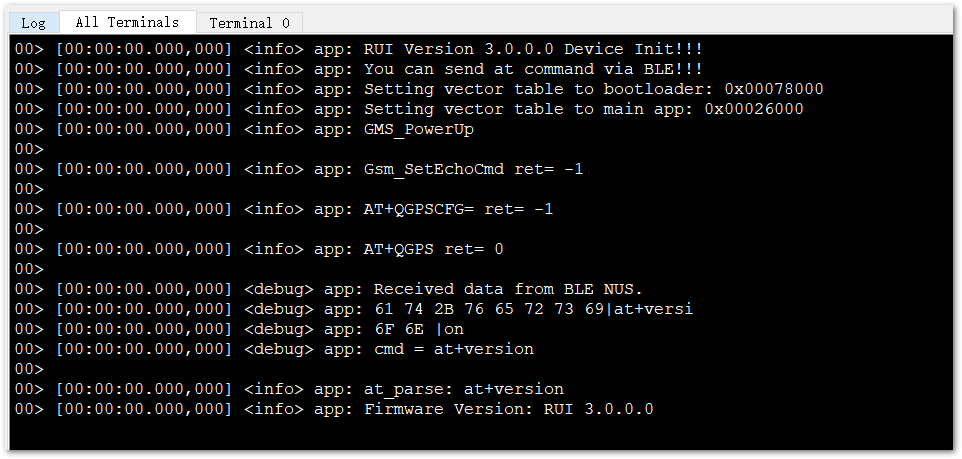 Figure 1: RAK8212 Firmware Version in RTT Viewer Tool
Connecting to Cellular Network
This section is a sample guide on how to connect you RAK8212 WisTrio iTracker Pro to a Cellular Network.
-
Insert a SIM Card into your RAK8212 WisTrio iTracker Pro .
-
Make sure that your RAK8212 WisTrio iTracker Pro is connected to your mobile device over BLE according to the Configuring your RAK8212 WisTrio iTracker Pro section.
-
Now, send
at+scan=cellularfrom mobile device over BLE to RAK8212 WisTrio iTracker Pro as shown in the image below:
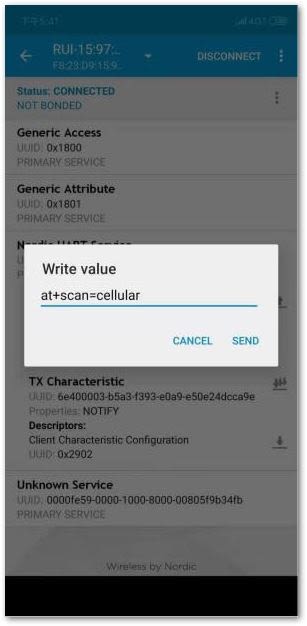 Figure 1: AT+command for scanning Cellular Network
- Wait for about 20 seconds, and you should see some information similar to the image shown below in the RTT Viewer:
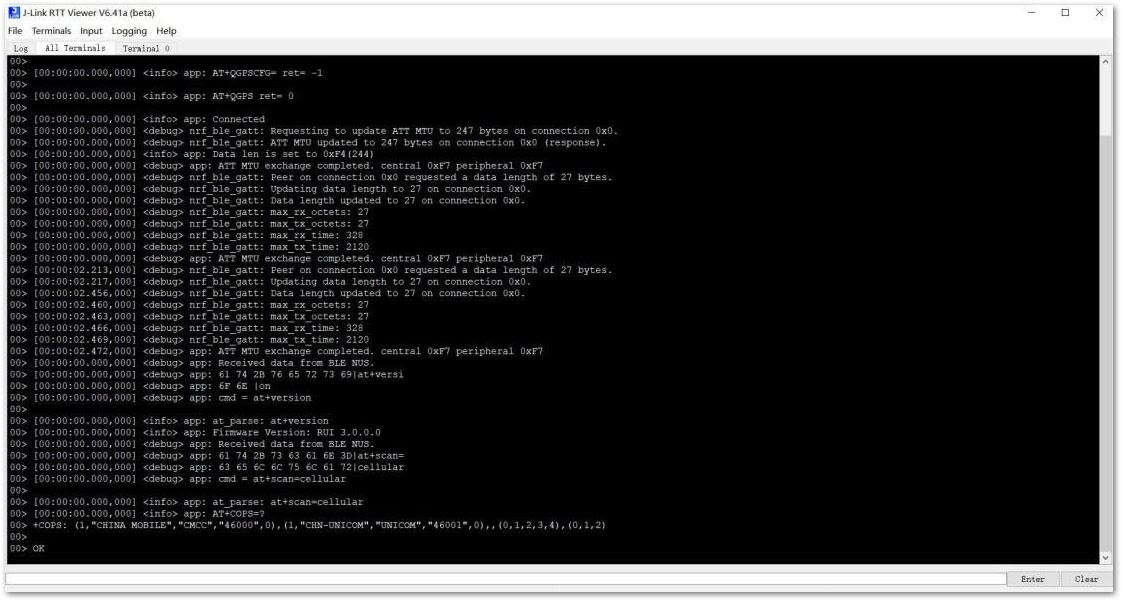 Figure 1: Cellular Network Scan in RTT Viewer
There may be several Cellular operator’s network signal detected upon scanning. In this section, the cellular networks available are CHINA MOBILE and CHN-UNICOM Cellular network.
Miscellaneous
Device Firmware Setup
An easy and quick way to have a fully functional RAK8212 WisTrio iTracker Pro is by using a Pre-compiled Firmware Image provided. In this section are the step by step instructions on how to install the Image into your device.
Burn the latest Firmware
- If you want to get a pre-compiled firmware instead of compiling the source code by yourself, download the latest firmware.
- Download and install J-Link tool on your Windows PC.
- Connect the RAK8212 WisTrio iTracker Pro with your PC through through your JTAG Emulator Kit as follows:
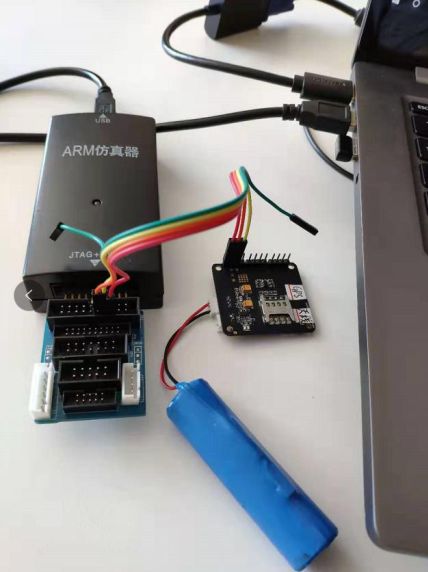 Figure 1: RAK8212 to Windows PC connection thru JTag Emulator Kit
- Now, Open the program J-Flash V6.41a which you just installed and click Start J-Flash
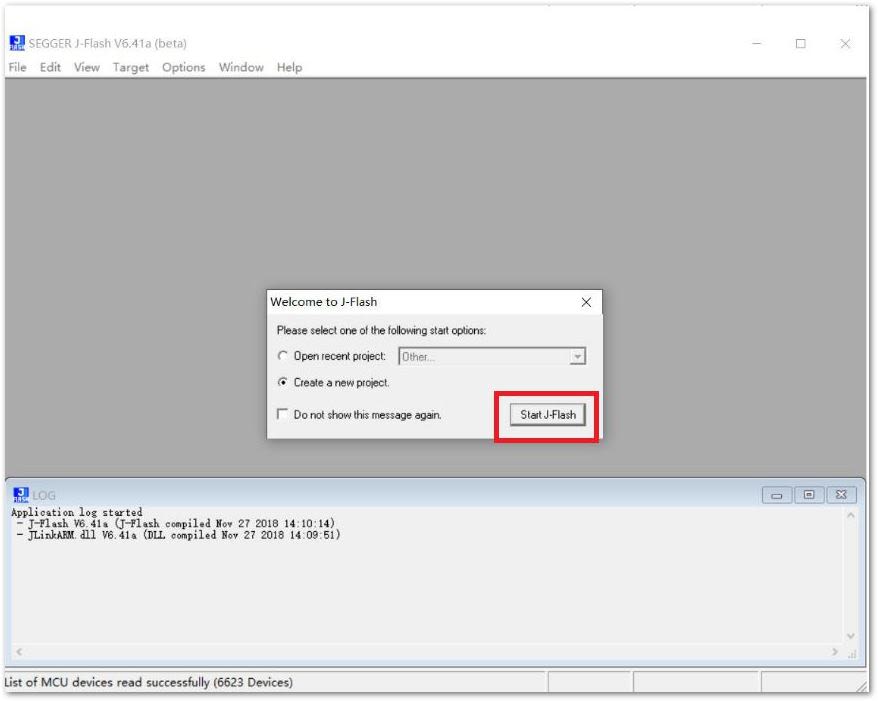 Figure 1: J-Flash Start Connection
- Click the button marked with the red box in the image below labeled Figure 15, then you can see the following page as shown in Figure 16 and in the table provided.
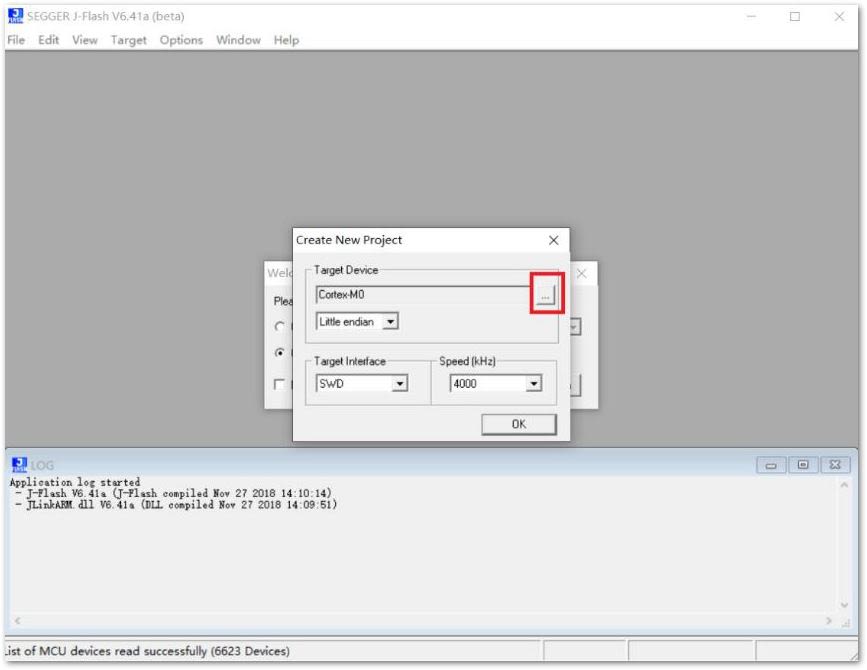 Figure 1: J-Flash Target Device Choosing
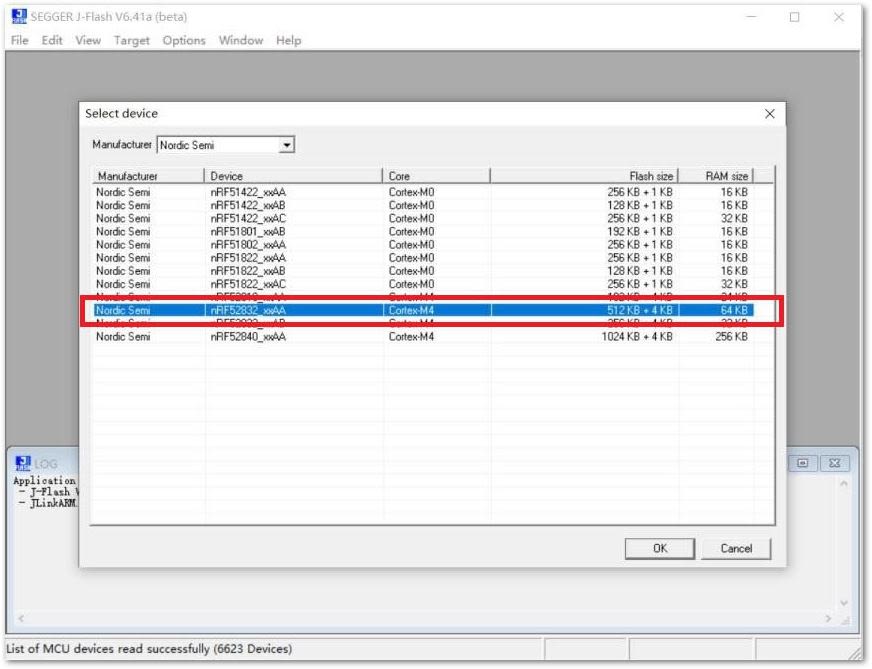 Figure 1: J-Flash Target Device Parameter
| Parameter | Value |
|---|---|
| Manufacturer | Nordic Semiconductor |
| Device | nRF52832_xxAA |
| Core | Cortex-M4 |
| Flash Size | 512 KB + 4 KB |
| RAM Size | 64 KB |
- Click OK and a window pops-up, as shown in Figure 17.
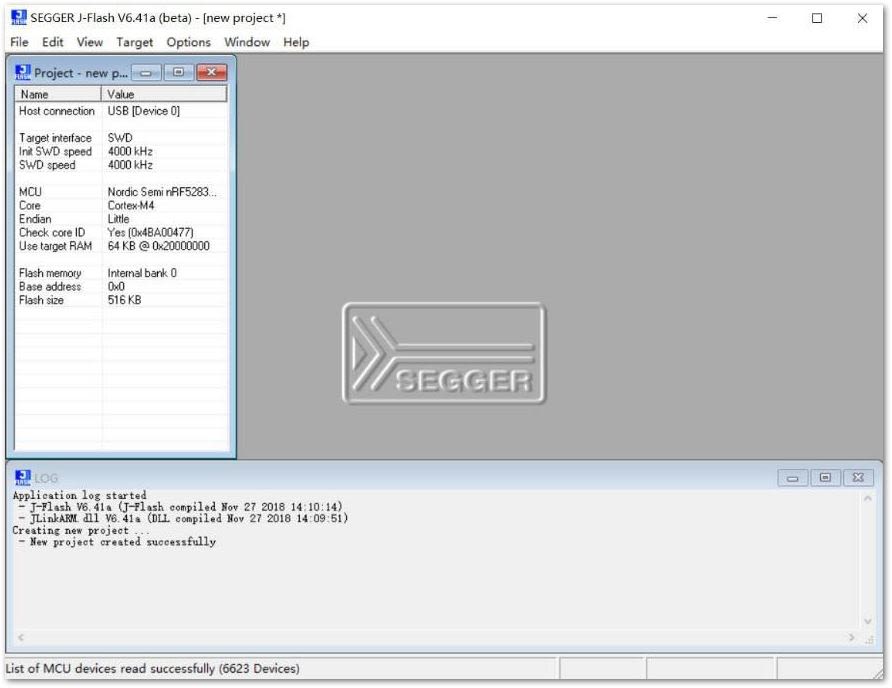 Figure 1: J-Flash Target Device Parameter Selection Window
- Now, connect to the RAK8212 WisTrio iTracker Pro by navigating through Target > Connect in the Main Menu.
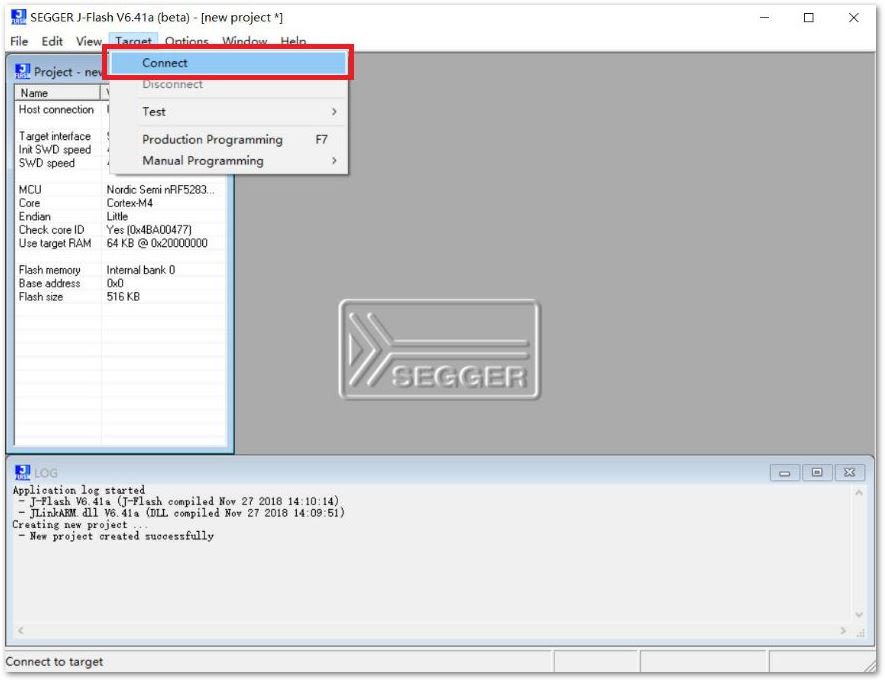 Figure 1: Connecting to the RAK8212 WisTrio iTracker Pro
If the connection is unsuccessful, please recheck the connections between the RAK8212 WisTrio iTracker Pro, JTAG, and the connecting wires.
- Open the download firmware of the RAK8212 WisTrio iTracker Pro by dragging it into the window as shown in the image below:
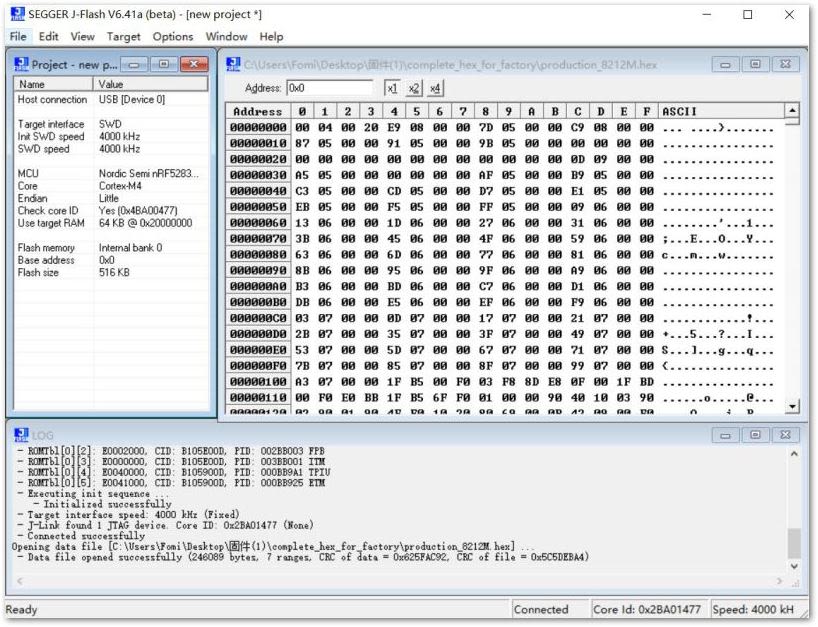 Figure 1: RAK8212 Firmware Opening
- Before going into the firmware process, make sure to have the old firmware erased in the chip by navigating through Target > Manual Programming > Erase Chip in the Main Menu or by doing the process shown in Figure 20.
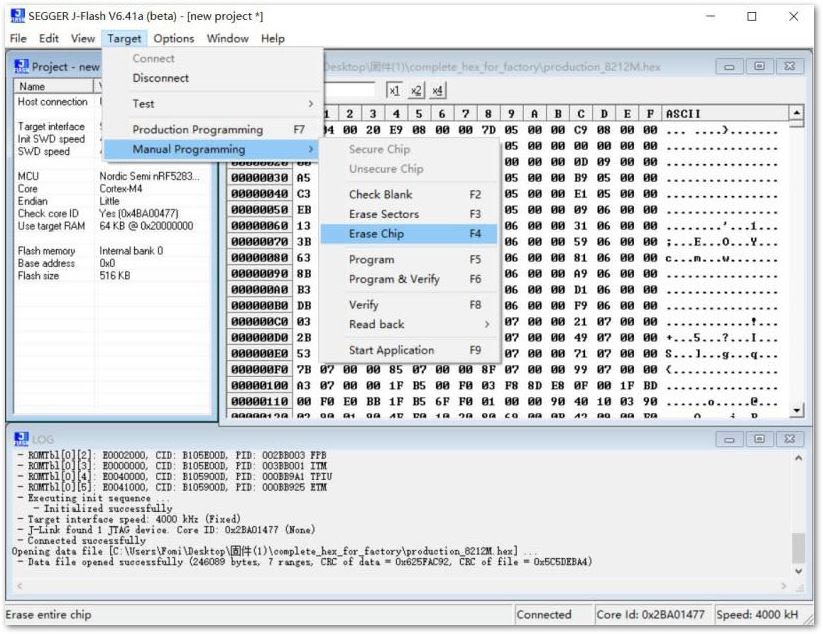 Figure 1: RAK8212 Old Firmware Data Erasing
-
After the successful erasing of the old Firmware, you can start to burn the new firmware into RAK8212 WisTrio iTracker Pro by navigating through Target > Production Programming in the Main Menu or by Pressing "F7".
-
Wait for a couple of seconds and a notification pop-ups showing a successful burning of the updated firmware as shown in the image below:
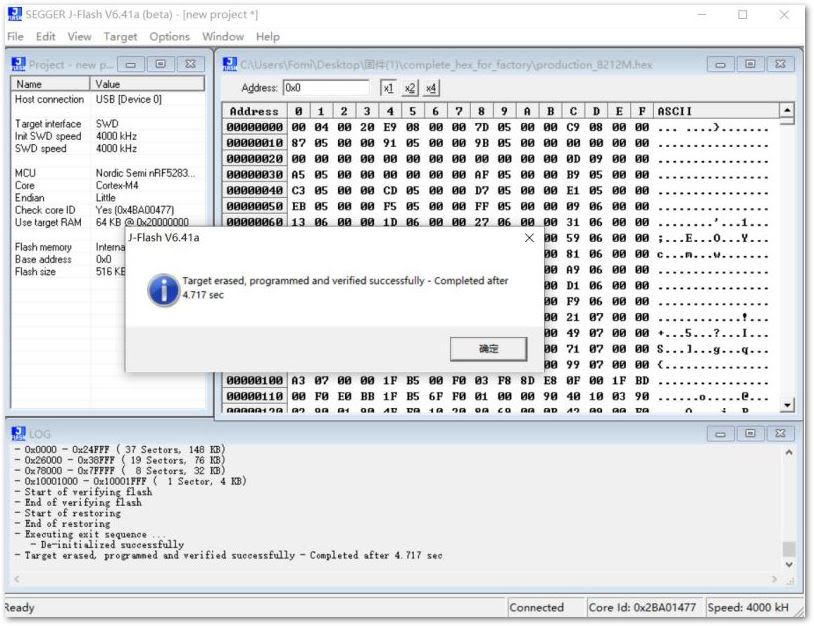 Figure 1: RAK8212 Firmware Burning Successful
Firmware Logs Checking
-
Open the program J-Link RTT Viewer V6.41a which you just installed and click OK.
-
Choose the parameters as shown in the image and in the table provided below and click OK.
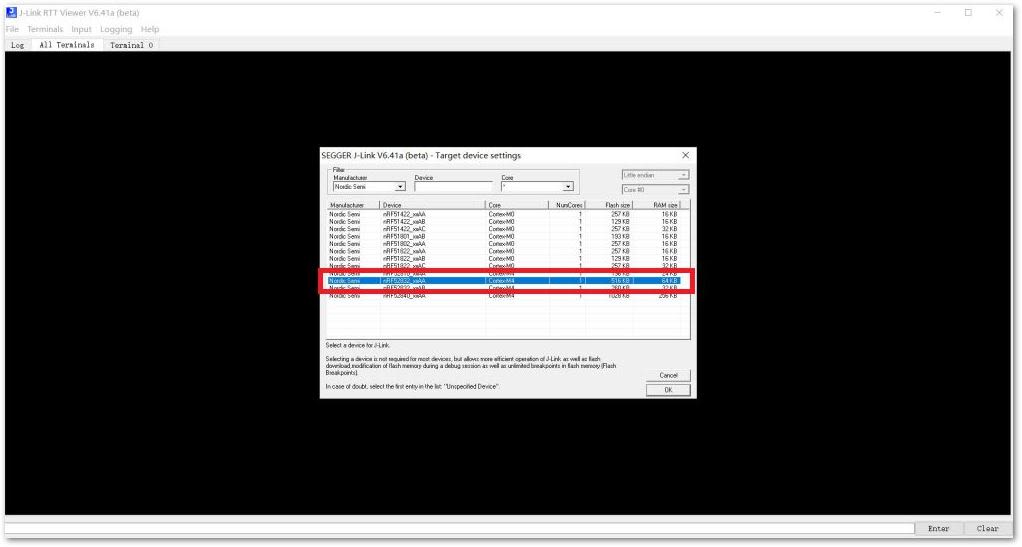 Figure 1: Firmware Log Checking Parameters
| Parameter | Value |
|---|---|
| Manufacturer | Nordic Semiconductor |
| Device | nRF52832_xxAA |
| Core | Cortex-M4 |
| Flash Size | 516 KB |
| RAM Size | 64 KB |
- Connect by navigating through File > Connect in the Main Menu or by pressing F2.
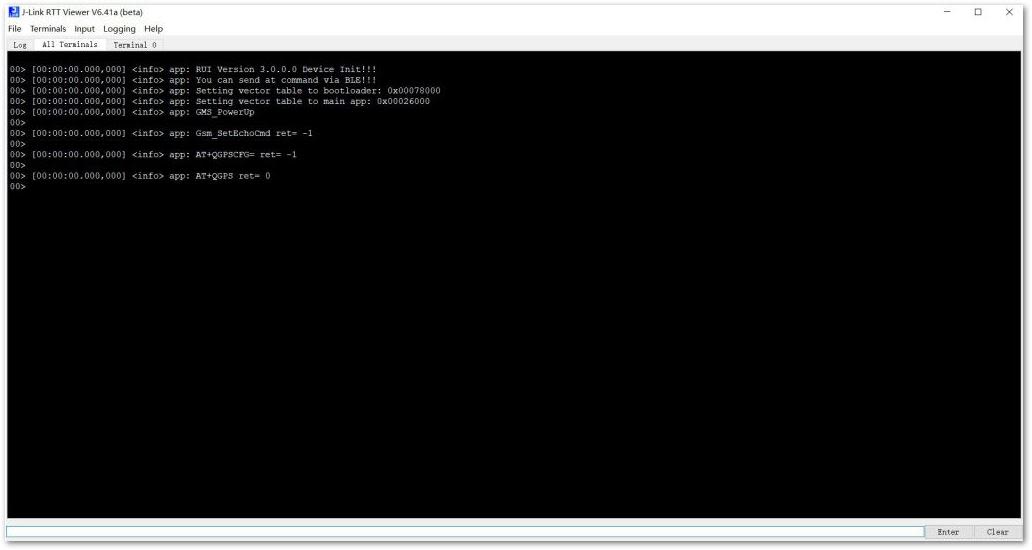 Figure 1: Firmware Log Sample
If no logs are shown upon connecting, try resetting the RAK8212 WisTrio iTracker Pro and redo the Firmware Logs Checking section.
