All-in-One 5G Quick Start Guide
A simple configuration guide for developers, private LTE & 5G, and some other usage.
Prerequisites
A good GPS signal is required to activate and run 4G and 5G radios.
- Assemble the device with the pedestal. Refer to the Installation Guide.
- After assembling the device, place it close to the window.
- Then, connect the GPS antenna to the device.
- Place the antenna outside the window to get a good GPS signal.
 Figure 1: All-in-One 5G
Attach the antenna first before powering on the device.
- Lastly, connect the PoE power source to the WAN/PoE port on the device to power it up.
Product Configuration
There are four (4) major scenarios you can use the RAK M310/M320 device for. The device configuration is based on the device’s usage.
- RAK M310/M320 as a pure 4G and/or 5G radio with the external EPC/5GC
- RAK M310/M320 running with RAK open-source Magma AGW
- RAK M310/M320 running with RAK open-source Open5GS
- RAK M310/M320 with your own EPC/5GC inside on open hardware CM4
Configuration with External EPC/5GC
Scenario 1. RAK M310/M320 as a pure 4G and/or 5G radio with an external EPC/5GC.
This section describes the basic configuration to connect eNodeB and gNodeB to your own EPC/5GC. After the configuration, the eNodeB and gNodeB should start serving.
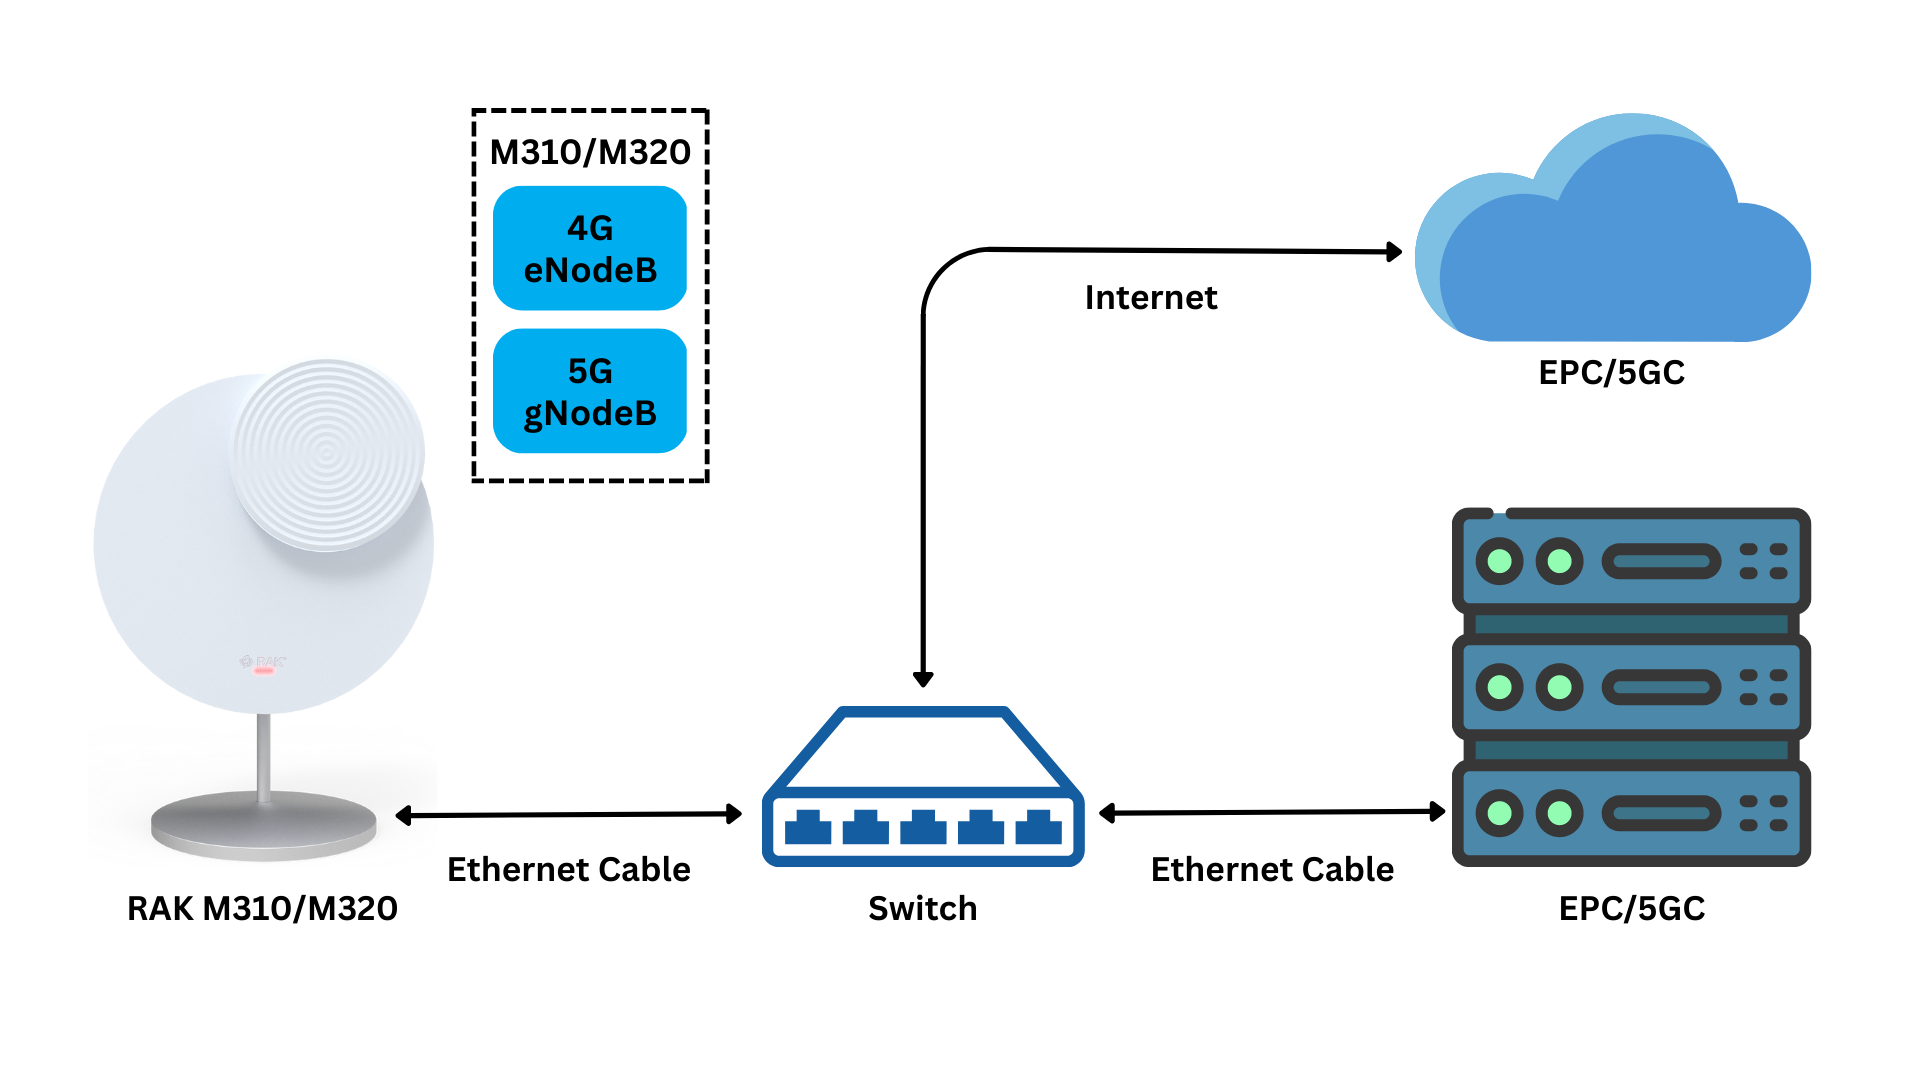 Figure 1: Connect RAK M310/M32 to external EPC/5GC
Listed in the table are the parameters to consider for the configuration:
| Item | Parameter | Description |
|---|---|---|
| IP Address | OAMP IP | OAM uses a separate IP address to access the local web, e.g., 192.168.150.123/124 |
| Core IP | MME IP for 4G eNodeB, AMF IP for 5G gNodeB – planned by the user | |
| Cell Parameters | PLMN | Planned by the user |
| TAC | Planned by the user | |
| Cell ID | Planned by the user | |
| NTP Server | NTP Server Address | Planned by the user. NTP is required to activate and run 4G eNodeB and 5G gNodeB |
To configure RAK M310/M320 with your own EPC/5GC:
1. Prepare your PC or laptop’s network to access the RAK M310/M320 local web.
Configure the ethernet port to the subnet 192.168.150.0/24 to access eNodeB or gNodeB local web management, bridged by a router/switch or connected directly.
- RAK M310&M320 4G eNodeB:
192.168.150.1/24 - RAK M320 5G gNodeB:
192.168.150.7/24
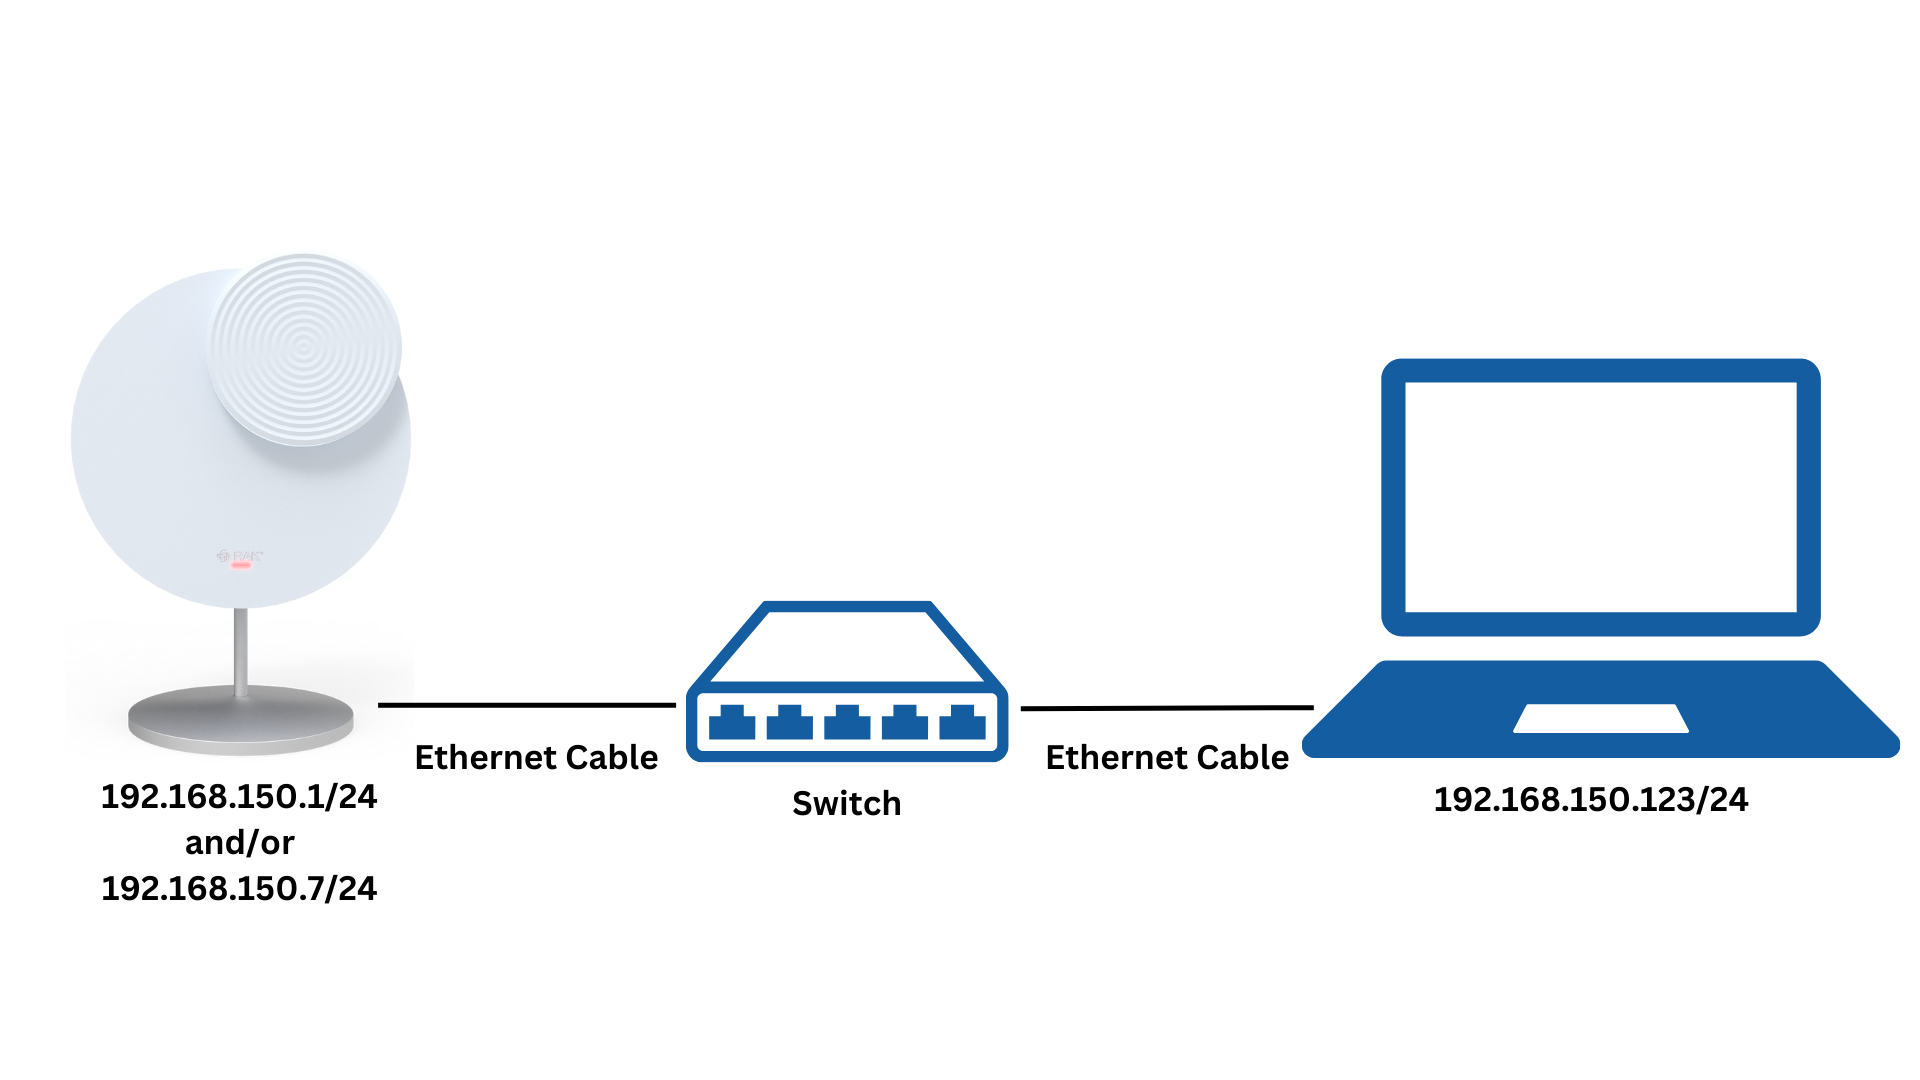 Figure 1: Network connection
2. Log in to eNodeB/gNodeB local web using the default credentials.
- RAK M310&M320 4G eNodeB
- Serving URL:
192.168.150.1/24 - Username: admin
- Password: admin
- Serving URL:
- RAK M320 5G gNodeB
- Serving URL:
192.168.150.7/24 - Username: new_user
- Password: gNB@2014
- Serving URL:
It is recommended to use Chrome browser to achieve the best effect.
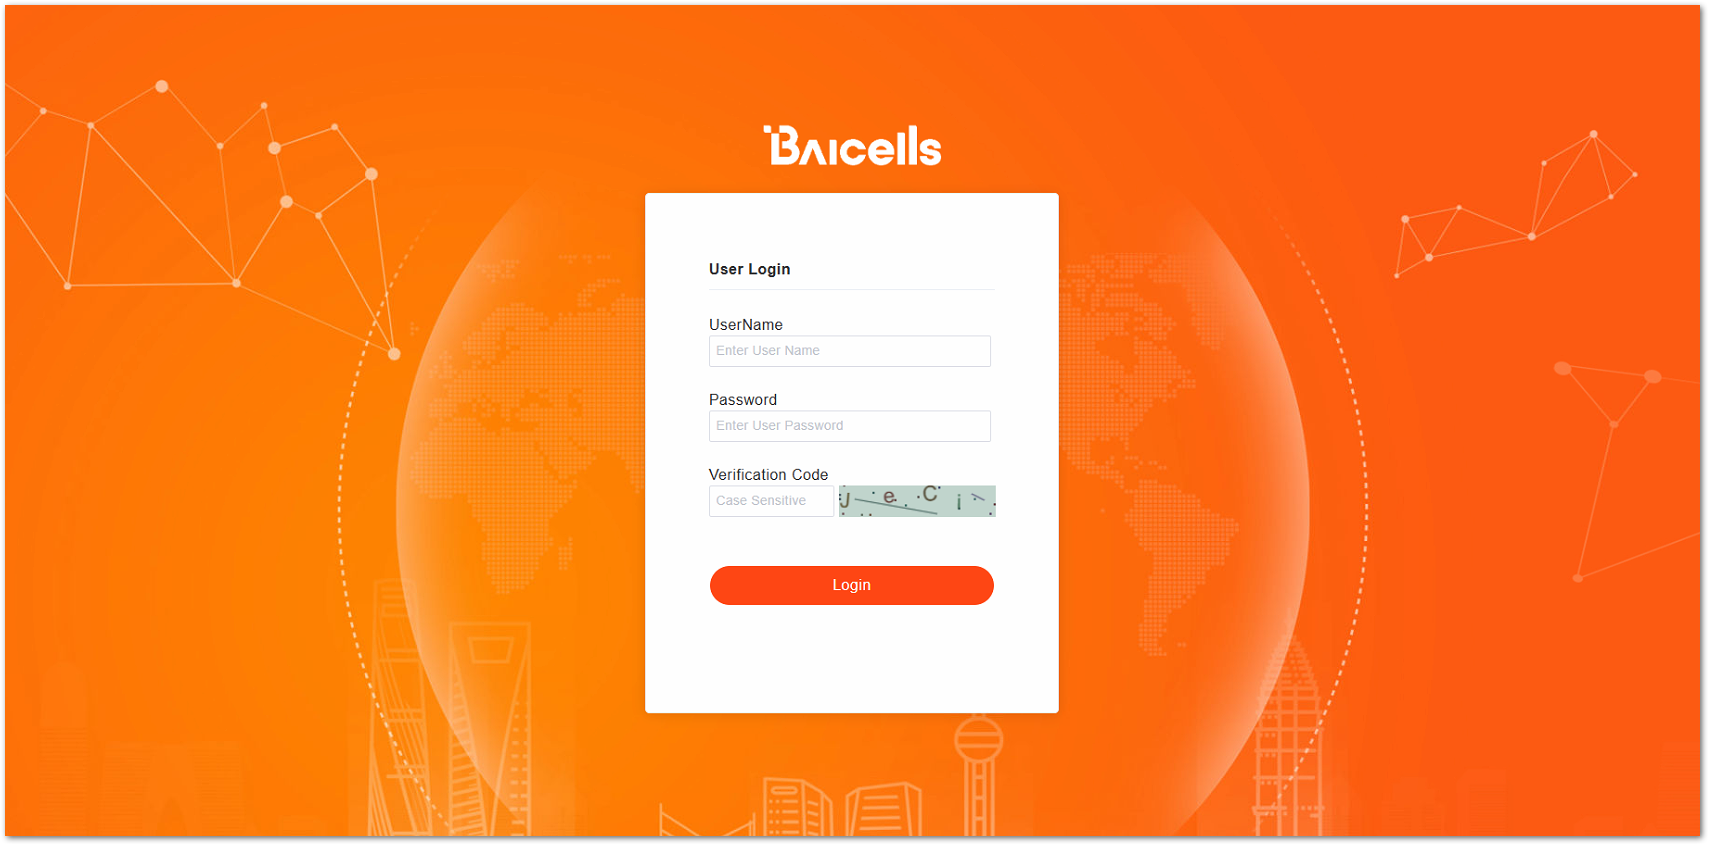 Figure 1: Login page
3. Configure eNodeB S1 or gNodeB N2 interface network according to your requirement.
Mostly the eNodeB's S1 and/or gNodeB's N2 interface are required to have a static IP address connected to your EPC and/or 5GC. Dynamic IP address allocated by DHCP is also supported, all depend on your network requirement.
-
S1 Interface with Static IP
a. Log in to eNodeB local web via
https://192.168.150.1
b. Navigate to Network > WAN/LAN/VLAN and click the edit button under WAN Config in the Operate column. Figure 1: WAN Configuration Static IP
c. The Edit window pops up. Select Static IP in IP Access Mode.
 Figure 1: eNodeB Static IP
d. Then edit the static IP Address, Netmask, and Gateway for the eNodeB S1 port.
 Figure 1: Static IP Configuration
e. Click OK and then save the configuration.
-
S1 Interface with Dynamic IP
a. Log in to eNodeB local web via
https://192.168.150.1.
b. Navigate to Network > WAN/LAN/VLAN and click the edit button under WAN Config. Figure 1: WAN Configuration Dynamic IP
c. The Edit window pops up. Select DHCP in IP Access Mode to enable the DHCP client on the eNodeB WAN port.
 Figure 1: eNodeB DHCP Configuration
d. Click OK and then save the configuration.
-
N2 Interface with Static IP
a. Log in to gNodeB local web via
http://192.168.150.7. Use the abovementioned default credentials:- Username: new_user
- Password: gNB@2014
b. Navigate to Network > WAN/VLAN and click open under WAN List > WAN Card1 to expand the list.
 Figure 1: Expand WAN Cards
c. WAN IPv4 table shows up, then click the Edit button under Operate.
 Figure 1: Edit WAN IPv4 Table
d. The Edit window pops up. Select Static IP in the Addressing Mode and Ng in the Port Type field, then edit the following fields as well for the gNodeB S2 port:
- IP Address
- Netmask
- Gateway
 Figure 1: Static IP Configuration
f. Lastly, click OK then save the configuration.
-
N2 Interface with Dynamic IP
a. Log in to gNodeB local web via
http://192.168.150.7.
b. Navigate to Network > WAN/VLAN and click open under WAN List > WAN Card1 to expand the list. Figure 1: Expand WAN Card
c. WAN IPv4 table shows up, then click the Edit button under Operate.
 Figure 1: WAN IPv4 Table Configuration
d. The Edit window pops up, and then select DHCP in the Addressing Mode field and Ng in the Port Type field.
 Figure 1: gNodeB DHCP Configuration
f. Then click OK and save the configuration.
4. Configure PLMN, TAC, Cell ID, MME, and AMF IP address.
Configure your eNodeB and gNodeB with planned TAC, PLMN, MME, and AMF IP address to connect your own EPC and 5GC. These parameters depend on your network requirements.
a. Log in to eNodeB local web via https://192.168.150.1
b. Navigate to the Quick Setting page and then configure the following parameters:
- PLMN
- TAC
- Country code
- MME IP
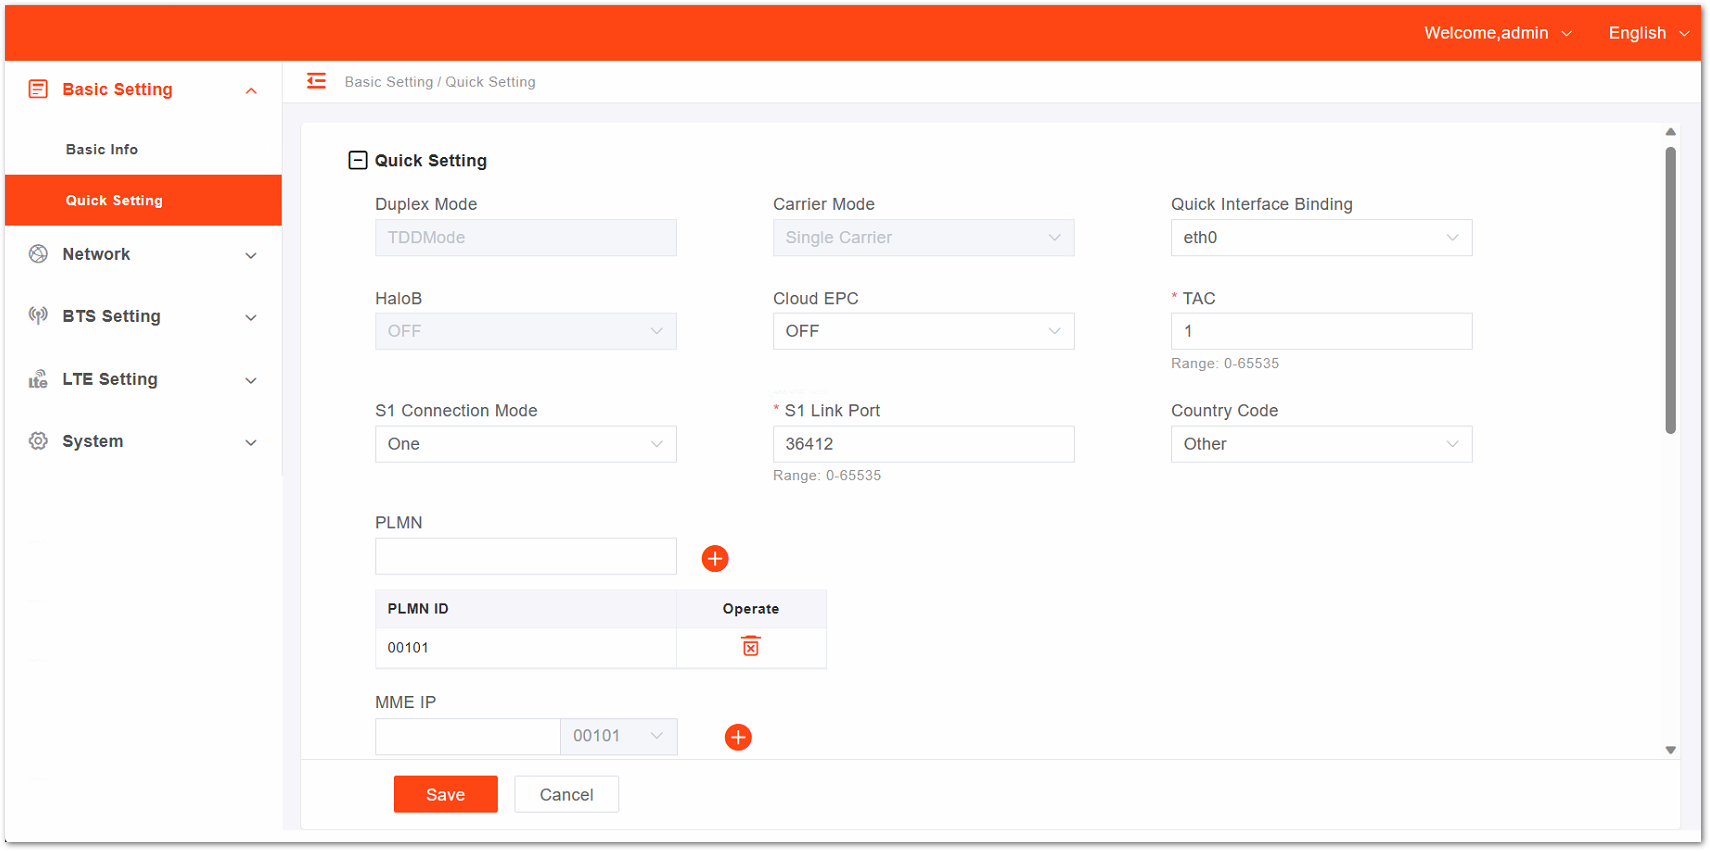 Figure 1: Quick Setting Parameters
c. Scroll down, and under Cell Quick Setting, configure the Cell ID and set the RF Status field to ON.
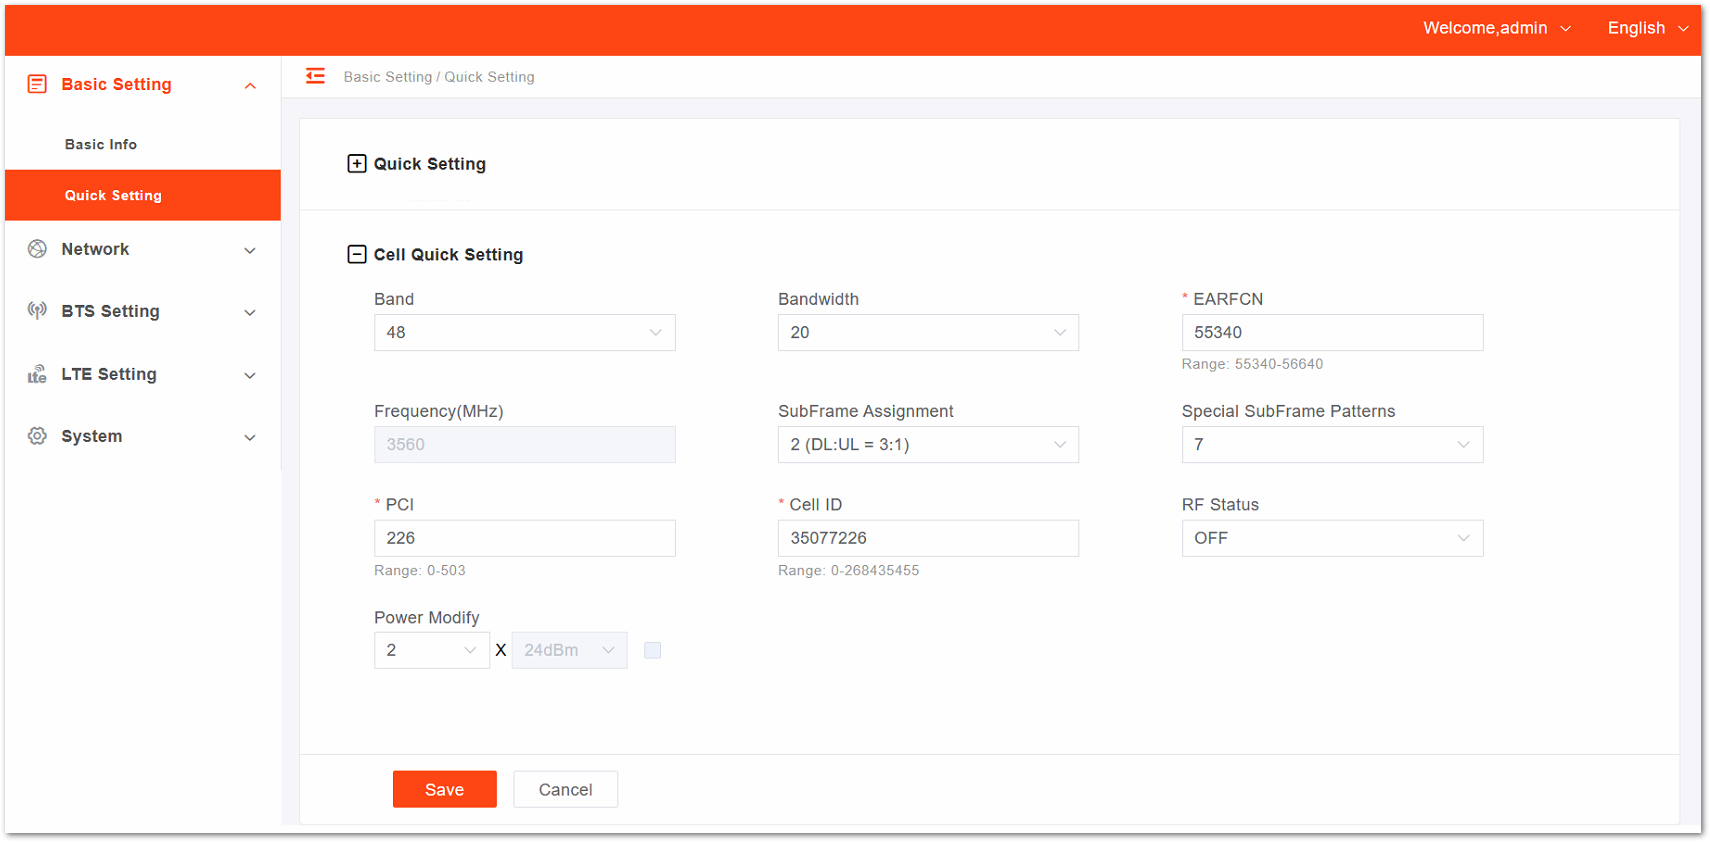 Figure 1: Cell Quick Setting Parameters
d. Lastly, Save the eNodeB configuration.
gNodeB Configuration-
PLMN
a. Log in to gNodeB local web via
http://192.165.150.7.
b. Navigate to NR Setting, select PLMN, and click the Edit button under the Operate column. Figure 1: Edit PLMN Identity Info List
c. An Edit window will pop up. Edit the Cell ID and TAC, then click OK.
 Figure 1: Configure Cell ID and TAC
d. The PLMN List will show up, then click the Edit button under the Operate column.
 Figure 1: PLMN List
e. Another Edit button appears, then edit the PLMNID.
 Figure 1: Configure PLMNID
 -
AMF IP Address
a. Under the NR Setting, select Advanced and then click the plus icon beside CU to show the CU fields.
 Figure 1: Advanced Setting Configuration
b. Scroll down and look for AMF IP, then click the Add icon.
 Figure 1: Add AMF IP
c. The Add window pops up, then add the AMF IP and PLMN.
 Figure 1: Configure AMF IP and PLMN
d. Once done, click OK and save the configuration.
5. Configure the NTP Server.
NTP is required to activate and run 4G eNodeB and 5G gNodeB. Without any reachable NTP servers, the eNodeB and gNodeB cannot be activated successfully.
a. Navigate to System then to the NTP page.
b. Tick the slider to turn on the NTP Servers and edit the NTP servers’ IP addresses and Port fields. Then click Save.
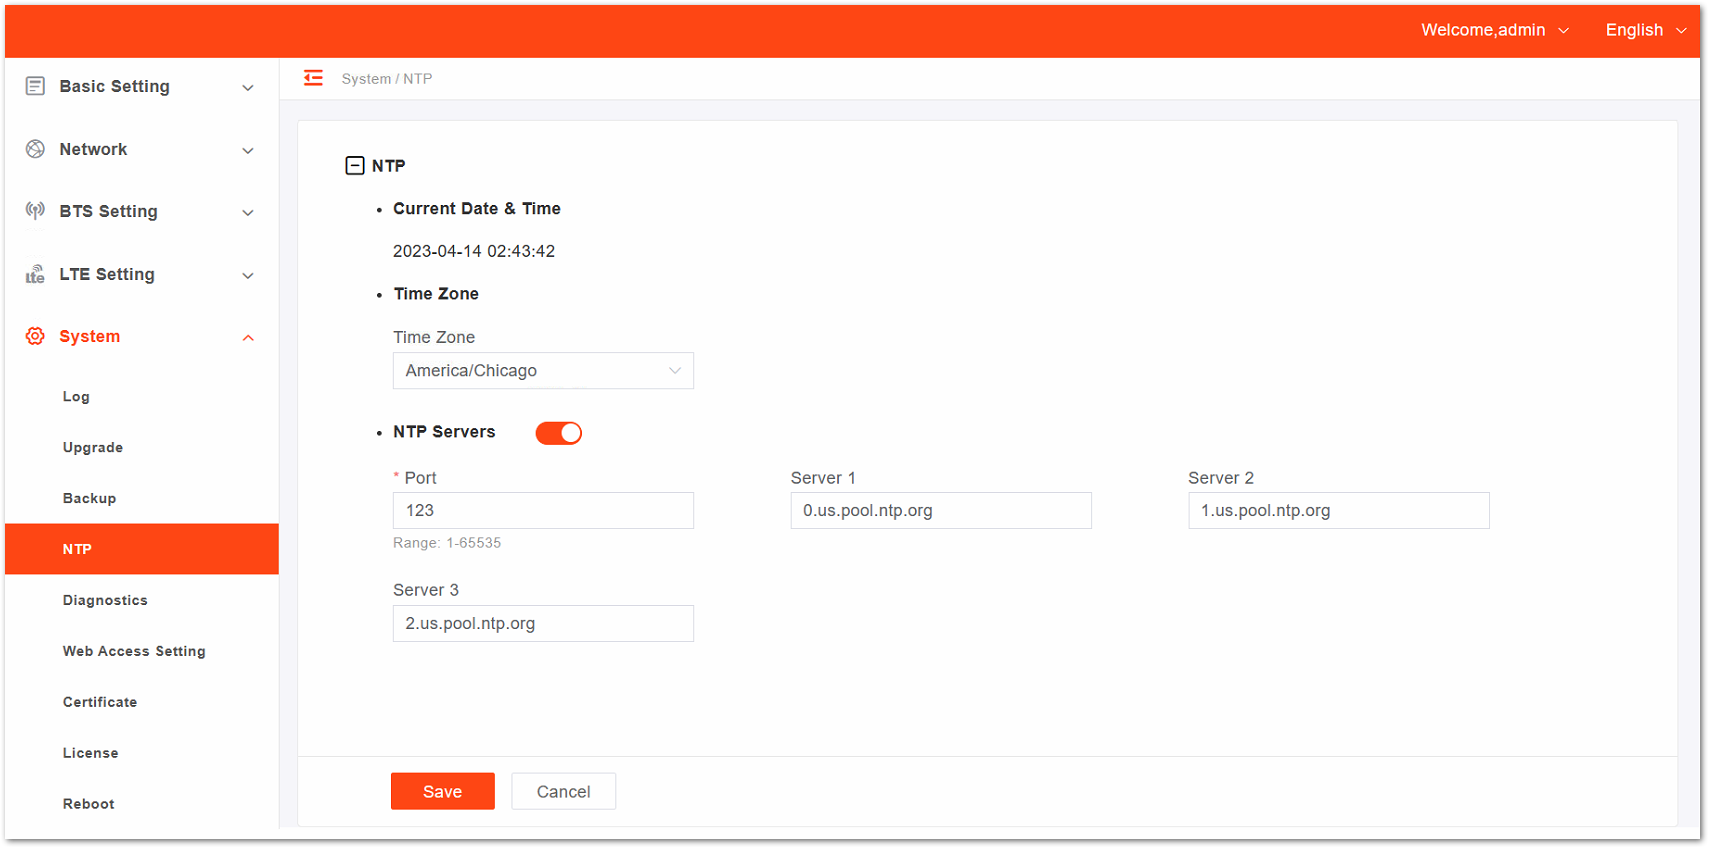 Figure 1: eNodeB NTP Servers
a. Navigate to System then to the NTP page.
b. In the Enable field, select ON and then edit the NTP servers’ IP addresses.
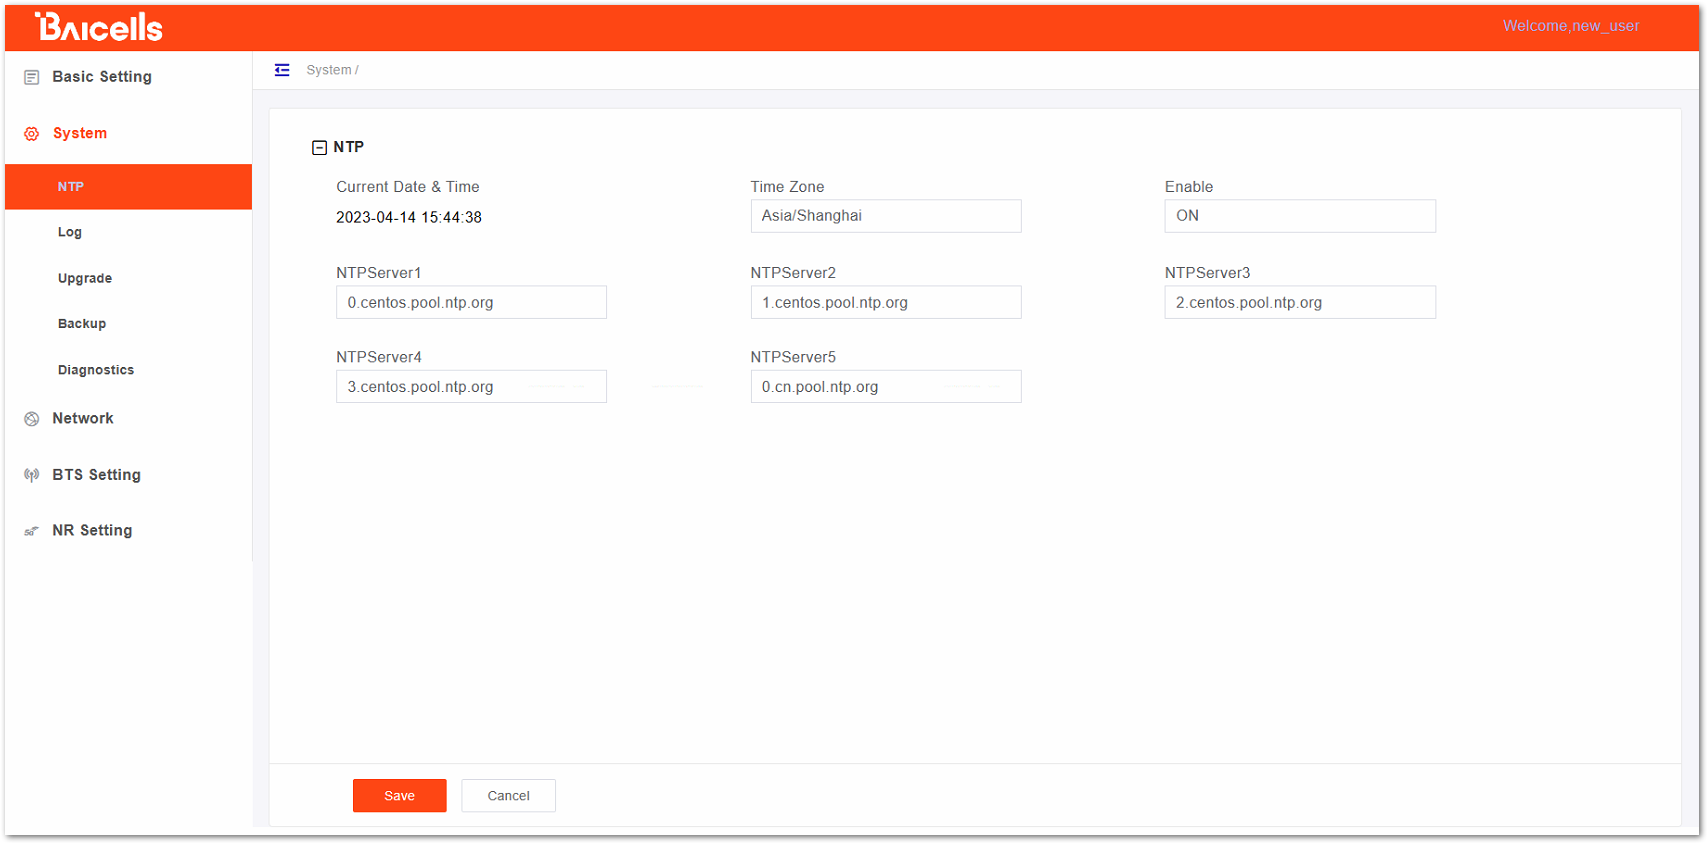 Figure 1: gNodeB NTP Servers
c. Once done, click OK and save the configuration.
6. Reboot to use the new configuration.
eNodeB Reboot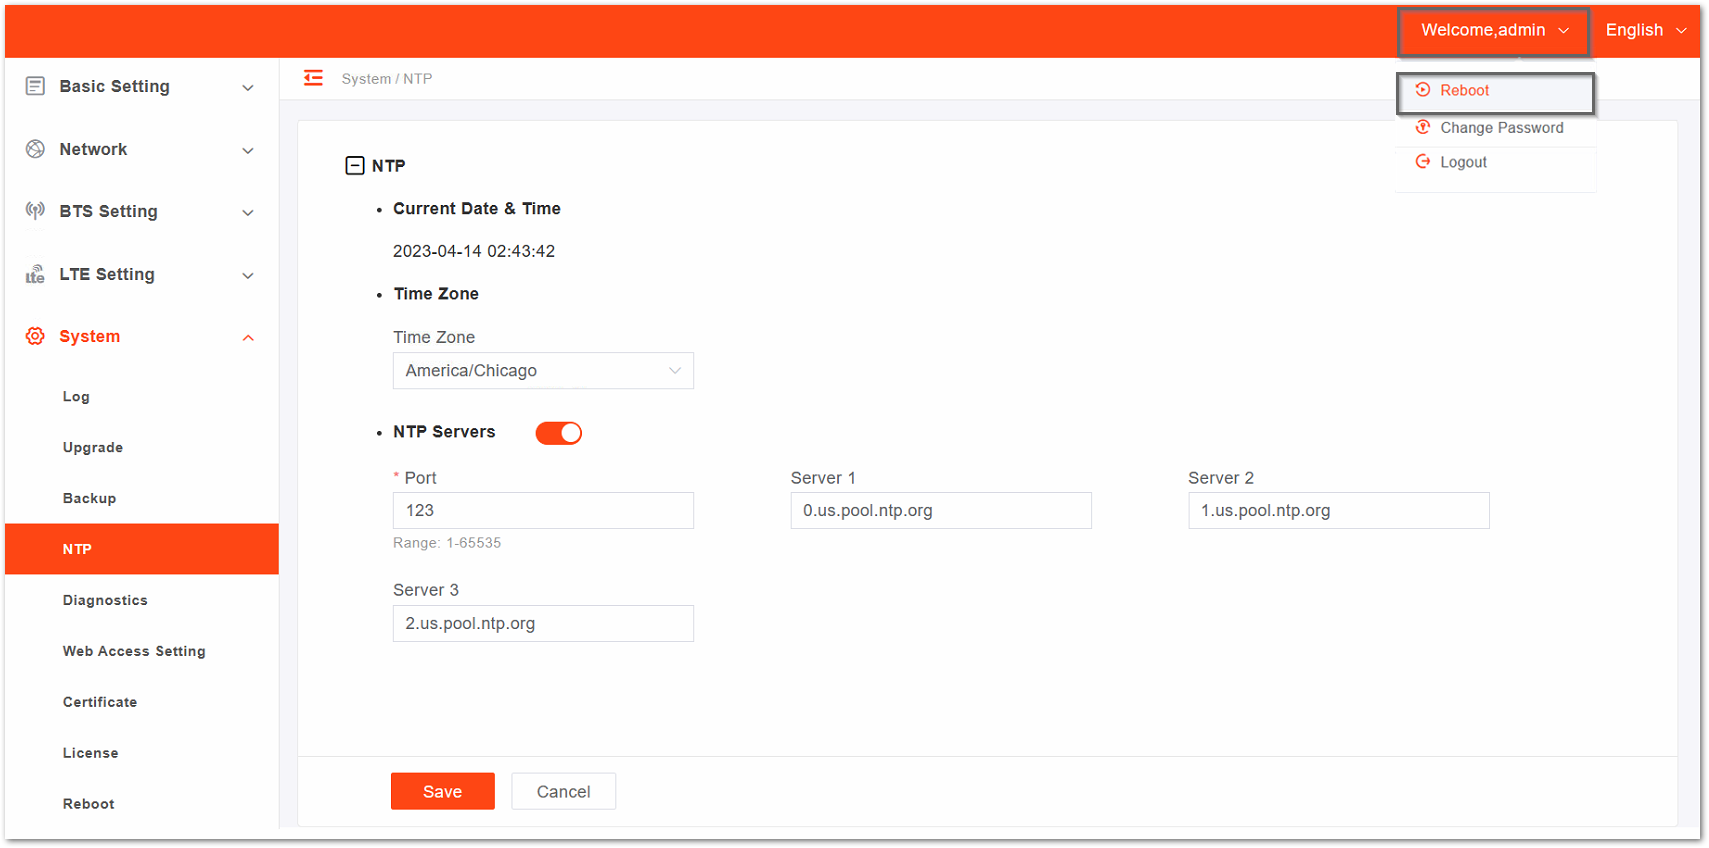 Figure 1: eNodeB Reboot
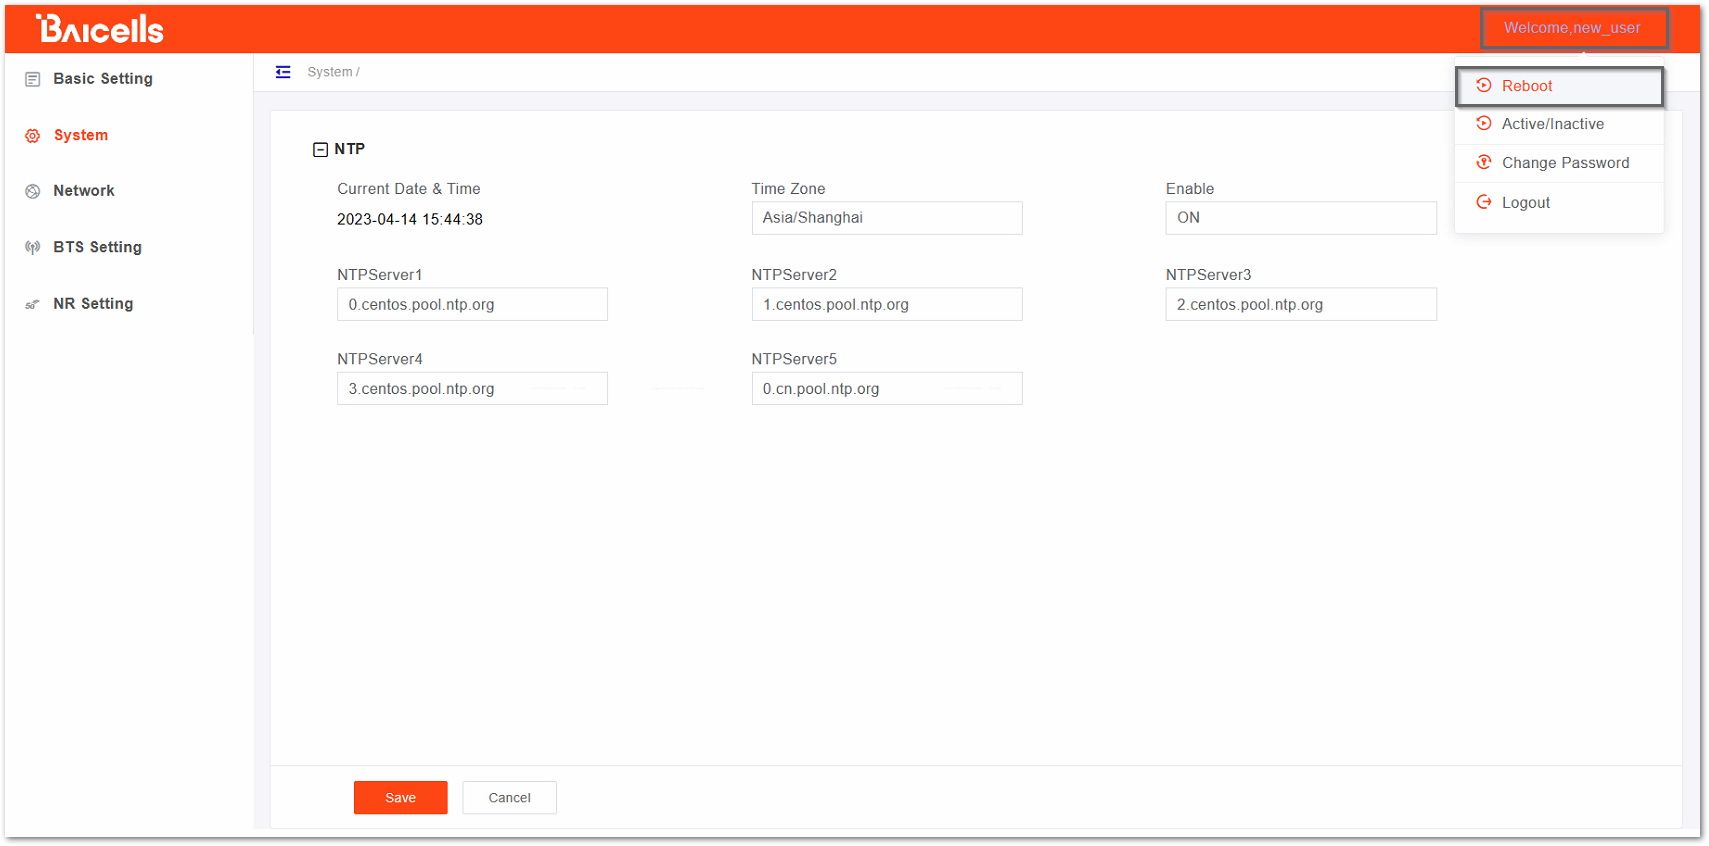 Figure 1: gNodeB Reboot
Configuration with Magma Inside
Scenario 2. RAK M310/M320 as an All-in-One device, running with RAK open-source Magma AGW. RAK M310/M320 has a built-in open-source Magma AGW installation package inside.
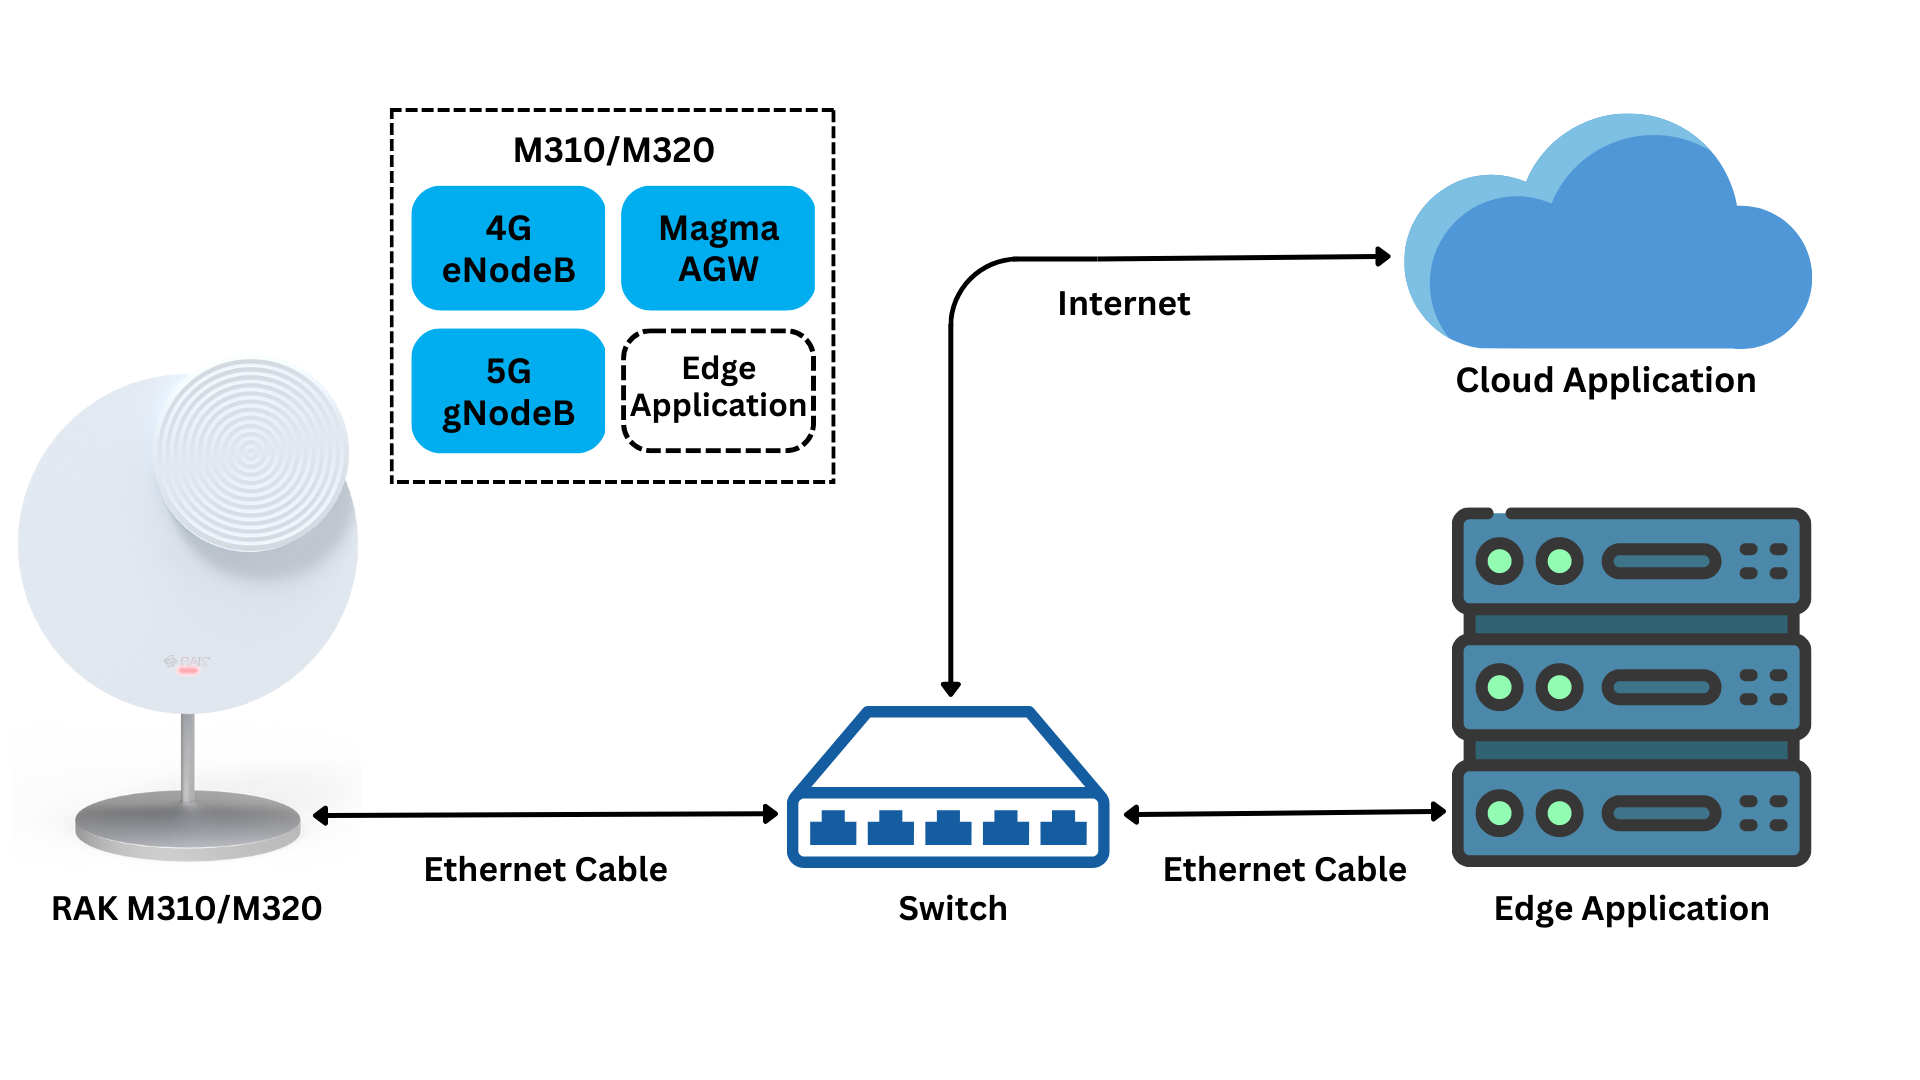 Figure 1: RAK M310/M320 as an All-in-One device
You can log in and install the package manually with the following steps:
- Prepare the network to access to M310/M320 CM4 module.
- SSH login to M310/M320 CM4 module.
- Install AGW with a built-in package.
- The package name would be with the prefix
upgrade_agw. - Specific package name:
magma$ sudo /var/opt/magma/upgrade_agw_xxx.
- Reboot to run AGW.
After installing the Magma AGW, the eNodeB and gNodeB will start serving automatically with the following default parameters:
| Parameter | Value |
|---|---|
| PLMN | 00101 |
| TAC | 1 |
| Cell ID | 1 |
- The CM4's static IP address will be changed automatically to
192.168.151.100/24. Use this IP address to SSH login to CM4 for more configurations. - For more Magma AGW configuration details, refer to Magma AGW Configuration Guide.
Configuration with Open5GS inside
Scenario 3. RAK M310/M320 as an All-in-One device, running with RAK open-source Open5GS.
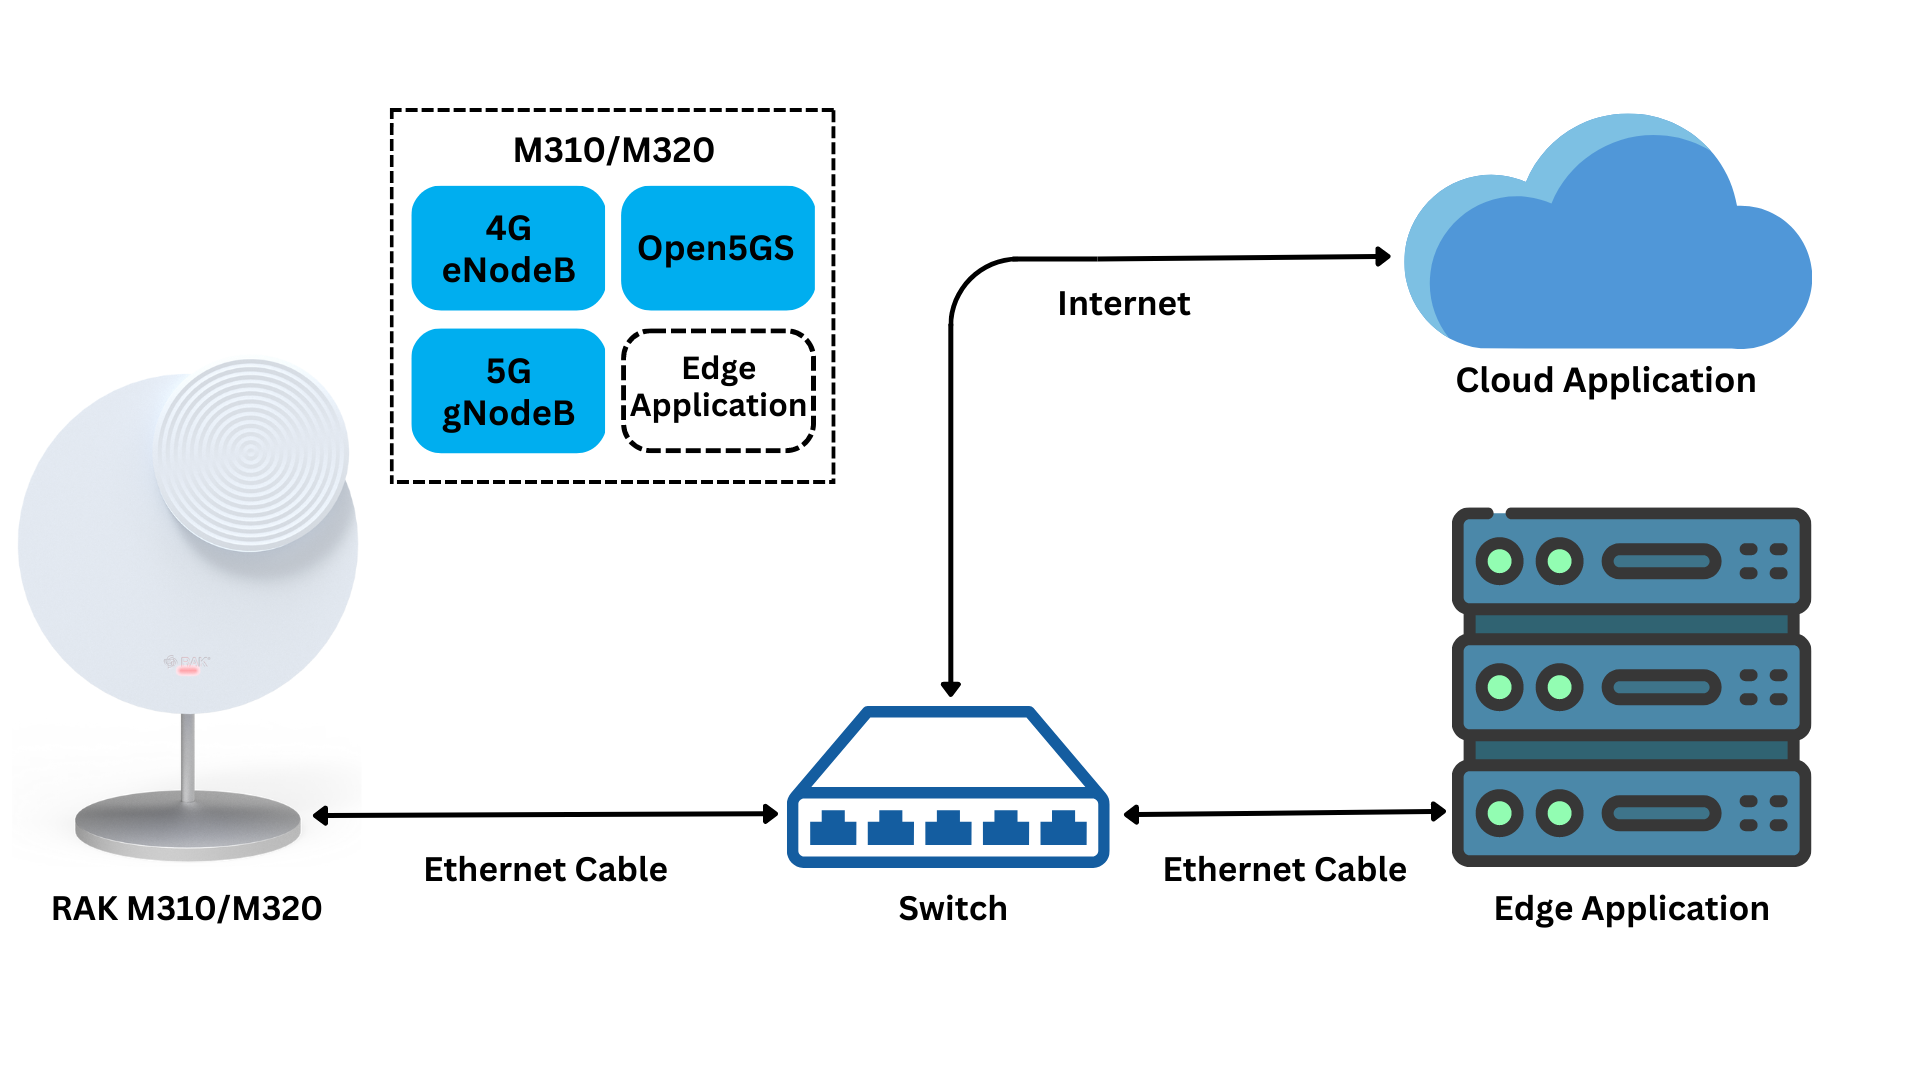 Figure 1: RAK M310/M320 with open-source Open5GS inside
RAK M310/M320 has a built-in open-source Open5GS installation package inside. You can log in and install the package manually with the following steps:
- Prepare the network to access to M310/M320 CM4 module.
- SSH login to M310/M320 CM4 module.
- Install Open5GS with a built-in package.
- The package name would be with the prefix
install_open5gs. - Specific package name:
magma$ sudo /var/opt/open5gs/install_open5gs_xxx.
- Reboot to run AGW.
After installing the Open5GS, the eNodeB and gNodeB will automatically start serving with default parameters as follows:
| Parameter | Value |
|---|---|
| PLMN | 00101 |
| TAC | 1 |
| Cell ID | 1 |
- The CM4's static IP address will be changed automatically to
192.168.151.100/24. Use this IP address to SSH login to CM4 for more configurations.
Configuration with Customer's EPC/5GC Inside
Scenario 4. RAK M310/M320 as an All-in-One device with your own EPC/5GC inside on open hardware CM4.
If you want to install your own EPC or 5GC onto RAK M310/M320 CM4 Module, make sure that it is compatible with Raspberry CM4.
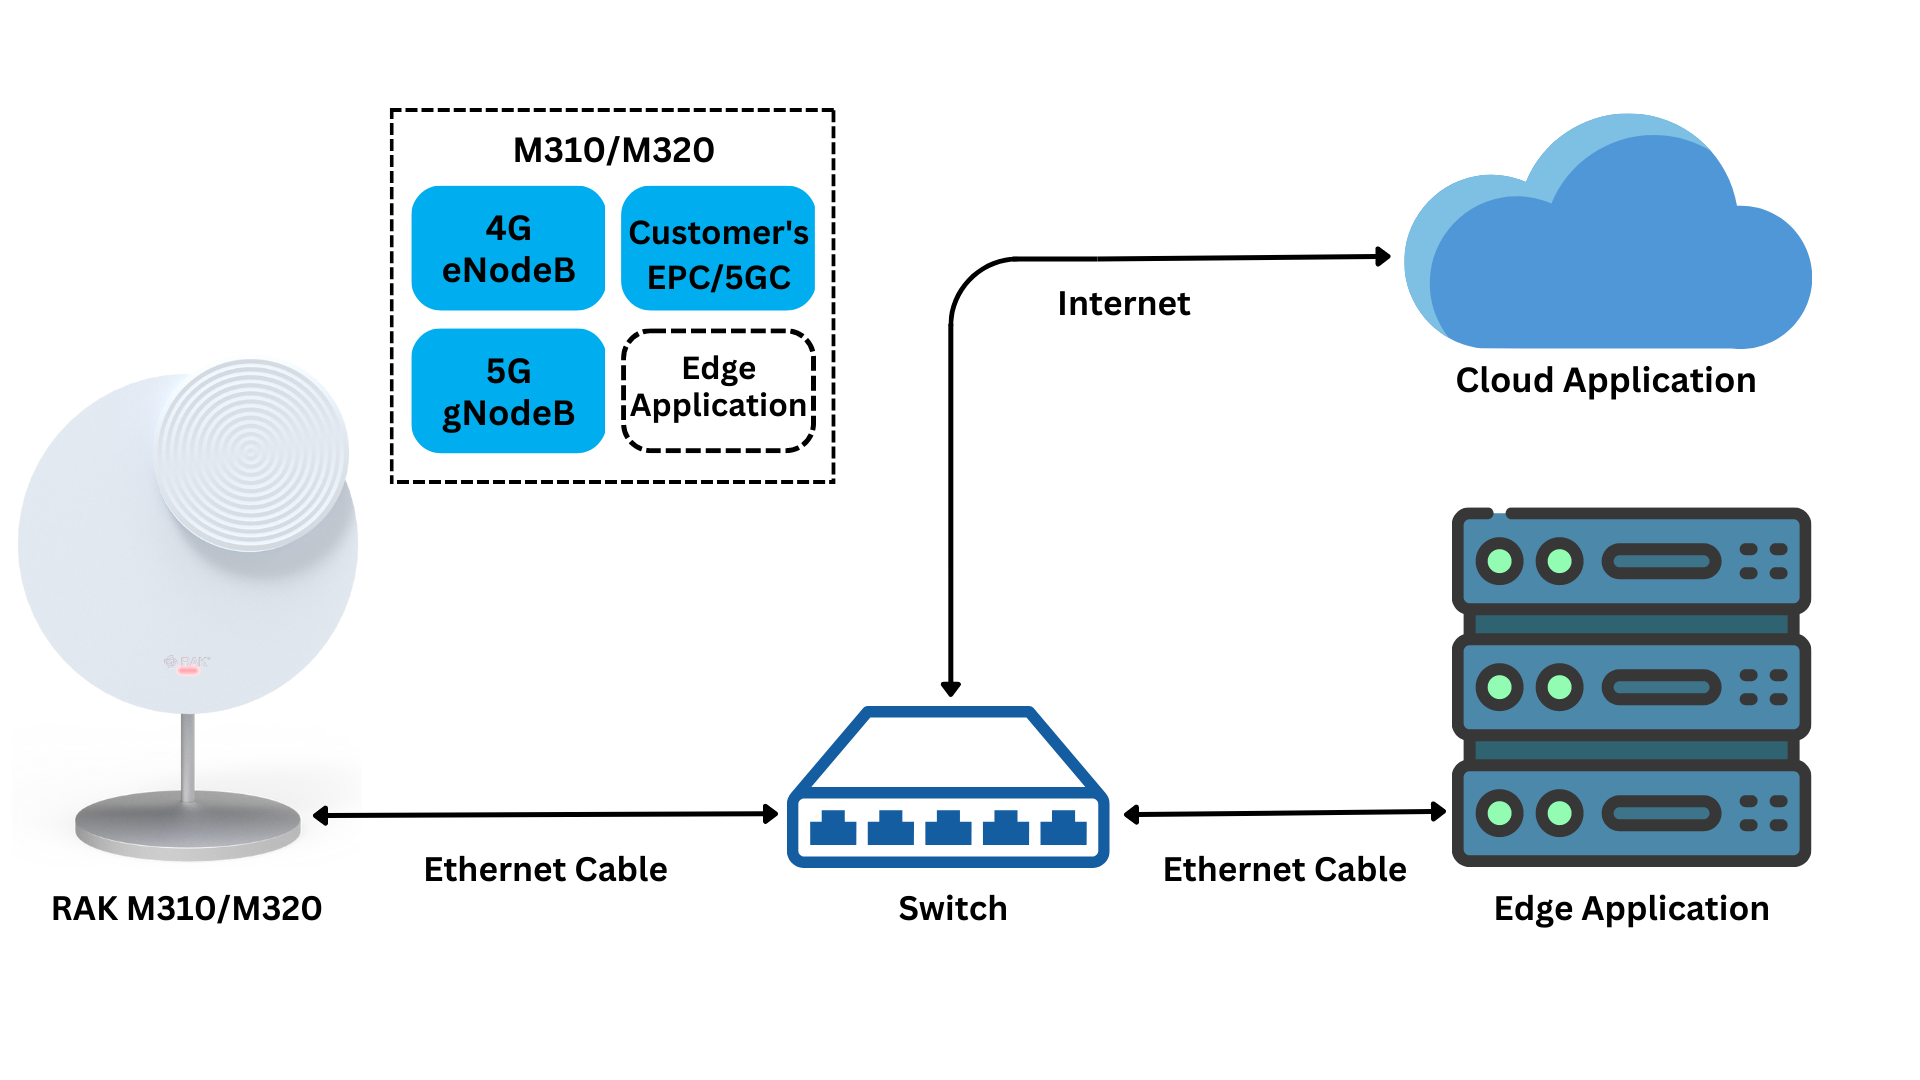 Figure 1: RAK M310/M320 with EPC/5GC on open hardware CM4
There are four major steps to install your own EPC or 5GC onto RAK M310/M320's CM4 Module:
- Prepare the network to access to M310/M320 CM4 module.
- SSH login to M310/M320 CM4 module.
- Install with the pre-built EPC or 5GC package.
- Reboot to run AGW.
CM4 Module
RAK M310 & M320 have a Raspberry CM4 where you can log in to the CM4 module to install built-in packages or your own application, depending on your requirements.
To install packages on CM4, here are some basic steps to operate:
1. Prepare the network
Prepare the network to access to M310/M320 CM4 module. RAK M310 & M320 CM4 module is configured with a static IP address 192.168.150.100/24 to serve local SSH access.
You need to configure your PC or laptop's ethernet port to subnet 192.168.150.0/24 to SSH access to CM4, bridged by a router/switch or connected directly. The network connection may look like this:
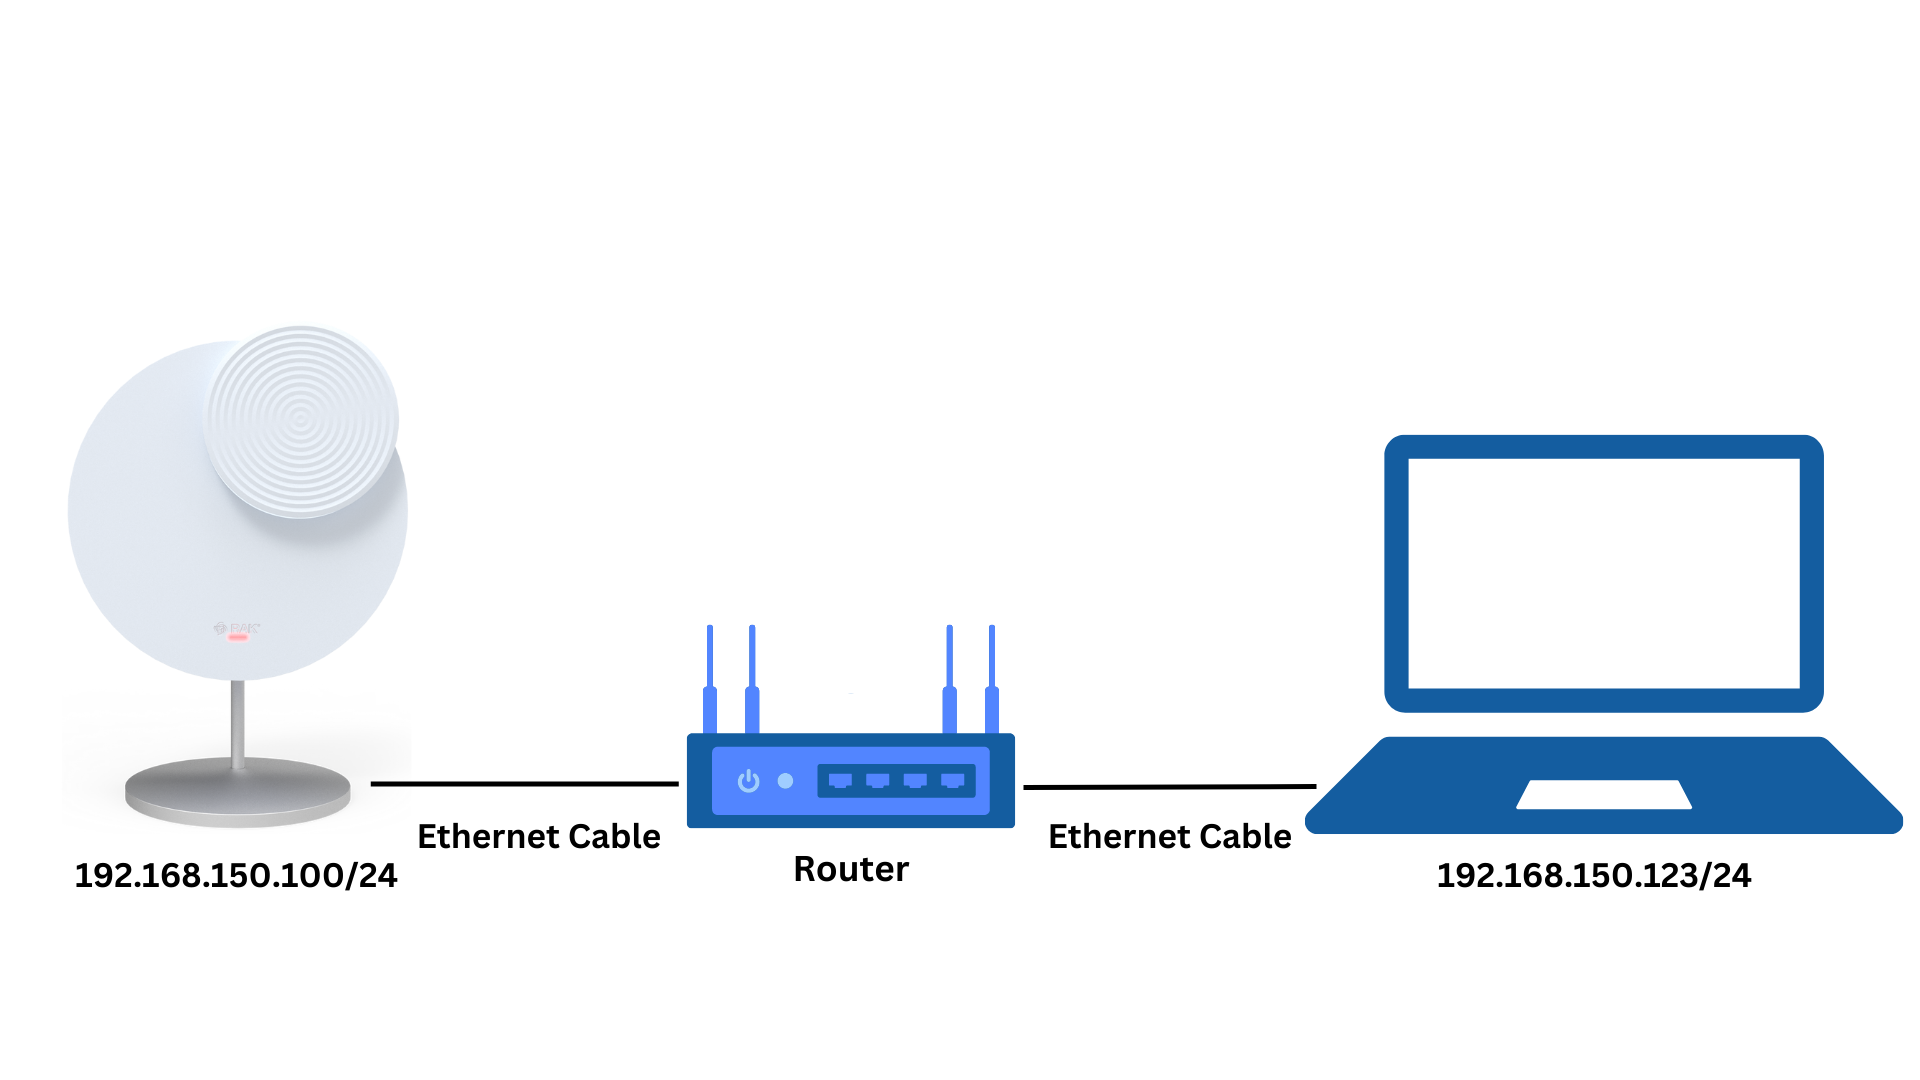 Figure 1: Network connection
If the device is installed with the built-in Magma AGW or Open5GS, the CM4's static IP address has changed to 192.168.151.100/24, then you need to configure the PC or laptop's IP to 192.168.151.0/24 to access to CM4.
2. SSH Login
SSH Login to M310/M320 CM4 module. RAK M310 & M320 AGW can be SSH to using the commands below with a default password: rakwireless.
customer$ ssh magma@192.168.150.100
Disable 4G on M320
RAK M320 is integrated with a 4G eNodeB and a 5G gNodeB. If you want 5G gNodeB only, execute the following steps:
- Log in to eNodeB's local web via
https://192.168.150.1. - Navigate to the Quick Setting page.
- Scroll down to the Cell Quick Setting, then set the RF Status to OFF.
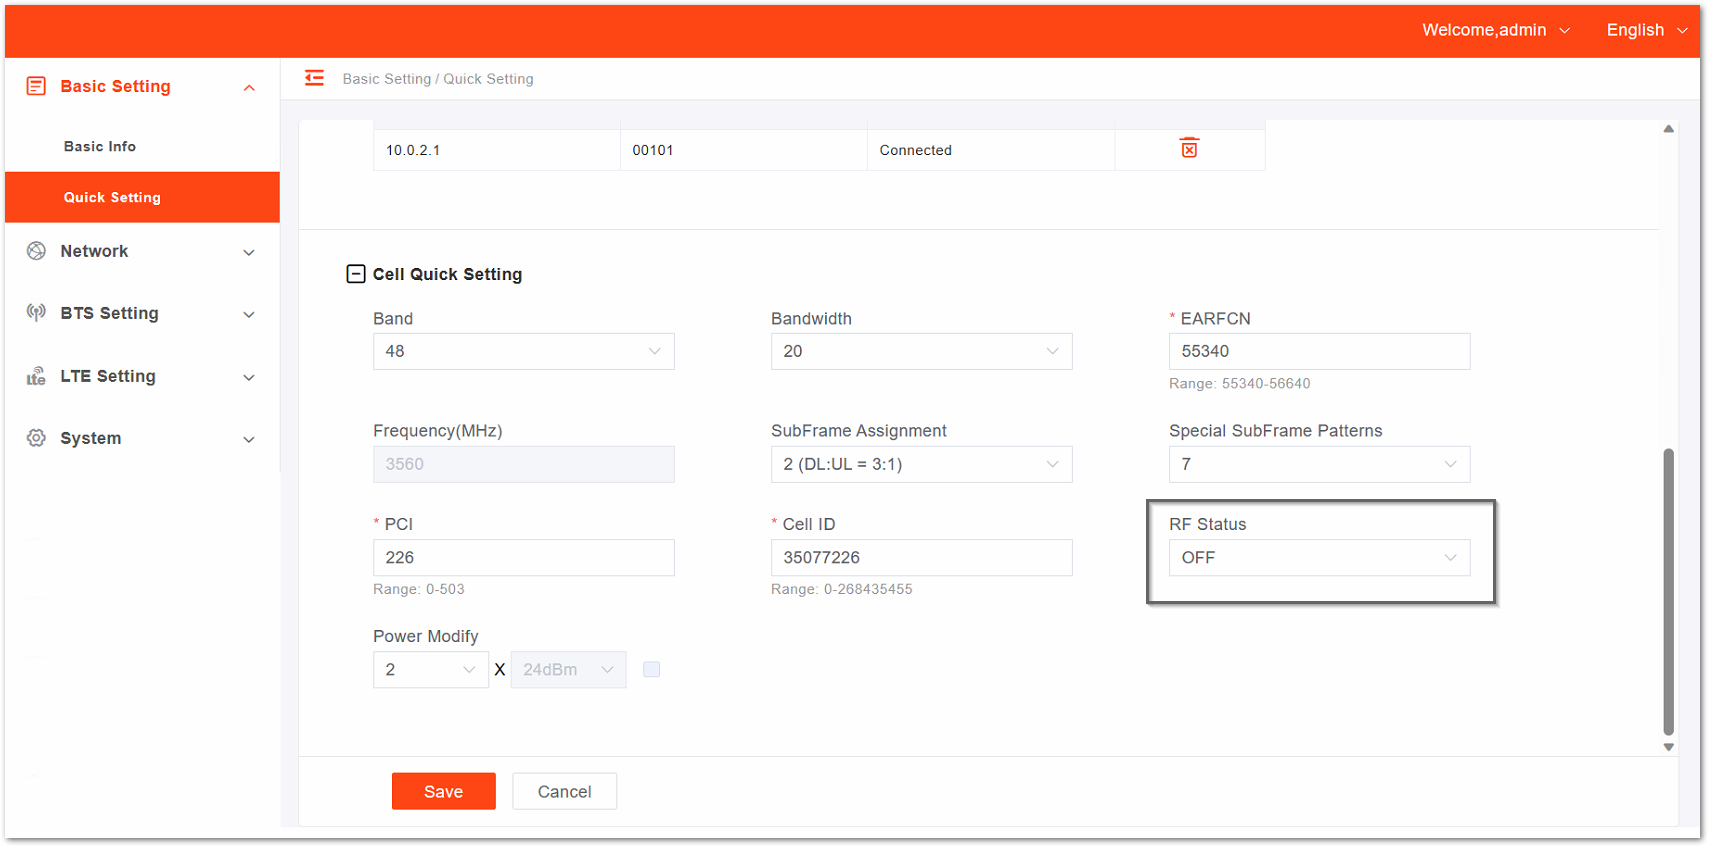 Figure 1: Disable 4G
- After that, click Save to save the configuration.
Mobile Phone Access to Network
Using your own EPC or 5GC:
You should insert SIM cards managed by yourself into the mobile phones and other end devices, whether configuring the phones or devices to access the network depends on your requirements.
Using RAK M310/M320 built-in Magma AGW or Open5GS:
Before mobile phones or other devices access the network, it is required to insert the SIM cards provided by RAK into mobile phones or other end devices, and add an APN named with the internet, and select the network 00101 at the first access.
