RAKDAP1 Flash and Debug Tool Quick Start Guide
Installation
As mentioned, RAKDAP1 is an SWD flash and debug tool that runs DAPLink to connect your RAKwireless product to your computer. It has an easy to use command line interface and supports the leading industry standard tool chains to program and debug the target system.
The following are the supported tools:
- pyOCD
- IAR Workbench
- Keil MDK
To use it, the open-source pyOCD Python SW is required. If you have already installed Python 3 on your computer, you can proceed to Installation of pyOCD.
Python 3 Installation
Before anything else, it requires you to install Python 3 on your computer. Download the latest Python 3 from the official Python website. Go to their Python Downloads and choose an installer depending on your system.
Windows
- Choose the python installer for Windows.
- Once downloaded, start the installation process.
- Make sure to check the
Add python.exe to PATH. Otherwise, you will have to add it manually later.
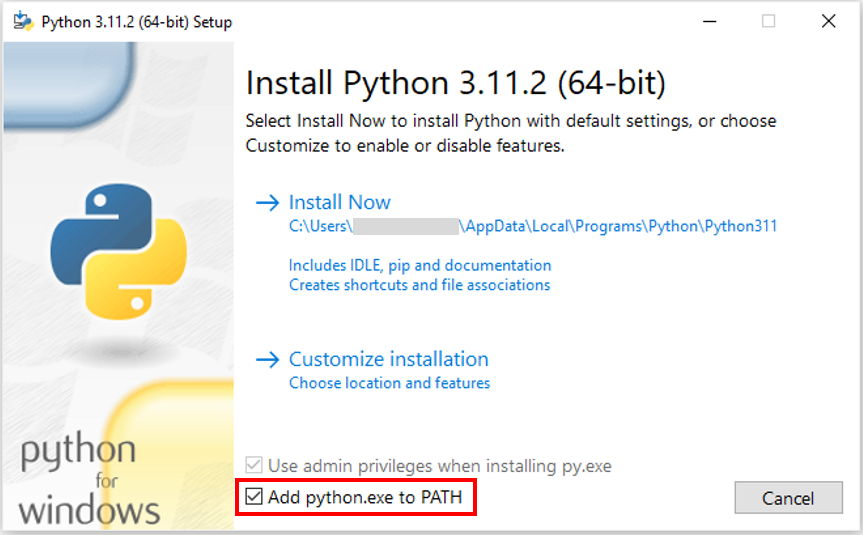 Figure 1: Installing Python for Windows
- Wait until the installation is finished.
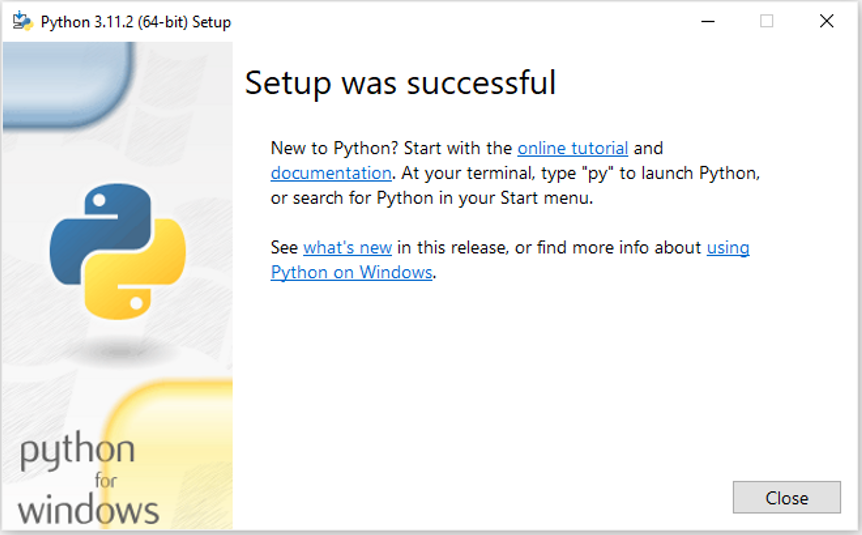 Figure 1: Disable the Path Limit
- After the installation has finished, open a command prompt window and check the versions of Python and pip3 using the following command listed below.
python --version
pip --version
 Figure 1: Checking the Python and pip3 versions
pip3 is required to install additional Python packages.
MacOS
Open the terminal on your Mac machine and type the following commands:
ruby -e $(curl -fsSL https://raw.githubusercontent.com/Homebrew/install/master/install.sh)
export PATH="/usr/local/opt/python/libexec/bin:$PATH"
If your macOS is based on Apple M chips, you might need to use this path:
export PATH="/opt/homebrew/opt/python/libexec/bin:$PATH" or export PATH="/opt/homebrew/opt/python@3/libexec/bin:$PATH"
brew install python
python --version
brew install libusb
Linux
Open the terminal on your Linux machine and type the following command:
sudo apt-get install python3
pyOCD Installation
Next step is to install pyOCD which is the SW tool required to flash bootloaders and application SW.
- To start the installation, open the command prompt and use the following command:
pip3 install pyocd
 Figure 1: Installing pyOCD
- After the installation is finished, check the version.
pyocd --version
 Figure 1: pyOCD version
Support Packages Installation
To flash and debug MCU, DAPLink needs support packages. These support packages are MDK files. For more details, you can refer to the supporting list of MDK.
But before installing, check the list first to know the required package for your RAKwireless product.
| MODEL | SUPPORTED PACKAGE |
|---|---|
| RAK3172 Module | stm32wle5 |
| RAK811 Module | stm32l151cb |
| RAK8710 | stm32l151cb |
| RAK4200 Module | stm32l071kb |
| Products using RAK4200 | stm32l071kb |
| RAK4270 Module | stm32l071kb |
| Products using RAK4270 | stm32l071kb |
| RAK7201/7202/7203 | stm32l071kb |
| RAK4600 Module | nrf52 |
| RAK4600 Evaluation Board | nrf52 |
| RAK8212 Board | nrf52 |
| RAK813 Module | nrf52 |
| RAK5010 | nrf52840 |
| RAK4630 | nrf52840 |
| RAK4631 | nrf52840 |
| RAK3401 | nrf52840 |
| RAK4260 Evaluation Board | atsaml21j18a |
| Products using RAK4260 | atsaml21j18a |
| RAK11720 and its variants | AMA3B1KK-KBR |
To install the support package, use the following command:
pyocd pack --i \<PACKAGE\>
For example, if you have RAK4630 module, enter the following command:
pyocd pack --i nrf52840
 Figure 1: Installing NRF52840 into the RAK4630 module
To check installed packages, you can use the command:
pyocd pack -s
Before flashing a new firmware, you can also perform the erase command.
Erasing the flash memory will remove all configured parameters in the modules like factory settings and LoRaWAN parameters (EUIs and keys).
pyocd erase -t \<PACKAGE\> --chip
For example, if you use RAK4630 module, you can use this command:
pyocd erase -t nrf52840 --chip
How to Flash an MCU
Before flashing a firmware or a bootloader for your product, connect it first to the RAKDAP1 SWD interface.
Here is an overview on how to connect the SWD interface. If you cannot find your product in the list, check the product documentation in the RAK Documentation Center.
RAK3172 Module
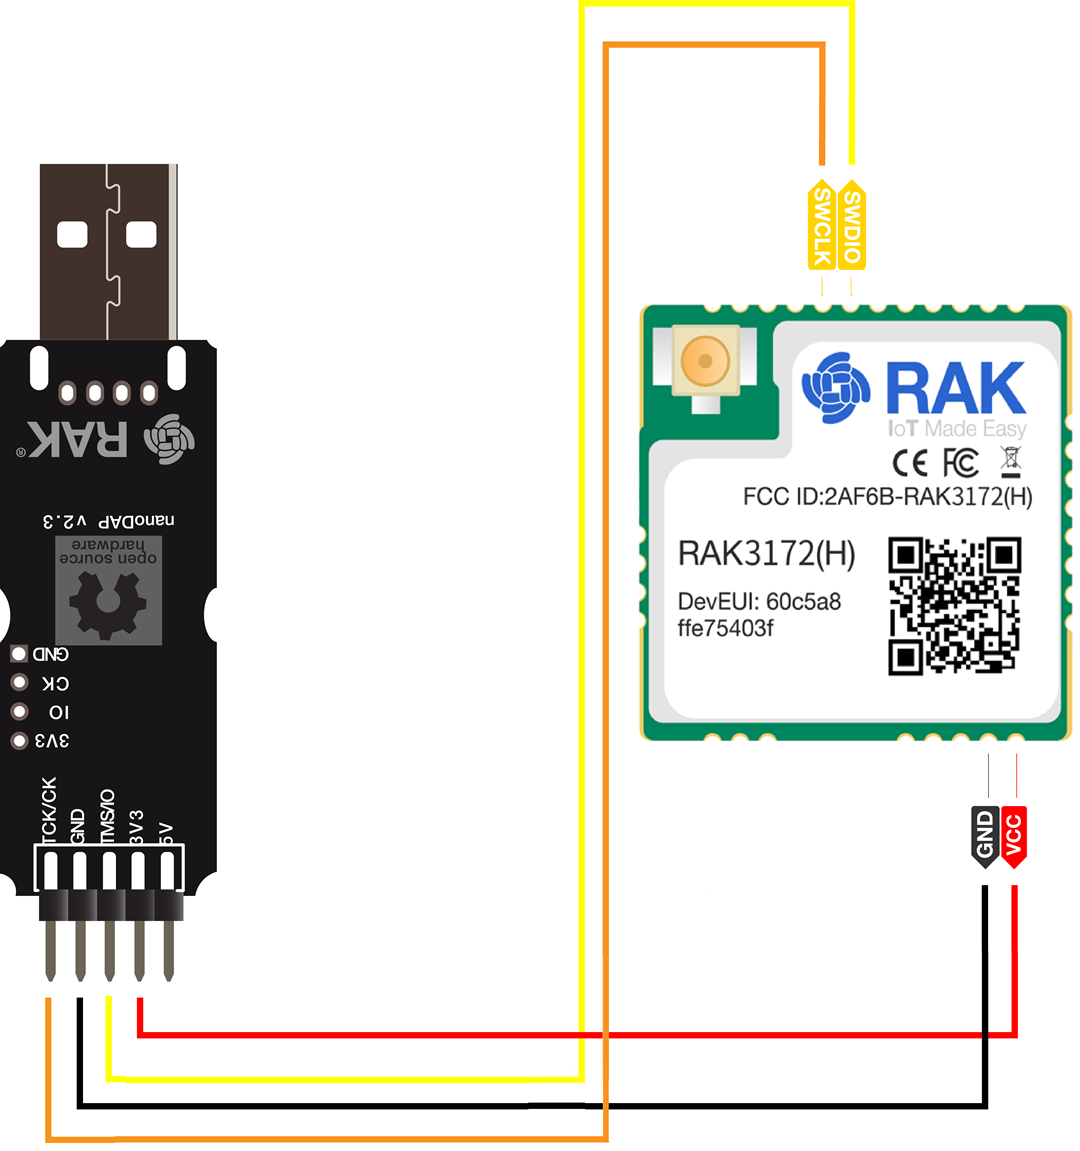 Figure 1: RAK3172 Module Pinout
RAK811 Module
 Figure 1: RAK811 Module Pinout
RAK4200 Module
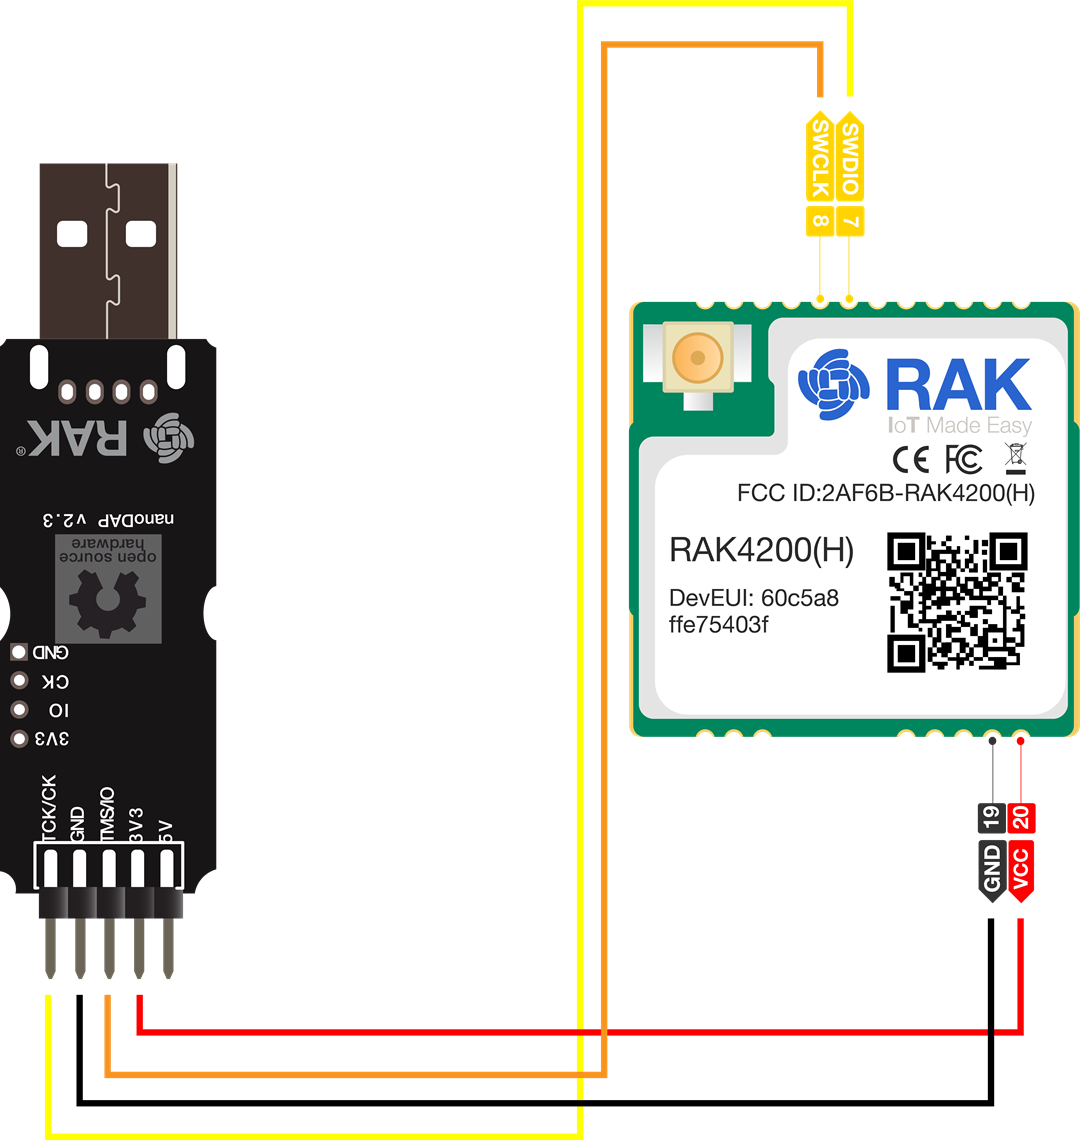 Figure 1: RAK4200 Module Pinout
RAK4600 Module
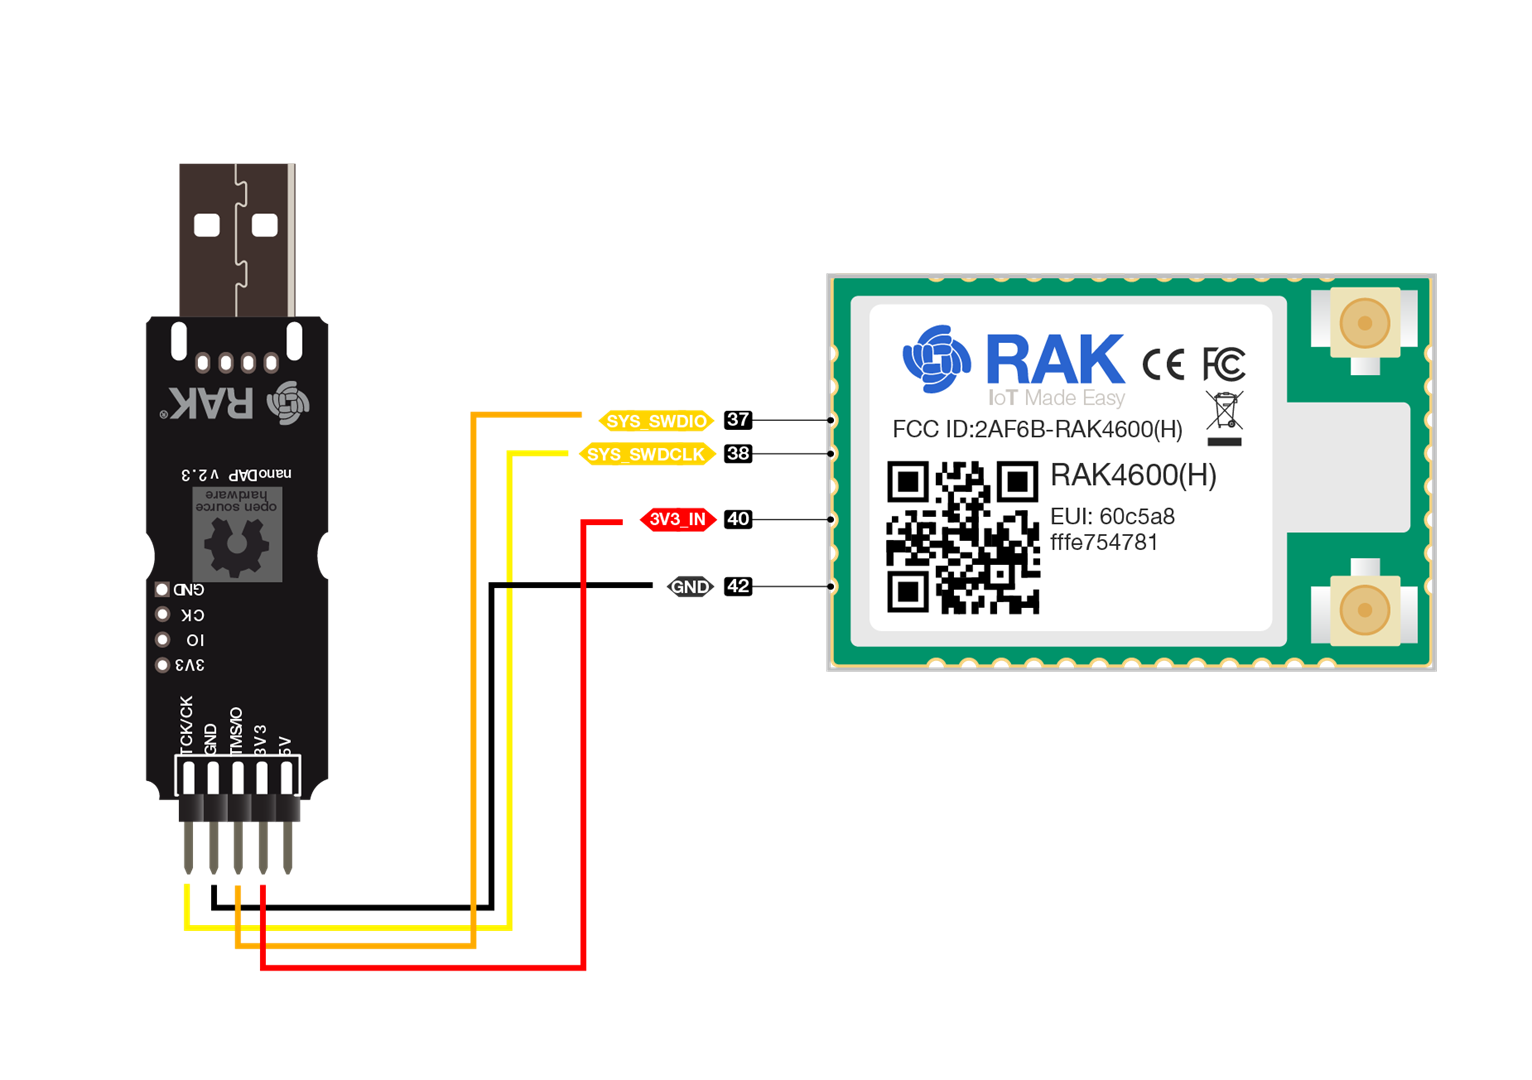 Figure 1: RAK4600 Module Pinout
RAK4270 Module
 Figure 1: RAK4270 Module Pinout
RAK4260 Module
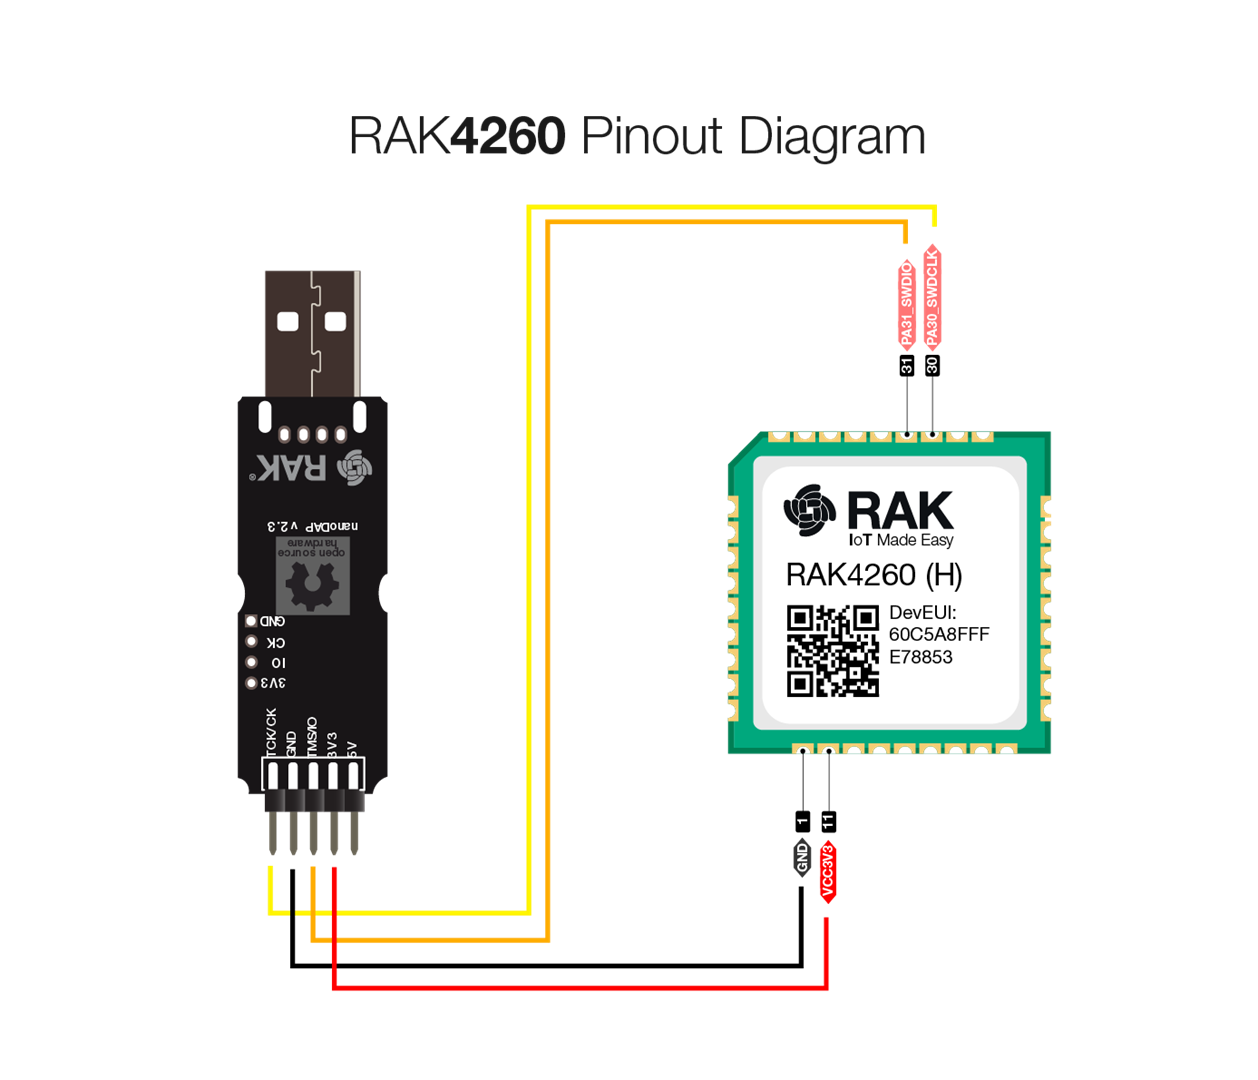 Figure 1: RAK4260 Module Pinout
RAK4260 Evaluation Board
 Figure 1: RAK4260 Evaluation Board Pinout
RAK4600 Evaluation Board
 Figure 1: RAK4600 Evaluation Board Pinout
RAK4630 Module
- For RAK4630 module, it is recommended to include an external DC supply or battery to prevent errors during bootloader flashing.
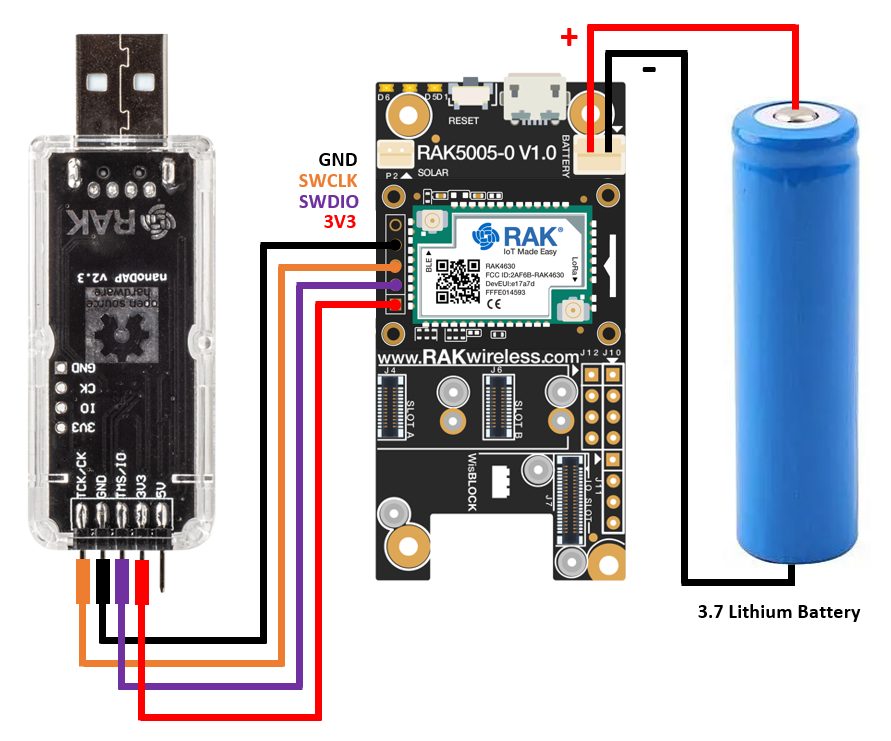 Figure 1: RAK4630 in WisBlock Base
Open the command prompt or terminal, then go to the directory where you saved the firmware file you want to flash using the cd <path> command.
The pyocd command syntax to flash the file is the following:
pyocd flash -t \<PACKAGE\> \<FILENAME\>
- Change <PACKAGE> to the support package from above list.
- Change <FILENAME> to the filename you want to flash. The file should be in .hex format.
Here is an example to flash the bootloader to a RAK4631 WisBlock Core module:
pyocd flash -t nrf52840 RAK4631_latest_final.hex
 Figure 1: Flashing the bootloader into the RAK4630 module
 Figure 1: Flashing bootloader completed