
WisMesh WiFi MQTT Gateway
The WisMesh WiFi MQTT Gateway connects your Meshtastic devices to the cloud, enabling communication with either the Meshtastic MQTT broker or your own MQTT broker. It supports sending sensor data, location information, and text messages.
The WisMesh WiFi MQTT Gateway was updated to WisMesh WiFi MQTT Gateway V2 by replacing the ESP32 Wroover MCU with an ESP32-S3 MCU. This update does not affect the functionality.
The original device featured the WisBlock RAK11200 Core module with Meshtastic firmware, integrated WiFi and BLE, and the RAK13300 LoRa module, all mounted on the RAK19007 Base Board.
With the update to WisMesh WiFi MQTT Gateway V2, the device uses the WisBlock RAK3312 Core module with Meshtastic firmware, integrated WiFi, BLE and a LoRa transceiver.
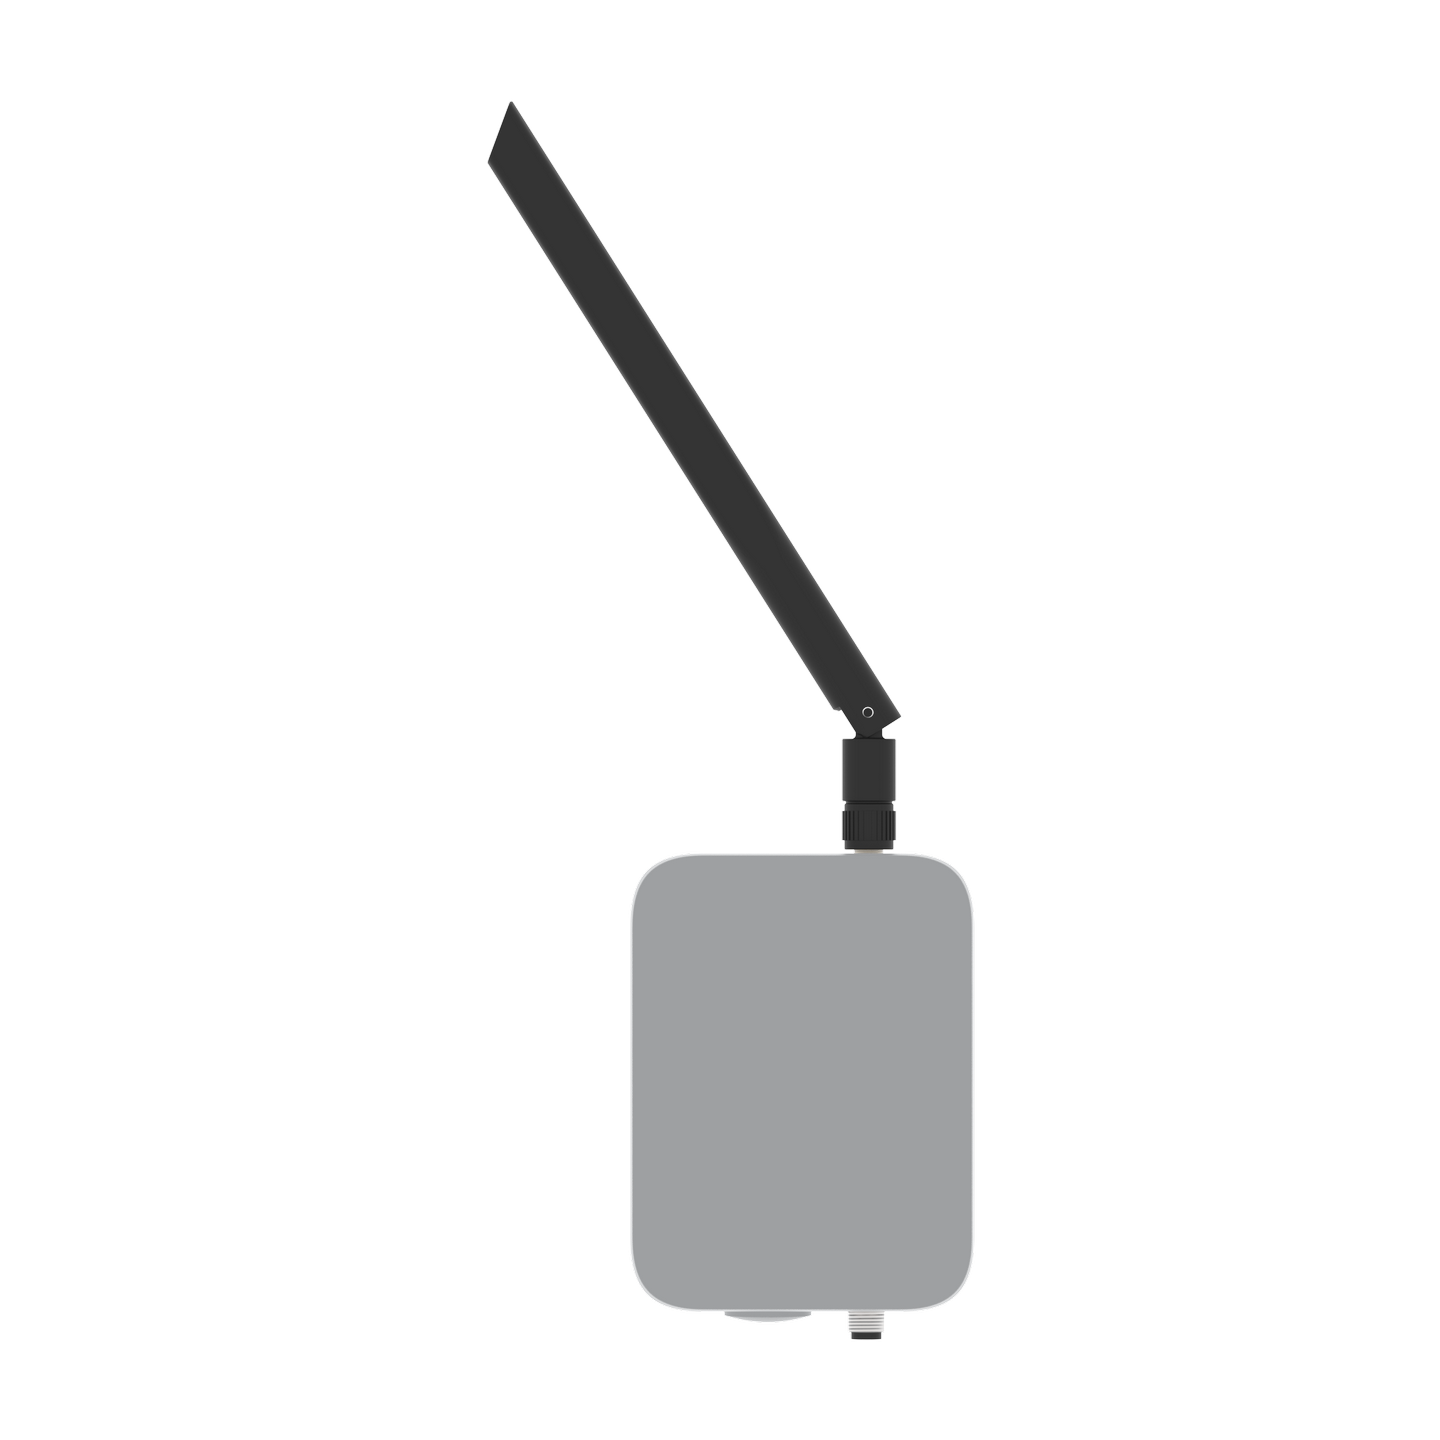 Figure 1: WisMesh WiFi MQTT Gateway V2
The device comes in a Unify 100x75x38 mm enclosure, offering a variety of mounting options.
For more details about the mounting options of the WisMesh WiFi MQTT Gateway, refer to the Unify Enclosure mounting accessories.
This guide covers the basics for RAKwireless Meshtastic devices that are not covered by the Meshtastic documentation.
For detailed instructions on how to configure the devices for the Meshtastic network, follow the Meshtastic Getting Started guide.
You can also refer to the following guides:
To ensure you are running the latest version of the Meshtastic firmware, it is advised to download the latest Meshtastic firmware version and upload it to your RAKwireless device. This ensures compatibility with the Meshtastic network.
For firmware 1.3 and 2.0 (from November 1, 2022), the WisBlock Base board is auto-detected. A special firmware version is required for the WisMesh WiFi MQTT Gateway. Make sure to update the device with the appropriate Meshtastic firmware:
- Meshtastic WiFi MQTT Gateway with RAK11200:
firmware-rak11200-w.x.yy.zzzzzzz.bin - Meshtastic WiFi MQTT Gateway V2 with RAK3312:
firmware-rak3312-w.x.yy.zzzzzzz.bin
Prerequisite
Before going through each and every step on using WisMesh WiFi MQTT Gateway, make sure to prepare the necessary items listed below:
Hardware
Software
The WisBlock Core module of the WisMesh WiFi MQTT Gateway comes pre-flashed with the Meshtastic firmware.
However, to connect the device to the Meshtastic network, it must be configure. The recommended method is using a mobile device via BLE, with one of the following apps:
Alternatively, the WisMesh WiFi MQTT Gateway has an USB connector inside. With the USB connection, you can use either of these configurations:
Make sure to install one of these applications. They are required to configure the device for the Meshtastic network.
To access the USB connector, unscrew the mounting plate inside the enclosure and lift it to reveal the connector.
Product Configuration
Hardware Setup
The WisMesh WiFi MQTT Gateway comes fully assembled. It is also available in the Unify Enclosure IP67 100x75x38 mm.
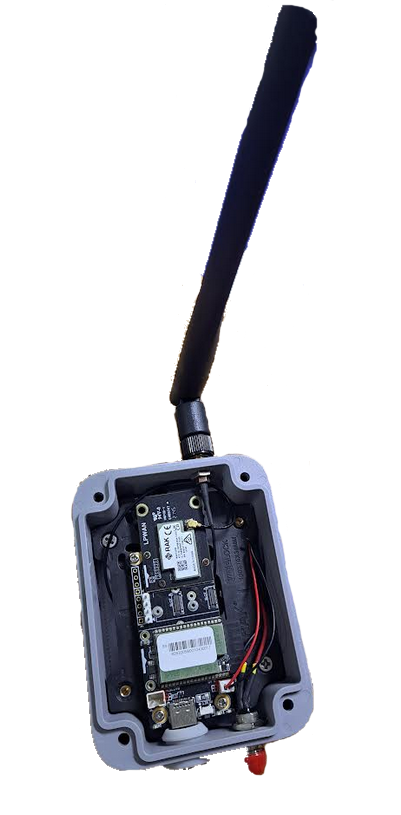 Figure 1: WisMesh WiFi MQTT Gateway in the Unify Enclosure 100x75x38mm
Power Supply
The WisMesh WiFi MQTT Gateway supports two power supply options:
1. USB connector
To power the device via USB, connect it to a wall adapter or a similar power source using a USB-C cable. The power source must provide 5 V and 1.5 A.
When using the USB connector for power supply, the enclosure is no longer waterproof.
2. 5-pin M8 connector
The enclosure features a waterproof 5-pin connector, allowing the device to be powered from any 5 V, 1.5 A power supply. To supply through the M8 connector, use the included cable stub and connect the red and black wires to the power source.
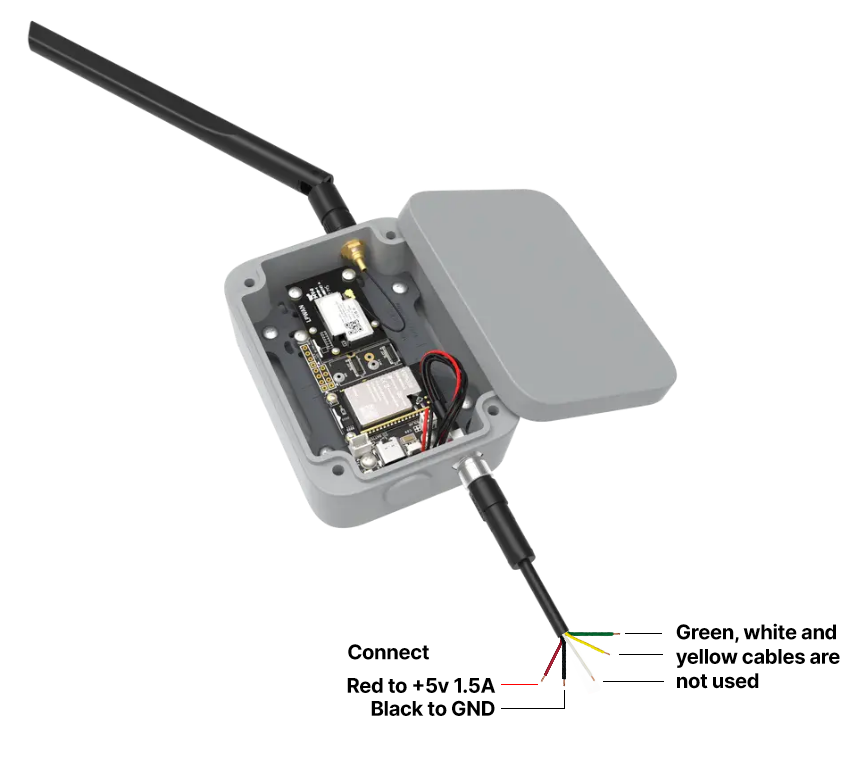 Figure 1: WisMesh WiFi MQTT Gateway M8 power supply connection
Antennas
The WisMesh WiFi MQTT Gateway comes with:
- A PCB BLE antenna
- An external LoRa antenna
Ensure both antennas are properly connected before powering on the device.
Software Setup
To ensure you are running the latest version of the Meshtastic firmware, it is advised to download the latest Meshtastic firmware and upload it to your RAKwireless device to make it compatible with the Meshtastic network.
For Firmware 1.3 and 2.0 (from November 1, 2022), the WisBlock Base board is auto-detected. Besides JSON output to the MQTT broker, there's a special firmware for the WisMesh WiFi MQTT Gateway. Make sure to update the device with this specific Meshtastic firmware.
- Meshtastic WiFi MQTT Gateway with RAK11200:
firmware-rak11200-w.x.yy.zzzzzzz.bin - Meshtastic WiFi MQTT Gateway V2 with RAK3312:
firmware-rak3312-w.x.yy.zzzzzzz.bin
The WisMesh WiFi MQTT Gateway comes pre-flashed with the Meshtastic firmware. If problems occur, update the Meshtastic firmware to the latest version.
- Guide to flash ESP32 devices. (link goes to Meshtastic.org)
To set up the WisMesh WiFi MQTT Gateway for the Meshtastic network, follow the configuration guide in the Meshtastic documentation.
Tutorial - Meshtastic MQTT Gateway Setup
Device Setup
The Meshtastic MQTT Gateway comes pre-flashed with Meshtastic firmware, but its device setup differs from other Meshtastic nodes.
To set up the device, connect the Meshtastic Gateway by selecting it on the Meshtastic app.
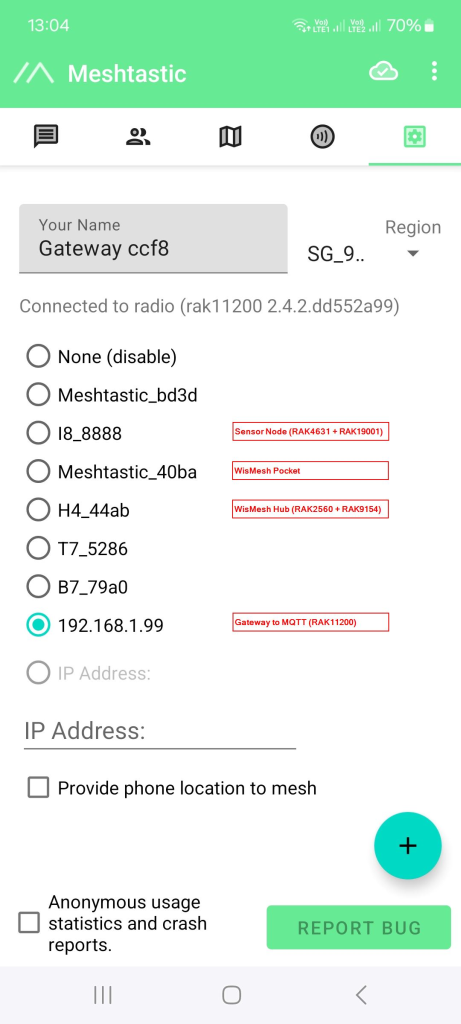 Figure 1: WisMesh devices in the Meshtastic Mobile App
- Set all devices to the same Region and Channel.
- The gateway does not include a GNSS module, so only a FIXED position can be set.
- If required, a RAK12501 GNSS module can be added to sensor Slot A.
 Figure 1: Setup fixed location
Gateway Connections
- Connect the gateway to the internet. In this case, the RAK3312 or RAK11200 with its built-in WiFi will be used.
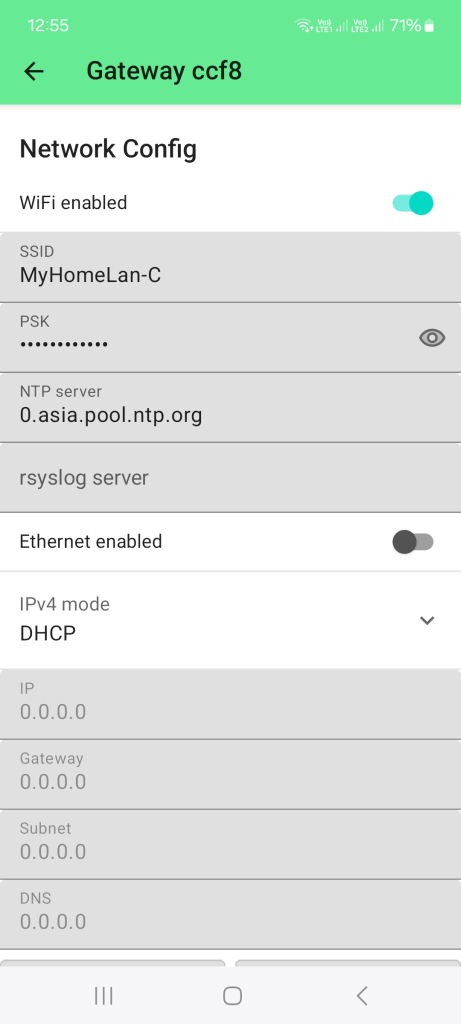 Figure 1: WiFi setup
Below are the options for connecting the gateway through WiFi:
- For this setup, connect the device via BLE, then configure the WiFi credentials.
- Alternatively, configure via USB using the Meshtastic Web GUI or command-line utility.
Once connected to the WiFi network, the device's IP address will be shown in the device list.
- Set up the connection to the MQTT broker.
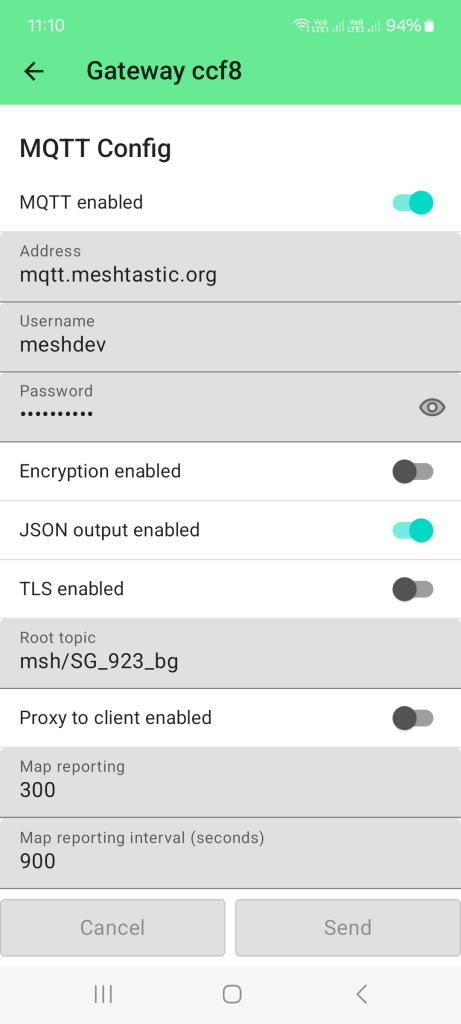 Figure 1: MQTT setup
- The MQTT broker used here is the free MQTT broker provided by Meshtastic. You can find the URL, address, username, and password in the Meshtastic documentation.
- To make parsing of the data easier, enable the JSON output.
- To avoid too much traffic, create a custom root topic. If the root topic already existed, it will be more difficult to filter out the devices later at your end.
- If you prefer to see the devices on the public Meshtastic maps (e.g. MeshMap.net), enable Map reporting and set a Map reporting interval.
A more comprehensive guide for the Meshtastic Gateway can be found in the Meshtastic-Sensor-Network PoC. This includes setting up multiple sensor nodes, retrieving the sensor data from the MQTT broker, and visualizing the data in Grafana.