Getting Started
This document is about RUI V2. The development of this framework is already discontinued. RUI V2 is only compatible to old modules RAK811, RAK4200, RAK4600, and RAK4270.
RUI3 is the new version of RAKwireless Unified Interface and primarily supports RAK3172, RAK3172-SiP, and RAK4630. RUI3 is not compatible to old RAK modules.
Overview
RAKwireless is a leading provider of low-power, wide-area Internet of Things (IoT) solutions in the industry. It provides from basic modules to complex but modular solutions for the IoT, smart city, and smart agriculture sectors.
In the field of LoRa communication, RAKwireless has launched RAK811, RAK4200, RAK4270, RAK4600, and other communication modules with LoRaWAN and Lora P2P functions.
RAK's LoRaWAN node modules support not only out-of-the-box integration through the use of traditional AT commands, but also allows users to customize the firmware and access to the functionalities of the internal MCU. Users can adapt and extend the logic in the firmware to meet the requirements of their own solution.
This document is aimed at developers who are familiar with the hardware of the RAK LoRaWAN module but want to extend its functionalities through customized versions of the firmware. In the following sections, the concept of the RAKwireless Unified Interface (RUI) API is introduced and explanations about how to extend the existing functionalities of the modules are provided.
Currently, the supported LoRaWAN modules are:
- RAK811 LoRaWAN module
- RAK4200 LoRaWAN module
- RAK4270 LoRaWAN module
- RAK4600 LoRaWAN module
- Other complex modules that have the above modules inside, such as, RAK5205, RAK7204, etc.
The content of this document applies to modules with firmware version 3.x.x.14 and above. If it is lower than this version, refer to this document: RUI LoRaWAN OpenMCU Development Guide.
RUI Customized Development
RAKwireless Unified Interface (RUI) is the standard interface defined to simplify the firmware development for the ecosystem of the hardware of RAK. RUI defines an API that abstracts the complexity of the hardware layer. Through the RUI API, customers can control all the functionalities of the module without the need to deal with the complexity of low-level hardware protocols such as SPI, I2C, etc.
RUI Framework
As shown in Figure 1, a firmware based on the RUI comprises two parts: the RUI SDK and the application.
The SDK is the core of RUI. It was developed to support multiple types of the RAK's LoRaWAN modules. The complexity of the hardware is hidden and abstracted in this layer in order to expose a unified RUI API interface to simplify the development of the application layer. The application layer should contain the implementation of the business logic of the customized solution.
For the purpose and usage of RUI API, refer to the RUI API Reference Manual.
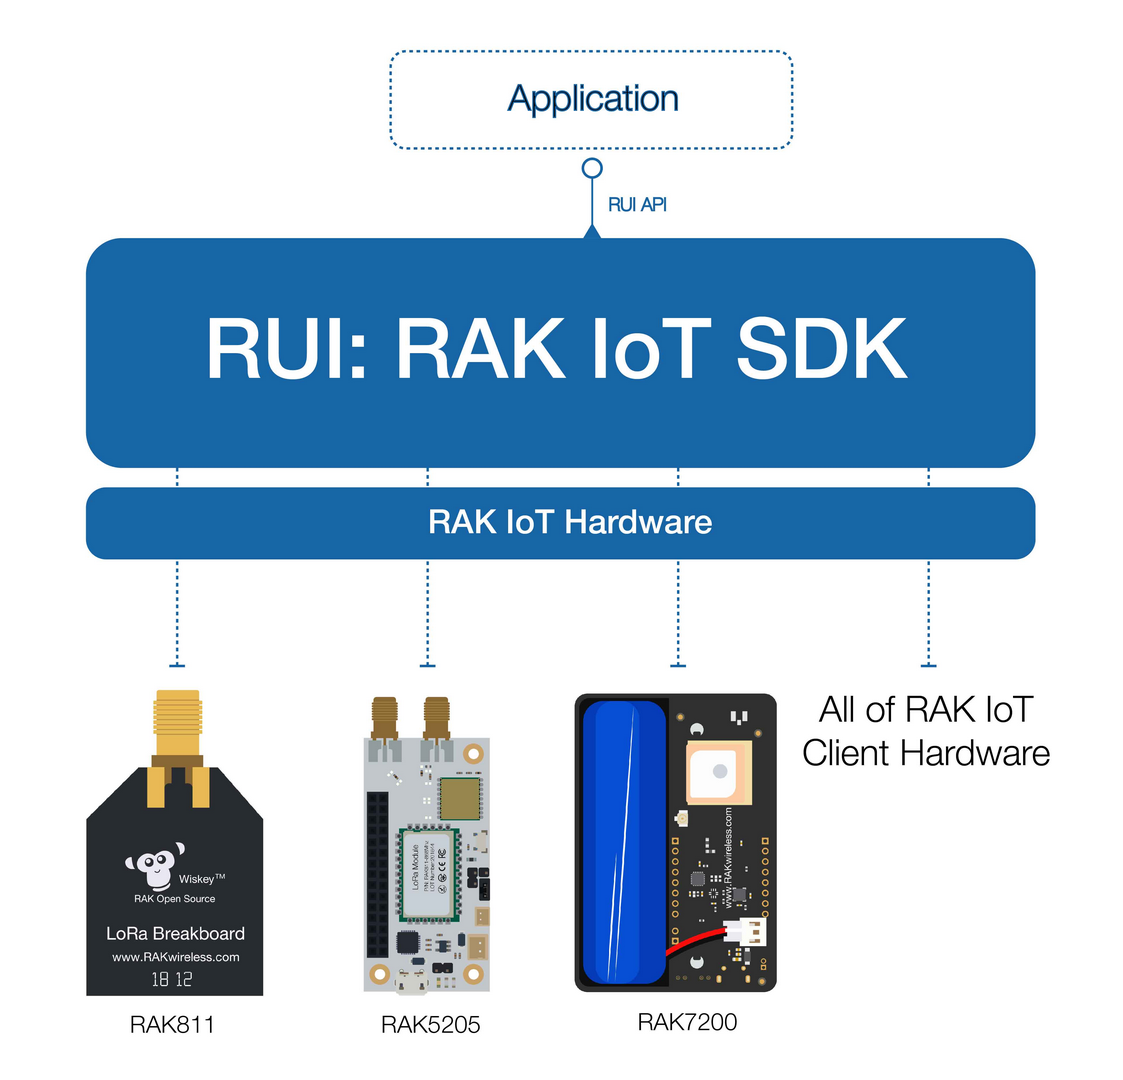 Figure 1: The RUI SDK
The application is open-sourced. Users can take the existing application code provided by RAK as a reference and extend it according to their business requirements.
The RUI SDK layer is not open-sourced. These libraries are available through the RUI Online Compiler. Once users have finalized their application code, they can make use of the RUI Online Compiler to generate the final firmware. The output binary will contain the RUI SDK and the application code ready to be loaded into the target module.
API Usage
The RUI SDK is not only for the external users, inside RAK, the development teams also make use of RUI SDK to implement and maintain efficiently the official version of firmware for all the LoRaWAN modules and products. RAK has published the application code of the official firmware at Github. Users can take them as a reference, not only to understand how to use the API but also to extend it for the customers’ final solutions. Beside the official application code, RAK also makes available sample codes of typical solutions based on the RAK LoRaWAN modules.
You can find the RAK’s repository in Github in this URL: https://github.com/RAKWireless/Products_practice_based_on_RUI_v2.0
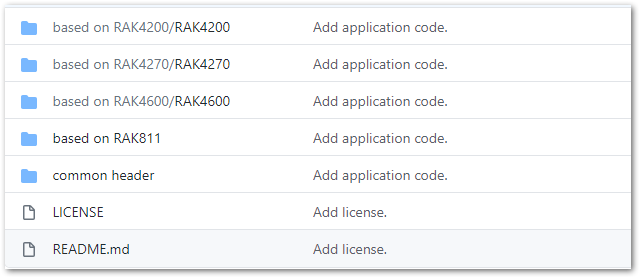 Figure 1: RAK’s Github repository
As shown in Figure 2, the code repository is classified according to the model of the core module. Specific sample codes can be found inside of the directory of the corresponding core module.
Taking the RAK811 module as an example. After entering into the "base on RAK811" directory, as shown in Figure 3, examples of application code based on the RAK811 module can be found. Some show how to control peripherals and sensors, others are the actual official firmware of products based on the RAK811 module.
 Figure 1: RAK’s Github, sample code
In Figure 3, the "RAK5205" directory contains the application source code corresponding to the official firmware of RAK5205. The RAK5205 is based on the RAK811 module, adding the environmental monitoring sensor (BME680), a three-axis acceleration sensor (lis3dh), and GPS module (Ublox Max 7q). The code example in this directory shows how to connect other sensors through I2C and GPS module through UART based on RAK811 module and complete the development of customized firmware through the RUI API.
The “RAK7204 " directory contains the application source code corresponding to the official firmware of RAK7204, an indoor environmental IoT product which including the sensor driver, AT command implementation, application logic processing, etc. In this implementation, quite a lot of RUI APIs are used. RAK7204 is based on the RAK811 module, and an environmental monitoring sensor (BME680) is added. Therefore, you can learn how to add an I2C sensor based on the RAK811 module through the product practice code, and quickly complete the development of customized firmware through the call of RUI API. For example, "app_7204.c ", see Figure 4, is the implementation of application logic processing. If you want to customize the application logic, you can focus on the code inside to understand the actual usage of RUI API.
The “RAK811" is the application code corresponding to the official firmware of the RAK811 module.
Application Development
These sample codes on RAK’s Github repository are actually complete applications. For example, the RAK7204 example code described earlier is shown in Figure 4.
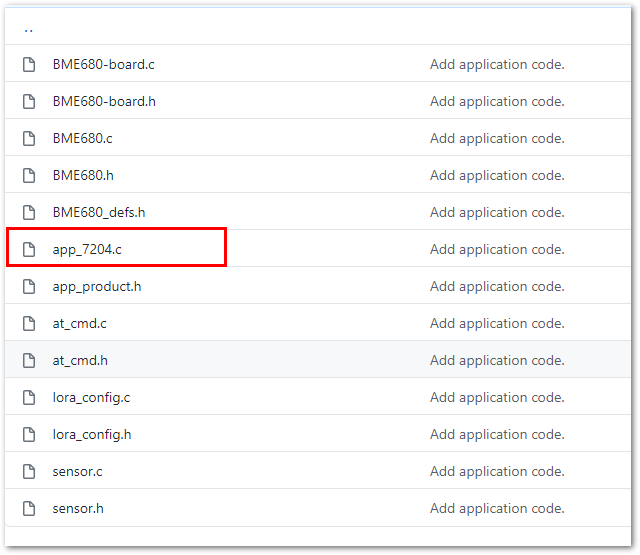 Figure 1: RAK’s Github, RAK7204 sample code
For instance, Once the node received a LoRaWAN downlink data, it only prints the data out through the serial port without actually doing any action. Below is the snippet of the callback from the app_7204.c file:
void LoRaReceive_callback(RUI_RECEIVE_T* Receive_datapackage)
{
  char hex_str[3] = {0};
  RUI_LOG_PRINTF("at+recv=%d,%d,%d,%d", Receive_datapackage->Port, Receive_datapackage->Rssi, Receive_datapackage->Snr, Receive_datapackage->BufferSize);

  if ((Receive_datapackage->Buffer != NULL) && Receive_datapackage->BufferSize) {
    RUI_LOG_PRINTF(':');
    for (int i = 0; i < Receive_datapackage->BufferSize; i++) {
      sprintf(hex_str, "%02x", Receive_datapackage->Buffer[i]);
      RUI_LOG_PRINTF('%s", hex_str);
    }
  }
  RUI_LOG_PRINTF('/r/n");
}
Within this callback, customers can add their logic here and control a peripheral of RAK811 according to the content of the downlink data.
Compile Application
After the customized an application code, you can use the RUI Online Compiler to generate the binaries. During the compilation (actually compilation and linking), the Online Compiler will automatically link the application with the libraries of RUI SDK together to output the final customized firmware. For specific usage, refer to section 3, the online compilation platform.
Download Firmware
Once the binary file is generated from the previous step, it has to be burned into the flash memory of the target modules. RAK has provided a “Firmware Update Tool”, which simplifies this process. The tool can be download from this URL:
- Device Firmware Upgrade Tool for Windows
- Device Firmware Upgrade Tool for MacOS
- Device Firmware Upgrade Tool for Ubuntu
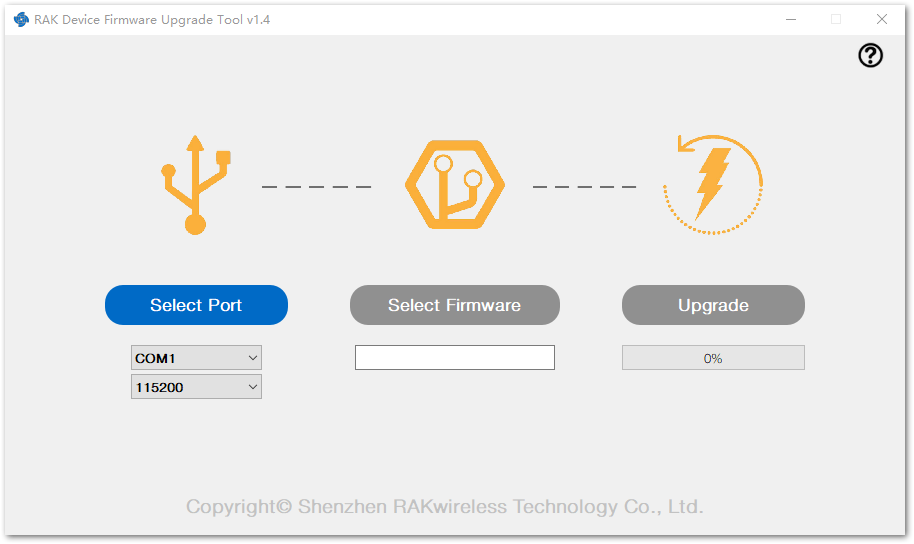 Figure 1: RAK Firmware Upgrade Tool.
As shown in Figure 5, the firmware update process is as simple as choosing the right serial port, select the binary file, and execute the update to the target module. This process should take less than one minute.
RUI Online Compiler Platform
This section describes how to compile customized firmware using the RUI Online Compiler’s platform.
Register and Sign in
Go to build.rakwireless.com to access the beta version of the RUI Online Compiler.
- Open the login interface of the RUI Online Compiler platform as shown in Figure 6. For the first time, you need to register an account.
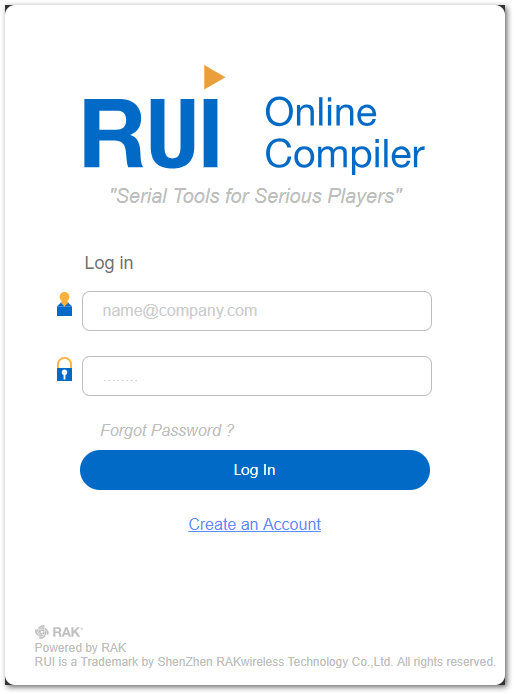 Figure 1: Login into RUI Online Compiler platform.
- Click the “Create an Account” link in this interface to register an account. As shown in Figure 7, an email and a password will be required. Hit the “Get verification code” button to receive a code in your email and input in the form. Once that is done, click on the “Create an Account” button to finalize the operation. After activation, you can log into the platform.
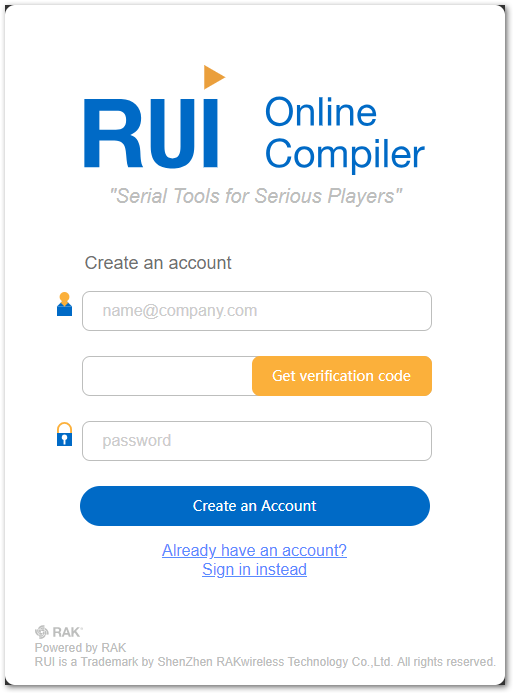 Figure 1: Create a new account in the RUI Online Compiler platform
Code Compilation
- After logging in to the platform, as shown in Figure 8, you need to select first the model of the target module.
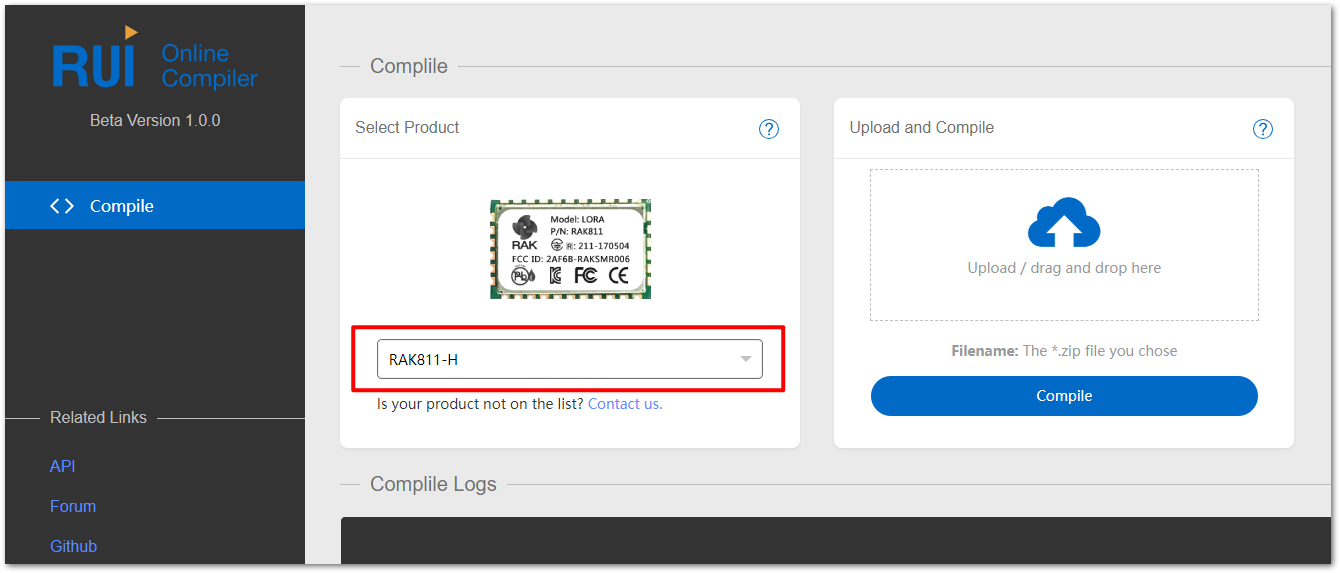 Figure 1: Online Compiler platform.
- The application code can be customized in any text editor. Once it is ready, they must be compressed into a ZIP format as shown in Figure 9.
Only the files are required, avoid creating a parent directory. Then the packaged application code is uploaded to the platform for compilation.
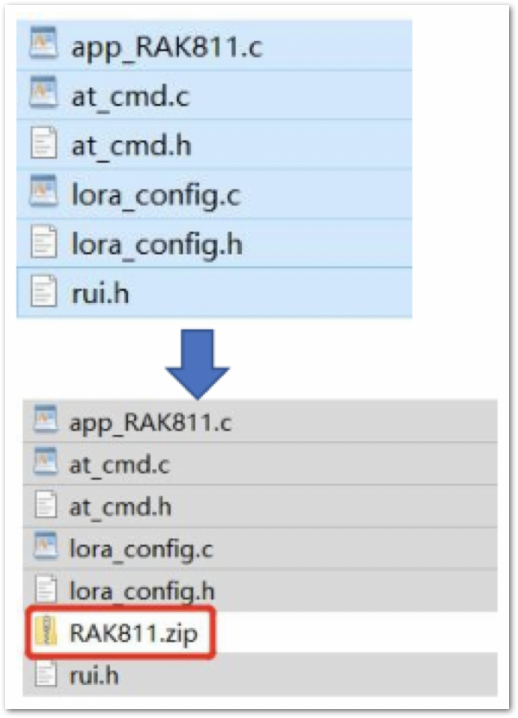 Figure 1: Compress the application code into a ZIP file.
- The compilation progress will be displayed in real-time during compilation. If there are syntax errors, the output information will be displayed. If the compilation is successful, the final binary file can be downloaded to the local file system. Then make download the customized firmware into the target module by using the Firmware Upgrade Tool, as explained in the Download Firmware section.
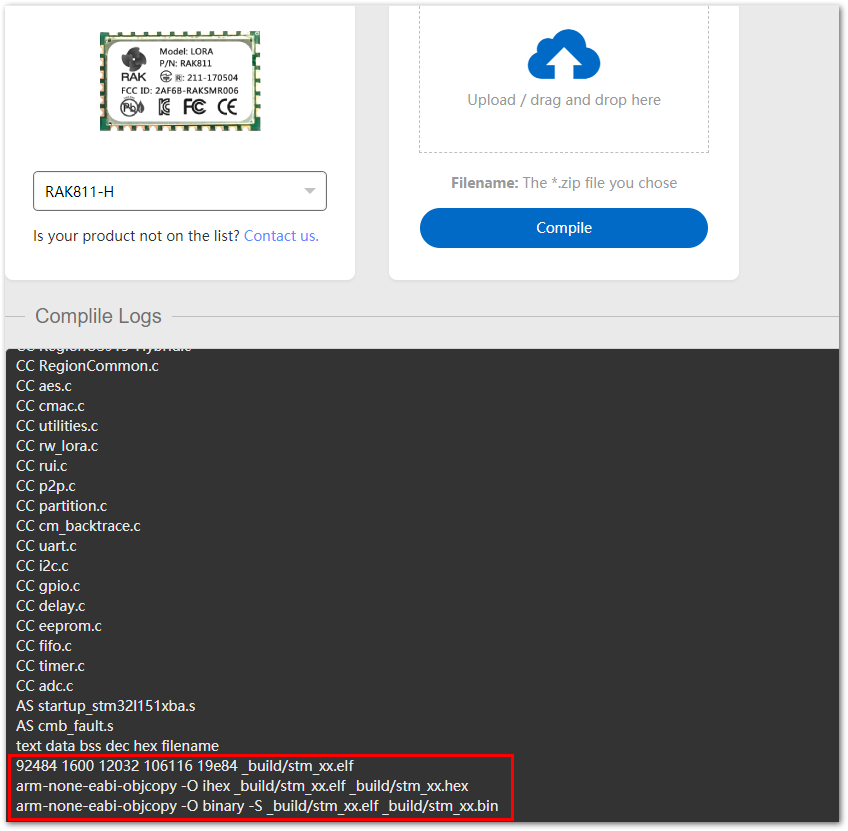 Figure 1: Compilation finished successfully
Upload Prebuilt Static Libraries
Besides c and h files, online compiler also supports prebuilt static libraries. It supports only three (3) kinds of static libraries:
- Compiled by GNU toolchain
- Compiled by ARM compiler 5
- Compiled ARM compiler 6
However, different products use different MCU, so instruction set architecture will be different:
- RAK4200/RAK4270: ARM Cortex M0
- RAK811: ARM Cortex M3
- RAK8212/RAK5010/RAK4600: ARM Cortex M4 with hardware floating-point unit conforming to the VFPv4-D16 architecture
When you build your static libraries, you need to use the following corresponding compiler arguments for different products:
- GNU toolchain
- ARM Cortex M0
- -mcpu=cortex-m0
For example:
# arm-none-eabi-gcc -mcpu=cortex-m0 -c ./myutil.c
# arm-none-eabi-ar rcs ./libmyutil.cm0.a ./myutil.o
- ARM Cortex M3
- -mcpu=cortex-m3
For example:
# arm-none-eabi-gcc -mcpu=cortex-m3 -c ./myutil.c
# arm-none-eabi-ar rcs ./libmyutil.cm3.a ./myutil.o
- ARM Cortex M4 with hardware floating-point unit conforming to the VFPv4-D16 architecture
- -mcpu=cortex-m4 -mfloat-abi=hard -mfpu=fpv4-sp-d16
For example:
# arm-none-eabi-gcc -mcpu=cortex-m4 -mfloat-abi=hard -mfpu=fpv4-sp-d16 -c ./myutil.c
# arm-none-eabi-ar rcs ./libmyutil.cm4_hard_float.a ./myutil.o
- ARM compiler 5
- ARM Cortex M0
- --cpu=Cortex-M0 --gnu --library_interface=aeabi_glibc
For example:
> armcc.exe --cpu=Cortex-M0 --gnu --library_interface=aeabi_glibc -c myutil.c
> armlink.exe --elf myutil.o --output myutil.axf
> armar.exe --create libmyutil.win_armcc.cm0.a myutil.axf
- ARM Cortex M3
- --cpu=Cortex-M3 --gnu --library_interface=aeabi_glibc
For example:
> armcc.exe --cpu=Cortex-M3 --gnu --library_interface=aeabi_glibc -c myutil.c
> armlink.exe --elf myutil.o --output myutil.axf
> armar.exe --create libmyutil.win_armcc.cm3.a myutil.axf
- ARM Cortex M4 with hardware floating-point unit conforming to the VFPv4-D16 architecture
- --cpu=Cortex-M4 --fpu=vfpv4_d16 --gnu --library_interface=aeabi_glibc
For example:
> armcc.exe --cpu=Cortex-M4 --fpu=vfpv4_d16 --gnu --library_interface=aeabi_glibc -c myutil.c
> armlink.exe --elf myutil.o --output myutil.axf
> armar.exe --create libmyutil.win_armcc.cm4_hard_float.a myutil.axf
- ARM compiler 6
- ARM Cortex M0
- --target=arm-arm-none-eabi -mcpu=Cortex-M0 -fgnu
For example:
> armclang.exe --target=arm-arm-none-eabi -mcpu=Cortex-M0 -fgnu -c myutil.c
> armlink.exe --elf myutil.o --output myutil.axf
> armar.exe --create libmyutil.win_armclang.cm0.a myutil.axf
- ARM Cortex M3
- --target=arm-arm-none-eabi -mcpu=Cortex-M3 -fgnu
For example:
> armclang.exe --target=arm-arm-none-eabi -mcpu=Cortex-M3 -fgnu -c myutil.c
> armlink.exe --elf myutil.o --output myutil.axf
> armar.exe --create libmyutil.win_armclang.cm3.a myutil.axf
- ARM Cortex M4 with hardware floating-point unit conforming to the VFPv4-D16 architecture
- --target=arm-arm-none-eabi -mcpu=Cortex-M4 -mfpu=vfpv4-d16 -fgnu
For example:
> armclang.exe --target=arm-arm-none-eabi -mcpu=Cortex-M4 -mfpu=vfpv4-d16 -fgnu -c myutil.c
> armlink.exe --elf myutil.o --output myutil.axf
> armar.exe --create libmyutil.win_armclang.cm4_hard_float.a myutil.axf
