BACnet Gateway
Overview
The BACnet Gateway extension enables seamless integration between LoRaWAN® end devices and BACnet/IP systems.
It provides bidirectional data exchange, device monitoring, and control capabilities for building automation, smart facilities, and industrial environments.
This extension allows LoRaWAN devices to be represented as BACnet objects, making it easy to integrate wireless sensors into existing building management systems (BMS).
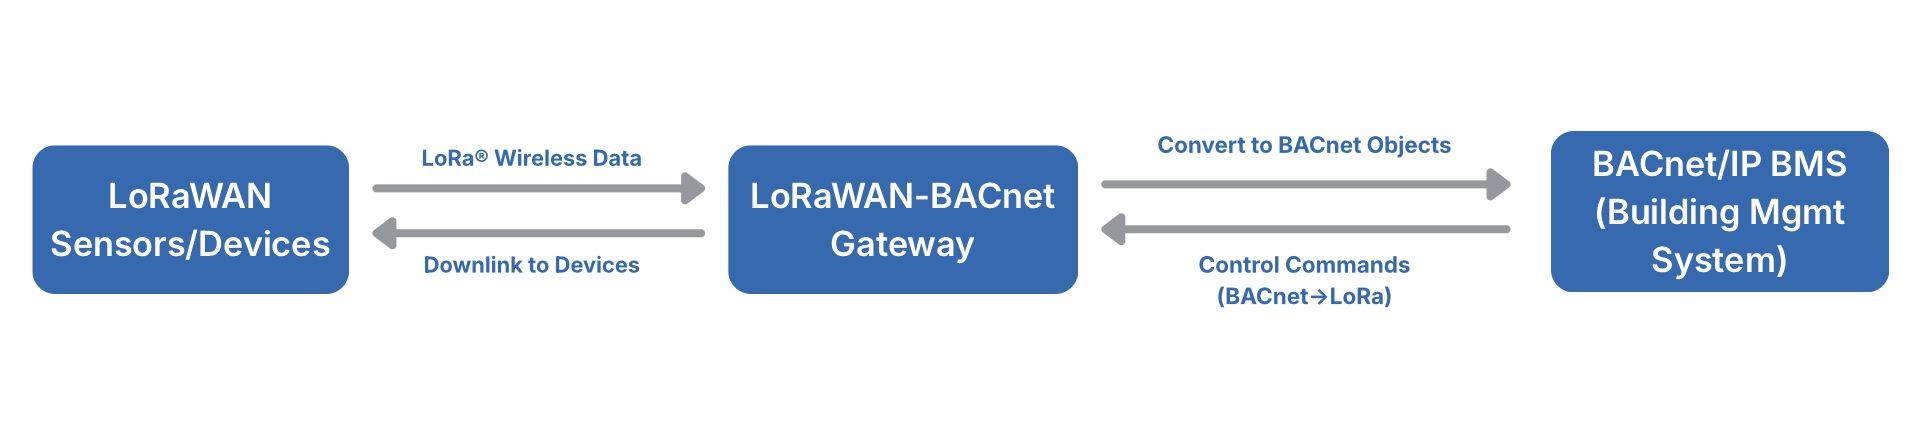 Figure 1: LoRaWAN–BACnet Bidirectional Data Flow
Key Features
- LoRaWAN®–BACnet/IP bridging: Convert LoRaWAN device data into standard BACnet objects.
- Bidirectional control: Support LoRaWAN uplink telemetry and BACnet-to-LoRaWAN control commands.
- Easy Web UI configuration: Simple and intuitive setup for mapping and BACnet parameters.
- MQTT Integration Support: Allows flexible data forwarding or additional application-layer integrations through MQTT brokers.
- Broad BMS compatibility: Compatible with Carrier BMS and standard BACnet/IP systems.
Technical Capabilities
The BACnet Gateway provides the following capabilities:
- BACnet/IP Standard: Based on BACnet/IP (ANSI/ASHRAE 135-2016)
- Communication: UDP-based BACnet/IP service bound to the active WAN interface
- Network Interfaces: Ethernet (PoE+), Cellular, Wi-Fi
- Device Identity: Configurable BACnet Device Name and Instance ID
- Supported Object Types: AI, AO, AV, BI, BO, BV, and OctetStringValue
- Supported Services: ReadProperty, WriteProperty, SubscribeCOV, and Confirmed/UnconfirmedCOVNotification
Typical Application Scenarios
- HVAC Monitoring and Control: Monitor and control temperature, humidity, differential pressure, and fan-coil systems.
- Energy Metering and Analytics: Measure and analyze electricity, water, and gas usage.
- IAQ and Occupancy-Based Ventilation: Monitor CO₂, TVOC, PM2.5/PM10 for indoor air quality and ventilation.
- Cold Chain and Asset Tracking: Track assets in buildings and warehouses for cold chain management
Configure BACnet Gateway
Prerequisites
- The RAK gateway must operate in Built-in Network Server mode.
- Your LoRaWAN end devices and the gateway must use the same regional frequency band.
Access the Extension
-
Open your browser and log in to the gateway's web UI. If necessary, refer to the Quick Start Guide section of the gateway’s user manual.
-
Once logged in, navigate to Extensions in the left menu.
NOTEClick the WisGate logo to expand the left menu and view all available tabs.
-
Under the Installed tab, you will see the BACnet Gateway extension. Click Launch.
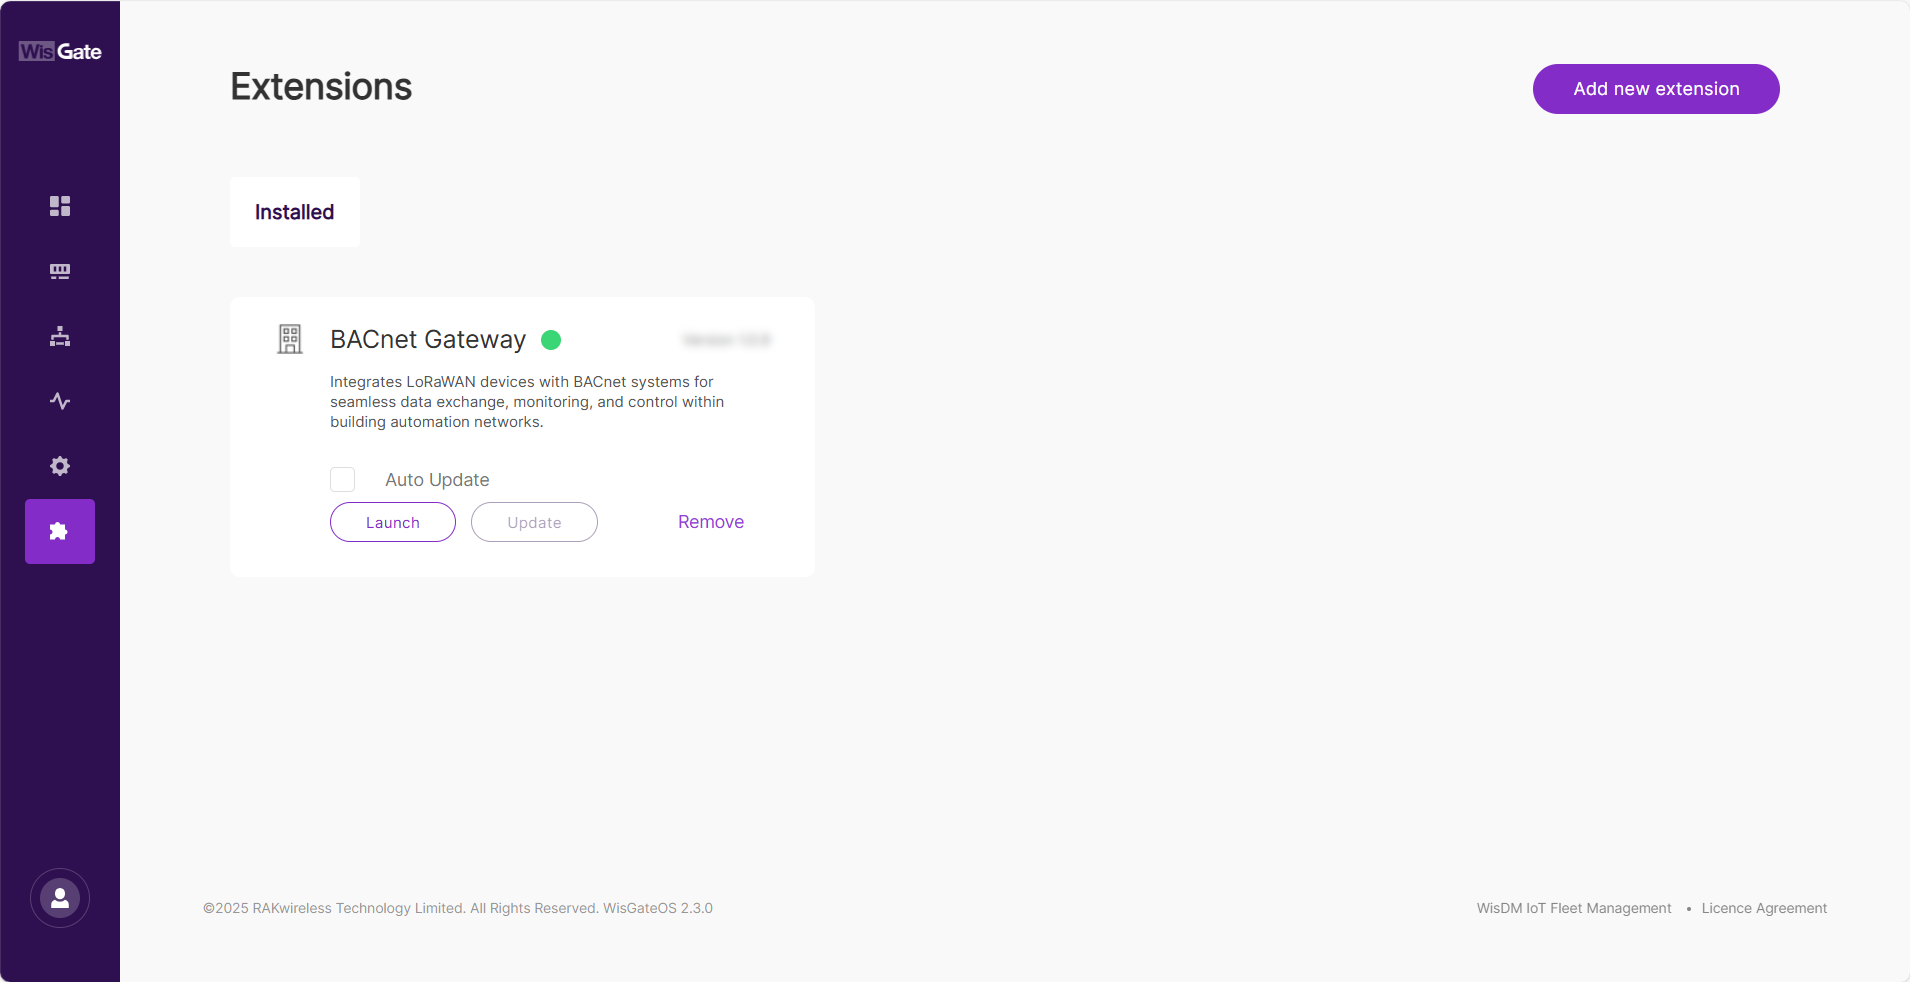 Figure 1: Extensions Tab
BACnet Configuration
This section enables you to configure the basic settings for the BACnet Gateway.
- In the Configuration tab, set up the basic information for the BACnet Gateway, including the following:
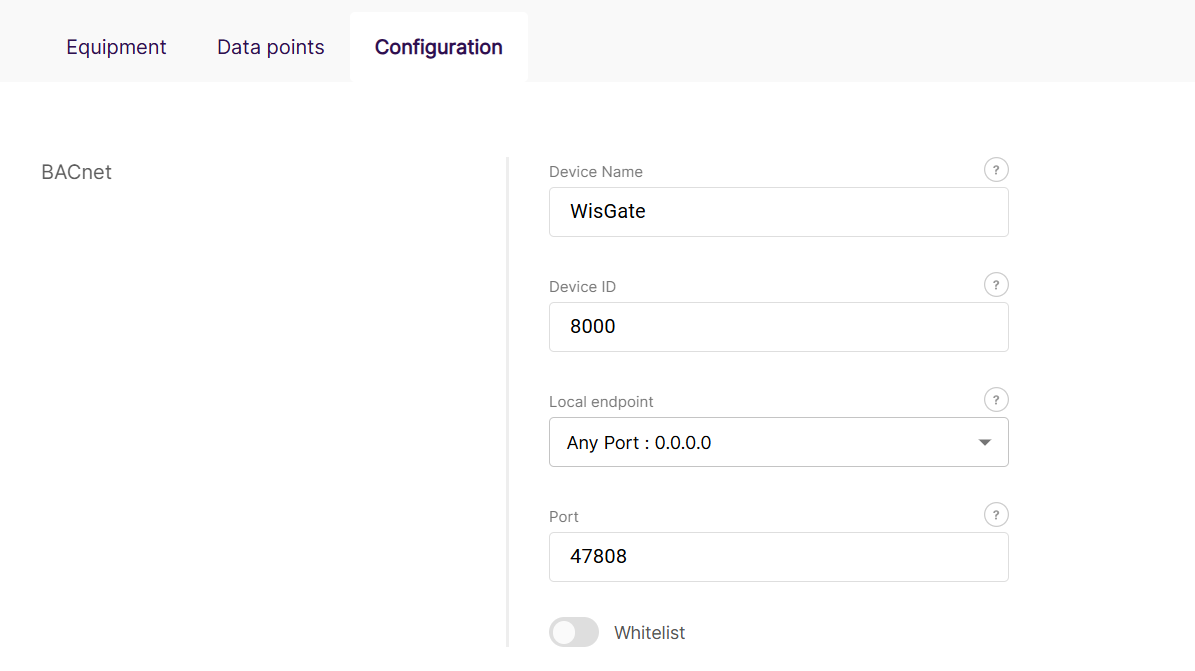 Figure 1: BACnet Configuration
-
Device Name: The name of the gateway as it will appear in the BACnet network.
-
Device ID: A unique Device Instance for the BACnet network. The ID range is 1 to 4194303.
-
Local Endpoint: Specifies the IP interface that the BACnet Gateway uses for UDP communication.
NOTEYou can either select a specific network interface to bind the BACnet Gateway to a particular IP address assigned by the connected network or choose Any Port: 0.0.0.0 for automatic IP selection.
If you select Any Port: 0.0.0.0, the BACnet Gateway will dynamically select the IP address of the network interface with the highest priority based on the available connections.
-
Port : The UDP port for the BACnet Gateway, ranges from 2000 to 65535, with the default set to 47808 (BAC0).
-
Whitelist : Enables the Whitelist feature, which allows you to specify a list of allowed BACnet Servers (BMS) IP addresses.
-
Source IP address: Specifies the list of IP addresses for BACnet Servers (BMS) that are allowed to communicate with the BACnet Gateway.
- Click Save changes.
Manage Equipment Profiles
The Manage Equipment Profiles section allows you to import and manage configuration profiles for LoRaWAN devices. The BACnet Gateway depends on these Profiles to accurately map LoRaWAN data to BACnet objects.
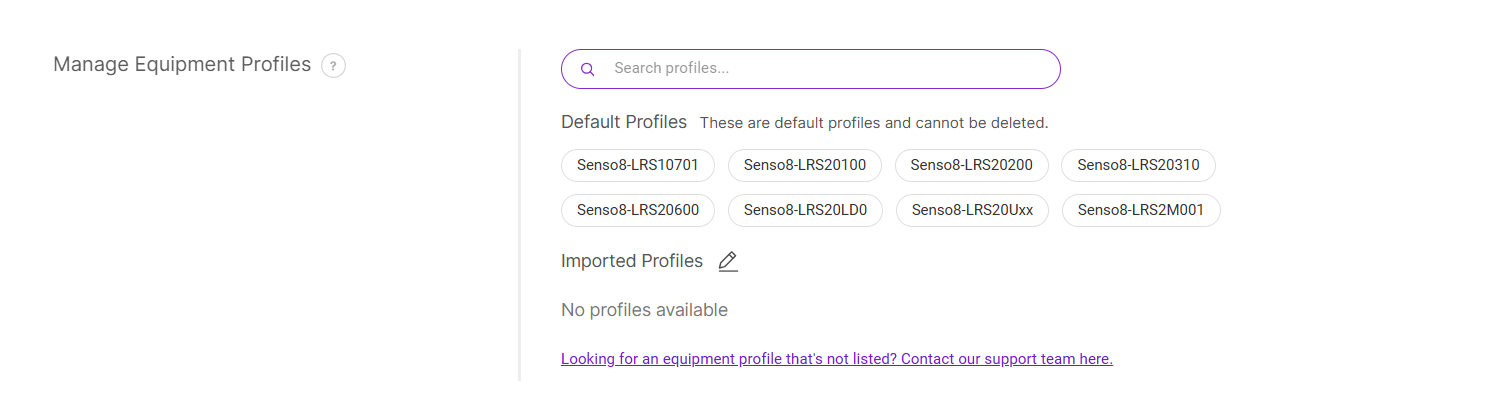 Figure 1: Manage Equipment Profiles
Default Profiles
The system offers a set of predefined device profiles, that cannot be deleted. If your device is one of the supported models, no additional profile import or configuration is necessary. You can proceed directly to the next step: Add Your Equipment.
Import a Profile
The Imported Profiles section displays all profiles that have been uploaded to the BACnet Gateway.
If your device is not listed in the supported models, you can visit the RAK Profile Library, where we offer additional profiles for various sensor types. Select the one that matches your device and download it.
- Click the edit icon
 .
. - Click choose file or drag and drop the downloaded profile into the upload box.
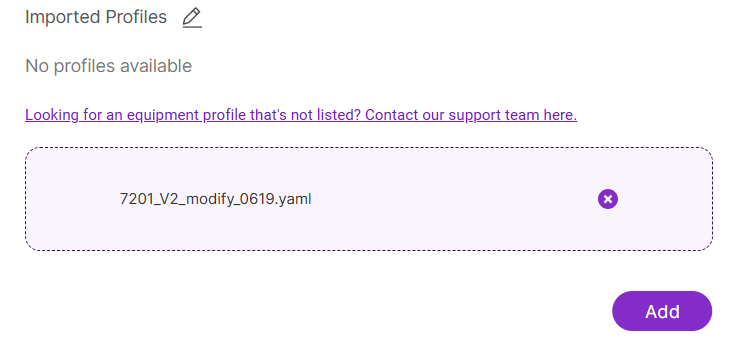 Figure 1: Import Profiles
- Click Add to include the profile in the list.
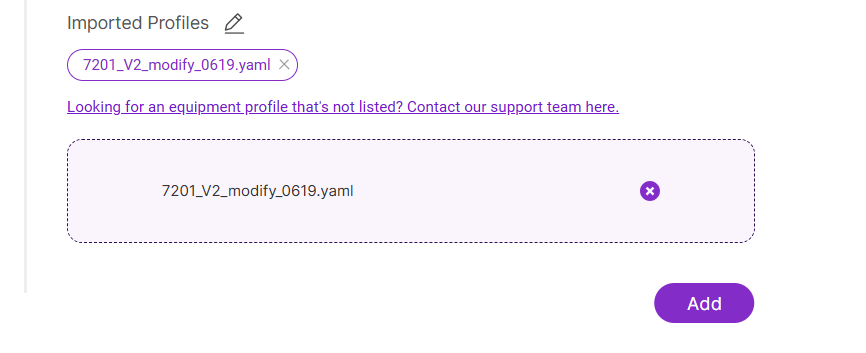 Figure 1: Add a Profile
- Click Save changes to upload the profile to the gateway system.
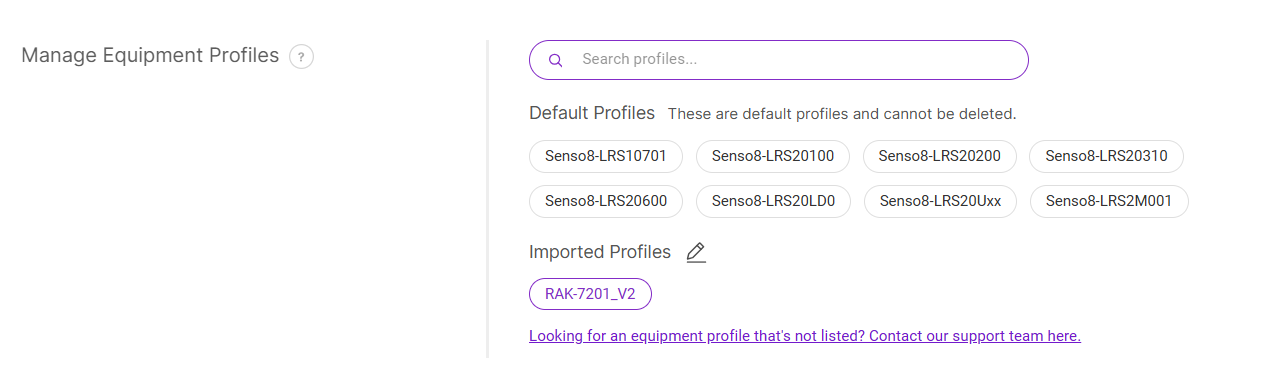 Figure 1: Upload Profile
Request a New Device Profile
If your device is not supported by any of the existing profiles, you can request a new device profile for your sensor.
- Visit the RAK BACnet Profile Library.
- Navigate to the Issues tab.
- Click New issue, and select Device Profile Request in the pop-up window.
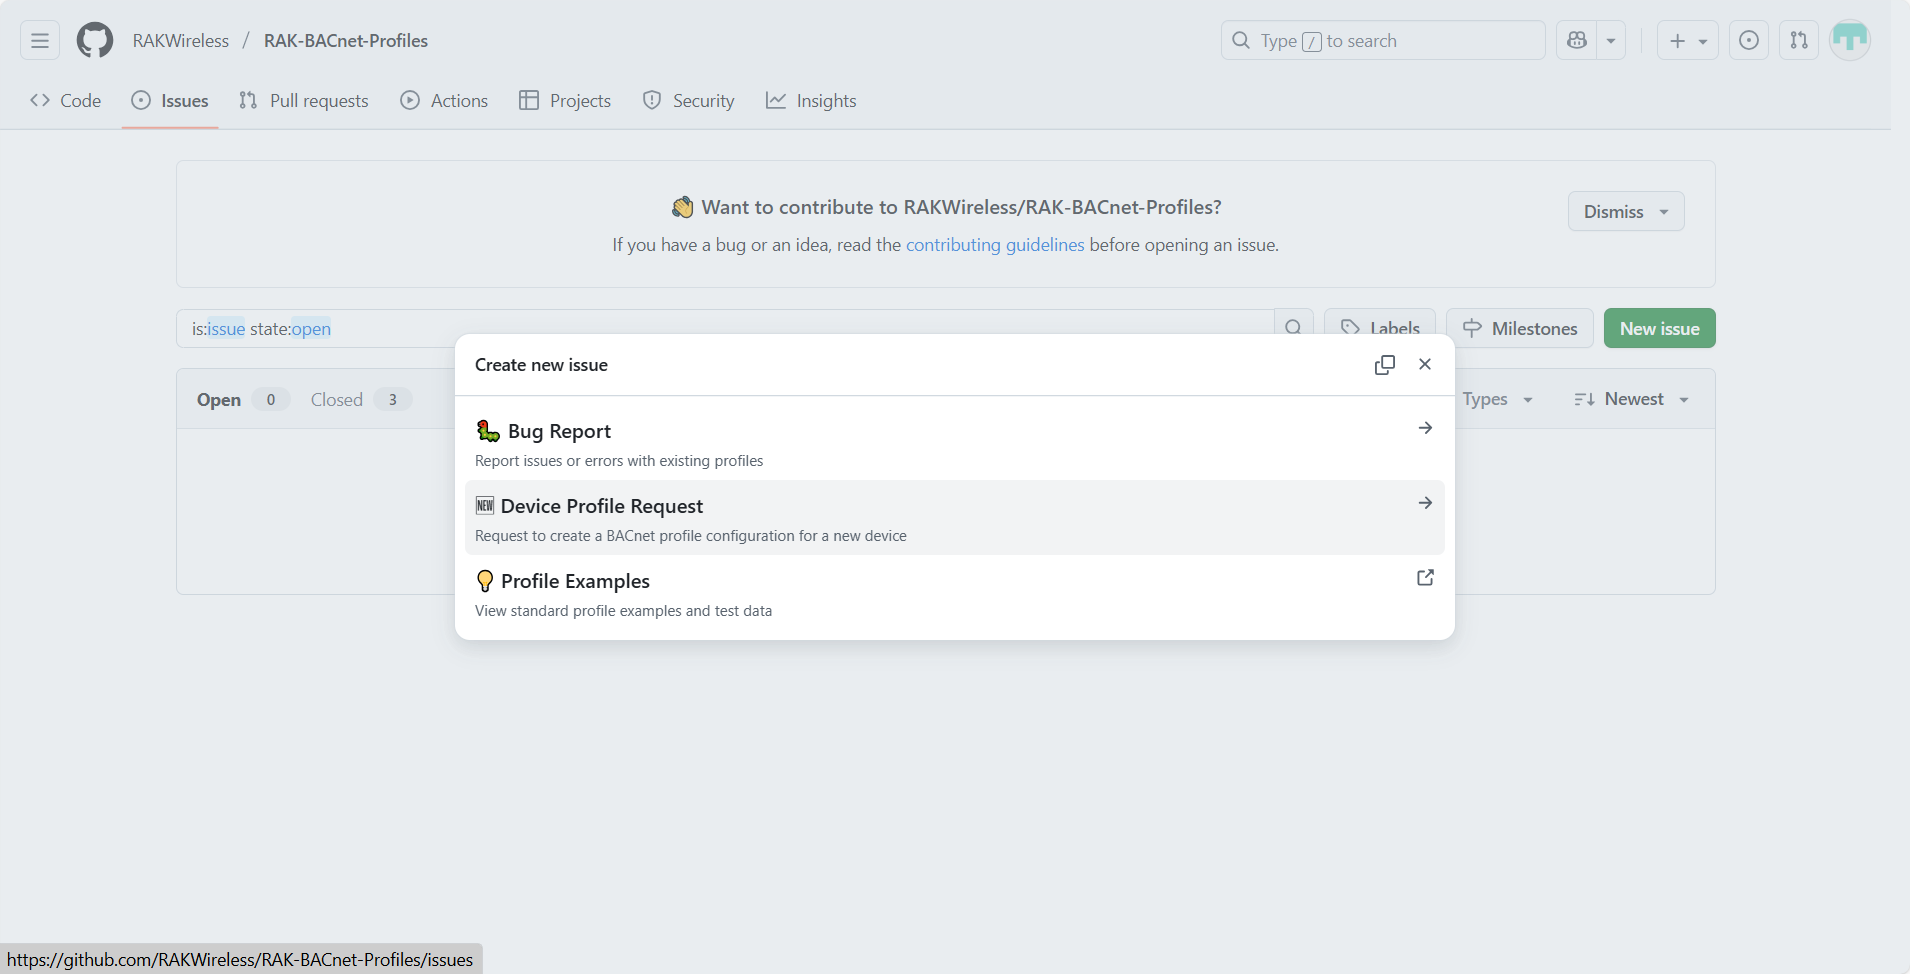 Figure 1: Create a new issue
- Fill out the request form with the required information:
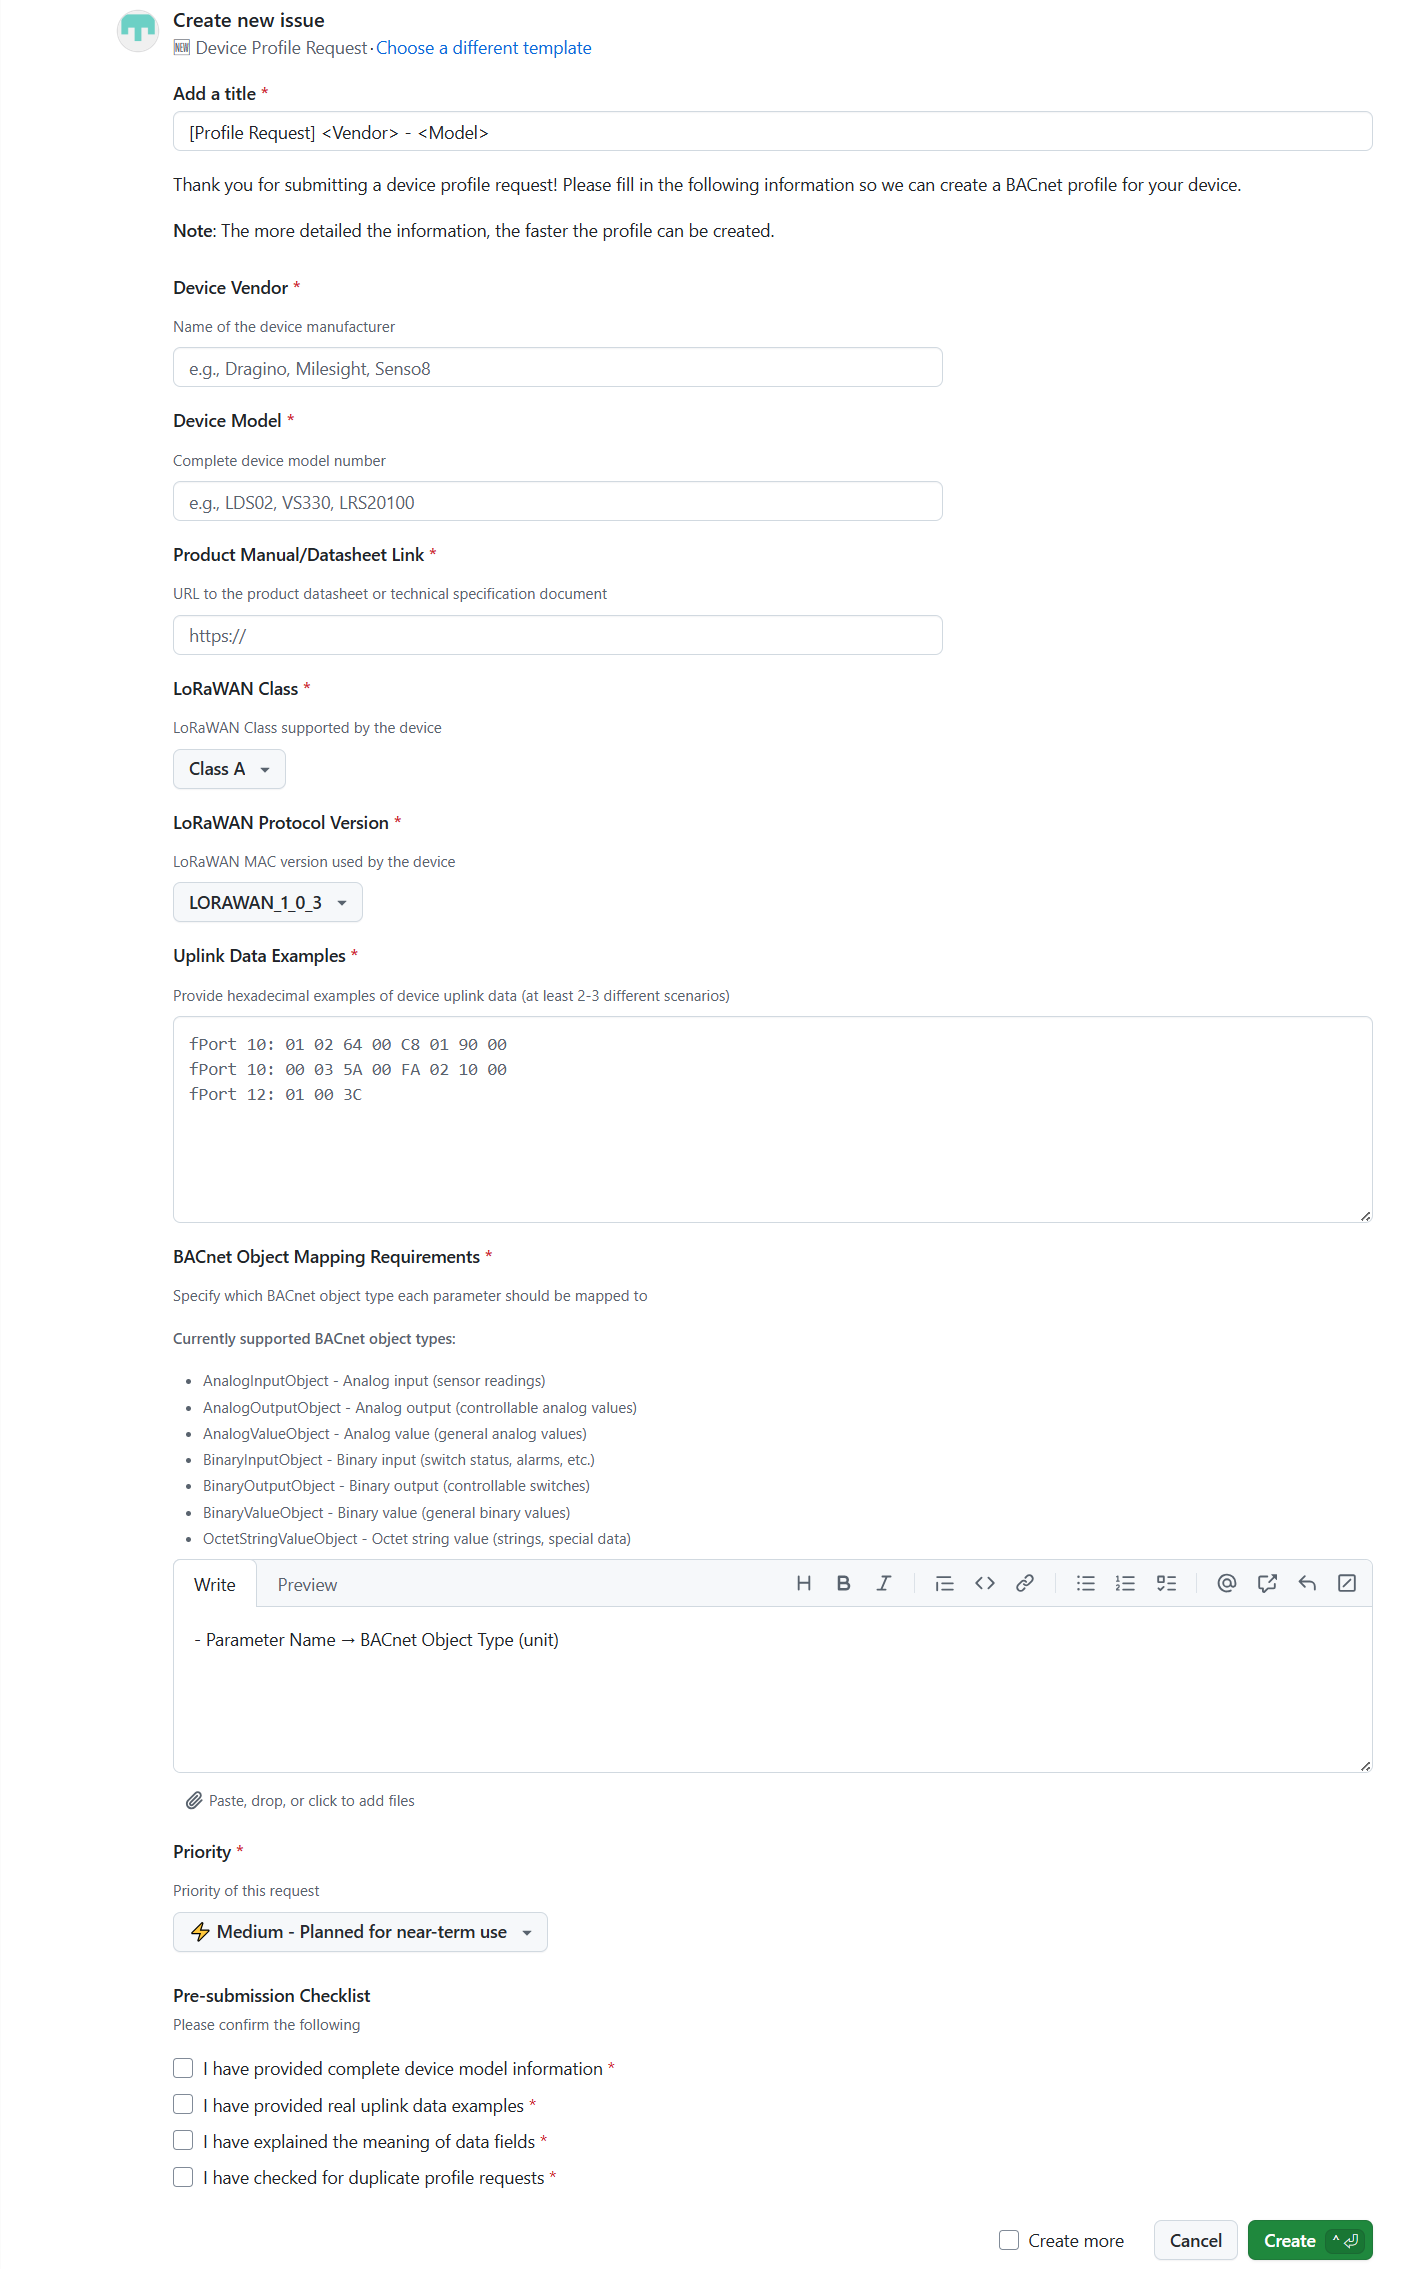 Figure 1: New Device Template Request Form
-
Add a title: Provide a clear and descriptive title using the format
[Profile Request] <Vendor> – <Model>. -
Device Vendor: Name of the device manufacturer.
-
Device Model: Full device model number.
-
Product Manual/Datasheet Link: URL link to the device datasheet or technical specifications.
-
LoRaWAN Class: The LoRaWAN class supported by the device.
-
LoRaWAN Protocol Version: The LoRaWAN MAC version used by the device.
-
Uplink Data Examples: Provide several hexadecimal uplink data samples from your device.
-
BACnet Object Mapping Requirements: Specify how each parameter from the device payload should be mapped to BACnet object types.
Supported BACnet object types include:
- AnalogInputObject - Analog input (sensor readings)
- AnalogOutputObject - Analog output (controllable analog values)
- AnalogValueObject - Analog value (general analog values)
- BinaryInputObject - Binary input (switch status, alarms, etc.)
- BinaryOutputObject - Binary output (controllable switches)
- BinaryValueObject - Binary value (general binary values)
- OctetStringValueObject - Octet string value (strings, special data)
Examples:
Temperature → AnalogInputObject ( ℃)
Humidity → AnalogInputObject (%RH)
EC (Electrical Conductivity) → AnalogInputObject (µS/cm) -
Priority: Select the urgency level for your request.
-
Pre-submission Checklist: Ensure that all checklist items are confirmed before submitting your request.
- After reviewing your information, click Create to submit the request.
RAK technical support will review the details and create a new device profile accordingly. Once the profile is published, download it from the repository and import it into your gateway using Import a Profile.
Add Equipment
Add and configure LoRaWAN end devices (equipment) and associate them with profiles to expose BACnet objects. You can add devices manually or in bulk via CSV, depending on your needs.
Add Device Manually
- In the Equipment tab, click Add Equipment to open the New Equipment page.
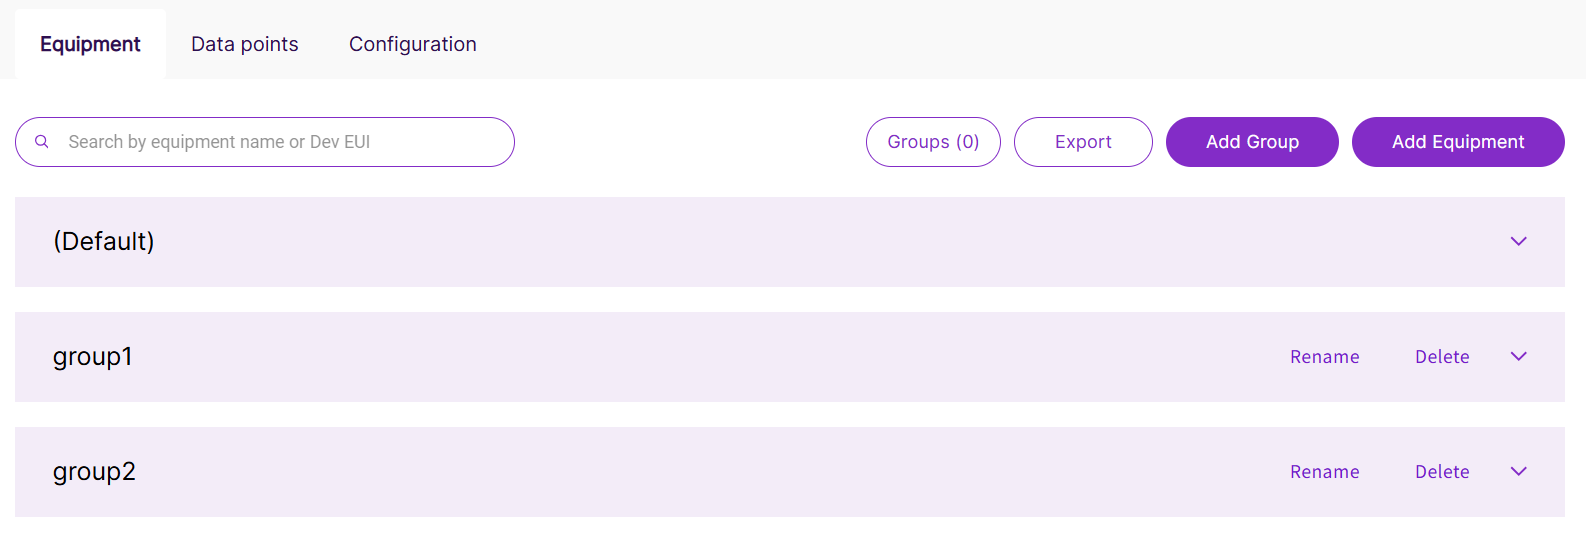 Figure 1: Add Equipment
- In the Manually add a new equipment section, configure the following parameters:
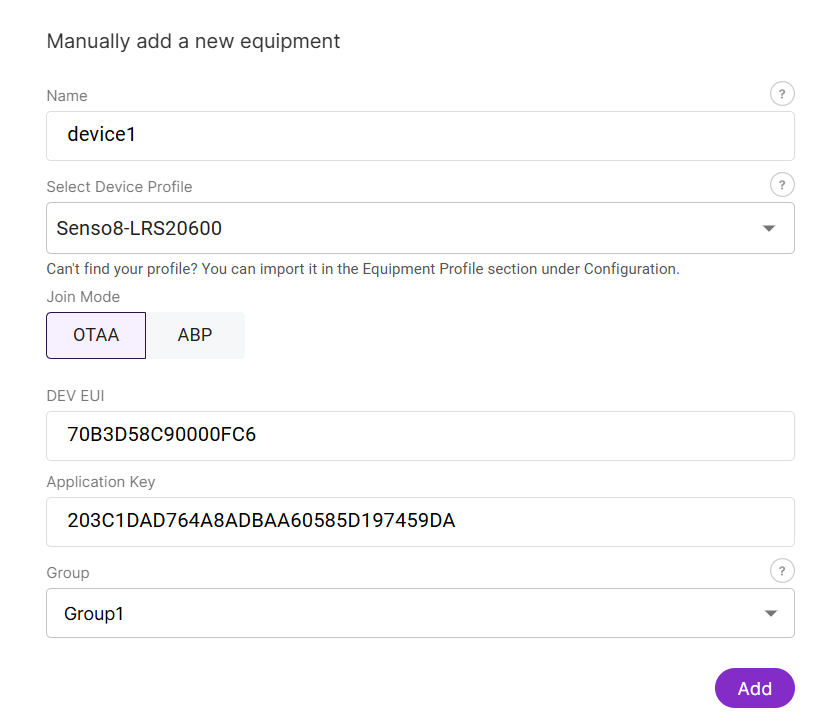 Figure 1: Configure parameters
- Name: Enter the name of the device.
- Select Device Profile: Choose the device profile. If the profile is not listed, ensure you have added the relevant configuration file for your device in the Manage Equipment Profiles section.
- Join Mode: Select the device join mode (e.g., OTAA).
- DEV EUI: Enter the Device EUI (Unique Identifier).
- Application Key: Enter the AppKey for OTAA.
- Group: Choose Create a new group and provide a name for the group to help organize devices into logical groups.
- Click Add to register the device. Once successfully added, it will appear in the device list.
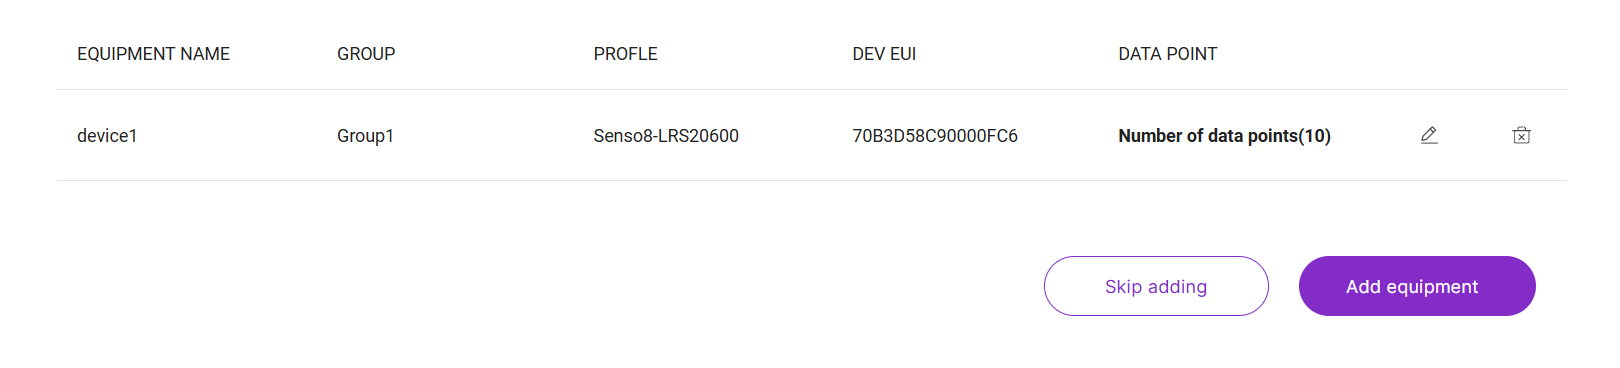 Figure 1: Device List
- (Optional) To customize the data points displayed in the Data Points tab, click the Edit icon in the DATA POINT column.
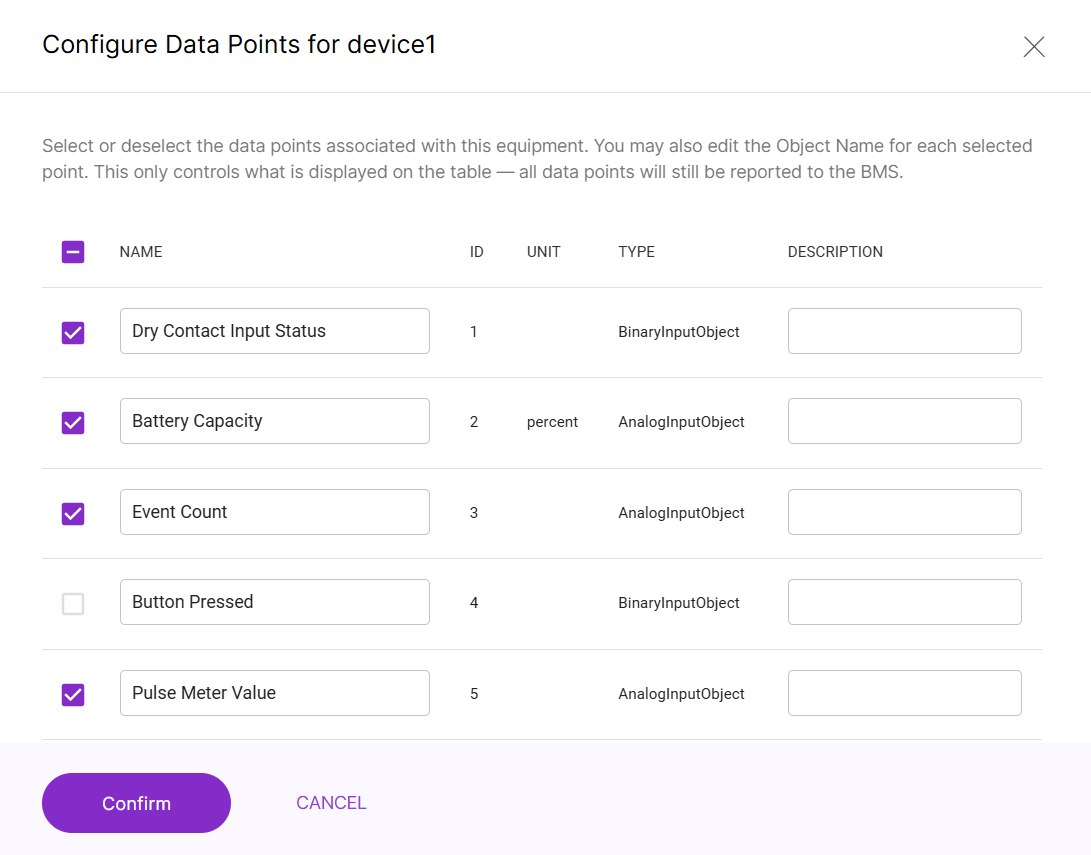 Figure 1: Configure Data Points
- You can select which data points to display in the BACnet Gateway's Data Points tab; however, all data points will still be reported to the integrated BMS.
- You can also customize the object Name and Description of each data point.
- Once finished, click Confirm to apply the changes.
- Click Add equipment to finalize the equipment addition.
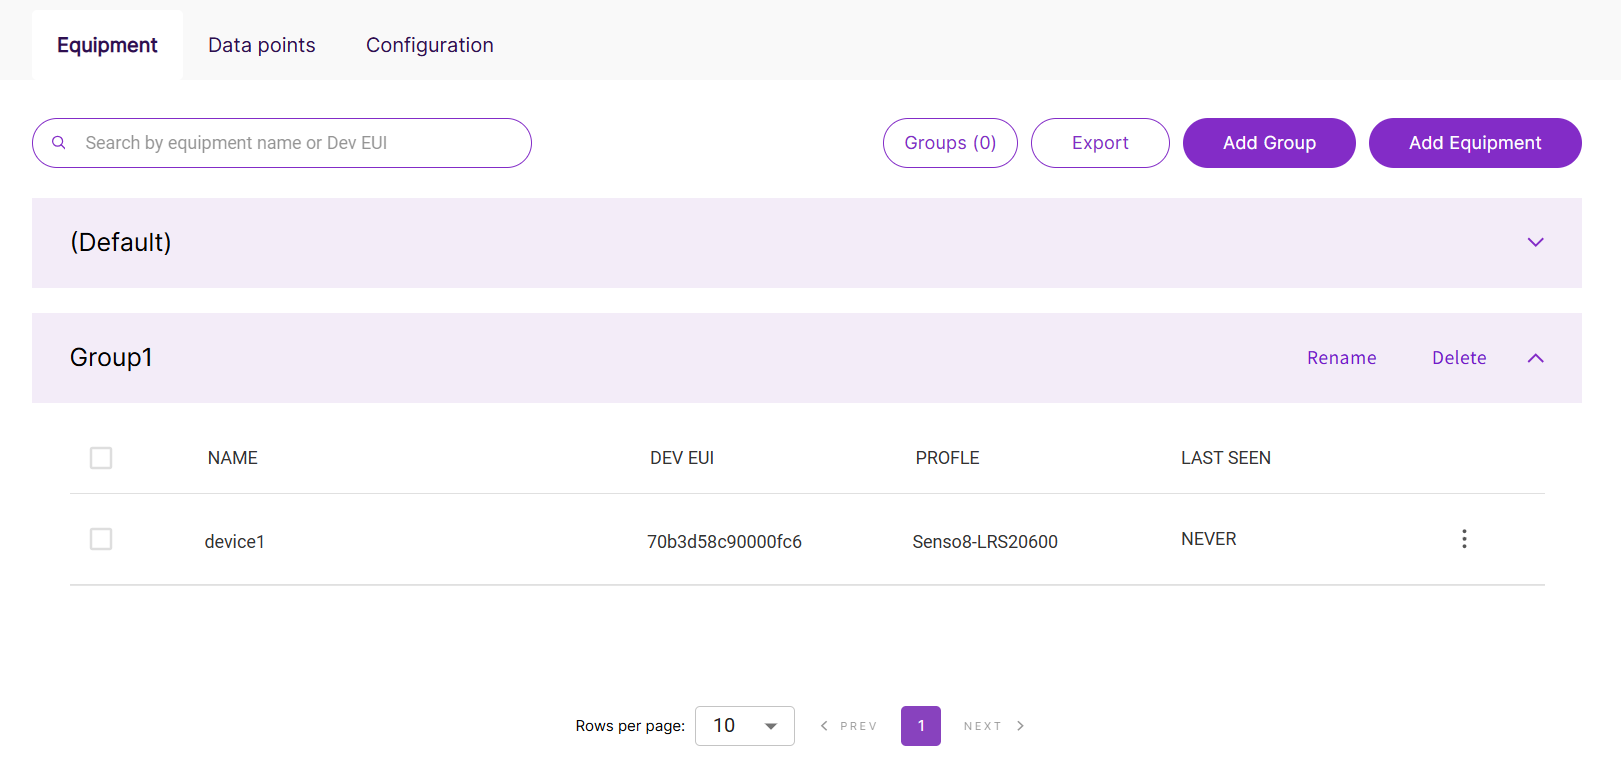 Figure 1: Successfully Added Equipment
Bulk Add Devices (CSV)
Bulk addition of equipment is only available for LoRaWAN® devices that are compatible with the RAKwireless profile database. The equipment list must follow a specific format.
- In the Equipment tab, click Add Equipment to open the New Equipment page.
Figure 1: Add Equipment- In the Upload a list of equipment section, click Download this template to obtain the CSV template.
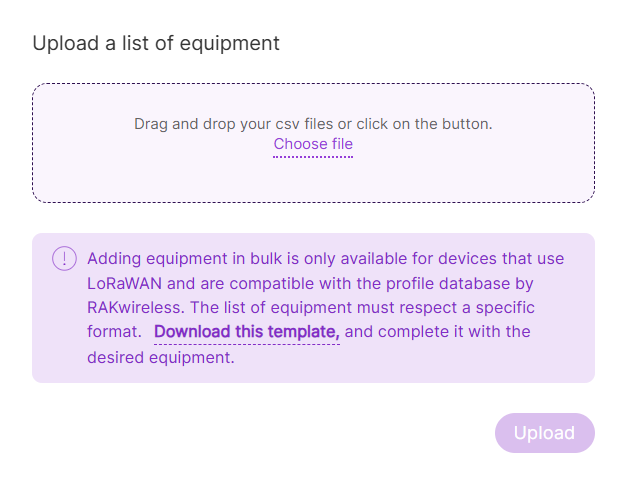 Figure 1: Add Equipment via CSV
- Fill in the device information in the template file:
-
JoinMode
- OTAA (Over-The-Air Activation)
- ABP (Activation By Personalization)
-
Group: Select or create a group to categorize the device, which helps in organizing devices into logical categories.
-
Name: The name assigned to the device.
-
Profile: The device profile that corresponds to the sensor's configuration. For details, refer to Manage Equipment Profiles section.
-
DevEUI: The unique Device EUI (Extended Unique Identifier) for the device.
-
AppKey: The Application Key used in OTAA for the device to join the network.
-
DevAddr: The Device Address for ABP devices.
-
AppSKey: The Application Session Key used to encrypt and decrypt application payloads for ABP devices.
-
NwkSKey: The Network Session Key used for network-level security in ABP devices.
NOTEEnsure the device profiles are supported and properly formatted. Incorrect or duplicate device information will prevent successful import.
- Click choose file or drag and drop your completed CSV file into the upload box.
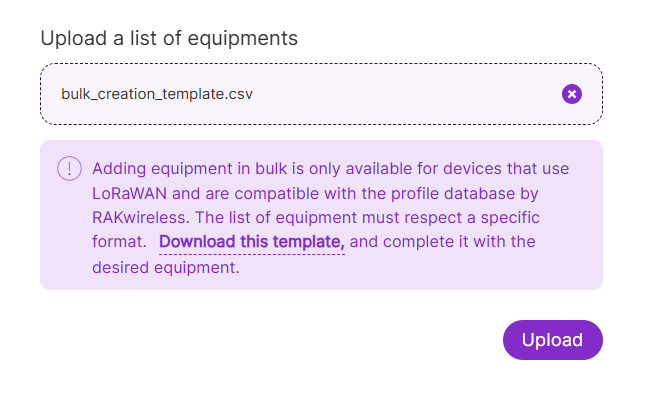 Figure 1: Upload CSV Template
- Click Upload.
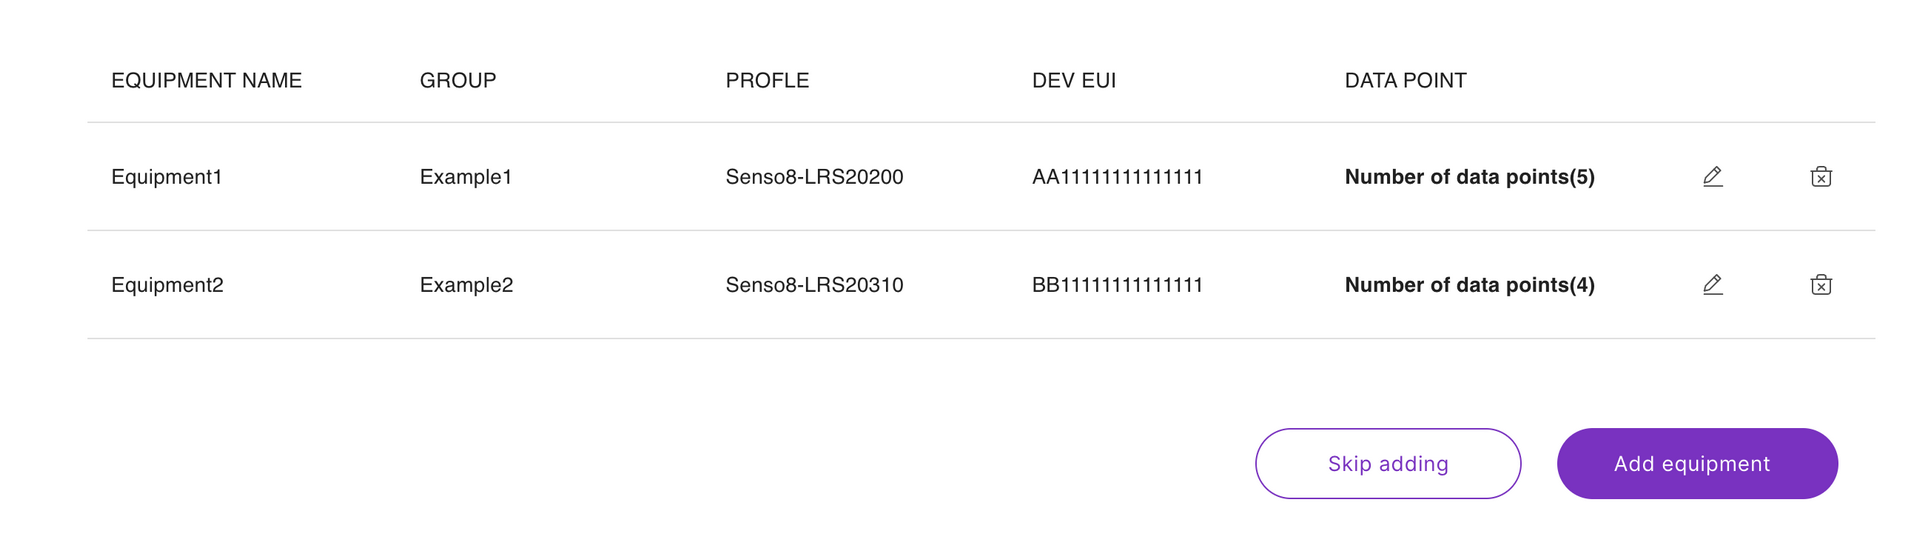 Figure 1: Upload Device Information
- (Optional) To customize the data points displayed in the Data Points tab, click the Edit icon in the DATA POINT column.
Figure 1: Configure Data Points- You can select which data points to display in the BACnet Gateway's Data Points tab; however, all data points will still be reported to the integrated BMS.
- You can customize the object Name and Description of each data point.
- Once finished, click Confirm to apply the changes.
- Click Add equipment to finalize the equipment addition.
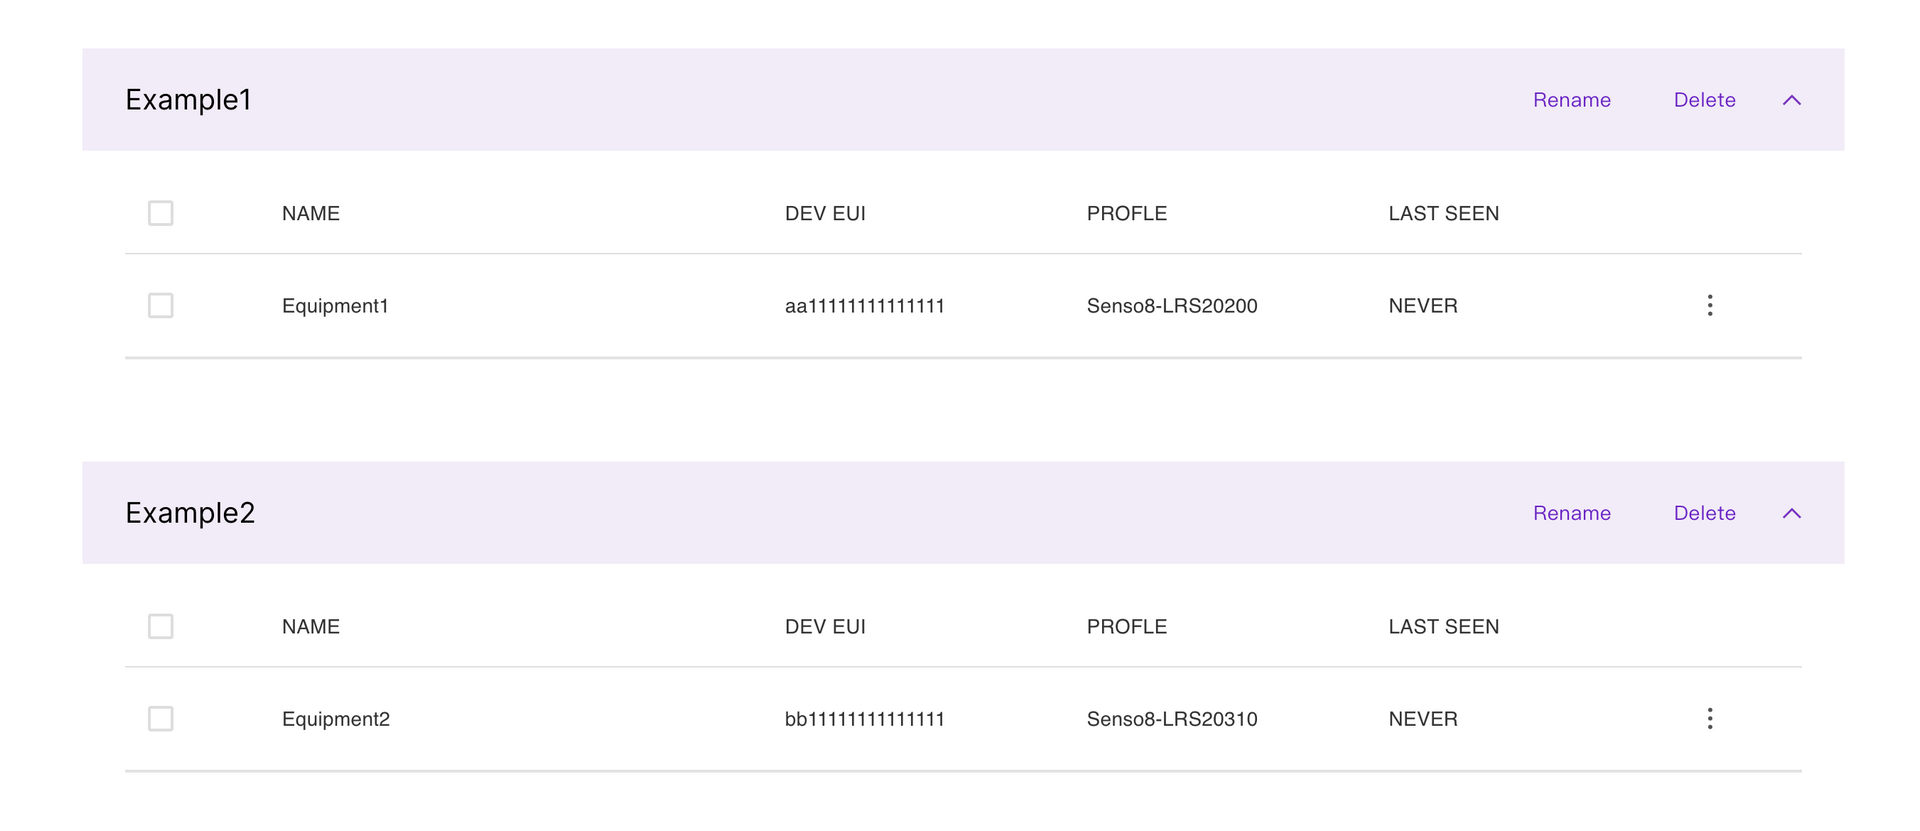 Figure 1: Successfully Added Equipment
Verify Device Join Status
Once the device is registered, you can check its status in the group. If LAST SEEN displays NEVER, it means the device has not yet joined the network.
Next, set your LoRaWAN device join information. Once the device joins, its status will be updated accordingly.
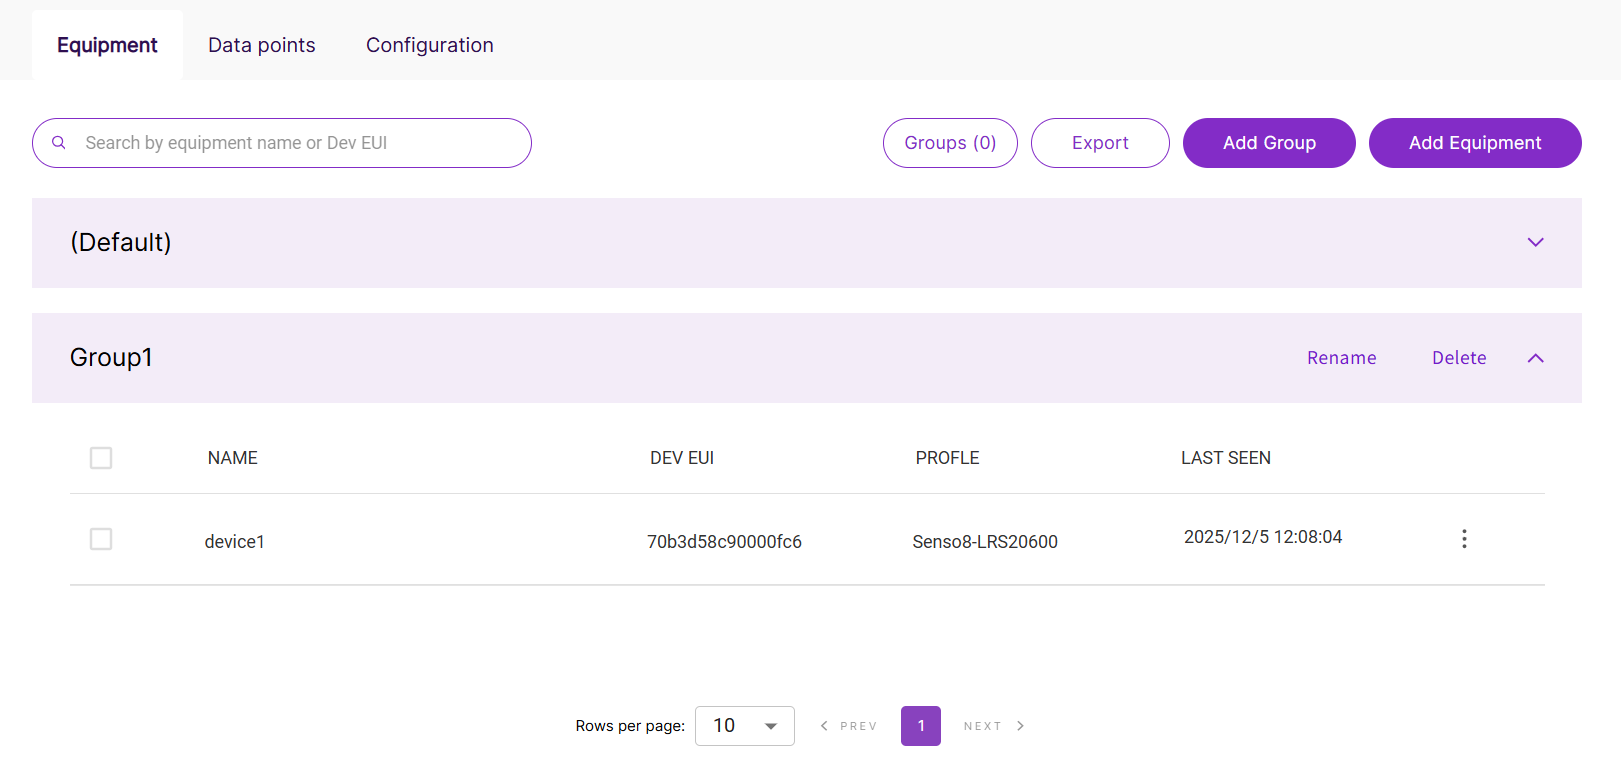 Figure 1: Join Network
View Device Data
Once your equipment is online, you can view its mapped BACnet data on the Data Points page or within your Building Management System (BMS).
View Device Data in Data Points
Go to the Data Points tab to view and configure the data points associated with your registered devices (equipment). These data points are mapped to BACnet objects and provide information such as sensor readings, statuses, and other measurements from the connected LoRaWAN devices.
You can use the search bar to quickly find equipment by Name or Device EUI.
For each piece of equipment, you can view:
- Basic information (Equipment Name, Device EUI, Profile, Last Seen)
- BACnet object parameters (Object Name, Object ID, Value, Unit)
- Timestamp of the latest LoRa uplink
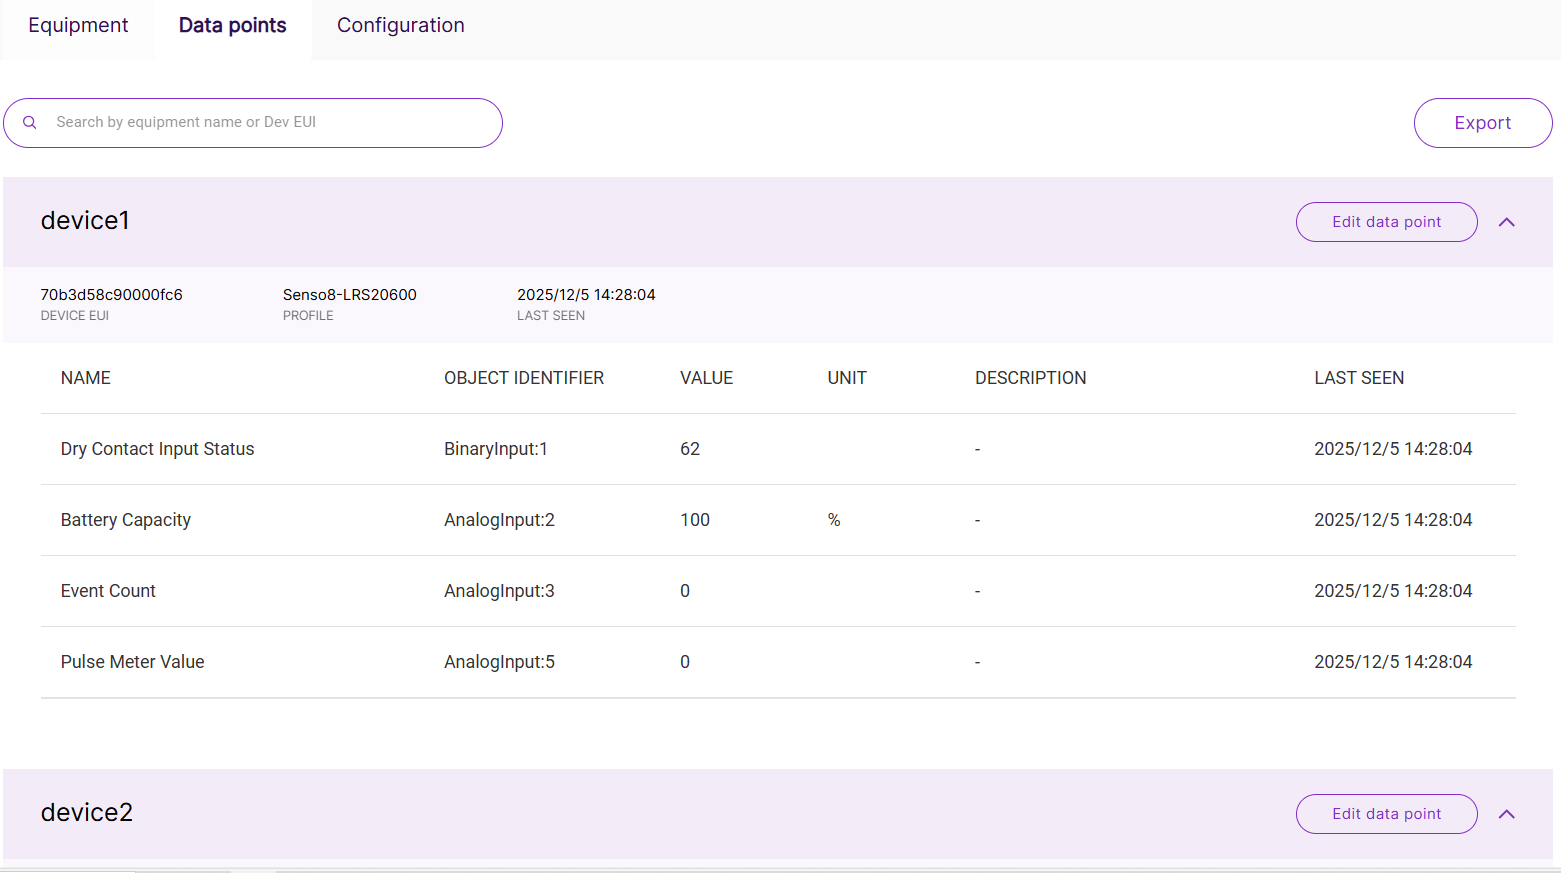 Figure 1: Device Data Points Overview
Edit Data Points
To customize the display of data points in the Data Points tab, click the Edit data point icon for the desired equipment.
Figure 1: Configure Data PointsYou can:
- Select the data points displayed in the DataPoints table.
- Edit the Object Name and Description for each data point.
After making any changes, click Confirm to save.
- If you configure the displayed data points, the UI will only show the selected data points. However, the system will still send all data points to the integrated BMS.
- BACnetIDs increment by creation order and do not reuse deleted IDs, ensuring unique identifiers. For example, with IDs 1–5, deleting ID 3 and adding a new datapoint yields ID 6.
Export Data Points
Click Export to generate a CSV file containing the BACnet-mapped data points from your registered equipment. This file provides a quick overview of the device data points and is used for integration with BACnet Building Management Systems (BMS).
The exported CSV will include all the data points displayed in the gateway UI.
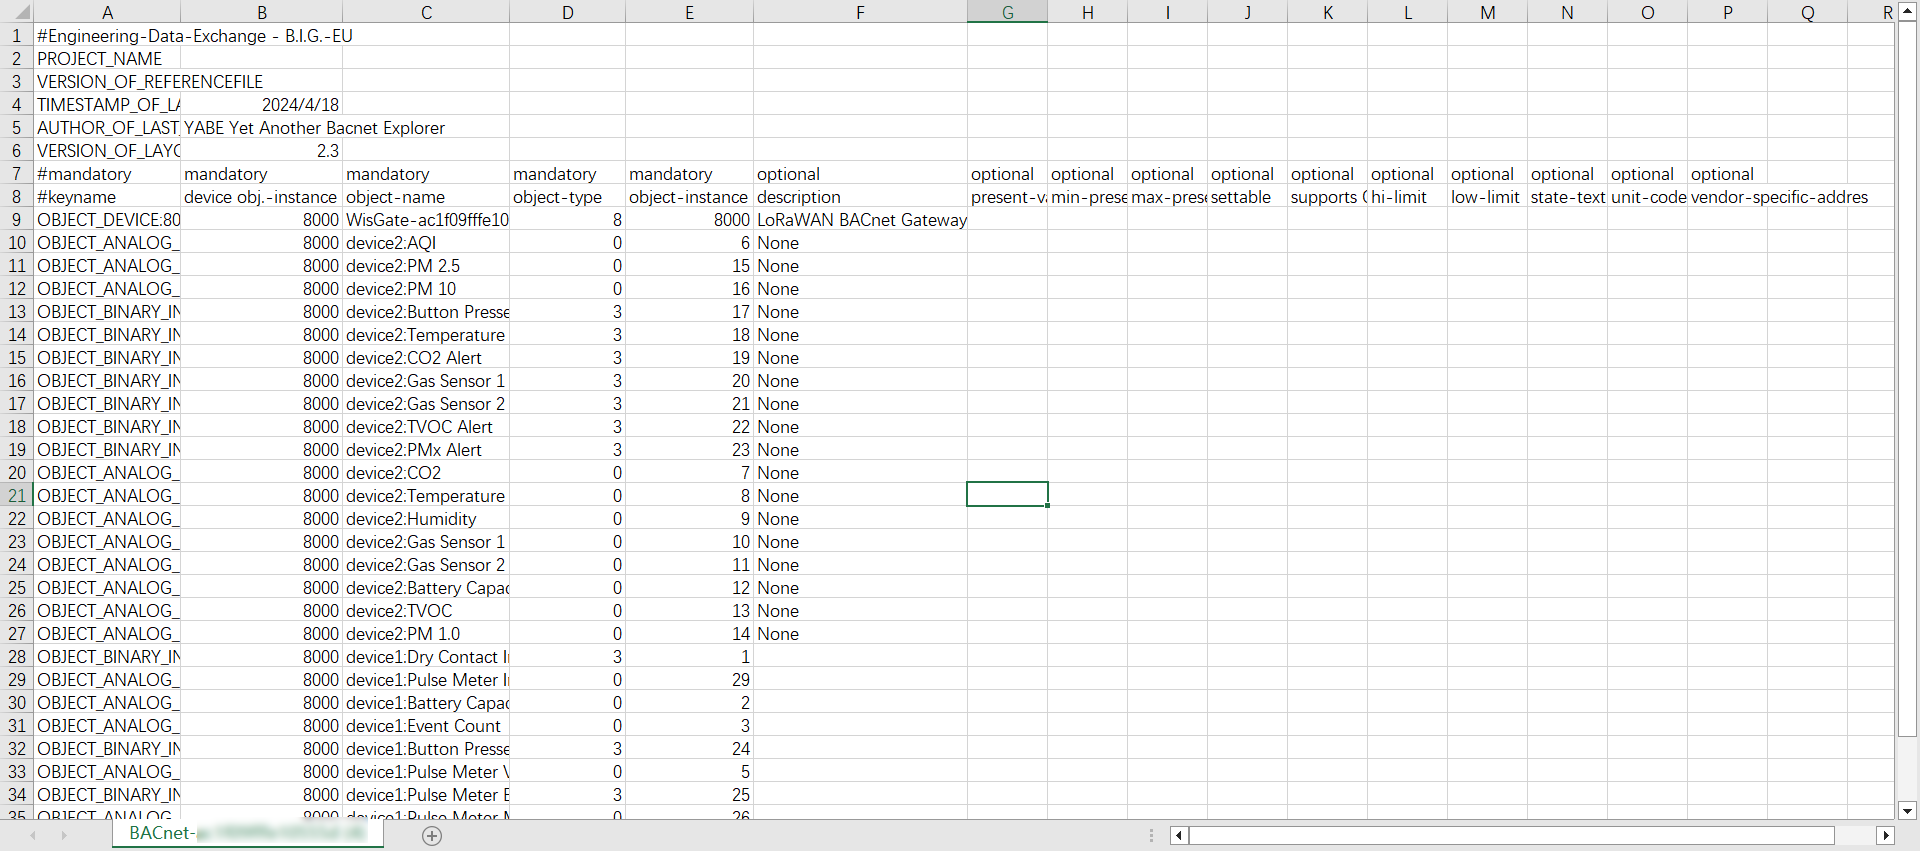 Figure 1: Data Points CSV Structure
Field Descriptions
| Field Name | Description |
|---|---|
| keyname | The keyname uniquely identifies each BACnet object, following the format: OBJECT_<Object Type>:<Instance ID> |
| device obj.-instance | The unique BACnet device instance ID for the gateway, used to identify the gateway within the BACnet network. |
| object-name | The object-name is a combination of the device name and the object name. |
| object-type | The type of BACnet object. |
| object-instance | The unique ID assigned to each BACnet object instance. |
| description | Optional metadata that provides additional context for the data point. |
View BACnet Data in BMS
After configuring the BACnet Gateway and devices, you can view the LoRaWAN-to-BACnet mapped data within your Building Management System (BMS). The BACnet Gateway presents each LoRaWAN device as a set of BACnet objects. Your BMS can discover these objects and read their values just like any other BACnet/IP device.
Once connected, your BMS can automatically discover and display:
- BACnet Device Instance
- BACnet Objects (AI, BI, AV, BV, OSV, etc.)
- Object Names (mapped from Profile)
- Real-time values (from LoRa uplinks)
These values are updated based on the device uplink frequency, mapping rules, and COV settings in the profile.
Example: Viewing BACnet Data Using Yabe (BACnet Browser)
The following example demonstrates how BACnet objects from the gateway appear in a BMS environment using a BACnet browser tool (Yabe):
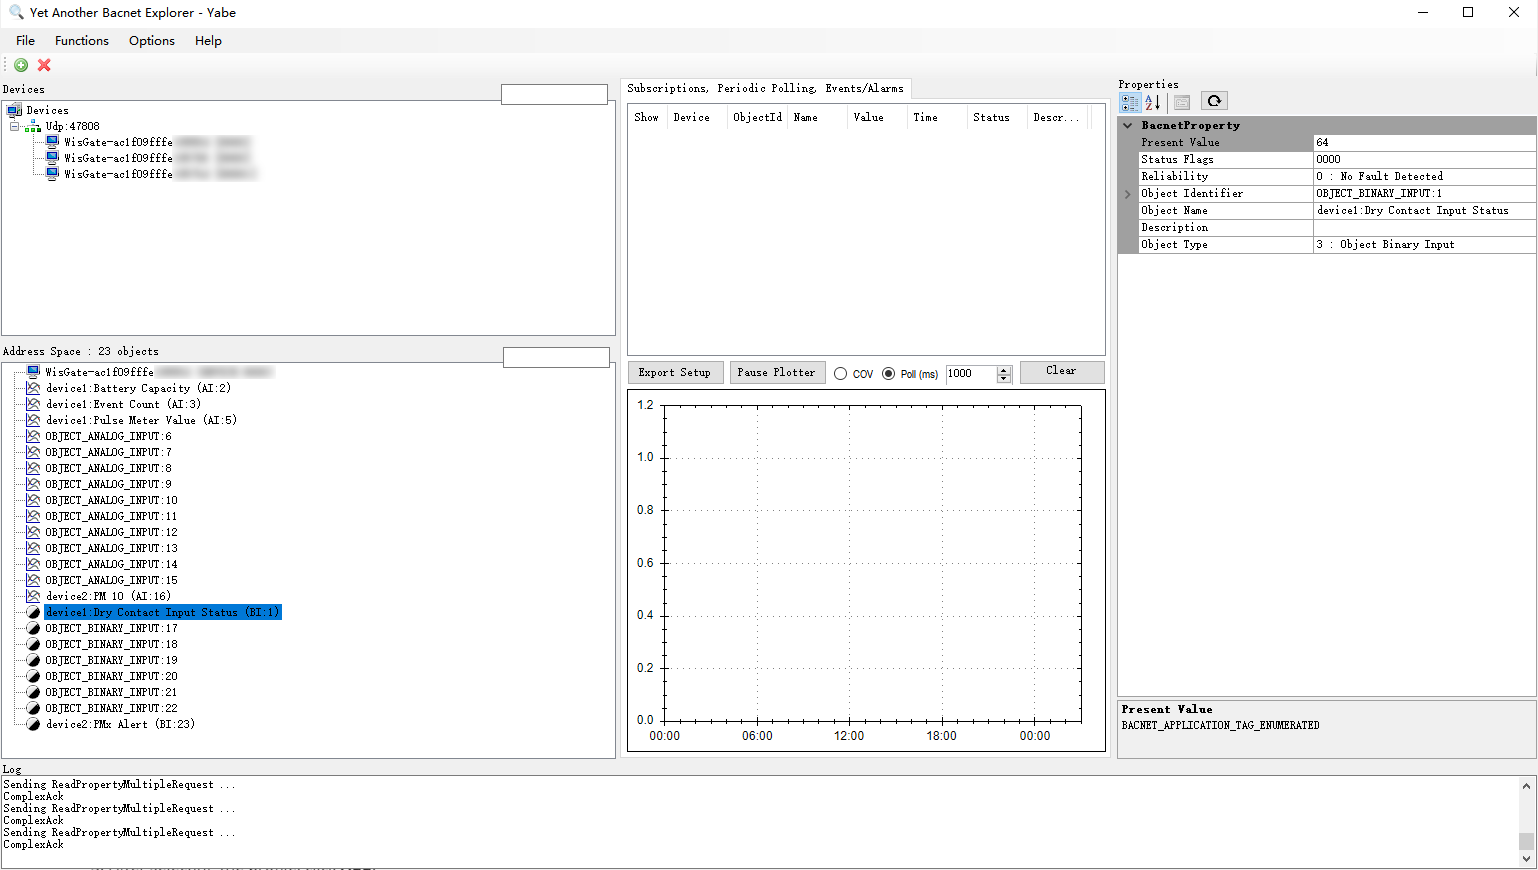 Figure 1: BACnet Objects and Values Displayed in Yabe
Manage Equipment
After adding devices to the BACnet Gateway, you can easily manage them from the Equipment page. This includes organizing devices into groups, renaming them, removing them, or exporting device information as needed.
You can manage individual devices or perform bulk operations on multiple devices simultaneously.
To manage multiple devices, simply select them using the checkboxes on the left. Once selected, bulk action buttons will appear at the top of the table for operations such as renaming, reassigning, or deleting.
A search bar at the top allows you to quickly locate equipment by Name or DevEUI, and you can select Groups to filter the devices based on their assigned group.
Reassign Group
Move the selected devices to another group to better organize them based on location, device type, or project structure.
- You can either select Reassign equipment group from the ⋮ (more options) menu for individual devices or select multiple devices from the list and click Reassign Group.
 Figure 1: Single Equipment Actions
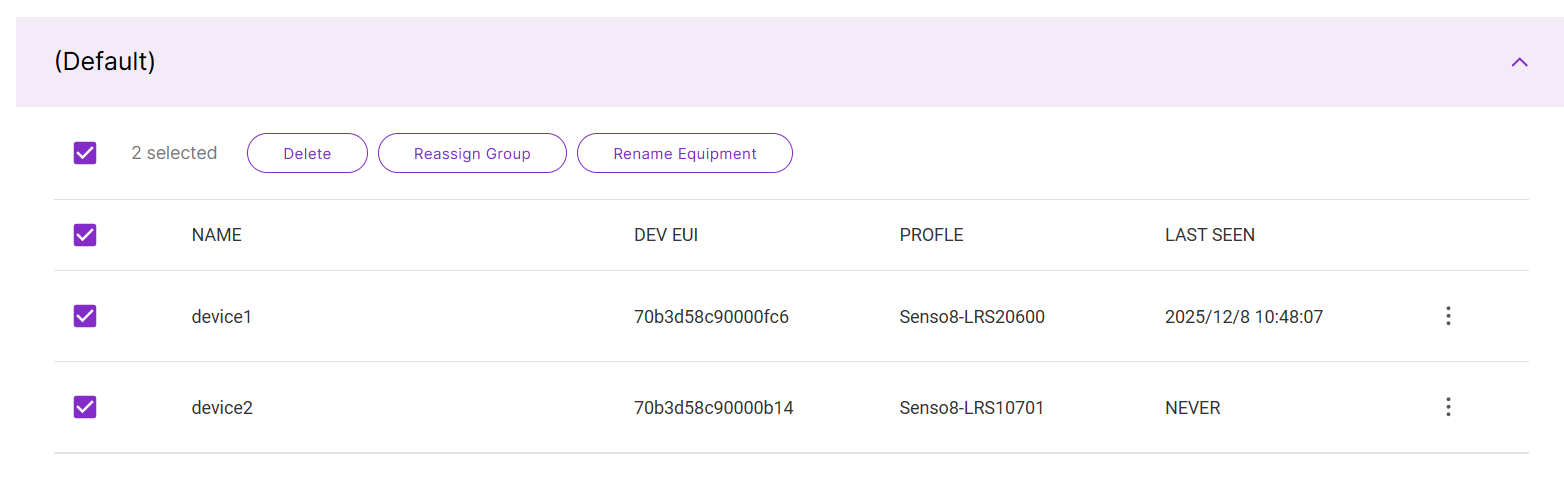 Figure 1: Bulk Equipment Actions
- In the pop-up window, search for and select the target group.
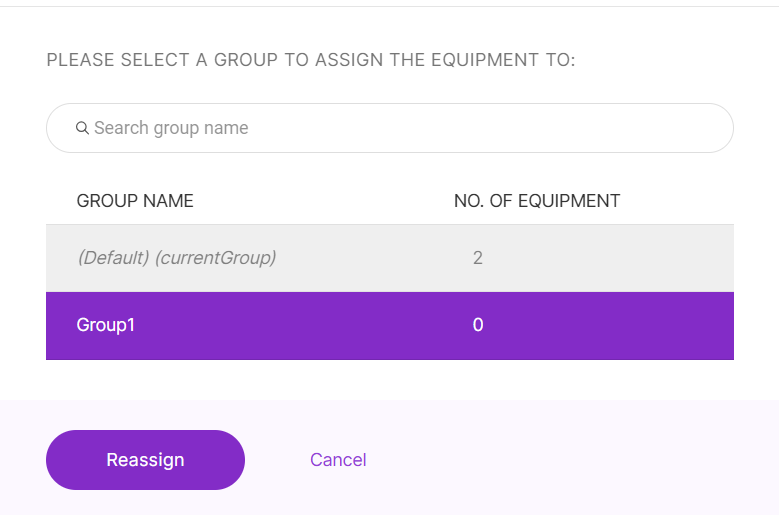 Figure 1: Assign to a New Group
- Click Reassign to complete the action.
Rename Equipment
To rename a device, click the edit icon ![]() in the Name column and enter the new name.
in the Name column and enter the new name.
To rename multiple devices, select the devices, click Rename Equipment, enter the new name, and then click Rename to apply the changes.
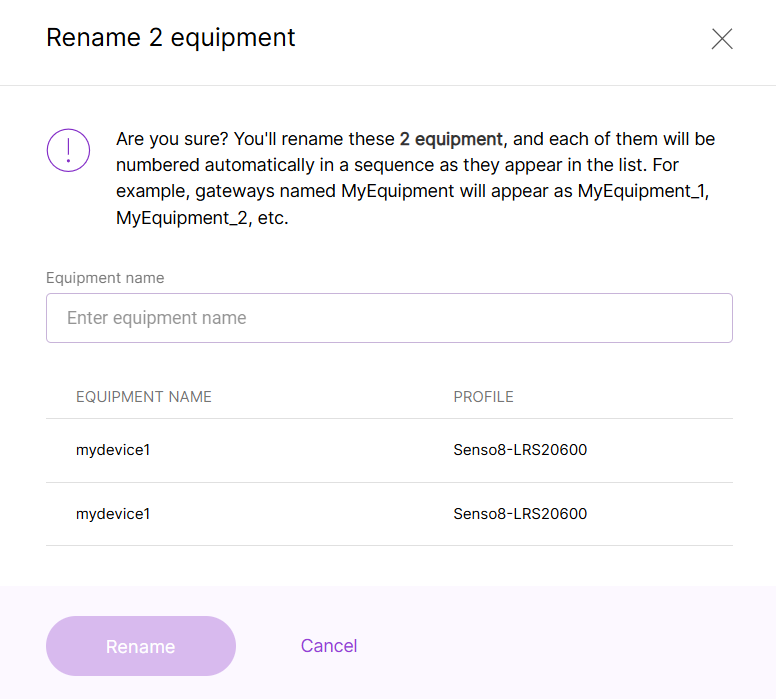 Figure 1: Bulk Rename Equipment
Delete Equipment
Remove the device from the BACnet Gateway.
- Deleting equipment does not delete its associated profile.
- Deletion is permanent and cannot be undone unless the device is added again.
- You can select Delete equipment from the ⋮ (more options) menu for individual devices, or you can select multiple devices from the list and click Delete.
Figure 1: Single Equipment ActionsFigure 1: Bulk Equipment Actions- Confirm the action by clicking OK in the pop-up window.
Add Group
Click this button to create a new device group, which will help you organize your equipment by project, location, or device type.
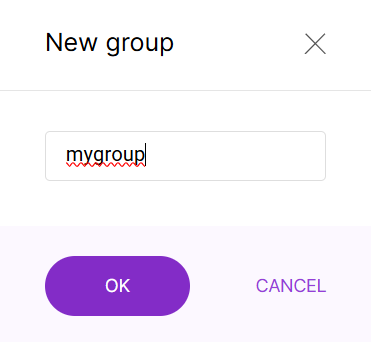 Figure 1: Create a Group
Export Equipment Data
By clicking Export, you can download the details of registered equipment into a CSV file. This file can be used for device backup or as a template for bulk device import.
In the case of sensor replacement, simply update the device's authentication information (DevEUI, AppKey, NwkSKey, DevAddr, AppSKey) in the exported file and re-import it. The system will automatically map the new device without requiring any changes to the BMS configuration.
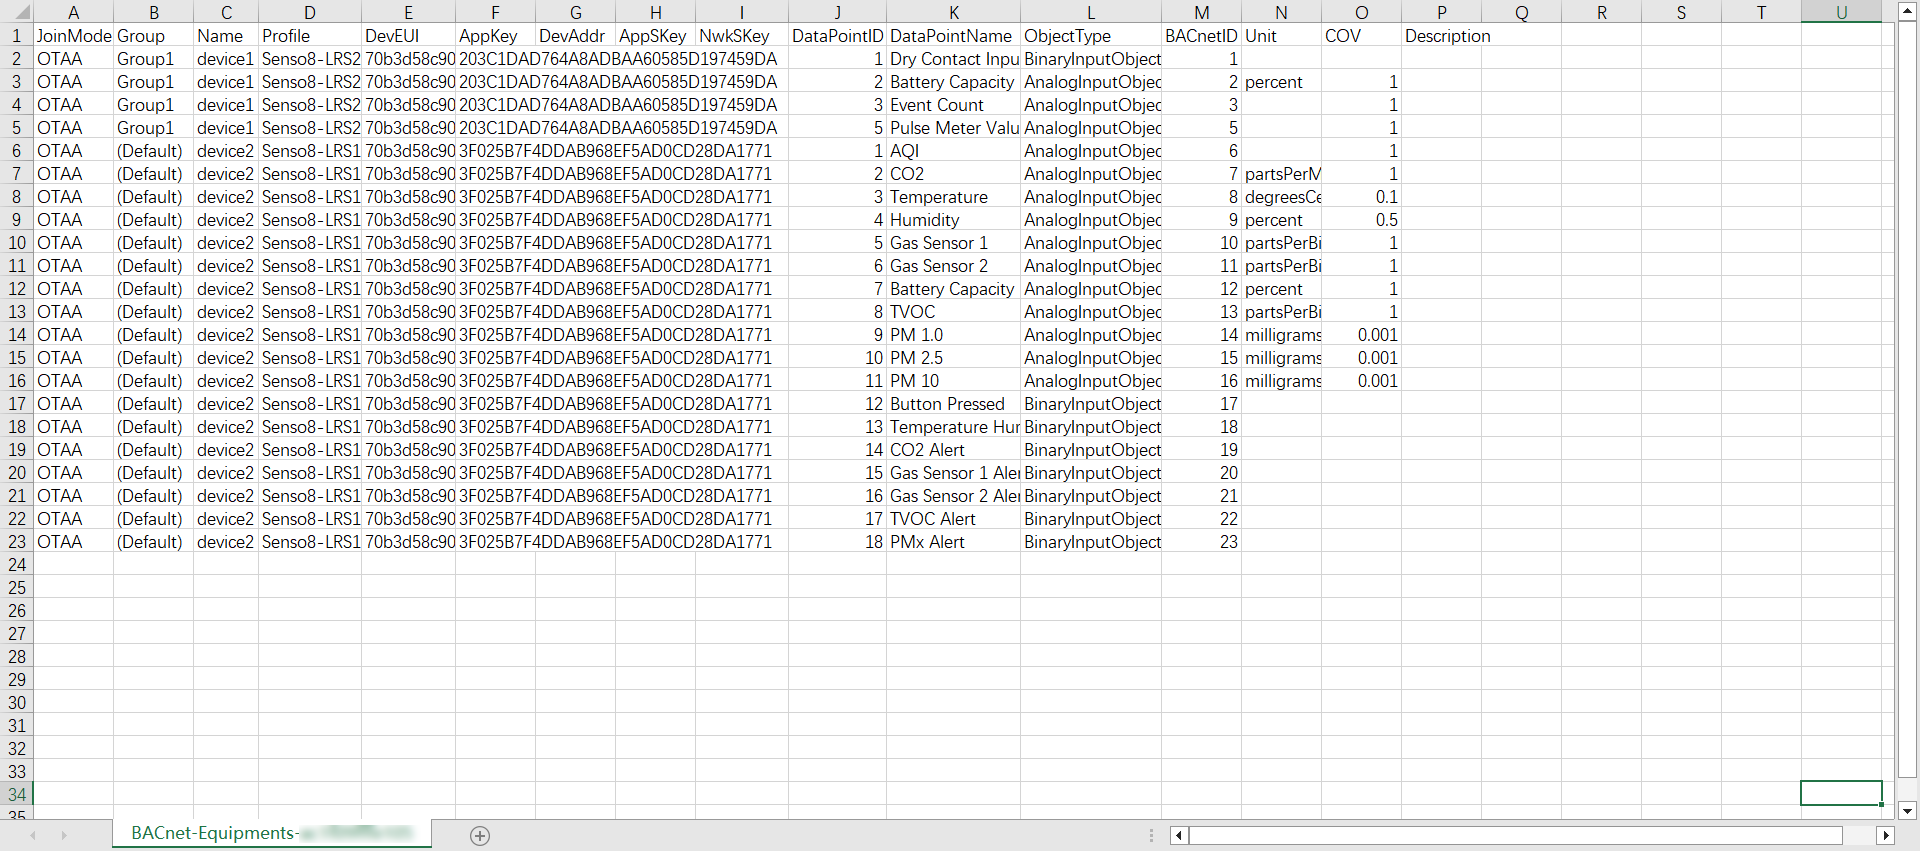 Figure 1: Equipment Data CSV Structure
Field Descriptions
| Field Name | Description |
|---|---|
| JoinMode | The LoRaWAN join mode (OTAA/ABP). |
| Group | The assigned equipment group. |
| Name | The name of the registered device. |
| Profile | The device profile applied. |
| DevEUI | The unique device identifier. |
| APPKey | The application key used in OTAA mode. |
| DevAddr | The device address (applicable only in ABP mode). |
| AppSKey | The application session key (applicable only in ABP mode). |
| NwkSKey | The network session key (applicable only in ABP mode). |
| DataPointID | A Unique identifier for each data point. |
| DataPointName | The name of the data point. |
| ObjectType | The type of BACnet object. |
| BACnetID | The unique ID of each BACnet object instance. |
| Unit | The unit of measurement for the data point. |
| COV | Change-of-Value (COV) increment for triggering events. |
| Description | A brief description of the data point. |
Configure MQTT Integration
The BACnet Gateway Extension supports dual services: BACnet/IP Gateway and MQTT. If you need to integrate with third-party MQTT applications, follow the steps below to configure the MQTT settings.
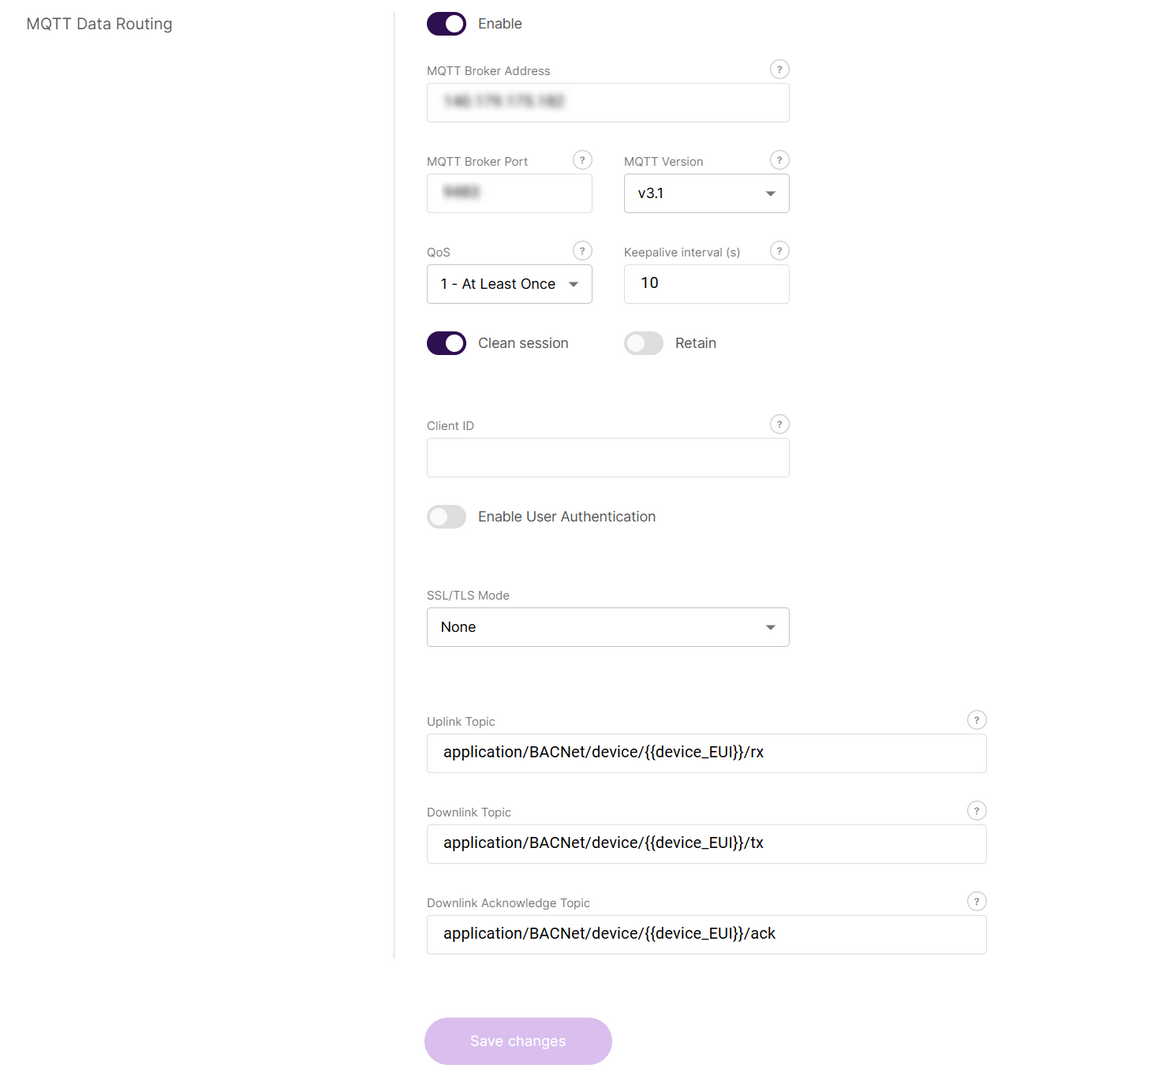 Figure 1: Configure MQTT Integration
- In the MQTT Data Routing section, click the Enable button to activate MQTT integration.
- Configure the MQTT integration parameters:
- MQTT Broker Address: The hostname or IP address of the MQTT server to connect to.
- MQTT Broker Port: The port number for the MQTT server (default: 1883 for unencrypted, 8883 for TLS).
- MQTT Version: Select the MQTT protocol version that matches your server.
- QoS: Level of message delivery assurance:
- 0: At most once
- 1: At least once
- 2: Exactly once
- Keepalive Interval (s): Heartbeat interval in seconds to maintain the connection between client and broker.
- Clean Session: If enabled, the broker does not store session data when the client disconnects.
- Retain: If enabled, the broker retains the last message sent to each topic.
- Client ID: A unique identifier for this MQTT client, used to distinguish between multiple clients.
- Enable User Authentication: Requires username/password login to the MQTT broker for enhanced security.
- Username: The username used for authentication with the MQTT broker.
- Password: The password corresponding to the above username.
- SSL/TLS Mode: Option to enable encrypted communication between client and broker.
- None: No encryption
- CA Certificate: The CA root certificate to verify the MQTT broker’s identity.
- Client Certificate: The X.509 certificate for client authentication (for mutual TLS).
- Client key: The private key file that matches the client certificate.
- Key Pass Phrase (optional): The password for the encrypted private key file.
- TLS Version: Specify the TLS version for securing the connection.
- Uplink Topic/Downlink Topic/Downlink Acknowledge Topic: MQTT topics used by the gateway to publish and receive messages to and the broker.
- Click Save changes.
After MQTT integration is enabled, the BACnet Gateway publishes device uplink data to the configured MQTT broker in JSON format.
Click to view the structure of the published message
{
  "deduplicationId": "89a5c63d-8371-4cb9-93b7-9ba71888b785",
  "time": "2026-01-21T06:41:47.256070904+00:00",
  "deviceInfo": {
    "tenantId": "52f14cd4-c6f1-4fbd-8f87-4025e1d49242",
    "tenantName": "ChirpStack",
    "applicationId": "f07368c1-00cd-4edc-b531-ebd61a273977",
    "applicationName": "BACNet",
    "deviceProfileId": "e392f363-f742-4096-b143-9b71f7869e60",
    "deviceProfileName": "20100",
    "deviceName": "20100",
    "devEui": "70b3d58c9000042b",
    "deviceClassEnabled": "CLASS_A",
    "tags": {
      "payload_type": "NONE",
      "integration_http_enabled": "false"
    }
  },
  "devAddr": "0241e033",
  "adr": true,
  "dr": 5,
  "fCnt": 20,
  "fPort": 10,
  "confirmed": false,
  "data": "ASFkAQABHwAAAAA=",
  "rxInfo": [
    {
      "gatewayId": "ac1f09fffe1057bd",
      "uplinkId": 1878154886,
      "nsTime": "2026-01-21T06:41:47.006301626+00:00",
      "rssi": -103,
      "snr": 8.8,
      "location": {
        "source": "GPS"
      },
      "context": "rM+kgw=="
    }
  ],
  "txInfo": {
    "frequency": 923200000,
    "modulation": {
      "lora": {
        "bandwidth": 125000,
        "spreadingFactor": 7,
        "codeRate": "CR_4_5"
      }
    }
  },
  "regionConfigId": "as923",
  "decodedPayload": [
    {
      "name": "Temperature",
      "channel": 1,
      "value": 25.6,
      "unit": "°C"
    },
    {
      "name": "Humidity",
      "channel": 2,
      "value": 28.7,
      "unit": "%"
    },
    {
      "name": "Battery",
      "channel": 3,
      "value": 100,
      "unit": "%"
    },
    {
      "name": "HumidityLowAlart",
      "channel": 4,
      "value": 0,
      "unit": null
    },
    {
      "name": "HumidityHighAlart",
      "channel": 5,
      "value": 0,
      "unit": null
    },
    {
      "name": "TemperatureLowAlart",
      "channel": 6,
      "value": 0,
      "unit": null
    },
    {
      "name": "TemperatureHighAlart",
      "channel": 7,
      "value": 0,
      "unit": null
    },
    {
      "name": "ButtonPressed",
      "channel": 8,
      "value": 1,
      "unit": null
    }
  ]