RAK11310 WisBlock LPWAN Module Quick Start Guide
This guide introduces the RAK11310 WisBlock Core LPWAN Module and how to use it. RAK11310 consists of a Raspberry Pi RP2040 chip and an SX1262 LoRa transceiver, making it ideal for various IoT projects.
Prerequisites
What Do You Need?
Before going through each and every step on using RAK11310 WisBlock Core, make sure to prepare the necessary items listed below:
Hardware
- RAK11310 WisBlock Core LPWAN Module
- Your choice of WisBlock Base
- Your choice of WisBlock Modules
- USB Cable
- Li-Ion/LiPo battery (optional)
- Solar charger (optional)
Software
You can choose the Arduino IDE or Platform IO to code the RAK11310 WisBlock Core.
Programming RAK11310 via Arduino IDE:- Download and install Arduino IDE.
If you are using Windows 10. Do NOT install the Arduino IDE from the Microsoft App Store. Instead, install the original Arduino IDE from the Arduino official website. The Arduino app from the Microsoft App Store has problems using third-party Board Support Packages.
For Windows users:
After the installation of Arduino IDE, the USB driver must be manually installed. The post_install.bat file must be executed with admin rights in Windows. The location of the .bat file is in the Arduino15 folder - C:\Users\username\AppData\Local\Arduino15\packages\rakwireless\hardware\mbed_rp2040\0.0.6\post_install.bat. You need to change the username in this directory to the actual username. If the USB driver is not installed, your upload of Arduino code to RAK11310 might fail.
- To add the WisBlock Core boards to your Arduino IDE, you need to install the RAKwireless Arduino BSP. You can follow this complete guide on adding the BSP in Arduino IDE. You can also have a look at the RAKwireless Arduino BSP github repository.
In the Arduino IDE, once you installed the BSP, some examples for RAK11310 will be automatically included in the list of examples when you select WisBlock Core RAK11310 Board in the Boards Manager.
Programming RAK11310 via Platform IO:Updated and complete WisBlock examples can be found in the WisBlock Examples repository, which contains source codes that you can copy-paste and upload.
Aside from that, each WisBlock Module has its own quick-start guide to help you in your WisBlock journey.
Product Configuration
Hardware Setup
RAK11310 to WisBlock Base
The RAK11310 will not work without a WisBlock Base board. The WisBlock Base provides a USB connection to program the RAK11310. It also provides a power source and various interfaces to RAK11310, so that it can be connected to other WisBlock Modules via different module slots.
RAKwireless offers many WisBlock Base Boards compatible with WisBlock Core. It is highly recommended to look at these WisBlock Base boards to see what matches your requirements in terms of available module slots, power supply options, and overall size.
To illustrate, RAK11310 can be connected to the RAK5005-O WisBlock Base, as shown in Figure 1.
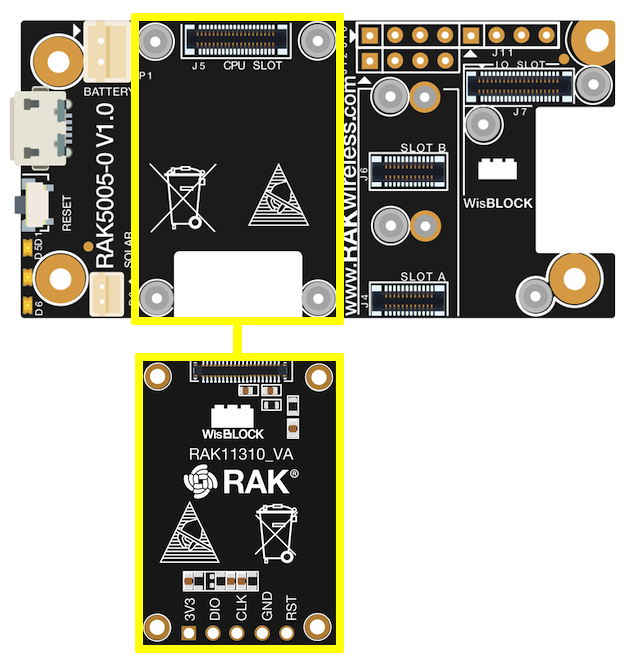 Figure 1: RAK11310 Connection to WisBlock Base RAK5005-O
There are a few pins that are exposed on RAK5005-O, and you can easily use them via header pins. The labels are at the back, as shown in Figure 2.
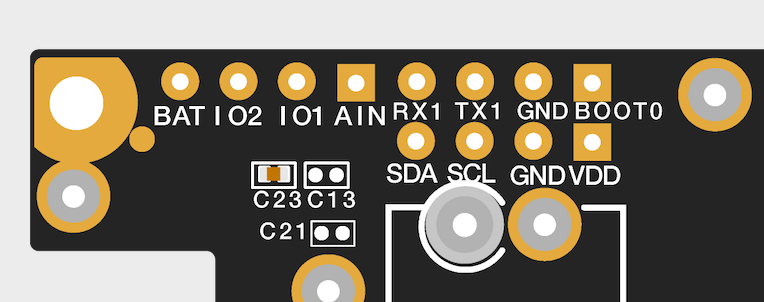 Figure 1: WisBlock Base exposed pins
More information can be found on the official documentation of the specific WisBlock Base you used in your project.
For RAK5005-O WisBlock Base with RAK11310 WisBlock Core, the accessible GPIO pins are defined as follows in the Arduino IDE and Platform IO:
WB_IO1for IO1 pinWB_IO2for IO2 pin (Also used to control the 3.3V supply of some WisBlock Modules to achieve low-power IoT devices.)WB_A0for AIN
There are two usable LEDs as well that can be controlled by the RAK11310 on the WisBlock Base board:
LED_GREENLED_BLUE
UART1 and I2C_1 are also exposed on the header of the WisBlock Base board.
- RAK11310 has a native USB peripheral onboard (Serial), which is used for programming and Serial debugging, and two usable hardware UART1 and UART2 (Serial 1 and Serial 2). UART1 is accessible on WisBlock Slot A, WisBlock IO slot, and the exposed header pins. UART2 is accessible only on the WisBlock IO slot.
- The I2C_1 header pins are shared on WisBlock Base Slots A to D as well. The second I2C_2 is available only on the WisBlock IO slot.
RAK11310 to WisBlock Modules
RAK11310 WisBlock Core is designed to be interfaced with other WisBlock Modules like sensors, displays, and other interfaces. You need to connect these modules to compatible slots on the WisBlock Base.
Each WisBlock Module that will be used with RAK11310 WisBlock Core has a dedicated quick-start guide you can follow on how to connect to the WisBlock Base.
Listed are the quick-start guides of some WisBlock modules you can buy from our store:
The listed links are just examples. All WisBlock Modules have their own quick-start guide that you can use as a reference to get started on specific modules.
Figure 3 shows an illustration on how you can combine various WisBlock Modules with the RAK11310 WisBlock Core via the WisBlock Base board.
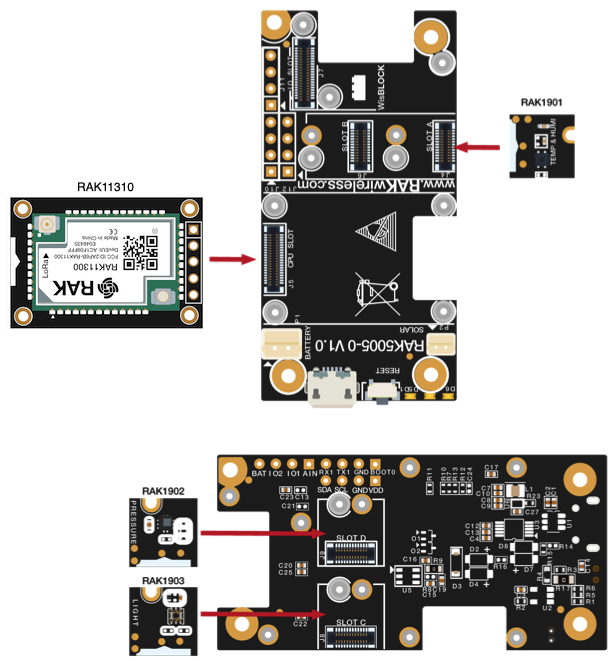 Figure 1: RAK11310 Connection to WisBlock Base and other WisBlock Modules
Assembling and Disassembling of WisBlock Modules
Assembling
Figure 4 shows how to mount the RAK11310 module on top of a WisBlock Base board (RAK5005-O). Follow carefully the procedure defined in WisBlock module assembly/disassembly instructions to secure the connection safely. Once attached, carefully fix the module with one or more pieces of M1.2 x 3 mm screws depending on the module.
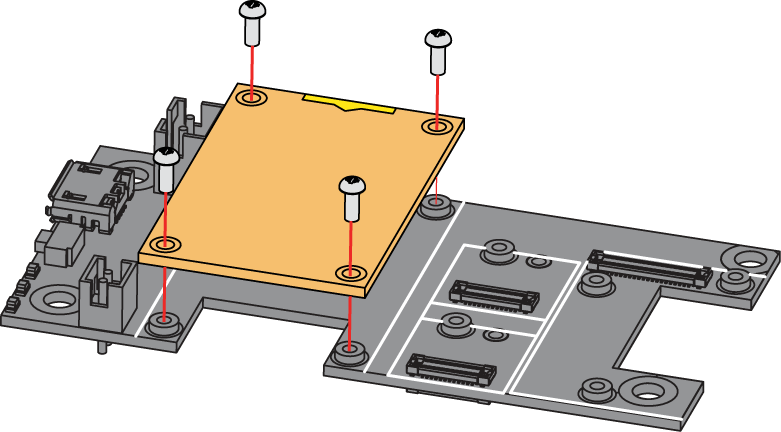 Figure 1: RAK11310 Mounting Sketch
Disassembling
The procedure in disassembling any type of WisBlock module is the same.
- First, remove the screws.
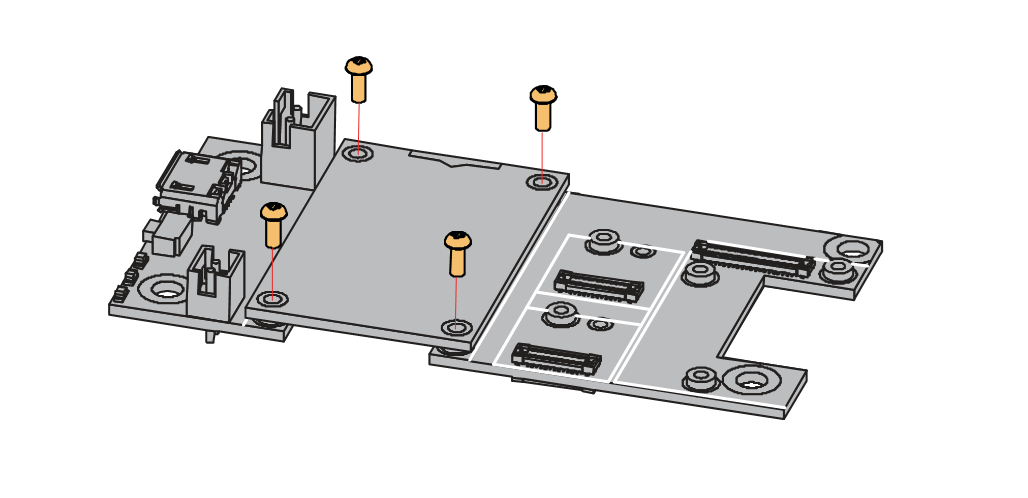 Figure 1: Removing screws from the WisBlock module
- Once the screws are removed, check the silkscreen of the module to find the correct location where force can be applied.
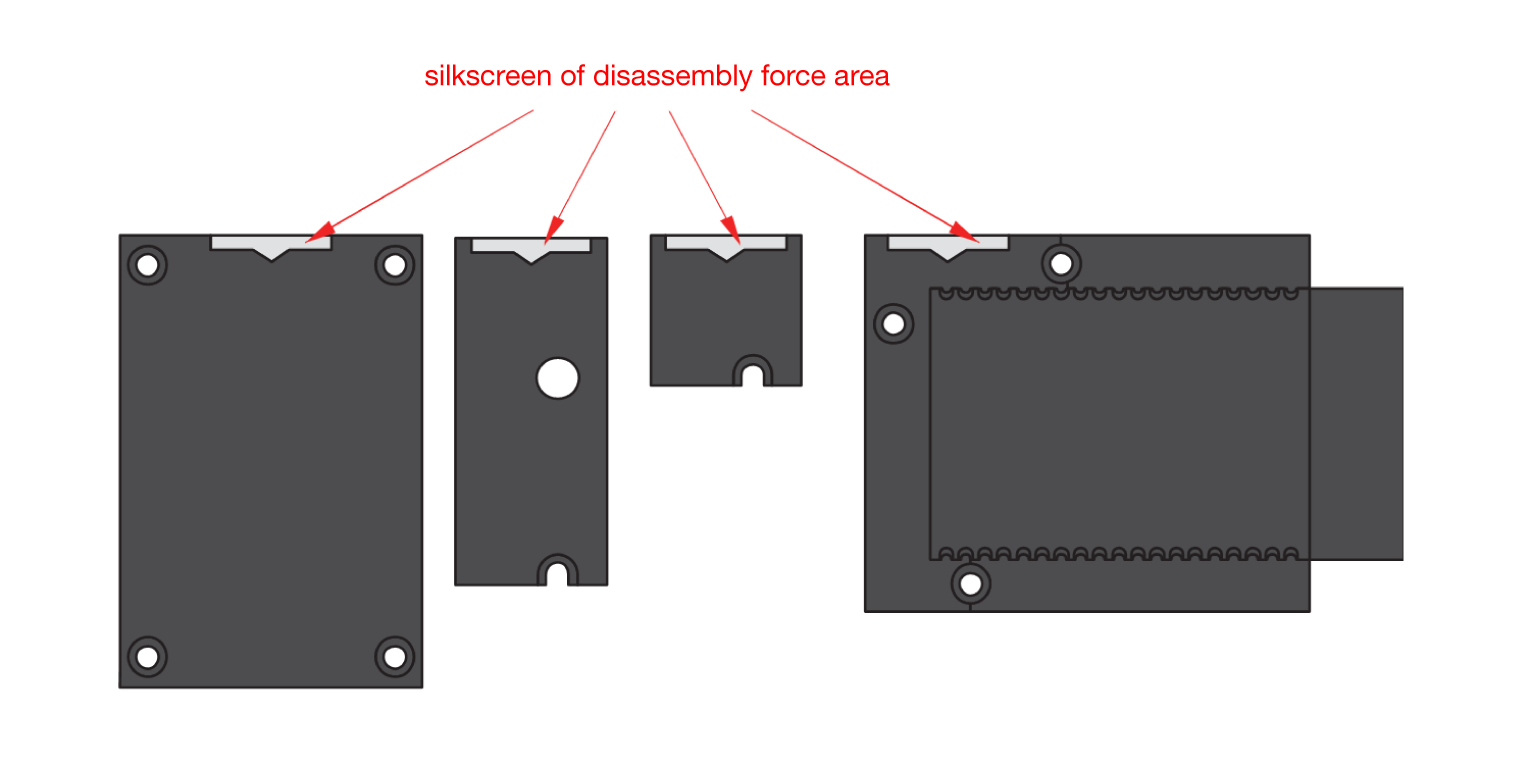 Figure 1: Detaching silkscreen on the WisBlock module
- Apply force to the module at the position of the connector, as shown in Figure 7, to detach the module from the baseboard.
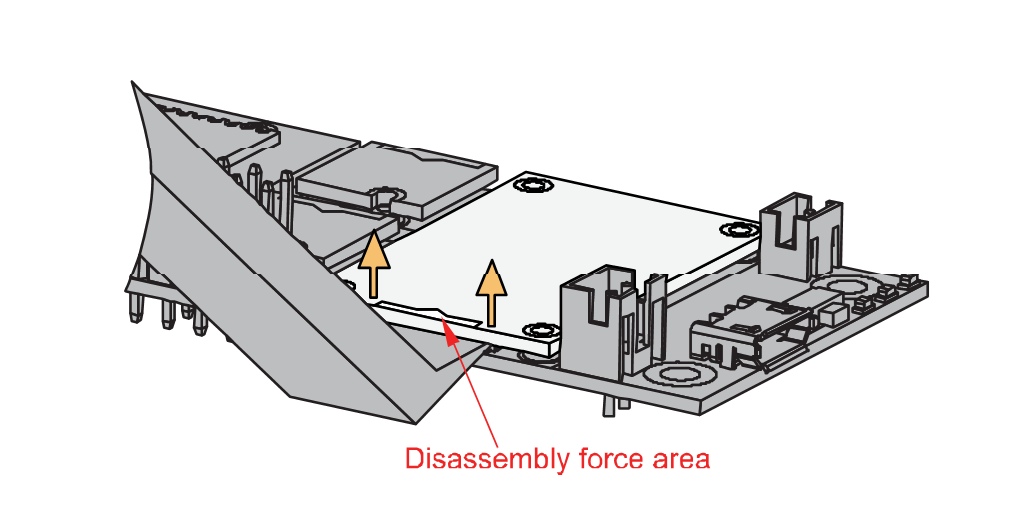 Figure 1: Applying even forces on the proper location of a WisBlock module
LoRa Antenna
Another important component of RAK11310 is the LoRa antenna.
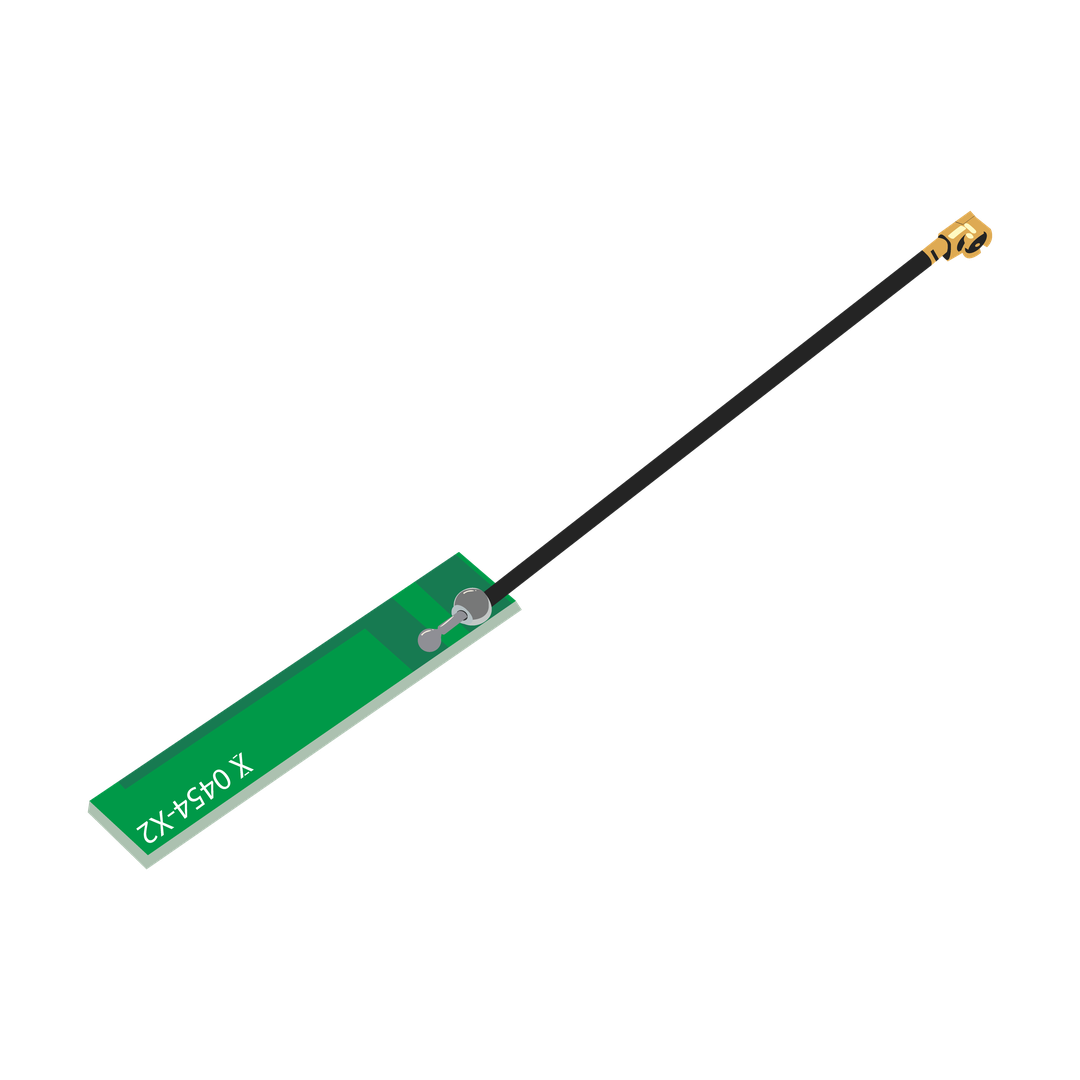 Figure 1: LoRa Antenna
You need to ensure that the antenna is properly connected to have a good LoRa signal. Do not power the module without an antenna connected to the IPEX connector to avoid damage to the RF section of the chip.
RAK11310 has a label on its sticker showing where to connect the antennas, as shown in Figure 9.
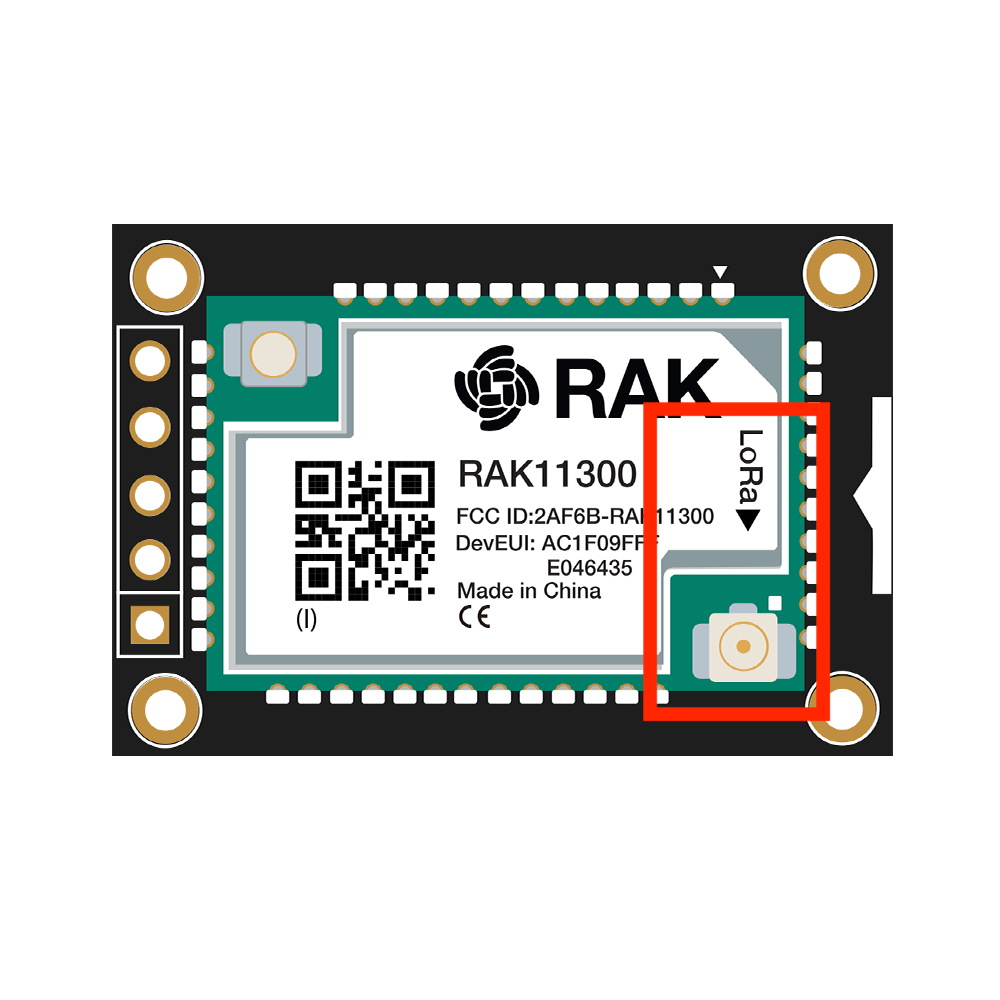 Figure 1: RAK11310 Antenna Label
Detailed information about the RAK11310 LoRa antenna can be found on the antenna datasheet.
When using LoRa, make sure that an antenna is always connected. Using these transceivers without an antenna can damage the system. Make sure to fix the module with the screws to ensure a proper function.
Battery and Solar Connection
RAK11310 can be powered via the USB cable or a Li-Ion/LiPo battery via the dedicated connectors, as shown in Figure 11. The matching connector for the battery wires is a JST PHR-2 2 mm pitch female.
This illustration uses RAK5005-O as WisBlock Base. There are other WisBlock Base boards available, and you need to check the datasheet of the specific WisBlock Base board for the right polarity and other parameters.
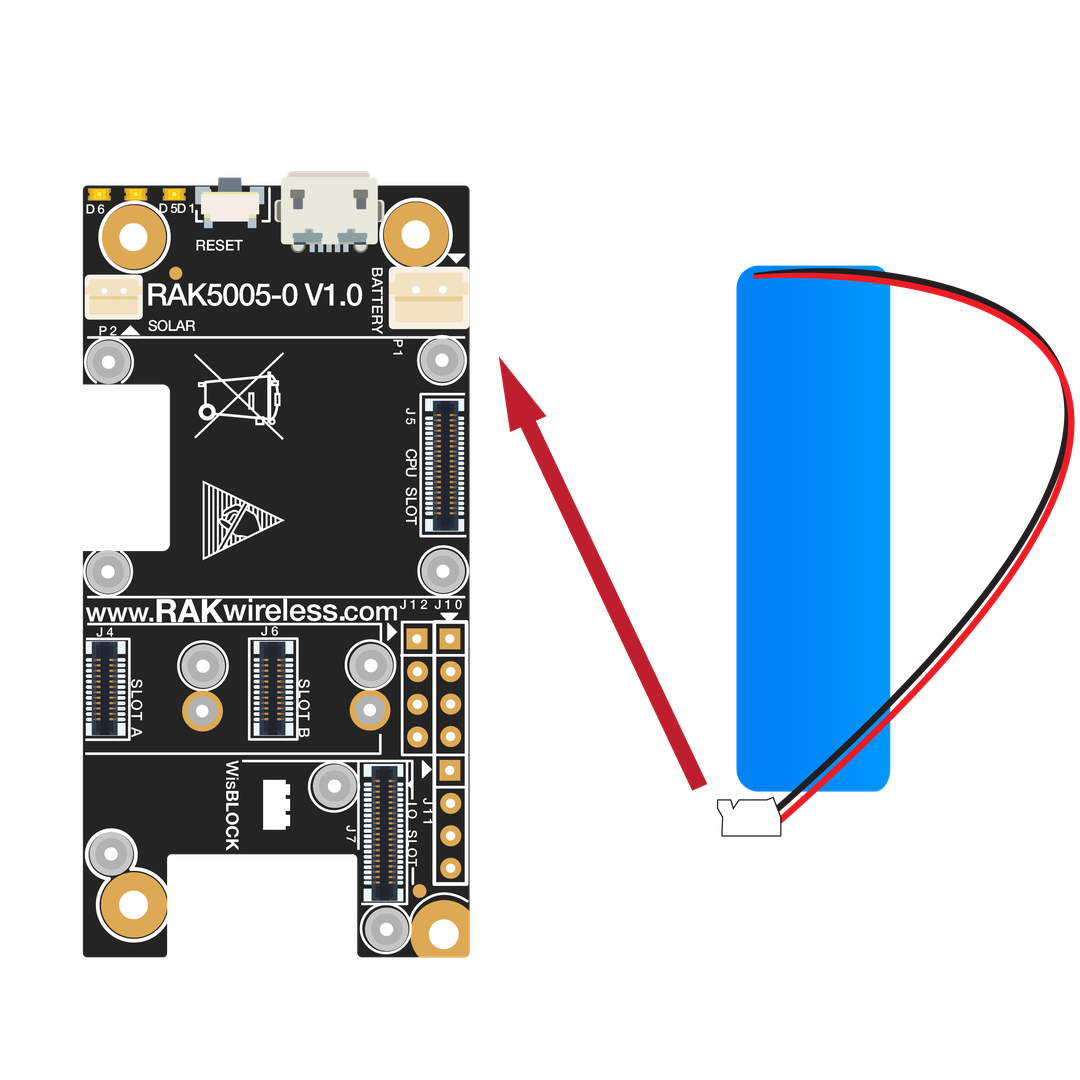 Figure 1: WisBlock Base Connection
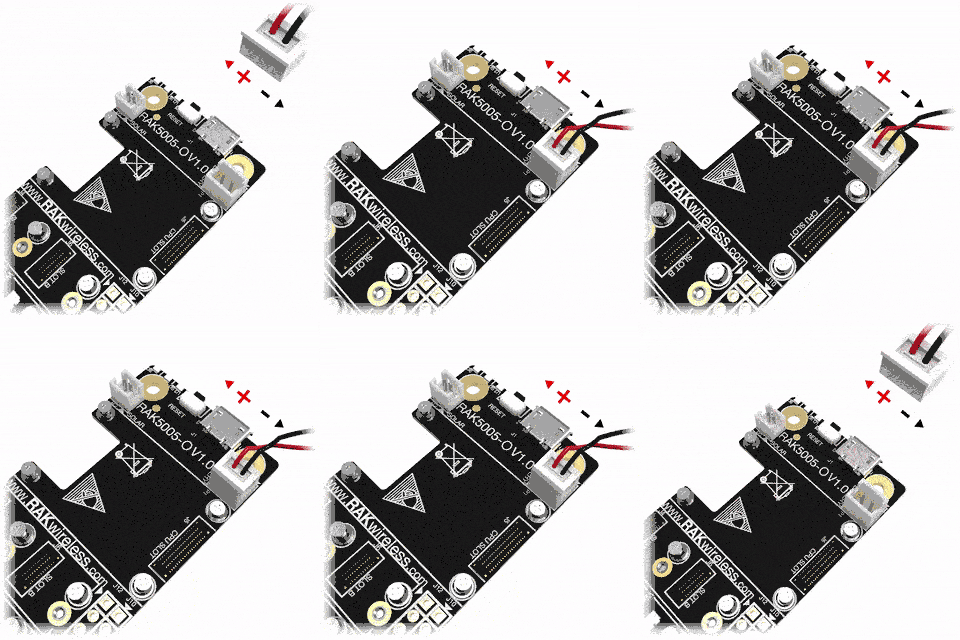 Figure 1: Battery Connection
The battery can be recharged, as well, via a 5 V solar panel, as shown in Figure 12. The matching connector for the solar panel wires is a JST ZHR-2 1.5 mm pitch female.
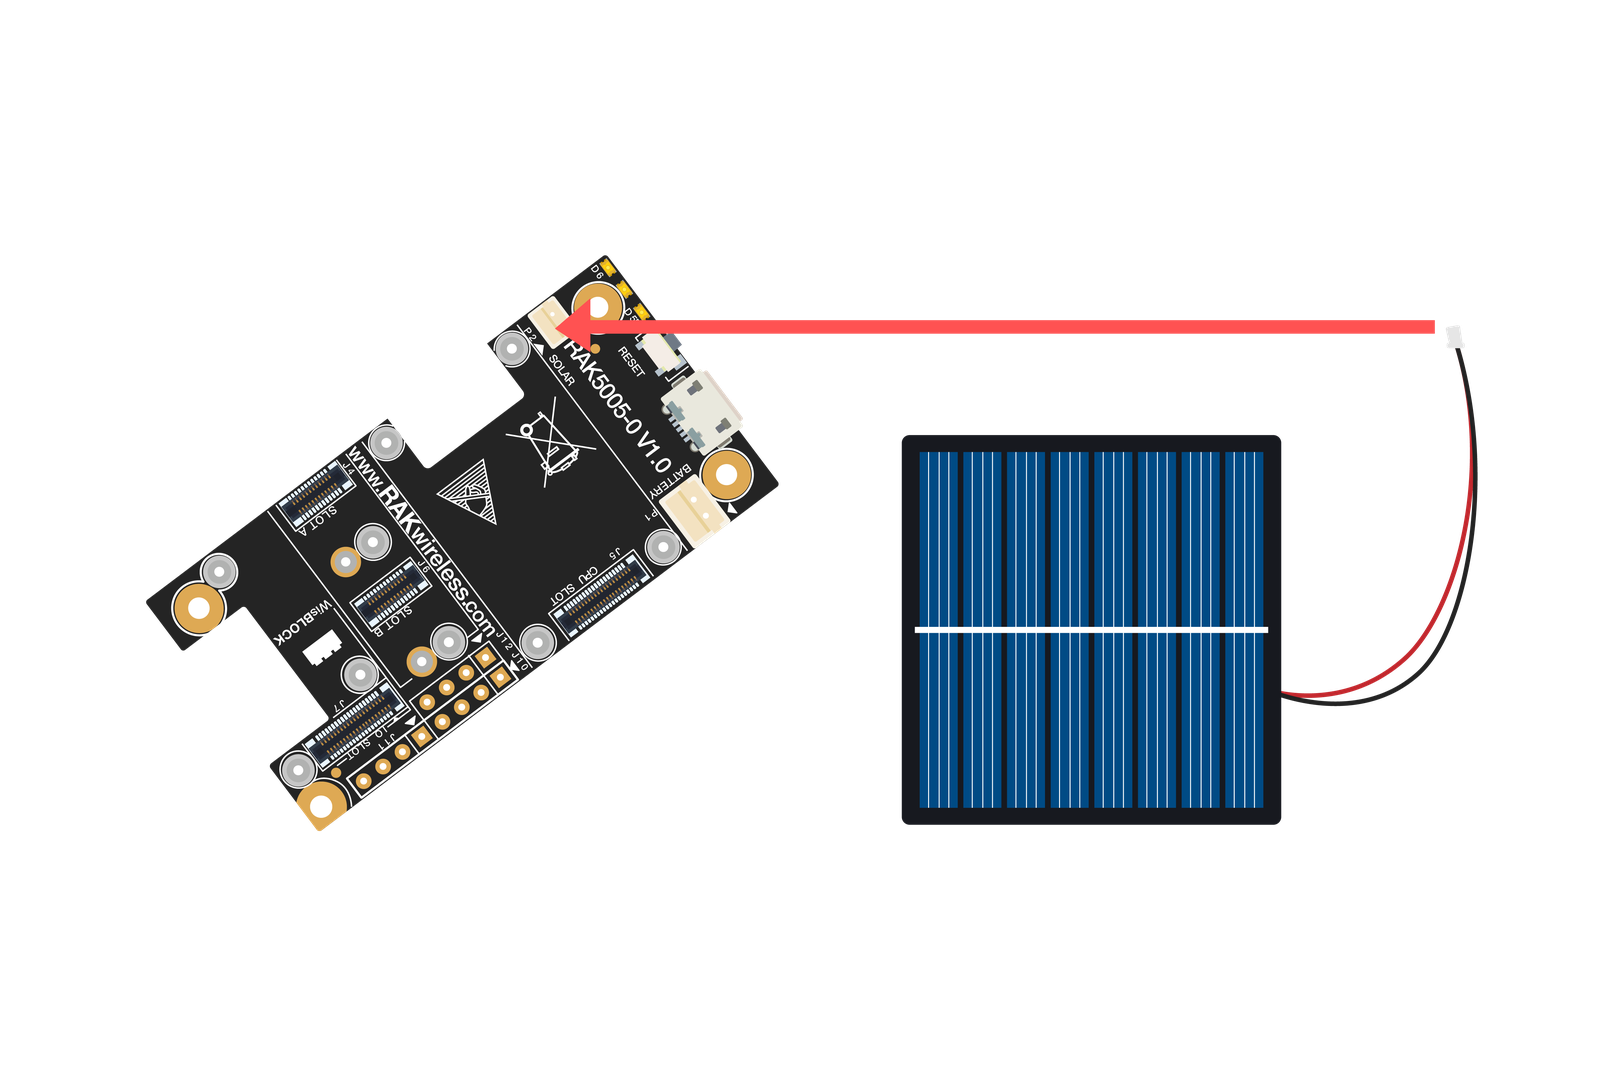 Figure 1: Solar Panel Connection
You can find the specification of the battery and solar panel in the datasheet of the WisBlock Base.
- Only 3.7-4.2 V Rechargeable LiPo batteries are supported. Do not use other types of batteries with the system.
- Only 5 V solar panels are supported. Do not use 12 V solar panels. It will destroy the charging unit and eventually other electronic parts.
- Make sure the battery wires match the polarity on the RAK5005-O board. Not all batteries have the same wiring.
Software Setup
RAK11310 WisBlock Core is designed to be interfaced with other WisBlock Modules like sensors, displays, and other interfaces. To make useful devices, you need to upload a source code to the RAK11310. Before you continue, you should have either the Arduino BSP or Platform IO already set up.
RAK11310 Example Repository
To quickly build your IoT device effortlessly, examples for RAK11310 for all WisBlock Modules are provided.
You can access the code on the WisBlock Example code repository. Examples compatible only with RAK11310 are in the RAK11300 folder. Shared WisBlock Core examples are in the common folder.
To use these examples, you have two options: Arduino IDE or Platform IO.
RAK11310 on Arduino IDE
Some examples for various WisBlock Modules like the RAK1901 and RAK1902 are available in the Arduino IDE once you install the BSP for the Arduino IDE, as shown in Figure 13. The updated and complete WisBlock examples are still in the WisBlock Examples.
 Figure 1: RAK11310 WisBlock Core Examples
It is highly recommended to also check the dedicated quick-start guide that you can follow on various WisBlock Modules. Each quick-start guide contains the detailed steps on how to open the examples and upload them to the RAK11310.
Listed are the examples where you can check the Software Setup on the quick-start guide of the following WisBlock Modules:
The listed links are just examples. All WisBlock Modules have their own quick-start guide that you can use as a reference to get started on specific modules.
RAK11310 on Platform IO
For the Platform IO, get the examples on the WisBlock Example code repository and add the necessary libraries individually. Then you can compile the example code.
Connecting RAK11310 to LoRaWAN
RAK11310 is the WisBlock Core capable of LoRaWAN connectivity.
There is an example on how to start with LoRaWAN in the RAK WisBlock examples in the Arduino IDE named LoRaWAN_OTAA_ABP. This is also available in the WisBlock Repository.
 Figure 1: RAK11310 LoRaWAN Example
Configuration of LoRaWAN Example Code
There are configurations you need to set up to ensure that the device can join a LoRaWAN Network server.
The guide below will explain the default settings and how to configure them.
- Set up the region.
Default is EU868.
LoRaMacRegion_t g_CurrentRegion = LORAMAC_REGION_EU868;
You can change this to the region applicable to you like LORAMAC_REGION_US915, LORAMAC_REGION_AU915, etc.
- Set up the activation method.
Default is OTAA.
bool doOTAA = true;
To configure the device to ABP, you need to change this boolean variable to false.
- Set up the message type to confirmed or unconfirmed.
Default is confirmed message.
lmh_confirm g_CurrentConfirm = LMH_CONFIRMED_MSG;
You can change to unconfirmed message by changing the value to LMH_UNCONFIRMED_MSG.
- Set up device class.
Default is Class A.
DeviceClass_t g_CurrentClass = CLASS_A;
You can change this to CLASS_B (still under development) or CLASS_C.
- Set up the keys.
If configured for OTAA activation:
uint8_t nodeDeviceEUI[8] = {0x88, 0x88, 0x88, 0x88, 0x88, 0x88, 0x33, 0x33};
uint8_t nodeAppEUI[8] = {0xB8, 0x27, 0xEB, 0xFF, 0xFE, 0x39, 0x00, 0x00};
uint8_t nodeAppKey[16] = {0x88, 0x88, 0x88, 0x88, 0x88, 0x88, 0x88, 0x88, 0x88, 0x88, 0x88, 0x88, 0x88, 0x88, 0x88, 0x88};
If configured for ABP activation:
uint32_t nodeDevAddr = 0x260116F8;
uint8_t nodeNwsKey[16] = {0x7E, 0xAC, 0xE2, 0x55, 0xB8, 0xA5, 0xE2, 0x69, 0x91, 0x51, 0x96, 0x06, 0x47, 0x56, 0x9D, 0x23};
uint8_t nodeAppsKey[16] = {0xFB, 0xAC, 0xB6, 0x47, 0xF3, 0x58, 0x45, 0xC7, 0x50, 0x7D, 0xBF, 0x16, 0x8B, 0xA8, 0xC1, 0x7C};
- Set up uplink period.
The default is 20000 mS.
#define LORAWAN_APP_INTERVAL 20000
You can make the transmission interval shorter or longer by changing this value.
LoRaWAN Payload
This default example will send a string Hello! to the LoRaWAN server. This is set up in the void send_lora_frame(void) function.
    memset(m_lora_app_data.buffer, 0, LORAWAN_APP_DATA_BUFF_SIZE);
    m_lora_app_data.port = gAppPort;
    m_lora_app_data.buffer[i++] = 'H';
    m_lora_app_data.buffer[i++] = 'e';
    m_lora_app_data.buffer[i++] = 'l';
    m_lora_app_data.buffer[i++] = 'l';
    m_lora_app_data.buffer[i++] = 'o';
    m_lora_app_data.buffer[i++] = '!';
    m_lora_app_data.buffsize = i;
The LoRaWAN payload is packaged in this function. You can change this section to format your payload.
Formatting the Payload
For illustration, you can check how the 32-bit latitude value (named ilat) from a GNSS sensor is formatted to a 4-byte size array.
This is the exact code snippet to format the Latitude data of the GPS Tracker example.
    gps.f_get_position(&flat, &flon, &age);
    flat == TinyGPS::GPS_INVALID_F_ANGLE ? 0.0 : flat;
    ilat = flat * 100000;

    // longitude section...

    m_lora_app_data.port = gAppPort;
    m_lora_app_data.buffer[0] = 0x09;
    //lat data
    m_lora_app_data.buffer[1] = (ilat & 0xFF000000) >> 24;
    m_lora_app_data.buffer[2] = (ilat & 0x00FF0000) >> 16;
    m_lora_app_data.buffer[3] = (ilat & 0x0000FF00) >> 8;
    m_lora_app_data.buffer[4] =  ilat & 0x000000FF;
Another important part of the code is configuring the size of the payload.
This is done with the m_lora_app_data.buffsize variable. For illustration, with only ilat above as the value to send, you need to set the buffer size to five (5), because the array starts at zero (0) and ends at four (4).
m_lora_app_data.buffsize = 5;
Decoding the Payload on the LoRaWAN Network Server
On the LoRaWAN network server side like TTN, Chirpstack, Helium, the value transmitted can be retrieved by decoding the payload.
    latitude_int = (bytes[1] << 24) | (bytes[2] << 16) | (bytes[3] << 8) | (bytes[4]);
    decoded.latitude = latitude_int / 100000;
Important Function in the LoRaWAN Example.
LoRa periodic transmission function should be very short, and all reading and processing of the data must be done in the main loop.
void tx_lora_periodic_handler(void)
Same with the transmission function, the receiving event handler should be short as well. All processing of the received data should be done in the main loop.
void lorawan_rx_handler(lmh_app_data_t *app_data)
Uploading the LoRaWAN Code
After all the configuration is done and the payload is formatted properly, you can now compile and upload the code. If you get errors compiling the LoRaWAN example, ensure that you have an updated BSP by checking the version in the boards manager.
 Figure 1: RAK11310 BSP(Board Support Package) in Arduino IDE Board Manager
You also need to ensure that you have the updated SX126x library.
 Figure 1: SX126x-Arduino Library
For Windows users, you need to run the post_install.bat script to be able to compile sketches for RAK11310. You can execute the script by double-clicking it or via command line.
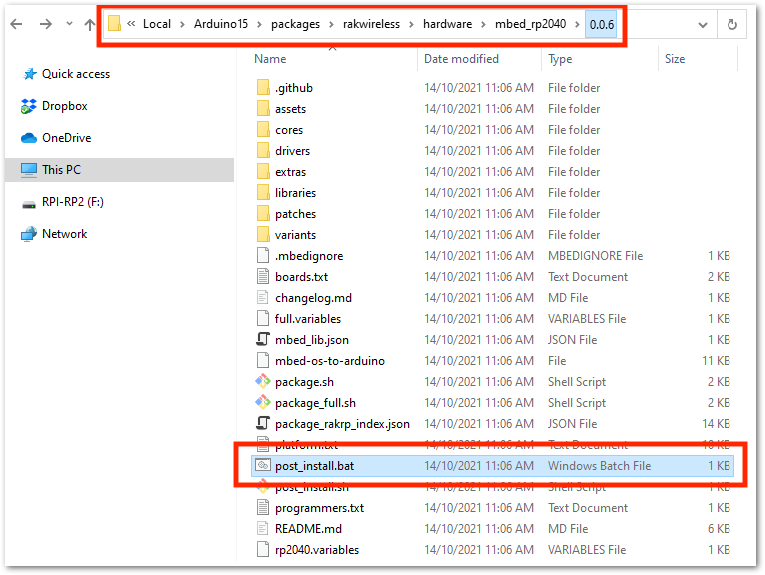 Figure 1: Executing post_install.bat script directly
 Figure 1: Running post_install.bat via commandline
LoRaWAN Configuration using AT Commands
Aside from the LoRaWAN example code in the previous section, you also have the option to configure the RAK11310 LoRaWAN parameters via AT commands.
The RAK11310 WisBlock Core is based on the RAK11300 WisDuo module, and it supports AT commands set that will let you configure LoRaWAN-related parameters. This is very useful in scenarios where you need to deploy many devices and you want to quickly onboard devices just by sending AT commands. The AT command set is already enabled in your RAK11310 WisBlock Core, and you can use it at any time. It will only be overwritten once you upload new firmware to it.
To utilize the AT command feature in your own custom firmware, you need to include the AT command parser functions that can be found in the RAK11300 AT command firmware repository.
Miscellaneous
Upgrading the Firmware
If you want to upgrade to the latest version firmware of the module, you can follow this section. RAK11310 uses the WisDuo RAK11300 module, and it shares the same firmware. The latest firmware can be found in the software section of RAK11300 Datasheet.
Firmware Upgrade Through USB
Minimum Hardware and Software Requirements
Refer to this table for the minimum hardware and software required to perform the firmware upgrade via USB.
| Hardware/Software | Requirement |
|---|---|
| Computer | A Windows/Ubuntu/Mac computer |
| USB Connection | RAK11310 attached to WisBlock Base Board |
| Firmware File | .uf2 firmware file downloaded from the website |
Firmware Upgrade Procedure
Execute the following procedure to upgrade the firmware via USB using the .uf2 firmware file.
-
Download the latest application firmware of the RAK11300.
-
Connect the WisBlock Base where RAK11310 is attached to the computer via USB.
-
Activate RAK11300 USB bootloader mode. There are two possible ways to do this:
- Click the reset button of the WisBlock Base Board twice to enable the USB Bootloader mode of the RAK11300 module.
- Hold the BootSel button in the RAK11300 module, reset the module (press the reset button of WisBlock Base Board for at least 2 seconds) then wait for the USB Mass Storage
RPI-RP2to appear before releasing the BootSel button.
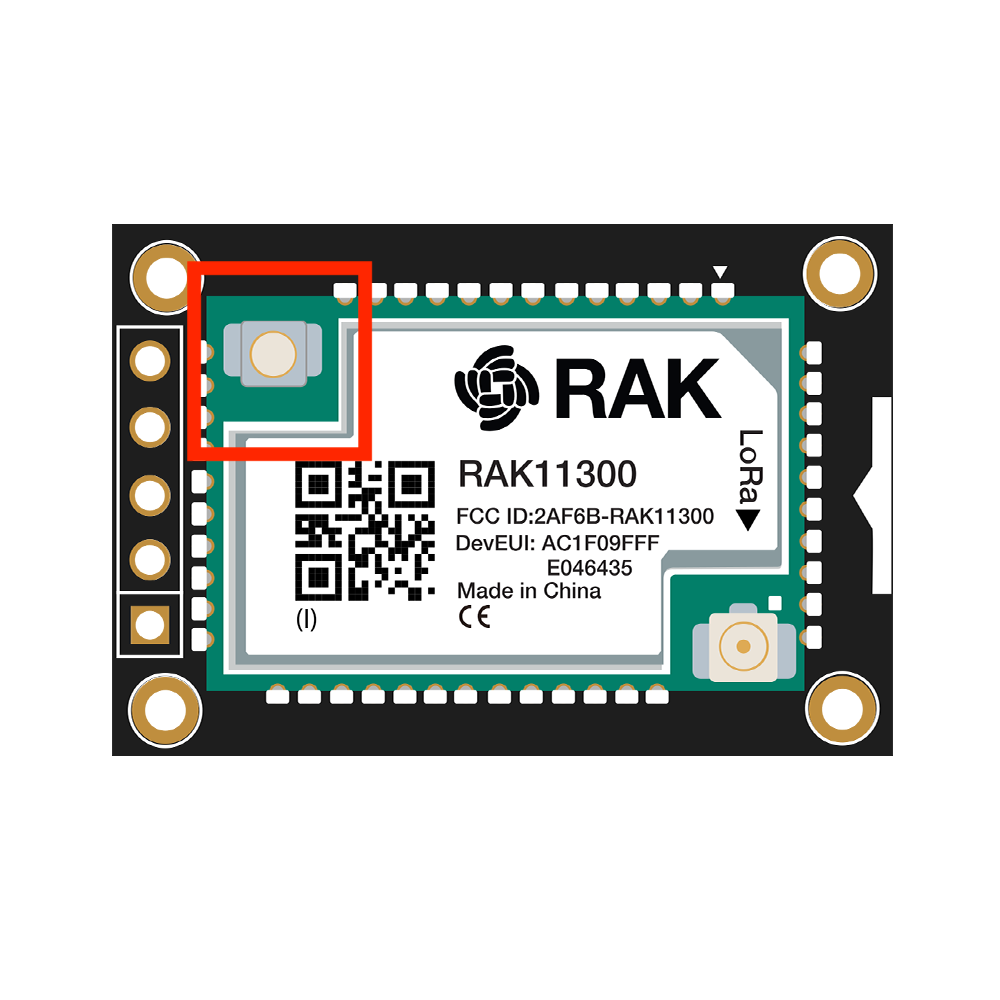 Figure 1: RAK11310 Bootsel Button
You need to do either of the two options until the USB Mass Storage RPI-RP2 shows on your computer.
- Copy the firmware.uf2 file to the
RPI-RP2Mass Storage device.
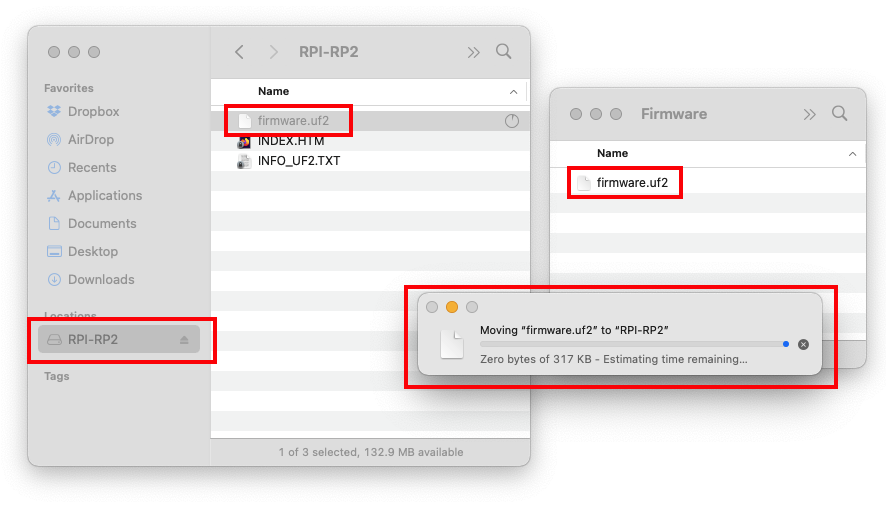 Figure 1: Drag the firmware.uf2 file to RPI-RP2 USB Mass Storage
- You need to reset the device after updating the
.uf2firmware file.
