RAK13002 WisBlock IO Module Quick Start Guide
Prerequisite
What Do You Need?
Before going through each and every step on using the RAK13002 WisBlock module, make sure to prepare the necessary items listed below:
Hardware
- RAK13002 Wisblock IO Module
- Your choice of WisBlock Base
- Your choice of WisBlock Core
- USB Cable
- Li-Ion/LiPo battery (optional)
- Solar charger (optional)
Software
- Download and install ArduinoIDE.
- To add the RAKwireless Core boards on your Arduino Boards Manager, install the RAKwireless Arduino BSP.
Product Configuration
Hardware Setup
The RAK13002 WisBlock IO Module is designed as an IO extension module that allows you to connect external digital and analog modules to create a customized IoT solution. It supports two (2) I2C interfaces, two (2) UART interfaces, one (1) SPI Interface, six (6) GPIOs, and two (2) ADC interfaces. For more information about RAK13002, refer to the Datasheet.
The RAK13002 WisBlock IO Module can be mounted on the IO slot of the WisBlock Base board, as shown in Figure 1. Also, always secure the connection of the WisBlock module by using compatible screws.
 Figure 1: RAK13002 connection to WisBlock Base
Assembling and Disassembling of WisBlock Modules
Assembling
As shown in Figure 2, the location for the IO slot is properly marked by silkscreen. Follow carefully the procedure defined in RAK5005-O module assembly/disassembly instructions to attach a WisBlock module. Once attached, carefully fix the module with three pieces of M1.2 x 3 mm screws.
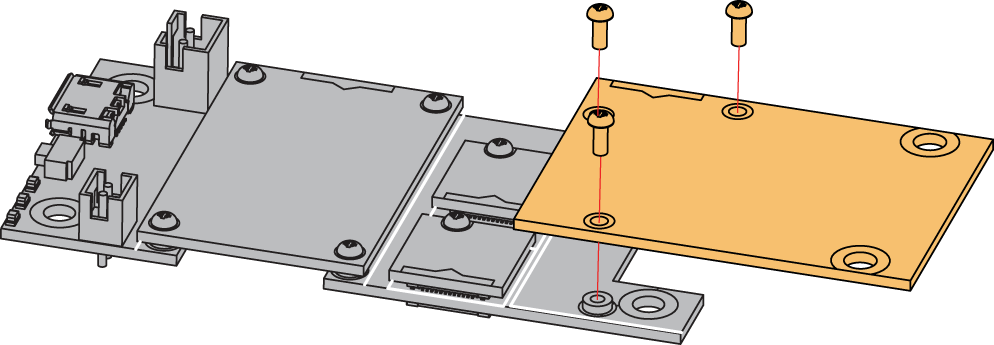 Figure 1: RAK13002 assembly to WisBlock Base
Disassembling
The procedure in disassembling any type of WisBlock modules is the same.
- First, remove the screws.
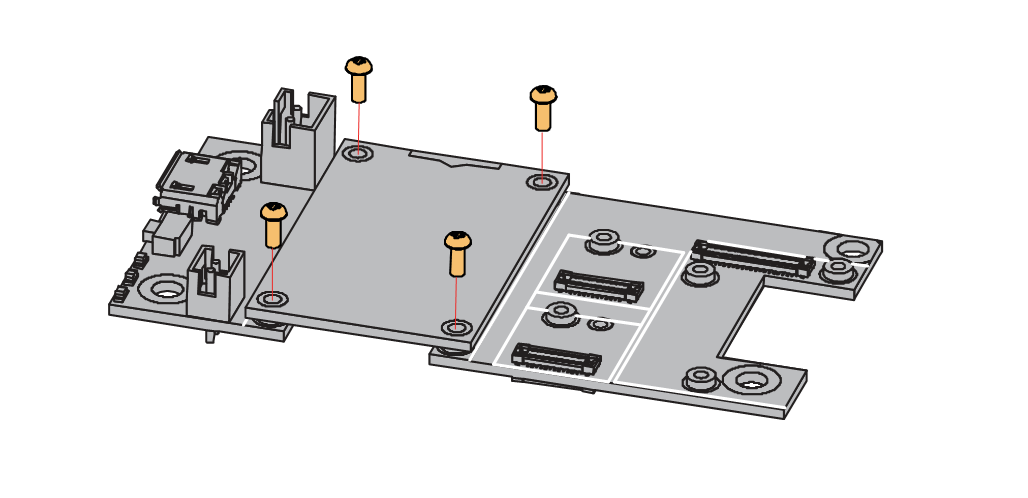 Figure 1: Removing screws from the WisBlock module
- Once the screws are removed, check the silkscreen of the module to find the correct location where force can be applied.
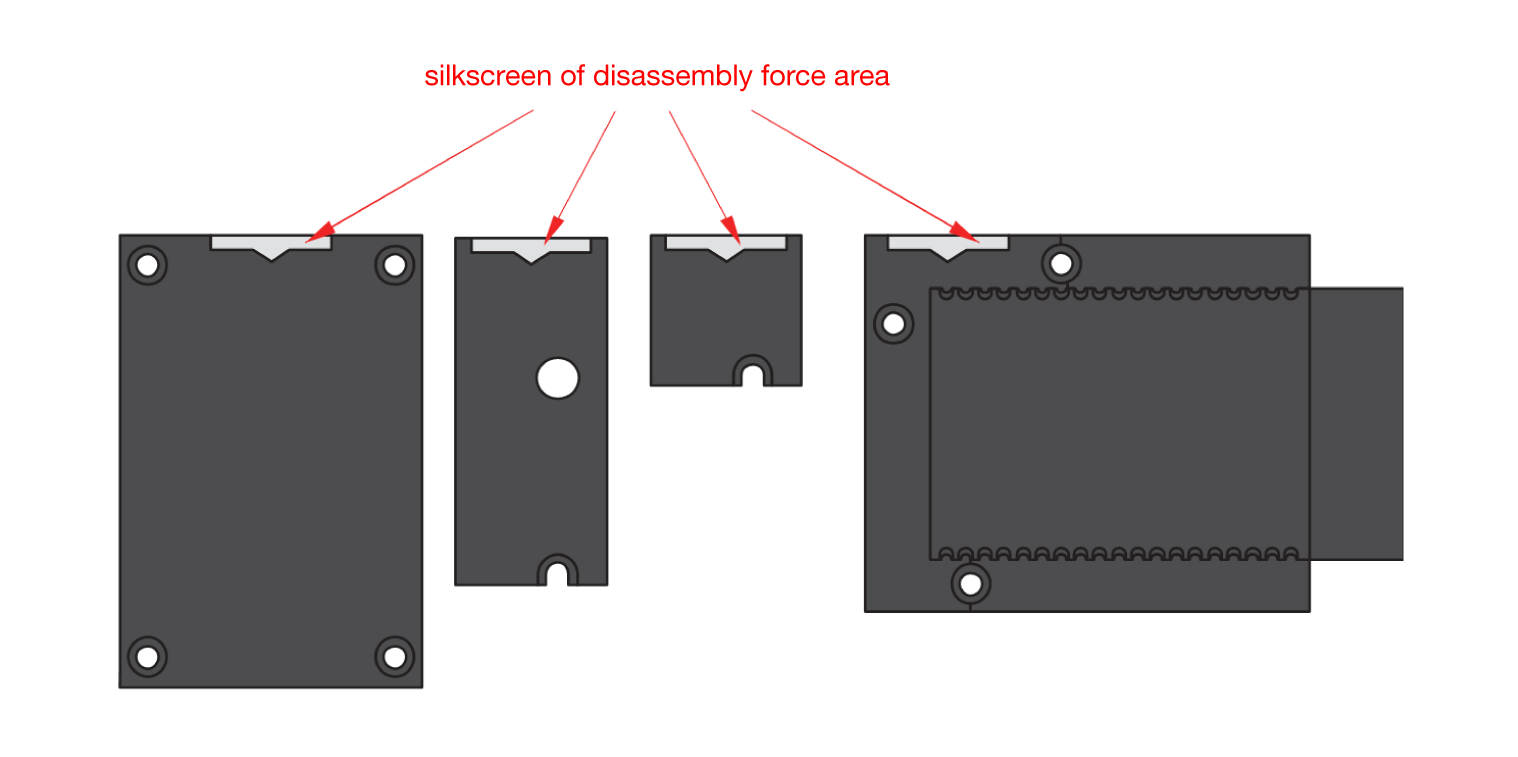 Figure 1: Detaching silkscreen on the WisBlock module
- Apply force to the module at the position of the connector, as shown in Figure 5, to detach the module from the baseboard.
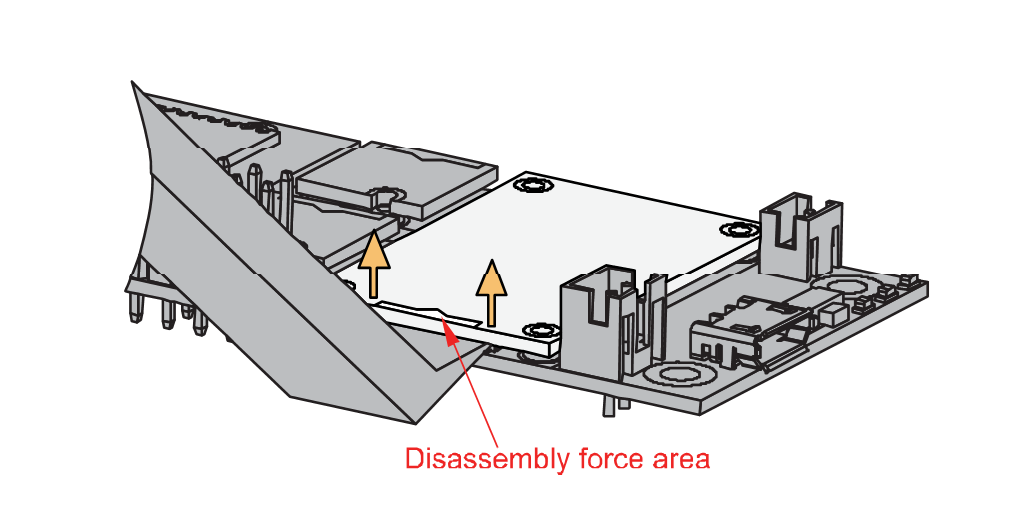 Figure 1: Applying even forces on the proper location of a WisBlock module
If you will connect other modules to the remaining WisBlock Base slots, check on the WisBlock Pin Mapper tool for possible conflicts.
After all this setup, you can now connect the battery (optional) and USB cable to start programming your WisBlock Core.
Software Configuration and Example
The RAK13002 module exposes the IO pins, SPI, I2C, and UART communication ports. You can use these ports to connect sensors or modules, digital I/O, analog I/O, and slave devices. These ports are routed to the WisBlock Core through the IO connector.
For RAK13002, the accessible GPIO pin assignments are defined as follows in the Arduino IDE:
WB_IO1for IO1, GPIO1 pinWB_IO2for IO2, GPIO2 pinWB_IO3for IO3, GPIO3 pinWB_IO4for IO4, GPIO4 pinWB_IO5for IO5, GPIO5 pinWB_IO6for IO6, GPIO6 pinWB_SW1for SW1 pinWB_A0for AIN0, ADC Input pinWB_A1for AIN1, ADC Input pin
| Row/Column | Column 1 | Column 2 | Column 3 | Column 4 |
|---|---|---|---|---|
| Row 1 | VCC | VCC | VCC | VCC |
| Row 2 | GND | GND | GND | GND |
| Row 3 | IO1 | SCL1 | TXD0 | CS |
| Row 4 | IO3 | SDA1 | RXD0 | SDI |
| Row 5 | IO4 | SCL2 | TXD1 | SDO |
| Row 6 | IO5 | SDA2 | RXD1 | SCK |
| Row 7 | IO6 | LED1 | AIN0 | RST |
| Row 8 | IO7 | LED2 | AIN1 | SW1 |
I2C Connection on RAK13002
This is just an example and illustration on how to use the RAK13002 for external I2C sensors, modules, or devices. You can use any I2C device as long as it operates at 3.3 V.
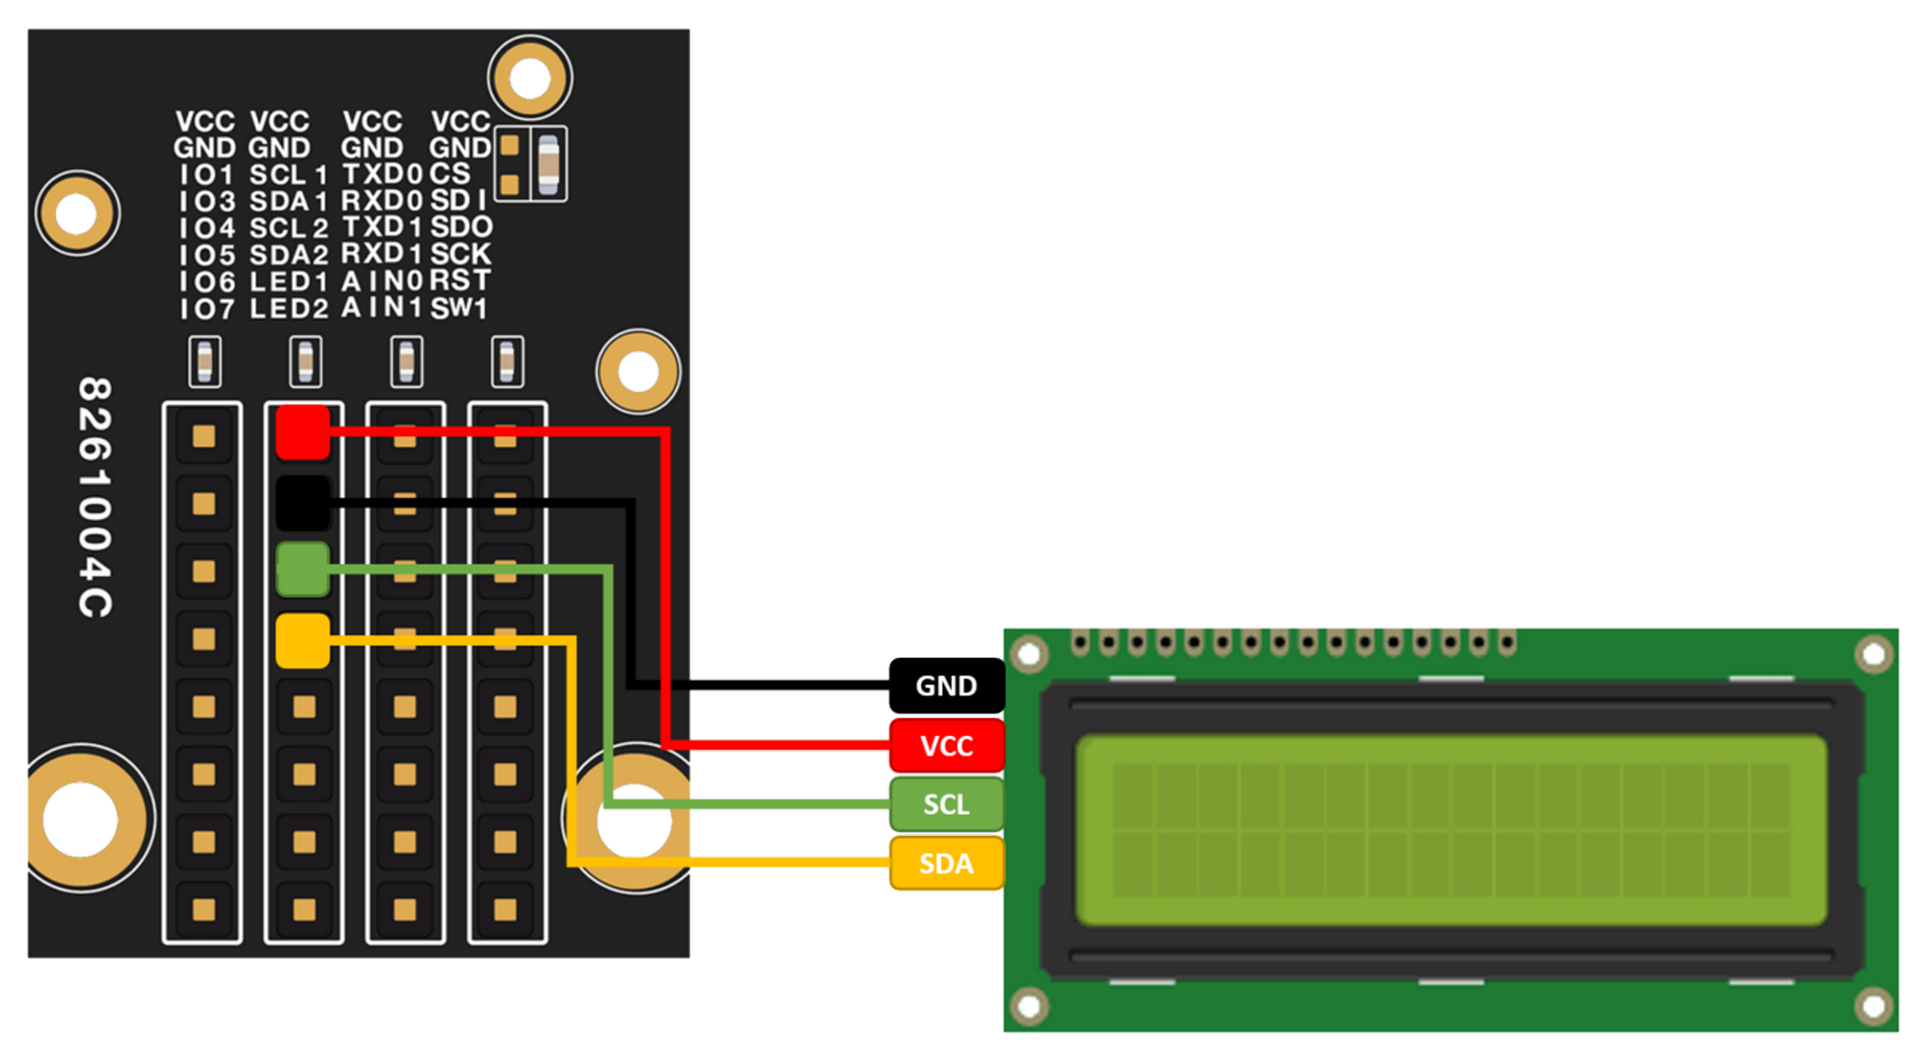 Figure 1: Connecting the RAK13002 to the I2C backpack of a 16x2 LCD
- You need to select first the WisBlock Core you have, as shown in Figure 7 to Figure 9.
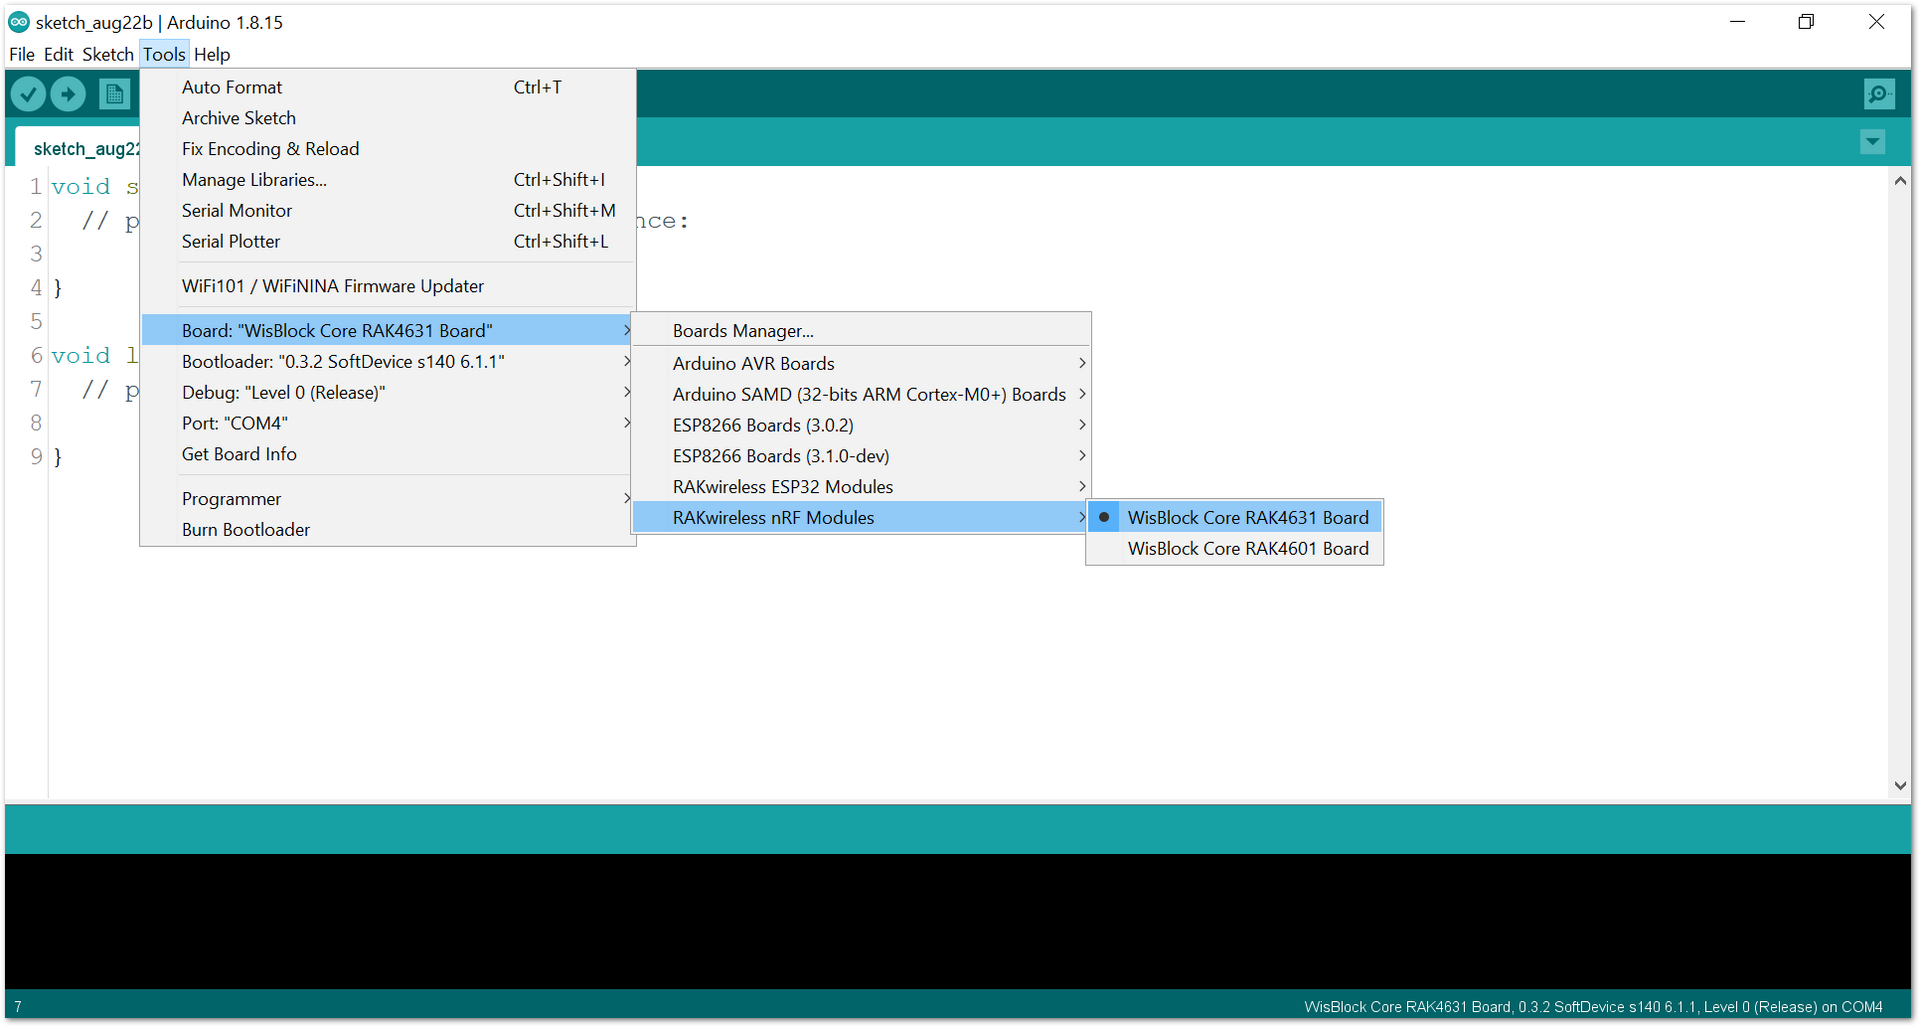 Figure 1: Selecting RAK4631 as WisBlock Core
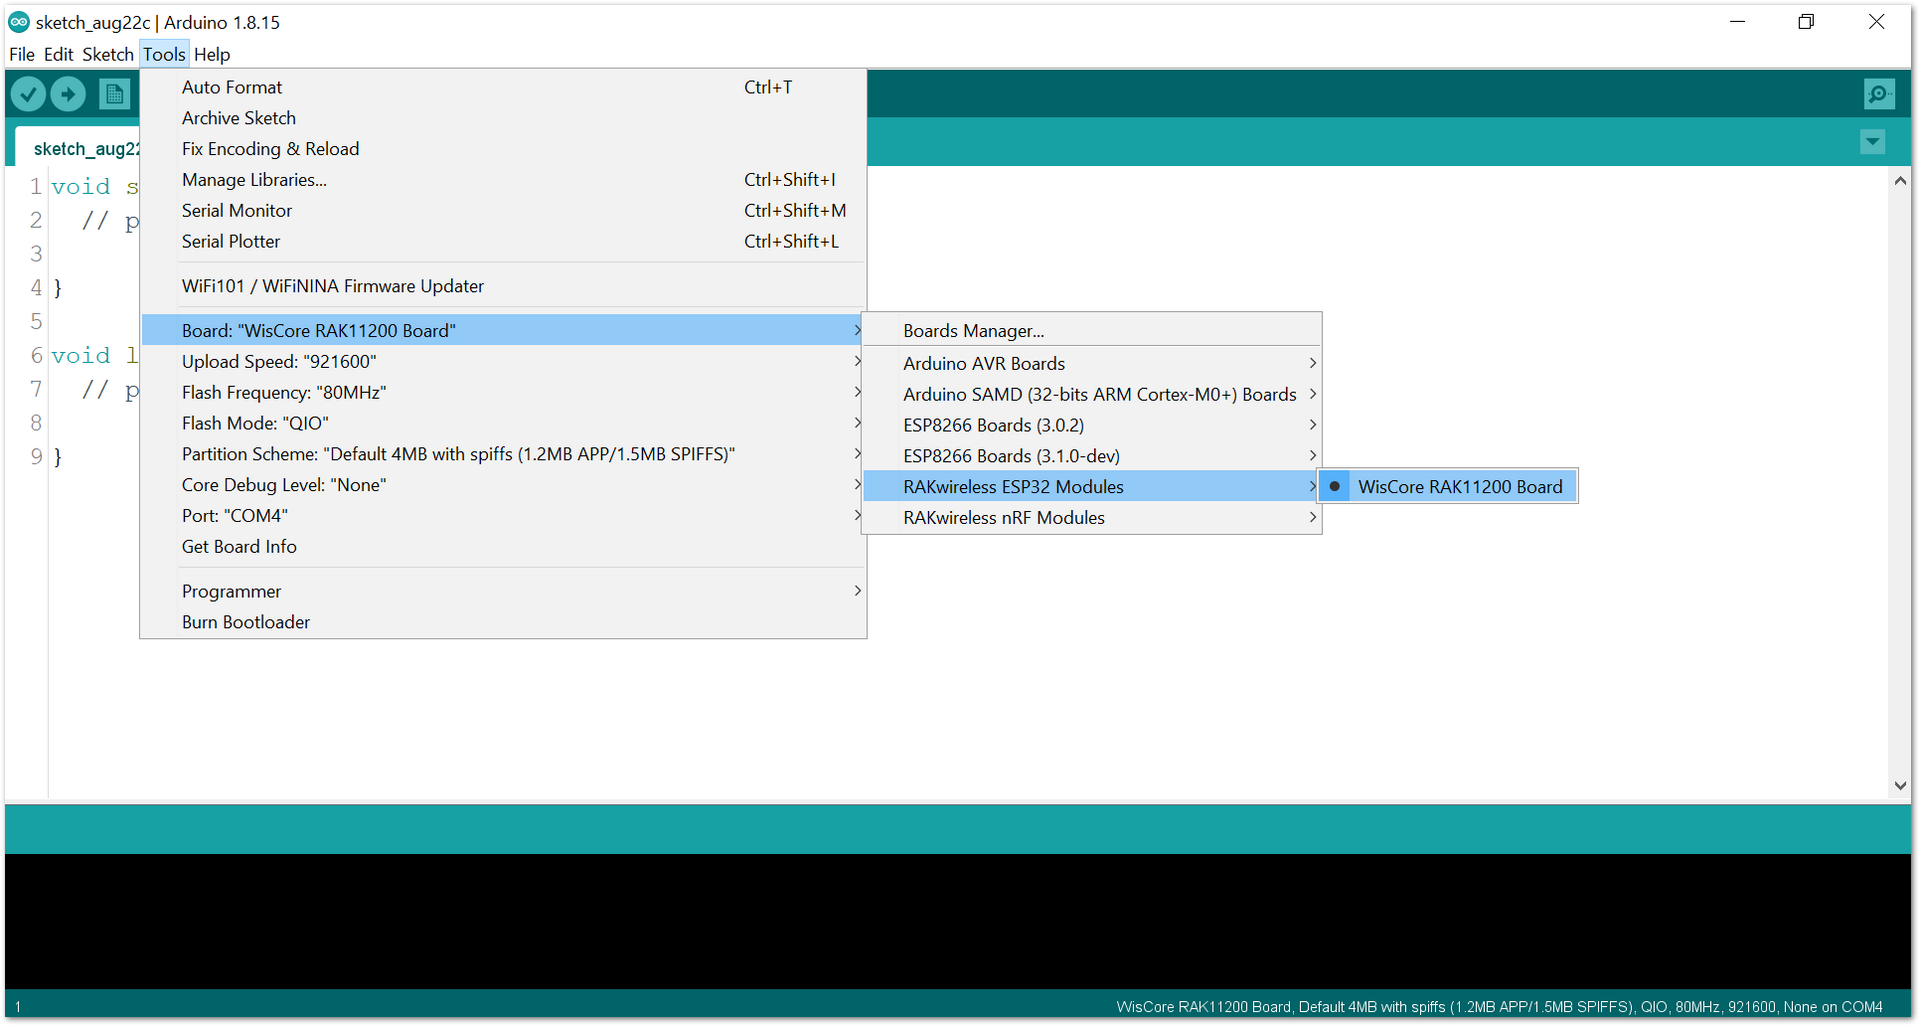 Figure 1: Selecting RAK11200 as WisBlock Core
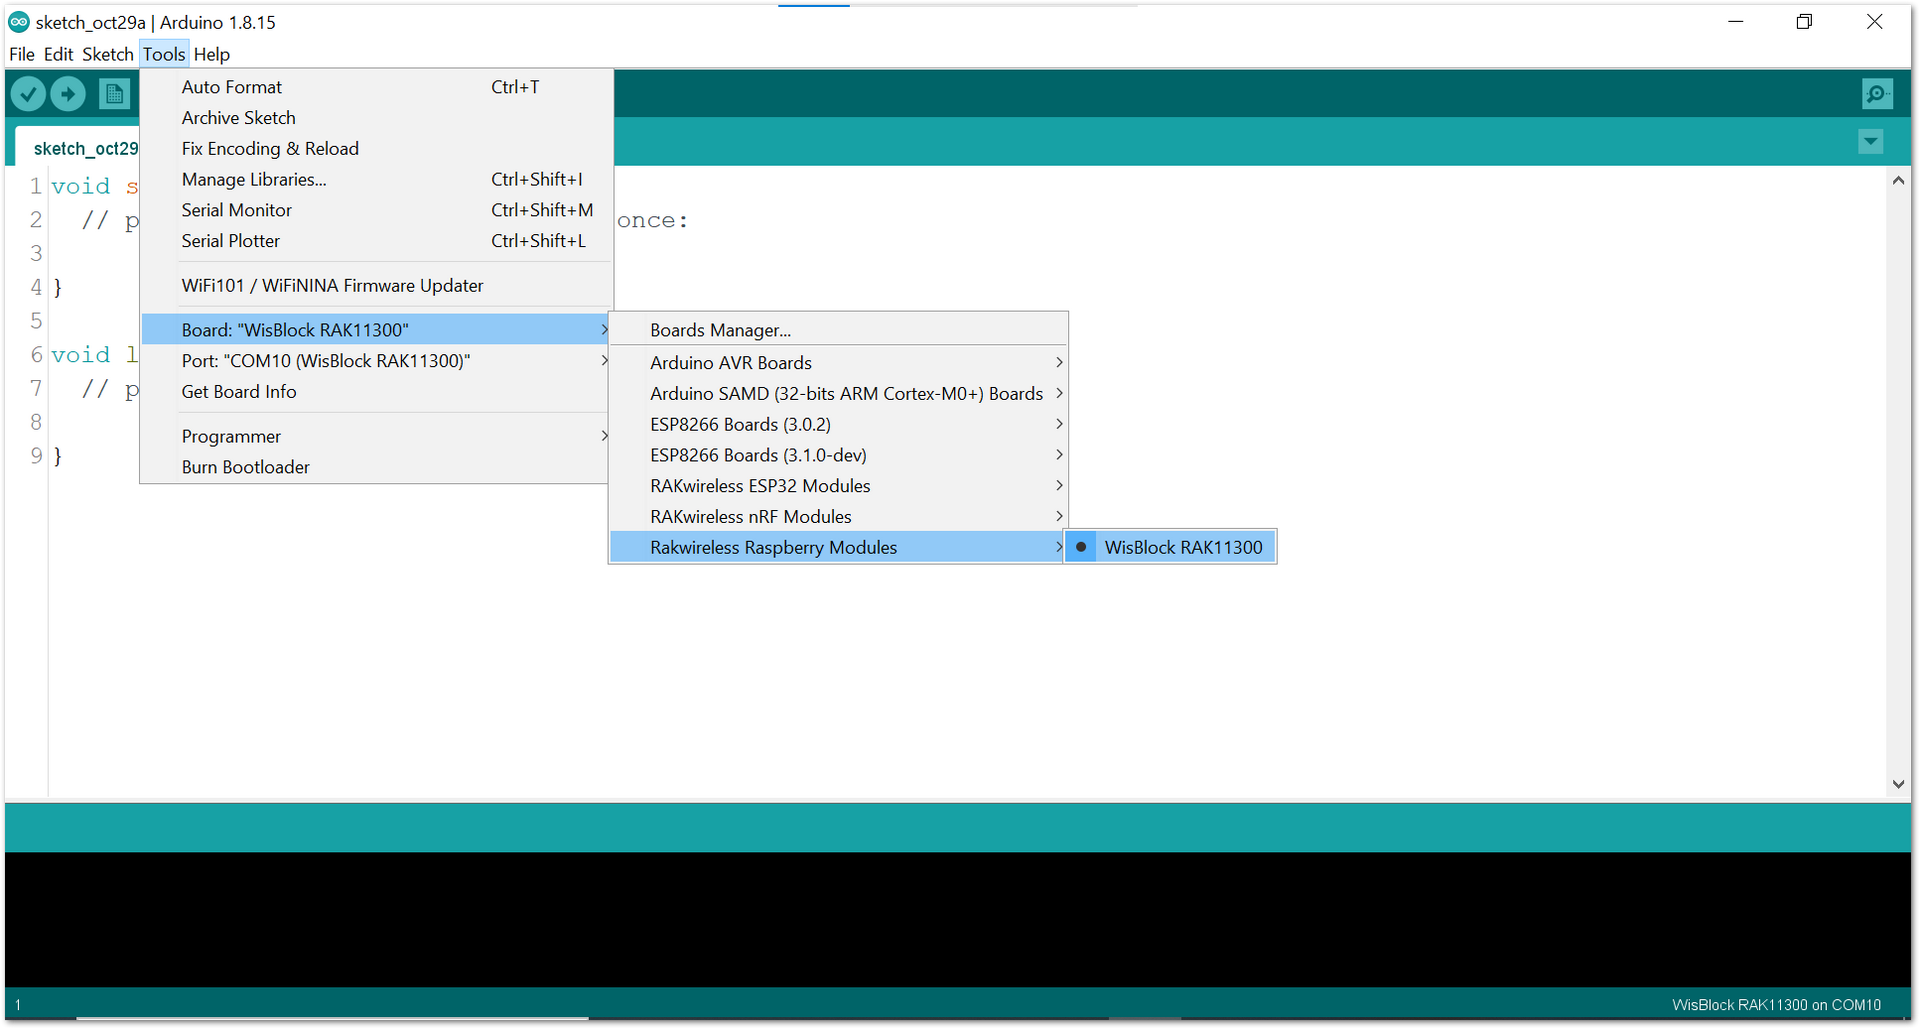 Figure 1: Selecting RAK11300 as WisBlock Core
- On the Arduino IDE, go to Sketch > Include Library > Manage Libraries. The Library Manager should open, then install the LiquidCrystal I2C library, as shown in Figure 10.
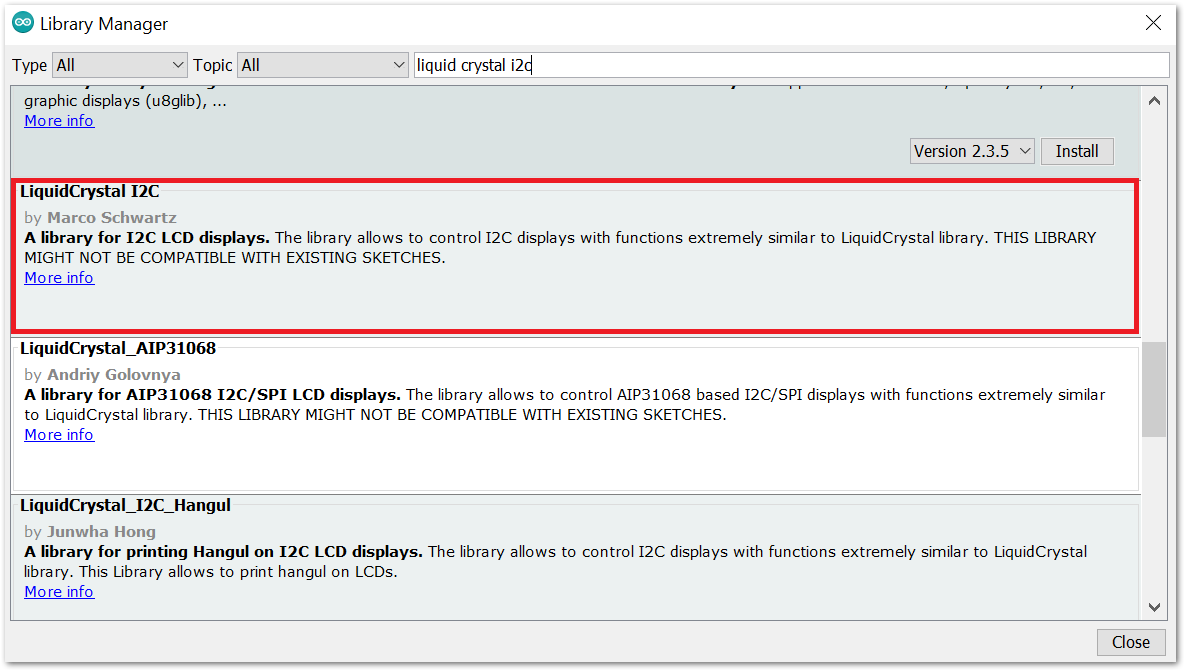 Figure 1: Installing the LiquidCrystal I2C library
- After successful installation of the library, you can now copy the following sample code into your Arduino IDE:
Click to view the code
#include LiquidCrystal_I2C.h

#include Wire.h

//initialize the liquid crystal library
//the first parameter is the I2C address
//the second parameter is how many rows are on your screen
//the third parameter is how many columns are on your screen
LiquidCrystal_I2C lcd(0x27, 16, 2);

void setup() {
  lcd.init();   //initialize lcd screen
  lcd.backlight(); // turn on the backlight
}
void loop() {

  start_display(); // star
  delay(1000); //wait for a second
  lcd.clear(); // clear the LCD content
  delay(1000); //wait for a second

}

void start_display(){

  lcd.setCursor(0,0); // tell the screen to write on the top row
  lcd.print("RAK13002");  // tell the screen to write “RAK13002” on the top row
  lcd.setCursor(0,1); // tell the screen to write on the bottom row
  lcd.print("EXAMPLE");  // tell the screen to write “EXAMPLE” on the bottom row

}
- Then select the right Serial Port and upload the code, as shown in Figure 11 and Figure 12.
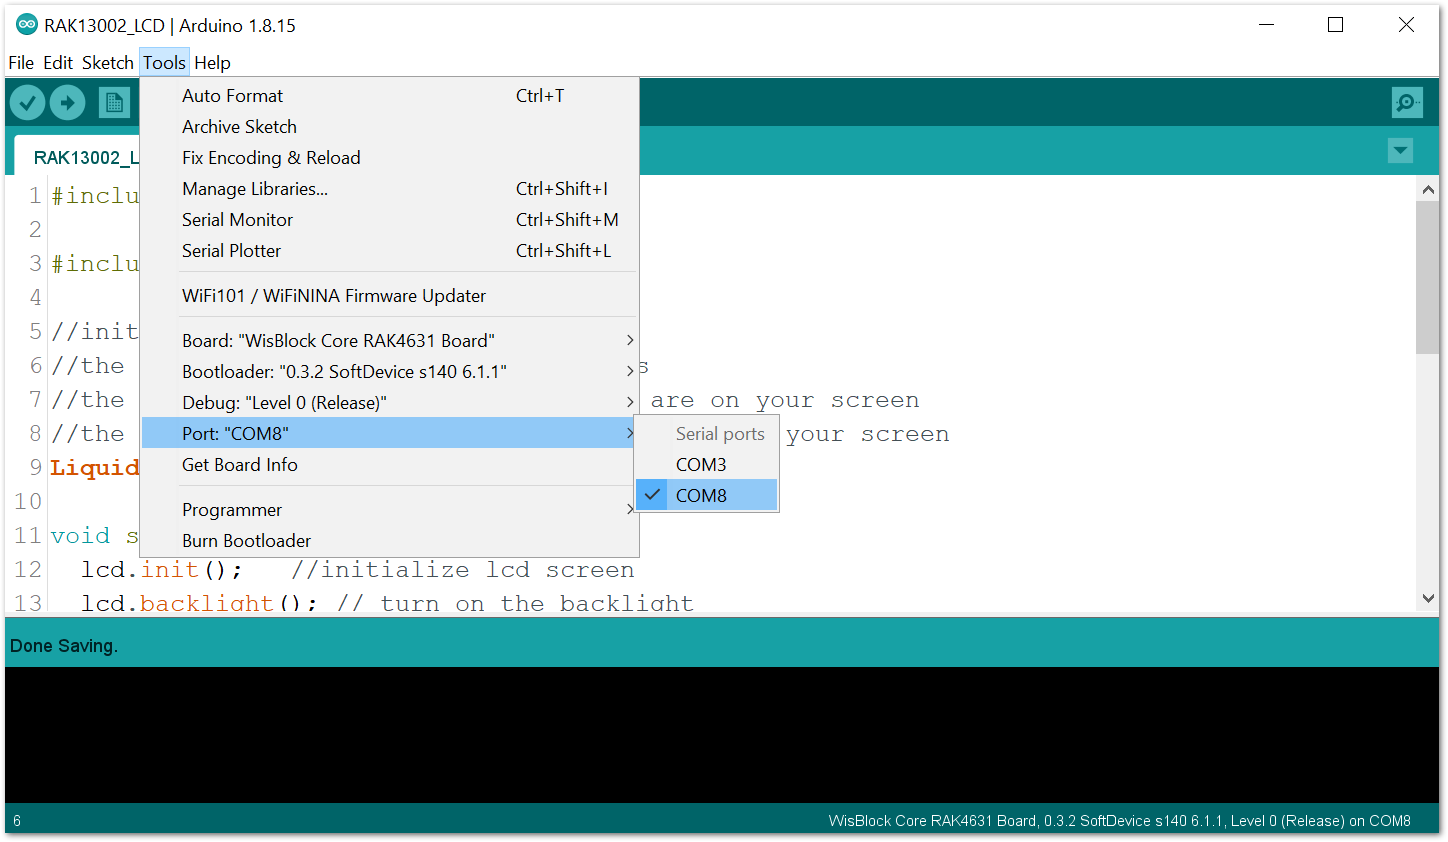 Figure 1: Selecting the correct Serial Port
 Figure 1: Uploading the sample code
- When you successfully uploaded the sample code, you will now be able to see the "RAK13002 EXAMPLE" in your LCD screen, as shown in Figure 13, which means that the module is properly communicating with the WisBlock core using the I2C protocol.
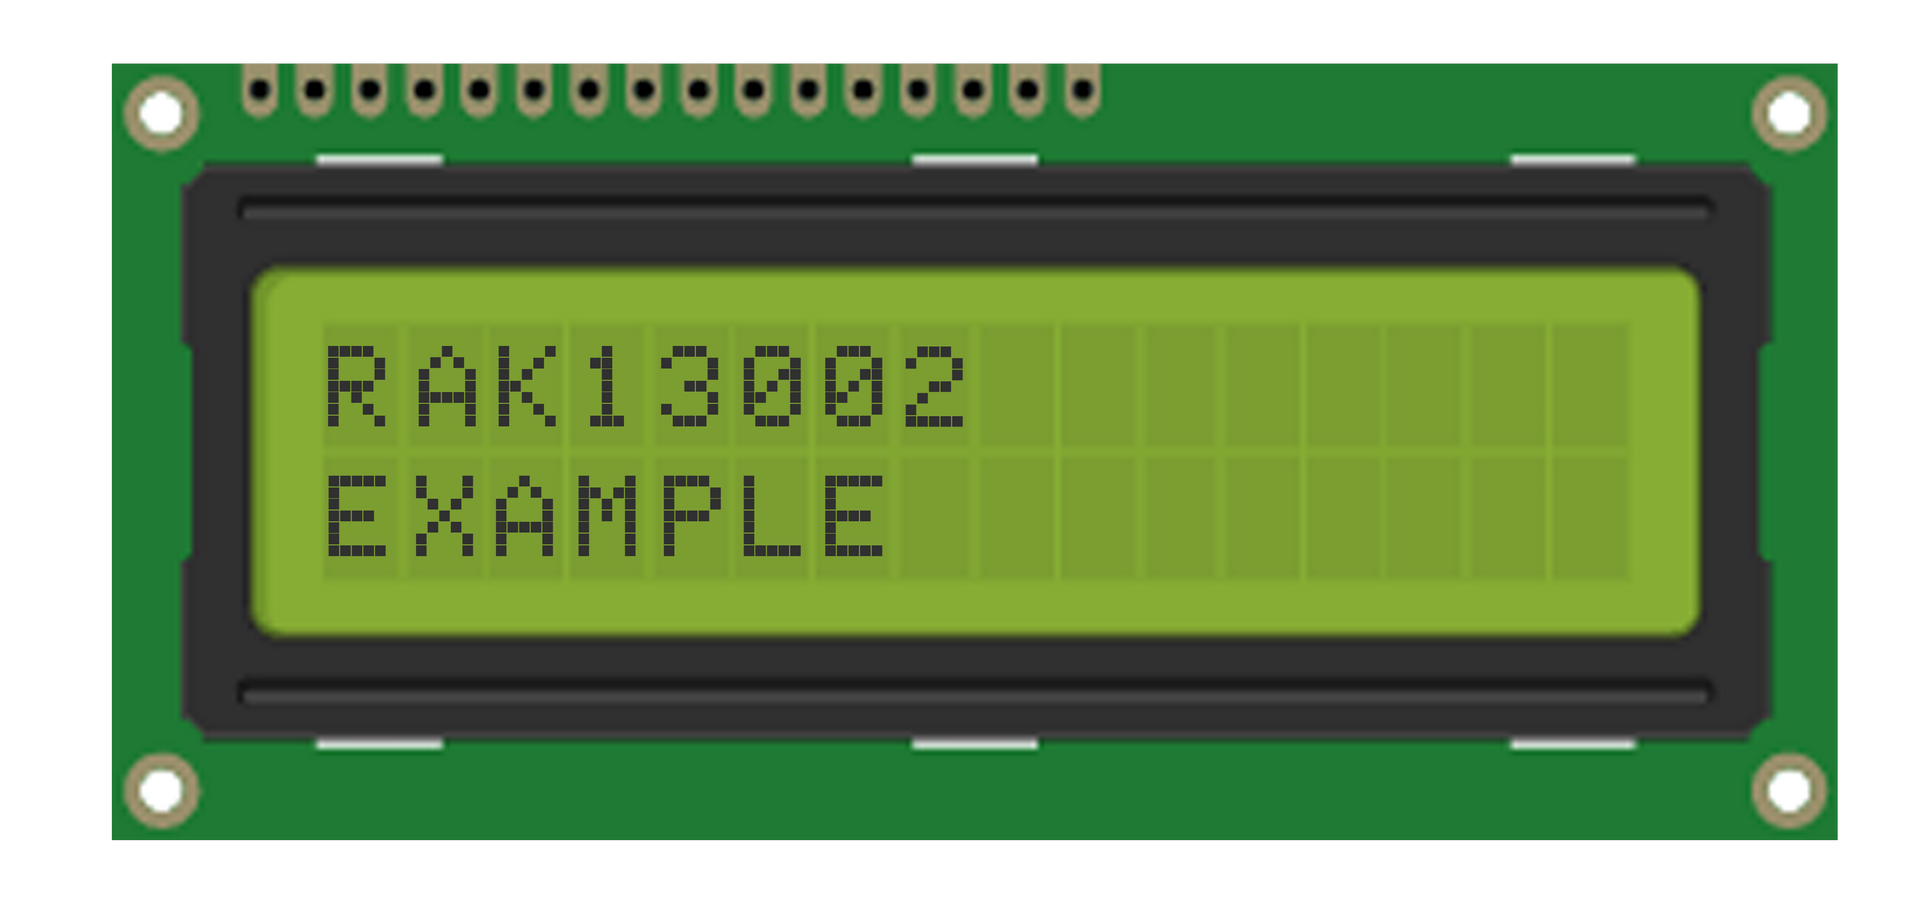 Figure 1: RAK13002 EXAMPLE displayed on 16x2 LCD
- If you are not seeing the same output, check the device's I2C address by using this code:
Click to view the code
/*
 * Scan the I2C Address of your LCD using
 * this example code. Make sure your SDA and SCL
 * line is connected properly.
 *
 * Follow the connection of LCD with I2C Backpack to RAK13002.
 */
#include <Wire.h> //include Wire.h library

void setup()
{
  Wire.begin(); // Wire communication begin
  Serial.begin(9600); // The baudrate of Serial monitor is set in 9600
  while (!Serial); // Waiting for Serial Monitor
  Serial.println("\nI2C Scanner");
}

void loop()
{
  byte error, address; //variable for error and I2C address
  int nDevices;

  Serial.println("Scanning...");

  nDevices = 0;
  for (address = 1; address < 127; address++ )
  {
    // The i2c_scanner uses the return value of
    // the Wire.endTransmission to see if
    // a device did acknowledge to the address.
    Wire.beginTransmission(address);
    error = Wire.endTransmission();

    if (error == 0)
    {
      Serial.print("I2C device found at address 0x");
      if (address < 16)
        Serial.print("0");
      Serial.print(address, HEX);
      Serial.println("  !");
      nDevices++;
    }
    else if (error == 4)
    {
      Serial.print("Unknown error at address 0x");
      if (address < 16)
        Serial.print("0");
      Serial.println(address, HEX);
    }
  }
  if (nDevices == 0)
    Serial.println("No I2C devices found\n");
  else
    Serial.println("done\n");

  delay(5000); // wait 5 seconds for the next I2C scan
}
- Your device's I2C address should be displayed on the Serial Monitor, as shown in Figure 14.
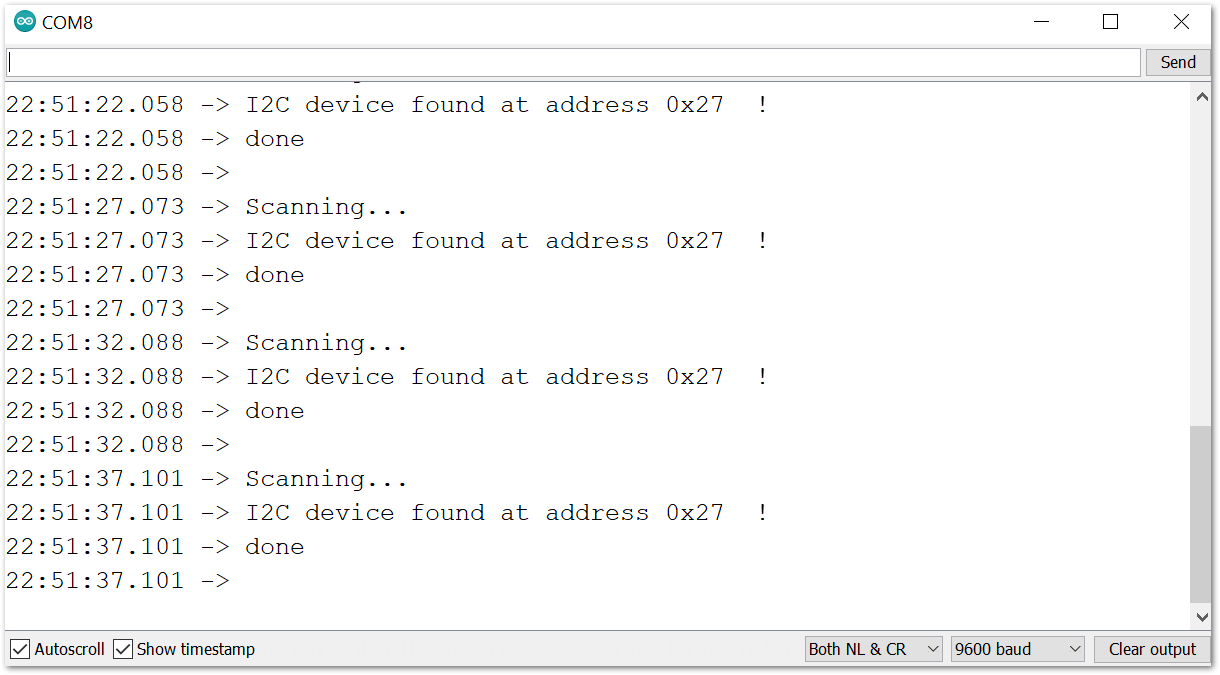 Figure 1: I2C address of your device
GPIO Connection on RAK13002
This is just an example and illustration on how to use the GPIO pins of RAK13002 for external sensors, modules, or devices. There are six (6) GPIO pins available on the RAK13002. You can use any of the GPIO pins as long as your modules, sensors, or devices operate at 3.3 V.
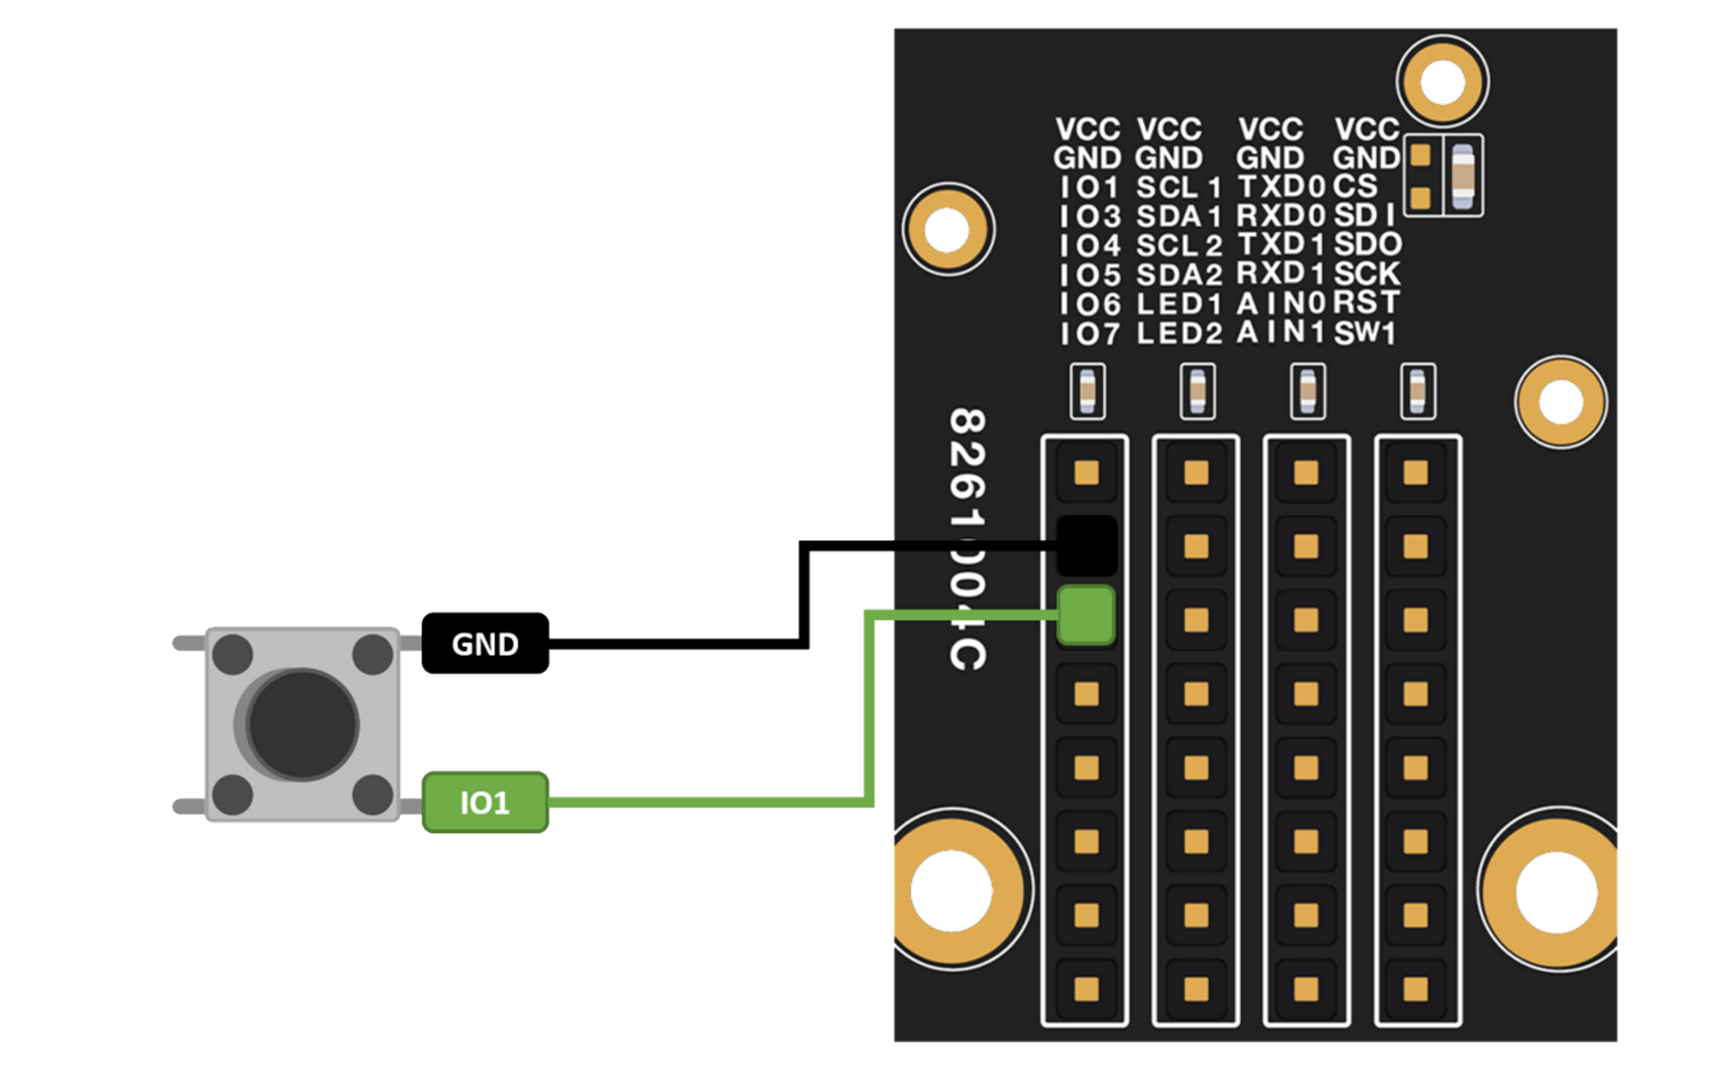 Figure 1: Connecting Button as your GPIO component
- You need to select first the WisBlock Core you have, as shown in Figure 16 to Figure 18.
 Figure 1: Selecting RAK4631 as WisBlock Core
 Figure 1: Selecting RAK11200 as WisBlock Core
 Figure 1: Selecting RAK11300 as WisBlock Core
- Copy the following sample code into your Arduino IDE:
Click to view the code
/*
 * Reading Long Press and Short Press on a Button using RAK13002
 *
 */

// constants won't change. They're used here to set pin numbers:
const int BUTTON_PIN = WB_IO1; // the number of the pushbutton pin
const int SHORT_PRESS_TIME = 500; // 500 milliseconds

// Variables will change:
int lastState = LOW;  // the previous state from the input pin
int currentState;     // the current reading from the input pin
unsigned long pressedTime  = 0;
unsigned long releasedTime = 0;

void setup() {
  Serial.begin(9600);
  pinMode(BUTTON_PIN, INPUT_PULLUP);
}

void loop() {
  // read the state of the switch/button:
  currentState = digitalRead(BUTTON_PIN);

  if(lastState == HIGH && currentState == LOW)        // button is pressed
    pressedTime = millis();
  else if(lastState == LOW && currentState == HIGH) { // button is released
    releasedTime = millis();

    long pressDuration = releasedTime - pressedTime;

    if( pressDuration < SHORT_PRESS_TIME )
      Serial.println("A short press is detected");
  }

  // save the the last state
  lastState = currentState;
}
- Then select the right Serial Port and upload the code, as shown in Figure 19 and Figure 20.
 Figure 1: Selecting the correct port
 Figure 1: Uploading your code
- When you successfully uploaded the sample code, open the Serial Monitor of the Arduino IDE to see the button's reading logs. Try pressing the button, and if you see the logs, as shown in Figure 21, then your module or sensor is properly communicating to the WisBlock core using the Digital Interface.
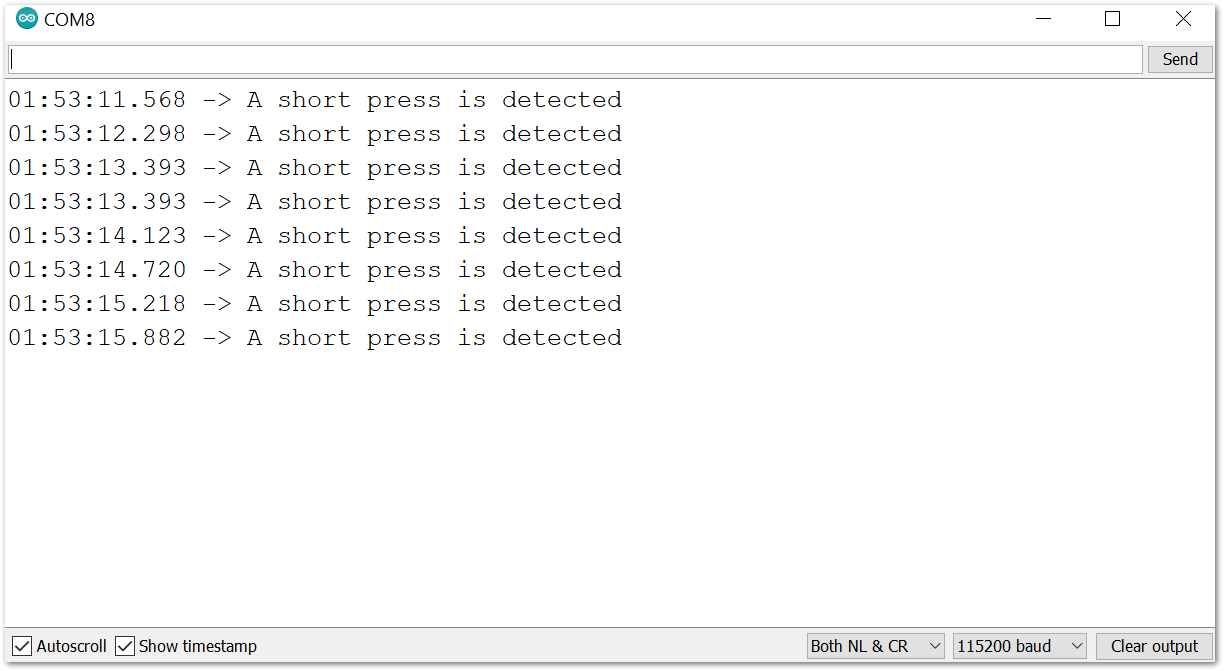 Figure 1: Serial Monitor Output
Analog Input (ADC) Connection on RAK13002
This is just an example and illustration on how to use the ADC pin of RAK13002 for external sensors, modules, or devices. There are two (2) ADC pins available on the RAK13002 that you can use as long as your modules, sensors, or devices operate at 3.3 V.
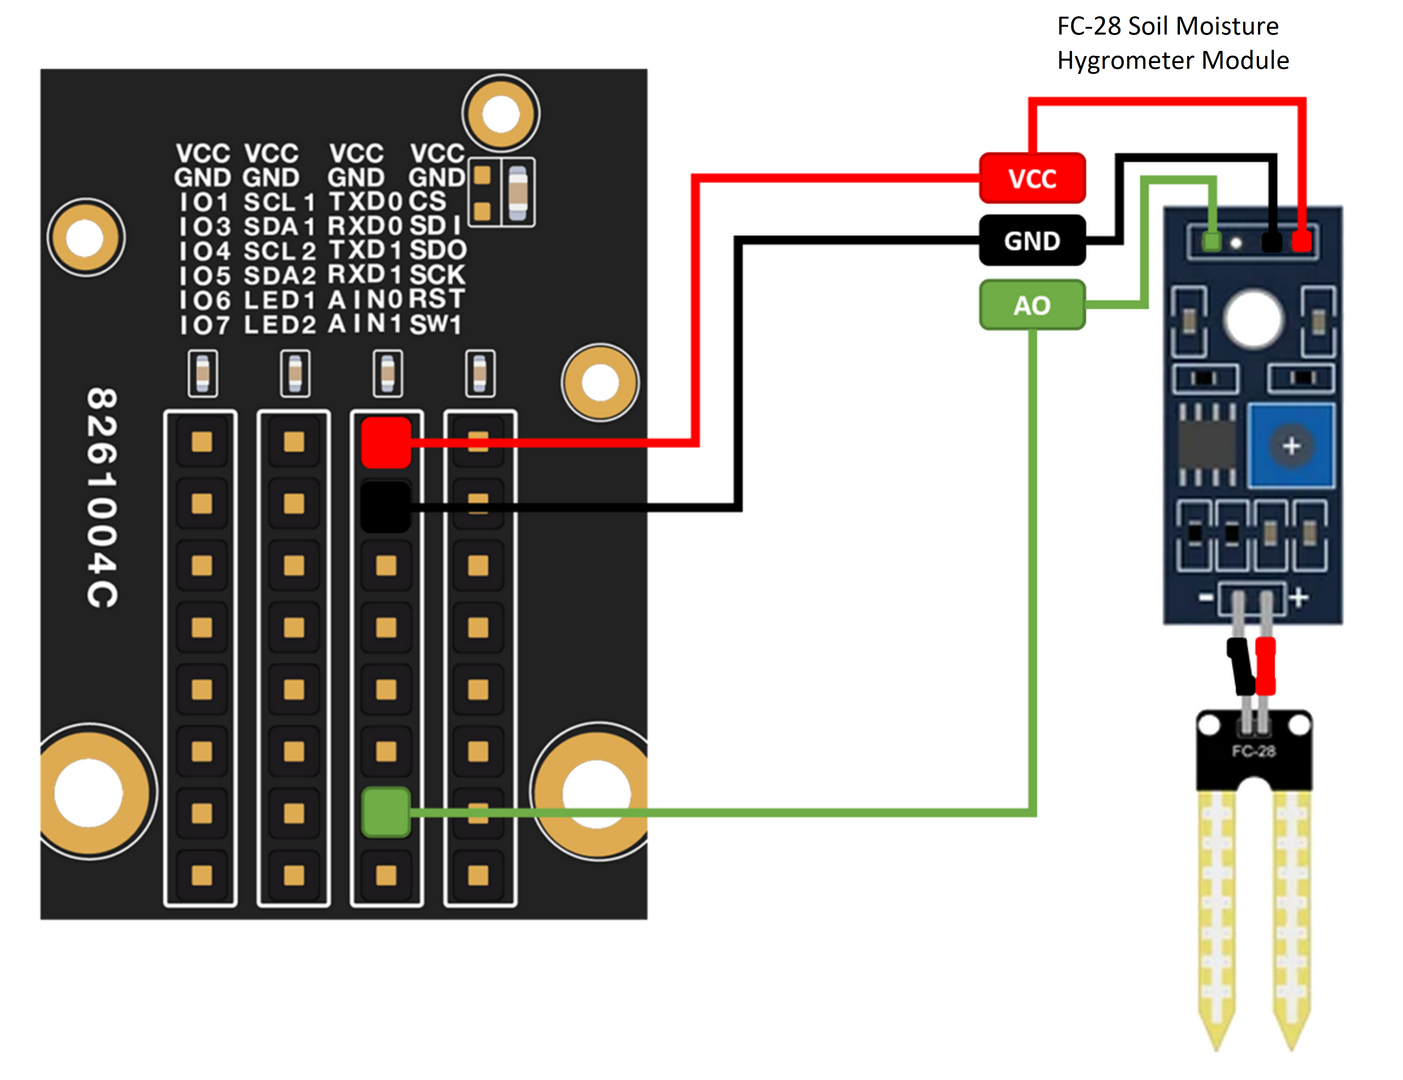 Figure 1: Connecting the RAK13002 to the ADC pin of the sensor module
- You need to select first the WisBlock Core you have, as shown in Figure 23 to Figure 25.
 Figure 1: Selecting RAK4631 as WisBlock Core
 Figure 1: Selecting RAK11200 as WisBlock Core
 Figure 1: Selecting RAK11300 as WisBlock Core
- Copy the following sample code into your Arduino IDE:
Click to view the code
/*
* Reading ADC pin on RAK13002
* using Soil Moisture Sensor
*
*/

#define SS WB_A0 //Soil Moisture Sensor A0 to AIN0 of RAK13002

int sensor_value;

void setup() {
  Serial.begin(9600); // Setting up Serial Monitor to read in 9600 baudrate

}
void loop() {
  readSensor();
  delay(1000); //Read sensor value and print every 1 second.
}

void readSensor(){
  sensor_value = analogRead(SS);
  Serial.println(sensor_value);
}
- Then select the right Serial Port and upload the code, as shown in Figure 26 and Figure 27.
 Figure 1: Selecting the correct Serial Port
 Figure 1: Uploading the sample code
- When you successfully uploaded the sample code, open the Serial Monitor of the Arduino IDE to see the module's reading logs. If you see the logs, as shown in Figure 28, then your module or sensor is properly communicating to the WisBlock core using the Analog Interface.
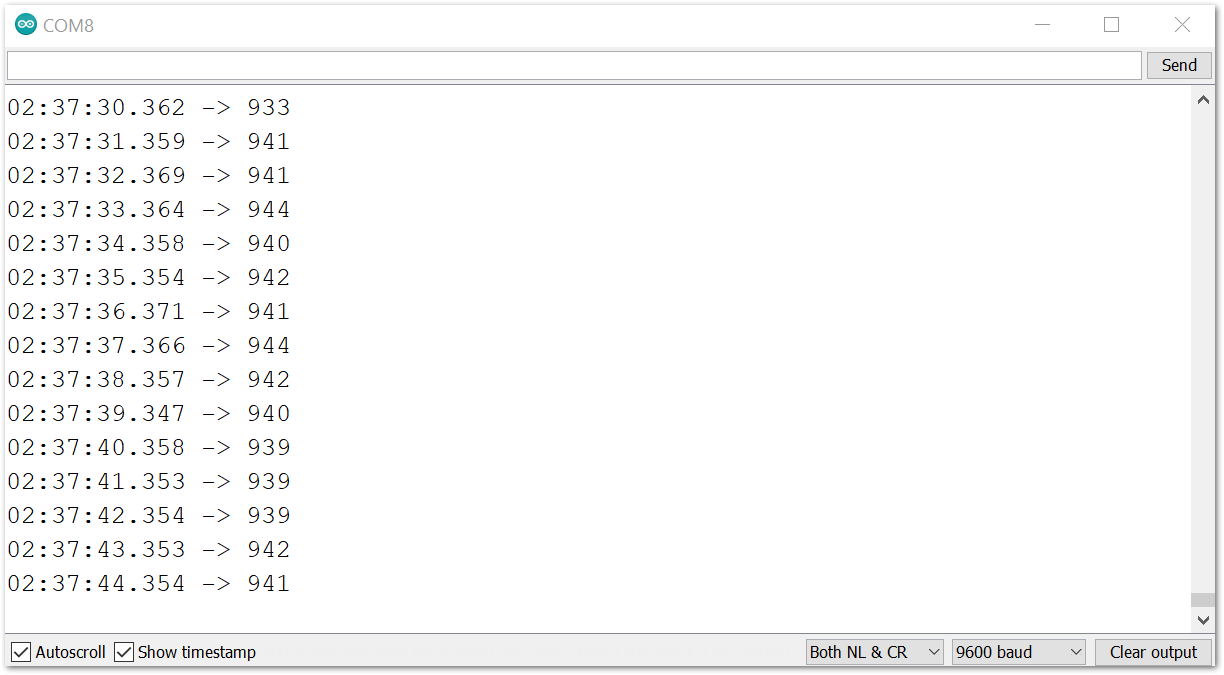 Figure 1: FC-28 Soil Moisture Hygrometer data logs