RAK16002 WisBlock Coulomb Sensor Module Quick Start Guide
Prerequisite
What Do You Need?
Before going through each and every step on using the RAK16002 WisBlock Coulomb sensor module, make sure to prepare the necessary items listed below:
Hardware
- RAK16002 WisBlock Coulomb Sensor Module
- WisBlock Base
- Your choice of WisBlock Core
- USB Cable
- Li-Ion/LiPo battery (optional)
- Solar charger (optional)
Software
Arduino
- Download and install the Arduino IDE.
- To add the RAKwireless Core boards to your Arduino Boards Manager, install the RAKwireless Arduino BSP.
Product Configuration
Hardware Setup
RAK16002 is a Coulomb sensor module based on LTC2941IDCB that features programmable high and low thresholds for the accumulated charge. If a threshold is exceeded, the device communicates an alert by setting a flag in the internal status register. It can measure the battery charge state in battery-powered IoT devices. For more information about the RAK16002, refer to the Datasheet.
The RAK16002 WisBlock Coulomb sensor module can be mounted on the IO slot of the WisBlock Base board, as shown in Figure 1. Also, always secure the connection of the WisBlock module by using compatible screws. In this example, we use J2 shorted pin1 and pin2 (internal charge/load) and J4 shorted pin1 and pin2 (internal battery measurement). See Figure 2 for jumper and battery connector settings.
 Figure 1: RAK16002 connection to WisBlock Base Board
 Figure 1: RAK16002 jumper and battery connectors
- J2 charge/load select
- short pin1 and pin2, Internal charge/load
- short pin2 and pin3, External charge/load
- J4 battery select
- short pin1 and pin2, Internal battery measurement
- short pin2 and pin3, External battery measurement
- J3
- pin1, Connect to external charge+/load+
- pin2, Connect to external charge-/load- & battery-
- pin3, Connect to external battery+
Assembling and Disassembling of WisBlock Modules
Assembling Procedure
The RAK16002 module can be mounted on the IO slot of the WisBlock Base board, as shown in Figure 3. Also, always secure the connection of the WisBlock module by using compatible screws.
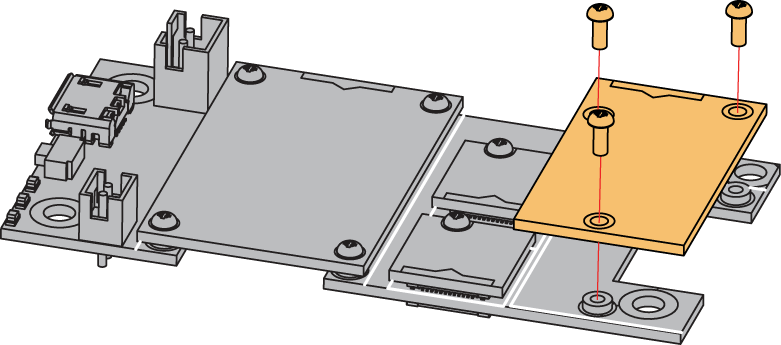 Figure 1: RAK16002 mounting connection to WisBlock Base module
Disassembling Procedure
The procedure in disassembling any type of WisBlock module is the same.
- Remove the screws.
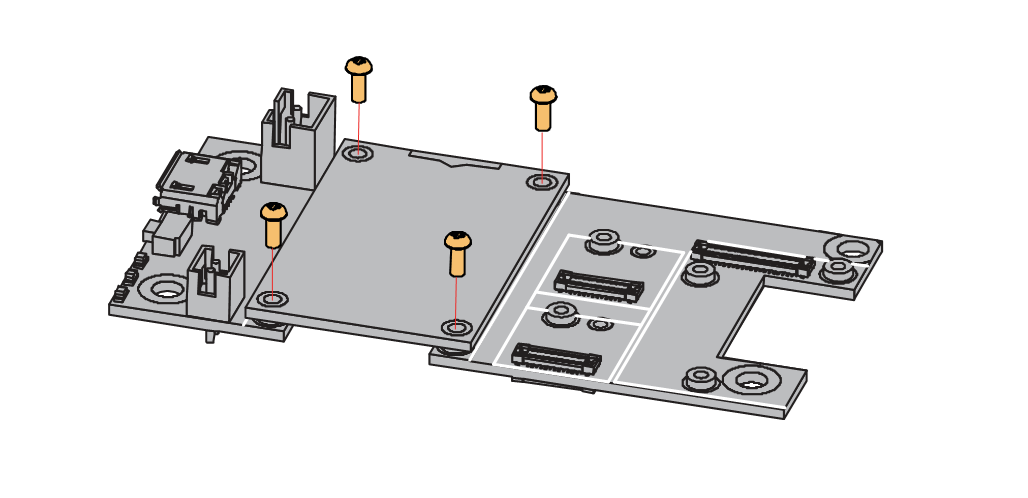 Figure 1: Removing screws from the WisBlock module
- Once the screws are removed, check the silkscreen of the module to find the correct location where force can be applied.
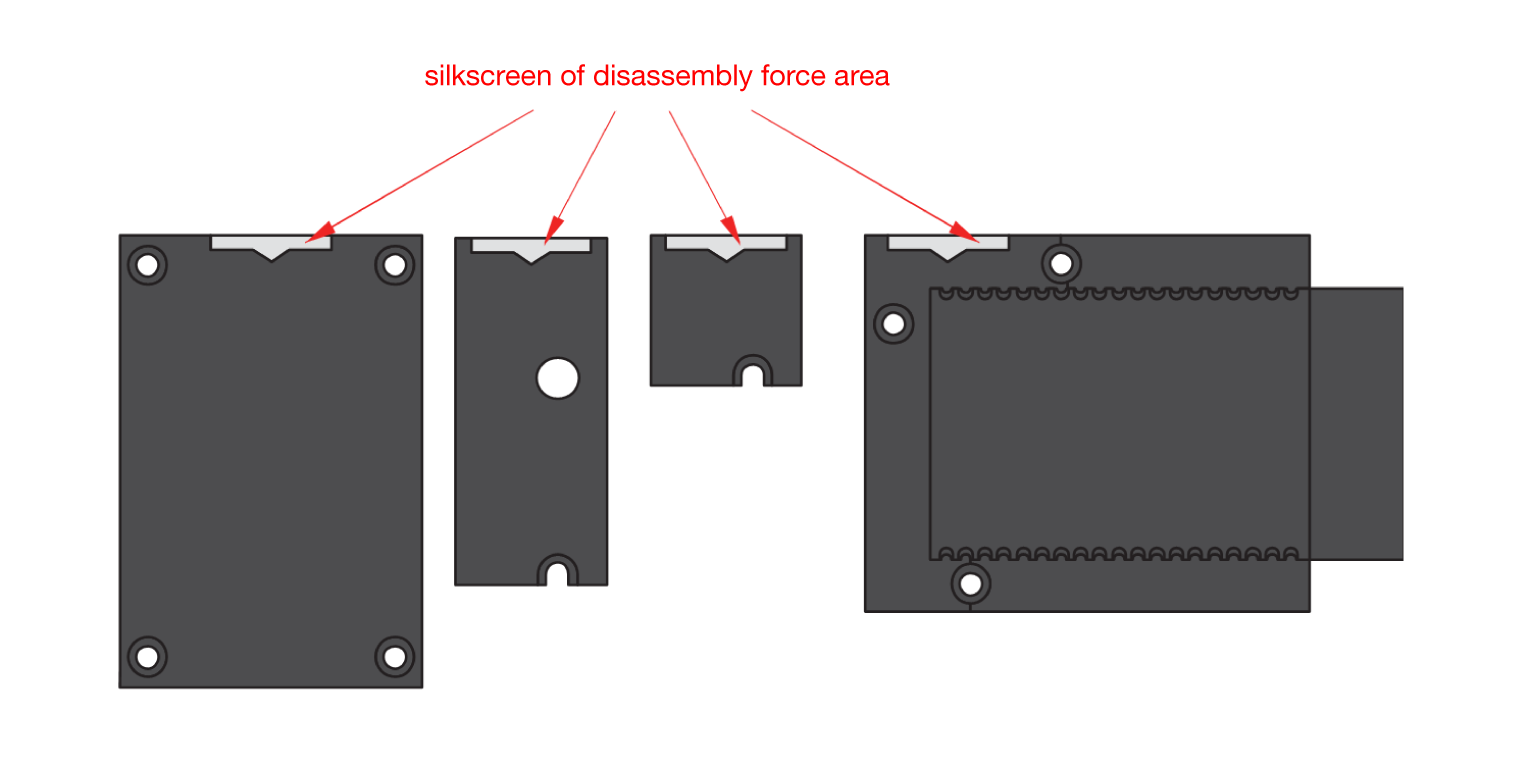 Figure 1: Detaching silkscreen on the WisBlock module
- Apply force to the module at the position of the connector, as shown in Figure 6, to detach the module from the baseboard.
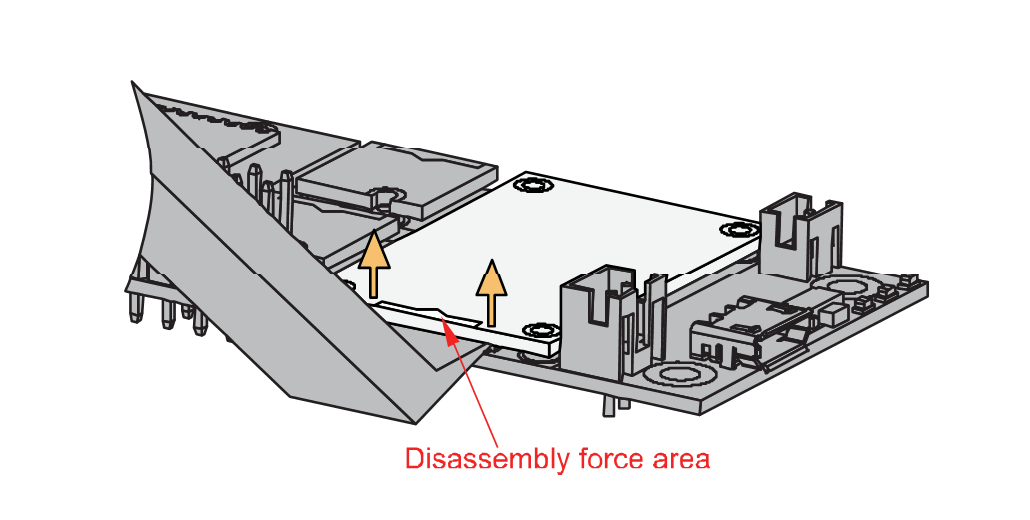 Figure 1: Applying even forces on the proper location of a WisBlock module
If you will connect other modules to the remaining WisBlock Base slots, check on the WisBlock Pin Mapper tool for possible conflicts.
Now, you can connect the battery (optional) and USB cable to start programming your WisBlock Core.
Software Configuration and Example
In our example, you can measure voltage and DC current from a sensor.
RAK16002 in RAK4631 WisBlock Core Guide
Arduino Setup
- Select the RAK4631 WisBlock Core.
Install the RAKwireless Arduino BSP to find the RAK4631 in the Arduino Boards Manager.
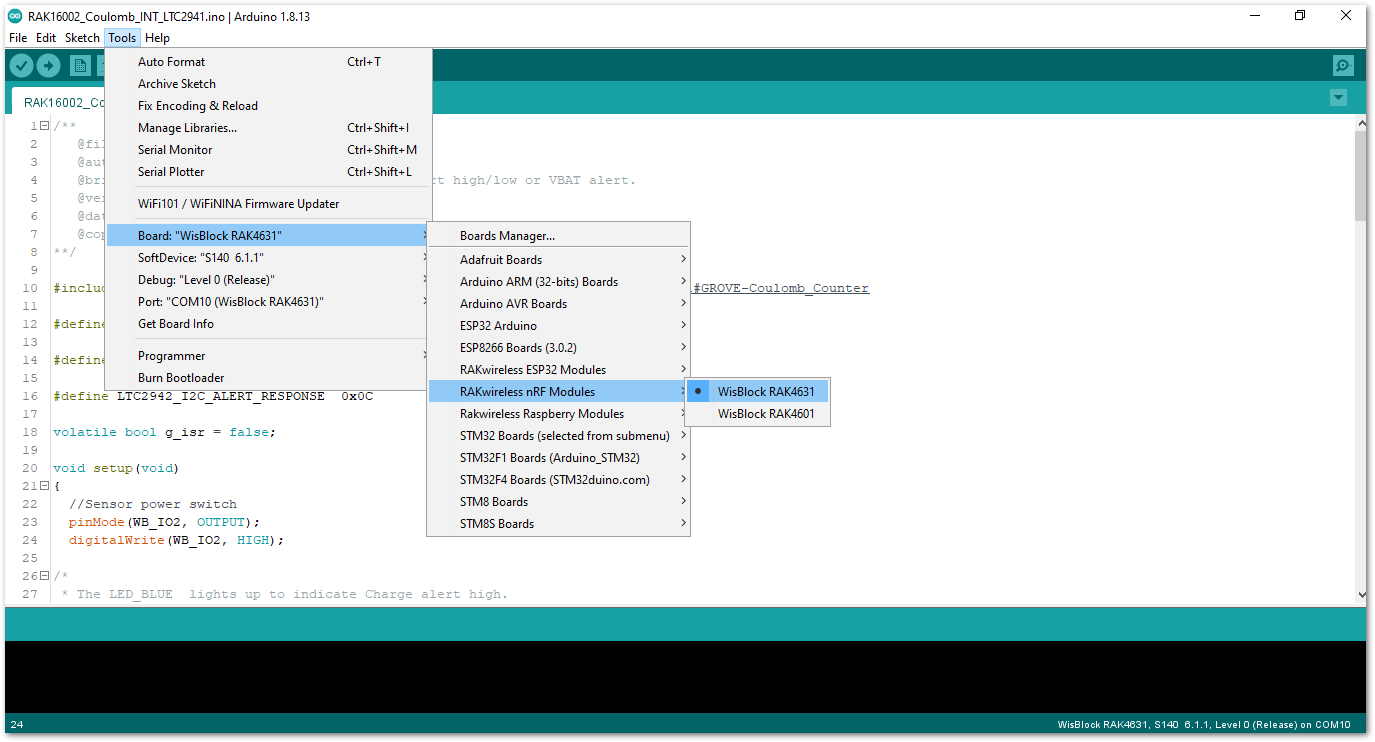 Figure 1: Selecting RAK4631 as WisBlock Core
- Next, copy the following sample code into your Arduino IDE:
Click to view the example
/**
   @file RAK16002_Coulomb_INT_LTC2941.ino
   @author rakwireless.com
   @brief  Trigger an interrupt when Charge alert high/low or VBAT alert.
   @version 0.1
   @date 2021-11-08
   @copyright Copyright (c) 2020
**/

#include "LTC2941.h"  //Click here to get the library: http://librarymanager/All#GROVE-Coulomb_Counter

#define INTERRUPT_PIN     WB_IO6  // Interrupt capable Arduino pin.

#define BATTERY_CAPACITY  2200     // unit:mAh

#define LTC2942_I2C_ALERT_RESPONSE  0x0C

volatile bool g_isr = false;

void setup(void)
{
  //Sensor power switch
  pinMode(WB_IO2, OUTPUT);
  digitalWrite(WB_IO2, HIGH);

/*
 * The LED_BLUE  lights up to indicate Charge alert high.
 * The LED_GREEN lights up to indicate Charge alert low.
 * All lights up to indicate VBAT alert.
 */
  pinMode(LED_BLUE, OUTPUT);
  digitalWrite(LED_BLUE, LOW);
  pinMode(LED_GREEN, OUTPUT);
  digitalWrite(LED_GREEN, LOW);

  pinMode(INTERRUPT_PIN, INPUT);

  time_t timeout = millis();
  Serial.begin(115200);
  while (!Serial)
  {
    if ((millis() - timeout) < 5000)
    {
      delay(100);
    }
    else
    {
      break;
    }
  }

  Serial.println("=====================================");
  Serial.println("RAK16002 Coulomb LTC2941 example");
  Serial.println("=====================================");

  Wire.begin();

  ltc2941.initialize();
  ltc2941.setBatteryFullMAh( BATTERY_CAPACITY , false);
  ltc2941.setAccumulatedCharge(42352); // Set the current battery level to 1800 mAh.

  attachInterrupt(digitalPinToInterrupt(INTERRUPT_PIN), interruptRoutine, FALLING);


  ltc2941.setBatteryAlert( VBAT_3_0_V );

  ltc2941.setChargeThresholdHigh( 42353 );//CURRENT_CAPACITY
  ltc2941.setChargeThresholdLow( 42351 );

  ltc2941.setAlertConfig( ALERT_MODE );

  /*
  *  The LTC2941 will stop pulling down the AL/CC pin and will not respond
  *  to further ARA requests until a new alert event occurs.
  */
  Wire.requestFrom(LTC2942_I2C_ALERT_RESPONSE, 1);
  while(Wire.available())
  {
    Wire.read();
  }
}

void loop(void)
{
  float coulomb = 0, mAh = 0, percent = 0;
  uint8_t Status;

  if (g_isr == true)
  {
    g_isr = false;

    ltc2941.setAccumulatedCharge(42352); // Reset the battery level only for periodic presentation interruption.

    Wire.requestFrom((int16_t)0x0C, 1); // Send alert response protocol.
    while(Wire.available())
    {
      Wire.read();
    }

    Status = ltc2941.getStatus();
    if(Status & 0x02)
    {
       Serial.println("VBAT alert interrupt!");
       digitalWrite(LED_GREEN, HIGH);
       digitalWrite(LED_BLUE, HIGH);
    }
    if(Status & 0x04)
    {
       Serial.println("Charge alert low interrupt!");
       digitalWrite(LED_GREEN, HIGH);
    }
    if(Status & 0x08)
    {
       Serial.println("Charge alert high interrupt!");
       digitalWrite(LED_BLUE, HIGH);
    }
  }
  coulomb = ltc2941.getCoulombs();
  mAh = ltc2941.getmAh();
  percent = ltc2941.getPercent();

  Serial.print(coulomb);
  Serial.print("C   ");
  Serial.print(mAh);
  Serial.print("mAh   ");
  Serial.print(percent);
  Serial.println("%");
  delay(1000);
  digitalWrite(LED_GREEN, LOW);
  digitalWrite(LED_BLUE, LOW);
}

void interruptRoutine()
{
  g_isr = true;
}
- Once the example sketch is open, install the GROVE-Coulomb_Counter library by clicking the red-highlighted link, as shown in Figure 8 and Figure 9.
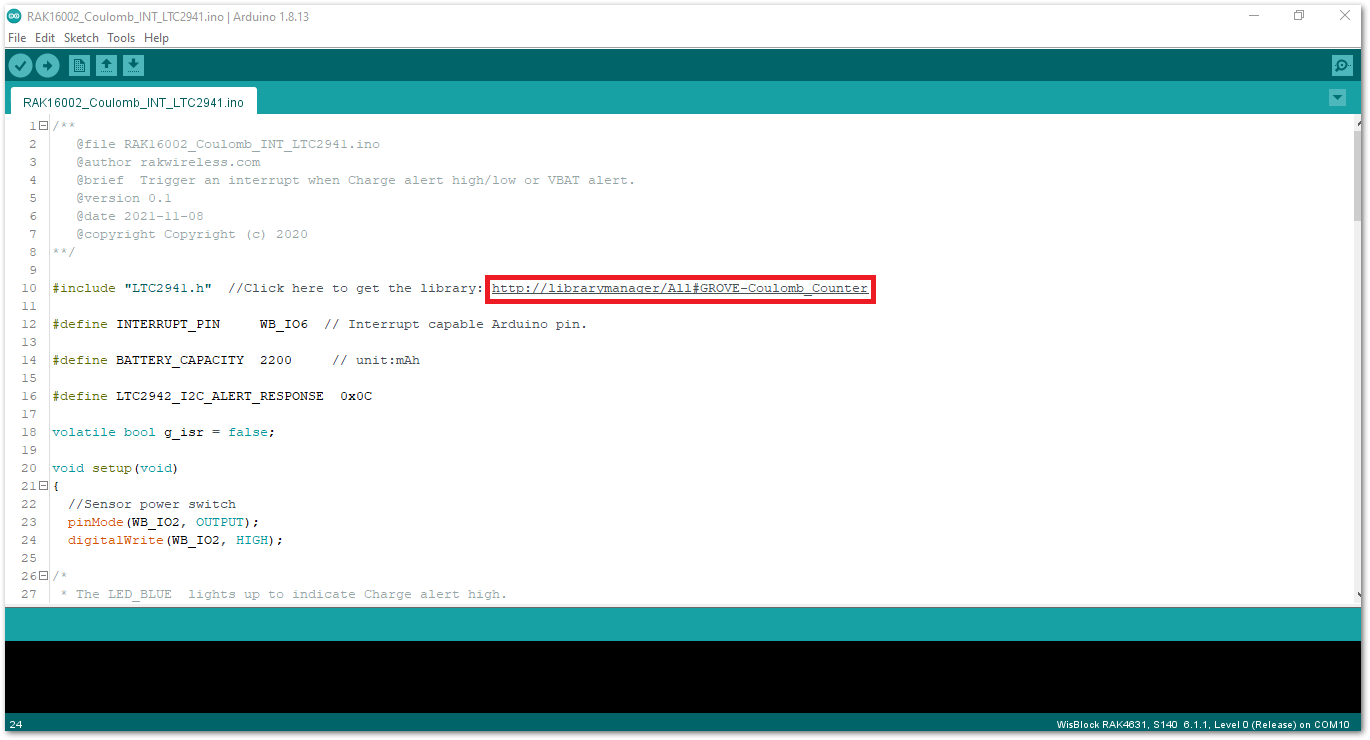 Figure 1: Install GROVE-Coulomb_Counter Library
Click on the Install button to finish the library installation.
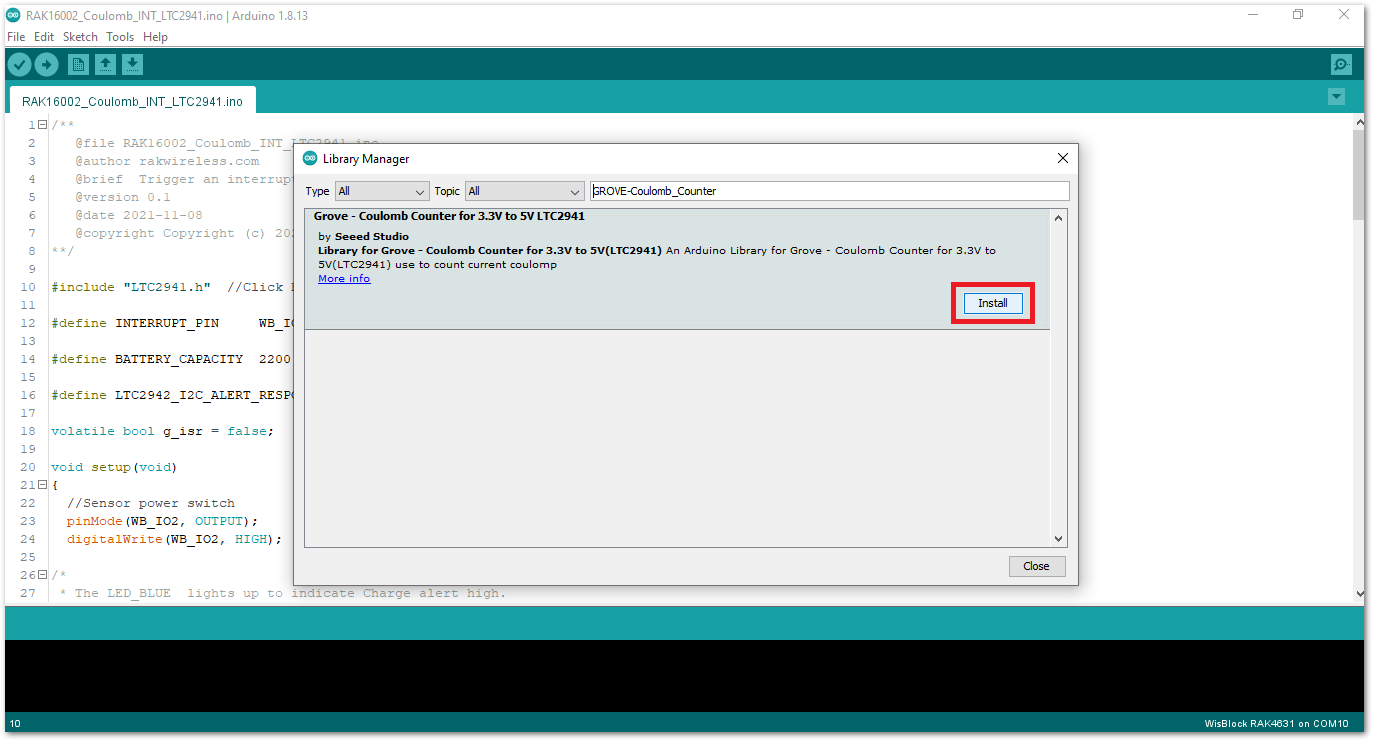 Figure 1: Arduino Library Manager GROVE-Coulomb_Counter
- Now, you can select the right port and upload the code, as shown in Figure 10 and Figure 11.
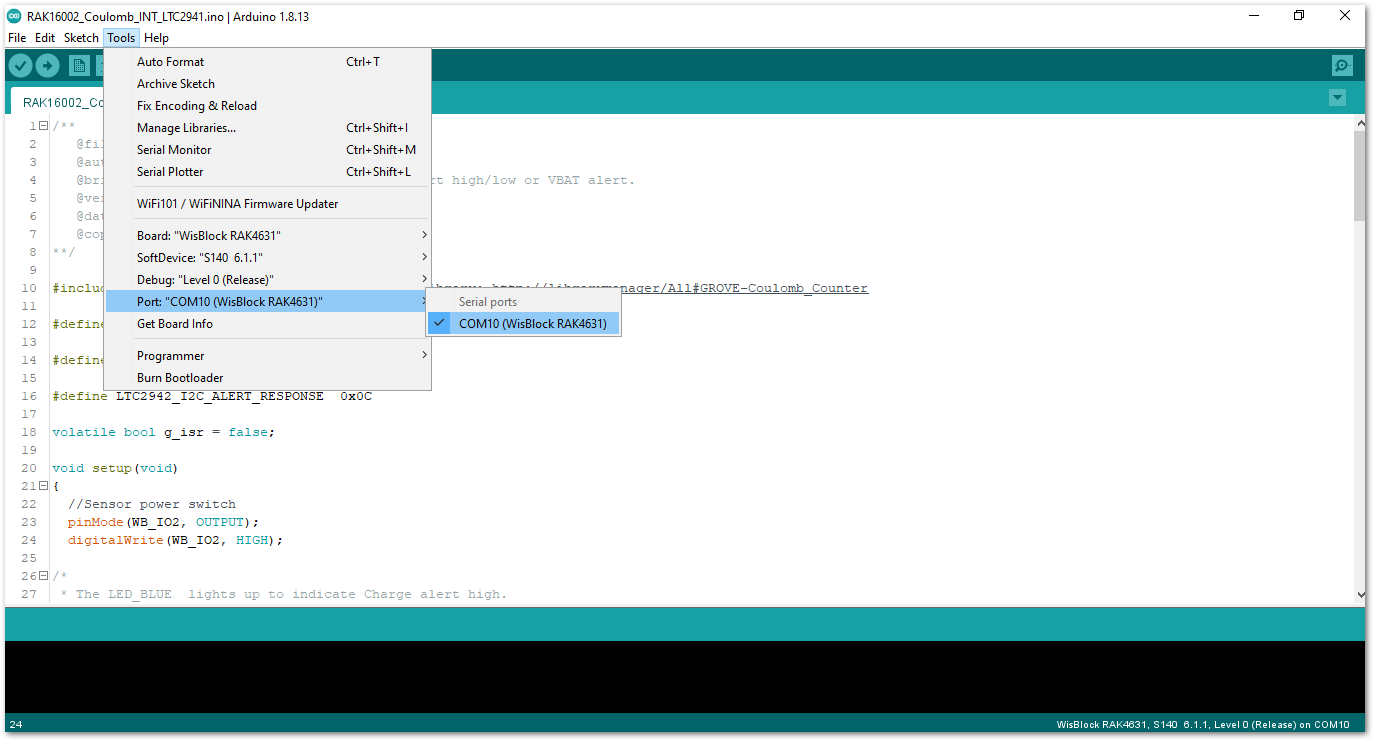 Figure 1: Selecting the correct Serial Port
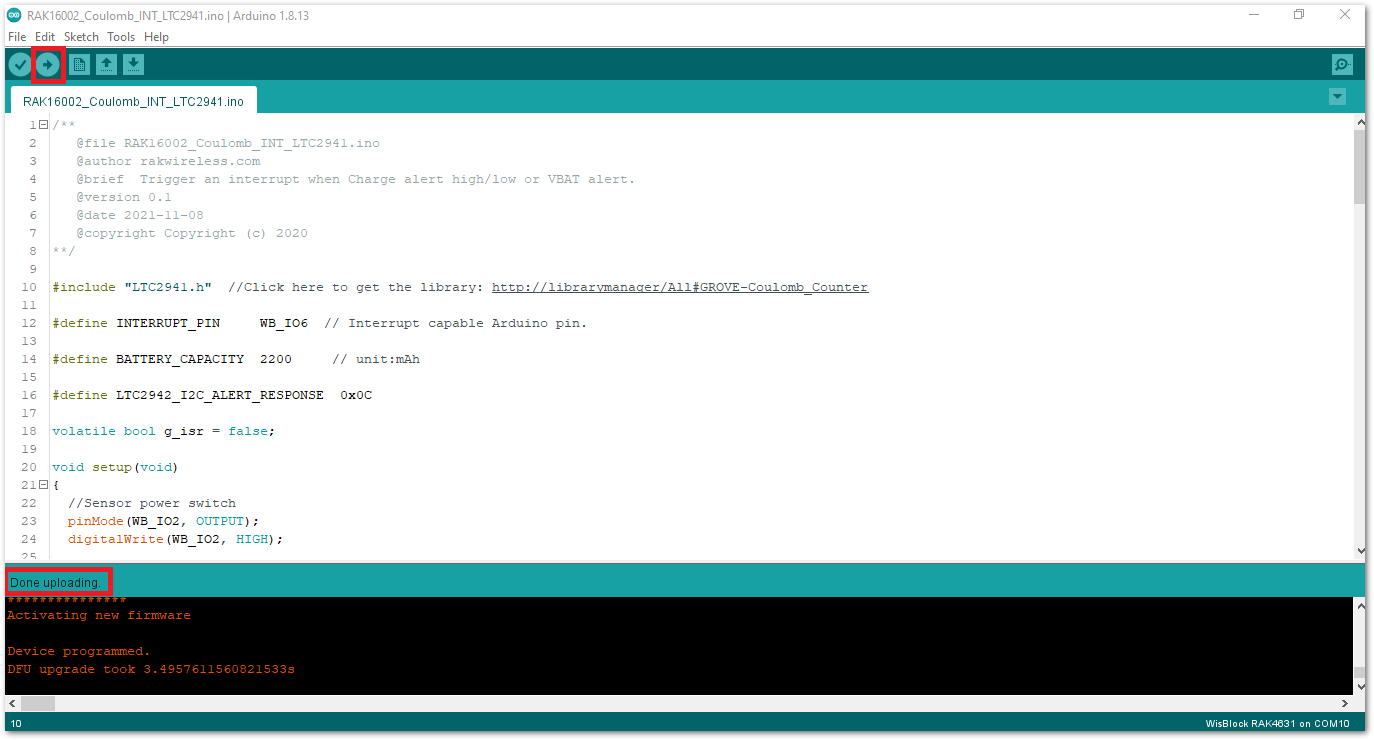 Figure 1: Uploading the RAK16002 Sample code
After a successful upload, open the Arduino Serial Monitor by clicking Tools->Serial Monitor and check the charge, capacity, and charge percentage.
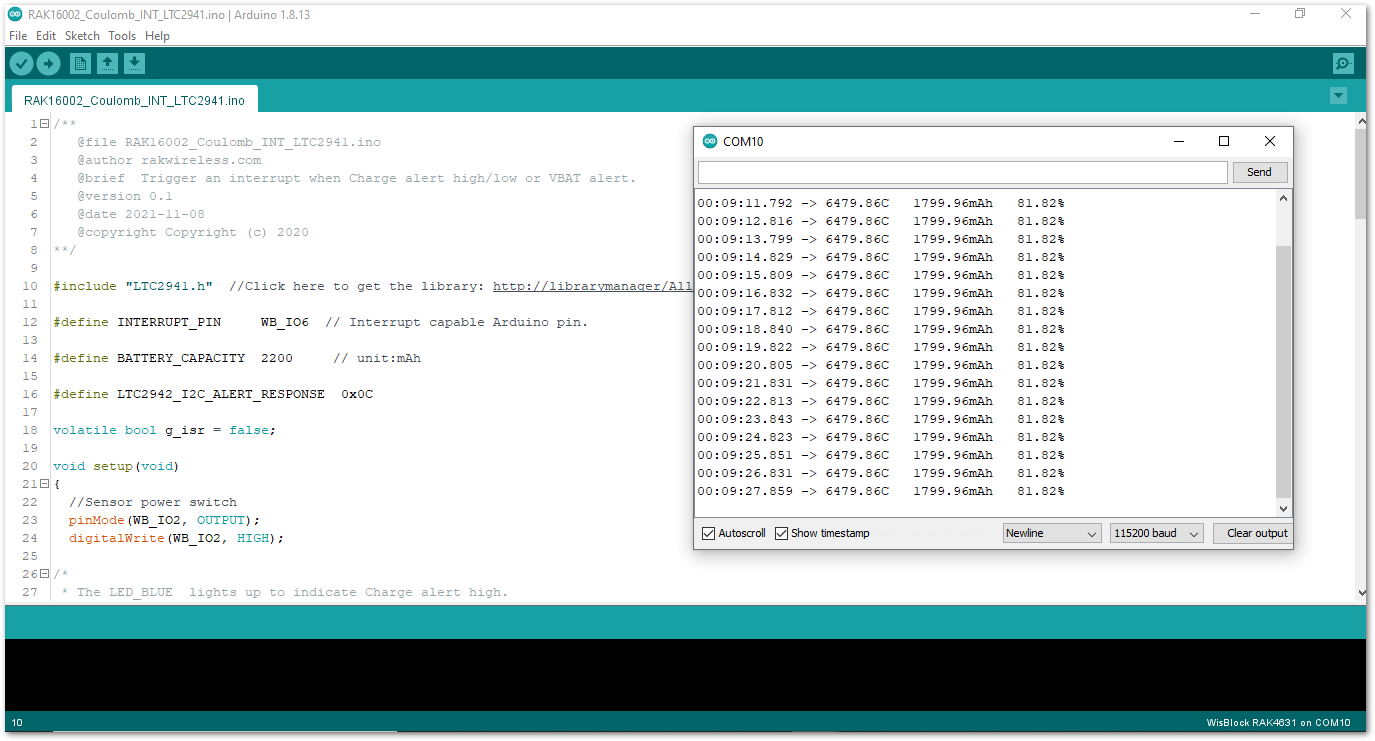 Figure 1: RAK16002 serial monitor
If you experience any error in compiling an example sketch, check the updated code for the RAK16002 WisBlock Core Module that can be found on the RAK16002 WisBlock Example Code Repository.
RAK16002 in RAK11200 WisBlock Core Guide
Arduino Setup
- Select the RAK11200 WisBlock Core.
Install the RAKwireless Arduino BSP to find the RAK11200 in the Arduino Boards Manager.
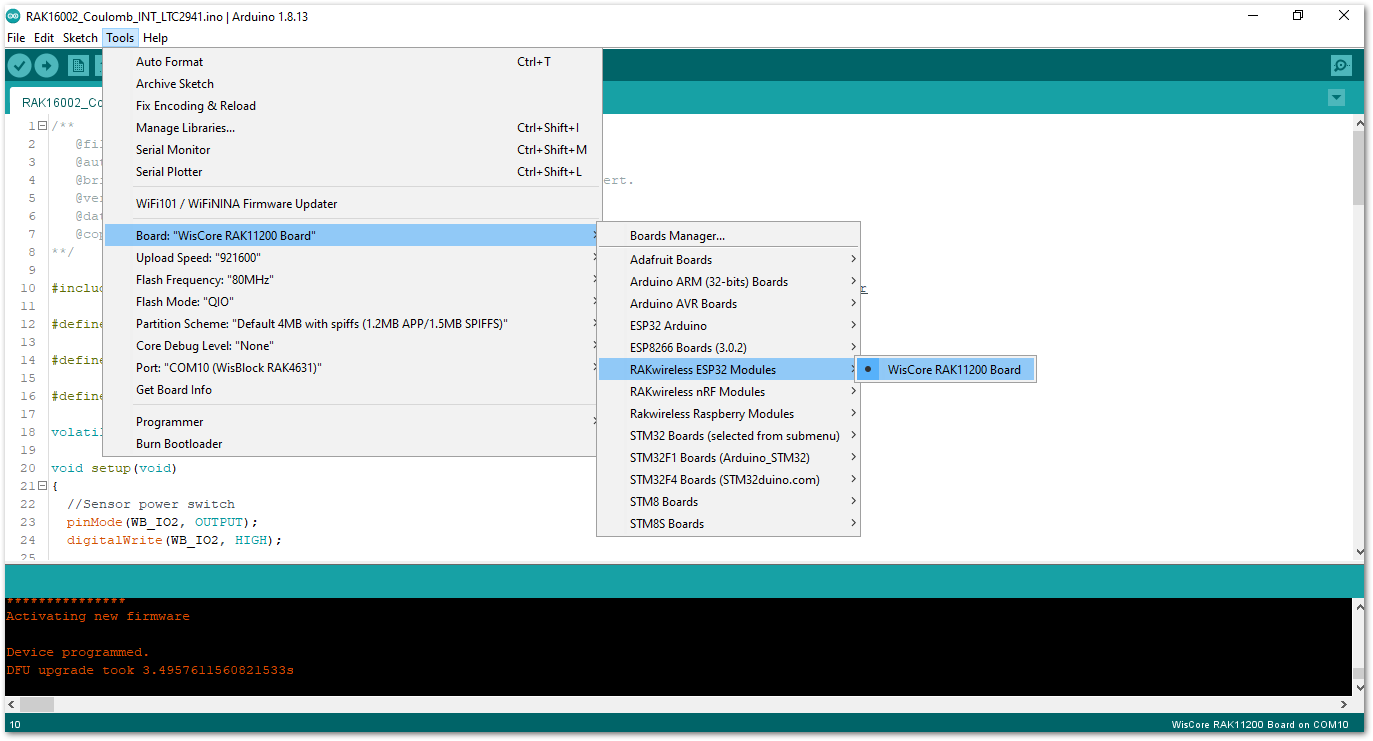 Figure 1: Selecting RAK11200 as WisBlock Core
- Next, copy the following sample code into your Arduino IDE:
Click to view the example
/**
   @file RAK16002_Coulomb_INT_LTC2941.ino
   @author rakwireless.com
   @brief  Trigger an interrupt when Charge alert high/low or VBAT alert.
   @version 0.1
   @date 2021-11-08
   @copyright Copyright (c) 2020
**/

#include "LTC2941.h"  //Click here to get the library: http://librarymanager/All#GROVE-Coulomb_Counter

#define INTERRUPT_PIN     WB_IO6  // Interrupt capable Arduino pin.

#define BATTERY_CAPACITY  2200     // unit:mAh

#define LTC2942_I2C_ALERT_RESPONSE  0x0C

volatile bool g_isr = false;

void setup(void)
{
  //Sensor power switch
  pinMode(WB_IO2, OUTPUT);
  digitalWrite(WB_IO2, HIGH);

/*
 * The LED_BLUE  lights up to indicate Charge alert high.
 * The LED_GREEN lights up to indicate Charge alert low.
 * All lights up to indicate VBAT alert.
 */
  pinMode(LED_BLUE, OUTPUT);
  digitalWrite(LED_BLUE, LOW);
  pinMode(LED_GREEN, OUTPUT);
  digitalWrite(LED_GREEN, LOW);

  pinMode(INTERRUPT_PIN, INPUT);

  time_t timeout = millis();
  Serial.begin(115200);
  while (!Serial)
  {
    if ((millis() - timeout) < 5000)
    {
      delay(100);
    }
    else
    {
      break;
    }
  }

  Serial.println("=====================================");
  Serial.println("RAK16002 Coulomb LTC2941 example");
  Serial.println("=====================================");

  Wire.begin();

  ltc2941.initialize();
  ltc2941.setBatteryFullMAh( BATTERY_CAPACITY , false);
  ltc2941.setAccumulatedCharge(42352); // Set the current battery level to 1800 mAh.

  attachInterrupt(digitalPinToInterrupt(INTERRUPT_PIN), interruptRoutine, FALLING);


  ltc2941.setBatteryAlert( VBAT_3_0_V );

  ltc2941.setChargeThresholdHigh( 42353 );//CURRENT_CAPACITY
  ltc2941.setChargeThresholdLow( 42351 );

  ltc2941.setAlertConfig( ALERT_MODE );

  /*
  *  The LTC2941 will stop pulling down the AL/CC pin and will not respond
  *  to further ARA requests until a new alert event occurs.
  */
  Wire.requestFrom(LTC2942_I2C_ALERT_RESPONSE, 1);
  while(Wire.available())
  {
    Wire.read();
  }
}

void loop(void)
{
  float coulomb = 0, mAh = 0, percent = 0;
  uint8_t Status;

  if (g_isr == true)
  {
    g_isr = false;

    ltc2941.setAccumulatedCharge(42352); // Reset the battery level only for periodic presentation interruption.

    Wire.requestFrom((int16_t)0x0C, 1); // Send alert response protocol.
    while(Wire.available())
    {
      Wire.read();
    }

    Status = ltc2941.getStatus();
    if(Status & 0x02)
    {
       Serial.println("VBAT alert interrupt!");
       digitalWrite(LED_GREEN, HIGH);
       digitalWrite(LED_BLUE, HIGH);
    }
    if(Status & 0x04)
    {
       Serial.println("Charge alert low interrupt!");
       digitalWrite(LED_GREEN, HIGH);
    }
    if(Status & 0x08)
    {
       Serial.println("Charge alert high interrupt!");
       digitalWrite(LED_BLUE, HIGH);
    }
  }
  coulomb = ltc2941.getCoulombs();
  mAh = ltc2941.getmAh();
  percent = ltc2941.getPercent();

  Serial.print(coulomb);
  Serial.print("C   ");
  Serial.print(mAh);
  Serial.print("mAh   ");
  Serial.print(percent);
  Serial.println("%");
  delay(1000);
  digitalWrite(LED_GREEN, LOW);
  digitalWrite(LED_BLUE, LOW);
}

void interruptRoutine()
{
  g_isr = true;
}
- Once the example sketch is open, install the GROVE-Coulomb_Counter library by clicking the red-highlighted link, as shown in Figure 14 and Figure 15.
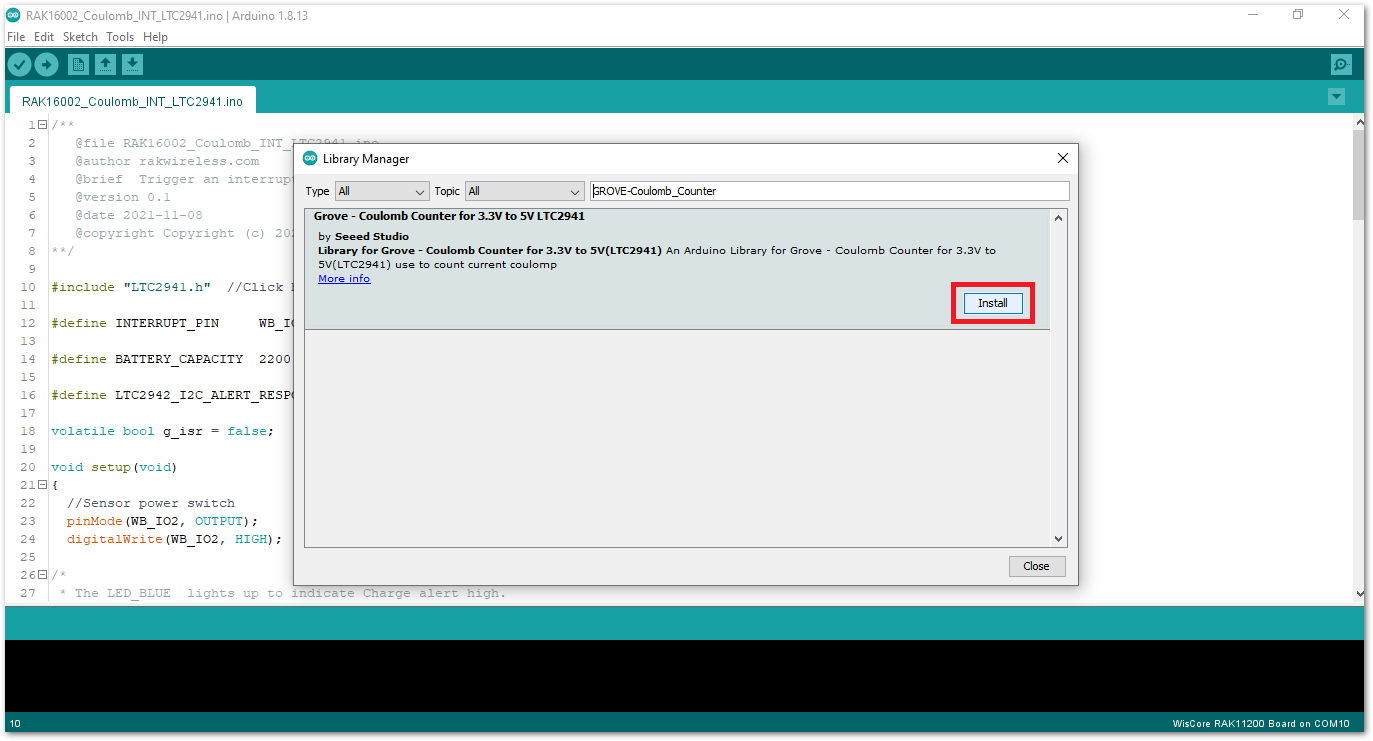 Figure 1: Install GROVE-Coulomb_Counter Library
Click on the Install button to finish library installation.
 Figure 1: Install GROVE-Coulomb_Counter Library
- Now, you can select the right port and upload the code, as shown in Figure 16 and Figure 18.
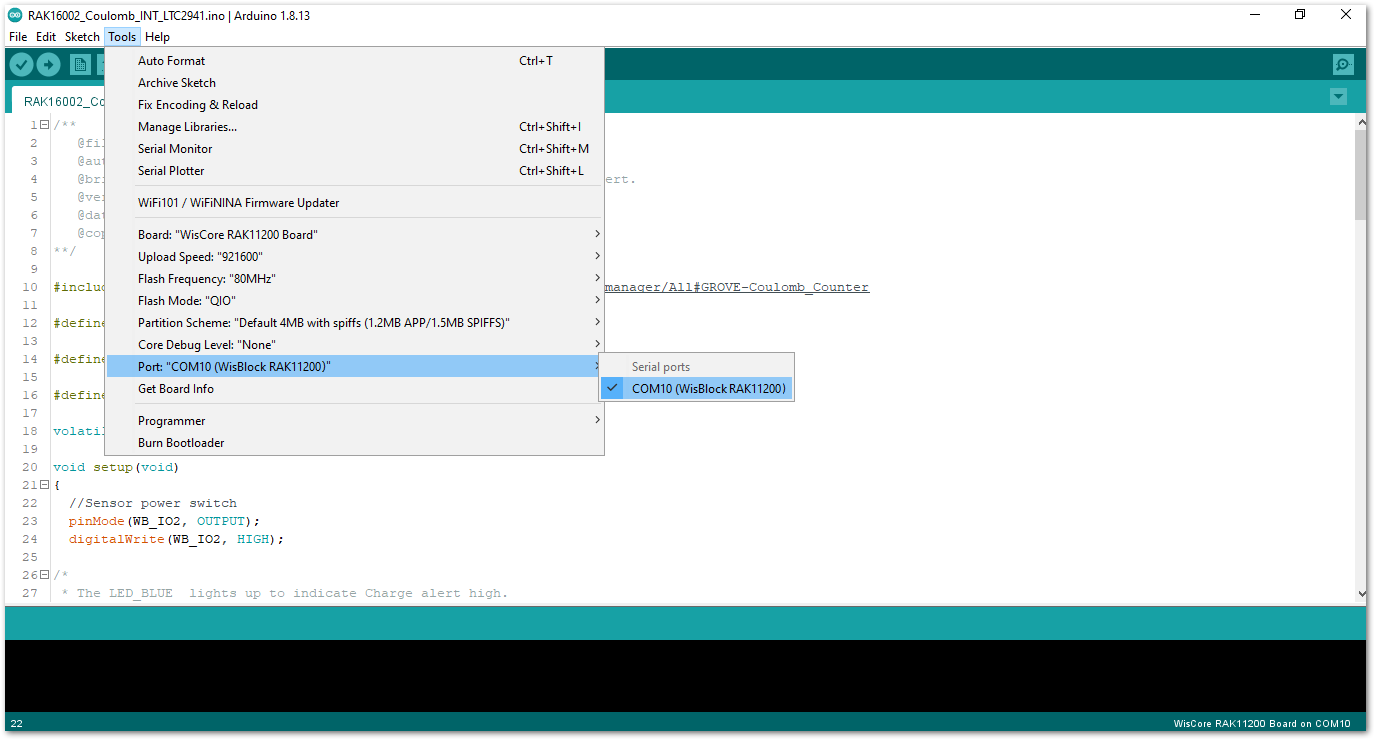 Figure 1: Selecting the correct Serial Port
Before uploading your sketch, short circuit BOOT0 and GND pin and press the reset button. Then click the Upload button.
 Figure 1: Force ESP32 download mode
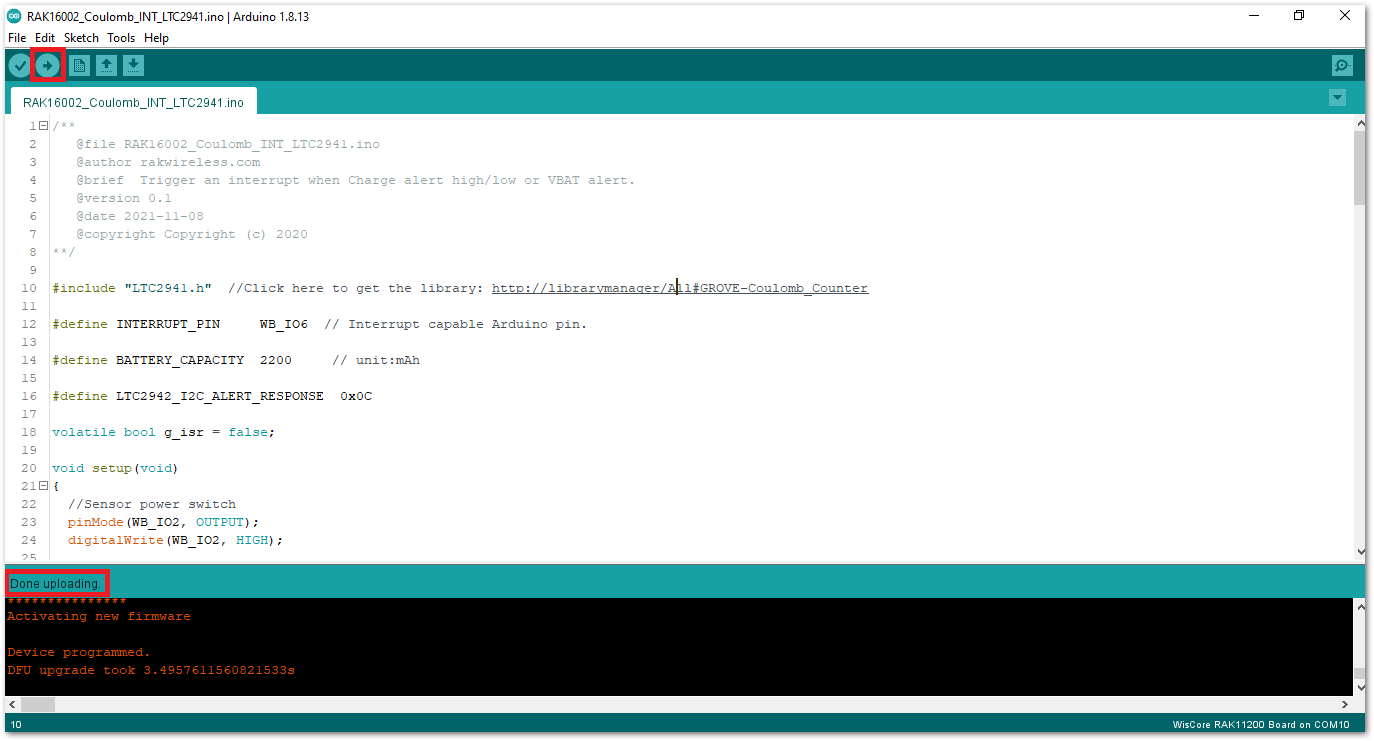 Figure 1: Uploading the RAK16002 sample code
After a successful upload, open the Arduino Serial Monitor by clicking Tools -> Serial Monitor and check the charge, capacity, and charge percentage.
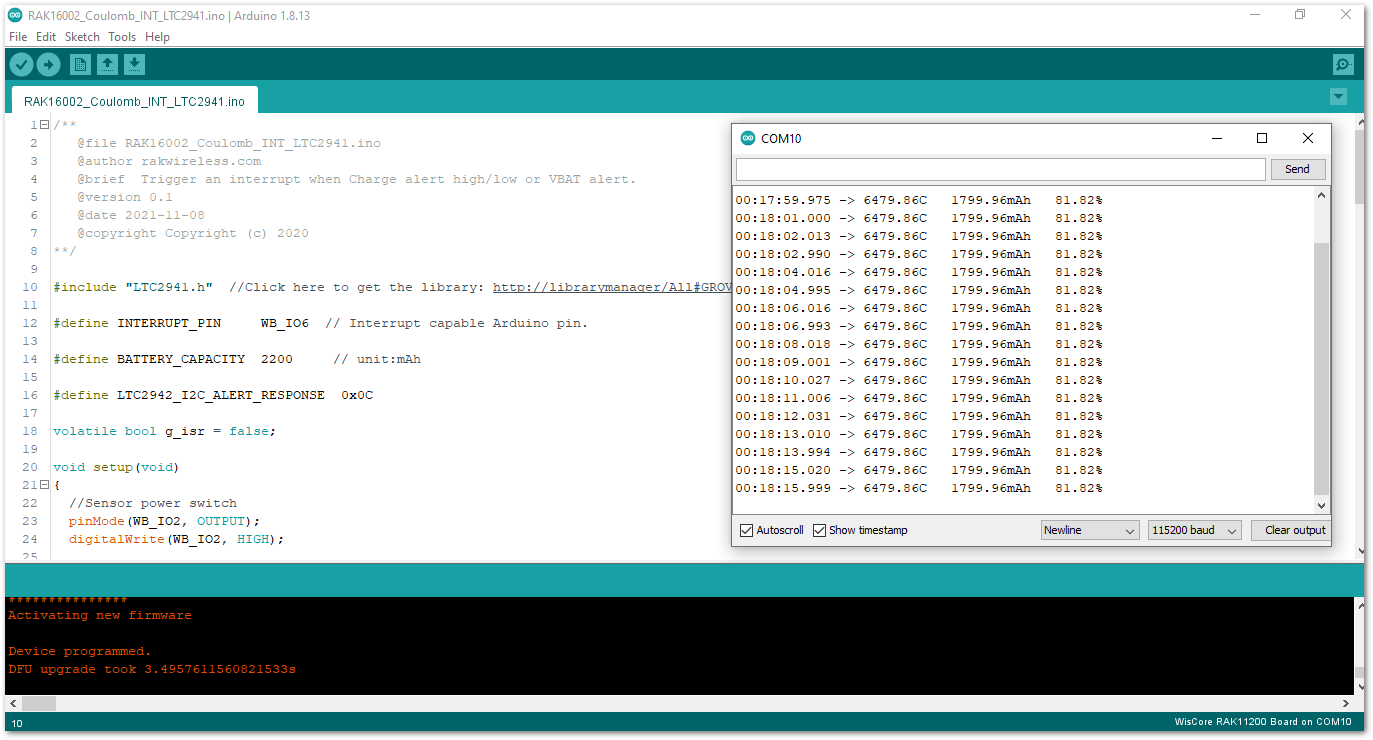 Figure 1: RAK16002 serial monitor
If you experience any error in compiling an example sketch, check the updated code for the RAK16002 WisBlock Core Module that can be found on the RAK16002 WisBlock Example Code Repository.
RAK16002 in RAK11310 WisBlock Core Guide
Arduino Setup
- Select the RAK11310 WisBlock Core.
Install the RAKwireless Arduino BSP to find the RAK11310 in the Arduino Boards Manager.
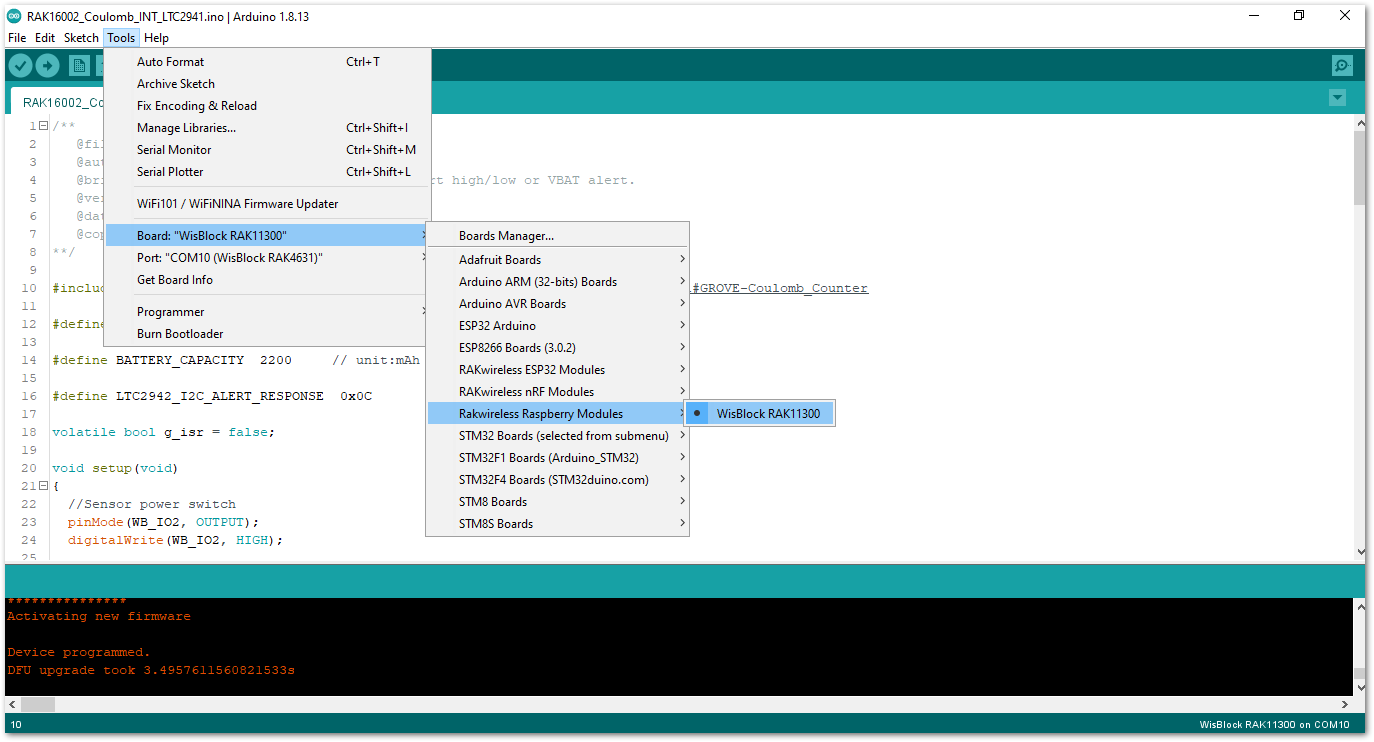 Figure 1: Selecting RAK11300 as WisBlock Core
- Next, copy the following sample code into your Arduino IDE:
Click to view the example
/**
   @file RAK16002_Coulomb_INT_LTC2941.ino
   @author rakwireless.com
   @brief  Trigger an interrupt when Charge alert high/low or VBAT alert.
   @version 0.1
   @date 2021-11-08
   @copyright Copyright (c) 2020
**/

#include "LTC2941.h"  //Click here to get the library: http://librarymanager/All#GROVE-Coulomb_Counter

#define INTERRUPT_PIN     WB_IO6  // Interrupt capable Arduino pin.

#define BATTERY_CAPACITY  2200     // unit:mAh

#define LTC2942_I2C_ALERT_RESPONSE  0x0C

volatile bool g_isr = false;

void setup(void)
{
  //Sensor power switch
  pinMode(WB_IO2, OUTPUT);
  digitalWrite(WB_IO2, HIGH);

/*
 * The LED_BLUE  lights up to indicate Charge alert high.
 * The LED_GREEN lights up to indicate Charge alert low.
 * All lights up to indicate VBAT alert.
 */
  pinMode(LED_BLUE, OUTPUT);
  digitalWrite(LED_BLUE, LOW);
  pinMode(LED_GREEN, OUTPUT);
  digitalWrite(LED_GREEN, LOW);

  pinMode(INTERRUPT_PIN, INPUT);

  time_t timeout = millis();
  Serial.begin(115200);
  while (!Serial)
  {
    if ((millis() - timeout) < 5000)
    {
      delay(100);
    }
    else
    {
      break;
    }
  }

  Serial.println("=====================================");
  Serial.println("RAK16002 Coulomb LTC2941 example");
  Serial.println("=====================================");

  Wire.begin();

  ltc2941.initialize();
  ltc2941.setBatteryFullMAh( BATTERY_CAPACITY , false);
  ltc2941.setAccumulatedCharge(42352); // Set the current battery level to 1800 mAh.

  attachInterrupt(digitalPinToInterrupt(INTERRUPT_PIN), interruptRoutine, FALLING);


  ltc2941.setBatteryAlert( VBAT_3_0_V );

  ltc2941.setChargeThresholdHigh( 42353 );//CURRENT_CAPACITY
  ltc2941.setChargeThresholdLow( 42351 );

  ltc2941.setAlertConfig( ALERT_MODE );

  /*
  *  The LTC2941 will stop pulling down the AL/CC pin and will not respond
  *  to further ARA requests until a new alert event occurs.
  */
  Wire.requestFrom(LTC2942_I2C_ALERT_RESPONSE, 1);
  while(Wire.available())
  {
    Wire.read();
  }
}

void loop(void)
{
  float coulomb = 0, mAh = 0, percent = 0;
  uint8_t Status;

  if (g_isr == true)
  {
    g_isr = false;

    ltc2941.setAccumulatedCharge(42352); // Reset the battery level only for periodic presentation interruption.

    Wire.requestFrom((int16_t)0x0C, 1); // Send alert response protocol.
    while(Wire.available())
    {
      Wire.read();
    }

    Status = ltc2941.getStatus();
    if(Status & 0x02)
    {
       Serial.println("VBAT alert interrupt!");
       digitalWrite(LED_GREEN, HIGH);
       digitalWrite(LED_BLUE, HIGH);
    }
    if(Status & 0x04)
    {
       Serial.println("Charge alert low interrupt!");
       digitalWrite(LED_GREEN, HIGH);
    }
    if(Status & 0x08)
    {
       Serial.println("Charge alert high interrupt!");
       digitalWrite(LED_BLUE, HIGH);
    }
  }
  coulomb = ltc2941.getCoulombs();
  mAh = ltc2941.getmAh();
  percent = ltc2941.getPercent();

  Serial.print(coulomb);
  Serial.print("C   ");
  Serial.print(mAh);
  Serial.print("mAh   ");
  Serial.print(percent);
  Serial.println("%");
  delay(1000);
  digitalWrite(LED_GREEN, LOW);
  digitalWrite(LED_BLUE, LOW);
}

void interruptRoutine()
{
  g_isr = true;
}
- Once the example sketch is open, install the GROVE-Coulomb_Counter library by clicking the red-highlighted link, as shown in Figure 21 and Figure 22.
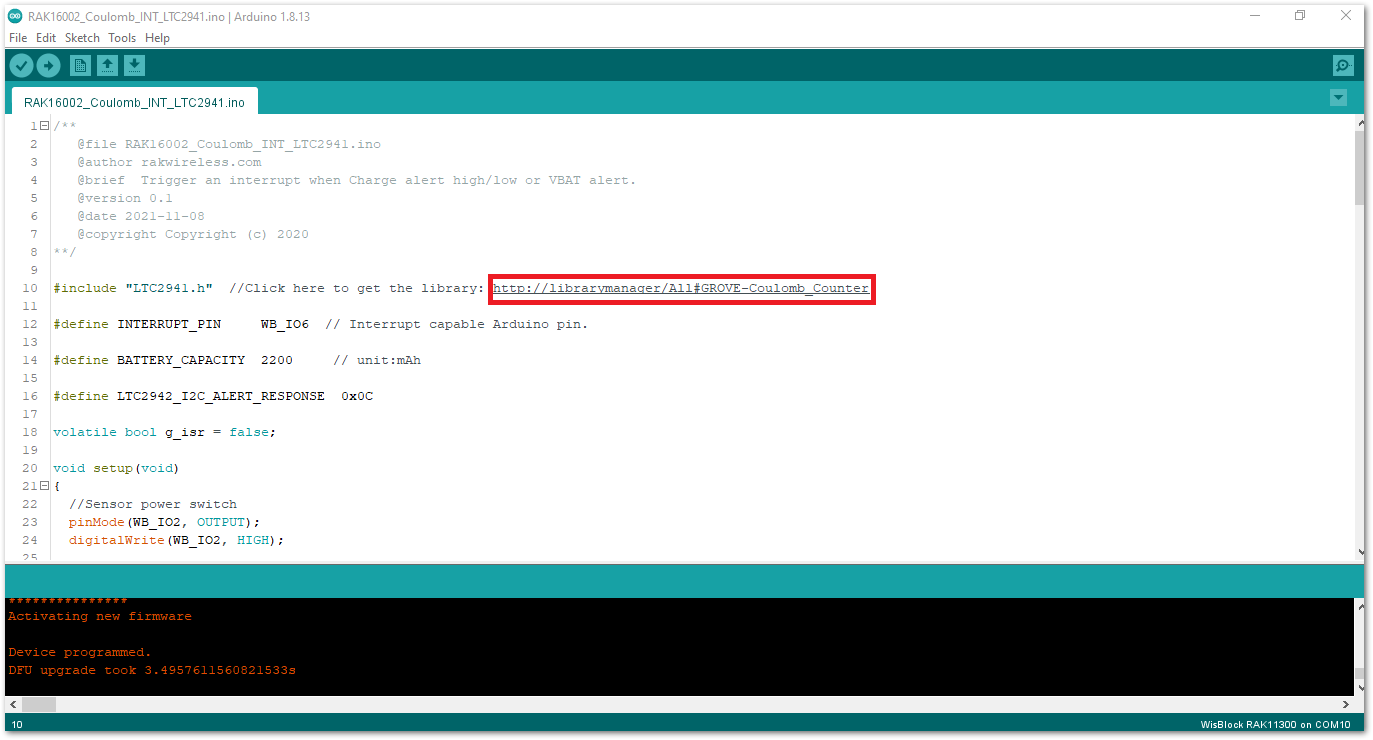 Figure 1: Install GROVE-Coulomb_Counter Library
Click on the Install button to finish library installation.
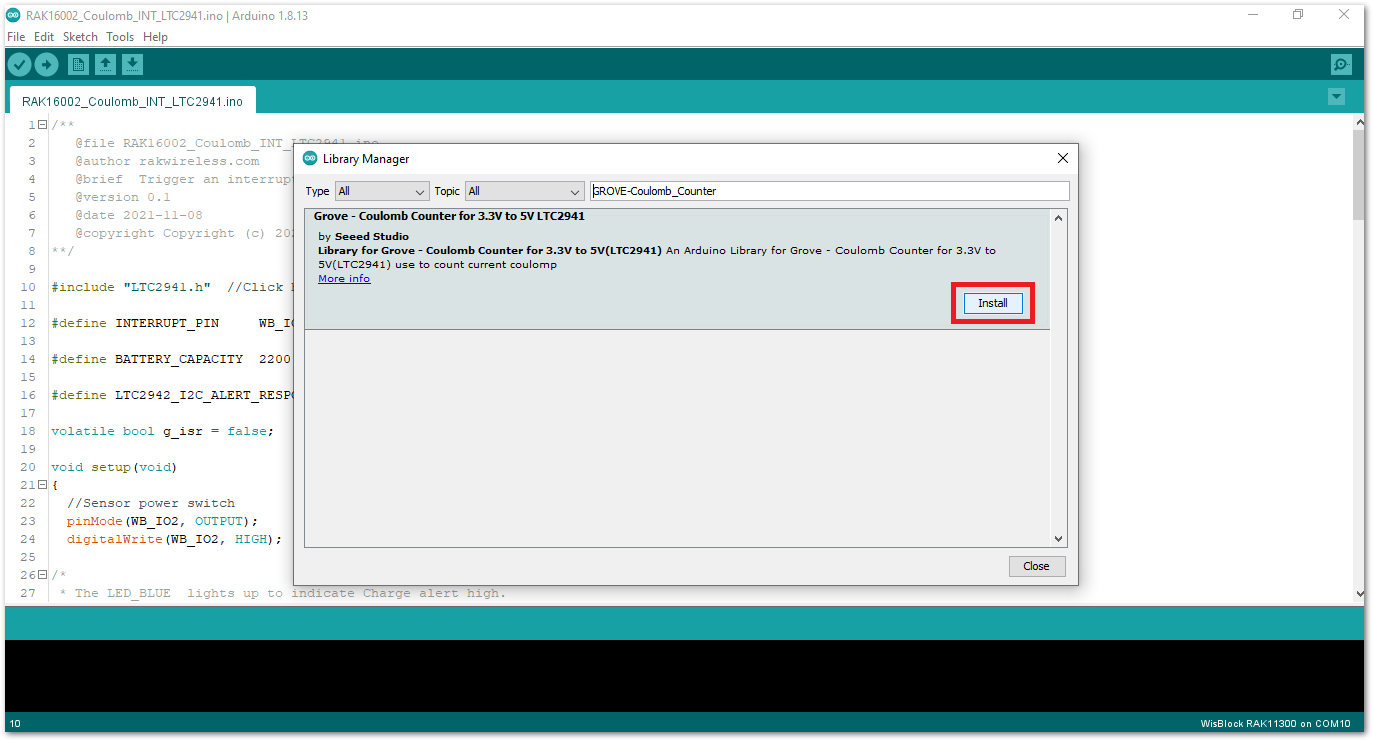 Figure 1: Install GROVE-Coulomb_Counter Library
- Now, you can select the correct port and upload the code, as shown in Figure 23 and Figure 24.
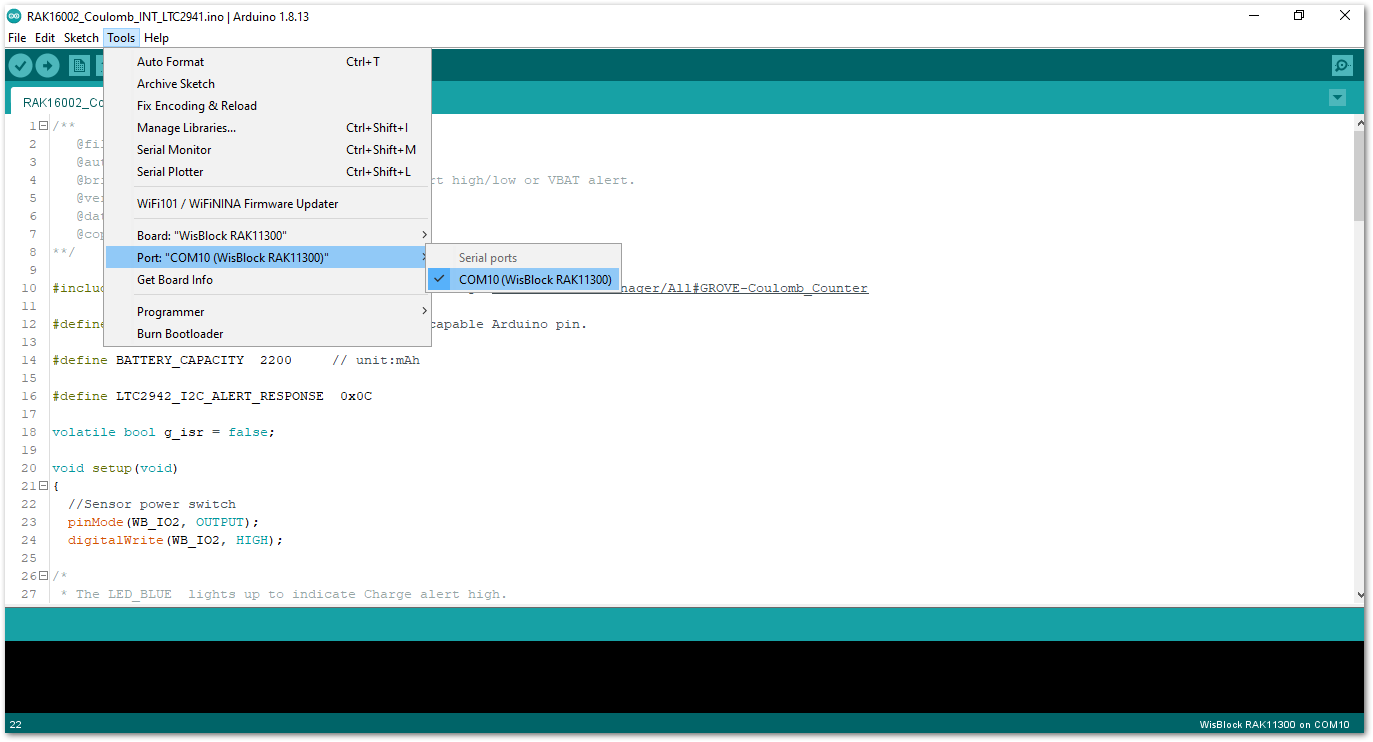 Figure 1: Selecting the correct Serial Port
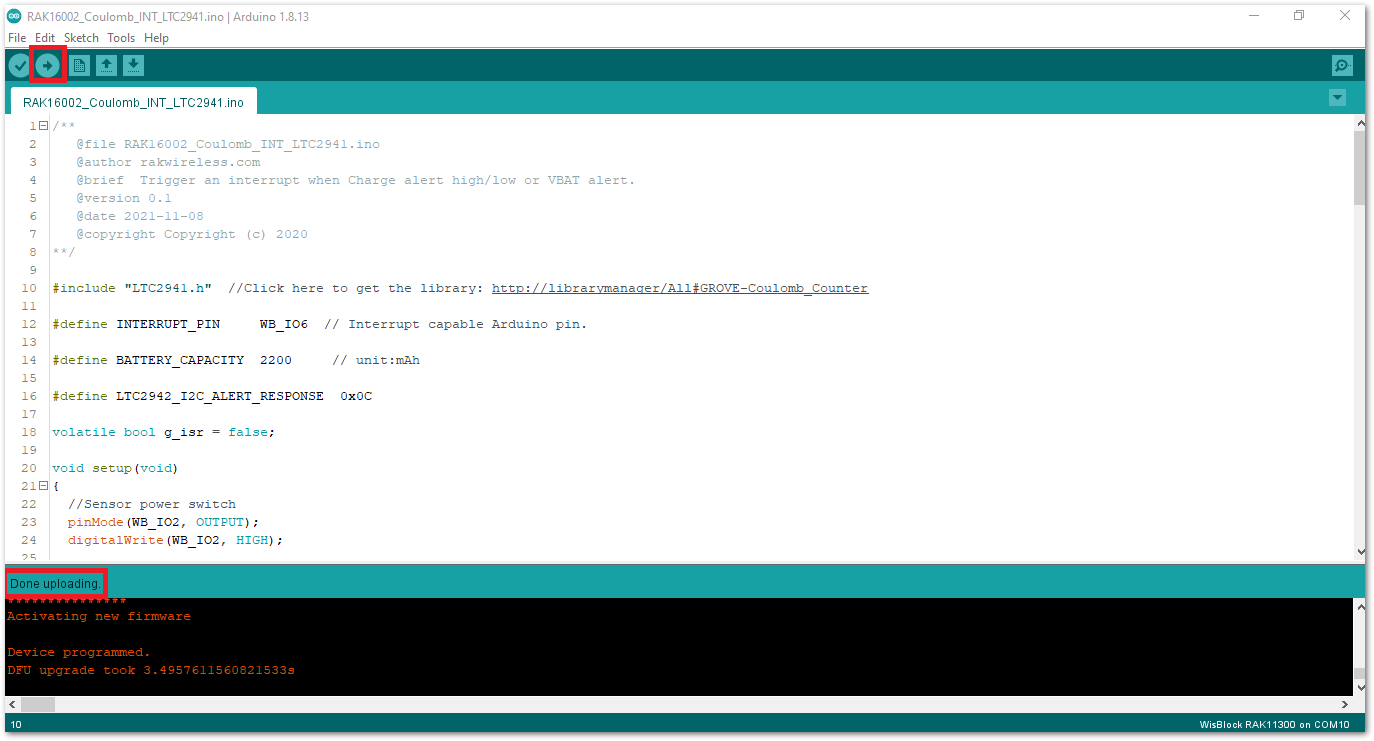 Figure 1: Uploading the RAK16002 Sample code
After a successful upload, open the Arduino Serial Monitor by clicking Tools -> Serial Monitor and check the charge, capacity, and charge percentage.
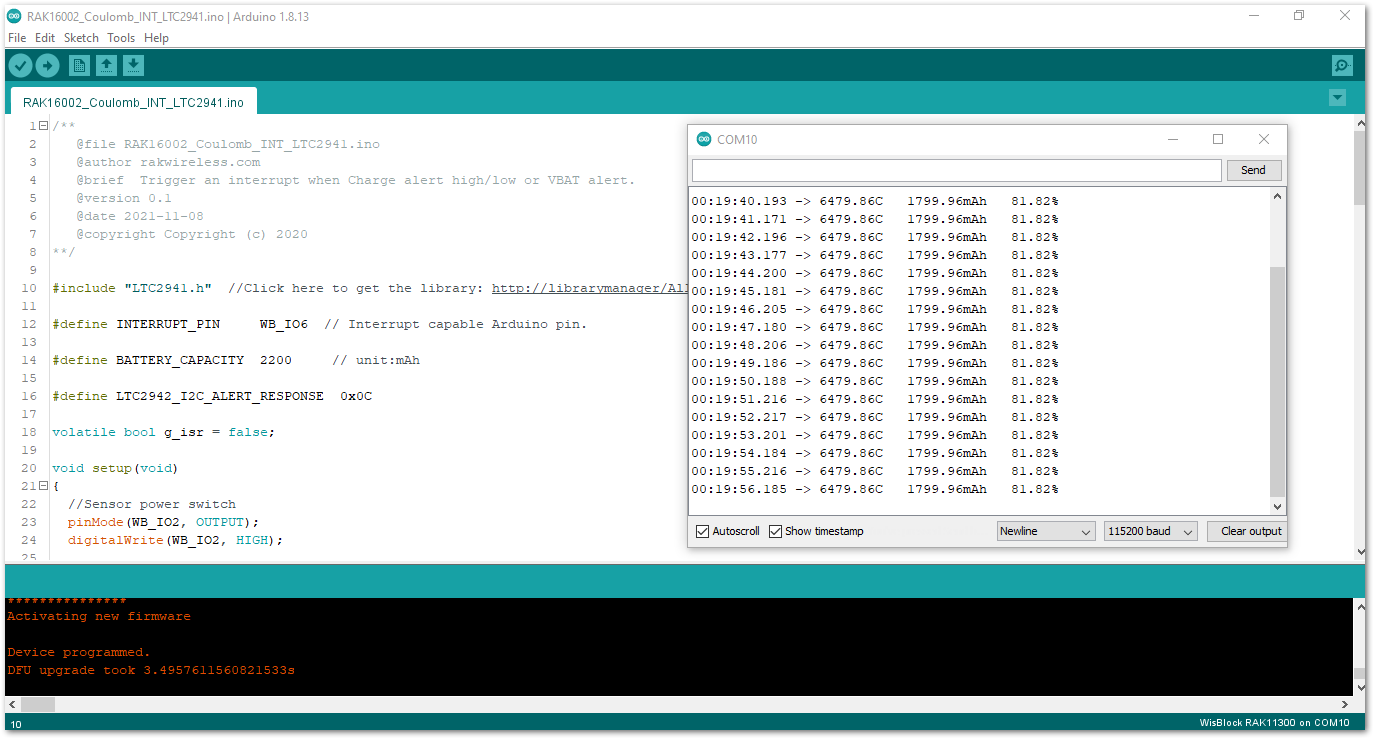 Figure 1: RAK16002 serial monitor
If you experience any error in compiling an example sketch, execute the following steps:
-
Run the
post_installscript to install the missing drivers. You have to go to%userprofile%\AppData\Local\Arduino15\packages\rakwireless\hardware\mbed_rp2040\0.0.6and runpost_install.bat. -
Check the updated code for the RAK16002 WisBlock Core Module that can be found on the RAK16002 WisBlock Example Code Repository.
