RAK19006 WisBlock Wireless Charge Module Quick Start Guide
Prerequisite
What Do You Need?
Before going through each and every step on using the RAK19006 WisBlock module, make sure to prepare the necessary items listed below:
Hardware
- RAK19006 WisBlock Wireless Charger Module
- Your choice of WisBlock Base
- Your choice of WisBlock Core
- USB Cable
- Li-Ion/LiPo battery (optional)
- Solar charger (optional)
Software
Arduino
- Download and install Arduino IDE.
- To add the RAKwireless Core boards on your Arduino Boards Manager, install the RAKwireless Arduino BSP.
Product Configuration
Hardware Setup
The RAK19006 WisBlock Wireless Charge Module is designed to be a part of the battery charger. It is highly efficient, Qi-compliant, and has a single-chip wireless power receiver and charger. It also integrates the receiver and linear charger and supports up to 5 W applications.
For more information about RAK19006, refer to the Datasheet.
RAK19006 Connection to WisBlock Base
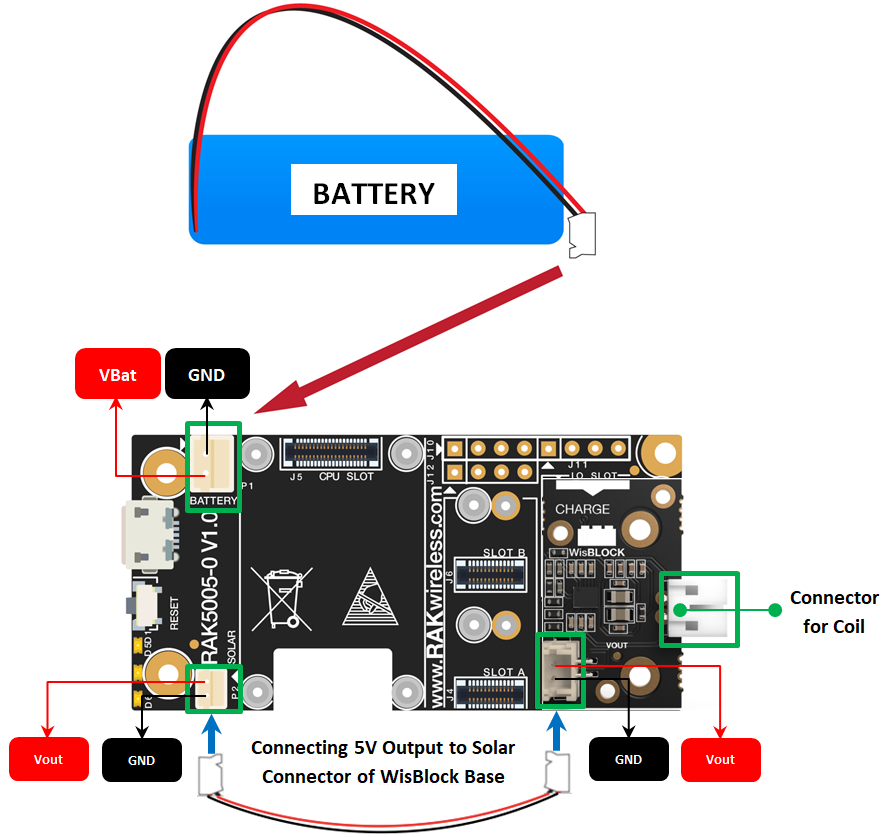 Figure 1: RAK19006 Pinout and Connector assignments
The RAK19006 supports wireless battery charge via coil attached to the connector for coil, as shown in Figure 1. The module has a 5 V output voltage that can be accessed via the JST connector and can be interfaced to the Solar Panel connector of the WisBlock Base to charge the Li-Ion/LiPo battery connected to WisBlock Base.
Coil Placement on Wireless Charging Pad
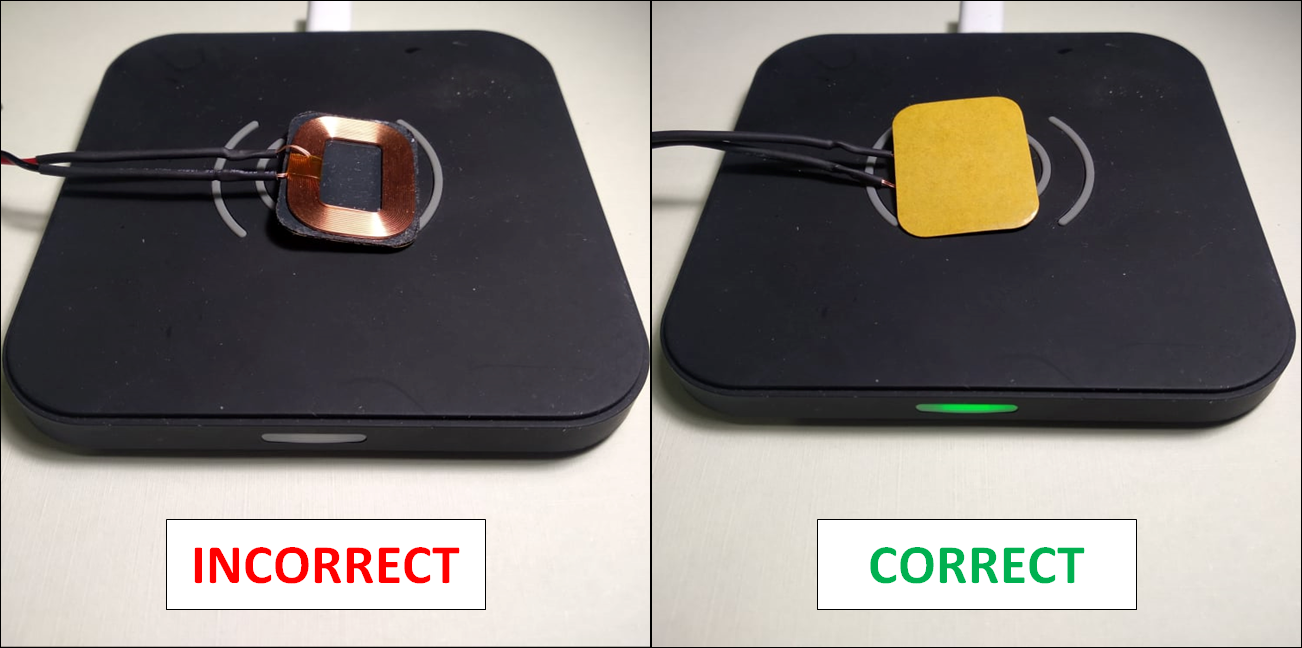 Figure 1: Coil proper placement on top of the Wireless Charging Pad
Assembling and Disassembling of WisBlock Modules
Assembling Procedure
The RAK19006 module can be mounted on the IO slot of the WisBlock Base board, as shown in Figure 3. Also, always secure the connection of the WisBlock module by using compatible screws.
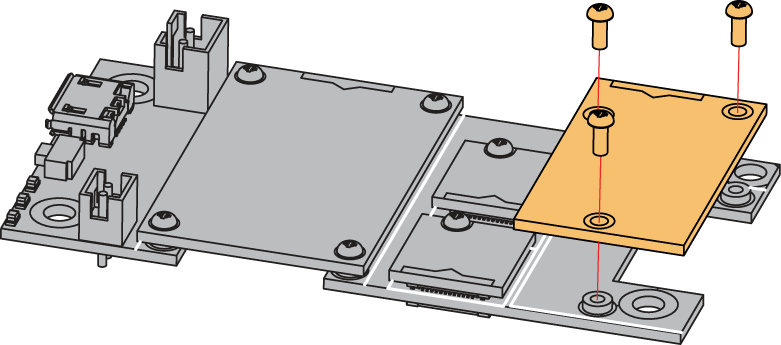 Figure 1: RAK19006 mounting connection to WisBlock Base module
Disassembling Procedure
The procedure in disassembling any type of WisBlock modules is the same.
- First, remove the screws.
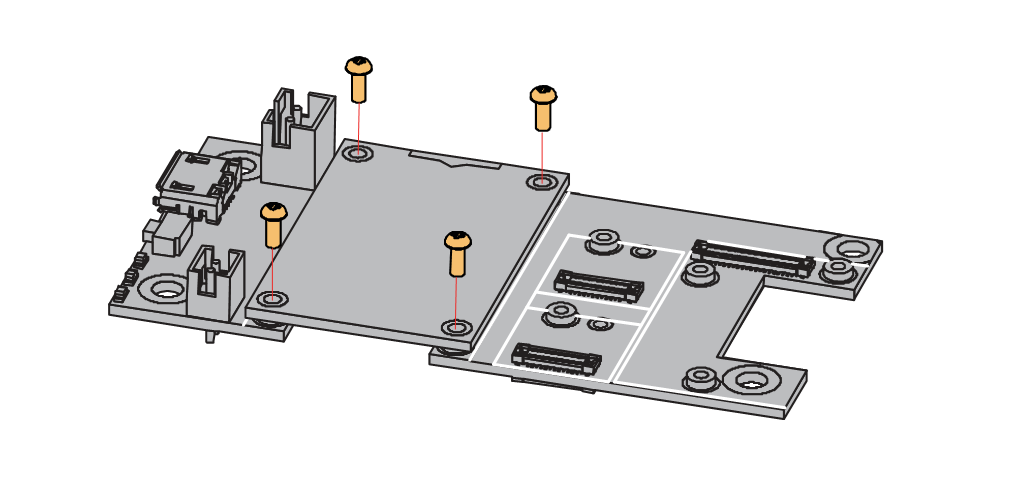 Figure 1: Removing screws from the WisBlock module
- Once the screws are removed, check the silkscreen of the module to find the correct location where force can be applied.
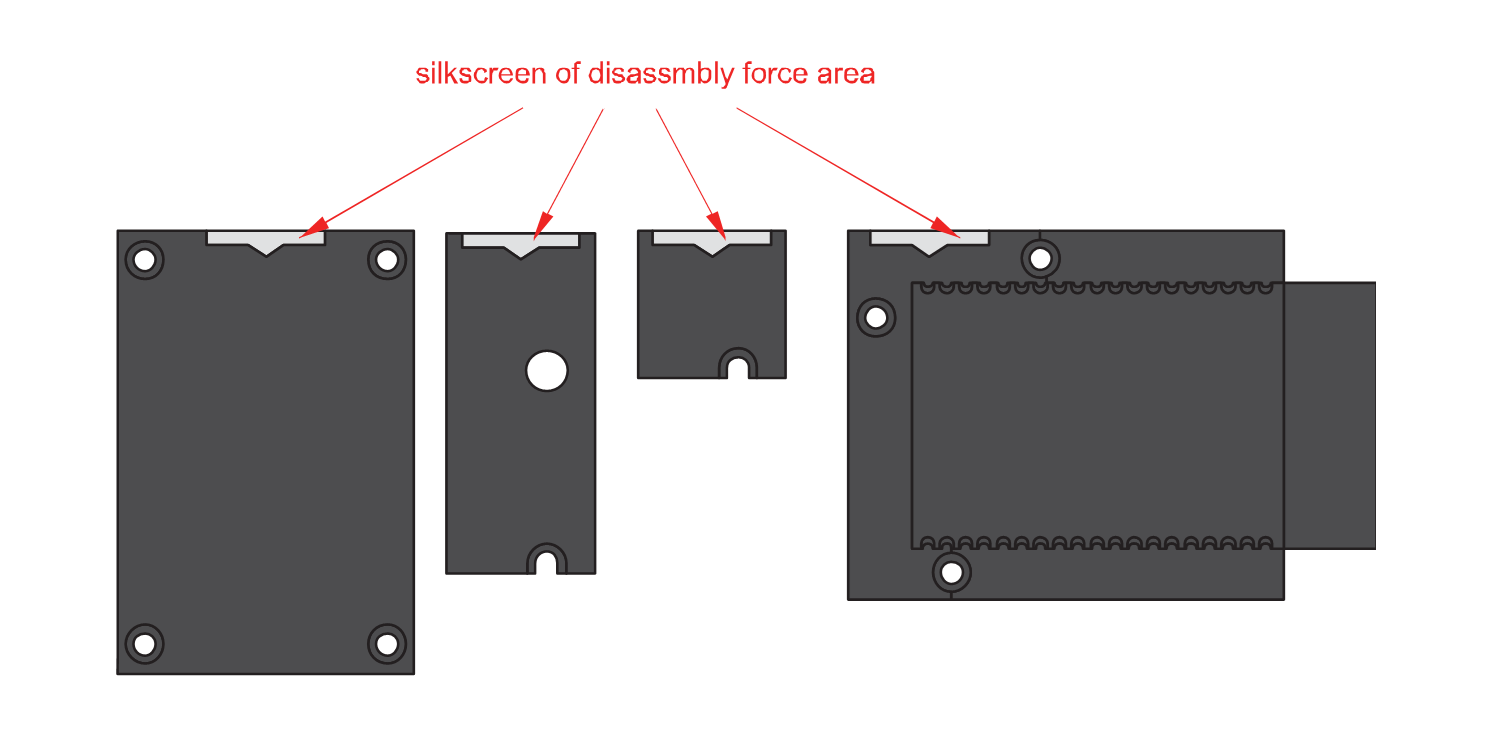 Figure 1: Detaching silkscreen on the WisBlock module
- Apply force to the module at the position of the connector, as shown in Figure 6, to detach the module from the baseboard.
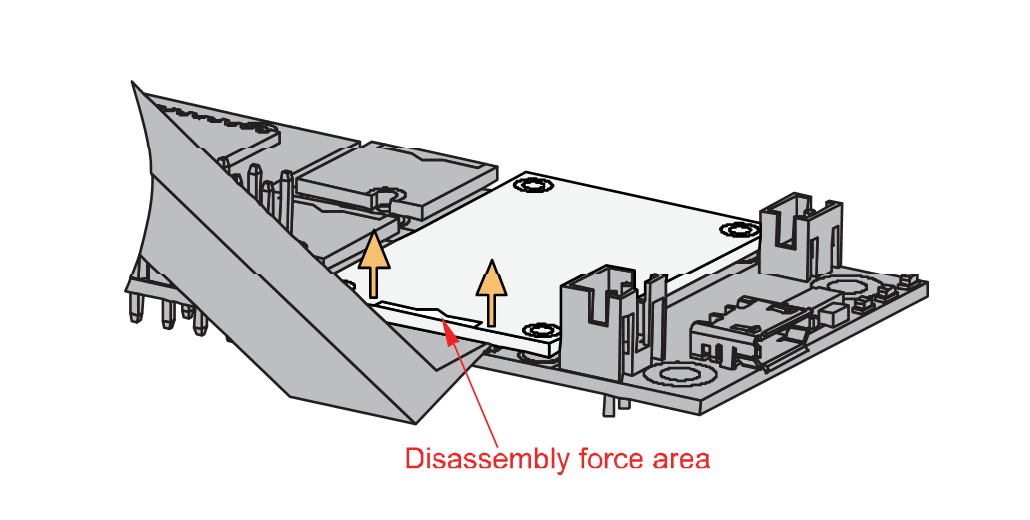 Figure 1: Applying even forces on the proper location of a WisBlock module
If you will connect other modules to the remaining WisBlock Base slots, check on the WisBlock Pin Mapper tool for possible conflicts.
Now, you can connect the battery and USB cable to start programming your WisBlock Core.
- Batteries can cause harm if not handled properly.
- Only 3.7-4.2 V Rechargeable LiPo batteries are supported. It is highly recommended not to use other types of batteries with the system unless you know what you are doing.
- If a non-rechargeable battery is used, it has to be unplugged first before connecting the USB cable to the USB port of the board to configure the device. Not doing so might damage the battery or cause a fire.
- Only 5 V solar panels are supported. Do not use 12 V solar panels. It will destroy the charging unit and eventually other electronic parts.
- Make sure the battery wires are matching the polarity on the WisBlock Base board. Not all batteries have the same wiring.
Software Configuration and Example
In the following example, you will be using the RAK19006 for the battery charging and will show the power voltage on the RAK1921 WisBlock OLED Display.
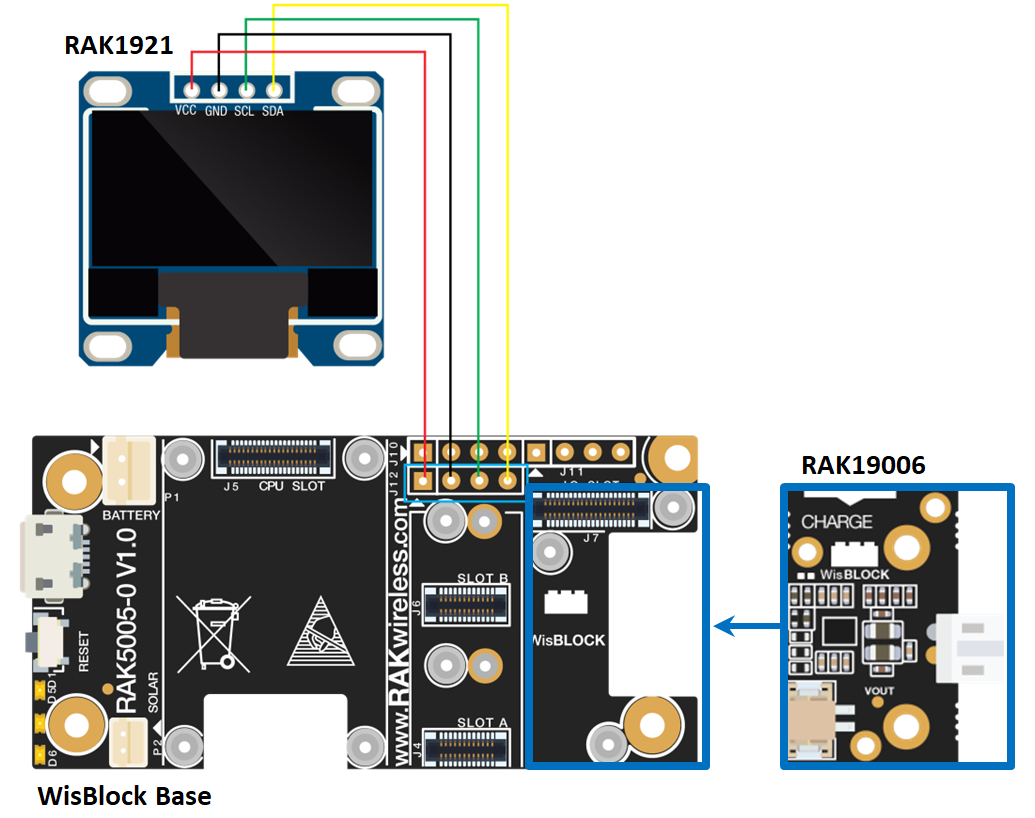 Figure 1: RAK19006 and RAK1921 connection to WisBlock Base Module
These are the quick links that go directly to the software guide for the specific WisBlock Core module you use:
- RAK19006 in RAK4631 WisBlock Core Guide
- RAK19006 in RAK11200 WisBlock Core Guide
- RAK19006 in RAK11310 WisBlock Core Guide
RAK19006 in RAK4631 WisBlock Core Guide
Arduino Setup
- First, you need to select the RAK4631 WisBlock Core.
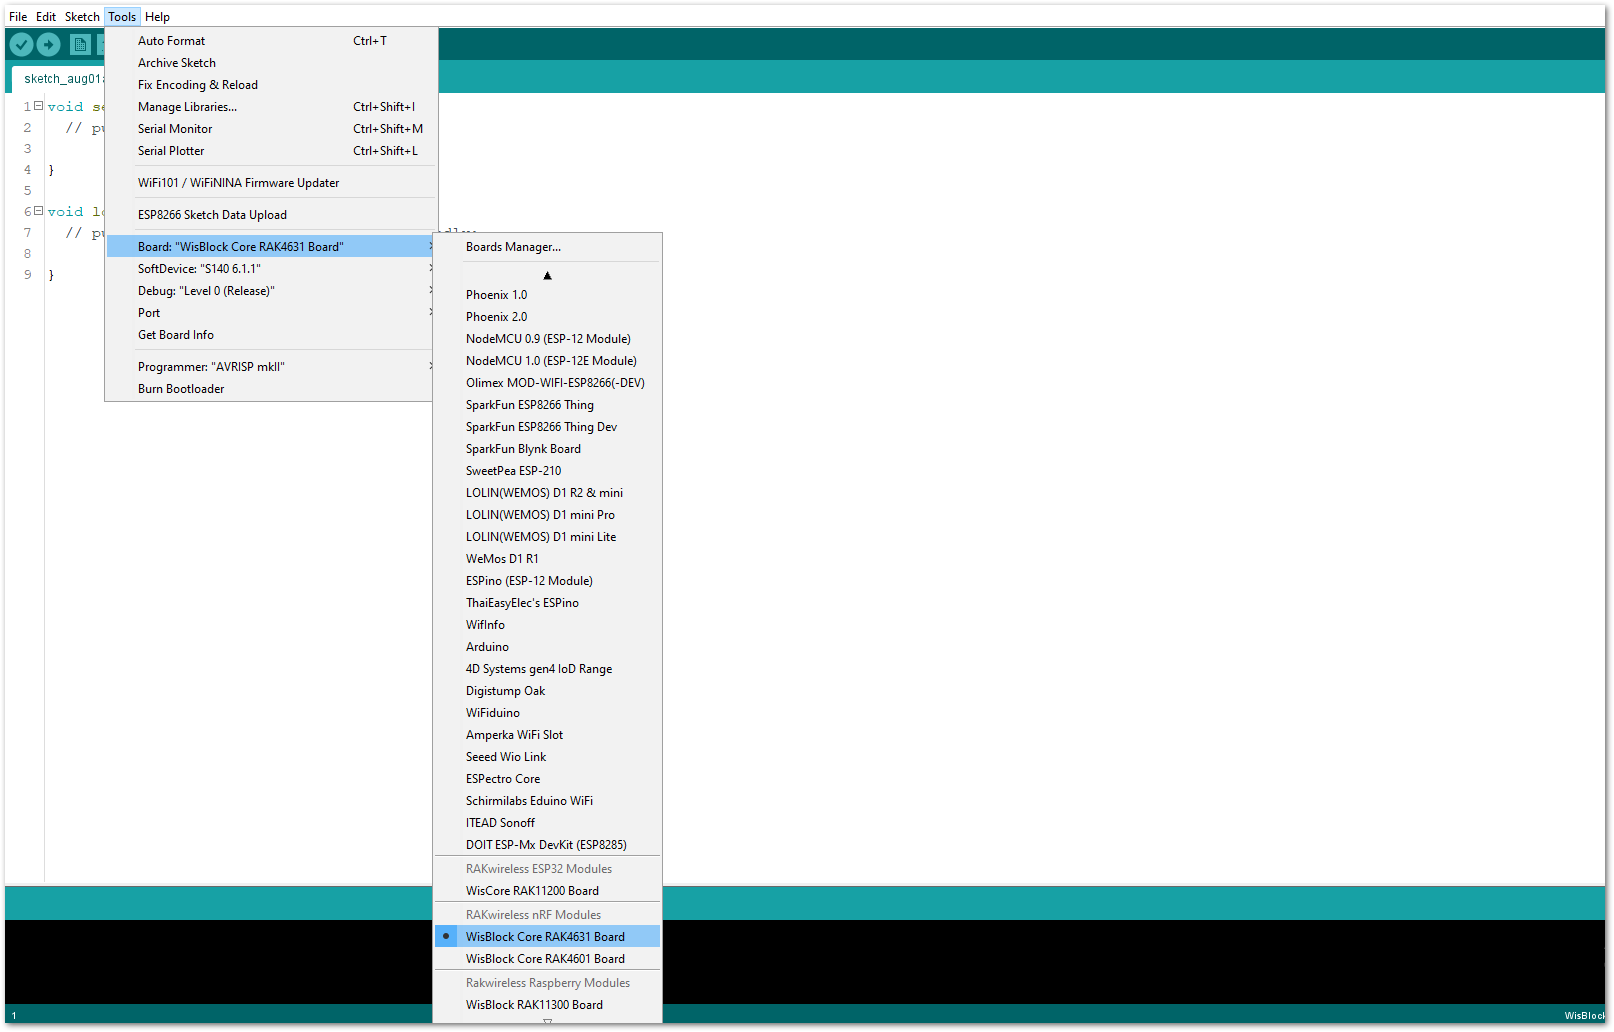 Figure 1: Selecting RAK4631 as WisBlock Core
- Next, copy the following sample code into your Arduino IDE.
Click to view the code
/**
 *  @file RAK13000_WirelessCharger.ino
 *  @author rakwireless.com
 *  @brief show the wireless charger power voltage by the oled
 *  @version 0.1
 *  @date 2021-02-23
 *  @copyright Copyright (c) 2020
 *  @note platform RAK4631
**/
#include <Wire.h>
#include <U8g2lib.h>       //Click here to get the library: http://librarymanager/All#u8g2

#define LED1  35
#define LED2  36

#define PIN_VBAT A0 //Analog pin to read battery level definition
/** Millivolt per LSB constant value = 3.0V ADC range and 12-bit ADC resolution = 3000mV/4096 */
#define VBAT_MV_PER_LSB (0.73242188F)
/** Voltage divider constant = 1.5M + 1M voltage divider on VBAT = (1.5M / (1M + 1.5M)) */
#define VBAT_DIVIDER (0.6F)
/** Compensation factor for the VBAT divider */
#define VBAT_DIVIDER_COMP (1.74)
/** Formula to calculate real battery voltage */
#define REAL_VBAT_MV_PER_LSB (VBAT_DIVIDER_COMP * VBAT_MV_PER_LSB)

U8G2_SSD1306_128X64_NONAME_F_HW_I2C u8g2(U8G2_R0);

float g_powerVoltage = 0;

void oled_show();
void readVBAT_init();
void get_BATvoltage();
void led1_on();
void led1_off();
void led2_on();
void led2_off();

void setup()
{
  time_t timeout = millis();
  readVBAT_init();
  u8g2.begin();
  Serial.begin(115200);
  while (!Serial)
  {
    if ((millis() - timeout) < 5000)
    {
       delay(100);
    }
    else
    {
       break;
    }
  }
  pinMode(LED1, OUTPUT);
  pinMode(LED2, OUTPUT);

  digitalWrite(LED1, LOW);
  digitalWrite(LED2, LOW);
}

void loop()
{
  led1_on();
  led2_off();
  get_BATvoltage();
  oled_show();
  delay(200);
  led2_on();
  led1_off();
  delay(200);
}
void led1_on()
{
  digitalWrite(LED1, HIGH);
}
void led1_off()
{
  digitalWrite(LED1, LOW);
}
void led2_on()
{
  digitalWrite(LED2, HIGH);
}
void led2_off()
{
  digitalWrite(LED2, LOW);
}
void oled_show()
{
  char data[32] = {0};
  u8g2.clearBuffer();         // clear the internal memory
  u8g2.setFont(u8g2_font_ncenB10_tr); // choose a suitable font

  u8g2.drawStr(3, 15, "Power  voltage:");
  memset(data, 0, sizeof(data));
  sprintf(data, "%3.2f V",g_powerVoltage);
  u8g2.drawStr(3, 45, data);
  u8g2.sendBuffer(); // transfer internal memory to the display
}
void readVBAT_init()
{
  // Set the analog reference to 3.0V (default = 3.6V)
  analogReference(AR_INTERNAL_3_0);
  // Set the resolution to 12-bit (0..4095)
  analogReadResolution(12); // Can be 8, 10, 12 or 14
  // Let the ADC settle
  delay(10);
}
void get_BATvoltage()
{
  unsigned int sum = 0,average_value = 0;
  unsigned int read_temp[10] = {0};
  unsigned char i = 0;
  unsigned int adc_max = 0;
  unsigned int adc_min = 4095;
  average_value = analogRead(PIN_VBAT);
  for(i=0;i<10;i++)
  {
    read_temp[i] = analogRead(PIN_VBAT);
    if(read_temp[i] < adc_min)
      {
        adc_min = read_temp[i];
      }
    if(read_temp[i] > adc_max)
      {
        adc_max = read_temp[i];
      }
     sum = sum + read_temp[i];
//     Serial.println(read_temp[i]);
//     delay(1);
  }
  average_value = (sum - adc_max - adc_min) >> 3;
//  Serial.println(average_value);
  g_powerVoltage = average_value * REAL_VBAT_MV_PER_LSB * 0.001;
  Serial.print("The battery voltage is:");
  Serial.print(g_powerVoltage,2);
  Serial.println(" V");
}
If you experience any error in compiling the example sketch, check the updated code for the RAK4631 WisBlock Core Module that can be found on the RAK19006 WisBlock Example Code Repository.
- Once the example code is open, install the U8g2 library by clicking the yellow highlighted link, as shown in Figure 9 and Figure 10.
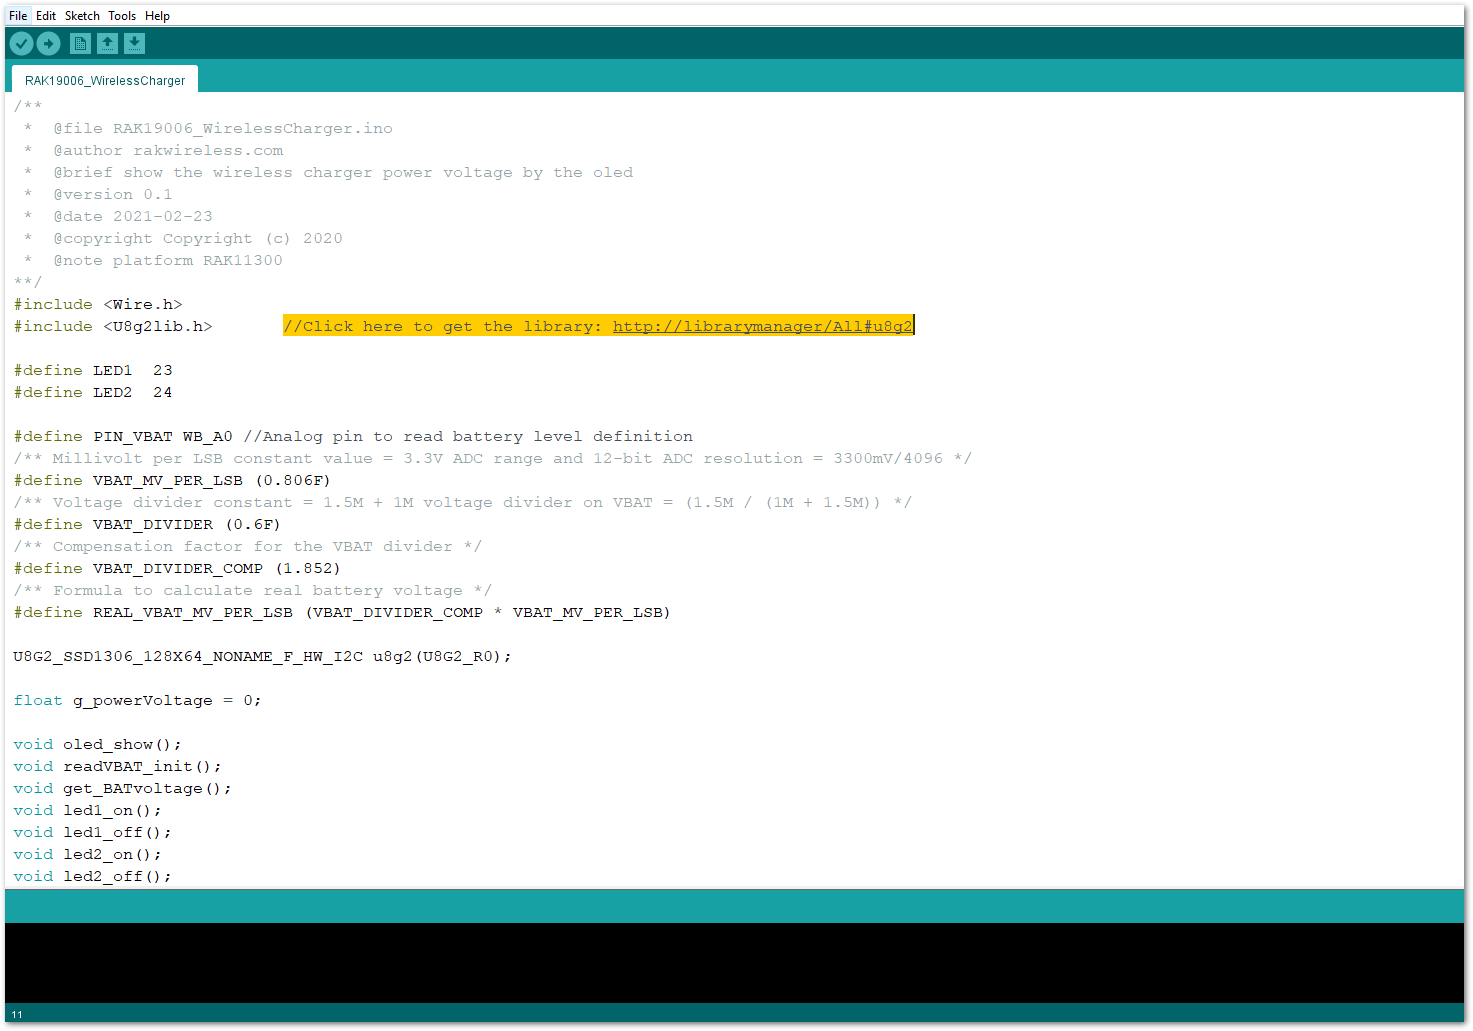 Figure 1: Accessing the library used for RAK19006 Module
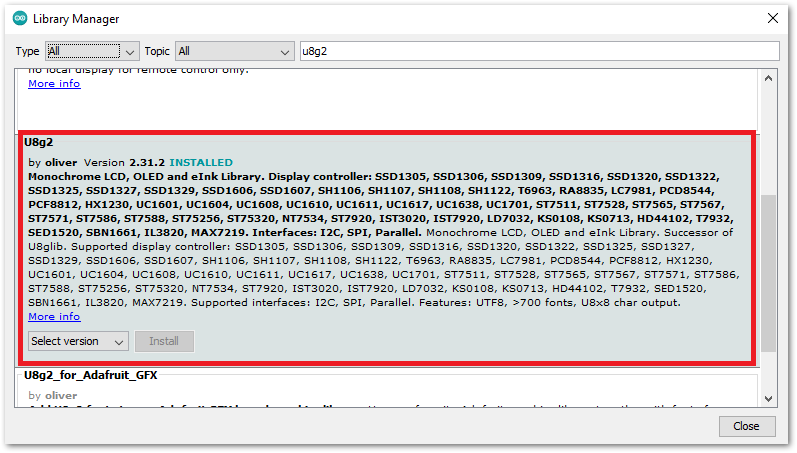 Figure 1: Installing the compatible library for RAK19006 Module
- Then you can now select the right port and upload the code, as shown in Figure 11 and Figure 12.
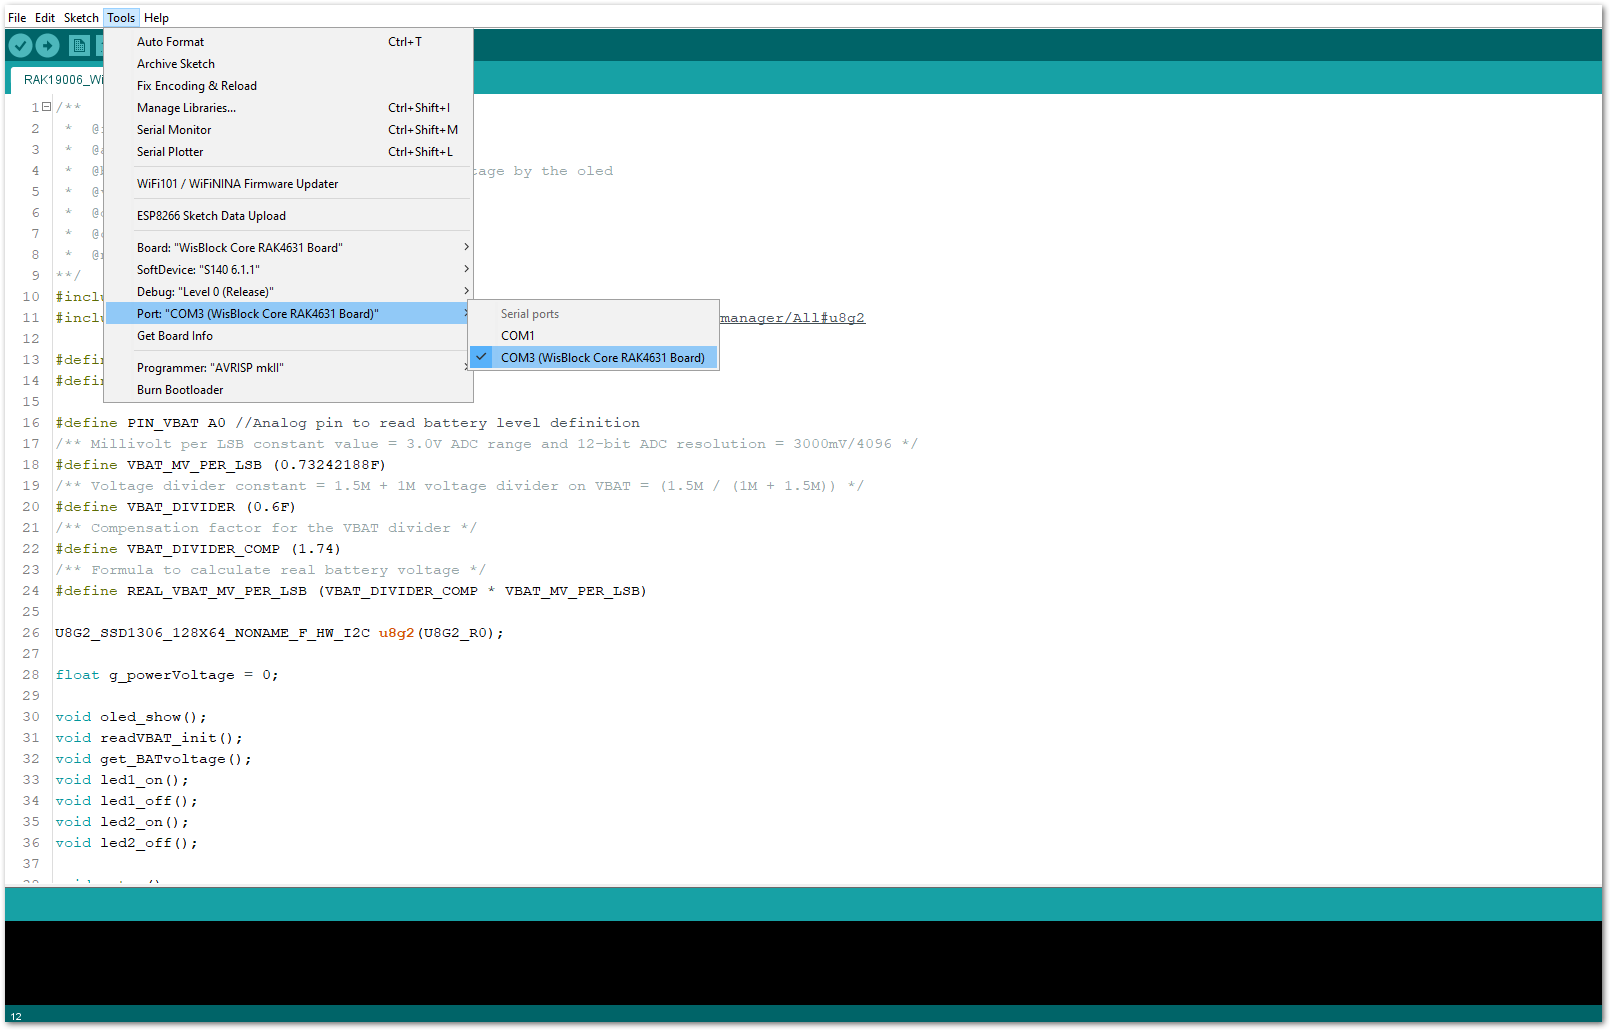 Figure 1: Selecting the correct Serial Port
 Figure 1: Uploading the RAK19006 Sample code
- When you successfully uploaded the example sketch, open the Serial Monitor of the Arduino IDE to see the RAK19006 reading logs, as shown in Figure 13. You will be able to see the battery voltage both on the Serial Monitor and OLED Display.
 Figure 1: RAK19006 Reading logs
RAK19006 in RAK11200 WisBlock Core Guide
Arduino Setup
- First, you need to select the RAK11200 WisBlock Core.
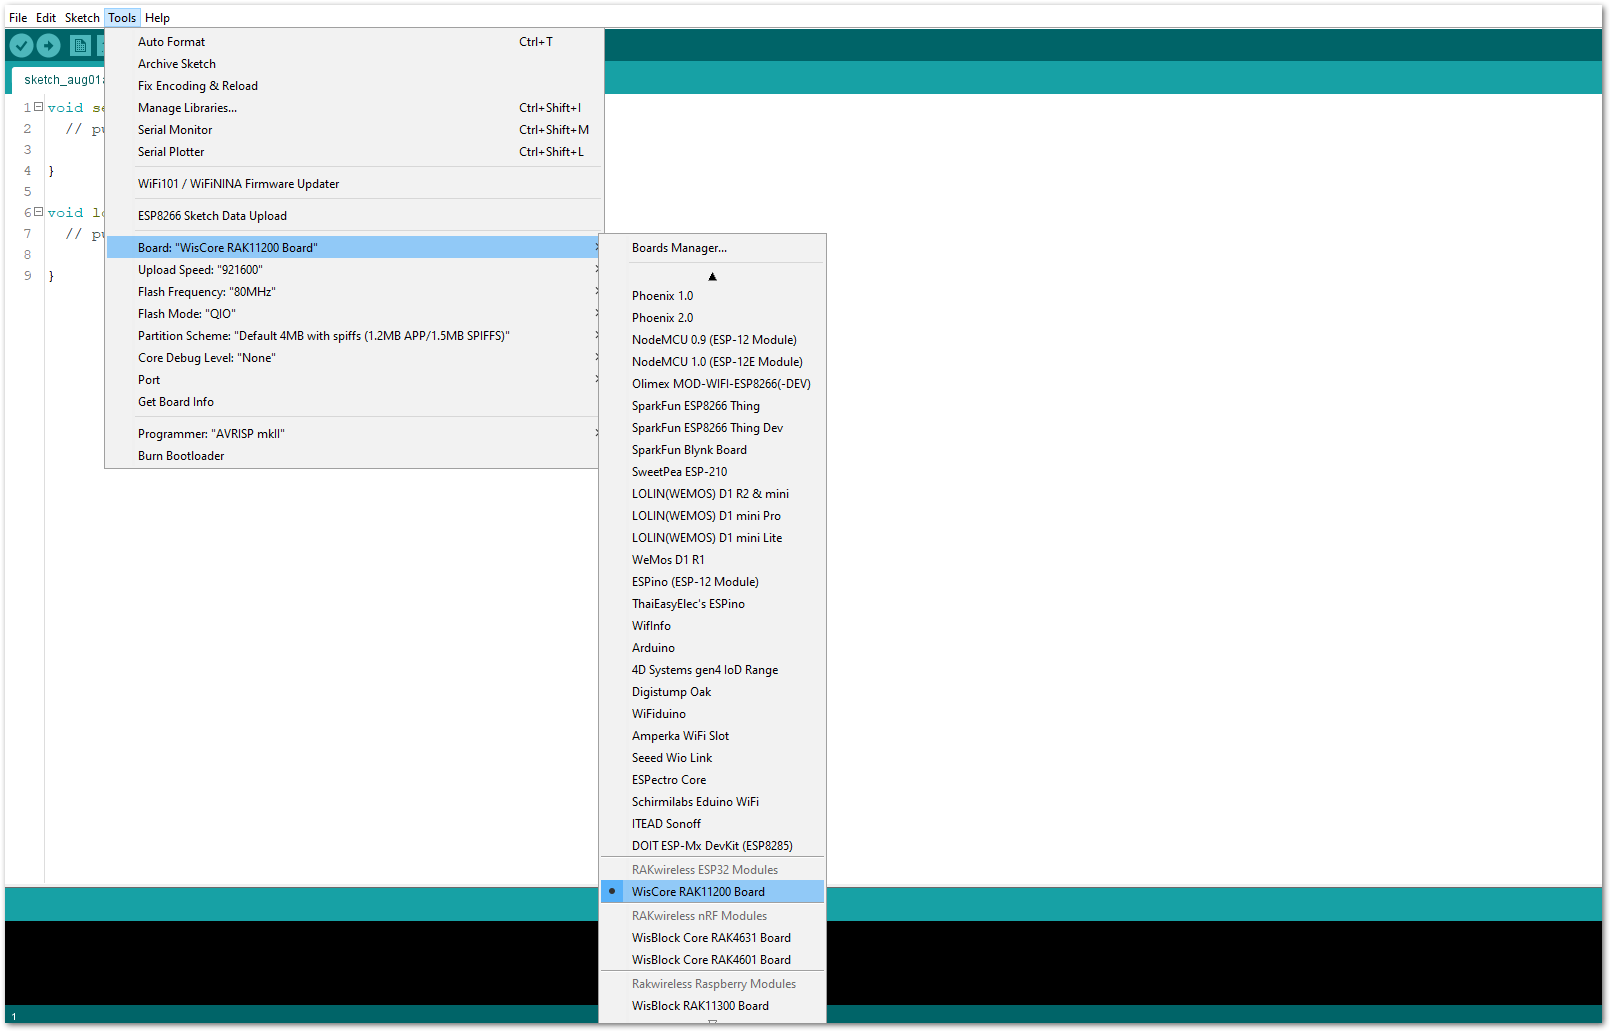 Figure 1: Selecting RAK11200 as WisBlock Core
- Next, copy the following sample code into your Arduino IDE:
Click to view the code
/**
 *  @file RAK13000_WirelessCharger.ino
 *  @author rakwireless.com
 *  @brief show the wireless charger power voltage by the oled
 *  @version 0.1
 *  @date 2021-02-23
 *  @copyright Copyright (c) 2020
 *  @note platform RAK11200
**/
#include <Wire.h>
#include <U8g2lib.h>       //Click here to get the library: http://librarymanager/All#u8g2

#define LED1 12
#define LED2 2

#define PIN_VBAT WB_A0  //Analog pin to read battery level definition
/** Millivolt per LSB constant value = 3.3V ADC range and 12-bit ADC resolution = 3300mV/4096 */
#define VBAT_MV_PER_LSB (0.8056640625F)
///** Voltage divider constant = 1.5M + 1M voltage divider on VBAT = (1.5M / (1M + 1.5M)) */
#define VBAT_DIVIDER (0.6F)
/** Compensation factor for the VBAT divider */
#define VBAT_DIVIDER_COMP (1.784F)  //(1.0/VBAT_DIVIDER)1.806
/** Formula to calculate real battery voltage */
#define REAL_VBAT_MV_PER_LSB (VBAT_DIVIDER_COMP * VBAT_MV_PER_LSB)

U8G2_SSD1306_128X64_NONAME_F_HW_I2C u8g2(U8G2_R0);

float g_powerVoltage = 0;

void oled_show();
void readVBAT_init();
void get_BATvoltage();
void led1_on();
void led1_off();
void led2_on();
void led2_off();

void setup()
{
  time_t timeout = millis();
  readVBAT_init();
  u8g2.begin();
  Serial.begin(115200);
  while (!Serial)
  {
    if ((millis() - timeout) < 5000)
    {
       delay(100);
    }
    else
    {
       break;
    }
  }
  pinMode(LED1, OUTPUT);
  pinMode(LED2, OUTPUT);

  digitalWrite(LED1, LOW);
  digitalWrite(LED2, LOW);
}

void loop()
{
  led1_on();
  led2_off();
  get_BATvoltage();
  oled_show();
  delay(200);
  led2_on();
  led1_off();
  delay(200);
}
void led1_on()
{
  digitalWrite(LED1, HIGH);
}
void led1_off()
{
  digitalWrite(LED1, LOW);
}
void led2_on()
{
  digitalWrite(LED2, HIGH);
}
void led2_off()
{
  digitalWrite(LED2, LOW);
}
void oled_show()
{
  char data[32] = {0};
  u8g2.clearBuffer();         // clear the internal memory
  u8g2.setFont(u8g2_font_ncenB10_tr); // choose a suitable font

  u8g2.drawStr(3, 15, "Power  voltage:");
  memset(data, 0, sizeof(data));
  sprintf(data, "%3.2f V",g_powerVoltage);
  u8g2.drawStr(3, 45, data);
  u8g2.sendBuffer(); // transfer internal memory to the display
}
void readVBAT_init()
{
  adcAttachPin(PIN_VBAT);
  analogSetAttenuation(ADC_11db);
   // Set the resolution to 12-bit (0..4095)
  analogReadResolution(12); // Can be 8, 10, 12 or 14
  analogSetWidth(12); //Sets the sampling bit and read resolution 9-12
//  analogSetSamples(10); //Set sampling times 1-255   The default 8
//  adcStart(PIN_VBAT);
  delay(10);
}
void get_BATvoltage()
{
  unsigned int sum = 0,average_value = 0;
  unsigned int read_temp[10] = {0};
  unsigned char i = 0;
  unsigned int adc_max = 0;
  unsigned int adc_min = 4095;
  average_value = analogRead(PIN_VBAT);
  for(i=0;i<10;i++)
  {
    read_temp[i] = analogRead(PIN_VBAT);
    if(read_temp[i] < adc_min)
      {
        adc_min = read_temp[i];
      }
    if(read_temp[i] > adc_max)
      {
        adc_max = read_temp[i];
      }
     sum = sum + read_temp[i];
//     Serial.println(read_temp[i]);
//     delay(1);
  }
  average_value = (sum - adc_max - adc_min) >> 3;
//  Serial.println(average_value);
  g_powerVoltage = average_value * REAL_VBAT_MV_PER_LSB * 0.001;
  Serial.print("The battery voltage is:");
  Serial.print(g_powerVoltage,2);
  Serial.println(" V");
}
If you experience any error in compiling the example sketch, check the updated code for the RAK11200 WisBlock Core Module that can be found on the RAK19006 WisBlock Example Code Repository.
- Once the example code is open, install the U8g2 library by clicking the yellow highlighted link, as shown in Figure 15 and Figure 16.
 Figure 1: Accessing the library used for RAK19006 Module
 Figure 1: Installing the compatible library for RAK19006 Module
- Then you can now select the right port and upload the code, as shown in Figure 17 and Figure 18.
RAK11200 requires the Boot0 pin to be configured properly first before uploading. If not done properly, uploading the source code to RAK11200 will fail. Check the full details on the RAK11200 Quick Start Guide.
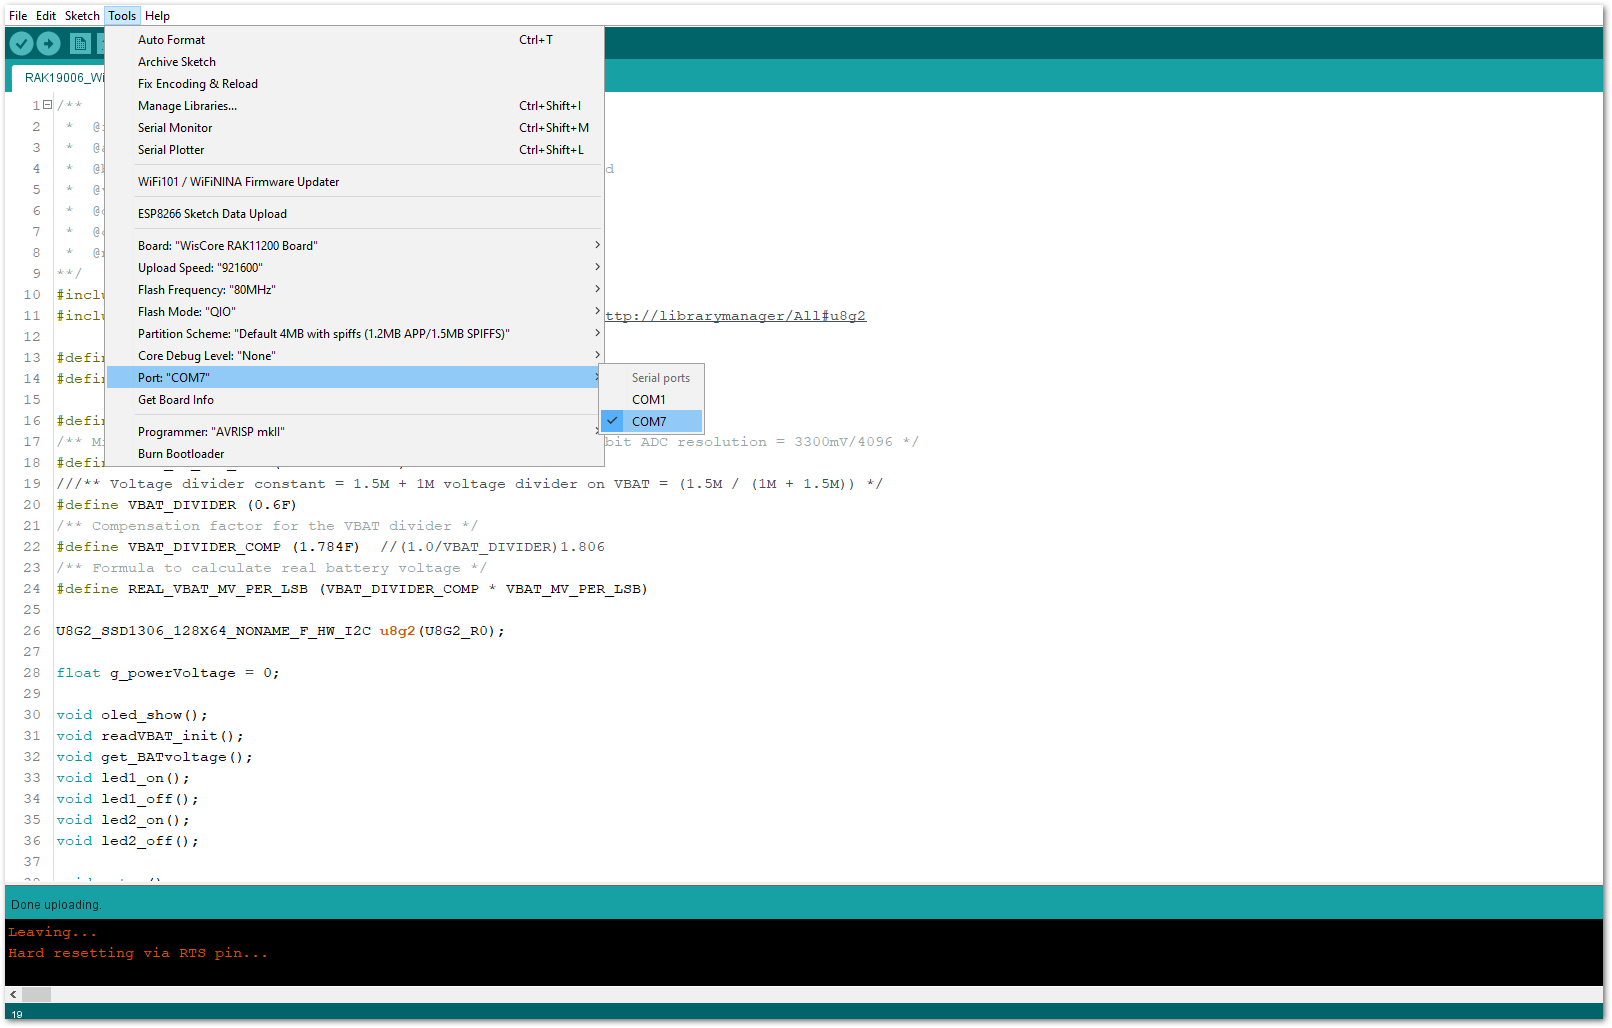 Figure 1: Selecting the correct Serial Port
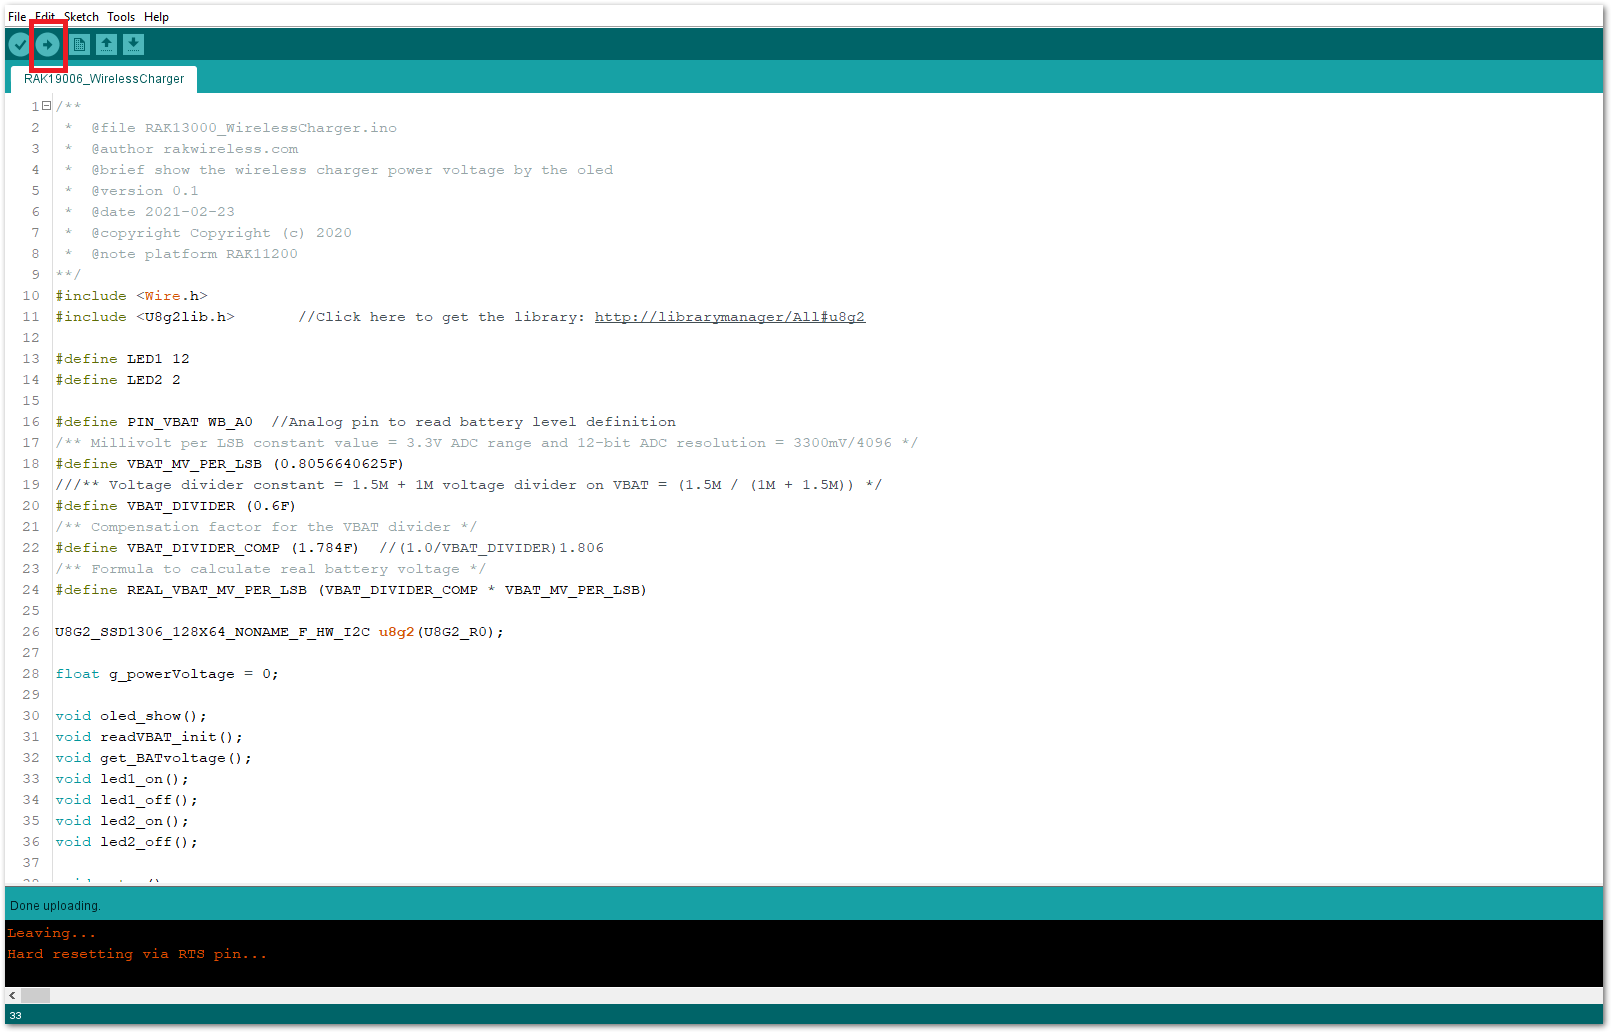 Figure 1: Uploading the RAK19006 Sample code
- When you successfully uploaded the example sketch, open the Serial Monitor of the Arduino IDE to see the RAK19006 reading logs, as shown in Figure 19. You will be able to see the battery voltage both on the Serial Monitor and OLED Display.
 Figure 1: RAK19006 Reading logs
RAK19006 in RAK11310 WisBlock Core Guide
Arduino Setup
- First, you need to select the RAK11310 WisBlock Core.
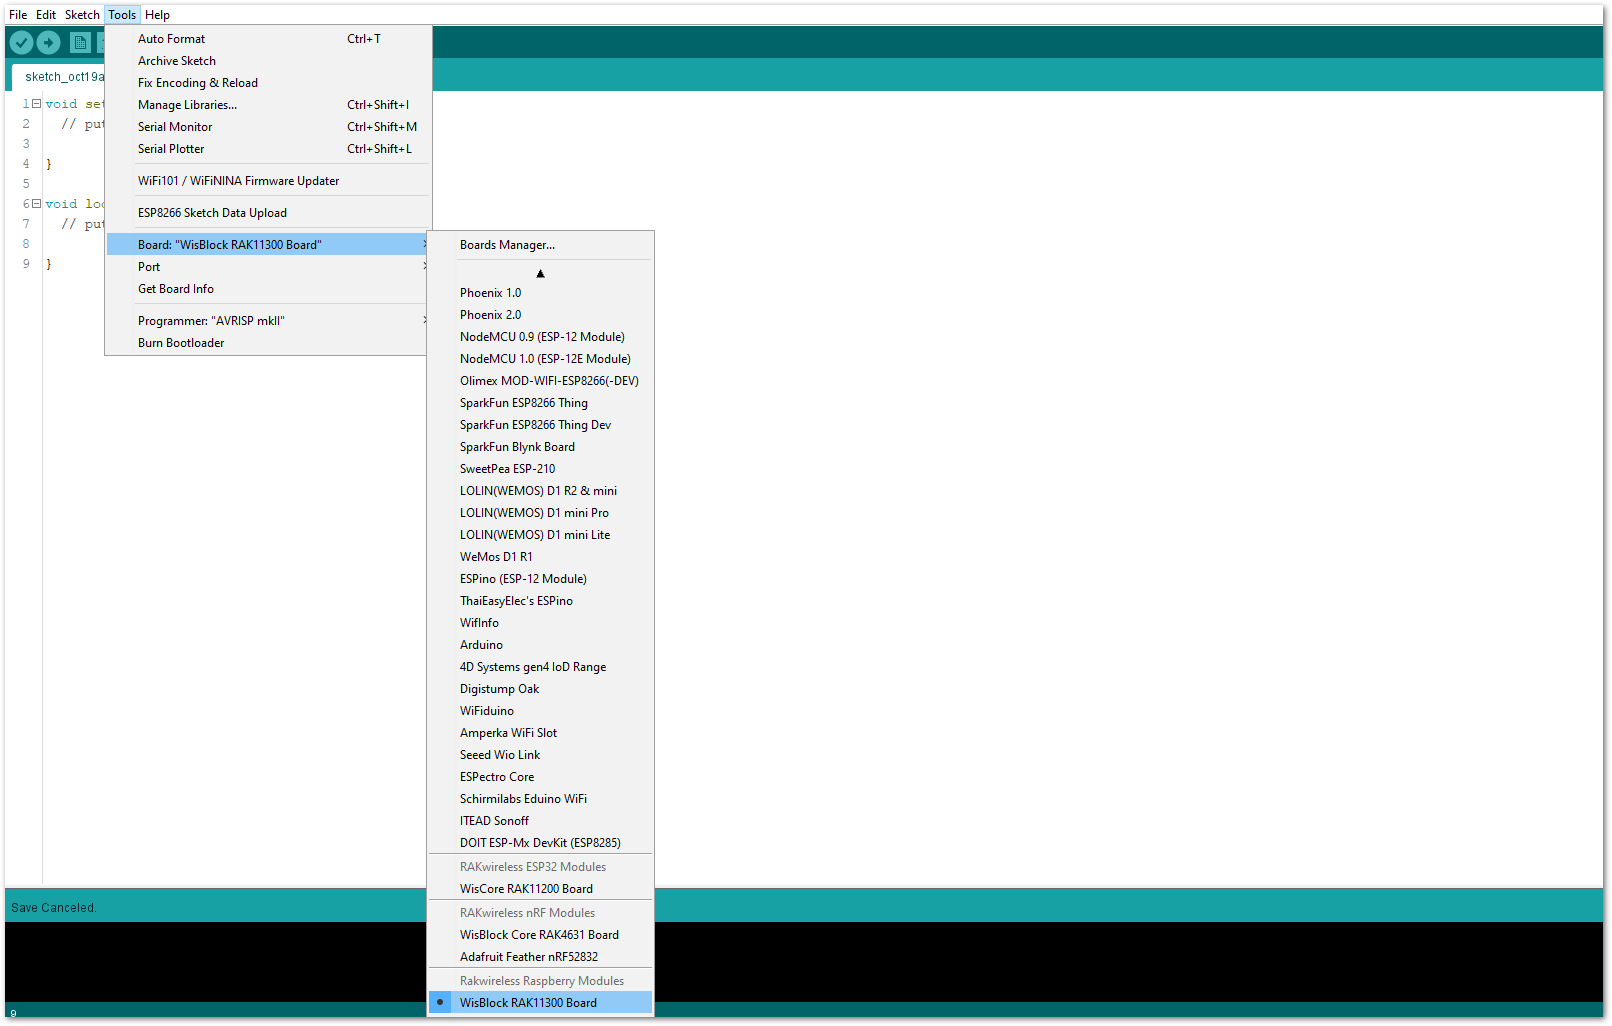 Figure 1: Selecting RAK11310 as WisBlock Core
- Next, copy the following sample code into your Arduino IDE:
Click to view the code
/**
 *  @file RAK19006_WirelessCharger.ino
 *  @author rakwireless.com
 *  @brief show the wireless charger power voltage by the oled
 *  @version 0.1
 *  @date 2021-02-23
 *  @copyright Copyright (c) 2020
 *  @note platform RAK11300
**/
#include <Wire.h>
#include <U8g2lib.h>       //Click here to get the library: http://librarymanager/All#u8g2

#define LED1  23
#define LED2  24

#define PIN_VBAT WB_A0 //Analog pin to read battery level definition
/** Millivolt per LSB constant value = 3.3V ADC range and 12-bit ADC resolution = 3300mV/4096 */
#define VBAT_MV_PER_LSB (0.806F)
/** Voltage divider constant = 1.5M + 1M voltage divider on VBAT = (1.5M / (1M + 1.5M)) */
#define VBAT_DIVIDER (0.6F)
/** Compensation factor for the VBAT divider */
#define VBAT_DIVIDER_COMP (1.852)
/** Formula to calculate real battery voltage */
#define REAL_VBAT_MV_PER_LSB (VBAT_DIVIDER_COMP * VBAT_MV_PER_LSB)

U8G2_SSD1306_128X64_NONAME_F_HW_I2C u8g2(U8G2_R0);

float g_powerVoltage = 0;

void oled_show();
void readVBAT_init();
void get_BATvoltage();
void led1_on();
void led1_off();
void led2_on();
void led2_off();

void setup()
{
  time_t timeout = millis();
  readVBAT_init();
  u8g2.begin();
  Serial.begin(115200);
  while (!Serial)
  {
    if ((millis() - timeout) < 5000)
    {
       delay(100);
    }
    else
    {
       break;
    }
  }
  pinMode(LED1, OUTPUT);
  pinMode(LED2, OUTPUT);

  digitalWrite(LED1, LOW);
  digitalWrite(LED2, LOW);
}

void loop()
{
  led1_on();
  led2_off();
  get_BATvoltage();
  oled_show();
  delay(200);
  led2_on();
  led1_off();
  delay(200);
}
void led1_on()
{
  digitalWrite(LED1, HIGH);
}
void led1_off()
{
  digitalWrite(LED1, LOW);
}
void led2_on()
{
  digitalWrite(LED2, HIGH);
}
void led2_off()
{
  digitalWrite(LED2, LOW);
}
void oled_show()
{
  char data[32] = {0};
  u8g2.clearBuffer();         // clear the internal memory
  u8g2.setFont(u8g2_font_ncenB10_tr); // choose a suitable font

  u8g2.drawStr(3, 15, "Power  voltage:");
  memset(data, 0, sizeof(data));
  sprintf(data, "%3.2f V",g_powerVoltage);
  u8g2.drawStr(3, 45, data);
  u8g2.sendBuffer(); // transfer internal memory to the display
}
void readVBAT_init()
{
  // Set the resolution to 12-bit (0..4095)
  analogReadResolution(12); // Can be 8, 10, 12 or 14
  // Let the ADC settle
  delay(10);
}
void get_BATvoltage()
{
  unsigned int sum = 0,average_value = 0;
  unsigned int read_temp[10] = {0};
  unsigned char i = 0;
  unsigned int adc_max = 0;
  unsigned int adc_min = 4095;
  average_value = analogRead(PIN_VBAT);
  for(i=0;i<10;i++)
  {
    read_temp[i] = analogRead(PIN_VBAT);
    if(read_temp[i] < adc_min)
      {
        adc_min = read_temp[i];
      }
    if(read_temp[i] > adc_max)
      {
        adc_max = read_temp[i];
      }
     sum = sum + read_temp[i];
//     Serial.println(read_temp[i]);
//     delay(1);
  }
  average_value = (sum - adc_max - adc_min) >> 3;
  Serial.printf("The ADC value is:%d\r\n",average_value);
//  Serial.println(average_value);
  g_powerVoltage = average_value * REAL_VBAT_MV_PER_LSB * 0.001;
  Serial.print("The battery voltage is:");
  Serial.print(g_powerVoltage,2);
  Serial.println(" V");
}
If you experience any error in compiling the example sketch, check the updated code for the RAK11310 WisBlock Core Module that can be found on the RAK19006 WisBlock Example Code Repository.
- Once the example code is open, install the U8g2 library by clicking the yellow highlighted link, as shown in Figure 21 and Figure 22.
 Figure 1: Accessing the library used for RAK19006 Module
 Figure 1: Installing the compatible library for RAK19006 Module
- Then you can now select the right port and upload the code, as shown in Figure 23 and Figure 24.
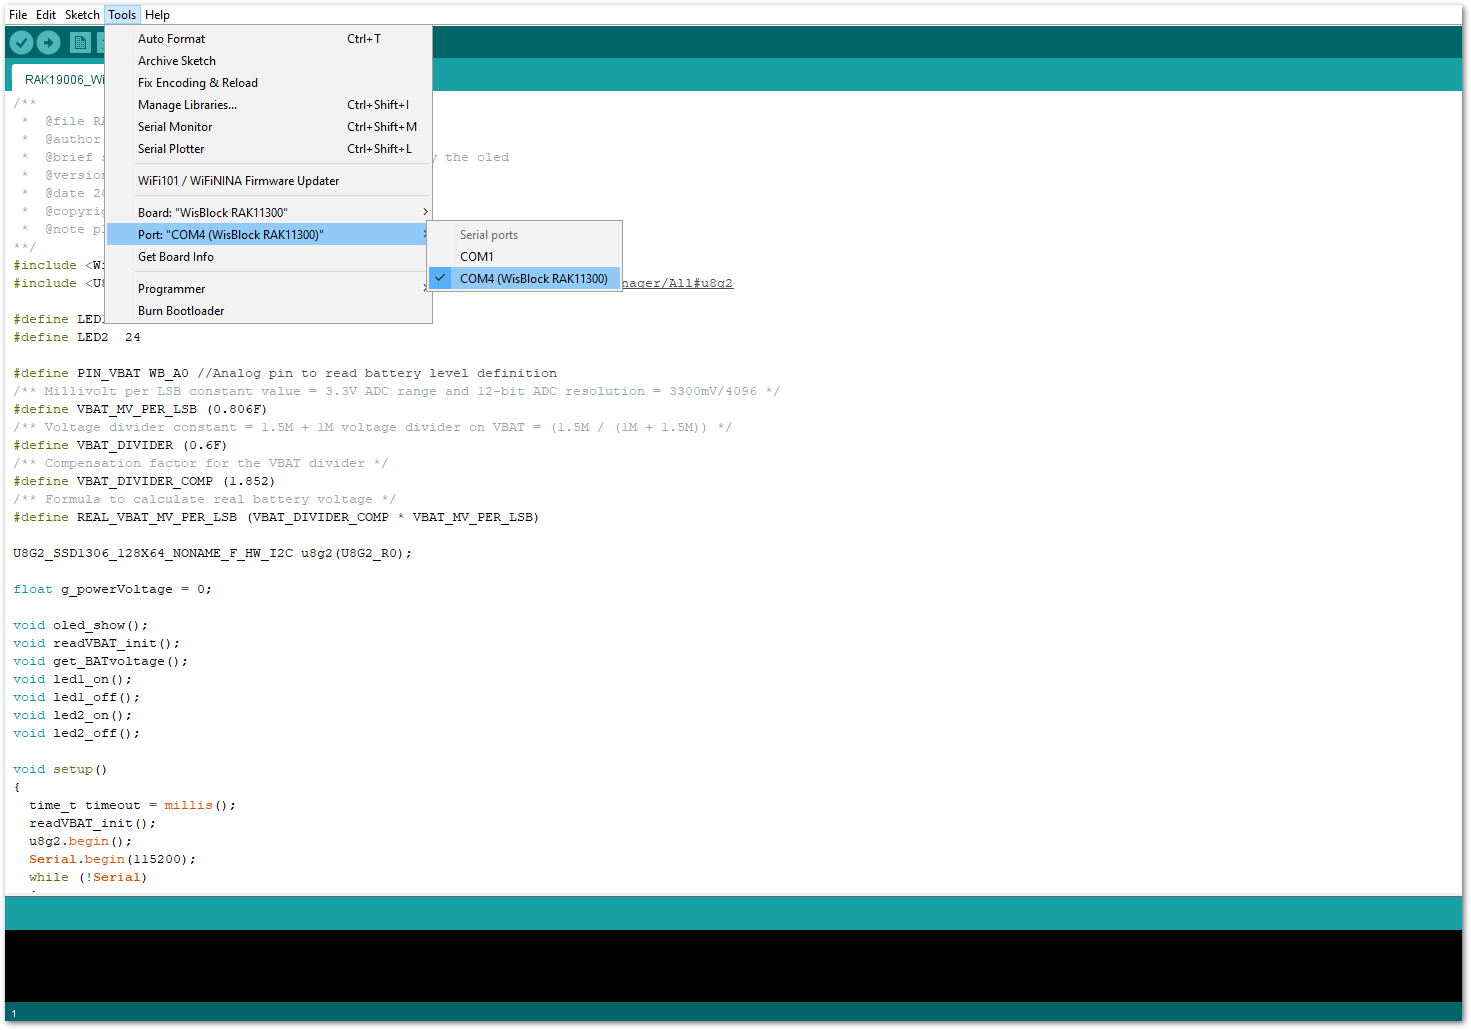 Figure 1: Selecting the correct Serial Port
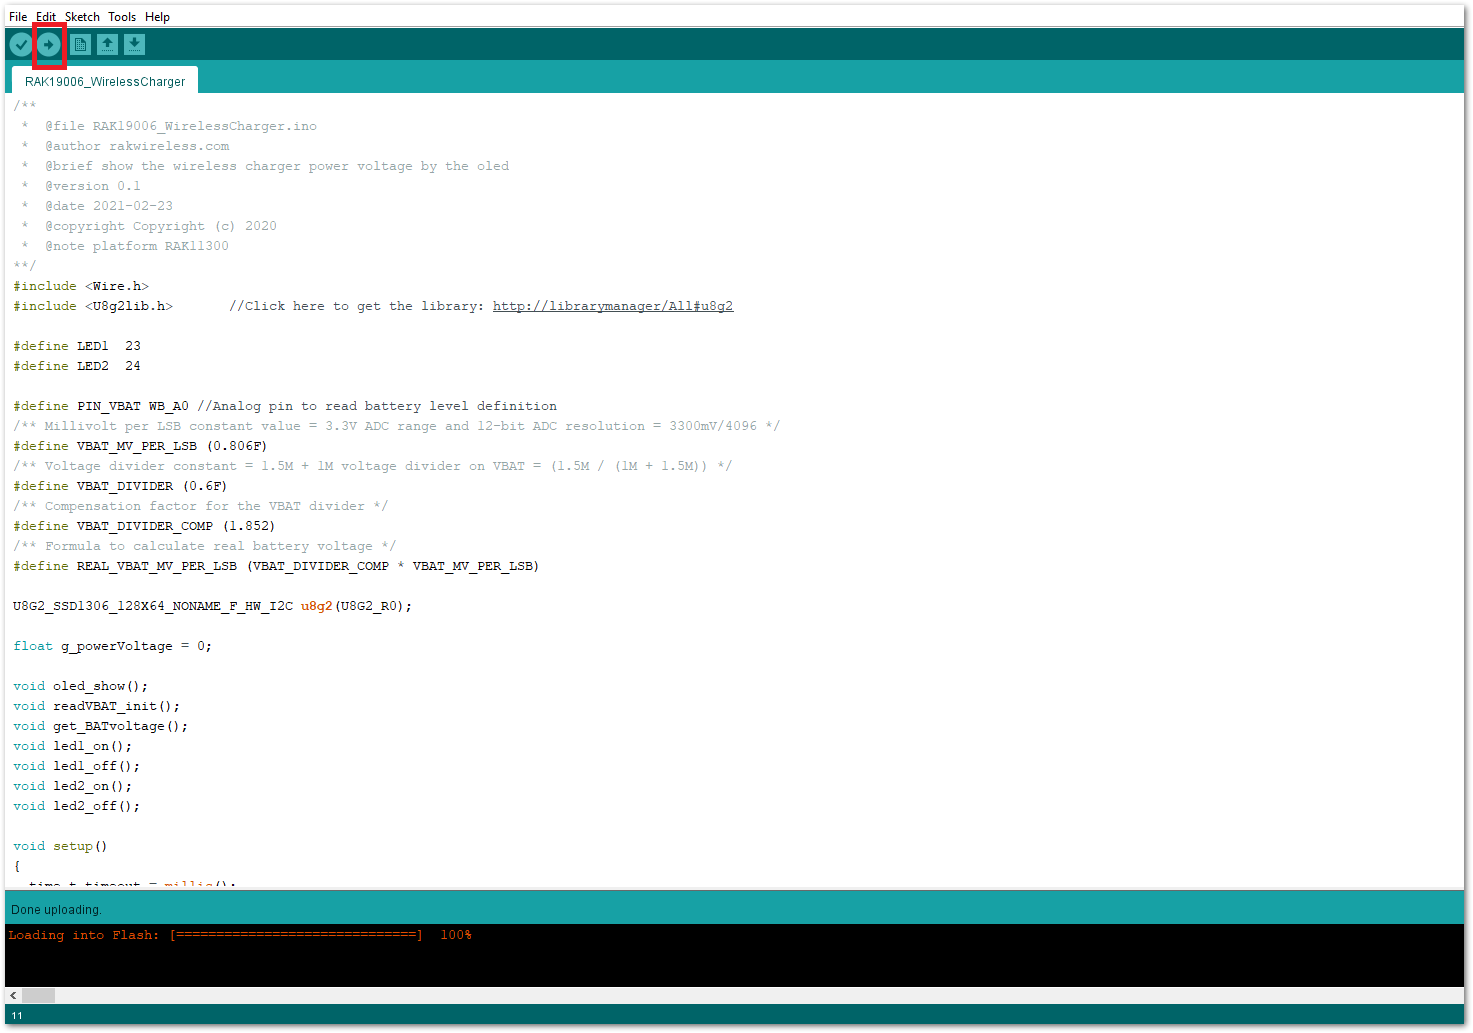 Figure 1: Uploading the RAK19006 Sample code
- When you successfully uploaded the example sketch, open the Serial Monitor of the Arduino IDE to see the RAK19006 reading logs, as shown in Figure 25. You will be able to see the battery voltage both on the Serial Monitor and OLED Display.
 Figure 1: RAK19006 Reading logs