RAK2305 WisBlock WiFi Interface Module Low Level Development Reference
Overview
RAK2305 module comes with two versions of firmware that allow you to configure its functionality via AT commands: The Factory bin version with WiFi and BLE AT commands and the alternative version. The alternative version can be used if users want to use MQTT and HTTP AT commands. This simplicity helps you develop your WiFi or BLE projects quickly.
Additionally, RAK offers a second alternative for advanced customers who need to have deeper integration of their solutions with these modules. In this alternative, you could develop your own version of ESP-AT firmware that runs inside of the RAK2305 module.
How to Create Your Own Firmware for RAK2305
Install Development Environment
Install Prerequisites
-
Download and install the latest stable release of CMake for Windows.
-
Download and install the latest stable Windows release of ninja.
-
Open the Windows Command Prompt: Press Windows+R to open “Run” box. Type “cmd” and then click “OK”. If you have already installed python, check the installed version. If you don't have python installed, use the link below as a guide.
 Figure 1: Checking python version
- Use the following command to check whether pip is installed:
python -m pip --version
If pip is not installed, use the link below to install pip:
- Install the following python packages with pip using the command:
python -m pip install pyyaml xlrd click
-
Download and install the precompiled Windows toolchain. Unzip the toolchain zip file to
C:\Program Files(or some other location). The zip file contains a single directory xtensa-esp32-elf. Next, the bin subdirectory of your toolchain install folder must be added to your path. -
Download and install the configuration tool mconf-idf from the kconfig-frontends releases page. This is the mconf configuration tool with some minor customizations for ESP-IDF. This tool will also need to be unzipped to a directory which is then added to your path.
- Download and install GitHub for windows.
Clone and Build the ESP-AT Project
Connect the RAK2305 on USB to UART adapter as described on the Flash ESP-AT Firmware into Your Device section.
- Open Windows Command Prompt:
Press Windows+R to open “Run” box. Type “cmd” and then click “OK”. In this example, the installation directory is located on the esp folder.
- Create the installation directory:
mkdir %userprofile%\esp
- Clone the ESP-AT project. To clone the ESP-AT project into installation directory, execute the commands below:
cd %userprofile%\esp
git clone --recursive https://github.com/espressif/esp-at.git
cd esp-at
The project will be cloned into the folder esp-at.
- Configure ESP-AT project. To configure your ESP-AT project, execute the commands below:
cd %userprofile%\esp\esp-at
python build.py menuconfig
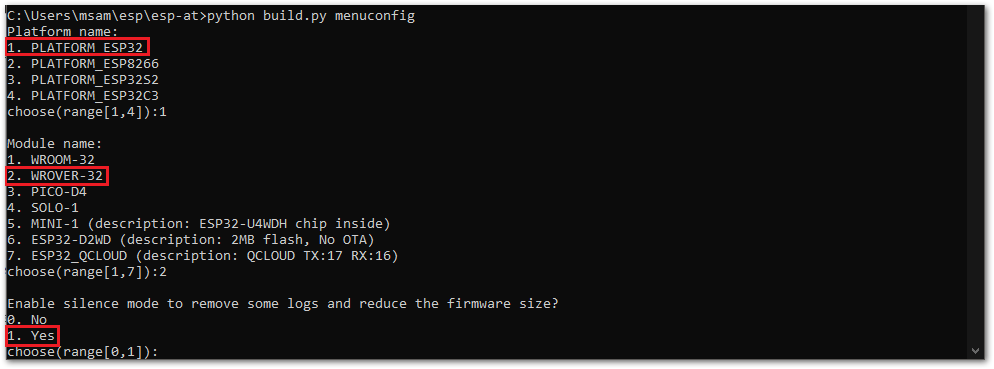
- Select PLATFORM_ESP32 on the Platform Name. Select WROVER-32 on the Module Name. On the Enable Silent Mode option, select 1.
 Figure 1: RAK2305 project configuration
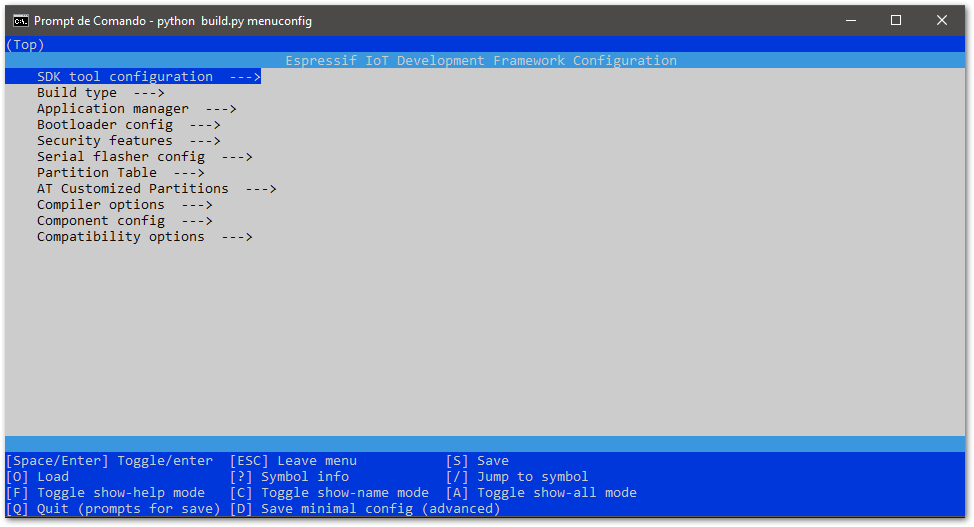
- You can browse on the Framework Configuration menus and customize your build.
 Figure 1: RAK2305 Framework Configuration
- To build the project on esp-at folder, execute the commands below:
cd %userprofile%\esp\esp-at
python build.py build
 Figure 1: RAK2305 successful build
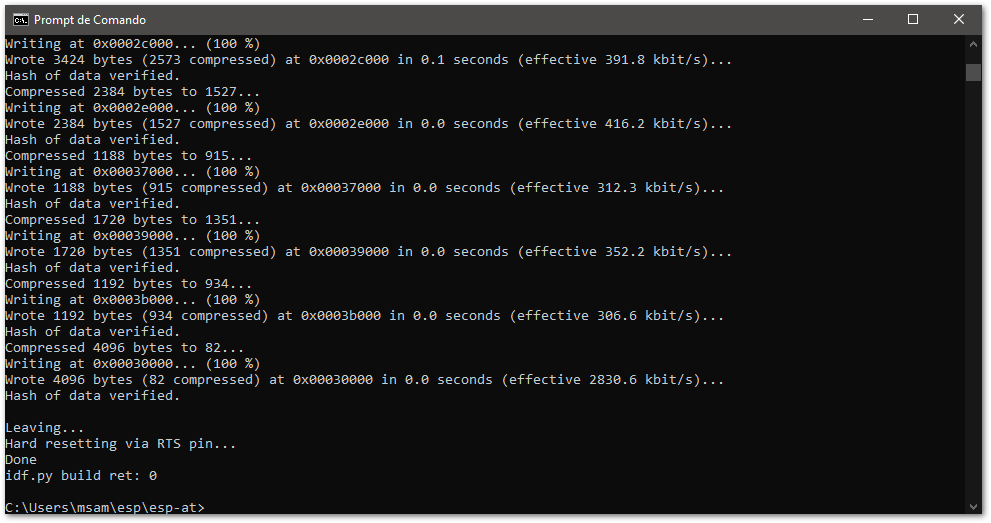
- Flash the image on RAK2305 using the command:
python build.py flash
 Figure 1: RAK2305 successful flash
How to Proceed in Case of Compilation Error
- The esp-at project uses its own version of ESP-IDF. If you need to remove an old ESP-IDF version, execute the following command:
cd %userprofile%\esp\esp-at
rmdir /s /q  esp-idf
- In case of a build error related to ESP-IDF in the compilation, it is recommended to update ESP-IDF environment variables. Update environment variables, remove the last build, then do a new build.
cd %userprofile%\esp\esp-at\esp-idf
export.bat
cd ..
rmdir /s /q  sdkconfig build
python build.py menuconfig
python build.py build
python build.py flash
- In case of a unknown build error, first, try to find the error. Then remove the build folder and do a new build.
cd %userprofile%\esp\esp-at
rmdir /s /q build
python build.py menuconfig
python build.py build
python build.py flash
- If you need to update just the esp-at repository, execute the commands below:
cd %userprofile%\esp\esp-at
git fetch --all --tags
git pull
git submodule update --init
- If the ESP-AT bin fails to boot and prints “ota data partition invalid”, execute the commands below:
cd %userprofile%\esp\esp-at
python build.py erase_flash
python build.py flash
You should erase the entire flash, and then re-flash the AT firmware.
Extending the ESP-AT Project
The link below shows a complete list of AT commands. Not all commands are available in the factory version.
User-Defined AT Commands
The structure, at_cmd_struct, is used to define four types of commands.
-
Test command:
AT+COMMAND=?Query parameters and scope of the various parameters of the Set command. -
Query command:
AT+COMMAND?This command returns the value of the current parameter and also can return some additional information. -
Set commands:
AT+COMMAND=...Set the value of a parameter(s) ... to the AT command and run this command. -
Execute commands:
AT+COMMANDThis kind of command executes instructions without parameters.
Examples of implementing user-defined AT commands are provided in /esp32-at/main/interface/uart/at_uart_task.c. The at command name always starts with plus +.
typedef struct {
    char *at_cmdName;                               /*!< at command name */
    uint8_t (*at_testCmd)(uint8_t *cmd_name);       /*!< Test Command function pointer */
    uint8_t (*at_queryCmd)(uint8_t *cmd_name);      /*!< Query Command function pointer */
    uint8_t (*at_setupCmd)(uint8_t para_num);       /*!< Setup Command function pointer */
    uint8_t (*at_exeCmd)(uint8_t *cmd_name);        /*!< Execute Command function pointer */
} esp_at_cmd_struct;
As an example, a new command called AT+RAKCMD is created. The following is the complete definition of this new command:
- Test command:
AT+RAKCMD=? - Query command:
AT+RAKCMD? - Setup command:
AT+RAKCMD=param_1,param_2,param_3,… - Execute command:
AT+RAKCMD
Because of no arguments, the execute command is used to achieve it. The sample code is as follows:
For simplicity, assume that the execute command returns a fixed string. The function that implements the execute command would be the following:
uint8_t rak_exeCmdExample(uint8_t *cmd_name)
{
    esp_at_port_write_data((uint8_t*)"This is RAK command", strlen("This is RAK command"));
    return ESP_AT_RESULT_CODE_OK;
}
To register the new command, the function esp_at_example_cmd_regist() is used. This function needs to be called within the app_main, as shown below. The app_main function is located at %userprofile%\esp\esp-at\main\app_main.c.
static esp_at_cmd_struct at_example_cmd[] = {
    {(char*)"+RAKCMD", NULL, NULL, NULL, rak_exeCmdExample},
};

bool esp_at_example_cmd_regist(void)
{
    return esp_at_custom_cmd_array_regist(at_example_cmd, sizeof(at_example_cmd) / sizeof(at_example_cmd[0]));
}

void app_main()
{
    ...

    if(esp_at_example_cmd_regist() == false) {
        printf("custom cmd register fail\r\n");
    }

    at_custom_init();
}
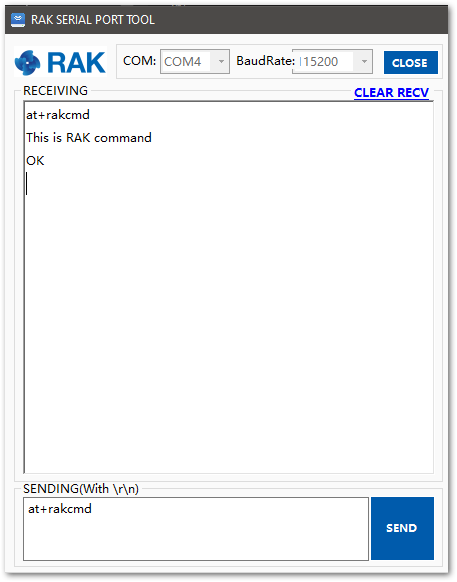
Testing the new ESP-AT command.
 Figure 1: RAK command output