RAK3372 WisBlock LPWAN Module Quick Start Guide
This guide explains how to use the RAK3372 as a WisBlock Core module, including steps for preparing the hardware and setting up the necessary software.
Although the RAK3372 WisBlock Core offers many more features and applications, this guide focuses only on demonstrating the LED Breathing and the LoRaWAN OTAA example.
By following this guide, you will successfully set up a working RAK3372 WisBlock Core.
This guide also includes instructions on how to perform firmware update.
Prerequisite
Package Inclusions
Before going through each and every step on using RAK3372 WisBlock Core, make sure to prepare the necessary items listed below:
Hardware
- RAK3372 WisBlock Core
- Your choice of WisBlock Base
- USB Cable
- Li-Ion/LiPo battery (optional)
- Solar charger (optional)
Software
Arduino IDE
- Download and install the Arduino IDE.
If you are using Windows 10:
Do NOT install the Arduino IDE from the Microsoft App Store. Instead, install the original Arduino IDE from the Arduino official website. The Arduino app from the Microsoft App Store has problems using third-party Board Support Packages.
- Add RAK3172 as a supported board in Arduino IDE by updating Board Manager URLs in Preferences settings of Arduino IDE with the JSON URL below.
https://raw.githubusercontent.com/RAKWireless/RAKwireless-Arduino-BSP-Index/main/package_rakwireless_com_rui_index.json
After that, add RAKwireless RUI STM32 Boards via Arduino board manager.
Product Configuration
Hardware Setup
The RAK3372 must be connected to a WisBlock Base along with an antenna. Various WisBlock Modules can be interfaced using the available slots on the WisBlock Base. Additionally, a battery can be added as a power source, with optional solar charging. All hardware-related configurations for the RAK3372 are covered in this guide.
This section covers:
- RAK3372 Connection to Base Board
- Assembling and Disassembling of WisBlock Modules
- Antenna and Battery/Solar Connection
RAK3372 to WisBlock Base
The RAK3372 will not work without a WisBlock Base board. The WisBlock Base provides a USB connection for programming the RAK3372. It also provides a power source and various interfaces to RAK3372 so that it can be connected to other WisBlock Modules via different module slots.
RAKwireless offers many WisBlock Base Boards compatible with WisBlock Core. It is highly recommended to look at these WisBlock Base boards to see what matches your requirements in terms of available module slots, power supply options, and overall size.
- RAK3372 WB_IO3 (WisBlock IO Pin 3) is connected to PB12 of the RAK3172 module. This pin is internally connected to a 10 kΩ resistor as mentioned on the pin definition table of the RAK3172 datasheet. Other WisBlock modules that use this pin will have possible conflict.
To illustrate, RAK3372 can be connected to RAK19007 WisBlock Base, as shown in Figure 1.
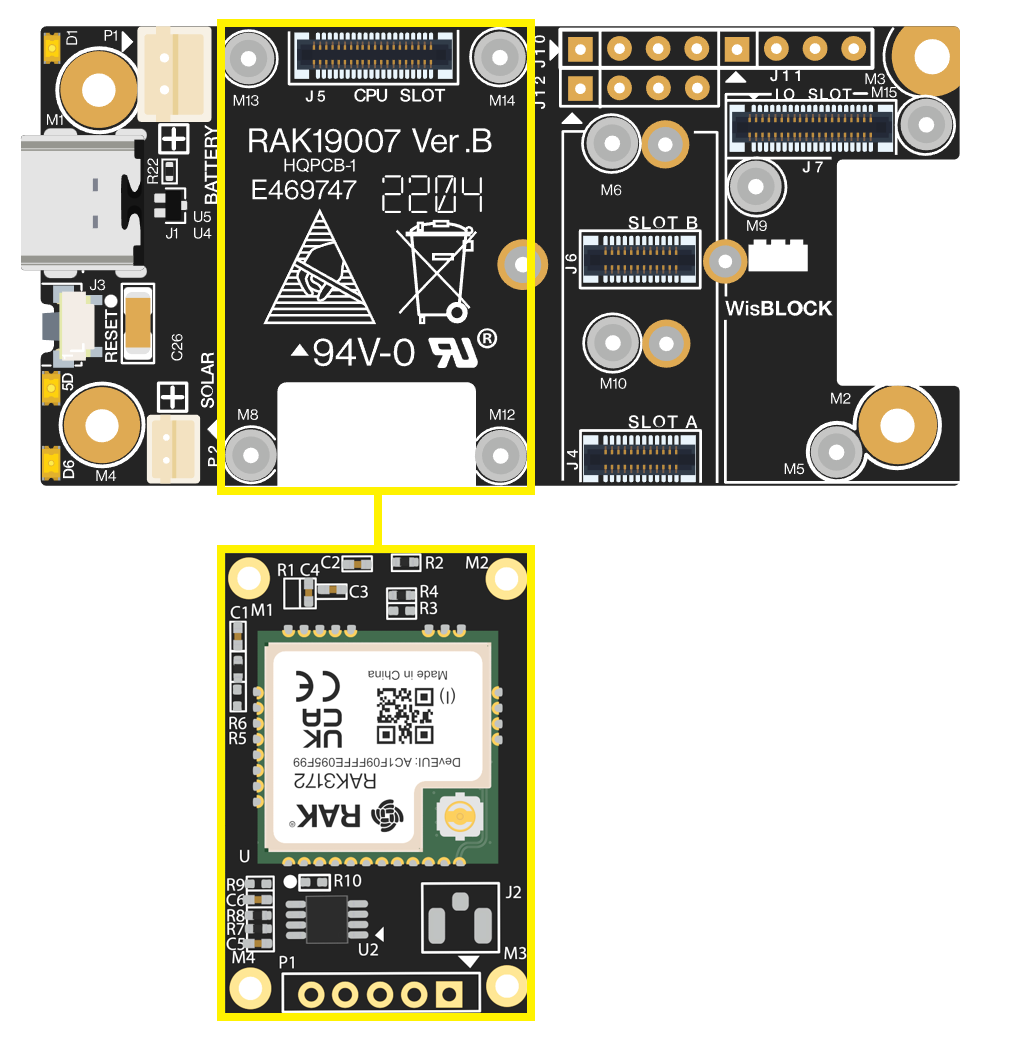 Figure 1: RAK3372 connection to WisBlock Base RAK19007
Some pins are exposed on RAK19007, and you can easily use them via header pins. The labels are at the back, as shown in Figure 2.
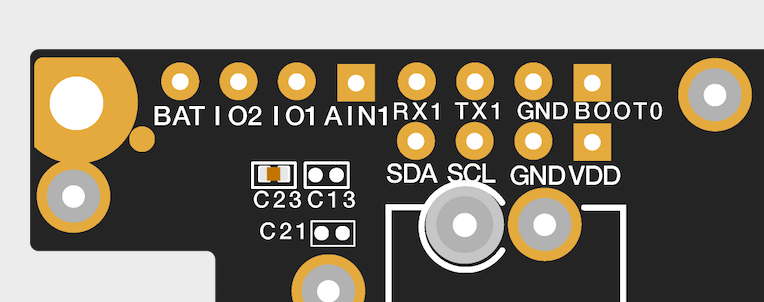 Figure 1: WisBlock Base exposed pins
Each WisBlock Base board provides a unique set of header pins for use. However, these header pins may vary between different WisBlock Base boards. Commonly, you will find IO pins and communication protocol pins such as I2C and UART. For more details, refer to the official documentation for the specific WisBlock Base used in your project.
You can access the AT commands via UART2 by default, and possibly via UART1. Firmware update is only possible via UART2. A built-in USB-Serial converter is on the board to easily connect the RAK3372 to the USB port of the PC.
There are useable LEDs as well in the WisBlock Base. You can control them in your code via the GREEN_LED and BLUE_RED macro.
Assembling and Disassembling of WisBlock Modules
Assembling
Figure 3 shows how to mount the RAK3372 module on top of a WisBlock Base board (RAK19007). Follow carefully the procedure defined in WisBlock module assembly/disassembly instructions to secure the connection safely. Once attached, carefully fix the module with one or more pieces of M1.2 x 3 mm screws depending on the module.
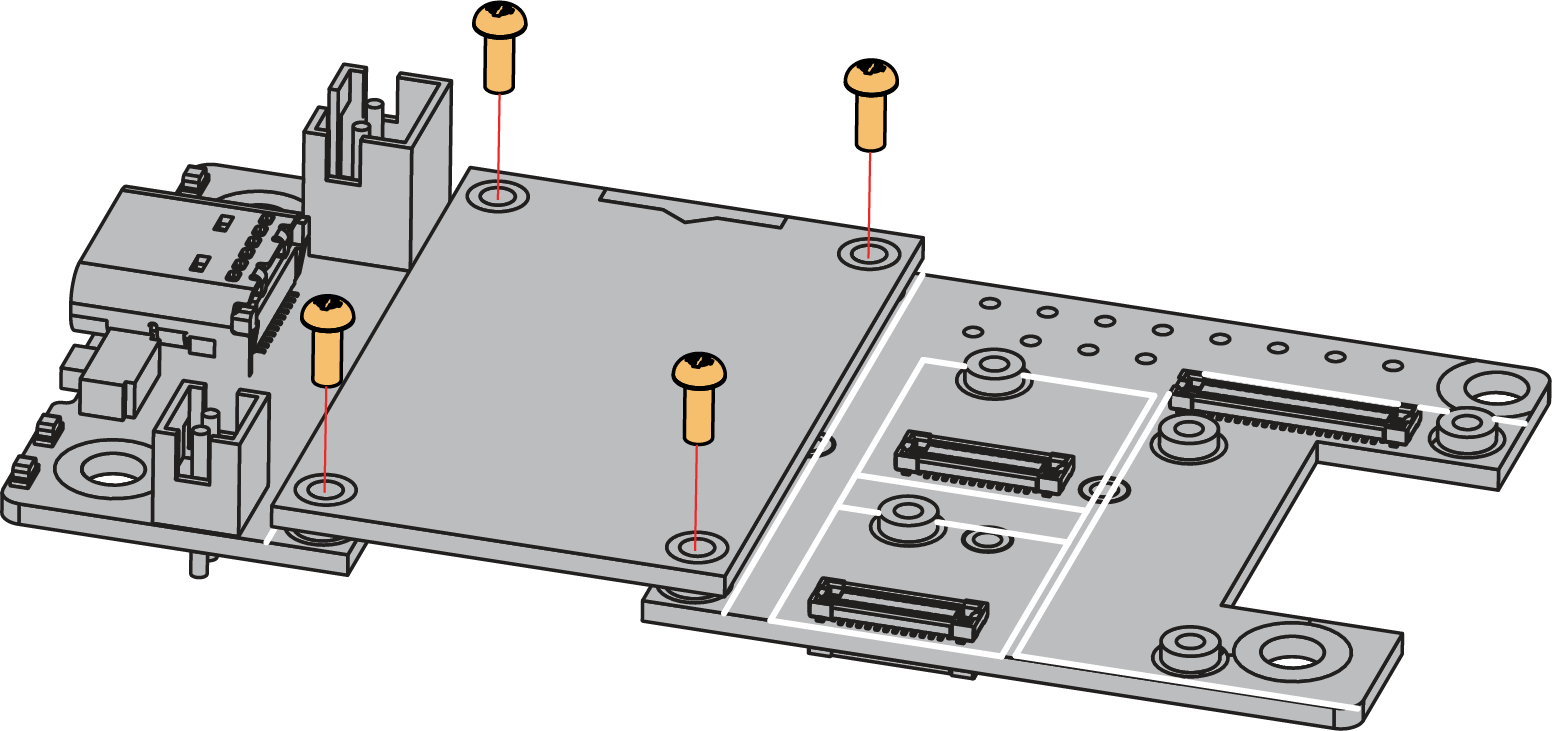 Figure 1: RAK3372 mounting sketch
Disassembling
The procedure in disassembling any type of WisBlock modules is the same.
- First, remove the screws.
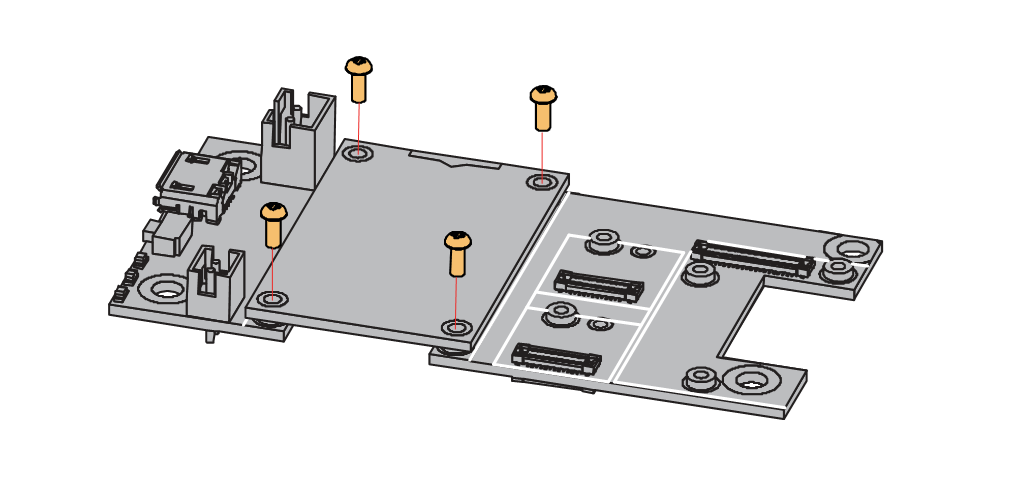 Figure 1: Remove the screws from the WisBlock module
- Once the screws are removed, check the silkscreen of the module to find the correct location where force can be applied.
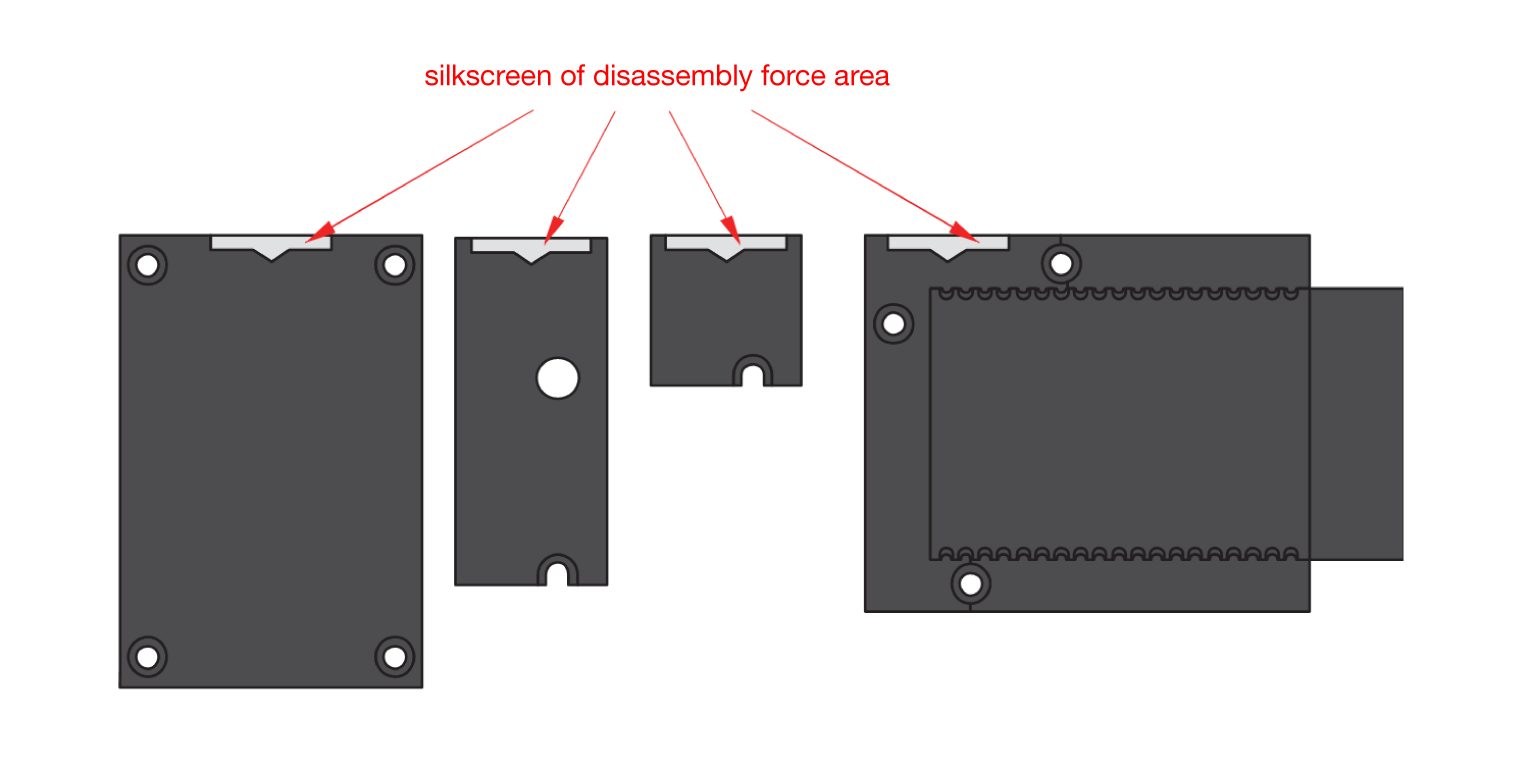 Figure 1: Detach the silkscreen on the WisBlock module
- Apply force to the module at the position of the connector, as shown in Figure 6, to detach the module from the baseboard.
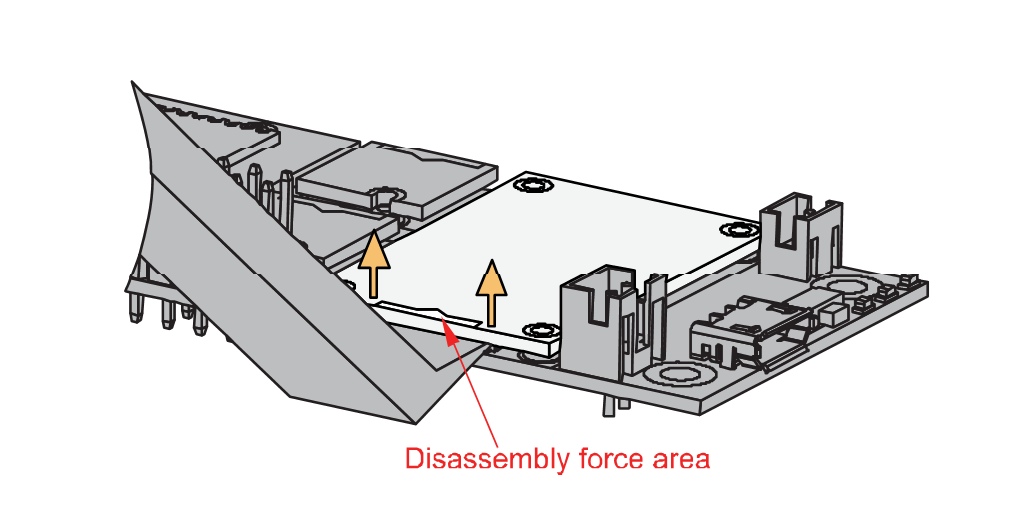 Figure 1: Apply even forces on the proper location of a WisBlock module
LoRa Antenna
Another important component of RAK3372 is the antenna.
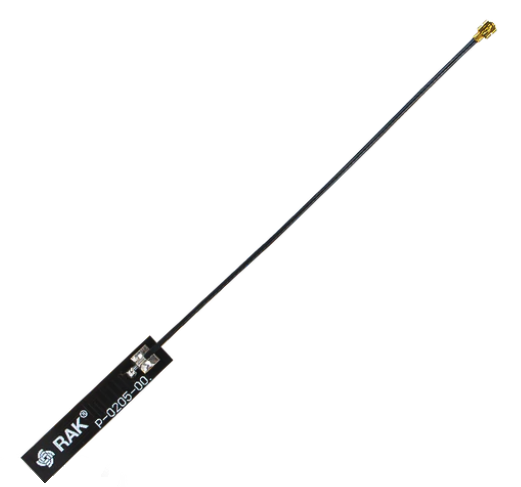 Figure 1: LoRa Antenna
You need to ensure that it is properly connected to have a good LoRa signal. Also, note that you can damage the RF section of the chip if you power the module without an antenna connected to the IPEX connector.
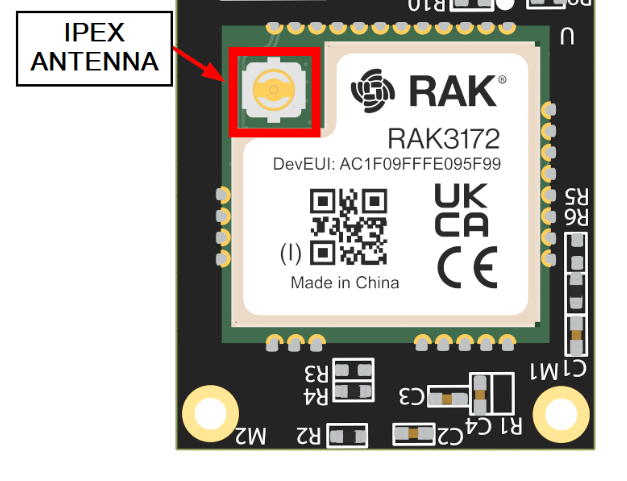 Figure 1: RAK3372 IPEX antenna connector
Detailed information about the RAK3372 LoRa PCB antenna can be found on the antenna datasheet. Keep in mind that the PCB antenna is intended ideally only for prototyping and device evaluation. For enterprise deployments, it is advisable to consider a better antenna for reliable performance.
- When using the LoRa transceiver, make sure that it is connected to an antenna. Using the transceiver chip without an antenna can damage the system.
- Make sure to fix the module with screws to ensure proper function.
Battery and Solar Connection
RAK3372 can be powered via the USB cable or Li-Ion/LiPo battery via the dedicated connectors, as shown in Figure 9. The matching connector for the battery wires is a JST PHR-2 2 mm pitch female.
This illustration uses RAK19007 as WisBlock Base. There are other WisBlock Base boards available, and you need to check the datasheet of the specific WisBlock Base board for the right polarity and other parameters.
- Batteries can cause harm if not handled properly.
- Only 3.7-4.2 V Rechargeable LiPo batteries are supported. It is highly recommended not to use other types of batteries with the system unless you know what you are doing.
- If a non-rechargeable battery is used, it has to be unplugged first before connecting the USB cable to the USB port of the board to configure the device. Not doing so might damage the battery or cause a fire.
- Only 5 V solar panels are supported. Do not use 12 V solar panels. It will destroy the charging unit and eventually other electronic parts.
- Make sure the battery wires match the polarity on the WisBlock Base Board. Not all batteries have the same wiring.
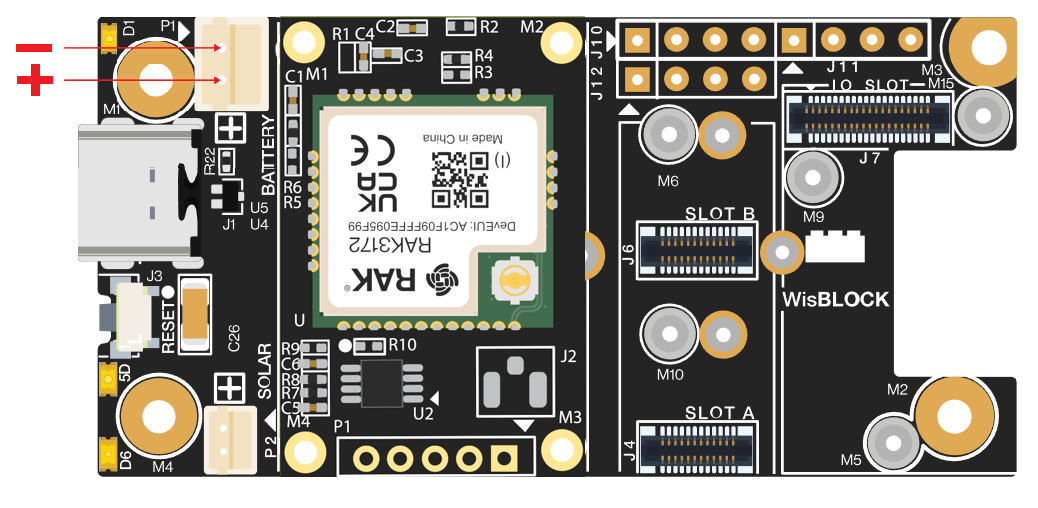 Figure 1: WisBlock Base Battery Connection
The battery can also be recharged via a small solar panel, as shown in Figure 10. The matching connector for the solar panel wires is a JST ZHR-2 1.5 mm pitch female.
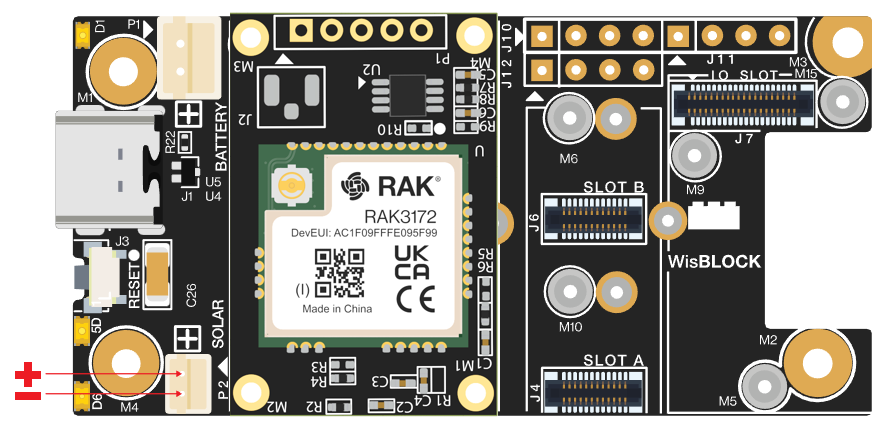 Figure 1: Solar panel connection
Specifications of the battery and solar panel can be found on the datasheet of the WisBlock Base.
Software Initial Guide
Software Setup
The default firmware of RAK3372 is based on RUI3, which allows you to develop your custom firmware to connect sensors and other peripherals to it. To develop your custom firmware using Arduino IDE, you need first to add RAKwireless RUI STM32 Boards in the Arduino board manager, which will be discussed in this guide. You can then use RUI3 APIs for your intended application.
You can upload the custom firmware via UART. The AT commands of RAK3372 is still available even if you compile custom firmware via RUI3. You can send AT commands via UART2 connection.
RAK3372 RUI3 Board Support Package in Arduino IDE
If you don't have an Arduino IDE yet, download it from the Arduino official website and follow the installation procedure depending on your machine.
For Windows 10 and up users: If you installed the Arduino IDE from the Microsoft App Store, uninstall it and download the version from the Arduino official website. The Microsoft App Store version has compatibility issues with third-party Board Support Packages.
Once the Arduino IDE has been installed successfully, configure the IDE to add the RAK3372 to its board selection by following these steps.
- Open Arduino IDE and go to File > Preferences.
 Figure 1: Arduino preferences
- To add the RAK3372 to your Arduino Boards list, edit the Additional Board Manager URLs. Click the icon, as shown in Figure 12.
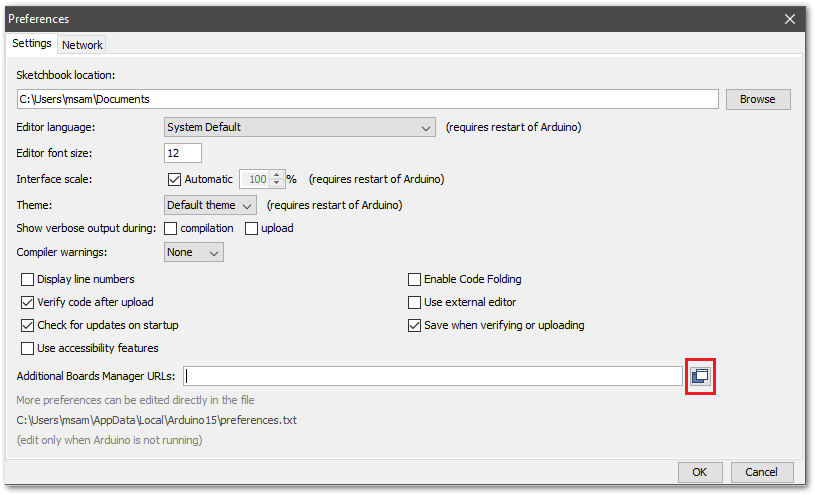 Figure 1: Modify Additional Board Manager URLs
- Copy the URL below and paste it on the field, as shown in Figure 13. If there are other URLs already listed, add them on the next line. Then, click OK.
https://raw.githubusercontent.com/RAKWireless/RAKwireless-Arduino-BSP-Index/main/package_rakwireless_com_rui_index.json
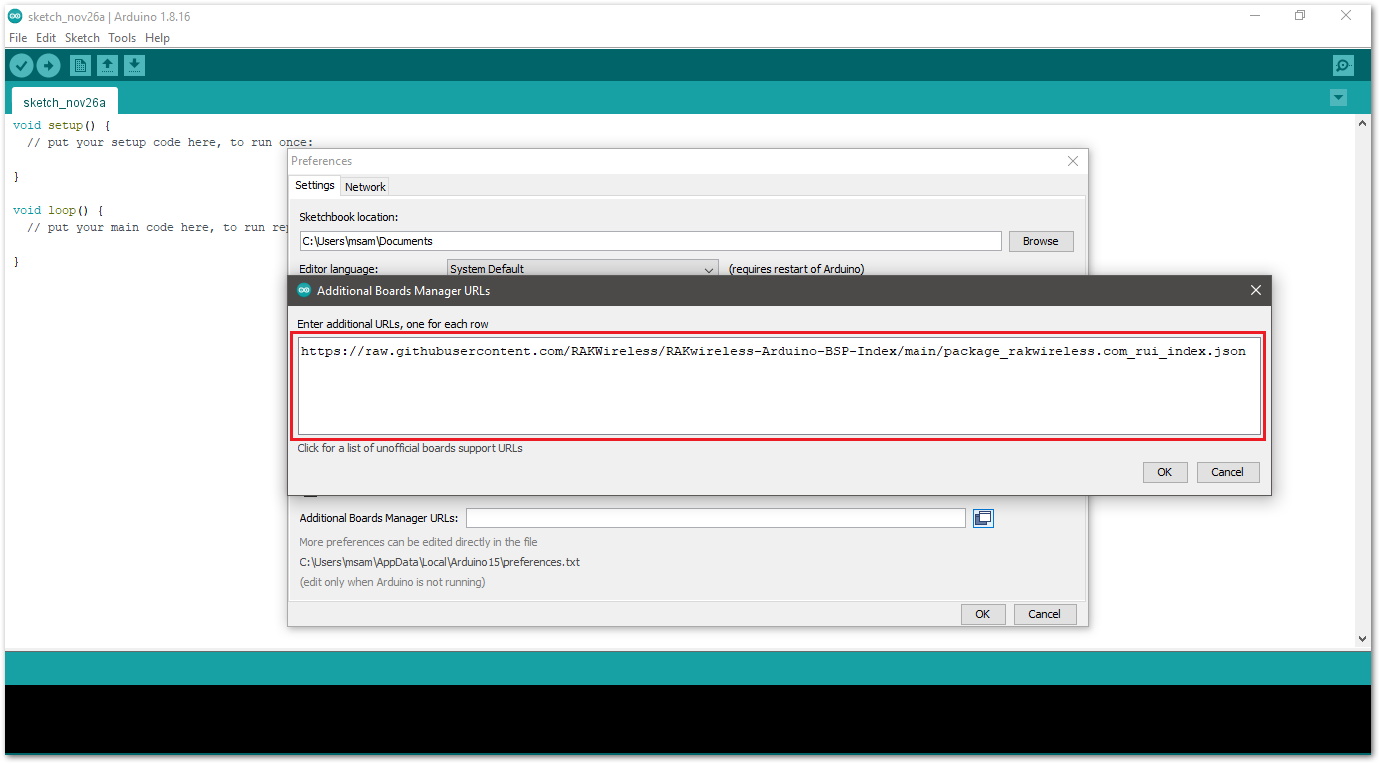 Figure 1: Add additional board manager URLs
-
Restart the Arduino IDE.
-
Open the Boards Manager from Tools Menu.
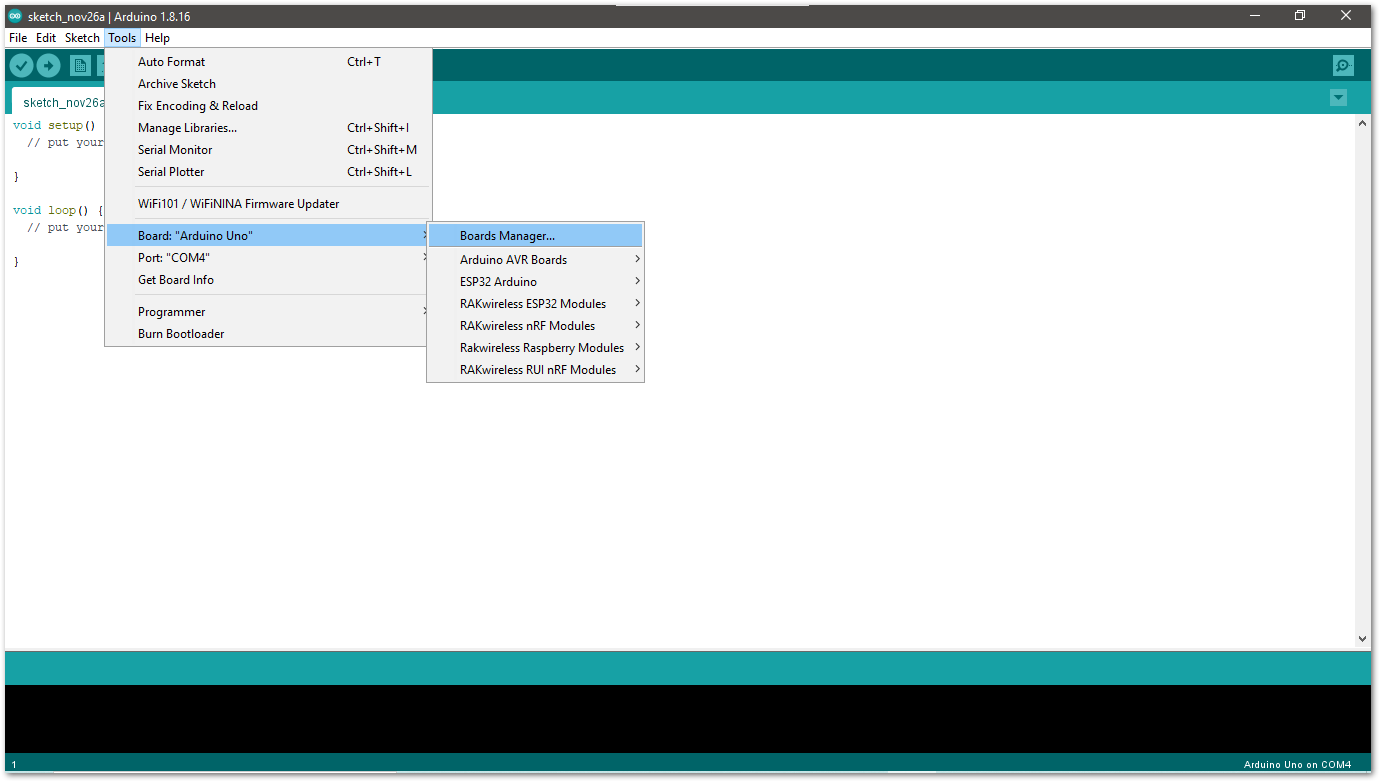 Figure 1: Open Arduino boards manager
-
Write RAK in the search bar, as shown in Figure 15. This will show the available RAKwireless module boards that you can add to your Arduino Board list.
-
Select RAKwireless RUI STM32 Boards, and click on Install to install the latest version of the RAKwireless RUI STM32 Boards.
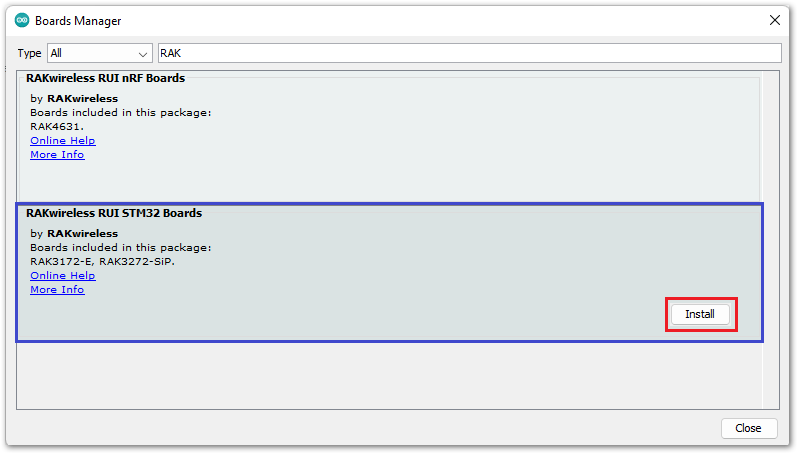 Figure 1: Install RAKwireless RUI STM32 Boards
Configure RAK3372 on Boards Manager
- Once the BSP is installed, select Tools > Boards Manager > RAKWireless RUI STM32 Modules > WisDuo RAK3172 Evaluation Board. The RAK3372 WisBlock Core uses the RAK3172 WisDuo module, so you must select that board, as shown in Figure 16.
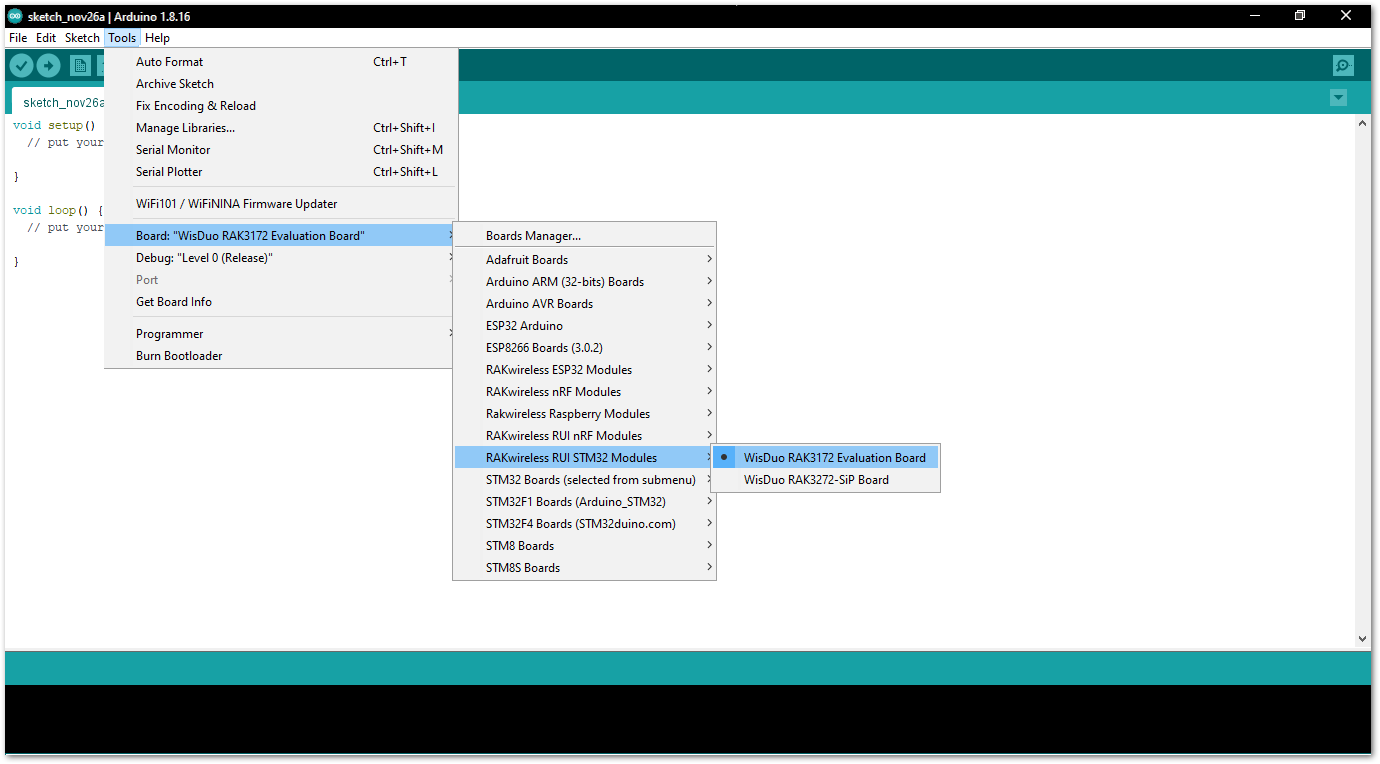 Figure 1: Select RAK3172 Module
RAK3372 COM Port on Device Manager
Connect the RAK3372 via UART and check RAK3372 COM Port using Windows Device Manager.
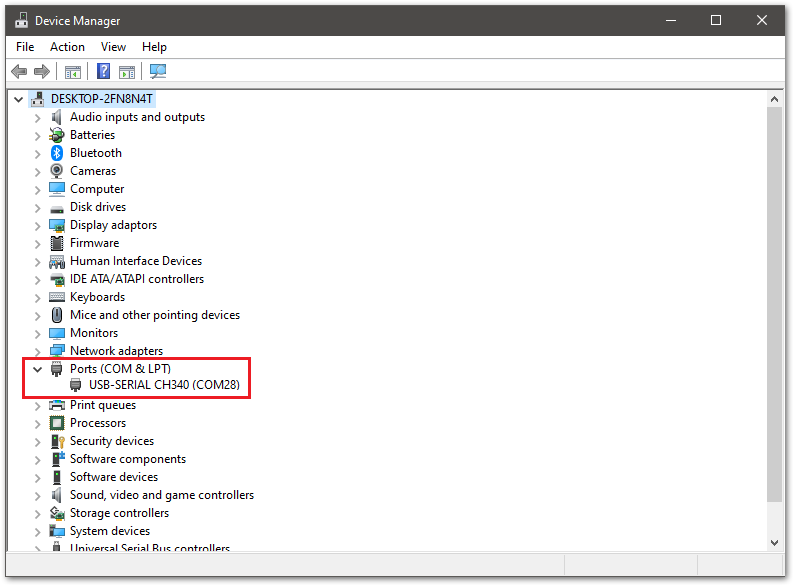 Figure 1: Device manager ports (COM & LPT)
Compile an Example with Arduino LED Breathing
-
Once your RAK3372 WisBlock Core is added to the Arduino IDE, try to run a simple program to test your setup. There is a built-in LED in the WisBlock Base board that you can control via RUI3 custom firmware.
-
Launch Arduino IDE and configure WisDuo RAK3172 Evaluation Board on board selection. See Figure 16.
-
Connect the RAK3372 via UART and check RAK3372 COM Port. See Figure 17.
-
Open the Tools Menu and select a COM port. COM28 is currently used. COM port number varies depending on the PC.
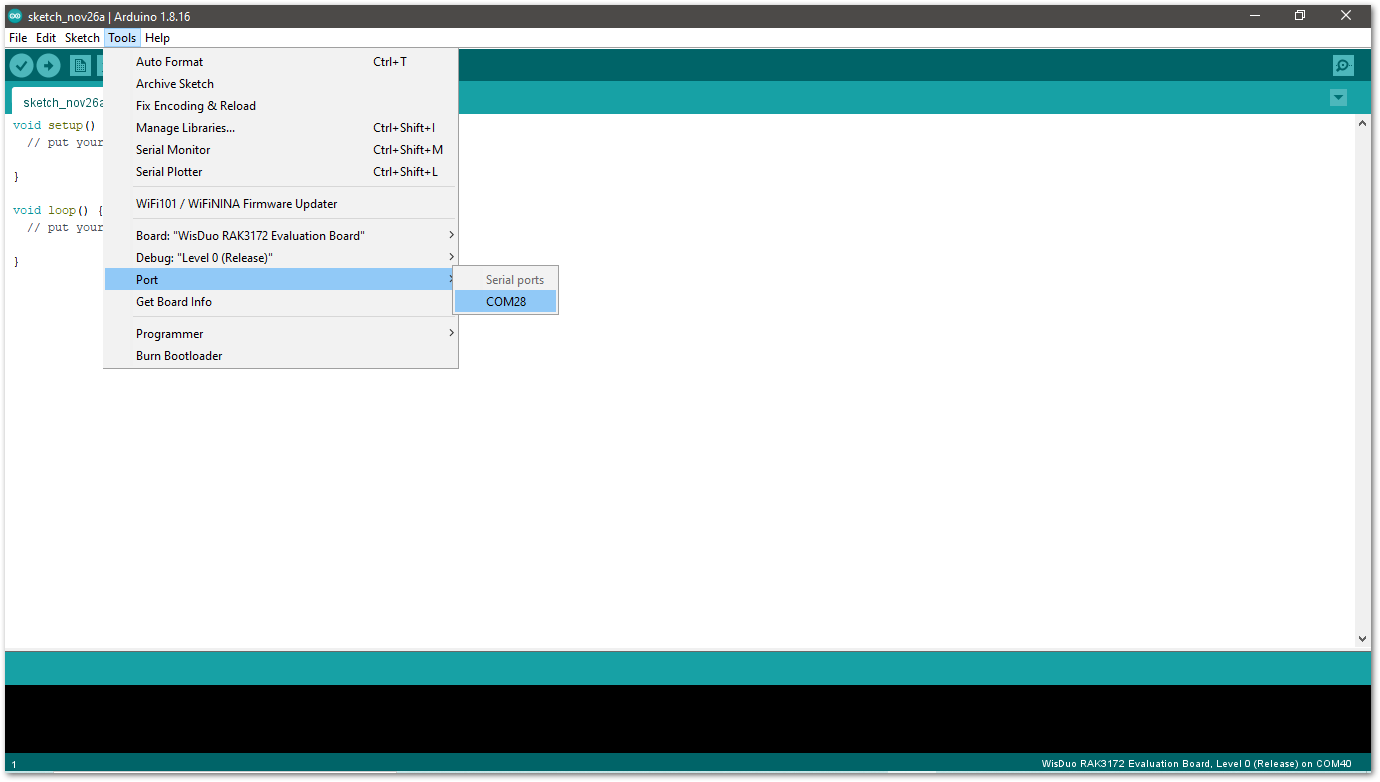 Figure 1: Select COM port
- You can now see the serial monitor icon and click it to connect the COM port.
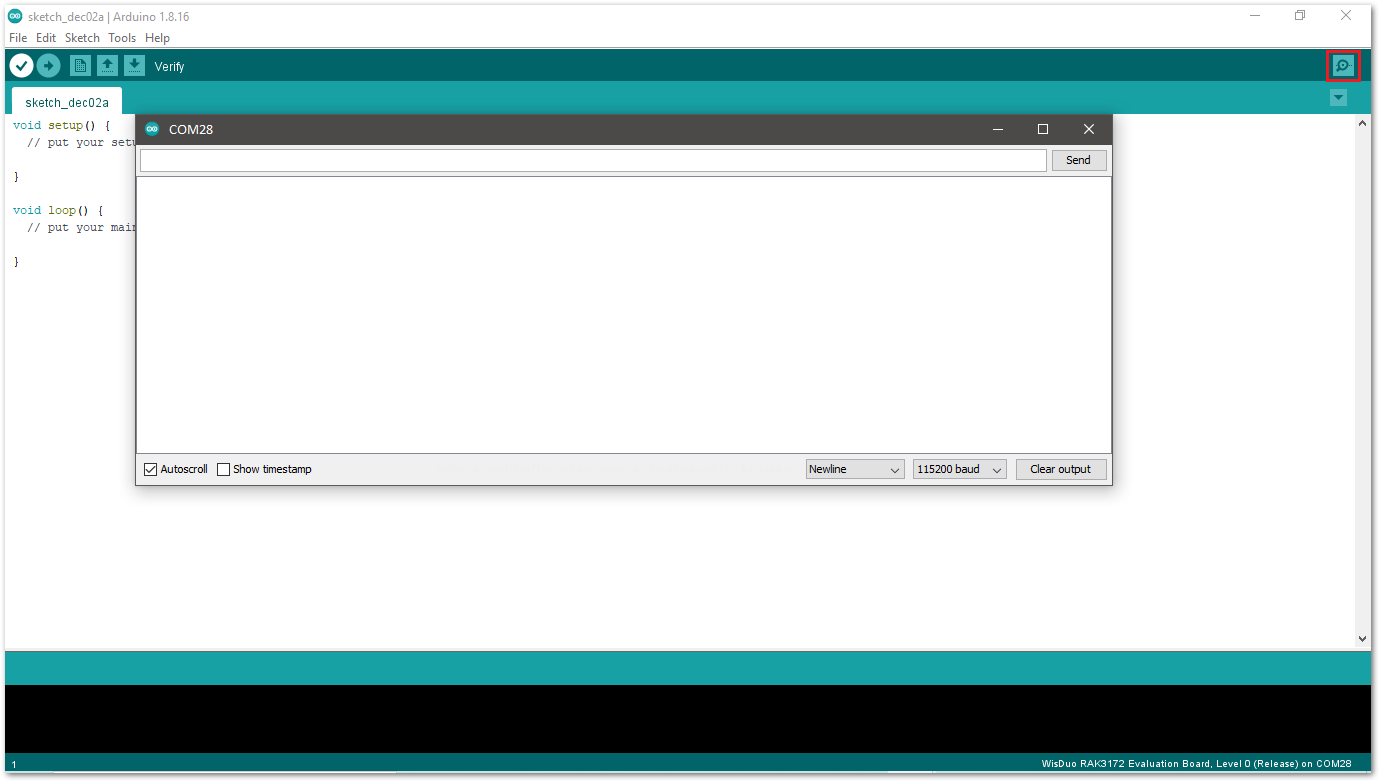 Figure 1: Open Arduino serial monitor
- If the connection is successful, you can send AT Commands to RAK3372. For example, to check the RUI version, type
AT+VER=?on the text area and click on the Send button, as shown in Figure 20.
If there is no reply, make sure you have selected the right COM port or double-check the USB connection.
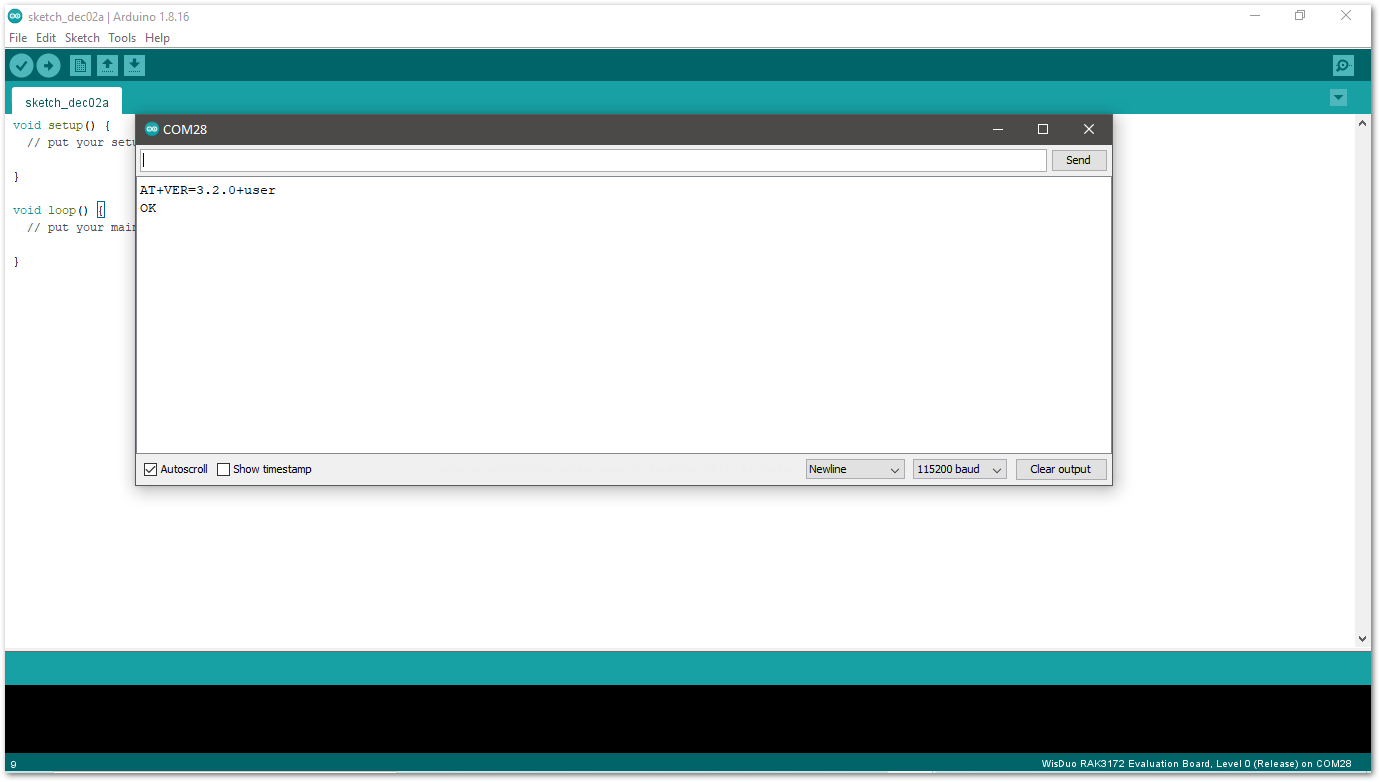 Figure 1: Send AT commands and Arduino serial monitor COM28
- Open Arduino_Led_Breathing example code.
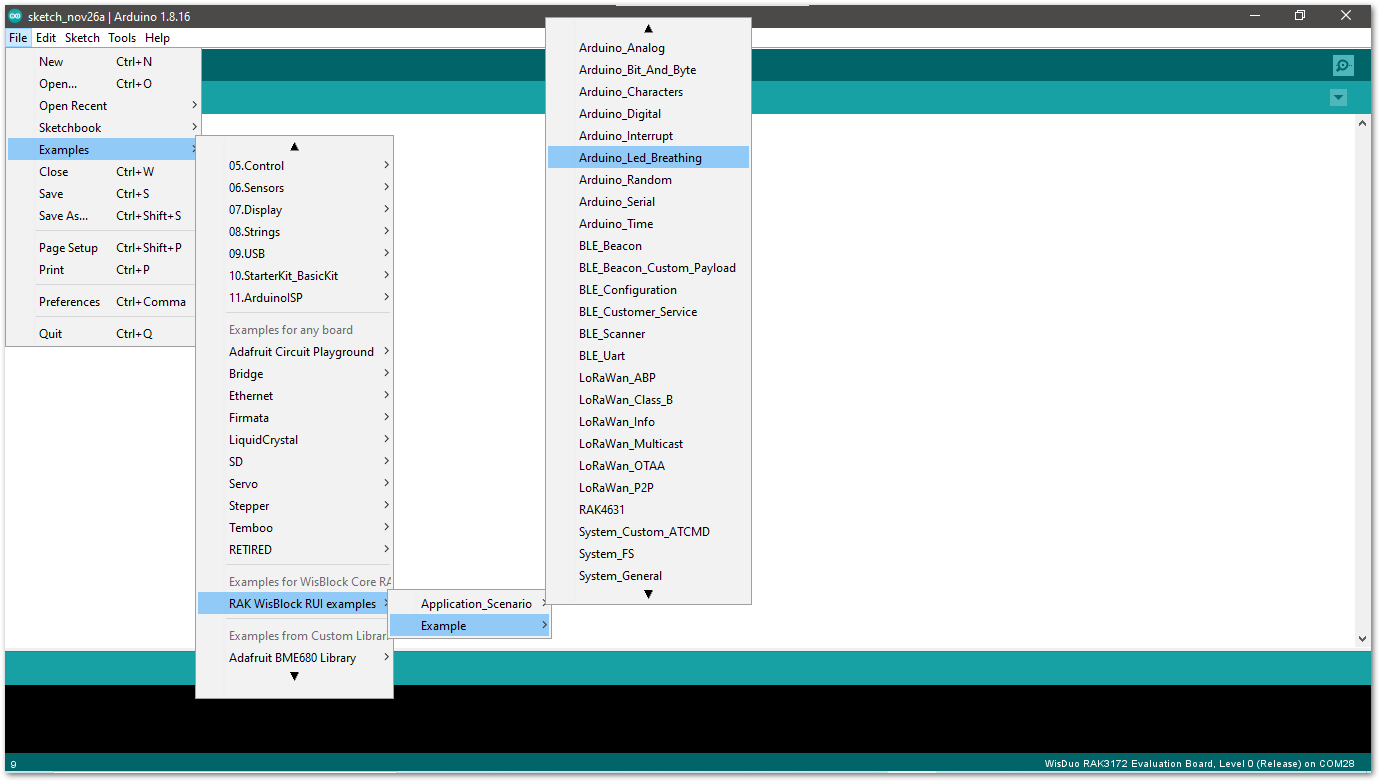 Figure 1: Arduino Led Breathing example
- Click on the Verify icon to check if you have successfully compiled the example code.
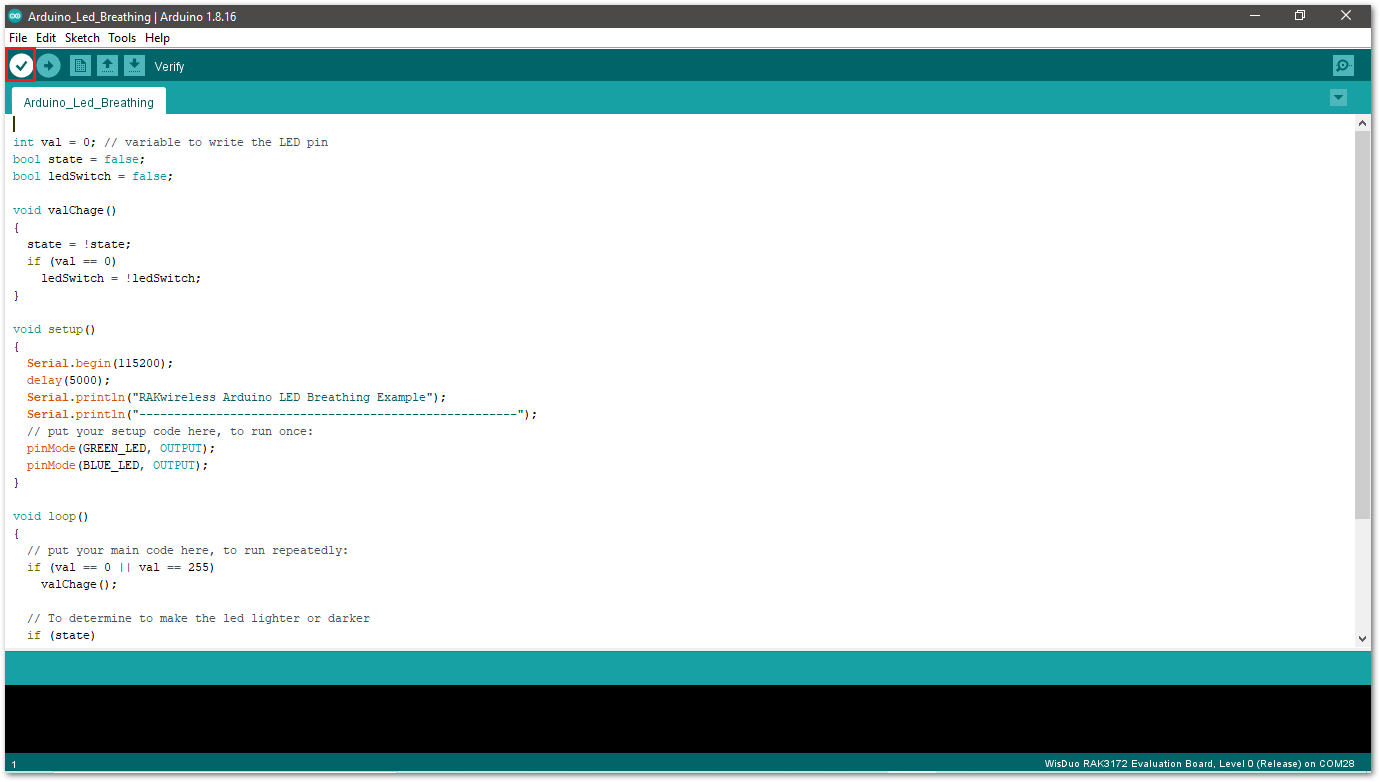 Figure 1: Verify the example code
- Click the Upload icon to send the compiled firmware to your RAK3372 WisBlock Core module.
RAK3172 module in the WisBlock Core should automatically go to BOOT mode when the firmware is uploaded via Arduino IDE.
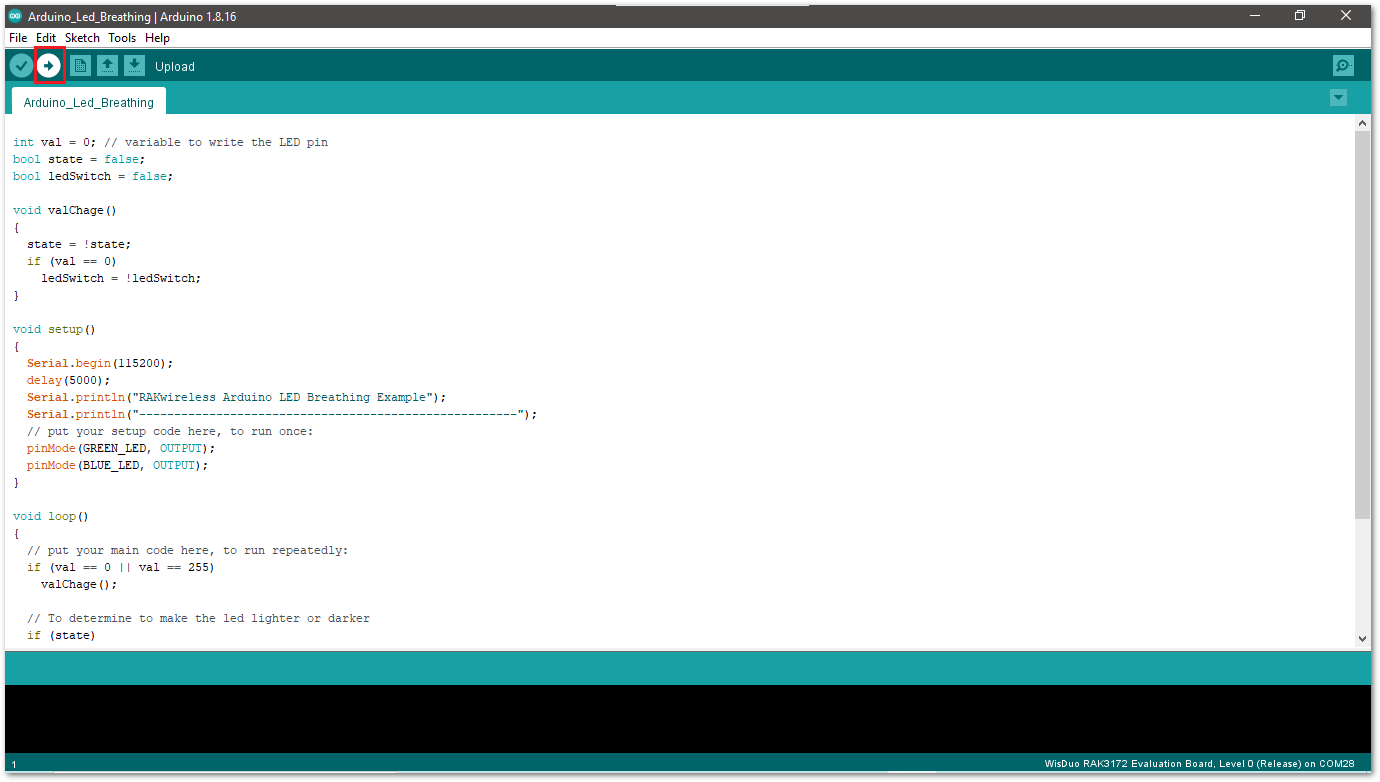 Figure 1: Upload the example code
- If the upload is successful, you will see an Upgrade Complete message.
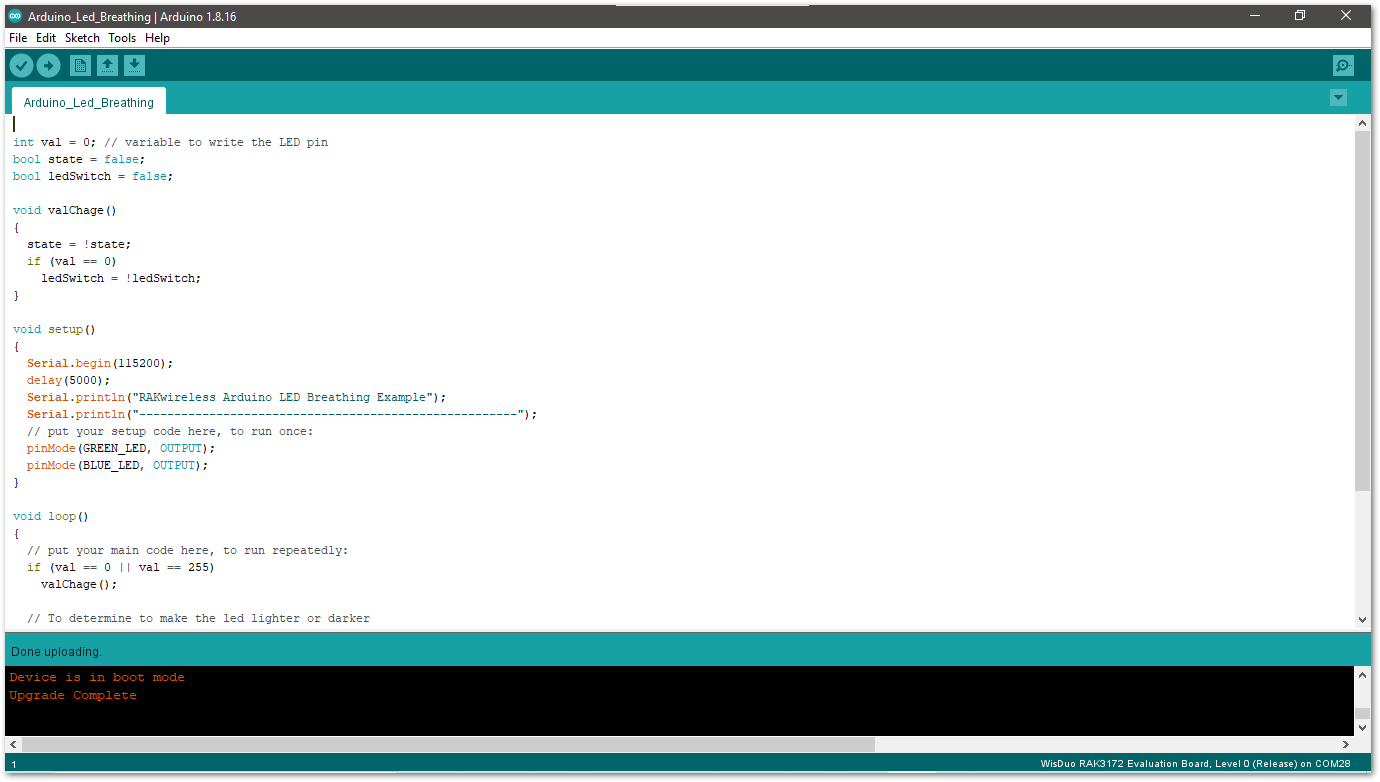 Figure 1: Device programmed successfully
- After the Device Programmed is completed, you will see that LEDs are blinking.
LoRaWAN Example
This example illustrates how to program RAK3372 WisBlock Core as a stand-alone LoRaWAN end-device via RUI3 Arduino APIs. To use the RAK3372 WisBlock Core module as a LoRaWAN end-device, it must be within range of a functioning LoRaWAN gateway that is registered to a LoRaWAN network server (LNS) or has a built-in network server.
If you are new to LoRaWAN, here are a few good references about LoRaWAN and gateways:
- LoRaWAN 101
- What is a LoRaWAN Gateway
- How do LoRaWAN Gateways work?
- Things to Consider When Picking A LoRaWAN Gateway
RAKwireless LoRaWAN gateway models like WisGate Edge have built-in network servers. It is also common that the LoRaWAN network server is external or in the cloud. The popular LoRaWAN network server in the cloud that you can use for free (but offers enterprise service, too) is TTN.
To correctly run this example, it is necessary to configure the LoRaWAN parameters and create an OTAA application on your LoRaWAN gateway.
Register the LoRaWAN Gateway on TTNv3 Community Edition
After configuring your gateway, you need to register it in TTNv3:
- Log in to the TTNv3 Network Server with a web browser.
- Navigate to the Console page and click on gateway icon, as shown in Figure 25.
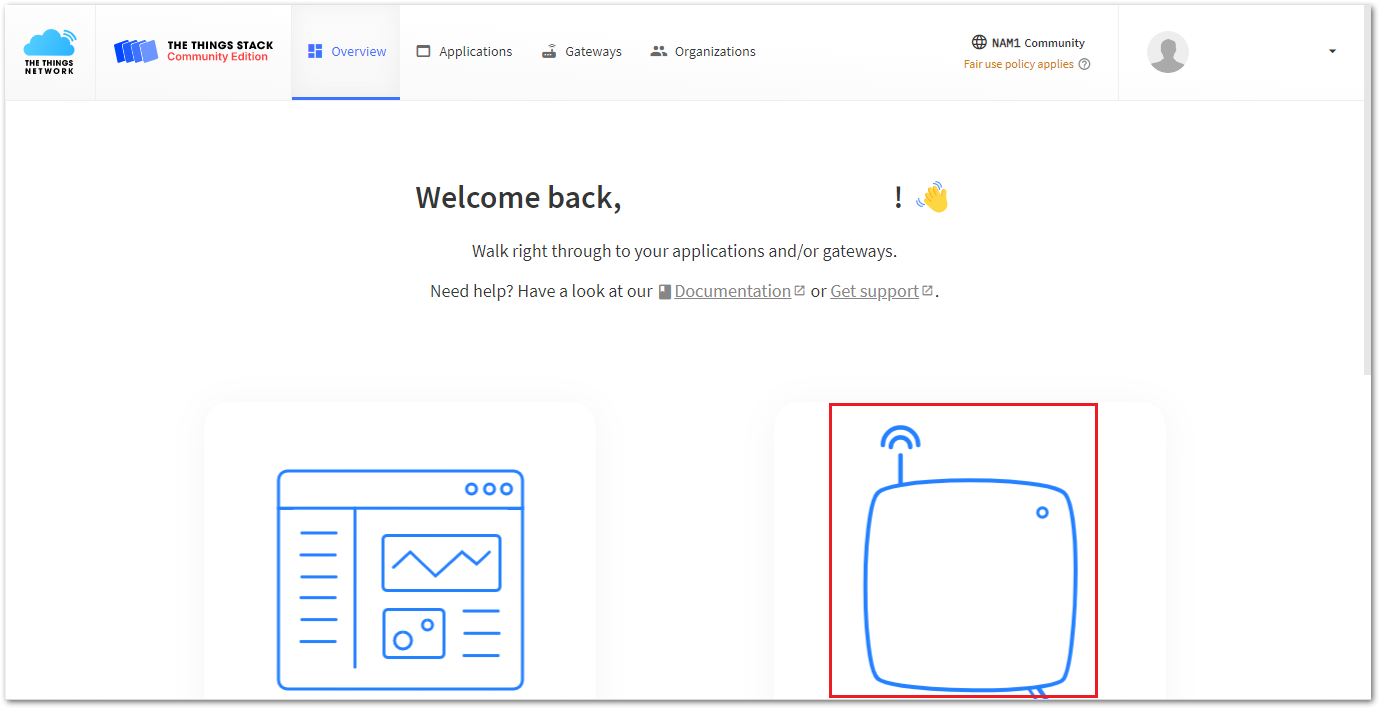 Figure 1: TTNv3 gateway registration and configuration
- On General Settings, enter the Gateway ID, Gateway EUI, and Gateway Name. This information is available in your LoRaWAN gateway configuration. Select the Gateway Server address according to the region where the LoRaWAN gateway will be installed.
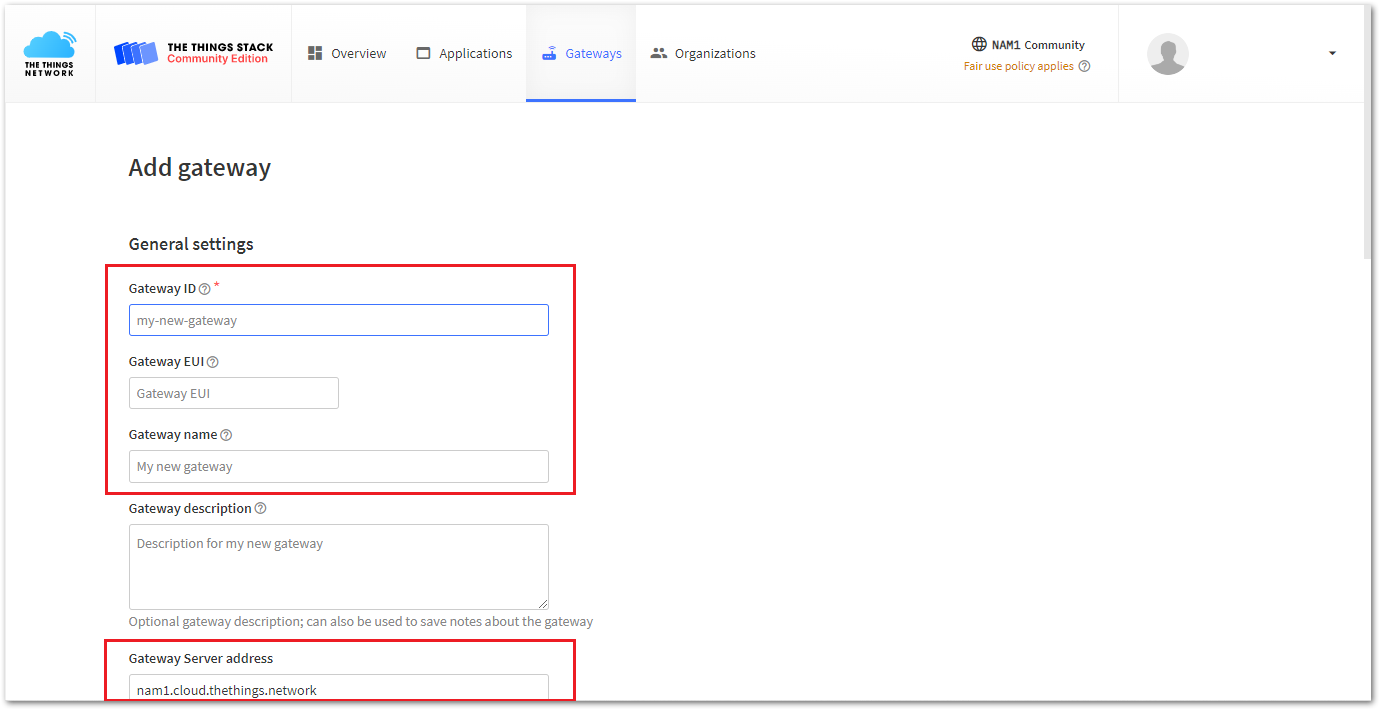 Figure 1: TTNv3 gateway registration and configuration
- Select the Frequency plan for your region (used by TTN), then click on the Create gateway button. This will add a new gateway to TTNv3.
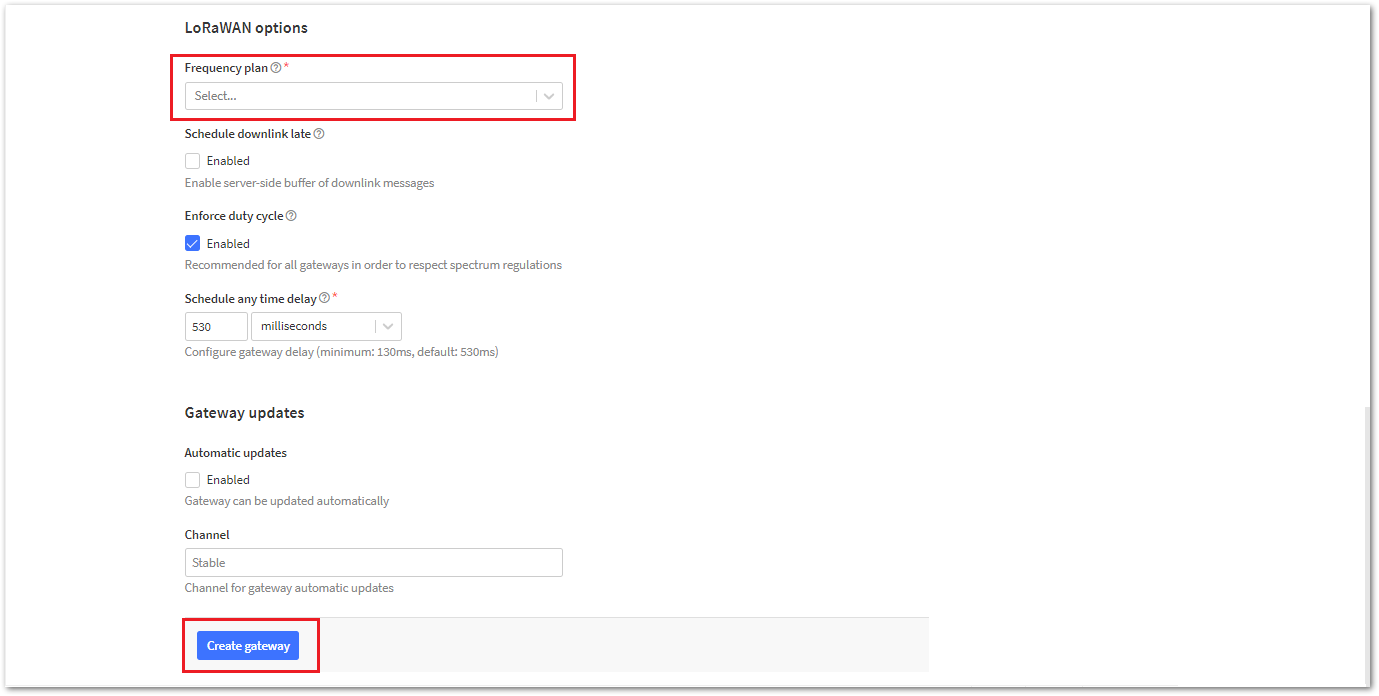 Figure 1: TTNv3 add new Gateway
Create a LoRaWAN Applications in TTN
- Go to The Things Network platform and select a cluster, as shown in Figure 28.
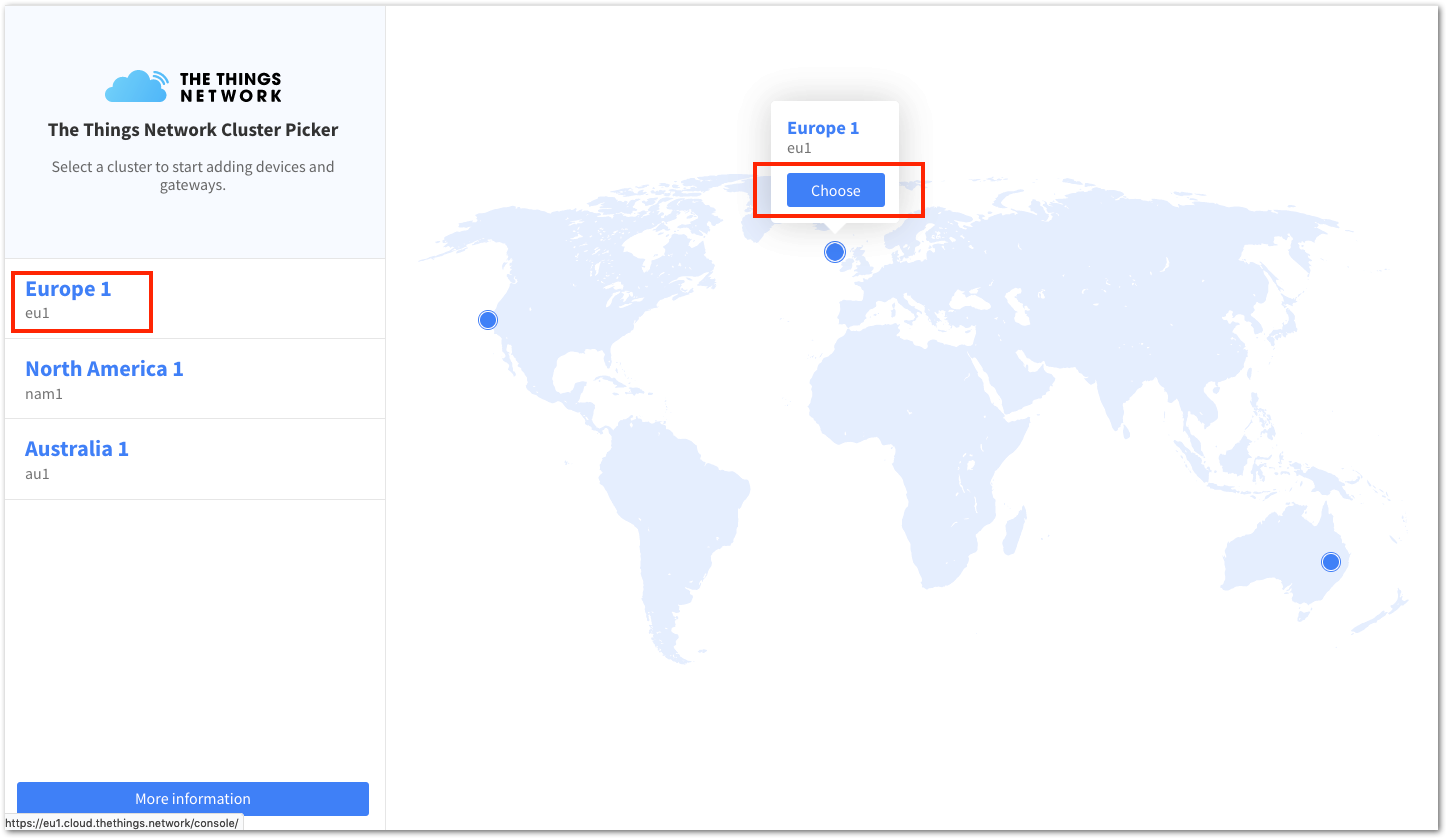 Figure 1: Select a Cluster in TTN V3
You can use the same login credentials on the TTN V2 if you have one. If you have no account yet, create one.
- To register as a new user to TTN, click on Login with The Things ID then select register on the next page, as shown in Figure 29 and Figure 30.
 Figure 1: Login using TTN account
 Figure 1: Registration of new account
-
You should now be on the step of creating your TTN account. Fill in all the necessary details and activate your account.
-
Log in on the platform using your username/email and password then click Submit, as shown in Figure 31.
 Figure 1: Log in to TTN platform
- Click Authorize to proceed.
 Figure 1: Authorization to TTN
- Now that you are logged in to the platform, the next step is to create an application. Click Create an application.
 Figure 1: Create TTN application for your LoRaWAN devices
- To have an application registered, input first the specific details and necessary information about your application then click Create application.
 Figure 1: Details of the TTN application
If you had no error during the previous step, you should now be on the application console page. The next step is to add end-devices to your TTN application. LoRaWAN specification enforces that each end-device has to be personalized and activated. There are two options for registering devices depending on the activation mode you select. Activation can be done either via Over-The-Air-Activation (OTAA) or Activation-By-Personalization (ABP). This guide will show OTAA.
TTN OTAA Device Registration
- Go to your application console to be able to register a device. To start adding an OTAA end-device, click + Add end device, as shown in Figure 35.
 Figure 1: Add end device
- To register the module, first click Manually, then configure the activation method by selecting Over the air activation (OTAA) and a compatible LoRaWAN version, and finally click the Start button, as shown in Figure 36 and Figure 37.
 Figure 1: Manually register the device to TTN
 Figure 1: Device activation configuration
- Put a unique End device ID and EUIs (DevEUI and AppEUI), as shown in Figure 38. Check if your module has a DevEUI on the sticker or QR that you can scan then use this as the device unique DevEUI.
Optionally, you can add a more descriptive End device name and End device description about your device.
- After filling in all the details, click Network layer settings to proceed to the next step.
It is advisable to use a meaningful end-device ID, end-device name, and end-device description that will match your device's purpose. The end-device ID rak-device is for illustration purposes only.
 Figure 1: OTAA Device Information
- The next step is to set up the Frequency plan, a compatible Regional Parameter version, and the LoRaWAN class supported. Then, click Join settings.
 Figure 1: OTAA Configuration
- The last step in the registration of a new OTAA end-device is the configuration of the AppKey. To get the AppKey, click the generate button. Then, click Add end device to finish your new device registration.
 Figure 1: OTAA AppKey generation and device registration
You should now be able to see the device on the TTN console after you fully register your device, as shown in Figure 41.
- The AppEUI, DevEUI, and AppKey are essential parameters for activating your LoRaWAN end-device using OTAA. For security purposes, the AppKey is hidden by default but can be revealed by clicking the "Show" button. You can also use the "Copy" button to quickly copy these parameters.
- The three OTAA parameters on the TTN device console are MSB by default.
- These parameters are always accessible on the device console page, as shown in Figure 50.
 Figure 1: OTAA device successfully registered to TTN
Upload LoRaWAN Example to RAK3372
After a successful registration of the RAK3372 device on the LNS, you can now proceed with running the LoRaWAN OTAA demo application example.
- Launch the Arduino IDE and configure WisDuo RAK3172 Evaluation Board on board selection. See Figure 16.
- Connect the RAK3372 via UART and check RAK3372 COM Port. See Figure 17.
- Open the example code under RAK WisBlock RUI examples: File > Examples > RAK WisBlock RUI examples > Example > LoRaWan_OTAA.
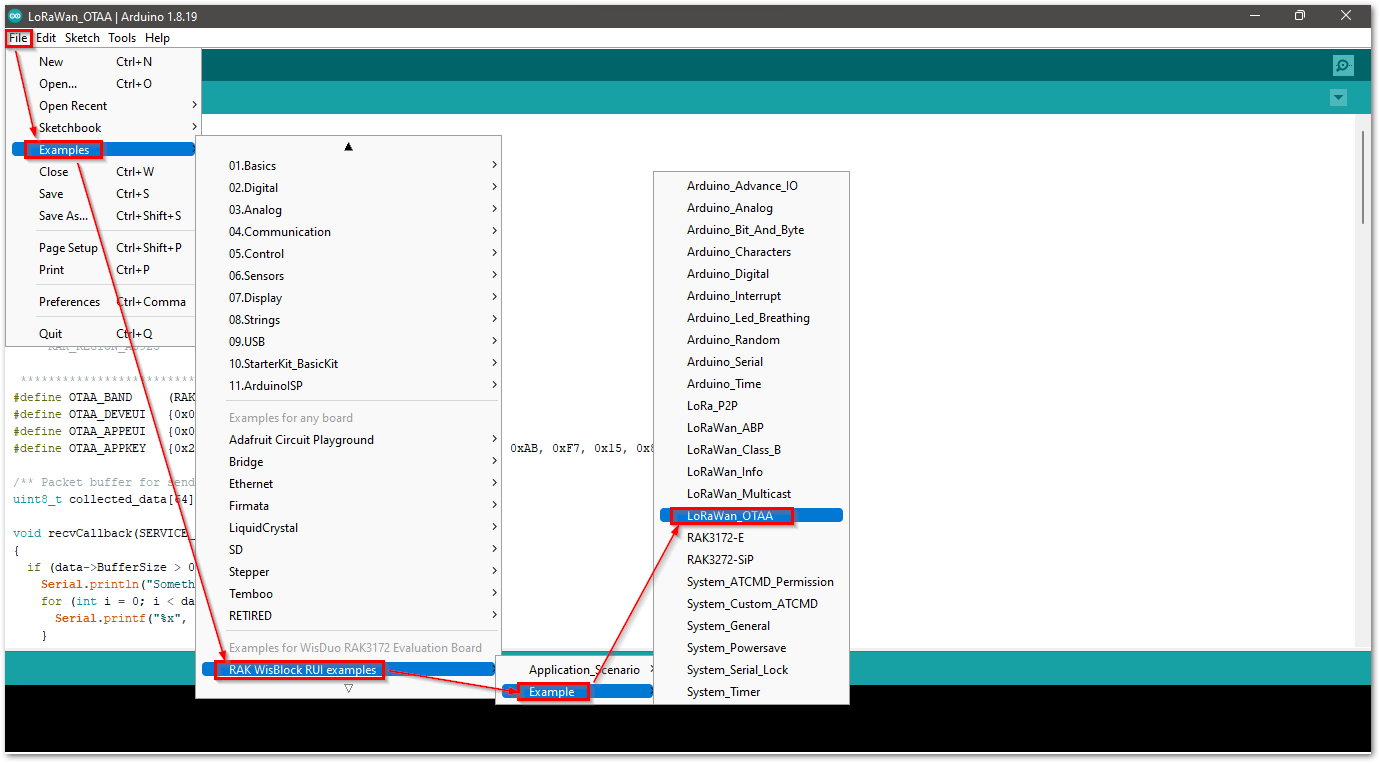 Figure 1: OTAA LoRaWAN application example
- In the example code, modify the device EUI OTAA_DEVEUI, the application EUI OTAA_APPEUI, and the application key OTAA_APPKEY.
- The OTAA_DEVEUI parameter should match the device EUI registered in your network server. Note that your RAK3372 module has a sticker with a QR code printed on it. You can use the QR code information to configure the OTAA_DEVEUI parameter. The OTAA_DEVEUI format is MSB first.
  // OTAA Device EUI MSB
#define OTAA_DEVEUI   {0x11, 0x33, 0x55, 0x77, 0x99, 0x22, 0x44, 0x66}
- The OTAA_APPEUI parameter. This parameter should also be the same as the APPEUI in the network server you configured.
  // OTAA Application EUI MSB
#define OTAA_APPEUI   {0x10, 0x00, 0x00, 0x00, 0x00, 0x00, 0x00, 0x09}
- Another important parameter to change is the application key OTAA_APPKEY. This parameter should also be the same as the APPKEY in the network server you configured. The OTAA_APPKEY format is MSB first.
// OTAA Application Key MSB
#define OTAA_APPKEY   {0x04, 0xFA, 0x4E, 0x62, 0x6E, 0xF5, 0xCF, 0x22, 0x7C, 0x96, 0x96, 0x01, 0x17, 0x62, 0x75, 0xC2}
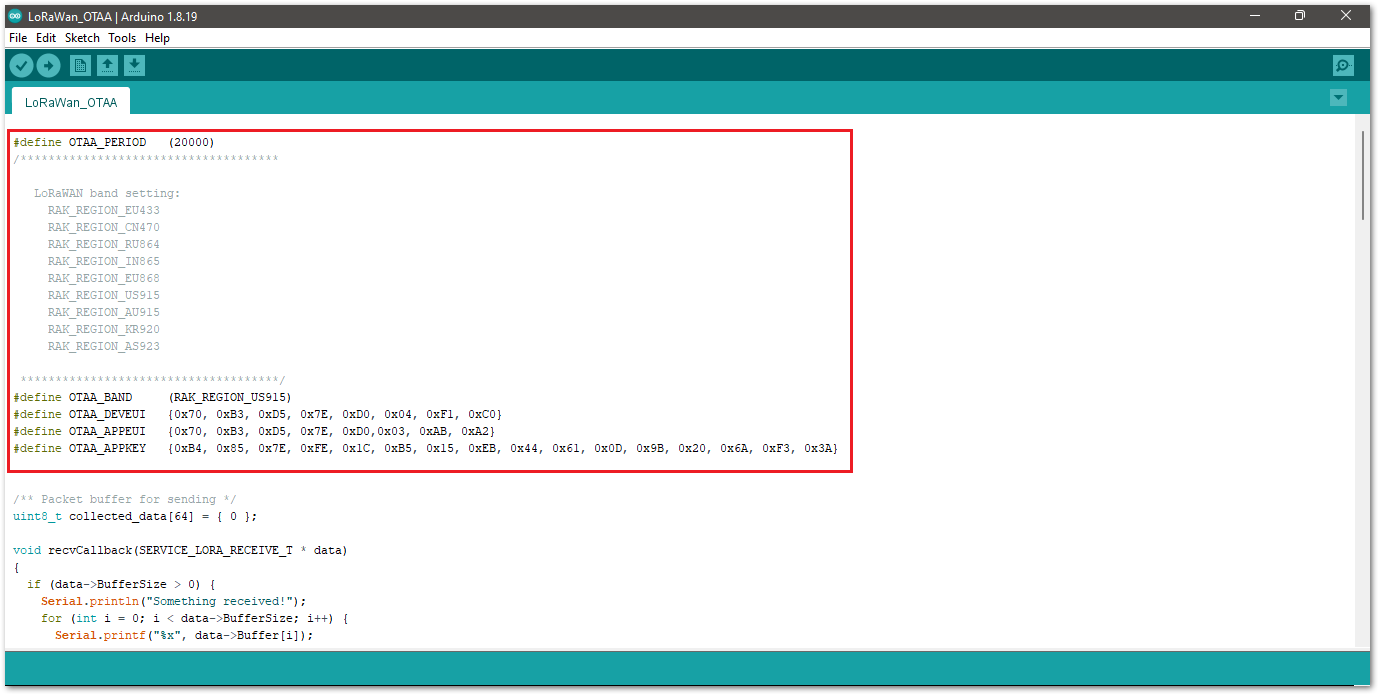 Figure 1: Configure DEVEUI, APPEUI and APPKEY
- Depending on the Regional Band you selected, you might need to configure the sub-band of your RAK module to match the gateway and LoRaWAN network server. This is especially important for Regional Bands like US915, AU915, and CN470.
This guide uses EU868. However, if you are using other regional bands, update it and possibly the channels. For example, if you are using US915 and AU915, set up the channel mask using the mask.set API. Channels 8 to 15 are the most commonly used channels in the US915 and AU915 bands, corresponding to a mask value of two.
Here's example on using US915 with OTAA_BAND equal to 5:
  if (!api.lorawan.band.set(OTAA_BAND)) {
    Serial.printf("LoRaWan OTAA - set band is incorrect! \r\n");
    return;
  }
  uint16_t maskBuff = 0x0002;
  if (!api.lorawan.mask.set(&maskBuff)) {
    Serial.printf("LoRaWan OTAA - set mask is incorrect! \r\n");
    return;
  }
RAK3372 supports the following regions:
- RAK_REGION_EU433 = 0
- RAK_REGION_CN470 = 1
- RAK_REGION_RU864 = 2
- RAK_REGION_IN865 = 3
- RAK_REGION_EU868 = 4
- RAK_REGION_US915 = 5
- RAK_REGION_AU915 = 6
- RAK_REGION_KR920 = 7
- RAK_REGION_AS923 = 8
- RAK_REGION_AS923-2 = 9
- RAK_REGION_AS923-3 = 10
- RAK_REGION_AS923-4 = 11
- Make sure you have configured the correct RAK board before uploading the code. See Configure RAK3372 on Boards Manager section.
- Also, check RAK3372 COM Port on Device Manager section.
- Open the Tools Menu and select a COM port. COM28 is currently used.
 Figure 1: Select COM port
- The last step is to upload the code by clicking the Upload icon on Arduino IDE. Take note that you should select the right board and COM port.
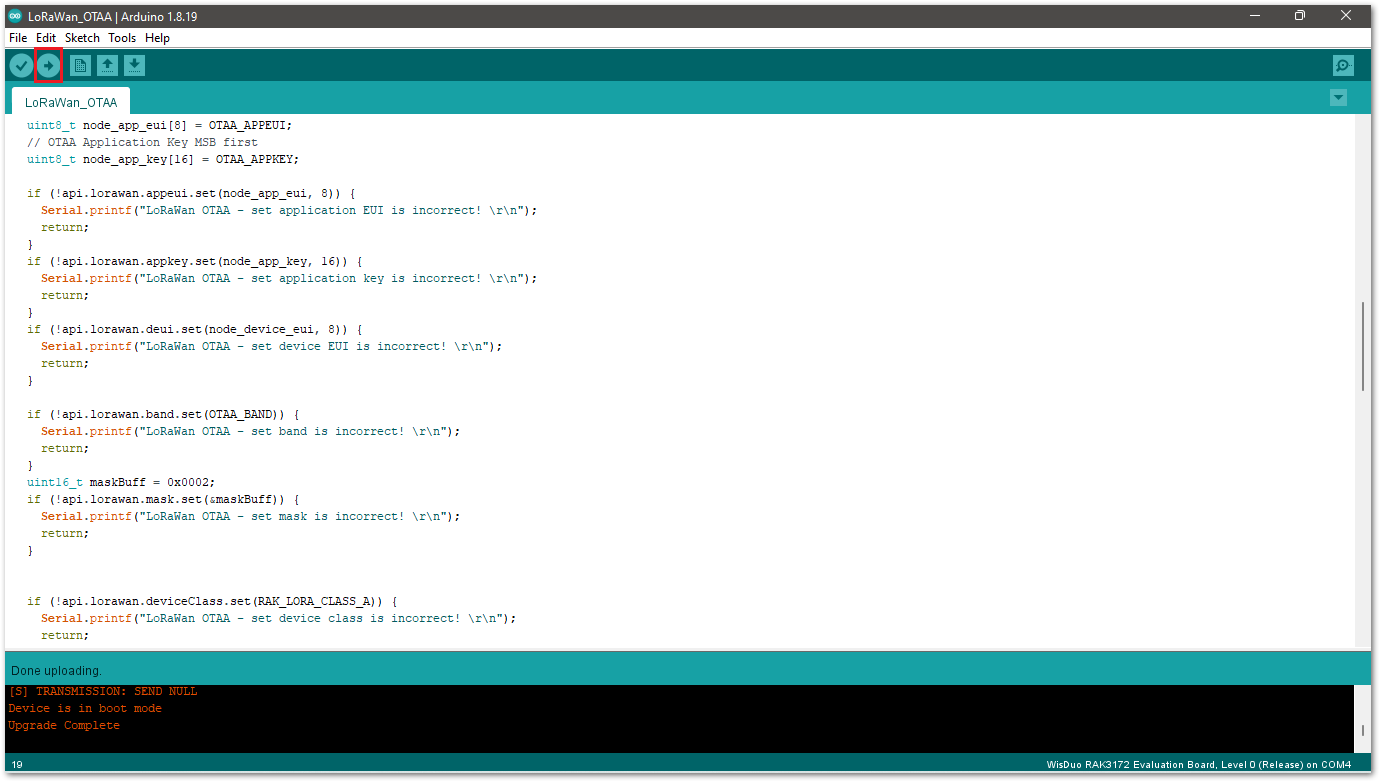 Figure 1: Upload the code
- You should now be able to view the console logs through the serial monitor in the Arduino IDE. If the COM port disconnects, the terminal output may not appear immediately. To resolve this, reconnect the module or press the reset button to restore the terminal output.
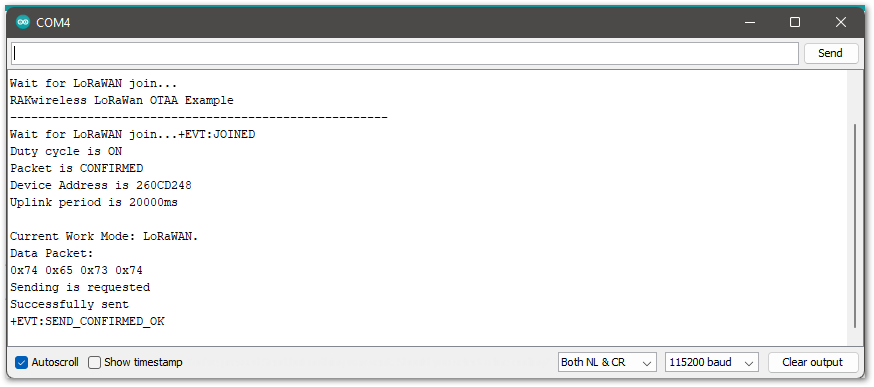 Figure 1: Arduino serial monitor logs
- Check on the LoRaWAN network TTN console logs if your device has been successfully joined with the
join-requestandjoin-acceptmessages.
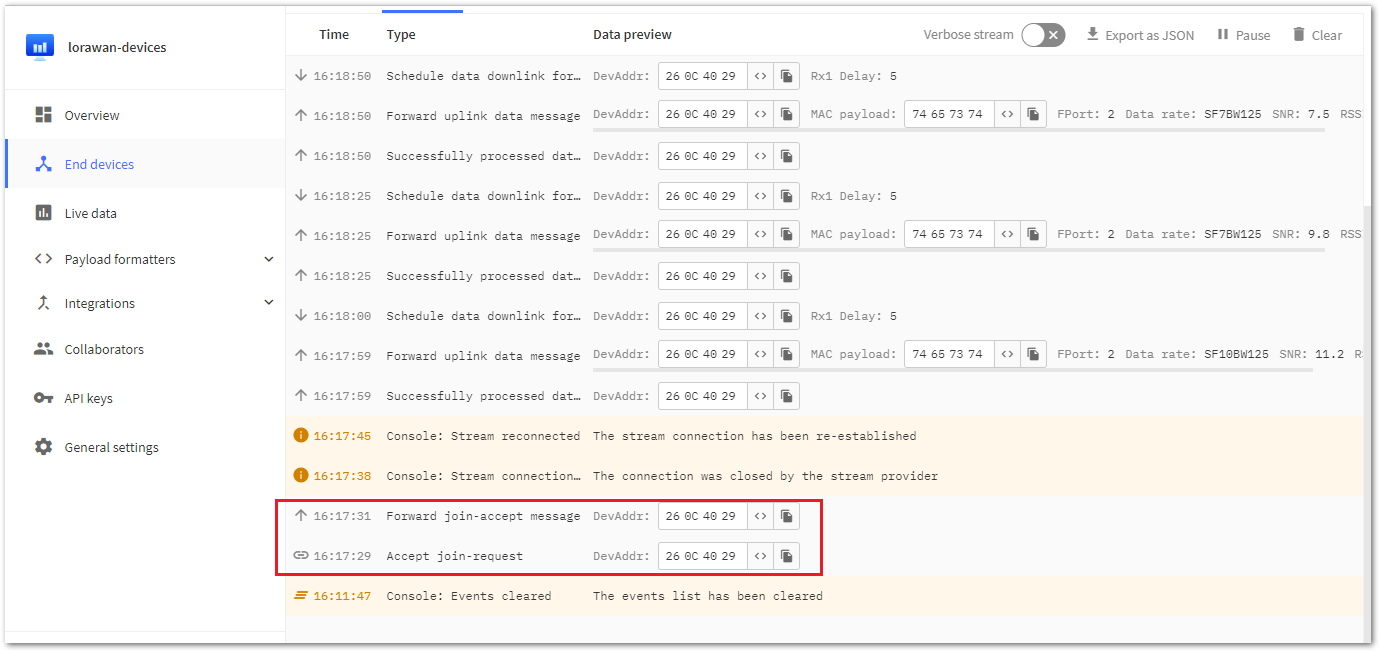 Figure 1: TTN console log
Miscellaneous
Upgrading the Firmware
If you want to upgrade to the latest version of the firmware of the module, follow this section. The latest firmware can be found in the software section of RAK3172 Datasheet.
What if the RAK3372 WisBlock Core module stops responding to AT commands and/or firmware updates?
You can recover your device by using the .hex file in the datasheet and uploading it using STM32CubeProgrammer. The guide on updating STM32 firmware using STM32CubeProgrammer can be found in the Learn section.
Uploading the .hex file via STM32CubeProgrammer will erase all configured data on the device.
Firmware Upgrade Through UART2
Minimum Hardware and Software Requirements
Refer to the table for the minimum hardware and software requirements to perform the firmware upgrade via UART2:
| Hardware/Software | Requirement |
|---|---|
| Computer | A Windows/Ubuntu/Mac computer |
| Firmware File | Bin firmware file downloaded from the website |
| Others | A USB to TTL module |
Firmware Upgrade Procedure
Execute the following procedure to upgrade the firmware in the Device Firmware Upgrade (DFU) mode through the UART2 interface.
RAK3172 should automatically go to BOOT mode when the firmware is uploaded via RAK DFU Tool or WisToolBox.
-
Download the latest RAK3172 Firmware.
-
Download the RAK Device Firmware Upgrade (DFU) Tool.
-
Connect the RAK3372 module to the computer using a USB-to-TTL cable.
-
Open the Device Firmware Upgrade tool. Select the serial port and baud rate (115200) of the module and click the Select Port button.
If your firmware upload always fails, check your current baud rate setting using the AT+BAUD=? command and use that baud rate value in the RAK DFU Tool. Check if you selected the right COM port.
 Figure 1: Device Firmware Upgrade Tool
- Select the application firmware file of the module with the suffix
.bin.
 Figure 1: Select firmware
- Click the Upgrade button to upgrade the device. After the upgrade is complete, the RAK3372 will be ready to work with the new firmware.
 Figure 1: Firmware upgrading
 Figure 1: Upgrade successful