RAK5804 WisBlock Interface Extension Module Quick Start Guide
Prerequisite
What Do You Need?
Before going through each and every step on using the RAK5804 WisBlock module, make sure to prepare the necessary items listed below:
Hardware
- RAK5804 Wisblock Interface Extension Board
- Your choice of WisBlock Base
- Your choice of WisBlock Core
- USB Cable
- Li-Ion/LiPo battery (optional)
- Solar charger (optional)
Software
- Download and install ArduinoIDE.
- To add the RAKwireless Core boards on your Arduino Boards Manager, install the RAKwireless Arduino BSP.
Product Configuration
Hardware Setup
The RAK5804 module is designed as an IO extension module that allows you to connect external digital and analog modules to create a customized IoT solution. These third-party modules are connected through two expansion connectors: J2 and J3. In addition, the RAK5804 module also supports a USB interface, which can be used to access and program the MCU of the WisBlock Core module of the solution. For more information about RAK5804, refer to the Datasheet.
The RAK5804 module can be mounted on the IO slot of the WisBlock Base board, as shown in Figure 1. Also, always secure the connection of the WisBlock module by using compatible screws.
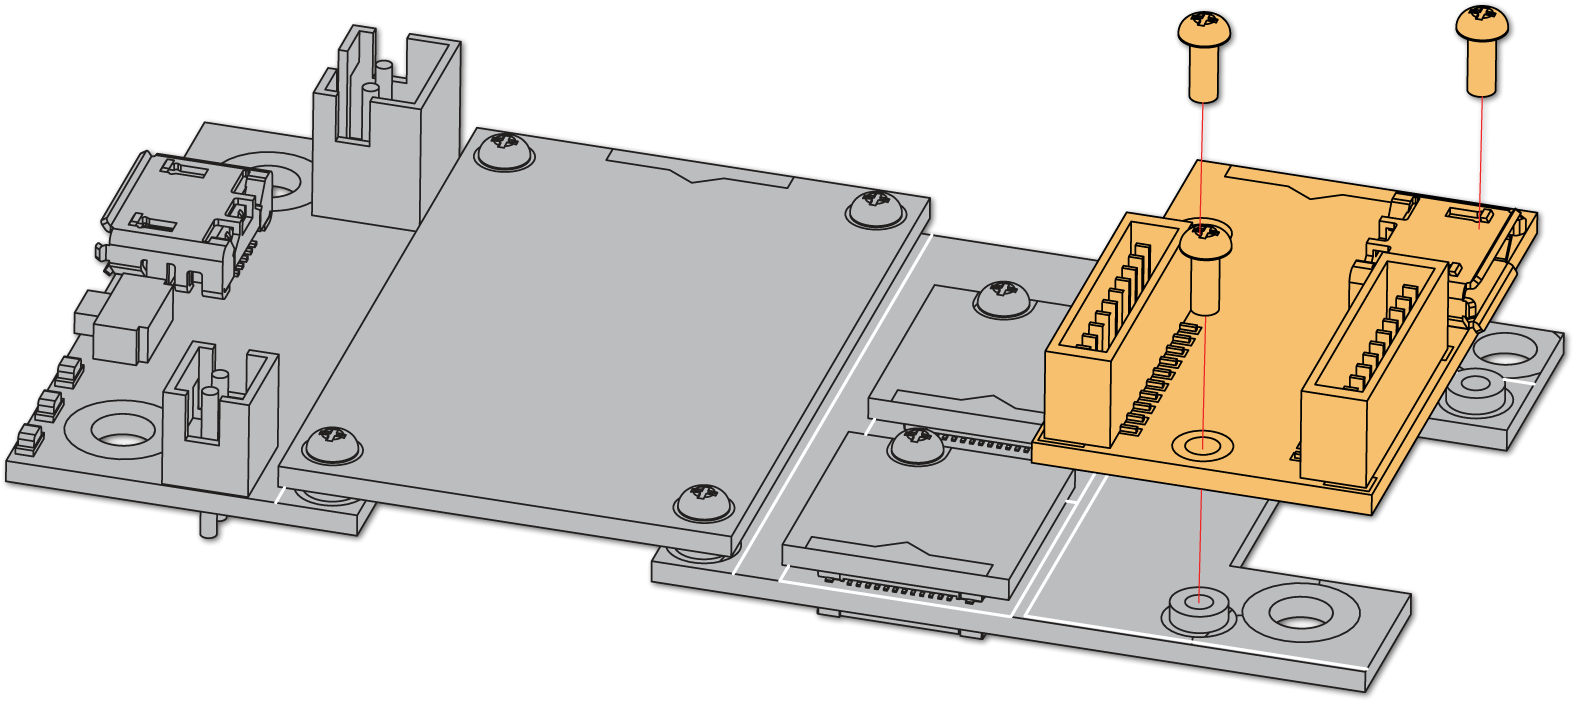 Figure 1: RAK5804 connection to WisBlock Base
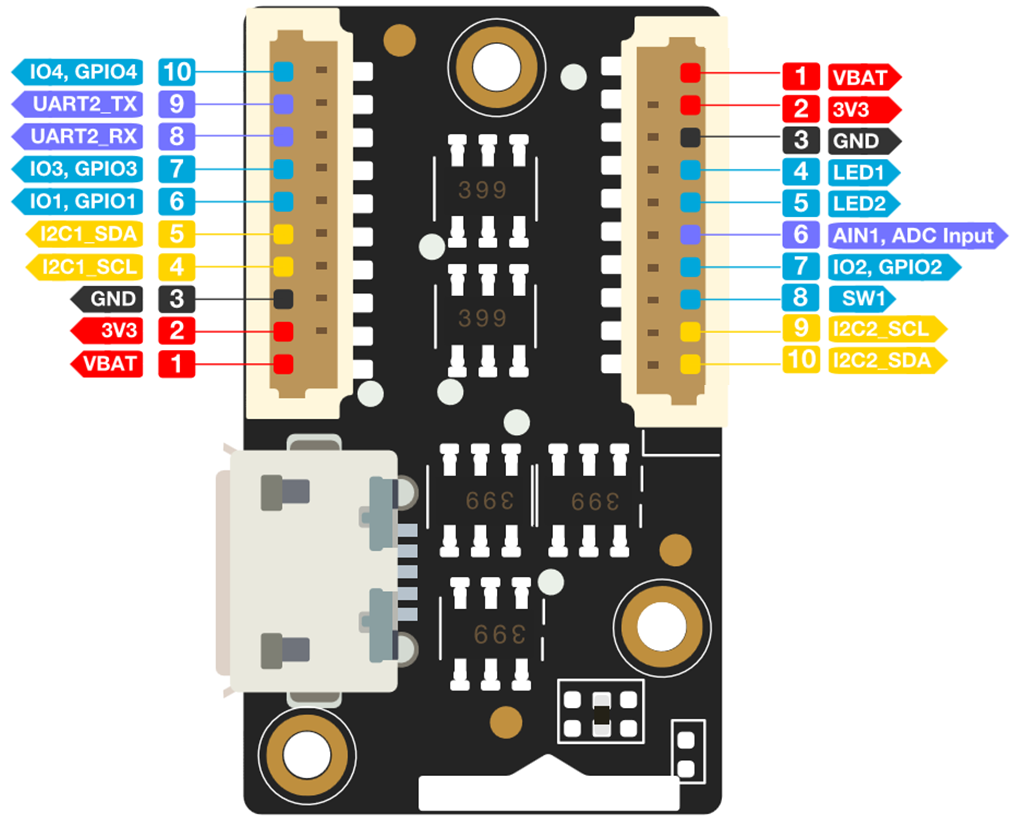 Figure 1: RAK5804 Pin Definition
If you will connect other modules to the remaining WisBlock Base slots, check on the WisBlock Pin Mapper tool for possible conflicts.
After all this setup, you can now connect the battery (optional) and USB cable to start programming your WisBlock Core.
- Batteries can cause harm if not handled properly.
- Only 3.7-4.2 V Rechargeable LiPo batteries are supported. It is highly recommended not to use other types of batteries with the system unless you know what you are doing.
- If a non-rechargeable battery is used, it has to be unplugged first before connecting the USB cable to the USB port of the board to configure the device. Not doing so might damage the battery or cause a fire.
- Only 5 V solar panels are supported. Do not use 12 V solar panels. It will destroy the charging unit and eventually other electronic parts.
- Make sure the battery wires are matching the polarity on the WisBlock Base board. Not all batteries have the same wiring.
Software Configuration and Example
The RAK5804 module exposes the IO pins, I2C, and UART communication ports. You can use these ports to connect sensors or modules, digital I/O, analog I/O, and slave devices. These ports are routed to the WisBlock Core through the IO connector.
For RAK5804, the accessible GPIO pin assignments are defined as follows in the Arduino IDE:
WB_IO1for IO1, GPIO1 pinWB_IO2for IO2, GPIO2 pinWB_IO3for IO3, GPIO3 pinWB_IO4for IO4, GPIO4 pinWB_SW1for SW1 pinWB_A1for AIN1, ADC Input pin
These are the quick links that go directly to the software guide for the specific WisBlock Core module you use:
- RAK5804 in RAK4631 WisBlock Core Guide
- RAK5804 in RAK11200 WisBlock Core Guide
- RAK5804 in RAK11310 WisBlock Core Guide
RAK5804 in RAK4631 WisBlock Core Guide
I2C Connection on RAK5804
This is just an example and illustration on how to use the RAK5804 for external I2C sensors, modules, or devices. You can use any I2C device as long as it operates at 3.3 V.
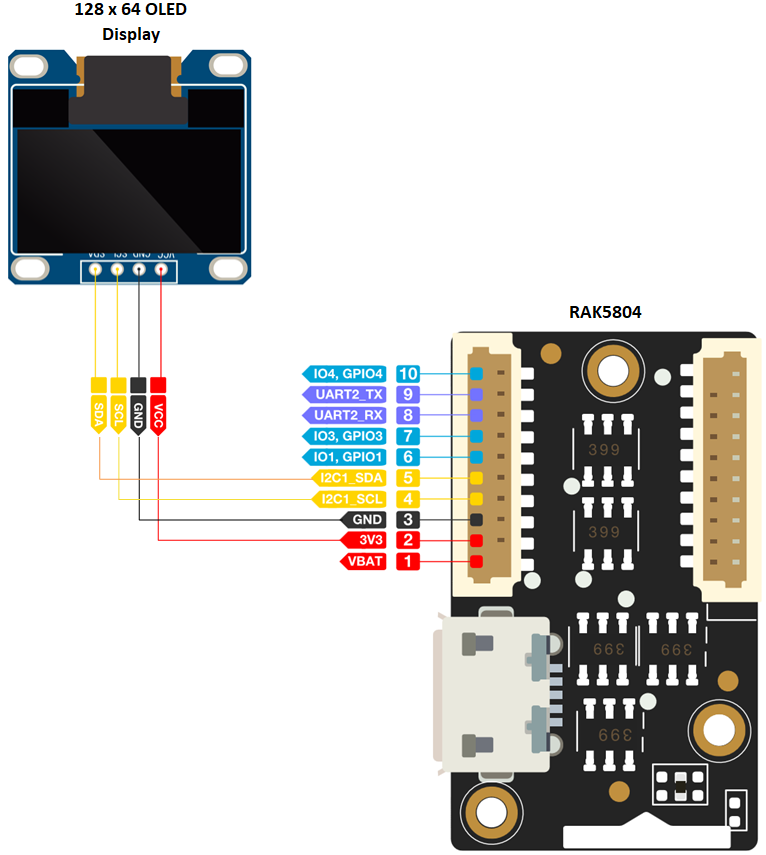 Figure 1: Connecting the RAK5804 to the I2C pin of the module
- Select the RAK4631 WisBlock Core.
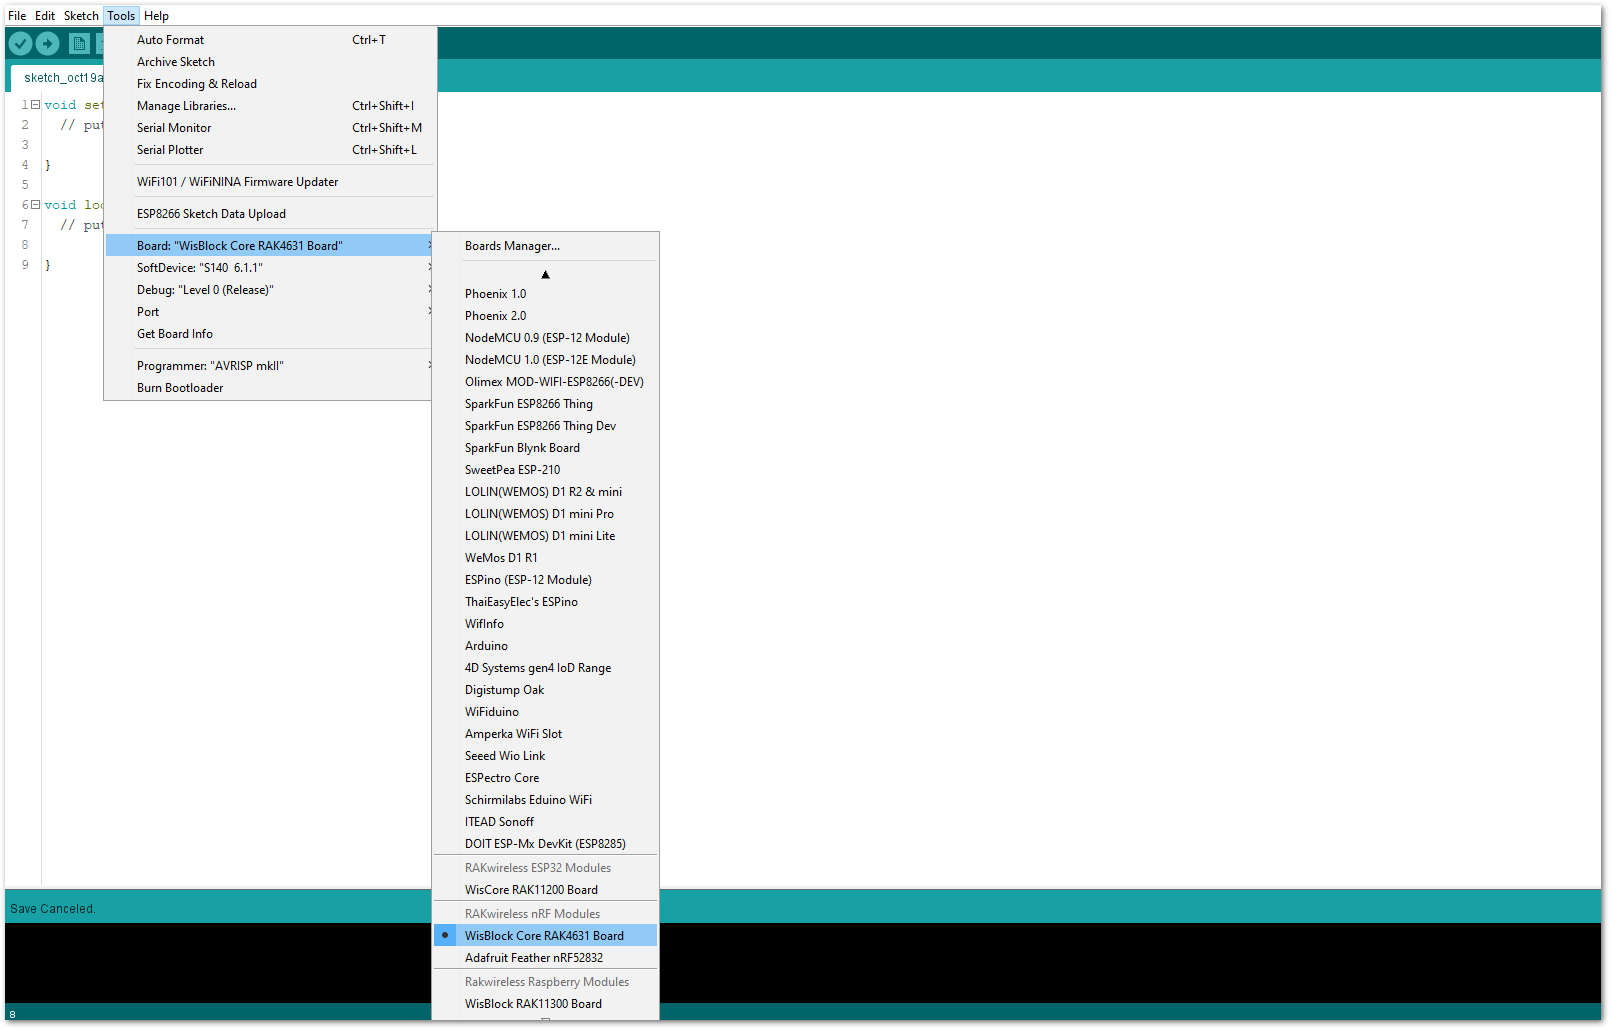 Figure 1: Selecting RAK4631 as WisBlock Core
- On the Arduino IDE, go to Sketch > Include Library > Manage Libraries. The Library Manager should open, then install the Adafruit SSD1306 and the Adafruit GFX libraries, as shown in Figure 5 and Figure 6.
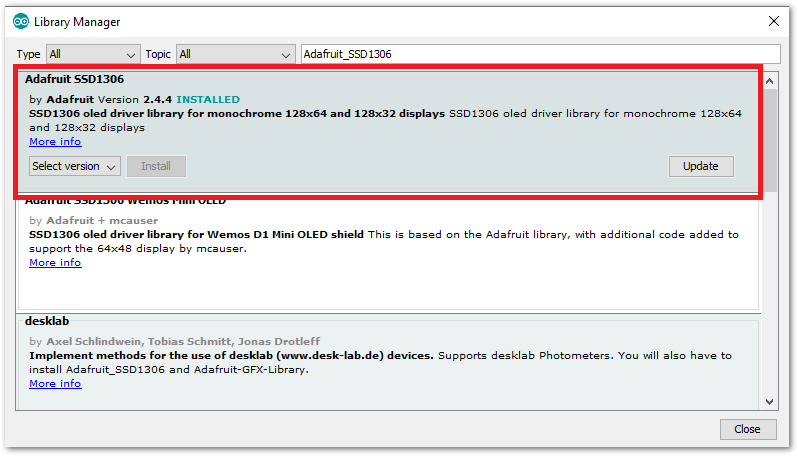 Figure 1: Installing the Adafruit SSD1306 library
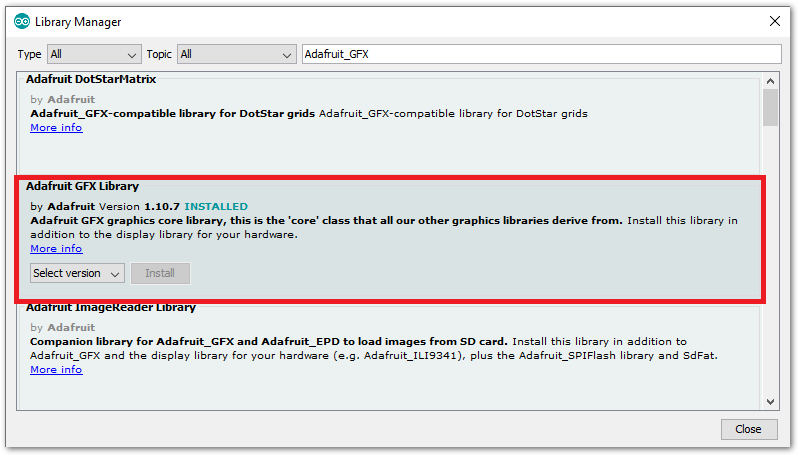 Figure 1: Installing the Adafruit GFX library
- After successful installation of the libraries, you can now copy the following sample code into your Arduino IDE:
/*********
 The following code will display the RAK logo into the OLED Display.
*********/

#include <Wire.h>
#include <Adafruit_GFX.h>
#include <Adafruit_SSD1306.h>

#define SCREEN_WIDTH 128
#define SCREEN_HEIGHT 64

Adafruit_SSD1306 display(SCREEN_WIDTH, SCREEN_HEIGHT, &Wire, -1);

static const unsigned char PROGMEM image_data_Saraarray[] = {
    0x00, 0x00, 0x00, 0x00, 0x00, 0x00, 0x00, 0x00, 0x00, 0x00, 0x00, 0x00, 0x00, 0x00, 0x00, 0x00,
    0x00, 0x00, 0x00, 0x00, 0x00, 0x00, 0x00, 0x00, 0x00, 0x00, 0x00, 0x00, 0x00, 0x00, 0x00, 0x00,
    0x00, 0x00, 0x00, 0x00, 0x00, 0x00, 0x00, 0x00, 0x00, 0x00, 0x00, 0x00, 0x00, 0x00, 0x00, 0x00,
    0x00, 0x00, 0x00, 0x00, 0x00, 0x00, 0x00, 0x00, 0x00, 0x00, 0x00, 0x00, 0x00, 0x00, 0x00, 0x00,
    0x00, 0x00, 0x00, 0x00, 0x00, 0x00, 0x00, 0x00, 0x00, 0x00, 0x00, 0x00, 0x00, 0x00, 0x00, 0x00,
    0x00, 0x00, 0x00, 0x00, 0x00, 0x00, 0x00, 0x00, 0x00, 0x00, 0x00, 0x00, 0x00, 0x00, 0x00, 0x00,
    0x00, 0x00, 0x00, 0x00, 0x00, 0x00, 0x00, 0x00, 0x00, 0x00, 0x00, 0x00, 0x00, 0x00, 0x00, 0x00,
    0x00, 0x00, 0x00, 0x00, 0x00, 0x00, 0x00, 0x00, 0x00, 0x00, 0x00, 0x00, 0x00, 0x00, 0x00, 0x00,
    0x00, 0x00, 0x00, 0x00, 0x00, 0x00, 0x00, 0x00, 0x00, 0x00, 0x00, 0x00, 0x00, 0x00, 0x00, 0x00,
    0x00, 0x00, 0x00, 0x00, 0x00, 0x00, 0x00, 0x03, 0xff, 0xe0, 0x00, 0x00, 0x00, 0x00, 0x00, 0x00,
    0x00, 0x00, 0x00, 0x00, 0x00, 0x00, 0x00, 0x7f, 0xff, 0xf0, 0x00, 0x00, 0x00, 0x00, 0x00, 0x00,
    0x00, 0x00, 0x00, 0x00, 0x00, 0x00, 0x03, 0xff, 0xff, 0xf0, 0x00, 0x00, 0x00, 0x00, 0x00, 0x00,
    0x00, 0x00, 0x00, 0x00, 0x00, 0x00, 0x0f, 0xff, 0xff, 0xf0, 0x00, 0x00, 0x00, 0x00, 0x00, 0x00,
    0x00, 0x00, 0x00, 0x00, 0x00, 0x00, 0x3f, 0xff, 0xc0, 0x00, 0x00, 0x00, 0x00, 0x00, 0x00, 0x00,
    0x00, 0x00, 0x00, 0x00, 0x00, 0x00, 0xff, 0xf8, 0xff, 0xf0, 0x00, 0x00, 0x00, 0x00, 0x00, 0x00,
    0x00, 0x00, 0x00, 0x00, 0x00, 0x01, 0xff, 0xcf, 0xff, 0xf8, 0x00, 0x00, 0x00, 0x00, 0x00, 0x00,
    0x00, 0x00, 0x00, 0x00, 0x00, 0x03, 0xfe, 0x7f, 0xff, 0xfb, 0xc0, 0x00, 0x00, 0x00, 0x00, 0x00,
    0x00, 0x00, 0x00, 0x00, 0x00, 0x07, 0xf9, 0xff, 0xff, 0xf3, 0xf8, 0x00, 0x00, 0x00, 0x00, 0x00,
    0x00, 0x00, 0x00, 0x00, 0x00, 0x1e, 0x67, 0x30, 0x3e, 0x07, 0xfe, 0x00, 0x00, 0x00, 0x00, 0x00,
    0x00, 0x00, 0x00, 0x00, 0xfe, 0x3f, 0x9f, 0xcf, 0xff, 0xf3, 0xff, 0x80, 0x00, 0x00, 0x00, 0x00,
    0x00, 0x00, 0x00, 0x00, 0xff, 0x7f, 0xbf, 0xef, 0xff, 0xf8, 0xff, 0xe0, 0x00, 0x00, 0x00, 0x00,
    0x00, 0x00, 0x00, 0x01, 0xff, 0x7f, 0xbf, 0xef, 0xff, 0xfb, 0x3f, 0xf0, 0x00, 0x00, 0x00, 0x00,
    0x00, 0x00, 0x00, 0x01, 0xff, 0x7f, 0xbf, 0xef, 0xff, 0xf7, 0xdf, 0xf8, 0x00, 0x00, 0x00, 0x00,
    0x00, 0x00, 0x00, 0x01, 0xff, 0x7f, 0xbf, 0xe0, 0x00, 0x27, 0xe7, 0xfc, 0x00, 0x00, 0x00, 0x00,
    0x00, 0x00, 0x00, 0x00, 0xff, 0x3f, 0xbf, 0xe0, 0x0f, 0xf7, 0xf3, 0xfe, 0x00, 0x00, 0x00, 0x00,
    0x00, 0x00, 0x00, 0x00, 0xff, 0xbf, 0x9f, 0xe0, 0x0f, 0xf3, 0xfb, 0xfe, 0x00, 0x00, 0x00, 0x00,
    0x00, 0x00, 0x00, 0x00, 0x7f, 0xdf, 0xdf, 0xe0, 0x0f, 0xfb, 0xf9, 0xff, 0x00, 0x00, 0x00, 0x00,
    0x00, 0x00, 0x00, 0x00, 0x7f, 0xe7, 0xc7, 0xff, 0xef, 0xfb, 0xfd, 0xff, 0x00, 0x00, 0x00, 0x00,
    0x00, 0x00, 0x00, 0x00, 0x3f, 0xf3, 0x9f, 0xff, 0xef, 0xfb, 0xfd, 0xff, 0x00, 0x00, 0x00, 0x00,
    0x00, 0x00, 0x00, 0x00, 0x0f, 0xfc, 0x3f, 0xff, 0xef, 0xfb, 0xfd, 0xff, 0x00, 0x00, 0x00, 0x00,
    0x00, 0x00, 0x00, 0x00, 0x07, 0xff, 0x3f, 0xff, 0xef, 0xf3, 0xfd, 0xfe, 0x00, 0x00, 0x00, 0x00,
    0x00, 0x00, 0x00, 0x00, 0x01, 0xff, 0xcf, 0xff, 0xc3, 0xe1, 0xf8, 0x7c, 0x00, 0x00, 0x00, 0x00,
    0x00, 0x00, 0x00, 0x00, 0x00, 0x7f, 0xde, 0x03, 0xfe, 0x1e, 0x00, 0x00, 0x00, 0x00, 0x00, 0x00,
    0x00, 0x00, 0x00, 0x00, 0x00, 0x0f, 0xbf, 0xff, 0xfe, 0x7f, 0xc0, 0x00, 0x00, 0x00, 0x00, 0x00,
    0x00, 0x00, 0x00, 0x00, 0x00, 0x01, 0x3f, 0xff, 0xf9, 0xff, 0x80, 0x00, 0x00, 0x00, 0x00, 0x00,
    0x00, 0x00, 0x00, 0x00, 0x00, 0x00, 0x3f, 0xff, 0x8f, 0xfe, 0x00, 0x00, 0x00, 0x00, 0x00, 0x00,
    0x00, 0x00, 0x00, 0x00, 0x00, 0x00, 0x00, 0x80, 0xff, 0xfc, 0x00, 0x00, 0x00, 0x00, 0x00, 0x00,
    0x00, 0x00, 0x00, 0x00, 0x00, 0x00, 0x0f, 0xff, 0xff, 0xf0, 0x00, 0x00, 0x00, 0x00, 0x00, 0x00,
    0x00, 0x00, 0x00, 0x00, 0x00, 0x00, 0x1f, 0xff, 0xff, 0xc0, 0x00, 0x00, 0x00, 0x00, 0x00, 0x00,
    0x00, 0x00, 0x00, 0x00, 0x00, 0x00, 0x1f, 0xff, 0xfe, 0x00, 0x00, 0x00, 0x00, 0x00, 0x00, 0x00,
    0x00, 0x00, 0x00, 0x00, 0x00, 0x00, 0x1f, 0xff, 0xf0, 0x00, 0x00, 0x00, 0x00, 0x00, 0x00, 0x00,
    0x00, 0x00, 0x00, 0x00, 0x00, 0x00, 0x00, 0x00, 0x00, 0x00, 0x00, 0x00, 0x00, 0x00, 0x00, 0x00,
    0x00, 0x00, 0x00, 0x00, 0x00, 0x00, 0x00, 0x00, 0x00, 0x00, 0x00, 0x00, 0x00, 0x00, 0x00, 0x00,
    0x00, 0x00, 0x00, 0x00, 0x00, 0x00, 0x00, 0x00, 0x00, 0x00, 0x00, 0x00, 0x00, 0x00, 0x00, 0x00,
    0x00, 0x00, 0x00, 0x00, 0x1f, 0xff, 0xe0, 0x0f, 0xc0, 0x7c, 0x1f, 0xc0, 0x00, 0x00, 0x00, 0x00,
    0x00, 0x00, 0x00, 0x00, 0x1f, 0xff, 0xf0, 0x1f, 0xc0, 0x7c, 0x3f, 0x00, 0x00, 0x00, 0x00, 0x00,
    0x00, 0x00, 0x00, 0x00, 0x1f, 0x01, 0xf0, 0x3f, 0xe0, 0x7c, 0xfc, 0x00, 0x00, 0x00, 0x00, 0x00,
    0x00, 0x00, 0x00, 0x00, 0x1f, 0x01, 0xf0, 0x7d, 0xf0, 0x7f, 0xf0, 0x00, 0x00, 0x00, 0x00, 0x00,
    0x00, 0x00, 0x00, 0x00, 0x1f, 0xff, 0xe0, 0x78, 0xf8, 0x7f, 0xf0, 0x00, 0x00, 0x00, 0x00, 0x00,
    0x00, 0x00, 0x00, 0x00, 0x1f, 0xff, 0xe0, 0xf8, 0x78, 0x7f, 0xfc, 0x00, 0x00, 0x00, 0x00, 0x00,
    0x00, 0x00, 0x00, 0x00, 0x1f, 0x01, 0xf1, 0xff, 0xfc, 0x7c, 0x7e, 0x00, 0x00, 0x00, 0x00, 0x00,
    0x00, 0x00, 0x00, 0x00, 0x1f, 0x01, 0xf3, 0xff, 0xfe, 0x7c, 0x1f, 0x80, 0x00, 0x00, 0x00, 0x00,
    0x00, 0x00, 0x00, 0x00, 0x1f, 0x00, 0xf3, 0xc0, 0x1f, 0x7c, 0x0f, 0xc0, 0x00, 0x00, 0x00, 0x00,
    0x00, 0x00, 0x00, 0x00, 0x1f, 0x00, 0xf7, 0xc0, 0x1f, 0x7c, 0x07, 0xe0, 0x00, 0x00, 0x00, 0x00,
    0x00, 0x00, 0x00, 0x00, 0x00, 0x00, 0x00, 0x00, 0x00, 0x00, 0x00, 0x00, 0x00, 0x00, 0x00, 0x00,
    0x00, 0x00, 0x00, 0x00, 0x00, 0x00, 0x00, 0x00, 0x00, 0x00, 0x00, 0x00, 0x00, 0x00, 0x00, 0x00,
    0x00, 0x00, 0x00, 0x00, 0x00, 0x00, 0x00, 0x00, 0x00, 0x00, 0x00, 0x00, 0x00, 0x00, 0x00, 0x00,
    0x00, 0x00, 0x00, 0x00, 0x00, 0x00, 0x00, 0x00, 0x00, 0x00, 0x00, 0x00, 0x00, 0x00, 0x00, 0x00,
    0x00, 0x00, 0x00, 0x00, 0x00, 0x00, 0x00, 0x00, 0x00, 0x00, 0x00, 0x00, 0x00, 0x00, 0x00, 0x00,
    0x00, 0x00, 0x00, 0x00, 0x00, 0x00, 0x00, 0x00, 0x00, 0x00, 0x00, 0x00, 0x00, 0x00, 0x00, 0x00,
    0x00, 0x00, 0x00, 0x00, 0x00, 0x00, 0x00, 0x00, 0x00, 0x00, 0x00, 0x00, 0x00, 0x00, 0x00, 0x00,
    0x00, 0x00, 0x00, 0x00, 0x00, 0x00, 0x00, 0x00, 0x00, 0x00, 0x00, 0x00, 0x00, 0x00, 0x00, 0x00,
    0x00, 0x00, 0x00, 0x00, 0x00, 0x00, 0x00, 0x00, 0x00, 0x00, 0x00, 0x00, 0x00, 0x00, 0x00, 0x00,
    0x00, 0x00, 0x00, 0x00, 0x00, 0x00, 0x00, 0x00, 0x00, 0x00, 0x00, 0x00, 0x00, 0x00, 0x00, 0x00
};

void setup() {
    // put your setup code here, to run once:
  Serial.begin(115200);

  if(!display.begin(SSD1306_SWITCHCAPVCC, 0x3C)) {
    Serial.println(F("SSD1306 allocation failed"));
    for(;;);
  }
  delay(2000); // Pause for 2 seconds

  // Clear the buffer.
  display.clearDisplay();

  // Draw bitmap on the screen
  display.drawBitmap(0, 0, image_data_Saraarray, 128, 64, 1);
  display.display();
}

void loop() {
    // put your main code here, to run repeatedly:

}
- Select the right Serial Port and upload the code.
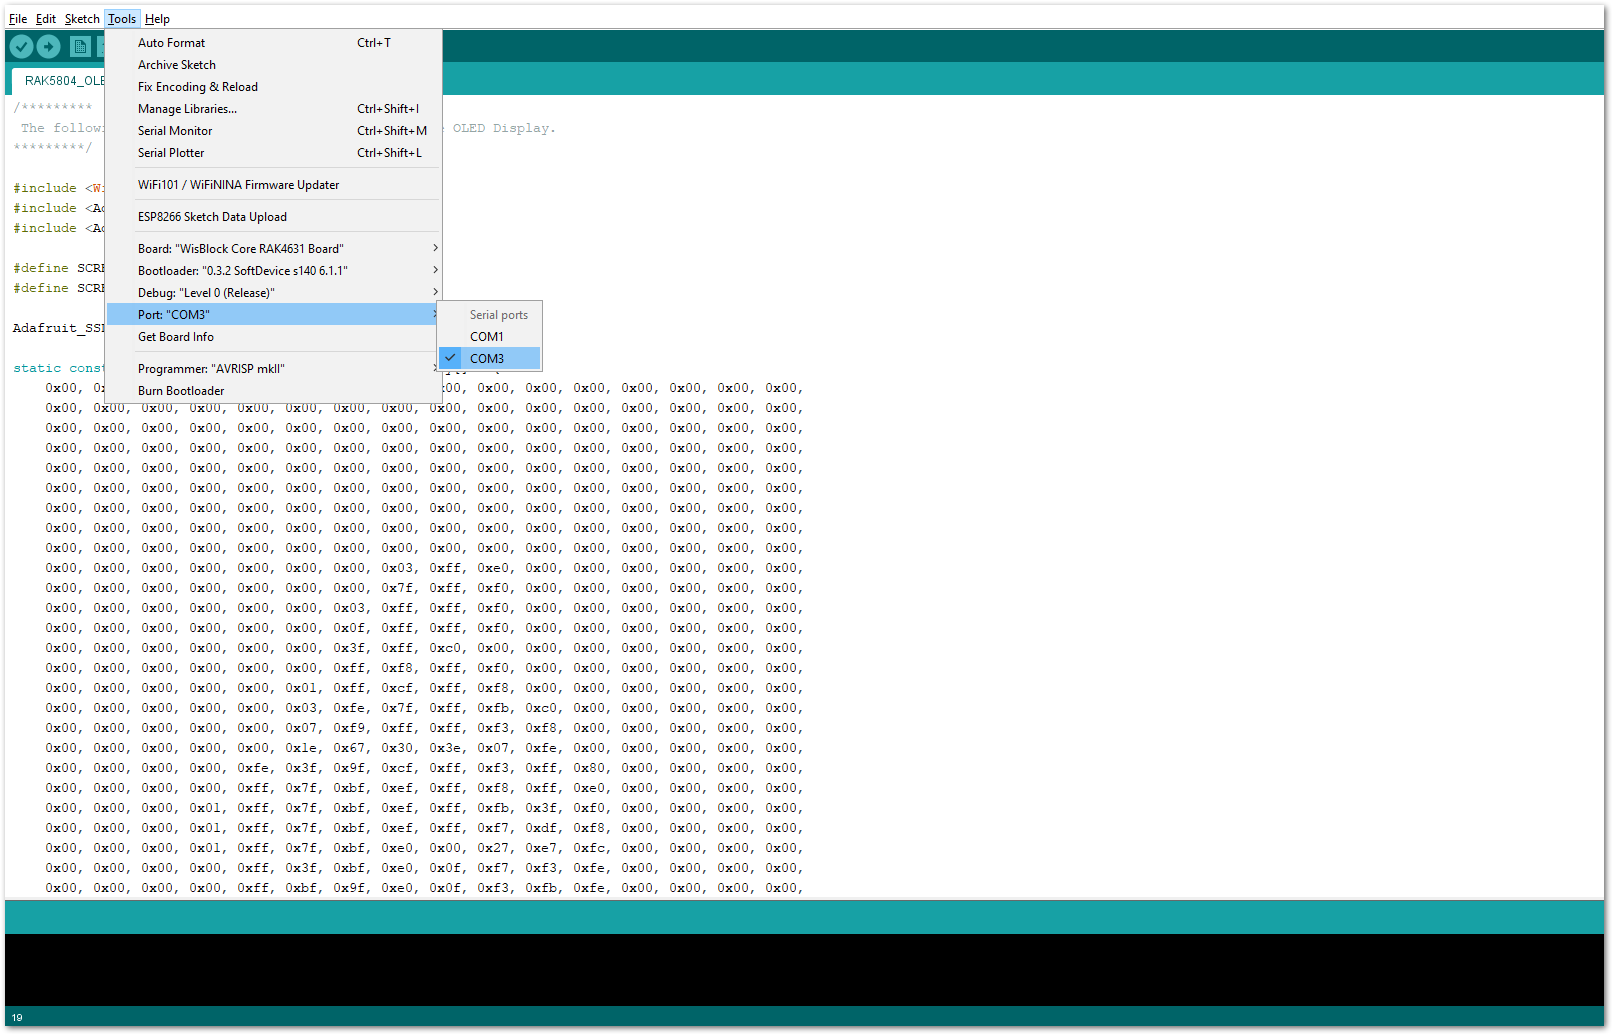 Figure 1: Selecting the correct Serial Port
- When you successfully uploaded the sample code, you will now be able to see the RAK logo displayed on your OLED screen, as shown in Figure 8, which means that the module is properly communicating with the WisBlock core using the I2C protocol.
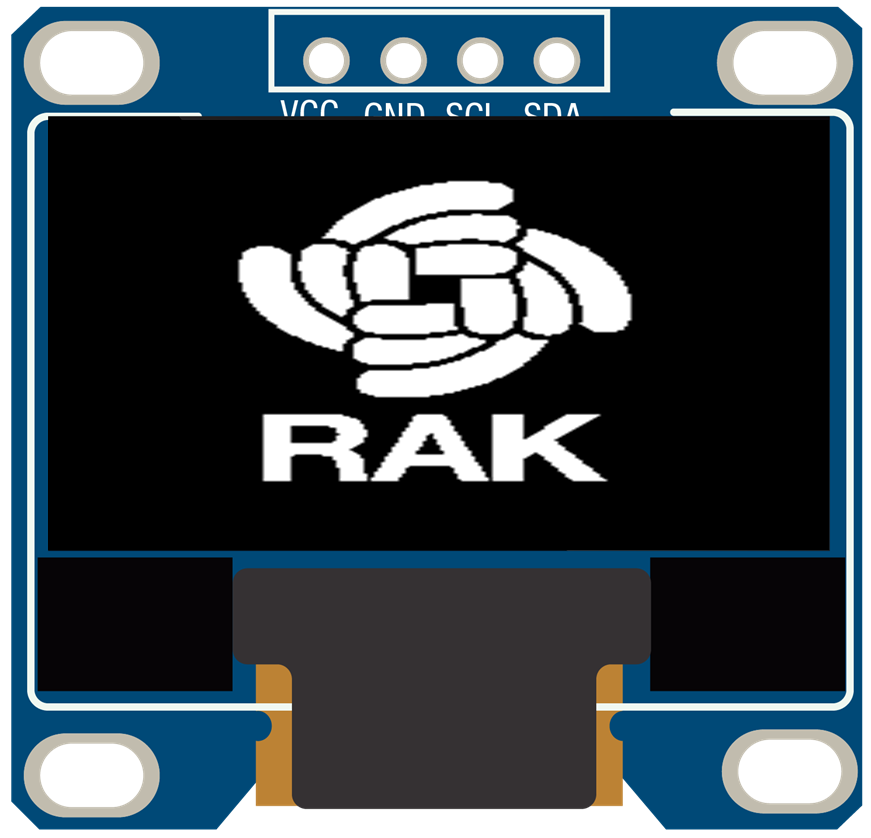 Figure 1: RAK logo displayed on OLED screen
GPIO Connection on RAK5804
This is just an example and illustration on how to use the GPIO pins of RAK5804 for external sensors, modules, or devices. There are four (4) GPIO pins available on the RAK5804. You can use any of the GPIO pins as long as your modules, sensors, or devices operate at 3.3 V.
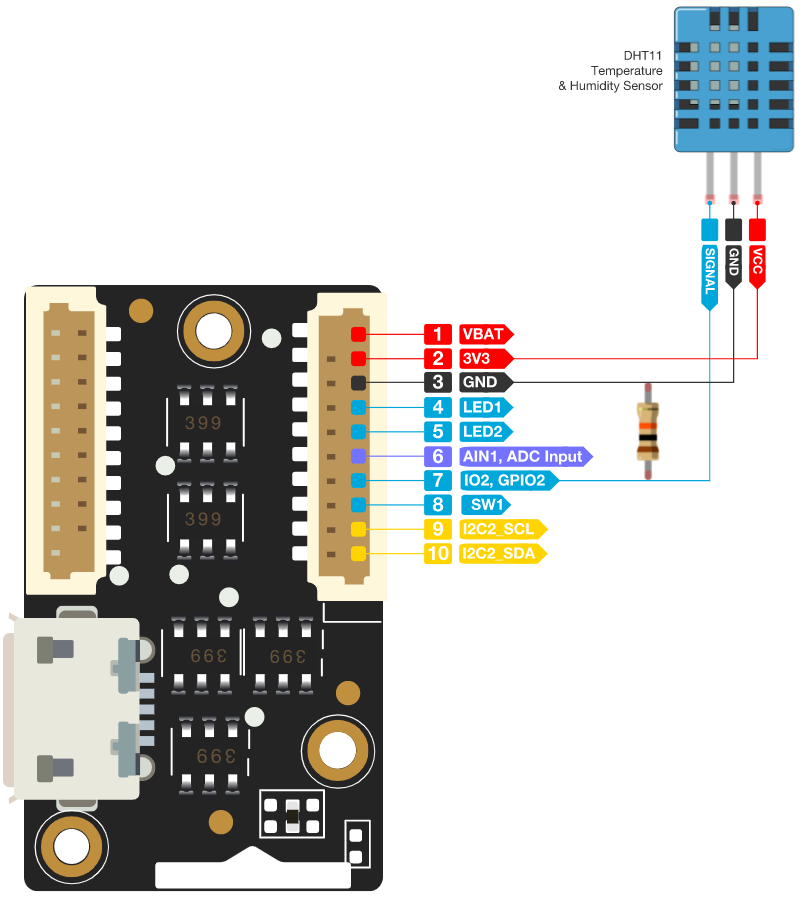 Figure 1: Connecting the RAK5804 to the GPIO pin of the sensor module
- Select the RAK4631 WisBlock Core.
 Figure 1: Selecting RAK4631 as WisBlock Core
- On the Arduino IDE, go to Sketch > Include Library > Manage Libraries. The Library Manager should open, then install the Adafruit DHT Sensor library, as shown in Figure 11.
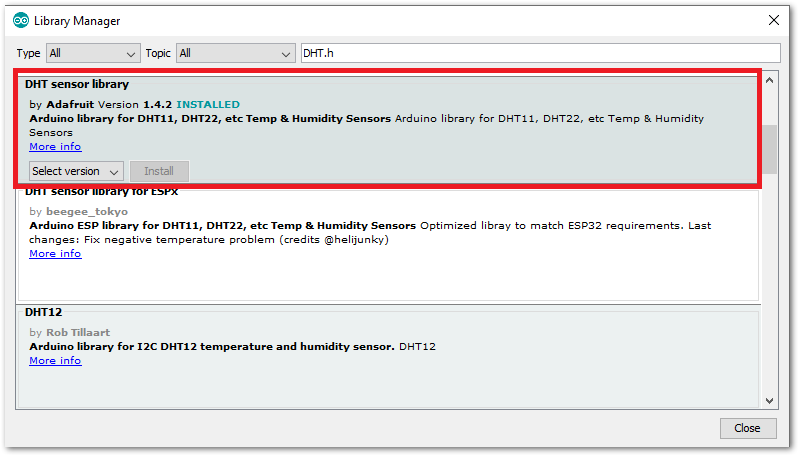 Figure 1: Installing the Adafruit DHT library
- After successful installation of the library, you can now copy the following sample code into your Arduino IDE:
/*********
 The following code will display the temperature & humidity
 using the DHT11 sensor in the Serial Monitor.
*********/

#include "DHT.h"

#define DHTPIN WB_IO2
#define DHTTYPE DHT11

DHT dht(DHTPIN, DHTTYPE);

void setup() {
  Serial.begin(9600);
  Serial.println(F("DHTxx test!"));
  dht.begin();
}

void loop() {
  delay(2000);
  float h = dht.readHumidity();
  float t = dht.readTemperature();
  float f = dht.readTemperature(true);

  if (isnan(h) || isnan(t) || isnan(f)) {
    Serial.println(F("Failed to read from DHT sensor!"));
    return;
  }

  float hif = dht.computeHeatIndex(f, h);
  float hic = dht.computeHeatIndex(t, h, false);

  Serial.print(F("Humidity: "));
  Serial.print(h);
  Serial.print(F("%  Temperature: "));
  Serial.print(t);
  Serial.print(F("°C "));
  Serial.print(f);
  Serial.print(F("°F  Heat index: "));
  Serial.print(hic);
  Serial.print(F("°C "));
  Serial.print(hif);
  Serial.println(F("°F"));
}
- Select the right Serial Port and upload the code.
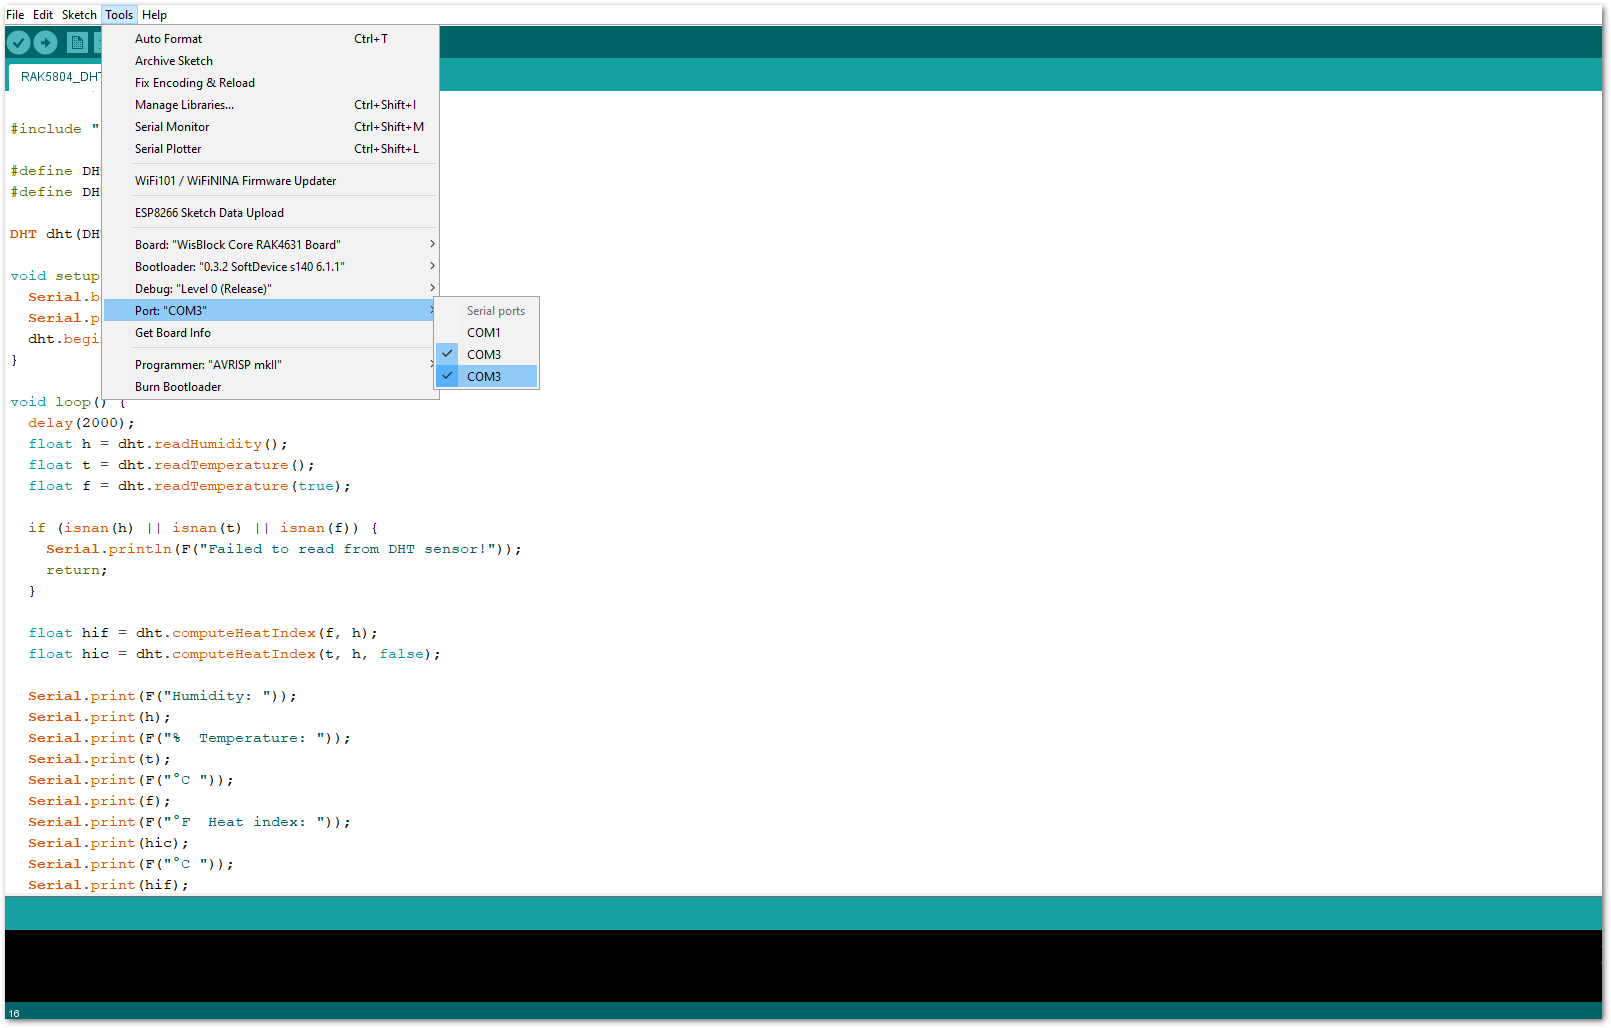 Figure 1: Selecting the correct Serial Port
- When you successfully uploaded the sample code, open the Serial Monitor of the Arduino IDE to see the module's reading logs. If you see the logs, as shown in Figure 13, then your module or sensor is properly communicating to the WisBlock core using the Digital Interface.
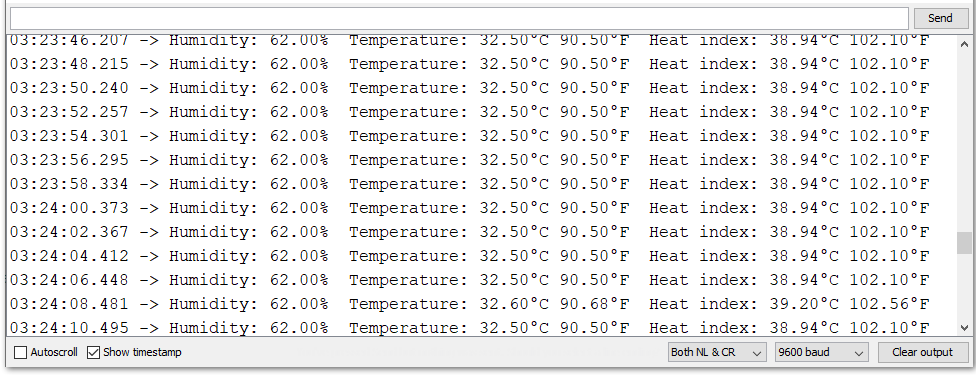 Figure 1: DHT11 Temp & Humidity data logs
Analog Input (ADC) Connection on RAK5804
This is just an example and illustration on how to use the ADC pin of RAK5804 for external sensors, modules, or devices. There is only one (1) ADC pin available on the RAK5804 that you can use as long as your modules, sensors, or devices operate at 3.3 V.
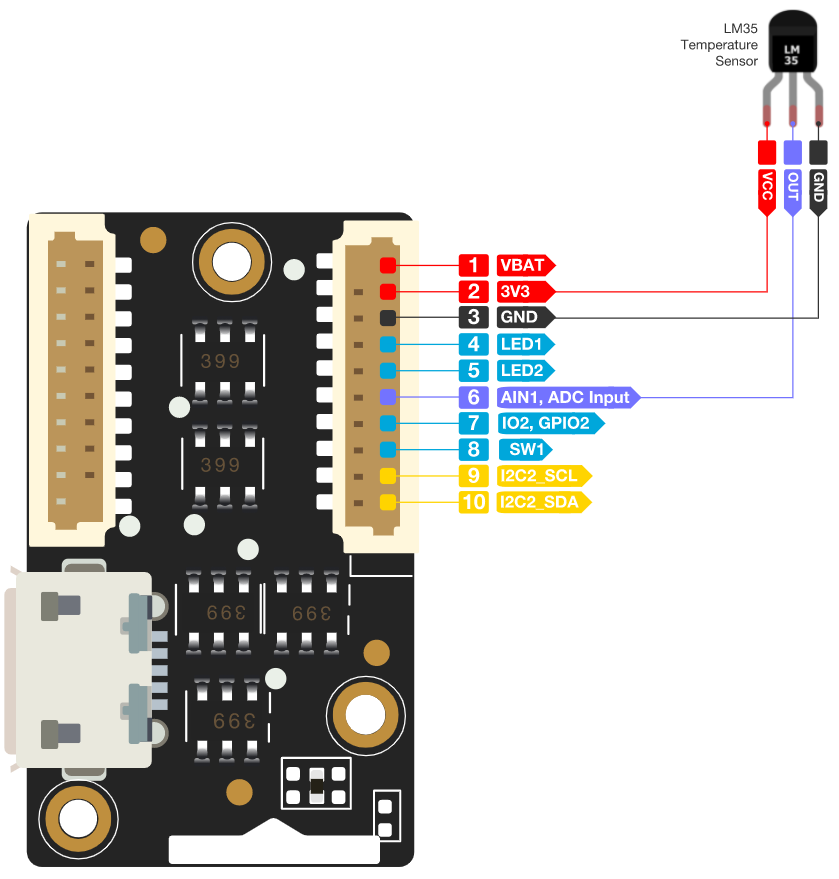 Figure 1: Connecting the RAK5804 to the ADC pin of the sensor module
- Select the RAK4631 WisBlock Core.
 Figure 1: Selecting RAK4631 as WisBlock Core
- Copy the following sample code into your Arduino IDE:
/*********
 The following code will display the ambient temperature using the LM35 sensor
 in the Serial Monitor.
*********/

#define lm35 WB_A1

int lmVal = 0;
int tem = 0;

void setup() {
  // put your setup code here, to run once:
  Serial.begin(9600);
}
void loop() {
  // put your main code here, to run repeatedly:
  lmVal = analogRead(lm35);
  tem = (lmVal*330)/1024;

  Serial.print(tem);
  Serial.print(" Celsius");
  Serial.println();
  delay(1000);
}
- Select the right Serial Port and upload the code.
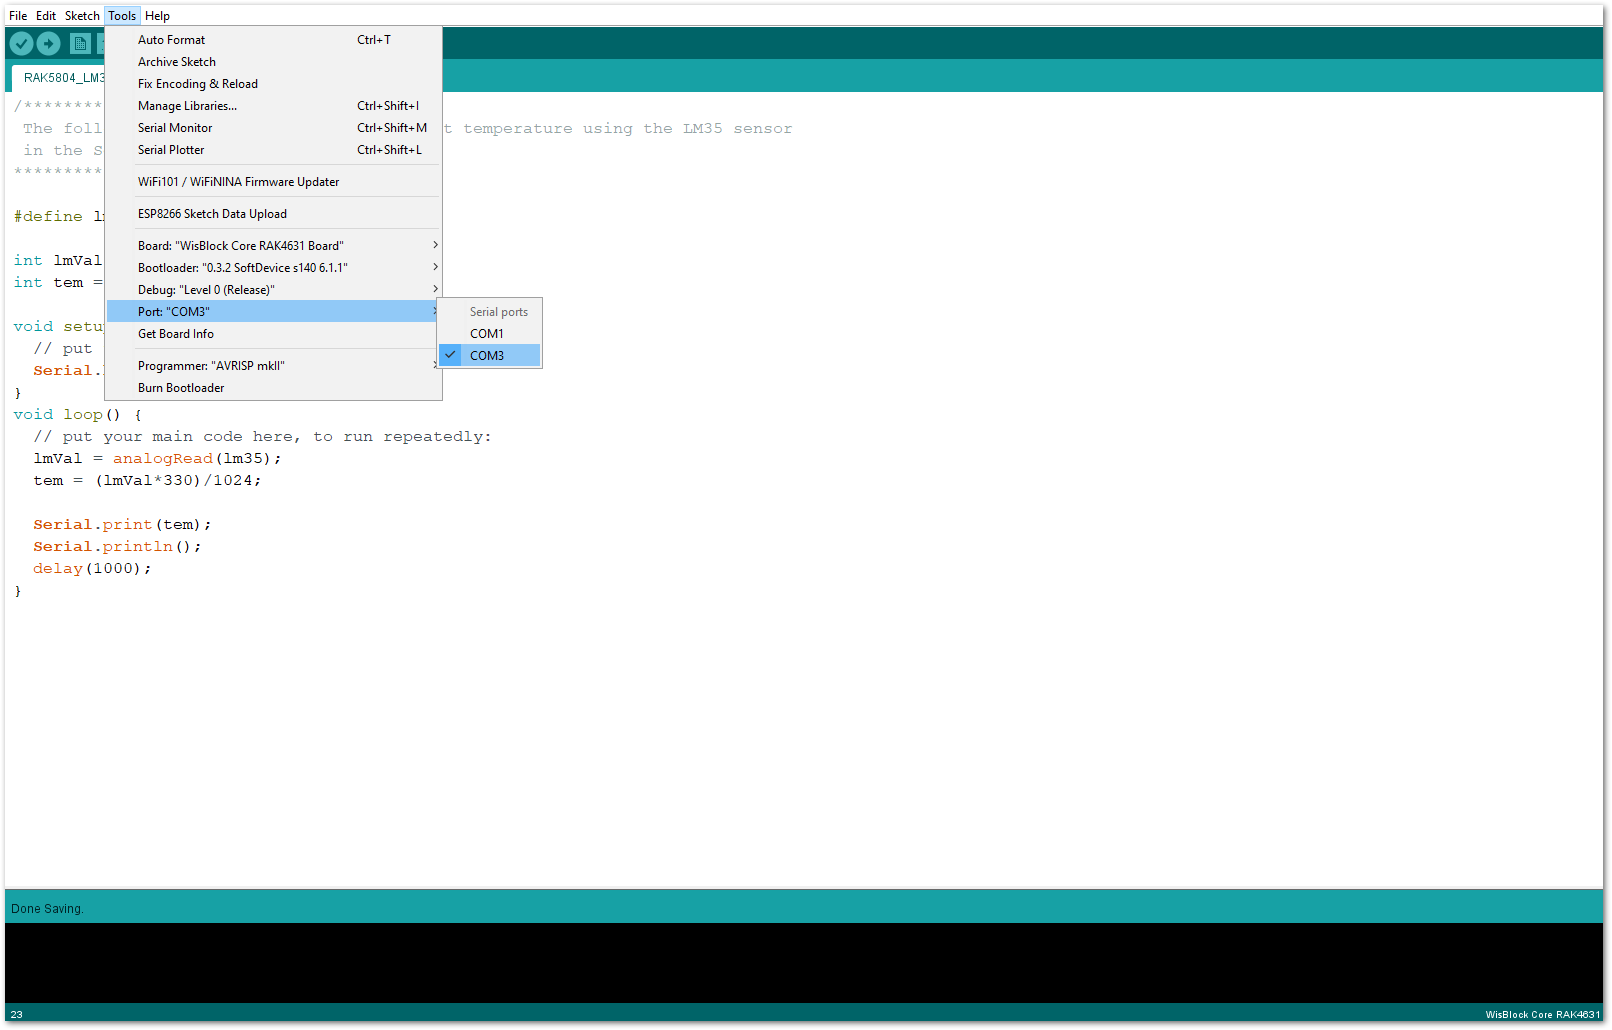 Figure 1: Selecting the correct Serial Port
- When you successfully uploaded the sample code, open the Serial Monitor of the Arduino IDE to see the module's reading logs. If you see the logs, as shown in Figure 17, then your module or sensor is properly communicating to the WisBlock core using the Analog Interface.
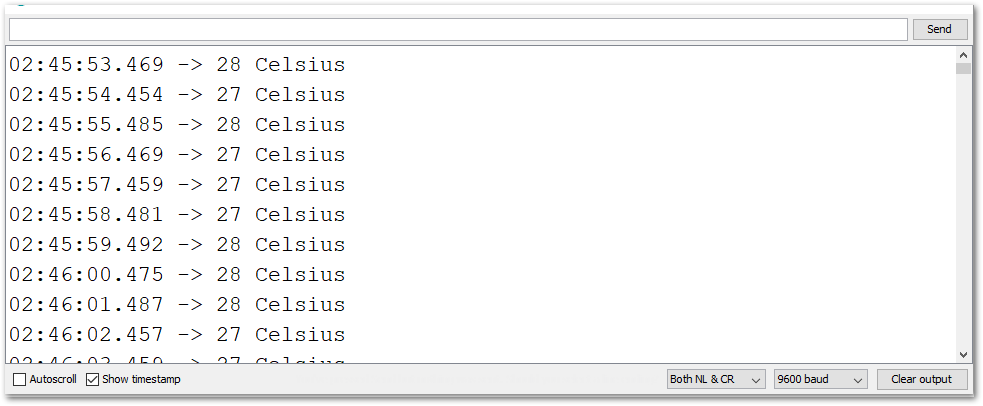 Figure 1: LM35 Temperature data logs
RAK5804 in RAK11200 WisBlock Core Guide
I2C Connection on RAK5804
This is just an example and illustration on how to use the RAK5804 for external I2C sensors, modules, or devices. You can use any I2C device as long as it operates at 3.3 V.
 Figure 1: Connecting the RAK5804 to the I2C pin of the module
- Select the RAK11200 WisBlock Core.
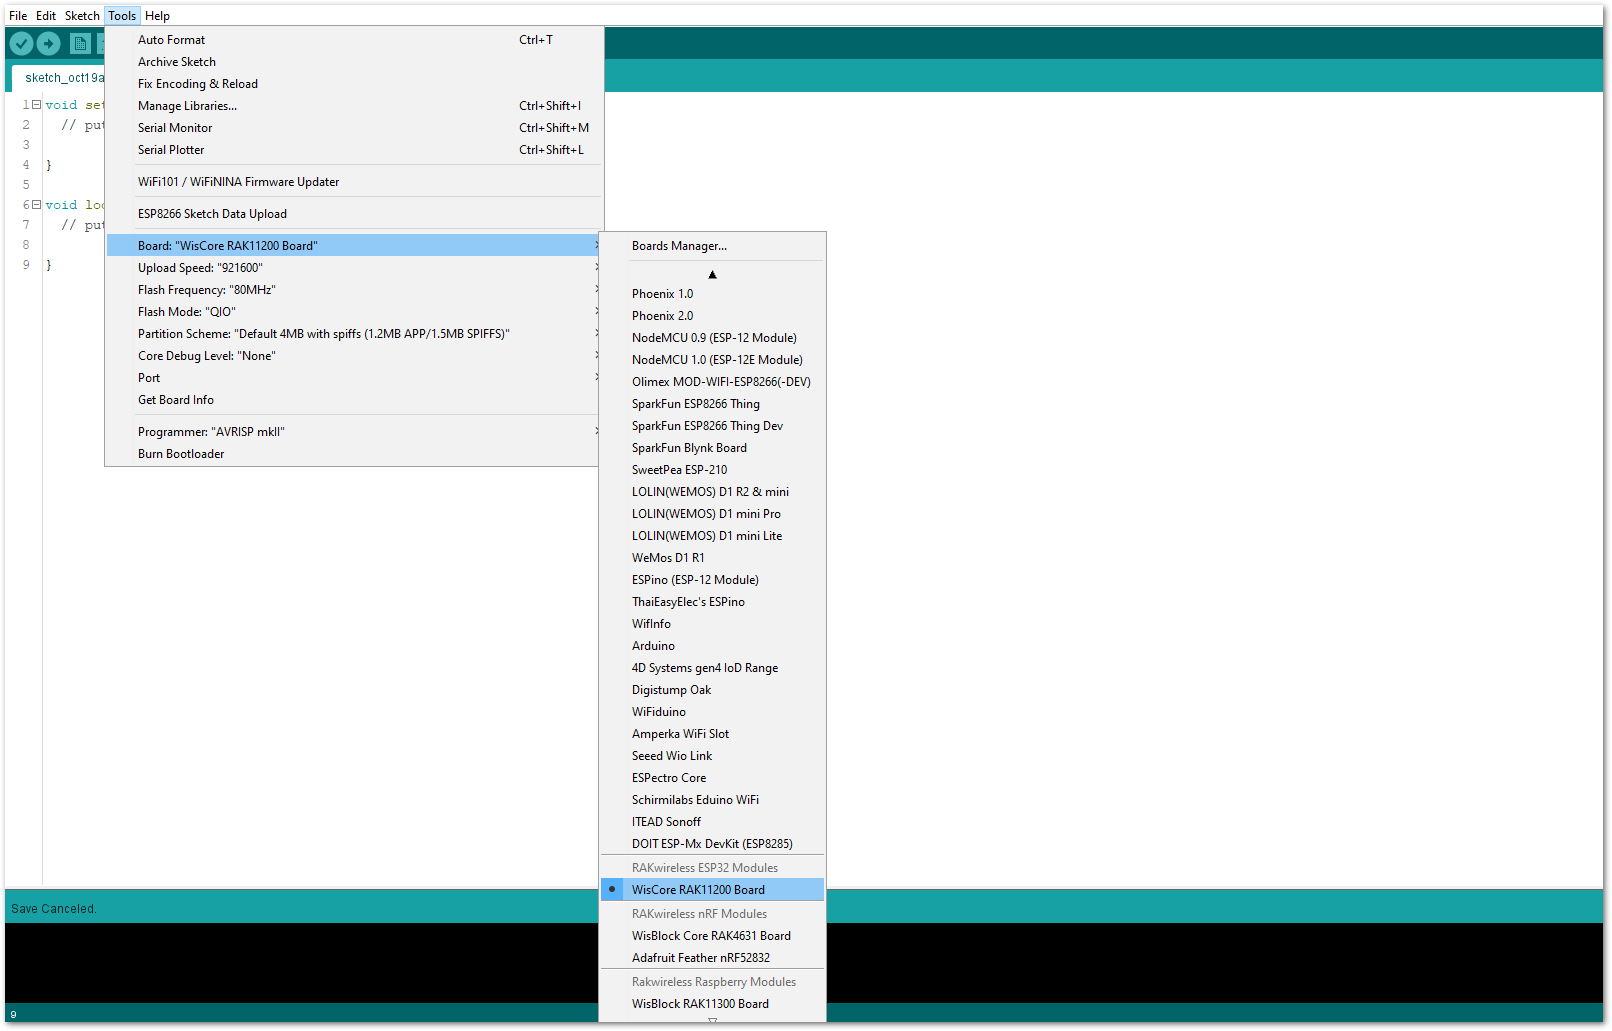 Figure 1: Selecting RAK11200 as WisBlock Core
- On the Arduino IDE, go to Sketch > Include Library > Manage Libraries. The Library Manager should open, then install the Adafruit SSD1306 and the Adafruit GFX libraries, as shown in Figure 20 and Figure 21.
 Figure 1: Installing the Adafruit SSD1306 library
 Figure 1: Installing the Adafruit GFX library
- After successful installation of the libraries, you can now copy the following sample code into your Arduino IDE:
/*********
 The following code will display the RAK logo into the OLED Display.
*********/

#include <Wire.h>
#include <Adafruit_GFX.h>
#include <Adafruit_SSD1306.h>

#define SCREEN_WIDTH 128
#define SCREEN_HEIGHT 64

Adafruit_SSD1306 display(SCREEN_WIDTH, SCREEN_HEIGHT, &Wire, -1);

static const unsigned char PROGMEM image_data_Saraarray[] = {
    0x00, 0x00, 0x00, 0x00, 0x00, 0x00, 0x00, 0x00, 0x00, 0x00, 0x00, 0x00, 0x00, 0x00, 0x00, 0x00,
    0x00, 0x00, 0x00, 0x00, 0x00, 0x00, 0x00, 0x00, 0x00, 0x00, 0x00, 0x00, 0x00, 0x00, 0x00, 0x00,
    0x00, 0x00, 0x00, 0x00, 0x00, 0x00, 0x00, 0x00, 0x00, 0x00, 0x00, 0x00, 0x00, 0x00, 0x00, 0x00,
    0x00, 0x00, 0x00, 0x00, 0x00, 0x00, 0x00, 0x00, 0x00, 0x00, 0x00, 0x00, 0x00, 0x00, 0x00, 0x00,
    0x00, 0x00, 0x00, 0x00, 0x00, 0x00, 0x00, 0x00, 0x00, 0x00, 0x00, 0x00, 0x00, 0x00, 0x00, 0x00,
    0x00, 0x00, 0x00, 0x00, 0x00, 0x00, 0x00, 0x00, 0x00, 0x00, 0x00, 0x00, 0x00, 0x00, 0x00, 0x00,
    0x00, 0x00, 0x00, 0x00, 0x00, 0x00, 0x00, 0x00, 0x00, 0x00, 0x00, 0x00, 0x00, 0x00, 0x00, 0x00,
    0x00, 0x00, 0x00, 0x00, 0x00, 0x00, 0x00, 0x00, 0x00, 0x00, 0x00, 0x00, 0x00, 0x00, 0x00, 0x00,
    0x00, 0x00, 0x00, 0x00, 0x00, 0x00, 0x00, 0x00, 0x00, 0x00, 0x00, 0x00, 0x00, 0x00, 0x00, 0x00,
    0x00, 0x00, 0x00, 0x00, 0x00, 0x00, 0x00, 0x03, 0xff, 0xe0, 0x00, 0x00, 0x00, 0x00, 0x00, 0x00,
    0x00, 0x00, 0x00, 0x00, 0x00, 0x00, 0x00, 0x7f, 0xff, 0xf0, 0x00, 0x00, 0x00, 0x00, 0x00, 0x00,
    0x00, 0x00, 0x00, 0x00, 0x00, 0x00, 0x03, 0xff, 0xff, 0xf0, 0x00, 0x00, 0x00, 0x00, 0x00, 0x00,
    0x00, 0x00, 0x00, 0x00, 0x00, 0x00, 0x0f, 0xff, 0xff, 0xf0, 0x00, 0x00, 0x00, 0x00, 0x00, 0x00,
    0x00, 0x00, 0x00, 0x00, 0x00, 0x00, 0x3f, 0xff, 0xc0, 0x00, 0x00, 0x00, 0x00, 0x00, 0x00, 0x00,
    0x00, 0x00, 0x00, 0x00, 0x00, 0x00, 0xff, 0xf8, 0xff, 0xf0, 0x00, 0x00, 0x00, 0x00, 0x00, 0x00,
    0x00, 0x00, 0x00, 0x00, 0x00, 0x01, 0xff, 0xcf, 0xff, 0xf8, 0x00, 0x00, 0x00, 0x00, 0x00, 0x00,
    0x00, 0x00, 0x00, 0x00, 0x00, 0x03, 0xfe, 0x7f, 0xff, 0xfb, 0xc0, 0x00, 0x00, 0x00, 0x00, 0x00,
    0x00, 0x00, 0x00, 0x00, 0x00, 0x07, 0xf9, 0xff, 0xff, 0xf3, 0xf8, 0x00, 0x00, 0x00, 0x00, 0x00,
    0x00, 0x00, 0x00, 0x00, 0x00, 0x1e, 0x67, 0x30, 0x3e, 0x07, 0xfe, 0x00, 0x00, 0x00, 0x00, 0x00,
    0x00, 0x00, 0x00, 0x00, 0xfe, 0x3f, 0x9f, 0xcf, 0xff, 0xf3, 0xff, 0x80, 0x00, 0x00, 0x00, 0x00,
    0x00, 0x00, 0x00, 0x00, 0xff, 0x7f, 0xbf, 0xef, 0xff, 0xf8, 0xff, 0xe0, 0x00, 0x00, 0x00, 0x00,
    0x00, 0x00, 0x00, 0x01, 0xff, 0x7f, 0xbf, 0xef, 0xff, 0xfb, 0x3f, 0xf0, 0x00, 0x00, 0x00, 0x00,
    0x00, 0x00, 0x00, 0x01, 0xff, 0x7f, 0xbf, 0xef, 0xff, 0xf7, 0xdf, 0xf8, 0x00, 0x00, 0x00, 0x00,
    0x00, 0x00, 0x00, 0x01, 0xff, 0x7f, 0xbf, 0xe0, 0x00, 0x27, 0xe7, 0xfc, 0x00, 0x00, 0x00, 0x00,
    0x00, 0x00, 0x00, 0x00, 0xff, 0x3f, 0xbf, 0xe0, 0x0f, 0xf7, 0xf3, 0xfe, 0x00, 0x00, 0x00, 0x00,
    0x00, 0x00, 0x00, 0x00, 0xff, 0xbf, 0x9f, 0xe0, 0x0f, 0xf3, 0xfb, 0xfe, 0x00, 0x00, 0x00, 0x00,
    0x00, 0x00, 0x00, 0x00, 0x7f, 0xdf, 0xdf, 0xe0, 0x0f, 0xfb, 0xf9, 0xff, 0x00, 0x00, 0x00, 0x00,
    0x00, 0x00, 0x00, 0x00, 0x7f, 0xe7, 0xc7, 0xff, 0xef, 0xfb, 0xfd, 0xff, 0x00, 0x00, 0x00, 0x00,
    0x00, 0x00, 0x00, 0x00, 0x3f, 0xf3, 0x9f, 0xff, 0xef, 0xfb, 0xfd, 0xff, 0x00, 0x00, 0x00, 0x00,
    0x00, 0x00, 0x00, 0x00, 0x0f, 0xfc, 0x3f, 0xff, 0xef, 0xfb, 0xfd, 0xff, 0x00, 0x00, 0x00, 0x00,
    0x00, 0x00, 0x00, 0x00, 0x07, 0xff, 0x3f, 0xff, 0xef, 0xf3, 0xfd, 0xfe, 0x00, 0x00, 0x00, 0x00,
    0x00, 0x00, 0x00, 0x00, 0x01, 0xff, 0xcf, 0xff, 0xc3, 0xe1, 0xf8, 0x7c, 0x00, 0x00, 0x00, 0x00,
    0x00, 0x00, 0x00, 0x00, 0x00, 0x7f, 0xde, 0x03, 0xfe, 0x1e, 0x00, 0x00, 0x00, 0x00, 0x00, 0x00,
    0x00, 0x00, 0x00, 0x00, 0x00, 0x0f, 0xbf, 0xff, 0xfe, 0x7f, 0xc0, 0x00, 0x00, 0x00, 0x00, 0x00,
    0x00, 0x00, 0x00, 0x00, 0x00, 0x01, 0x3f, 0xff, 0xf9, 0xff, 0x80, 0x00, 0x00, 0x00, 0x00, 0x00,
    0x00, 0x00, 0x00, 0x00, 0x00, 0x00, 0x3f, 0xff, 0x8f, 0xfe, 0x00, 0x00, 0x00, 0x00, 0x00, 0x00,
    0x00, 0x00, 0x00, 0x00, 0x00, 0x00, 0x00, 0x80, 0xff, 0xfc, 0x00, 0x00, 0x00, 0x00, 0x00, 0x00,
    0x00, 0x00, 0x00, 0x00, 0x00, 0x00, 0x0f, 0xff, 0xff, 0xf0, 0x00, 0x00, 0x00, 0x00, 0x00, 0x00,
    0x00, 0x00, 0x00, 0x00, 0x00, 0x00, 0x1f, 0xff, 0xff, 0xc0, 0x00, 0x00, 0x00, 0x00, 0x00, 0x00,
    0x00, 0x00, 0x00, 0x00, 0x00, 0x00, 0x1f, 0xff, 0xfe, 0x00, 0x00, 0x00, 0x00, 0x00, 0x00, 0x00,
    0x00, 0x00, 0x00, 0x00, 0x00, 0x00, 0x1f, 0xff, 0xf0, 0x00, 0x00, 0x00, 0x00, 0x00, 0x00, 0x00,
    0x00, 0x00, 0x00, 0x00, 0x00, 0x00, 0x00, 0x00, 0x00, 0x00, 0x00, 0x00, 0x00, 0x00, 0x00, 0x00,
    0x00, 0x00, 0x00, 0x00, 0x00, 0x00, 0x00, 0x00, 0x00, 0x00, 0x00, 0x00, 0x00, 0x00, 0x00, 0x00,
    0x00, 0x00, 0x00, 0x00, 0x00, 0x00, 0x00, 0x00, 0x00, 0x00, 0x00, 0x00, 0x00, 0x00, 0x00, 0x00,
    0x00, 0x00, 0x00, 0x00, 0x1f, 0xff, 0xe0, 0x0f, 0xc0, 0x7c, 0x1f, 0xc0, 0x00, 0x00, 0x00, 0x00,
    0x00, 0x00, 0x00, 0x00, 0x1f, 0xff, 0xf0, 0x1f, 0xc0, 0x7c, 0x3f, 0x00, 0x00, 0x00, 0x00, 0x00,
    0x00, 0x00, 0x00, 0x00, 0x1f, 0x01, 0xf0, 0x3f, 0xe0, 0x7c, 0xfc, 0x00, 0x00, 0x00, 0x00, 0x00,
    0x00, 0x00, 0x00, 0x00, 0x1f, 0x01, 0xf0, 0x7d, 0xf0, 0x7f, 0xf0, 0x00, 0x00, 0x00, 0x00, 0x00,
    0x00, 0x00, 0x00, 0x00, 0x1f, 0xff, 0xe0, 0x78, 0xf8, 0x7f, 0xf0, 0x00, 0x00, 0x00, 0x00, 0x00,
    0x00, 0x00, 0x00, 0x00, 0x1f, 0xff, 0xe0, 0xf8, 0x78, 0x7f, 0xfc, 0x00, 0x00, 0x00, 0x00, 0x00,
    0x00, 0x00, 0x00, 0x00, 0x1f, 0x01, 0xf1, 0xff, 0xfc, 0x7c, 0x7e, 0x00, 0x00, 0x00, 0x00, 0x00,
    0x00, 0x00, 0x00, 0x00, 0x1f, 0x01, 0xf3, 0xff, 0xfe, 0x7c, 0x1f, 0x80, 0x00, 0x00, 0x00, 0x00,
    0x00, 0x00, 0x00, 0x00, 0x1f, 0x00, 0xf3, 0xc0, 0x1f, 0x7c, 0x0f, 0xc0, 0x00, 0x00, 0x00, 0x00,
    0x00, 0x00, 0x00, 0x00, 0x1f, 0x00, 0xf7, 0xc0, 0x1f, 0x7c, 0x07, 0xe0, 0x00, 0x00, 0x00, 0x00,
    0x00, 0x00, 0x00, 0x00, 0x00, 0x00, 0x00, 0x00, 0x00, 0x00, 0x00, 0x00, 0x00, 0x00, 0x00, 0x00,
    0x00, 0x00, 0x00, 0x00, 0x00, 0x00, 0x00, 0x00, 0x00, 0x00, 0x00, 0x00, 0x00, 0x00, 0x00, 0x00,
    0x00, 0x00, 0x00, 0x00, 0x00, 0x00, 0x00, 0x00, 0x00, 0x00, 0x00, 0x00, 0x00, 0x00, 0x00, 0x00,
    0x00, 0x00, 0x00, 0x00, 0x00, 0x00, 0x00, 0x00, 0x00, 0x00, 0x00, 0x00, 0x00, 0x00, 0x00, 0x00,
    0x00, 0x00, 0x00, 0x00, 0x00, 0x00, 0x00, 0x00, 0x00, 0x00, 0x00, 0x00, 0x00, 0x00, 0x00, 0x00,
    0x00, 0x00, 0x00, 0x00, 0x00, 0x00, 0x00, 0x00, 0x00, 0x00, 0x00, 0x00, 0x00, 0x00, 0x00, 0x00,
    0x00, 0x00, 0x00, 0x00, 0x00, 0x00, 0x00, 0x00, 0x00, 0x00, 0x00, 0x00, 0x00, 0x00, 0x00, 0x00,
    0x00, 0x00, 0x00, 0x00, 0x00, 0x00, 0x00, 0x00, 0x00, 0x00, 0x00, 0x00, 0x00, 0x00, 0x00, 0x00,
    0x00, 0x00, 0x00, 0x00, 0x00, 0x00, 0x00, 0x00, 0x00, 0x00, 0x00, 0x00, 0x00, 0x00, 0x00, 0x00,
    0x00, 0x00, 0x00, 0x00, 0x00, 0x00, 0x00, 0x00, 0x00, 0x00, 0x00, 0x00, 0x00, 0x00, 0x00, 0x00
};

void setup() {
    // put your setup code here, to run once:
  Serial.begin(115200);

  if(!display.begin(SSD1306_SWITCHCAPVCC, 0x3C)) {
    Serial.println(F("SSD1306 allocation failed"));
    for(;;);
  }
  delay(2000); // Pause for 2 seconds

  // Clear the buffer.
  display.clearDisplay();

  // Draw bitmap on the screen
  display.drawBitmap(0, 0, image_data_Saraarray, 128, 64, 1);
  display.display();
}

void loop() {
    // put your main code here, to run repeatedly:

}
- Then select the right Serial Port and upload the code.
RAK11200 requires the Boot0 pin to be configured properly first before uploading. If not done properly, uploading the source code to RAK11200 will fail. Check the full details on the RAK11200 Quick Start Guide.
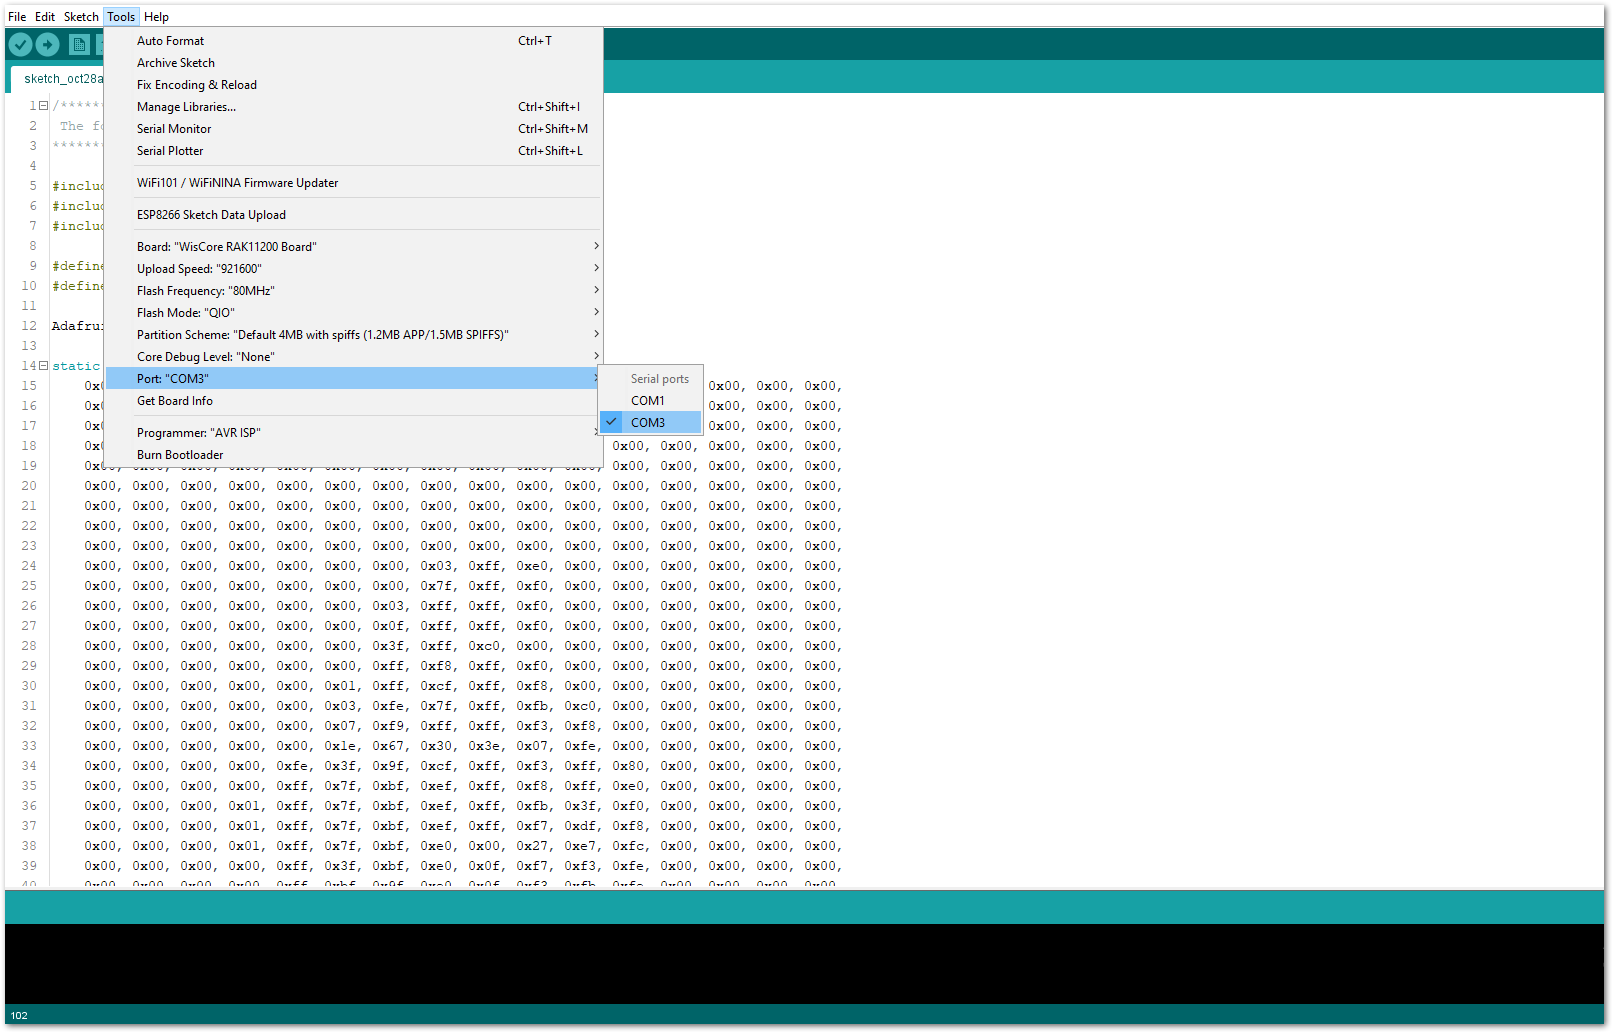 Figure 1: Selecting the correct Serial Port
- When you successfully uploaded the sample code, you will now be able to see the RAK logo displayed on your OLED screen, as shown in Figure 23, which means that the module is properly communicating with the WisBlock core using the I2C protocol.
 Figure 1: RAK logo displayed on OLED screen
GPIO Connection on RAK5804
This is just an example and illustration on how to use the GPIO pins of RAK5804 for external sensors, modules, or devices. There are four (4) GPIO pins available on the RAK5804. You can use any of the GPIO pins as long as your modules, sensors, or devices operate at 3.3 V.
 Figure 1: Connecting the RAK5804 to the GPIO pin of the sensor module
- Select the RAK11200 WisBlock Core.
 Figure 1: Selecting RAK11200 as WisBlock Core
- On the Arduino IDE, go to Sketch > Include Library > Manage Libraries. The Library Manager should open, then install the Adafruit DHT Sensor library, as shown in Figure 26.
 Figure 1: Installing the Adafruit DHT library
- After successful installation of the library, you can now copy the following sample code into your Arduino IDE:
/*********
 The following code will display the temperature & humidity
 using the DHT11 sensor in the Serial Monitor.
*********/

#include "DHT.h"

#define DHTPIN WB_IO2
#define DHTTYPE DHT11

DHT dht(DHTPIN, DHTTYPE);

void setup() {
  Serial.begin(9600);
  Serial.println(F("DHTxx test!"));
  dht.begin();
}

void loop() {
  delay(2000);
  float h = dht.readHumidity();
  float t = dht.readTemperature();
  float f = dht.readTemperature(true);

  if (isnan(h) || isnan(t) || isnan(f)) {
    Serial.println(F("Failed to read from DHT sensor!"));
    return;
  }

  float hif = dht.computeHeatIndex(f, h);
  float hic = dht.computeHeatIndex(t, h, false);

  Serial.print(F("Humidity: "));
  Serial.print(h);
  Serial.print(F("%  Temperature: "));
  Serial.print(t);
  Serial.print(F("°C "));
  Serial.print(f);
  Serial.print(F("°F  Heat index: "));
  Serial.print(hic);
  Serial.print(F("°C "));
  Serial.print(hif);
  Serial.println(F("°F"));
}
- Then select the right Serial Port and upload the code.
RAK11200 requires the Boot0 pin to be configured properly first before uploading. If not done properly, uploading the source code to RAK11200 will fail. Check the full details on the RAK11200 Quick Start Guide.
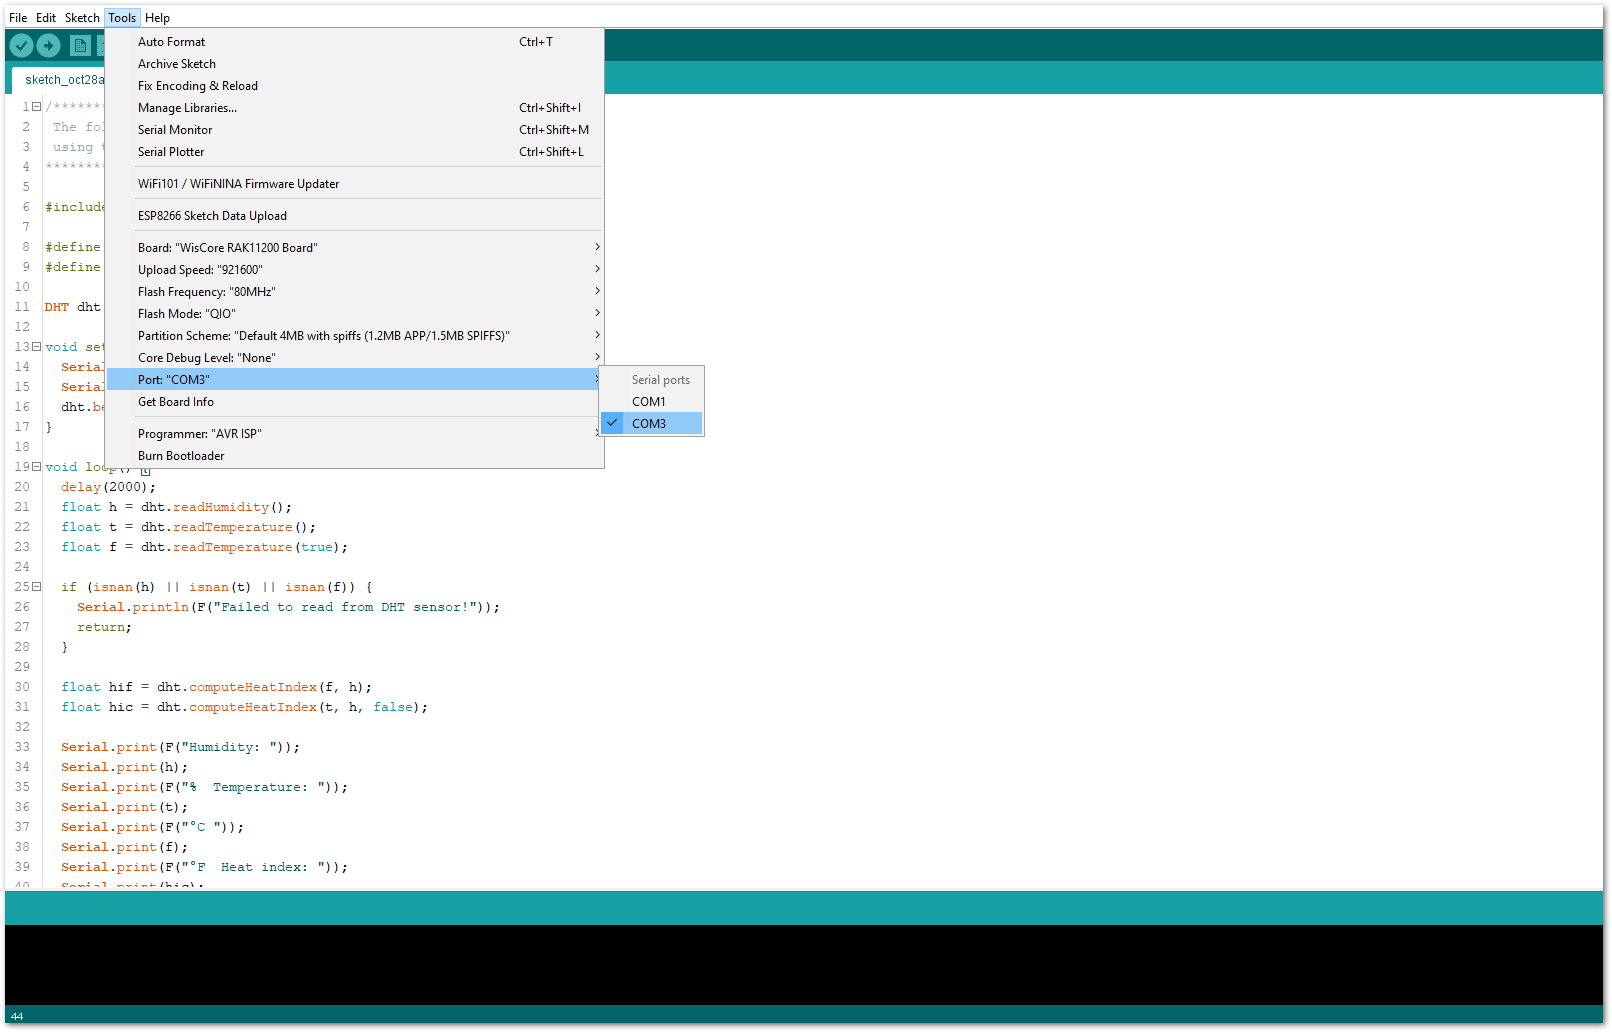 Figure 1: Selecting the correct Serial Port
- When you successfully uploaded the sample code, open the Serial Monitor of the Arduino IDE to see the module's reading logs. If you see the logs, as shown in Figure 28, then your module or sensor is properly communicating to the WisBlock core using the Digital Interface.
 Figure 1: DHT11 Temp & Humidity data logs
Analog Input (ADC) Connection on RAK5804
This is just an example and illustration on how to use the ADC pin of RAK5804 for external sensors, modules, or devices. There is only one (1) ADC pin available on the RAK5804 that you can use as long as your modules, sensors, or devices operate at 3.3 V.
 Figure 1: Connecting the RAK5804 to the ADC pin of the sensor module
- Select the RAK11200 WisBlock Core.
 Figure 1: Selecting RAK11200 as WisBlock Core
- Copy the following sample code into your Arduino IDE:
/*********
 The following code will display the ambient temperature using the LM35 sensor
 in the Serial Monitor.
*********/

#define lm35 WB_A1

int lmVal = 0;
int tem = 0;

void setup() {
  // put your setup code here, to run once:
  Serial.begin(9600);
}
void loop() {
  // put your main code here, to run repeatedly:
  lmVal = analogRead(lm35);
  tem = (lmVal*330)/1024;

  Serial.print(tem);
  Serial.print(" Celsius");
  Serial.println();
  delay(1000);
}
- Then select the right Serial Port and upload the code.
RAK11200 requires the Boot0 pin to be configured properly first before uploading. If not done properly, uploading the source code to RAK11200 will fail. Check the full details on the RAK11200 Quick Start Guide.
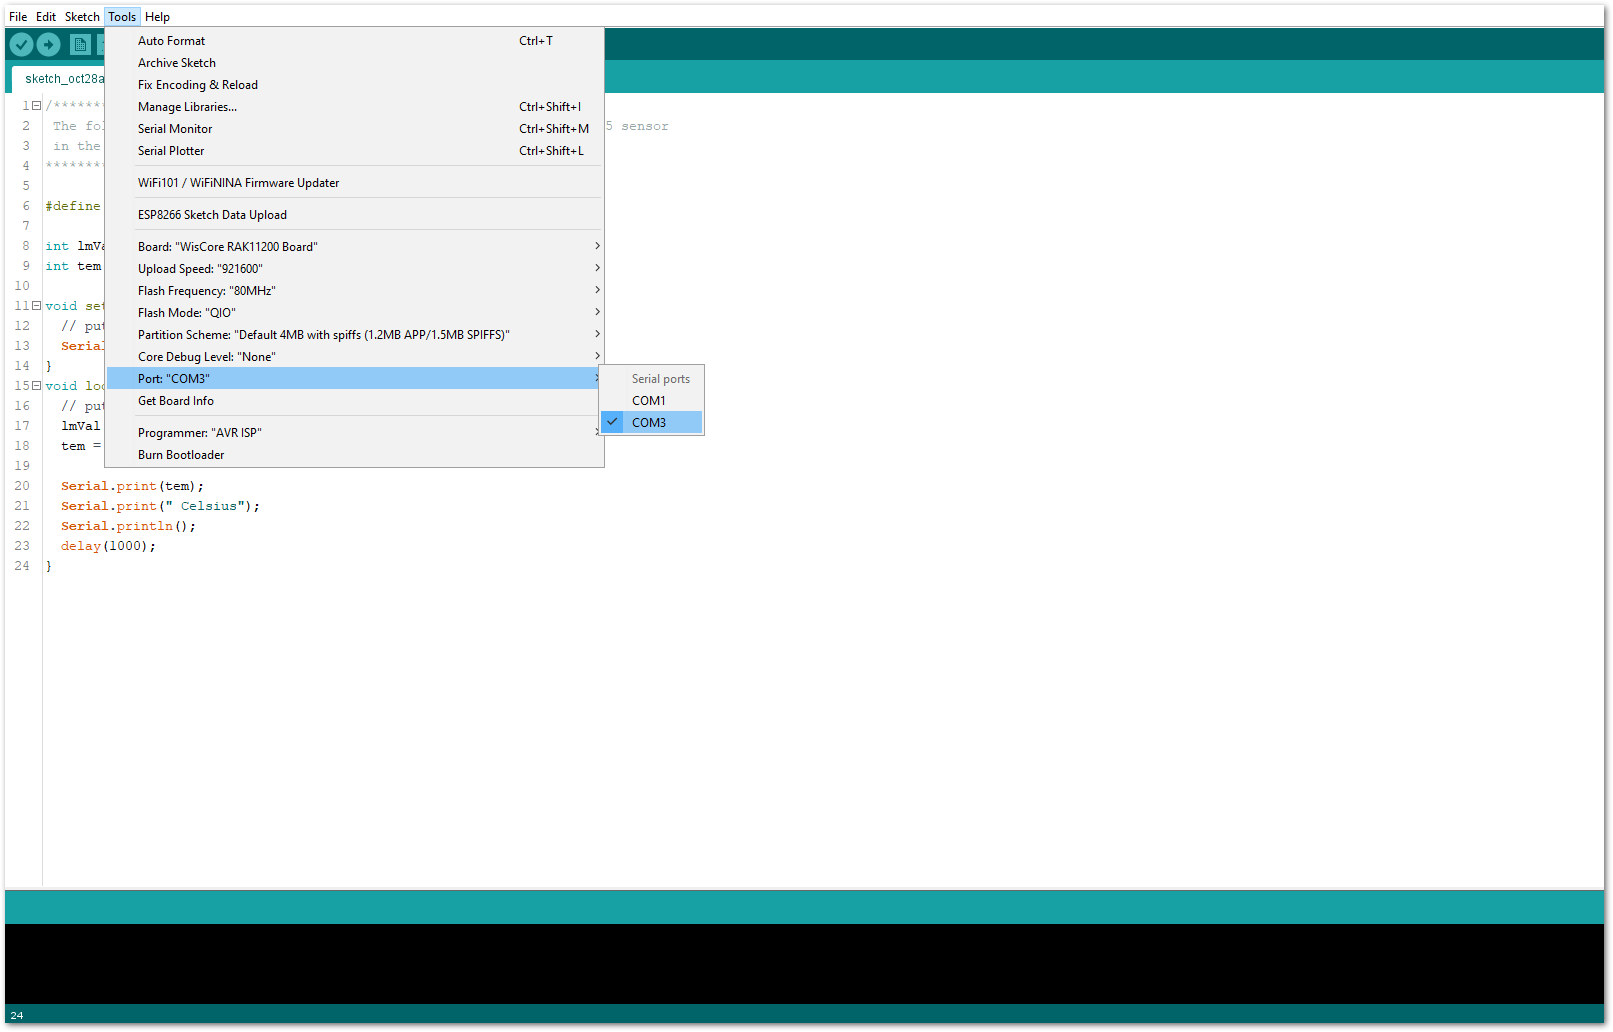 Figure 1: Selecting the correct Serial Port
- When you successfully uploaded the sample code, open the Serial Monitor of the Arduino IDE to see the module's reading logs. If you see the logs, as shown in Figure 32, then your module or sensor is properly communicating to the WisBlock core using the Analog Interface.
 Figure 1: LM35 Temperature data logs
RAK5804 in RAK11310 WisBlock Core Guide
I2C Connection on RAK5804
This is just an example and illustration on how to use the RAK5804 for external I2C sensors, modules, or devices. You can use any I2C device as long as it operates at 3.3 V.
 Figure 1: Connecting the RAK5804 to the I2C pin of the module
- Select the RAK11310 WisBlock Core.
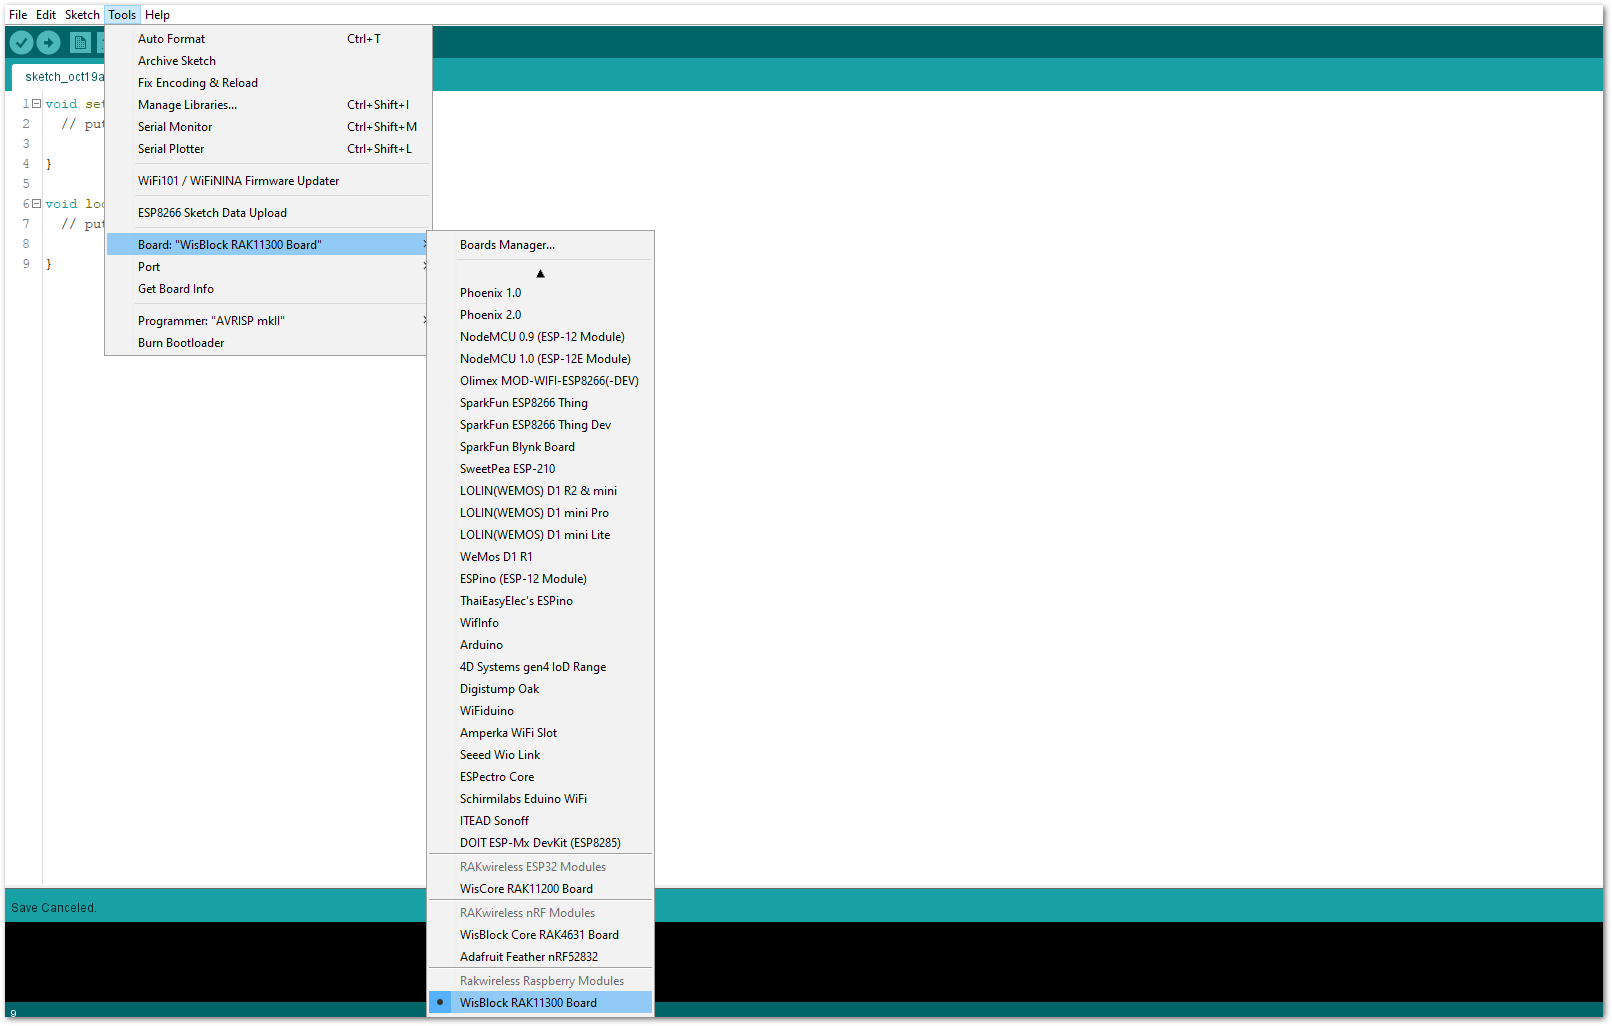 Figure 1: Selecting RAK11310 as WisBlock Core
- On the Arduino IDE, go to Sketch > Include Library > Manage Libraries. The Library Manager should open, then install the Adafruit SSD1306 and the Adafruit GFX libraries, as shown in Figure 35 and Figure 36.
 Figure 1: Installing the Adafruit SSD1306 library
 Figure 1: Installing the Adafruit GFX library
- After successful installation of the libraries, you can now copy the following sample code into your Arduino IDE:
/*********
 The following code will display the RAK logo into the OLED Display.
*********/

#include <Wire.h>
#include <Adafruit_GFX.h>
#include <Adafruit_SSD1306.h>

#define SCREEN_WIDTH 128
#define SCREEN_HEIGHT 64

Adafruit_SSD1306 display(SCREEN_WIDTH, SCREEN_HEIGHT, &Wire, -1);

static const unsigned char PROGMEM image_data_Saraarray[] = {
    0x00, 0x00, 0x00, 0x00, 0x00, 0x00, 0x00, 0x00, 0x00, 0x00, 0x00, 0x00, 0x00, 0x00, 0x00, 0x00,
    0x00, 0x00, 0x00, 0x00, 0x00, 0x00, 0x00, 0x00, 0x00, 0x00, 0x00, 0x00, 0x00, 0x00, 0x00, 0x00,
    0x00, 0x00, 0x00, 0x00, 0x00, 0x00, 0x00, 0x00, 0x00, 0x00, 0x00, 0x00, 0x00, 0x00, 0x00, 0x00,
    0x00, 0x00, 0x00, 0x00, 0x00, 0x00, 0x00, 0x00, 0x00, 0x00, 0x00, 0x00, 0x00, 0x00, 0x00, 0x00,
    0x00, 0x00, 0x00, 0x00, 0x00, 0x00, 0x00, 0x00, 0x00, 0x00, 0x00, 0x00, 0x00, 0x00, 0x00, 0x00,
    0x00, 0x00, 0x00, 0x00, 0x00, 0x00, 0x00, 0x00, 0x00, 0x00, 0x00, 0x00, 0x00, 0x00, 0x00, 0x00,
    0x00, 0x00, 0x00, 0x00, 0x00, 0x00, 0x00, 0x00, 0x00, 0x00, 0x00, 0x00, 0x00, 0x00, 0x00, 0x00,
    0x00, 0x00, 0x00, 0x00, 0x00, 0x00, 0x00, 0x00, 0x00, 0x00, 0x00, 0x00, 0x00, 0x00, 0x00, 0x00,
    0x00, 0x00, 0x00, 0x00, 0x00, 0x00, 0x00, 0x00, 0x00, 0x00, 0x00, 0x00, 0x00, 0x00, 0x00, 0x00,
    0x00, 0x00, 0x00, 0x00, 0x00, 0x00, 0x00, 0x03, 0xff, 0xe0, 0x00, 0x00, 0x00, 0x00, 0x00, 0x00,
    0x00, 0x00, 0x00, 0x00, 0x00, 0x00, 0x00, 0x7f, 0xff, 0xf0, 0x00, 0x00, 0x00, 0x00, 0x00, 0x00,
    0x00, 0x00, 0x00, 0x00, 0x00, 0x00, 0x03, 0xff, 0xff, 0xf0, 0x00, 0x00, 0x00, 0x00, 0x00, 0x00,
    0x00, 0x00, 0x00, 0x00, 0x00, 0x00, 0x0f, 0xff, 0xff, 0xf0, 0x00, 0x00, 0x00, 0x00, 0x00, 0x00,
    0x00, 0x00, 0x00, 0x00, 0x00, 0x00, 0x3f, 0xff, 0xc0, 0x00, 0x00, 0x00, 0x00, 0x00, 0x00, 0x00,
    0x00, 0x00, 0x00, 0x00, 0x00, 0x00, 0xff, 0xf8, 0xff, 0xf0, 0x00, 0x00, 0x00, 0x00, 0x00, 0x00,
    0x00, 0x00, 0x00, 0x00, 0x00, 0x01, 0xff, 0xcf, 0xff, 0xf8, 0x00, 0x00, 0x00, 0x00, 0x00, 0x00,
    0x00, 0x00, 0x00, 0x00, 0x00, 0x03, 0xfe, 0x7f, 0xff, 0xfb, 0xc0, 0x00, 0x00, 0x00, 0x00, 0x00,
    0x00, 0x00, 0x00, 0x00, 0x00, 0x07, 0xf9, 0xff, 0xff, 0xf3, 0xf8, 0x00, 0x00, 0x00, 0x00, 0x00,
    0x00, 0x00, 0x00, 0x00, 0x00, 0x1e, 0x67, 0x30, 0x3e, 0x07, 0xfe, 0x00, 0x00, 0x00, 0x00, 0x00,
    0x00, 0x00, 0x00, 0x00, 0xfe, 0x3f, 0x9f, 0xcf, 0xff, 0xf3, 0xff, 0x80, 0x00, 0x00, 0x00, 0x00,
    0x00, 0x00, 0x00, 0x00, 0xff, 0x7f, 0xbf, 0xef, 0xff, 0xf8, 0xff, 0xe0, 0x00, 0x00, 0x00, 0x00,
    0x00, 0x00, 0x00, 0x01, 0xff, 0x7f, 0xbf, 0xef, 0xff, 0xfb, 0x3f, 0xf0, 0x00, 0x00, 0x00, 0x00,
    0x00, 0x00, 0x00, 0x01, 0xff, 0x7f, 0xbf, 0xef, 0xff, 0xf7, 0xdf, 0xf8, 0x00, 0x00, 0x00, 0x00,
    0x00, 0x00, 0x00, 0x01, 0xff, 0x7f, 0xbf, 0xe0, 0x00, 0x27, 0xe7, 0xfc, 0x00, 0x00, 0x00, 0x00,
    0x00, 0x00, 0x00, 0x00, 0xff, 0x3f, 0xbf, 0xe0, 0x0f, 0xf7, 0xf3, 0xfe, 0x00, 0x00, 0x00, 0x00,
    0x00, 0x00, 0x00, 0x00, 0xff, 0xbf, 0x9f, 0xe0, 0x0f, 0xf3, 0xfb, 0xfe, 0x00, 0x00, 0x00, 0x00,
    0x00, 0x00, 0x00, 0x00, 0x7f, 0xdf, 0xdf, 0xe0, 0x0f, 0xfb, 0xf9, 0xff, 0x00, 0x00, 0x00, 0x00,
    0x00, 0x00, 0x00, 0x00, 0x7f, 0xe7, 0xc7, 0xff, 0xef, 0xfb, 0xfd, 0xff, 0x00, 0x00, 0x00, 0x00,
    0x00, 0x00, 0x00, 0x00, 0x3f, 0xf3, 0x9f, 0xff, 0xef, 0xfb, 0xfd, 0xff, 0x00, 0x00, 0x00, 0x00,
    0x00, 0x00, 0x00, 0x00, 0x0f, 0xfc, 0x3f, 0xff, 0xef, 0xfb, 0xfd, 0xff, 0x00, 0x00, 0x00, 0x00,
    0x00, 0x00, 0x00, 0x00, 0x07, 0xff, 0x3f, 0xff, 0xef, 0xf3, 0xfd, 0xfe, 0x00, 0x00, 0x00, 0x00,
    0x00, 0x00, 0x00, 0x00, 0x01, 0xff, 0xcf, 0xff, 0xc3, 0xe1, 0xf8, 0x7c, 0x00, 0x00, 0x00, 0x00,
    0x00, 0x00, 0x00, 0x00, 0x00, 0x7f, 0xde, 0x03, 0xfe, 0x1e, 0x00, 0x00, 0x00, 0x00, 0x00, 0x00,
    0x00, 0x00, 0x00, 0x00, 0x00, 0x0f, 0xbf, 0xff, 0xfe, 0x7f, 0xc0, 0x00, 0x00, 0x00, 0x00, 0x00,
    0x00, 0x00, 0x00, 0x00, 0x00, 0x01, 0x3f, 0xff, 0xf9, 0xff, 0x80, 0x00, 0x00, 0x00, 0x00, 0x00,
    0x00, 0x00, 0x00, 0x00, 0x00, 0x00, 0x3f, 0xff, 0x8f, 0xfe, 0x00, 0x00, 0x00, 0x00, 0x00, 0x00,
    0x00, 0x00, 0x00, 0x00, 0x00, 0x00, 0x00, 0x80, 0xff, 0xfc, 0x00, 0x00, 0x00, 0x00, 0x00, 0x00,
    0x00, 0x00, 0x00, 0x00, 0x00, 0x00, 0x0f, 0xff, 0xff, 0xf0, 0x00, 0x00, 0x00, 0x00, 0x00, 0x00,
    0x00, 0x00, 0x00, 0x00, 0x00, 0x00, 0x1f, 0xff, 0xff, 0xc0, 0x00, 0x00, 0x00, 0x00, 0x00, 0x00,
    0x00, 0x00, 0x00, 0x00, 0x00, 0x00, 0x1f, 0xff, 0xfe, 0x00, 0x00, 0x00, 0x00, 0x00, 0x00, 0x00,
    0x00, 0x00, 0x00, 0x00, 0x00, 0x00, 0x1f, 0xff, 0xf0, 0x00, 0x00, 0x00, 0x00, 0x00, 0x00, 0x00,
    0x00, 0x00, 0x00, 0x00, 0x00, 0x00, 0x00, 0x00, 0x00, 0x00, 0x00, 0x00, 0x00, 0x00, 0x00, 0x00,
    0x00, 0x00, 0x00, 0x00, 0x00, 0x00, 0x00, 0x00, 0x00, 0x00, 0x00, 0x00, 0x00, 0x00, 0x00, 0x00,
    0x00, 0x00, 0x00, 0x00, 0x00, 0x00, 0x00, 0x00, 0x00, 0x00, 0x00, 0x00, 0x00, 0x00, 0x00, 0x00,
    0x00, 0x00, 0x00, 0x00, 0x1f, 0xff, 0xe0, 0x0f, 0xc0, 0x7c, 0x1f, 0xc0, 0x00, 0x00, 0x00, 0x00,
    0x00, 0x00, 0x00, 0x00, 0x1f, 0xff, 0xf0, 0x1f, 0xc0, 0x7c, 0x3f, 0x00, 0x00, 0x00, 0x00, 0x00,
    0x00, 0x00, 0x00, 0x00, 0x1f, 0x01, 0xf0, 0x3f, 0xe0, 0x7c, 0xfc, 0x00, 0x00, 0x00, 0x00, 0x00,
    0x00, 0x00, 0x00, 0x00, 0x1f, 0x01, 0xf0, 0x7d, 0xf0, 0x7f, 0xf0, 0x00, 0x00, 0x00, 0x00, 0x00,
    0x00, 0x00, 0x00, 0x00, 0x1f, 0xff, 0xe0, 0x78, 0xf8, 0x7f, 0xf0, 0x00, 0x00, 0x00, 0x00, 0x00,
    0x00, 0x00, 0x00, 0x00, 0x1f, 0xff, 0xe0, 0xf8, 0x78, 0x7f, 0xfc, 0x00, 0x00, 0x00, 0x00, 0x00,
    0x00, 0x00, 0x00, 0x00, 0x1f, 0x01, 0xf1, 0xff, 0xfc, 0x7c, 0x7e, 0x00, 0x00, 0x00, 0x00, 0x00,
    0x00, 0x00, 0x00, 0x00, 0x1f, 0x01, 0xf3, 0xff, 0xfe, 0x7c, 0x1f, 0x80, 0x00, 0x00, 0x00, 0x00,
    0x00, 0x00, 0x00, 0x00, 0x1f, 0x00, 0xf3, 0xc0, 0x1f, 0x7c, 0x0f, 0xc0, 0x00, 0x00, 0x00, 0x00,
    0x00, 0x00, 0x00, 0x00, 0x1f, 0x00, 0xf7, 0xc0, 0x1f, 0x7c, 0x07, 0xe0, 0x00, 0x00, 0x00, 0x00,
    0x00, 0x00, 0x00, 0x00, 0x00, 0x00, 0x00, 0x00, 0x00, 0x00, 0x00, 0x00, 0x00, 0x00, 0x00, 0x00,
    0x00, 0x00, 0x00, 0x00, 0x00, 0x00, 0x00, 0x00, 0x00, 0x00, 0x00, 0x00, 0x00, 0x00, 0x00, 0x00,
    0x00, 0x00, 0x00, 0x00, 0x00, 0x00, 0x00, 0x00, 0x00, 0x00, 0x00, 0x00, 0x00, 0x00, 0x00, 0x00,
    0x00, 0x00, 0x00, 0x00, 0x00, 0x00, 0x00, 0x00, 0x00, 0x00, 0x00, 0x00, 0x00, 0x00, 0x00, 0x00,
    0x00, 0x00, 0x00, 0x00, 0x00, 0x00, 0x00, 0x00, 0x00, 0x00, 0x00, 0x00, 0x00, 0x00, 0x00, 0x00,
    0x00, 0x00, 0x00, 0x00, 0x00, 0x00, 0x00, 0x00, 0x00, 0x00, 0x00, 0x00, 0x00, 0x00, 0x00, 0x00,
    0x00, 0x00, 0x00, 0x00, 0x00, 0x00, 0x00, 0x00, 0x00, 0x00, 0x00, 0x00, 0x00, 0x00, 0x00, 0x00,
    0x00, 0x00, 0x00, 0x00, 0x00, 0x00, 0x00, 0x00, 0x00, 0x00, 0x00, 0x00, 0x00, 0x00, 0x00, 0x00,
    0x00, 0x00, 0x00, 0x00, 0x00, 0x00, 0x00, 0x00, 0x00, 0x00, 0x00, 0x00, 0x00, 0x00, 0x00, 0x00,
    0x00, 0x00, 0x00, 0x00, 0x00, 0x00, 0x00, 0x00, 0x00, 0x00, 0x00, 0x00, 0x00, 0x00, 0x00, 0x00
};

void setup() {
    // put your setup code here, to run once:
  Serial.begin(115200);

  if(!display.begin(SSD1306_SWITCHCAPVCC, 0x3C)) {
    Serial.println(F("SSD1306 allocation failed"));
    for(;;);
  }
  delay(2000); // Pause for 2 seconds

  // Clear the buffer.
  display.clearDisplay();

  // Draw bitmap on the screen
  display.drawBitmap(0, 0, image_data_Saraarray, 128, 64, 1);
  display.display();
}

void loop() {
    // put your main code here, to run repeatedly:

}
- Select the right Serial Port and upload the code.
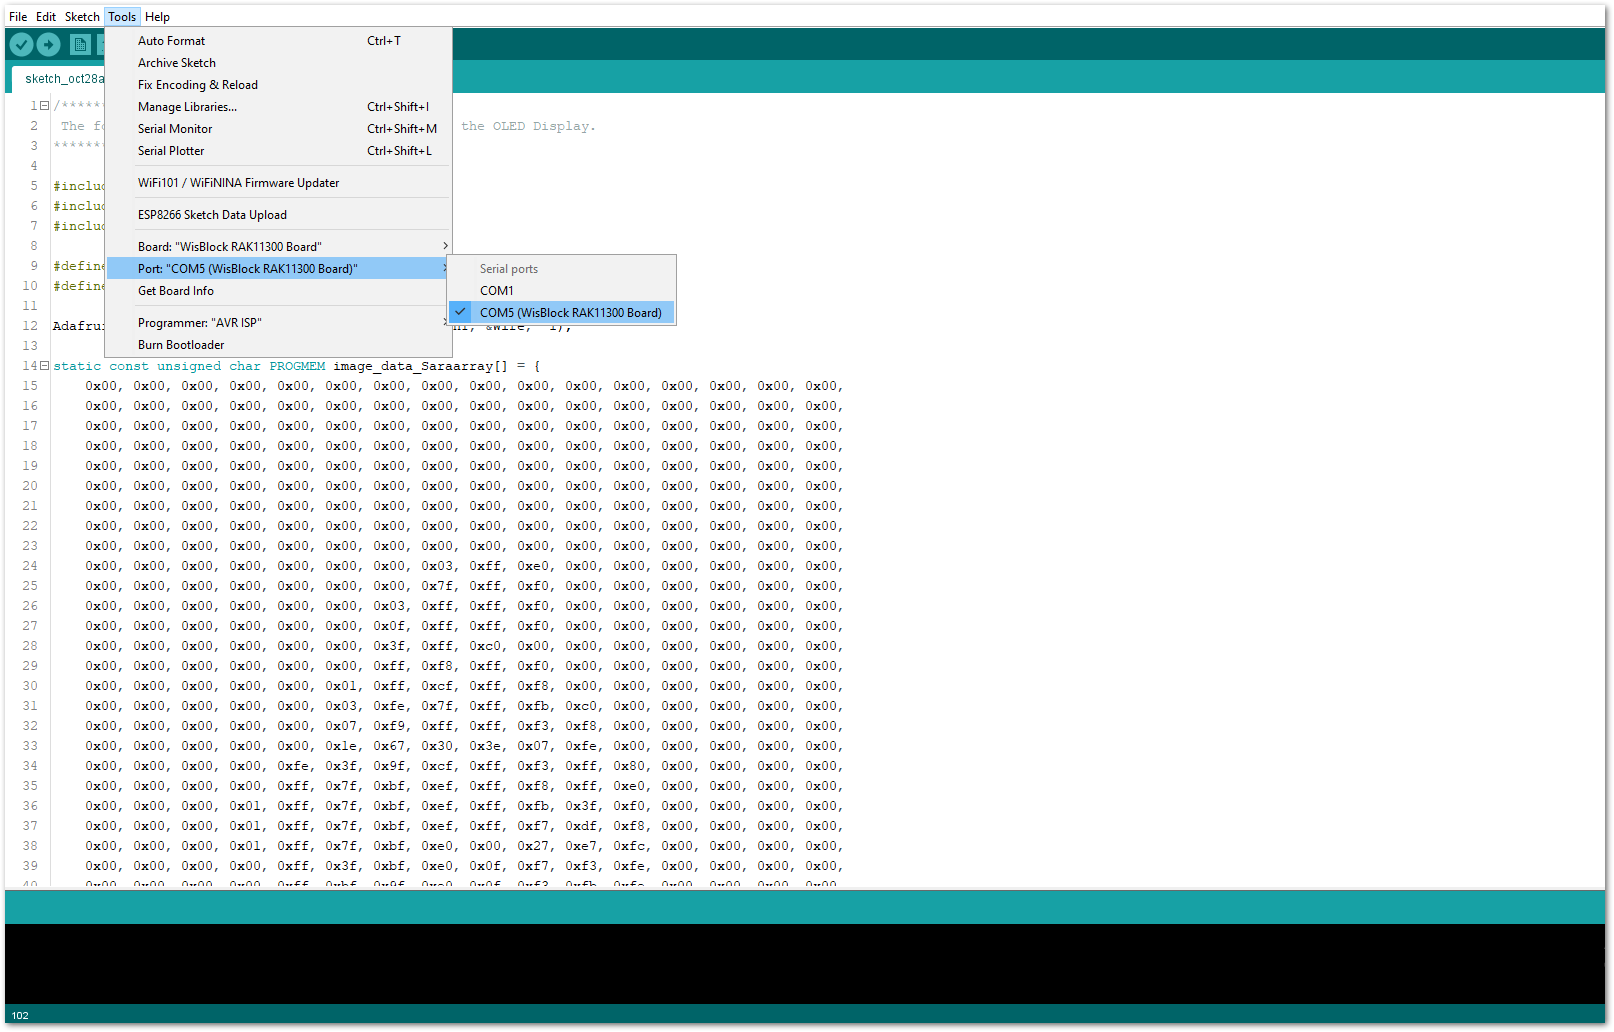 Figure 1: Selecting the correct Serial Port
- When you successfully uploaded the sample code, you will now be able to see the RAK logo displayed on your OLED screen, as shown in Figure 38, which means that the module is properly communicating with the WisBlock core using the I2C protocol.
 Figure 1: RAK logo displayed on OLED screen
GPIO Connection on RAK5804
This is just an example and illustration on how to use the GPIO pins of RAK5804 for external sensors, modules, or devices. There are four (4) GPIO pins available on the RAK5804. You can use any of the GPIO pins as long as your modules, sensors, or devices operate at 3.3 V.
 Figure 1: Connecting the RAK5804 to the GPIO pin of the sensor module
- Select the RAK11310 WisBlock Core.
 Figure 1: Selecting RAK11310 as WisBlock Core
- On the Arduino IDE, go to Sketch > Include Library > Manage Libraries. The Library Manager should open, then install the Adafruit DHT Sensor library, as shown in Figure 41.
 Figure 1: Installing the Adafruit DHT library
- After successful installation of the library, you can now copy the following sample code into your Arduino IDE:
/*********
 The following code will display the temperature & humidity
 using the DHT11 sensor in the Serial Monitor.
*********/

#include "DHT.h"

#define DHTPIN WB_IO2
#define DHTTYPE DHT11

DHT dht(DHTPIN, DHTTYPE);

void setup() {
  Serial.begin(9600);
  Serial.println(F("DHTxx test!"));
  dht.begin();
}

void loop() {
  delay(2000);
  float h = dht.readHumidity();
  float t = dht.readTemperature();
  float f = dht.readTemperature(true);

  if (isnan(h) || isnan(t) || isnan(f)) {
    Serial.println(F("Failed to read from DHT sensor!"));
    return;
  }

  float hif = dht.computeHeatIndex(f, h);
  float hic = dht.computeHeatIndex(t, h, false);

  Serial.print(F("Humidity: "));
  Serial.print(h);
  Serial.print(F("%  Temperature: "));
  Serial.print(t);
  Serial.print(F("°C "));
  Serial.print(f);
  Serial.print(F("°F  Heat index: "));
  Serial.print(hic);
  Serial.print(F("°C "));
  Serial.print(hif);
  Serial.println(F("°F"));
}
- Select the right Serial Port and upload the code.
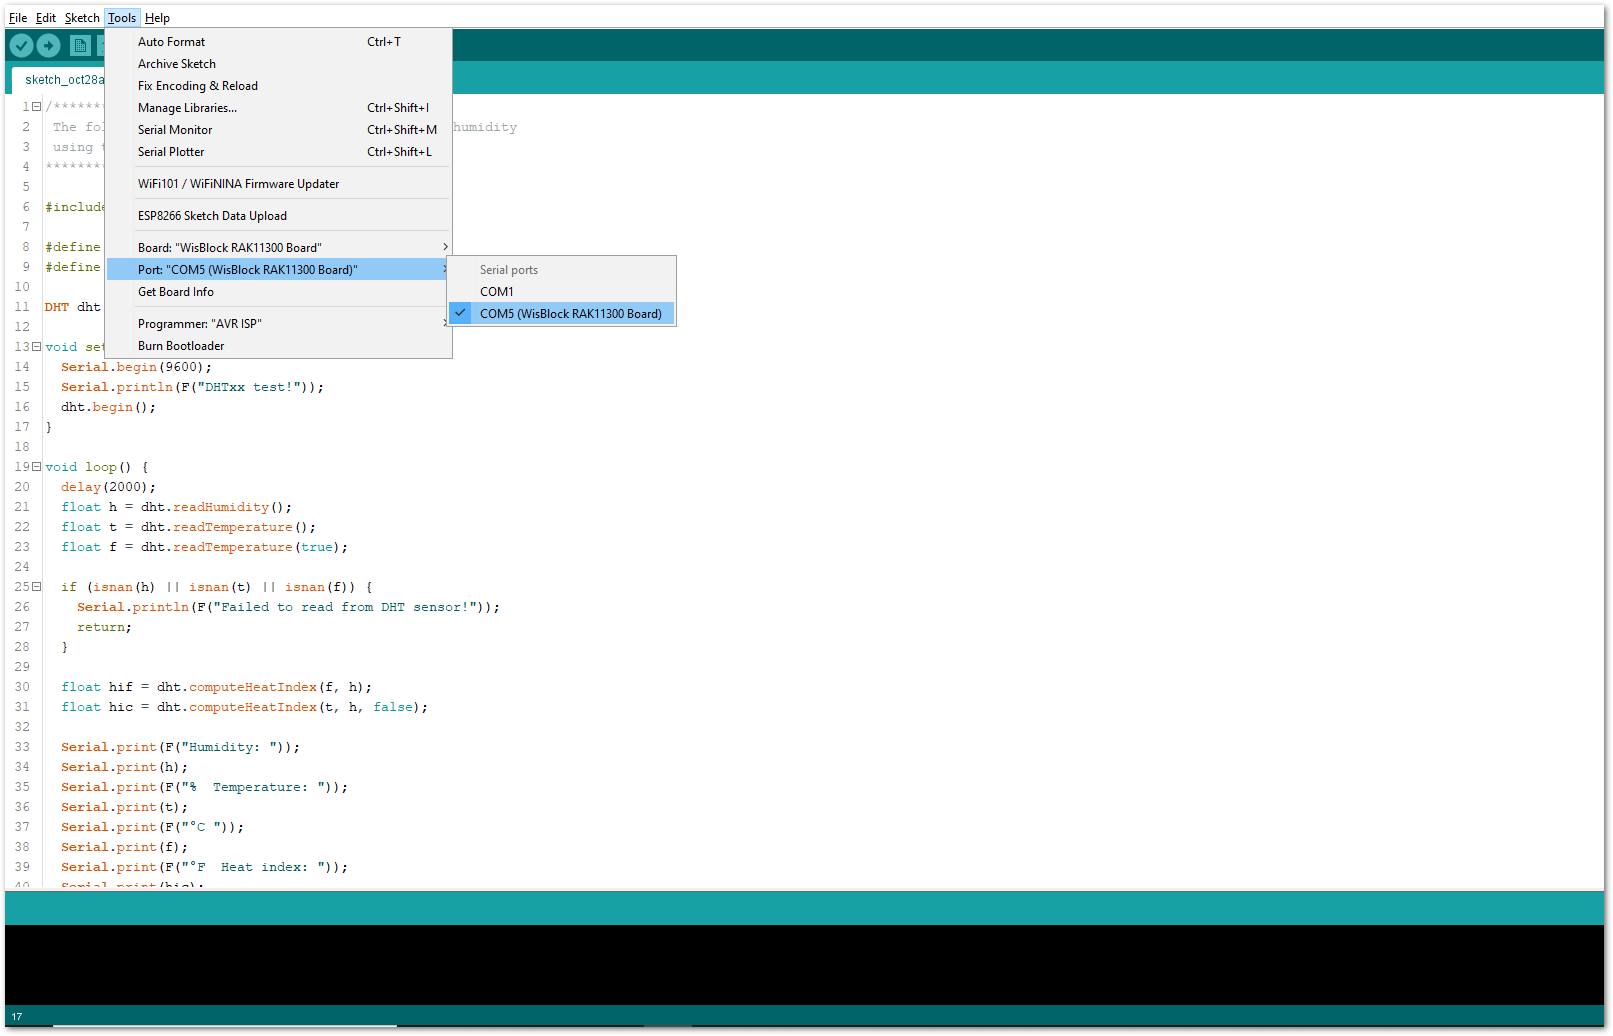 Figure 1: Selecting the correct Serial Port
- When you successfully uploaded the sample code, open the Serial Monitor of the Arduino IDE to see the module's reading logs. If you see the logs, as shown in Figure 43, then your module or sensor is properly communicating to the WisBlock core using the Digital Interface.
 Figure 1: DHT11 Temp & Humidity data logs
Analog Input (ADC) Connection on RAK5804
This is just an example and illustration on how to use the ADC pin of RAK5804 for external sensors, modules, or devices. There is only one (1) ADC pin available on the RAK5804 that you can use as long as your modules, sensors, or devices operate at 3.3 V.
 Figure 1: Connecting the RAK5804 to the ADC pin of the sensor module
- Select the RAK11310 WisBlock Core.
 Figure 1: Selecting RAK11310 as WisBlock Core
- Copy the following sample code into your Arduino IDE:
/*********
 The following code will display the ambient temperature using the LM35 sensor
 in the Serial Monitor.
*********/

#define lm35 WB_A1

int lmVal = 0;
int tem = 0;

void setup() {
  // put your setup code here, to run once:
  Serial.begin(9600);
}
void loop() {
  // put your main code here, to run repeatedly:
  lmVal = analogRead(lm35);
  tem = (lmVal*330)/1024;

  Serial.print(tem);
  Serial.print(" Celsius");
  Serial.println();
  delay(1000);
}
- Select the right Serial Port and upload the code.
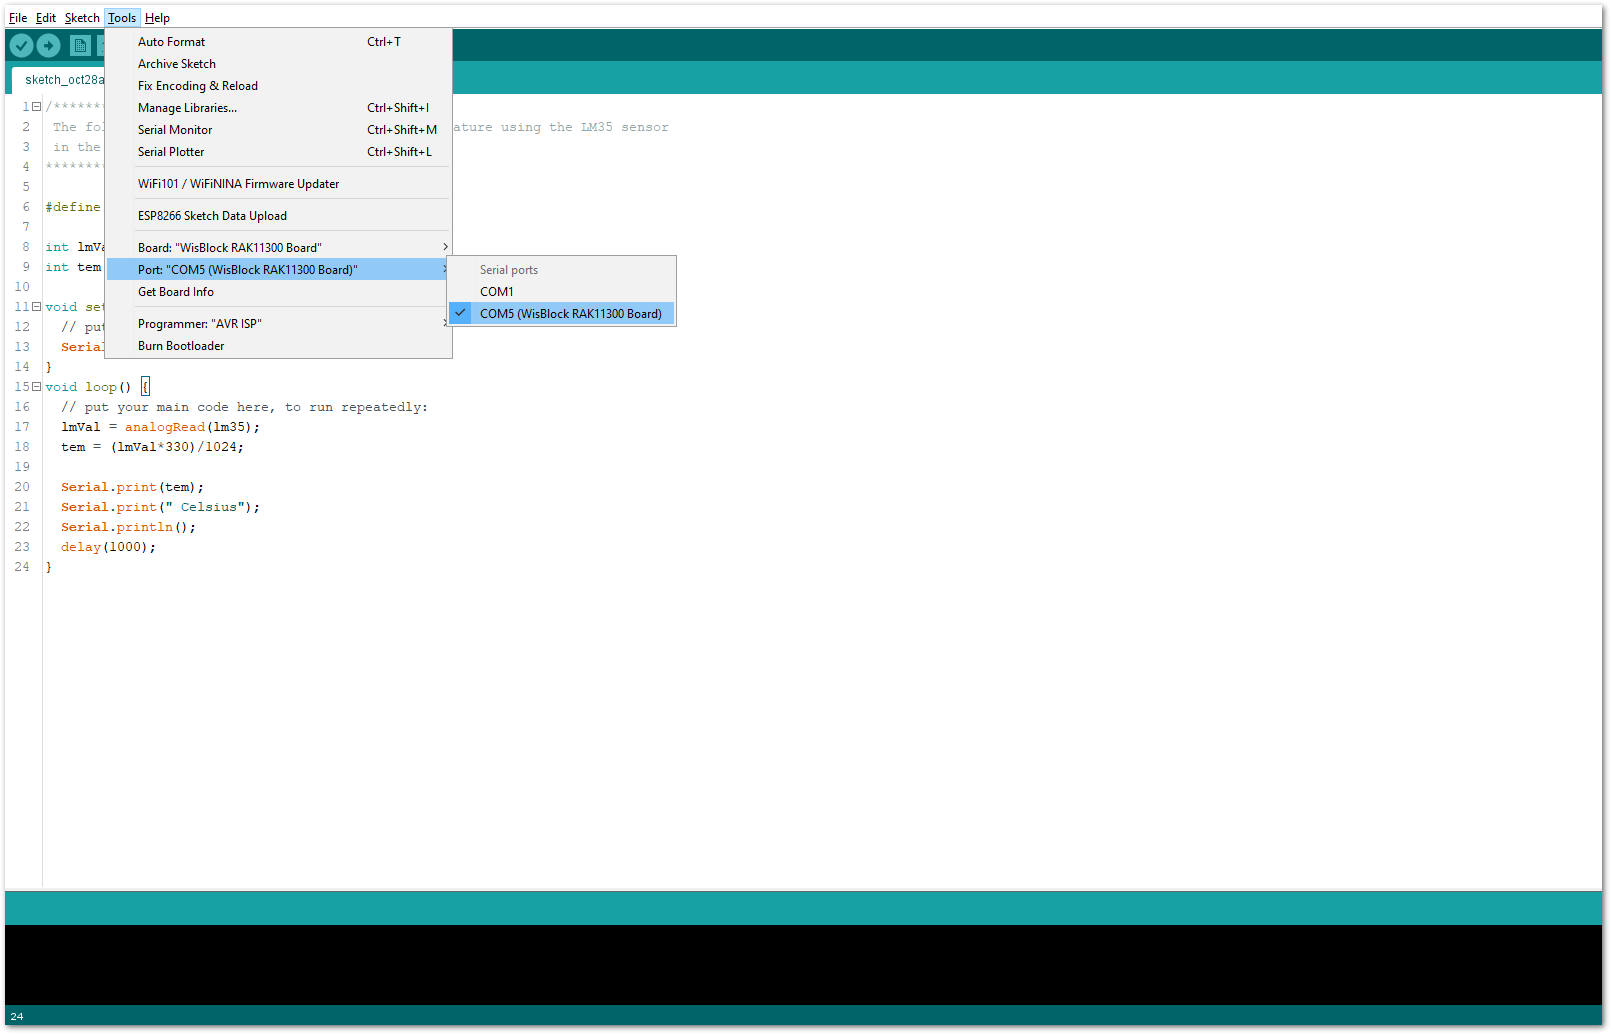 Figure 1: Selecting the correct Serial Port
- When you successfully uploaded the sample code, open the Serial Monitor of the Arduino IDE to see the module's reading logs. If you see the logs, as shown in Figure 47, then your module or sensor is properly communicating to the WisBlock core using the Analog Interface.
 Figure 1: LM35 Temperature data logs