Installation Guide
Package Contents
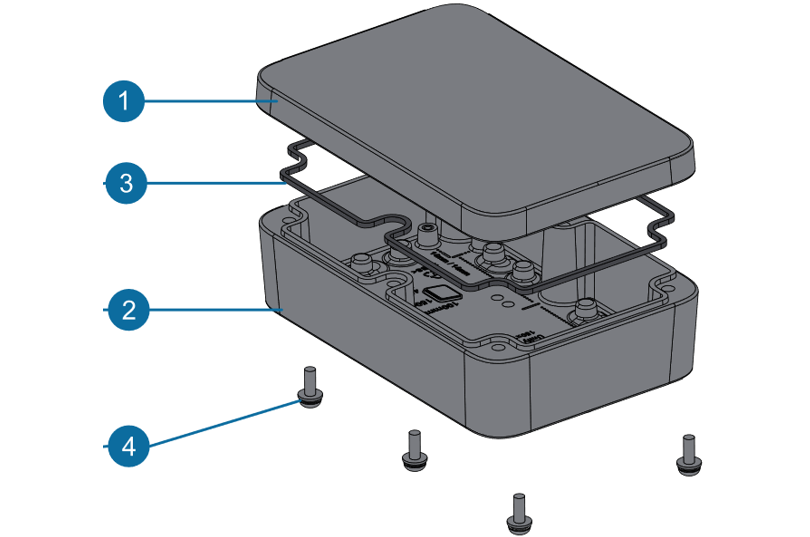 Figure 1: Medium WisBlock Unify Enclosure package content
| Number | Name | Quantity | Material | Color |
|---|---|---|---|---|
| 1 | Top Cover | 1 | ABS UL94V-0 | White or Grey |
| 2 | Bottom Base | 1 | ABS UL94V-0 | White or Grey |
| 3 | Gasket | 1 | Silicone | Black |
| 4 | Screw | 4-6 | Stainless steel |
Assembly Guide
- Prepare the Lid and Gasket.
First, install the rubber gasket in the groove of the top cover, as shown in Figure 2. Put the four corners of the gasket into the groove, and then press the middle gently. Ensure that the gasket is not twisted.
Before assembly, check if the gasket is installed correctly. The rubber gasket helps seal the enclosure properly and protects it from dust and water.
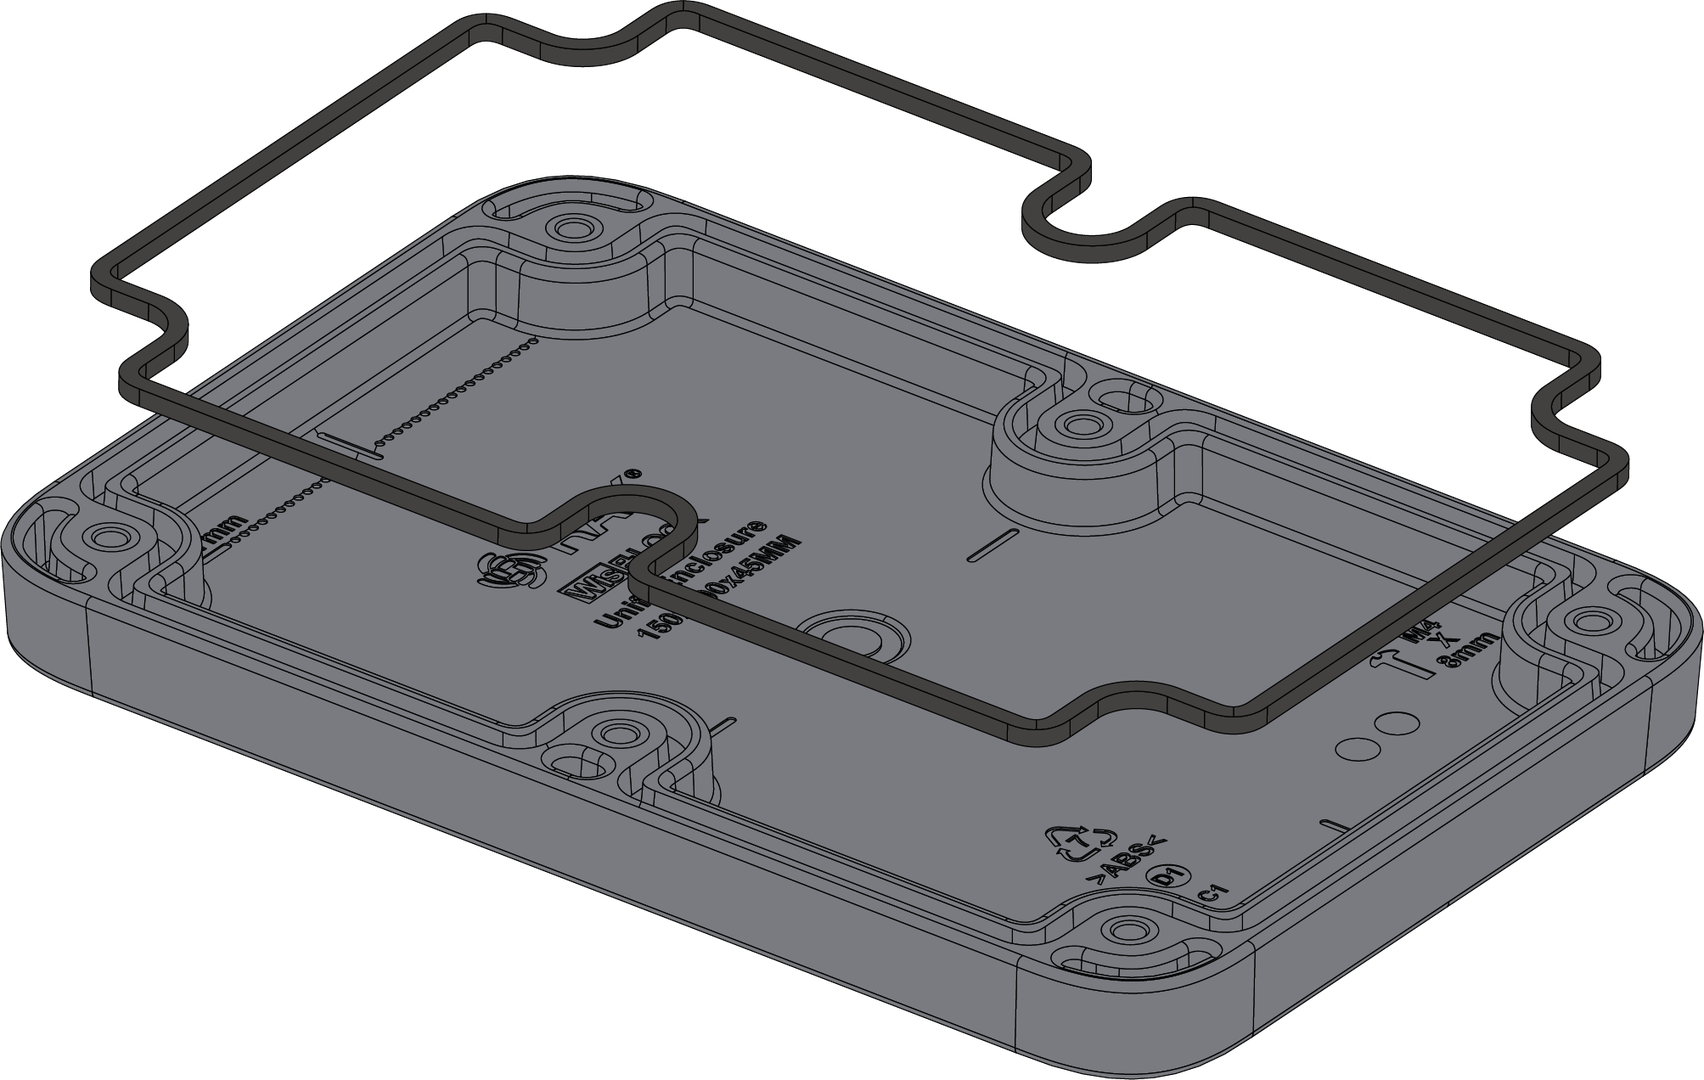 Figure 1: Installing the rubber gasket
- Choose the Internal Mounting Plate.
Next is to prepare the mounting plate. There are two types of mounting plates:
- Plain mounting plate
- WisBlock bespoke mounting plate
Plain Mounting Plate
The plain mounting plate has no holes, except for mounting holes to the enclosure. It is designed to be customized depending on the circuit board to be placed in the enclosure.
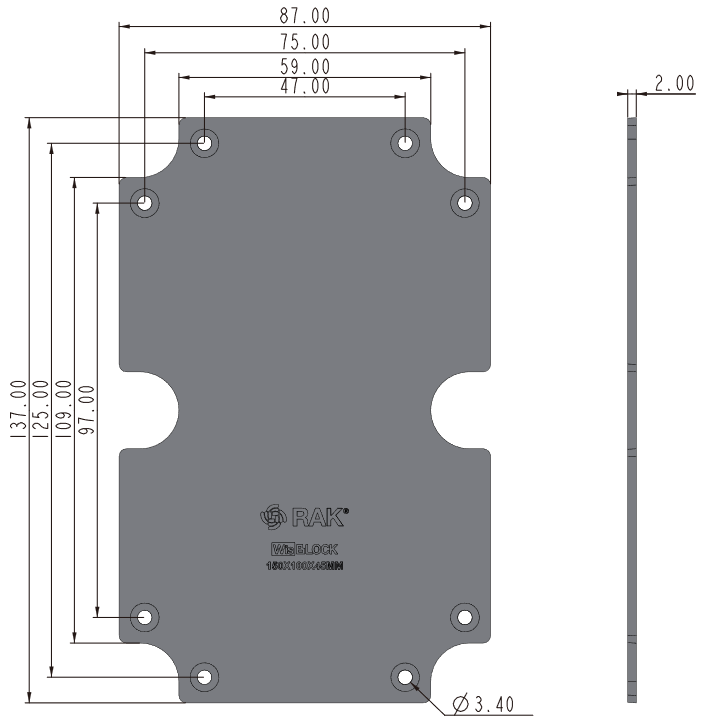 Figure 1: Plain mounting plate
WisBlock Bespoke Mounting Plate
The WisBlock Bespoke Mounting Plate is designed specifically to hold WisBlock Base boards. You have to cut the excess bosses or parts with a wire cutter depending on the WisBlock Base board that you have.
The following guide shows what to cut depending on the WisBlock Base board.
For the cutting reference, the red line is the cut-out area.
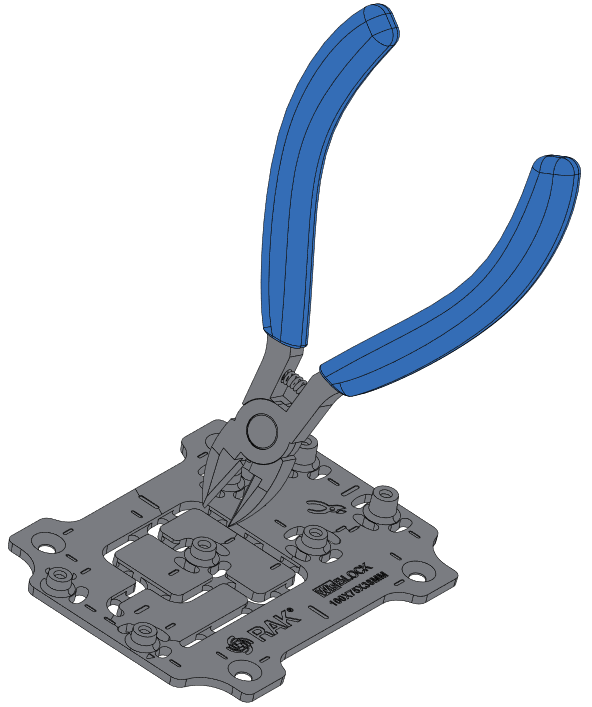 Figure 1: Cutting-out excess parts of the WisBlock Internal mounting plate
RAK5005-O
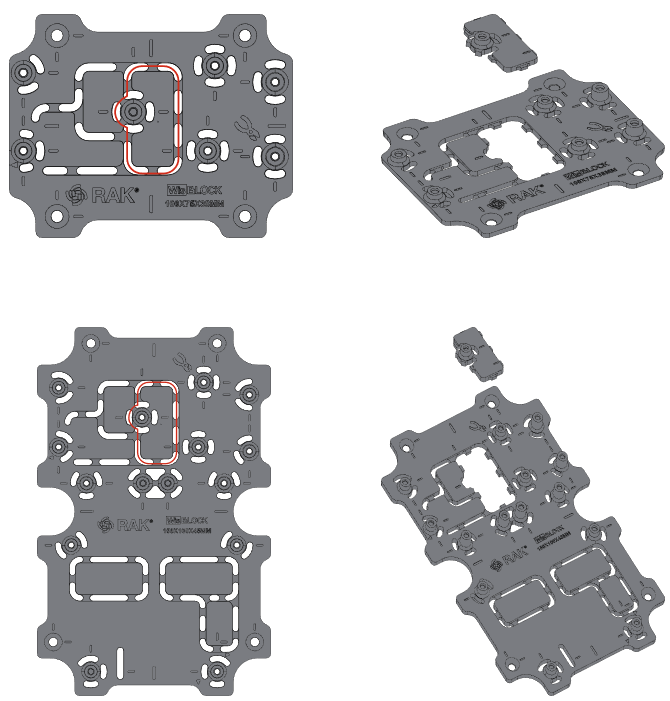 Figure 1: RAK5005-O WisBlock Base board cut-out area
RAK19007
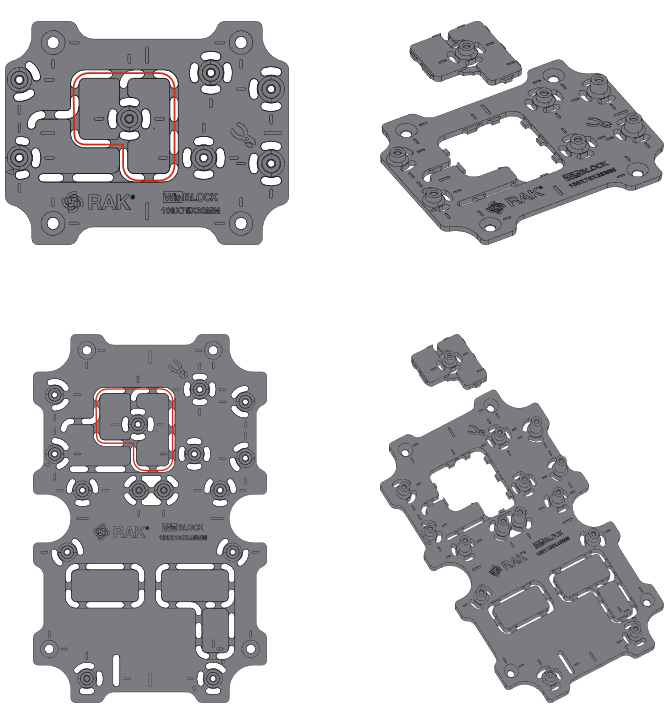 Figure 1: RAK19007 WisBlock Base board cut-out area
RAK19003
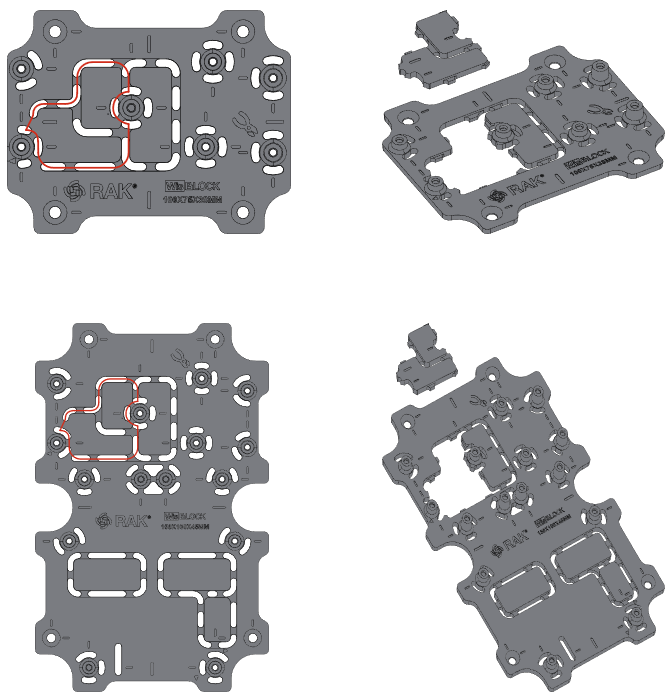 Figure 1: RAK19003 WisBlock Base board cut-out area
RAK19001
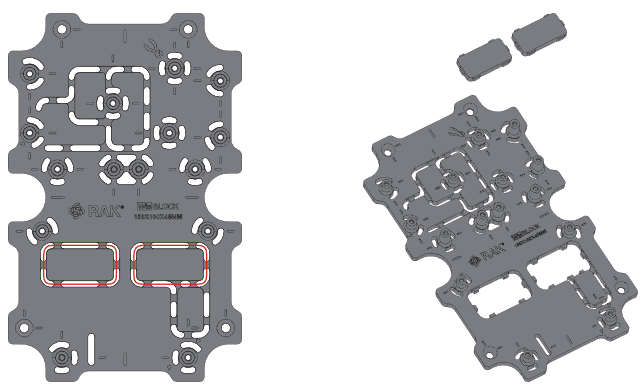 Figure 1: RAK19001 WisBlock Base board cut-out area
- Screw the WisBlock to Internal Mounting Plate.
After cutting the Internal Mount Plate, install the WisBlock Base board onto the Internal Mount Plate with 2.2*5 mm self-tapping screws, as shown in Figure 9.
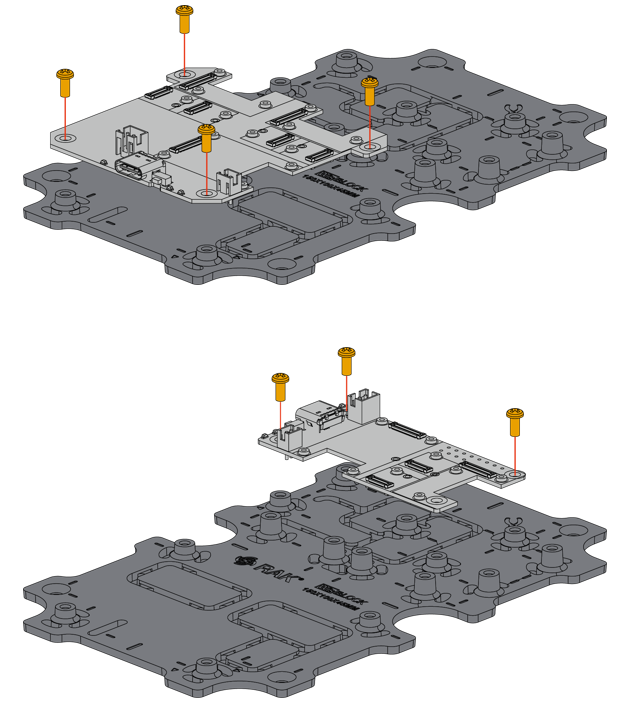 Figure 1: Installing WisBlock Base board on Internal Mount Plate
- Attach the Mounting Plate to the Enclosure.
Then, install the WisBlock Internal Mount Plate to the base of the enclosure using four (4) pieces of M3*4 mm Countersunk head screws, as shown in Figure 10.
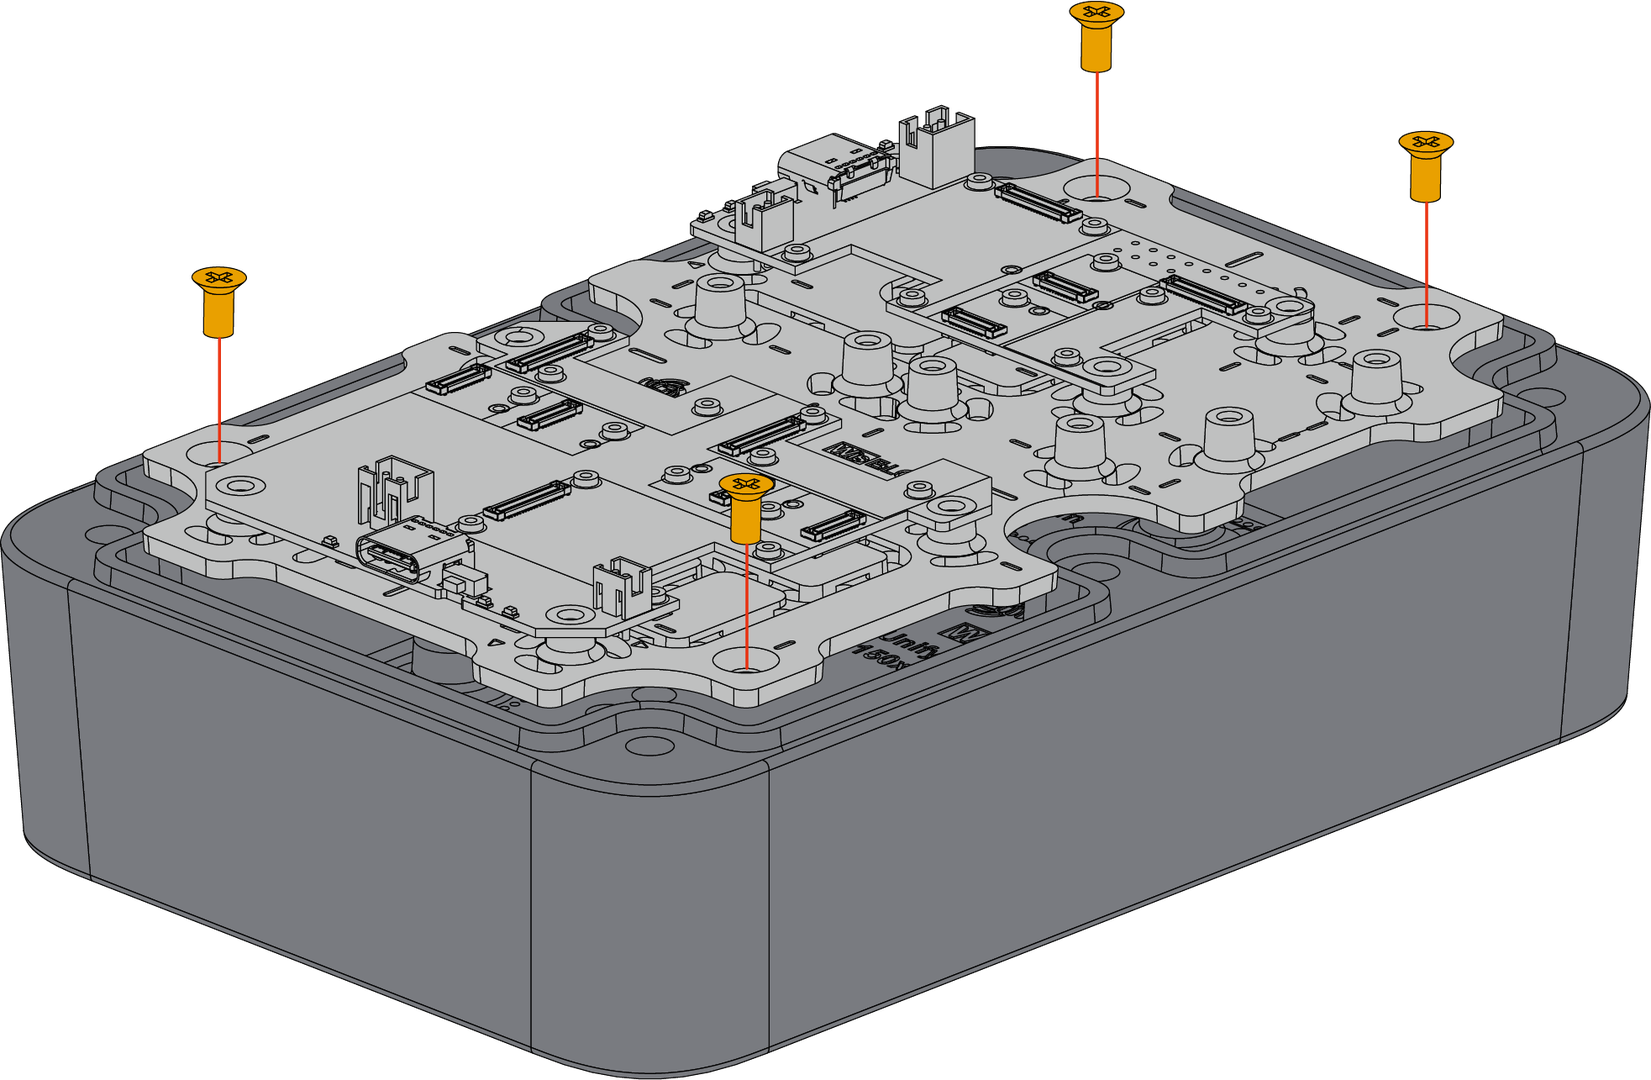 Figure 1: Installing Internal Mount Plate to the enclosure
- Cover the Enclosure with Lid.
Finally, close the WisBlock Unify Enclosure with the top lid using six (6) pieces of M4 x 8 mm head screw with a washer, as shown in Figure 11.
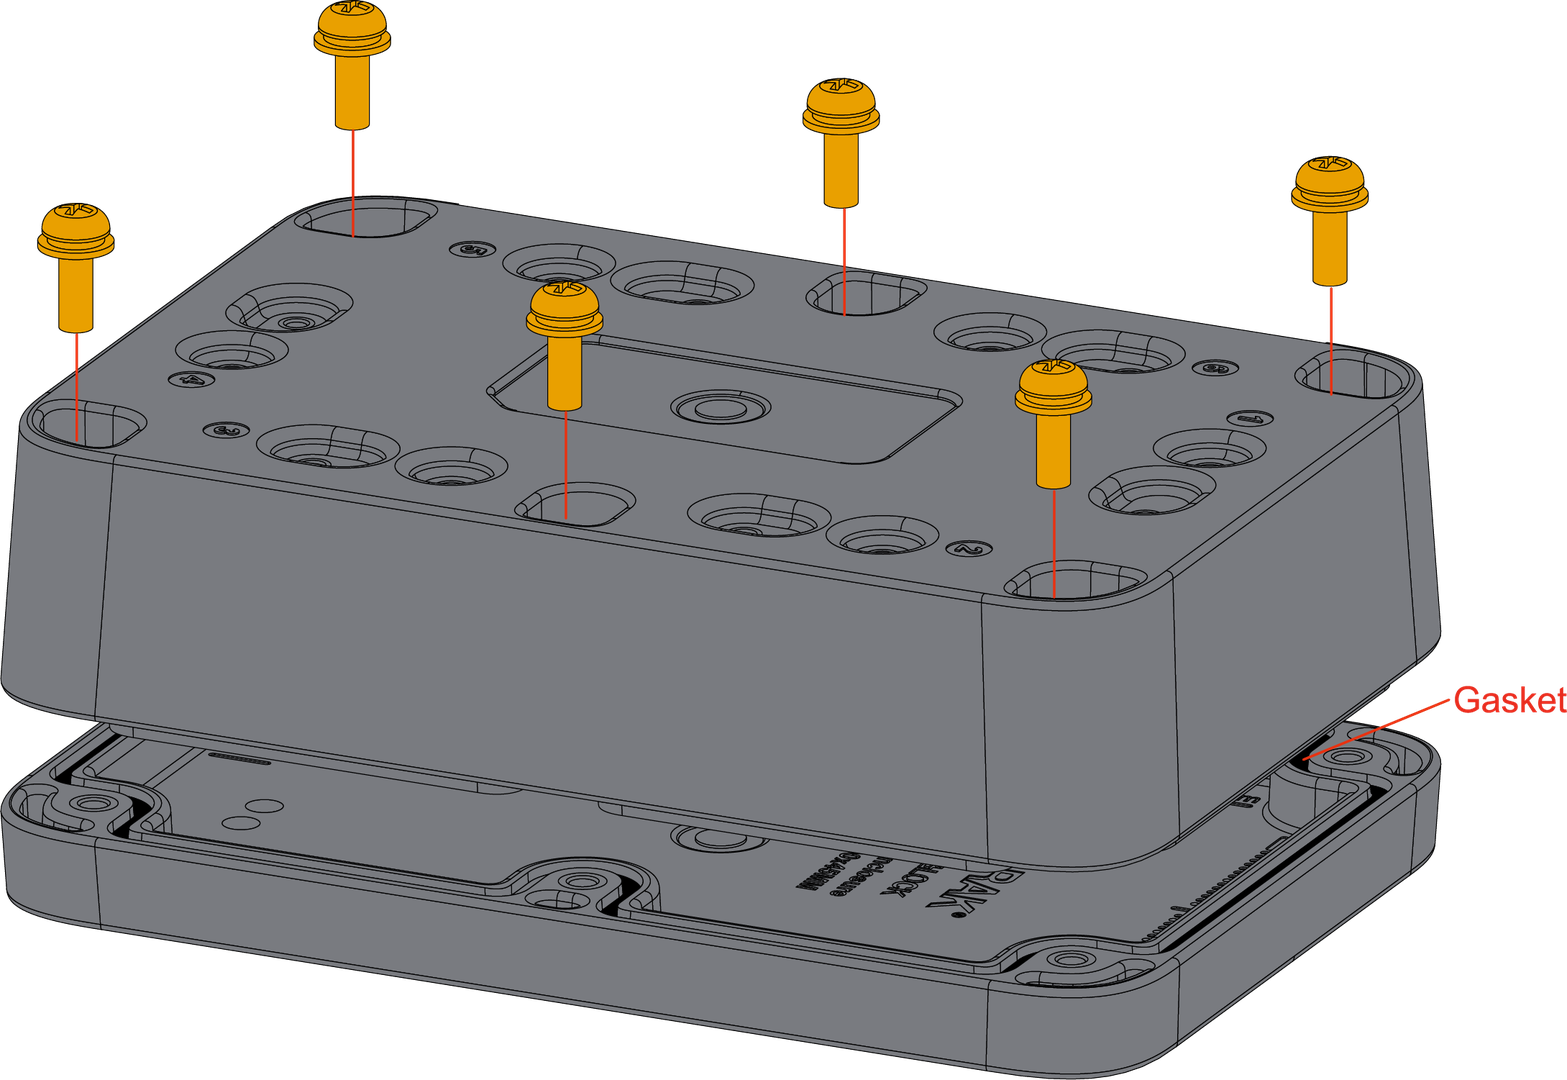 Figure 1: Closing the WisBlock Unify Enclosure
Mounting Guide
After full assembly of the enclosure, the next step is to choose the right mounting accessory for your application. Each mount accessory has a mark indicated by a capital letter, as shown in Figure 12, and each WisBlock Unify Enclosure has several fixed positions, which are indicated by a mark of numerals, as shown in Figure 13. The medium-sized WisBlock Unify Enclosure has only six (6) fixed positions.
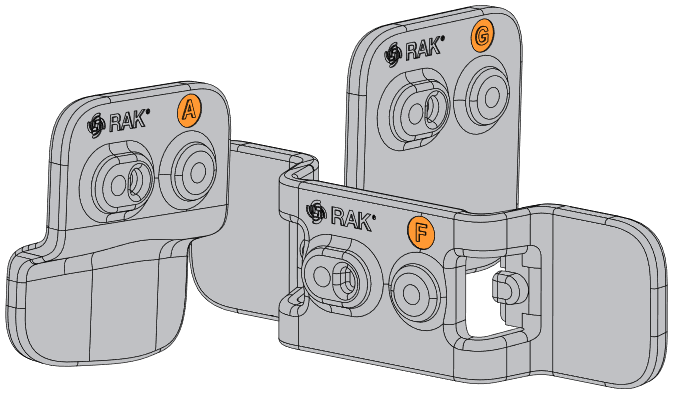 Figure 1: Mount accessories marked with letters
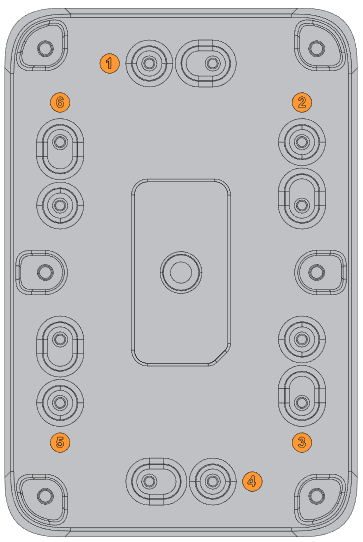 Figure 1: WisBlock Unify Enclosure marked with numerals
Pole Mount Vertical (Type A)
- For vertical pole mount, use two (2) pieces of mount accessories, which has an indicated mark of the letter A, as shown in Figure 14.
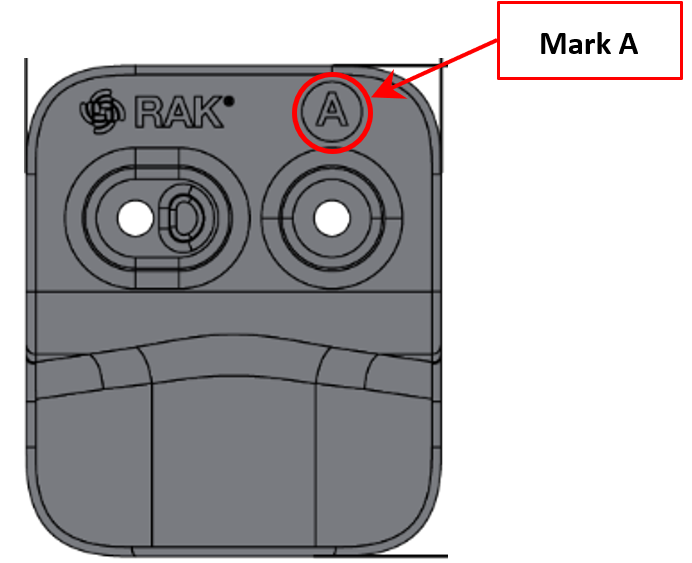 Figure 1: Mount accessory marked with the letter A
- Fix the pole mounts marked with the letter A on the WisBlock Unify Enclosure using four (4) pieces of M3*8 mm Head screw with a washer. Place it on fixed positions number 1 & 4 of the enclosure, as shown in Figure 15.
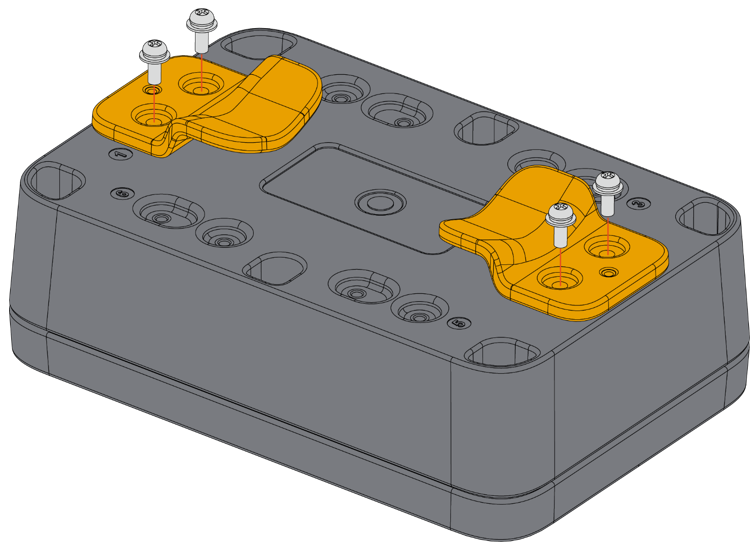 Figure 1: Fixing the pole mount on the enclosure
| Size | Fix Position |
|---|---|
| Medium | 1 & 4 |
- After fixing the mounts on the enclosure, place the WisBlock Unify Enclosure onto the pole by using two (2) steel strips (65-89 mm), as shown in Figure 16.
The steel strips ONLY support 65-89 mm diameter of the pole.
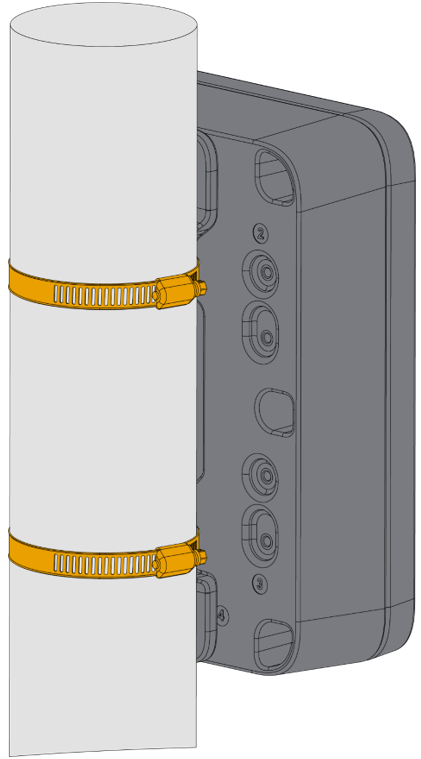 Figure 1: Fixing the enclosure on the pole
Pole Mount Overlap Horizontal (Type C)
- For horizontal pole mount overlap, use two (2) pieces of mount accessories, which has an indicated mark of the letter C, as shown in Figure 17.
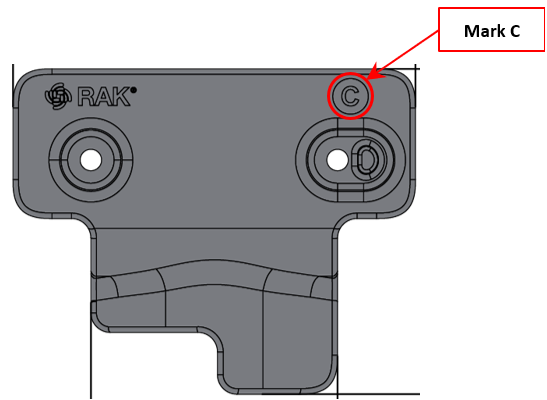 Figure 1: Mount accessory marked with the letter C
- Fix the pole mounts marked with the letter C on the WisBlock Unify Enclosure using four (4) pieces of M3*8 mm Head screw with a washer. Place it on fixed positions between number 2 & 3 or 5 & 6 of the enclosure, in Figure 18.
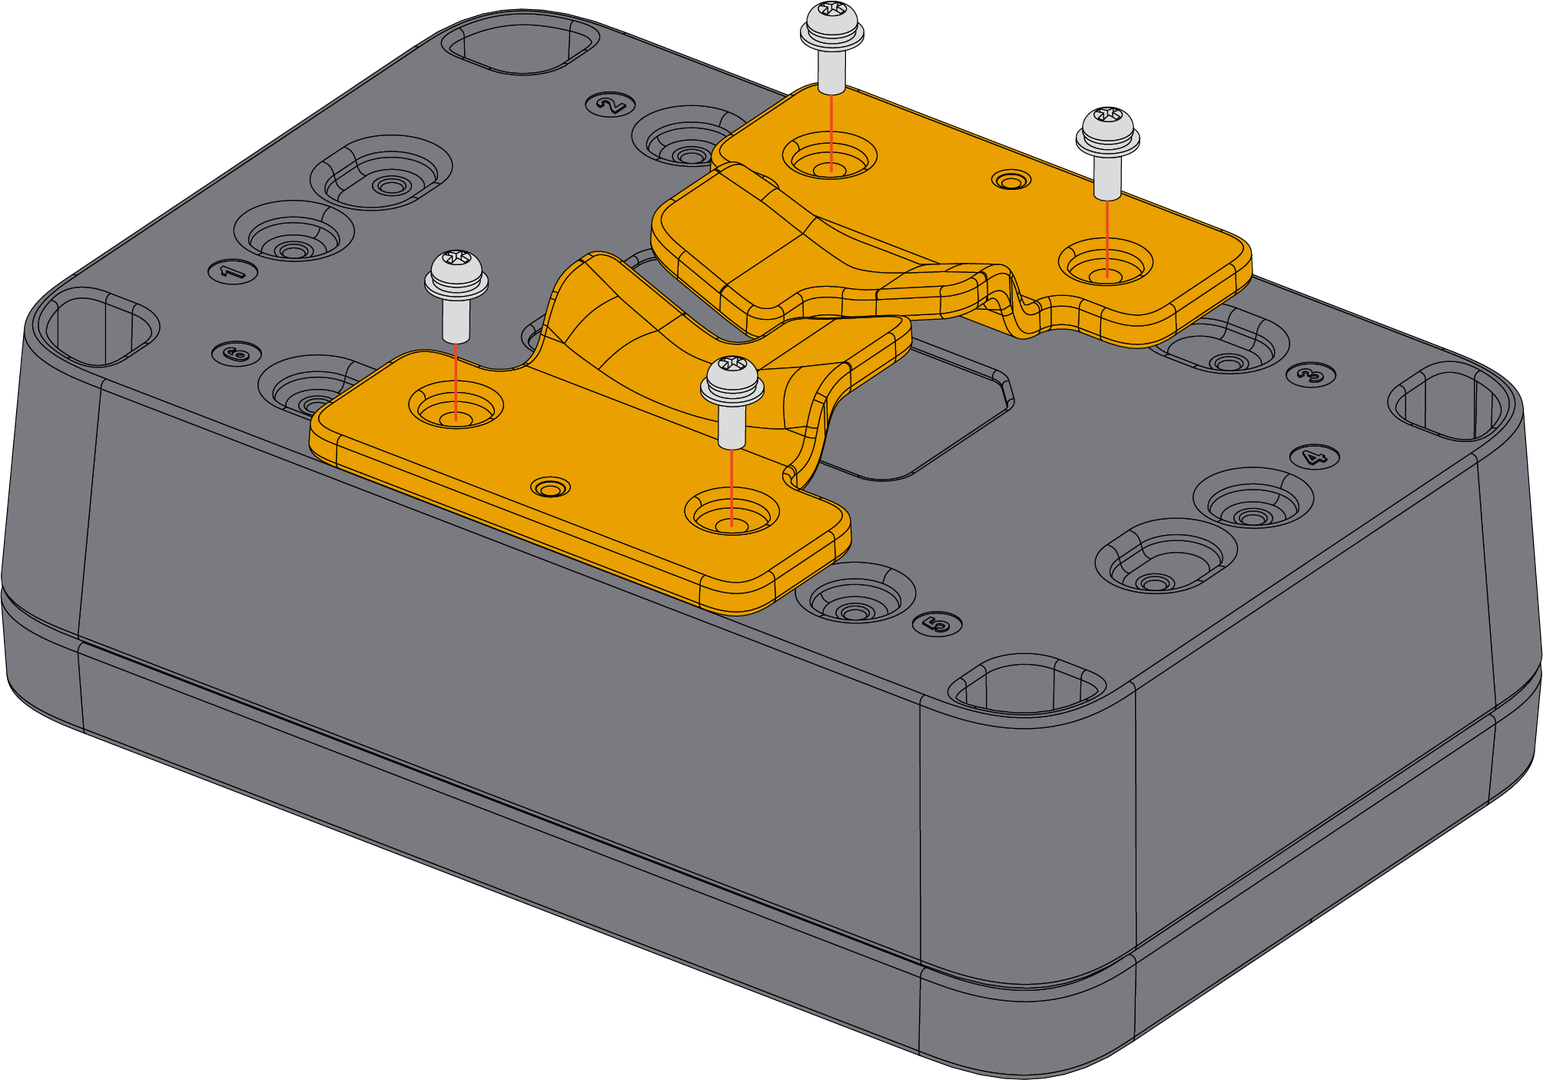 Figure 1: Fixing the pole mount on the enclosure
| Size | Fix Position |
|---|---|
| Medium | Between 2 & 3 or 5 & 6 |
- After fixing the mounts on the enclosure, place the WisBlock Unify Enclosure onto the pole by using two (2) steel strips (65-89 mm), as shown in Figure 19.
The steel strips ONLY support 65-89 mm diameter of the pole.
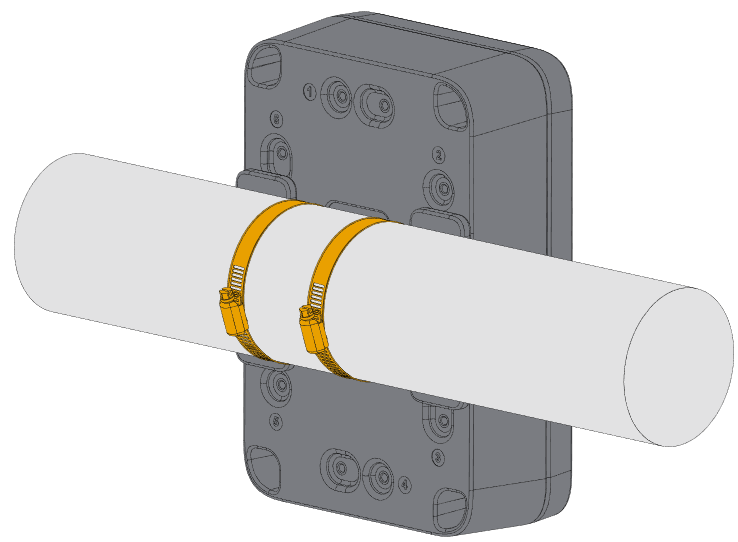 Figure 1: Fixing the enclosure on the pole
Wall Mount (Type D)
- For wall mount, use two (2) pieces of mount accessories with an indicator marked with the letter D, as shown in Figure 20.
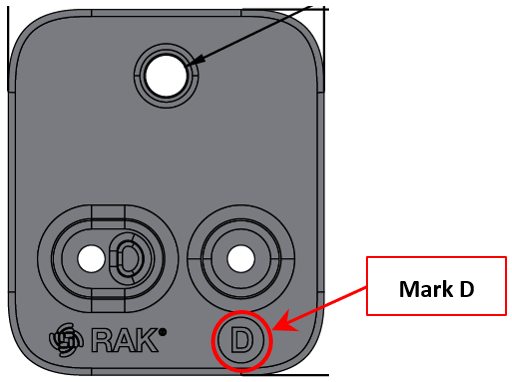 Figure 1: Mount accessory marked with the letter D
- Fix the wall mounts marked with the letter D on the WisBlock Unify Enclosure using four (4) pieces of M3*8 mm head screw with a washer. Place it on fix positions number 1 & 4 or 2 & 6 or 3 & 6 of the enclosure, as shown in Figure 21.
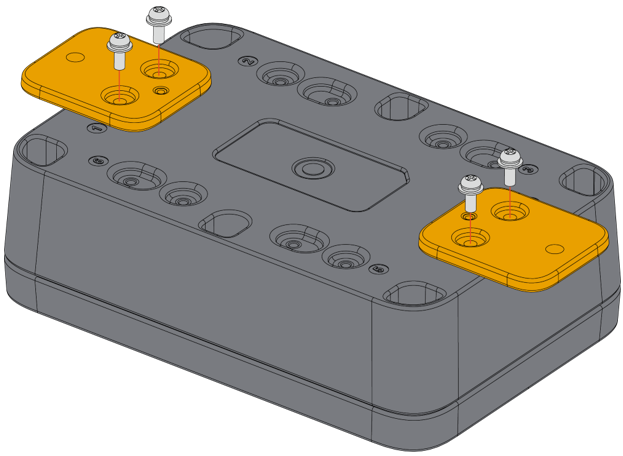 Figure 1: Fixing the wall mount on the enclosure
| Size | Fix Position |
|---|---|
| Medium | 1 & 4 or 2 & 6 or 3 & 6 |
- Lastly, follow the steps below, as also shown in Figure 22:
- Step 1: Use a Φ5 mm drill head to drill holes in the wall. Drill at least 55-60 mm in depth.
- Step 2: Plug the screw anchors into the drilled holes. You can use a hammer to plug it in. It helps the screws to have a secure fit on the wall.
- Step 3: Fix the WisBlock Unify Enclosure on the wall using two (2) pieces of ST3.5*35 mm tapping screws.
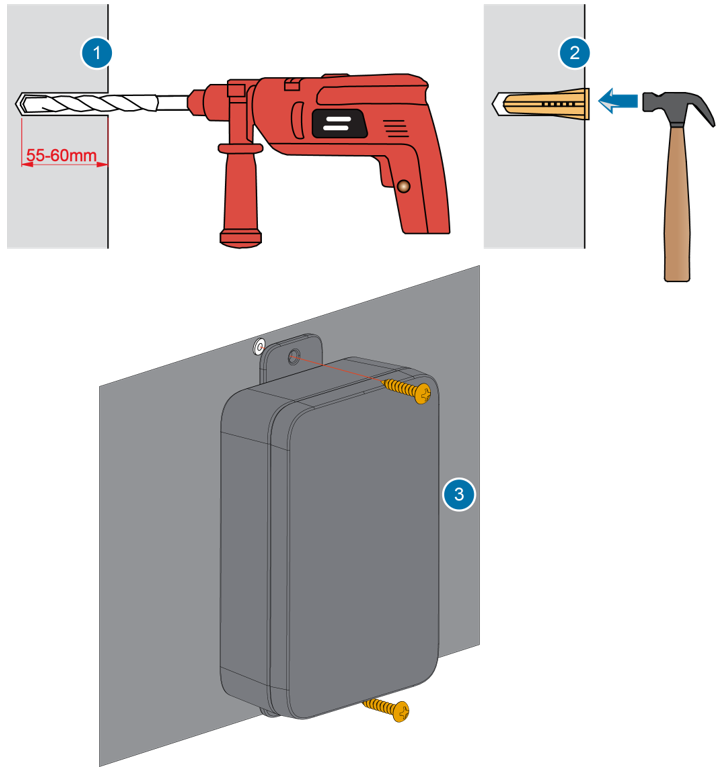 Figure 1: Fixing the enclosure on the wall
Belt Clip Mount (Type E)
- For belt clip mount, use one (1) piece of mount accessory with an indicator marked with the letter E, as shown in Figure 23.
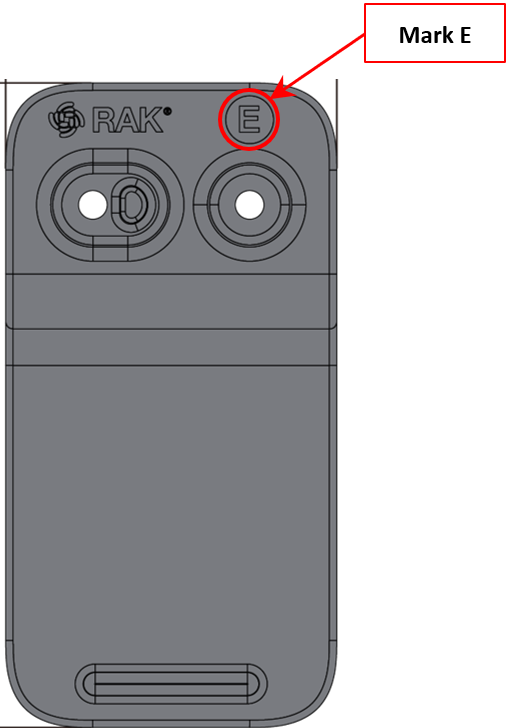 Figure 1: Mount accessory marked with the letter E
- Fix the belt clip mount marked with the letter E on the WisBlock Unify Enclosure using two (2) pieces of M3*8 mm Head screw with washer. Place it on fixed positions number 1 or 4 of the enclosure, as shown in Figure 24.
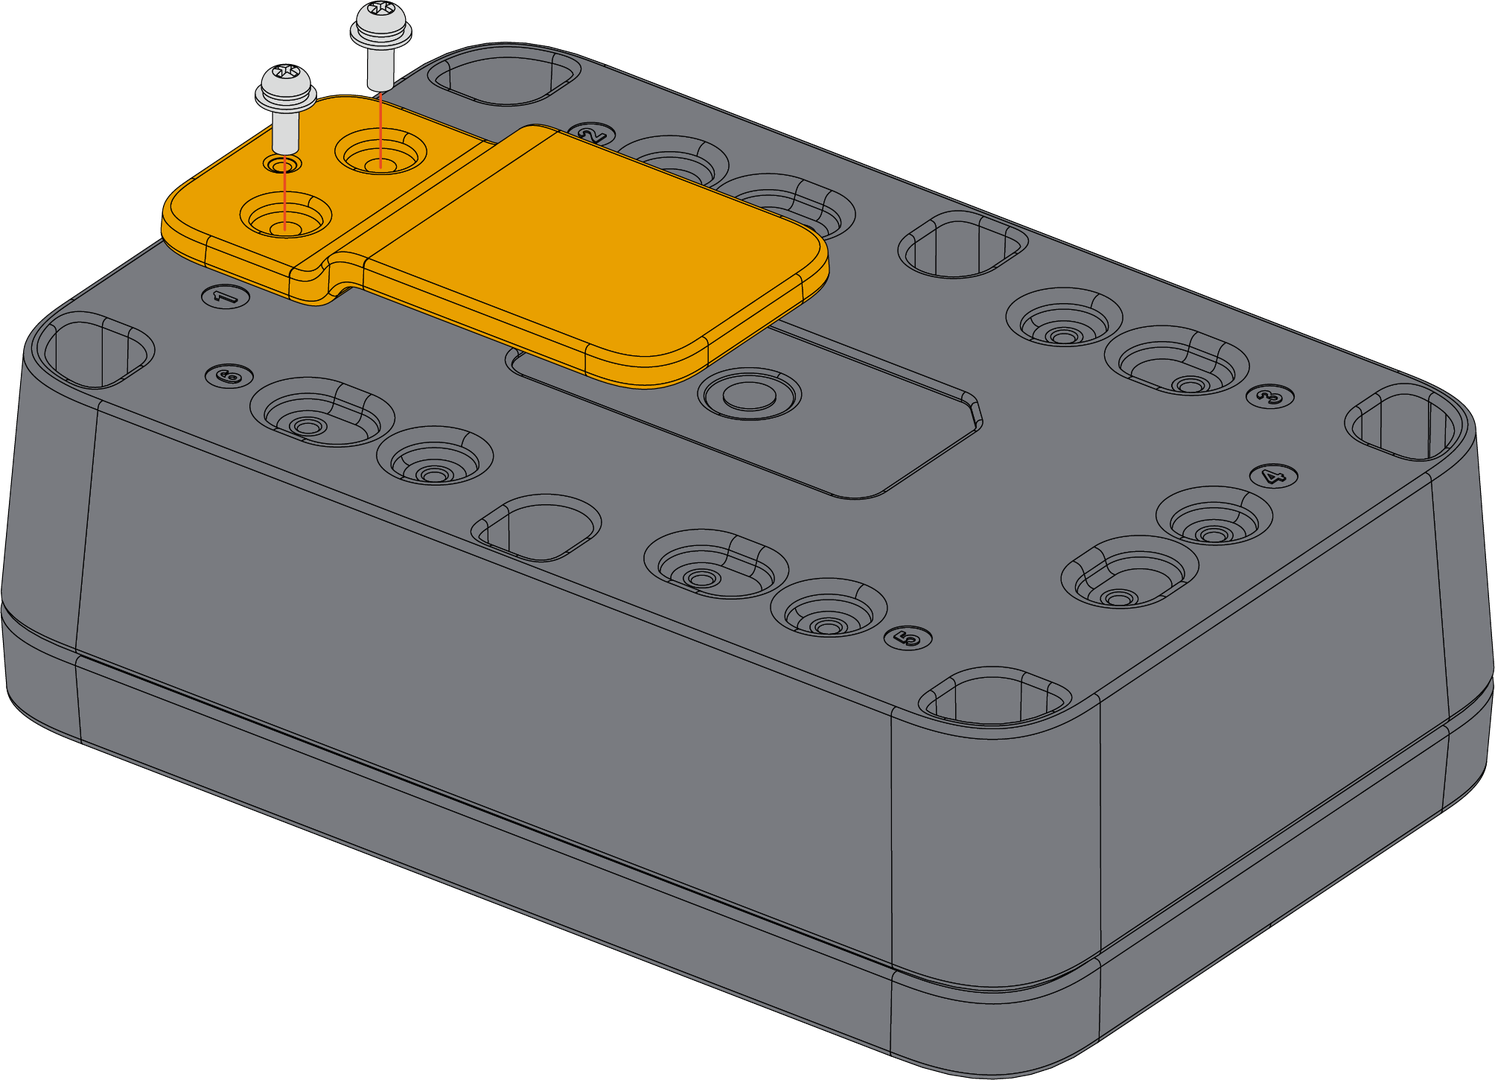 Figure 1: Fixing the belt clip mount on the enclosure
| Size | Fix Position |
|---|---|
| Medium | 1 or 4 |
- Lastly, clip the unify enclosure on the belt directly, as shown in Figure 25.
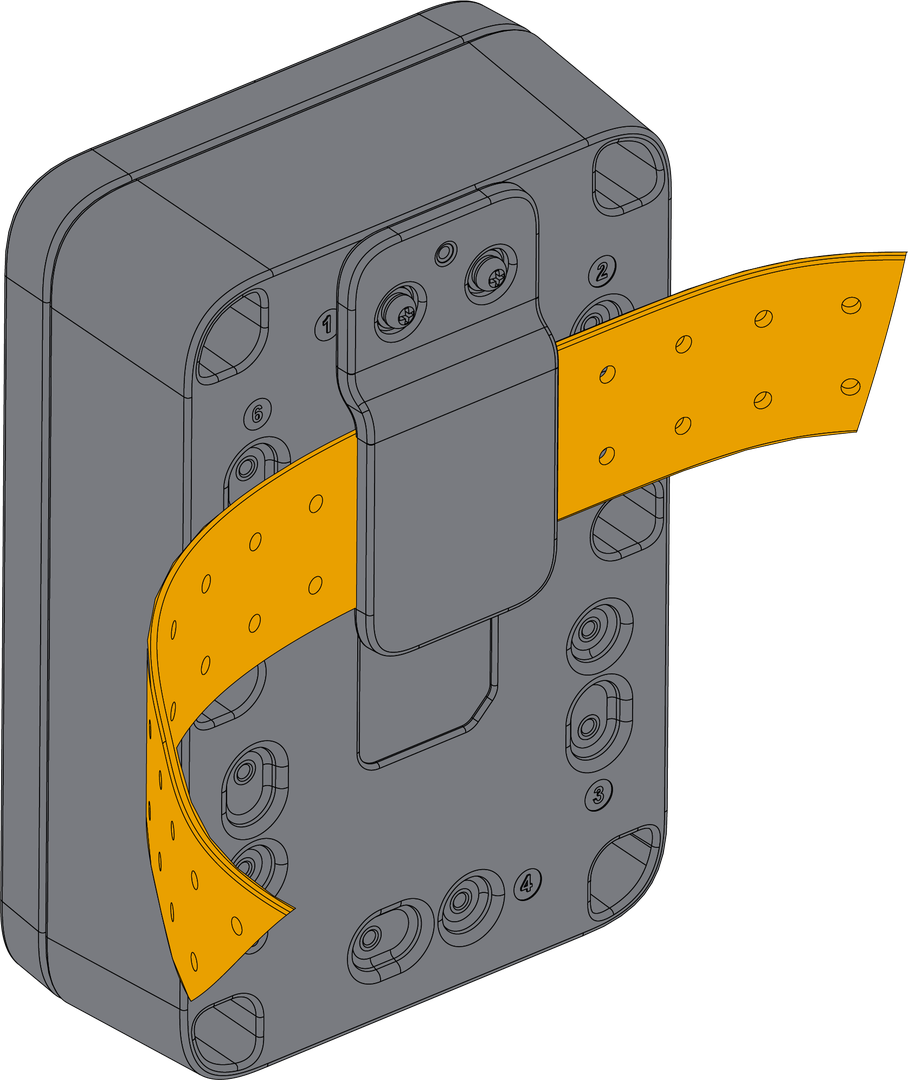 Figure 1: Fixing the enclosure on the belt clip
DIN Mount (Type F)
- For DIN mount, use two (2) pieces of mount accessories with an indicator marked with the letter F, as shown in Figure 26.
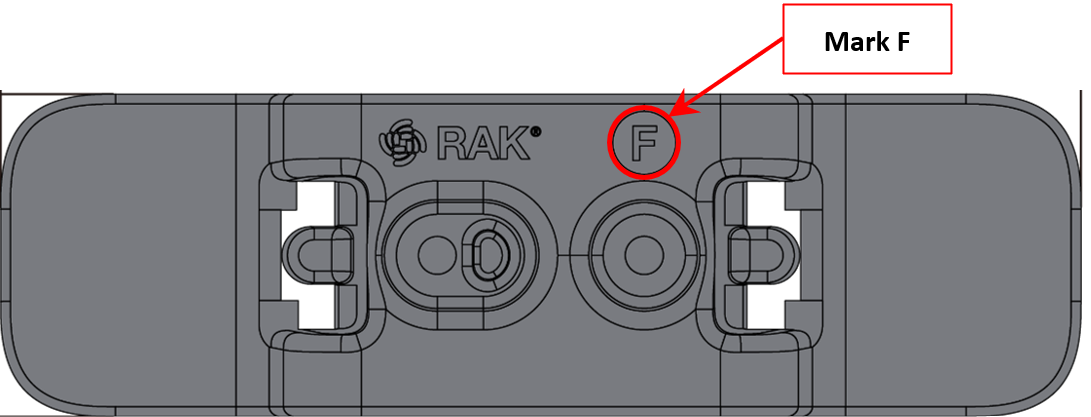 Figure 1: Mount accessory marked with the letter F
- Fix the DIN mount marked with the letter F on the WisBlock Unify Enclosure using four (4) pieces of M3*8 mm Head screw with the washer. Place it on fixed positions number 1 & 4 or 2 & 6 of the enclosure, as shown in Figure 27 and Figure 28.
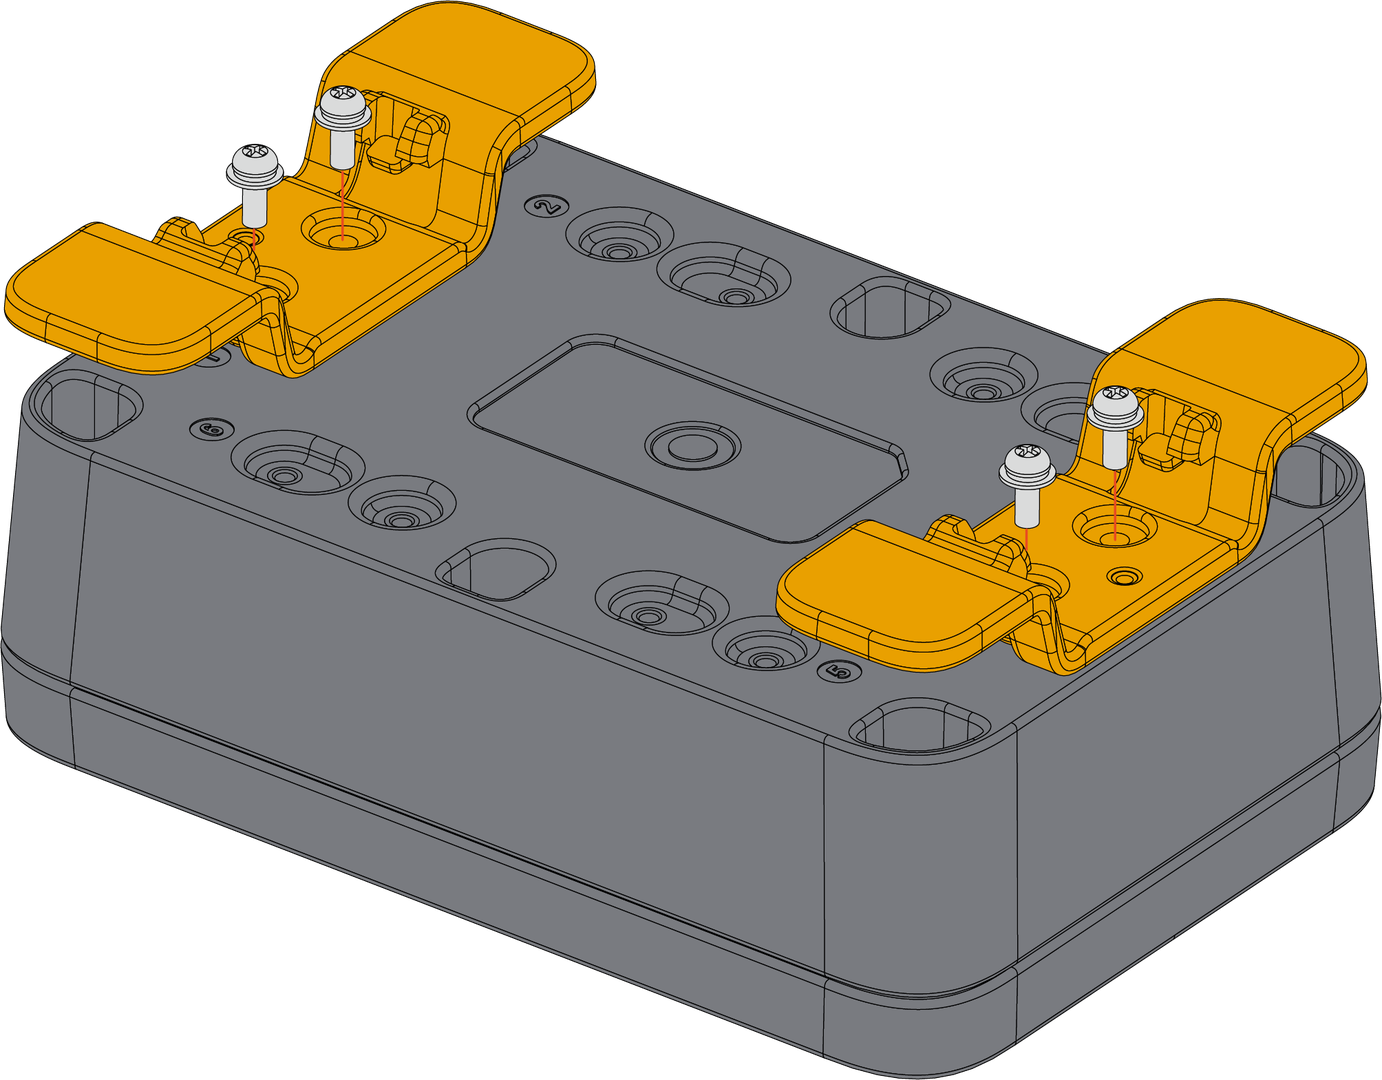 Figure 1: Fixing the DIN mount on the enclosure's position number 1 & 4
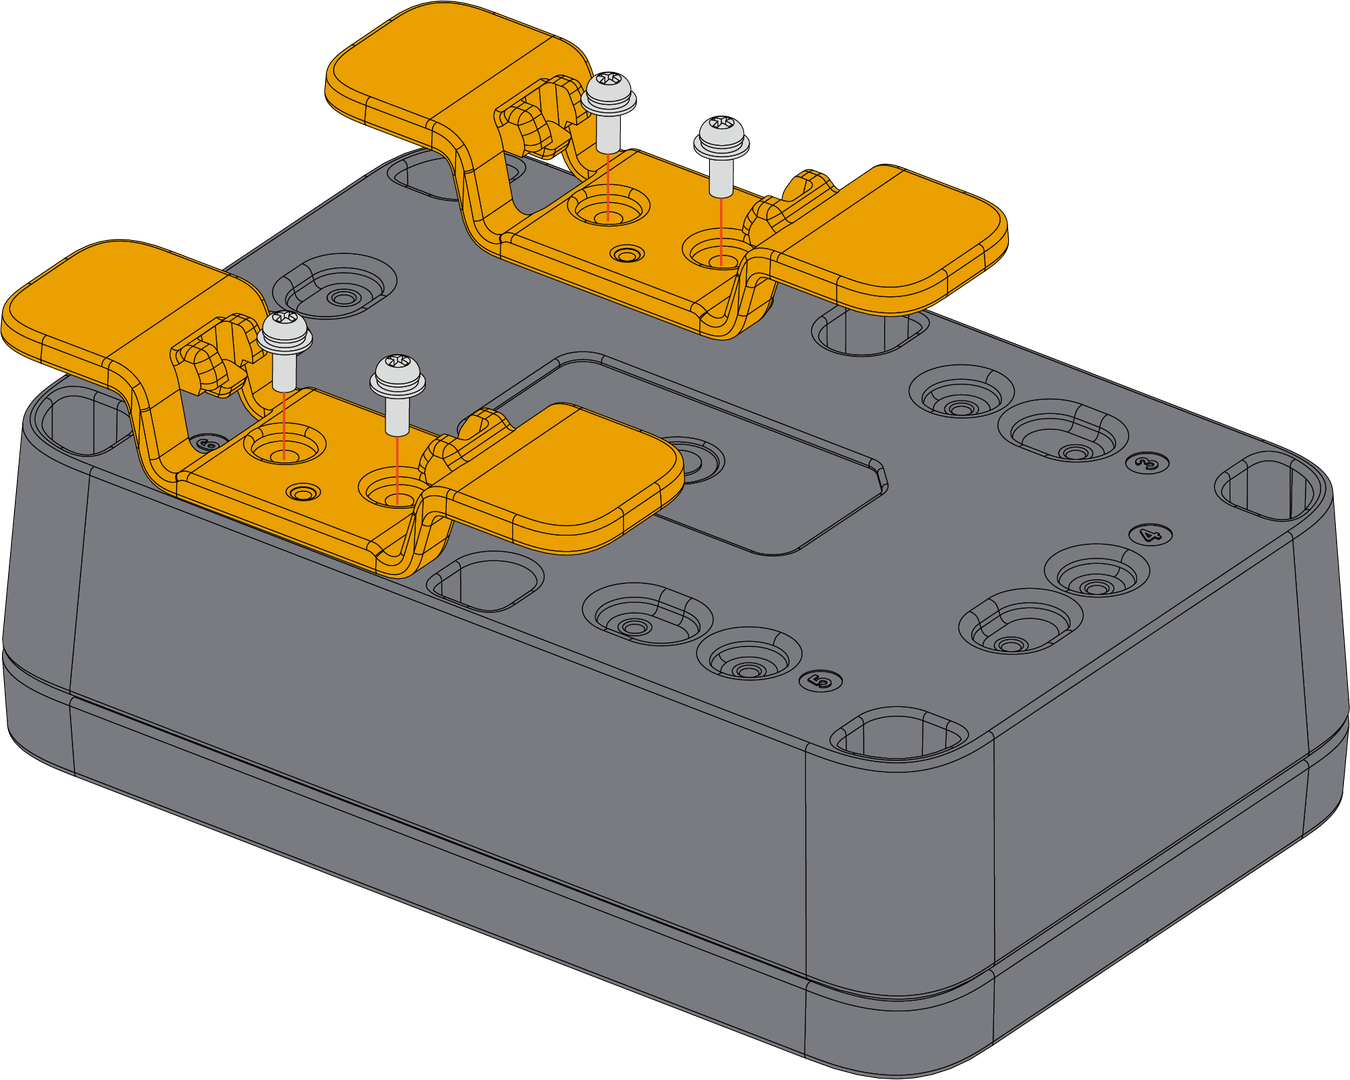 Figure 1: Fixing the DIN mount on the enclosure's position number 2 & 6
| Size | Fix Position |
|---|---|
| Medium | 1 & 4 or 2 & 6 |
- Lastly, clamp the buckle of the DIN mount kit at one end on the edge of the DIN rail, then rotate and press the enclosure to clamp the other end, as shown in Figure 29.
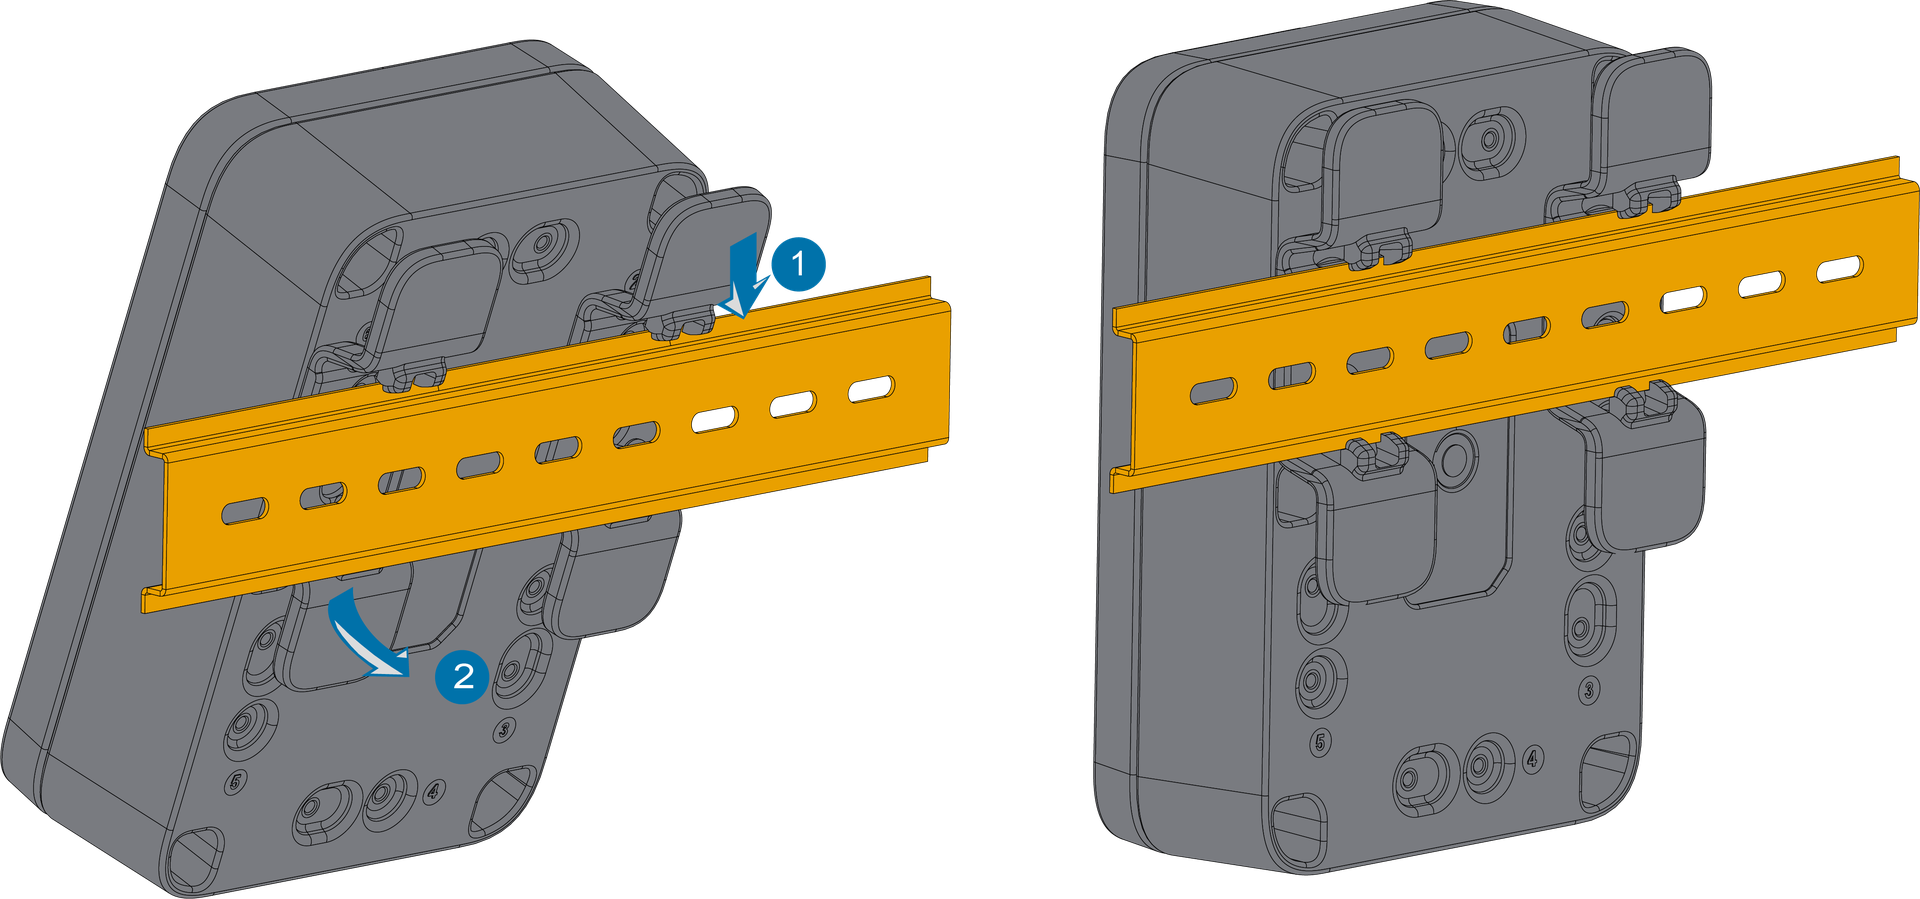 Figure 1: Fixing the enclosure on the DIN rail
Magnet Mount (Type G)
- For magnet mount, use one (1) up to six (6) pieces of mount accessories with an indicator marked with the letter G as shown in Figure 30.
- The quantity of magnets to be used will depend on the weight of the device and enclosure.
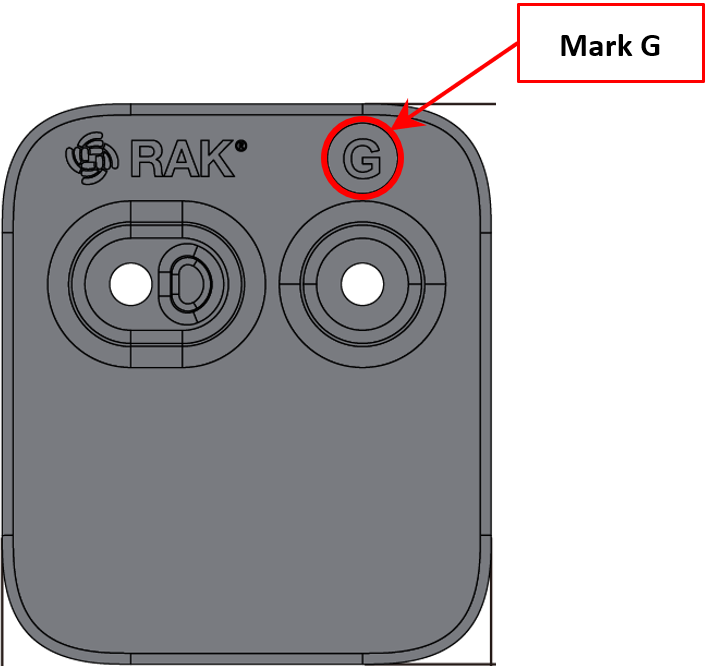 Figure 1: Mount accessory marked with the letter G
- Fix the magnet mount marked with the letter G on the WisBlock Unify Enclosure using one (1) to eight (8) pieces of M3*8 mm Head screw with washer. Place it on fixed positions number 1 to 6 of the enclosure as shown in Figure 31.
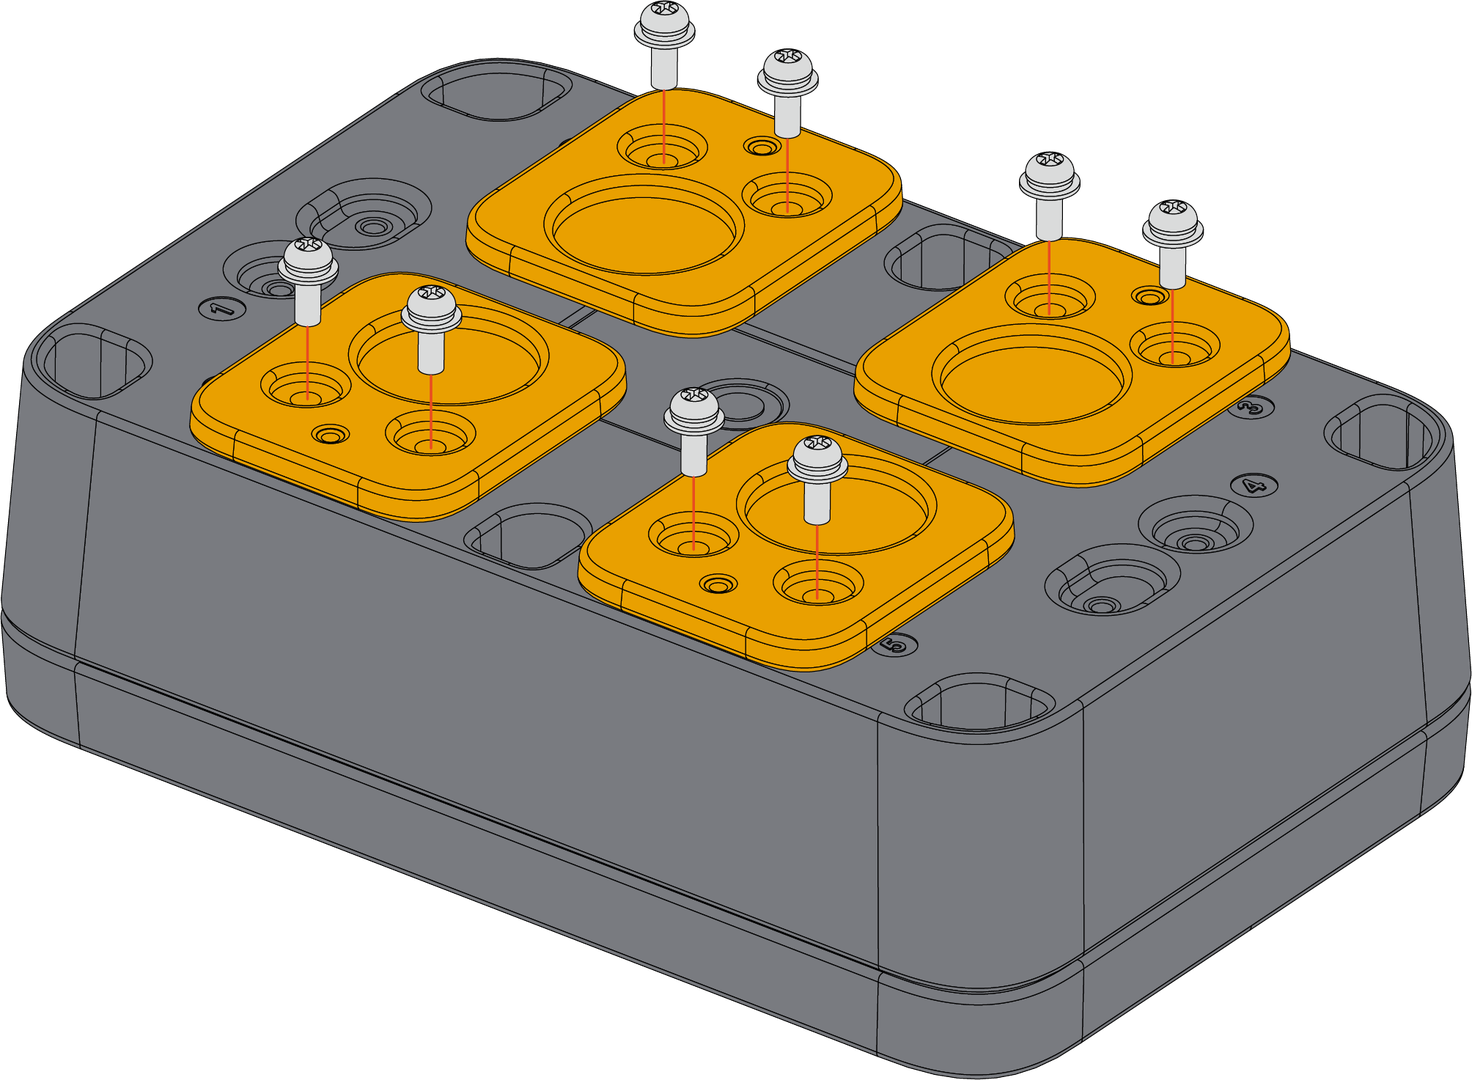 Figure 1: Fixing the magnet mount on the enclosure
| Size | Fix Position |
|---|---|
| Medium | 1 - 6 |
- Place the magnets onto the mounting, as shown in Figure 32.
Confirm the number of magnets according to the weight of the device. The medium and large unify enclosures support up to 6 magnets.
- Avoid placing the enclosure too high or in an environment that vibrates, shocks, or is unstable because doing so could result in equipment damage or physical injury.
- The effect of magnet adsorption is related to the material of adsorption position, surface spraying thickness, and roughness, so it can only be used after confirming that the installation effect is not a problem. If the surface condition of the installation position is not good, it may also affect the reliability of the magnet installation.
- When the enclosure is fixed on the desk by magnetic suction, do not push it back and forth artificially, otherwise, the coating on the contact surface will be damaged.
- During installation, pay attention to the fixation of the external cable of the device to avoid falling off the enclosure due to the excessive weight of the external cable, resulting in personal injury or equipment damage.
- Do not put the magnet close to the magnetic card and other products, or else the stored content of the product may be erased.
- Do not put the magnet close to the computer and other electronic equipment susceptible to the magnetic field, otherwise, it may cause electronic equipment-related failure.
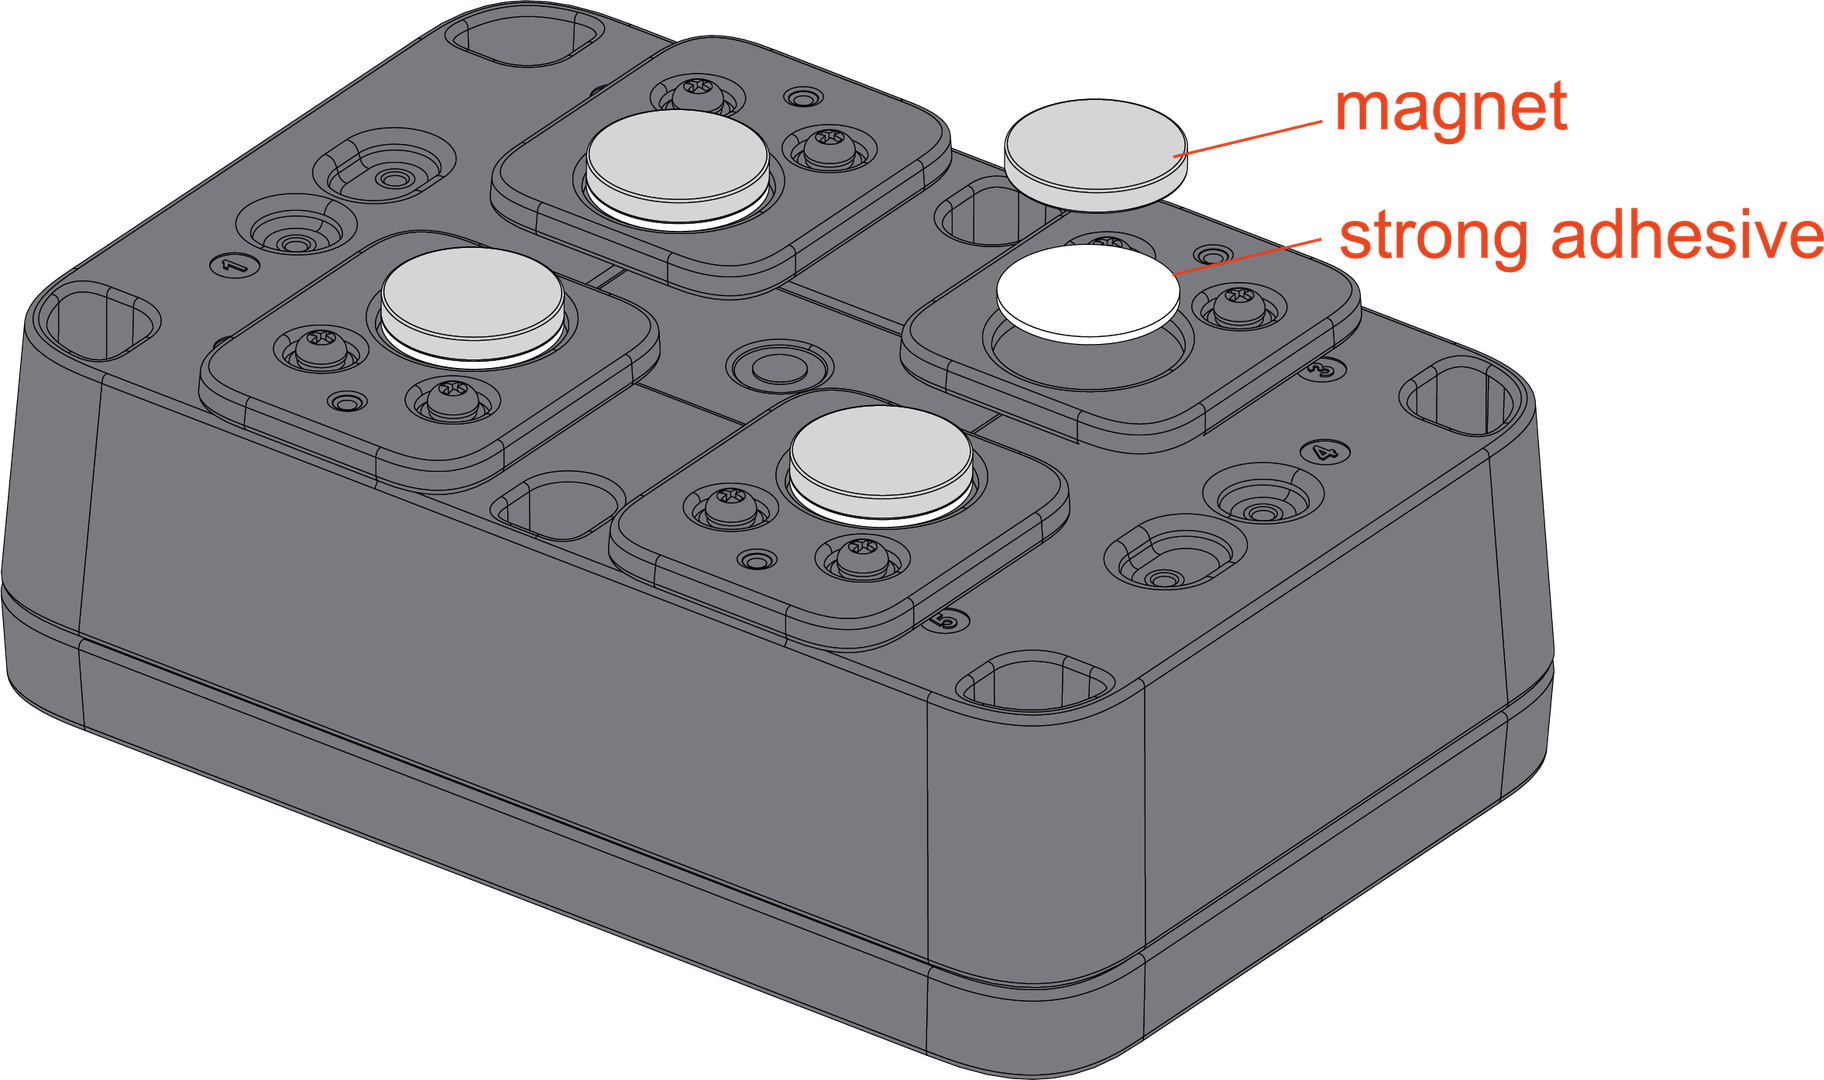 Figure 1: Fixing the magnet mount on the enclosure
- The magnet should be ordered separately. Consult before placing an order.
| No. | Diameter | Thickness | Material | Adsorption |
|---|---|---|---|---|
| 1 | 20 mm | 3 mm | NdFeB | 2800 Gauss (TBD) |
| 2 | 20 mm | 5 mm | NdFeB | 3100 Gauss (TBD) |
Handle with care to avoid personal injury or damage to the magnet.
- Lastly, attach the unify enclosure to a metallic surface. Be careful not to pinch your fingers due to the high magnetism.
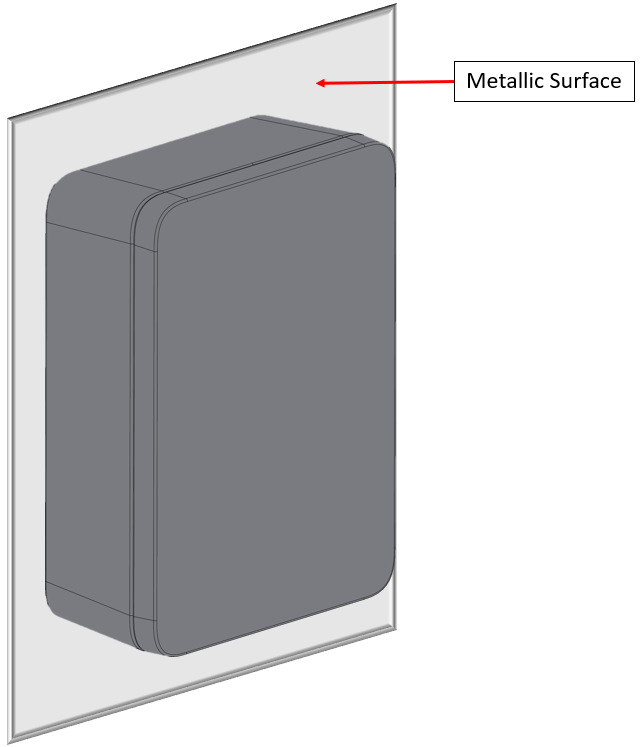 Figure 1: Fixing the enclosure onto the metal surface
Belt Loop Mount (Type H)
- For belt loop mount, use two (2) pieces of mount accessories with an indicator marked with the letter H, as shown in Figure 34.
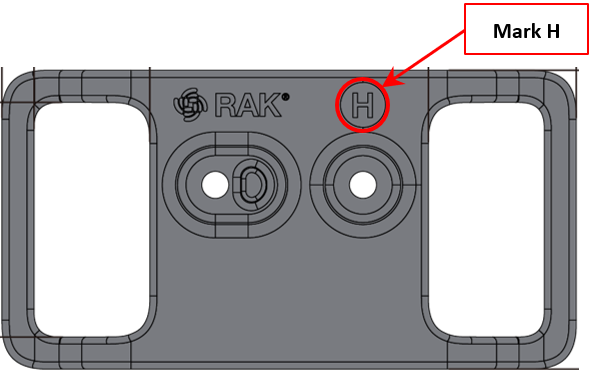 Figure 1: Mount accessory marked with the letter H
- Fix the belt loop mount marked with the letter H on the WisBlock Unify Enclosure using four (4) pieces of M3*8 mm Head screw with a washer. Place it on fixed positions number 1 to 6 of the enclosure, as shown in Figure 35.
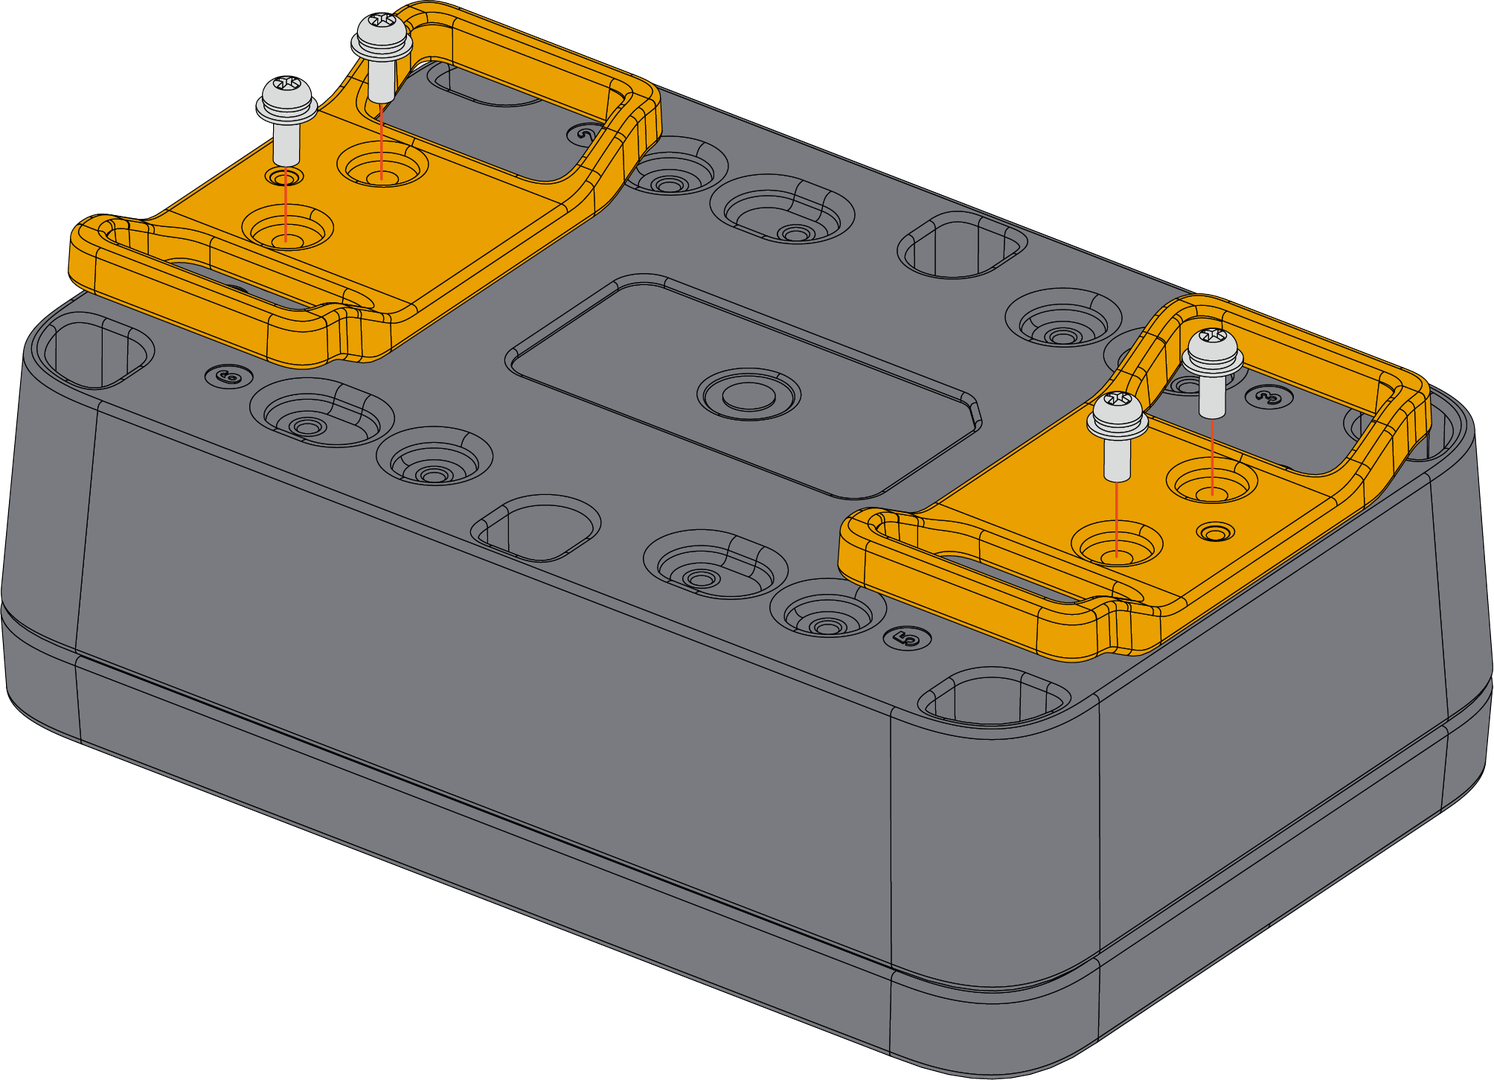 Figure 1: Fixing the belt loop mount on the enclosure
| Size | Fix Position |
|---|---|
| Medium | 1 - 6 |
- Lastly, thread the belt through the hole of the unify enclosure, as shown in Figure 36.
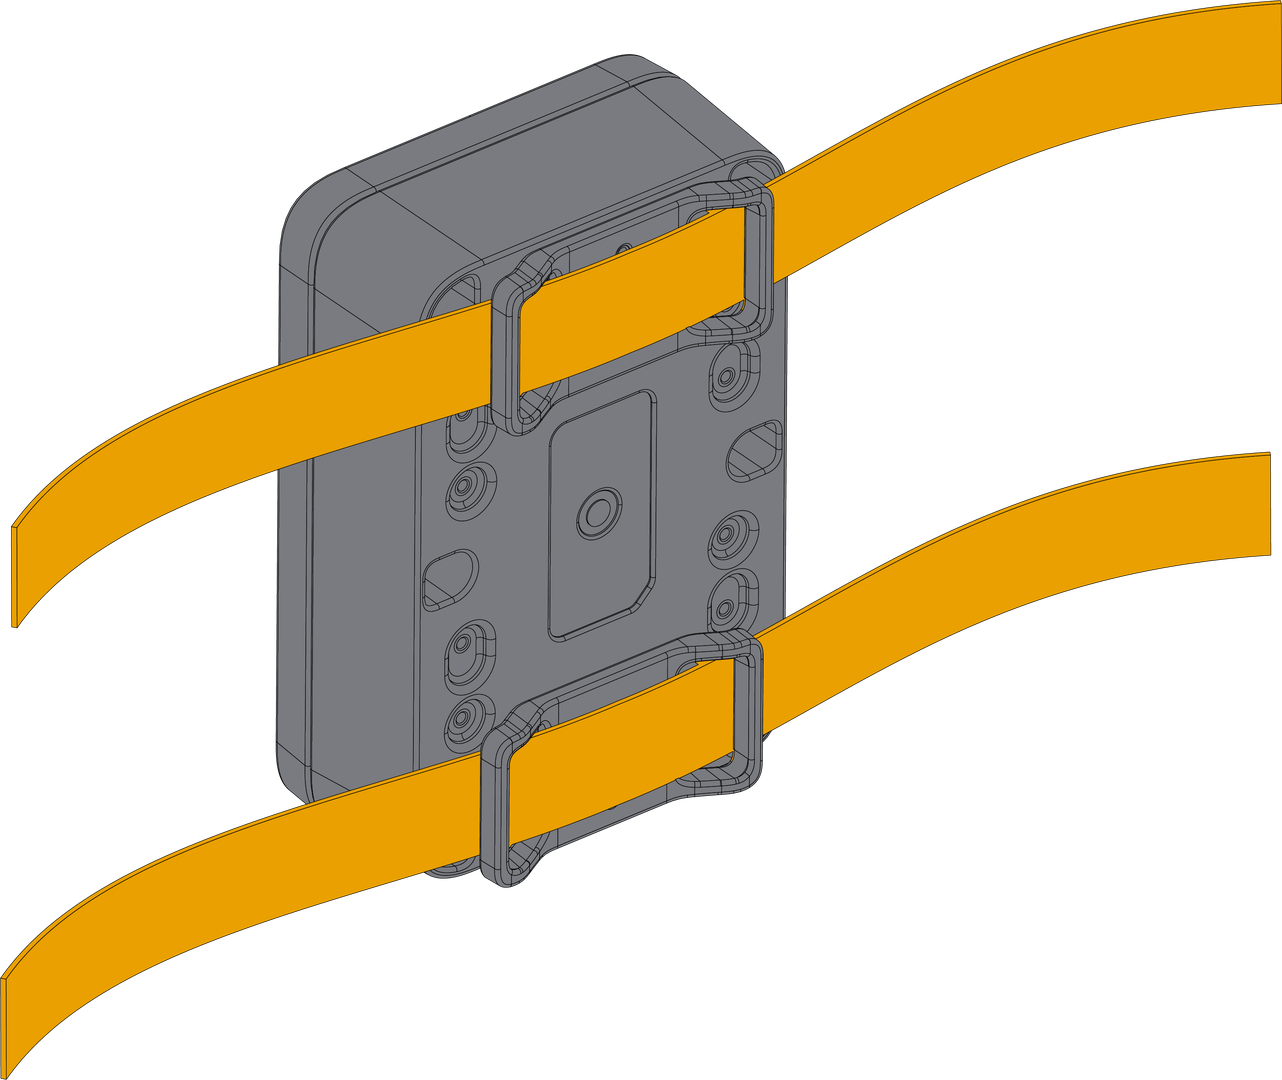 Figure 1: Fixing the enclosure on the belt thread
Label Mount (Type I)
- For label mount, use one (1) piece of mount accessory with an indicator marked with the letter I, as shown in Figure 37.
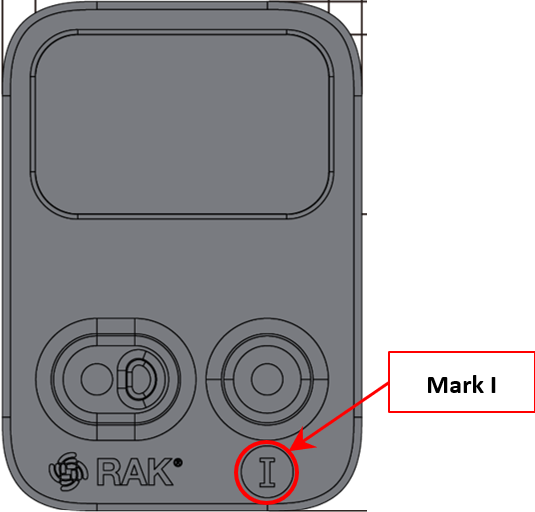 Figure 1: Mount accessory marked with the letter I
- Fix the label mount marked with the letter I on the WisBlock Unify Enclosure using two (2) pieces of M3*8 mm head screw with the washer. Place it on fixed position numbers 1 to 6 of the enclosure, as shown in Figure 38.
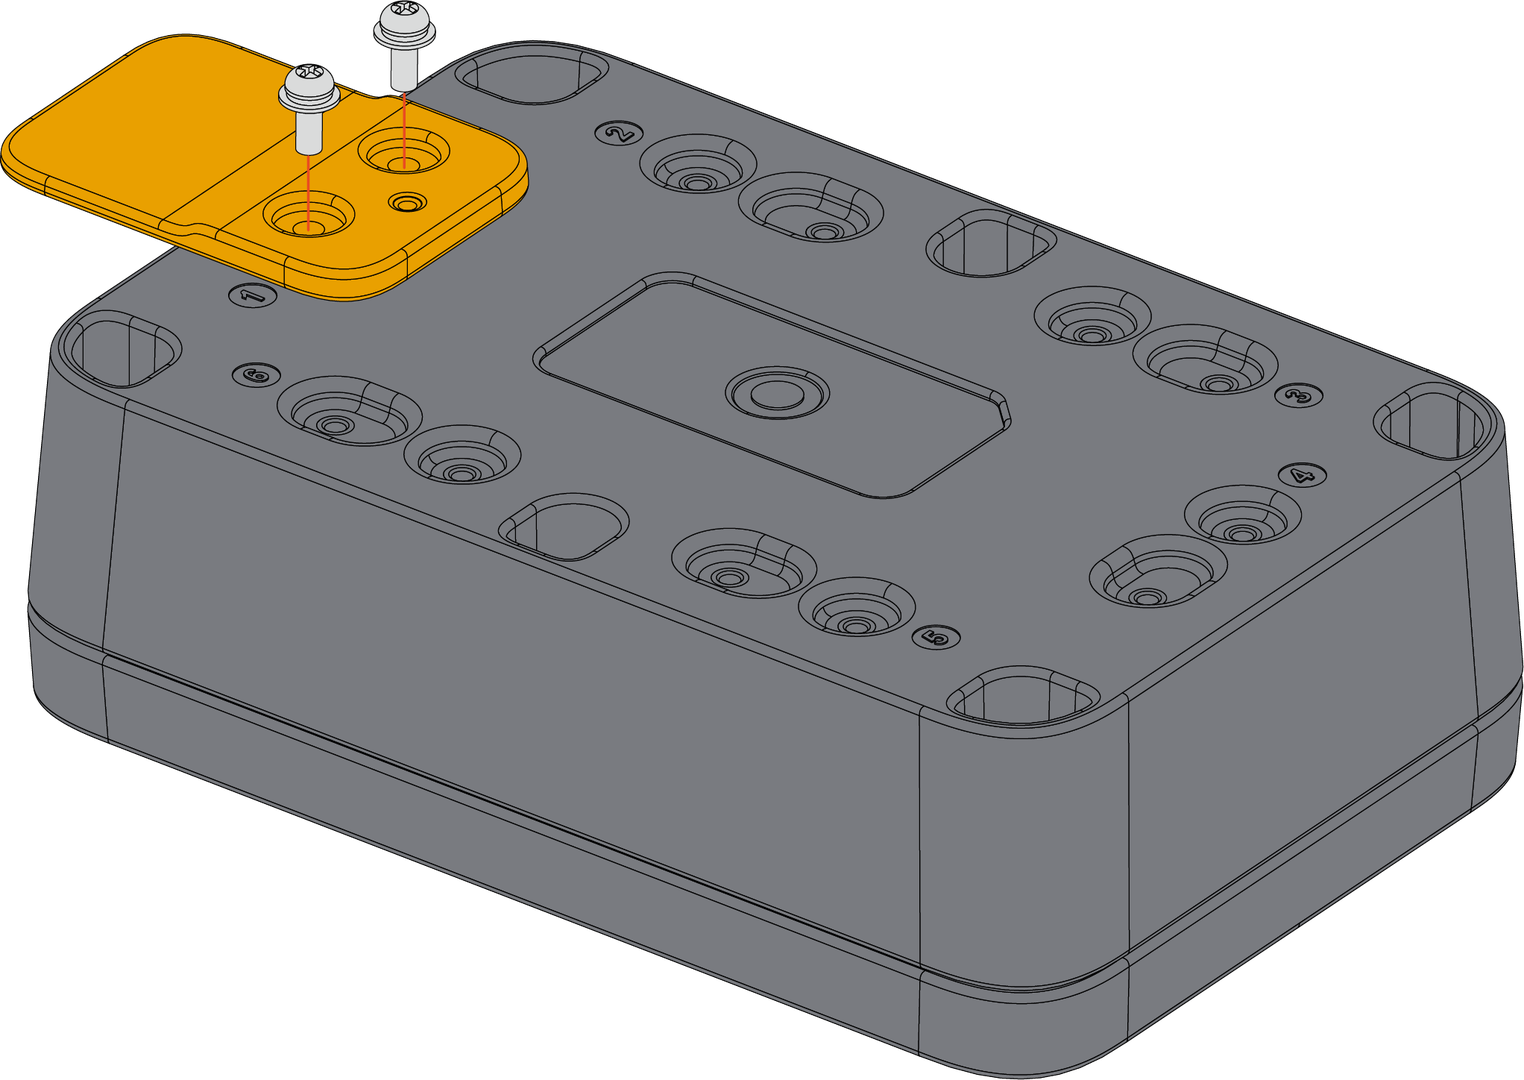 Figure 1: Fixing the label mount on the enclosure
| Size | Fix Position |
|---|---|
| Medium | 1 - 6 |
- Lastly, you can paste a 30 x 18 mm Fillet R4 label in the label zone, as shown in Figure 39 and Figure 40.
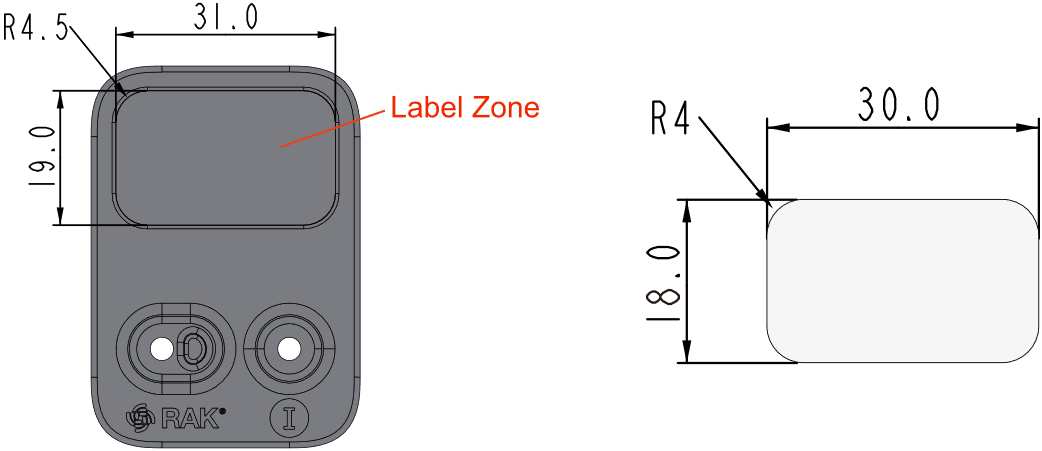 Figure 1: Label dimension
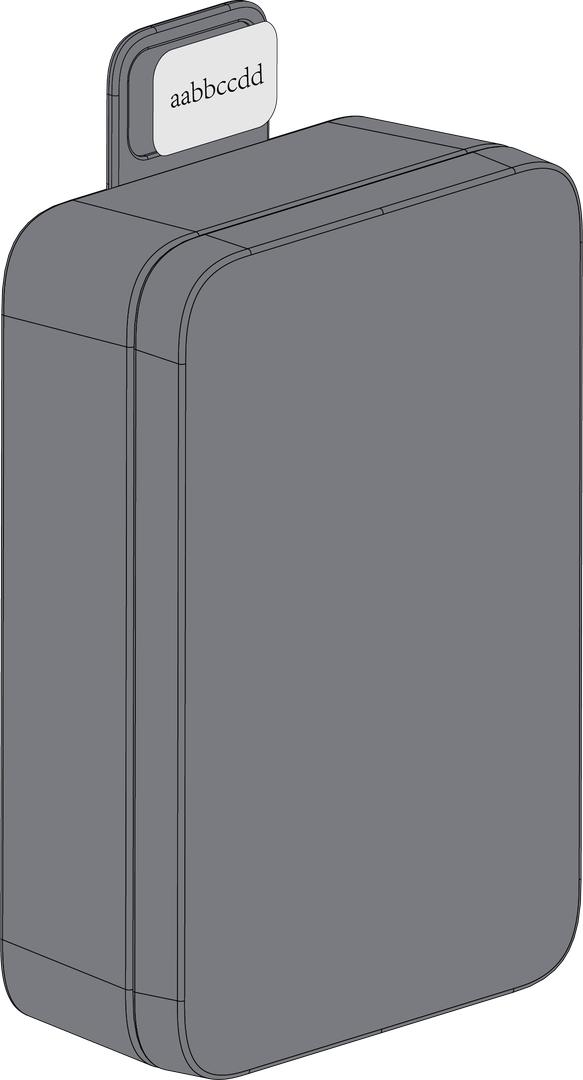 Figure 1: Attaching the label on the enclosure
Hook Loop Mount (Type J)
- For hook loop mount, use one (1) piece of mount accessory with an indicator marked with the letter J, as shown in Figure 41.
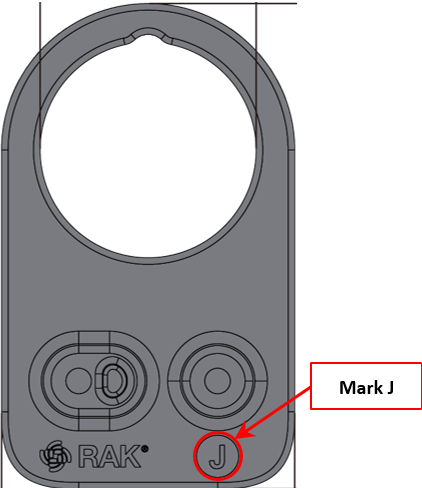 Figure 1: Mount accessory marked with the letter J
- Fix the hook loop mount marked with the letter J on the WisBlock Unify Enclosure using two (2) pieces of M3*8 mm Head screw with washer. Place it on fixed position number 1 or 4 of the enclosure, as shown in Figure 42.
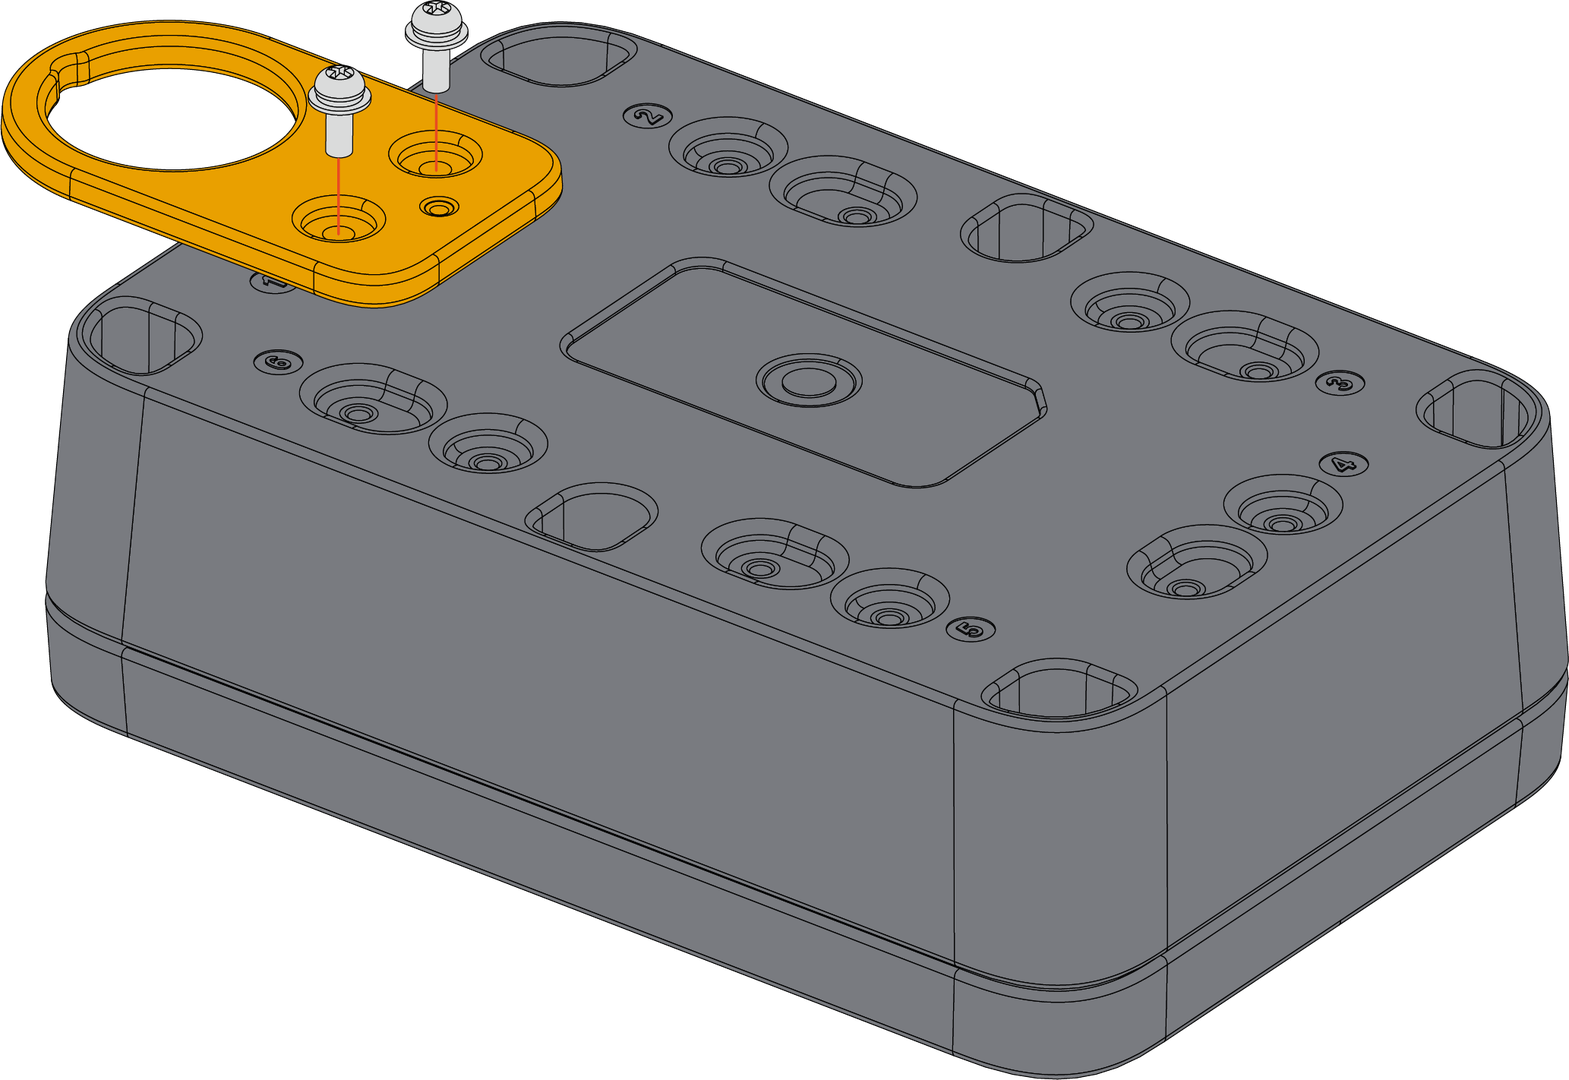 Figure 1: Fixing the hook loop mount on the enclosure
| Size | Fix Position |
|---|---|
| Medium | 1 or 4 |
- Lastly, hang the unify enclosure directly on a hook.
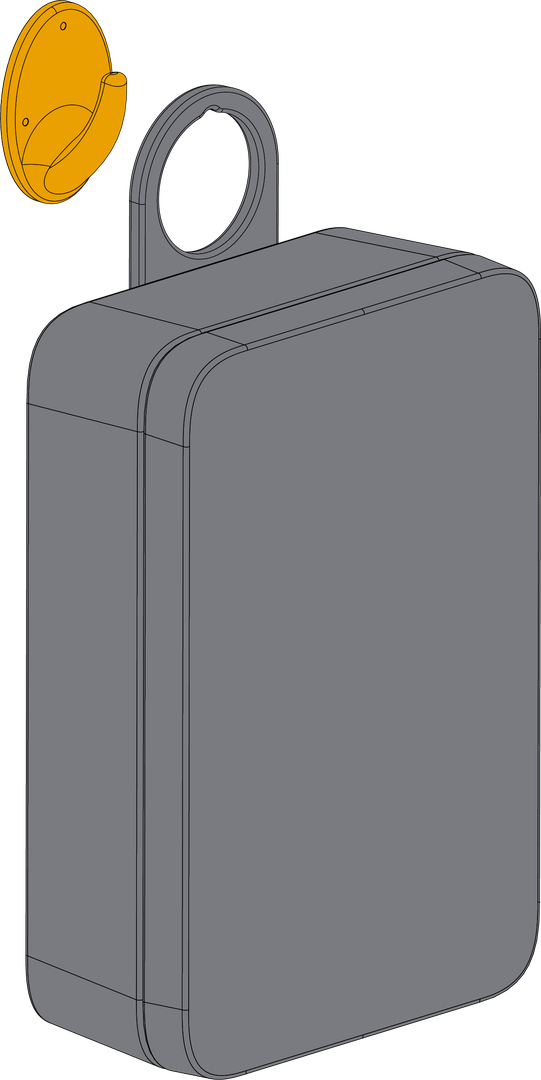 Figure 1: Fixing the enclosure on the hook