RAK4600 Evaluation Board Quick Start Guide
Prerequisites
What Do You Need?
Before going through the configuration guide of the RAK4600 Evaluation Board, make sure to prepare the items listed below:
- RAK4600 Evaluation Board
- Micro USB cable
- LoRA Gateway in Range for testing (not provided)
- RAKDAP1 DapLink Tool (not provided)
- Windows PC
This device released by RAKWireless is already pre-loaded with its latest firmware upon manufacture. If you want to have your device's firmware burned or upgraded, refer to the following links:
What's Included in the Package?
- 1pc - RAK4600 Evaluation Board
- 1pc - Micro USB cable
- 1pc - LoRa Antenna (iPEX)
- 1pc - BLE Antenna (iPEX)
- 2pcs - 4-pin Header (not soldered)
- 9pcs - Dupont Lines
Interfacing with RAK4600
To interface with the Evaluation Board, using a Windows PC, you need to install the RAK Serial Port Tool.
Before powering the RAK4600 Evaluation Board, you should install the LoRa and BLE Antenna first. Not doing so might damage the board.
 Figure 1: LoRa and BLE Antennas
- Connect your RAK4600 Evaluation Board to your Windows PC using the provided micro USB cable.
 Figure 1: RAK4600 Evaluation Board to Windows PC Connection
- Open the RAK Serial Port Tool.
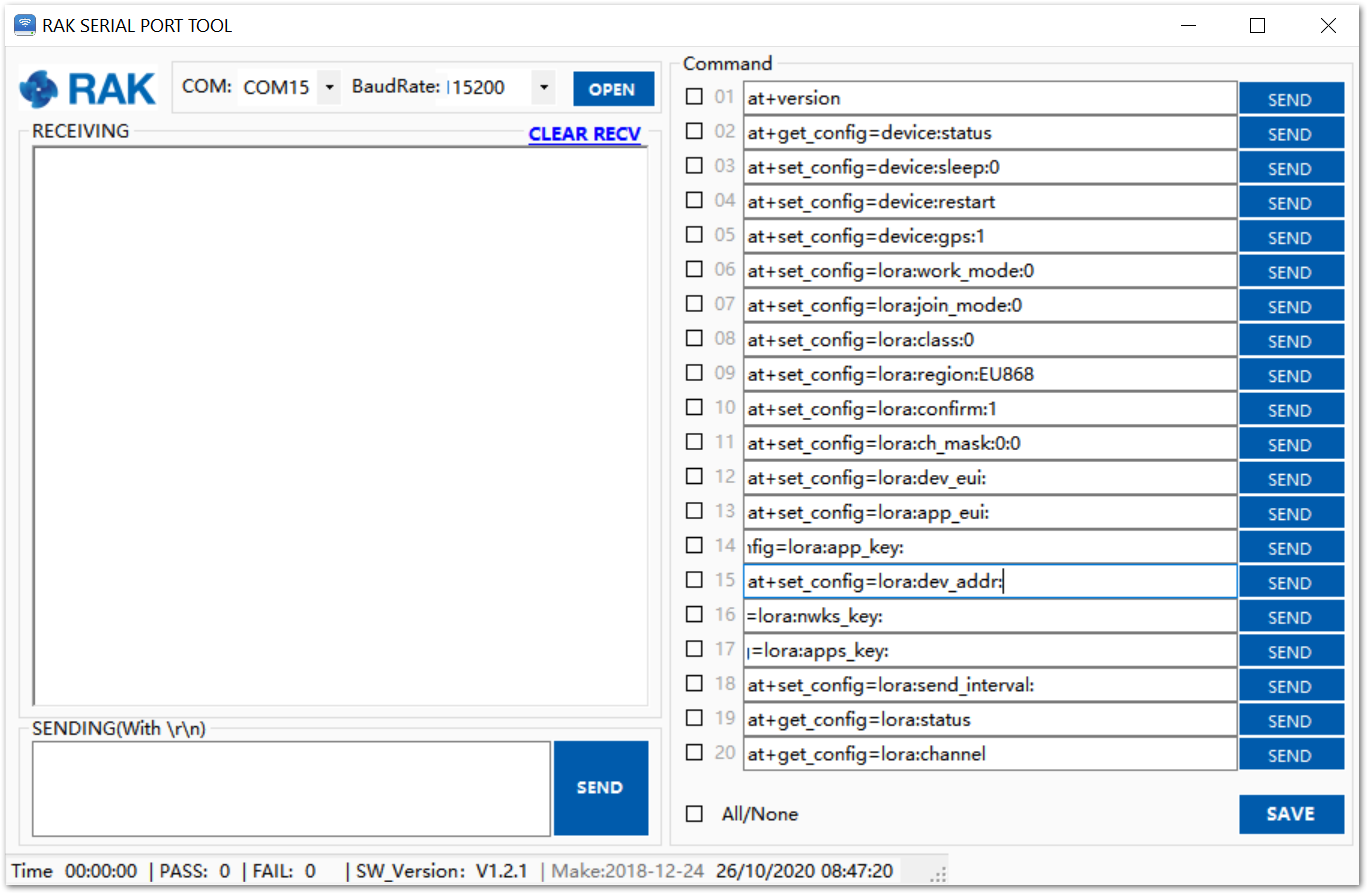 Figure 1: RAK Serial Port Tool
- To choose the correct COM Port number for your device, open your Device Manager by pressing Windows + R and typing
devmgmt.msc, or search in the Start Menu.
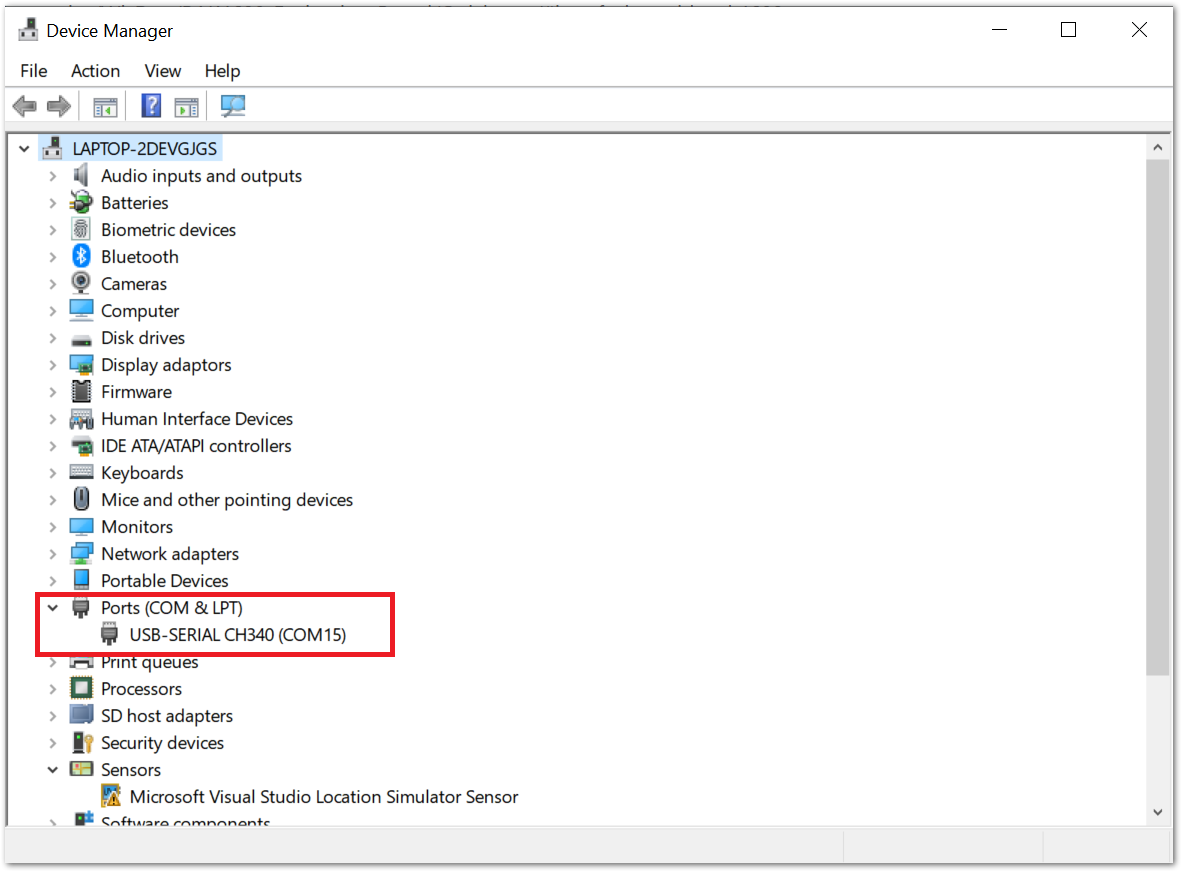 Figure 1: Device Manager
- Look for Ports (COM & LPT) and find the name USB-SERIAL CH340. Take note of the COM Port Number.
If you didn't find any Port with the name USB-Serial CH340, make sure you have installed the CH340 Drivers on your Windows PC.
- Choose the correct port number and baud rate from the device manager, then click Open.
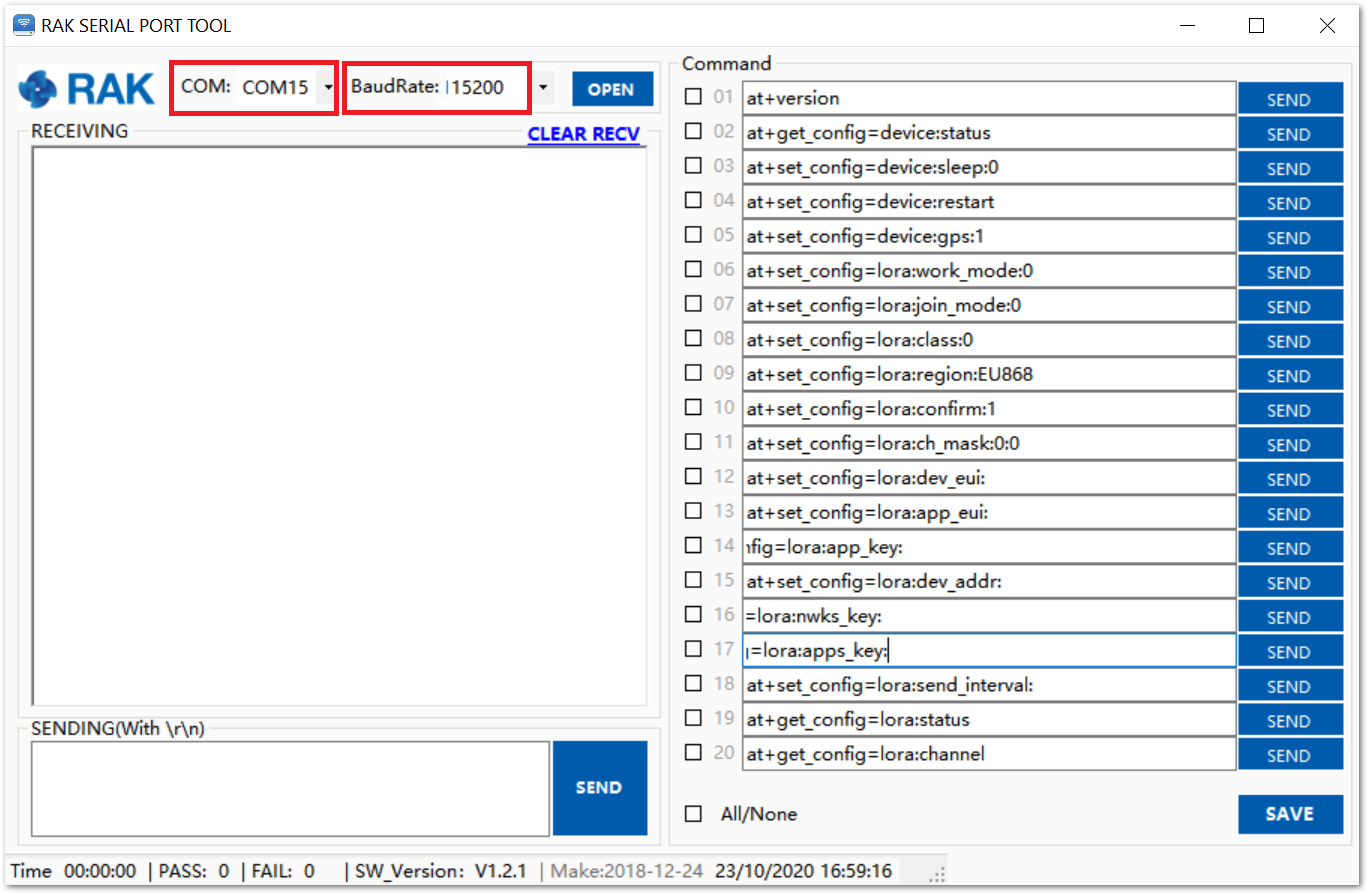 Figure 1: Correct Port Number and Baud rate
Checking Device Logs
-
Open the RAK Serial Port Tool.
-
Press the reset button on the RAK4600 Evaluation Board, then you will see the following contents in the Serial Port Tool.
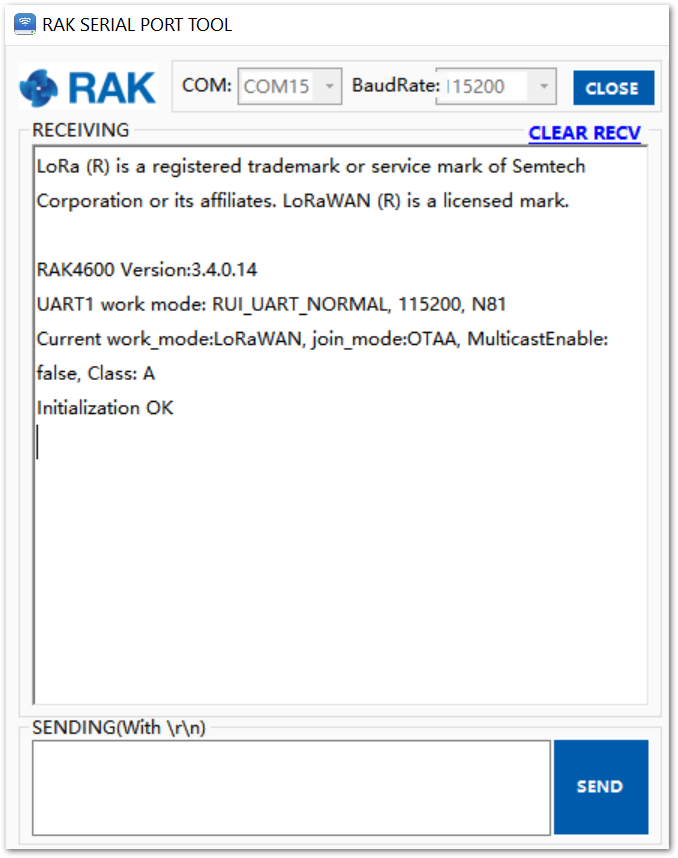 Figure 1: Log Checking through UART
You still have to connect the micro USB cable to the RAK4600 Evaluation Board to power the board.
Configuring RAK4600
You can configure your RAK4600 Evaluation Board by sending AT Commands either through BLE or through micro USB.
For the full list of AT Commands available for configuring your RAK4600, refer to the AT Command Manual.
Through Micro USB
- As mentioned in Checking Device Logs, if you want to use the RAK4600 Evaluation Board through UART, you should connect the RAK4600 to Windows PC, as shown in Figure 7.
Figure 1: RAK4600 Evaluation Board to Windows PC Connection- Try to send a simple AT command to RAK4600 to get the current firmware’s version by sending the command below using the RAK Serial Port Tool. Similarly, you can send other AT commands of RAK4600 in the same way.
at+version
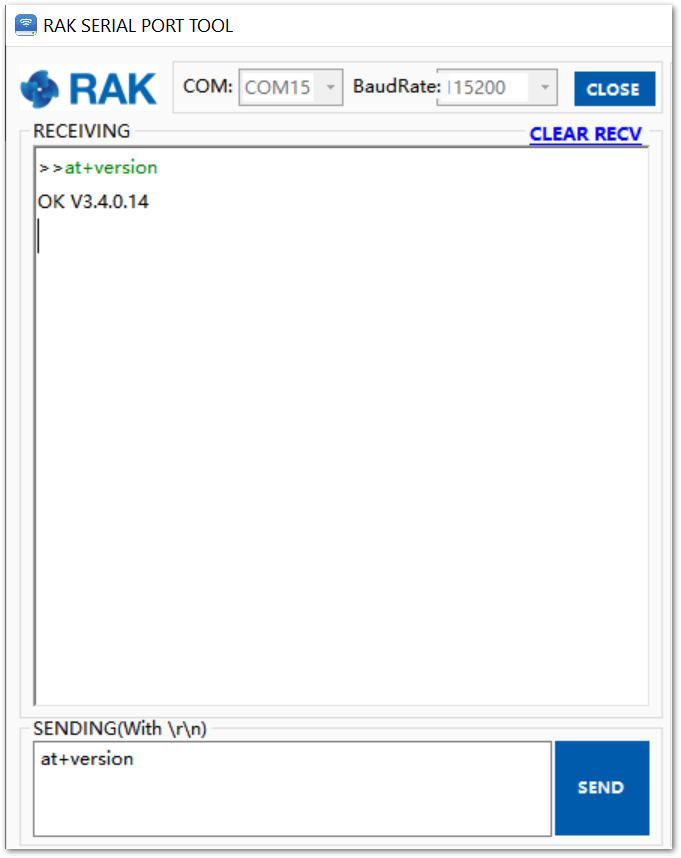 Figure 1: AT command for Firmware Version
Through BLE
- To configure the RAK4600 through BLE, download and install the nRF Connect for Mobile. This tool is developed by Nordic Semiconductor and is available on the App Store and Google Play Store.
 Figure 1: nRF Connect App in Android and IOS
- Make sure the Bluetooth on your mobile is turned on. Open the application and scan for BLE devices. You will see all the BLE devices in range in the scan list.
 Figure 1: Available Bluetooth Devices in the Nordic App
- Press the reset button on the RAK4600 Evaluation Board and wait for a couple of seconds. Look for a BLE Device named "RUI-..." in the scan list of the app. Connect to this device and click "Nordic UART Service".
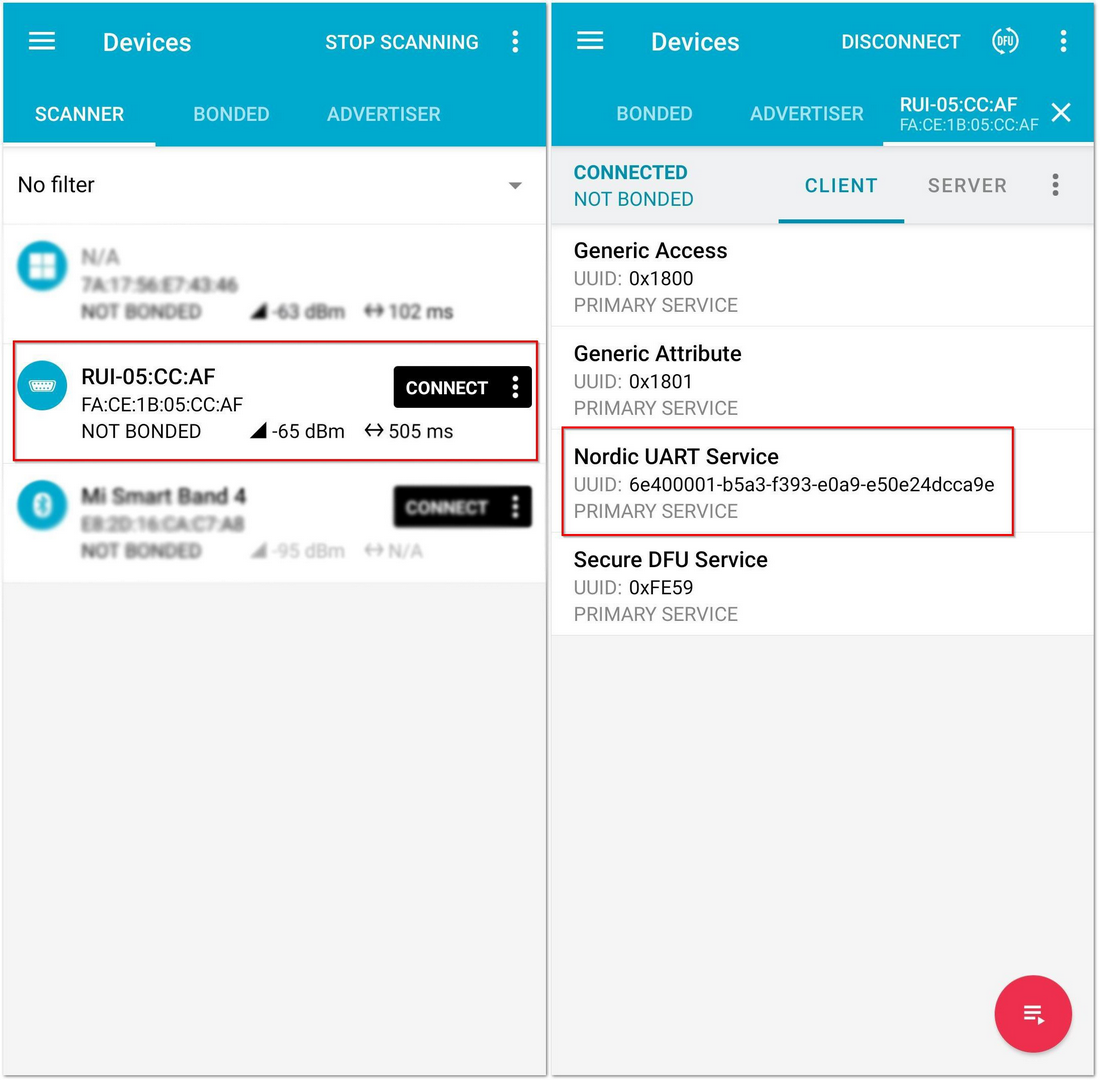 Figure 1: Nordic UART Service in the Nordic App
By default, the BLE signal of the RAK4600 is turned off automatically if no connection is established after 60 seconds. Connect to RAK4600 over BLE immediately after pressing the reset button.
- Click on the arrow highlighted in a red box, as shown in Figure 12.
 Figure 1: RX Characteristic in the Nordic UART Service
- You can now send AT commands to the RAK4600.
- For example, if you want to check the current firmware’s version, send the following command:
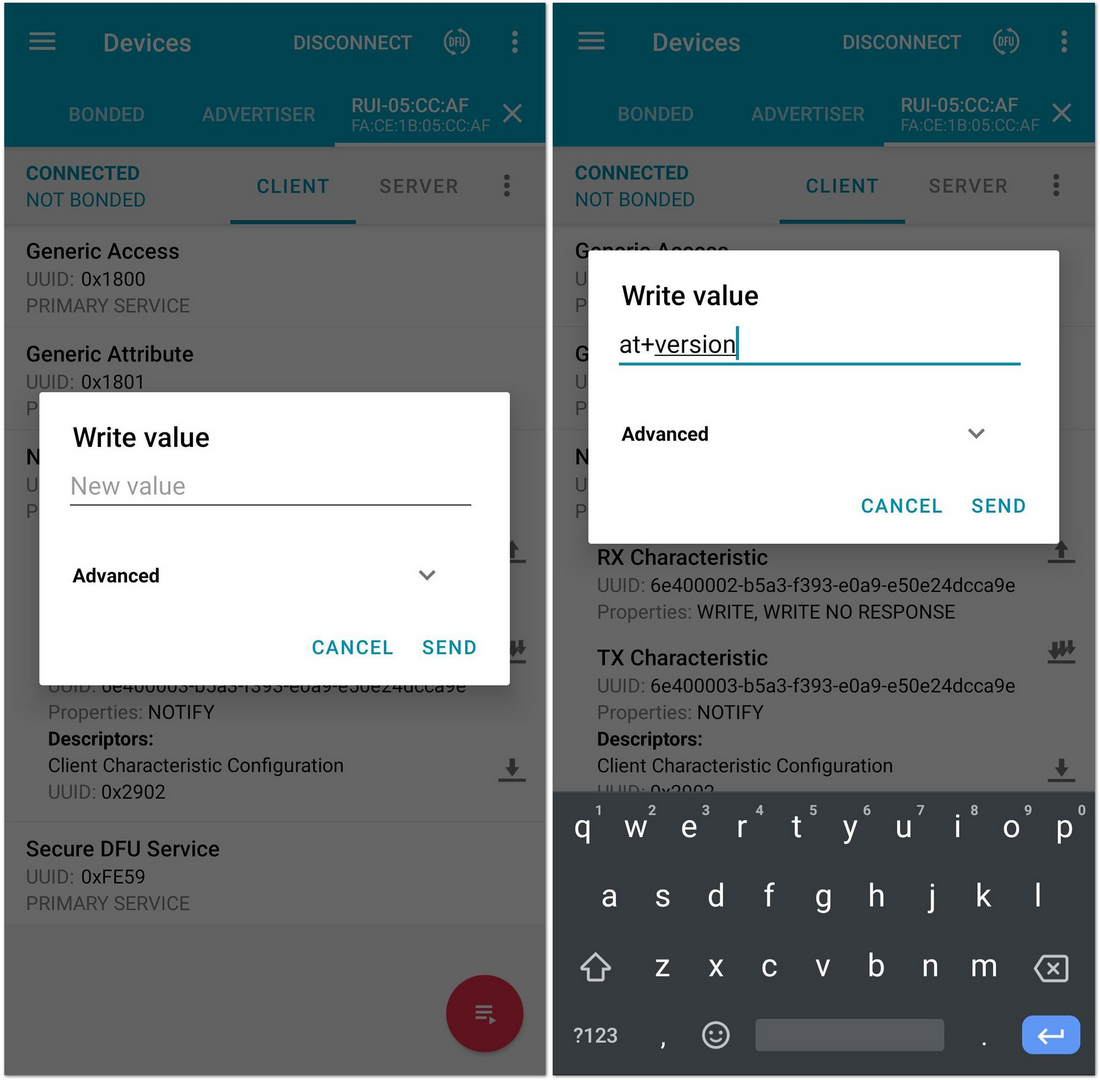 Figure 1: Sending AT Command via Nordic App
- Check the AT command response on Nordic UART Service Tx Characteristic.
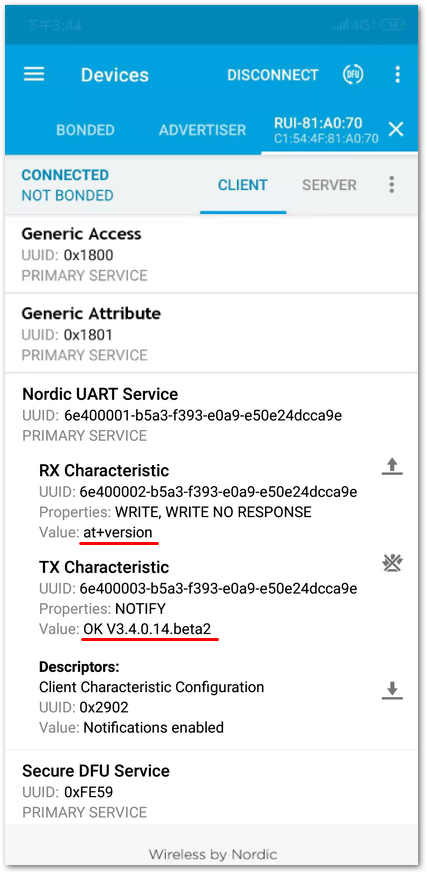 Figure 1: AT response over BLE
Open Source Framework
Before using RAK4600 on Arduino IDE, you need to flash a new bootloader using the RAKDAP1 Tool and pyOCD.
- Install pyOCD.
Refer to RAKDAP1 Flash and Debug Tool.
- Check pyOCD installation.
pyocd list
- Clone RAK repository.
git clone https://github.com/RAKWireless/RAK4600_Arduino
- Flash bootloader.
cd RAK4600_Arduino
pyocd flash -t nrf52 feather_nrf52832_bootloader.hex
- Install the BSP support for Arduino as described in section BSP Installation.
https://github.com/RAKWireless/RAK4600_Arduino#bsp-installation
Before uploading any Arduino example, make sure that the RAK4600 is on DFU mode.
- Connect the RX pin of RAK4600 to GND.
- Press the reset button and then disconnect the RX pin from GND. Now the RAK4600 is on DFU mode.
Connecting to The Things Stack (TTN V3)
Refer to Connecting to The Things Network (TTN).
Connecting with Chirpstack
Refer to Connecting with ChirpStack.
LoRa P2P
Refer to LoRa P2P guide.
Miscellaneous
RAK5005 Core Module Slot Connection to RAK4601
The RAK5005 is the base board that connects the RAK4600 Core Module. It creates the power supply for the attached module and provides additional IO and Sensor support for your project needs.
RAK4601 is a circuit board module for RAK5005 with a pre-soldered RAK4600 LPWAN Module.
Listed below are the accessible pins and data bus of the attached RAK5005 base board on the RAK4600 EVB:
| RAK4601 Pin Definition | Function Name of WisBase | Pin Number | Pin Number | Function Name of WisBase | RAK4601 Pin Definition |
|---|---|---|---|---|---|
| NC | VBAT | 1 | 2 | VBAT | NC |
| GND | GND | 3 | 4 | GND | GND |
| 3V3 | 3V3 | 5 | 6 | 3V3 | 3V3 |
| NC | USB+ | 7 | 8 | USB- | NC |
| NC | VBUS | 9 | 10 | SW1 | NC |
| UART1_TX/P0.23 | TXD0 | 11 | 12 | RXD0 | UART1_RX/P0.22 |
| MCU_RST | RESET | 13 | 14 | LED1 | NC |
| NC | LED2 | 15 | 16 | LED3 | NC |
| 3V3 | VDD | 17 | 18 | VDD | 3V3 |
| I2C1_SDA/P0.13 | I2C1_SDA | 19 | 20 | I2C1_SCL | I2C1_SCL/P0.12 |
| NC | AIN0 | 21 | 22 | AIN1 | NC |
| NC | BOOT0 | 23 | 24 | NC | NC |
| NC | SPI_CS | 25 | 26 | SPI_CLK | NC |
| NC | SPI_MISO | 27 | 28 | SPI_MOSI | NC |
| IO1/RESERVED | IO1 | 29 | 30 | IO2 | IO2/RESERVED |
| NFC1/P0.09 | IO3 | 31 | 32 | IO4 | NFC2/P0.10 |
| UART2_TX/P0.19 | TXD1 | 33 | 34 | RXD1 | UART2_RX/P0.18 |
| NC | I2C2_SDA | 35 | 36 | I2C2_SCL | NC |
| NC | IO5 | 37 | 38 | IO6 | NC |
| GND | GND | 39 | 40 | GND | GND |
Bluetooth Connection Modes
There are three BLE modes in RAK4600 from the firmware V3.0.0.6: the Peripheral Mode, the Central Mode, and the Beacon Scan Mode. You can change the work mode of RAK4600’s BLE using the commands provided below, which is defined in the AT Command Manual.
at+set_config=ble:work_mode:X:Y
Description: Set the work mode for BLE.
- X - 0: BLE peripheral mode, 1: BLE central mode. 2: Beacon scan mode.
- Y - 0: normal range, 1: BLE long range.
BLE Peripheral Mode
For the Peripheral Mode, you can scan RAK4600’s BLE and connect with it using your mobile device.
BLE Central Mode
For the Central Mode, RAK4600’s BLE will not broadcast, so that your mobile devices will not be able to scan it. This is very useful if you want to make the RAK4600 act as a BLE Gateway wherein BLE Sensor Nodes (up to 20 Devices) can send sensor data.
Beacon Scan Mode
For the Beacon Scan mode, RAK4600 can scan around the Beacon signal. It is useful for a Beacon use case like iBeacon.
RAK4600 BLE Default Settings
By default, the RAK4600 Evaluation Board will work on Peripheral Mode. In this mode, you can configure it through BLE, including DFU. It should be noted that after resetting the RAK4600, you have only 60 seconds to establish a connection with your Mobile Device through BLE based on its power consumption settings. If no connection has been established within 60 seconds, the RAK4600 BLE signal will not be broadcasted, and it will enter power-saving mode. On the other hand, there is no limitation once you are already connected with the RAK4600's BLE.
If you set the RAK4600 to work in Central Mode, the RAK4600 will work first on Peripheral Mode for 30 seconds, and if no connection is established after 30 seconds, it will automatically work in Central Mode. In this mode, the BLE signal of the RAK4600 will stop broadcasting and will not be visible on your mobile devices up until you change the work mode to peripheral mode or reset the RAK4600 again.
Burning the Firmware
If you want to get a pre-compiled firmware instead of compiling the source code by yourself, you can find the latest firmware on the RAK downloads.
Flash the firmware using DAPLink and RAKDAP
Refer to RAKDAP1 Flash and Debug Tool.
Upgrading Firmware through DFU using BLE
-
Download the DFU package of the RAK4600 Evaluation Board, and save it on your mobile phone.
-
Make sure the Bluetooth on your mobile is turned on. Open the nRF Connect Mobile application, and you will see all BLE devices in range in the scan list.
 Figure 1: Available Bluetooth Devices in the Nordic App
- Press the reset button on the RAK4600 and wait for a couple of seconds. Look for a BLE Device named "RUI-..." in the scan list of the app. Connect to this device and click on "Secure DFU Service".
This will be only visible for 60 seconds. More information about Bluetooth connection guide can be found in the BLE Connection Modes section.
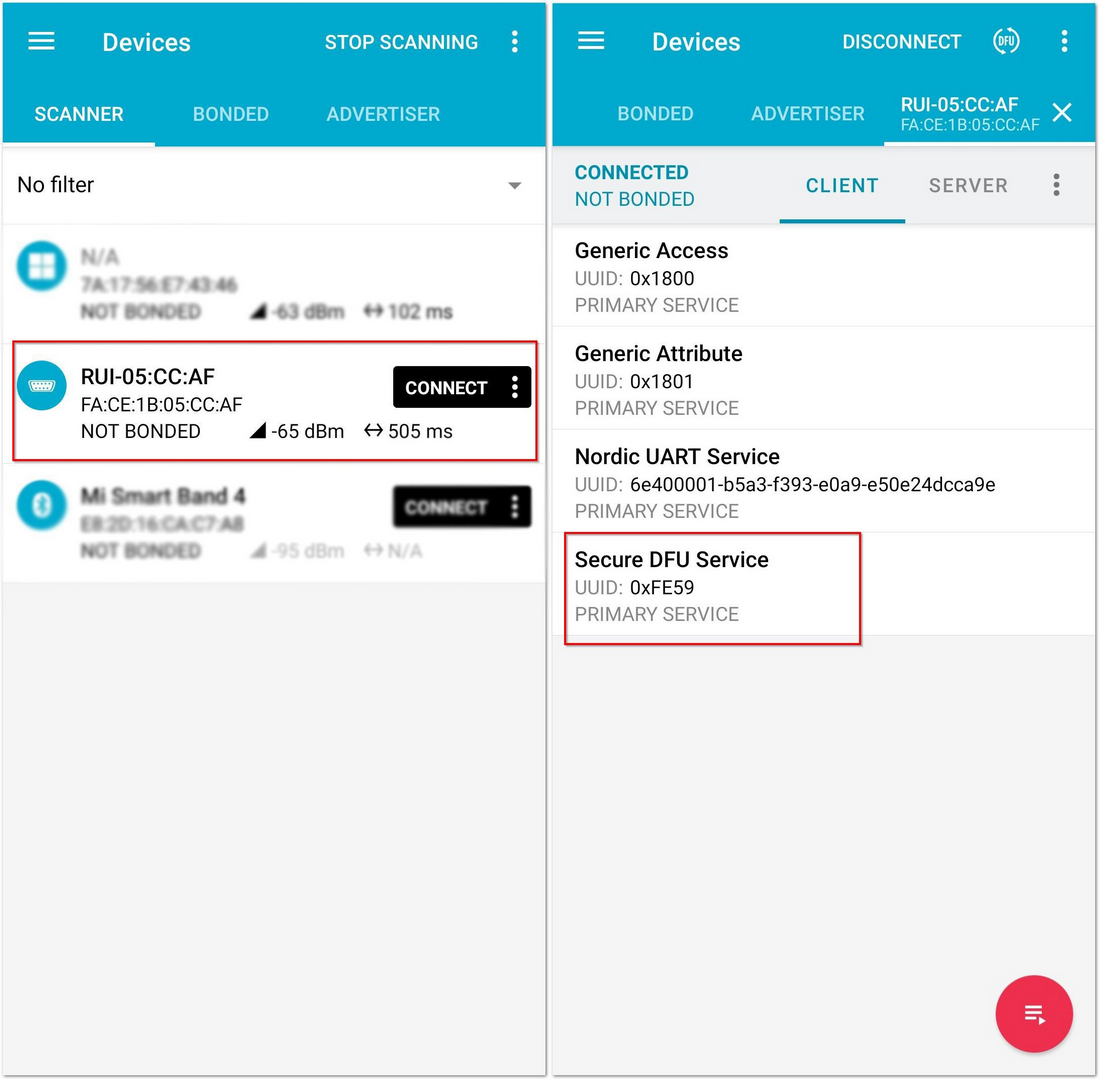 Figure 1: Secure DFU Service in the Nordic App
- On the “Secure DFU Service”, click on the button highlighted in red, as shown in Figure 17.
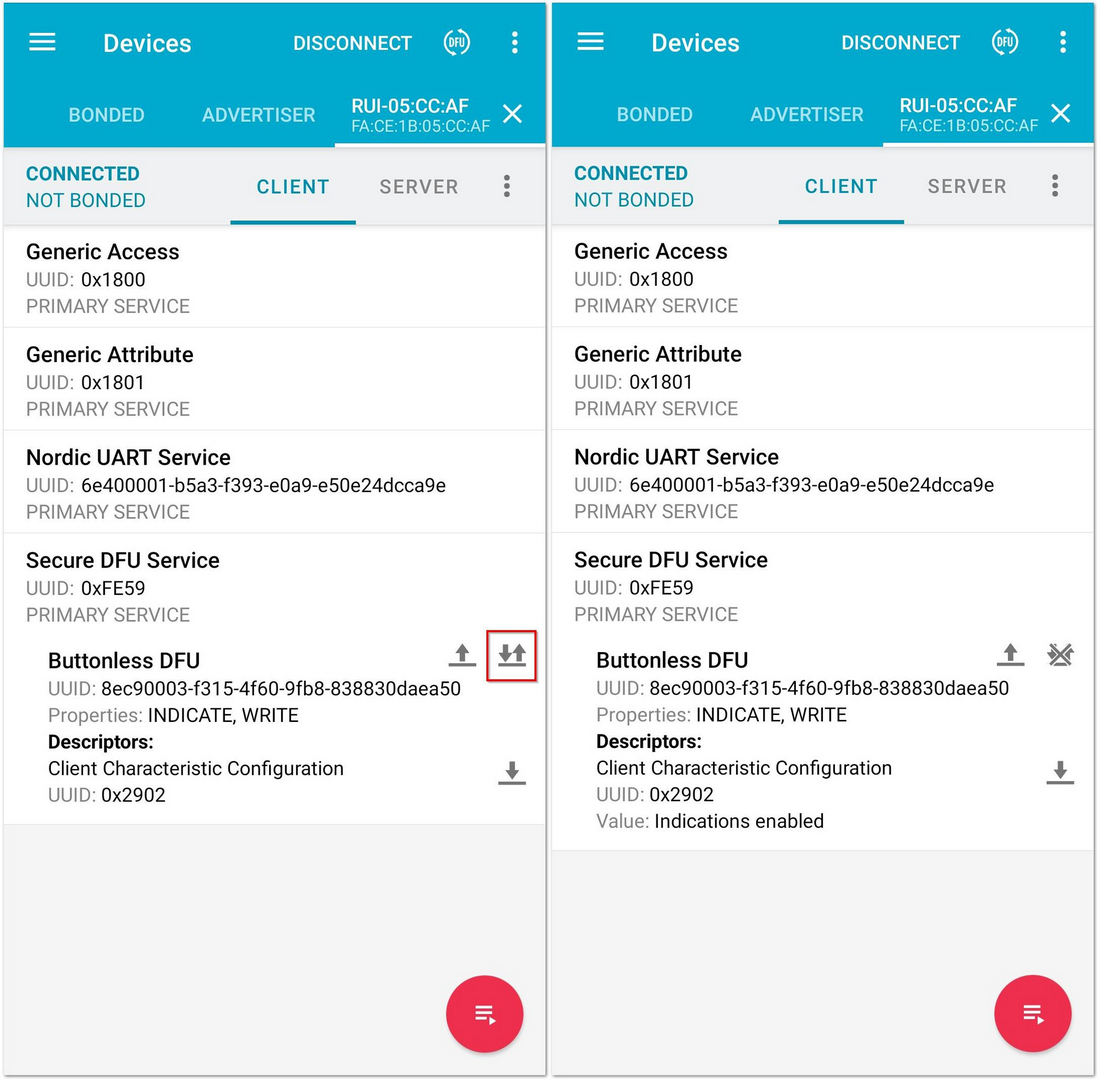 Figure 1: Buttonless DFU
- Now, click on the arrow highlighted in a red box, as shown in Figure 18. A Write Value window will pop up, then press "Send".
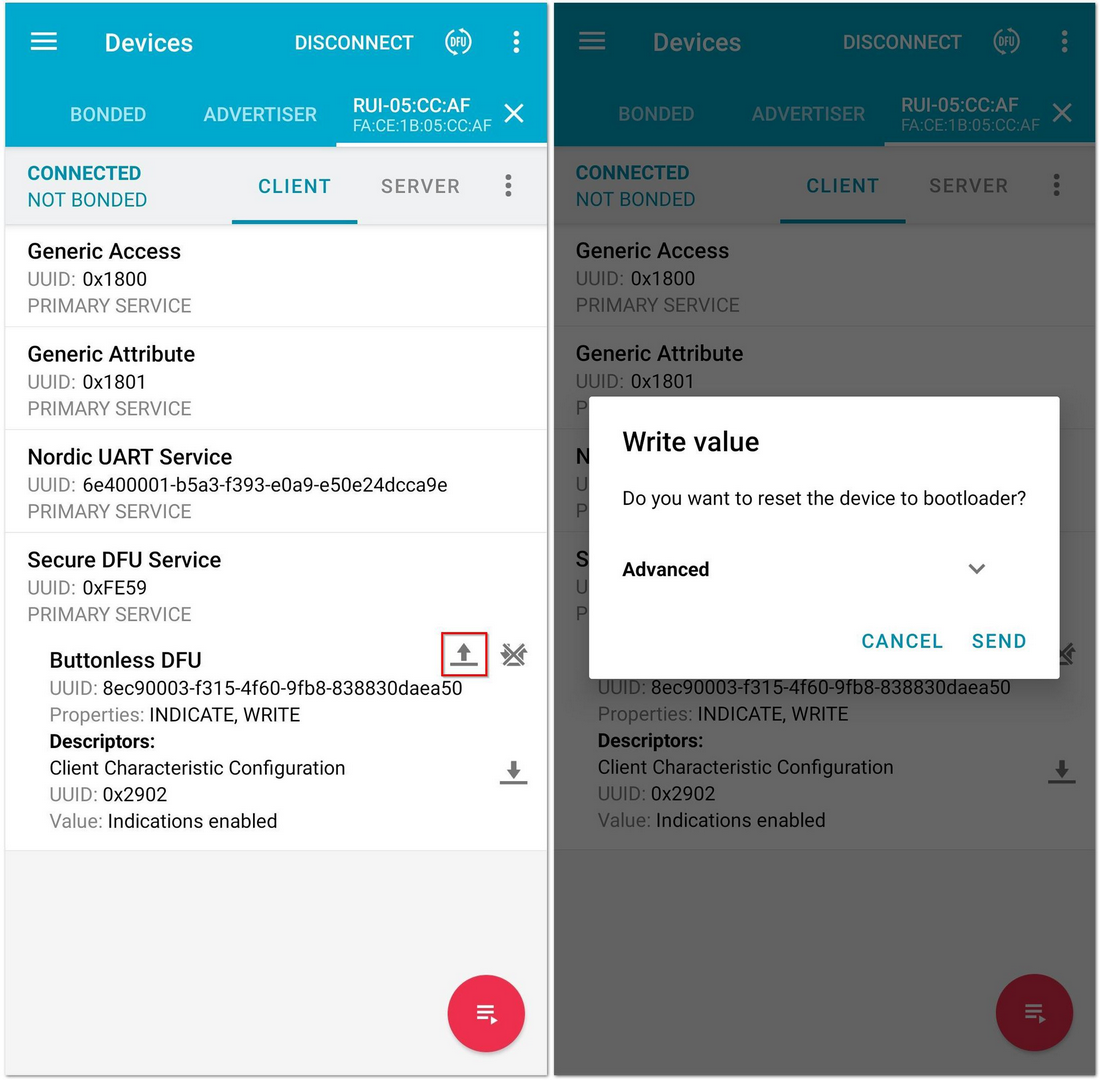 Figure 1: Resetting the Bootloader via Bluetooth
- The RAK4600 is now working in DFU Mode. In the application, you will see the same as shown in Figure 19.
 Figure 1: RAK4600 Default Status Overview after Resetting
- In the device list, find a BLE device named "DfuTarg" and click on Connect.
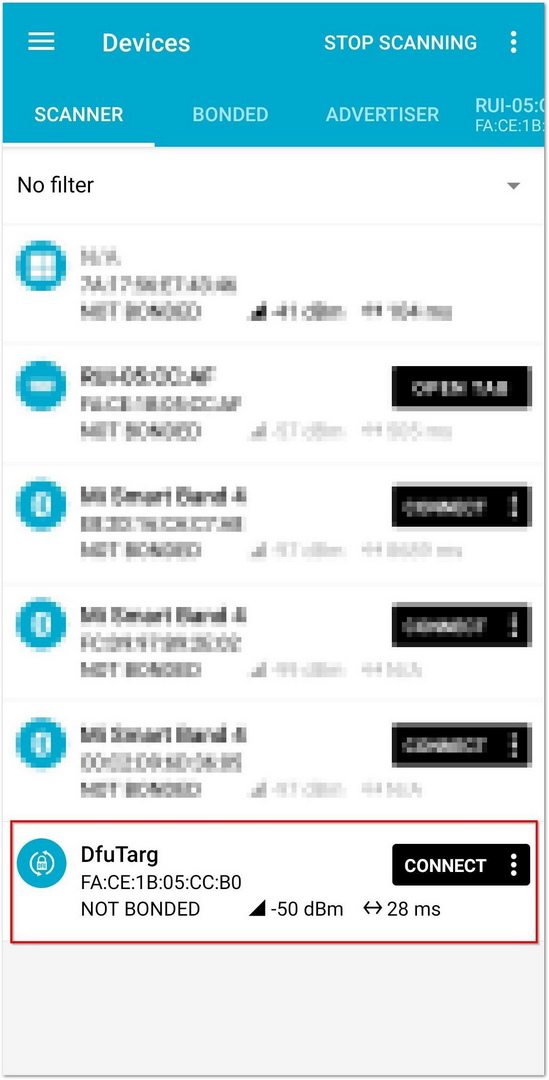 Figure 1: RAK4600 Default Bluetooth ID after Resetting
-
After connecting, select the DFU Icon. On the Select file type, choose Distribution packet (ZIP) and press OK. This will then prompt you to select the zip file of the firmware that you have downloaded.
-
The DFU application automatically starts to upgrade the firmware of your RAK4600 through DFU over BLE. After upgrading, the application restarts the RAK4600, and the DFU mode is disabled. You can now use the RAK4600 with the latest firmware.
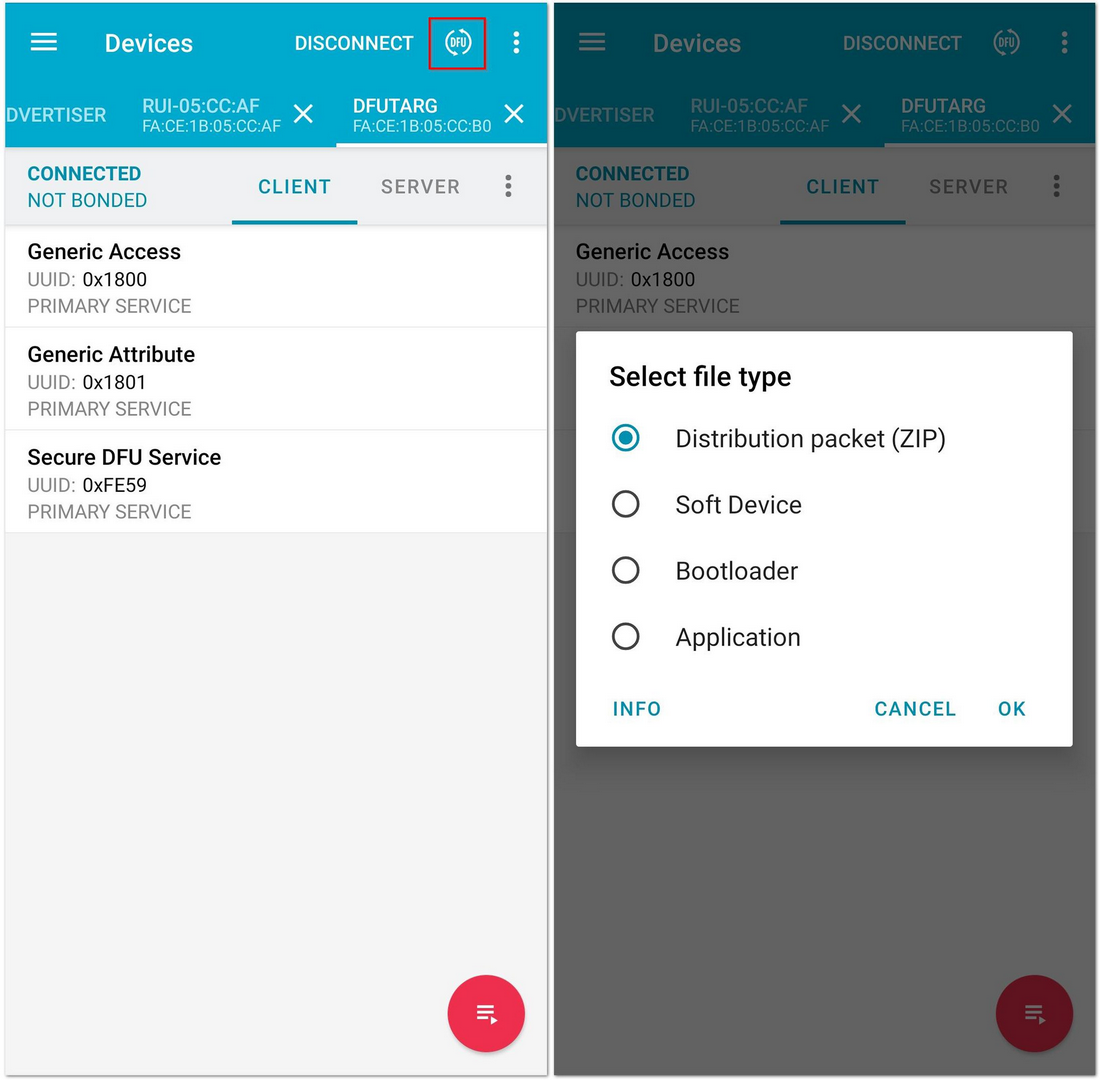 Figure 1: Distribution Packet File Type under DFU