RAK7289V2/RAK7289CV2 WisGate Edge Pro V2 LoRaWAN Network Server Guide
This manual provides you with operation guidance for connecting the gateway to different LoRaWAN network servers.
Built-In Network Server
This section is an example demonstration on how to interconnect your RAK commercial gateway with its built-in LoRa network server and make an application for the node.
Requirements
- Your node module (In this section, RAK3172 will be used as an example module)
- Your RAK gateway is connected to the Internet
Set the Gateway Work Mode
- Configure Work mode to Built-in network server. Navigate to LoRa > Configuration. For Work mode, select Built-in network server.
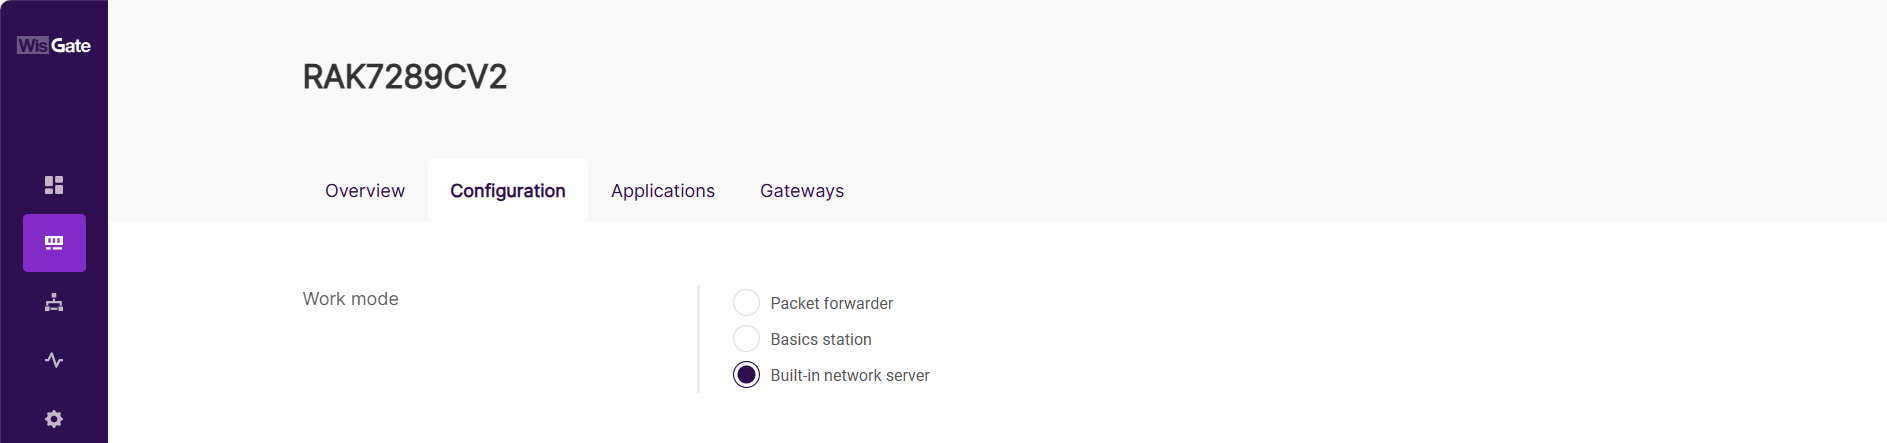 Figure 1: Set the gateway work mode
- Select the log level and frequency band.
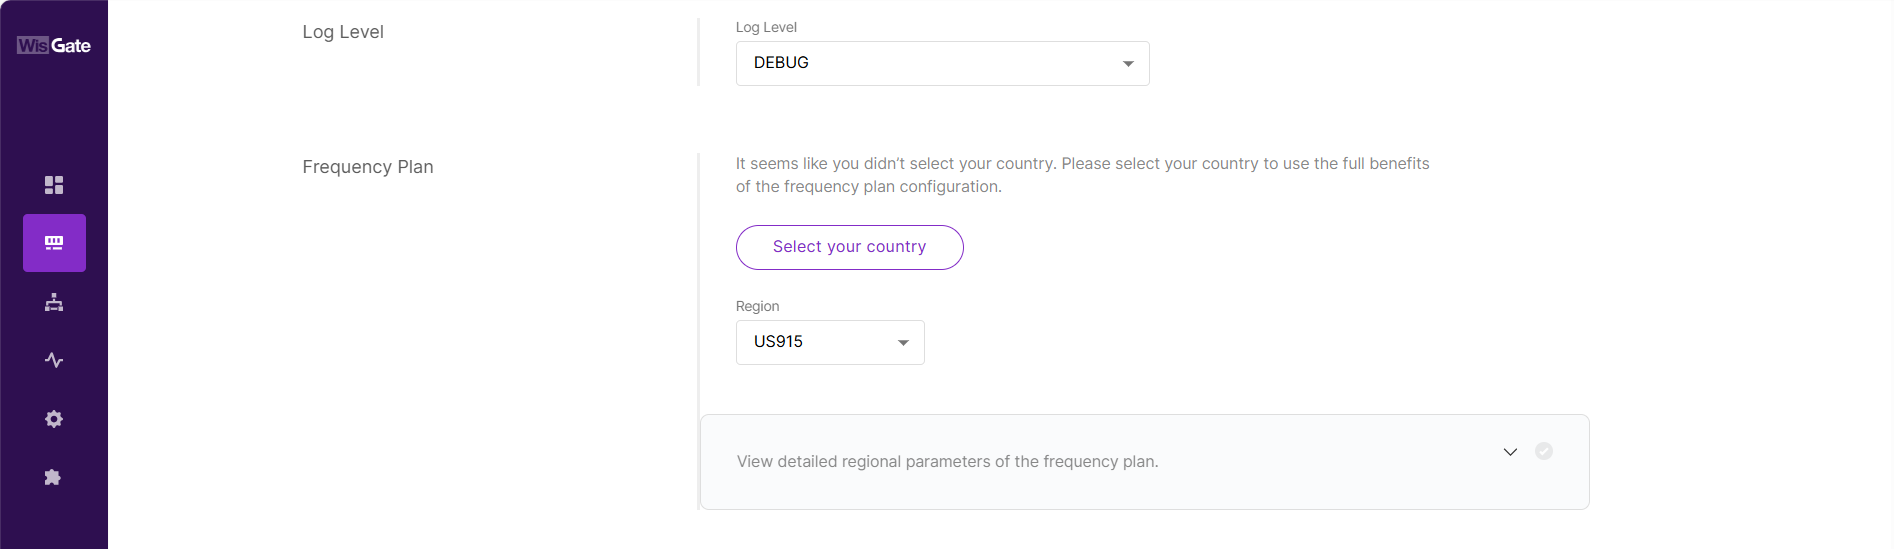 Figure 1: Configure log level and frequency band
You can expand the View detailed regional parameters of the frequency plan option to configure detailed regional parameters.
Create an Application
- Navigate to LoRa > Applications tab.
- Click the Add application button or the add one now link to add a new application.
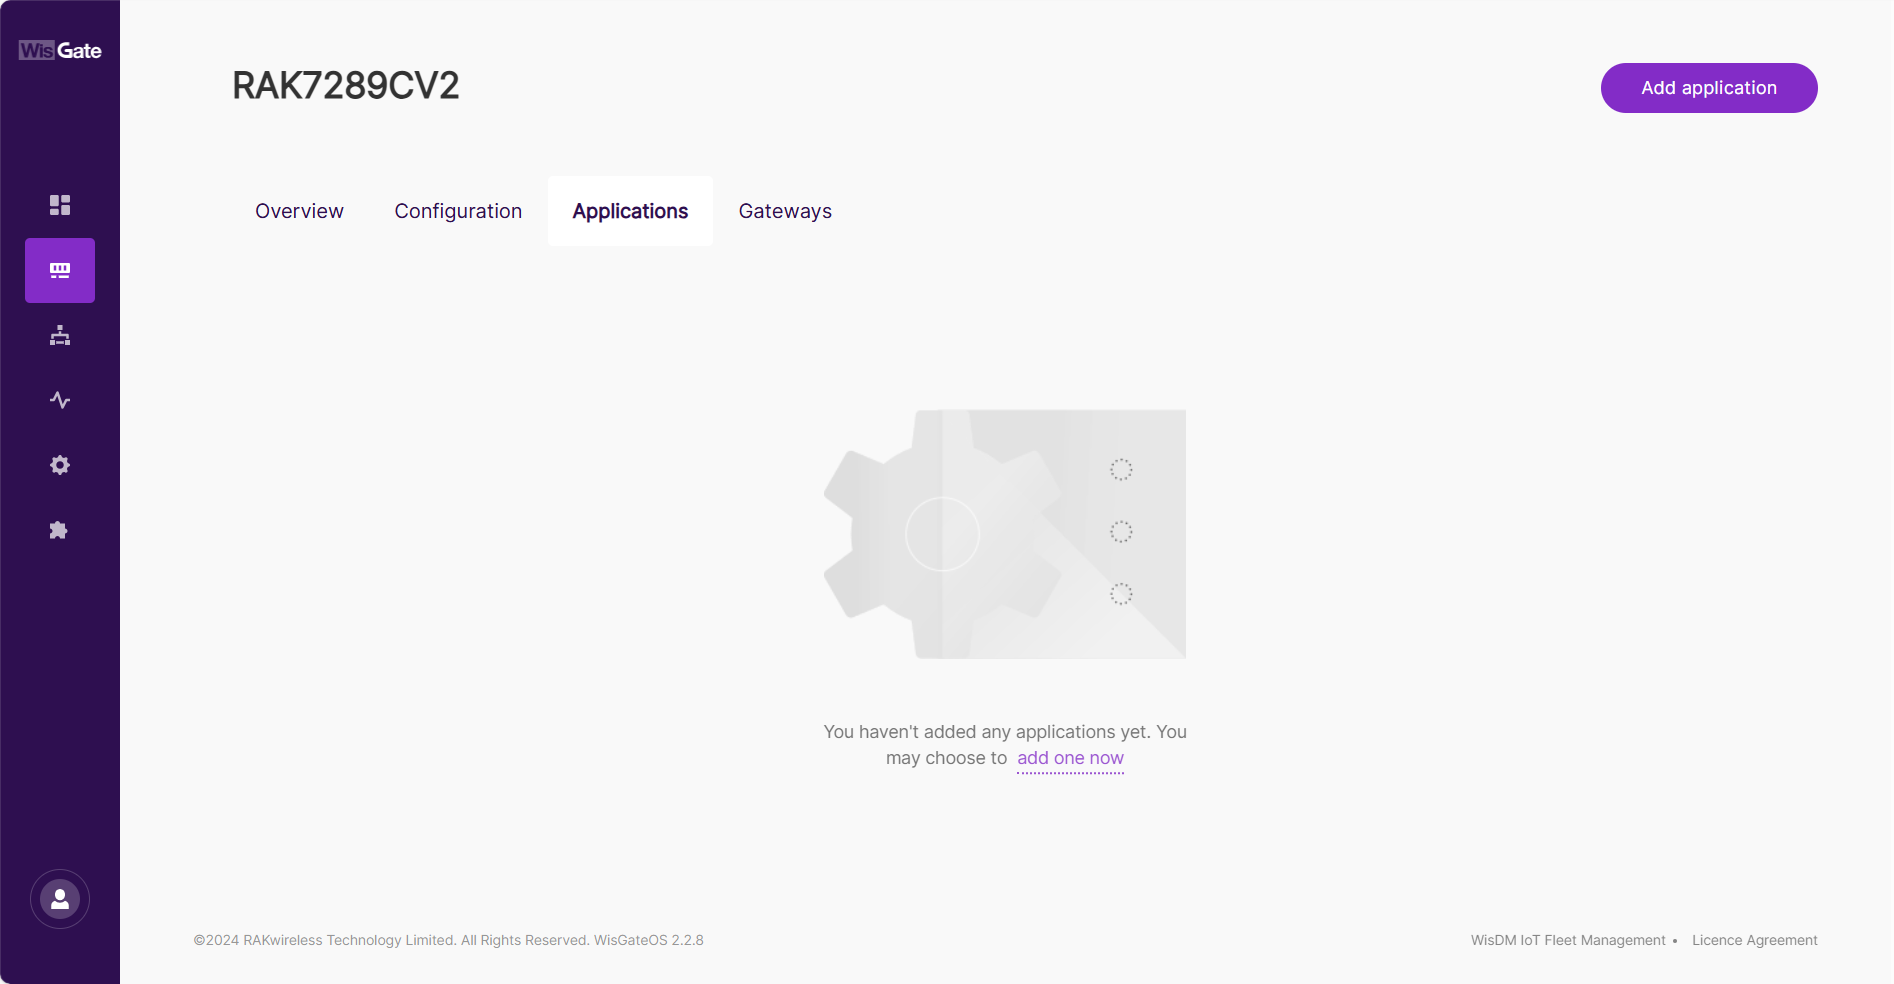 Figure 1: Add an application
- After the page jumps, configure the following information.
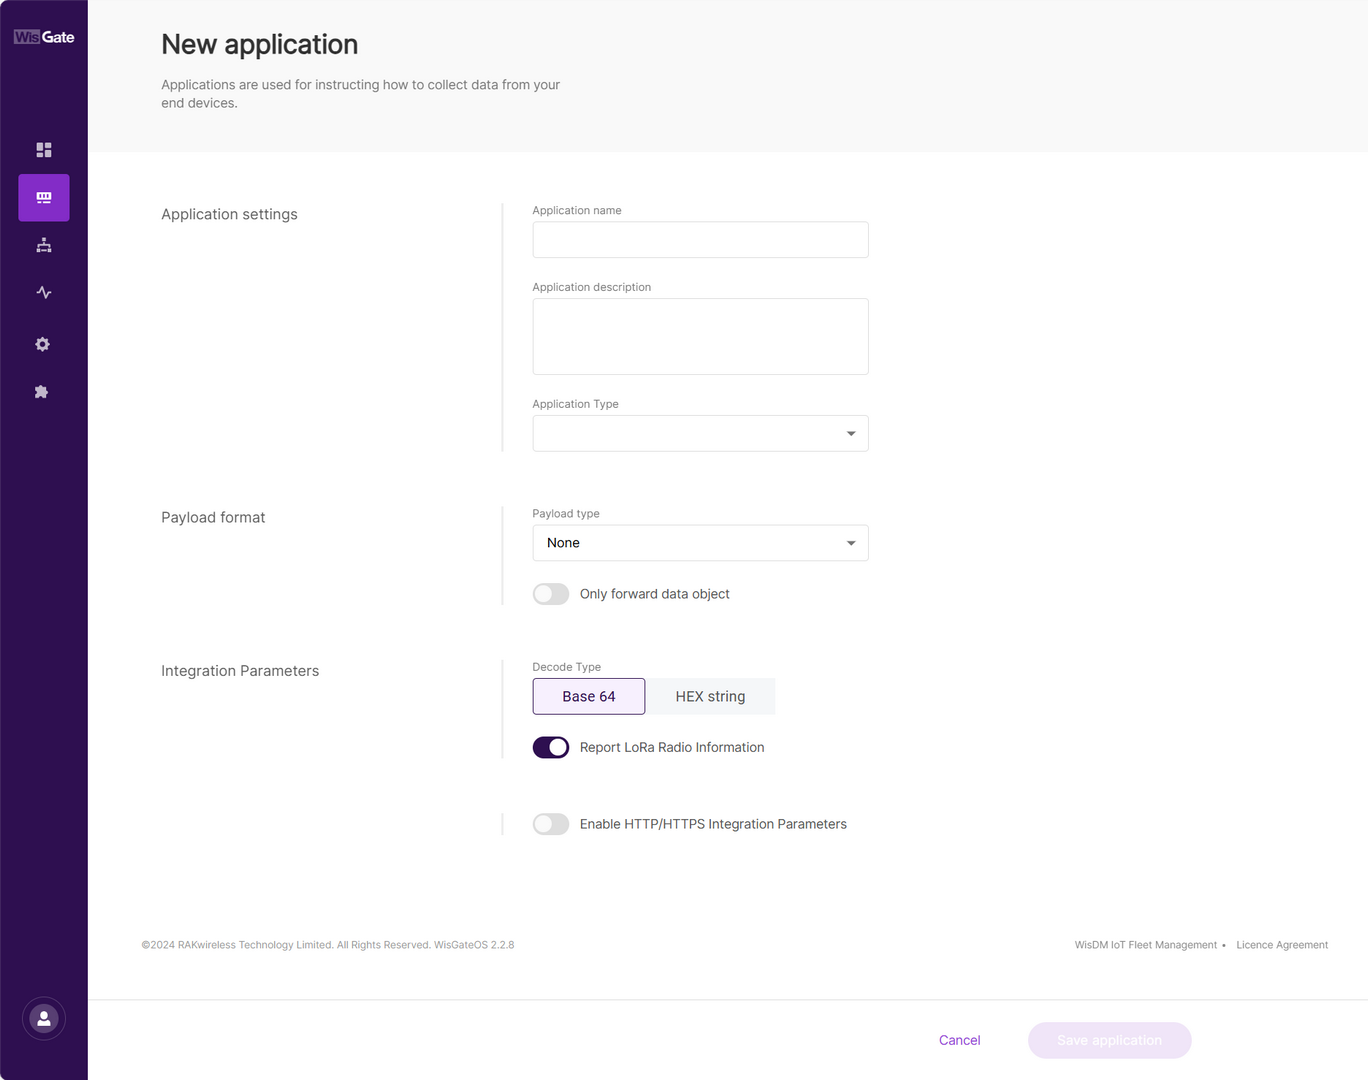 Figure 1: Set parameters
-
Application name: Name of the application
-
Application description: Description of the application, optional
-
Application Type
- Unified Application key: All devices will use the same application key. Selecting this option, then the application key field will pop up, where you can type in an application key or click the Autogenerate button to generate a key. This value needs to be consistent with the value from the end device, so either obtain it by querying the end device, or auto-generate it and synchronously change the corresponding value of the device.
 Figure 1: Configure unified application key
After enabling the Auto Add Device option, you need to configure the Application EUI option. This value needs to be consistent with the value from the end device, so either obtain it by querying the end device, or auto-generate it and synchronously change the corresponding value of the device. After the application EUI and key verification, the device will be automatically added to the application.
 Figure 1: Enable auto add device
- Separate Application keys: Each device has its own application key. Add the key when registering the device.
- Click Save Application to add the new application.
Add End Devices
- Navigate to LoRa > Applications tab.
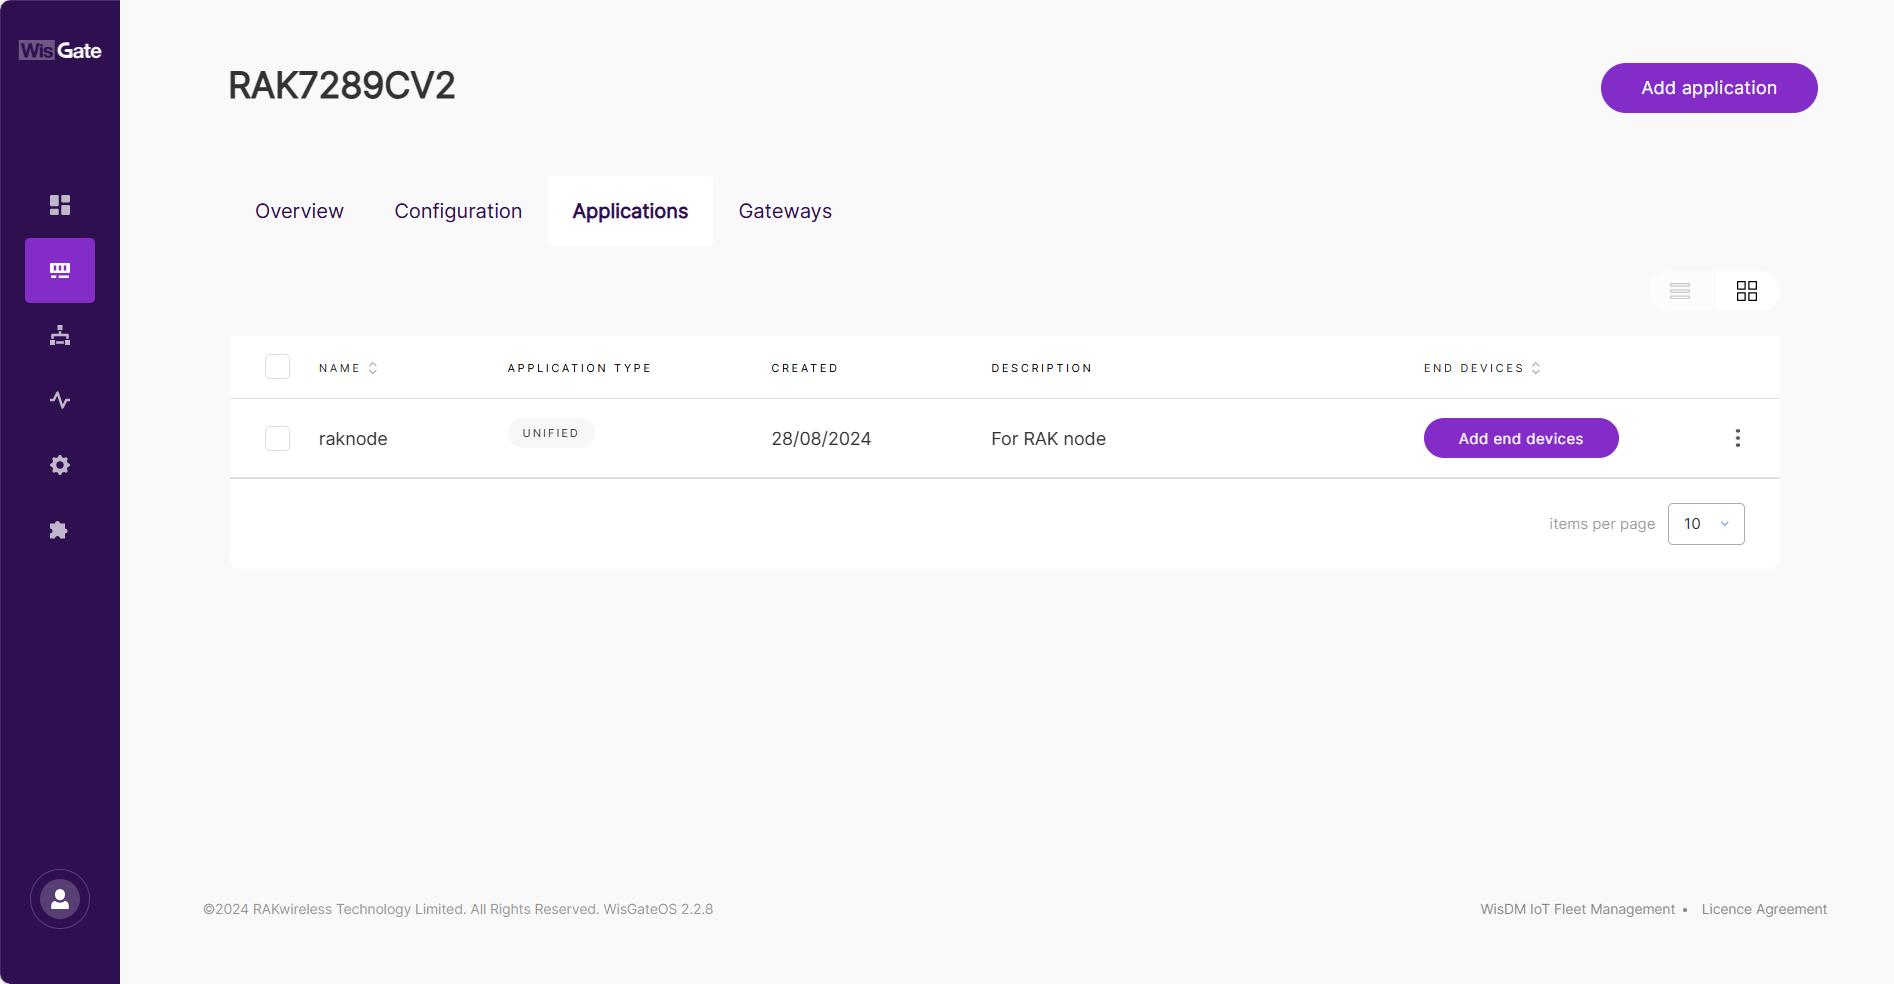 Figure 1: Application list
- In the application list, click the newly created application and choose the End devices tab.
If you have enabled Auto Add Device, the device will be automatically registered with the adding request. Otherwise, you need to refer to the next step.
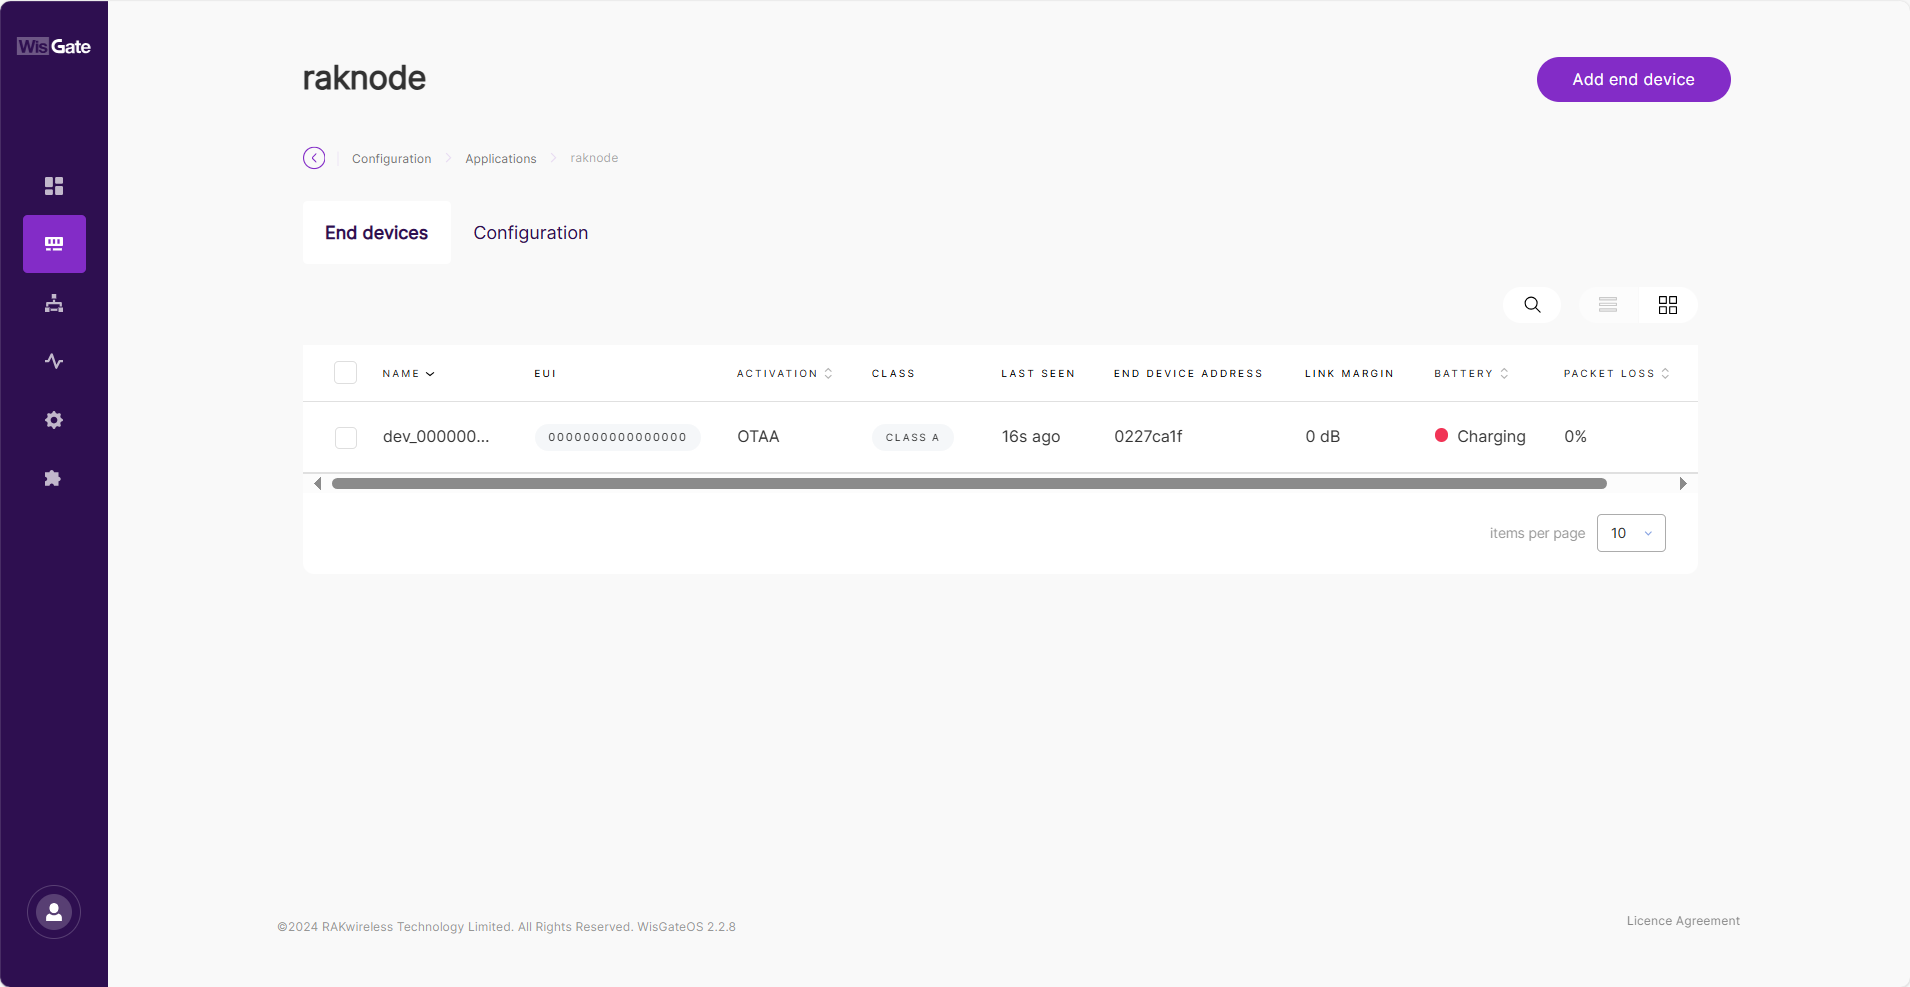 Figure 1: Device list
- Click the Add end device button.
- In the End device information interface, enter the following information.
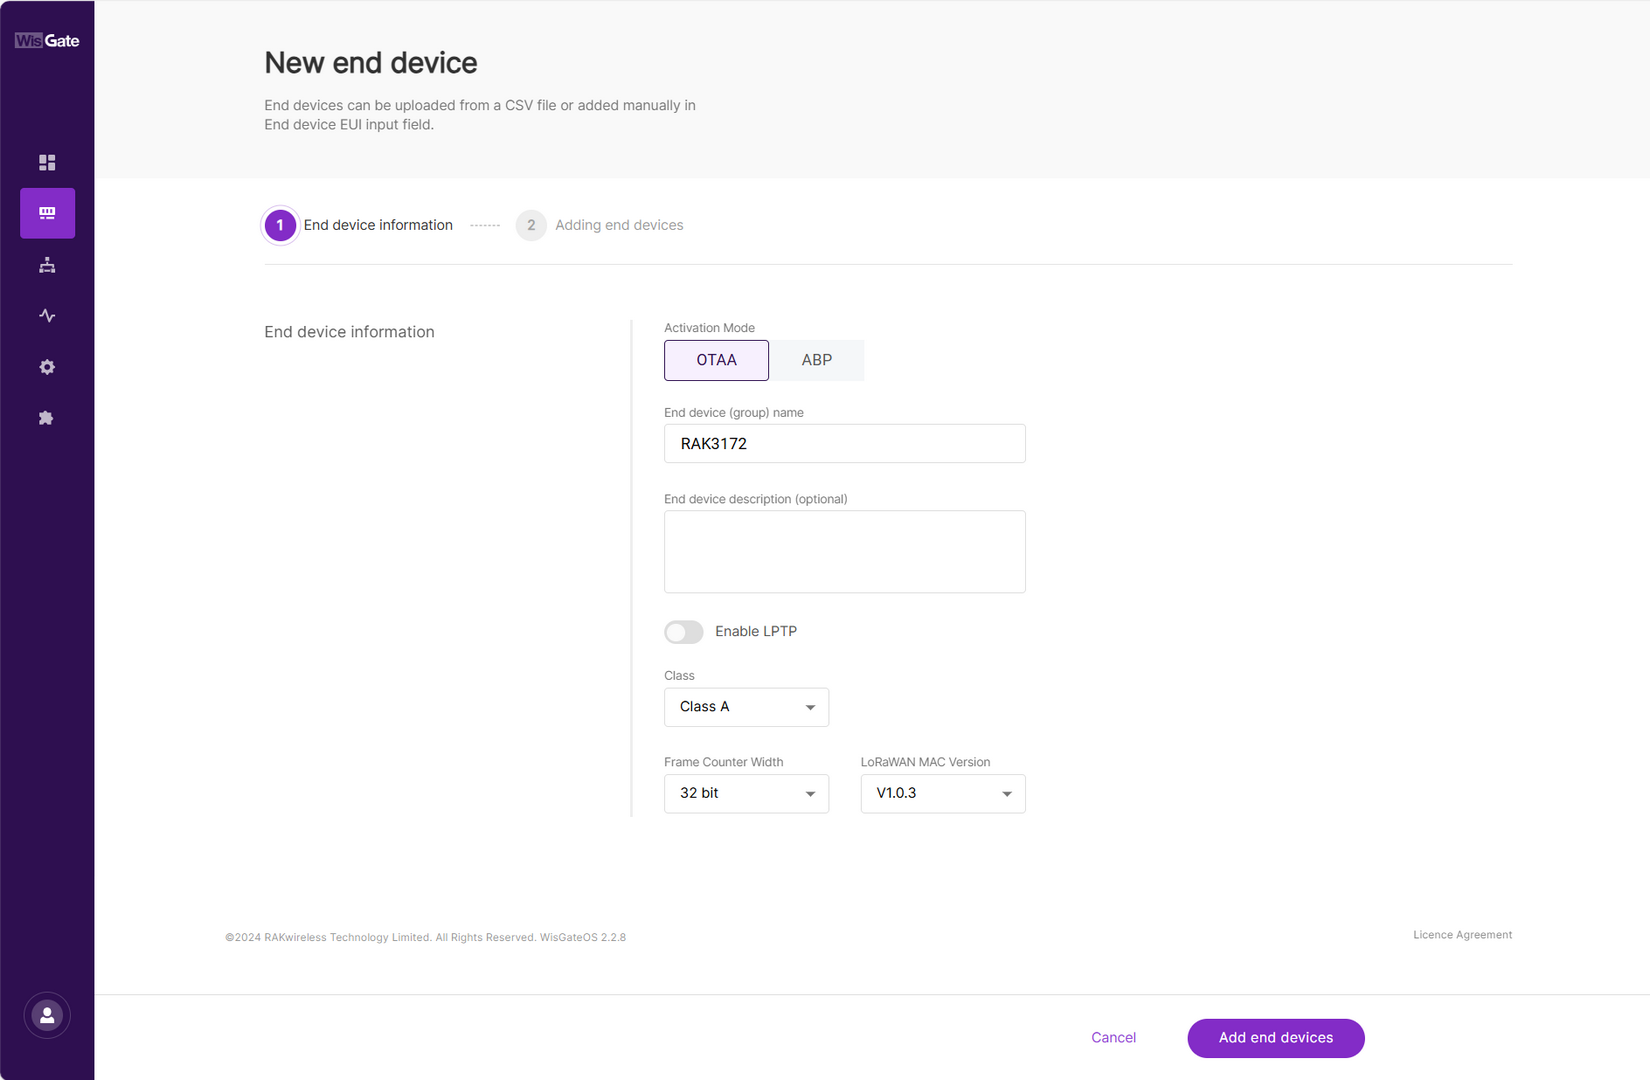 Figure 1: Add new device
- Activation Mode: OTAA or ABP. This value needs to be consistent with the value from the end device. The ABP mode will pop up two additional fields, Application Session Key and Network Session Key.
- End device (group) name: Name of the end device (group).
- End device description (optional): A description of the end device, optional.
- Class: This value needs to be consistent with the value from the end device.
- Frame Counter Width: Keep the default value.
- Click Add end devices to enter the device adding page.
- In the Adding end devices interface, enter the device EUI in the End Device EUI (main) field and click the Add to End Devices list button.
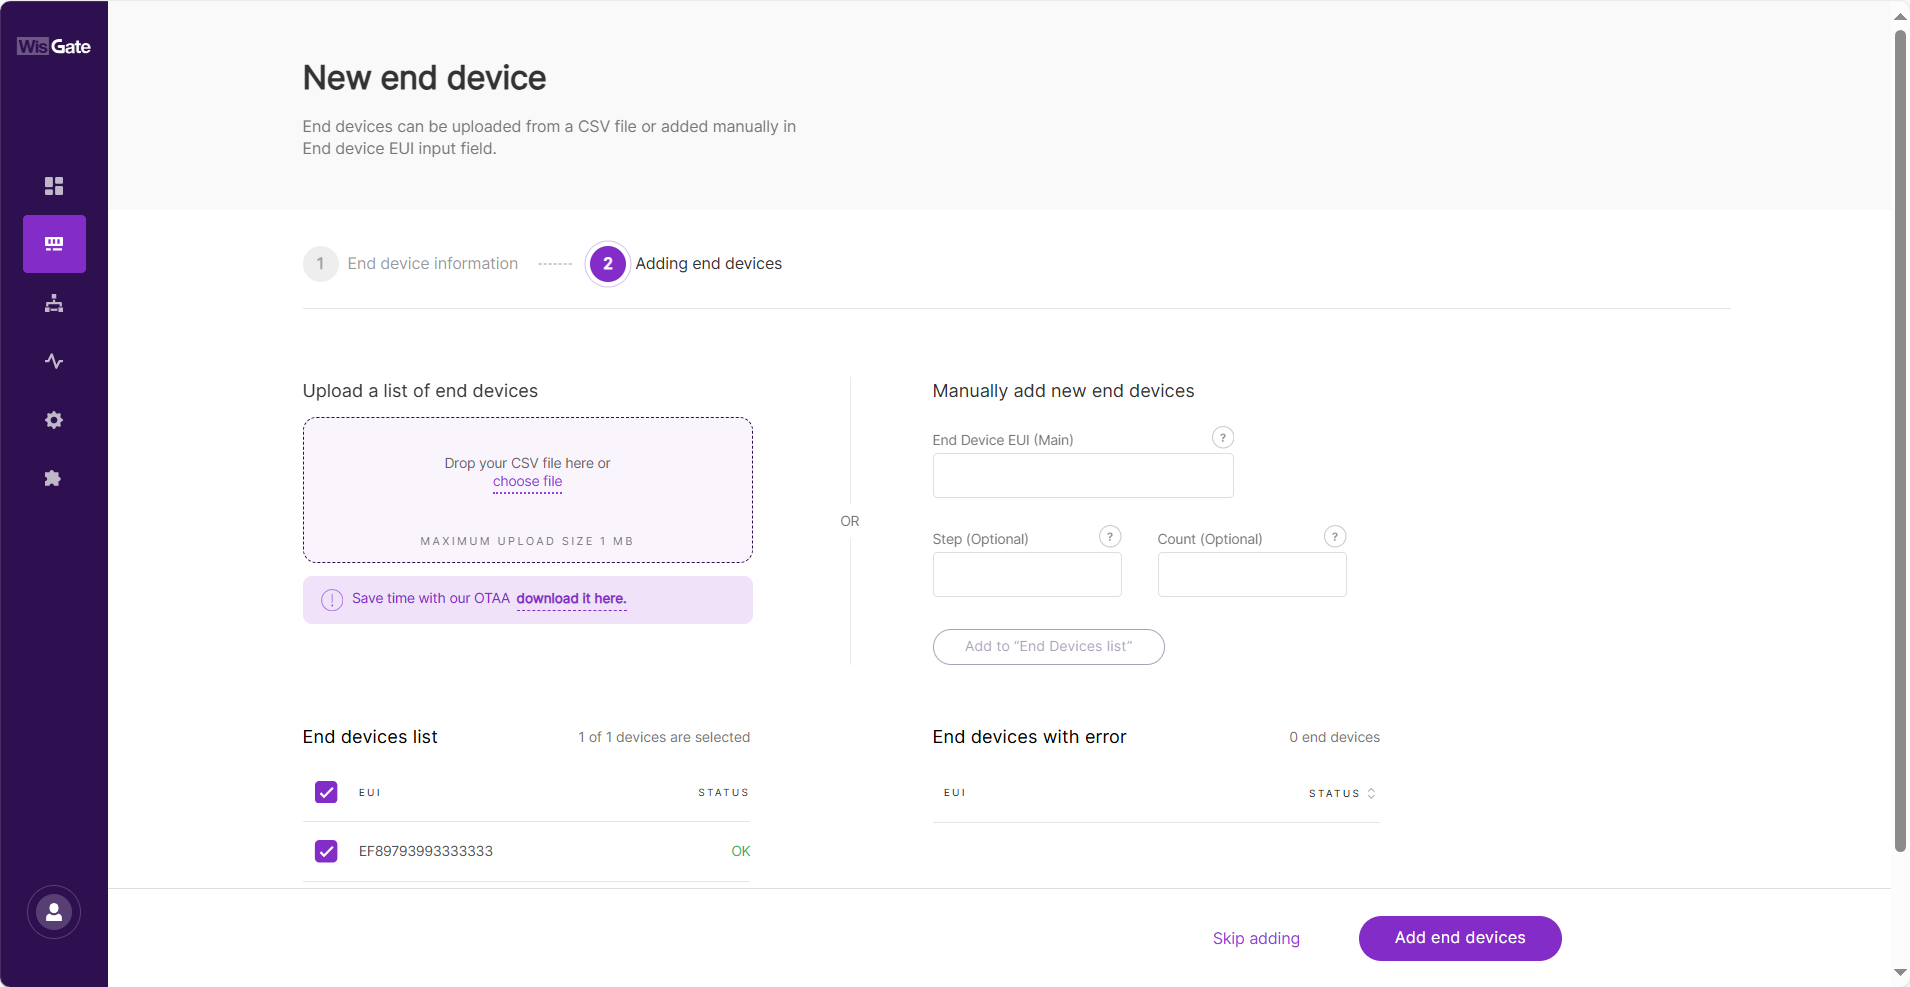 Figure 1: Add new device to End Devices list
- The device EUI needs to be consistent with the end device EUI.
- If the EUI is correct, the device will appear in the “End devices list”.
- If the EUI is duplicate, the device will be displayed in the “End devices with an error”.
- Click Add end devices to add the device to the application. Execute join request on the node side.
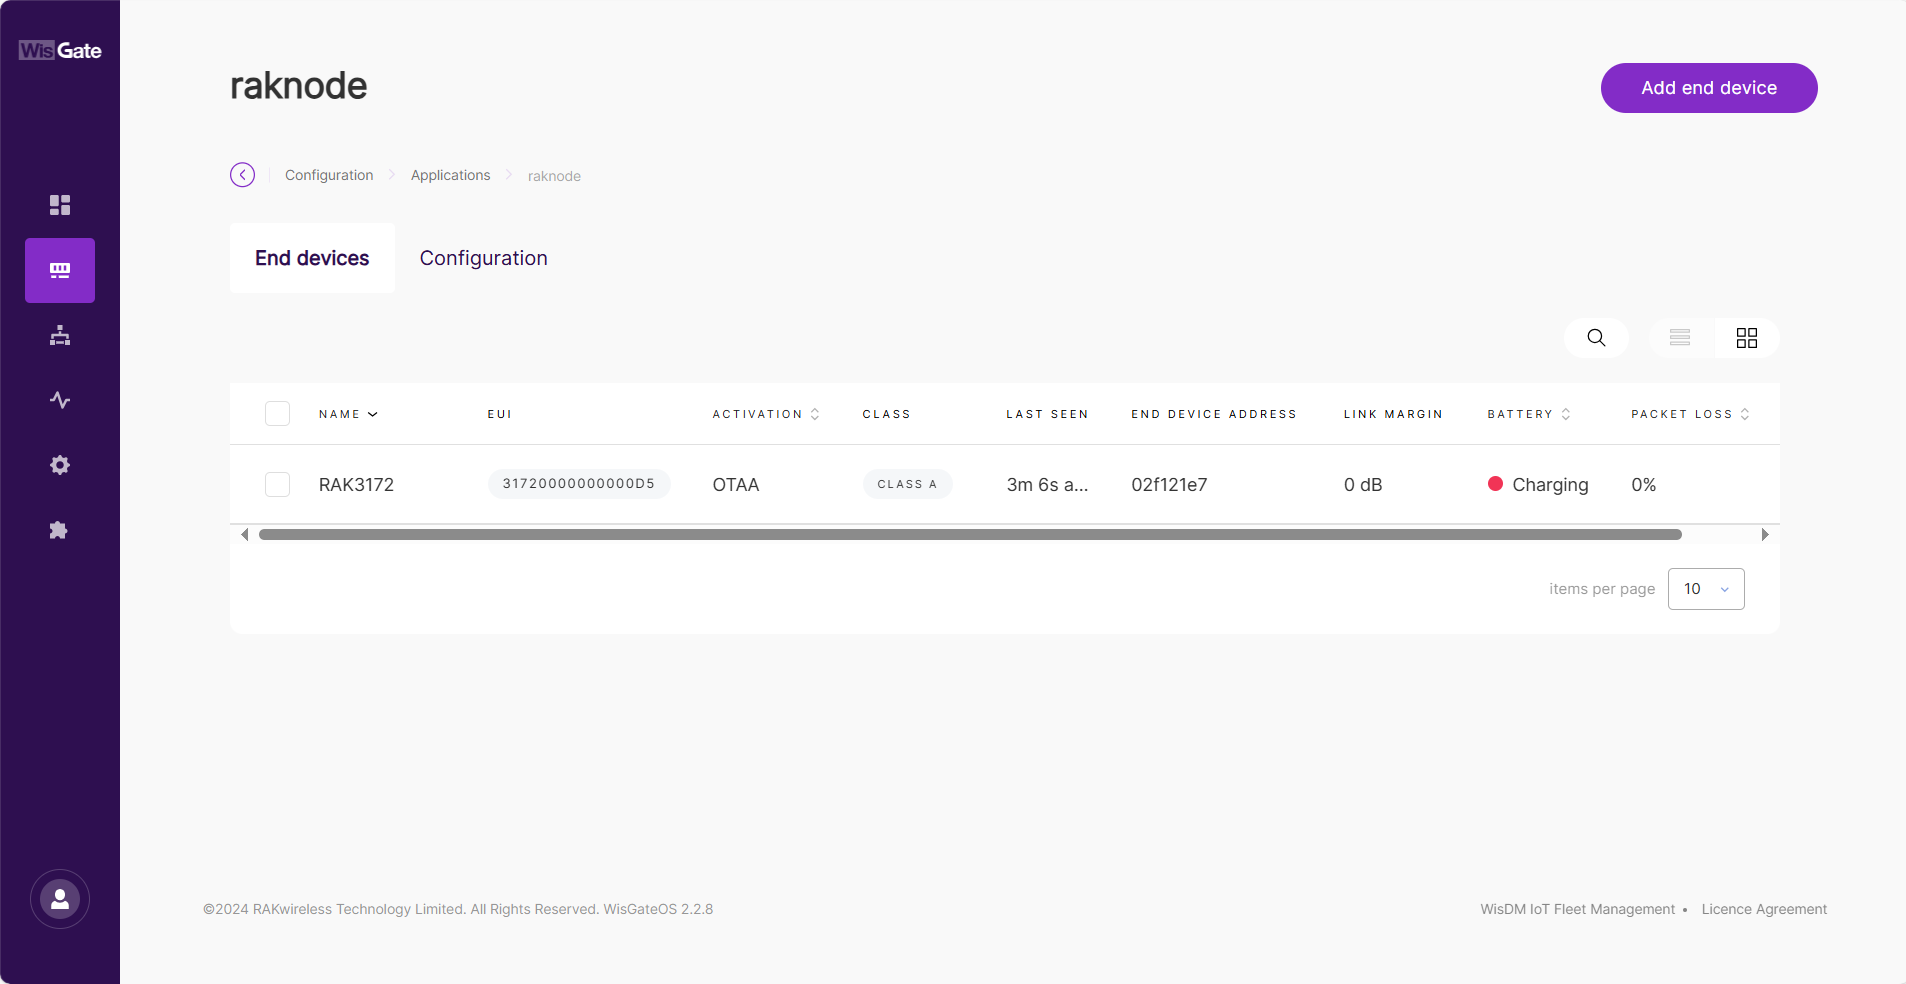 Figure 1: Device online
By following the steps in the previous sections, you should now have your device registered. If you click on the Device EUI, you will go to the corresponding Configuration tab. Click the Packet capture button. Here you can monitor the data that the application is exchanging in real time.
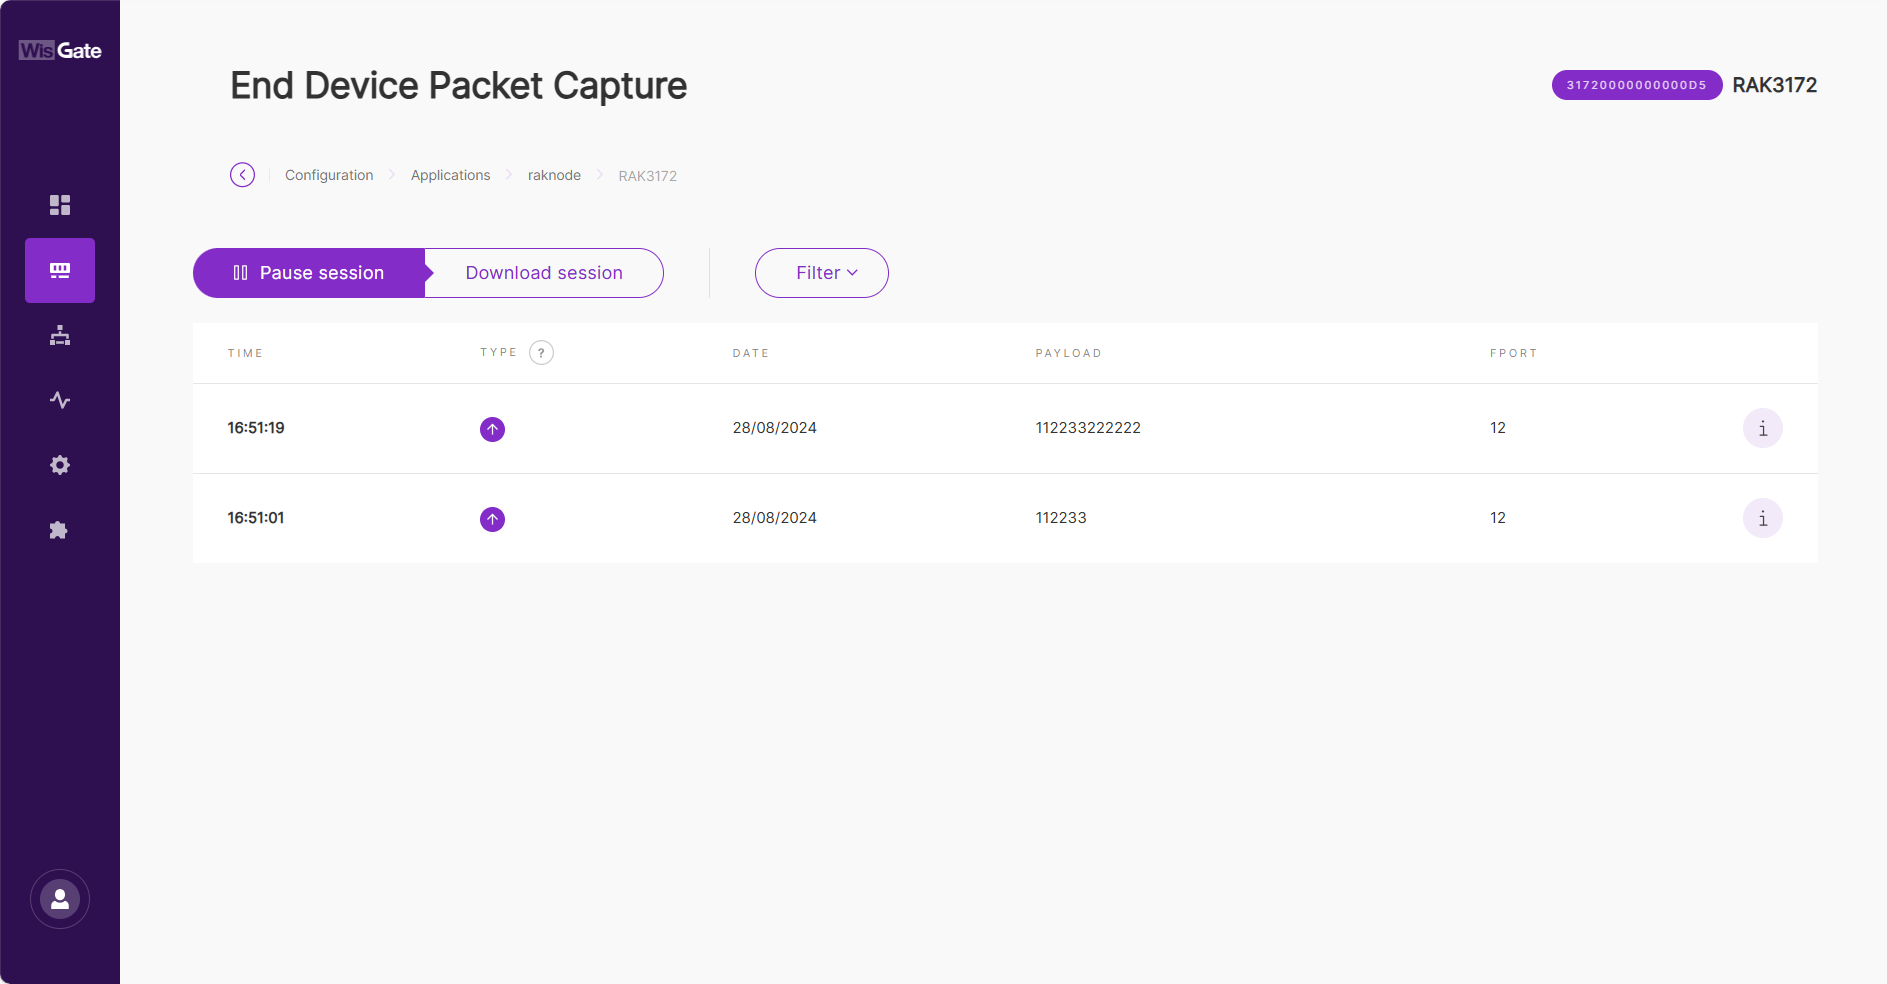 Figure 1: End Device Packet Capture
AWS IoT Core for LoRaWAN
Execute the following steps to set up your AWS account and permissions:
Set up Roles and Policies in IAM
Add an IAM Role for CUPS Server
Adding an IAM role will allow the Configuration and Update Server (CUPS) to handle the wireless gateway credentials.
This procedure needs to be done only once, but must be performed before a LoRaWAN gateway tries to connect with AWS IoT Core for LoRaWAN.
-
Go to the IAM Roles page on the IAM console.
-
Choose Create role.
-
On the Create Role page, choose AWS account > Another AWS account.
-
Enter your Account ID, then select Next.
-
In the search box next to the filter policies, type AWSIoTWirelessGatewayCertManager.
-
If the search results show the policy named AWSIoTWirelessGatewayCertManager, select it by clicking the checkbox.
-
If the policy does not exist, create one.
- Go to the IAM Policies page. Choose Create Policy, then select the JSON tab to open the policy editor.
- Replace the existing template with a trust policy document.
{
"Version": "2012-10-17",
"Statement": [
{
"Sid": "IoTWirelessGatewayCertManager",
"Effect": "Allow",
"Action": [
"iot:CreateKeysAndCertificate",
"iot:DescribeCertificate",
"iot:ListCertificates",
"iot:RegisterCertificate"
         ],
"Resource": "*"
          }
      ]
}- Click Next.
- On the Review and create page. For the Name, type AWSIoTWirelessGatewayCertManager.
NOTEYou must enter the name as AWSIoTWirelessGatewayCertManager and must not use a different name. This is for consistency with future releases.
- For the Description, enter a description of your choice.
- Then choose Create policy. You will see a confirmation message showing the policy has been created.
-
-
Click Next.
-
In Role name, enter IoTWirelessGatewayCertManagerRole, and then choose to Create role.
You must not use a different name. This is for consistency with future releases.
- In the confirmation message, choose IoTWirelessGatewayCertManagerRole to edit the new role.
- In the Summary, choose the Trust relationships tab, and then choose Edit trust relationship.
- In the Policy Document, change the Principal property to represent the IoT Wireless service:
"Principal": {
"Service": "iotwireless.amazonaws.com"
},
- After changing the Principal property, the complete policy document should look like the following:
{
"Version": "2012-10-17",
"Statement": [
    {
"Effect": "Allow",
"Principal": {
"Service": "iotwireless.amazonaws.com"
        },
"Action": "sts:AssumeRole",
"Condition": {}
    }
    ]
}
- Choose Update Trust Policy to save your changes and exit. At this point, you have created the IoTWirelessGatewayCertManagerRole and you won't need to do this again.
The examples in this document are intended only for dev environments. All devices in your fleet must have credentials with privileges that authorize only intended actions on specific resources. The specific permission policies can vary for your use case. Identify the permission policies that best meet your business and security requirements. For more information, refer to Example Policies and Security Best Practices
Add IAM Role for Destination to AWS IoT Core for LoRaWAN
Creating a PolicyCreating a policy gives the role permissions to describe the IoT endpoint and publish messages to AWS IoT.
- Go to the IAM console.
- Choose Policies from the navigation pane.
- Choose Create Policy, then choose the JSON tab to open the policy editor. Replace the existing template with this trust policy document:
{
"Version": "2012-10-17",
"Statement": [
   {
"Effect": "Allow",
"Action":
[
"iot:DescribeEndpoint",
"iot:Publish"
],
"Resource": "*"
   }
   ]
}
- Click Next.
- On the Review and create page. For the Name, enter a name of your choice.
- For Description, enter a description of your choice.
- Choose Create policy. You will see a confirmation message indicating that the policy has been created.
- In the IAM console, choose Roles from the navigation pane to open the Roles page.
- Choose Create Role.
- On the Create Role page, choose AWS account > Another AWS account.
- Enter your Account ID, then select Next.
- Search for the IAM policy you just created by entering the policy name in the search bar.
- In the search results, select the checkbox corresponding to the policy.
- Click Next.
- For Role name, enter an appropriate name of your choice.
- For Description, enter a description of your choice.
- Choose Create role. You will see a confirmation message indicating that your role has been created.
Update your role's trust relationship to grant AWS IoT Core for LoRaWAN permission to assume this IAM role when delivering messages from devices to your account.
- In the IAM console, choose Roles from the navigation pane to open the Roles page.
- Enter the name of the role you created earlier in the search window, and click on the role name in the search results. This opens up the Summary page.
- Choose the Trust relationships tab to navigate to the Trust relationships page.
- Click Edit trust policy. The principal AWS role in your trust policy document defaults to root and must be changed. Replace the existing policy with this:
{
"Version": "2012-10-17",
"Statement": [
{
"Sid": "",
"Effect": "Allow",
"Principal": {
"Service": "iotwireless.amazonaws.com"
},
"Action": "sts:AssumeRole",
"Condition": {}
   }
   ]
}
- Choose Update Policy.
Add the Gateway to AWS IoT
Requirements
To complete setting up your gateway, you need the following:
- LoRaWAN region. For example, if the gateway is deployed in a US region, the gateway must support LoRaWAN region US915.
- Gateway LNS-protocols. Currently, the LoRa Basics Station protocol is supported.
- Gateway ID (GatewayEUI) or serial number. This is used to establish the connection between the LNS and the gateway. Consult the documentation for your gateway to locate this value.
- Add minimum software versions required, including Basics Station 2.0.5.
Add the LoRaWAN Gateway
To register the gateway with AWS IoT Core for LoRaWAN, execute these steps:
- Go to the AWS IoT console.
- Select LPWAN devices in the navigation panel on the left.
- Choose Gateways, and then click Add gateway.
- In the Add gateway section, fill in the Gateway's EUI and Frequency band (RF Region) fields.
- Enter a descriptive name in the Name: optional field. It is recommended that you use the GatewayEUI as the name.
- Click Add gateway.
- On the Configure your gateway page, find the section titled Gateway certificate.
- Select Create certificate.
- Once the Certificate created and associated with your gateway message is shown, select Download certificate files to download the certificate (xxxxx.cert.pem) and private key (xxxxxx.private.key).
- In the section Provisioning credentials, choose Download server trust certificates to download the CUPS (cups.trust) and LNS (lns.trust) server trust certificates.
- Copy the CUPS and LNS endpoints and save them in a
.txtfile for use while configuring the gateway. - Choose Submit to add the gateway.
Set Up the Gateway
- Using your preferred Web browser, access the gateway. To access the gateway, see the Quick Start Guide.
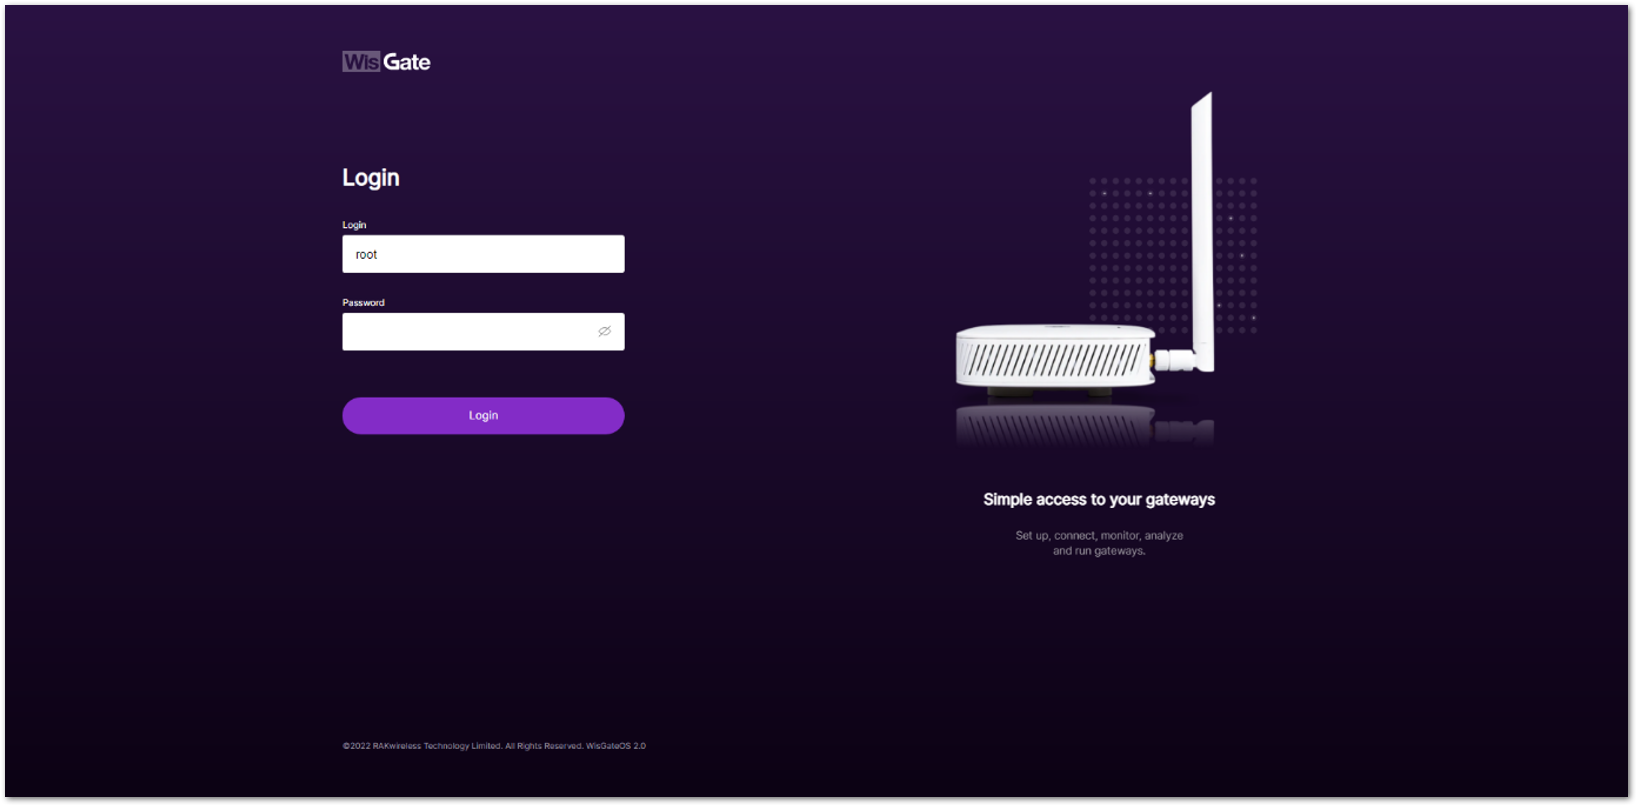 Figure 1: Web User Interface Log-in
- Configure Network Mode to Basics Station. Navigate to LoRa.
- For Work mode, select Basics station and click Configure Basics Station server setup to expand the Basics Station settings.
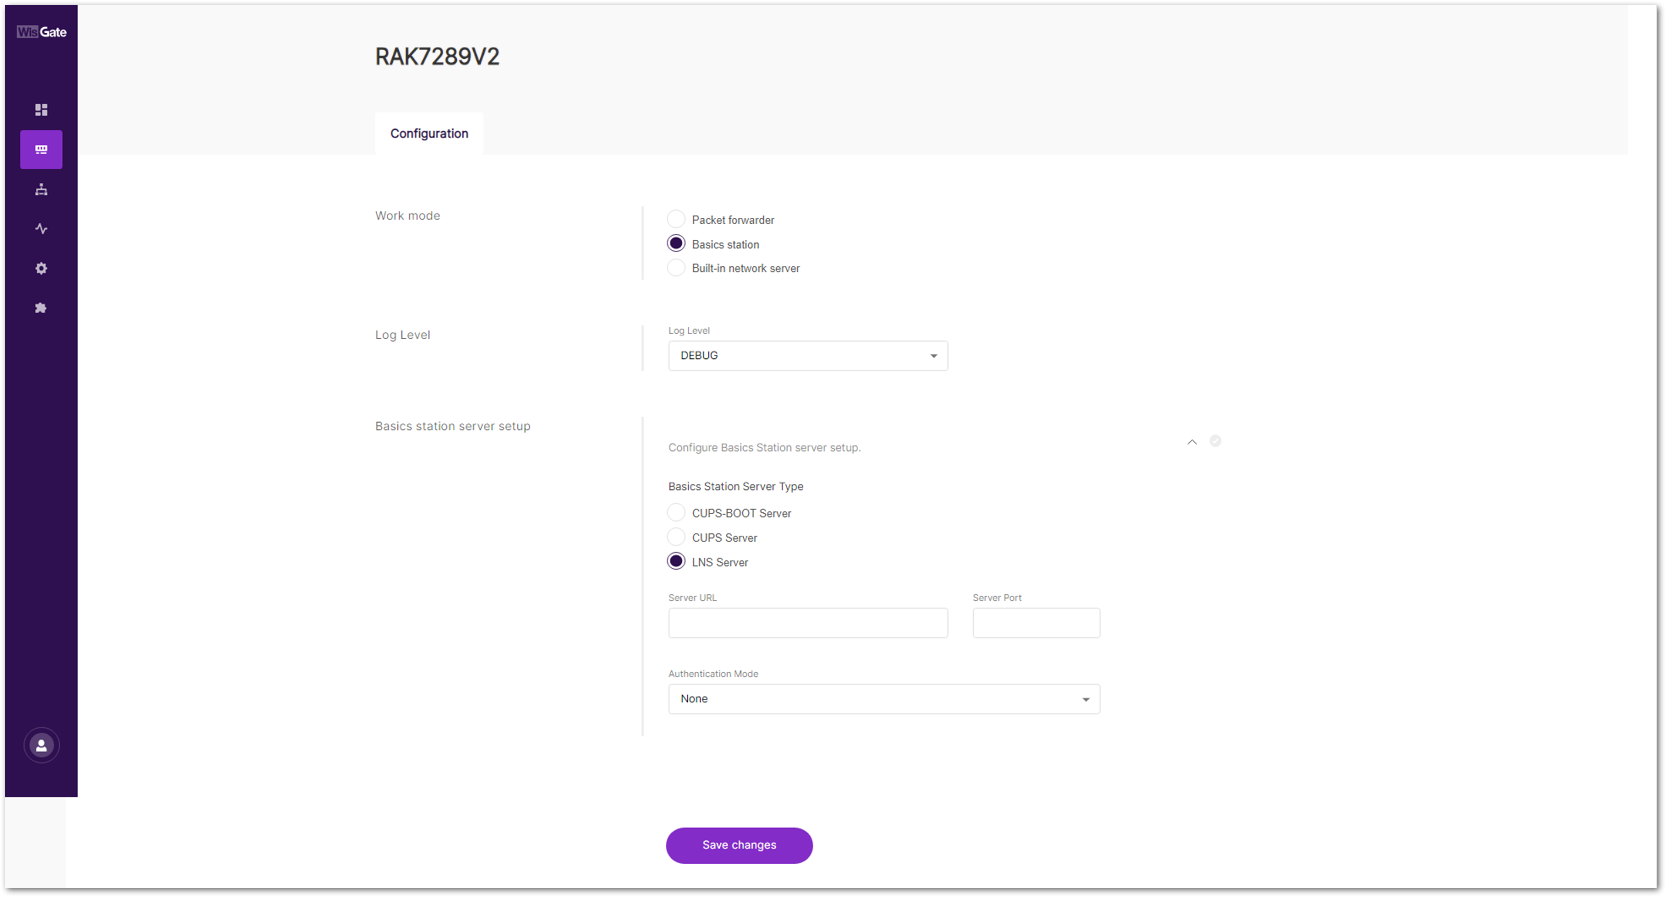 Figure 1: Basics Station Work Mode
- Select LNS Server from Server, then choose TLS Server and Client Authentication from Authentication Mode.
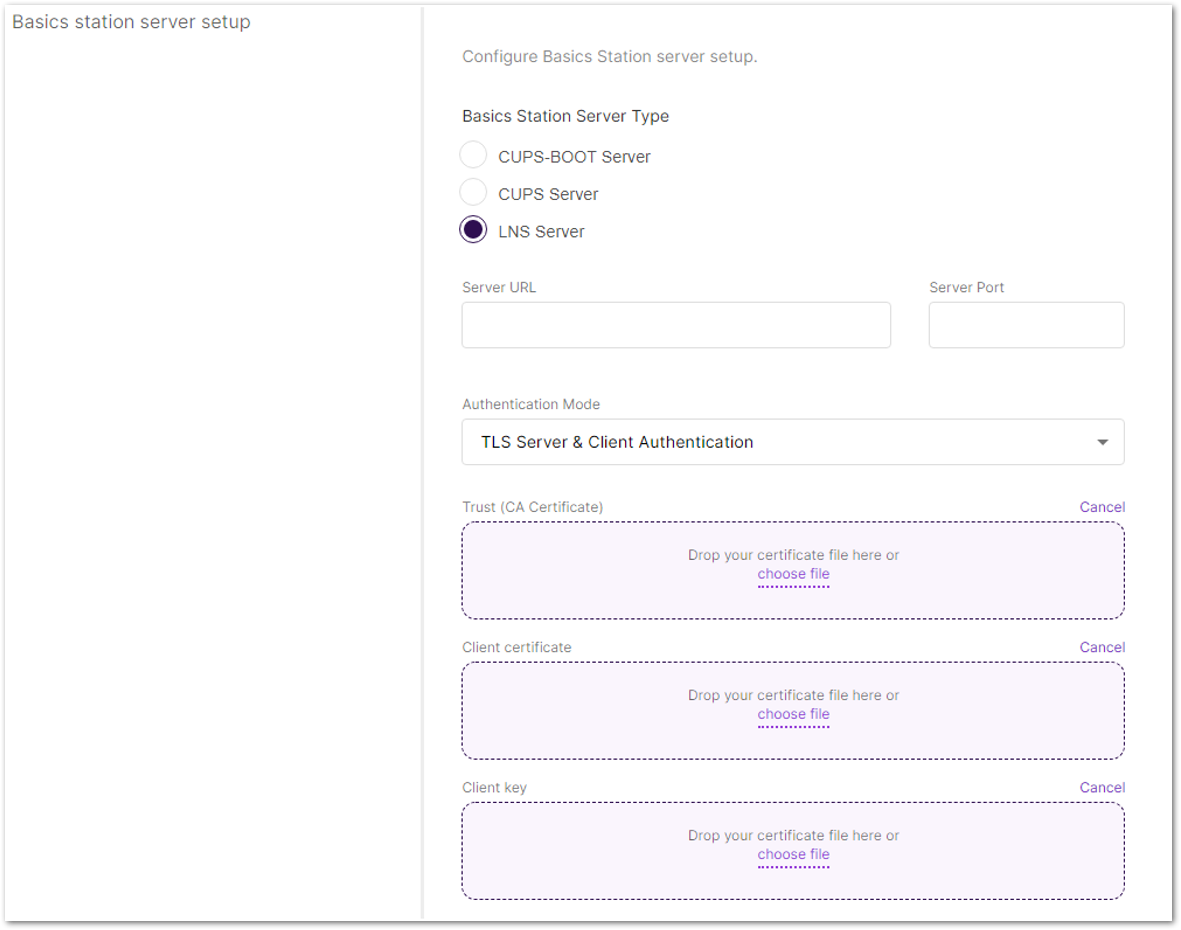 Figure 1: Configuring Network Mode to Basics Station
- Configure URI, Port, and Authentication Mode.
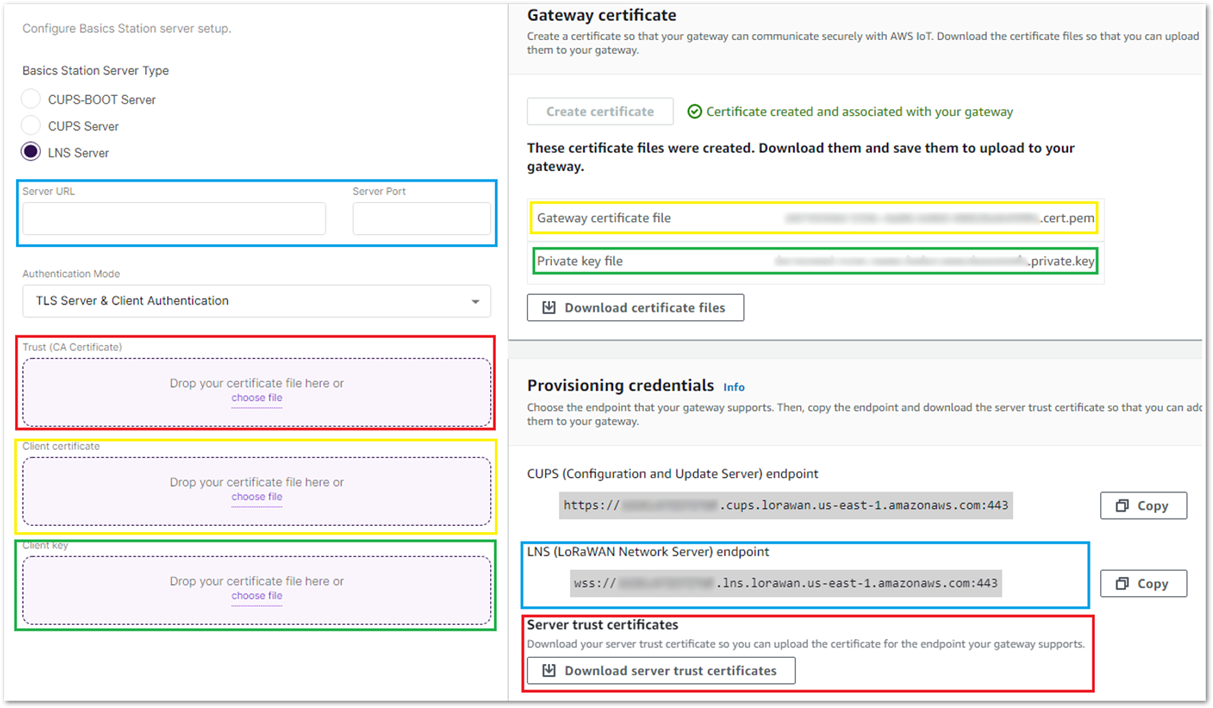 Figure 1: Configuring URI, Port, and Authentication Mode
- Click Save. Check if the gateway is online in AWS IoT console.
 Figure 1: Verifying Operation
Add a LoRaWAN Device to AWS IoT
In this section we use RAK3172 as an example device.
Requirements
- Locate and note the following specifications about your endpoint device.
- LoRaWAN Region: This must match the gateway LoRaWAN region.
- MAC Version: This must be one of the following:
- V1.0.2
- v1.0.3
- v1.0.4
- v1.1
- OTAA v1.0.x and OTAA v1.1 are supported.
- ABP v1.0.x and ABP v1.1 are supported.
- Locate and note the following information from your device manufacturer:
- For OTAA v1.0x devices: DevEUI, AppKey, AppEUI
- For OTAA v1.1 devices: DevEUI, AppKey, NwkKey, JoinEUI
- For ABP v1.0x devices: DevEUI, DevAddr, NwkSkey, AppSkey
- For ABP v1.1 devices: DevEUI, DevAddr, NwkSEnckey, FNwkSIntKey, SNwkSIntKey, AppSKey
Verify Profiles
AWS IoT Core for LoRaWAN supports device profiles and service profiles. Device profiles contain the communication and protocol parameter values the device needs to communicate with the network server. Service profiles describe the communication parameters the device needs to communicate with the application server.
Some pre-defined profiles are available for device and service profiles. Before proceeding, verify that these profile settings match the devices you will be setting up to work with AWS IoT Core for LoRaWAN.
- Navigate to the AWS IoT console. In the navigation pane, choose LPWAN devices, then click Profiles.
- In the Device Profiles section, there are some pre-defined profiles listed.
- Check each of the profiles to determine if one of them will work for you. If not, select Add device profile and set up the parameters as needed. For US915 as an example:
 Figure 1: Adding the Device Profile
-
Click Add device profile once you have set a device profile that will work for you.
-
In the Service Profiles section, click Add service profile and set up the parameters as needed. As an example, the default service profile parameters are shown below. However, only the AddGwMetadata setting can be changed at this time.
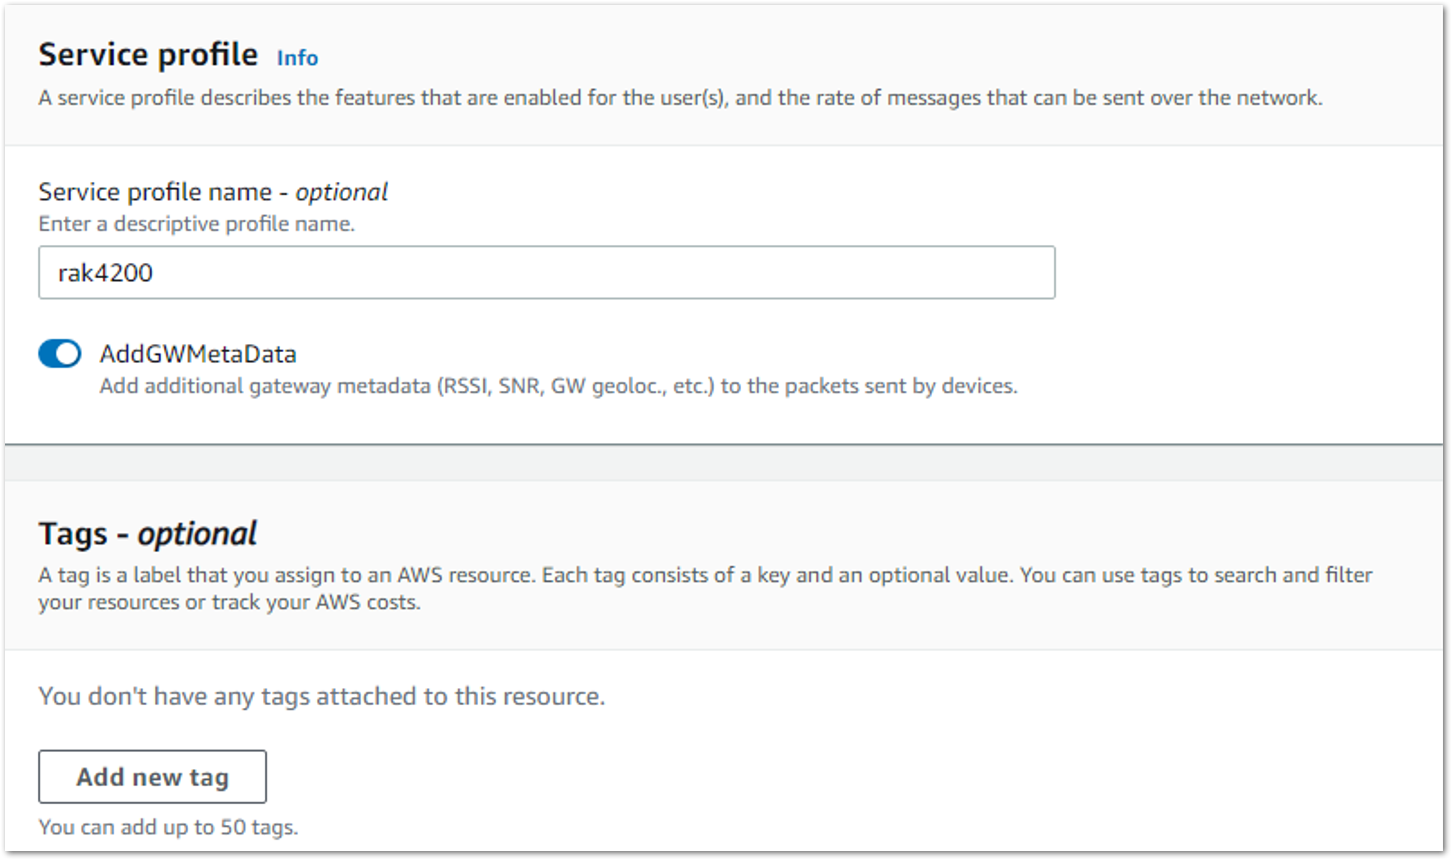 Figure 1: Adding the Service Profile
- Proceed only if you have a device and service profile that will work for you.
Set Up a Destination for Device Traffic
Because most LoRaWAN devices don't send data to AWS IoT Core for LoRaWAN in a format that can be consumed by AWS services, traffic must first be sent to a Destination. A Destination represents the AWS IoT rule that processes a device's data for use by AWS services. This AWS IoT rule contains the SQL statement that selects the device's data and the topic rule actions that send the result of the SQL statement to the services that will use it.
For more information on Destinations, refer to the AWS LoRaWAN Developer Guide.
A destination consists of a Rule and a Role. To set up the destination, execute the following steps:
- Navigate to the AWS IoT console. In the navigation pane, choose LPWAN devices, and then Destinations.
- Choose Add Destination.
- For the Destination name, enter ProcessLoRa, and then add an appropriate description under Destination description – optional.
The Destination name can be anything. For getting started and consistency, choose ProcessLoRa for the first integration with AWS IoT Core for LoRaWAN.
- For Rule name, enter LoRaWANRouting. Ignore the section Rules configuration – Optional for now. The Rule will be set up later in the "Hello World" sample application. See Create the IoT Rule for the destination.
- In the Permissions section, choose Select an existing service role and select the IAM role you had created earlier, from the drop-down.
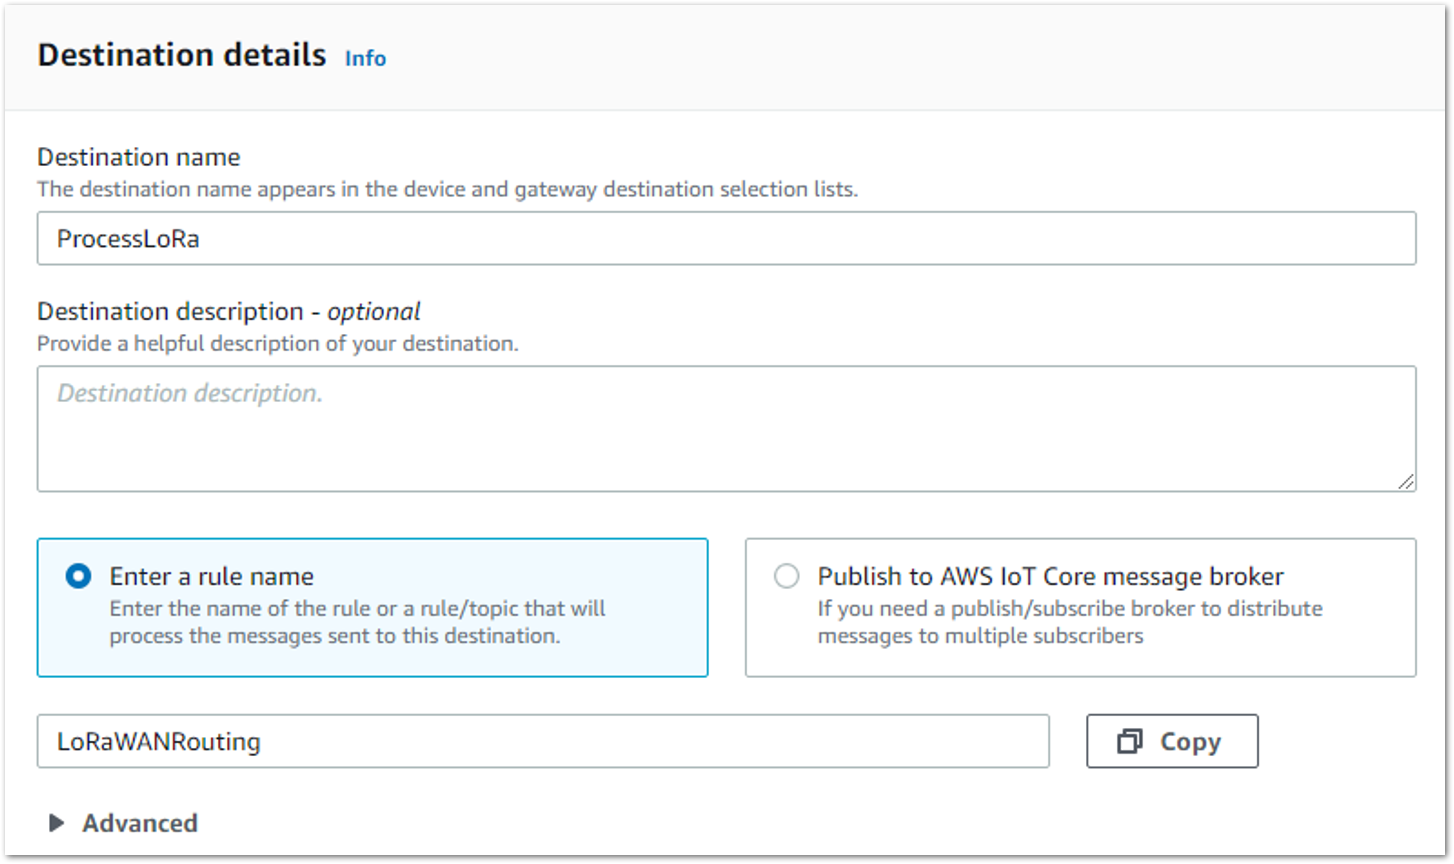 Figure 1: Adding Destination
- Choose Add Destination. You will see a message Destination added, indicating the destination has been successfully added.
Register the Device
Now, register an endpoint device with AWS IoT Core for LoRaWAN as follows. Before adding a device to AWS IoT, retrieve the DevEUI, AppEUI, and AppKey from the end Device's console. The RAK3172 device used in this example needs to query device information through AT commands.
- Go to the AWS IoT console.
- Select LPWAN devices in the navigation panel on the left.
- Select Devices, then choose Add wireless device.
- On the Add device page, select the LoRaWAN specification version in the drop-down under Wireless device specification.
- Enter the DevEUI.
- Enter the remaining fields as per the OTAA/ABP choice you made above.
- Enter a name for your device in the Wireless device name – optional field.
- In the Profiles section, under Wireless device profile, from the drop-down option find the device profile you have created or the one that corresponds to your device and region.
Compare your device details to ensure the device profile is correct. If there are no valid default options, you will have to create a new profile. See the Verify Profiles section.
- Choose the destination you created earlier (ProcessLoRa) from the drop-down under Choose destination.
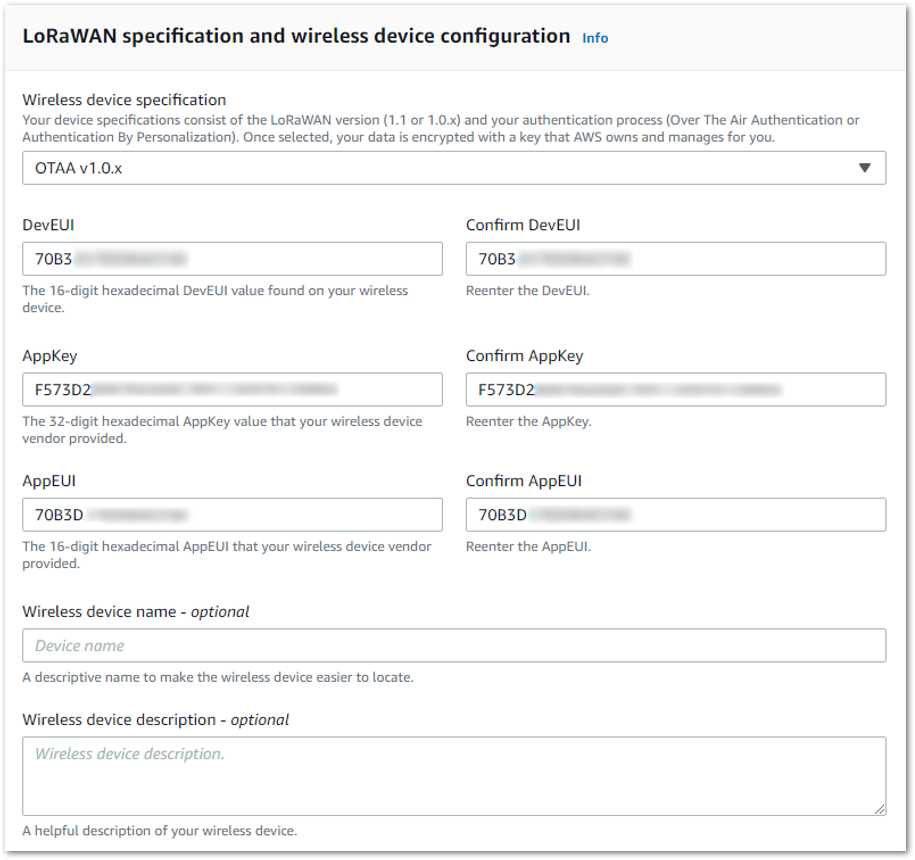 Figure 1: LoRaWAN specifications and wireless device configuration
- Click Next.
- Choose Add device. You will see a message saying "Wireless device added", indicating that your device has been set up successfully.
- Restart the end device, and it should join the AWS IoT LoRaWAN server.
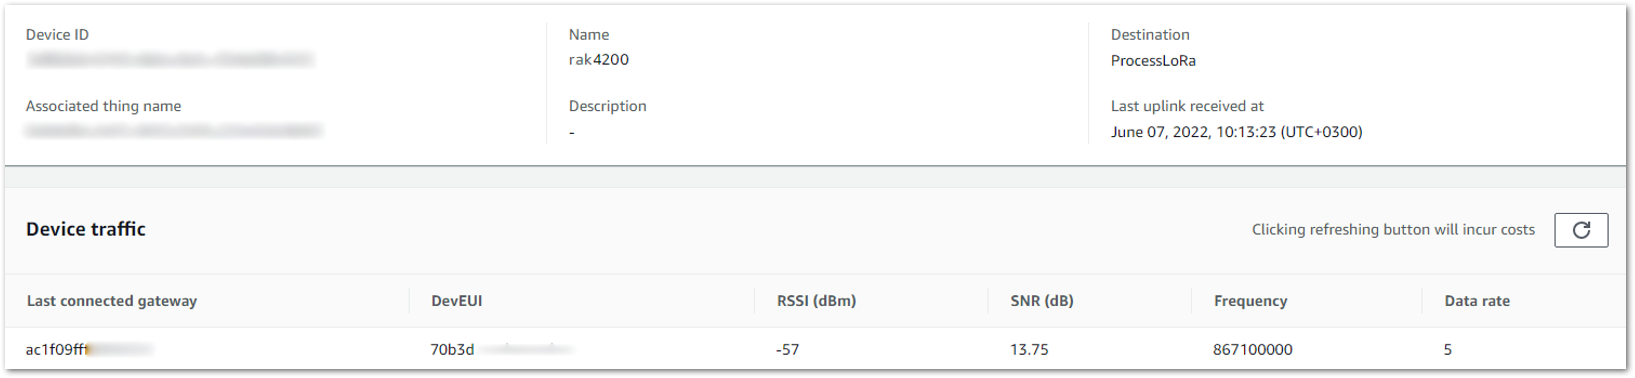 Figure 1: Joined Device
Verifying Operation
Once setup is completed, provisioned OTAA devices can join the network and start to send messages. Messages from devices can then be received by AWS IoT Core for LoRaWAN and forwarded to the IoT Rules Engine.
Instructions for a sample Hello World application are given below, assuming that the device has joined and is capable of sending uplink traffic.
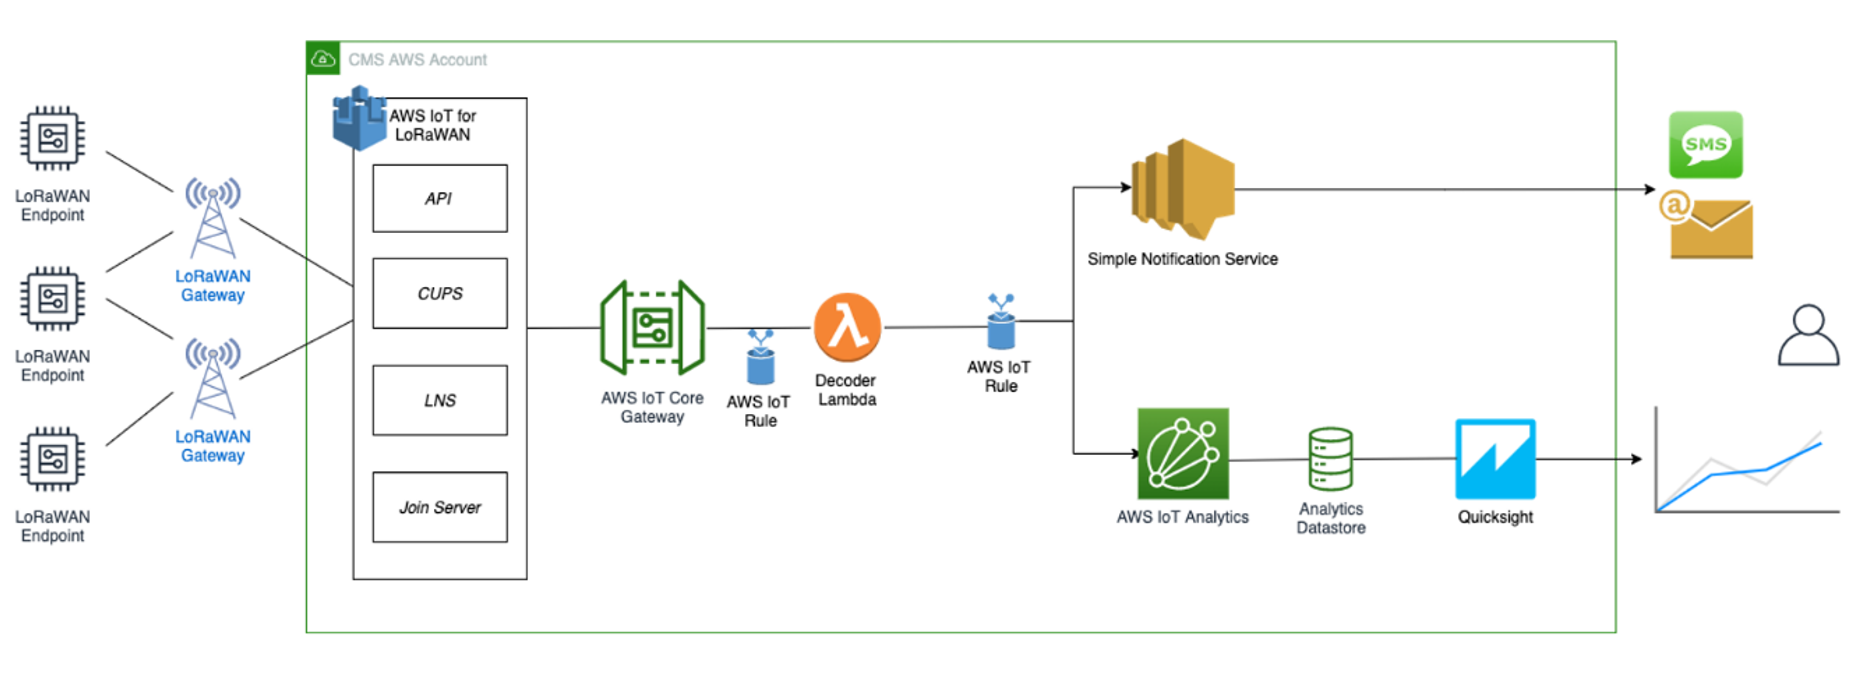 Figure 1: Sending Uplink Architecture
Create a Lambda Function for Destination Rule
Create the lambda function to process device messages processed by the destination rule.
- Go to the AWS Lambda console.
- Select Functions in the navigation pane.
- Choose Create function.
- Select Author from scratch.
- Under Basic Information, enter the function name and choose Runtime Python 3.8. from the drop-down under Runtime.
- Click Create function.
- Under Function code, paste the copied code into the editor under the lambda_function.py tab.
Click to view the code
import base64
import json
import logging
import ctypes
import boto3

# define function name

FUNCTION_NAME = 'RAK-HelloWorld'

# Second Byte in Payload represents Data Types
# Low Power Payload Reference: https://developers.mydevices.com/cayenne/docs/lora/

DATA_TYPES = 1

# Type Temperature

TYPE_TEMP = 0x67

# setup iot-data client for boto3

client = boto3.client('iot-data')

# setup logger

logger = logging.getLogger(FUNCTION_NAME)
logger.setLevel(logging.INFO)

def decode(event):
    data_base64 = event.get('PayloadData')
    data_decoded = base64.b64decode(data_base64)
    result = {
        'devEui': event.get('WirelessMetadata').get('LoRaWAN')
                .get('DevEui'),
        'fPort': event.get('WirelessMetadata').get('LoRaWAN')
                .get('FPort'),
        'freq': event.get('WirelessMetadata').get('LoRaWAN')
                .get('Frequency'),
        'timestamp': event.get('WirelessMetadata').get('LoRaWAN')
                .get('Timestamp'),
    }

    if data_decoded[DATA_TYPES] == TYPE_TEMP:
        temp = data_decoded[DATA_TYPES + 1] << 8 \
            | data_decoded[DATA_TYPES + 2]
        temp = ctypes.c_int16(temp).value
        result['temperature'] = temp / 10

    return result

def lambda_handler(event, context):
    data = decode(event)
    logger.info('Data: %s' % json.dumps(data))
    response = client.publish(topic=event.get('WirelessMetadata')
                              .get('LoRaWAN').get('DevEui')
                              + '/project/sensor/decoded', qos=0,
                              payload=json.dumps(data))
    return response
- Once the code has been pasted, choose Deploy to deploy the lambda code.
- Click the Configuration tab of the lambda function and select Permissions.
- Change the Lambda Role Policy permission.
- Under Execution role, click the hyperlink under Role name.
- On the Permissions tab, find the policy name and select it.
- Choose Edit policy, and choose the JSON tab.
- Append the following to the Statement section of the policy to allow publishing to AWS IoT.
 {
   "Effect":"Allow",
   "Action":[
      "iot:Publish"
   ],
   "Resource":[
      "*"
   ]
}
- After the change, the code should look like this:
{
    "Version": "2012-10-17",
    "Statement": [
        {
        "Effect":"Allow",
        "Action":[
             "iot:Publish"
        ],
         "Resource":[
          "*"
         ]
        }
    ]
}
- Choose Review Policy, then Save changes.
- Go back to the Lambda function Code source and create a test event that will allow you to test the functionality of the lambda function.
-
Click Test next to Deploy.
-
In the Configure test event, enter a name for the test event in the Event name field.
-
Paste the following sample payload in the area under Event JSON field:
NOTEThe device information in the following code must be consistent with the device information you are using.
      {
      "WirelessDeviceId": "65d128ab-90dd-4668-9556-fe47c589610b",
      "PayloadData": "AWf/1w==",
      "WirelessMetadata": {
      "LoRaWAN": {
      "DataRate": "4",
      "DevEui": "0000000000000088",
      "FPort": 1,
      "Frequency": "868100000",
      "Gateways": [
              {
      "GatewayEui": "80029cffXXXXXXXX",
      "Rssi": -109,
      "Snr": 5
              }
          ],
      "Timestamp": "2021-02-08T04:00:40Z"
          }
      }
      }
- Choose Save to save the event.
- In a new window, navigate to the AWS IoT console, choose Test on the navigation pane, and select MQTT test client.
- In Subscription topic field type # (all topics) and click Subscribe to topic. The MQTT will subscribe to all topics.
- Click on Test in the Lambda function page to generate the test event you just created.
- Verify the published data in the AWS IoT Core MQTT Test client. The output should look similar to this:
    000000000000000088/project/sensor/decoded      February 09, 2021, 14:45:29 (UTC+0800)
    {
        "devEui": "000000000000000088",
        "fPort": 1,
        "freq": "868100000",
        "timestamp": "2021-02-08T04:00:40Z",
        "temperature": -4.1
    }
Create the Destination Rule
In this section, create the IoT rule that forwards the device payload to your application. This rule is associated with the destination created earlier in Set up a Destination for Device Traffic section.
- Navigate to the AWS IoT console
- In the navigation pane, choose Act, then select Rules.
- On the Rules page, choose Create rule.
- On the Create a rule page, enter as follows:
-
Name: LoRaWANRouting
-
Description: Any description of your choice.
NOTEThe Name of your Rule is the information needed when you provision devices to run on AWS IoT Core for LoRaWAN.
-
- Leave the default Rule query statement:
SELECT * FROM 'iot/topic'unchanged. This query has no effect at this time, as traffic is currently forwarded to the rules engine based on the destination. - Under Set one or more actions, click Add action.
- On the Select an action page, select Republish a message to an AWS IoT topic. Scroll down and choose Configure action.
- On the Configure action page, for Topic, enter project/sensor/decoded. The AWS IoT Rules Engine will forward messages to this topic.
- Under Choose or create a role to grant AWS IoT access to perform this action, click on Create Role.
- For Name, enter a name of your choice.
- Select Create role to complete the role creation. You will see a "Policy Attached" tag next to the role name, indicating that the Rules Engine has been permitted to execute the action.
- Choose Add action.
- Add one more action to invoke the Lambda function. Under Set one or more actions, click Add action.
- Select Send a message to a Lambda function.
- Choose Configure action.
- Click the Lambda function created earlier and choose Add action.
- Then select Create rule.
- A "Success" message will be displayed at the top of the panel, and the destination has a rule bound to it.
You can now check that the decoded data is received and republished by AWS by triggering a condition or event on the device itself.
- Go to the AWS IoT console. In the navigation pane, select Test, and choose MQTT client.
- Subscribe to the wildcard topic '#' to receive messages from all topics.
- Send message from endDevice using AT command
- You should see traffic similar to that shown below.
    393331375d387505/project/sensor/decoded           February 09, 2021, 14:47:21 (UTC+0800)
    {
    "devEui": "393331375d387505",
    "fPort": 1,
    "freq": "867100000",
    "timestamp": "2021-02-09T06:47:20Z",
    "temperature": 27.2
    }
  project/sensor/decoded    February 09, 2021, 14:47:21 (UTC+0800)
  {
       "WirelessDeviceID": "3eff83dd-9159-XXXX-XXXX-XXXXXXXXXXXX",
       "PayloadData": "AWcBEA==",
       "WirelessMetadata": {
           "LoRaWAN": {
               "DataRate": "4",
               "DevEui": "3933XXXXXXXXXXXX ",
               "FPort": 1,
               "Frequency": "867100000",
               "Gateways": [
                  {
                       "GatewayEui": "ac1ff09ffXXXXXXXX",
                       "Rssi": -103,
                       "Snr": 8.5
                  }
              ],
               "Timestamp": "2021-02-09T06:47:20Z"
          }
      }
  }
Configuring Amazon SNS
You will be using the Amazon Simple Notification Service to send text messages (SMS) when certain conditions are met.
- Go to the Amazon SNS console.
- Select Text Messaging (SMS) and choose Publish text message.
- Under Message type, select Promotional.
- Enter your phone number (phone number that will receive text alerts).
- Enter "Test message" for the Message and choose Publish message.
- If the phone number you entered is valid, you will receive a text message and your phone number will be confirmed.
- Create an Amazon SNS Topic as follows:
- In the navigation pane, choose Topics.
- Select Create topic.
- Under Type, select Standard.
- Enter a name of your choice. Here, you will use "text_topic".
- Select Create topic.
- Create a subscription for this topic:
- On the newly created text_topic page, choose the Subscriptions tab.
- Choose Create subscription.
- In Topic ARN, choose the topic you have created earlier.
- Select Protocol as SMS from the drop-down.
- Under Endpoint, enter the previously validated phone number to receive the SMS alerts.
- Choose Create subscription. You should see a Subscription to text_topic created successfully message.
Add a Rule for Amazon SNS Notification
Now, add a new rule to send an Amazon SNS notification when certain conditions are met in a decoded message.
- Navigate to the AWS IoT console.
- In the navigation pane, choose Act. Then, choose Rules.
- On the Rules page, choose Create.
- Enter the Name as "text_alert" and provide an appropriate Description.
- Under the Rule query statement, enter the following query:
SELECT devEui as device_id, "Temperature exceeded 25" as message, temperature as temp, timestamp as time FROM '+/project/sensor/decoded' where temperature > 25
- Under Set one or more actions, choose Add action.
- Choose Send a message as an SNS push notification.
- Choose Configure action.
- Under SNS target, select text_topic from the drop-down.
- Select RAW under Message format.
- Under Choose or create a role to grant AWS IoT access to perform this action, choose Create role.
- Enter a name for the role and choose Create role.
- Choose Create rule. You should see a "Success" message, indicating that the rule has been created.
Test the Rule for Amazon SNS Notification
After adding the rule for Amazon SNS notification, you should receive a text message when hitting the event.
Wait for an uplink from the device. Here is the message from the mobile device after sending an uplink message.
  {
       "device_id": "3933XXXXXXXXXXXX",
       "message": "Temperature exceeded 25",
       "temp": 27.2,
       "time": "2021-02-22T07:58:54Z"
  }
Send Downlink Payload
This section shows how to send downlink payload from AWS IoT LoRaWAN Server to the end Device.
- Install the AWS SAM CLI.
- Deploy SAM template to AWS.
- Send Payload to End Device.
- Go to the AWS IoT console.
- In the navigation pane, select Test, and choose MQTT client.
- Subscribe to the wildcard topic '#' to receive messages from all topics.
- Specify the topic to cmd/downlink/{WirelessDeviceId} and a base64-encoded message.
 Figure 1: Specifying a Topic
-
You should see traffic on AWS similar as shown below:
downlink/status/3eff83dd-9159-XXXX-XXXX-XXXXXXXXXXXX  February 09, 2021, 15:09:29 (UTC+0800)
{
  "sendresult": {
    "status": 200,
    "RequestId": "4f1d36e1-8316-4436-8e9d-2207e3711755",
    "MessageId": "60223529-0011d9f5-0095-0008",
    "ParameterTrace": {
      "PayloadDate": "QQ==",
      "WirelessDeviceId": "3eff83dd-9159-XXXX-XXXX-XXXXXXXXXXXX",
      "Fport": 1,
      "TransmitMode": 1
    }
  }
}
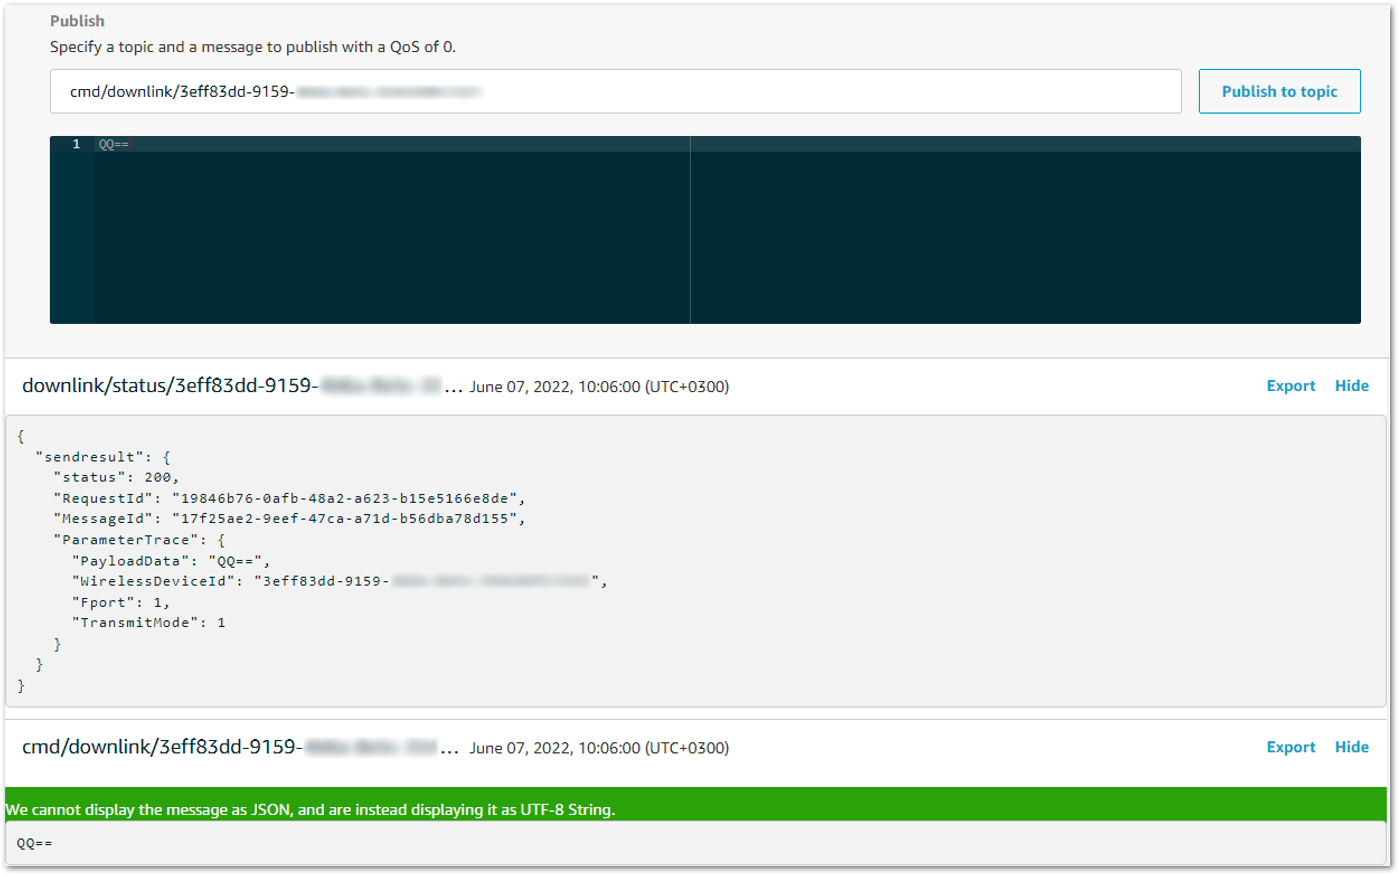 Figure 1: Traffic on AWS
- You should see traffic on your console of end device similar as shown below.
SYSLOG:4:LoRa rX : 41 - 14
SYSLOG:4:LoRa Tx :
IoT Analytics
You will use IoT Analytics to visually display data via graphs if there is a need in the future to do further analysis.
Create an IoT Analytics Rule
Create a Rule First- Navigate to the AWS IoT console.
- In the navigation pane, choose Act and then, choose Rules.
- On the Rules page, choose Create.
- Enter the Name as Visualize, and provide an appropriate Description.
- Under the Rule query statement, enter the following query:
SELECT * FROM 'project/sensor/decoded'
- Choose Add action.
- Select Send a message to IoT Analytics.
- Choose Configure Action.
- Choose Quick Create IoT Analytics Resources.
- Under Resource Prefix, enter an appropriate prefix for your resources, such as LoRa.
- Choose Quick Create.
- Once the Quick Create Finished message is displayed, choose Add action.
- Choose Create rule. You should see a Success message, indicating that the rule has been created.
Configure AWS IoT Analytics
Set up AWS IoT Analytics- Go to the AWS IoT Analytics console.
- In the navigation panel, choose Data sets.
- Select the data set generated by the Quick Create in Create an IoT Analytics Rule.
- In the Details section, click Edit in the SQL query.
- Replace the query with as follows:
SELECT devEui as device_id, temperature as temp, timestamp as time FROM LoRa_datastore
- Click Update.
- Navigate to Schedule, and click Edit.
- Under Frequency, choose Every 1 minute, and then click Update.
Configure Amazon QuickSight
Amazon QuickSight lets you easily create and publish interactive business intelligence (BI) dashboards that include machine learning-powered insights.
- Go to AWS Management console.
- From the management console, enter QuickSight in the "Search for services, features.." search box.
- Click on QuickSight in the search results.
- If you haven't signed up for the service before, go ahead and sign up, as there is a free trial period.
- Select the Standard Edition, and choose Continue.
- Enter a unique name in the field QuickSight account name.
- Fill in the Notification email address.
- Review the other checkbox options and change them as necessary. The AWS IoT Analytics option must be selected.
- Choose Finish. You will see a confirmation message.
- Choose Go to Amazon QuickSight.
- Select Datasets.
- Select New dataset.
- Select AWS IoT Analytics.
- Under Select an AWS IoT Analytics data set to import, choose the data set created in Create an IoT Analytics Rule.
- Choose Create data source, and then choose Visualize.
- Select the dataset created, then select Refresh or Schedule Refresh for a periodic refresh of the dataset.
Testing Your "Hello Word" Application
Using your device, create a condition to generate an event, such as a high-temperature condition. If the temperature is above the configured threshold, you will receive a text alert on your phone. This alert will include key parameters about the alert.
You can also visualize the data set as follows:
- Go to the AWS IoT Analytics console.
- Choose Data sets.
- Select the dataset created earlier.
- Select Content and ensure there are at least few uplink entries available in the data set.
- Go to the QuickSight console.
- Choose New analysis.
- Choose the dataset created in Create an IoT Analytics Rule.
- Select time on the X-axis, Value as temp (Average), and Color as device_id to see a chart of your dataset.
Debugging
After logging in to the device using the web browser, the system log can be viewed from Diagnostics > System Log.
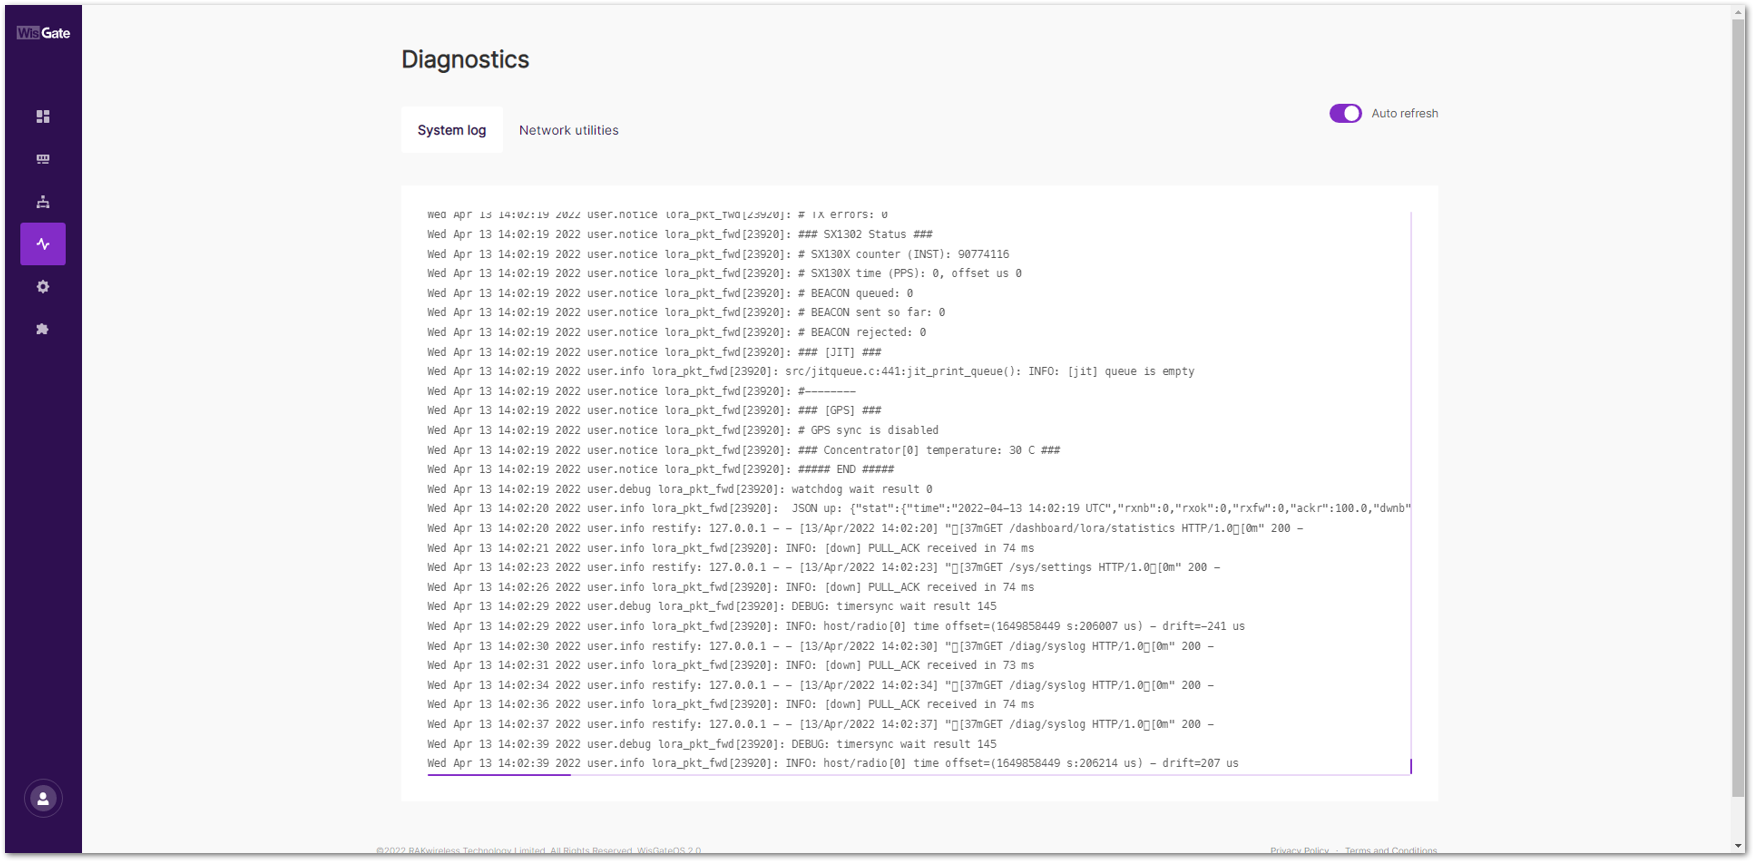 Figure 1: System Log
Troubleshooting
- Unable to see the web login:
- Check that your Wi-Fi is connected to RAK7289V2_XXXX or RAK7289CV2_XXXX.
- Try ping 192.168.230.1.
- Lost password to login to the web login.
- Hold the reset button for 10 seconds to factory reset the device.
AWS IoT Core Integration
AWS IoT Core Integration is a software service that enables your LoRaWAN gateway to work with AWS IoT Core. The AWS Integration for WisGate Edge V2 tutorial will show you how to set up a LoRaWAN end-node and view its data on the AWS IoT Console. In addition, it’ll show you how to send a message from AWS IoT Console to the end-node as well.
The Things Network (TTN)
This tutorial illustrates how to configure and connect your RAK Gateway with WisGateOS 2 to a LoRaWAN Network Server by using the Basics Station protocol. For this example, we will show you how to connect the gateway to TTNv3.
LoRa Basics Station is an implementation of a LoRa packet forwarder. This protocol simplifies the management of large-scale LoRaWAN Networks. More information about the Basics Station protocol can be found in the explanatory document provided by Semtech.
Register the Gateway
- First, log in and navigate to the TTNv3 website. If you already have a TTN account, you can use your credentials to log in.
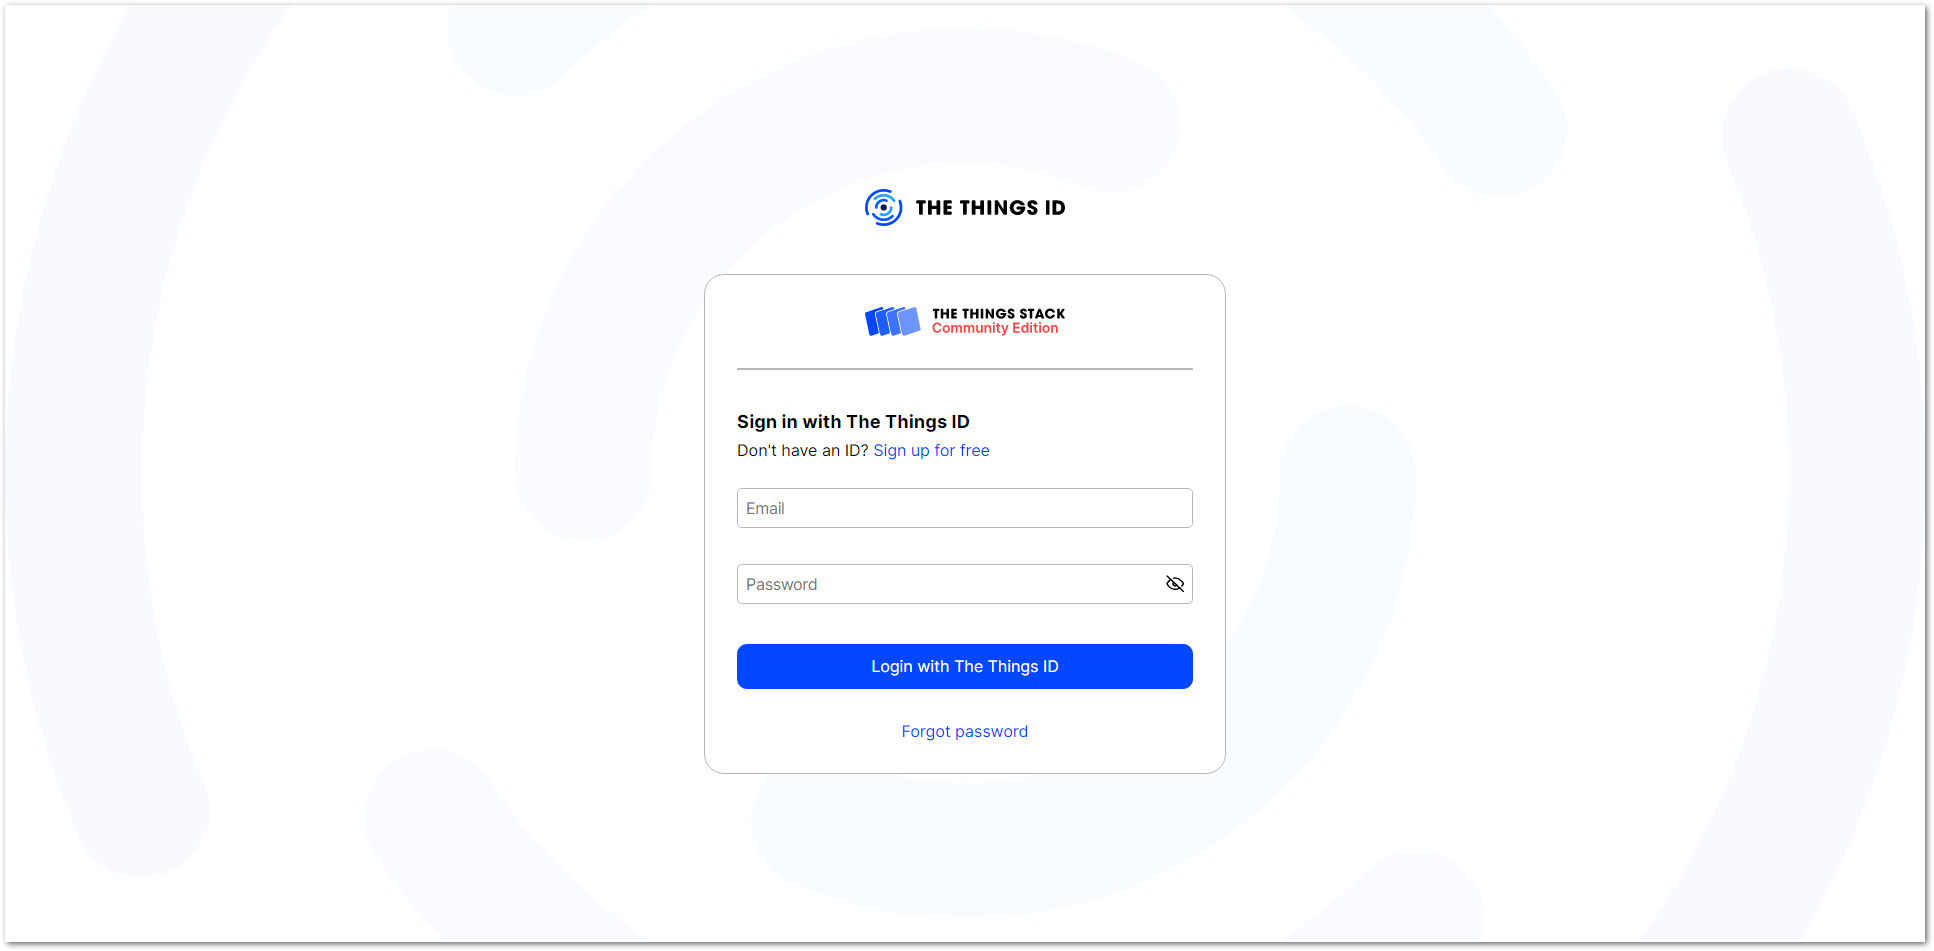 Figure 1: The Things Stack Login Page
- To register a commercial gateway, choose Register a gateway (for new users that do not already have a registered gateway) or go to Gateways > + Register gateway (for users that have registered gateways before).
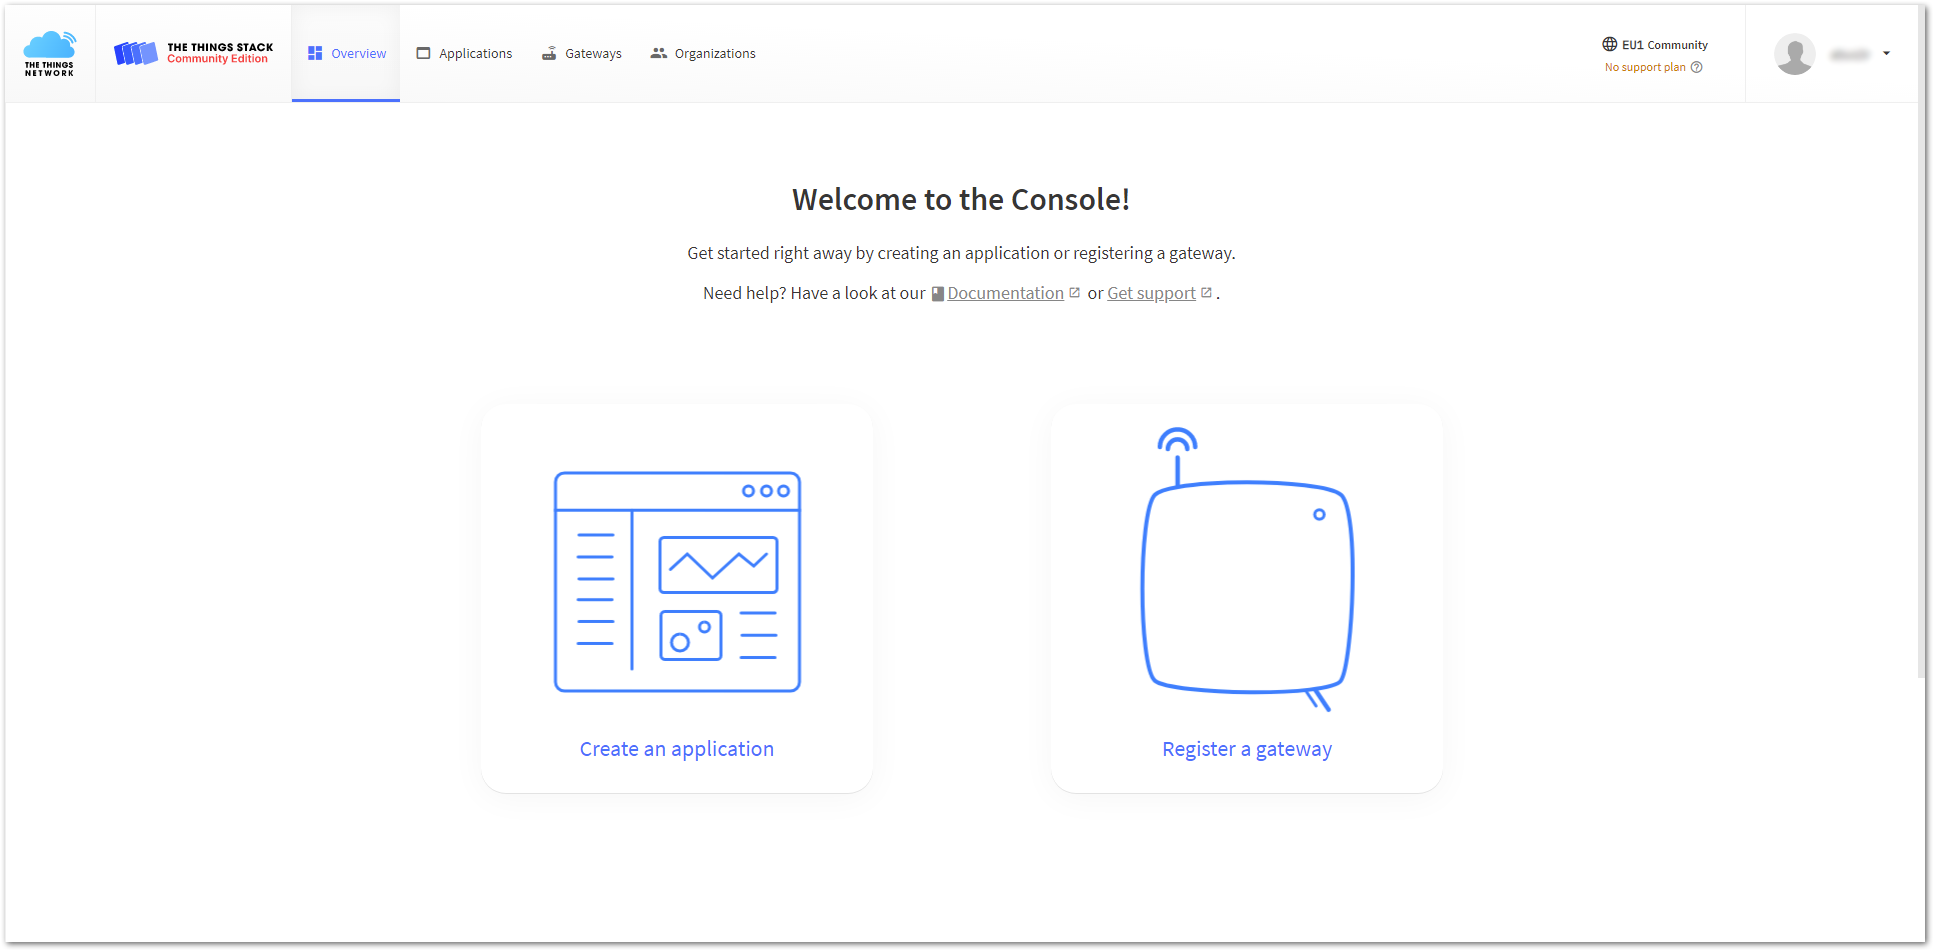 Figure 1: Console Page After a Successful Login
- You will be redirected to the Register gateway page.
- In the Gateway EUI field, type the EUI of the gateway. The gateway's EUI can be found either on the sticker on the casing or by going to the Dashboard > Overview page via the Web UI. Instructions on how to access your gateway via Web UI can be found in the product's Quick Start Guide.
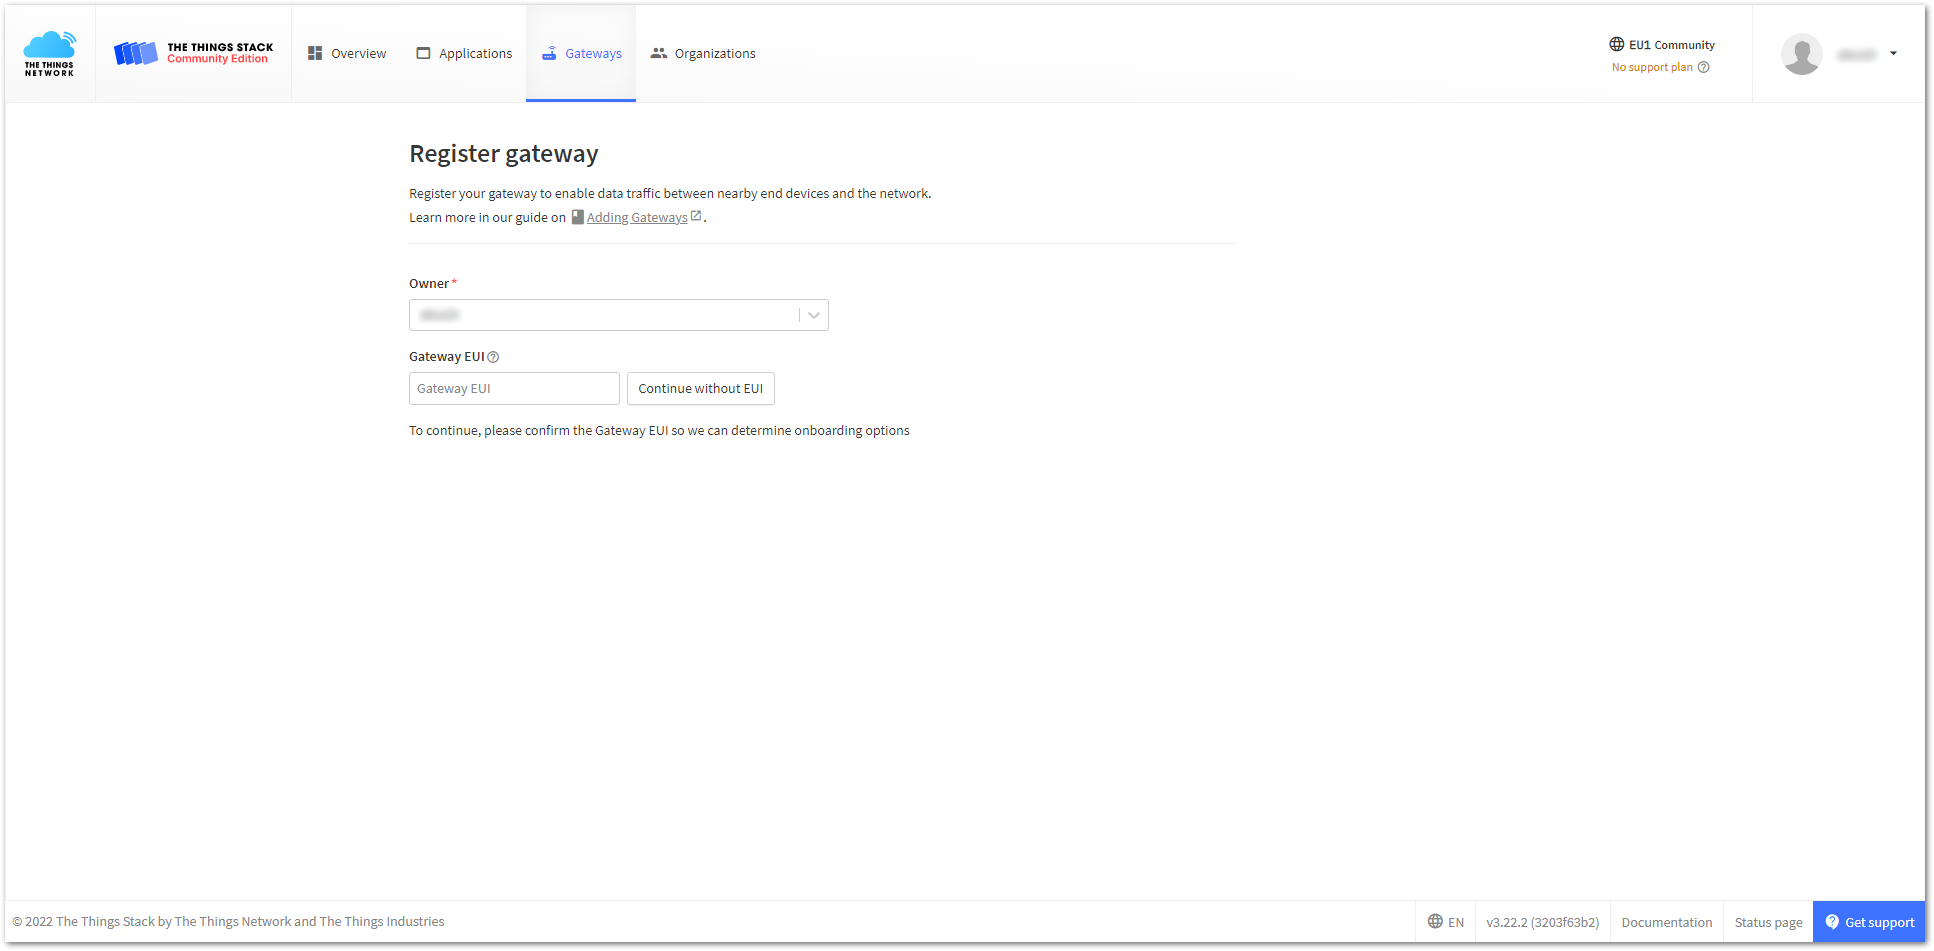 Figure 1: Register gateway
- After entering the EUI, click on Confirm. Additional fields will appear. Fill in the following information:
- Gateway ID: This will be the unique ID of your gateway in the Network. An ID based on the EUI is automatically generated. You can change it if you needed. Note that the ID must contain only lowercase letters, numbers, and dashes (-).
- Gateway name: Optionally, you can type a name for your gateway.
- Frequency plan: The frequency plan used by the gateway.
- The other settings are optional and can be adjusted to meet your specific requirements.
- This tutorial is for the EU868 Frequency band.
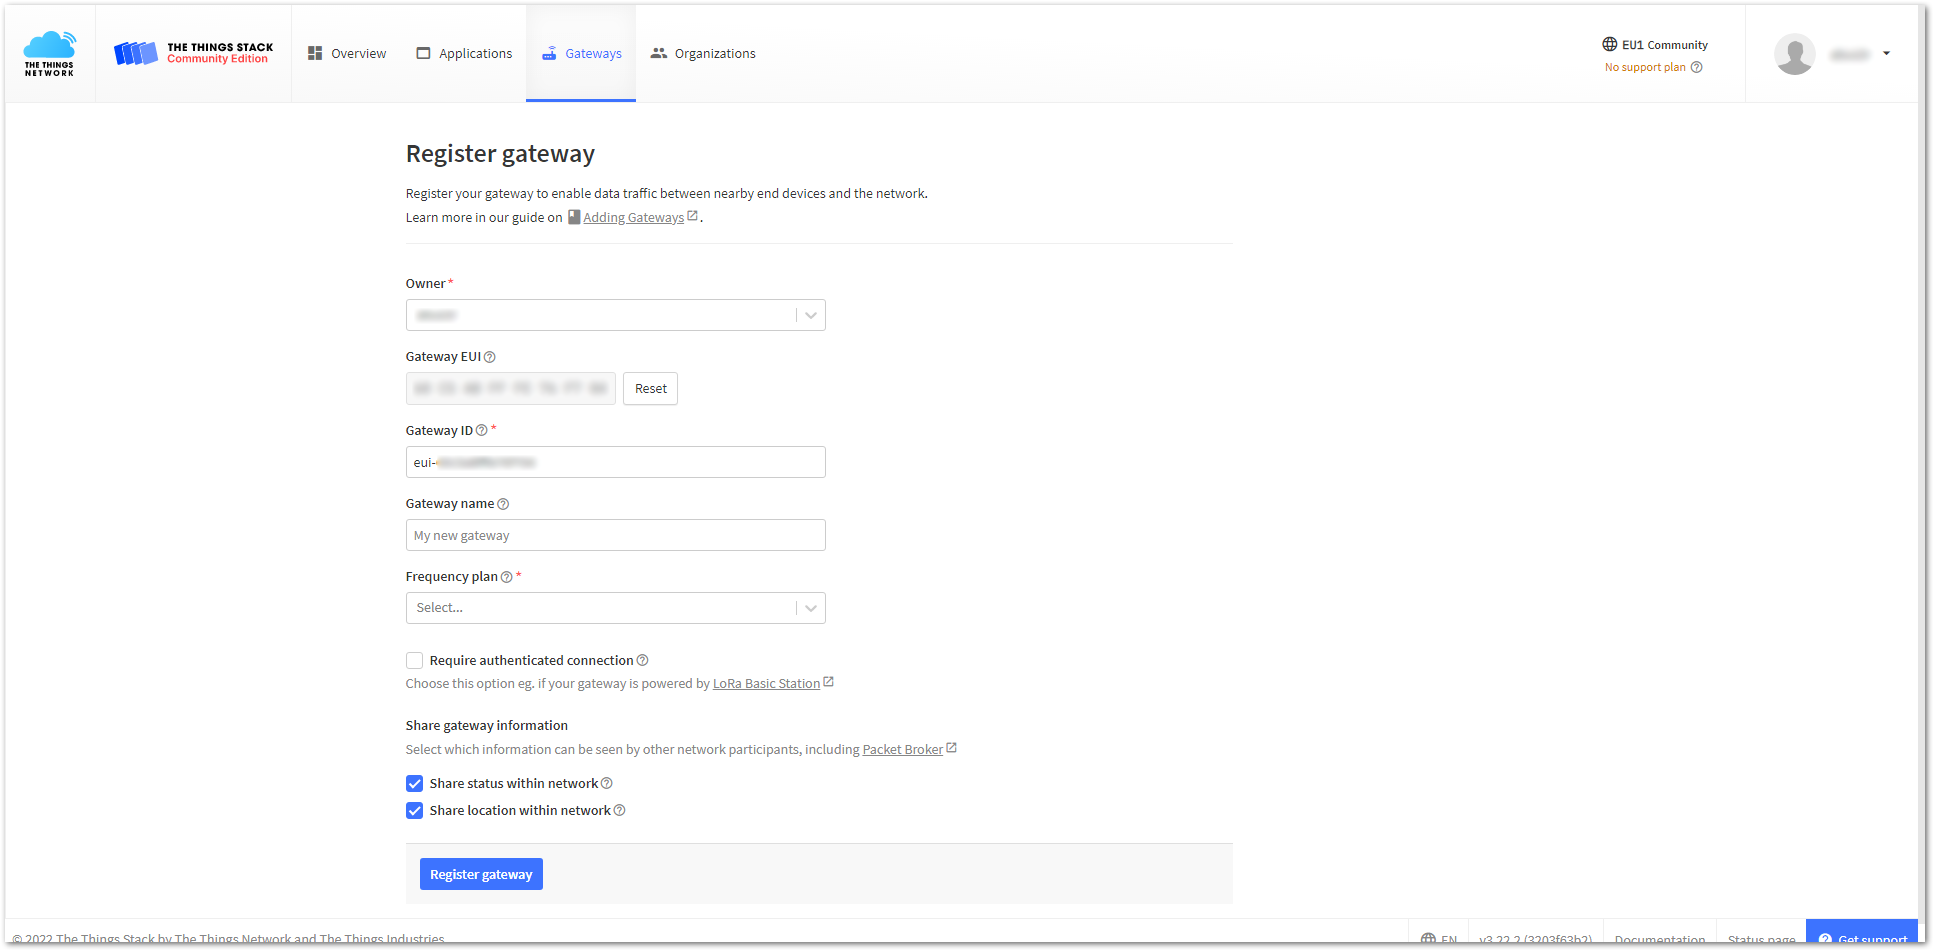 Figure 1: Adding a gateway
- To register your gateway, click Register gateway.
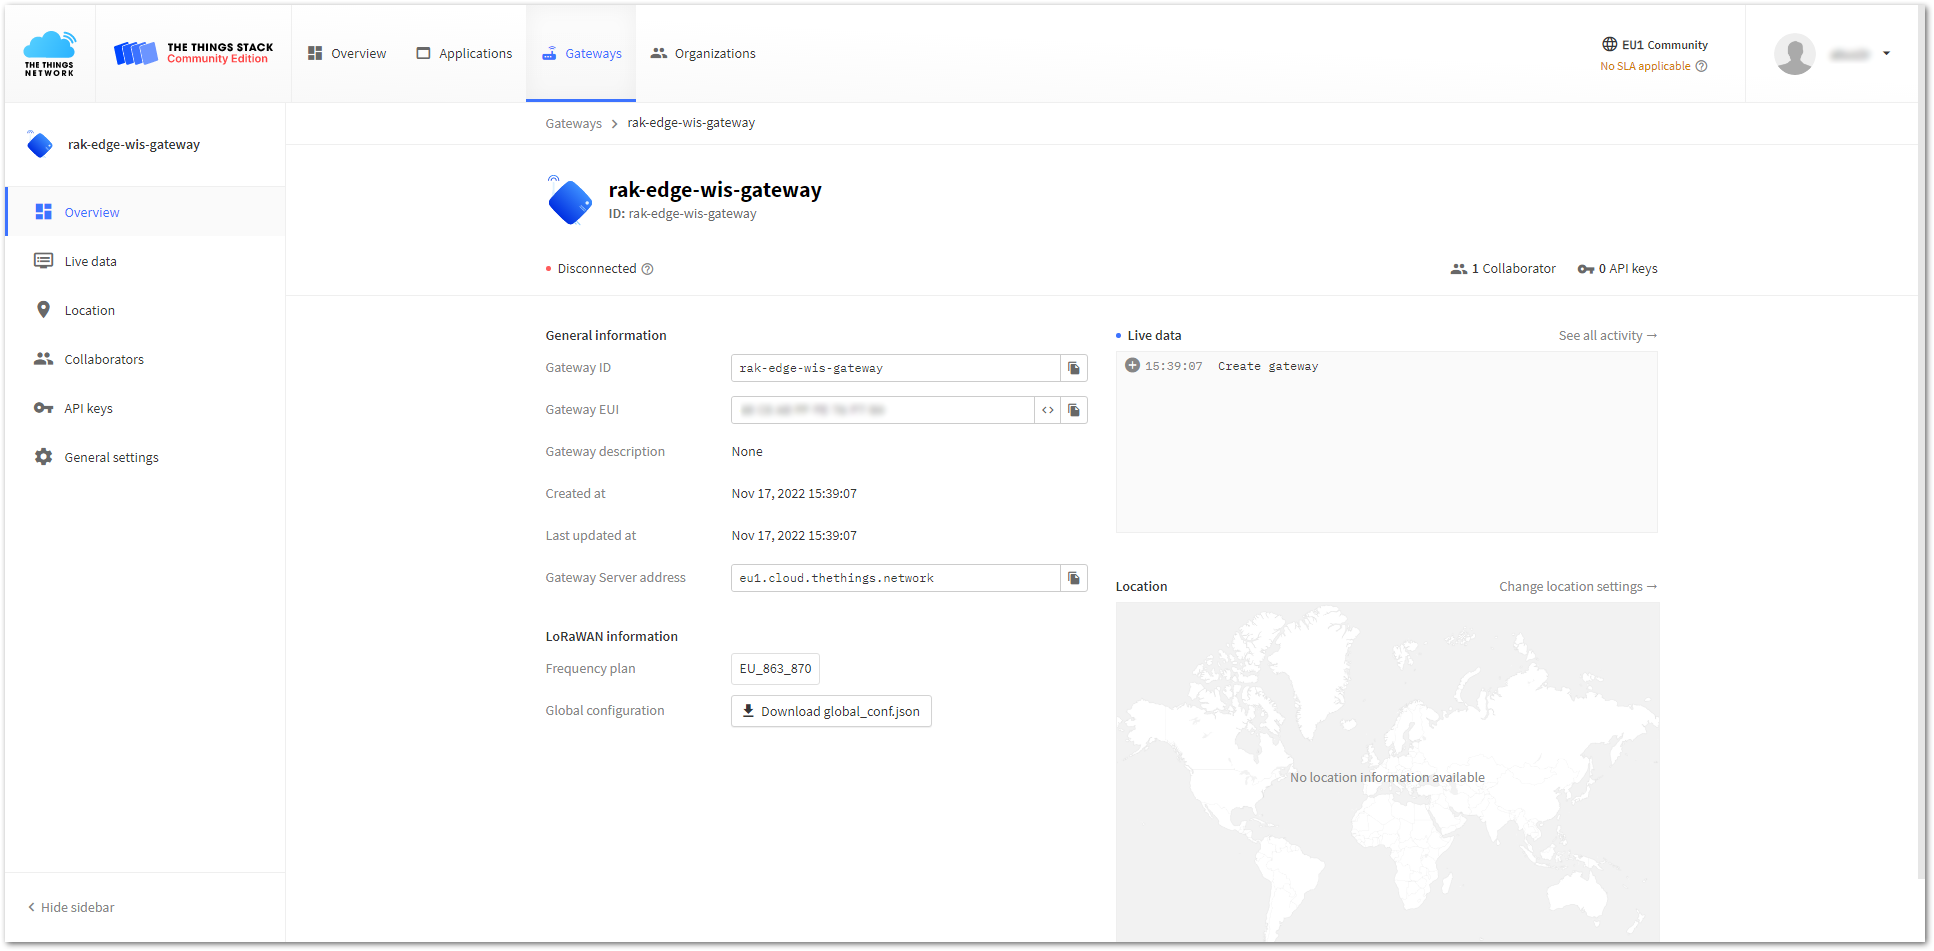 Figure 1: Successfully added a gateway
Generate the Token
TTNv3 supports TLS server authentication and client tokens, which require a trust file and a key file to configure the gateway to successfully connect it to the network.
- To generate a key file, from the Overview page of the registered gateway navigate to API keys.
 Figure 1: Overview page
- On the API keys page, choose + Add API key.
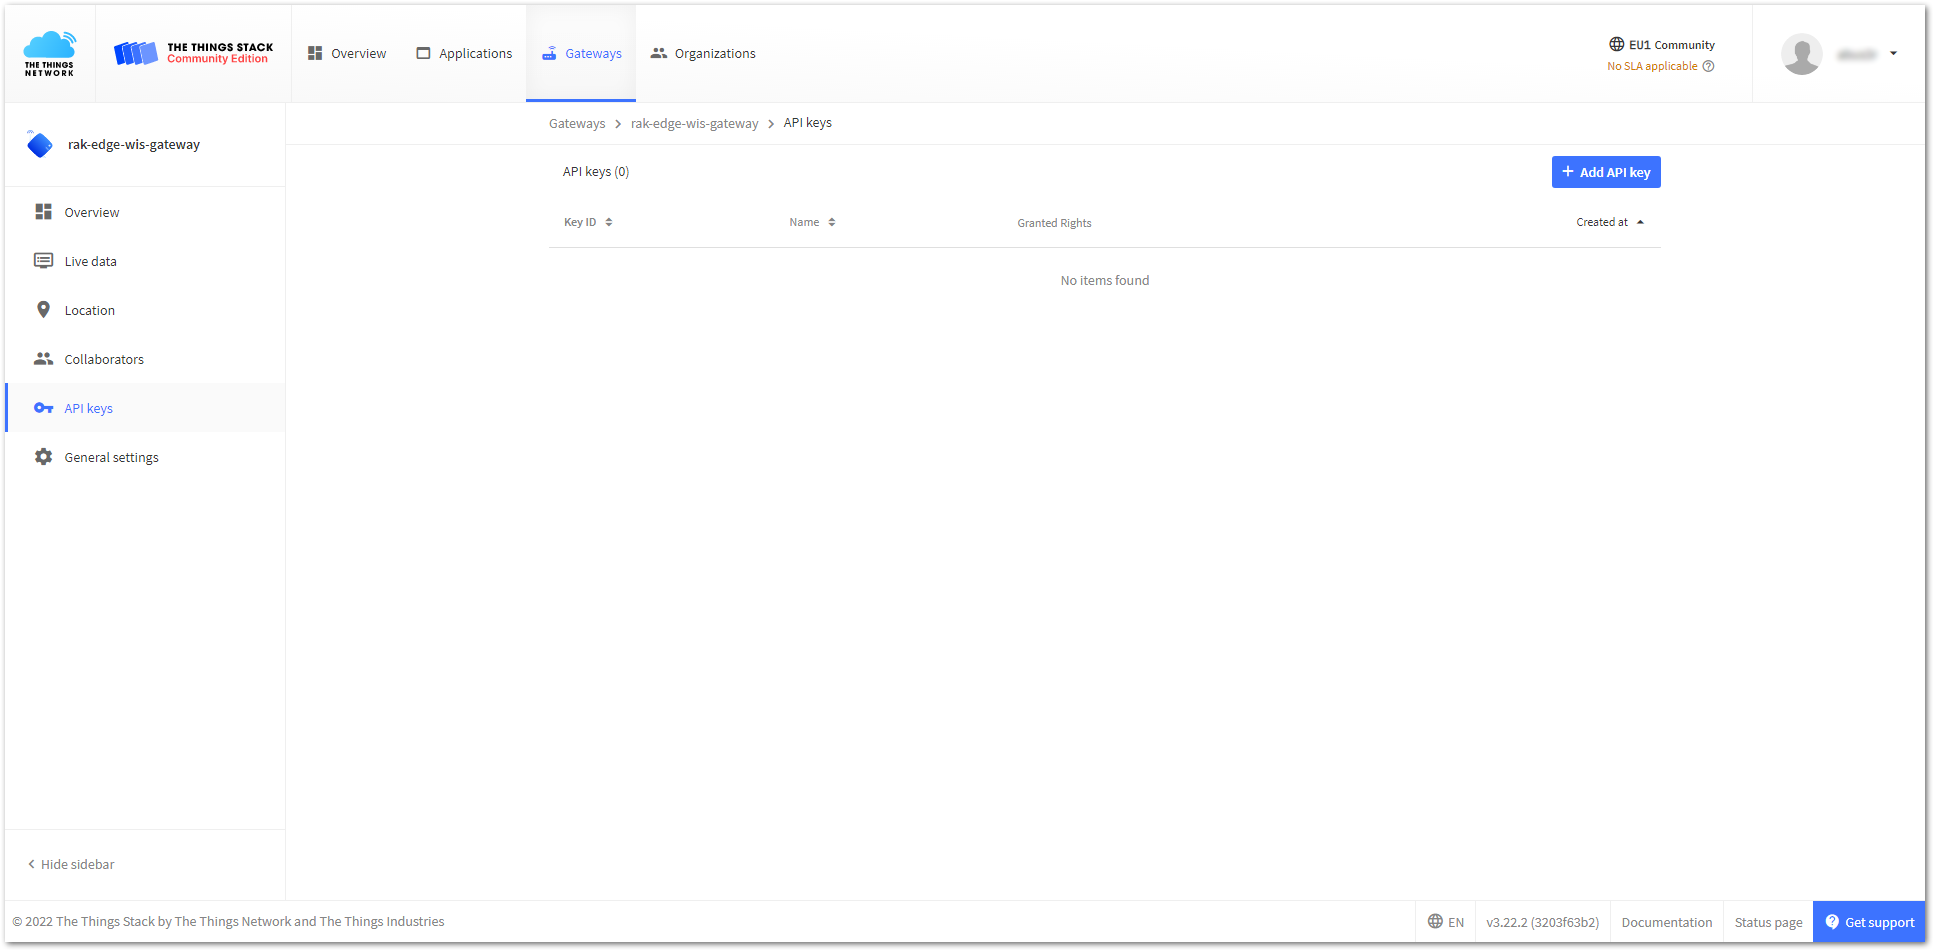 Figure 1: API key page
- In the Name field, type the name of your key (for example: mykey). Choose Grant individual rights and select the Link as Gateway to a Gateway for traffic exchange, i.e. read uplink and write downlink option.
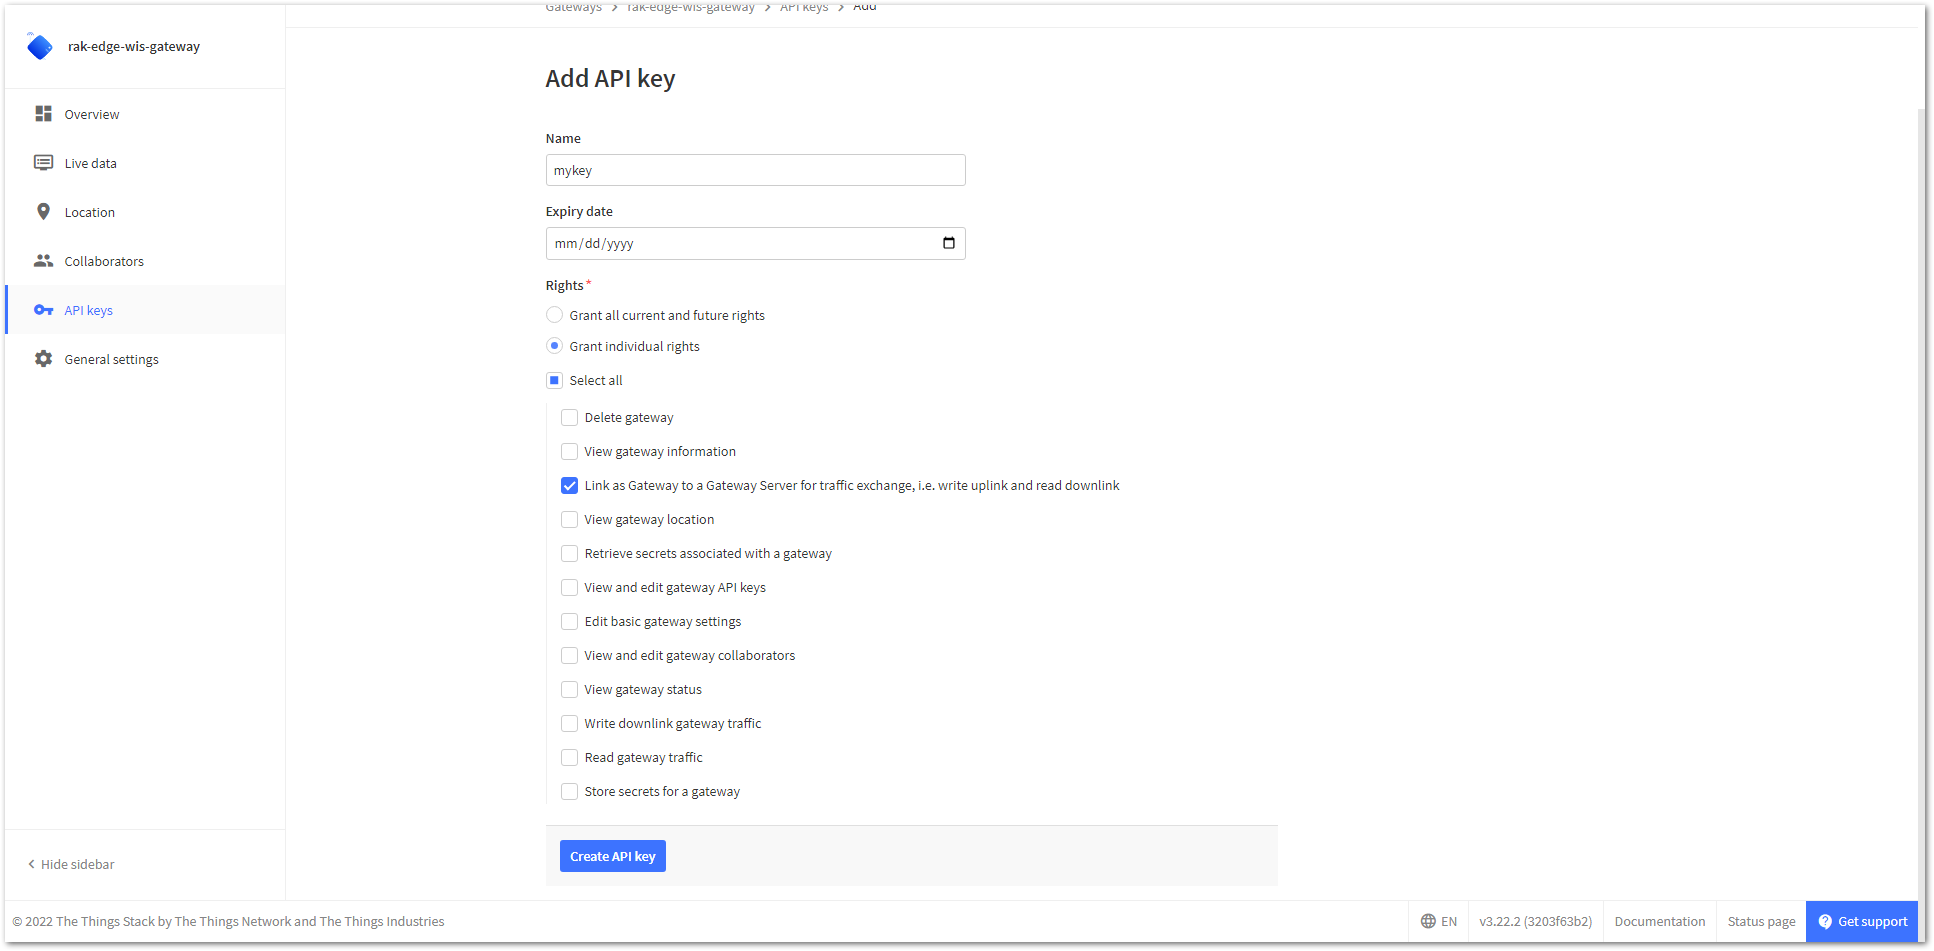 Figure 1: Generating an API key
- To generate the key, choose Create API key. The following window will pop up, instructing you to copy the generated key.
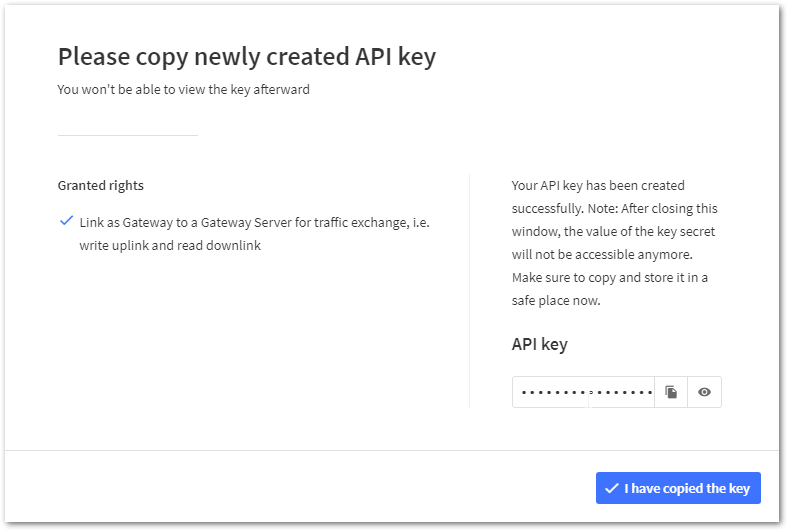 Figure 1: Copying the generated key
Copy the key and save it in a .txt file (or another format), as you won’t be able to view or copy your key later.
- Click I have copied the key to proceed.
Configure the Gateway
-
To configure the gateway, access it via the Web UI. Refer to the Quick Start Guide for specific instructions.
-
Navigate to LoRa > Configuration > Work mode and select Basics station.
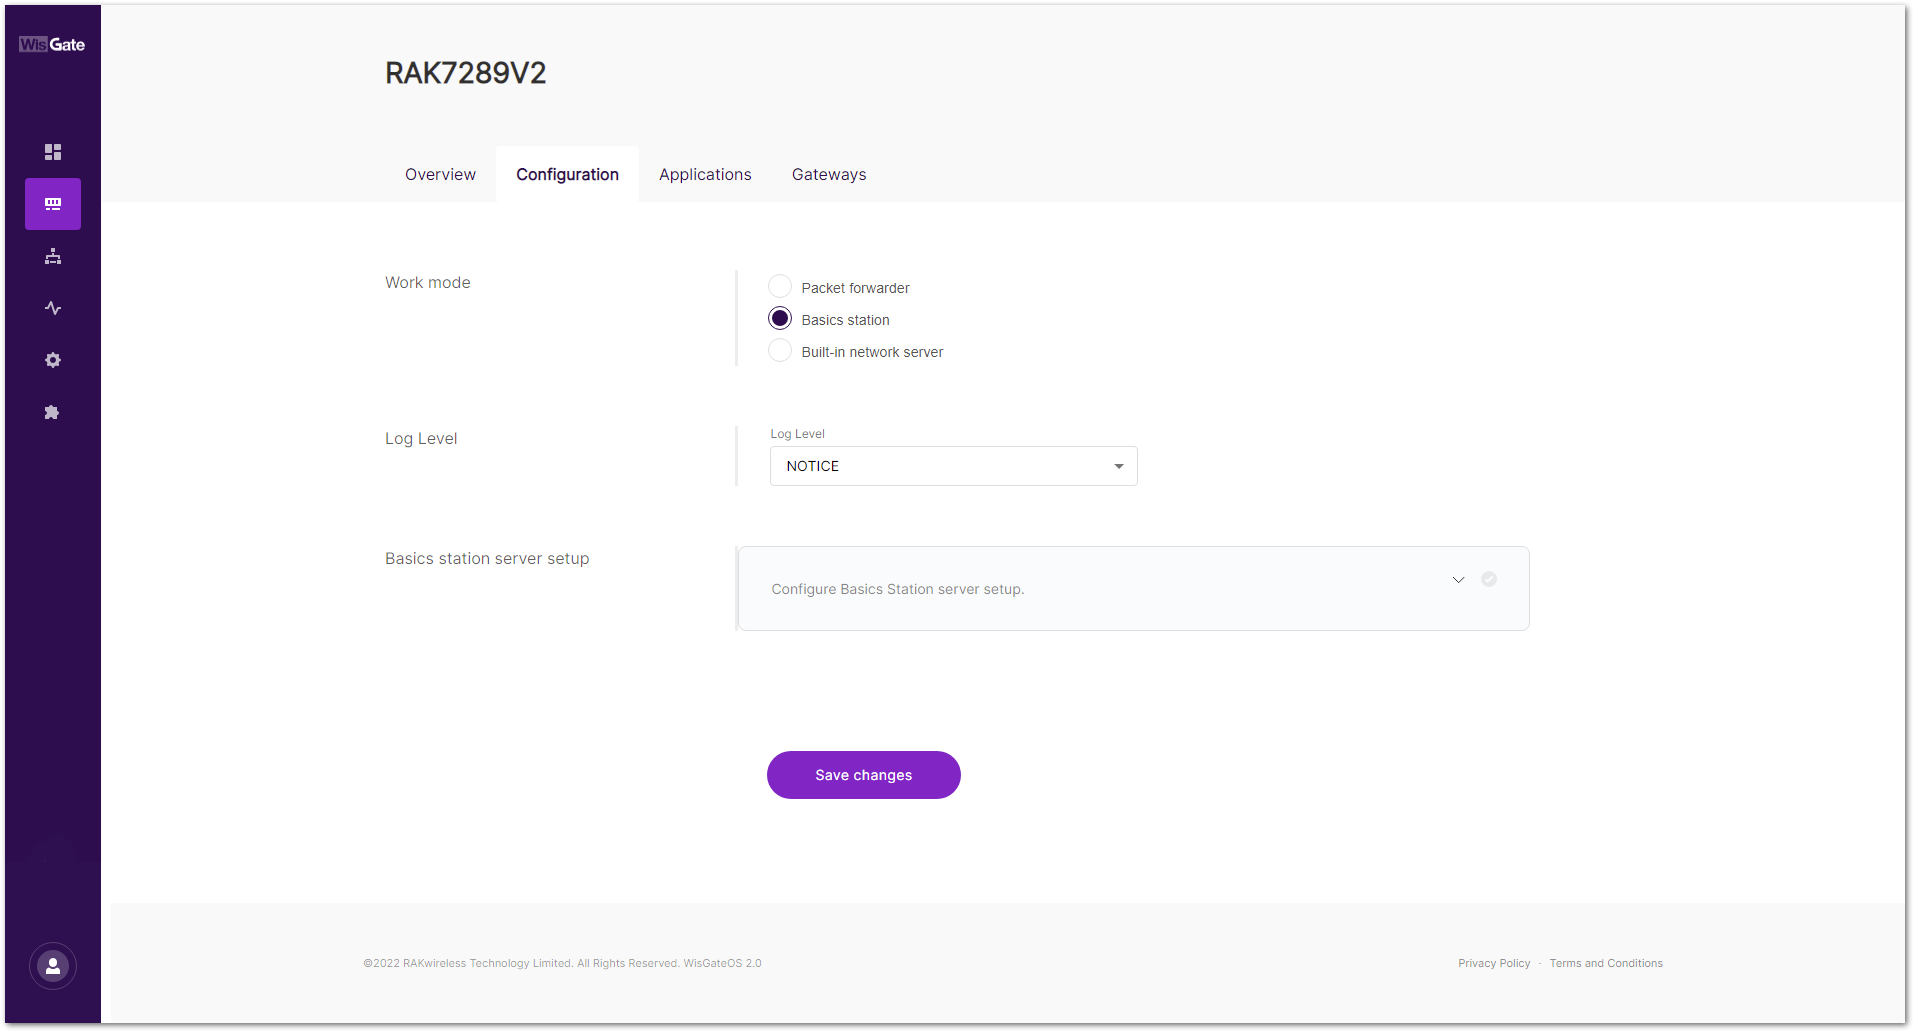 Figure 1: Changing the working mode
- Expand the Basics Station settings by clicking Configure Basics Station server setup.
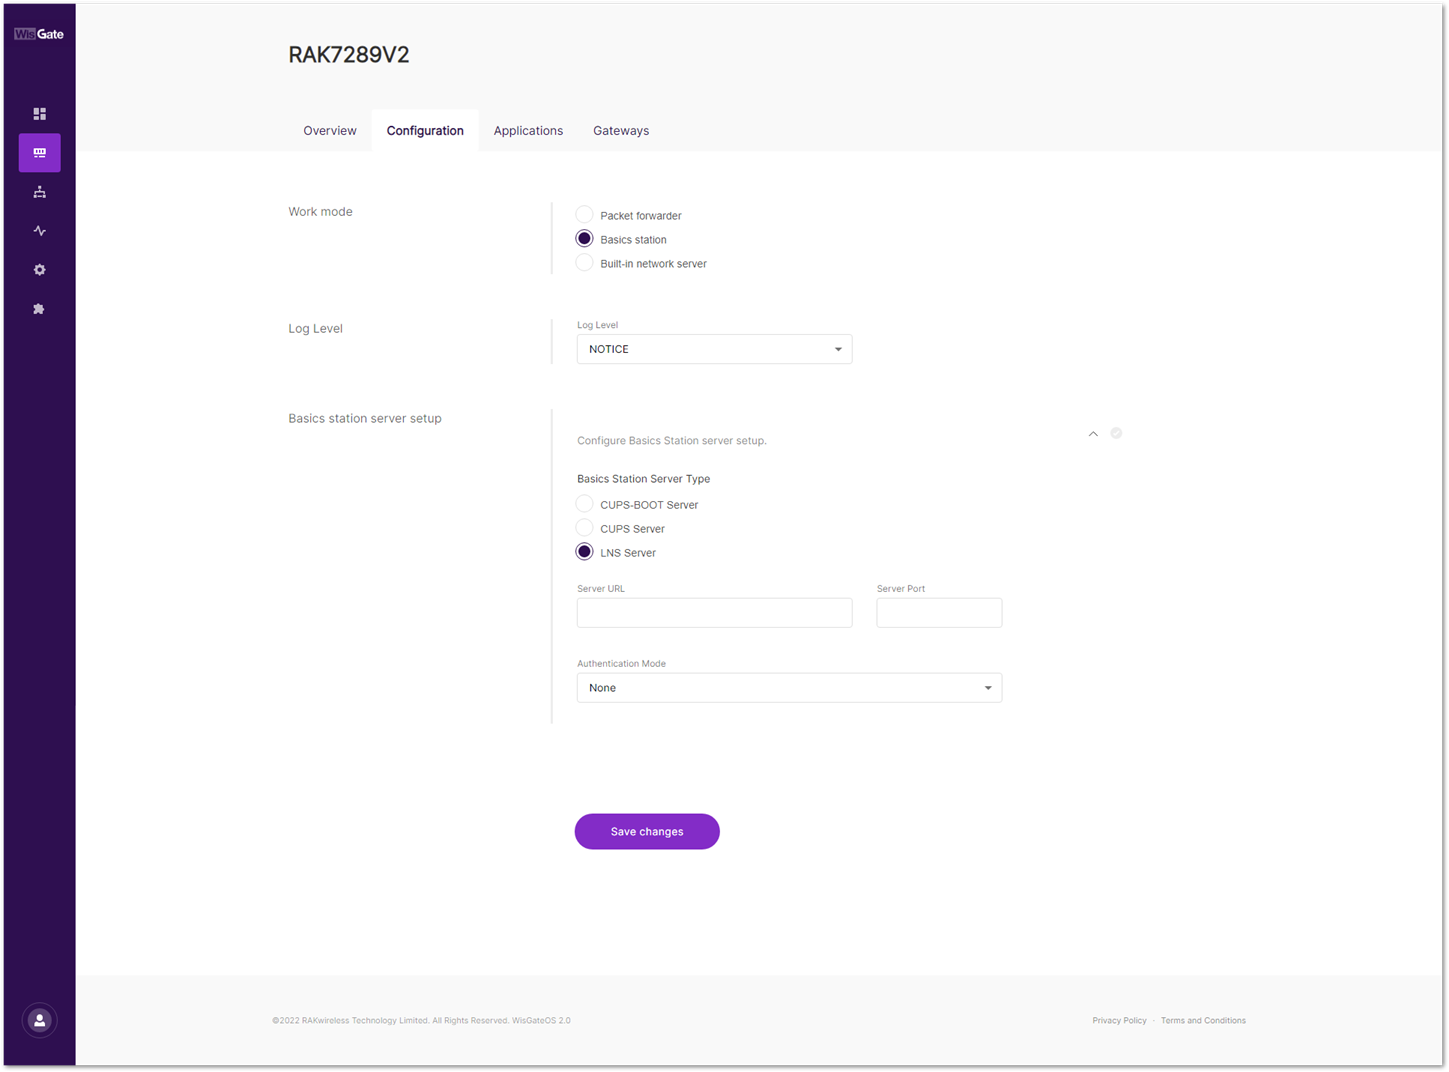 Figure 1: Expanded Basics Station settings
- To connect the gateway to TTNv3, configure the following parameters:
- Basics Station Server Type: For server type, choose LNS Server.
- Server URL: This is the link to The Things Stack server. For this tutorial, the gateway is connected to the European cluster. Fill in the following for Europe:
wss://eu1.cloud.thethings.network
- Server Port: The LNS Server uses port
8887. Type in8887. - Authentication Mode: Choose TLS server authentication and Client token. When selected, the Trust (CA Certificate) and Client token fields will show up.
- Trust (CA Certificate): For Trust, upload the Let’s Encrypt ISRG ROOT X1 Trust certificate by clicking choose file. The file with the certificate can be downloaded directly.
- Client Token: This is the generated API key.
 Figure 1: Basics Station settings
- To save the changes, click Save Changes. If everything is set correctly, you can see the gateway is connected to TTNv3.
 Figure 1: Successful connection
ChirpStack
This guide will show you how to connect the RAKWireless Commercial gateway running WisGateOS 2 to a ChirpStack Network Server. Whether it is a local or external ChirpStack Network Server, the steps to add a gateway are the same. The guide is not about how to install ChirpStack, but how to configure the gateway to send data to it. In this tutorial, an external ChirpStack v4 Network Server is used as an example.
For external ChirpStack, RAK provides instructions for installing the ChirpStack Network Server on the AWS cloud. You can refer to the Learn Site.
Requirements
- Your RAK gateway is connected to the Internet.
- Connect to ChirpStack v4, the firmware of gateway is WisGateOS 2 2.2.x or above.
- ChirpStack v4 Network server is ready.
To access the ChirpStack web UI, you need to enable TCP port 8080 and to make the gateway to communicate with the Network server you need to enable the following ports in the inbound rules of the instance:
- The Semtech Packet Forwarder needs UDP port
1700. - MQTT Bridge (unsecured) needs TCP port
1883. - MQTT Bridge (secured) needs TCP port
8883. - Basics Station needs TCP port
3001.
Instructions for opening the ports mentioned above are provided in the installing ChirpStack on AWS guide.
Registering the Gateway
- To register the gateway in the ChirpStack Network server, access the ChirpStack UI. To do that, open a web browser and type the server address of the ChirpStack with port
8080.
<IP address of ChirpStack>:8080
- In this case, the ChirpStack is installed on the AWS cloud with the public IP address
18.156.176.220.
 Figure 1: ChirpStack login page
- Login using the following credentials:
- Username/email: admin
- Password: admin
 Figure 1: ChirpStack dashboard
- On the left pane, head to Gateways.
 Figure 1: Gateway list
- By default, no gateways are registered. To register one, click Add gateway.
- In the General menu, you need to set the gateway parameters.
 Figure 1: Registering the gateway
- Name: unique name for the gateway on the Network server. The name may only contain words, numbers, and dashes.
- Description: a brief description of the gateway.
- Gateway ID (EUI64): the Extended Unique Identifier (EUI) of the gateway. The EUI is in the Overview menu of the Dashboard page of the web UI of the gateway.
- Stats interval (secs): The expected interval in seconds in which the gateway sends its statistics.
- Click Submit. You will see the registered gateway in the Gateway list.
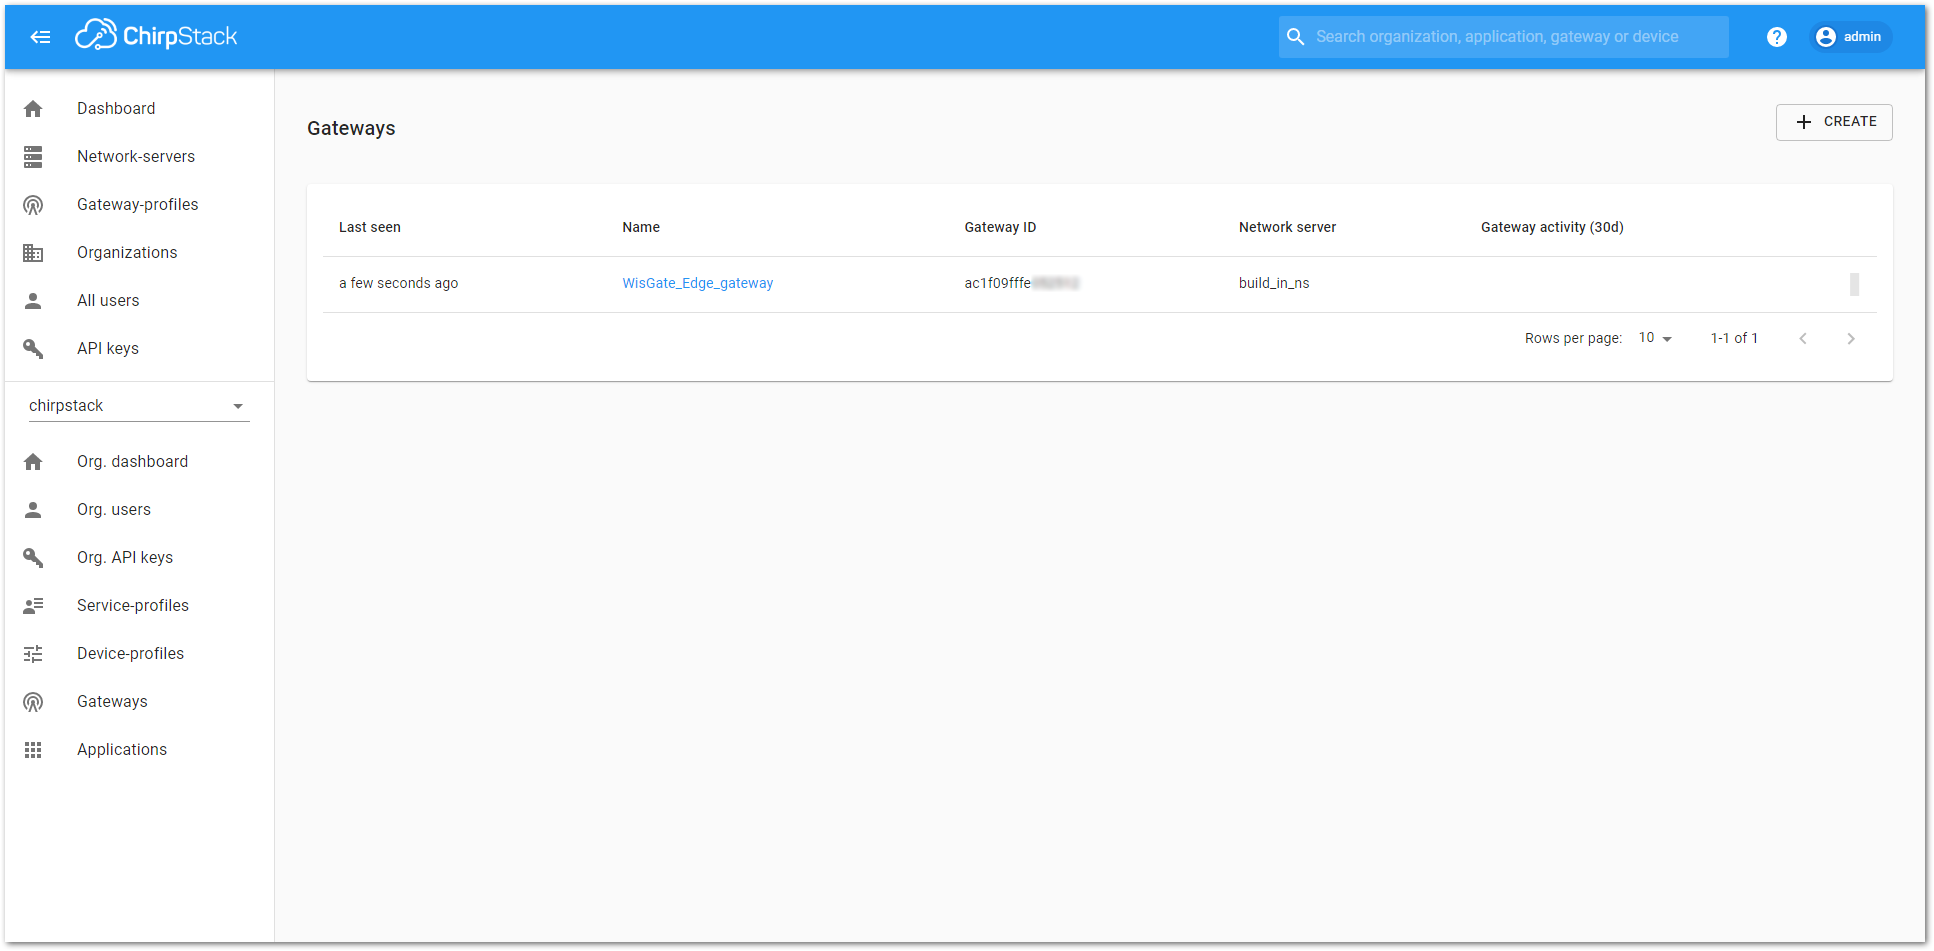 Figure 1: Registered gateway
Configuring the Gateway
Three options will be considered here, and you can choose one of the connection options as needed.
- Connecting the Gateway via Packet Forwarder
- Connecting the Gateway via MQTT Bridge
- Connecting the Gateway via Basics Station
Connecting the Gateway via Packet Forwarder
In this method, you will configure the gateway’s packet forwarder to send data to the ChirpStack Gateway Bridge.
When connecting the gateway to the ChirpStack, you will need to open ports 1700 and 8080 to enable the communication between the gateway and the server and be able to access the ChirpStack.
 Figure 1: Opened 1700 UDP port
- Start by accessing the gateway.
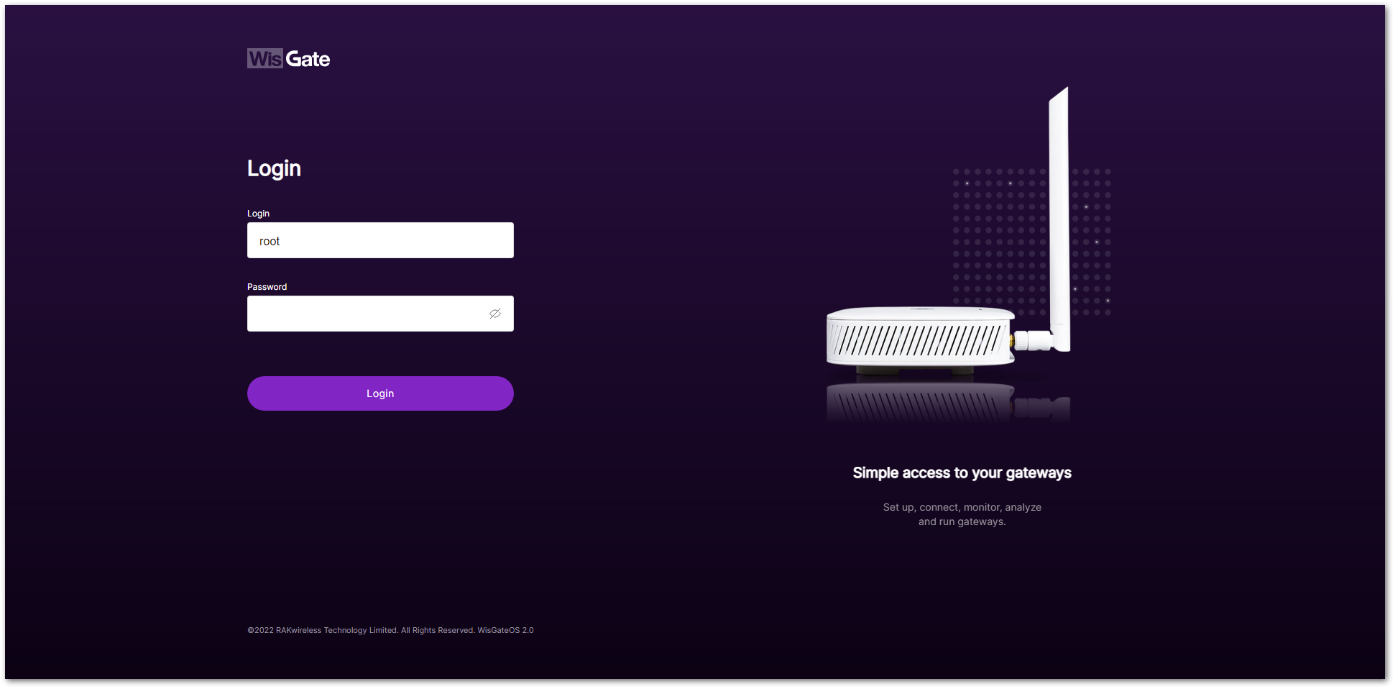 Figure 1: Login page
- Login using the set credentials you have set in the Access the Gateway section.
- On the left side, head to LoRa. By default, the gateway is configured to work as a Built-in network server.
- From Work Mode, select Packet forwarder. Click Choose from the available protocols to expand the Packet forwarder settings.
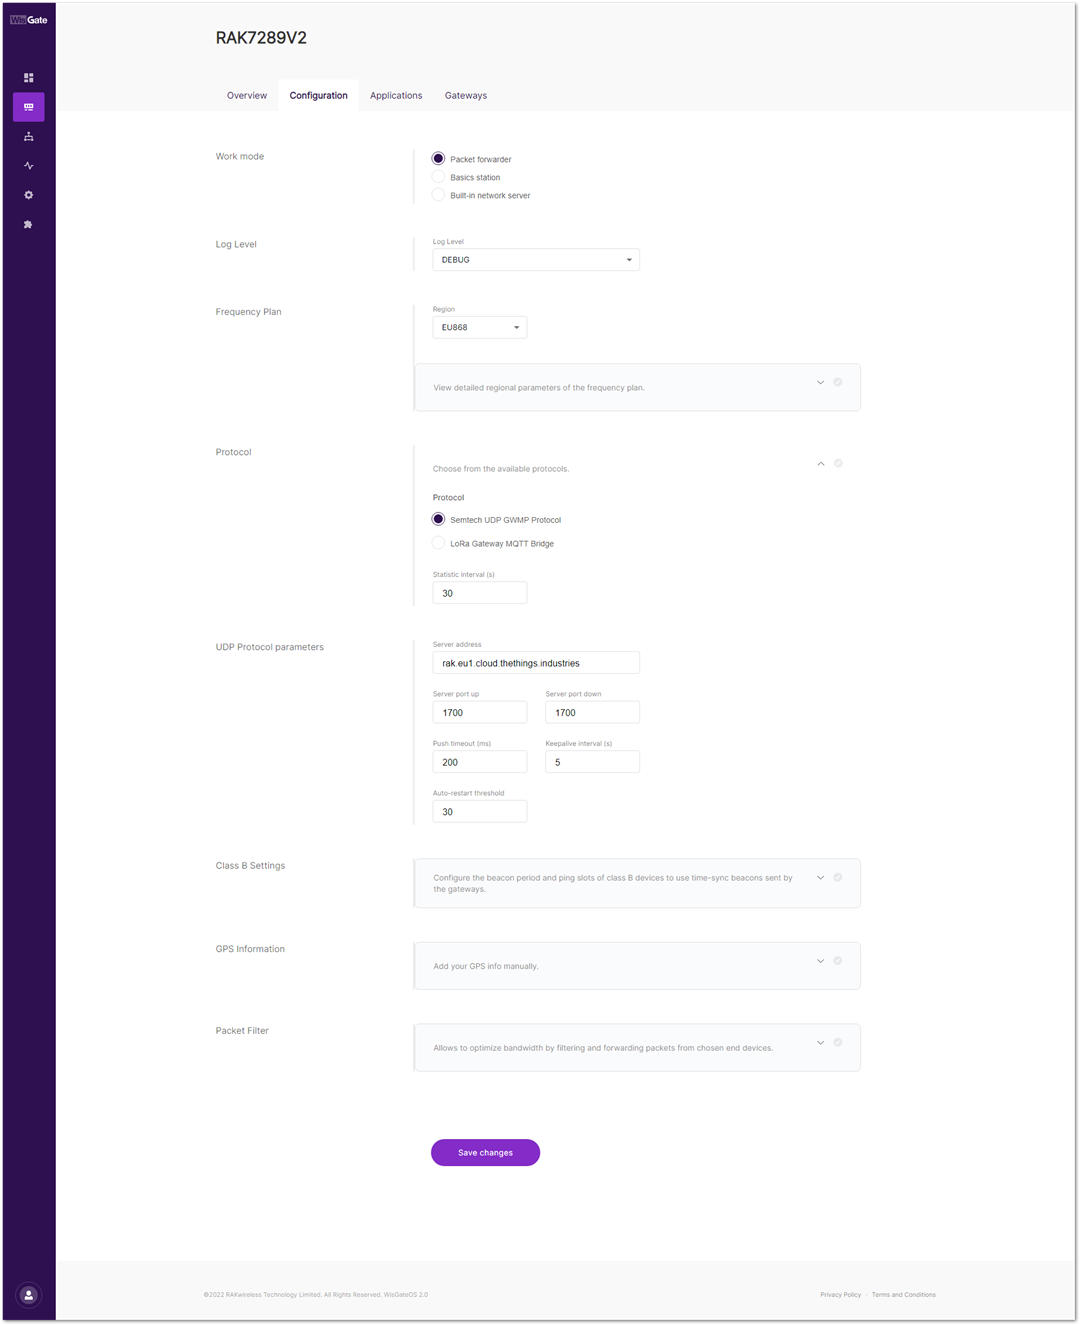 Figure 1: Setting Packet Forwarder Mode
When Packet Forwarder mode is chosen, the Semtech UDP GWMP Protocol is selected by default.
In this case, the ChirpStack is installed on the AWS cloud instance with public IP 18.156.176.220 (yours will be different). The default ports that the packet forwarder is using are 1700.
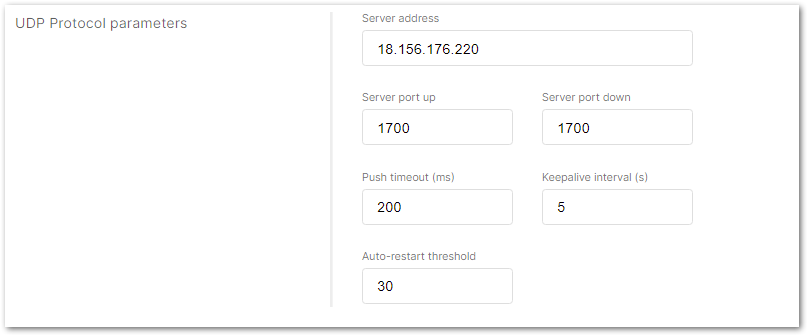 Figure 1: Configuring UDP Protocol parameters on ChirpStack
- Click Save changes to save the changes.
- If everything is set correctly, the gateway will display as online. You can click the gateway name to inspect the gateway traffic.
Figure 1: Registered gateway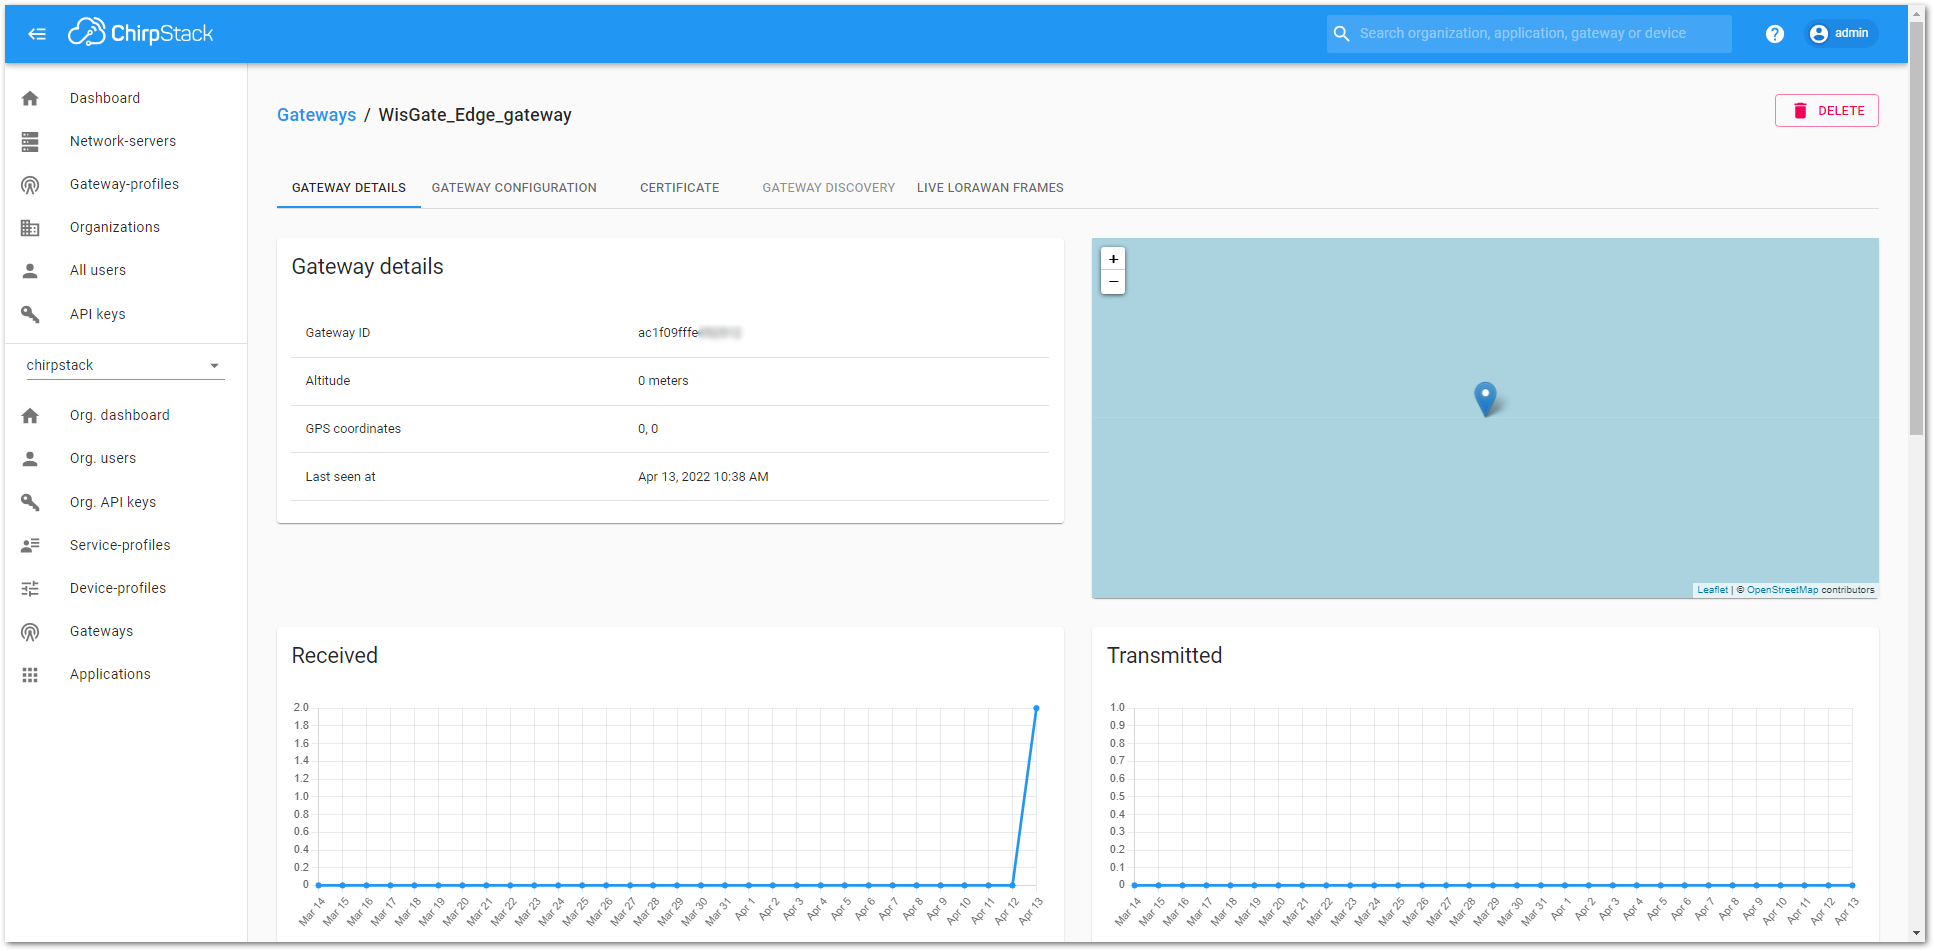 Figure 1: Gateway details
Connecting the Gateway via MQTT Bridge
In this method, you will configure the gateway’s built-in bridge to publish the data to the ChirpStack MQTT broker.
When connecting the gateway to the ChirpStack, you will need to open ports 1883 and 8080 to enable the communication between the gateway and the server and be able to access the ChirpStack.
 Figure 1: ChirpStack enable ports
- Start by accessing the gateway.
Figure 1: Login page- Login using the set credentials you have set in the Access the Gateway section.
- On the left side, head to LoRa. By default, the gateway is configured to work as Built-in network server.
- From Work Mode, select Packet forwarder. Click Choose from the available protocols to expand the Packet forwarder settings.
Figure 1: Setting packet forwarder mode- To use the built-in gateway bridge, from the Protocol select LoRa Gateway MQTT Bridge.
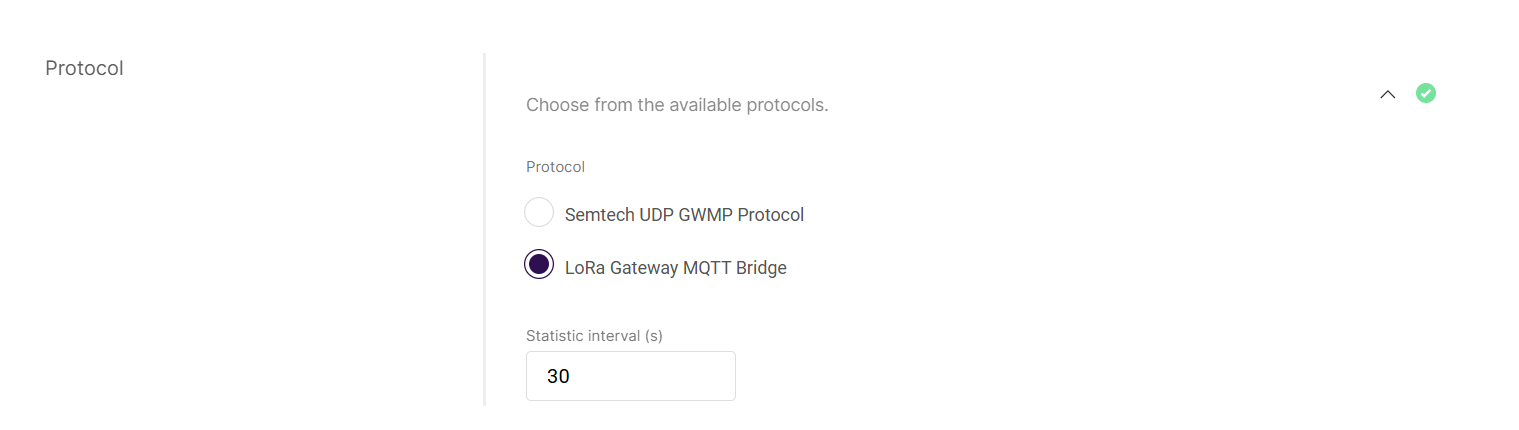 Figure 1: LoRa Gateway MQTT bridge
- Choose MQTT for ChirpStack 4.x (PROTOBUF) as the MQTT protocol.
- The ChirpStack v3 supports both MQTT for ChirpStack 3.x (JSON) and MQTT for ChirpStack 3.x (PROTOBUF). If you are using an earlier version of ChirpStack (v3), you need to choose one of the MQTT protocols to use.
- If you want to use the JSON protocol, you need to change the payload marshaler in the gateway bridge
.tomlfile to.json. By default, the marshaler is protobuf. To configure the payload marshaler, you will use the SSH client PuTTY to access the configuration files. How to do this is explained in the Learn Site.
By default, the built-in gateway bridge is pointed to the local broker (127.0.0.1). To point the gateway to the ChirpStack network, you need to set the ChirpStack Broker address in the MQTT Broker Address field.
In this case, the ChirpStack is installed on an AWS cloud instance with public IP 18.156.176.220 (yours will be different). The default port that the MQTT Broker uses is 1883.
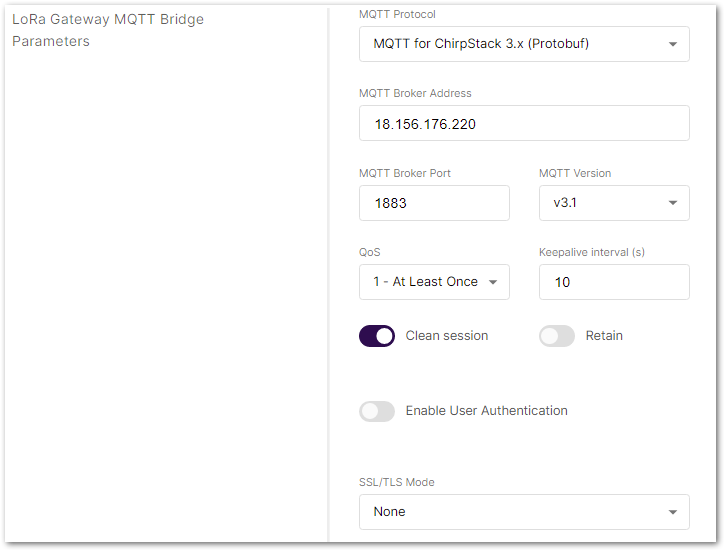 Figure 1: Configure MQTT Bridge parameters on ChirpStack
- Click Save changes to save the changes.
If everything is set correctly, the gateway will display as online. You can click the gateway name to inspect the gateway traffic.
Figure 1: Registered gatewayFigure 1: Gateway detailsConnecting the Gateway via Basics Station
In this method, you will connect the gateway to the ChirpStack via Basics Station. The LoRa Basics™ Station is an implementation of a LoRa packet forwarder.
When connecting the gateway to the ChirpStack, you will need to open TCP ports 3001 and 8080 to enable the communication between the gateway and the server and be able to access the ChirpStack.
Figure 1: ChirpStack enable ports- Start by accessing the gateway.
Figure 1: Login interface-
Login using the set credentials you have set in the Access the Gateway section.
-
On the left side, head to LoRa. By default, the gateway is configured to work as Built-in network server.
-
For Work Mode, select Basics station and click Configure Basics Station server setup to expand the Basics Station settings.
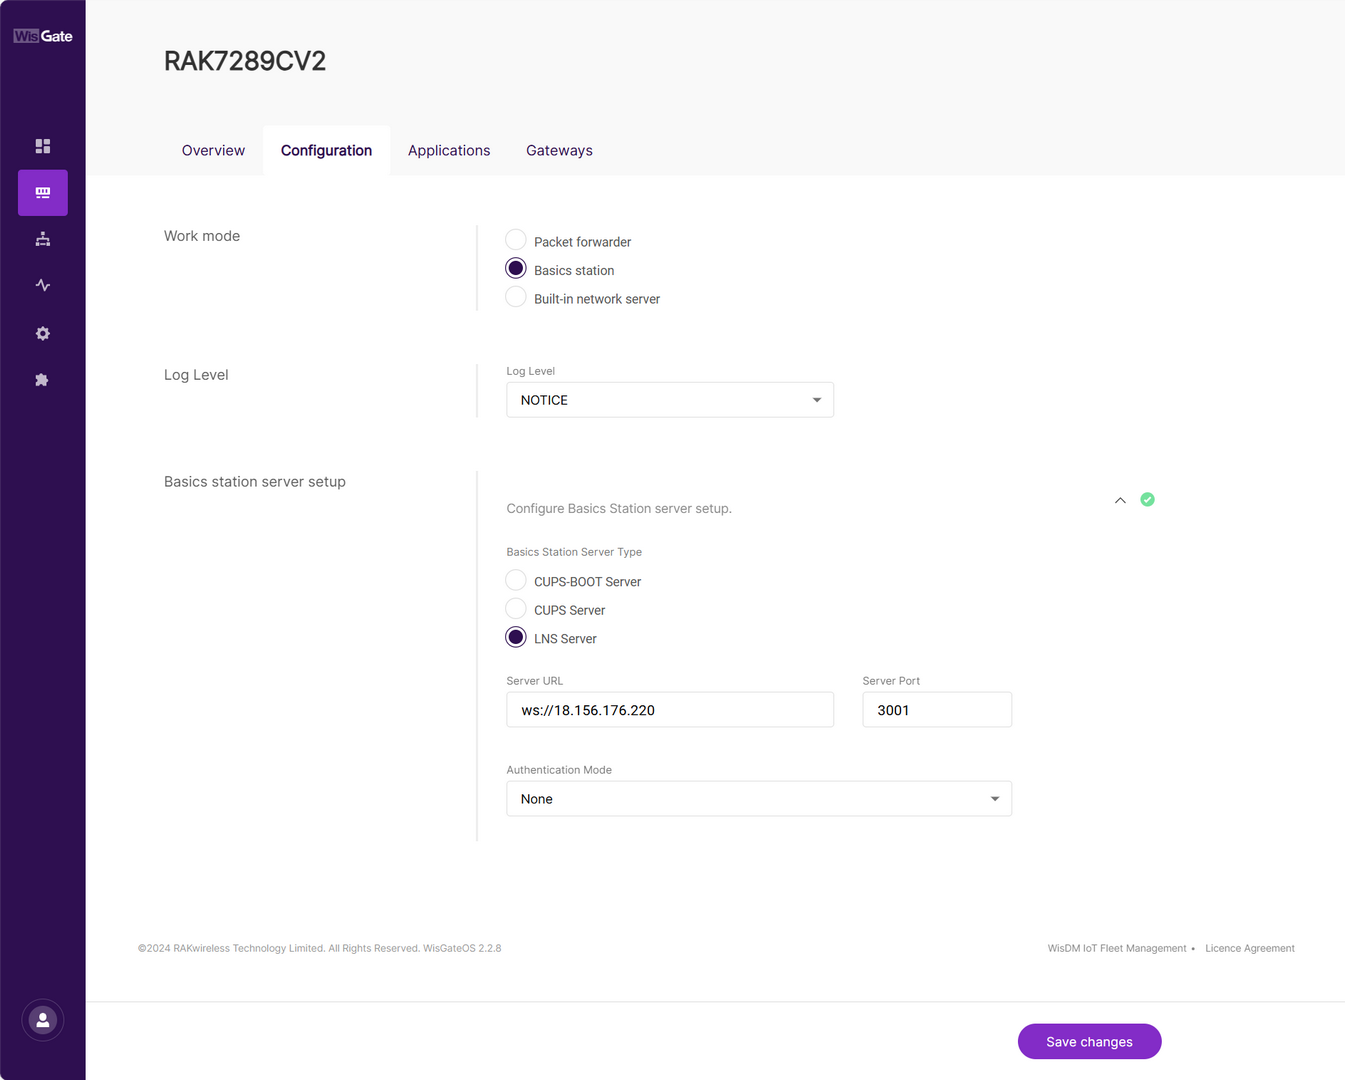 Figure 1: Setting Basics Station mode
- Basics Station Server Type: For server, choose LNS Server.
- Server URL: the address of the ChirpStack v4 server. In this case, the ChirpStack v4 is installed on an AWS cloud instance with public IP
18.156.176.220(yours will be different). The URL will be:ws://18.156.176.220.
The URL starts with ws:// in case a plain text connection is used. Using the wss:// scheme will trigger a TLS connection based on the tc.{cert,key,trust}credentials set.
- Server Port: the port to which the Websocket listens. The port is
3001. - Authentication Mode: Authentication for the ChirpStack server. For this case, you will use no authentication.
- Click Save changes to save the changes.
Now, your gateway is configured to work as a Basics Station and is pointed to the ChirpStack gateway bridge. The default installation of the ChirpStack sets up the backend of the ChirpStack gateway bridge as semtech_udp.
To configure the backend of the ChirpStack gateway bridge, you need to access the configuration file of the bridge. To access it, you will need an SSH terminal. In this case, you will use the PuTTY client.
To access the ChirpStack configuration files, you need to access the instance. How to do this is explained in the Learn Site.
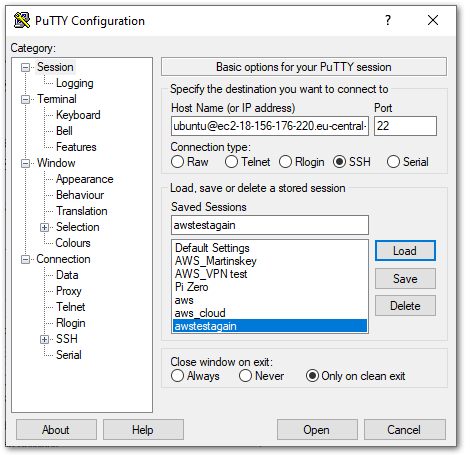 Figure 1: PuTTY client
-
Go to the
/etc/chirpstack-gateway-bridge/file path and open thechirpstack-gateway-bridge.tomlfile. -
In the file, find the gateway backend configuration paragraph and replace the type with
basic_station.
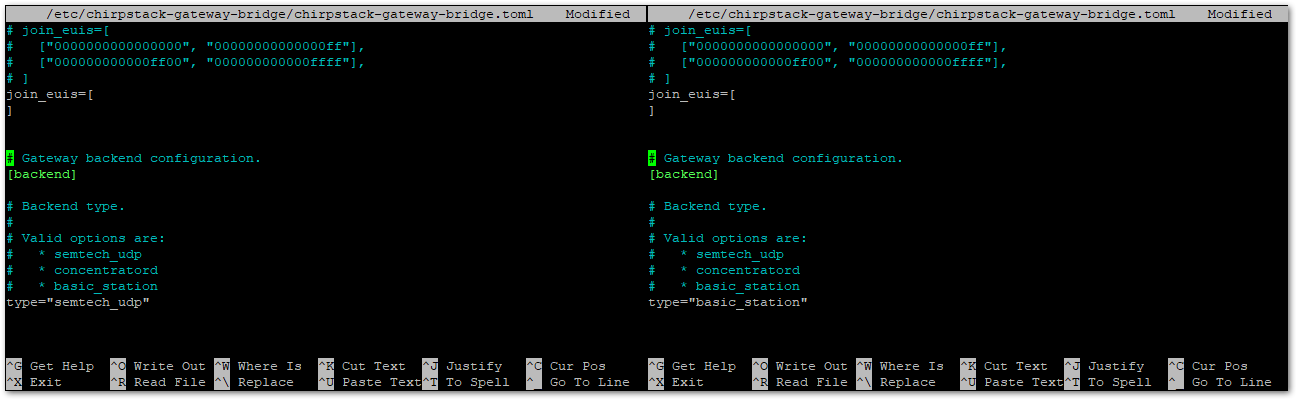 Figure 1: Configure gateway bridge type
- Now scroll down until you find the Concentrator configuration paragraph and uncomment the following text as shown below.
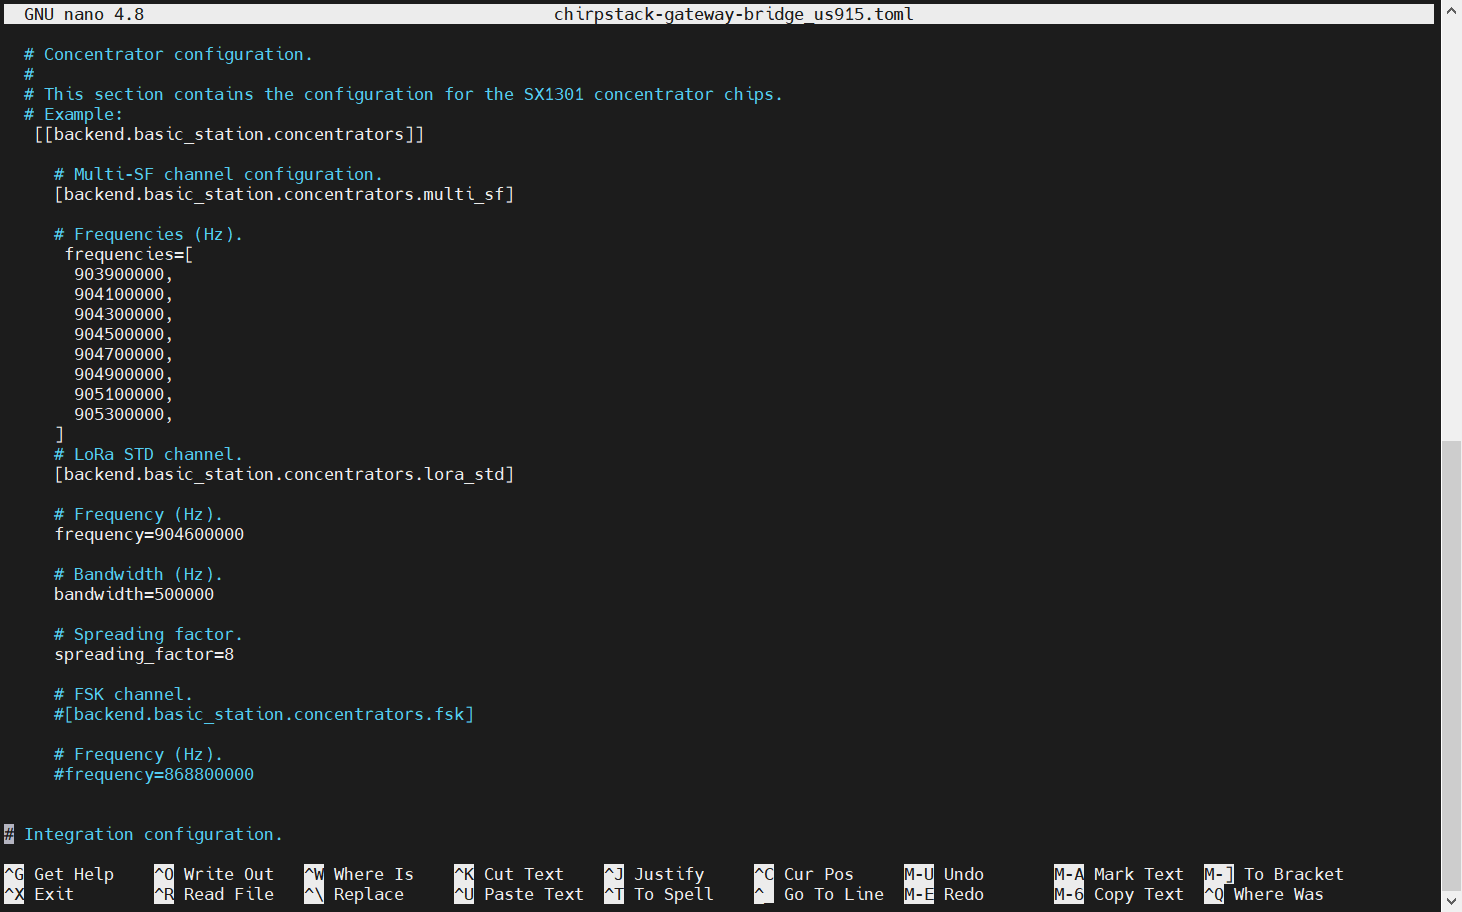 Figure 1: Configuring gateway bridge backend
The example uses US915. The frequency band setting needs to be consistent with the frequency band of the gateway used.
- Save and exit the
.tomlfile and restart the gateway bridge service to apply the changes by restarting the gateway bridge service with the following command:
sudo systemctl restart chirpstack-gateway-bridge.service
Now, the ChirpStack backend configuration is set to the Basics station.
If everything is set correctly, the gateway will display as online. You can click the gateway name to inspect the gateway traffic.
Figure 1: Registered gatewayFigure 1: Gateway detailsThingPark by Actility
In this section, you will learn how to add the RAK7289V2/RAK7289CV2 WisGate Edge Pro to ThingPark.
ThingPark is Actility’s platform, in which you can register your LoRaWAN® gateway and end devices. ThingPark offers a user-friendly dashboard where you can monitor various information about the gateway/end device, such as status, radio traffic, statistics, and more. Together with HTTPS integration, you can send the data received from the end nodes to an application server for post-processing and visualization.
For the complete step-by-step tutorial, refer to the How to Add RAK WisGate Edge Gateway V2 in ThingPark - Actility ThingPark Guide.
Chirp Network
Chirp Wireless is a leading global wireless network provider, offering reliable and extensive IoT connectivity solutions for outdoor and indoor use. Chirp's main objective is to simplify IoT deployments for its clients.
By providing multiple connectivity options, including 2.4 GHz LoRa, and offering white-label business-specific modules, Chirp eliminates the need for multiple networks, platforms, and billing systems. Chirp offers its visualization platform, empowering clients to effortlessly implement IoT devices and visualize data with a simple click.
In this guide, you will learn how to connect a WisGate Edge V2 gateway to the LNS solution provided by Chirp Wireless.
Adding the Gateway
- Log in to your account at the Chirp Wireless login page. If you don't have an account, create one.
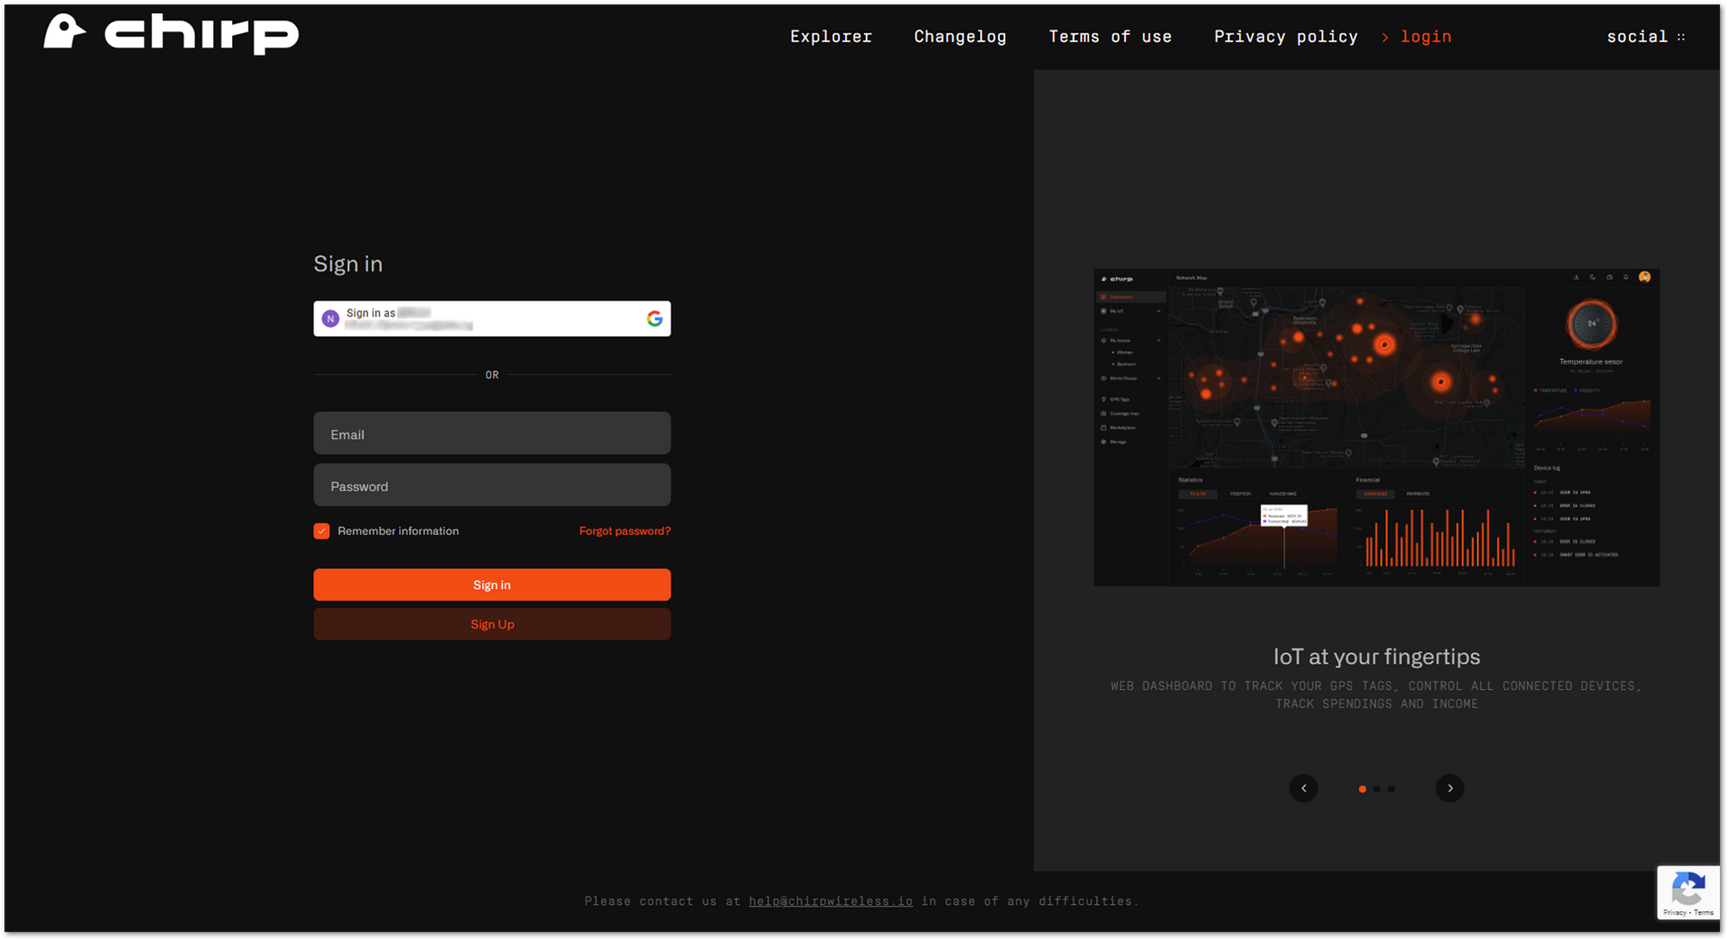 Figure 1: Chirp's login page
- Once logged in, navigate to Gateways > +Add gateway > 3rd Party Gateway.
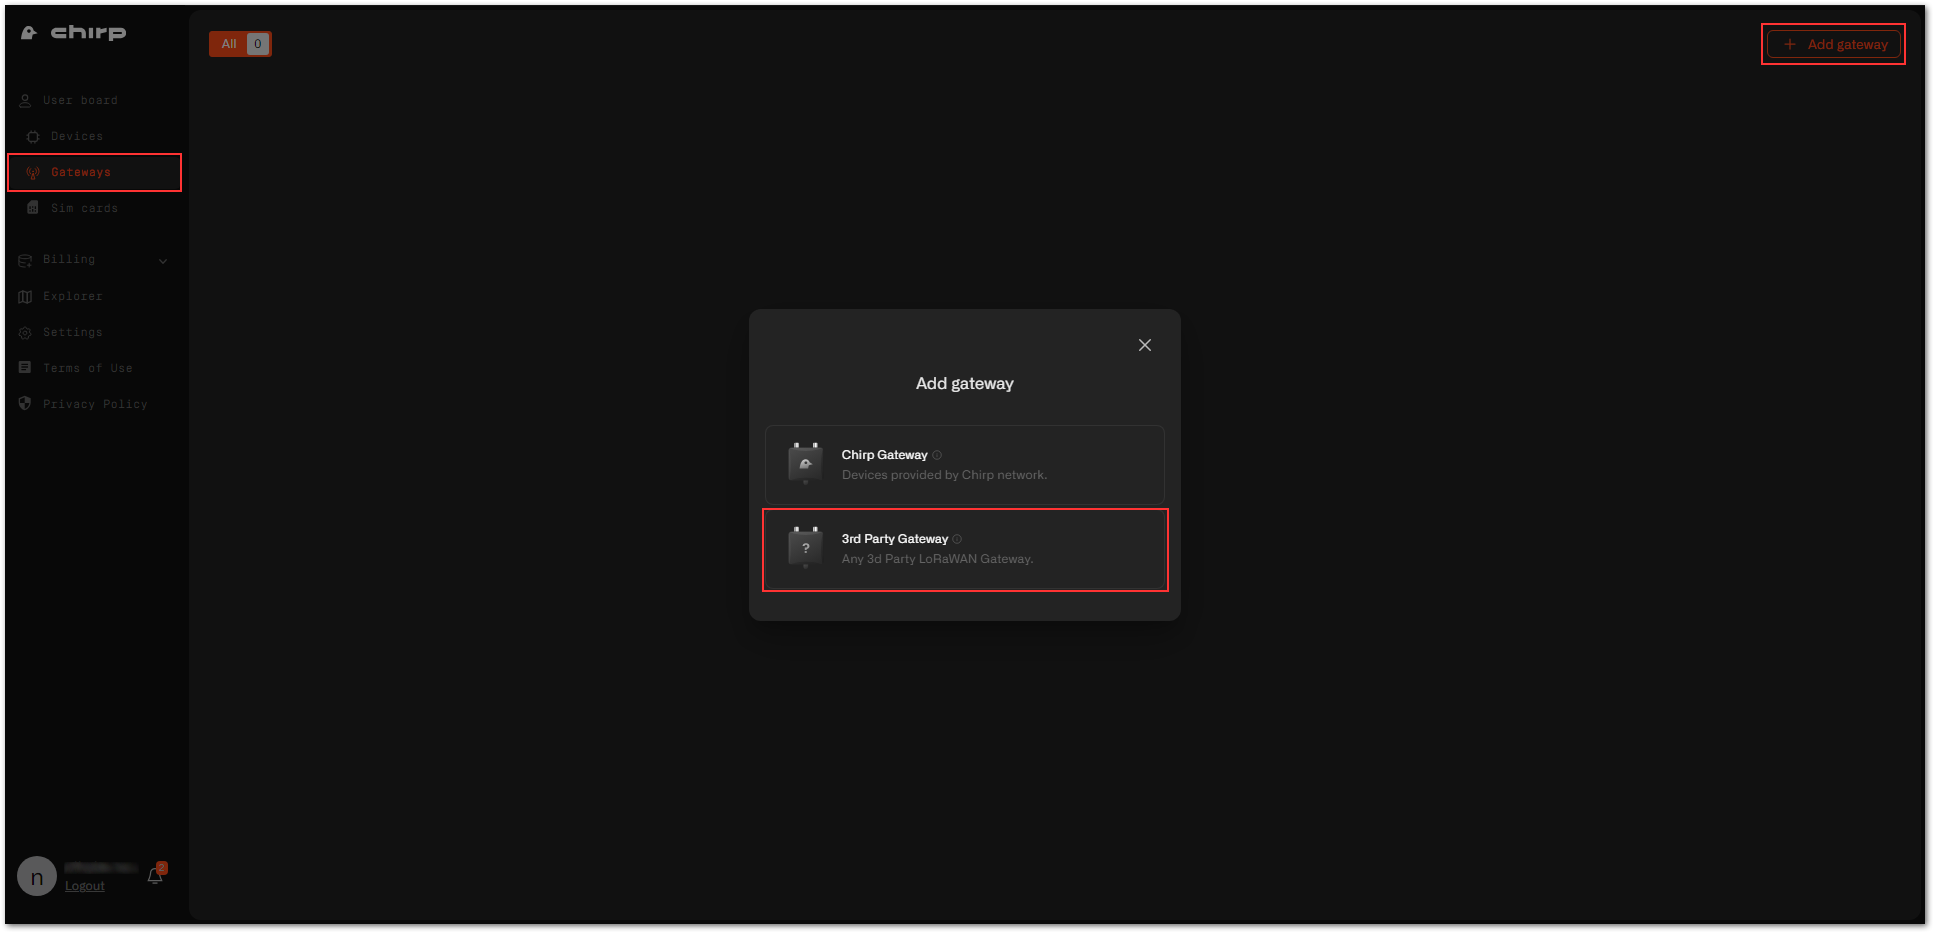 Figure 1: Adding a gateway
- Fill in the needed data and click Next.
- Name: Enter a name for the gateway that will help you identify it easily.
- Region: This is the LoRaWAN region of the gateway. For this example, we will be using the EU868.
- Gateway EUI: This is the EUI of the gateway. You can find it either on a sticker at the back of the device or in the Web UI > Dashboard > Overview.
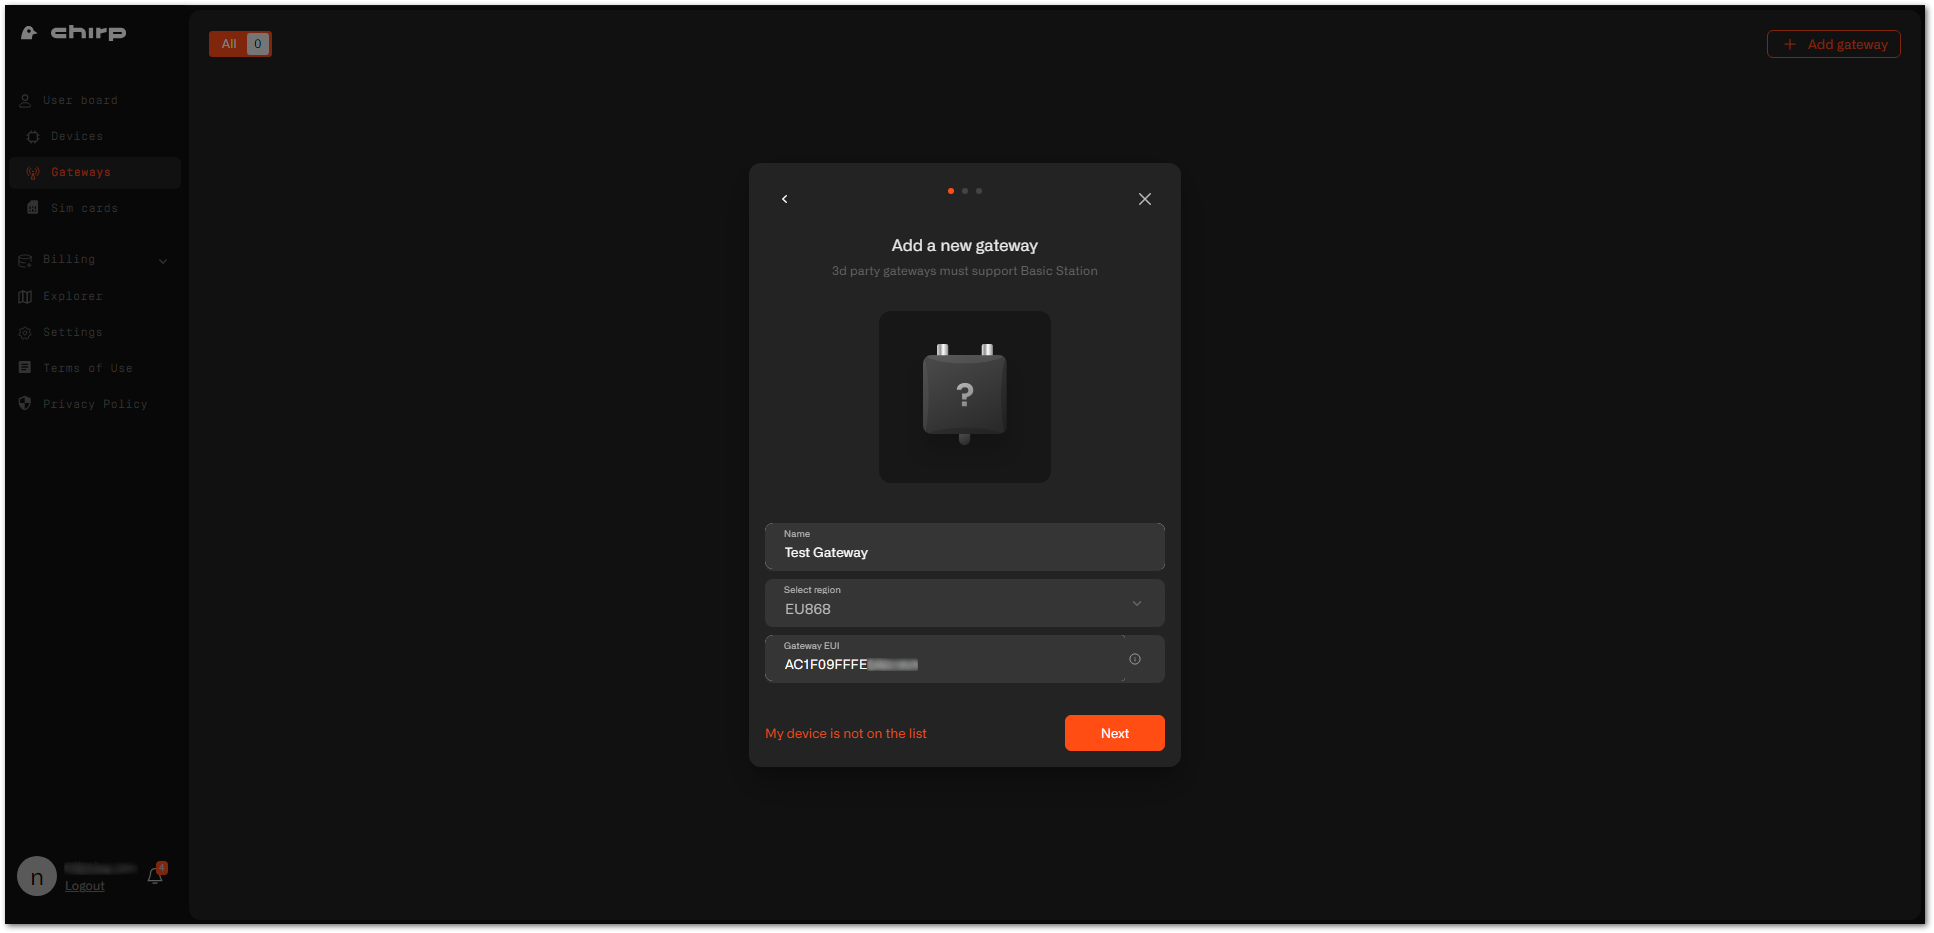 Figure 1: Gateway information
- After confirmation, download the
certs.zipcontaining the needed certificates and copy the LNS address to the clipboard. Click Continue.
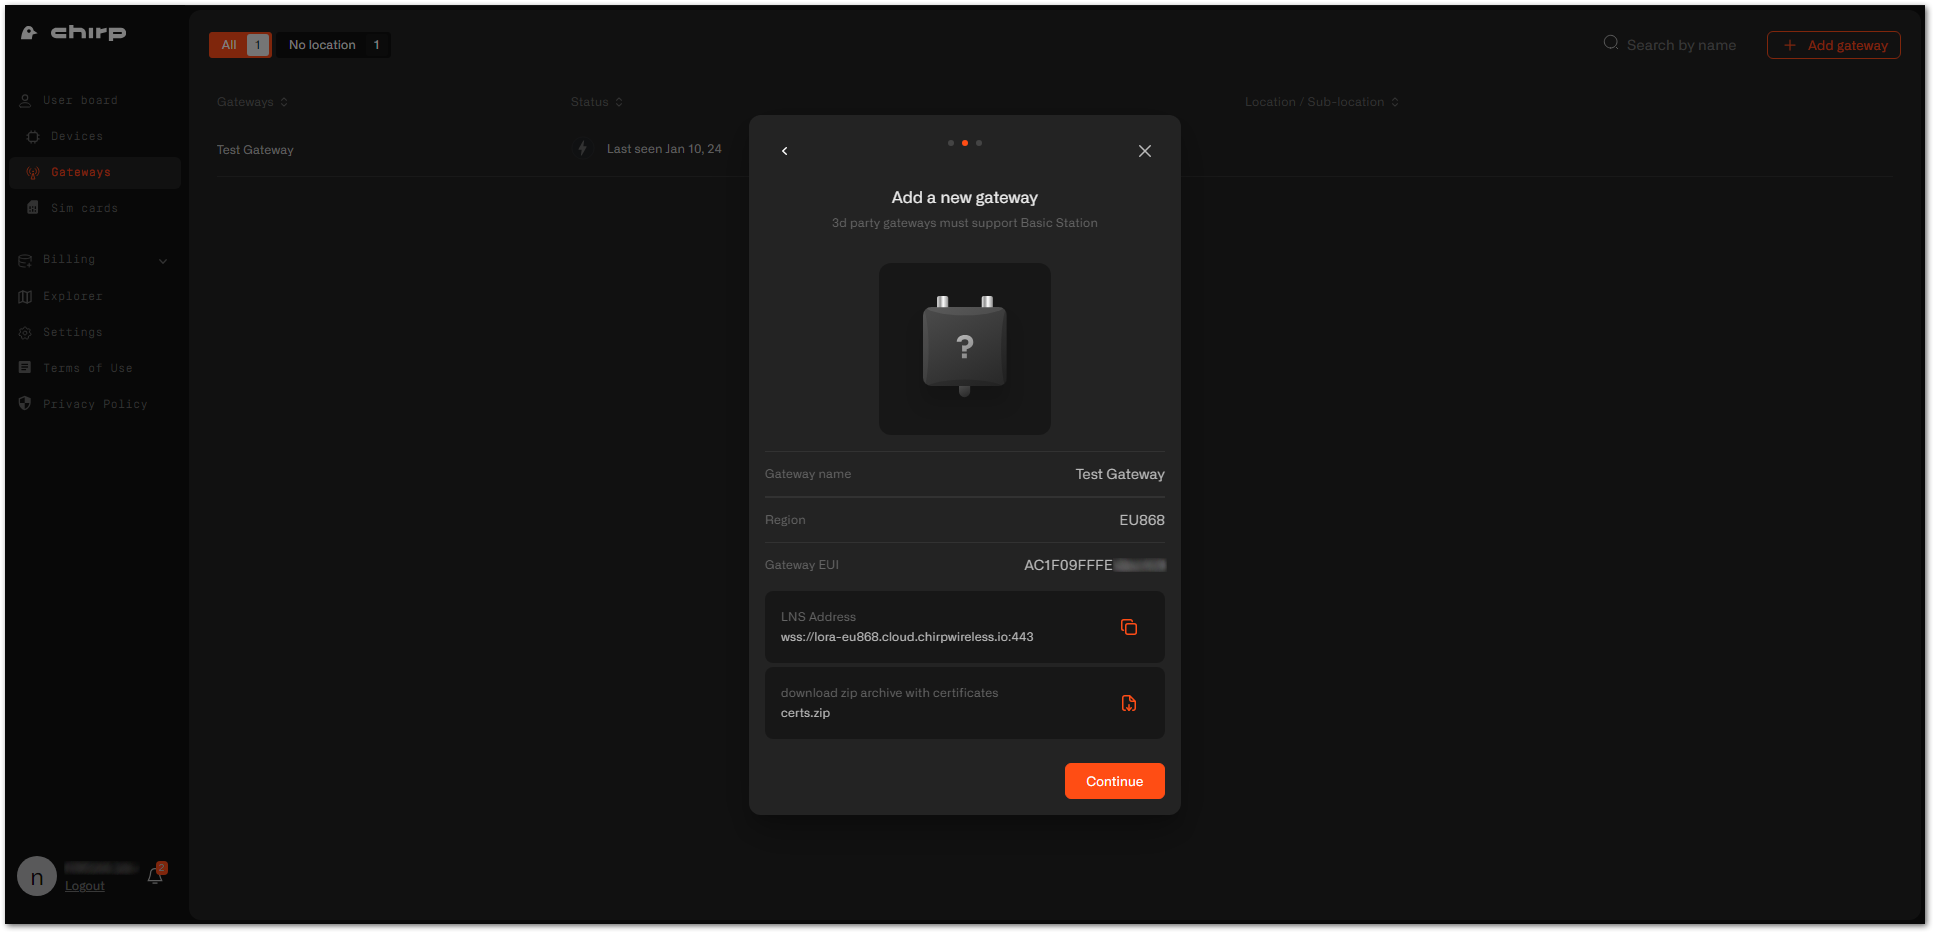 Figure 1: Certificates and address generation
- Now, your gateway is successfully added to the Chirp platform. Click Continue to view your gateway list.
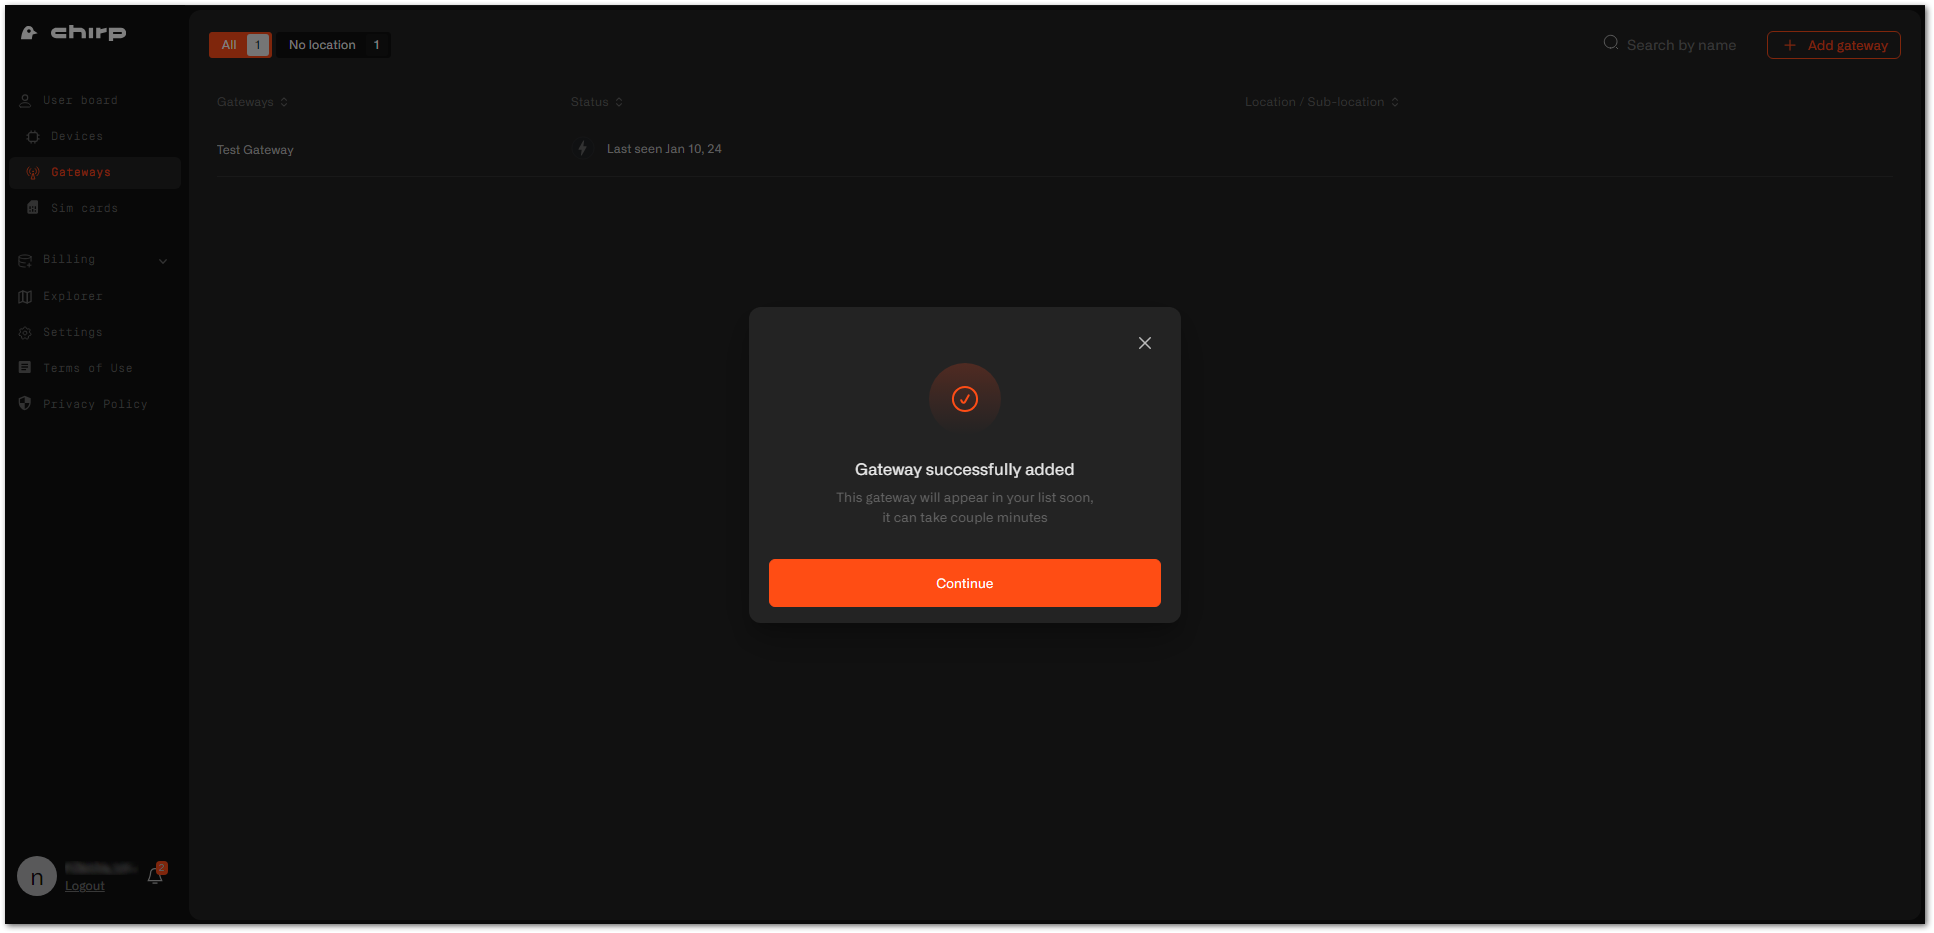 Figure 1: Gateway successfully added
If you didn't save the certificates or LNS address, you can navigate to the gateway's Settings tab.
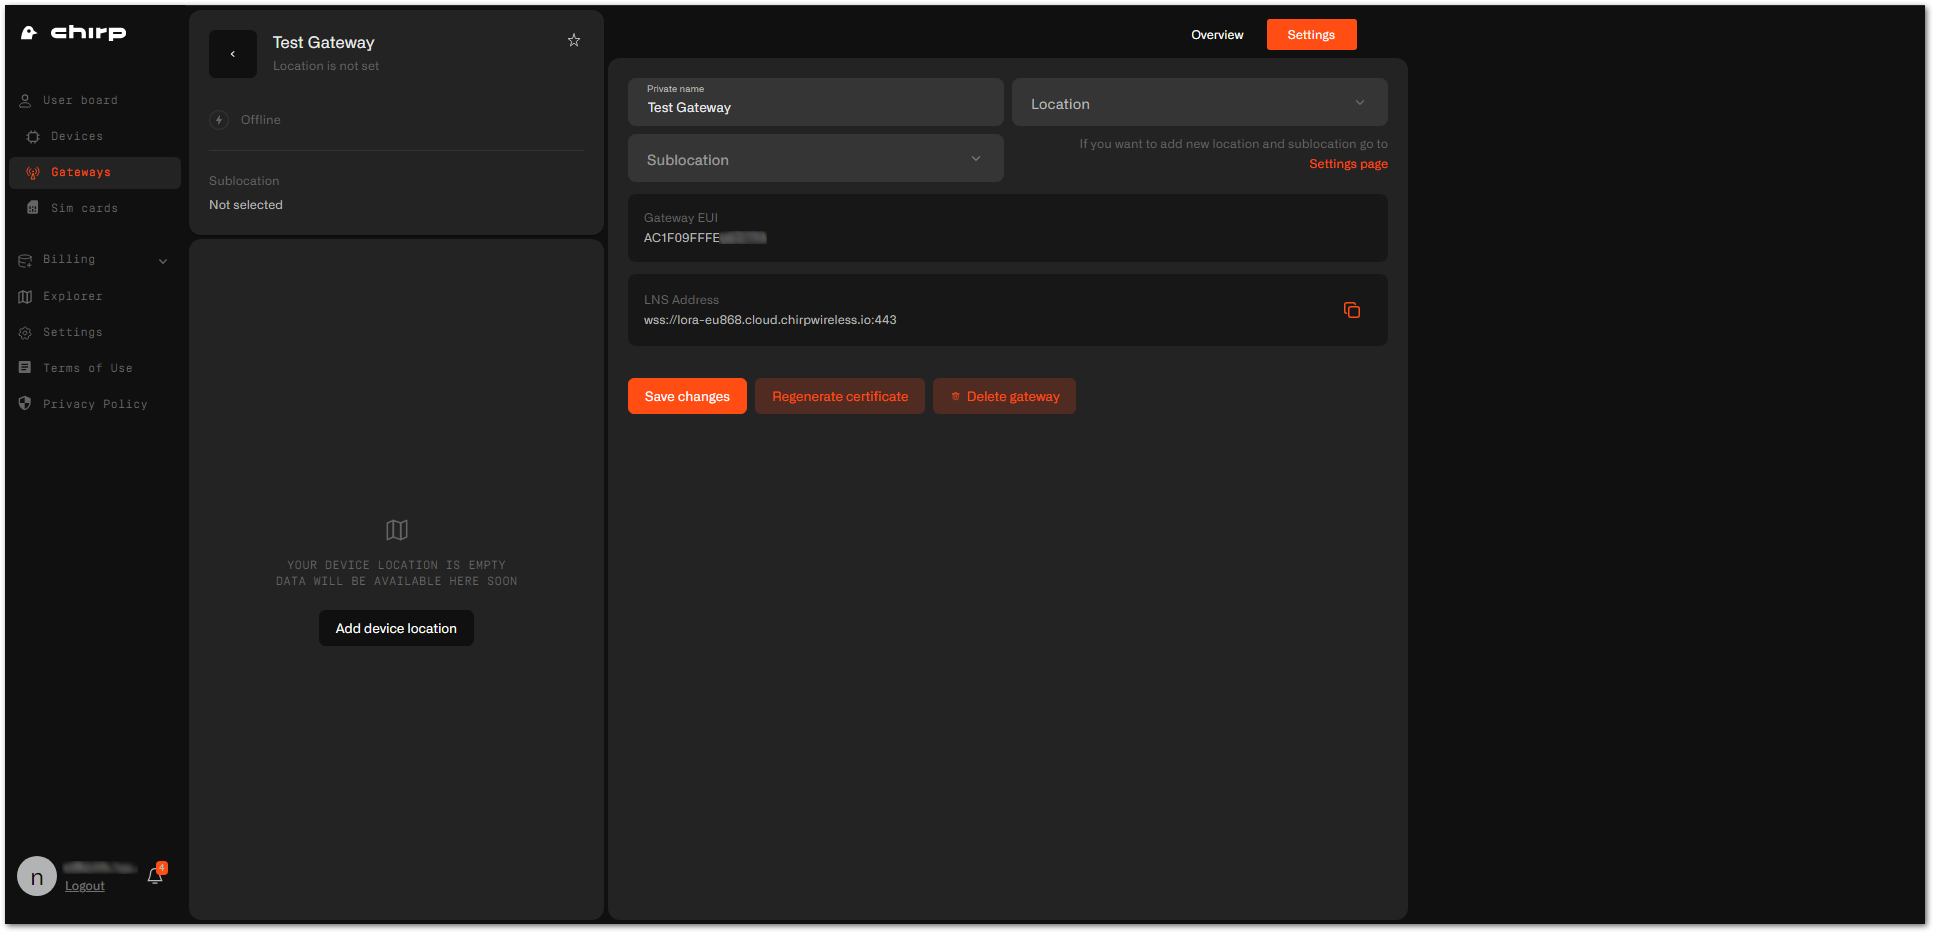 Figure 1: Gateway settings
Configuring the Gateway
- To configure the gateway, access it via the Web UI. To learn how to do that, refer to the Quick Start Guide for each gateway.
- Navigate to LoRa > Configuration > Work mode and select Basics station.
- Server URL: Put the LNS Address you copied from Chirp's dashboard.
- Server Port: Enter the port number
443. - Authentication Mode: Select TLS Server & Client Authentication.
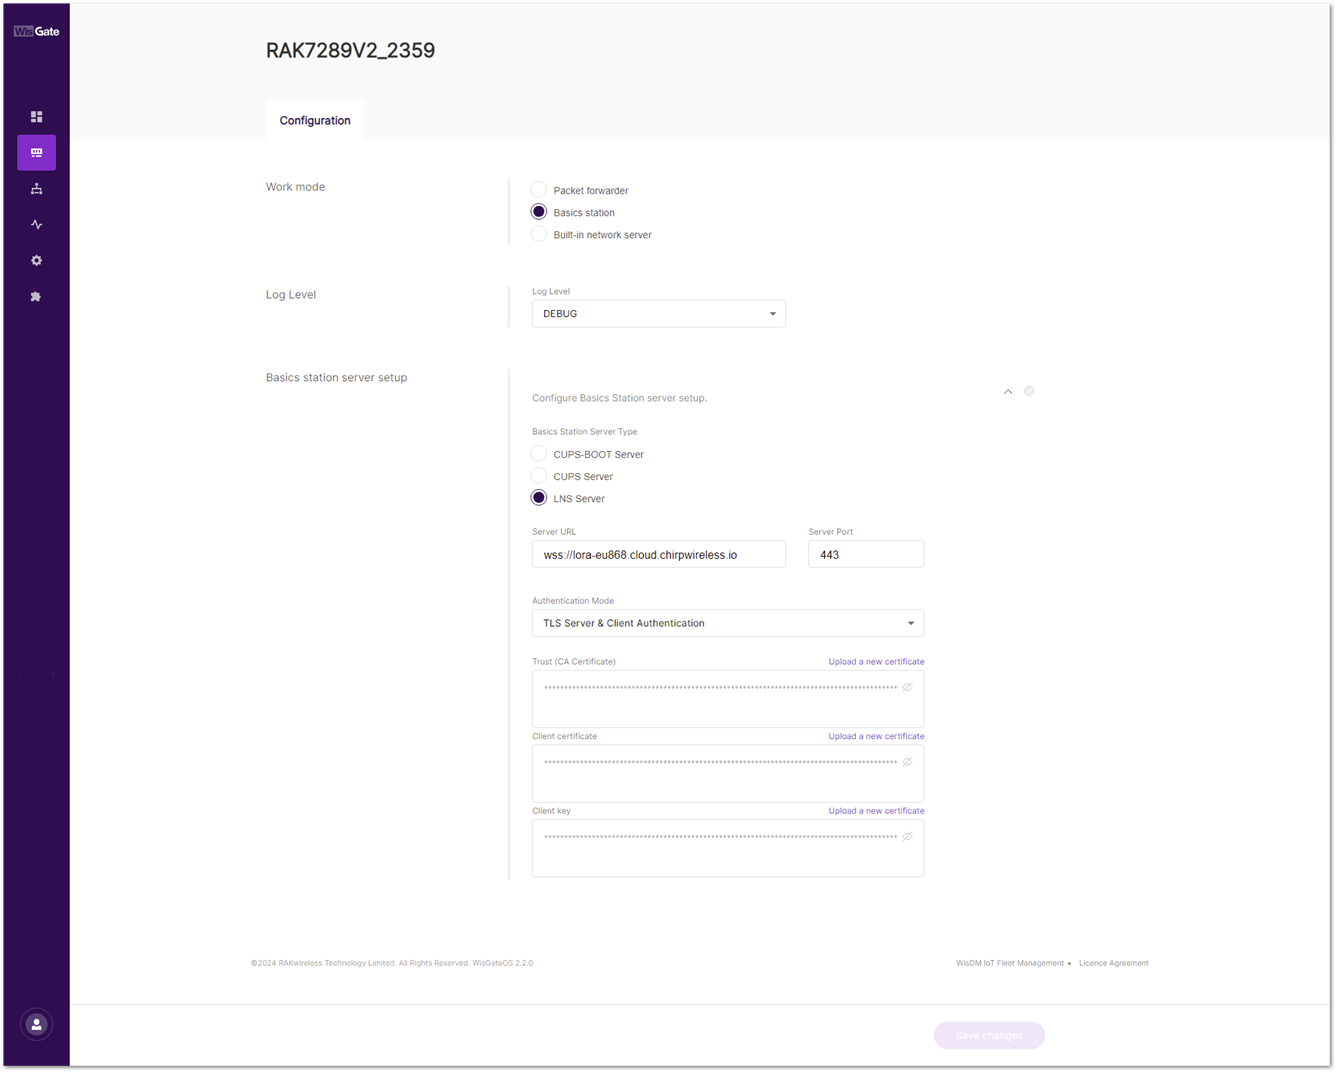 Figure 1: Gateway configuration
- Unzip the certificates.
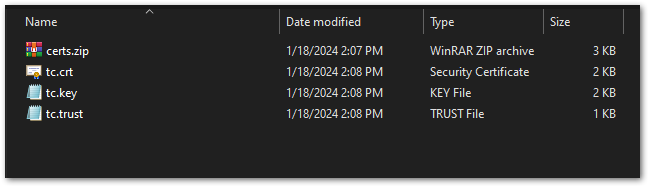 Figure 1: Certificates
- Upload each certificate to the corresponding field in the Web UI and click Save changes.
| Field | Certificate |
|---|---|
| Trust (CA Certificate) | tc.trust |
| Client certificate | tc.crt |
| Client key | tc.key |
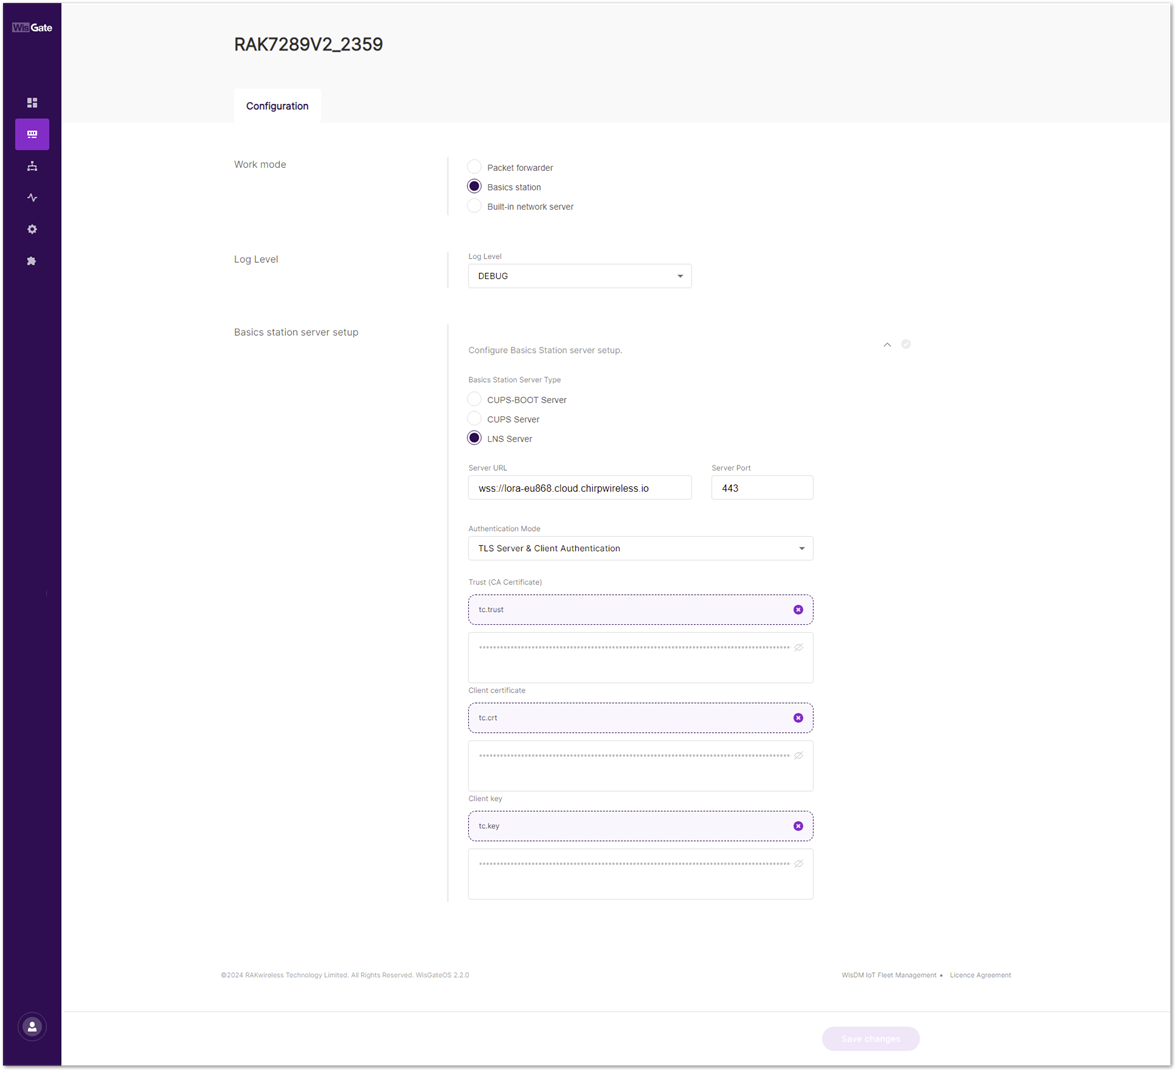 Figure 1: Uploading certificates
- If set up correctly, the status of the gateway on the Chirp's dashboard will show as online. It may take a couple of minutes, so wait till the dashboard appears.
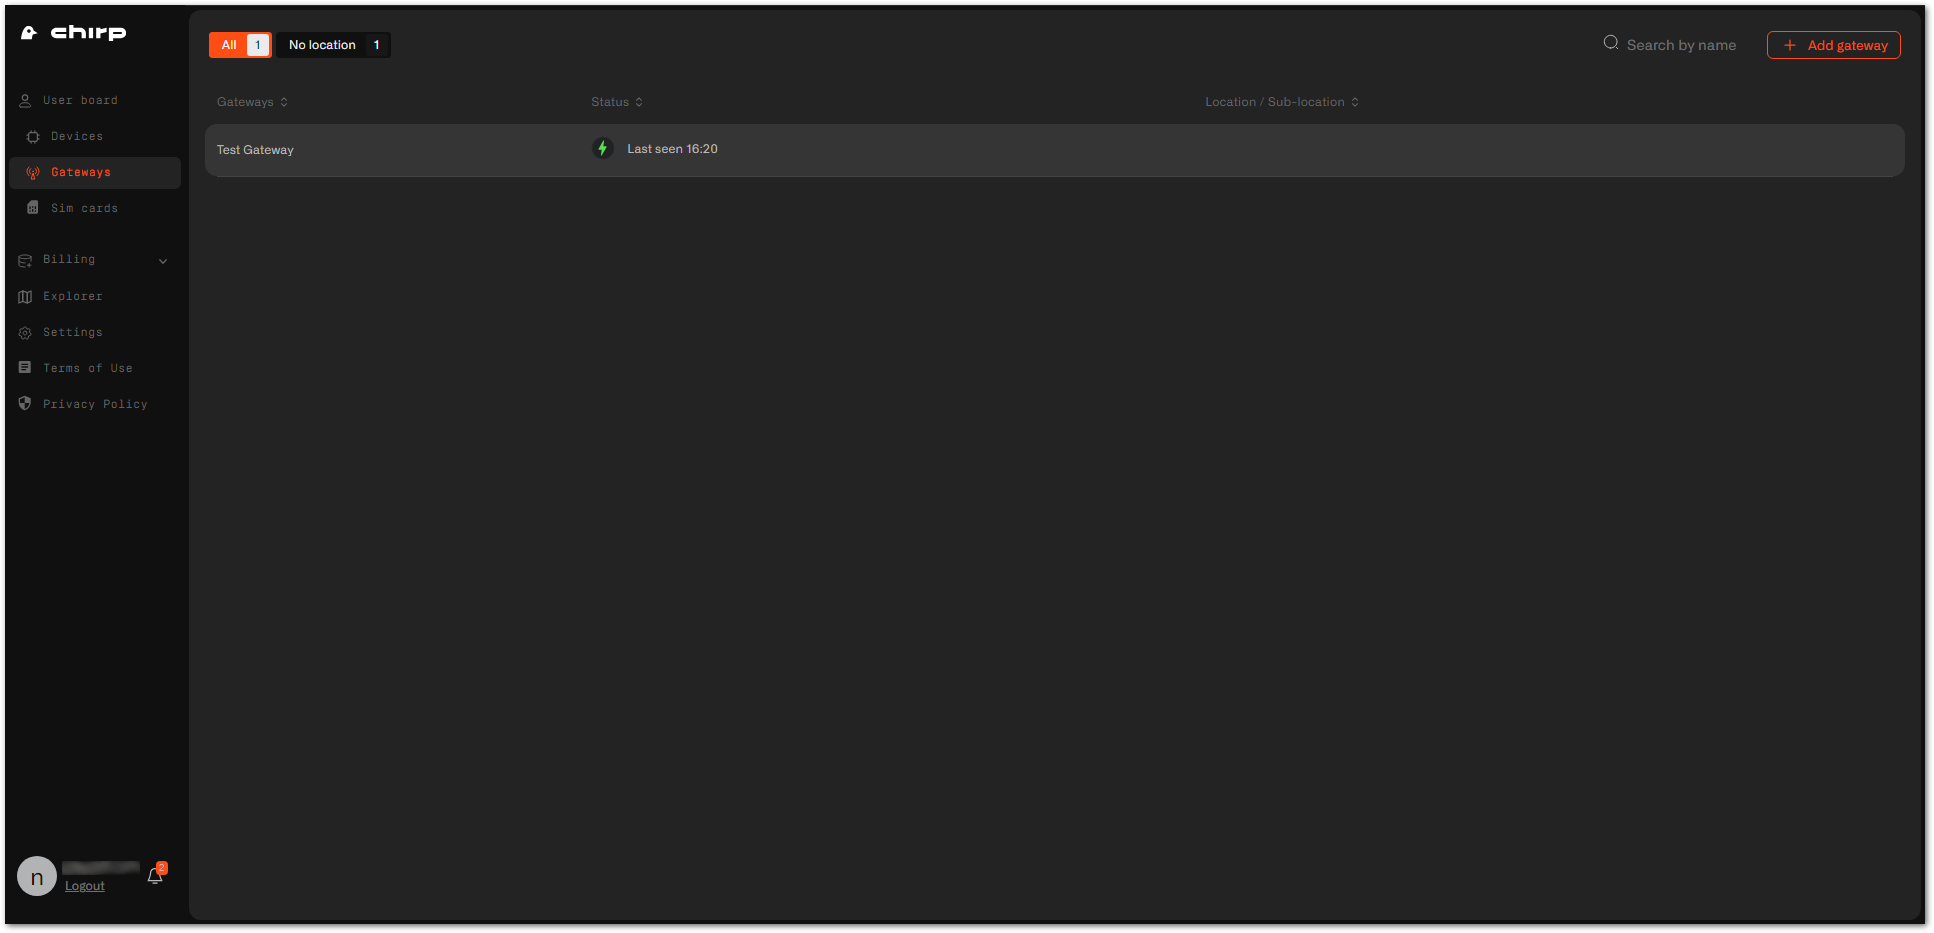 Figure 1: Gateway is online
 Figure 1: Gateway overview