RAK7391 WisGate Connect Quick Start Guide
Powering on the Device
The RAK7391 can be powered via 10-28 VDC. Make sure you power either using one or the other not both at the same time.
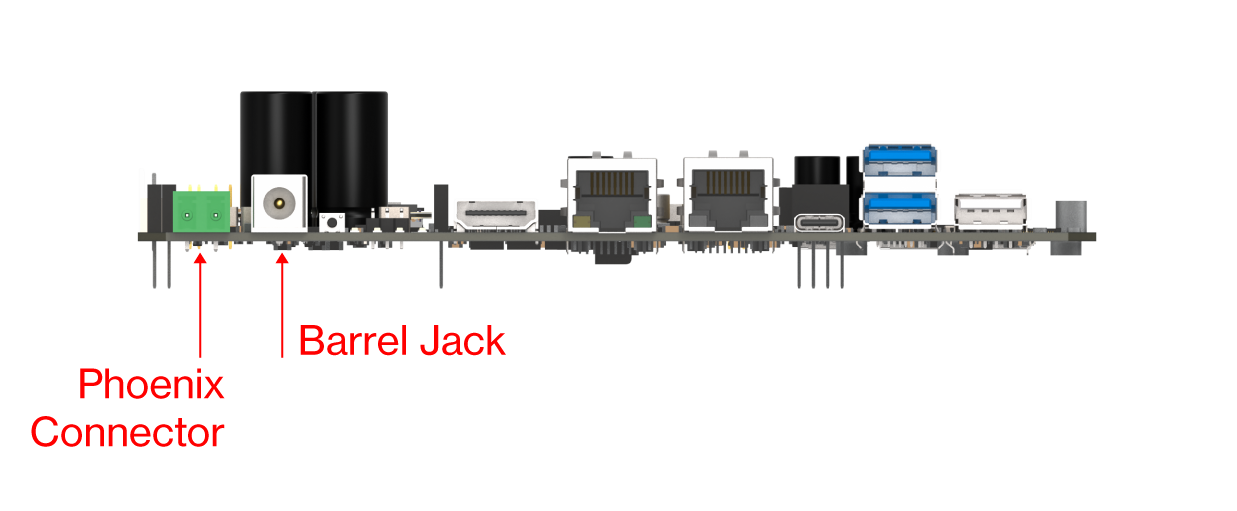 Figure 1: DC power connectors
The device also supports IEEE 802.3 at/bt active PoE when used with a specialized PoE HAT module. By mounting the PoE HAT module, you can power the board through the 1 GB Ethernet port.
The PoE board is specialized, and a standard Raspberry Pi 40-pin PoE HAT is not compatible.
 Figure 1: PoE HAT socket
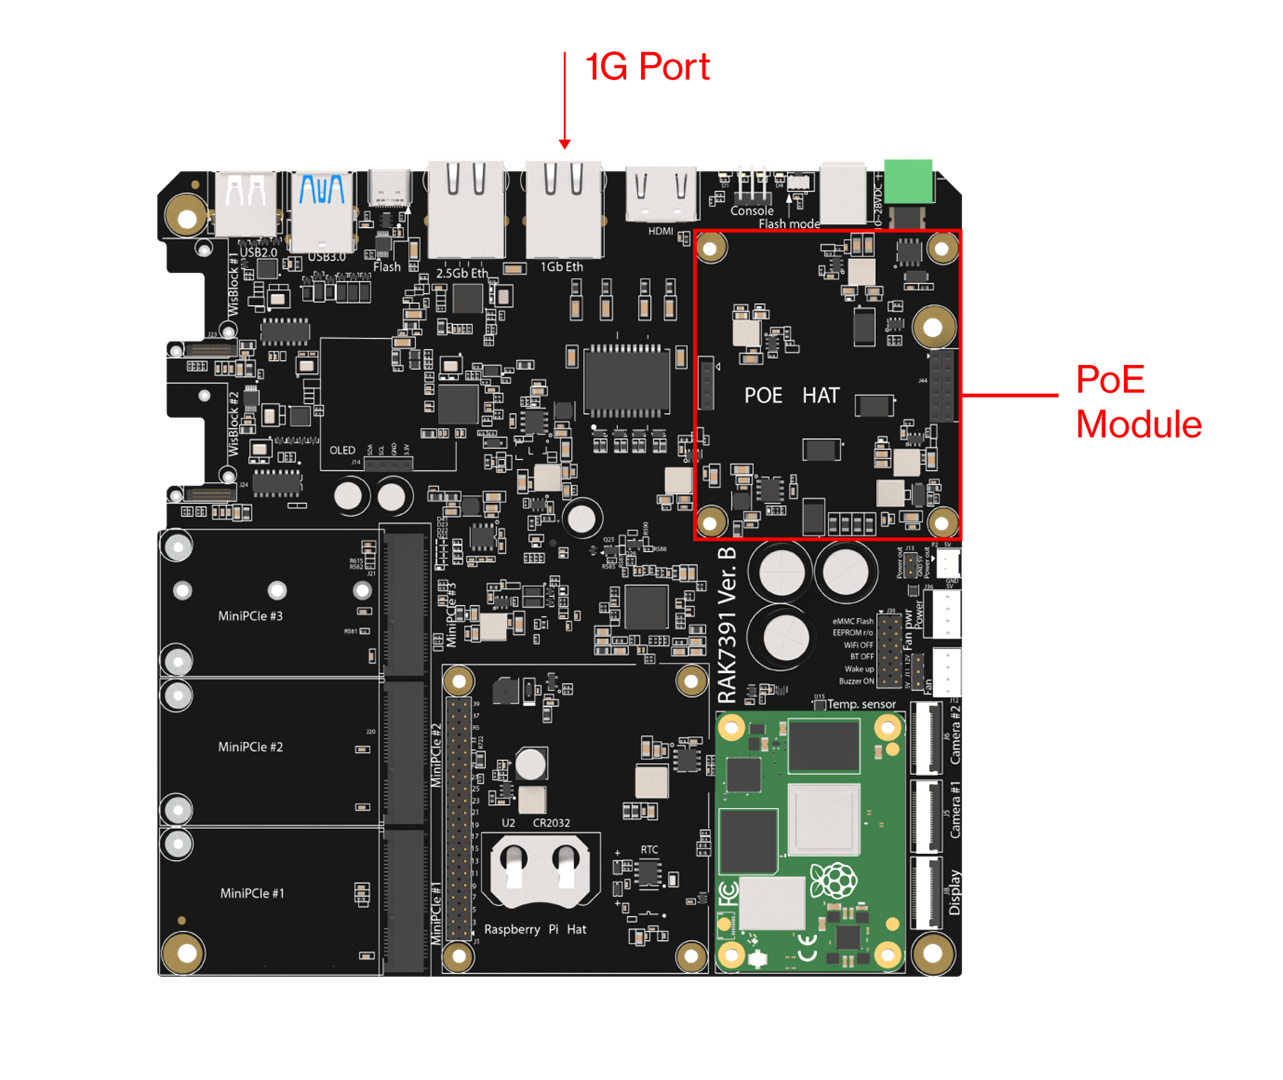 Figure 1: PoE provisioning via the 1-GB port (PoE HAT installed)
Flashing the OS
The recommended operating system for the RAK7391 is RAKPiOS. For detailed instructions on flashing and booting the OS, refer to the RAKPiOS documentation.
Network Connectivity
Connectivity management for the RAK7391 is handled through the NetworkManager tool suite. NetworkManager provides flexibility for configuring Ethernet, Wi-Fi, and Cellular interfaces. It enables the creation, display, editing, deletion, activation, and deactivation of network connections via configuration files. The command-line tool nmcli can also be used to control NetworkManager.
The NetworkManager configuration file must be owned by root, and only root should have read access. Set the permissions using the following commands:
sudo chmod -R 600
/etc/NetworkManager/system-connections/MyConnection.nmconnection
sudo chown -R root:root
/etc/NetworkManager/system-connections/MyConnection.nmconnection
The OS must be rebooted or the gateway power cycled for the configuration changes to take effect.
Ethernet
The gateway features two Ethernet ports: a 1 Gb Ethernet port (eth0) and a 2.5 Gb Ethernet port (eth1). Connecting to either port enables Ethernet DHCP to function automatically, without requiring specific NetworkManager configuration. The assigned address can be retrieved via the router interface or from the OLED screen, if installed.
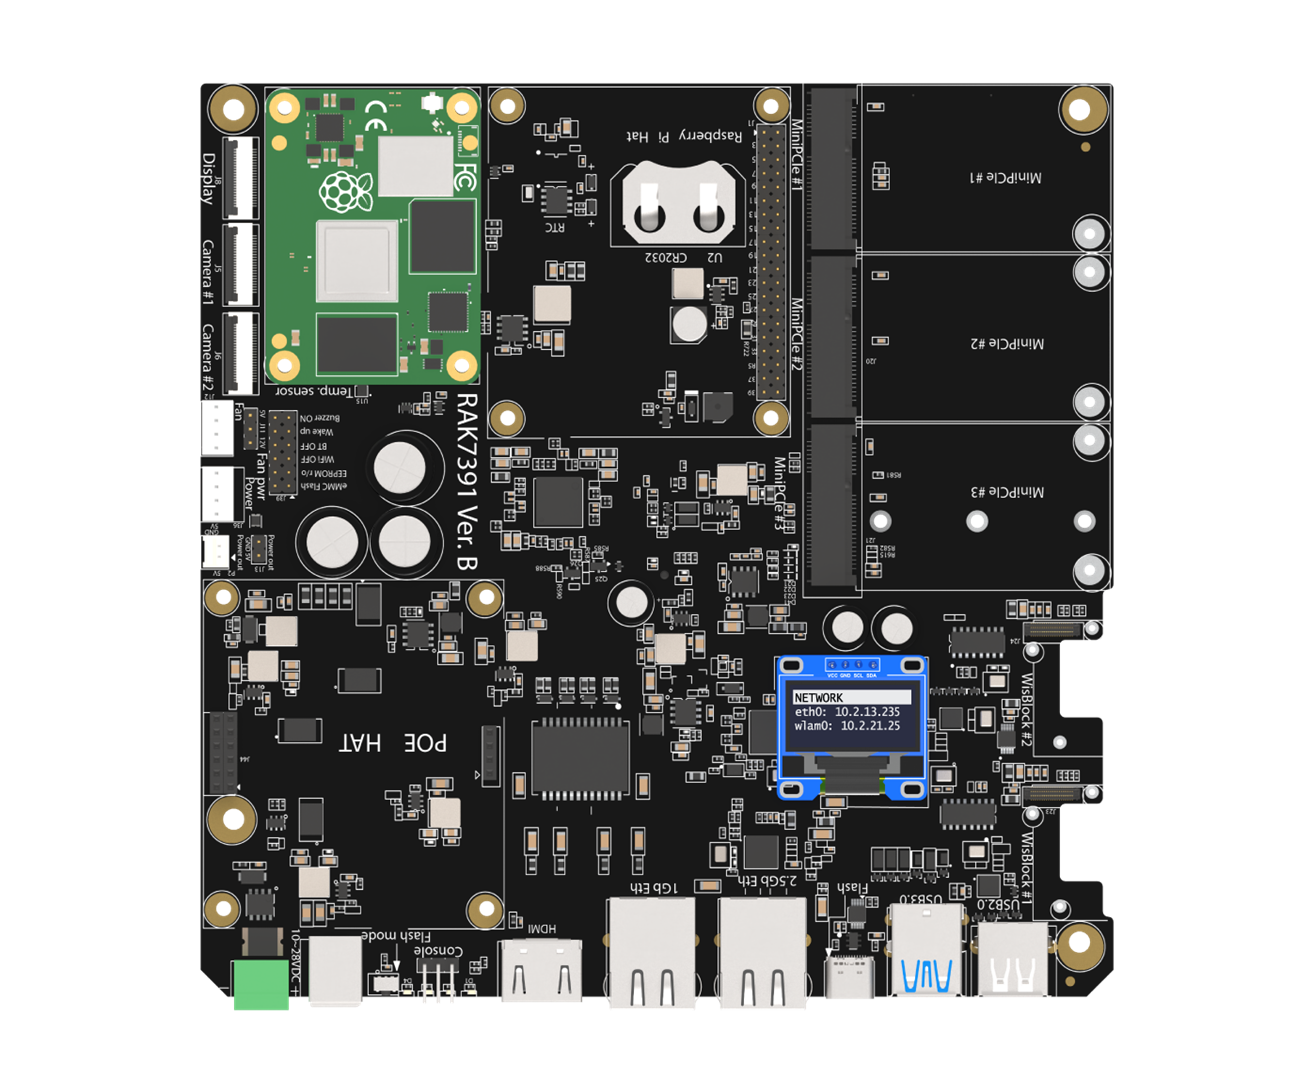 Figure 1: IP address listed on the OLED screen
To assign a static IP to an Ethernet interface, such as eth0, create a new connection file named ethernet-eth0.nmconnection in the /etc/NetworkManager/system-connections/ folder.
The file should have the following contents:
[connection]
id=ethernet-eth0
type=ethernet
interface-name=eth0

[ipv4]
address1=192.168.1.111/24,192.168.1.1
dns=8.8.8.8
method=manual

[ipv6]
addr-gen-mode=stable-privacy
method=auto
The important bits to take note of here are:
interface-name=eth0: indicates which network interface to use,(eth0)in this example .address1=192.168.1.111/24,192.168.1.1: shows which the assigned static IP address assigned to the interface is and which gateway is to be used(192.168.1.111)and the network gateway IP address192.168.1.1.dns=8.8.8.8: indicates which Domain Name Server (DNS) is to be used, Google's in this example.
If one wants to do the above static IP setting, but using the command-line tool nmcli, execute the following command:
sudo nmcli con add type ethernet autoconnect yes ifname eth0 ipv4.addr 192.168.1.111/24 ipv4.gateway 192.168.1.1 ipv4.dns 8.8.8.8 ipv4.method manual
WiFi
WiFi 5
If the CM4 you are using has built-in Wi-Fi, it supports speeds up to Wi-Fi 5 (IEEE 802.11 b/g/n/ac). Connecting to Wi-Fi is configured in a similar manner to setting up a manual Ethernet connection.
For example, to connect to a hotspot named RAK, create a new connection file named RAK.nmconnection in the /etc/NetworkManager/system-connections/ folder.
The file should have the following contents:
[connection]
id=RAK
type=wifi
interface-name=wlan0

[wifi]
ssid=RAK

[wifi-security]
auth-alg=open
key-mgmt=wpa-psk
psk=rak20140629

[ipv4]
method=auto
route-metric=100

[ipv6]
addr-gen-mode=stable-privacy
method=auto
interface-name=wlan0: The built-in Wi-Fi interface iswlan0.ssid=RAK: The SSID of the network, in this case, it isRAK.key-mgmt=wpa-psk: Type of authentication, in this casewpa-psk.psk=rak20220922: Password, in this caserak20220922.
To apply the new configuration, reload it using the following commands:
sudo chown -R root:root /etc/NetworkManager/system-connections/RAK.nmconnection
sudo chmod -R 600 /etc/NetworkManager/system-connections/RAK.nmconnection
sudo nmcli con reload
sudo nmcli con up RAK
The equivalent commands using the nmcli tool are:
sudo nmcli device wifi connect RAK if name wlan0 password rak20220922
WiFi 6
The RAK7391 supports Wi-Fi 6 modules via the mPCIe interface. The OS image includes pre-installed firmware and drivers for several Intel Wi-Fi 6 card models, such as the AX200, AX201, and AX210. For instance, the WiFi6E Intel AX210 module has been tested and works as a Plug & Play device when connected to MiniPCie #3 on the RAK7391.
In RAKPiOS, the wireless interface name for the module should be wlan1. To connect to a Wi-Fi 6 hotspot, follow the same procedure as for Wi-Fi 5, but update the interface name from wlan0 to wlan1 in the configuration.
Cellular
The RAK7391 supports cellular connectivity when paired with the RAK8213, a multi-band LTE Cat M1/Cat NB1/EGPRS module. This module is based on the Quectel BG96 and features a standard PCI Express® (mPCIe) form factor.
Hardware Setup
Insert the RAK8213 module into either mPCIe #2 or mPCIe #3 on the RAK7391 board. Ensure you have a SIM card that supports at least one of the following: LTE Cat M1, Cat NB1, or EGPRS. Insert the SIM card into the SIM card slot SIM #2 or SIM #3, both located on the underside of the board.
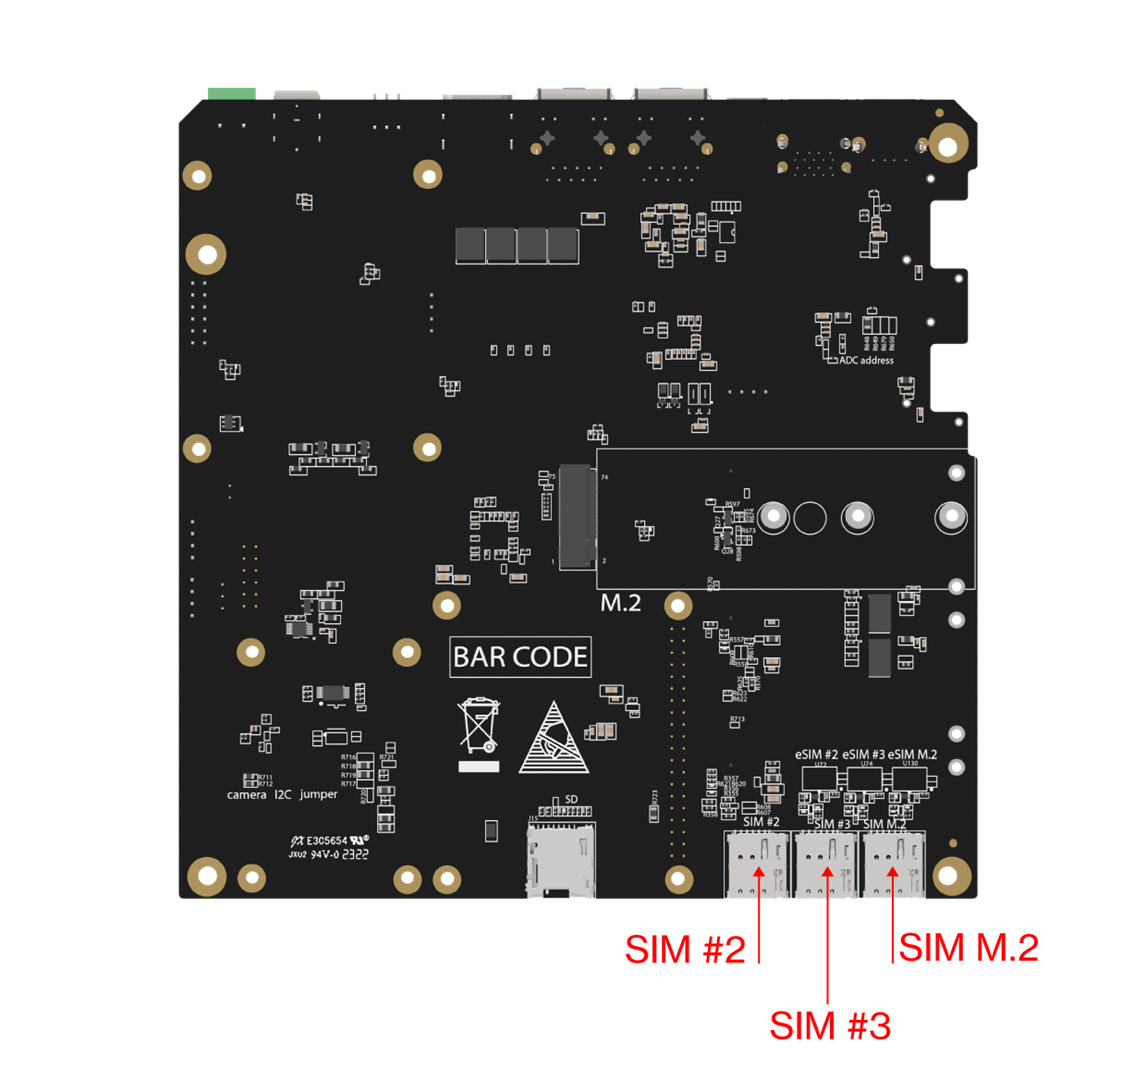 Figure 1: SIM slots
Cellular Configuration
Before creating a 4G connection file, you must configure the SIM card to register with the network provider. This involves connecting to the BG96 module via the serial port and sending a series of AT commands.
For this example, use the serial communication tool minicom to configure the BG96 module.
- To start, execute the following command:
sudo minicom -D /dev/ttyUSB3
- Ensure the local echo is turned on so you can see the commands you input. Press Ctrl+A, then Z to access the Command summary in minicom.
- Press E to toggle the local echo on or off.
The following code block is a summary of the commands you need to execute in the same order. For detailed descriptions of these commands, refer to this AT command manual from Quectel.
at+cfun=0   //Minimum functionality
at+qcfg="nwscanmode",0,1 //set scanmode automatic
at+qcfg="nwscanseq",010203,1  // set searching sequence:GSM -> LTE CAT M1 -> LTE CAT NB1
at+qcfg="iotopmode",1,1
at+qcfg="servicedomain",1,1
at+qcfg="roamservice",255,1
at+qcfg="band",f,400A0E189F,A0E189F,1 //search all band
at+cpsms=0
at+cfun=1  //Full functionality
at+cops=?  //Lists the available network providers.
at+cops=1,2,"46000",0  //select and register the network providers
at+cops?  //Queries the connected web server information.
Connection File
Create a cellular connection file named gsm.nmconnection in the folder /etc/NetworkManager/system-connections/.
The file should have the following contents:
[connection]
id=gsm
uuid=55e9c95e-5947-4dad-9a92-9d409449ba4d
type=gsm
interface-name=cdc-wdm0
permissions=

[gsm]
apn=iot.1nce.net

[ipv4]
dns-search=
method=auto

[ipv6]
addr-gen-mode=stable-privacy
dns-search=
method=auto

[proxy]
The key details to note are:
apn=cmnetspecifies the Access Point Name (APN) for your SIM card's network provider.- After configuration, reboot your board, and the
wwan0interface will obtain an IP address, making it ready for internet connectivity.
interface-name=cdc-wdm0: Indicates the interface used.uuid=55e9c95e-5947-4dad-9a92-9d409449ba4d: The UUID, should be provided with the SIM card.apn=iot.1nce.net: Every provider has a specific one, you need to obtain it via their online portal, for example, 1nce is used, which has the APNiot.1nce.net.
After creating the configuration file, reboot or power cycle the gateway for the changes to take effect. If the connection is established successfully, the wwan0 interface will obtain an IP address, which can be verified on the OLED display.