RAK7204 Quick Start Guide
Prerequisites
What do you need?
Before going through each and every step in the installation guide of the RAK7204 WisNode Sense Home, make sure to prepare the necessary items listed below:
- RAK7204 WisNode Sense Home
- Micro USB Cable
- Gateway in Range, for Testing
- Windows PC
This device released by RAKwireless is already pre-loaded with its latest firmware upon manufacturing. If you want to have your device's firmware and bootloader burned, please refer to the sections below:
What's Included in the Package?
- 1pc - RAK7204 WisNode Sense Home
- 1pc - LoRa Antenna
- 1pc - 3500 mAh Lithium Battery
Product Configuration
Interfacing with the RAK7204 WisNode Sense Home
In order for you to be able to interface with the RAK7204 WisNode Sense Home with your Windows Machine, you need to download the RAK Serial Port Tool.
The included battery is non rechargeable. Please do note that when configuring the device, you have to connect the battery first in order for it to work.
- Connect your RAK7204 WisNode Sense Home in your Windows Machine using the provided micro-usb cable.
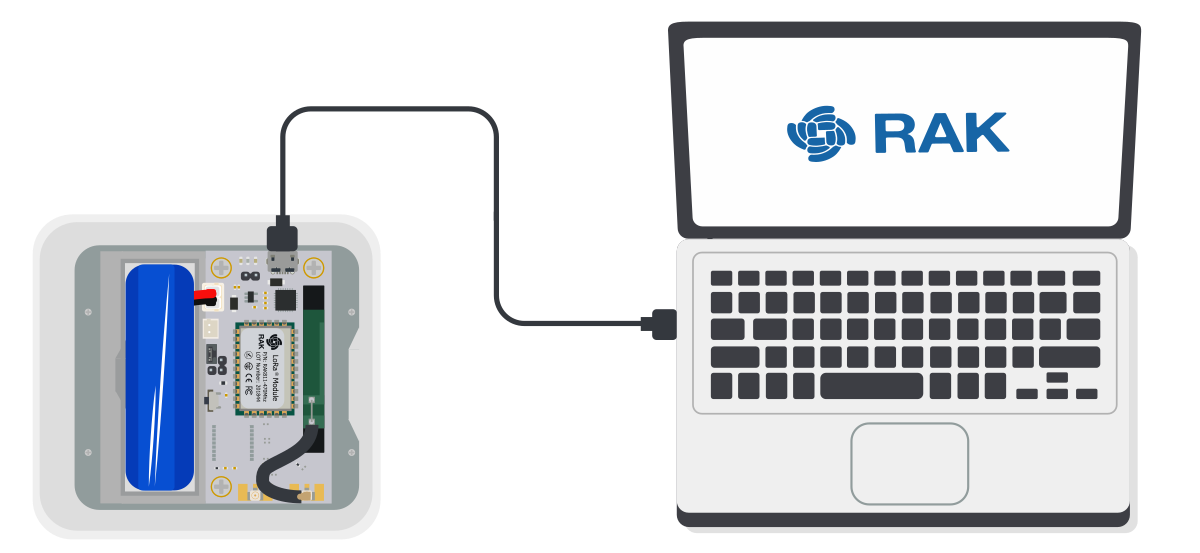 Figure 1: RAK7204 WisNode Sense Home to Laptop Connection
The pin distance of the battery connector is 2.0 mm. Reverse connection or short circuit may damage the device and may cause overheating and combustion of the battery. Therefore, when replacing the battery, it is necessary to strictly confirm whether the positive and negative poles of the connector are correct.
- Open the RAK Serial Port Tool :
 Figure 1: RAK Serial Port Tool
- In choosing the correct COM Port number for your device. Go to your Device Manager by pressing : Windows + R and type
devmgmt.mscor search in the Start Menu
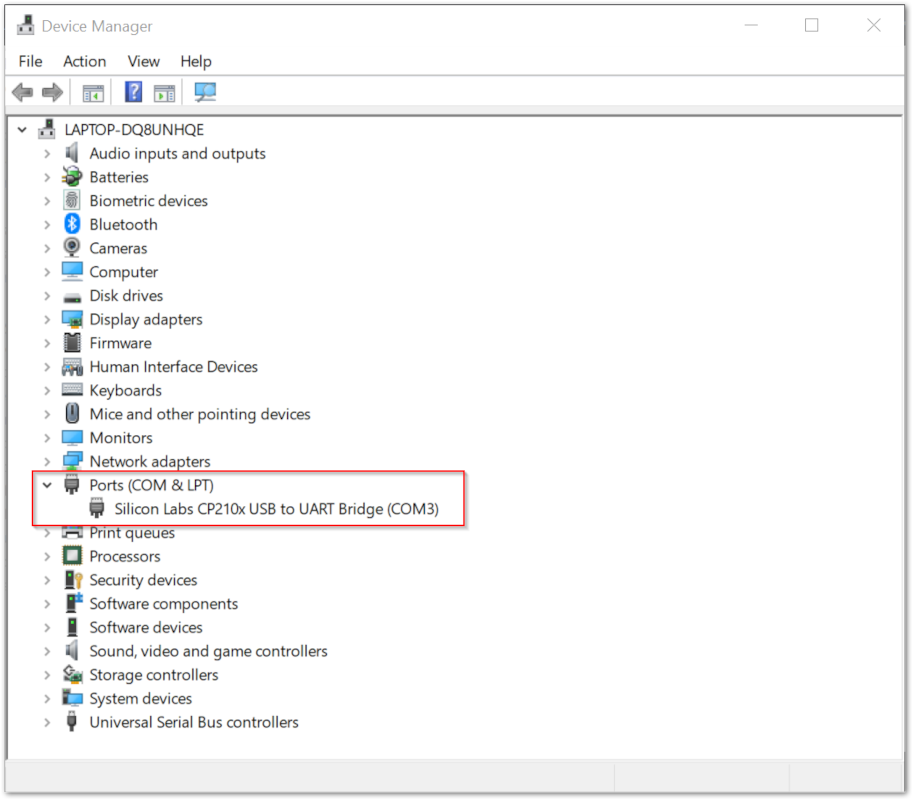 Figure 1: Device Manager
- Look for Ports (COM & LPT) and Find the name Silicon Labs CP210x USB to UART Bridge and take note of the COM Port Number.
If you didn't find any Port with the name Silicon Labs CP210x USB to UART Bridge, make sure you have downloaded the CP210x USB Drivers in your Machine.
- Choose the Correct Port Number from the device manager and the Correct Baudrate then click Open:
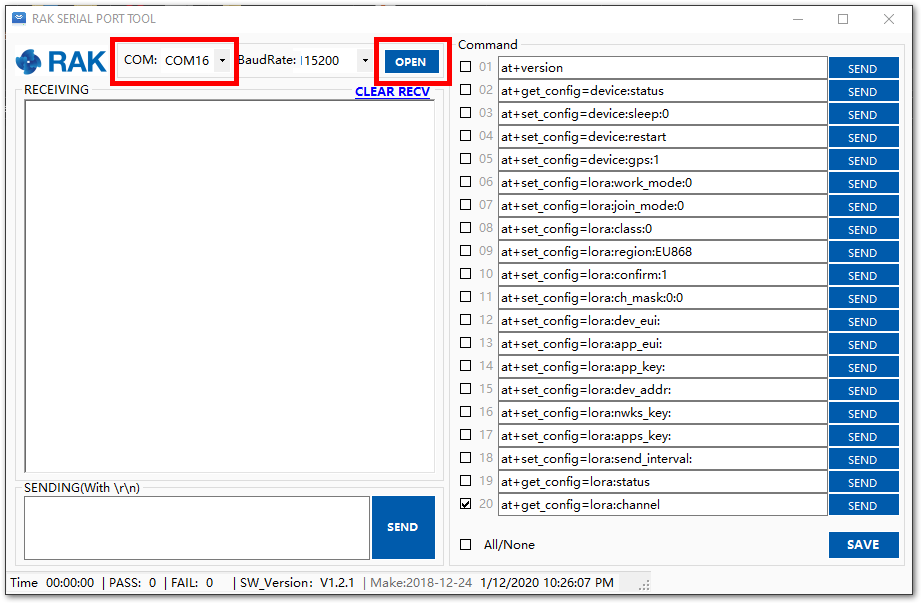 Figure 1: Correct Port Number and Correct Baud rate
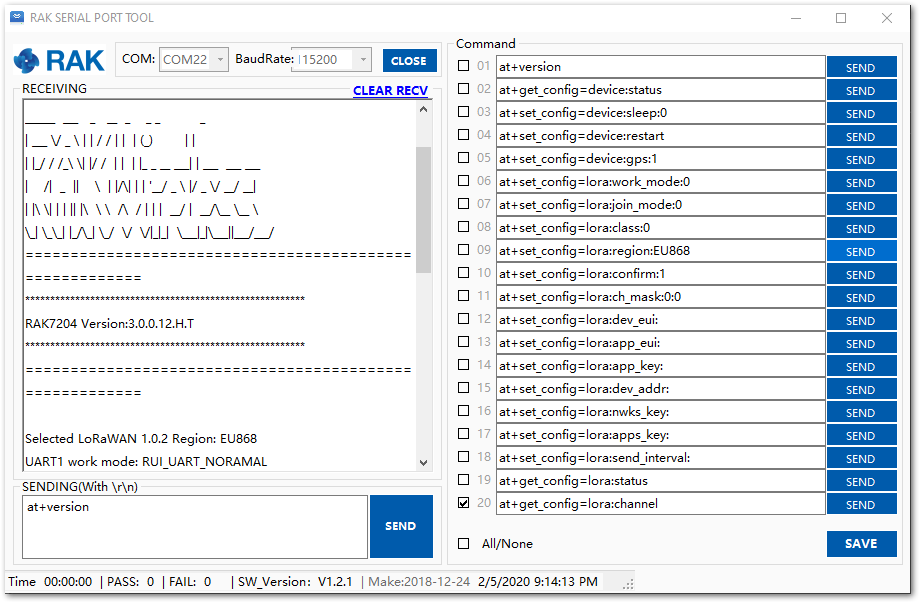 Figure 1: Connection Success
Connecting to Helium (The People's Network)
Helium has quickly become the most widespread LPWAN communal network with more than 27,000 devices deployed globally. All our node products are compatible with it and the process of adding a device to the network is intuitive and straightforward.
This section will focus on giving a brief guide on how to connect the RAK7204 to the network console, assuming that there is a Helium Hotspot within range.
Log in or create your Helium account.
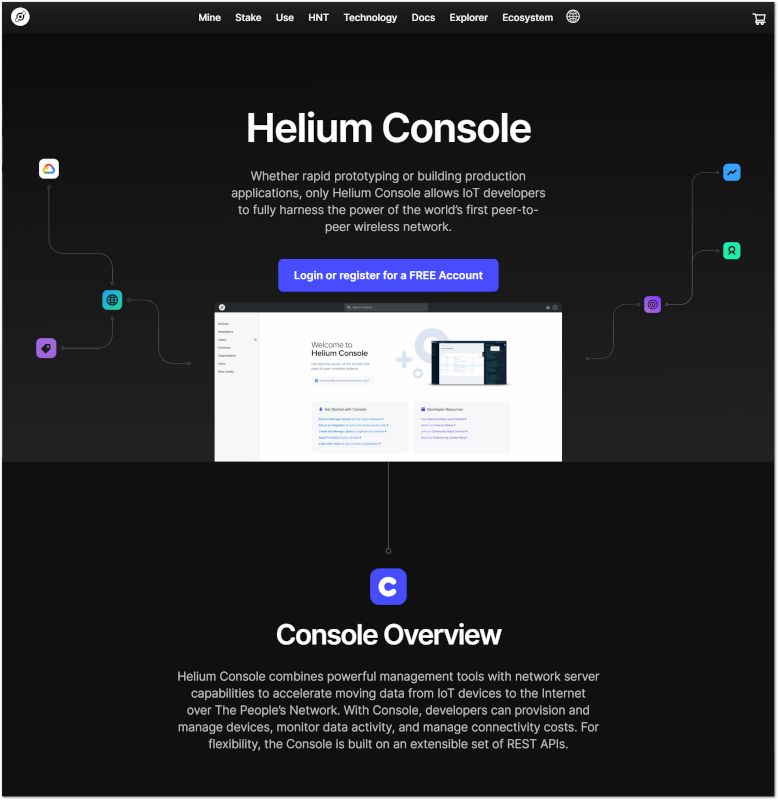 Figure 1: Helium console
Once registered/logged in, you will end up at the home page where you can see your function tree on the left and your DC balance at the tops as well as a number of useful links.
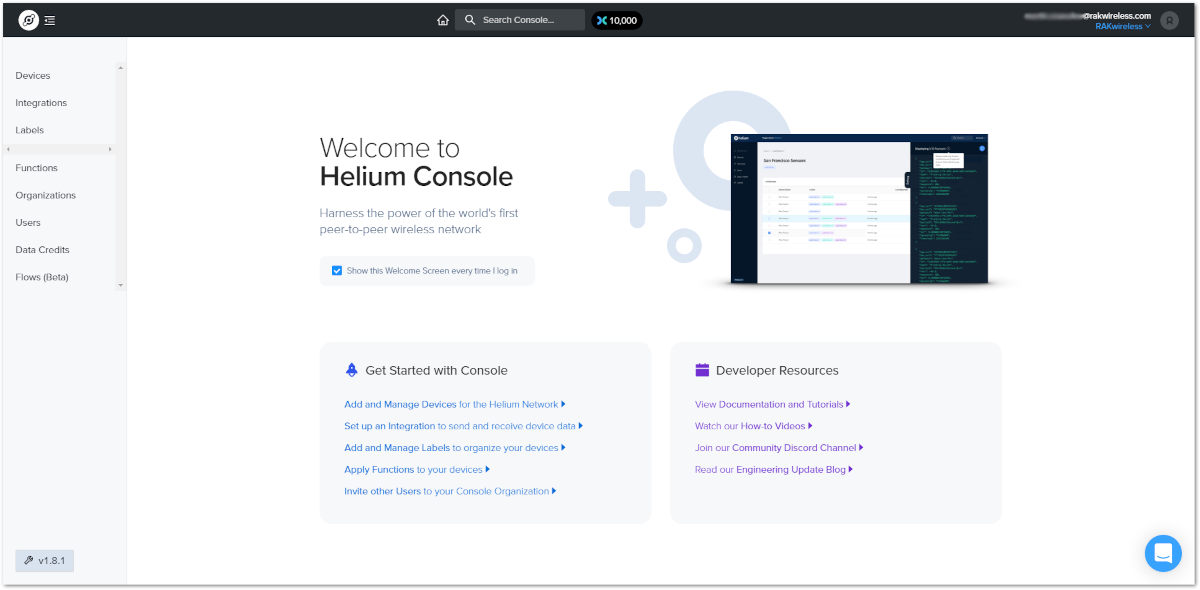 Figure 1: Helium console home screen
Go to the Devices section in the function tree. If this is your first time doing this there will be no devices registered. Click the + Add Device button to get started.
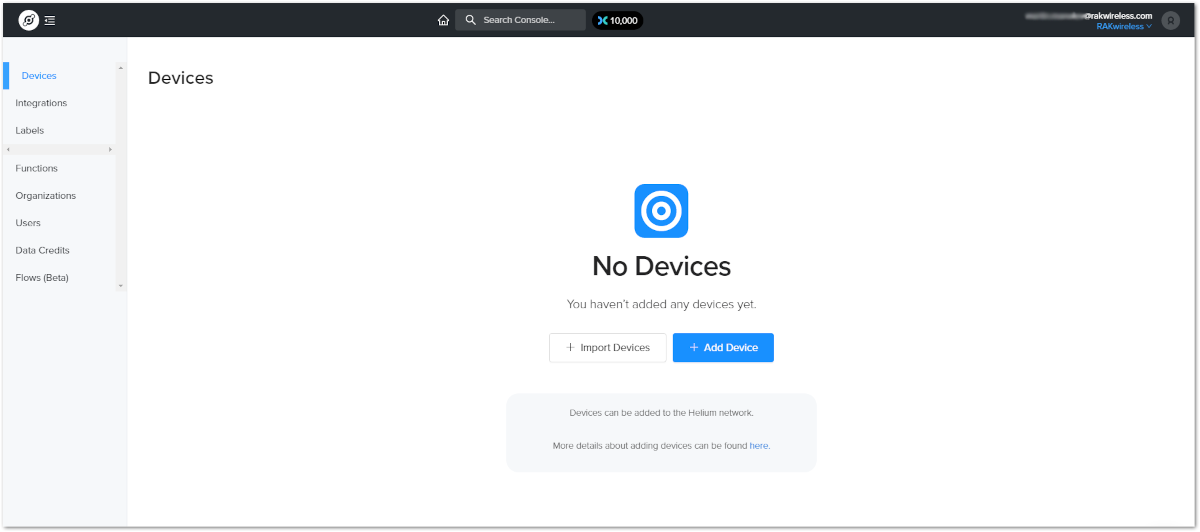 Figure 1: Helium devices
A window will pop up with a set of field containing the device parameters required for its registration.
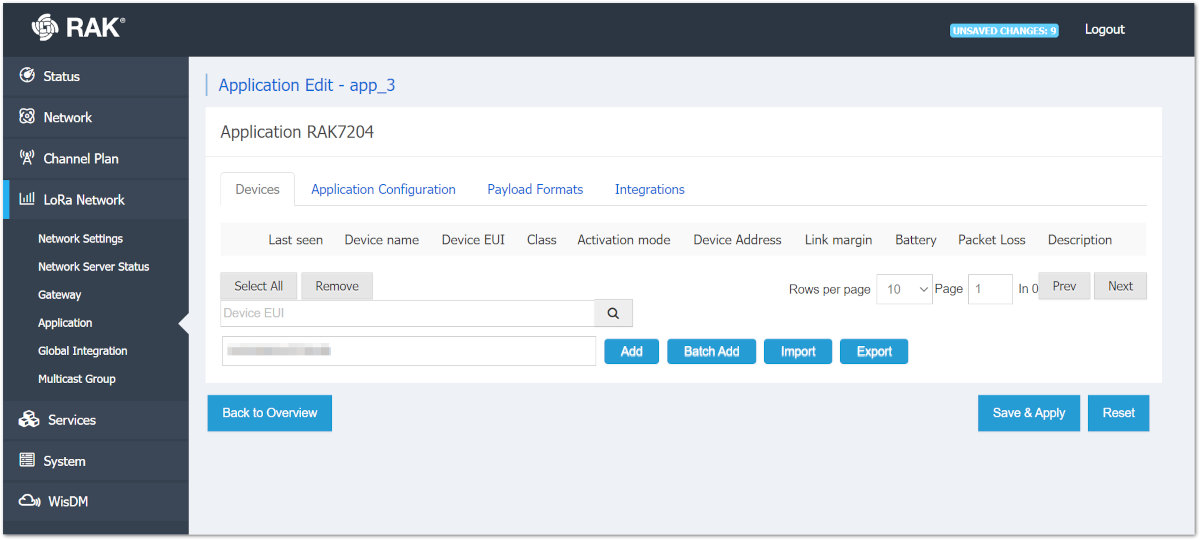 Figure 1: Add a new device
Fill in a name of your choosing. The Dev EUI, App EUI, and App Key will have random values generated for you by default. Press the eye icon to reveal the values. You can manually replace them with values of your own. For this tutorial, use the default values. Press the Submit button, and you are done.
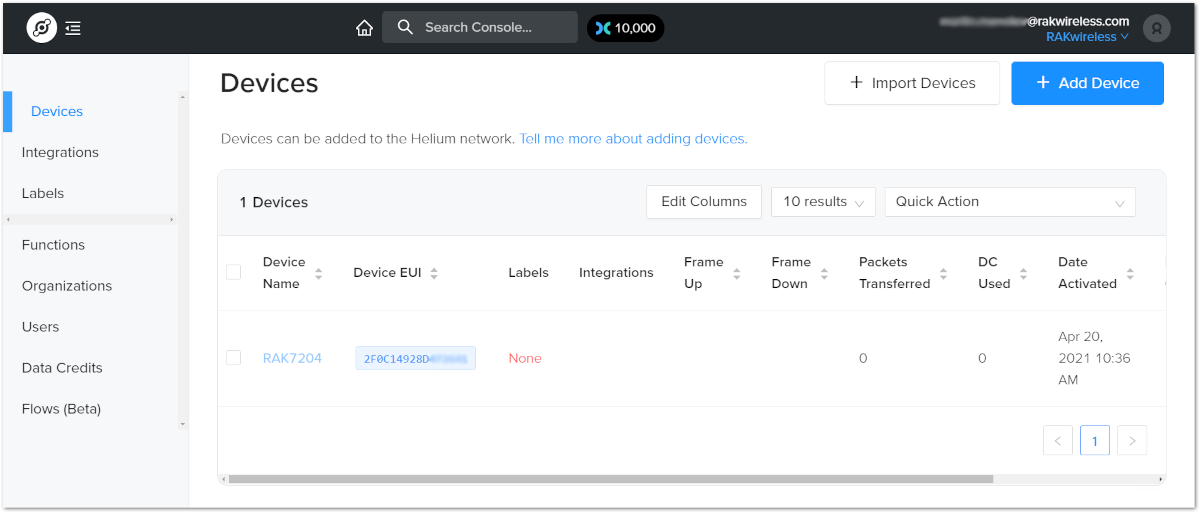 Figure 1: Helium devices
Now your RAK7204 is registered and is awaiting activation. For this to happen, you need to import the Dev EUI, App EUI and App Key in the RAK7204 using the RAK Serial Port Tool.
Open the tool, select the desired port (default baud rate) and open it. Then start importing your settings.
Configure your LoRa band and activation mode. This tutorial will be using the EU868 band and OTAA (only option available for now with Helium) with device class A (default one, does not need configuring).
- Regional band and activation mode setting
at+set_config=lora:join_mode:0
at+set_config=lora:region:EU868
- Enter the Dev UI
Use the command below by replacing the XXXX with your Device EUI from the Helium console:
at+set_config=lora:dev_eui:XXXX
- Enter the App EUI
Same as with the Device EUI, replace the XXXX with your value:
at+set_config=lora:app_eui:XXXX
- Enter App Key
Finally, fill in the App key with the command:
at++set_config=lora:app_key:XXXX
- Join Network
Finish executing the join command in order for the node to initiate the join procedure.
Once the procedure is initiated and successfully complete you will have a notification in the serial console
at+join
You output should resemble the one in Figure 11:
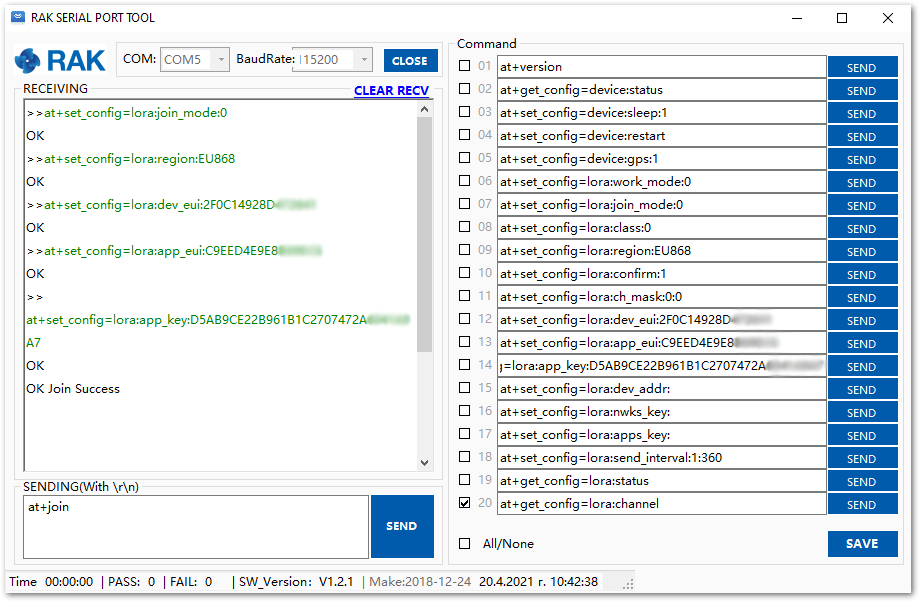 Figure 1: RAK7204 EUIs and key
If you take a look at the Helium console, you will also see the join request packets both in the graph and event log. Your node is now a part of the Helium Network.
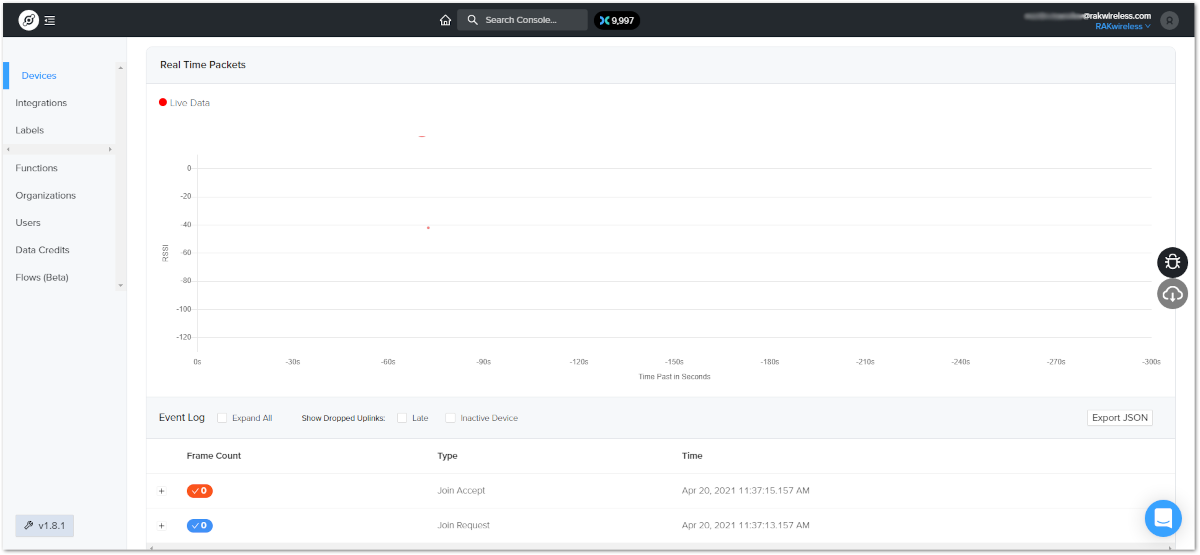 Figure 1: Helium console live device data
Configuring the Built-in Server
The procedure for connecting the RAK7204 to the Built-in Server is straightforward and includes going through the following steps:
- Open a browser and access the Web UI of your WisGate Edge Gateway by entering its IP address in the browser address bar. You will be greeted by the Log in screen. The default user name/password are both "root".
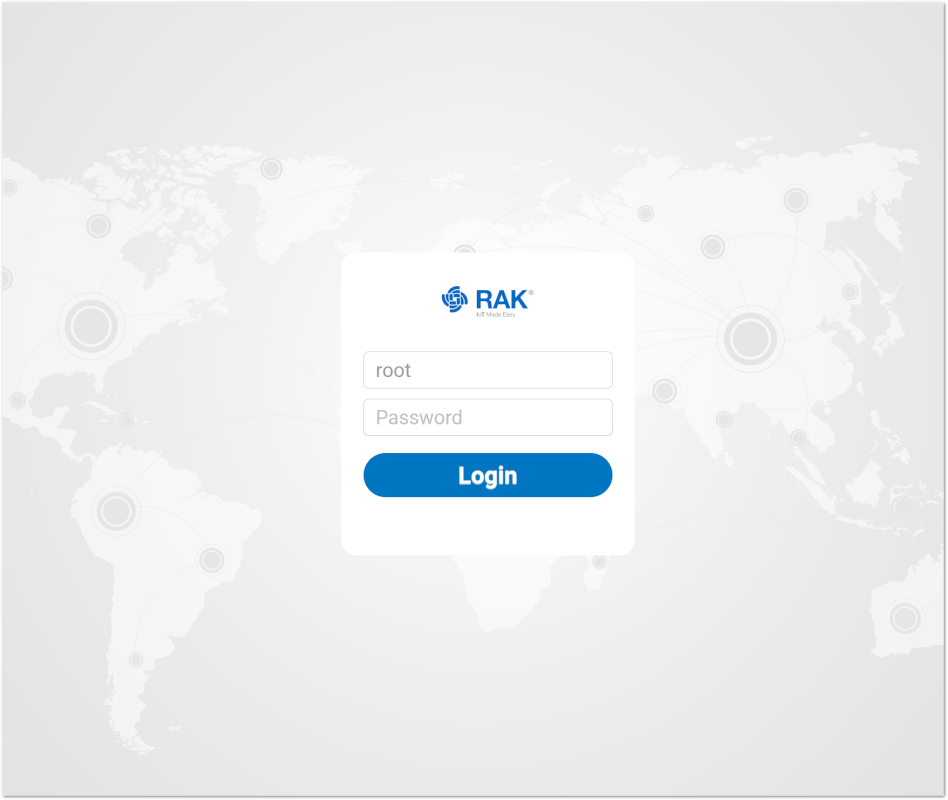 Figure 1: Built-in Server Log in screen
Once you have logged in make sure you are in Network Server mode. By default the gateway is working in this mode, so if this is the first time you are configuring it it should already be set. If this is nit the case go to the Network Server menu, the Network Settings sub menu and select the Network Server option in the Mode drop-down menu:
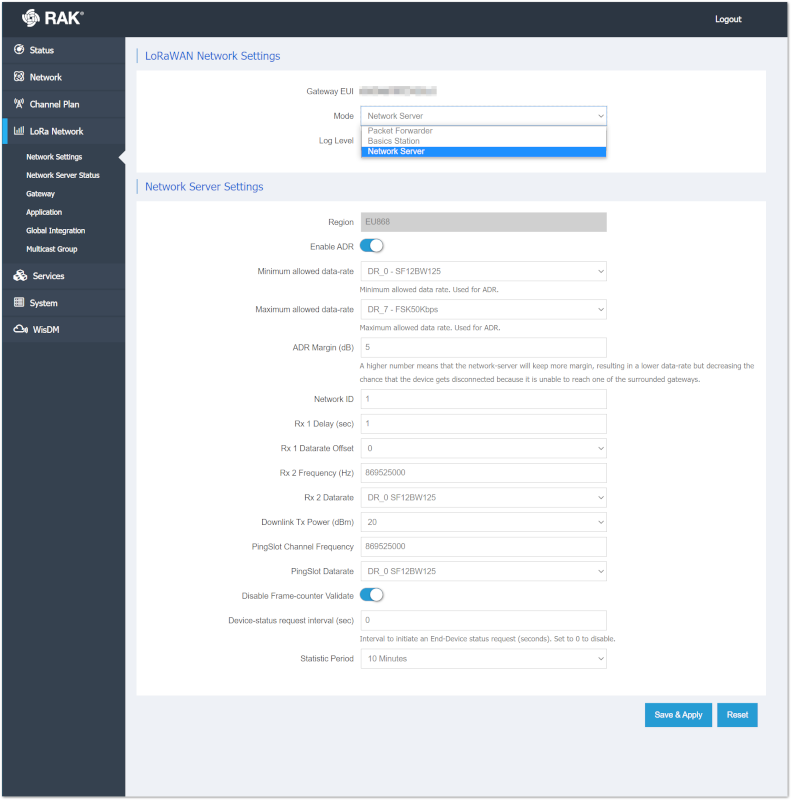 Figure 1: Network Server mode
- Start the Device registration process by going to the Application sub menu in the LoRa Network section and creating an application. Enter a name in the field, leave the default type and press "Save & Apply"
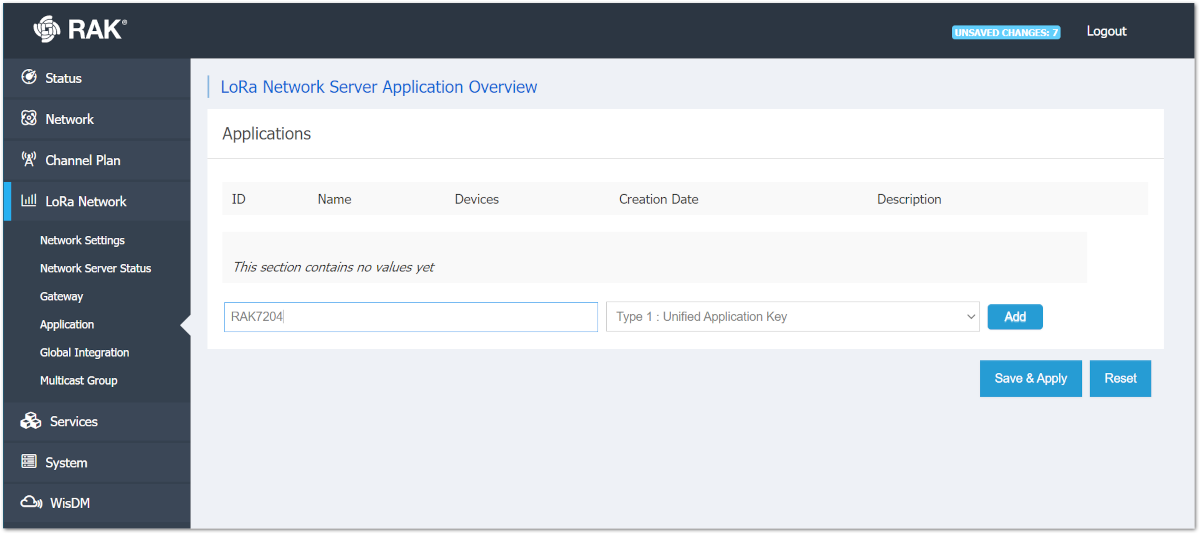 Figure 1: Creating your application
In the following screen you will see fields for the application parameters.
In the Application Configuration sub-window enable the "Auto Add LoRa Device" functionality. Generate a random Application EUI and Application Key via the green arrow button next to the text fields. Note these down as you will need them for the RAK7204 configuration.
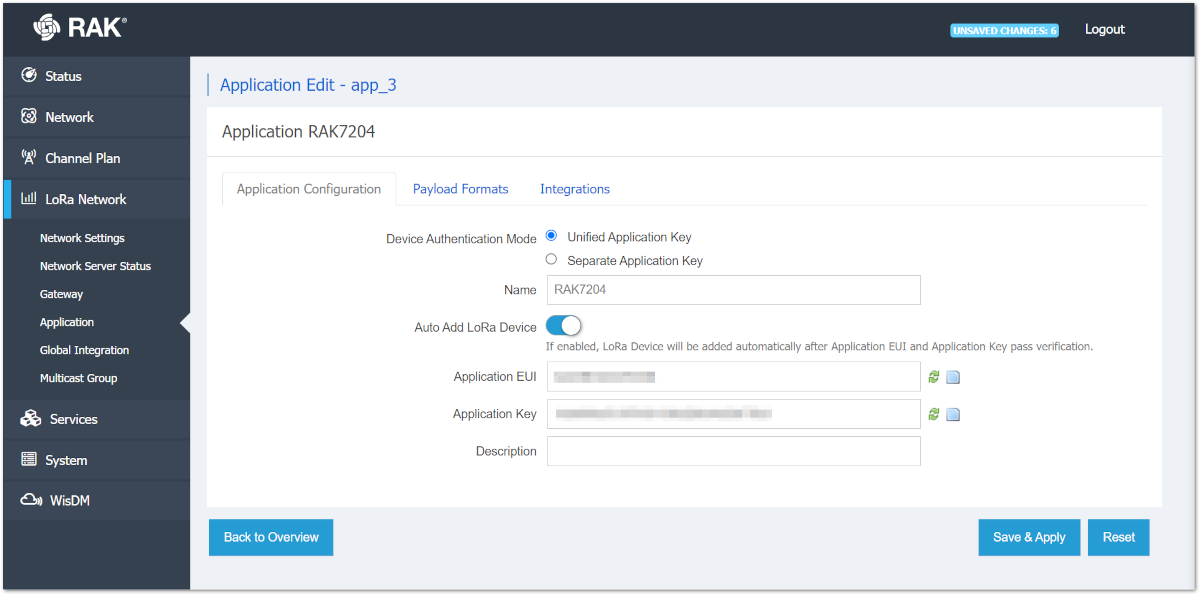 Figure 1: Application configuration
Move to the Payload Formats sub-window and set the payload format to "CayenneLPP" via the drop down menu. This is the format that the RAK7204 uses, thus enabling this functionality will allow you to see the parsed data in the Application Server. Finally enable the "Only forward the parsed data object" functionality, press the "Save & Apply" button to finalize the configuration changes.
 Figure 1: Payload Format
- Now that your application has been created you need to go to the device section by pressing the "Edit " button.
 Figure 1: Editing an application
Now you are in the "Devices" section and you can add a device by entering its Device EUI, which you can find on a sticker on the back of the RAK7204. Press the "Add" button to proceed.
Figure 1: Adding a deviceIn the configuration screen enter a name for your device and leave the rest of the parameters with their default values (the Description is optional). Finish by pressing the "Save & Apply" button.
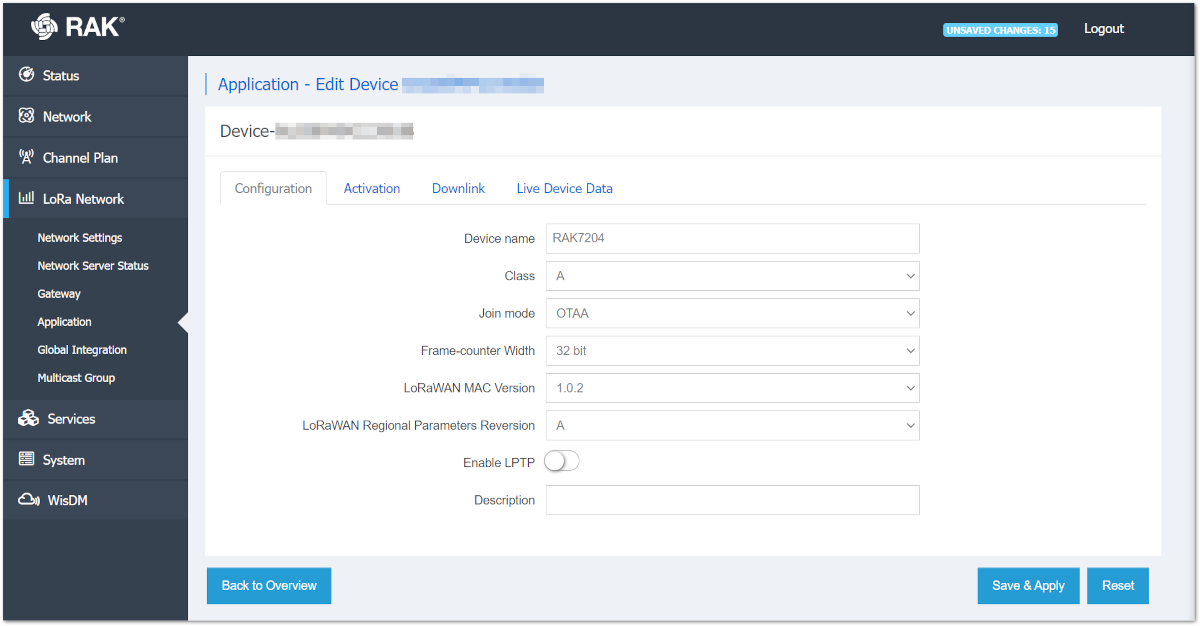 Figure 1: Device parameters
Your Device is now added to the Built-in server and you should see it in the "Devices" section.
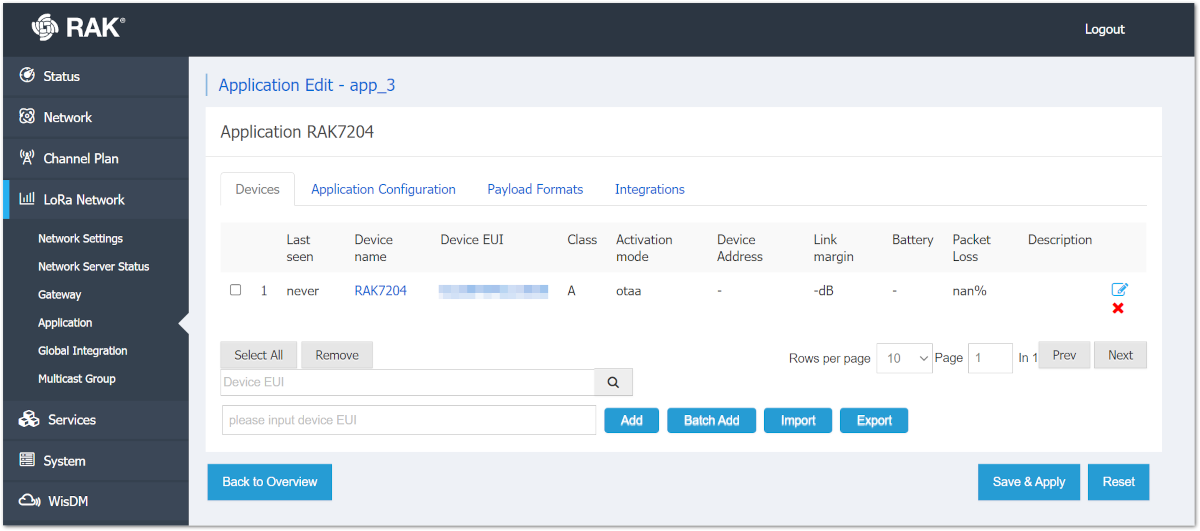 Figure 1: Devices section
Next you need to import the same configuration in the RAK7204.
Configuring the RAK7204
Start by connecting to your RAK7204 as described in the Product Configuration section of the Quick Start Guide.
Open a terminal and check your firmware version using the command:
at+version
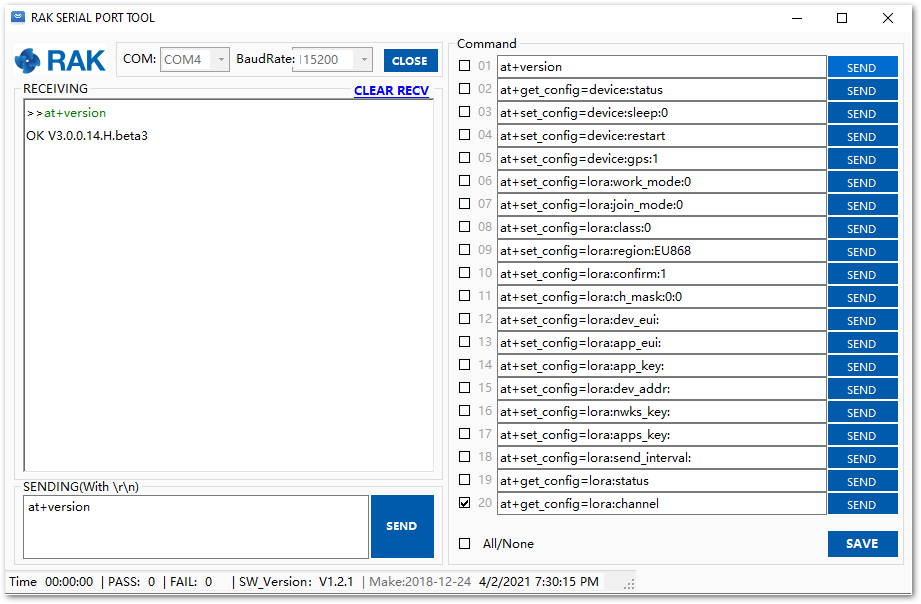 Figure 1: Firmware version
If there is a newer firmware version at the link, update using this procedure.
Follow the steps in order to update the RAK7204 configuration and connect it to the Built-in Server
- Import the Device EUI (from the label on the back), Application EUI and Application Key (you should have noted them down as instructed in the previous section), by executing the following commands in order (replace the "xxxx" with your values).
Device EUI
at+set_config=lora:dev_eui:xxxx
Application EUI
at+set_config=lora:app_eui:xxxx
Application Key
at+set_config=lora:app_key:xxxx
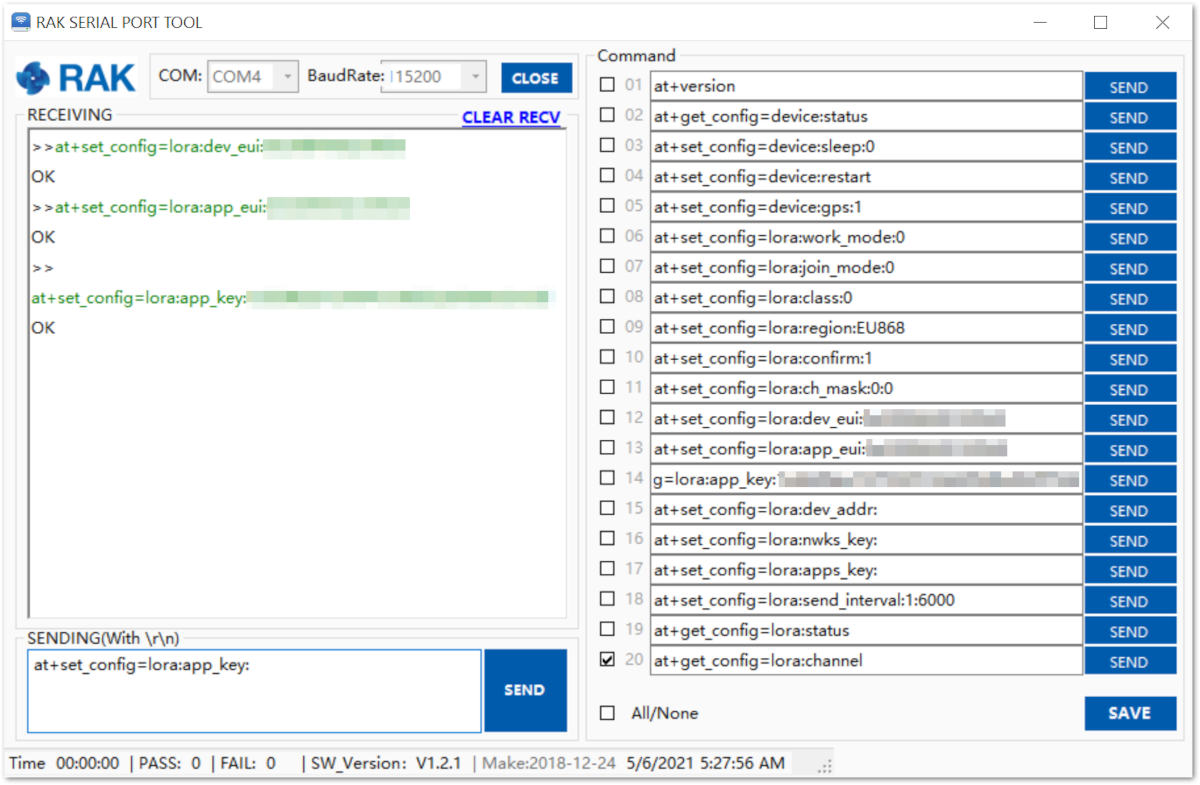 Figure 1: Importing EUIs and Key
- Set the activation parameters (LoRa Region, Device Class, Activation Mode). This example will use the EU868 regional band, class A, OTAA activation mode.
LoRa Region
at+set_config=lora:region:EU868
Device Class
at+set_config=lora:class:0
Activation Mode
at+set_config=lora:join_mode:0
After executing the last command the node will automatically start the join procedure. If for some reason this is not the case, you can always use the command below to start the activation process:
at+join
 Figure 1: Activation parameters
Upon successful registration the following response will be shown in the Serial Tool.
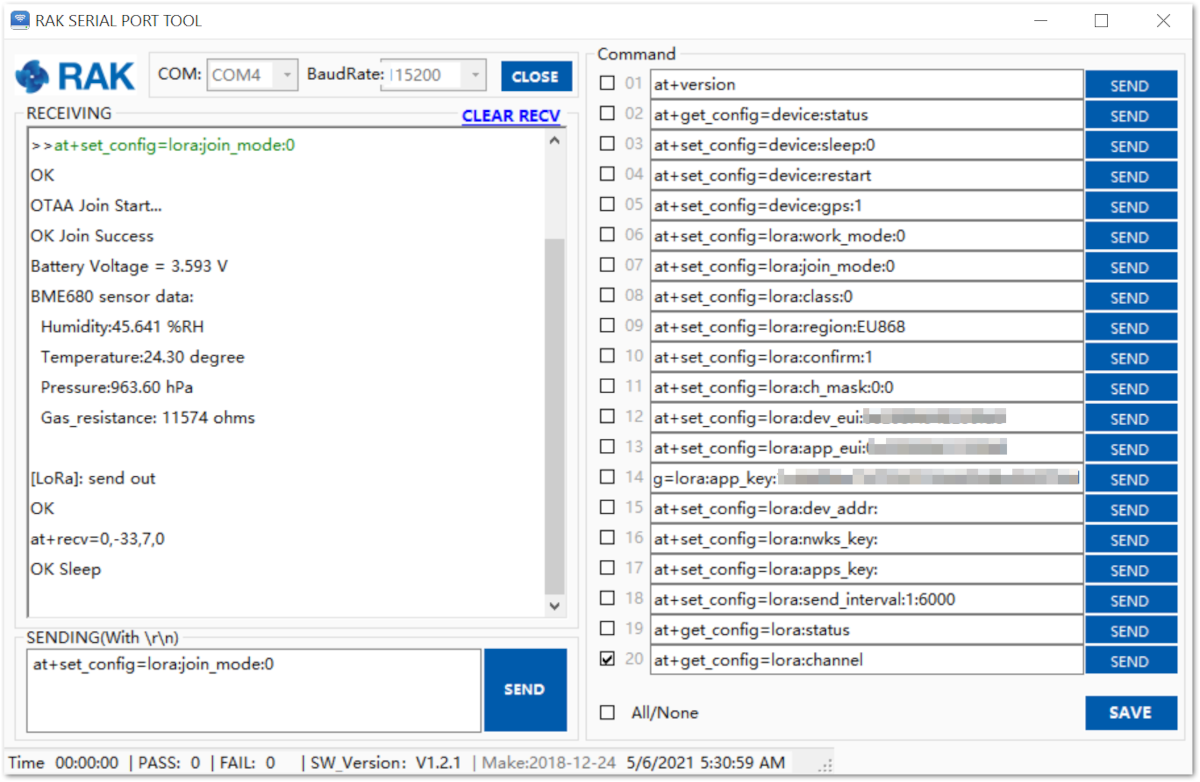 Figure 1: Successful Device Join
If you check the Devices Section and the Live Device Data in the Devices section you should see the device being online for some time and also some packets, in this case the Join request and an uplink packet where the data is visible in a human readable format (as we chose the Cayenne payload format)
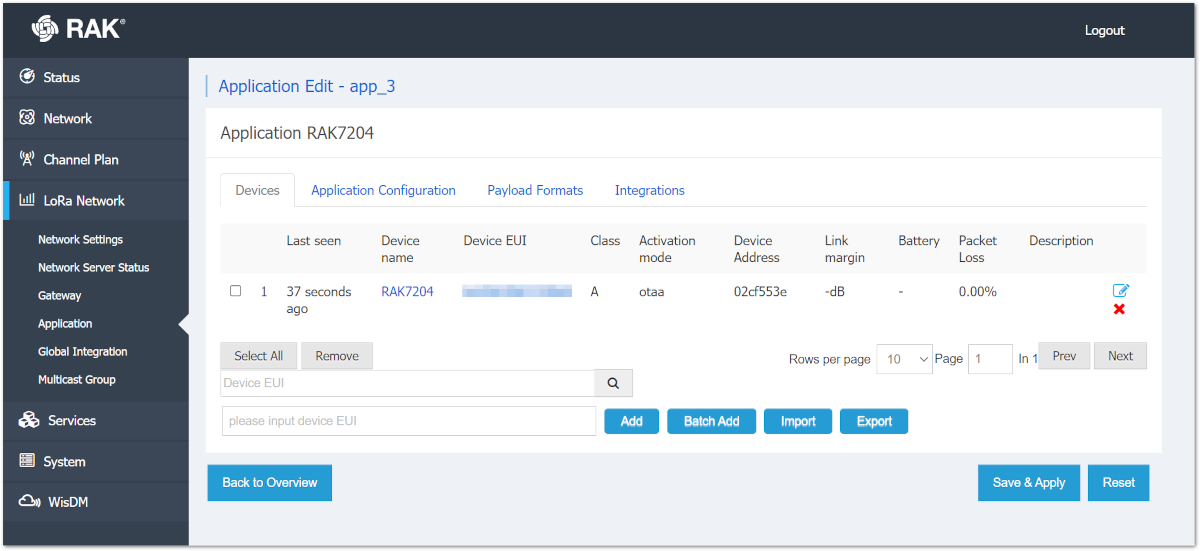 Figure 1: Device up-time
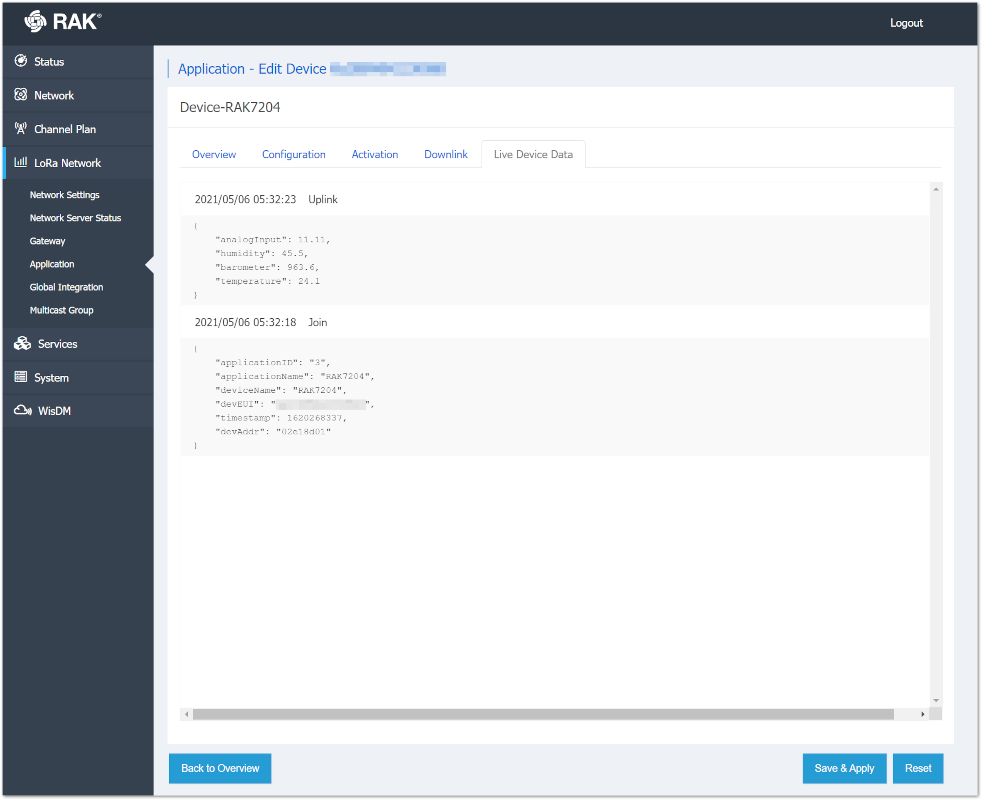 Figure 1: Device real time packets
Your RAK7204 is now connected to the Built-in server and transmitting data over regular intervals.
Connecting to The Things Network V3 (TTNv3)
At The Things Conference 2021, it was announced that The Things Network is upgrading to The Things Stack v3.
In this section, it will be shown how to connect RAK7204 WisNode Sense Home to The Things Stack.
First, log in to the TTNv3. To do so, head to the TTNv3 site. If you already have a TTN account, you can use your The Things ID credentials to log in.
 Figure 1: The Things Stack Home Page
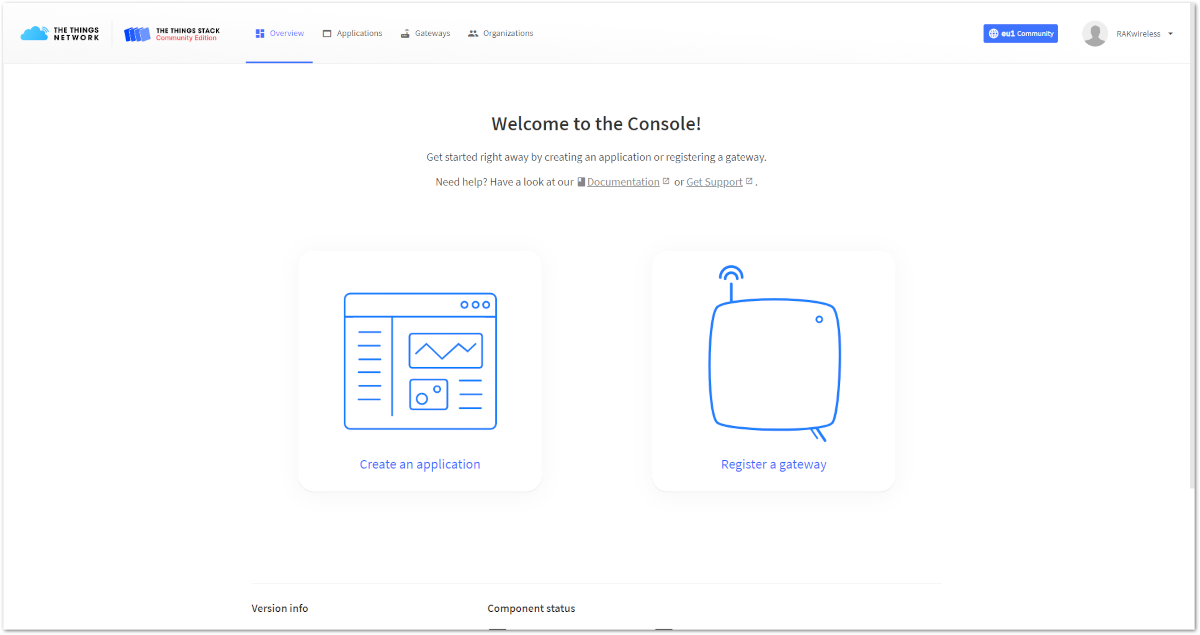 Figure 1: Console Page after successful login
-
To connect RAK7204 WisNode Sense Home to TTNv3, you should already have connected a gateway in range to TTNv2 or TTNv3, or you have to be sure that you are in the range of a public gateway.
-
This tutorial is for EU868 Frequency band.
Adding an Application
- If you do not have created applications yet, to create an application, choose Create an application. If you have created applications before, navigate through Go to applications > + Add application.
 Figure 1: Create an application page
-
Fill in the needed information:
-
Owner - Automatically filled by The Things Stack, based on your account or created organization.
-
Application ID - This will be the unique ID of your application in the Network. ID must contain only lowercase letters, numbers, and dashes (-).
-
Application name (optional) - This is the name of your application.
-
Description (optional) – Description of your application. Optional application description; can also be used to save notes about the application.
-
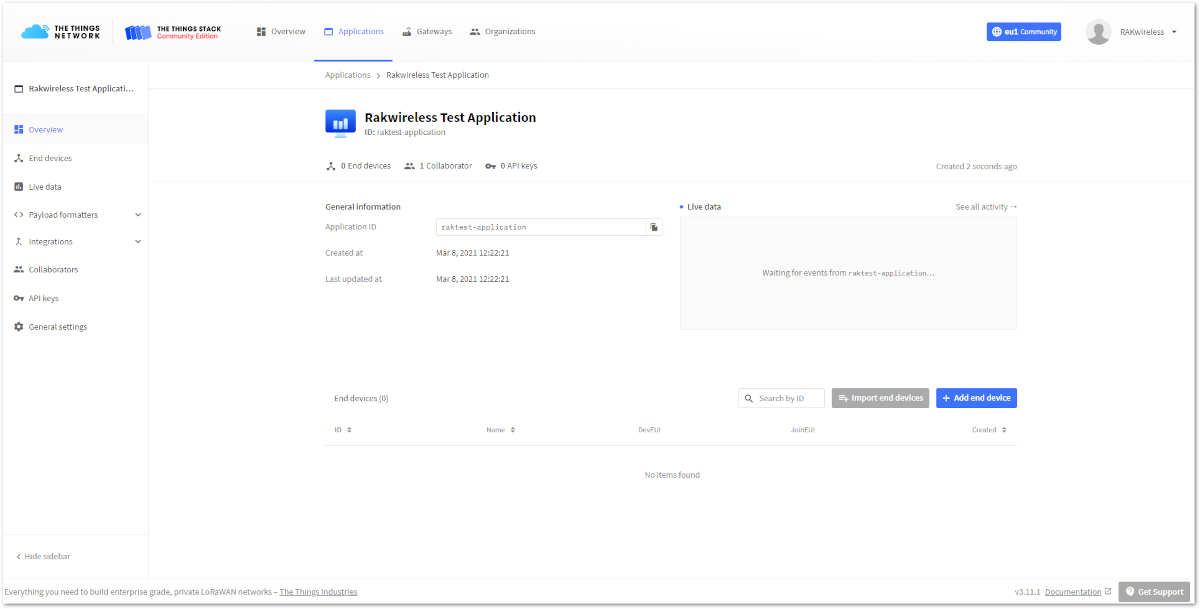 Figure 1: Application Overview
OTAA Mode
Register the Device
- From the Application Overview page, click on + Add end device.
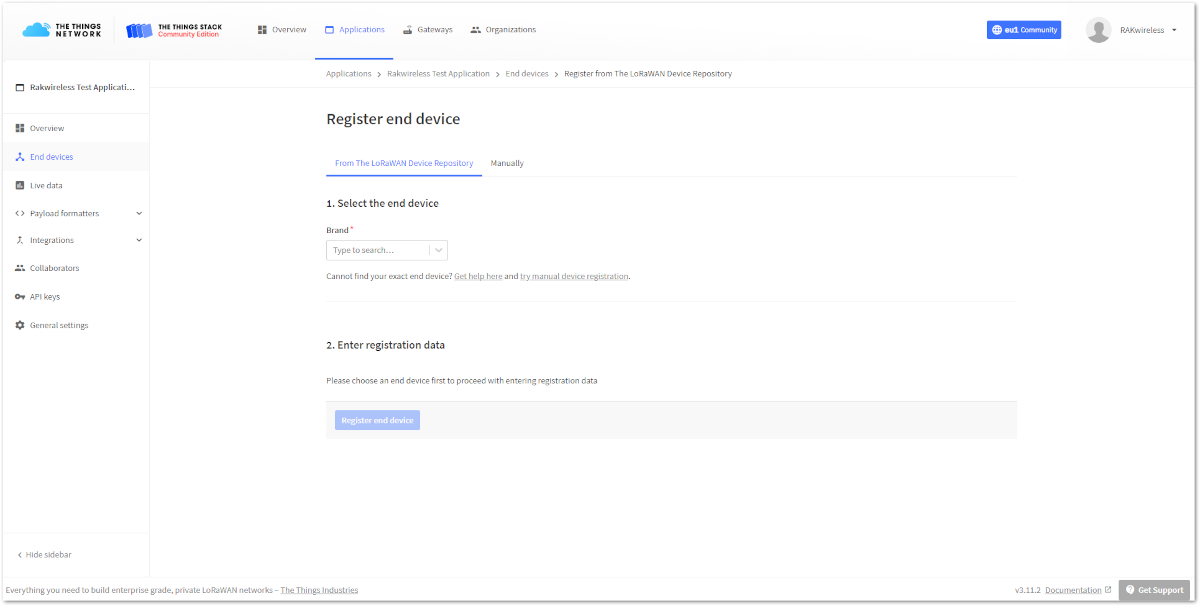 Figure 1: Adding a device in OTAA mode
- Below the Register end device heading, you can find two options for registering a device. Choose Manually.
- For Activation mode, choose Over the air activation (OTAA)
- For the LoRaWAN version, choose MAC V1.0.2 (RAK7204 is LoRaWAN 1.0.2 fully compliant).
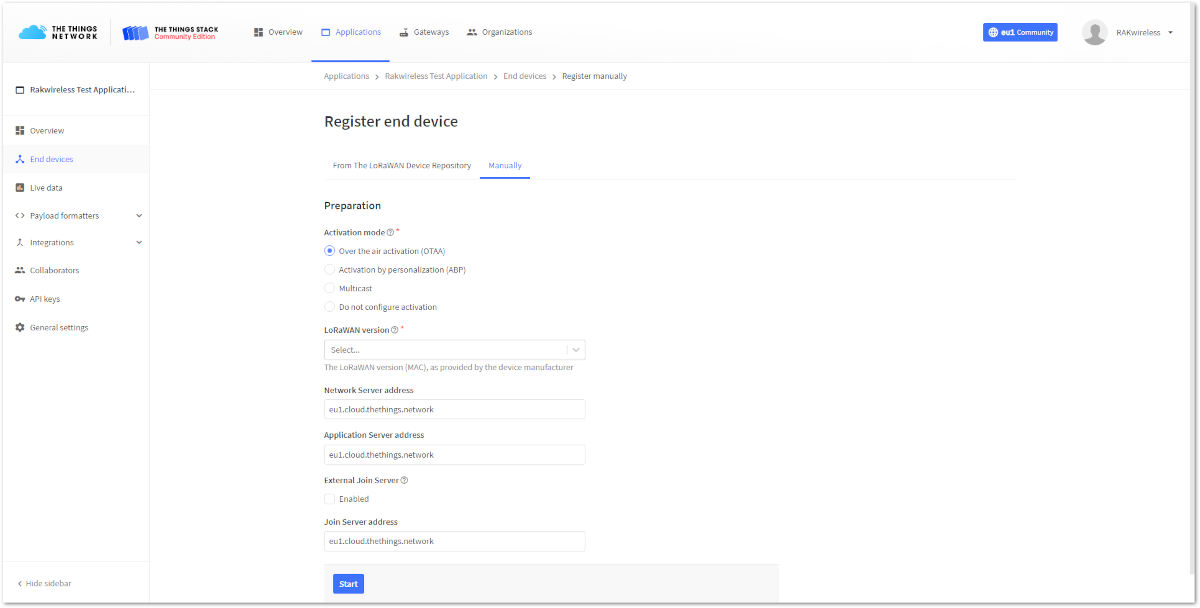 Figure 1: Registering the device in OTAA mode
- To get to the next step of the registration, click Start.
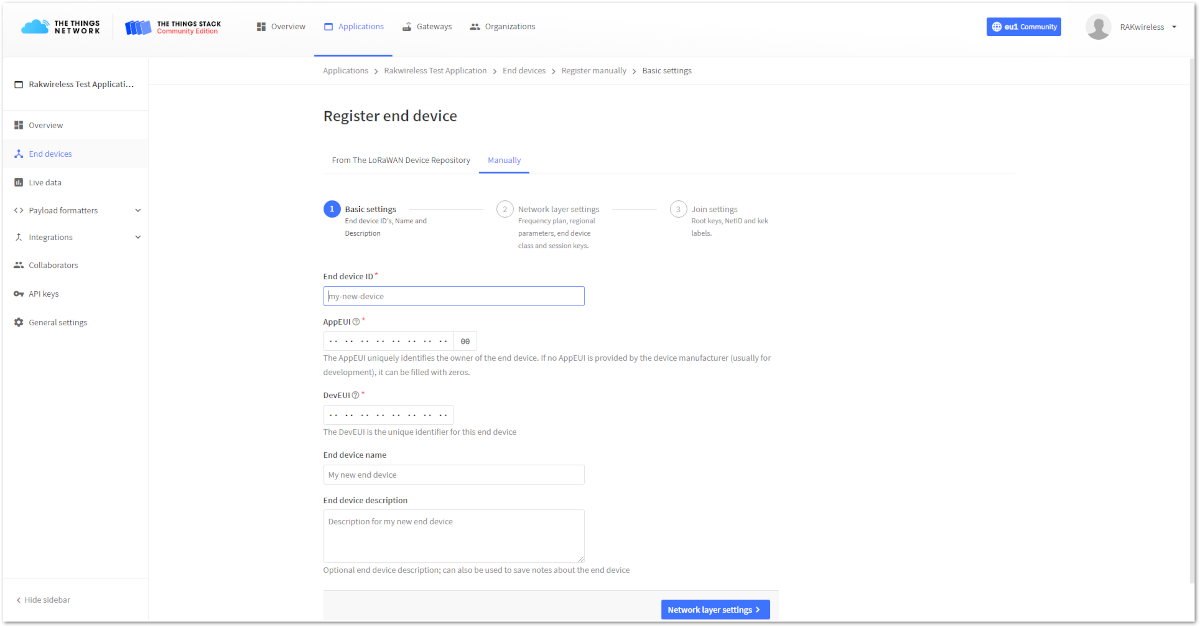 Figure 1: Basic settings for OTAA mode
-
Fill in the Basic settings for the device:
-
End device ID - This is the unique identifier for your RAK7204 WisNode Sense Home in your application. You need to enter this manually. The End device ID must contain only lowercase letters, numbers, and dashes (-).
-
AppEUI - The AppEUI uniquely identifies the owner of the end device. It is provided by the device manufacturer. To get the AppEUI, connect your device via USB cable to your computer. Open RAK Serial Port Tool, choose the correct COM port and BaudRate, and run the following command:
at+get_config=lora:status -
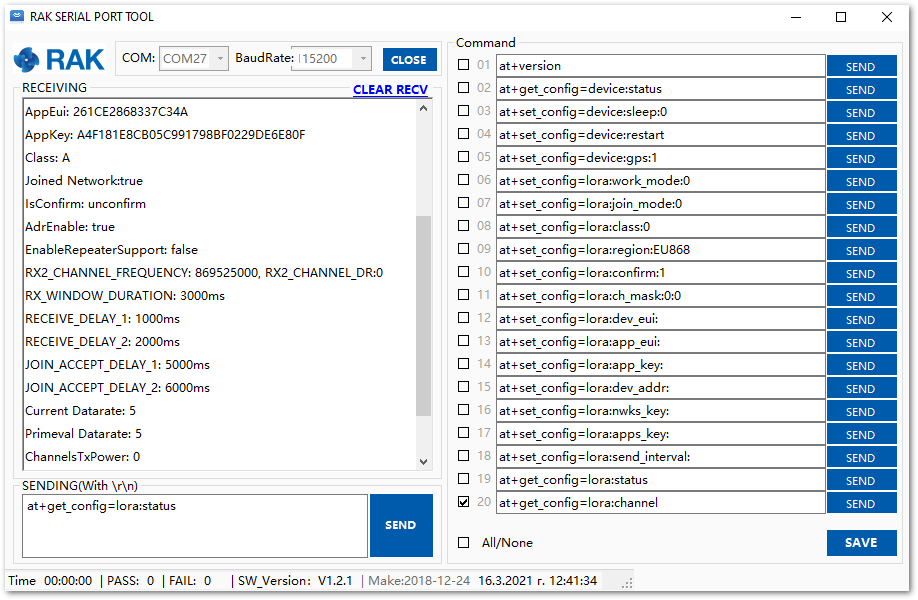 Figure 1: AppEUI of the device
- DevEUI - The unique identifier for this end device. It can be found on a sticker on the back of the device.
- End device name (optional) - A unique, human-readable identifier for your device. You make it up, so be creative. Device IDs cannot be used by multiple devices within the same application.
- End device description (optional) - Optional end device description; can also be used to save notes about the end device.
- Click Network layer setting.
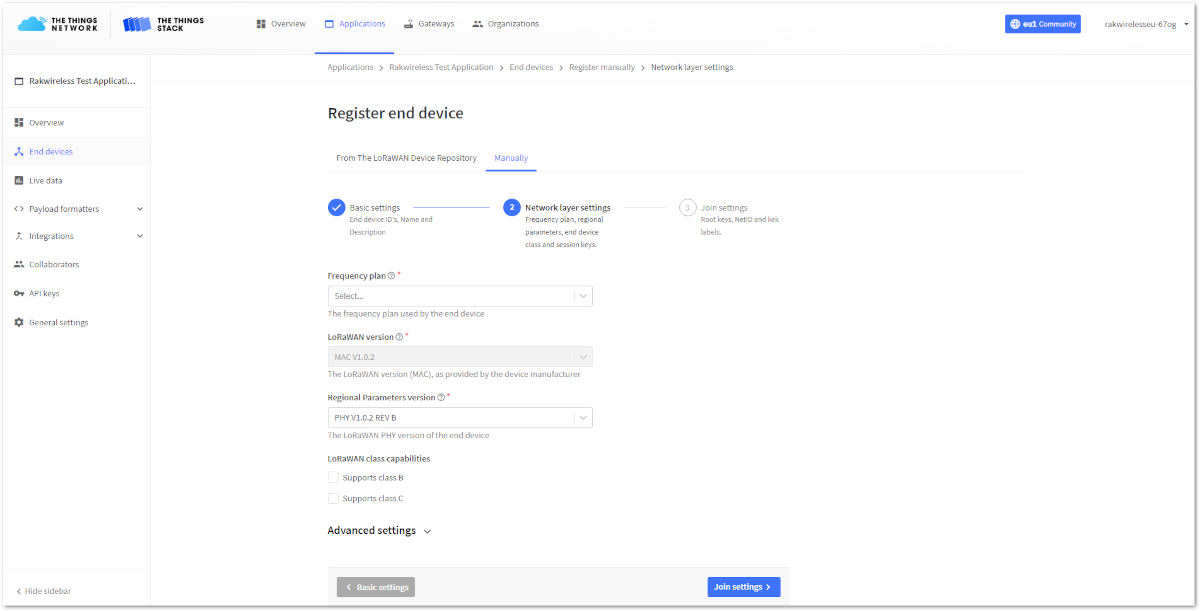 Figure 1: Network layer setting for OTAA mode
- Here you must configure the Network layer settings for the device:
-
Frequency plan - The frequency plan used by the end device. Note that, for this tutorial, the frequency plan used is Europe 863-870 MHz (SF9 for RX2 – recommended).
-
Regional Parameters version - The Regional Parameters specify frequency, dwell time, and other communication settings for different geographical areas. The Regional Parameters version is the version of the LoRa Alliance specification which your device supports. This should be provided by the device manufacturer in a datasheet. For this example, PHY V1.0.2 REV B is chosen.
-
LoRaWAN class capabilities – Here you can select if your device supports Class B, Class C, or both.
- In Advanced settings, you can configure additional settings for your device.
 Figure 1: Advanced network layer settings of the device
For this example, these settings will be left as default.
- Click Join settings.
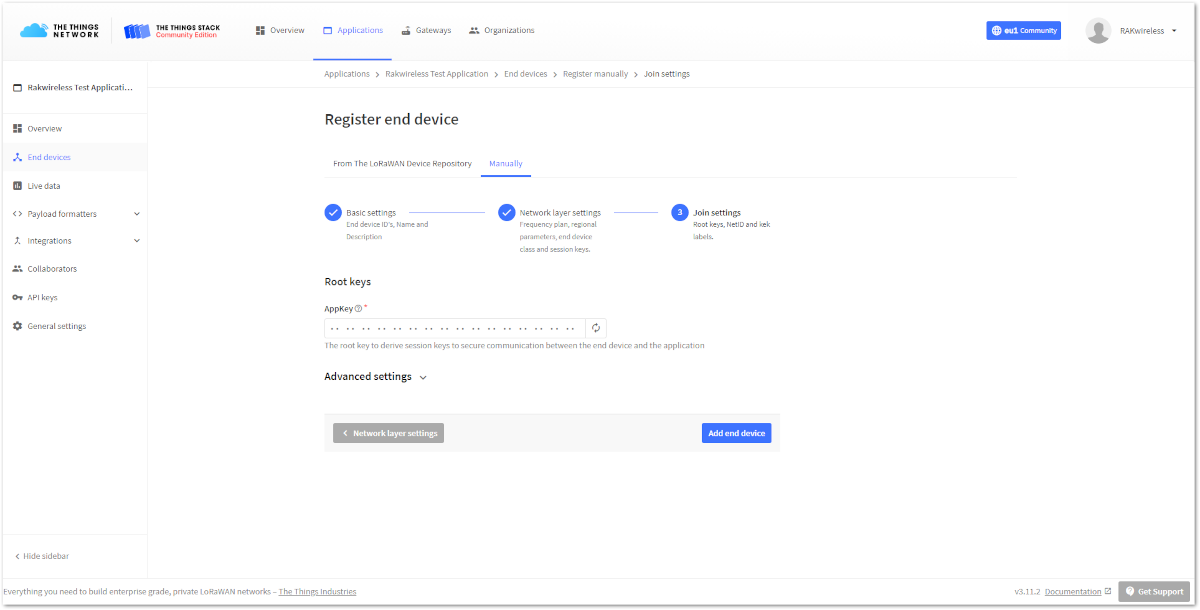 Figure 1: Join settings for OTAA mode
- Fill in the Application key (AppKey) to secure communication between the end device and the application. The AppKey can be generated automatically by clicking the Generate button next to the AppKey field.
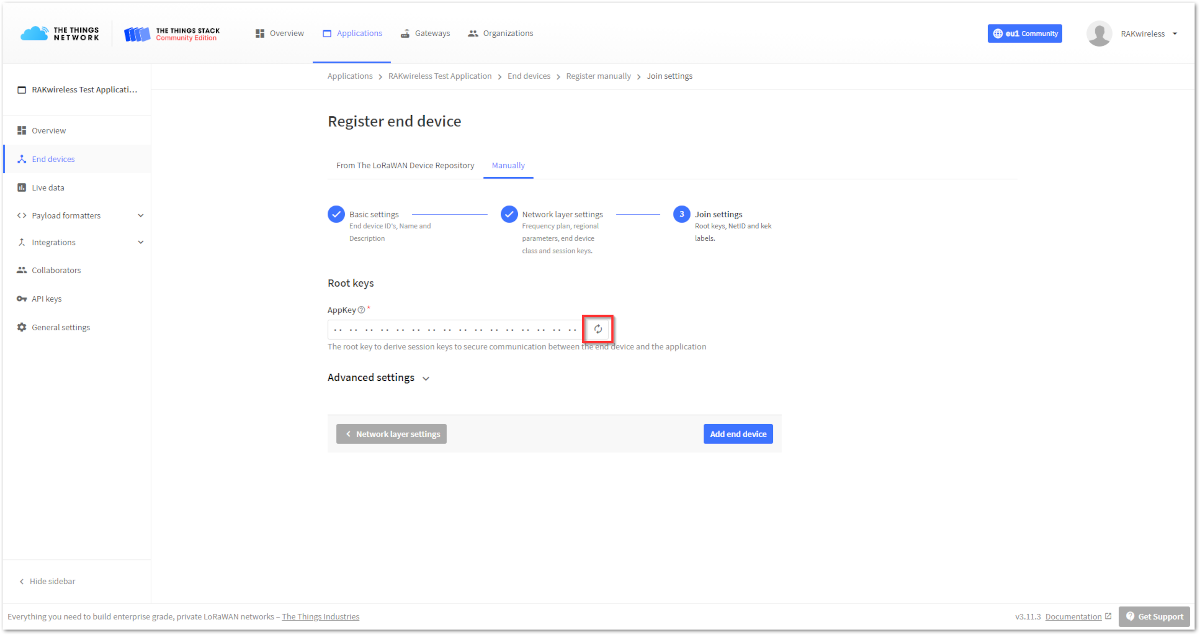 Figure 1: Generate the AppKey
- In the Advanced settings, you can configure more options about your device.
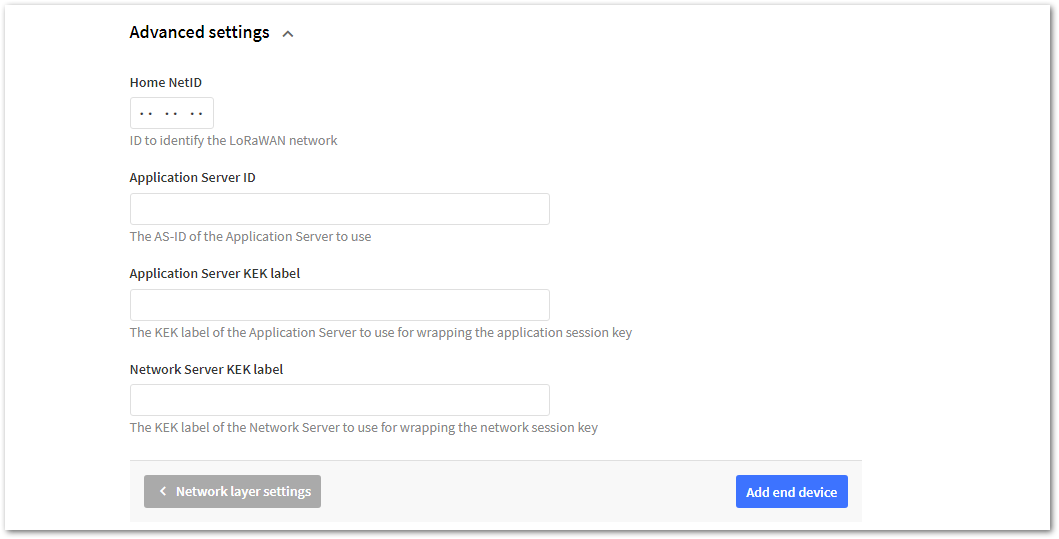 Figure 1: Advanced join settings for OTAA mode
For this example, these settings will be left as default.
- Finally, to finish registering your device, click Add end device.
Configuring the Device in OTAA Mode
- For configuring the node, you will need the following three parameters: Device EUI, Application EUI, and Application Key. You can see them all on the Device Overview page. But since the two EUI's come with the device, you only need the Application Key from there.
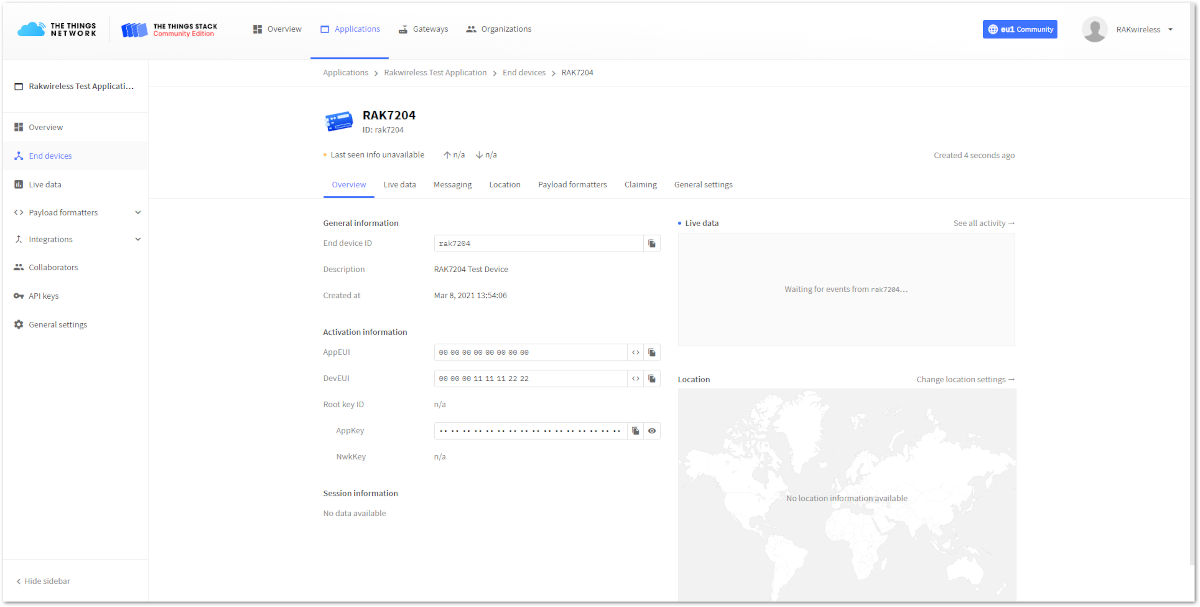 Figure 1: OTAA device parameters
- Using the RAK Serial Port Tool, set the join mode, device class, and your LoRaWAN region to your correct frequency band, with the following set of AT commands:
- For the join mode (OTAA):
at+set_config=lora:join_mode:0
- For the class (Class A):
at+set_config=lora:class:0
- For the region:
at+set_config=lora:region:EU868
Remember to replace the frequency band with the one for your LoRaWAN region. Check first your frequency plan.
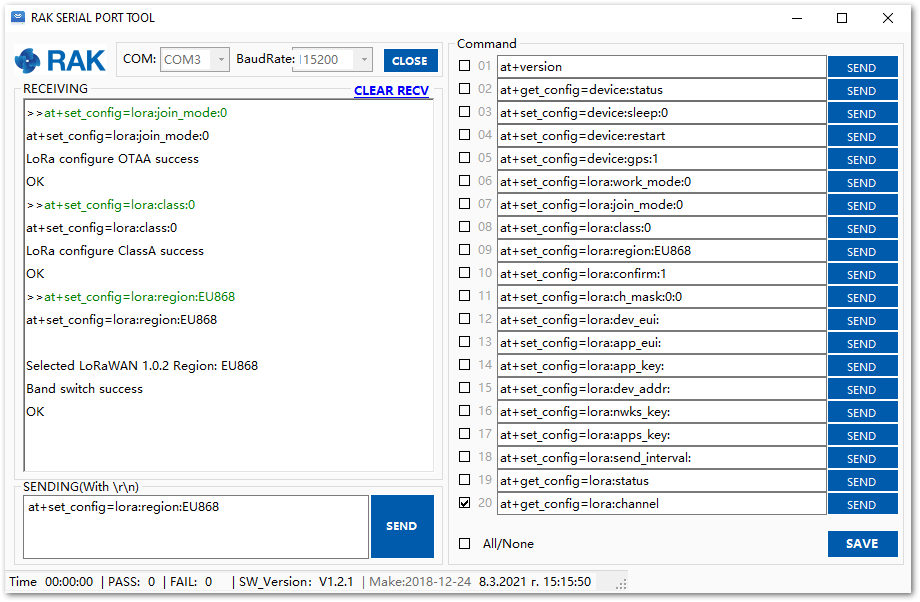 Figure 1: Setting up the RAK7204 WisNode Sense Home operation mode
The following tutorial is based on using the EU868 frequency band.
- Now that those parameters are set, enter the App Key, using the command below. Remember to replace the "XXXX" with the corresponding parameter value for your particular case.
at+set_config=lora:app_key:XXXX
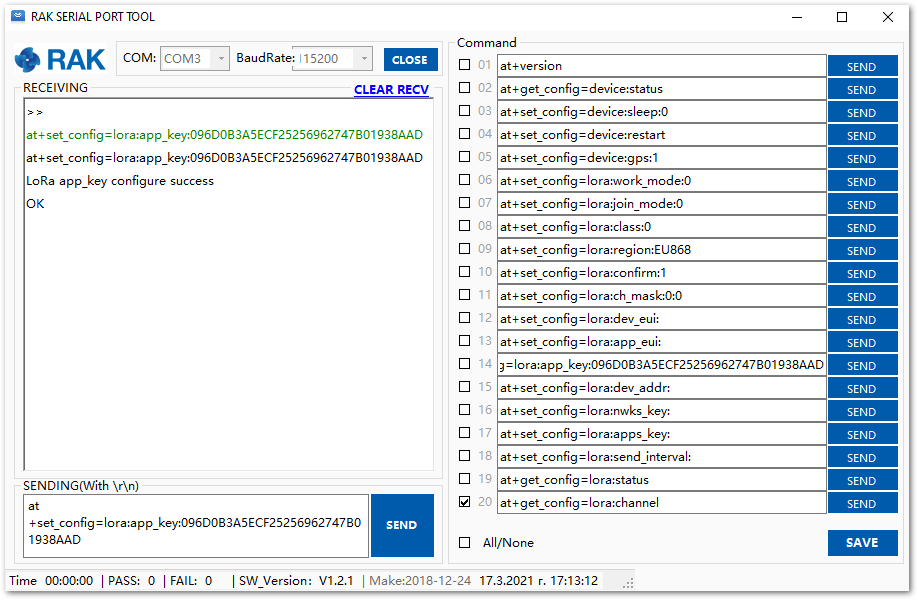 Figure 1: Setting up the RAK7204 WisNode Sense Home OTAA parameters
- Finally, execute the join command:
at+join
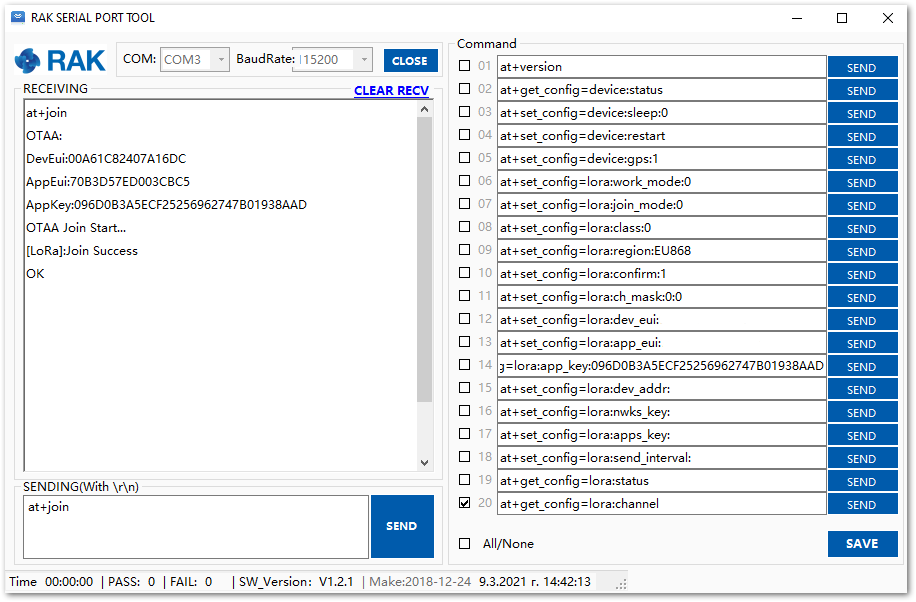 Figure 1: Join command
If you get a response in the Live data feed in The Things Stack, it means your RAK7204 is successfully connected!
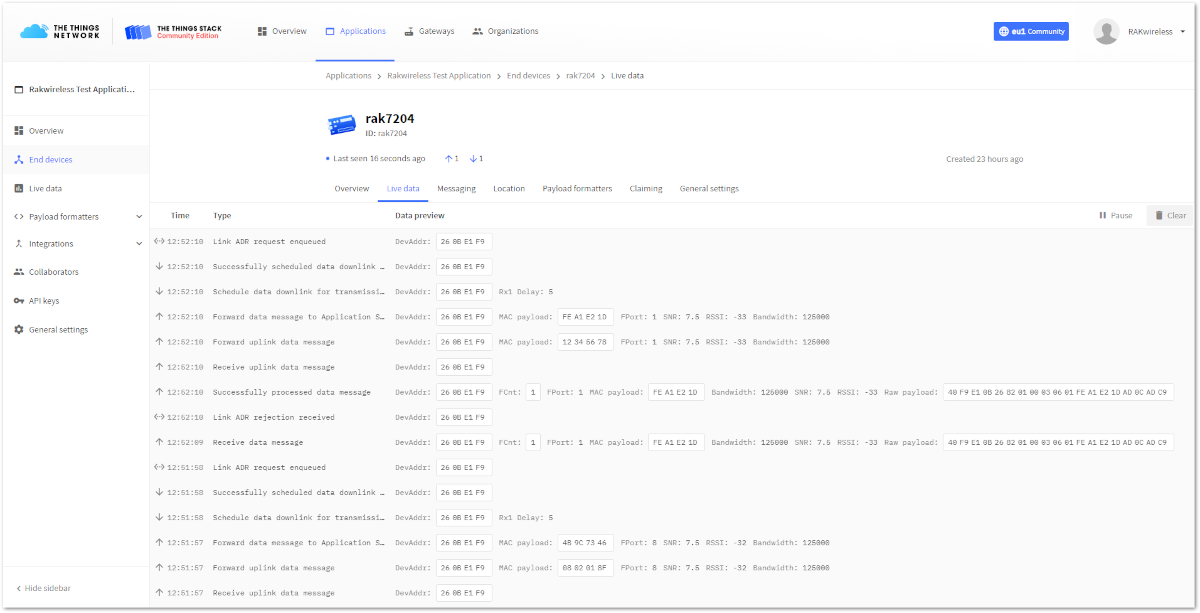 Figure 1: Sending data to The Things Stack from RAK7204 WisNode Sense Home
Connecting to ChirpStack
The ChirpStack or previously known as LoRaServer project provides open-source components for building LoRaWAN networks. Learn more about ChirpStack.
You can use RAK7204 WisNode Sense Home to connect with ChirpStack according to the following steps:
In this section, it is assumed that you are using RAK Gateway and its built-in ChirpStack or RAK cloud testing ChirpStack. It is also assumed that a Gateway with the ChirpStack has been configured successfully. If not, please have a look at RAK's documents for more details about RAK LPWAN Gateway and RAK cloud testing.
- Open the web page of the ChirpStack which you want to connect with and login.
- By default, there is already one or more items in this page, you can use it or create a new item. Now, let’s create a new item by clicking the “CREATE” button, then filling them in.
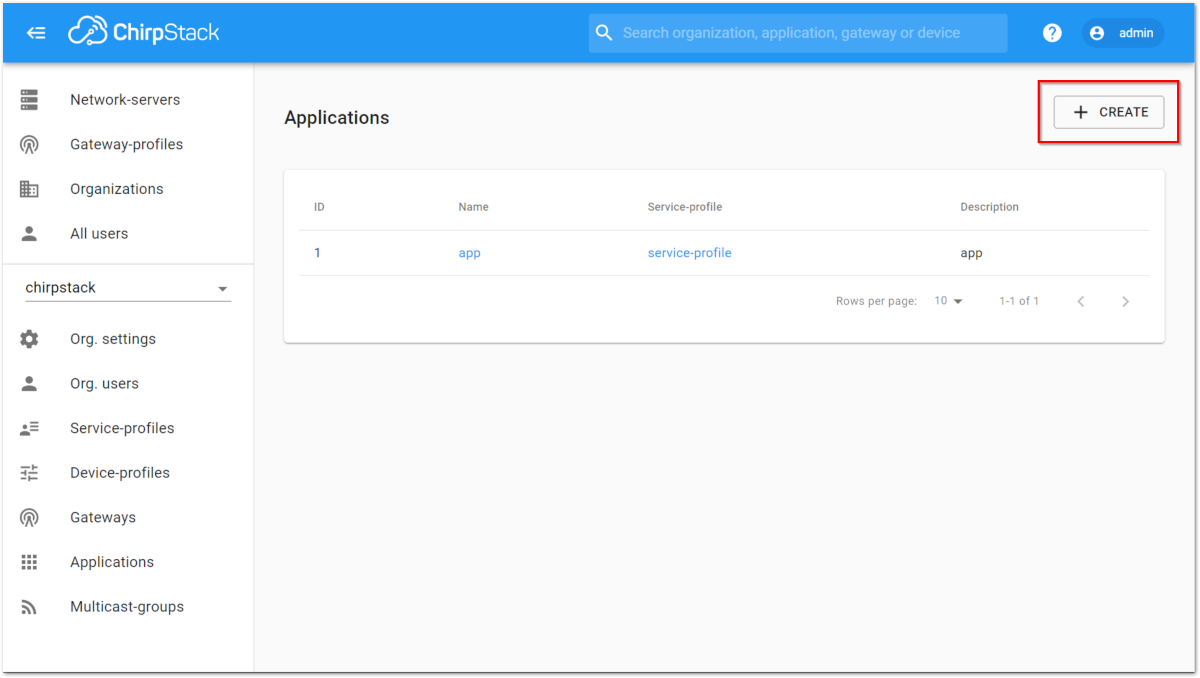 Figure 1: ChirpStack Applications
- Fill up the necessary information then Click "CREATE APPLICATION”.
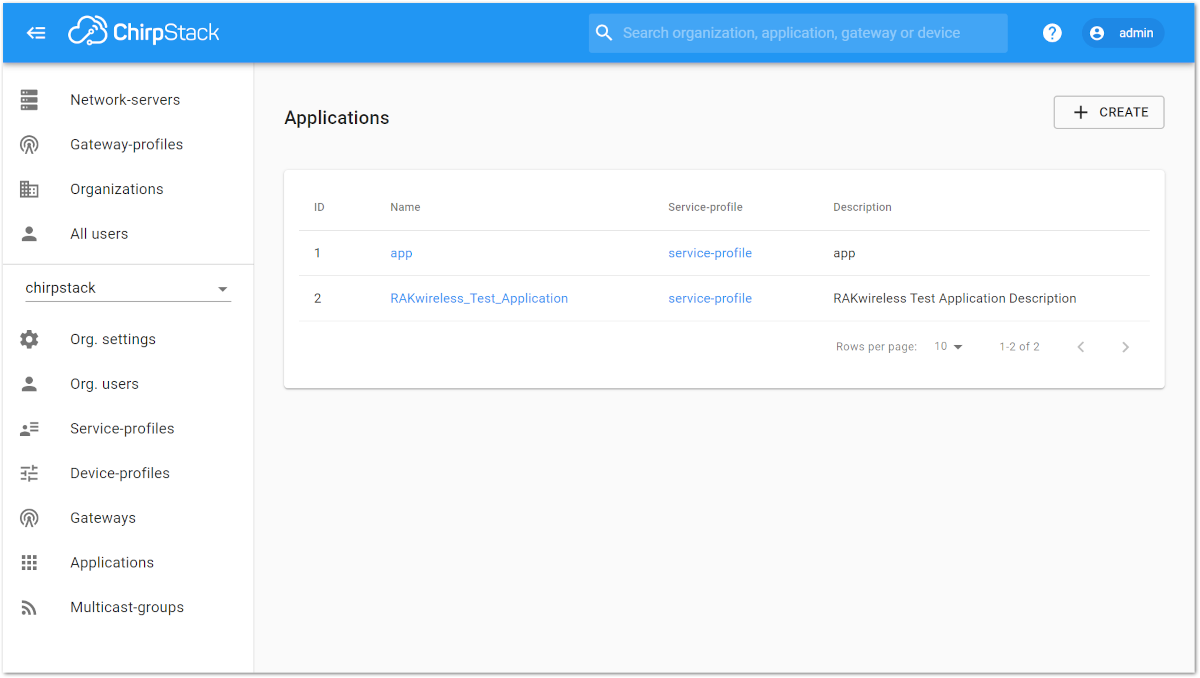 Figure 1: Creating the Application
- Click the new item name “RAKwireless_Test_Application”:
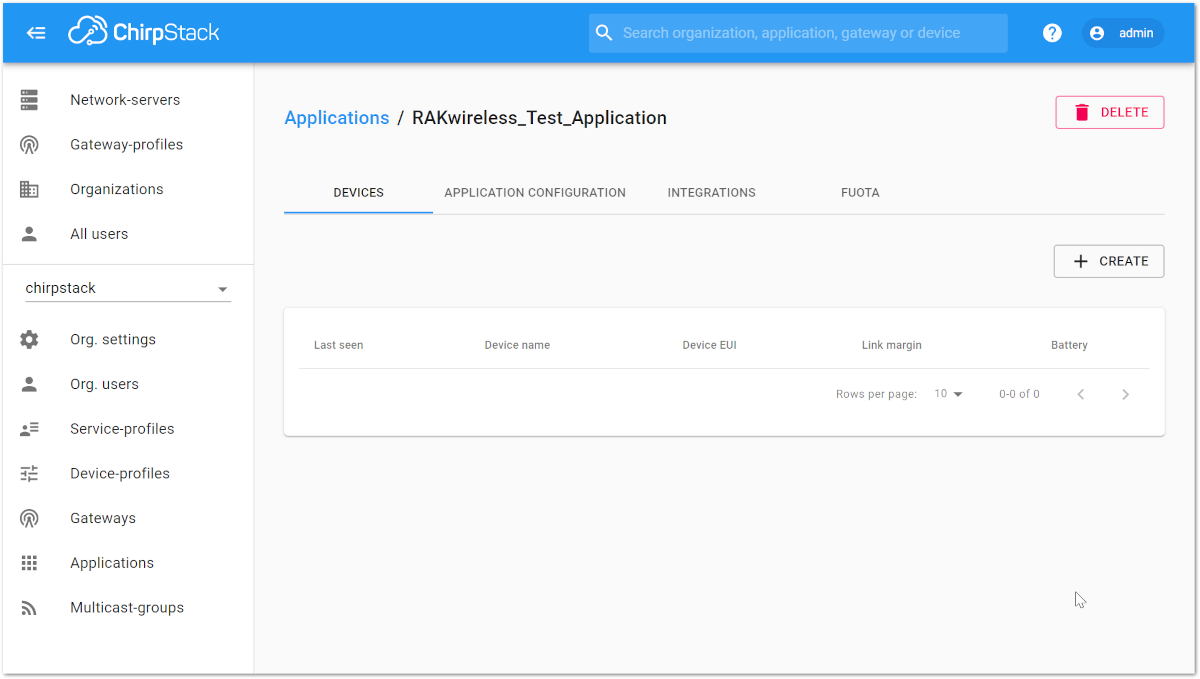 Figure 1: Applications page in ChirpStack
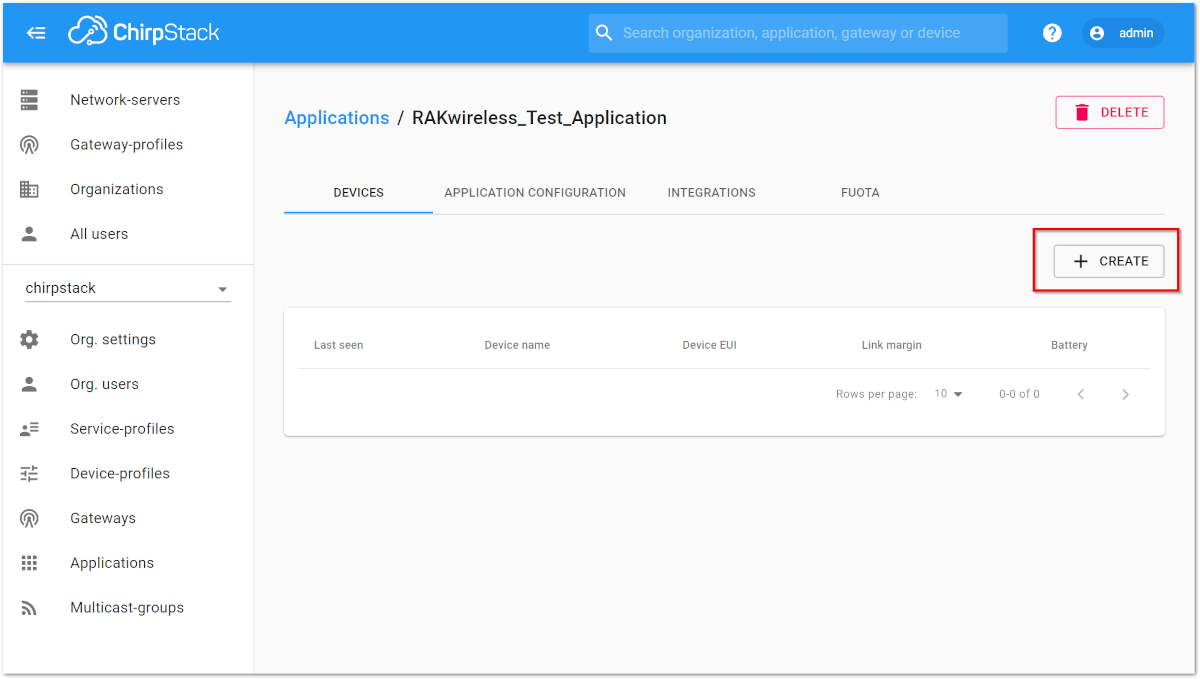 Figure 1: RAKwireless Test Application
- Add a Node device into ChirpStack by clicking the “CREATE” button:
Figure 1: Adding a Node Device- Fill them in. You can generate a Device EUI automatically by clicking the Device EUI icon, or you can write the correct Device EUI in the edit box.
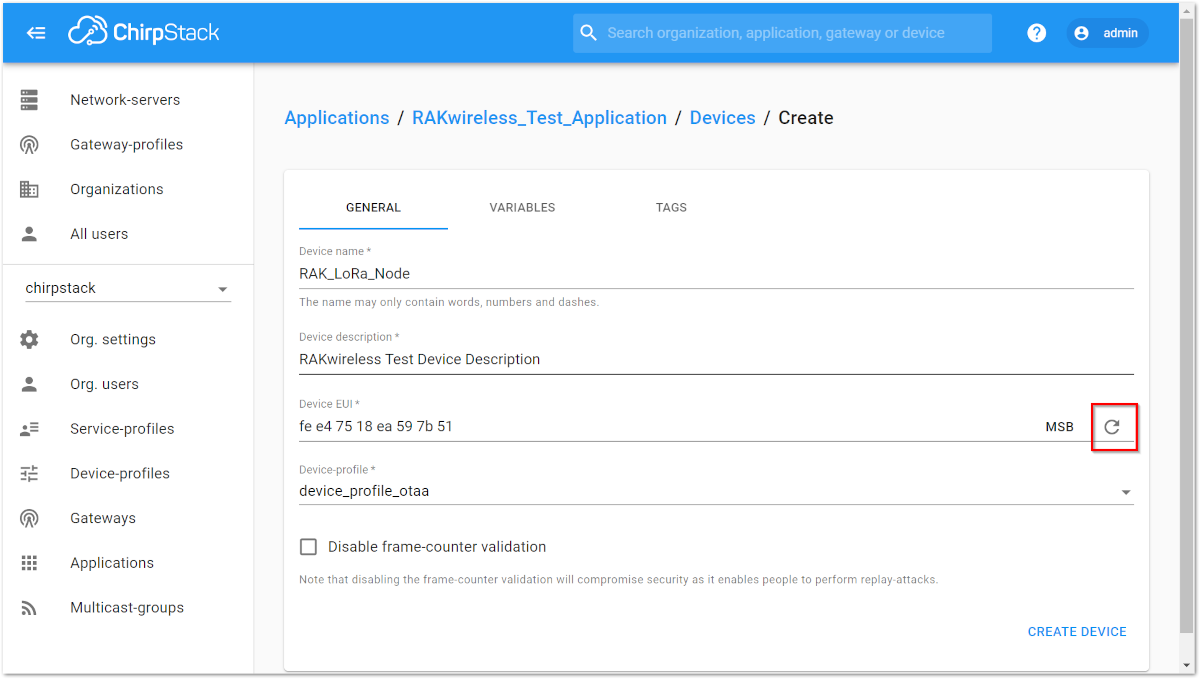 Figure 1: Filling the Device Parameters
If you want to join in OTAA mode, select “DeviceProfile_OTAA” in the “Device-profile” item. If you want to join in ABP mode and CN470 frequency, then, select “DeviceProfile_ABP_CN470” in the “Device-Profile” item. If you want to join in ABP mode and other frequencies except AS923 and CN470, you should select “DeviceProfile_ABP” in the “Device-profile” item.
OTAA Mode
- To join ChirpStack in OTAA mode, select “DeviceProfile_OTAA”.
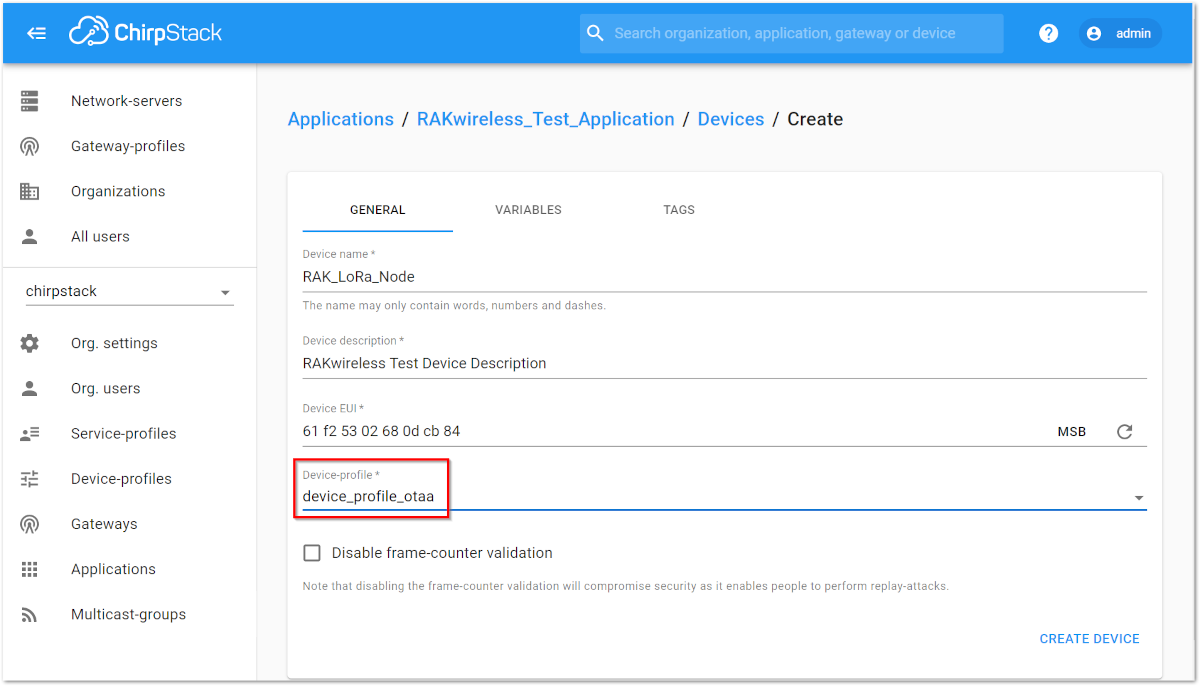 Figure 1: Selecting OTAA Activation Mode in ChirpStack
- Press “CREATE DEVICE” button. You may write the application key by yourself or generate it automatically by clicking the icon highlighted in the image.
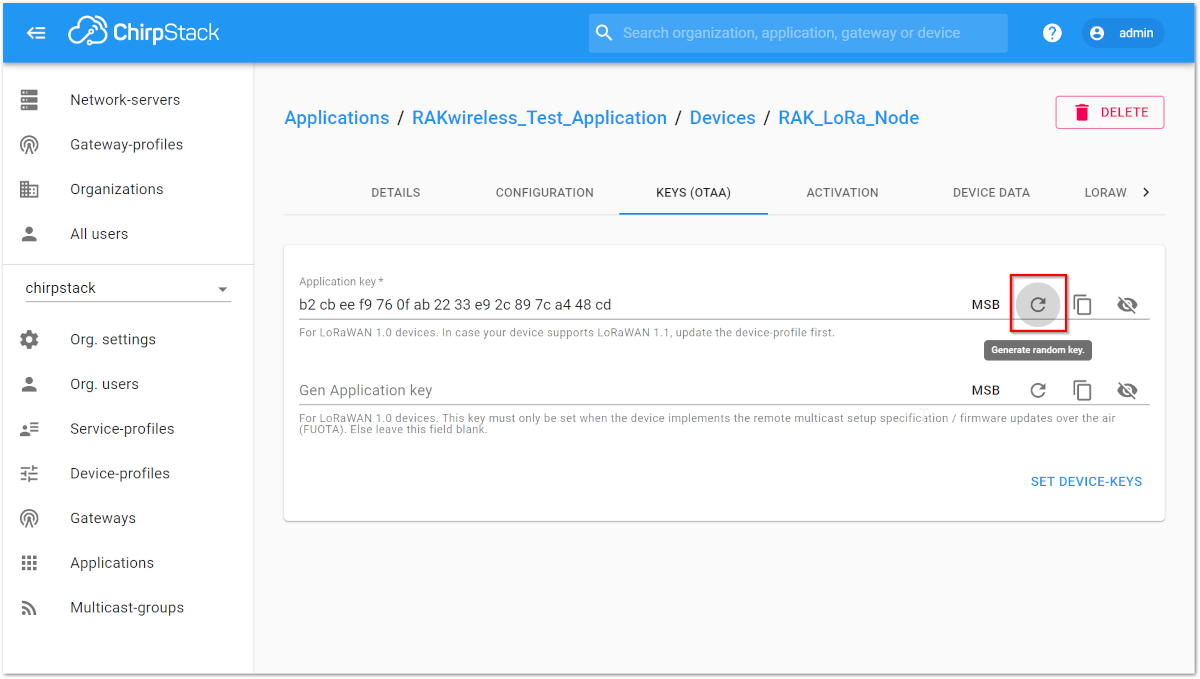 Figure 1: Application Key Generation
- Click "SET DEVICE KEYS” button. Now, you’ve completed the configuration on ChirpStack.
- The Device EUI which was set in the previous section to your RAK7204 WisNode Sense Home as "dev_eui" is the same in the image highlighted below.
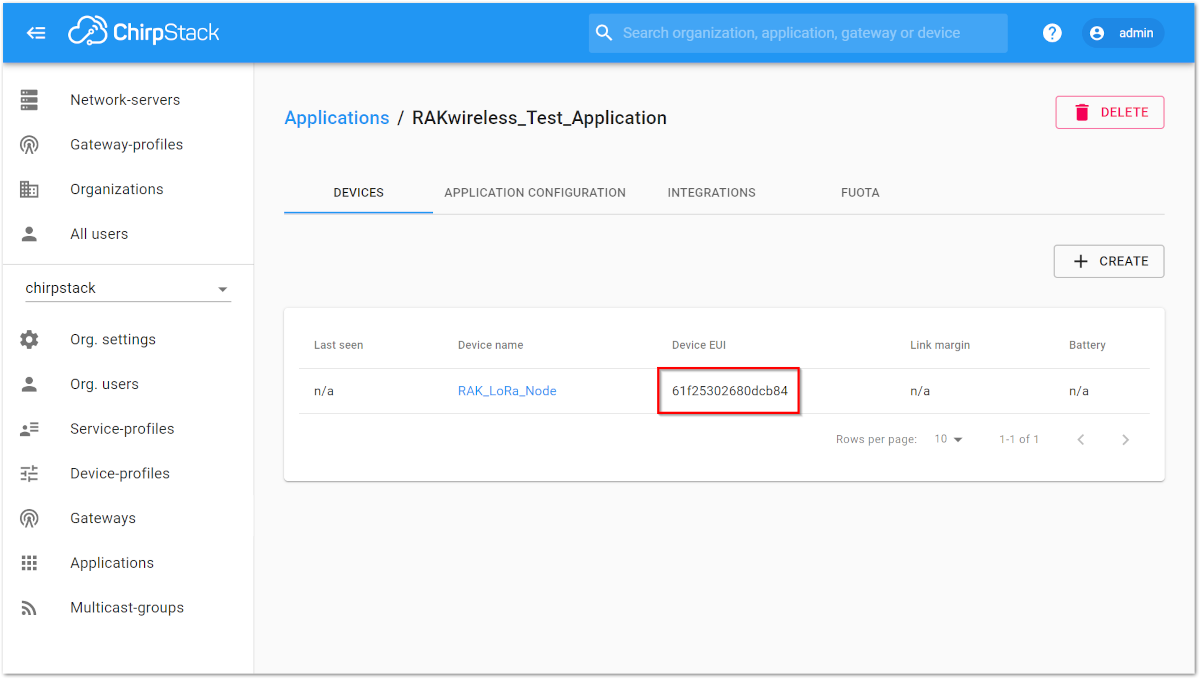 Figure 1: Device EUI Code
- Same with the Application Key, which was set in the previous section as "app_key" is the same with the image highlighted.
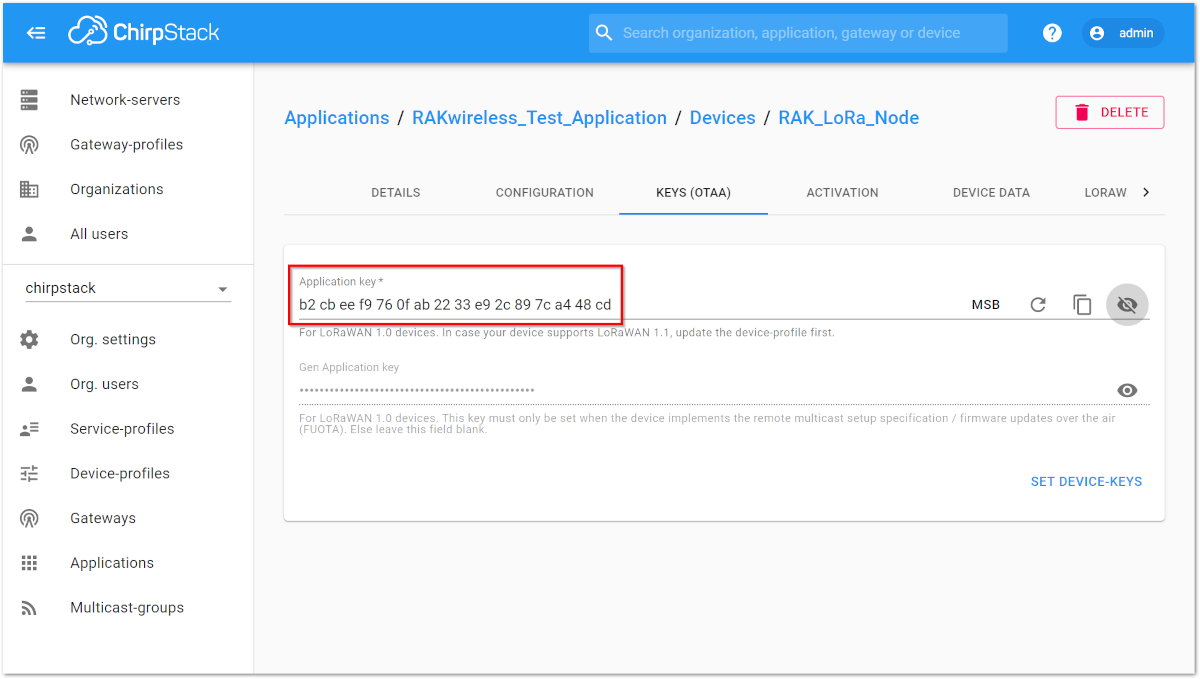 Figure 1: Application Key LoRaWAN
The Application EUI which was into RAK7204 WisNode Sense Home as “app_eui” is not needed for ChirpStack.
- Next, let’s configure RAK7204 WisNode Sense Home by using AT commands. To do this, connect your RAK7204 WisNode Sense Home to a PC, power it on and open RAK Serial Port Tool on your computer.
at+version
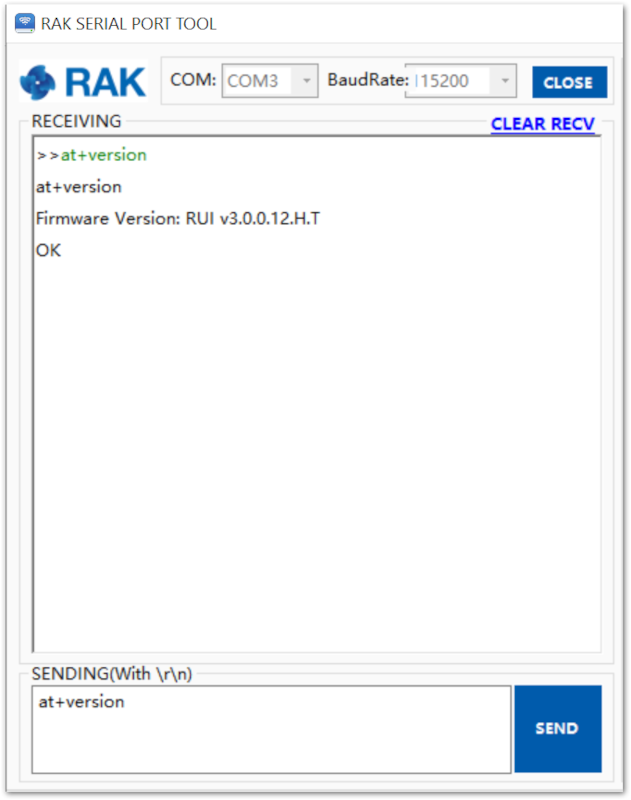 Figure 1: RAK Serial Port Tool
- Now, let us join our RAK7204 WisNode Sense Home using the OTAA activation mode.
- If the join mode is not in OTAA, just set the LoRa join mode to OTAA and LoRa class to Class A by typing the AT commands shown in the picture below.
at+set_config=lora:join_mode:0
at+set_config-lora:class:0
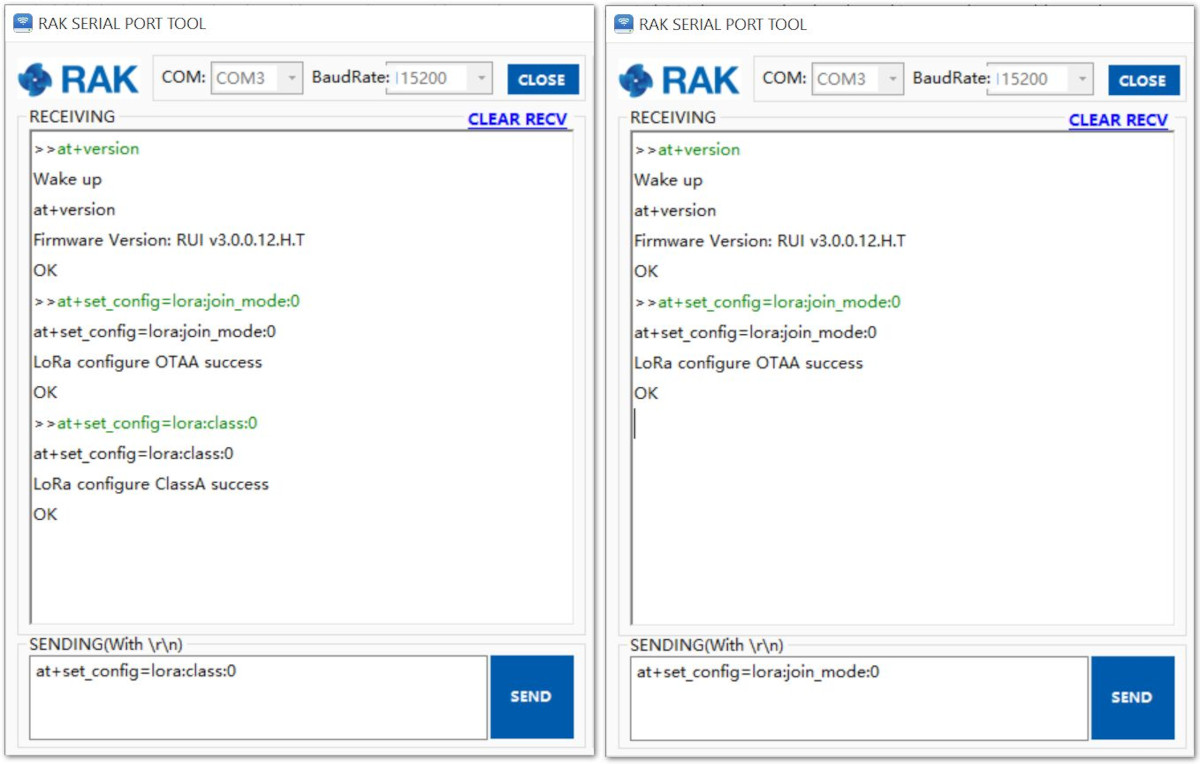 Figure 1: Setting of LoRaWAN mode and class
- Type the following AT command to set the: Frequency/Region, Device EUI, Application EUI and Application Key. Remember to replace the "XXXX" with the corresponding parameter value for your particular case:
at+set_config=lora:region:XXXX
at+set_config=lora:dev_eui:XXXX
at+set_config=lora:app_eui:XXXX
at+set_config=lora:app_key:XXXX
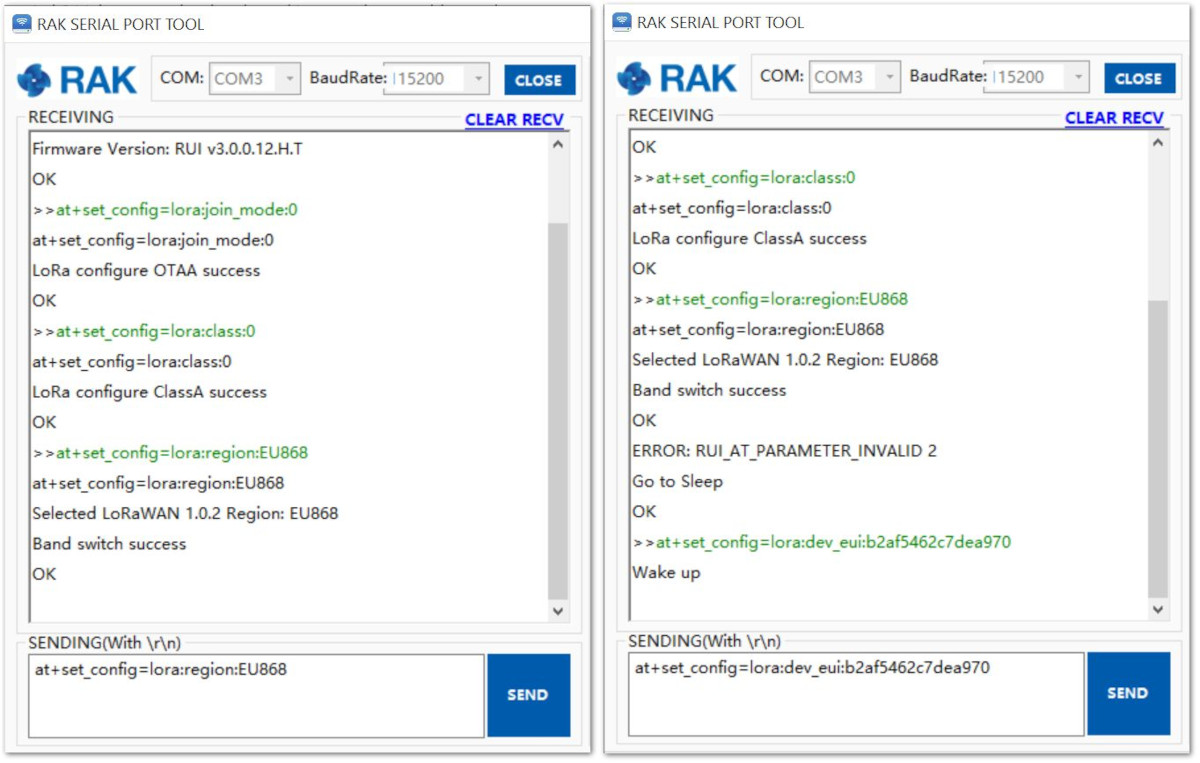 Figure 1: Setting of Frequency and Device EUI
 Figure 1: Setting of Application EUI and Key
- Then, join in OTAA mode.
at+join
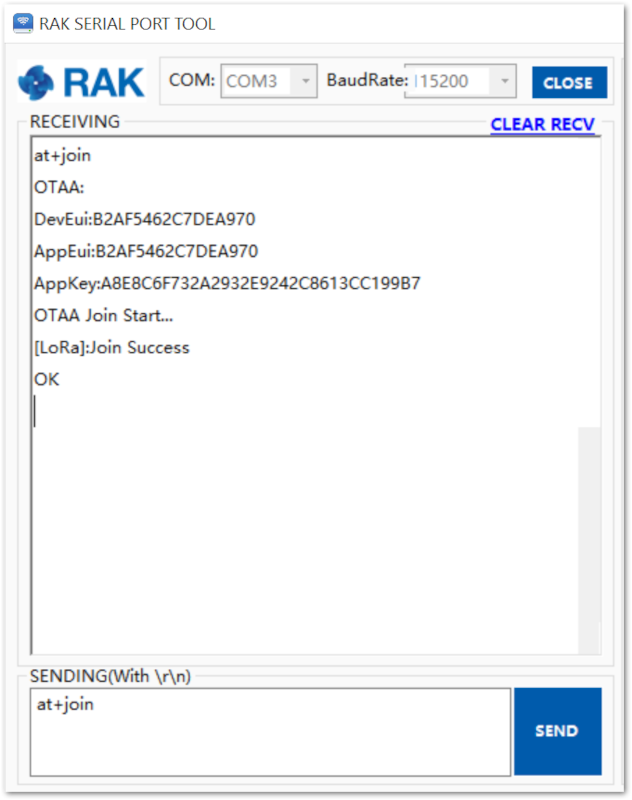 Figure 1: Joining in OTAA
- Joined Successfully! 🎉
- You can view the "JoinRequest" and "JoinAccept" on ChirpStack page:
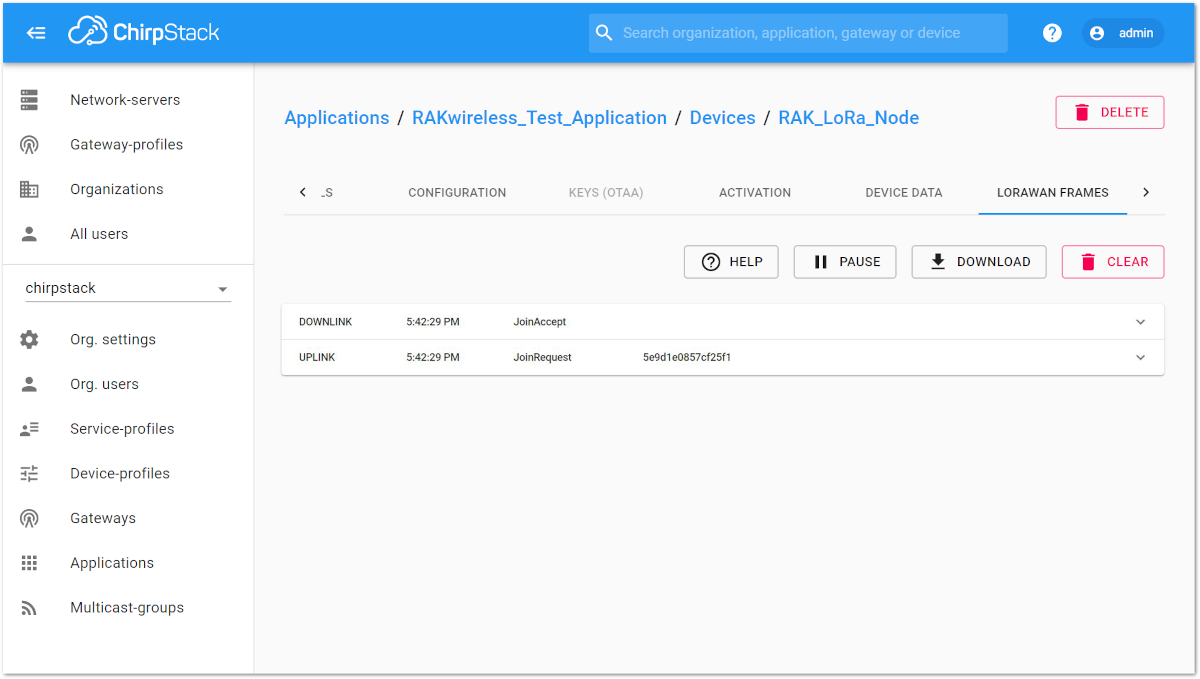 Figure 1: Join Request of the Device in the ChirpStack
- Let’s try sending data from our RAK7204 WisNode Sense Home to the ChirpStack by typing the command below in the serial port.
at+send=lora:2:1234567890
 Figure 1: Sending Data to ChirpStack
- You can see the message on ChirpStack page:
Figure 1: Message Received in ChirpStackABP Mode
- If you select “Device Profile ABP” or “DeviceProfile_ABP_CN470”, it means you want to join ChirpStack in ABP mode.
Frequency AS923 in ABP Mode is not supported in ChirpStack
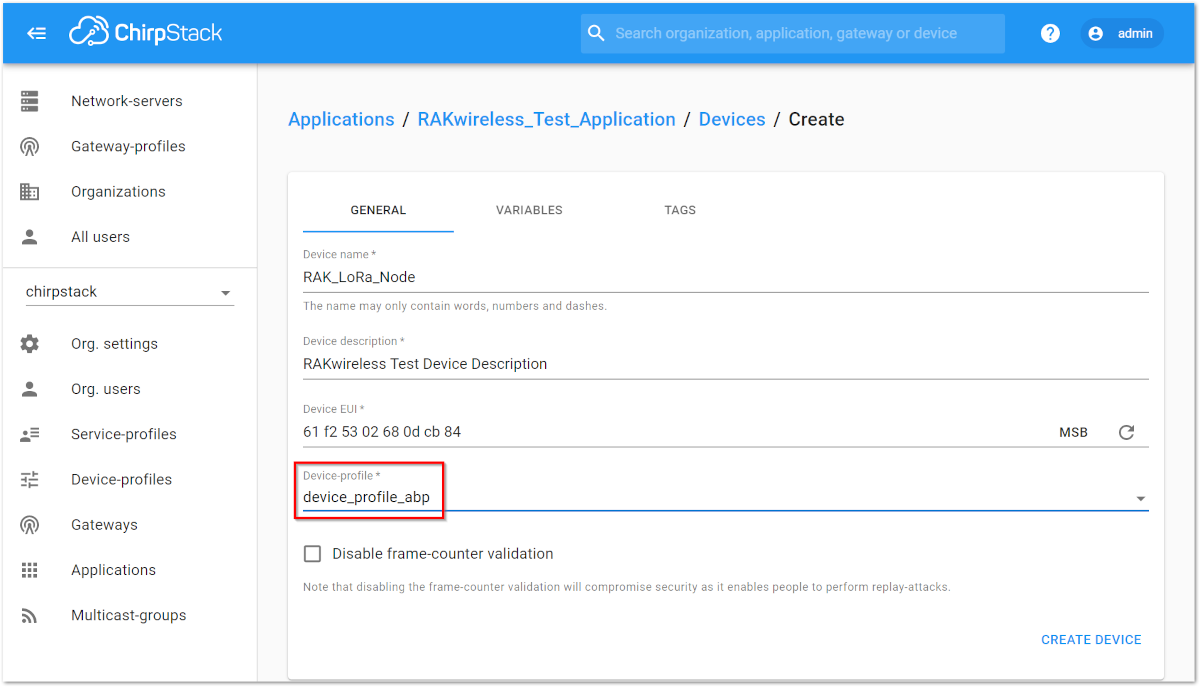 Figure 1: Switching to ABP Mode
- Then you can see that there are some parameters for ABP in the “ACTIVATION” item:
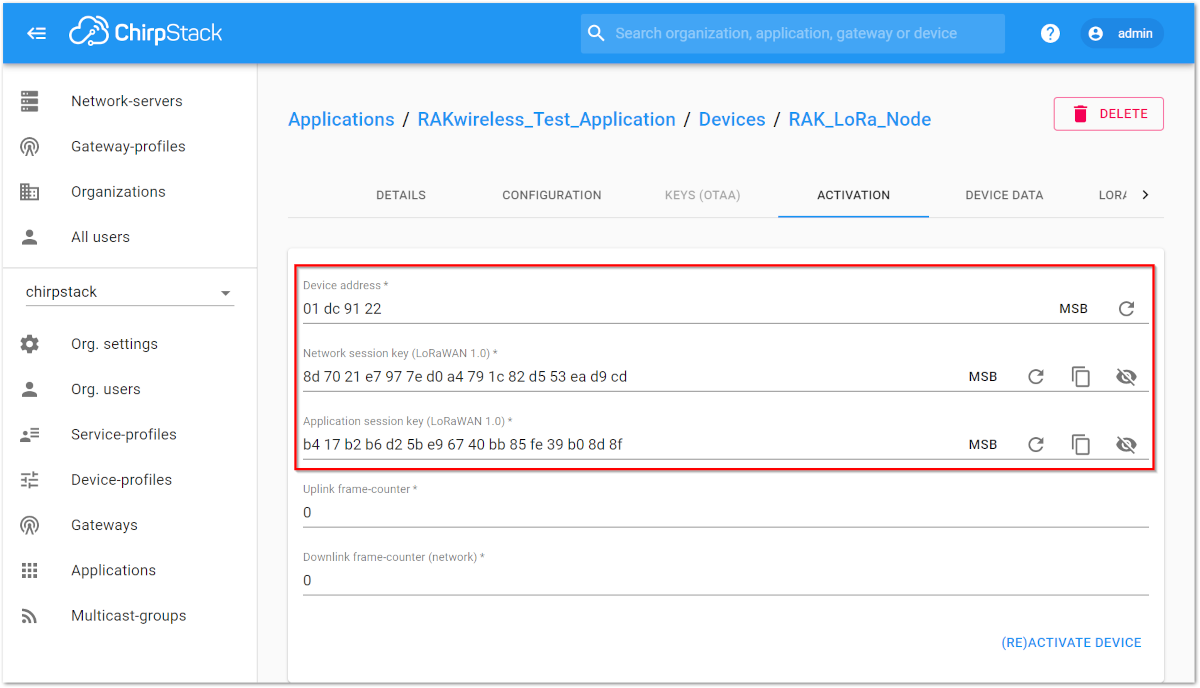 Figure 1: ABP Parameters
- Next, let’s use these parameters to set WisNode LoRa by using AT command. Let's join in ABP mode and set EU868 frequency as an example.
- If the join mode is not in ABP, just set the LoRa join mode to ABP and LoRa class to Class A by typing the following commands in RAK Serial Port Tool
Figure 1: Setting of LoRaWAN Mode and Class- Type the following AT command to set your respective: Frequency/Region, Device Address, Network Session Key and App Session Key.
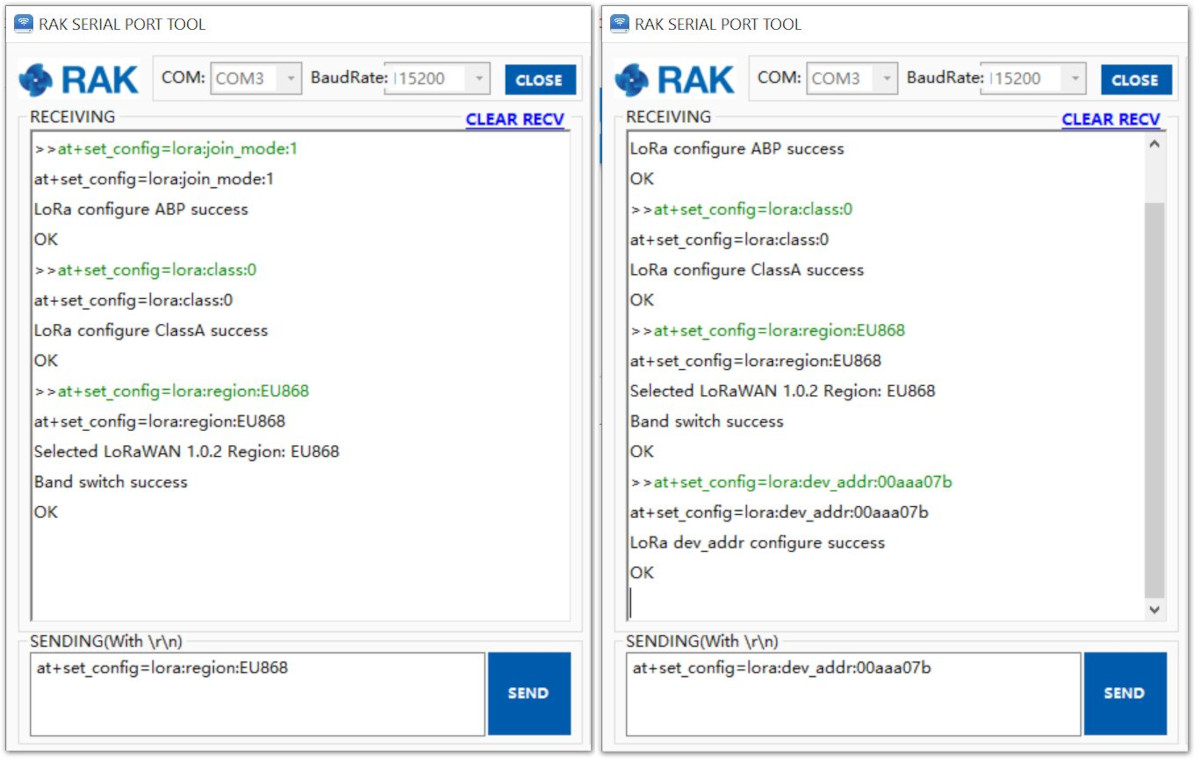 Figure 1: Setting of Frequency and Device Address
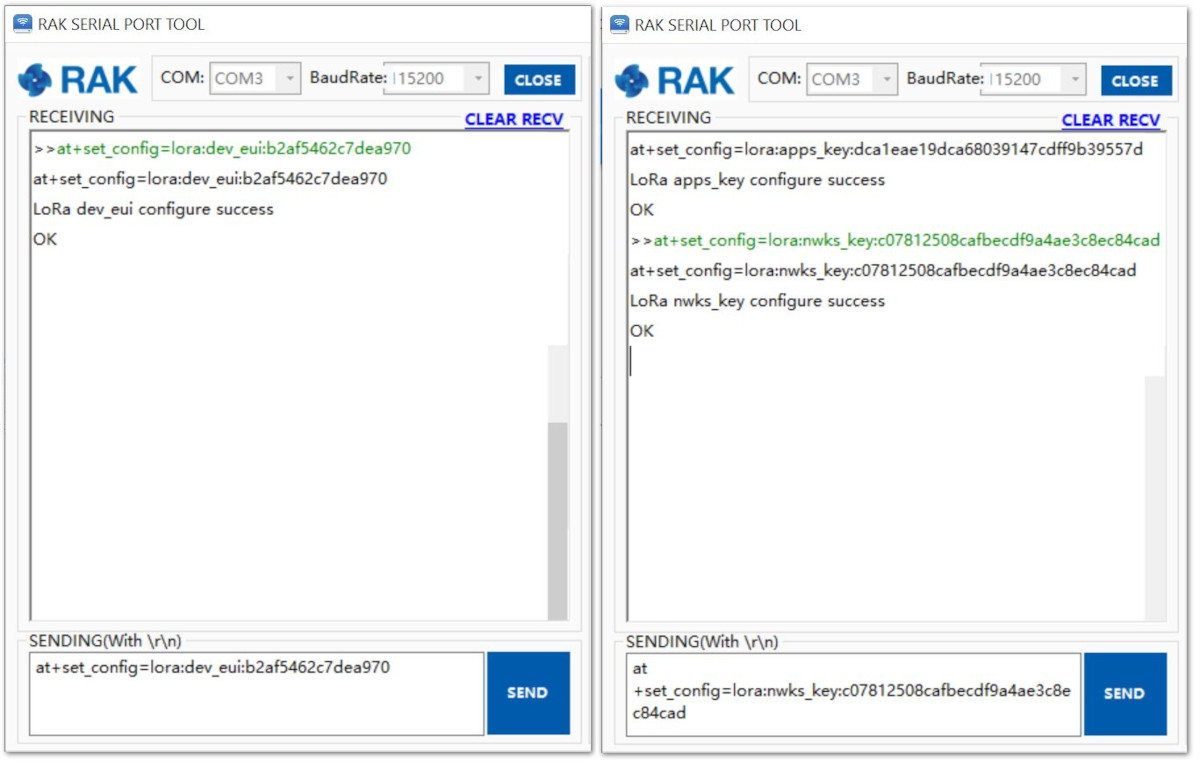 Figure 1: Setting of Device EUI and Network Session Key
- Then, join in ABP mode.
 Figure 1: Joining of ABP
- Now, try sending data from our WisNode LoRa to the Chirpstack
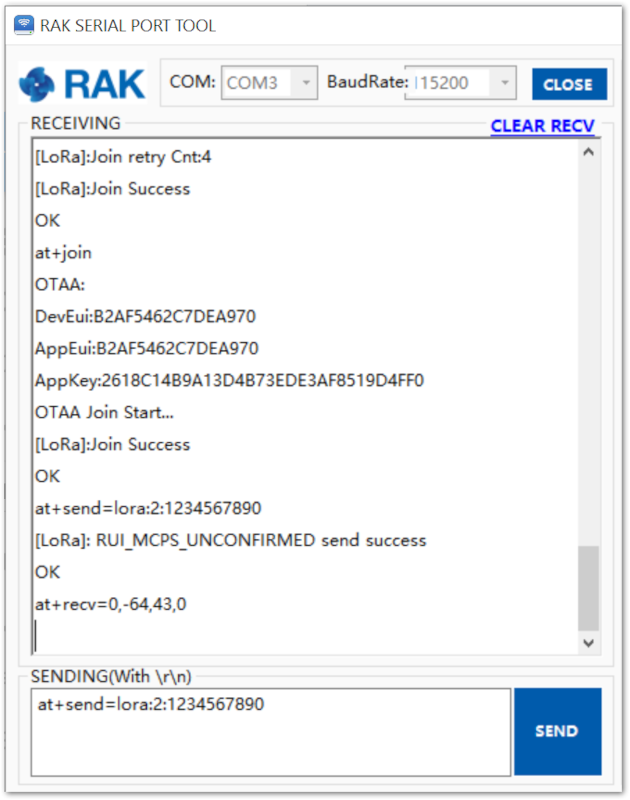 Figure 1: Sending Data to ChirpStack
- You can see the data which is just sent from RAK7204 WisNode Sense Home on ChirpStack page:
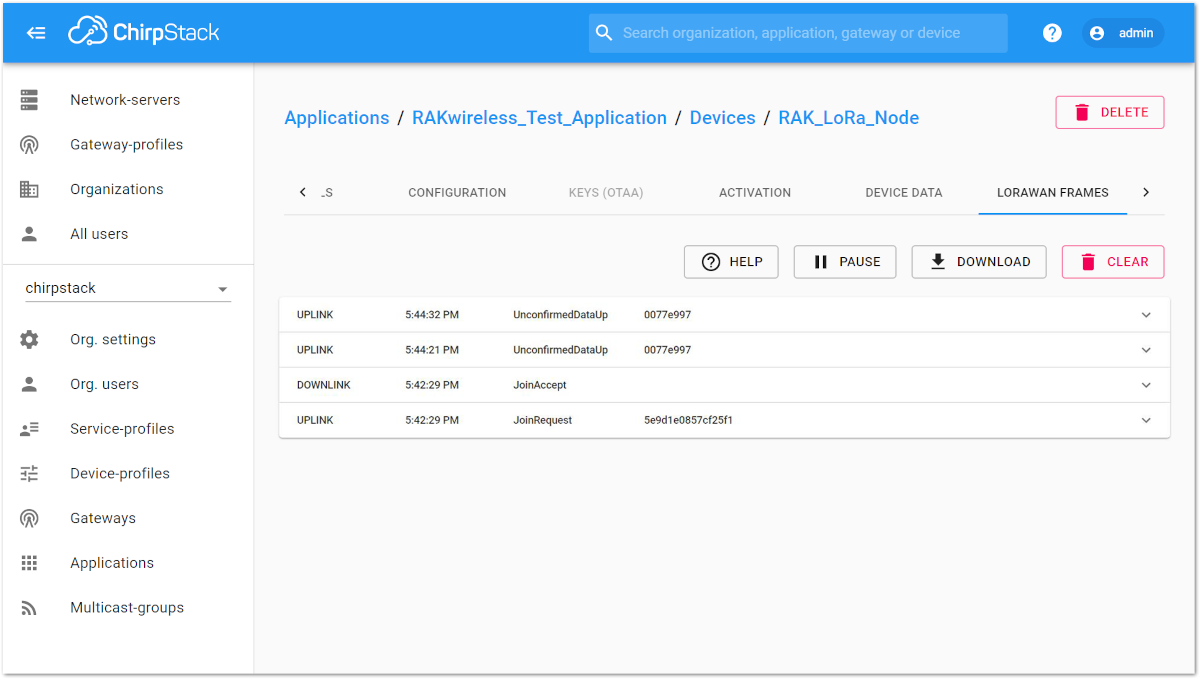 Figure 1: Message Status in ChirpStack
Decoding Sensor Data on ChirpStack and TTN
Analyzing Sensor Data from RAK7204 WisNode Sense Home��
In the previous section, we have successfully sent some raw data from our RAK7204 WisNode Sense Home to The Things Network, but the problem is that you can't really see the actual sensor data from the payload. In this section , we will solve that and understand what each payload means.
Let's take this data for example:
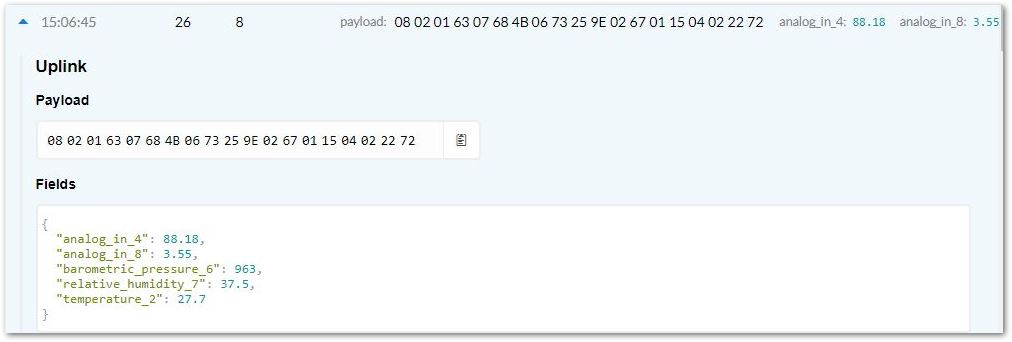 Figure 1: Received Raw Data in TTN
 Figure 1: Actual Data sent to Cayenne
For this example, the payload is : 08 02 01 63 07 68 4B 06 73 25 9E 02 67 01 15 04 02 22 72 04 02 22 72
Now lets analyze each data , which is in Hexadecimal Format. We will be using the data mentioned above as an example. We will convert the Hexadecimal Data into Decimal Data using this converter in order to be able to understand it.
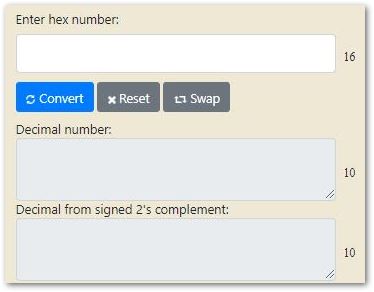 Figure 1: Hexadecimal to Decimal converter
1. Battery Voltage
| Parameter | Hex Data | Decimal Equivalent | Multiplier | True Value |
|---|---|---|---|---|
| Data flag | 08 02 | |||
| Battery Voltage | 01 67 | 355 | 0.01 Signed | 3.55 V |
2. Humidity Data
Example Data: 07 68 4B
| Parameter | Hex Data | Decimal Equivalent | Multiplier | True Value |
|---|---|---|---|---|
| Data flag | 07 68 | |||
| Humidity | 4B | 75 | 0.5 % Unsigned | 37.5 % RH |
3. Pressure Data
Example Data: 06 73 25 9E
| Parameter | Hex Data | Decimal Equivalent | Multiplier | True Value |
|---|---|---|---|---|
| Data flag | 06 73 | |||
| Pressure | 25 9E | 9630 | 0.1 hPa Unsigned MSB | 963.0 hPa |
4. Temperature Data
Example Data: 02 67 01 15
| Parameter | Hex Data | Decimal Equivalent | Multiplier | True Value |
|---|---|---|---|---|
| Data flag | 02 67 | |||
| Temperature | 01 15 | 277 | 0.1 °C Signed MSB | 27.7℃ |
5. Gas Resistance Data
Example Data: 04 02 22 72
| Parameter | Hex Data | Decimal Equivalent | Multiplier | True Value |
|---|---|---|---|---|
| Data flag | 04 02 | |||
| Gas Resistance | 22 72 | 8818 | 0.01 kΩ Signed | 88.18 kΩ |
For further details about the LPP format, you can take a look at this link.
Decoding Sensor Data in TTN
Input Decoding Function in TTN
- To start with, download the decoding function through this link.
Click to view the code
// ttn application function to decode uplink data.
// Decode decodes an array of bytes into an object.
//  - port contains the LoRaWAN fPort number
//  - bytes is an array of bytes, e.g. [225, 230, 255, 0]
// The function must return an object
// for RAK, return {
//                     "DecodeDataHex": {} // RAK5205 sensor data in Hex format
//                     "DecodeDataObj": {} // RAK5205 sensor data object.
//                 }
// The function prototype cannot be modified.
function Decoder(bytes, port) {
  var decoded = {"DecodeDataHex": {}, "DecodeDataObj": {}};
  var hexString=bin2HexStr(bytes);
  decoded.DecodeDataHex = hexString;
  decoded.DecodeDataObj = rakSensorDataDecode(hexString);

  return decoded;
}

// convert array of bytes to hex string.
// e.g: 0188053797109D5900DC140802017A0768580673256D0267011D040214AF0371FFFFFFDDFC2E
function bin2HexStr(bytesArr) {
  var str = "";
  for(var i=0; i<bytesArr.length; i++) {
    var tmp = (bytesArr[i] & 0xff).toString(16);
    if(tmp.length == 1) {
      tmp = "0" + tmp;
    }
    str += tmp;
  }
  return str;
}

// convert string to short integer
function parseShort(str, base) {
  var n = parseInt(str, base);
  return (n << 16) >> 16;
}

// convert string to triple bytes integer
function parseTriple(str, base) {
  var n = parseInt(str, base);
  return (n << 8) >> 8;
}

// decode Hex sensor string data to object
function rakSensorDataDecode(hexStr) {
  var str = hexStr;
  var myObj = {};
  var environment = {};
  var magnetometer = {};

  while (str.length > 4) {
    var flag = parseInt(str.substring(0, 4), 16);
    switch (flag) {
      case 0x0768:// Humidity
        environment.humidity = ((parseShort(str.substring(4, 6), 16) * 0.01 / 2) * 100).toFixed(1) + '% RH';
        str = str.substring(6);
        break;
      case 0x0673:// Atmospheric pressure
        environment.barometer = (parseShort(str.substring(4, 8), 16) * 0.1).toFixed(2) + "hPa";
        str = str.substring(8);
        break;
      case 0x0267:// Temperature
        environment.temperature = (parseShort(str.substring(4, 8), 16) * 0.1).toFixed(2) + "°C";
        str = str.substring(8);
        break;
      case 0x0188:// GPS
        var gps = {};
        gps.latitude = (parseTriple(str.substring(4, 10), 16) * 0.0001).toFixed(4) + "°";
        gps.longitude = (parseTriple(str.substring(10, 16), 16) * 0.0001).toFixed(4) + "°";
        gps.altitude = (parseTriple(str.substring(16, 22), 16) * 0.01).toFixed(1) + "m";
        myObj.gps = gps;
        str = str.substring(22);
        break;
      case 0x0371:// Triaxial acceleration
        var acceleration = {};
        acceleration.x = (parseShort(str.substring(4, 8), 16) * 0.001).toFixed(3) + "g";
        acceleration.y = (parseShort(str.substring(8, 12), 16) * 0.001).toFixed(3) + "g";
        acceleration.z = (parseShort(str.substring(12, 16), 16) * 0.001).toFixed(3) + "g";
        myObj.acceleration = acceleration;
        str = str.substring(16);
        break;
      case 0x0402:// air resistance
        environment.gasResistance = (parseShort(str.substring(4, 8), 16) * 0.01).toFixed(2)  + "KΩ";
        str = str.substring(8);
        break;
      case 0x0802:// Battery Voltage
        myObj.battery = (parseShort(str.substring(4, 8), 16) * 0.01).toFixed(2) + "V";
        str = str.substring(8);
        break;
      case 0x0586:// gyroscope
        var gyroscope = {};
        gyroscope.x = (parseShort(str.substring(4, 8), 16) * 0.01).toFixed(2) + "°/s";
        gyroscope.y = (parseShort(str.substring(8, 12), 16) * 0.01).toFixed(2) + "°/s";
        gyroscope.z = (parseShort(str.substring(12, 16), 16) * 0.01).toFixed(2) + "°/s";
        myObj.gyroscope = gyroscope;
        str = str.substring(16);
        break;
      case 0x0902:// magnetometer x
        magnetometer.x = (parseShort(str.substring(4, 8), 16) * 0.01).toFixed(2) + "μT";
        str = str.substring(8);
        break;
      case 0x0a02:// magnetometer y
        magnetometer.y = (parseShort(str.substring(4, 8), 16) * 0.01).toFixed(2) + "μT";
        str = str.substring(8);
        break;
      case 0x0b02:// magnetometer z
        magnetometer.z = (parseShort(str.substring(4, 8), 16) * 0.01).toFixed(2) + "μT";
        str = str.substring(8);
        break;
      default:
        str = str.substring(7);
        break;
    }
  }
  if(Object.getOwnPropertyNames(environment).length > 0) {
    myObj.environment = environment;
  }
  if(Object.getOwnPropertyNames(magnetometer).length > 0) {
    myObj.magnetometer = magnetometer;
  }

  return myObj;
}
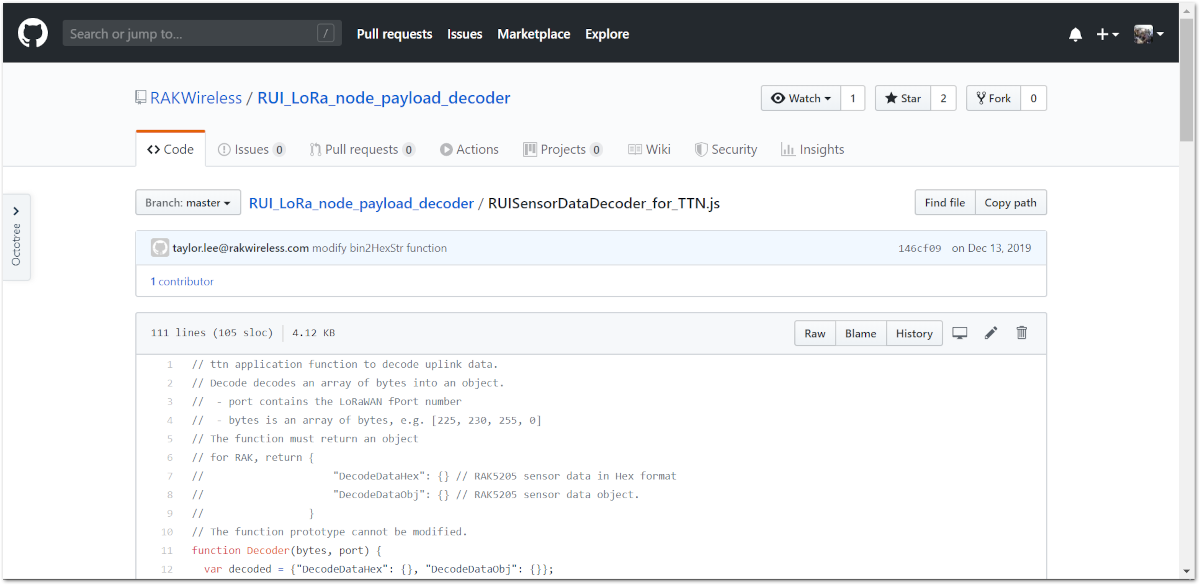 Figure 1: Github Page for the Decoding Function
- From your TTN console, go to application page and click the "Payload Formats" tab as shown in the image below.
 Figure 1: Payload Format at TTN Application Page
- Next, select "Payload Format" as "Custom". Then, from the decoder tab, copy and paste the decoder function from step 1.
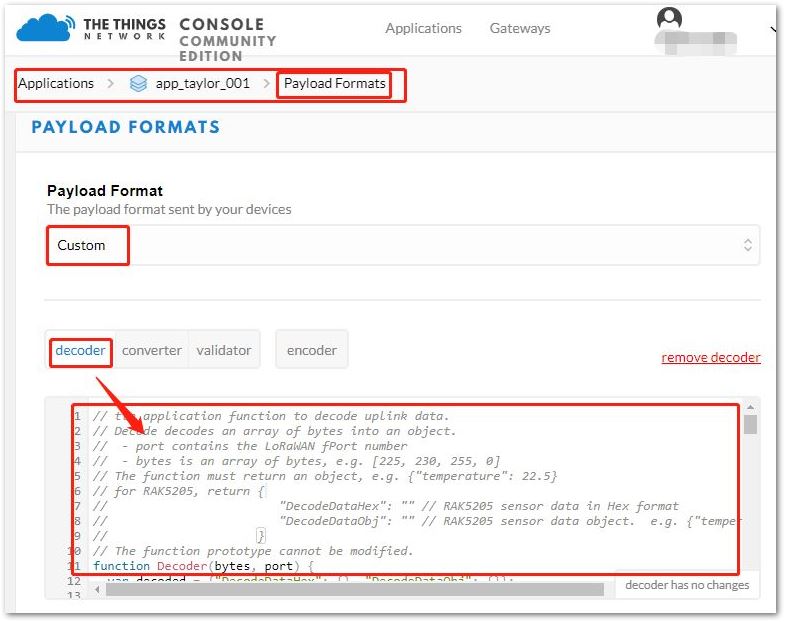 Figure 1: Decoder Function
Testing the Validity of Decoding Sensor Data in TTN
- Input the data below in the "Payload" box as shown in the image below.
08 02 01 63 07 68 4B 06 73 25 9E 02 67 01 15 04 02 22 72 04 02 22 72
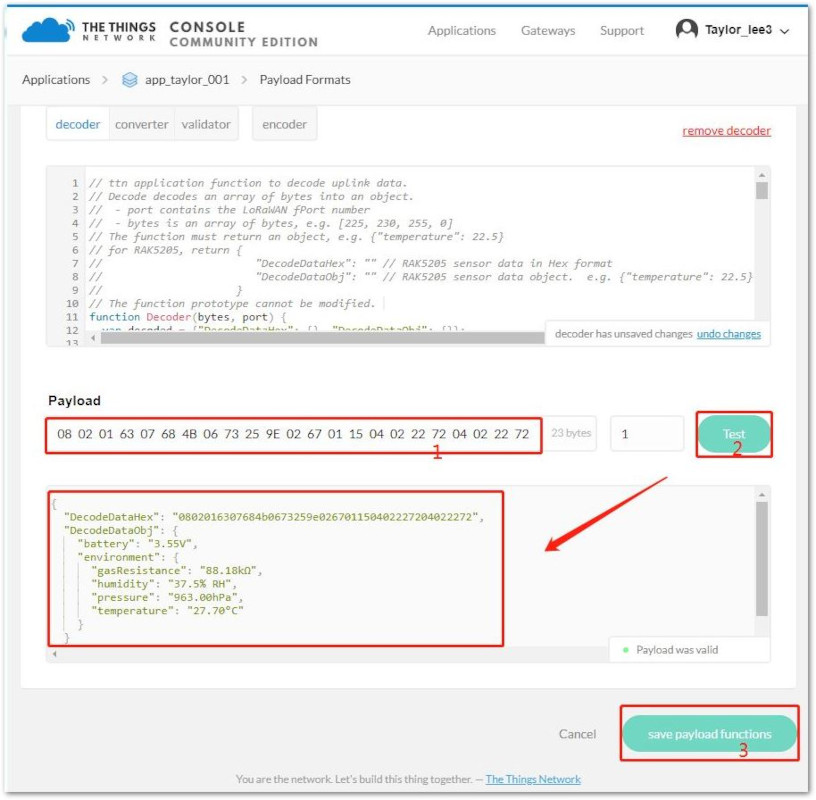 Figure 1: Testing Payload Data
- Then, click "Test" and it will generate a code with the decoded data as shown in the image above.
Testing in Real System in TTN
After gateway and node go online, click the uplink data record from the application data tab to check the decode status. From the image below, we can see the data decoded successfully in TTN.
 Figure 1: Uplink Decoded Data
Decoding Sensor Data in ChirpStack
Input Decoding Function in ChirpStack
- To start with, download the decoding function through this link.
Click to view the code
// chirpstack application function to decode uplink data.
// Decode decodes an array of bytes into an object.
//  - fPort contains the LoRaWAN fPort number
//  - bytes is an array of bytes, e.g. [225, 230, 255, 0]
// The function must return an object
// for RAK, return {
//                     "DecodeDataHex": {} // RAK5205 sensor data in Hex format
//                     "DecodeDataObj": {} // RAK5205 sensor data object.
//                 }
// The function prototype cannot be modified.
function Decode(fPort, bytes) {
  var decoded = {"DecodeDataHex": {}, "DecodeDataObj": {}};
  var hexString=bin2HexStr(bytes);
  decoded.DecodeDataHex = hexString;
  decoded.DecodeDataObj = rakSensorDataDecode(hexString);

  return decoded;
}

// convert array of bytes to hex string.
// e.g: 0188053797109D5900DC140802017A0768580673256D0267011D040214AF0371FFFFFFDDFC2E
function bin2HexStr(bytesArr) {
  var str = "";
  for(var i=0; i<bytesArr.length; i++) {
    var tmp = (bytesArr[i] & 0xff).toString(16);
    if(tmp.length == 1) {
      tmp = "0" + tmp;
    }
    str += tmp;
  }
  return str;
}

// convert string to short integer
function parseShort(str, base) {
  var n = parseInt(str, base);
  return (n << 16) >> 16;
}

// convert string to triple bytes integer
function parseTriple(str, base) {
  var n = parseInt(str, base);
  return (n << 8) >> 8;
}

// decode Hex sensor string data to object
function rakSensorDataDecode(hexStr) {
  var str = hexStr;
  var myObj = {};
  var environment = {};
  var magnetometer = {};

  while (str.length > 4) {
    var flag = parseInt(str.substring(0, 4), 16);
    switch (flag) {
      case 0x0768:// Humidity
        environment.humidity = ((parseShort(str.substring(4, 6), 16) * 0.01 / 2) * 100).toFixed(1) + '% RH';
        str = str.substring(6);
        break;
      case 0x0673:// Atmospheric pressure
        environment.barometer = (parseShort(str.substring(4, 8), 16) * 0.1).toFixed(2) + "hPa";
        str = str.substring(8);
        break;
      case 0x0267:// Temperature
        environment.temperature = (parseShort(str.substring(4, 8), 16) * 0.1).toFixed(2) + "°C";
        str = str.substring(8);
        break;
      case 0x0188:// GPS
        var gps = {};
        gps.latitude = (parseTriple(str.substring(4, 10), 16) * 0.0001).toFixed(4) + "°";
        gps.longitude = (parseTriple(str.substring(10, 16), 16) * 0.0001).toFixed(4) + "°";
        gps.altitude = (parseTriple(str.substring(16, 22), 16) * 0.01).toFixed(1) + "m";
        myObj.gps = gps;
        str = str.substring(22);
        break;
      case 0x0371:// Triaxial acceleration
        var acceleration = {};
        acceleration.x = (parseShort(str.substring(4, 8), 16) * 0.001).toFixed(3) + "g";
        acceleration.y = (parseShort(str.substring(8, 12), 16) * 0.001).toFixed(3) + "g";
        acceleration.z = (parseShort(str.substring(12, 16), 16) * 0.001).toFixed(3) + "g";
        myObj.acceleration = acceleration;
        str = str.substring(16);
        break;
      case 0x0402:// air resistance
        environment.gasResistance = (parseShort(str.substring(4, 8), 16) * 0.01).toFixed(2)  + "KΩ";
        str = str.substring(8);
        break;
      case 0x0802:// Battery Voltage
        myObj.battery = (parseShort(str.substring(4, 8), 16) * 0.01).toFixed(2) + "V";
        str = str.substring(8);
        break;
      case 0x0586:// gyroscope
        var gyroscope = {};
        gyroscope.x = (parseShort(str.substring(4, 8), 16) * 0.01).toFixed(2) + "°/s";
        gyroscope.y = (parseShort(str.substring(8, 12), 16) * 0.01).toFixed(2) + "°/s";
        gyroscope.z = (parseShort(str.substring(12, 16), 16) * 0.01).toFixed(2) + "°/s";
        myObj.gyroscope = gyroscope;
        str = str.substring(16);
        break;
      case 0x0902:// magnetometer x
        magnetometer.x = (parseShort(str.substring(4, 8), 16) * 0.01).toFixed(2) + "μT";
        str = str.substring(8);
        break;
      case 0x0a02:// magnetometer y
        magnetometer.y = (parseShort(str.substring(4, 8), 16) * 0.01).toFixed(2) + "μT";
        str = str.substring(8);
        break;
      case 0x0b02:// magnetometer z
        magnetometer.z = (parseShort(str.substring(4, 8), 16) * 0.01).toFixed(2) + "μT";
        str = str.substring(8);
        break;
      default:
        str = str.substring(7);
        break;
    }
  }
  if(Object.getOwnPropertyNames(environment).length > 0) {
    myObj.environment = environment;
  }
  if(Object.getOwnPropertyNames(magnetometer).length > 0) {
    myObj.magnetometer = magnetometer;
  }
  return myObj;
}
- From to your ChirpStack, go to application page and click the "APPLICATION CONFIGURATION" tab as shown in the image below.
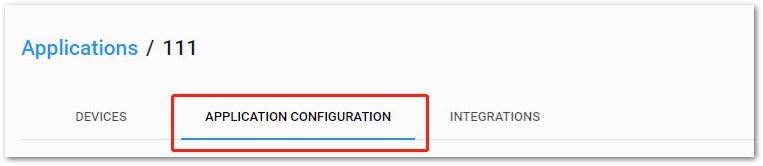 Figure 1: Application Configuration Tab
- Next, select "Payload codec" as "Custom JavaScript codec functions". Then, from the decoder tab, copy and paste the decoder function from step 1.
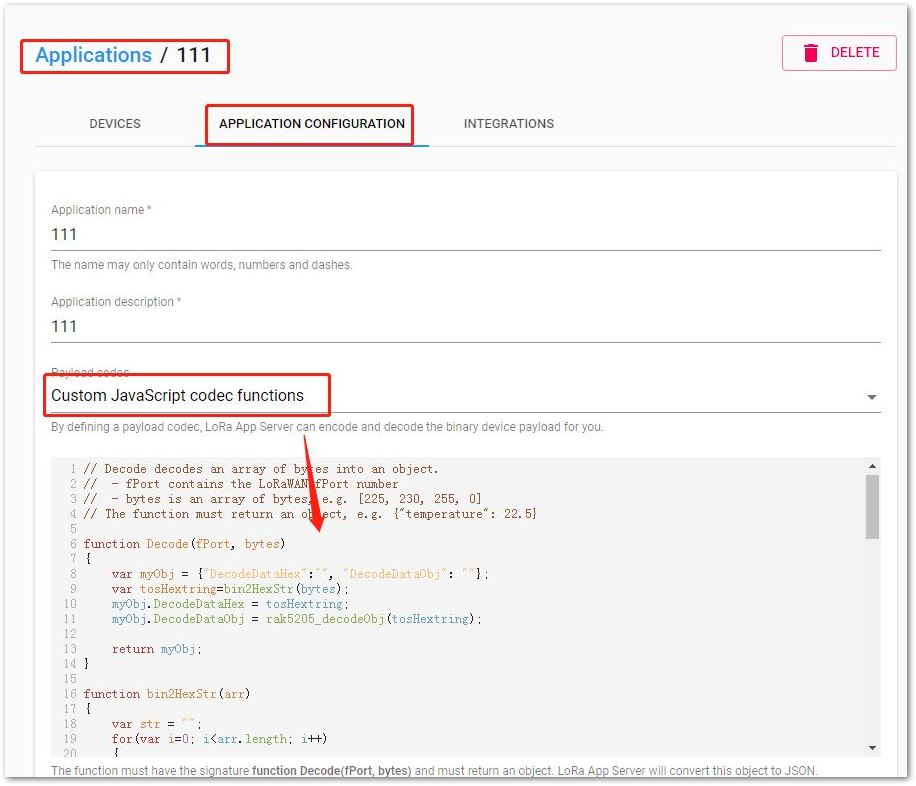 Figure 1: Decoded Function in Chirpstack
- Then, click ‘UPDATE APPLICATION’ button to save decoding function.
Testing in Real System in ChirpStack
After gateway and node go online, click the uplink data record from the application data at "LIVE DEVICE DATA" tab to check the decode status. From the image below, we can see the data decoded successfully in ChirpStack.
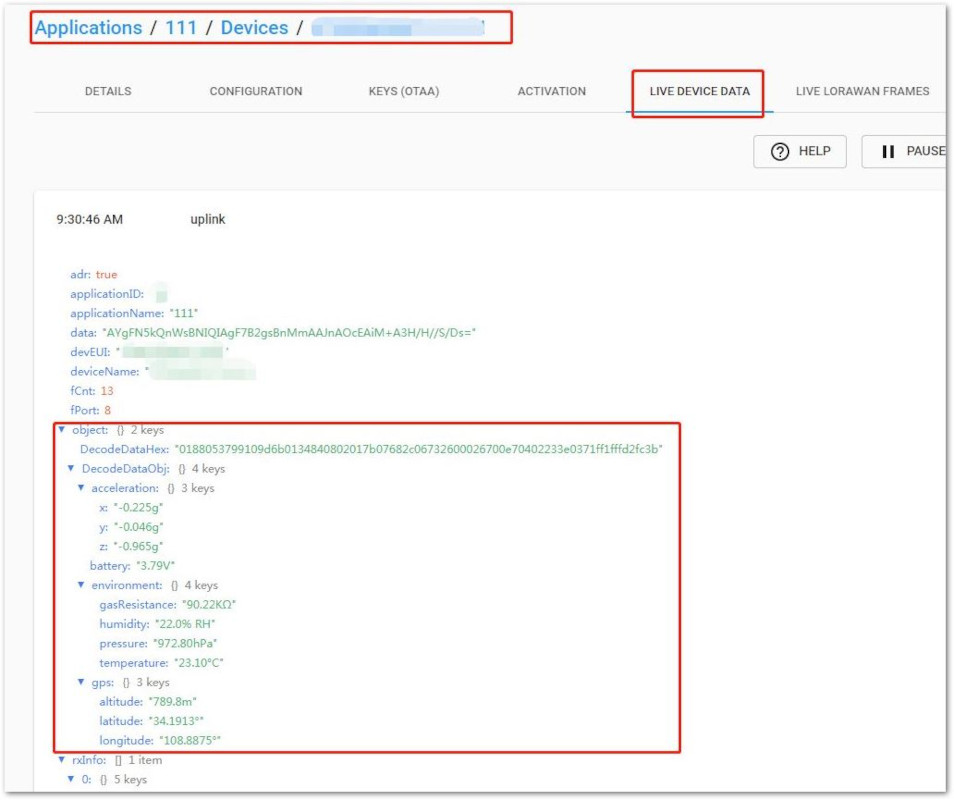 Figure 1: Decode Status in ChirpStack
LoRa P2P Mode
The setup process for the RAK7204 WisNode Sense Home in LoRaP2P Mode is just the same with the process with the RAK811 Wisnode. These are the steps that you need to follow for this mode:
- First, find two RAK7204 WisNode Sense Home which can work on EU868 frequency and make sure their firmware version isn’t less than V3.0.0.1.
- Next, connect these two RAK7204 WisNode Sense Home with PC through USB cable, and open two serial port tool on PC.
- Now, configure them to both work in LoRaP2P mode as follow:
at+set_config=lora:work_mode:1
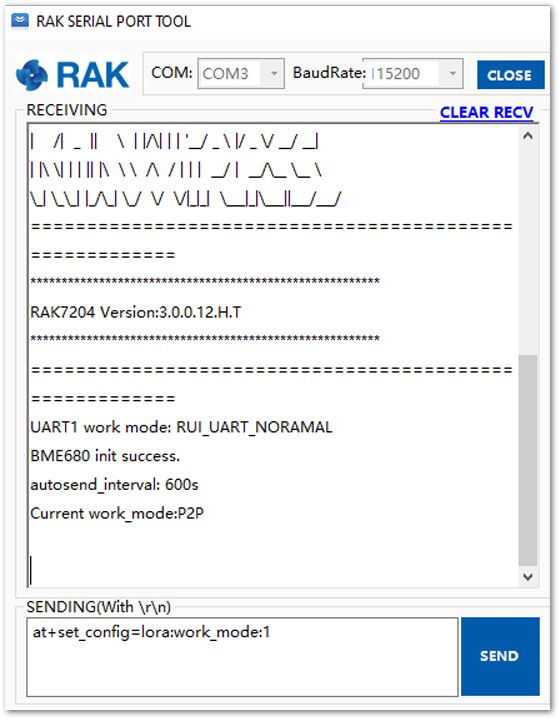 Figure 1: LoRaP2P Mode
Then configure LoRaP2P parameters for both of them as follow for example:
at+set_config=lorap2p:869525000:7:0:1:5:5
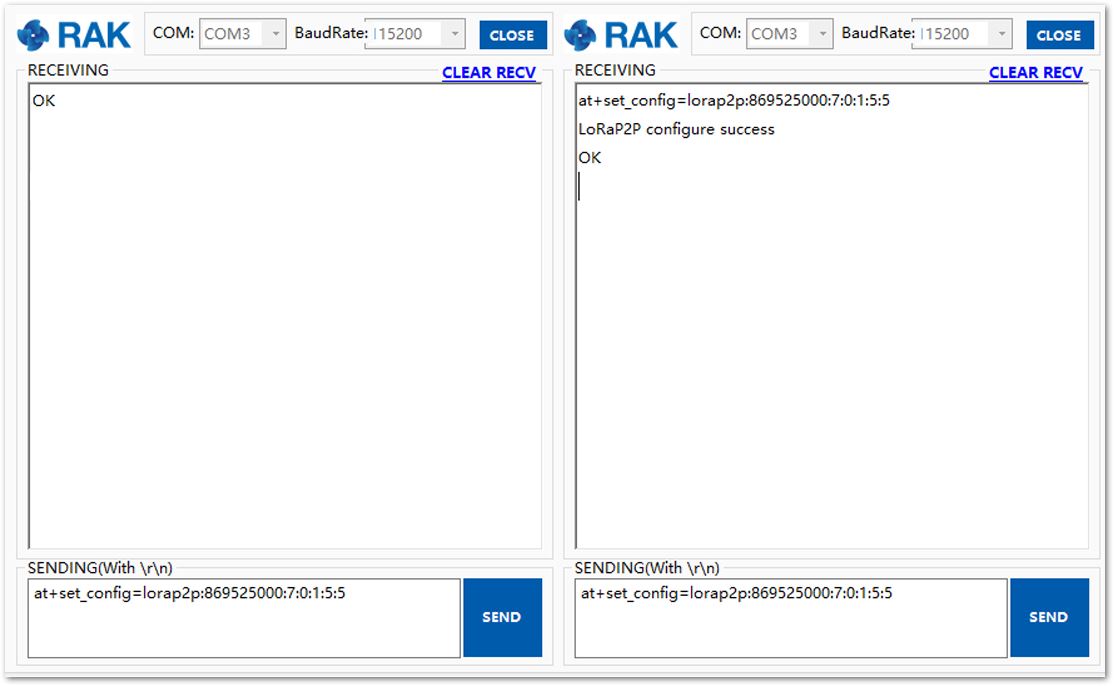 Figure 1: LoRaP2P Configuration
OK! Try to send a message from RAK7204 WisNode Sense Home - 2 (the right one) to RAK7204 WisNode Sense Home - 1 (the left one):
at+send=lorap2p:1234567890
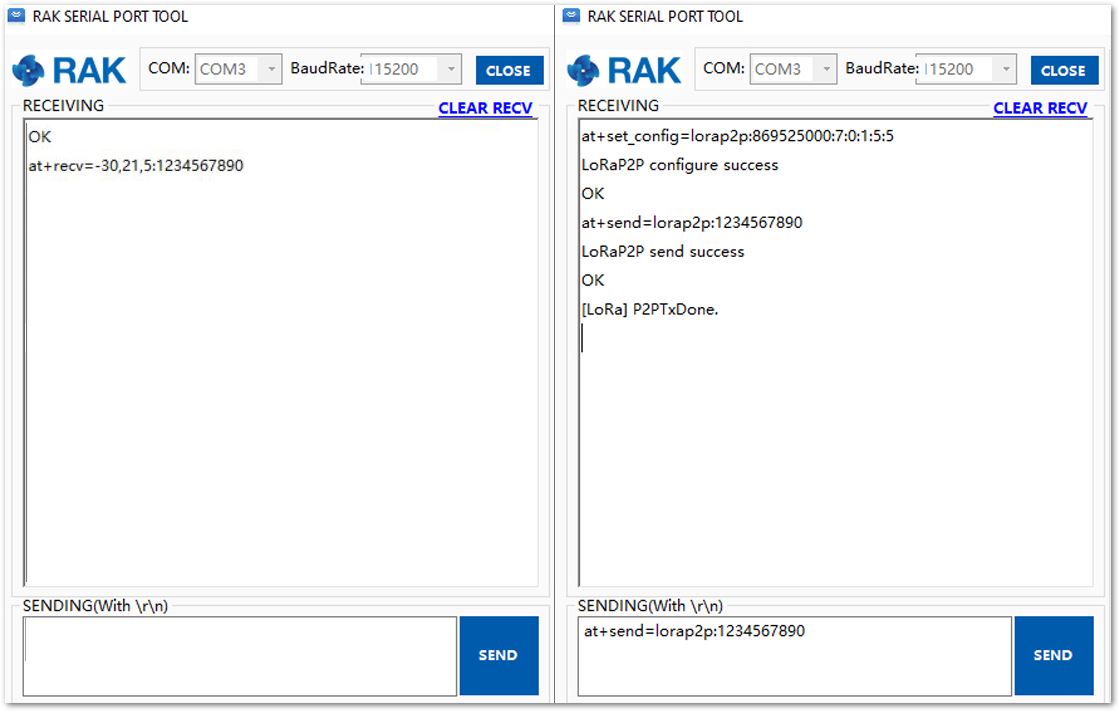 Figure 1: Test Message Sent
Success! You can send more messages:
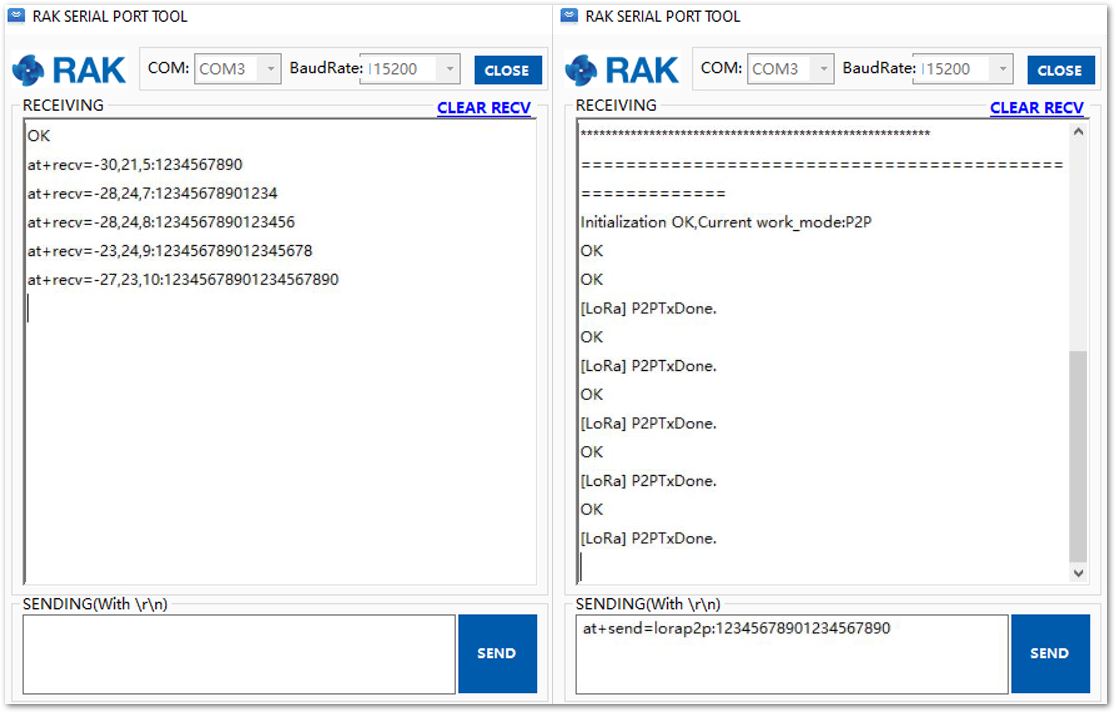 Figure 1: Test Message Sent
Similarly, you can send message from RAK7204 WisNode Sense Home-1 to RAK7204 WisNode Sense Home-2 surely. Just try it freely. Great! We’ve done it, and that’s all about how to use LoRaP2P on RAK811 WisNode.
You can use RAK7204 WisNode Sense Home LoRaP2P mode according to it.
ADR and DR
You can open the ADR feature of RAK7204 WisNode Sense Home by using the following AT command:
at+set_config=lora:adr:1
or you can close the ADR feature of RAK7204 WisNode Sense Home by using this AT command:
at+set_config=lora:adr:0
There is also an AT command which is used to set the DataRate(DR):
| AT Command | Description |
|---|---|
at+set_config=lora:dr:X | Set the DR of LoRa Node. • X : the number of DR. Generally, the value of X can be 0~5. More details, please check the LoRaWAN 1.0.2 specification. |
For example, if you want to set the current DR to DR0, you just do as follow:
at+set_config=lora:dr:0
Miscellaneous
Burning the Bootloader
Usually you don't need to burn the bootloader since there is a bootloader already in RAK7204 WisNode Sense Home from V3.0.0.0 firmware and so on. If the firmware of your RAK7204 WisNode Sense Home is V3.0.0.0 or a newer one, Skip this section.
You can burn the bootloader in your RAK7204 WisNode Sense Home by following the steps below:
- Download and Install the STM32CubeProgrammer Software from STMicroelectronics on your Windows PC.
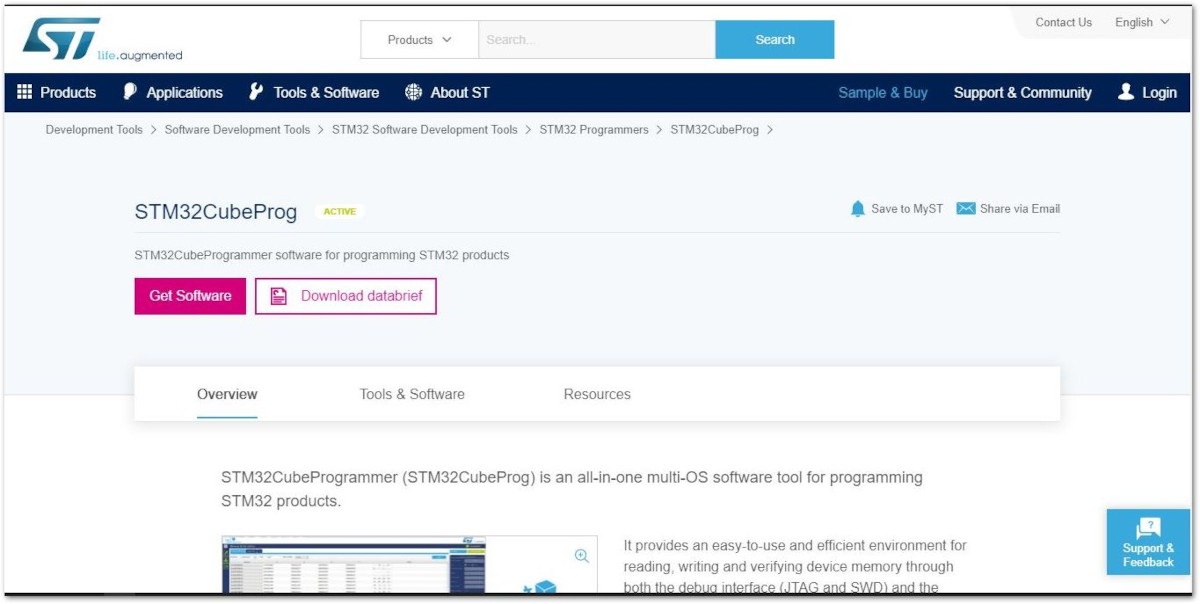 Figure 1: STM32CubeProg Download Page
- Insert the provided jumper on the Boot line pins ("BOOT" pin and "VDD"), shorting them . Also, make sure that the RX pin of J25 is connected to the RXCP pin.
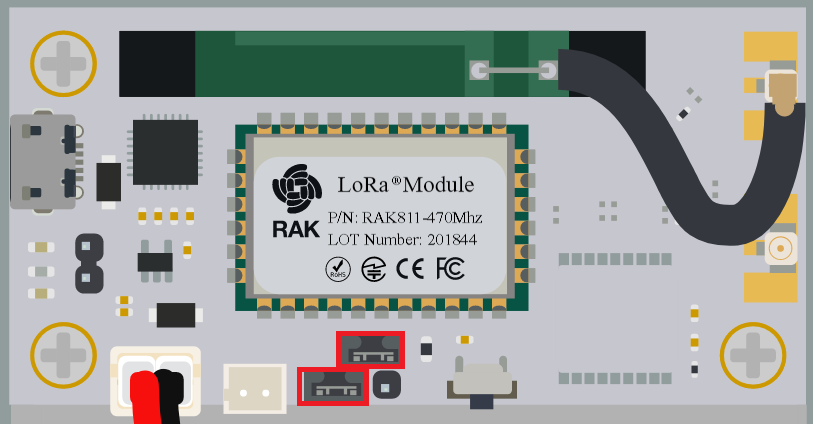 Figure 1: Boot Line shorted using the Jumper Pins
- Connect the RAK7204 WisNode Sense Home on your Windows PC's USB Interface and press the RST Button or power it on again. Open the STM32CubeProgrammer Software and Select UART type.
Figure 1: USB Interface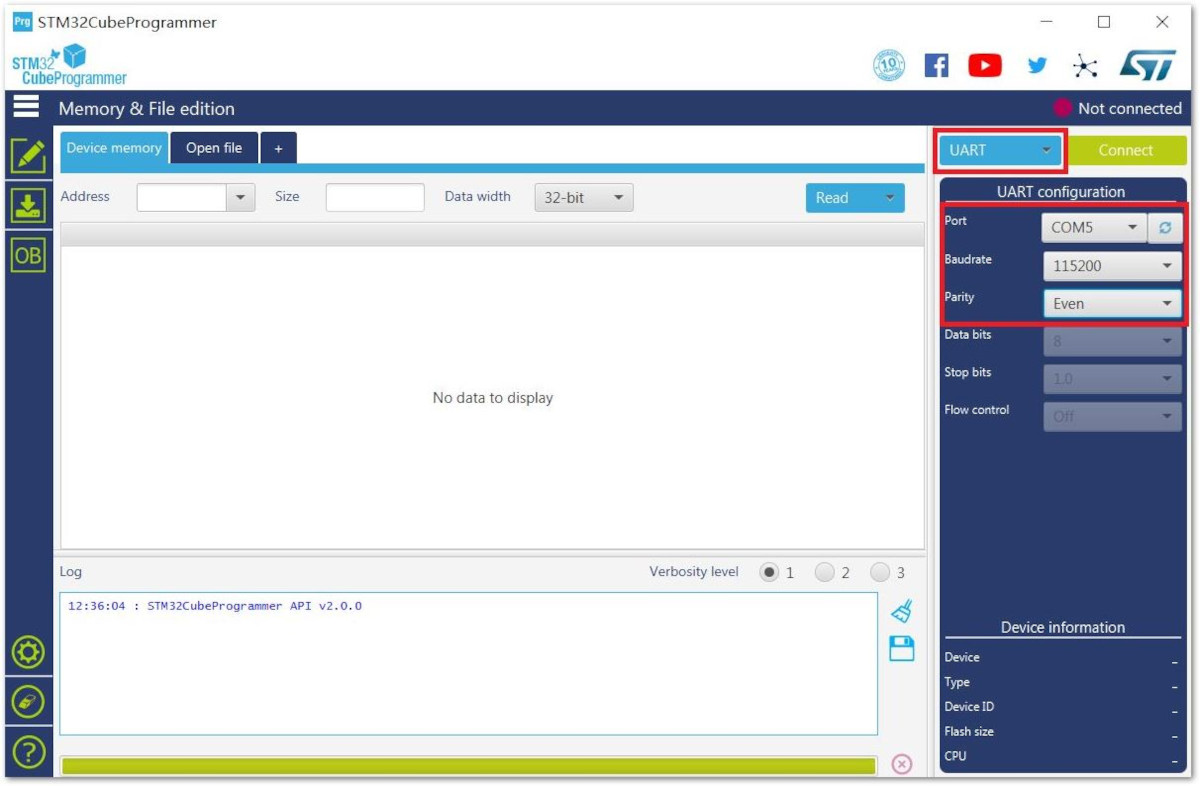 Figure 1: UART Settings in STM32CubeProgrammer
-
Choose the appropriate port number in the COM Port field.
-
Set the Baud Rate to 115200, and the Parity to Even as seen in the figure above then Press Connect.
- If you didn't properly set your RAK7204 WisNode Sense Home to work in BOOT Mode, you will see the following information in the Log Section of the Software:
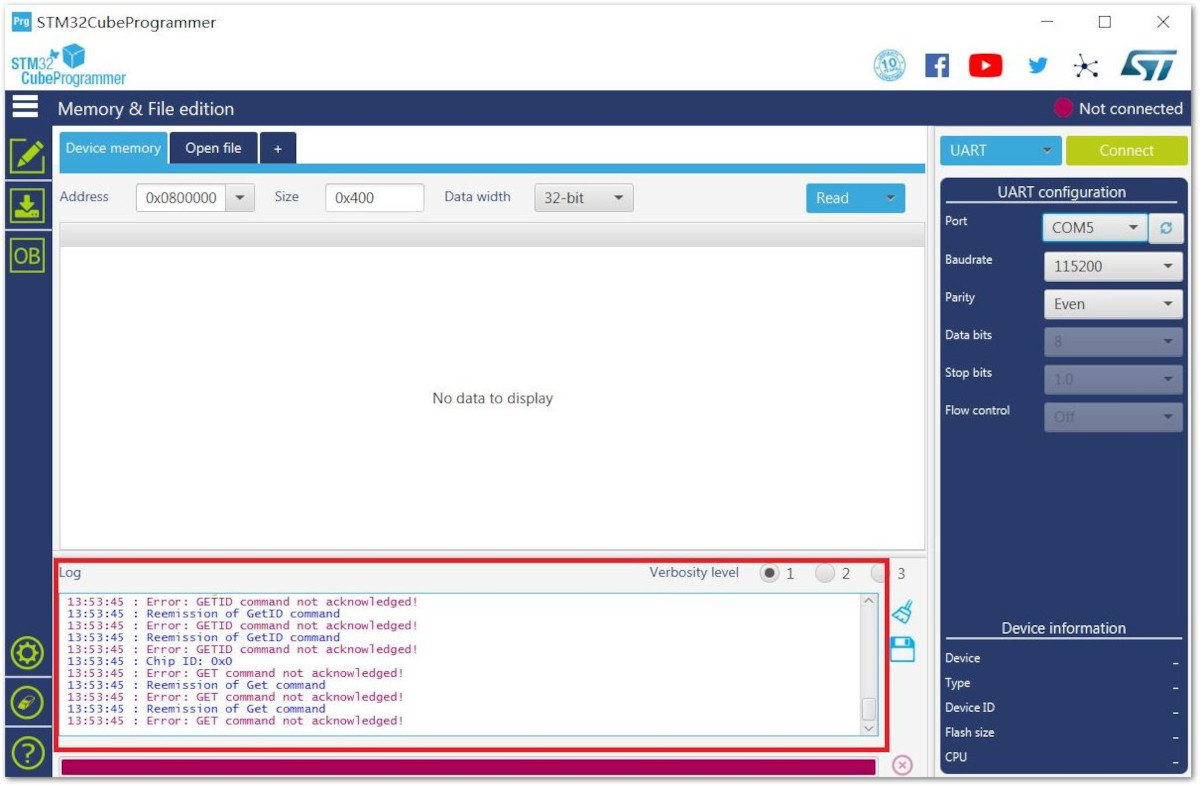 Figure 1: Errors Occurred During Connecting
- If this happens, Close the STM32CubeProgrammer and go back to the section above and set your RAK7204 WisNode Sense Home to work in Boot Mode again.
- If all works well, You will then see the following log:
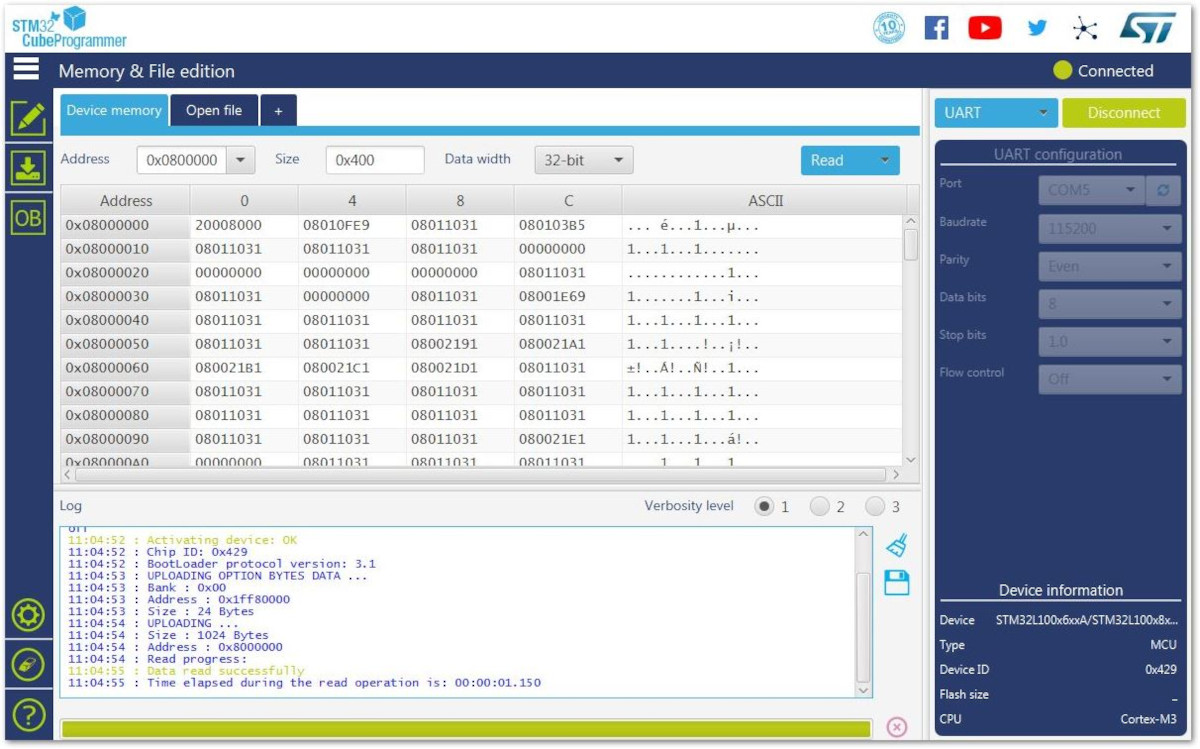 Figure 1: Successful Connection Log to your Device
Now that you have successfully connected your RAK7204 WisNode Sense Home to the STM32CubeProgrammer Tool, let's burn the Bootloader into the RAK7204 WisNode Sense Home.
-
Download the bootloader for the RAK7204 WisNode Sense Home.
-
In the STM32CubeProgrammer, Click the "Erase Chip" button to erase all the data on RAK7204 WisNode Sense Home:
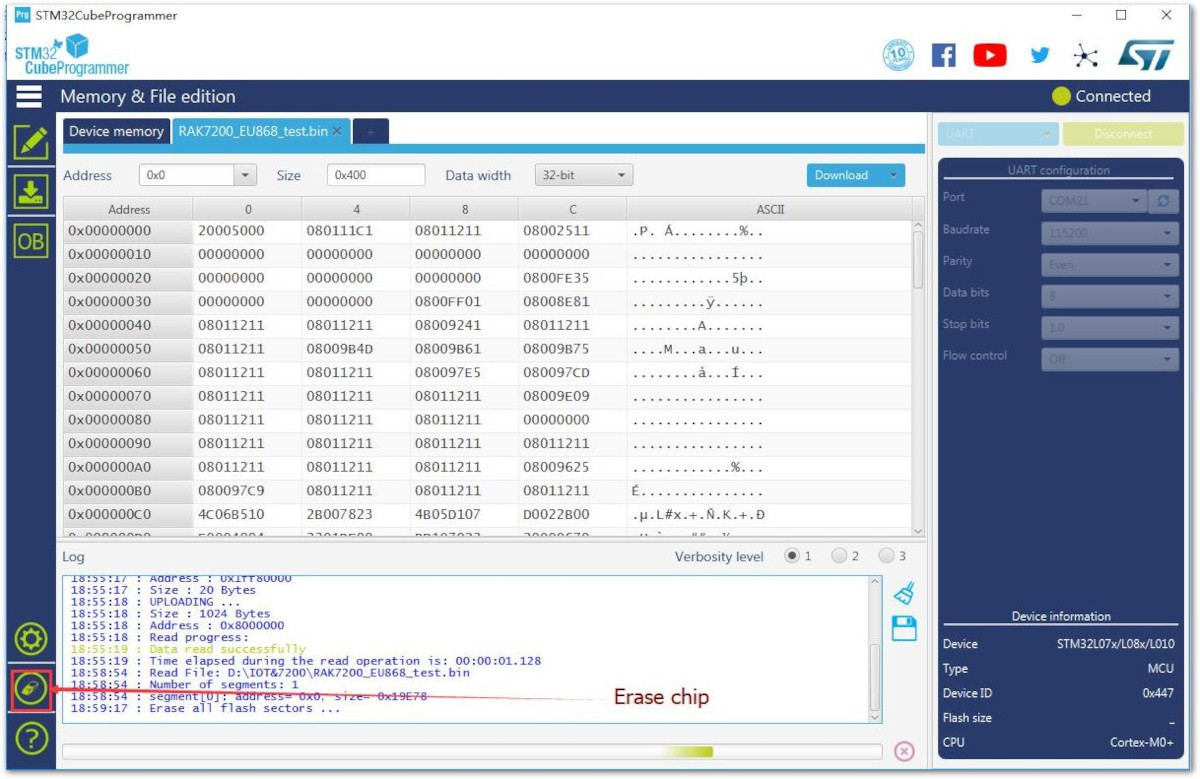 Figure 1: Erasing the Data in the Chip
- Click "Open File" and select the correct Bootloader file that you have just downloaded.
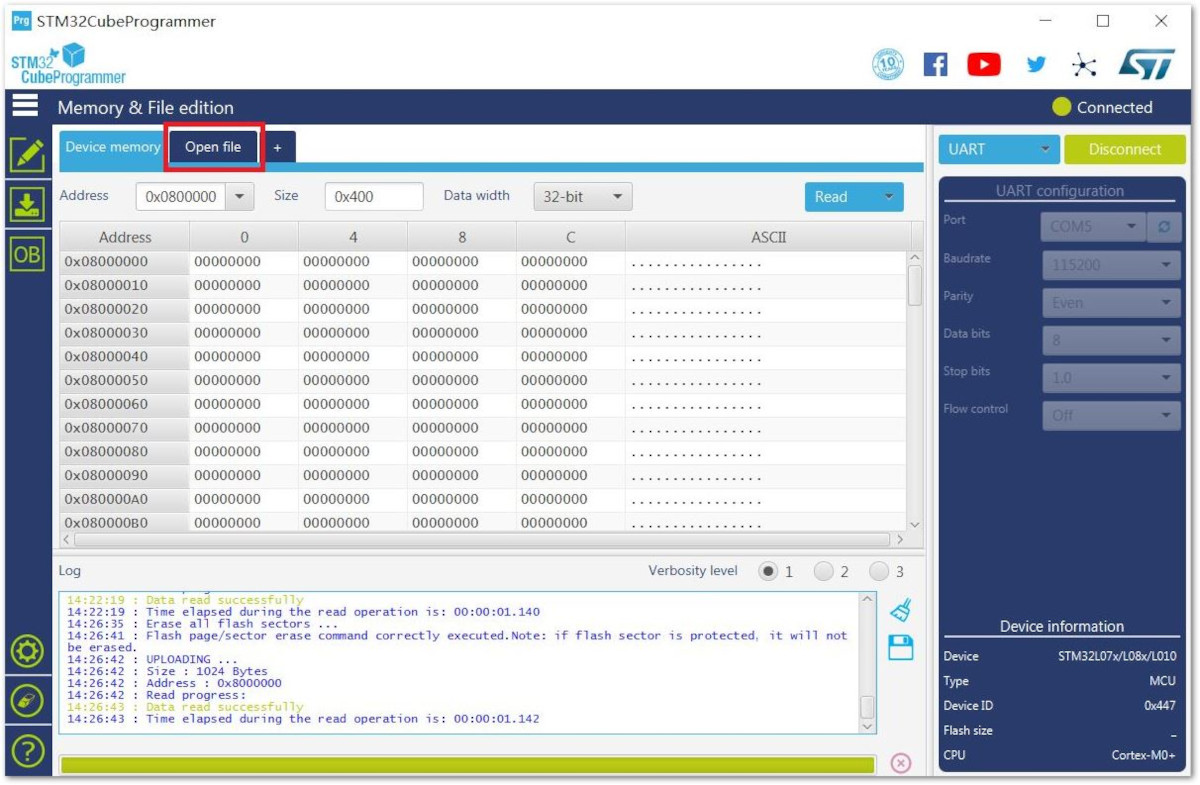 Figure 1: Opening the Bootloader file
- Click the "Download" Button to start the burning process.
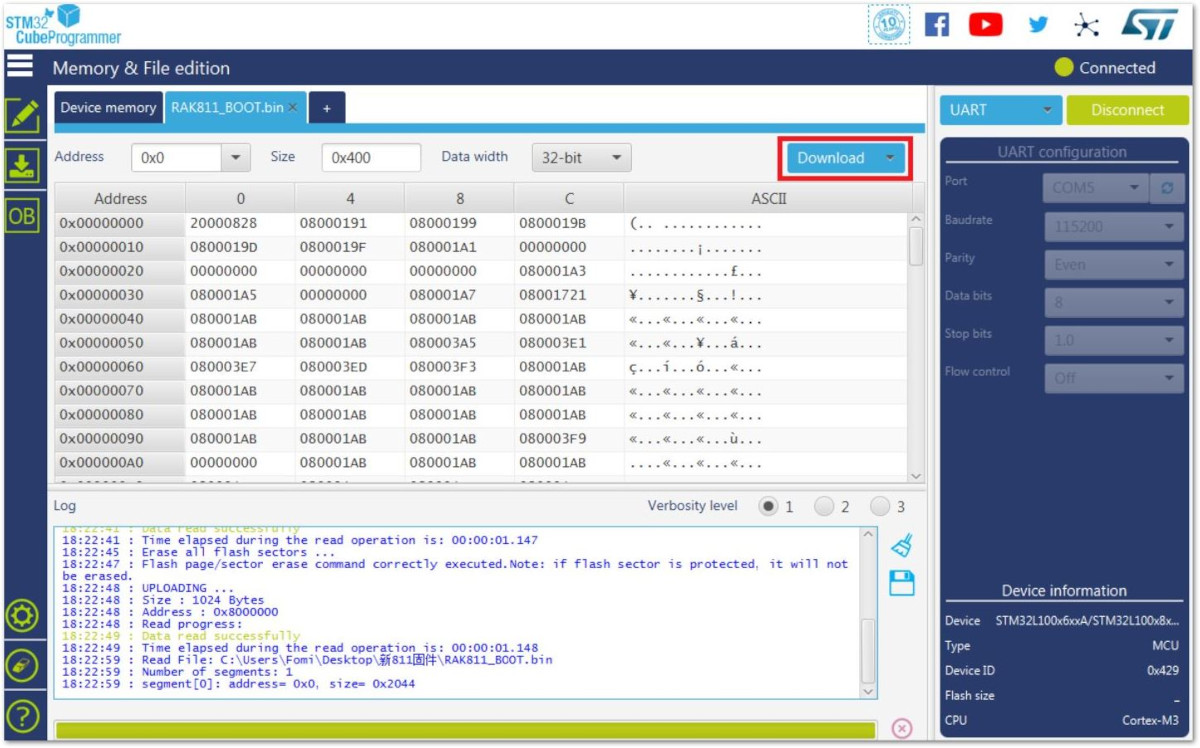 Figure 1: Downloading of Bootloader to the device
- After a couple of seconds, you will see the following window telling that you have successfully burned the Bootloader to your RAK7204 WisNode Sense Home!
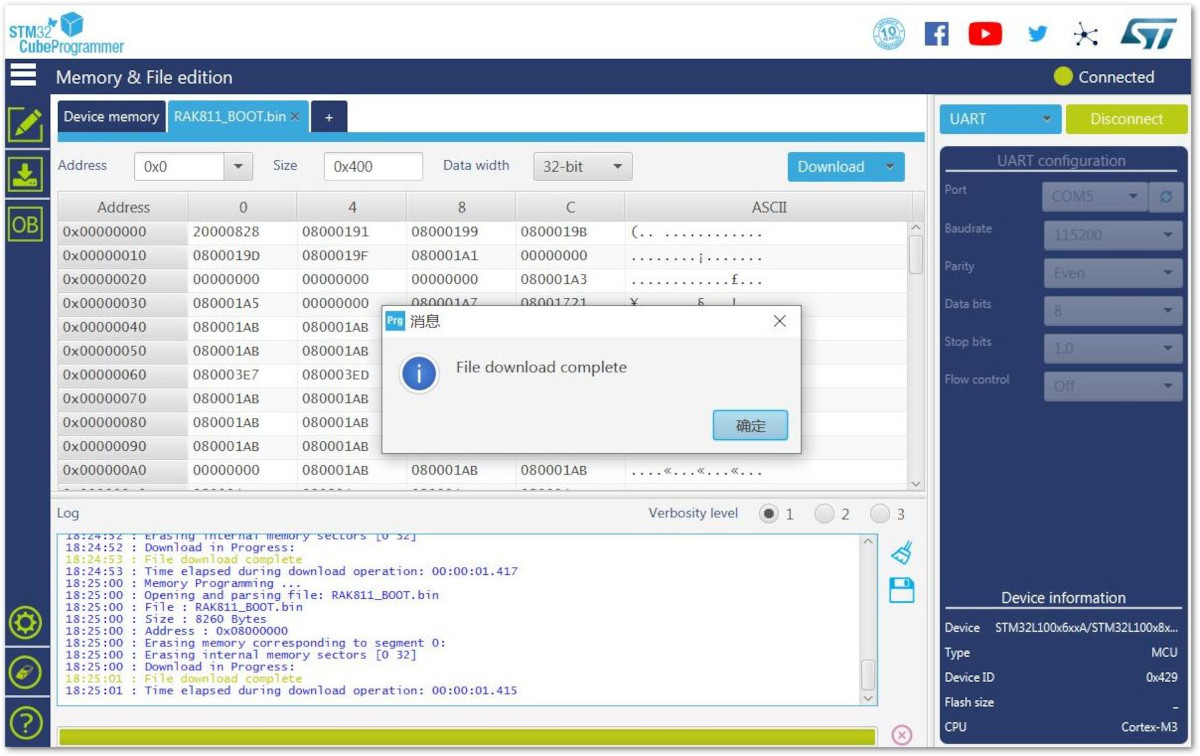 Figure 1: Successfully Burned the Bootloader to the device
- “Disconnect” and close the “STM32CubeProgrammer” tool.
Disconnect your RAK7204 WisNode Sense Home in your Windows PC and do not forget to remove the Jumper on the Boot Line Pins to work in Normal Mode.
Burning the Firmware
If the firmware version of your RAK7204 WisNode Sense Home is newer than V3.0.0.0 or you have just burned the bootloader into the board according to the Burning the Bootloader section, follow the steps below
- Make sure you have set your RAK7204 WisNode Sense Home to work in boot mode. If you have just burned the bootloader according to the previous section, it works in boot mode now.
- Open and download the RAK Serial Port Tool Here and Connect your board via the USB interface and enter the following AT command to let it work in boot mode.
Before configuring your RAK7204 WisNode Sense Home, make sure you already connected the Battery provided on your device in order for you to communicate with the device successfully.
at+set_config=device:boot
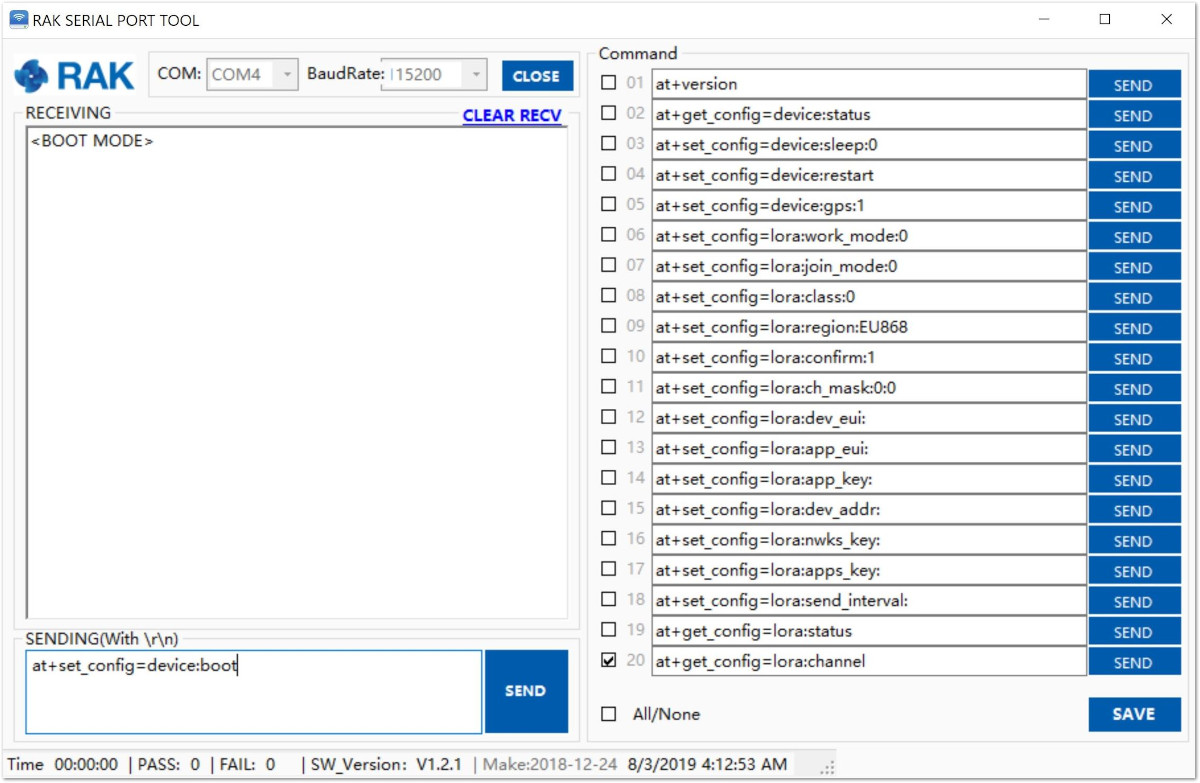 Figure 1: Entering Boot Mode
- Download the RAK Device Firmware Upgrade (DFU) Tool from the RAKwireless website.
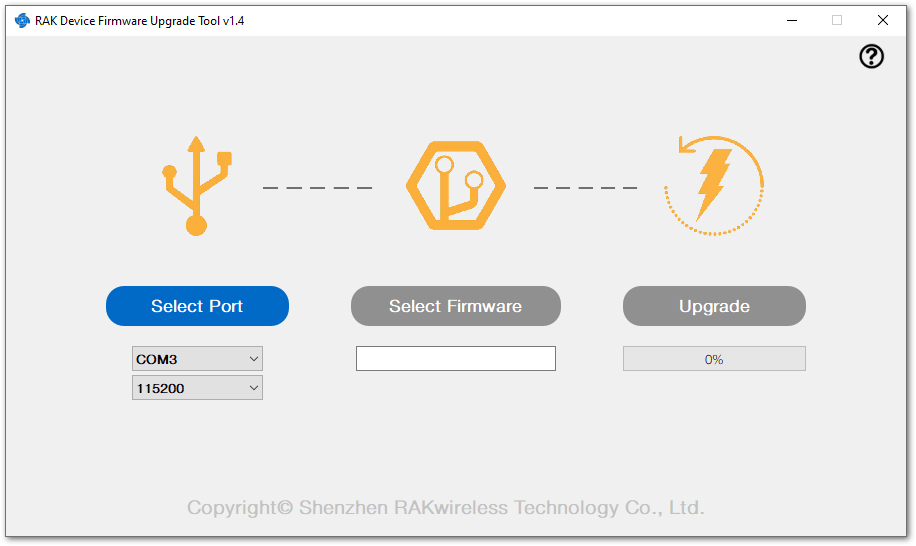 Figure 1: Device Firmware Upgrade Tool
- Download the latest firmware for the RAK7204 WisNode Sense Home
Make sure to pick the appropriate bin file depending on the region you are in.
- "RUI_RAK7204_V3.x.x.x.H" supported regions are: IN865, EU868, US915, AU915, KR920, AS923
- "RUI_RAK7204_V3.x.x.x.L” supported regions are: EU433, CN470 Visit this article for more information on your local TTN frequency plan.
- Select the application firmware file of the module with the suffix ". bin".
 Figure 1: Select firmware
- Click the "upgrade" button to upgrade the device. After the upgrade is complete, the RAK7204 is now ready to work with the new firmware.
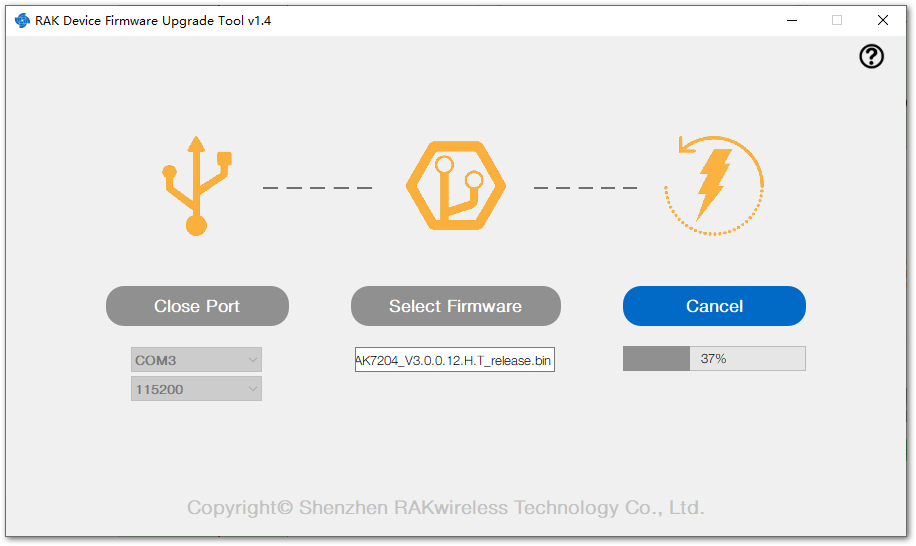 Figure 1: Firmware upgrading
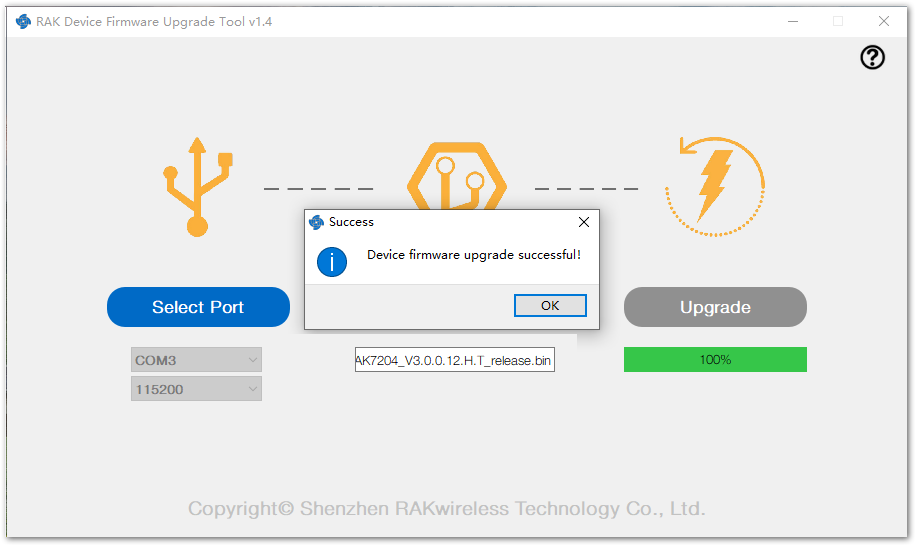 Figure 1: Upgrade successful
- Now, CLOSE the upgrade tool and and proceed to the next section.
Testing the Installed Firmware
In order for you to check if you have successfully installed the firmware on your RAK7204 WisNode Sense Home, open the Serial Port tool again. Press the "Reset button" or type the command below. If everything works perfectly, you should see the following message below:
 Figure 1: Restarting Your Device
This information means that you have uploaded the Firmware successfully!