
RAK6421 Pi HAT EEPROM Flashing Guide
This guide explains how to write the HAT EEPROM on a RAK6421 Pi HAT and verify that it was written correctly.
What Is Raspberry Pi HAT+?
HAT means Hardware Attached on Top. A Raspberry Pi HAT/HAT+ is an add-on board that can identify itself to the Pi through an EEPROM (usually at I2C address 0x50).
When EEPROM data is valid, Raspberry Pi OS can read details such as:
- Vendor and product name
- Product ID and version
- Custom fields (for example hardware version or slot/module mapping)
Those values appear under /proc/device-tree/hat/.
- Power off first before changing any jumper/short.
- You must short the EEPROM write-enable pins on the RAK6421 to allow writing.
- If write-enable is not shorted, the flash command can look successful but the EEPROM content is not actually updated.
- After flashing, remove the short again if you want normal write protection behavior.
Prerequisites
- Raspberry Pi OS running on the target Pi.
- Basic terminal access (
sshor local terminal). - Required commands available:
eepmake,eepflash.sh,eepdump,i2cdetect,python3. - This repository cloned on the Pi.
Quick check:
which eepmake eepflash.sh eepdump i2cdetect python3
Flashing Steps
1. Enable I2C Bus 0 (Required)
The HAT EEPROM is on I2C bus 0. If bus 0 is not enabled, the EEPROM at 0x50 will not be detected.
Edit the Raspberry Pi config and make sure these lines are present in /boot/firmware/config.txt:
dtparam=i2c_vc=on
dtoverlay=i2c0
Then reboot:
sudo reboot
2. Confirm EEPROM Is Visible at 0x50
After reboot:
i2cdetect -y 0
Expected output includes 50 in the 0x50 row, similar to:
     0  1  2  3  4  5  6  7  8  9  a  b  c  d  e  f
00:                          -- -- -- -- -- -- -- --
10:  -- -- -- -- -- -- -- -- -- -- -- -- -- -- -- --
20:  -- -- -- -- -- -- -- -- -- -- -- -- -- -- -- --
30:  -- -- -- -- -- -- -- -- -- -- -- -- -- -- -- --
40:  -- -- -- -- -- -- -- -- -- -- -- -- -- -- -- --
50:  50 -- -- -- -- -- -- -- -- -- -- -- -- -- -- --
60:  -- -- -- -- -- -- -- -- -- -- -- -- -- -- -- --
70:  -- -- -- -- -- -- -- --
If 0x50 is missing, fix I2C config first before flashing.
3. Prepare EEPROM Content File
Edit RAK-6421-eeprom.txt for your board:
product_id,product_ver,vendor,productcustom_datalines such as:
custom_data "hardware_version D"
custom_data "io_slot1 RAK13302"
- Use format
custom_data "field value"(space separator, no colon). - Keep comments starting with
#. - Keep
product_uuidas all zeroes if you wanteepmaketo auto-generate a UUID.
4. Enable Write (Hardware Short)
Before writing EEPROM:
- Power off the Pi.
- Short the EEPROM write-enable pins on the RAK6421.
- Power on the Pi.
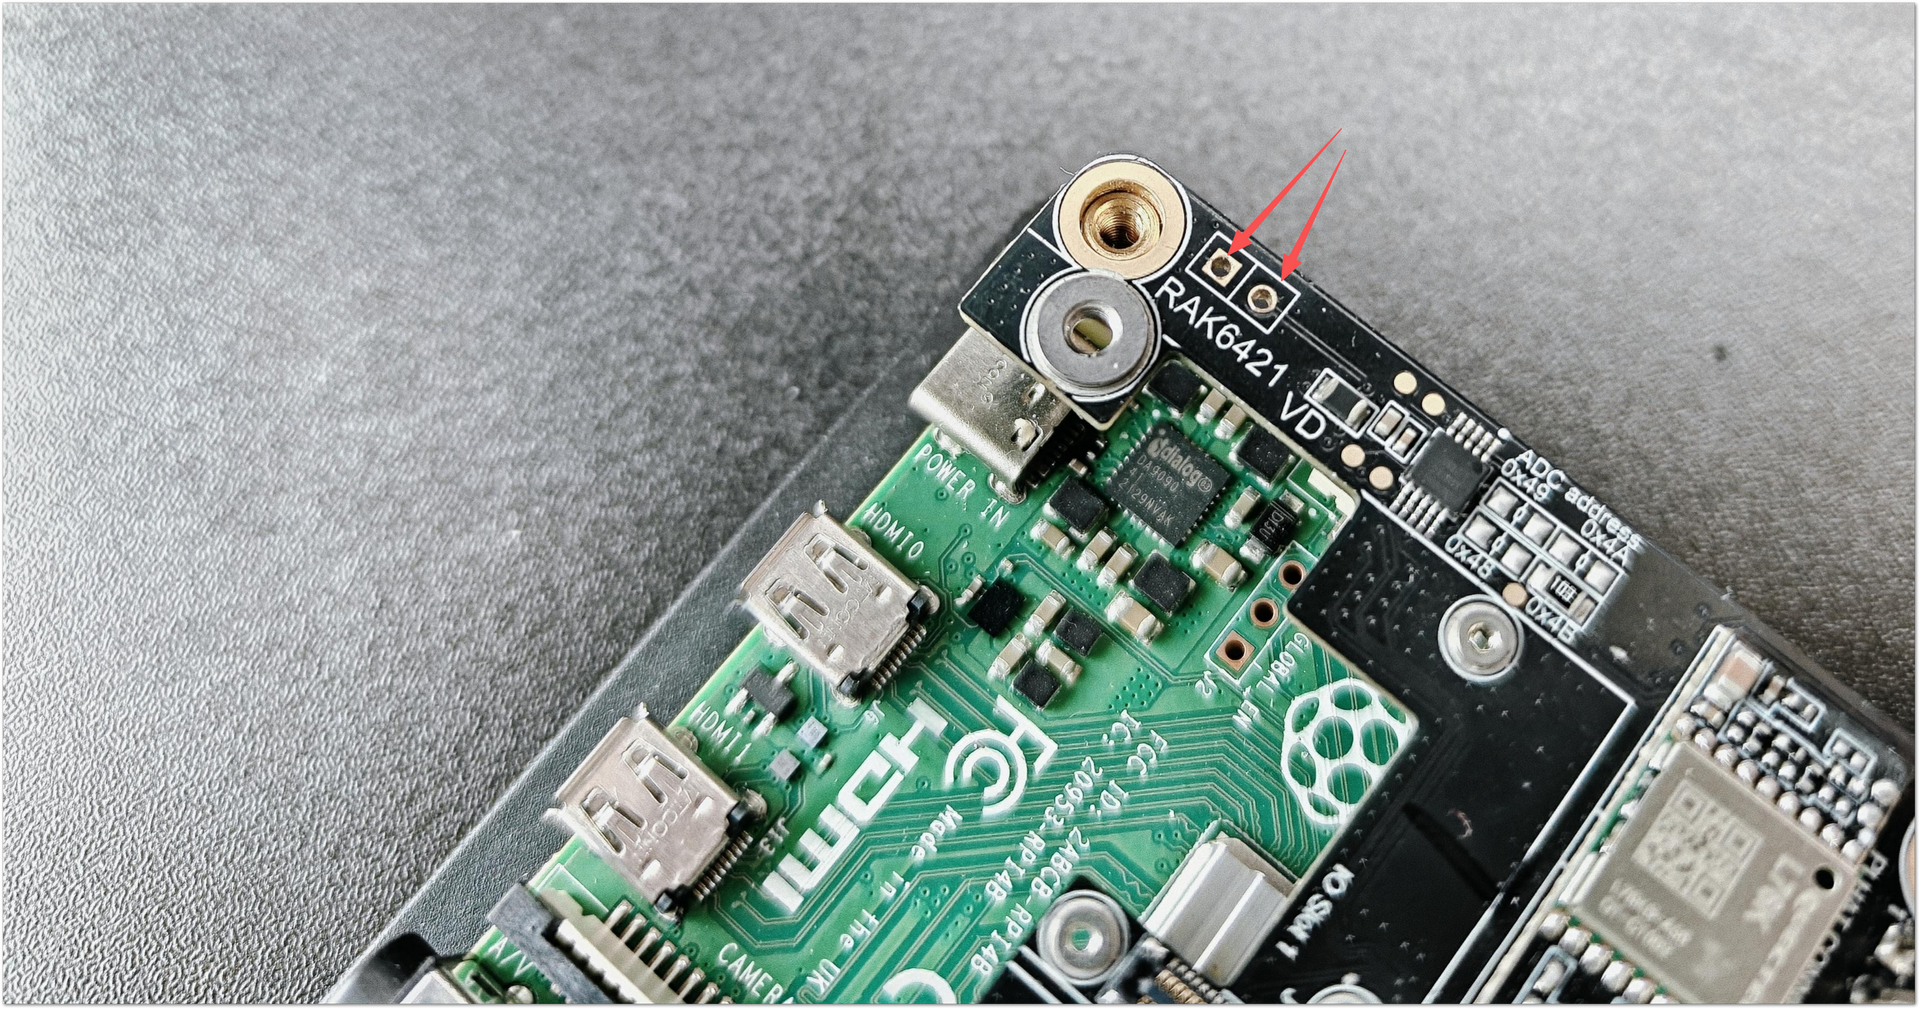 Figure 1: Short on the EEPROM Enable Pins
Do not skip this step.
5. Flash + Verify (Recommended Script)
Run from repository root:
python3 flash-eeprom-and-check.py
You can also pass a sudo password as an argument:
python3 flash-eeprom-and-check.py '<sudo-password>'
The script performs:
eepmake RAK-6421-eeprom.txt RAK-6421-eeprom.eepeepflash.sh -y -w -f=RAK-6421-eeprom.eep -t=24c32- Read-back + parse verification against the config file
- JSON result output with PASS/FAIL status per field
You can also pass sudo password as argument:
python3 flash-eeprom-and-check.py '<sudo-password>'
Manual Flashing (Without the Script)
If you prefer to run the commands yourself instead of using flash-eeprom-and-check.py, follow these steps. The same prerequisites apply (I2C bus 0 enabled, write-enable pins shorted, etc.).
1. Generate the Binary EEPROM File
Use eepmake to convert your text config into a binary .eep file:
eepmake RAK-6421-eeprom.txt RAK-6421-eeprom.eep
If you use a different config file or output name:
eepmake <your-config>.txt <output>.eep
2. Write to the EEPROM
Use eepflash.sh to write the binary image. The RAK6421 uses a 24c32 EEPROM:
sudo eepflash.sh -y -w -f=RAK-6421-eeprom.eep -t=24c32
| Flag | Description |
|---|---|
-y | Skips confirmation prompts |
-w | Write mode (use -r for read) |
-f= | Specifies the file |
-t=24c32 | Specifies the EEPROM type |
3. (Optional) Read Back and Verify
To manually verify what was written:
# Read EEPROM to a file
sudo eepflash.sh -y -r -f=verify.eep -t=24c32

# Dump binary to human-readable text
eepdump verify.eep verify.txt

# Inspect the result
cat verify.txt
Then compare verify.txt with your RAK-6421-eeprom.txt to confirm the values match.
4. Reboot and Check Device-Tree
Reboot the Pi, then inspect what the OS sees:
cat /proc/device-tree/hat/
cat /proc/device-tree/hat/custom_0
cat /proc/device-tree/hat/custom_1
Troubleshooting Checklist
i2cdetect -y 0 does not show 50
- Confirm
dtparam=i2c_vc=onanddtoverlay=i2c0are in config. - Reboot and test again.
Flash command reports success but values do not change
- Write-enable pins were not shorted (most common issue).
Verification mismatch in script output
- Check
custom_dataformatting and spelling inRAK-6421-eeprom.txt. - Reflash with write-enable short in place.


