Location Management
A Location in WisDM represents a logical or physical group of gateways within a deployment region. Gateways assigned to a Location inherit shared network settings and can be centrally monitored, updated, and maintained.
Manage and Create Locations
Use the Locations page to centrally manage all Locations in your organization or create new ones.
From the left navigation, click Locations to access the management console. Here, you can use the search bar to find specific locations.
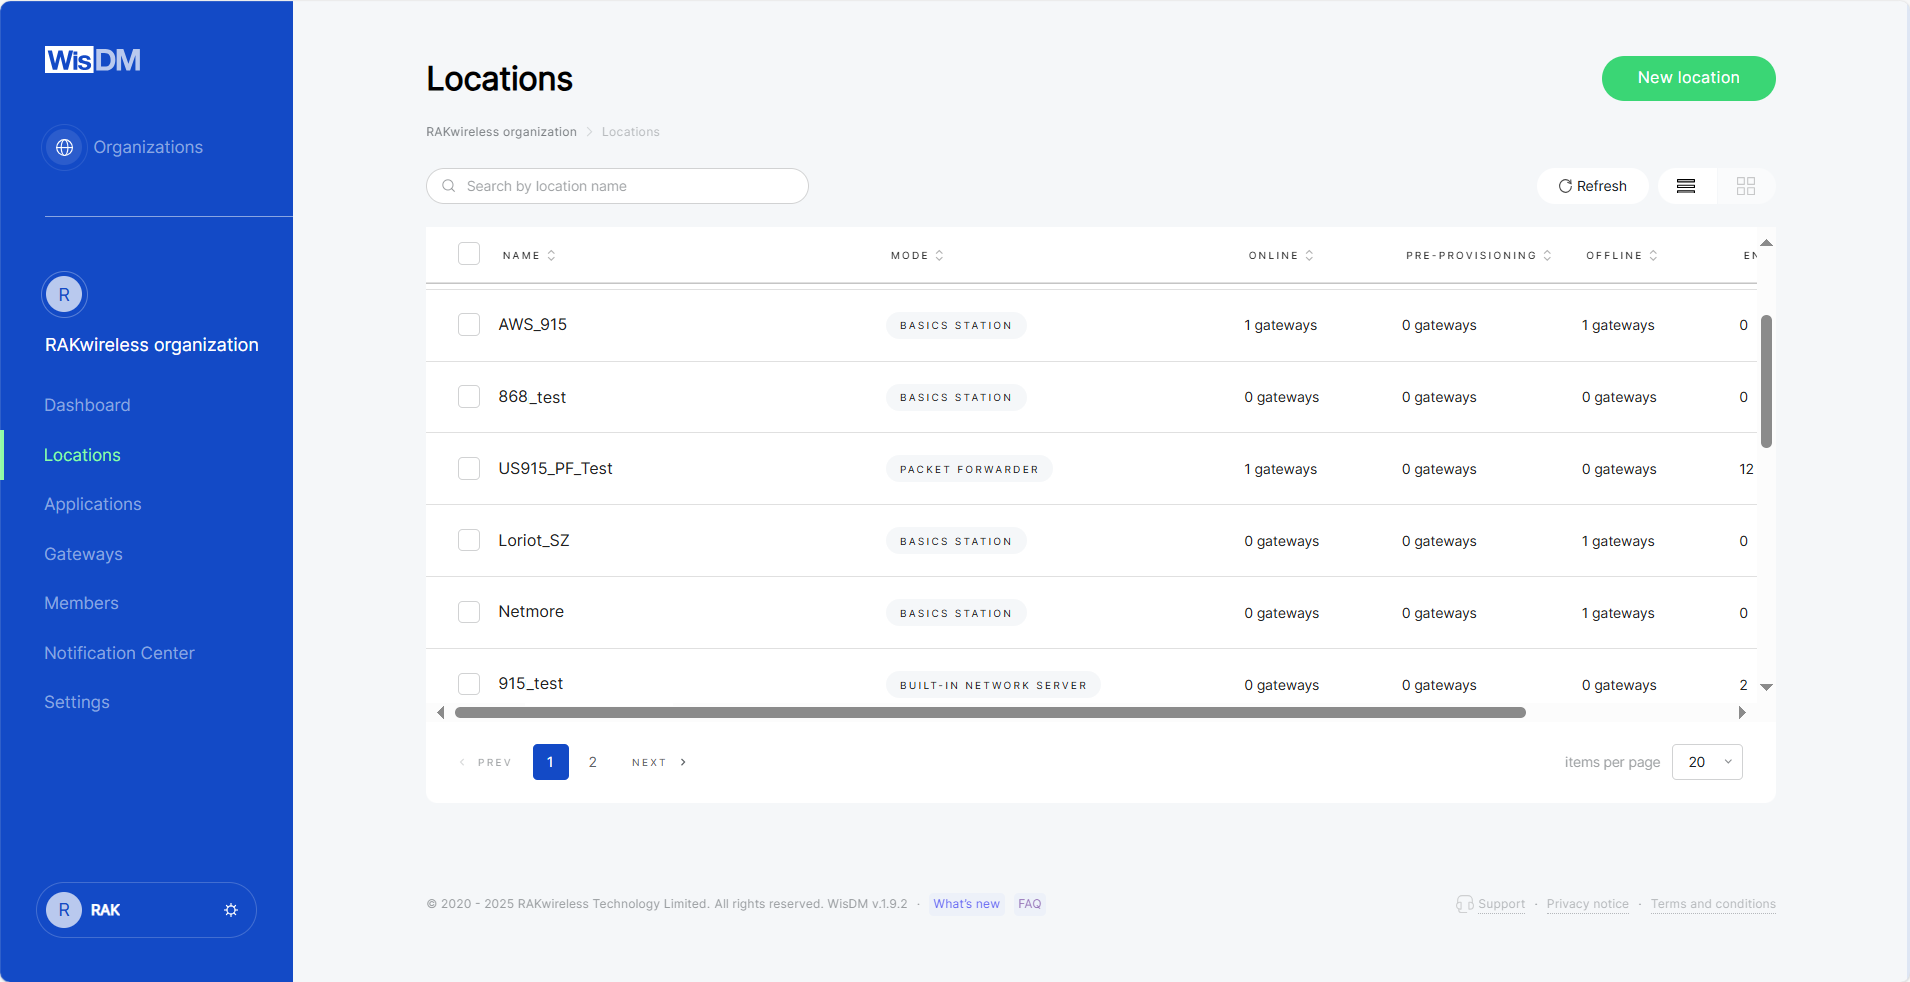 Figure 1: Locations
- Name: Custom name of the location.
- Mode: Operating mode of the location; Packet Forwarder, Basics Station, Built-in Network Server, or No Mode.
NOTE
No Mode appears when a location is created but not yet configured. Use the Configure button to complete its setup.
- Online / Offline / Pre-Provisioning: Number of gateways in each status (online, offline, or pre-provisioned) under this location.
- End Devices: Number of end devices under this location.
Export Location Information
WisDM allows you to export location information in bulk, including General Info and LoRaWAN configurations.
- In the location list, select one or more Locations and click Export CSV.
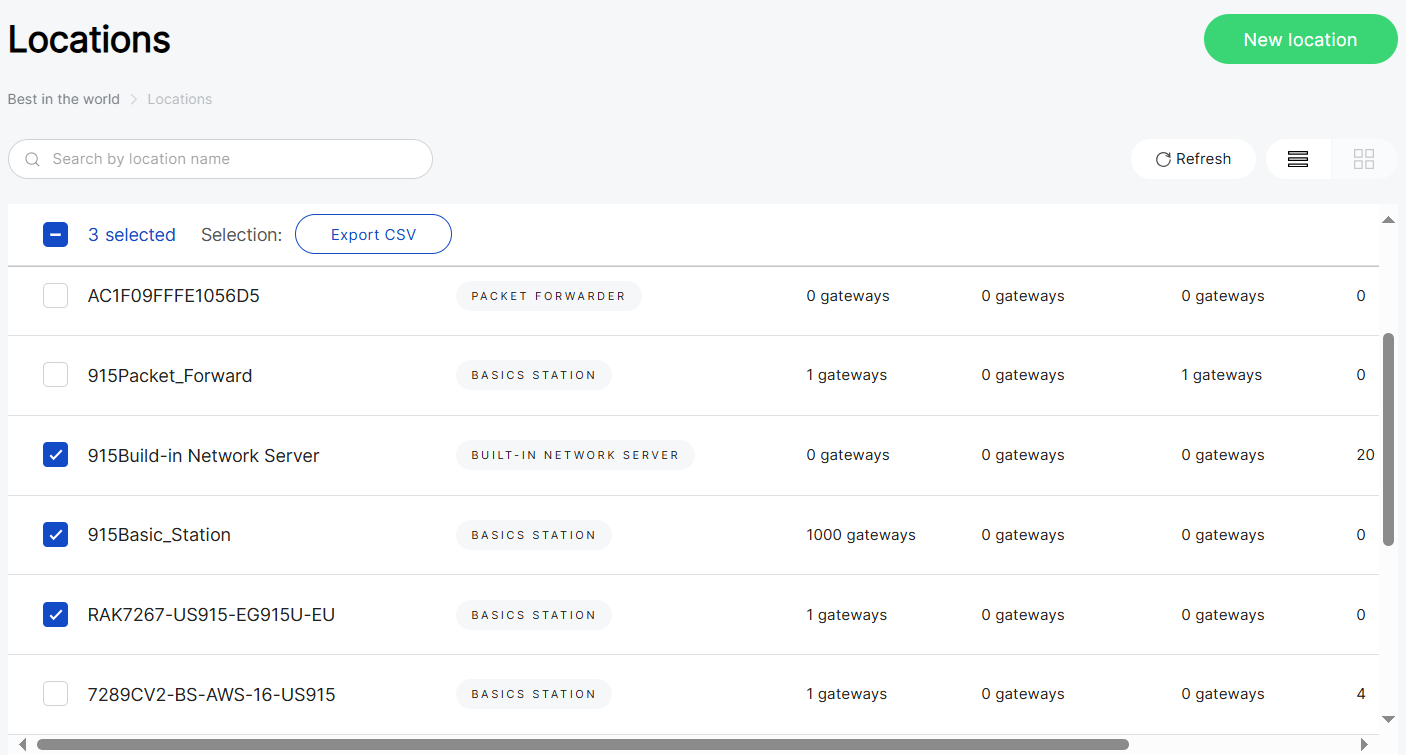 Figure 1: Location List
- Choose the details you want to export and click Export location info. A CSV file will be generated and sent to your email.
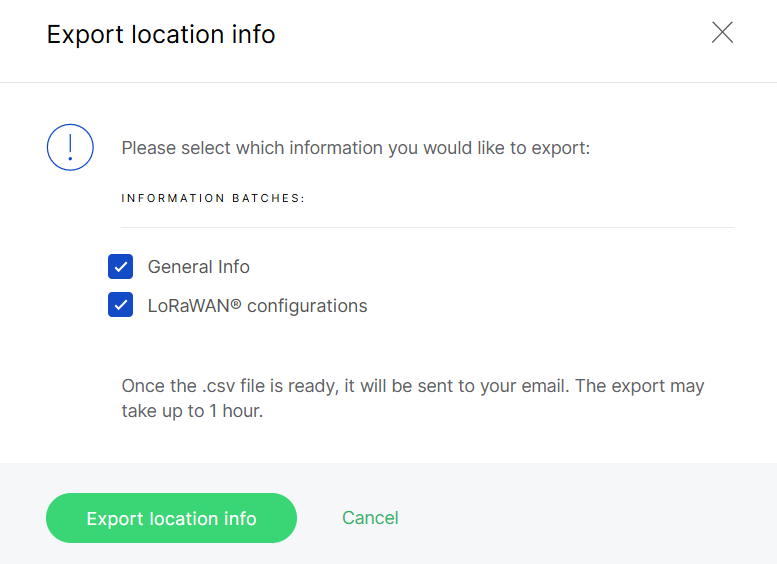 Figure 1: Location info
Delete a Location
You can delete a location from the actions menu in the Location List.
Before deleting a location, please note:
- This action cannot be undone. All location-level settings, applications, and end devices will be permanently removed.
- Assigned gateways are not deleted. They will be automatically unassigned but remain associated with the organization.
- Deleting a location will reset all gateways under it to their factory defaults.
- Only organization admins can permanently delete a location. Location admins can request deletion, subject to approval.
- In the Location List, open the actions menu and click Delete this location.
- Confirm the action in the dialog and enter your RAK ID password. If 2FA is enabled, also enter the code from your authenticator app.
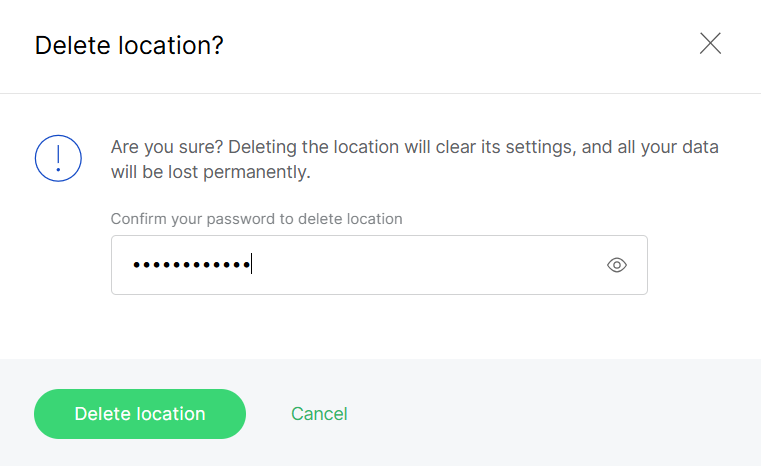 Figure 1: Delete a Location
- Click Delete location.
Add a New Location
To create a new location, click New location in the top-right corner. The setup process follows to same steps outlined in Quick Start Guide > Add a Location.
LoRaWAN Network Configuration
The LoRaWAN section displays the current LoRaWAN configuration for all gateways in the location. Although these settings are initially configured during location creation, they can be reviewed or adjusted at any time. For detailed explanations of parameters in each work mode, refer to the Quick Start Guide > Network Configuration.
Packet Forwarder and Basics Station modes cannot be switched to Built-in Network Server.
Gateway Management
The Gateways tab under a location offers a consolidated list of all gateways assigned to it. You can view their deployment on the map, check details such as Serial Number, EUI, and firmware versions, and perform management actions like adding new gateways, searching, filtering, or applying bulk operations.
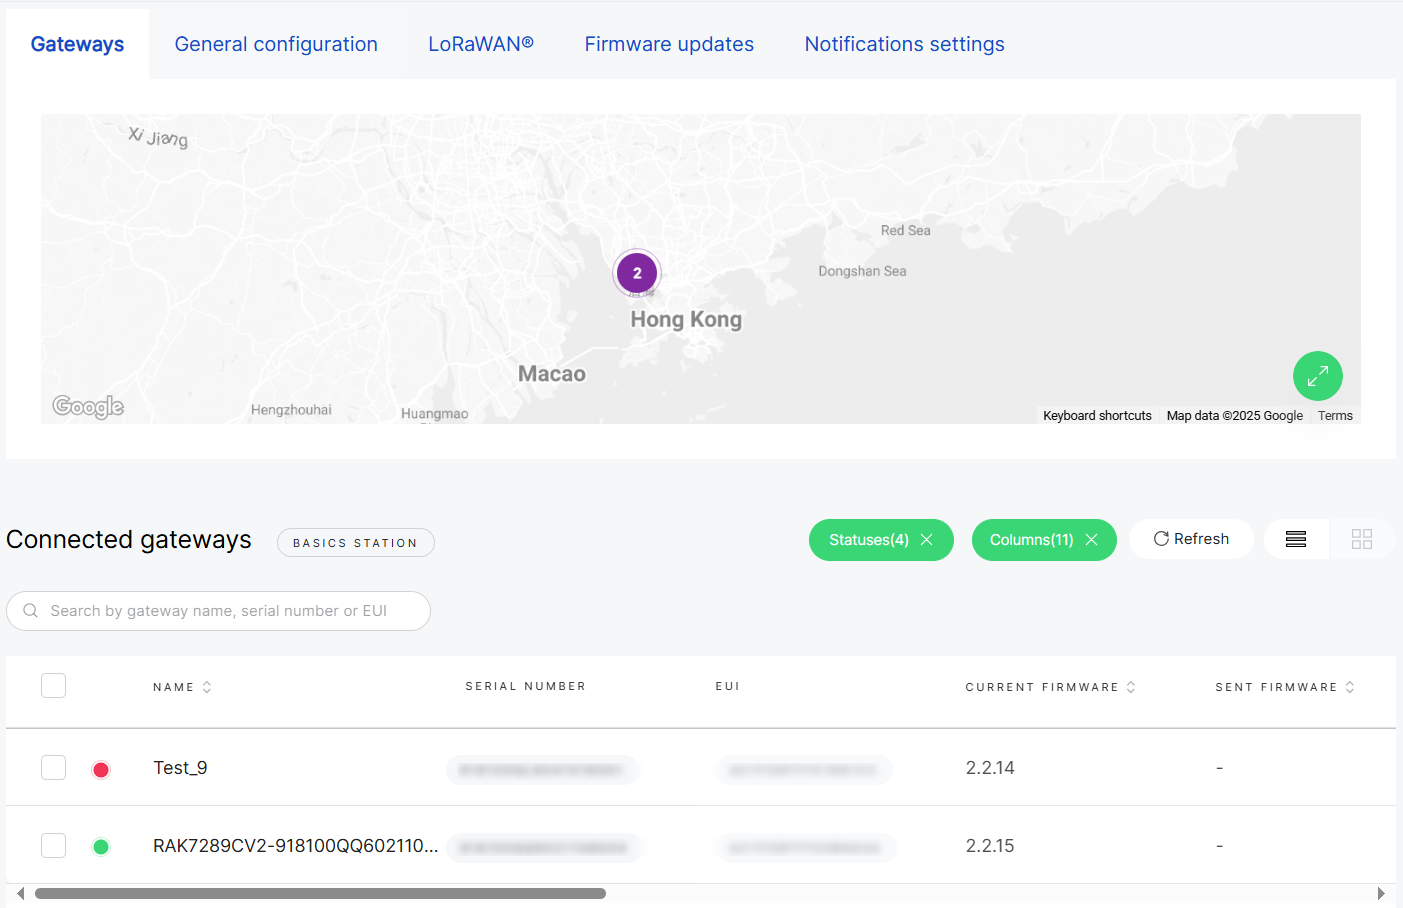 Figure 1: Manage gateways assigned to a specific Location
You can manage gateways within a location in two ways:
-
Single gateway management
Rename, unassign, run diagnostics/debug, or delete a single gateway. These operations follow the same logic as organization-level gateway management.For detailed steps, see Gateway Management > Single Gateway Management and Gateway Management > Diagnostic & Debug.
-
Bulk management (per Location)
Unassign, synchronize system settings, rename, or export general information and system settings to a CSV file for multiple gateways simultaneously.These operations adhere to the same principles as organization-level bulk gateway management. For detailed steps, see Gateway Management > Multiple Gateway Management.
Synchronize Network Interface Settings
This feature enables you to copy the network interface configuration from one sample gateway and apply it to other selected gateways within the same location.
- Synchronization overwrites the current network interface settings of the selected gateways.
- Gateways in Provisioning state are automatically skipped.
- If the sample gateway uses a static protocol, those settings will not be propagated.
-
In the Gateways list of a location, select one or more gateways.
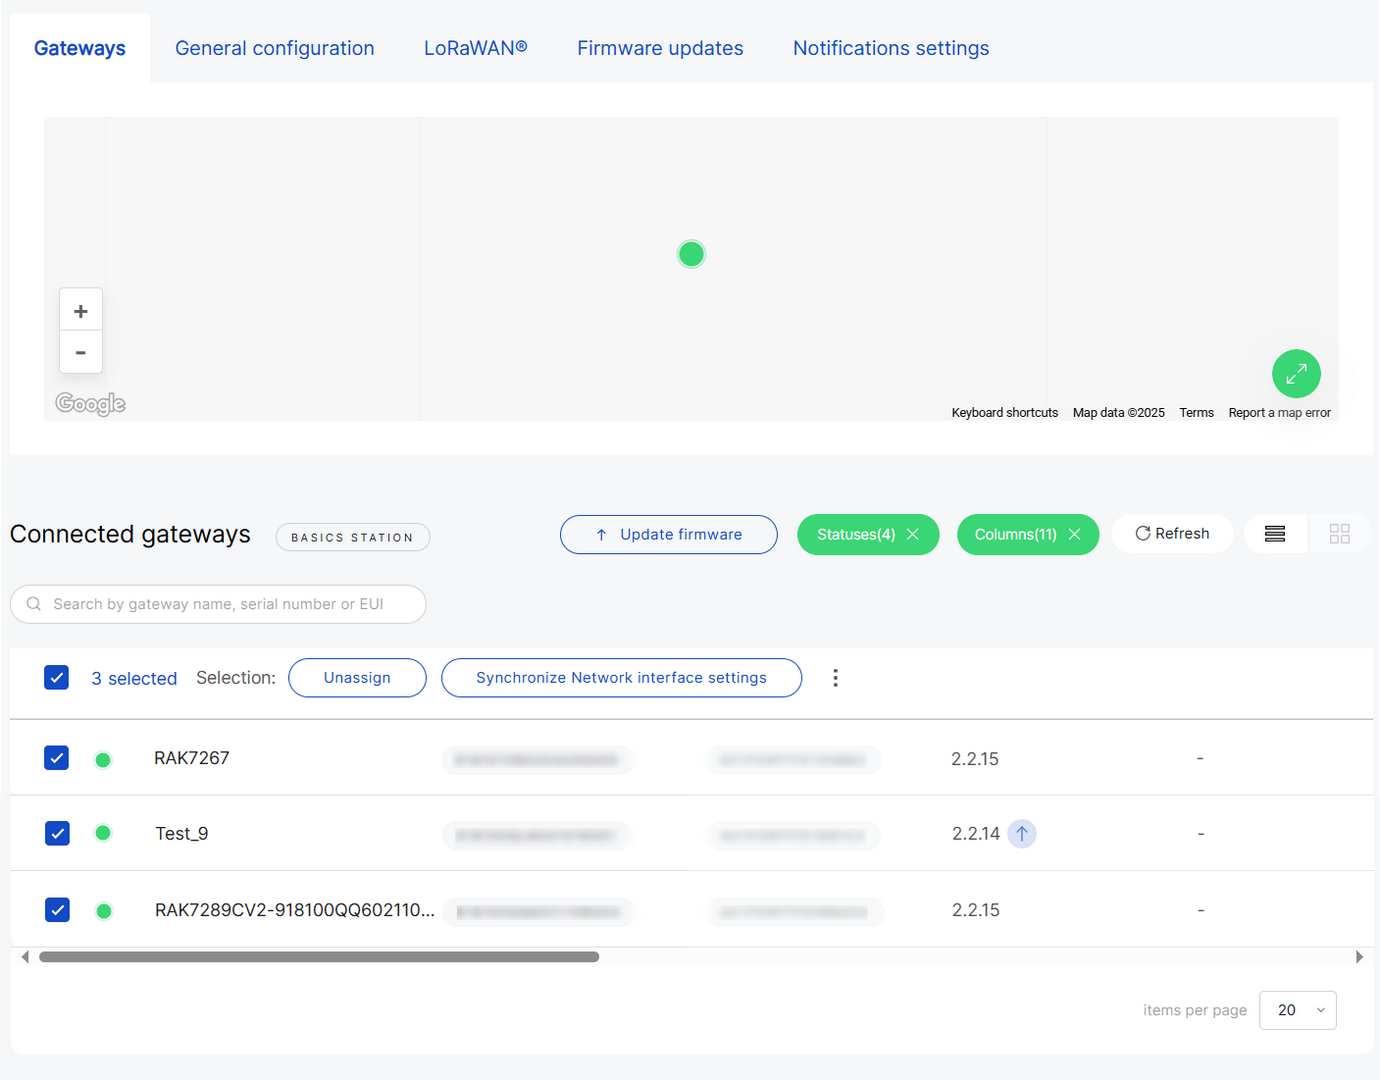 Figure 1: Select multiple gateways for synchronization
 -
Click Synchronize network interface settings and choose the sample gateway.
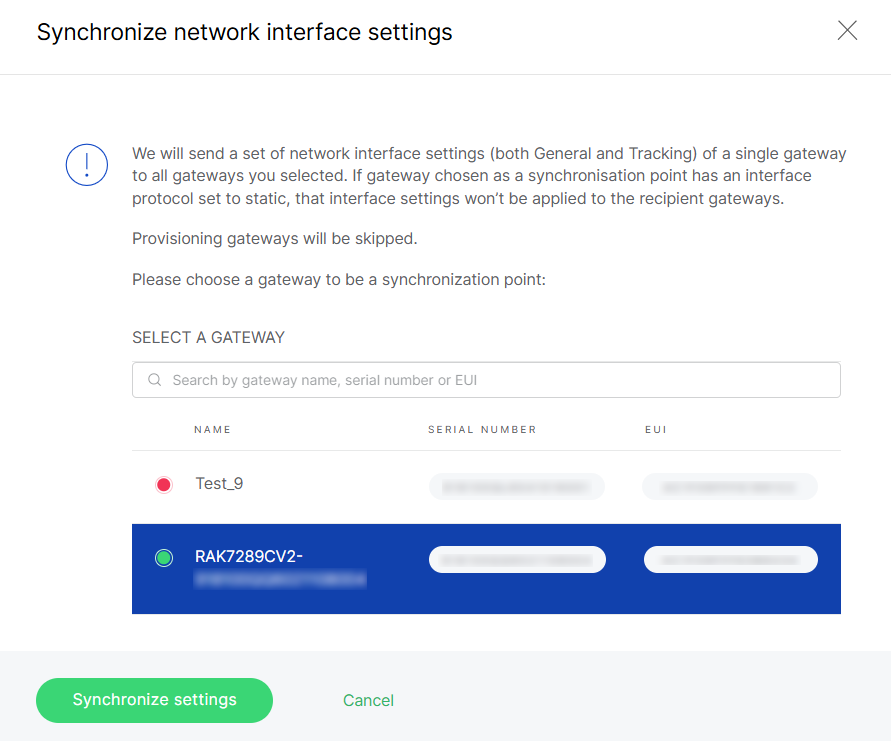 Figure 1: Choose a sample gateway for synchronization
- Click Synchronize settings to apply the configuration.
Reassign Gateway
The Reassign Gateway feature allows you to move one or more gateways from their current Location to another existing Location within the same Organization.
This operation is supported only when the source and target Locations share the same work mode.
-
In the Gateways list of a location, select one or more gateways.
-
Click Reassign.
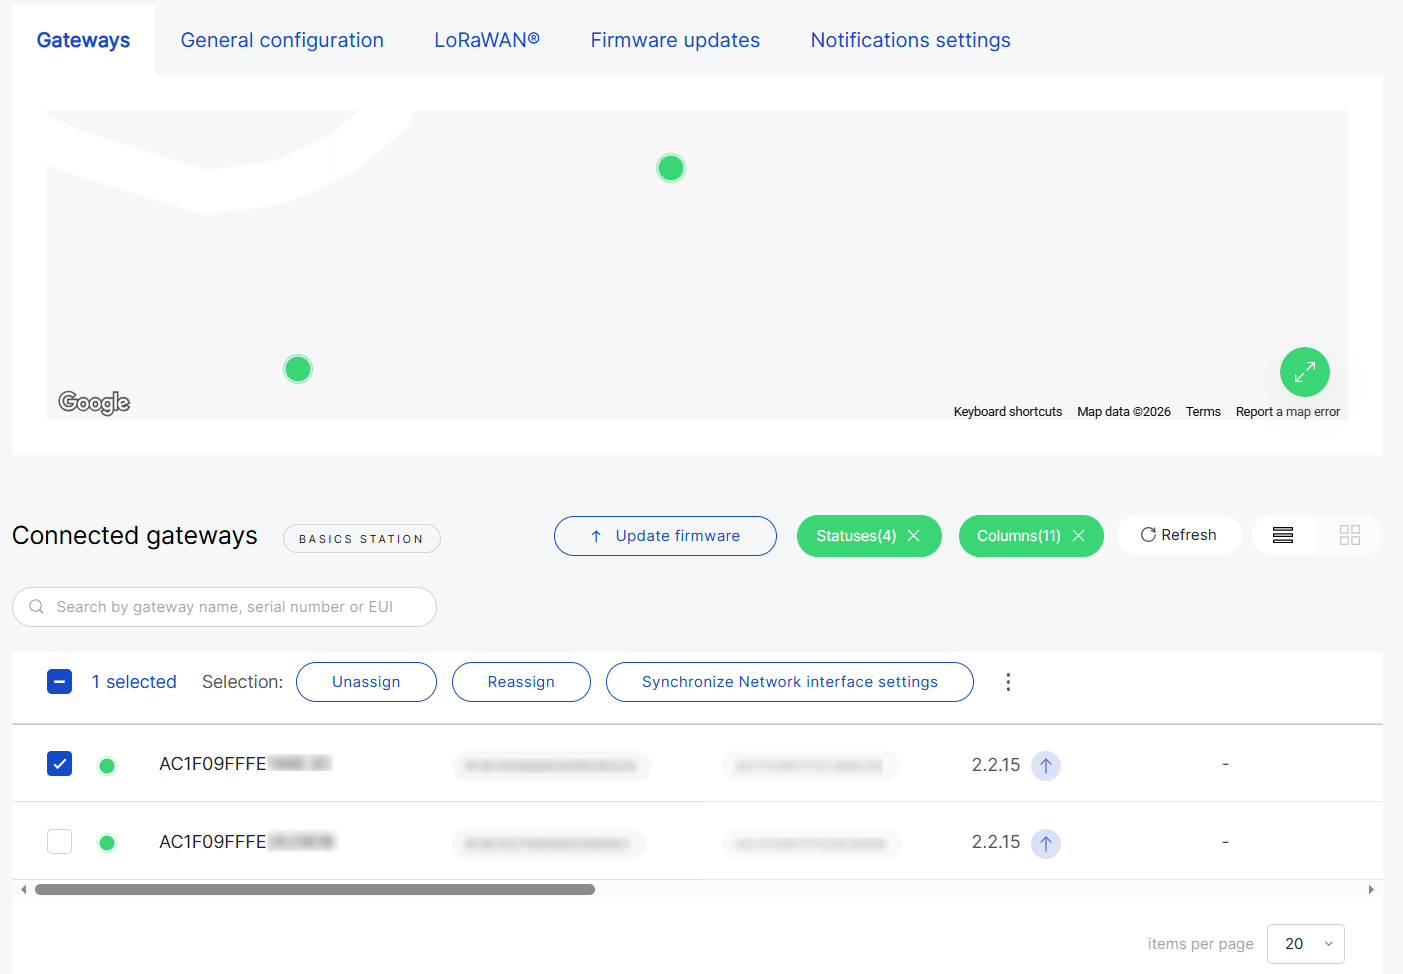 Figure 1: Select gateways and click Reassign
 -
Select a target Location. Only Locations with the same work mode are available for selection.
-
Click Reassign to proceed.
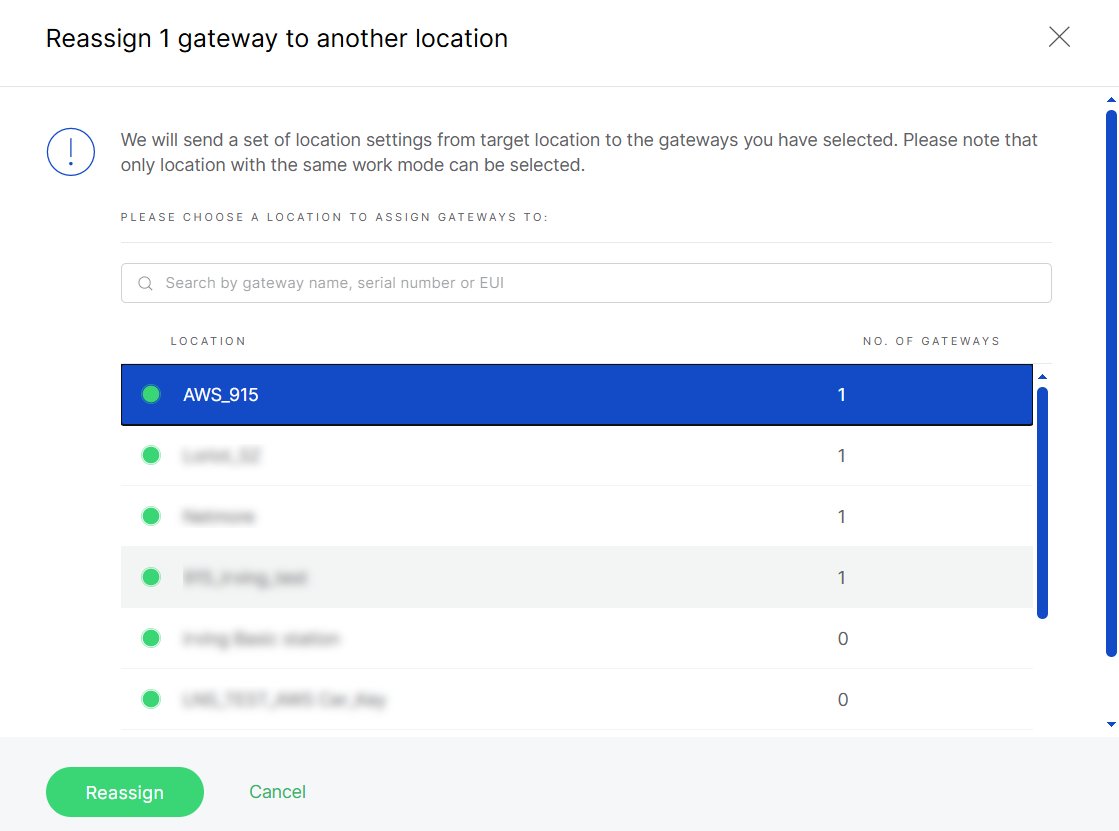 Figure 1: Select a compatible target Location
 -
After selecting the target Location, the system performs a pre-validation process (verifying frequency compatibility, identifier validity, and assignment status):
- If the gateway configuration is compatible with the target Location, it is listed under Available.
- If the configuration does not match, it is listed under Unavailable. Refer to the Status column for the specific validation result.
 Figure 1: Available gatewayNOTE
If the selected Location operates in Basics™ Station mode and Use individual client keys is enabled, the system displays the authentication status for the gateway. You must upload, retrieve, or skip the required credentials before proceeding.
-
Click Add gateways. The gateway will then appear in the New Location's Gateways list.
Add a New Gateway
Besides managing existing gateways, you can also add new ones to your location.
To add a new gateway, click Add Gateway in the top-right corner of the Gateway tab. The setup process is identical to the steps described in the Quick Start Guide > Add a Gateway to a Location.
Applications (Built-in Network Server)
In WisDM, Applications and End Devices are key components of the Built-in Network Server architecture. Applications group devices and define how their data flows within the Built-in Network Server.
- End Devices - Physical devices (e.g., sensors) that send data packets via LoRaWAN.
- Applications - Logical entities that define how device data is authenticated, parsed, and forwarded.
- WisDM does not provide LoRaWAN Network Server or Application Server functionality. It serves as a remote management platform for the Built-in Network Server running on the central gateway within a location.
- Applications are created at the Location level, not on individual gateways. You can create an Application even if no gateways are currently assigned, which is useful for preparing the network while gateways are still in transit.
- Adding an Application is a synchronous operation. If a Central Gateway is already assigned to the location, it must be online to successfully add the Application.
Create an Application
Follow the steps below to add an application to your location:
- In Locations > Your location > Applications, click Add application.
 Figure 1: Application overview
- Configure the application details:
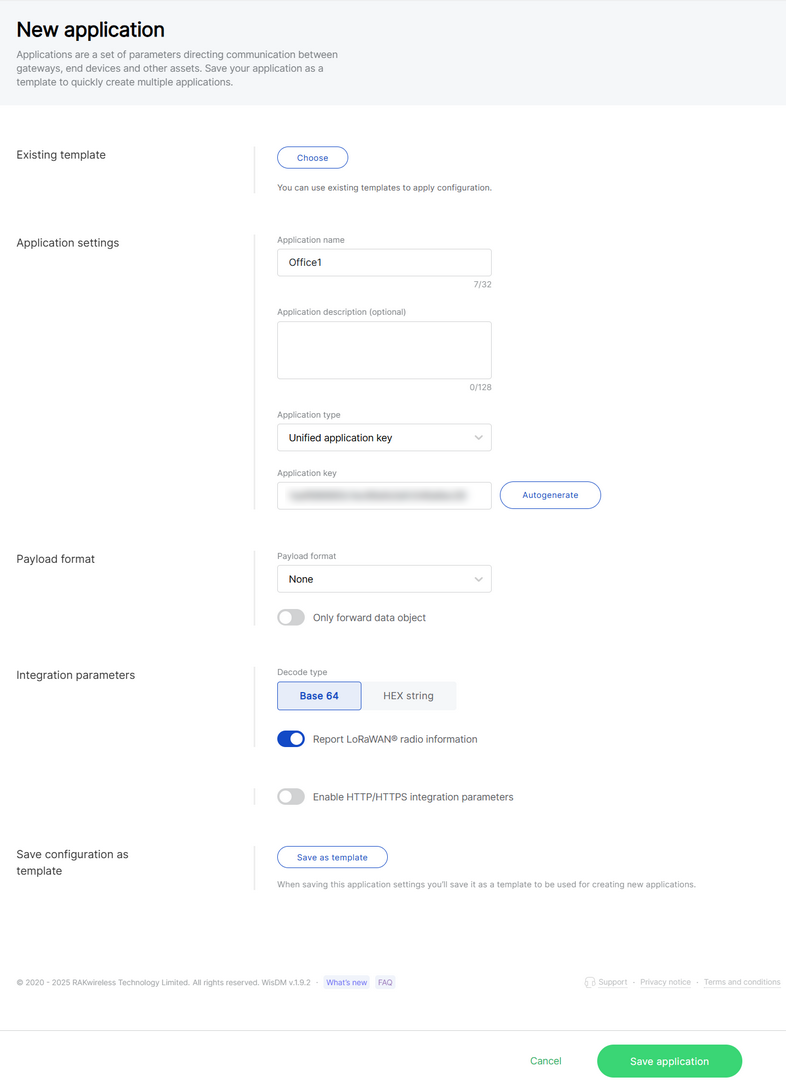 Figure 1: Configure application information
- Application name: A unique name for the application.
- Application description: (Optional) A description of the application.
- Application type
- Unified application key: All devices will use the same application key.
- Separate application keys: Each device or group of devices has a unique key.
- Application Key: Required for Unified Application Key setup.
- Payload format
- None: No specific payload format.
- CayenneLPP: Payload format based on the Cayenne Low Power Payload (LPP) standard.
- Only forward data object: If enabled, the gateway will only forward the raw data object to the server without processing or decoding it.
- Decode type: Select the encoding of the uplink payload as forwarded to integrations. Ensure this matches what your cloud parser expects.
- Base 64
- HEX string
- Report LoRa Radio Information: If enabled, the gateway will include LoRa signal data (RSSI, SNR, etc.) in the payload sent to the server. This may increase packet size.
- Enable HTTP/HTTPS Integration Parameters: If enabled, this allows forwarding of uplink data and events to external HTTP/HTTPS endpoints.
- Header name
- Header value
- Uplink data URL
- Join notification URL
- Ack notification URL
- Device-status notification URL
- Maximum number of concurrent connections
- Maximum length of queue
- Save as template: Save this configuration as a reusable template.
- Click Save application.
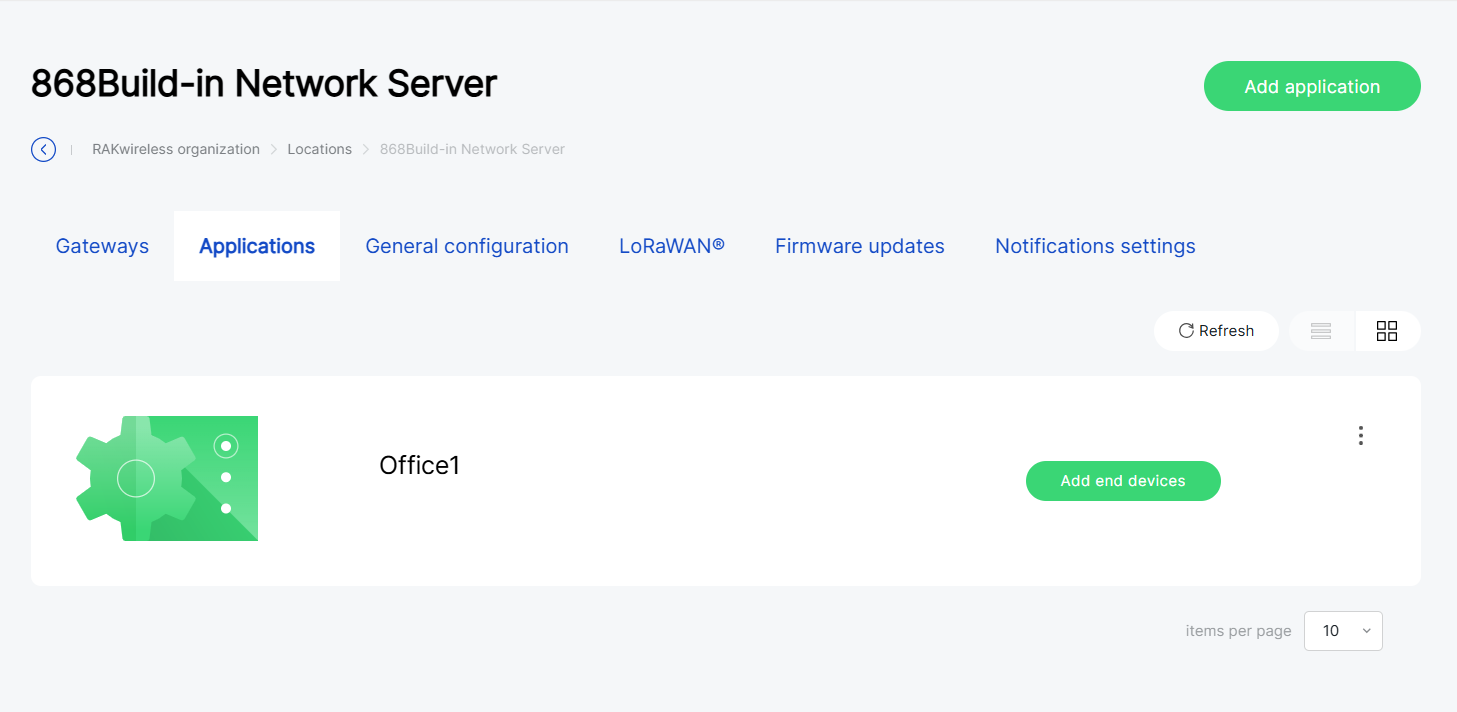 Figure 1: Application created
Register End Devices
You can register devices using a CSV file, manually, or by selecting from a saved device list.
Configure Device Parameters
After creating an application, you can register end devices to it.
-
In Locations > Your location > Applications, select the target application.
NOTEIf no devices are registered, you can also click Add end devices directly from the application list.
-
In the End devices page, click Add end devices.
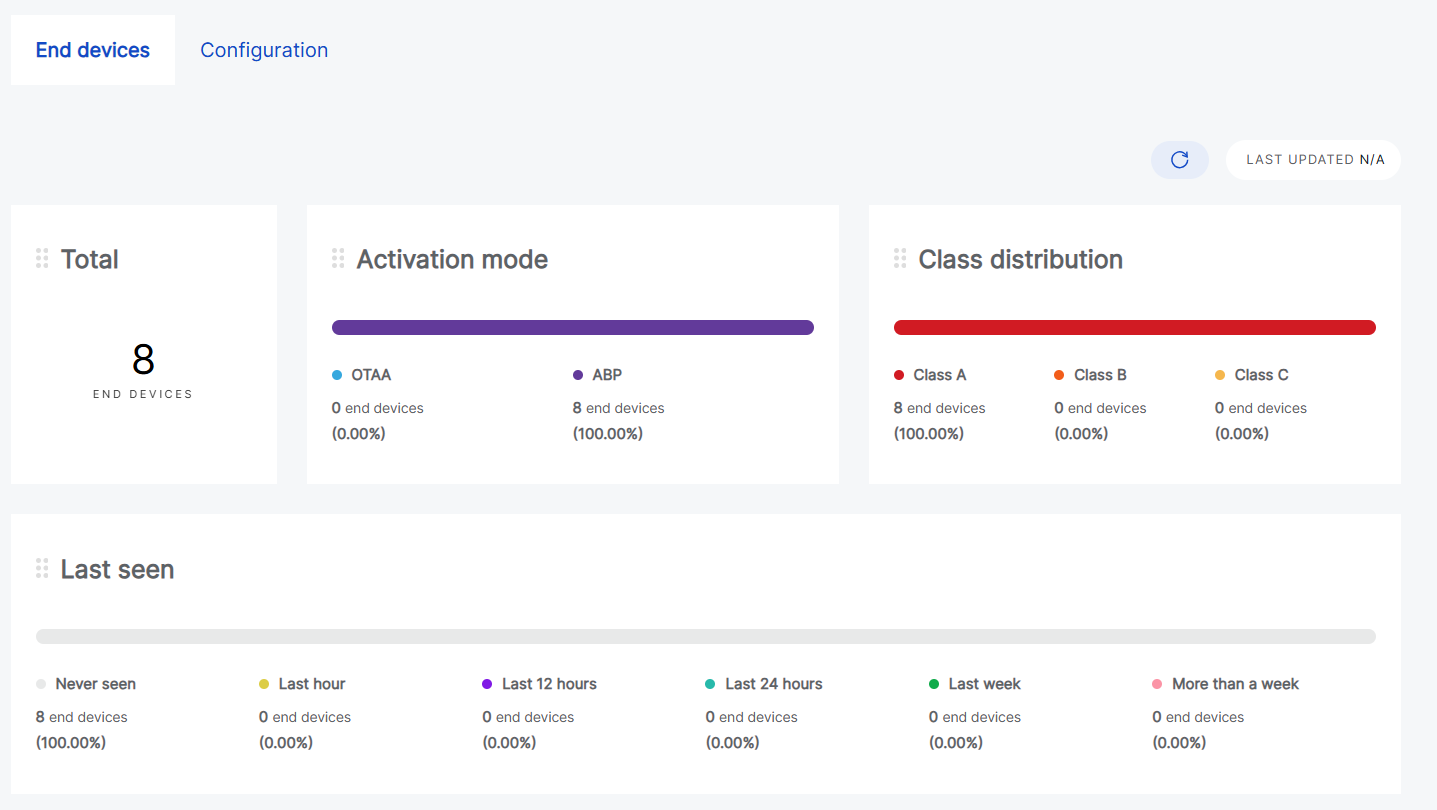 Figure 1: Add end device
- Fill in device details:
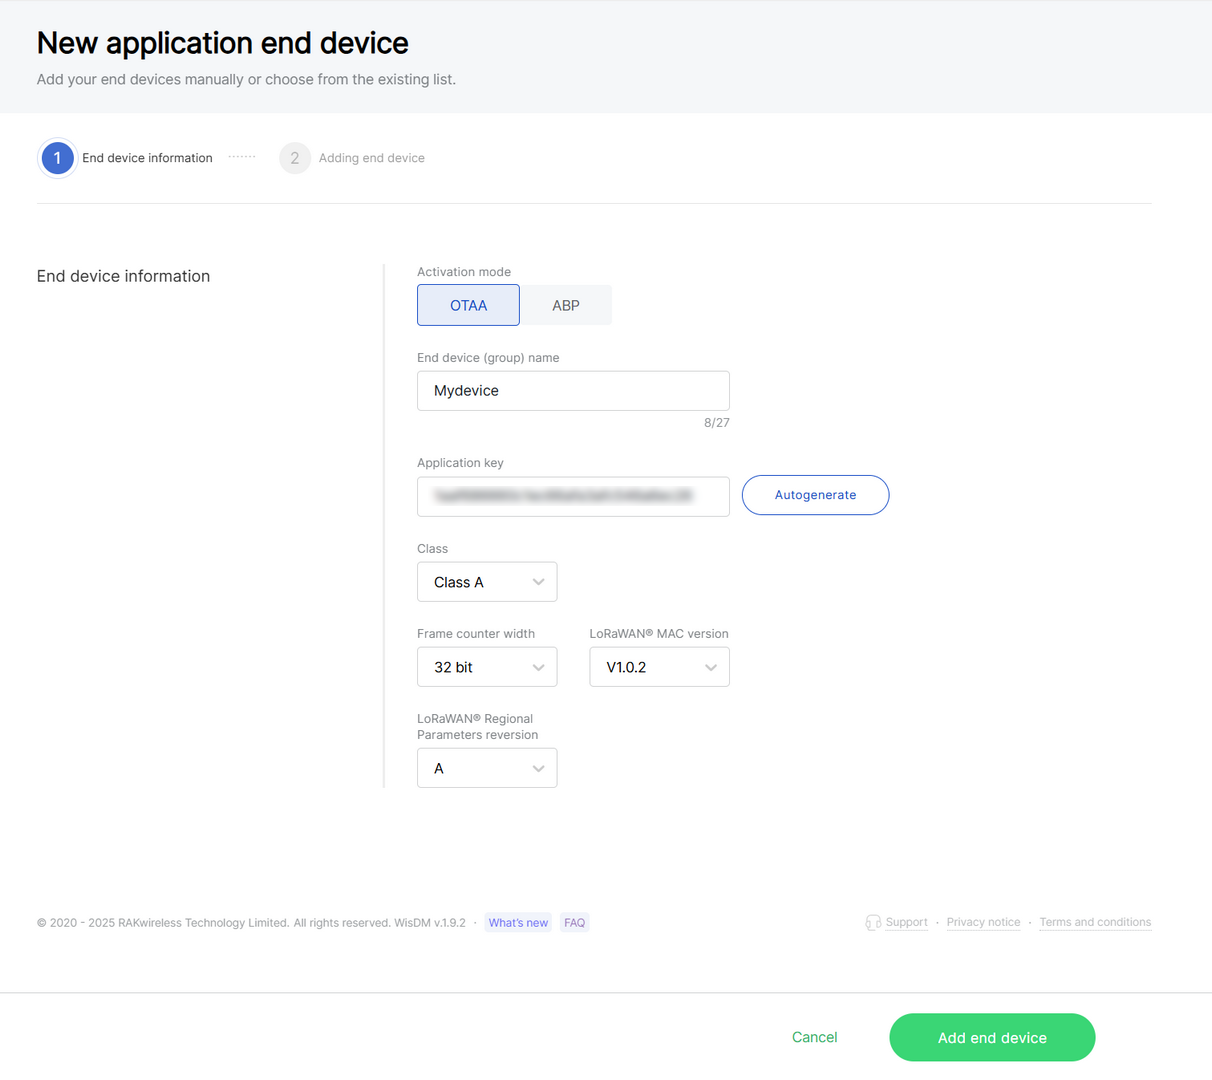 Figure 1: Configure device information
- Activation mode
- OTAA: Over-The-Air-Activation (OTAA).
- ABP: Activation-By-Personalization (ABP).
- End device (group) name: Enter a name for the device or group of devices.
- Application key: Required for LoRaWAN OTAA devices. Enter the AppKey during registration when using Separate Application keys.
- Application Session Key: Required for ABP devices.
- Network Session Key: Required for ABP devices.
- Class:
- Class A
- Class B
- Class C
- Frame counter width: Defines the frame counter size for message tracking.
- LoRaWAN MAC version: V1.0.2 / V1.0.3
- LoRaWAN Regional Parameters revision: Defines the revision of the Regional Parameters specification (A or B). This setting is available only when the LoRaWAN MAC Version is 1.0.2.
- Click Add end device.
Import Devices via CSV
Use this method when adding a large number of devices at once.
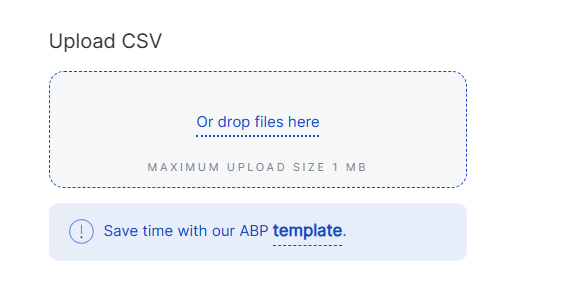 Figure 1: Download CSV template
-
You can create a CSV file in two ways:
- Download the template by clicking template.
- Alternatively, create your CSV file manually.
NOTE
- end device EUI : Enter the unique 64-bit EUI, displayed as a 16-character hexadecimal string.
- end device address: Enter the 32-bit device address, displayed as an 8-character hexadecimal string (required for ABP mode).
- Ensure the file size does not exceed 1 MB.
-
Click Or drop files here.
-
Once the CSV file is imported the system will automatically verify the device information.
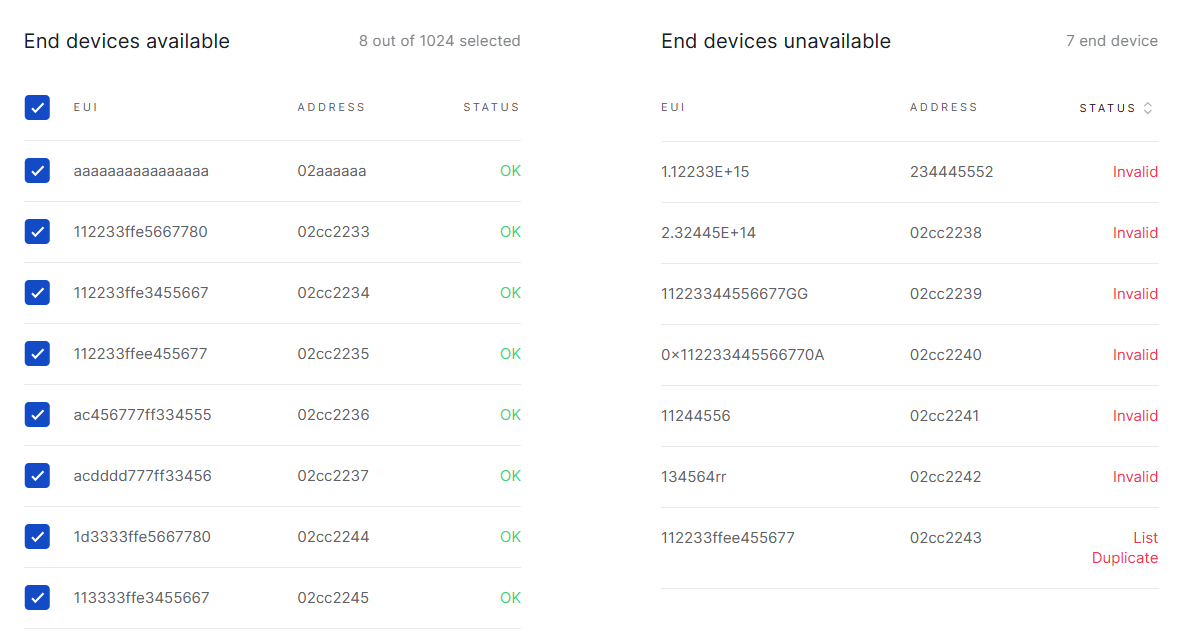 Figure 1: Verify device information
-
Valid devices will be listed under End devices available.
-
Duplicate or invalid entries will be listed under End devices unavailable.
NOTEYou can click Save as new list to reuse these entries later.
- Click Add to application.
Manually Add Devices
Use this method for quick testing or when adding only a few devices.
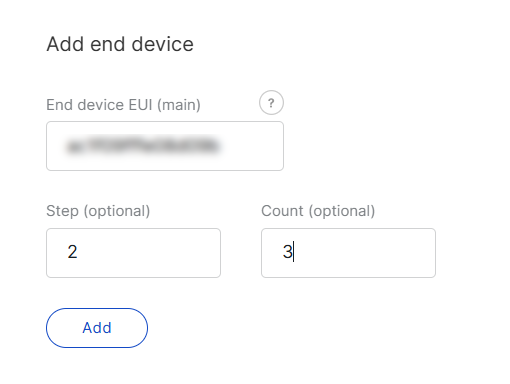 Figure 1: Manually add device
- Enter the following:
- End device EUI (main): Enter the device's unique EUI (Required).
- End device address (main): Enter the device's unique address (Required for ABP mode).
- Step (optional): Use this field to auto-generate multiple devices in sequence.
- Count (optional): Specify the number of devices to generate.
- Click Add and the system will automatically verify the device information.
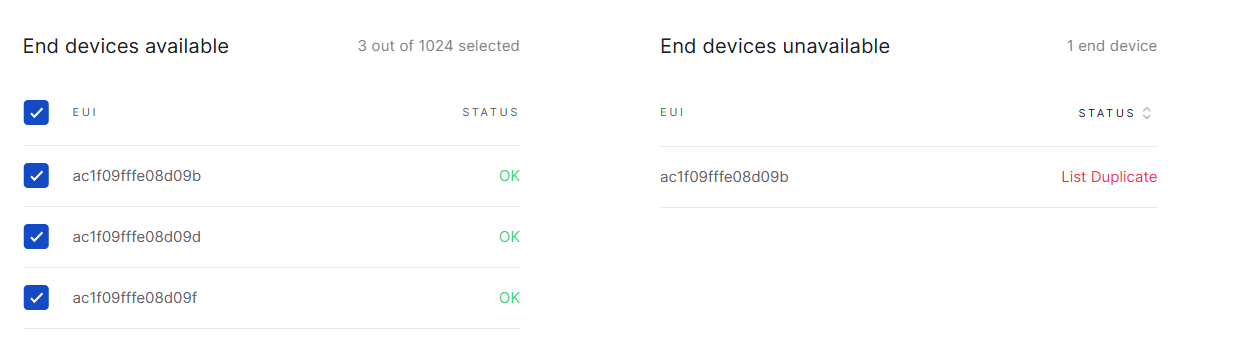 Figure 1: Verify device information
- Valid devices are listed under End devices available.
- Duplicates are found under End devices unavailable.
Click Save as new list to reuse these entries later.
- To add the devices, click Add to application.
Add Devices from Saved List
After validating device information (whether added via CSV or manually), the system allows you to save the verified devices in the End devices available list as a reusable device list. Later, you can quickly add devices by selecting from this saved list.
- On the Adding end device page, click Choose from list.
 Figure 1: Choose from saved device list
- Select the target list and click Add selected list.
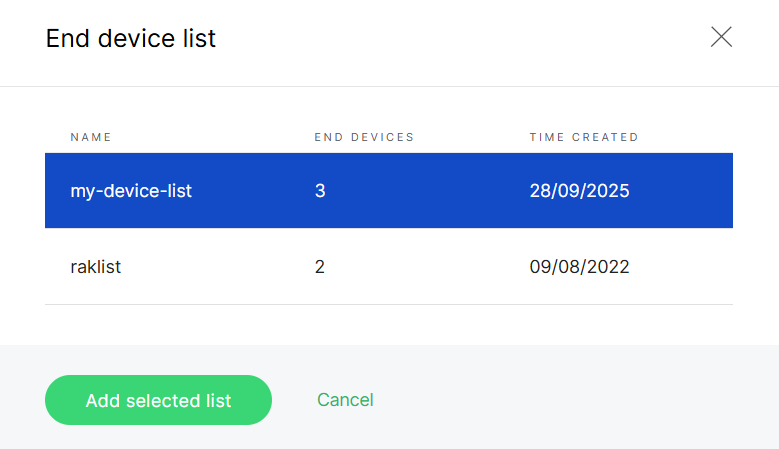 Figure 1: Select target device list
- Devices appear under End devices available.
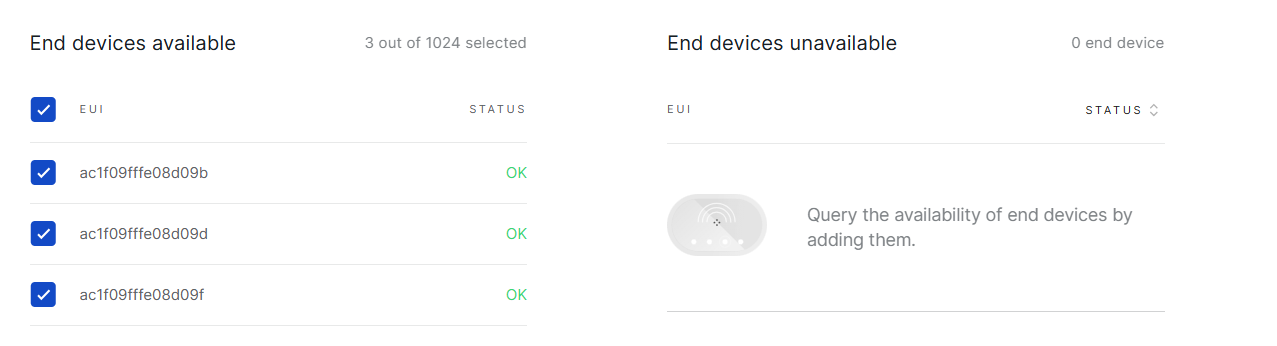 Figure 1: Device list
- Click Add to application.
Manage Application
You can access Applications in two ways:
- Navigate to Locations > Your location > Applications
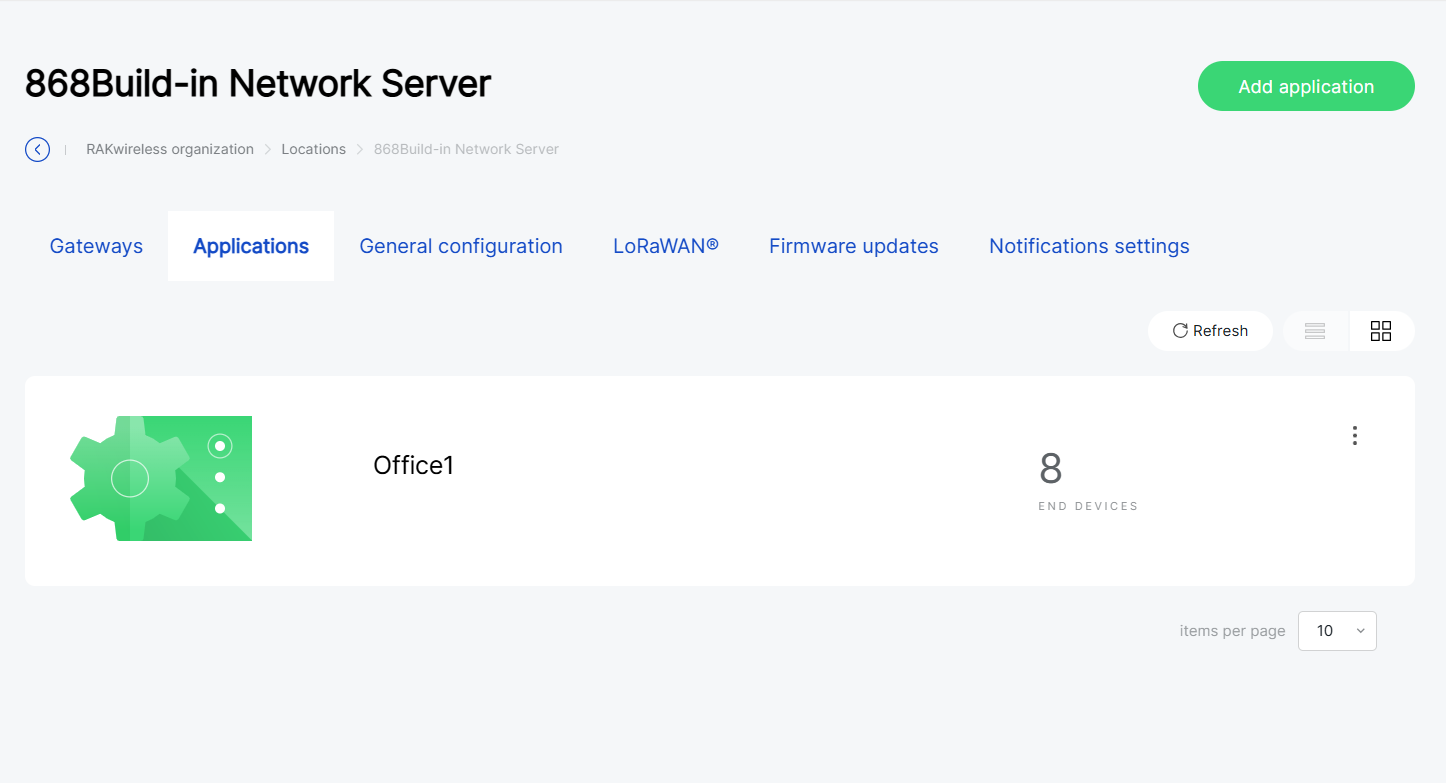 Figure 1: Application list (by location)
- Or use the left navigation menu Applications
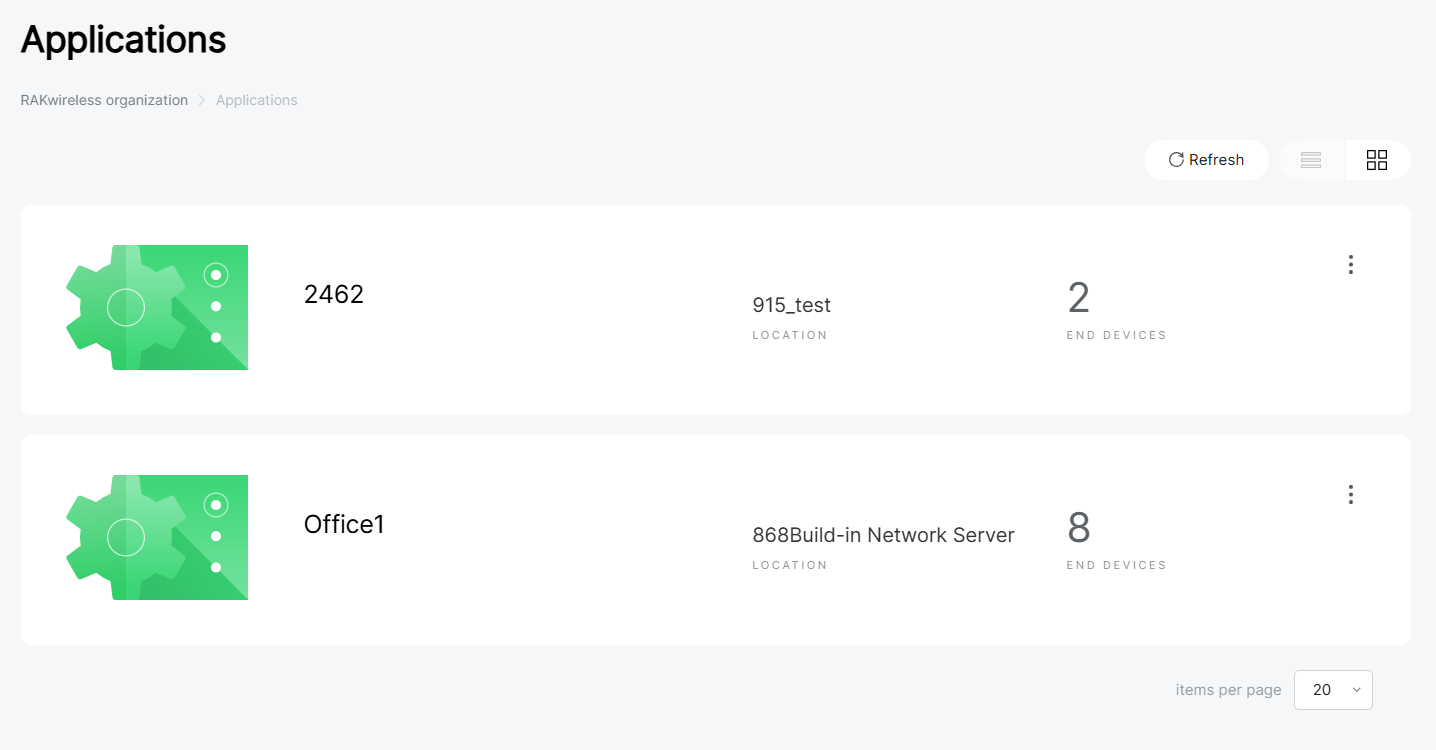 Figure 1: Application list (global view)
View and Edit Application Settings
- Click the target application to navigate to its Configuration tab, or click (
 ) and choose Edit configuration.
 - In the Configuration tab, you can view and modify the application settings.
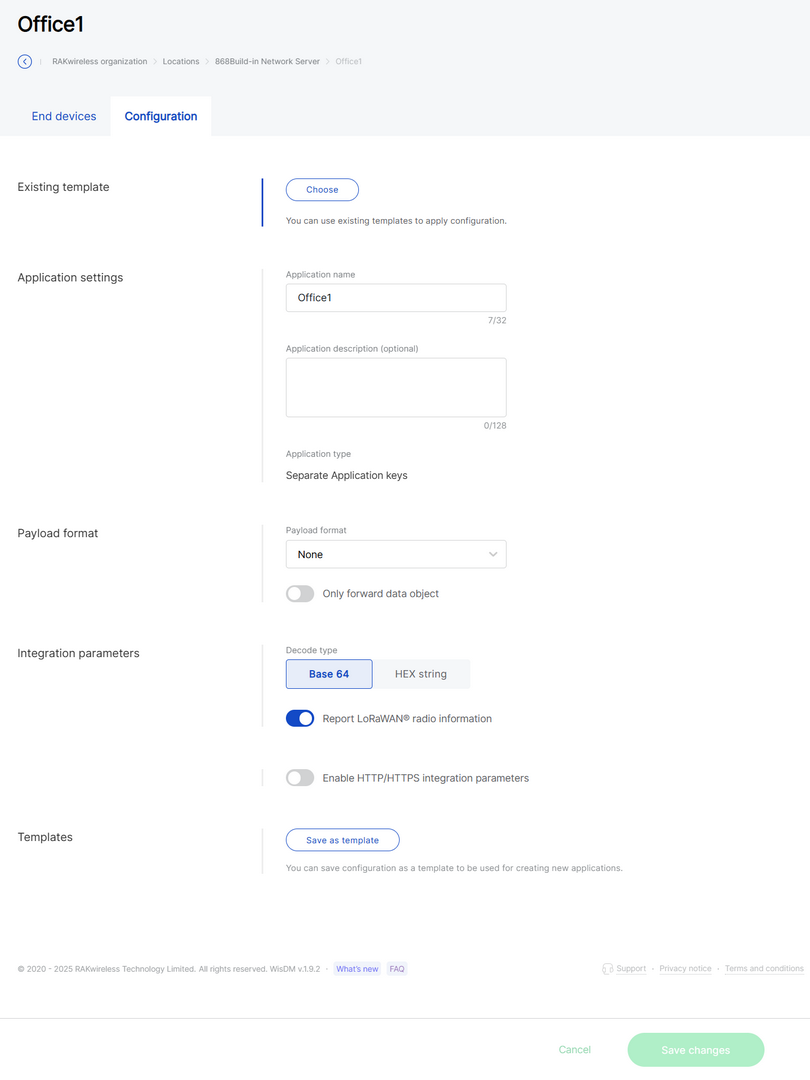 Figure 1: Application configuration
Delete Application
Once deleted, the applications cannot be recovered. Proceed with caution.
- From the application list, click () and choose Delete application.
- Confirm your choice and click Delete application.
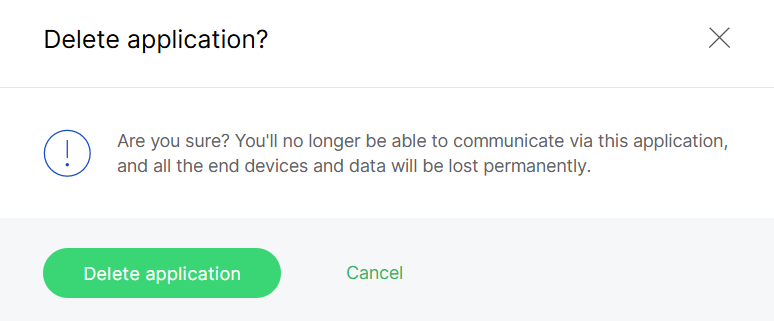 Figure 1: Confirm application deletion
Manage Devices
This section provides an overview of registered devices and the available device management operations.
To access the target application go to the End devices tab, or click () and choose View end devices.
Overview of Registered Devices
Figure 1: Device overview- Total: The total number of registered devices.
- Activation Mode: The distribution of devices using OTAA and ABP.
- Class Distribution: The distribution of devices across LoRaWAN Classes A, B, and C.
- Last Seen: An overview of device activity indicating the recency of communication (e.g., Never, Last hour, Last 12 hours, Last week, etc.).
Device Details
From the device list, click a device row, or View device details in the actions menu.
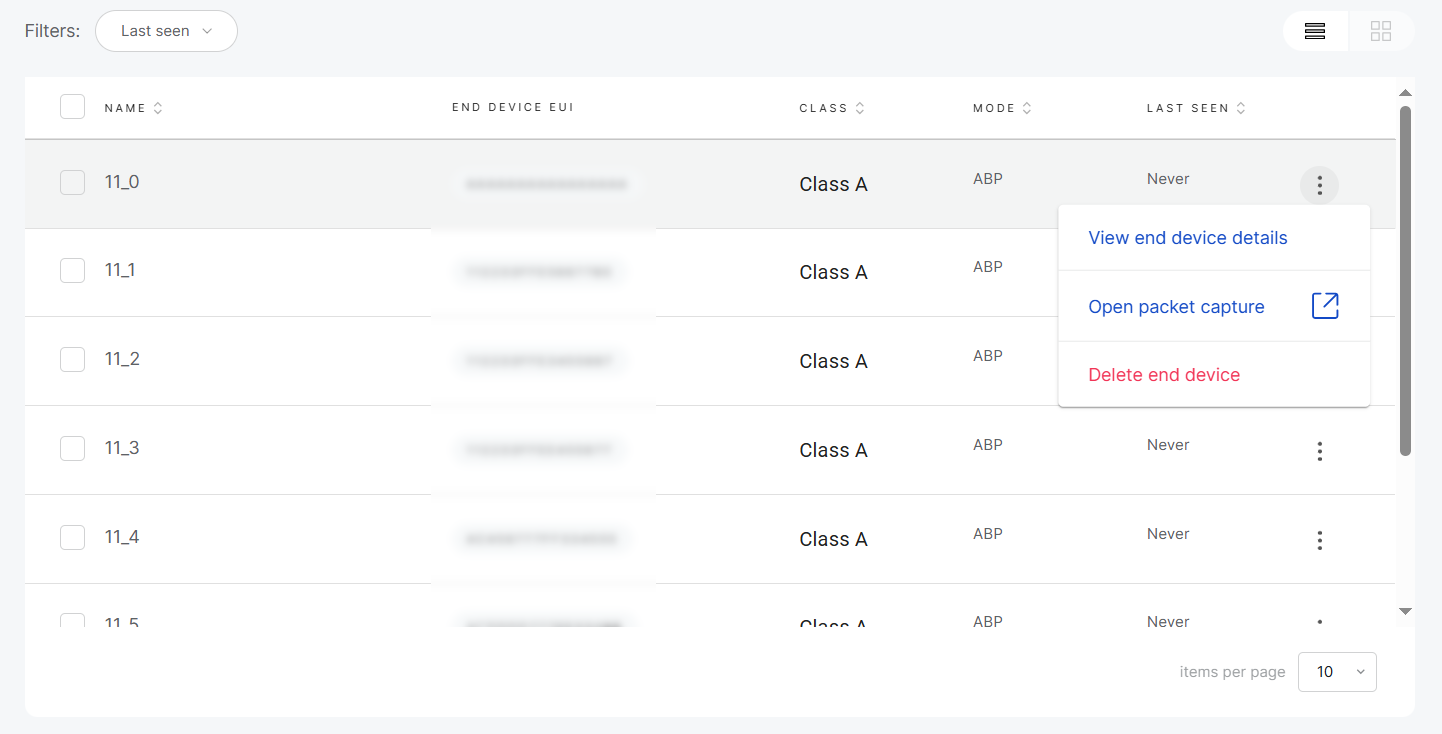 Figure 1: Single device management
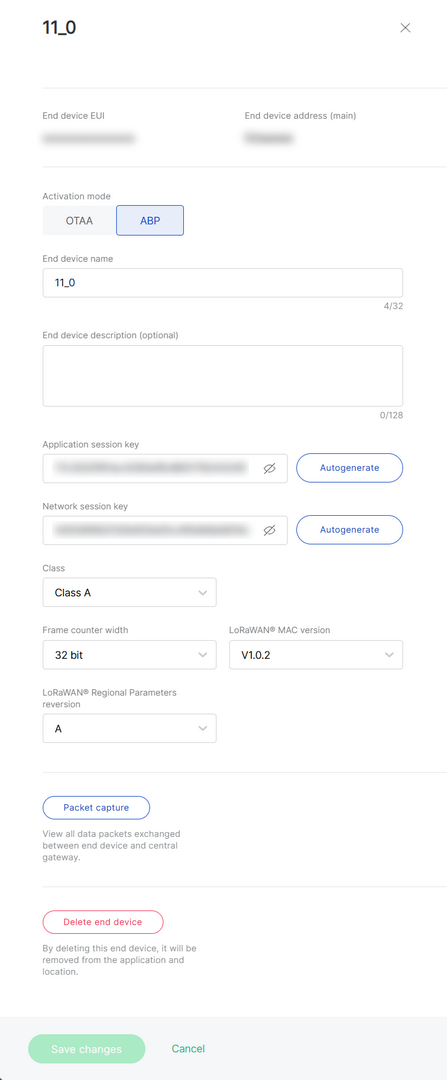 Figure 1: Device details
Device Packet Capture
Monitor real-time communication between the device and the Central Gateway.
-
From the actions menu, select Open packet capture, or navigate to the device details page and choose Packet capture.
-
Set the session duration and click Start new session.
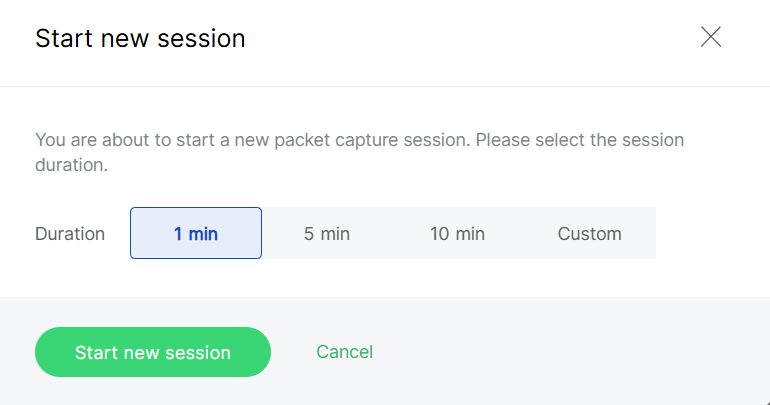 Figure 1: Configure capture session
- Packets are displayed in real time.
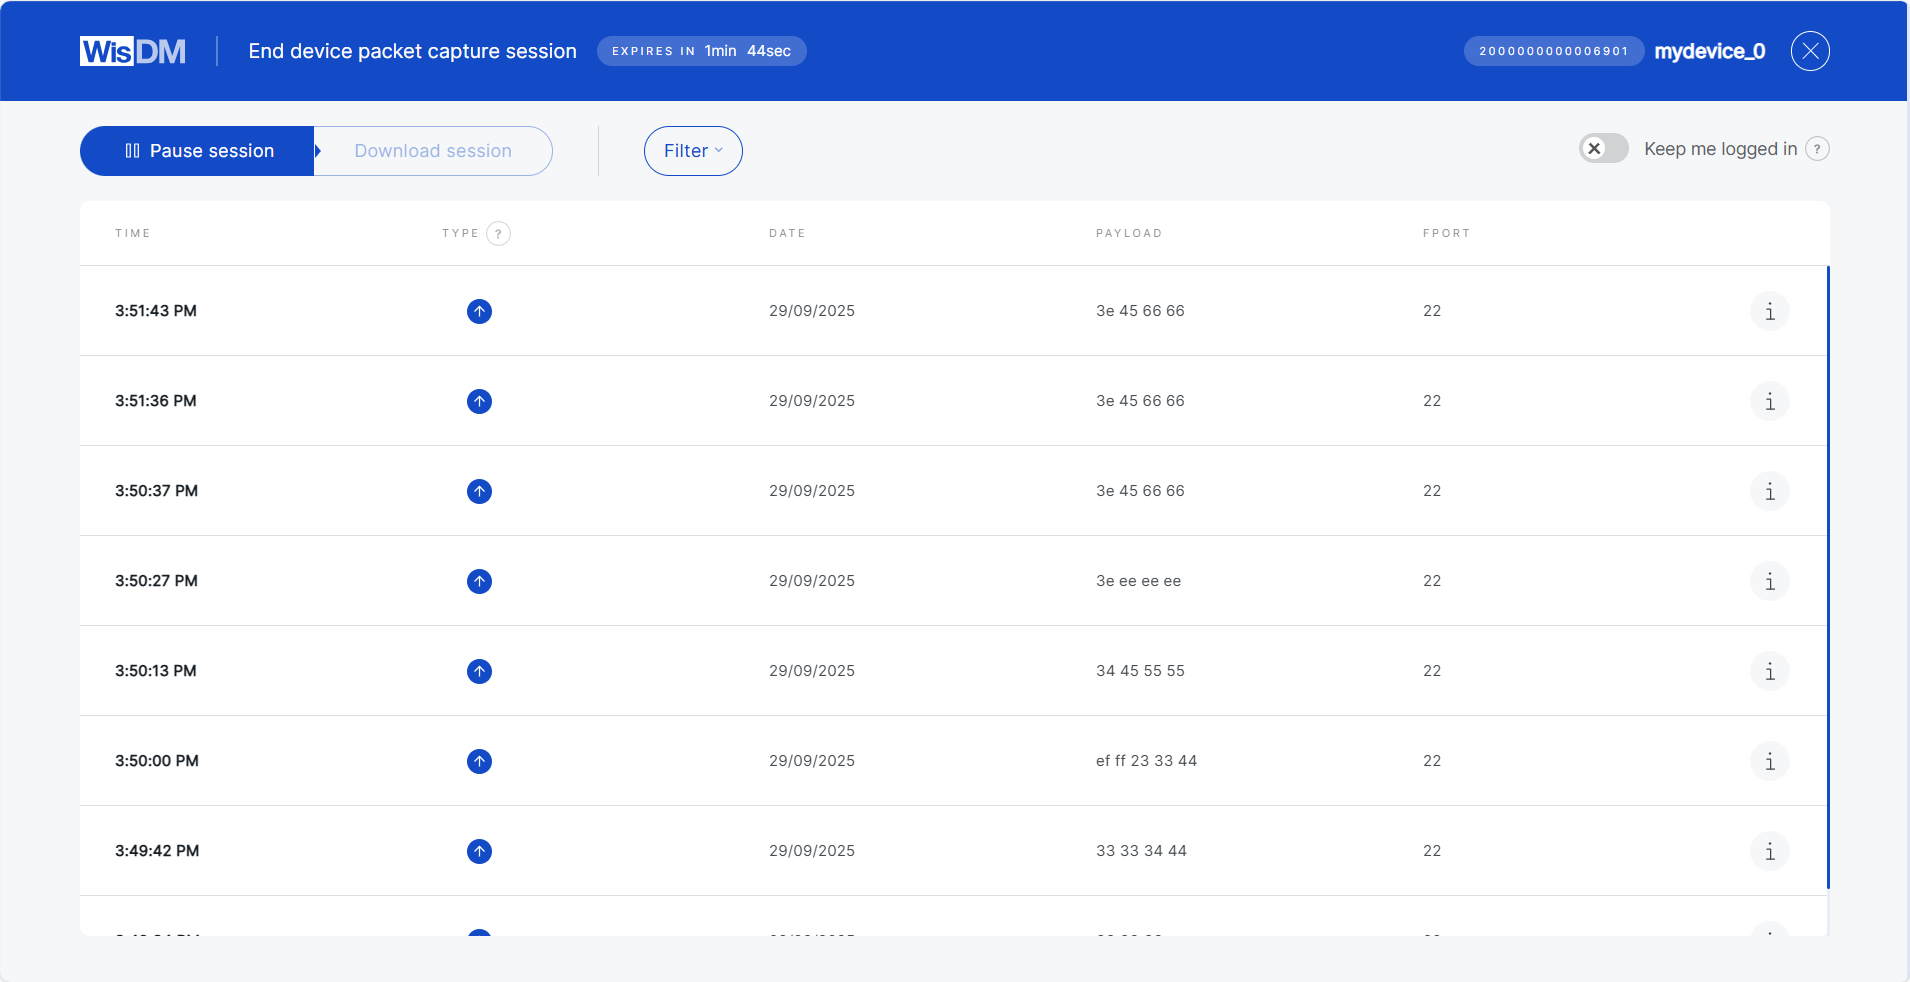 Figure 1: Packets Overview
- When the session ends, you can either start a new session with a different duration or download the captured data for further analysis.
Additional Operations
Join Session
If the selected device already has an active session, you can join it for the duration you specify. While joining, you may also request to load all previously captured packets from the start of that session.
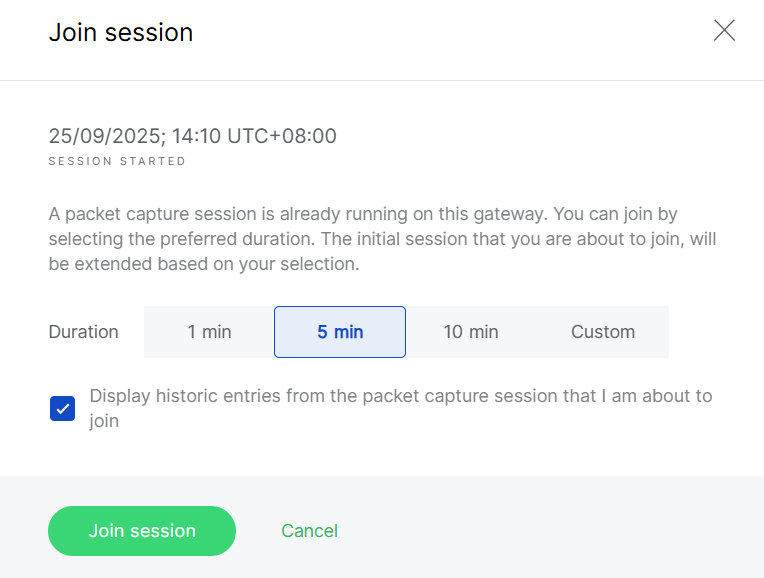 Figure 1: Join Existing Session
Pause and Resume
You can pause or resume updates at any time. While paused, you can review older packets or apply filters based on packet parameters.
Keep Me Logged In
For security reasons, WisDM automatically logs you out after 15 minutes of inactivity. If your packet capture session runs for longer than 15 minutes, ensure that you enable the Keep me logged in toggle during the session to prevent interruption.
Rename Devices
You can select multiple devices for bulk renaming. Apply a common name prefix, and WisDM will automatically append sequential numbers (e.g., MyDevice_1, MyDevice_2, etc).
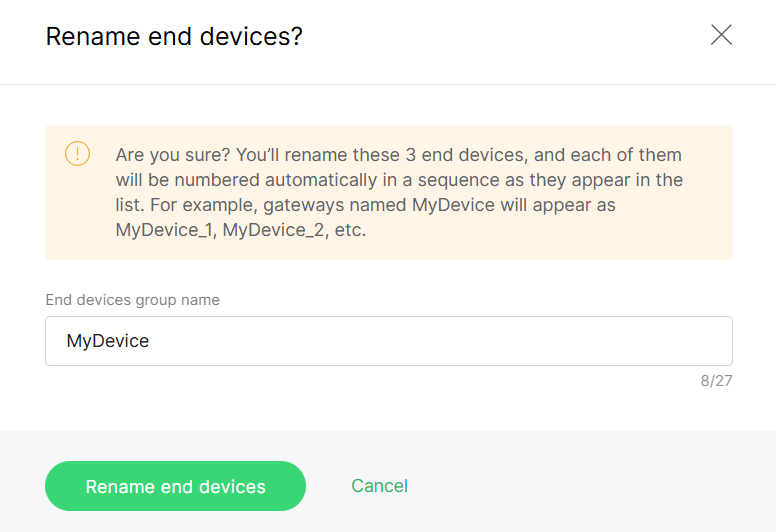 Figure 1: Bulk rename devices
Save as Device List
You can select multiple devices and save them as a device list for quick reuse when adding devices later.
Delete Devices
Devices can be removed individually or in bulk.
Deletion is permanent and cannot be undone.
- To delete a single device, open the actions menu and select Delete end device.
- To delete multiple devices, select the devices and click Delete.
Bulk Firmware Updates
WisDM provides two types of firmware updates for gateways under a Location:
- Standard Updates: Regular releases that include new features, performance improvements, or minor bug fixes.
- Critical Updates: Security patches or urgent fixes that should be applied as soon as possible.
Updates can be triggered manually by administrators or, for critical updates, automatically when auto-update is enabled.
Prerequisites
- FOTA must be enabled on all gateways. This is required for any remote firmware update in WisDM, including both manual upgrades and automatic critical updates.
- Gateways must be powered by a stable power supply to prevent failures during the update process.
Standard Firmware Updates
If newer firmware versions are available, you can upgrade multiple gateways under the same Location at once.
- Gateways will reboot during the update, which may cause short service interruptions.
- Schedule upgrades during off-peak hours to minimize impact.
- Use a staged strategy: test on a small group of gateways before rolling out to the entire Location.
- In Locations > Your location > Gateways, click Update firmware.
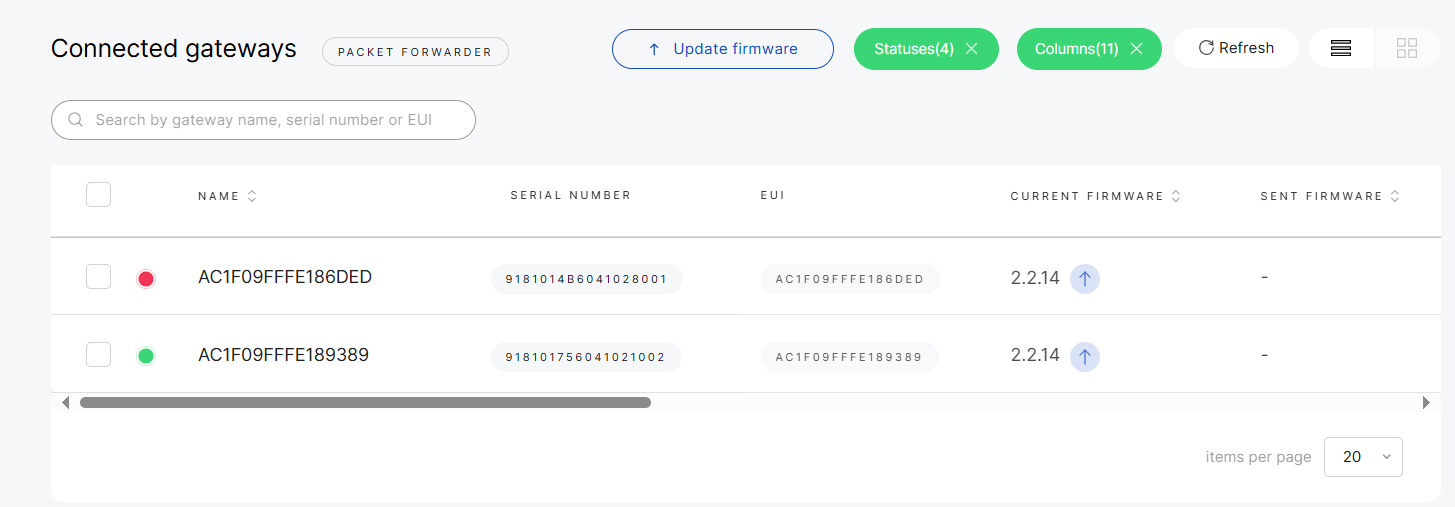 Figure 1: Update firmware
- Select the gateways and target version.
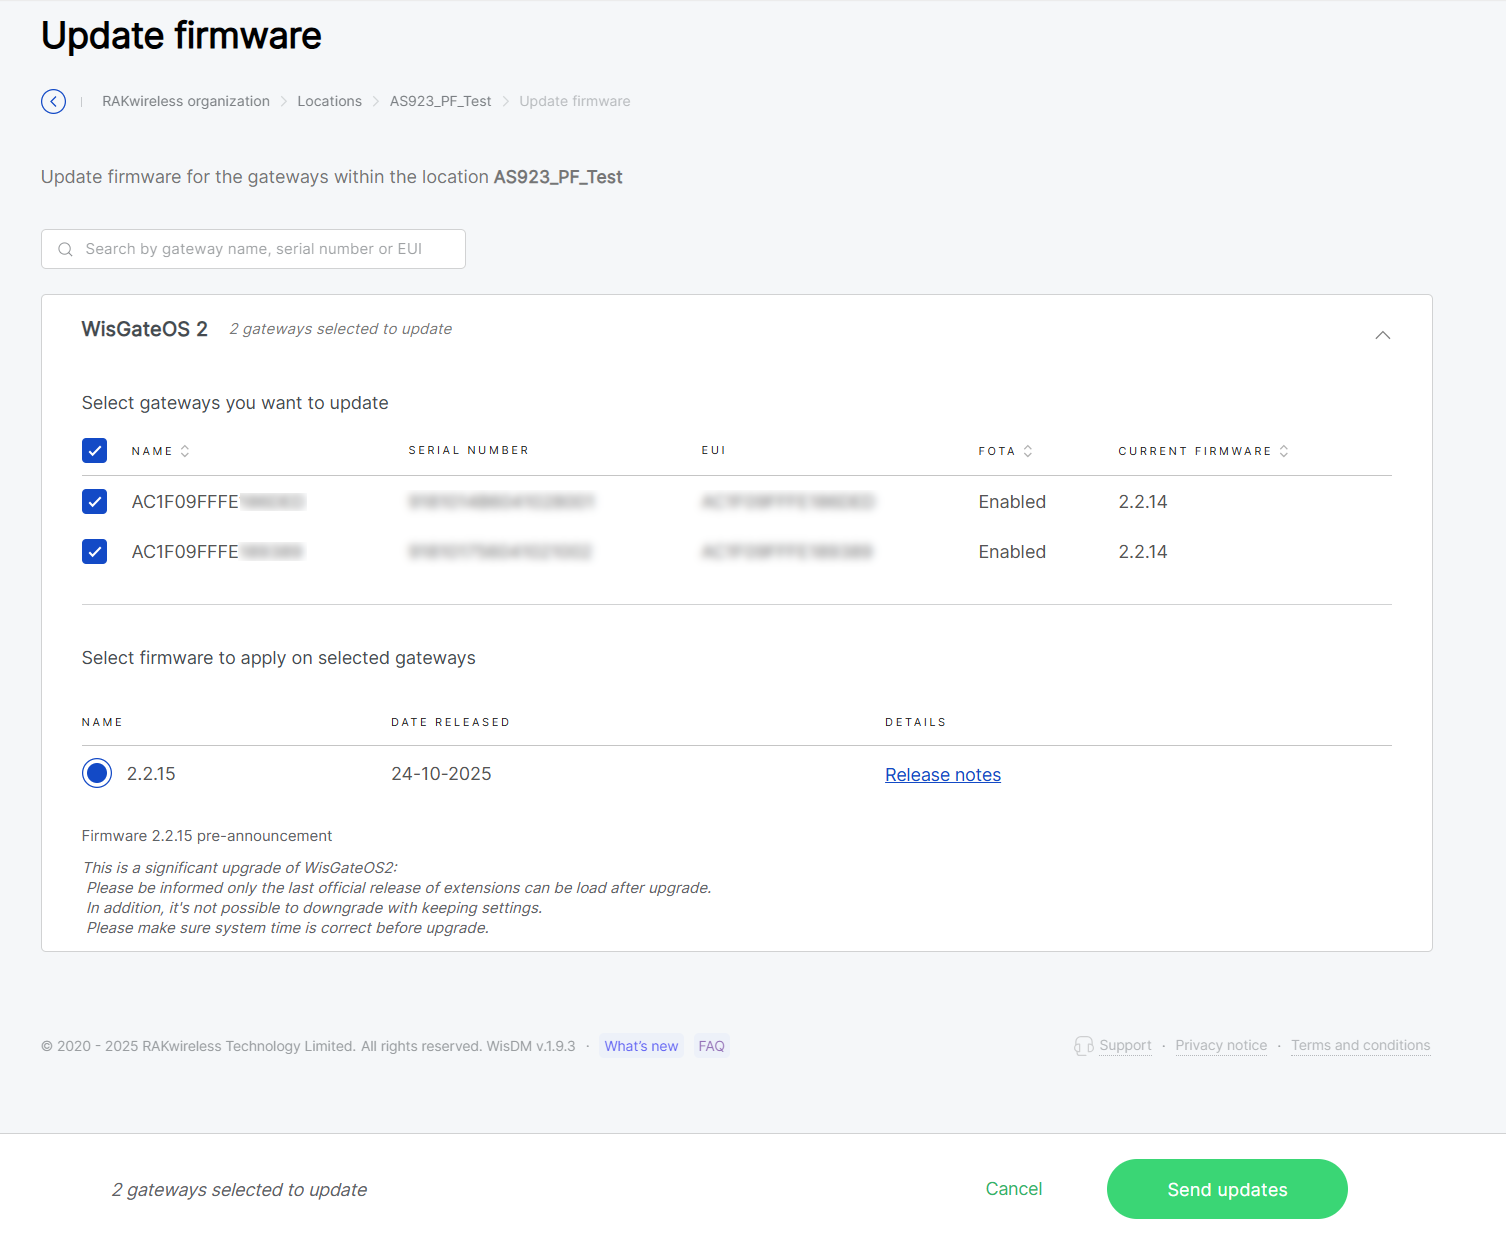 Figure 1: Select gateways and firmware version
- Confirm and click Update selected gateways.
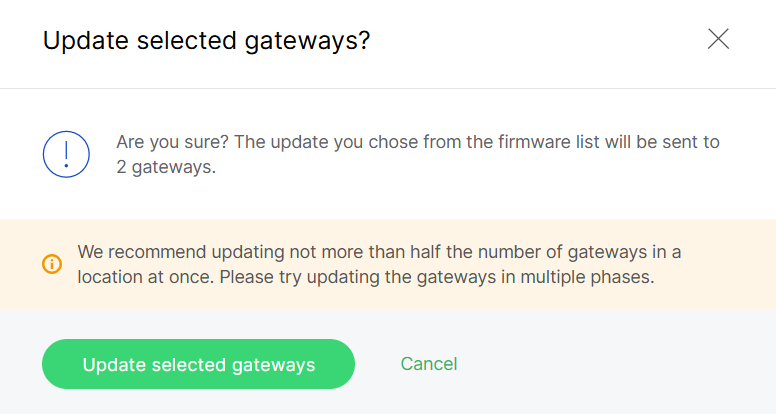 Figure 1: Confirm firmware upgrade
If a selected gateway is offline, its firmware update will remain in Pending status. You can cancel the update at any time before the upgrade begins by navigating to the gateway's System Settings > Firmware and clicking Cancel pending update.
Critical Firmware Updates
Critical firmware updates address security or data integrity issues and should be applied immediately.
- Navigate to Locations > Your location > Firmware updates > Settings.
- Toggle Enable critical updates.
 Figure 1: Enable Critical Updates
When enabled, WisDM will automatically update all eligible gateways within the Location once a critical firmware version becomes available.
View Firmware Update Status
WisDM offers a dedicated page for checking the firmware update status across a Location.
To access it, navigate to Locations > Your location > Firmware updates > Last updates.
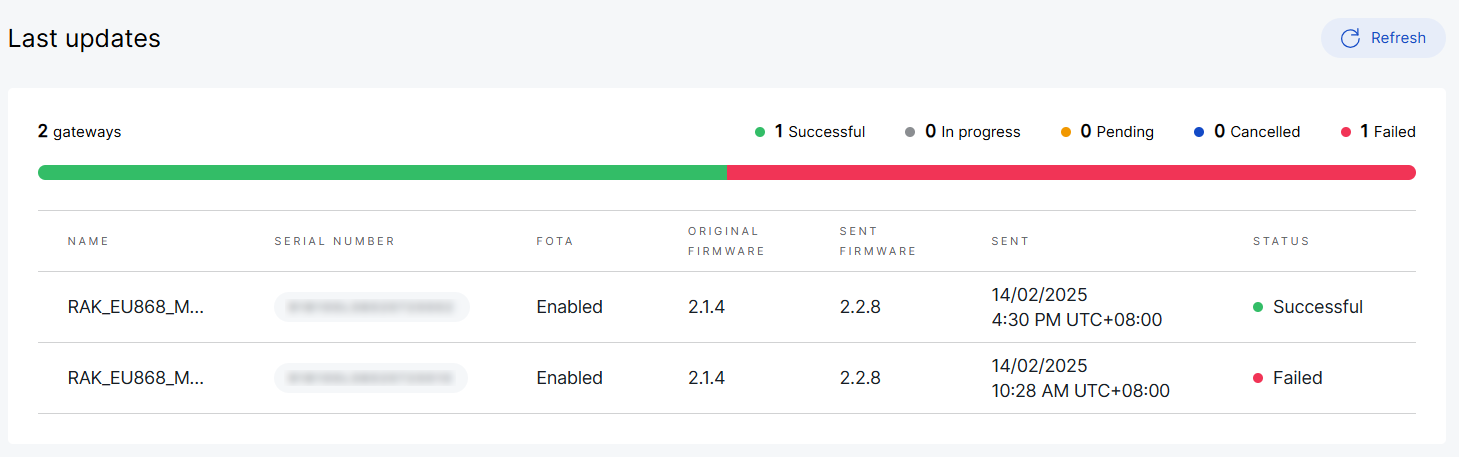 Figure 1: Check firmware update status
- Successful: Gateways that have completed the update.
- In progress: Updates that are currently running.
- Pending: Updates that are scheduled but have not yet started.
- Cancelled: Updates that were manually canceled by the user before installation began. The gateway will remain on its previous firmware version.
- Failed: Updates that did not complete successfully. Administrators can re-trigger these updates after troubleshooting.
If firmware update notifications are enabled in your account settings, WisDM will send an email summary after each update process.
Location-Level Notification Settings
The Notification Center defines how alerts are delivered for gateway status, solar battery, firmware, configuration, and performance events.
By default, a Location inherits its notification rules from the Organization-level Notification Center.
Administrators can choose to override inherited rules and apply a Location-specific configuration when needed.
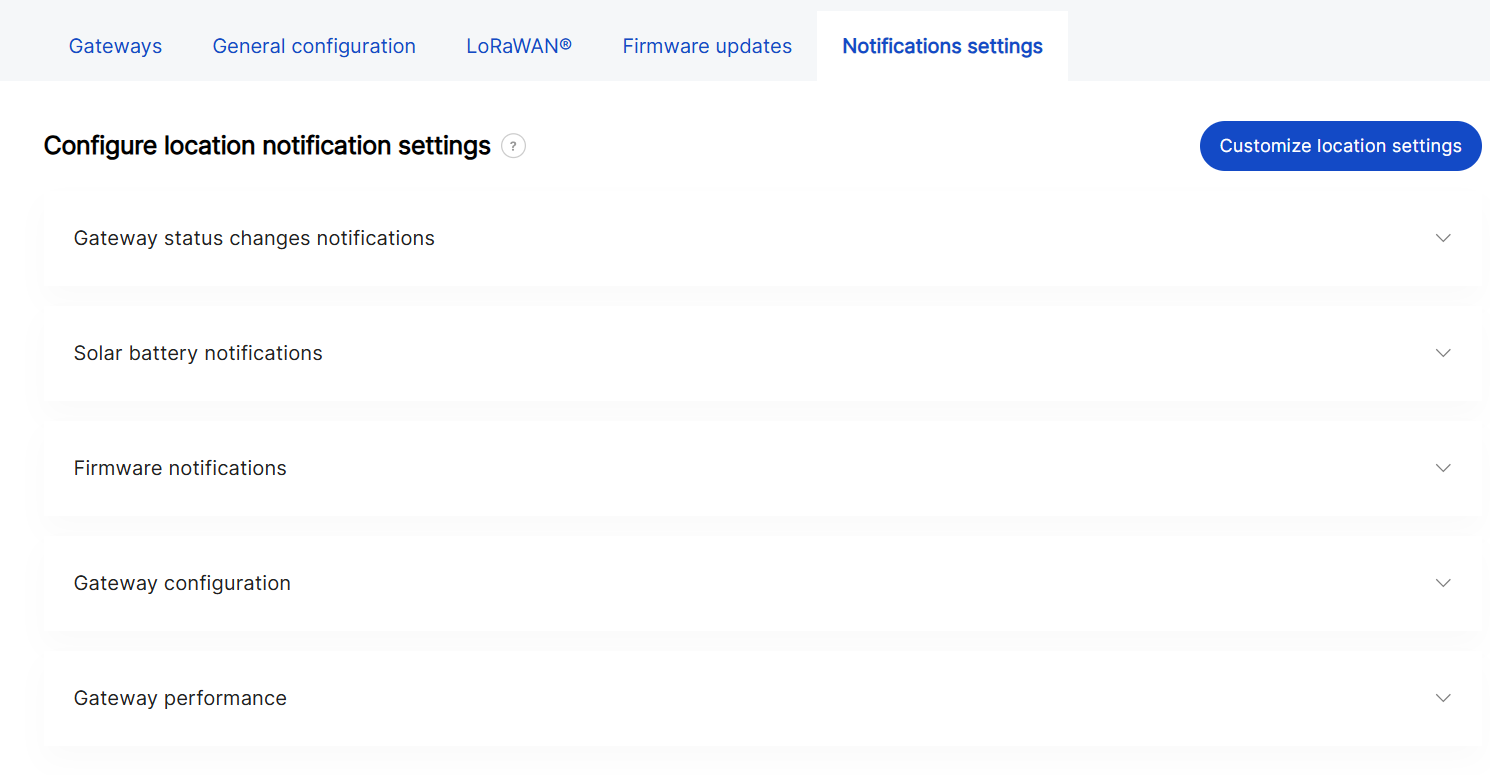 Figure 1: Notification settings overview
Enable Custom Location Settings
- Click Customize location settings.
- Confirm and click Customize to proceed.
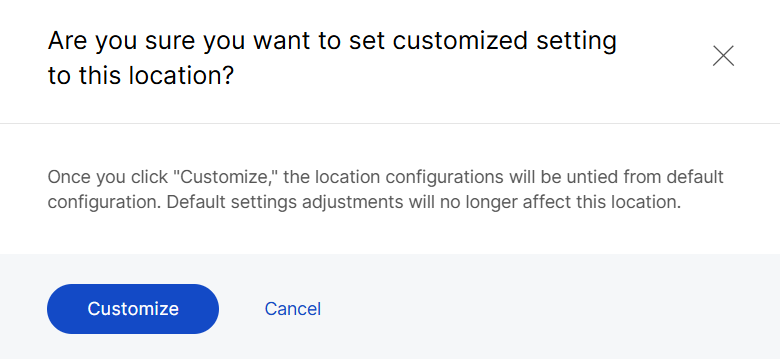 Figure 1: Confirm customization
To revert to the Organization-level defaults, click Reset to default at any time.
Notification Configuration
The configuration structure for Location-level notifications; including event types, recipient roles, and delivery frequency, follows the same logic as the Organization-level Notification Settings.
The key difference is that Location-level notifications allow adding Custom recipients using + Add Email Address, allowing external partners or service providers to receive alerts.
For detailed descriptions of all configuration parameters and notification types, refer to: Organization Management > Locations Notification Settings.
Diagnostics
Packet Capture
The system allows you to perform real-time packet capture across multiple gateways within a single Location. This feature is useful for analyzing network traffic, verifying LoRaWAN message flow, and diagnosing communication issues.
- From the Locations list, open the action menu and select Open packet capture, or go to the Location Details page and click Open packet capture.
 Figure 1: Starting a packet capture session from the Locations view
-
In the Duration section, choose how long the packet capture should run:
- 1 min
- 5 min
- 10 min
- or Custom duration
-
Adjust capture parameters by applying filters to refine the collected data.
- Click on Type to select which LoRaWAN message types to capture (as shown in the second image).
Available options include:
- Join request
- Join accept
- Unconfirmed data up
- Unconfirmed data down
- Confirmed data up
- Confirmed data down
- Other
- Click Gateways to limit the capture to specific gateways.
- Additional filters, such as RSSI or SNR can also be applied if needed.
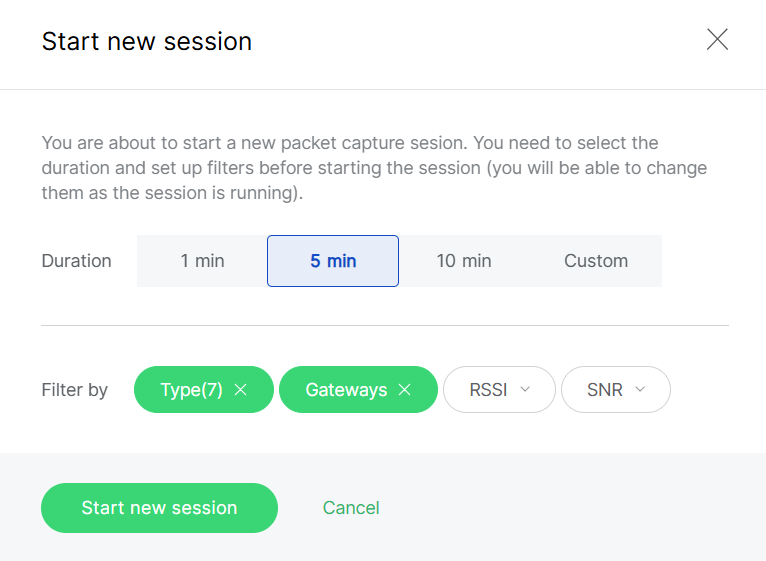 Figure 1: Set capture parameters
- Once filters and duration are set, click Start new session to begin capturing packets. Filters can be modified even while the session is active.
 Figure 1: Start session
Keep Me Logged In
For security reasons, WisDM automatically logs you out after 15 minutes of inactivity. If your packet capture session lasts longer than 15 minutes, ensure that you enable the Keep me logged in toggle during the session to prevent interruption.