Organization Management
An Organization is the top-level entity in WisDM, typically representing an enterprise customer, a partner, or a managed service provider (MSP).
- Can include multiple Locations, with each Location managing a group of gateways and end devices.
- Members, roles, permissions, notifications, subscriptions, and billing are all managed at the Organization level.
Manage and Create Organizations
From the left navigation panel, click Organizations at the top to open the organization management console.
The Organizations page lists all the organizations that the current user has access to in WisDM. Each organization represents an independent management domain; typically an enterprise account, a partner instance, or a demo environment.
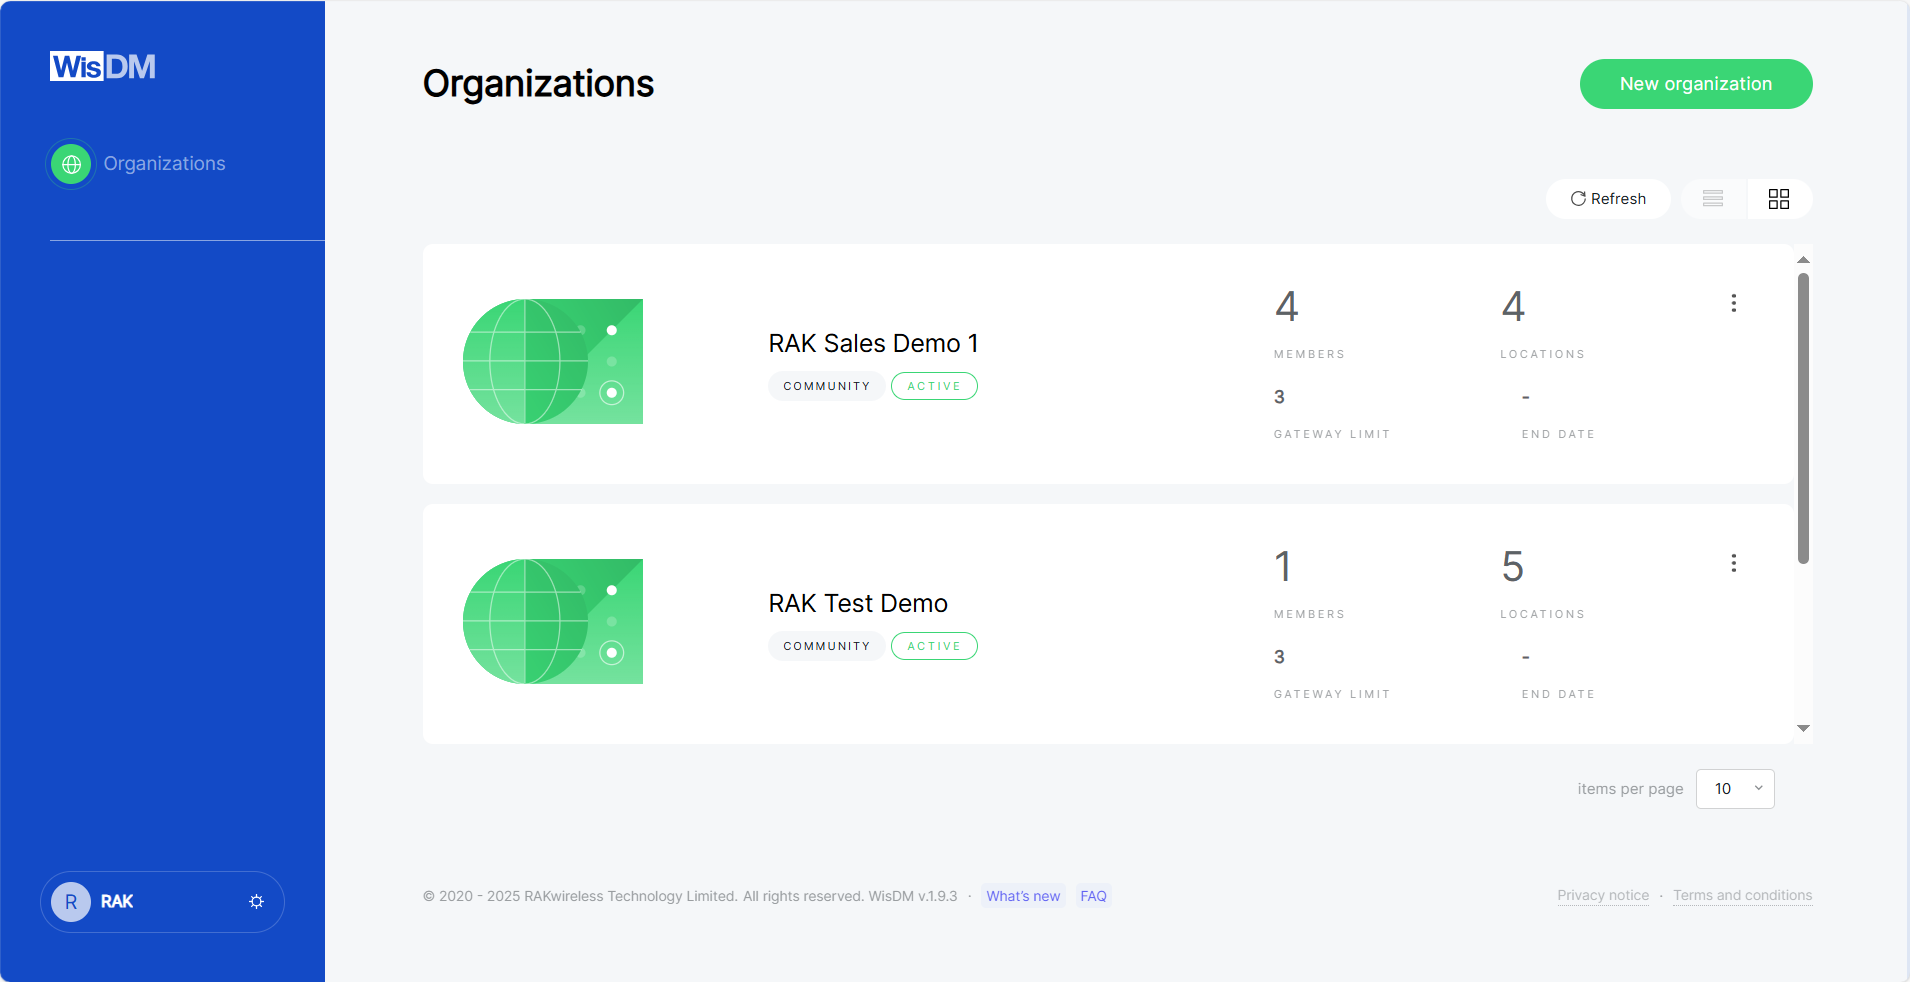 Figure 1: Organizations
Manage Existing Organizations
Each organization card includes an actions menu that allows you to perform management operations such as opening, leaving, or deleting an organization.
Open Organization
This option opens the selected organization and navigates to its dashboard. From there, you can access Locations, Gateways, Applications, and other management features.
Leave Organization
Leaving an organization removes your WisDM account from that organization. Once you leave, you will immediately lose access to all its locations, gateways, and other associated assets.
- Any member can voluntarily leave an Organization.
- If you are the only Organization Admin with billing permissions, you must transfer your role to another member before leaving the organization.
- On the Organizations page, click the ⋮ actions menu next to the target organization.
- Select Leave organization.
- A confirmation dialog will appear, warning that you will lose access to all Organization assets.
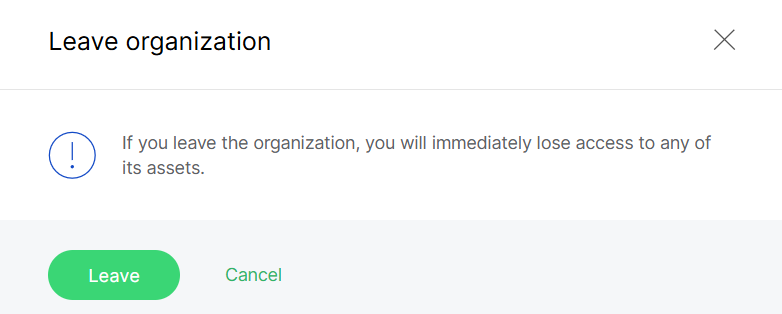 Figure 1: Confirm leaving the organization
- Click Leave to confirm.
Delete Organization
Deleting an Organization permanently removes all its data, configurations, and member access from WisDM. This action is irreversible and should only be performed by an organization Admin when the Organization is no longer needed.
- Click the actions menu next to the target Organization.
- Select Delete organization.
- Review the confirmation dialog and verify the list of data that will be deleted.
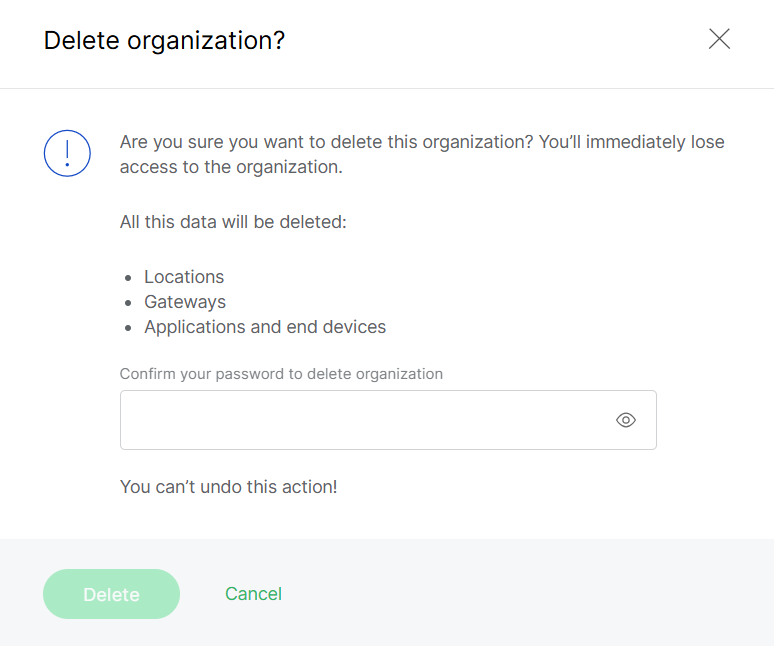 Figure 1: Delete organization confirmation
-
Enter your password (and 2FA code if enabled).
-
Click Delete to finalize the action.
Once confirmed, the Organization and all its data will be permanently deleted. WisDM support cannot restore deleted Organizations.
Create a New Organization
To create a new organization, click New organization in the top-right corner.
The setup process is identical to the steps described in Quick Start Guide > Create an Organization.
Dashboard
The Organization dashboard offers a comprehensive overview of system health by consolidating location distribution, gateway status, work mode ratios, and offline hotspots into a single view.
Organization Map
The map widget displays the geographic distribution of all Locations within the Organization. It supports zooming and panning, enabling administrators to quickly locate gateways and assess deployment coverage across various regions. This widget is mandatory and cannot be disabled.
The coordinates and map location shown are based on the manually entered address during the creation of each Location.
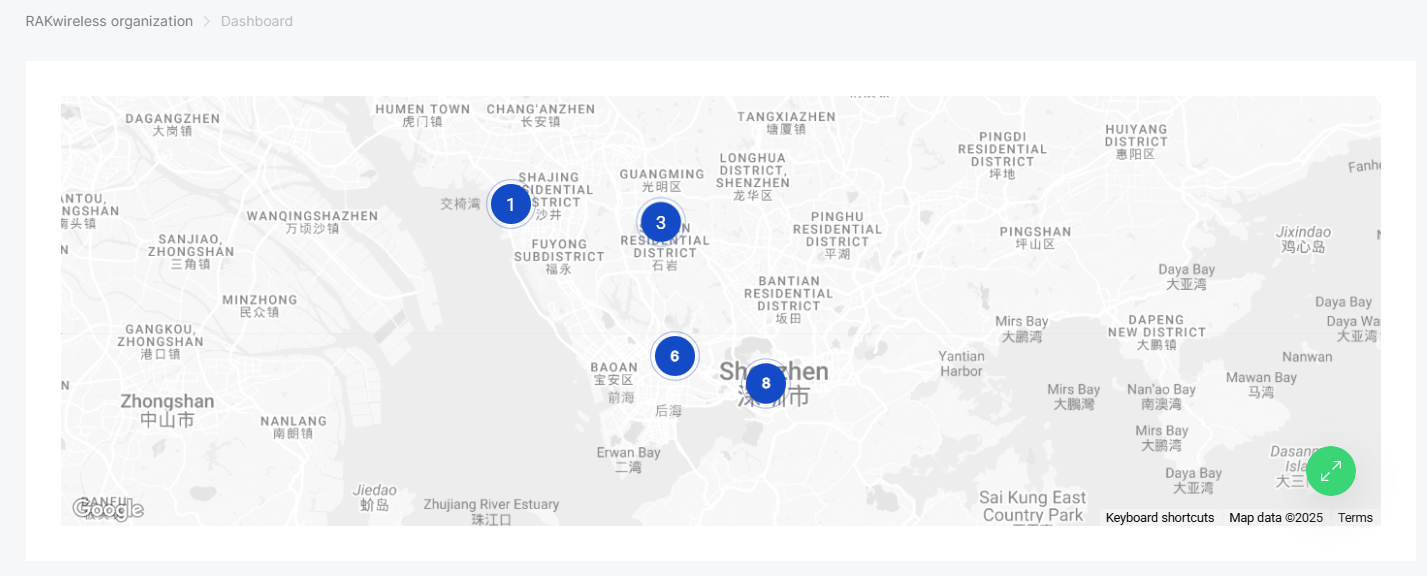 Figure 1: Organization map
Gateway Summary
The Gateways Summary widget provides an overview of all gateways under the Organization, categorized by their current connection status.
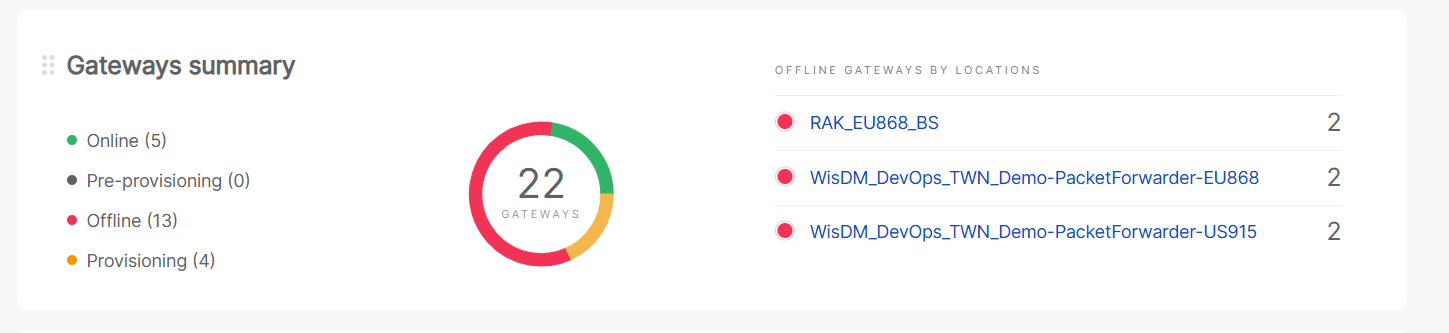 Figure 1: Gateway Summary
- Online: Connected and operating normally.
- Pre-provisioning: Pre-configured in the factory and pre-registered in WisDM, but not yet online.
- Offline: Disconnected; cannot forward traffic. Pending configurations are cached and applied once reconnected.
- Provisioning: In setup mode, typically following a factory reset or unassignment.
A donut chart in the center displays the total number of gateways, while the list on the right highlights the top three Locations with the highest number of offline gateways, enabling administrators to quickly identify areas with potential connectivity issues.
The Gateways Summary widget is optional and can be toggled on or off through the Choose widgets option in the dashboard view.
Location Summary
The Location Summary widget provides an overview of all Locations within the Organization, grouped by their current operation mode.
 Figure 1: Location Summary
- No mode(non configured)
- Built-in Network Server
- Packet Forwarder
- Basics Station
A horizontal bar visually represents the distribution of Locations by mode, while the total number of Locations is displayed on the left. This allows administrators to quickly assess the deployment composition and identify non configured or inactive Locations.
The Location Summary widget is optional and can be enabled or disabled from the Choose widgets panel on the dashboard.
Members Management
The members module controls who can access the Organization and defines their capabilities. Roles and permissions are established here to facilitate multi-user collaboration while maintaining system security.
Overview
The Members page displays a list of all users within the current Organization. It allows administrators to view roles, manage access permissions, and invite new members to collaborate on managing locations, gateways, and applications.
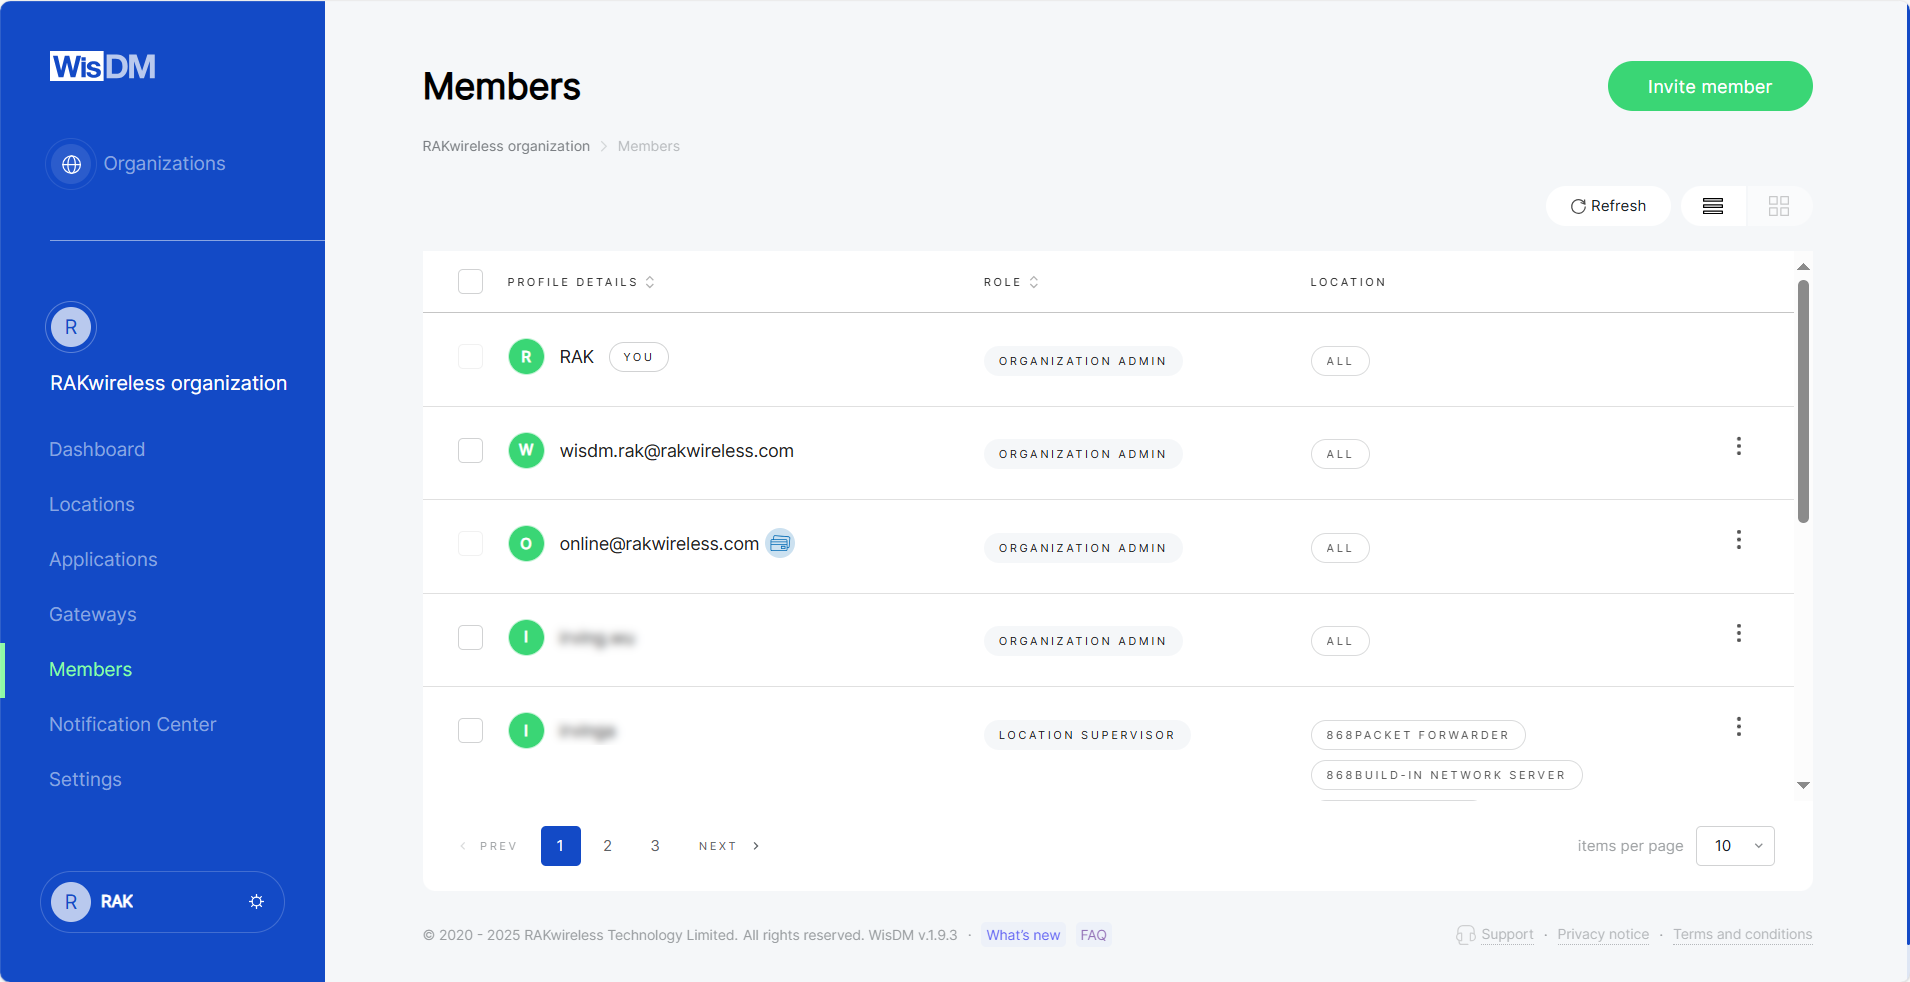 Figure 1: Members overview
 : Indicates a pending invitation that has been sent but not yet accepted.
 : Identifies the Organization Owner, the user who created the Organization.
Roles and Permissions
After creating and setting up an Organization, you can add members and assign different roles to define their access permissions. WisDM supports four role types, each offering distinct levels of access and control.
Role Types
| Role | Description |
|---|---|
| Organization Admin | Has full access to all assets and settings within the Organization. Can manage members, locations, gateways, and configurations. |
| Organization Supervisor | Can view all Organization assets but cannot make configuration changes. |
| Location Admin | Has full access to specific Locations as defined by the Organization Admin. Can manage gateways, applications, and end devices within those Locations. |
| Location Supervisor | Can view assets within assigned Locations but cannot make any configuration changes. |
Permission Matrix
The table below summarizes the permissions available to each role category.
| Role | Permission Category | Available Actions |
|---|---|---|
| Organization Admin | Notifications | Get assigned gateway status notifications |
| Organization Management | Update organization settings Provide/update temporary support access Review temporary support access details ZenDesk online support | |
| Organization Assets | Add new location to organization Review full organization unassigned gateway list | |
| Subscription | Update organization subscription View organization subscription | |
| Organization User Management | View the list of users with organization-based roles View the list of users with location-based roles Change user organization role Assign user to organization/location Unassign users from organization/location | |
| Location Management | Remove location Update location general configuration | |
| Location Gateway Management | Add/unassign gateway to location Change location central gateway Review location network configuration Update location network configuration Create/apply own location network configuration templates Review location application list Add/remove/edit location applications Review application configuration Create/apply own application templates Review application end device lists Add/remove/edit application end devices Review end device configuration Create/upload own end device lists Update location firmware Review full location gateway details Open Linux SSH session with a location gateway Review gateway livefeed Review location livefeed Review end device livefeed | |
| Organization Supervisor | Notifications | Get assigned gateway status notifications |
| Organization Management | Review temporary support access details | |
| Organization Assets | Review full organization unassigned gateway list | |
| Organization User Management | View the list of users with organization-based roles View the list of users with location-based roles | |
| Location Gateway Management | Review location network configuration Review location application list Review application configuration Review application end device lists Review end device configuration Review full location gateway details | |
| Location Admin | Notifications | Get assigned gateway status notifications |
| Organization User Management | View the list of users with organization-based roles View the list of users with location-based roles Assign user to organization/location Unassign users from organization/location | |
| Location Management | Request location removal Update location general configuration | |
| Location Gateway Management | Add/unassign gateway to location Change location central gateway Review location network configuration Update location network configuration Create/apply own location network configuration templates Review location application list Add/remove/edit location applications Review application configuration Create/apply own application templates Review application end device lists Add/remove/edit application end devices Review end device configuration Create/upload own end device lists Update location firmware Review full location gateway details Open Linux SSH session with a location gateway Review gateway livefeed Review location livefeed Review end device livefeed | |
| Location Supervisor | Notifications | Get assigned gateway status notifications |
| Organization User Management | View the list of users with organization-based roles View the list of users with location-based roles | |
| Location Gateway Management | Review location network configuration Review location application list Review application configuration Review application end device lists Review end device configuration Review full location gateway details |
Invite Members
Administrators can invite new members to join the organization via email, assigning them appropriate roles and location permissions. Once the invited users accept the invitation, they will appear in the Members list.
-
Click Invite member in the top-right corner of the Members page.
-
Enter the Member email (RAK ID).
NOTEIf the invitee does not have a RAK ID yet, they can complete registration during the invitation acceptance process.
-
Select a Member role from the dropdown menu.
- Available roles include Organization Admin, Organization Supervisor, Location Admin, and Location Supervisor.
- Each role defines different permissions for managing assets and settings. For a detailed comparison of role capabilities, see the Permission Matrix.
-
Under Location permissions, choose which Locations the member can access.
- This option applies only to Location-level roles (Location Admin and Location Supervisor).
- Members with Organization-level roles automatically have access to all Locations within the Organization.
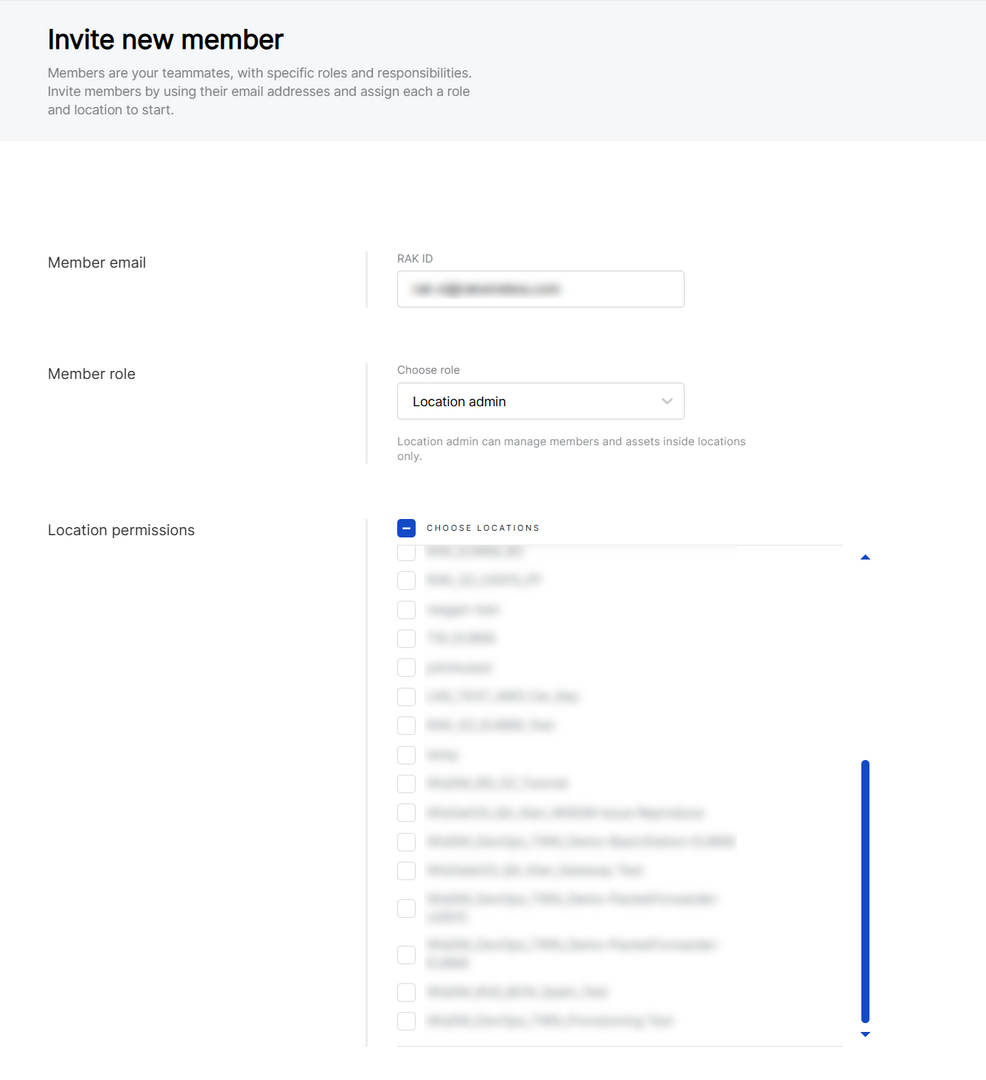 Figure 1: Invite new member
- Click Invite new member to send the invitation.
After sending the invitation, the invitee will receive an email from WisDM.
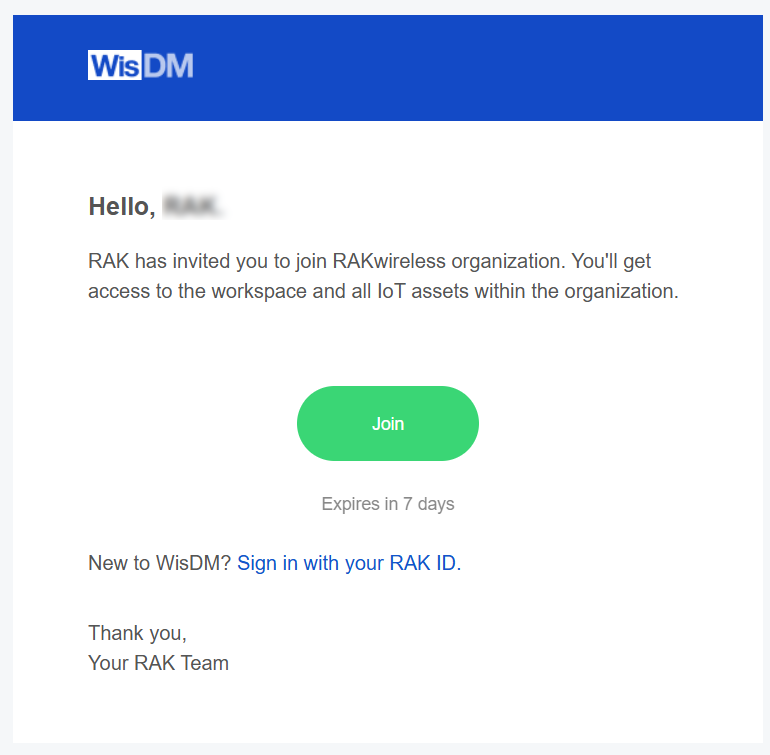 Figure 1: Invitation email example
When the invitee clicks Join (or Sign in with your RAK ID), they will be redirected to the WisDM login page. On this page, they can either:
- Sign in using an existing RAK ID, or
- Create a new RAK ID to complete the registration and join the Organization.
Invitations automatically expire after 7 days if not accepted.
Change Member Role and Permissions
Organization Admins can update member roles and Location permissions within the Organization.
The Organization Owner role is read-only and cannot be modified.
- On the Members page, locate the member you want to edit.
- Click the actions menu on the right side of the member entry.
- Select Edit member details to open the Edit profile details page. This option allows you to change the user's role and location access.
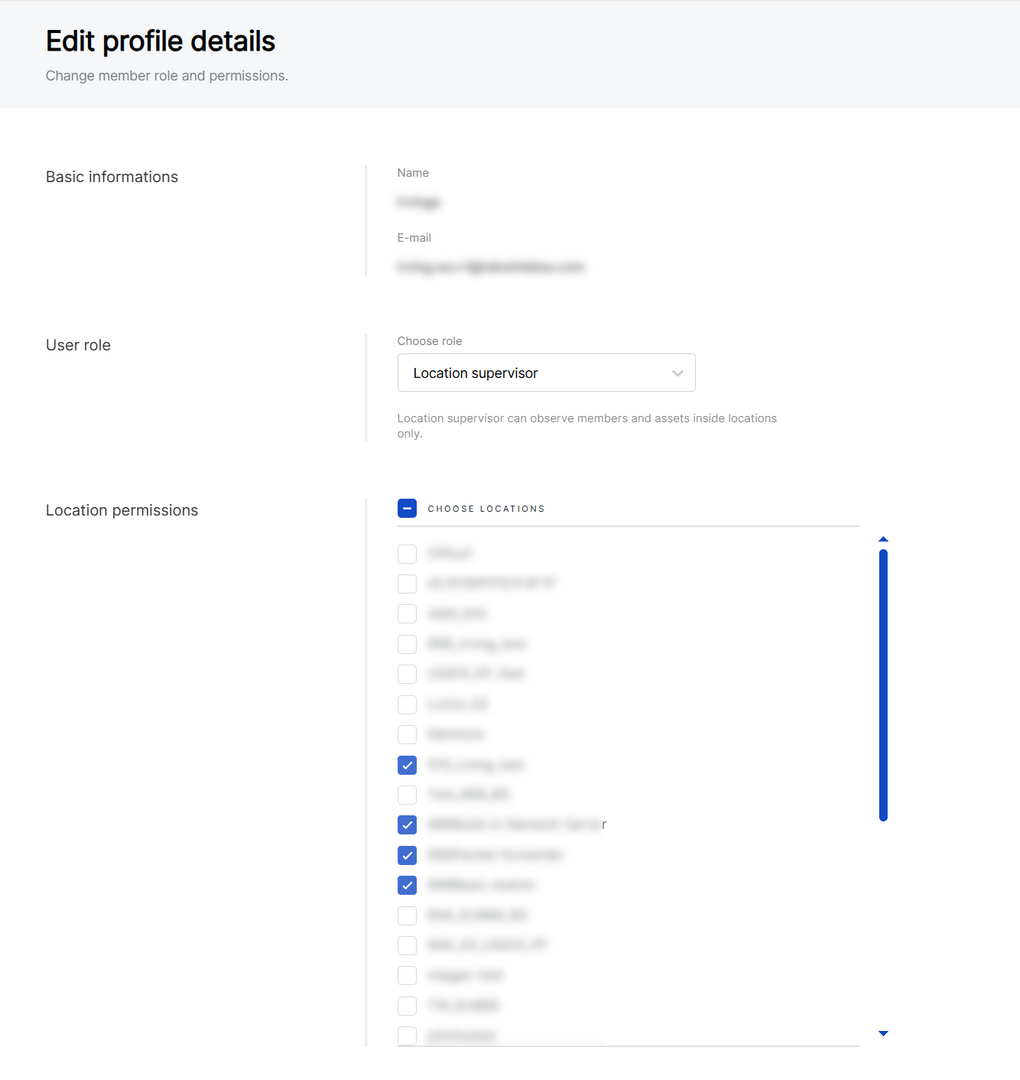 Figure 1: Access the member actions menu
- Click Save changes to apply the updates.
Transfer Billing Ownership
The Transfer billing ownership option allows the current Billing Owner to transfer billing and subscription management rights to another member within the Organization.
Only the current Billing Owner can initiate this action, and the new recipient must hold the Organization Admin role.
- On the Members page, locate the member you want to transfer billing ownership to.
- Click the actions menu on the right side of the member entry.
- Select Transfer billing ownership.
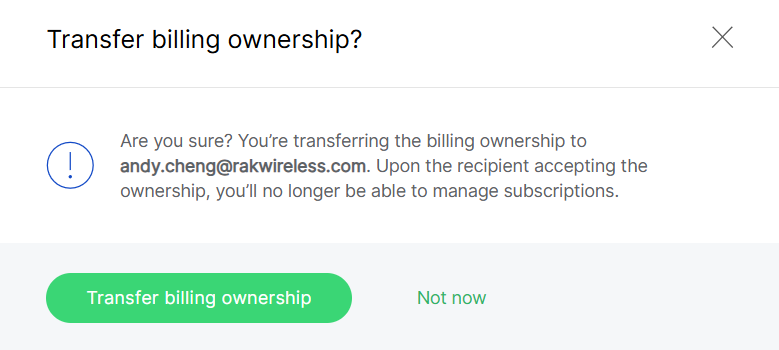 Figure 1: Transfer billing ownership from Members page
- Only one Billing Owner exists per Organization.
- After the transfer, the new Billing Owner will gain full access to subscription and payment settings.
- The previous owner will retain administrative privileges but will lose billing management rights.
Remove Members
Administrators can remove both active members and pending invitations from the Organization using the Unassign member option. You can also select multiple members and click Unassign to remove them in bulk. This action revokes the member's access to all Organization assets, while their RAK ID remains valid and can be re-invited later if needed.
-
On the Members page, locate the member you want to remove.
-
Click the actions menu on the right side of the member entry.
-
Select Unassign member.
NOTEThe Organization Owner cannot be unassigned.
-
In the confirmation dialog, click Unassign to confirm the removal.
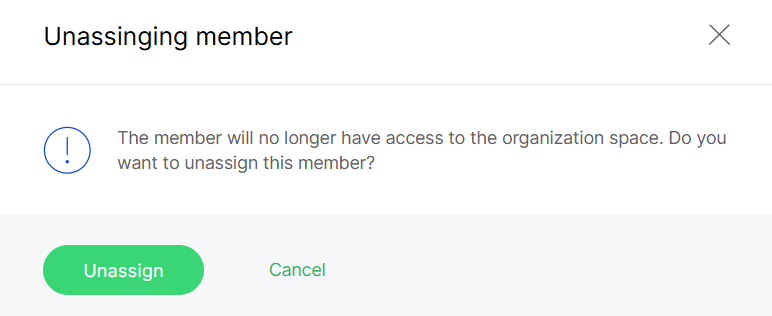 Figure 1: Unassign member confirmation dialog
After confirmation, the member will immediately lose access to the Organization workspace and all related locations, gateways, and applications. You can also select multiple members and click Unassign to remove them in bulk.
Organization-Level Notification Settings
The Notification Center at the Organization level defines how alerts and messages are managed across all Locations within the Organization.
It consists of two main categories:
- Location Notifications - System and device-related alerts that apply to all Locations (e.g., gateway status, firmware updates, and performance).
- Billing Notifications - Subscription and payment-related messages that are sent to designated finance contacts.
Locations Notification Settings
By default, all Locations inherit the Organization-level notification rules, unless a custom Location-level policy is configured.
Notification Recipients
For each notification type, you can define who receives the alerts:
- Organization Supervisor
- Organization Admin
- Location Supervisor
- Location Admin
Each role can be assigned a delivery frequency, depending on the event type:
- Immediately: Send notifications as soon as the event occurs.
- Hourly report: Group notifications and send once per hour.
- Daily report: Group notifications and send once per day.
- Never: Do not send notifications.
Gateway Status Change Notifications
This section allows administrators to configure email alerts when gateway status changes occur. Notifications help monitor gateway availability and detect issues early, reducing downtime and improving response time.
Status
Sends notifications when a gateway goes online or offline.
Gateway Sends Dying Gasp
Alerts when a gateway transmits a “dying gasp” signal before shutting down (e.g., due to power failure).
More than X% of Gateways are Offline Simultaneously
Triggers when the percentage of offline gateways exceeds the configured threshold.
 Figure 1: Set threshold value
- Percent of gateways offline (X%): Set the percentage threshold (10%-100%).
- Offline duration (N, mins): Minimum time a gateway must remain offline before it contributes to the threshold.
- Back to normal: Option to send notification when the condition is resolved.
Gateway is Offline for More than N Minutes
 Figure 1: Set threshold value
- Offline duration (N mins): Define the offline period that triggers the event (5-1440 minutes).
- Back to normal: Option to notify when the gateway comes back online.
Solar Battery Notifications
This section allows administrators to configure alerts related to solar battery health and safety. Notifications are sent when the battery reports a fault, enters protection mode, or raises a warning about abnormal conditions.
Fault
Triggers when the solar battery reports a critical fault condition. Immediate response is typically required to prevent system failure.
Protect
Triggers when the battery enters a protection state (e.g., cutoff due to unsafe voltage or current). This helps administrators act quickly to restore safe operating conditions.
Warning
Triggers when non-critical but abnormal conditions are detected (e.g., overheating, drop in charging efficiency). This provides early visibility of potential issues before they escalate to faults.
Firmware Notifications
Send alerts regarding the results of firmware upgrade tasks. This ensures that administrators are aware of successful and failed upgrades without the need to manually check the update logs.
Firmware upgrade result
Summarizes whether the firmware upgrade succeeded or failed after a gateway firmware update completes.
Gateway Configuration Notifications
Notifies administrators when critical configuration changes are automatically rolled back, aiding in the detection of misconfigurations.
Network interface setting rollback event
When gateway network interface settings fail and revert to the previous configuration. This ensures that administrators are aware of failed configuration attempts.
Gateway Performance Notifications
Monitor gateway resource usage to detect performance degradation before it impacts operations.
Gateway performance deteriorates
Helps administrators take proactive action to optimize resources or prevent overload.
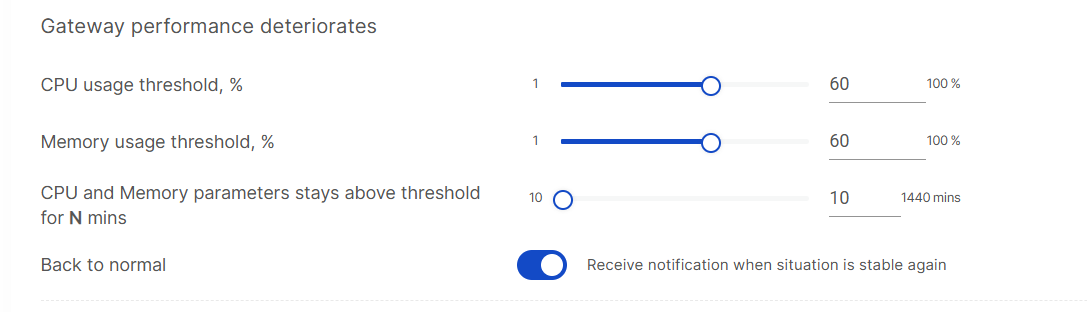 Figure 1: Set performance threshold
- CPU usage threshold (%): Define the percentage of CPU usage that triggers the alert.
- Memory usage threshold (%): Define the percentage of memory usage that triggers the alert.
- Duration (N, mins): Specify how long the CPU or memory usage must remain above the threshold before an alert is triggered.
- Back to normal: Option to receive a notification when the gateway returns to stable performance.
Billing Notifications
The Billing notifications tab allows administrators to add specific email recipients for billing-related messages. This ensures that subscription and payment updates are delivered directly to finance or accounting teams.
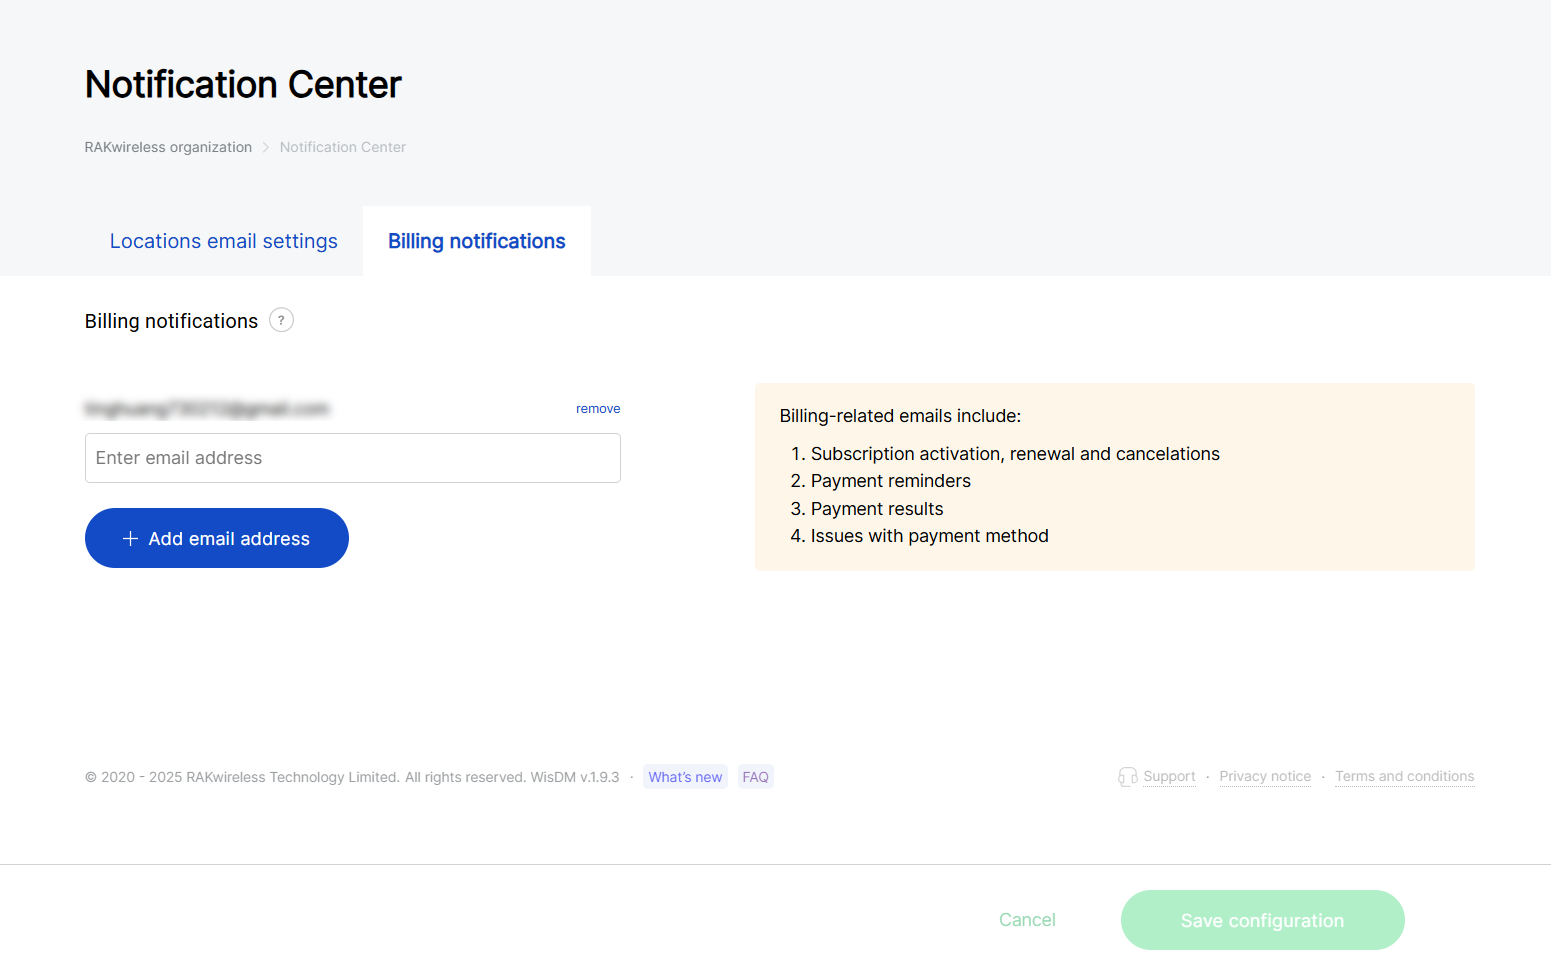 Figure 1: Billing notifications settings
Billing-related emails include:
- Subscription activation, renewal, and cancellation
- Payment reminders
- Payment results (success or failure)
- Issues with payment methods
Billing notifications are independent of system alerts and Location-level policies. Only email recipients added here will receive subscription and payment-related updates.
Organization Settings
The Organization Settings page centralizes organization profile details, subscription and billing information, temporary access configuration, and other organization-level settings.
Overview
The Overview tab shows your organization's basic information. Updating these details requires the Organization Admin role.
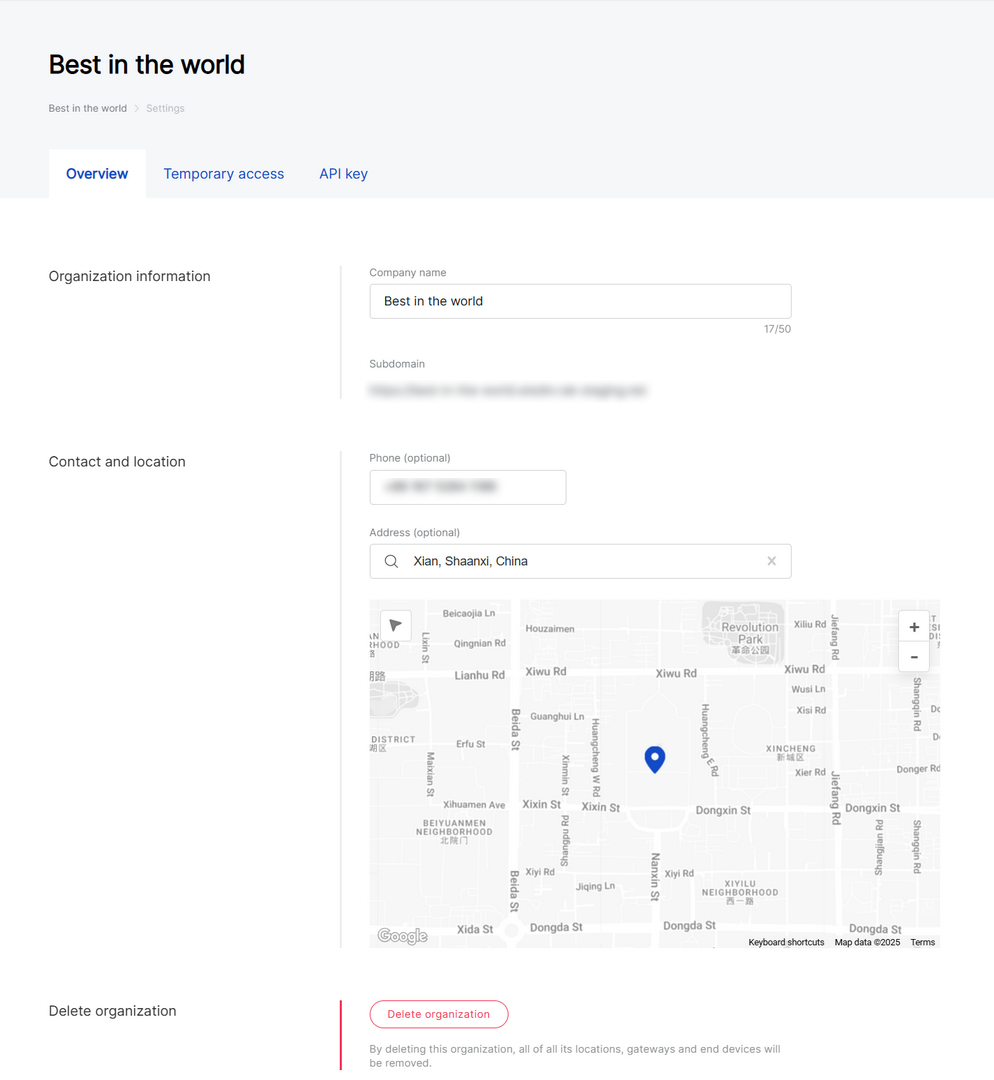 Figure 1: Organization basic information overview
-
Company Name: Edit the name of your Organization.
-
Subdomain: The dedicated login URL for WisDM (e.g.,
your-org.wisdm.rakwireless.com). To change the subdomain, contact RAK Support. -
Phone / Address (Optional): Update your Organization's contact number and map location.
-
Delete organization: Permanently remove your Organization and all related data.
warningOnce confirmed, the Organization and all its data are permanently deleted. WisDM support cannot restore deleted Organizations.
Subscription
The Subscription section allows you to view and manage your organization's current subscription plan. You can also view billing-related information for your subscription here.
- Access to subscription plan details is restricted to the Organization Owner.
- Access to billing information (including payment methods, billing history, invoices, and receipts) is restricted to users with billing permissions.
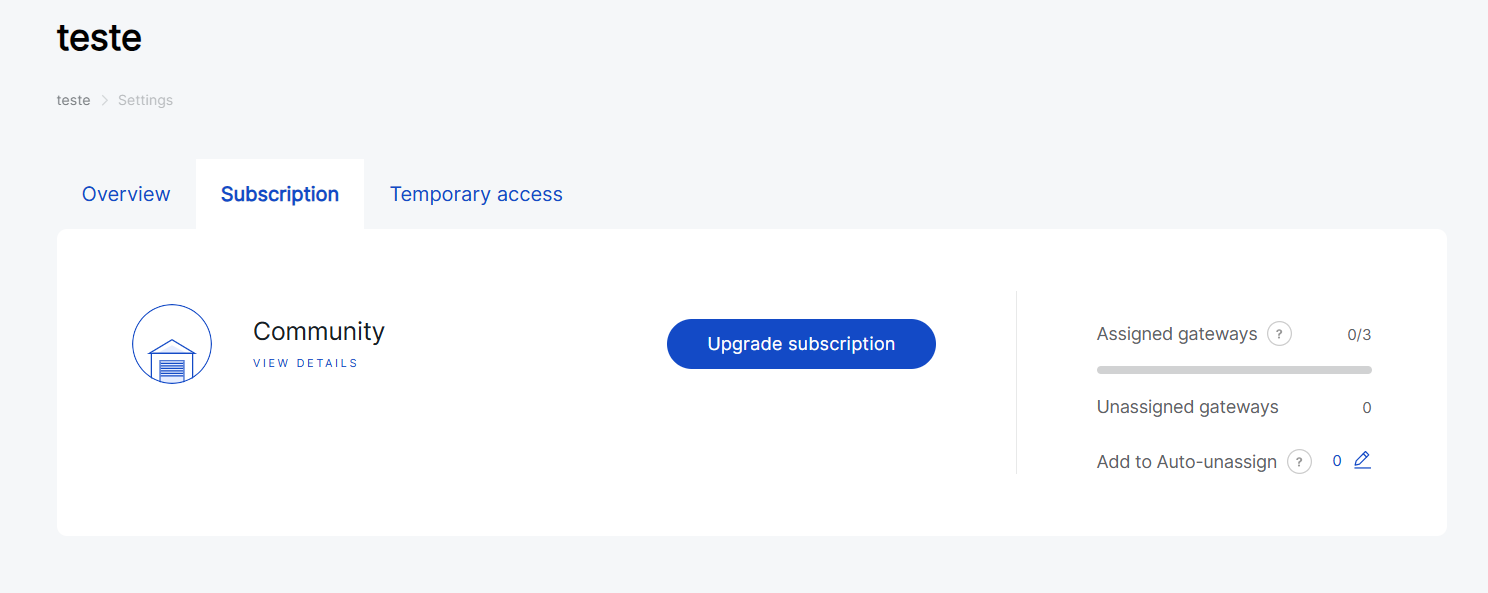 Figure 1: Organization subscription overview
Change Subscription Plan
Depending on your subscription type, you can upgrade, downgrade, or request plan adjustments directly within the interface.
- Go to Settings > Subscription.
- Click Upgrade subscription or See all plans.
- Review the available tiers and select your desired plan.
- Confirm the plan change and complete the Billing Information form.
If upgrading your plan:
- You only pay the price difference between your current plan and the new one.
- The billing cycle remains unchanged your next payment date stays the same.
If downgrading your plan:
- During the current billing cycle: The downgrade takes effect after the current paid period ends (no refunds for unused time).
- During the retry period: The downgrade takes effect immediately upon request.
- WisDM automatically applies the Auto-Unassign mechanism if the new plan supports fewer gateways.
Switching between Online and On-Demand plans:
- From Online to On-Demand: Contact RAK Support to evaluate your current usage and receive a quotation. Once confirmed and paid, your On-Demand Subscription is activated. Any unused balance from your previous plan is deducted from the new invoice.
- From On-Demand to Online: When your On-Demand term expires, select your preferred Online plan (e.g., Standard, Professional, or Enterprise) before expiration to ensure a smooth transition.
Adjust On-Demand Plan
Organizations with an On-Demand plan cannot directly upgrade or downgrade through WisDM. However, administrators can request additional gateway capacity as needed.
-
Go to Settings > Subscription.
-
Click Request more gateways.
-
Fill in the request form and confirm your submission.
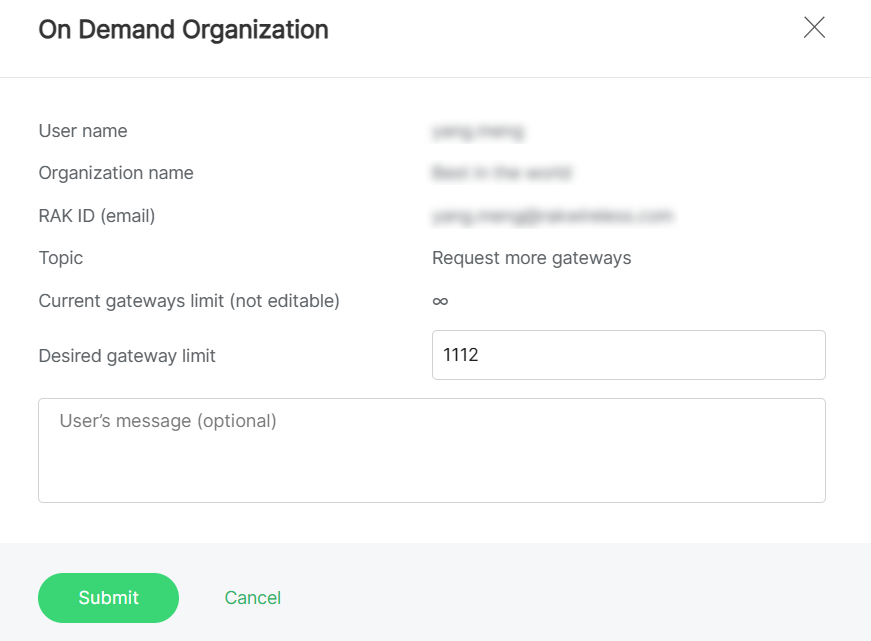 Figure 1: Gateway capacity requests
All On-Demand plan changes, renewals, or cancellations must be handled through RAK Sales or Support.
Download Invoices and Receipts
Only users with billing permissions can download invoices or receipts.
- Go to Settings > Subscription.
- In the Billing History section, you can view all subscription payment records.
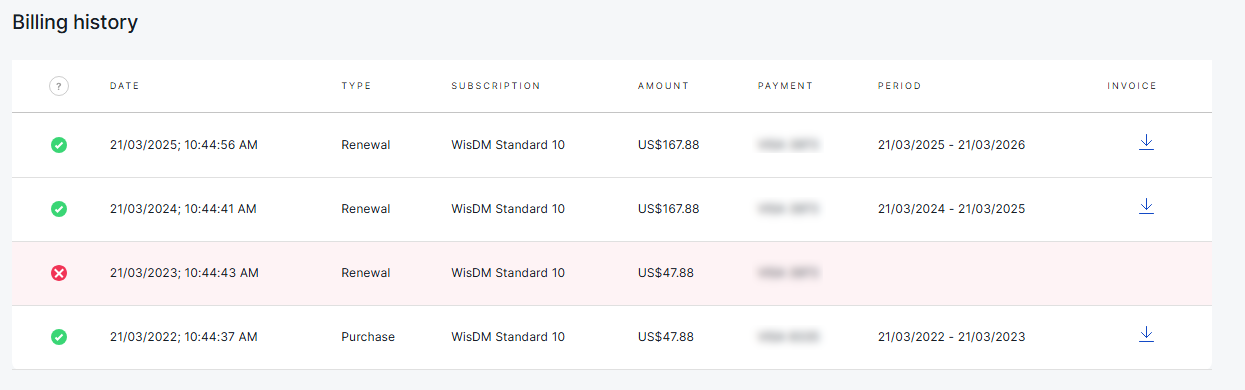 Figure 1: Billing History
- Locate the target record and click the download icon in the INVOICE column.
- In the pop-up window, select the file you want to download, then click Download invoice or Download receipt.
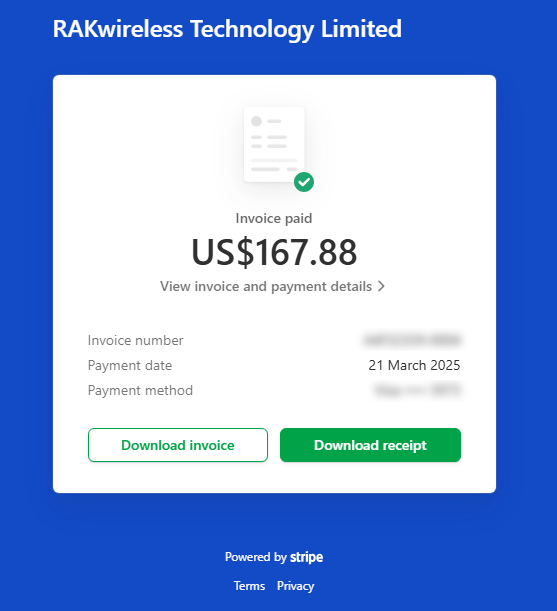 Figure 1: Download invoice or receipt
Auto-Unassign Gateways
The Auto-Unassign feature allows administrators to specify which gateways will be automatically unassigned if the Organization's subscription is downgraded and the new plan supports fewer gateways.
This ensures a smooth transition when reducing your subscription plan, preventing service interruptions for critical devices.
If the Auto-Unassign gateways are insufficient during a downgrade, WisDM will automatically remove additional gateways at random until the new plan limit is reached.
Add Gateways to Auto-Unassign
- Go to Settings > Subscription.
- Click the pencil icon next to Add to Auto-Unassign.
- In the Auto-Unassign gateways window, select the gateways to include in the auto-unassign list.
- Click Add to Auto-Unassign and confirm your action.
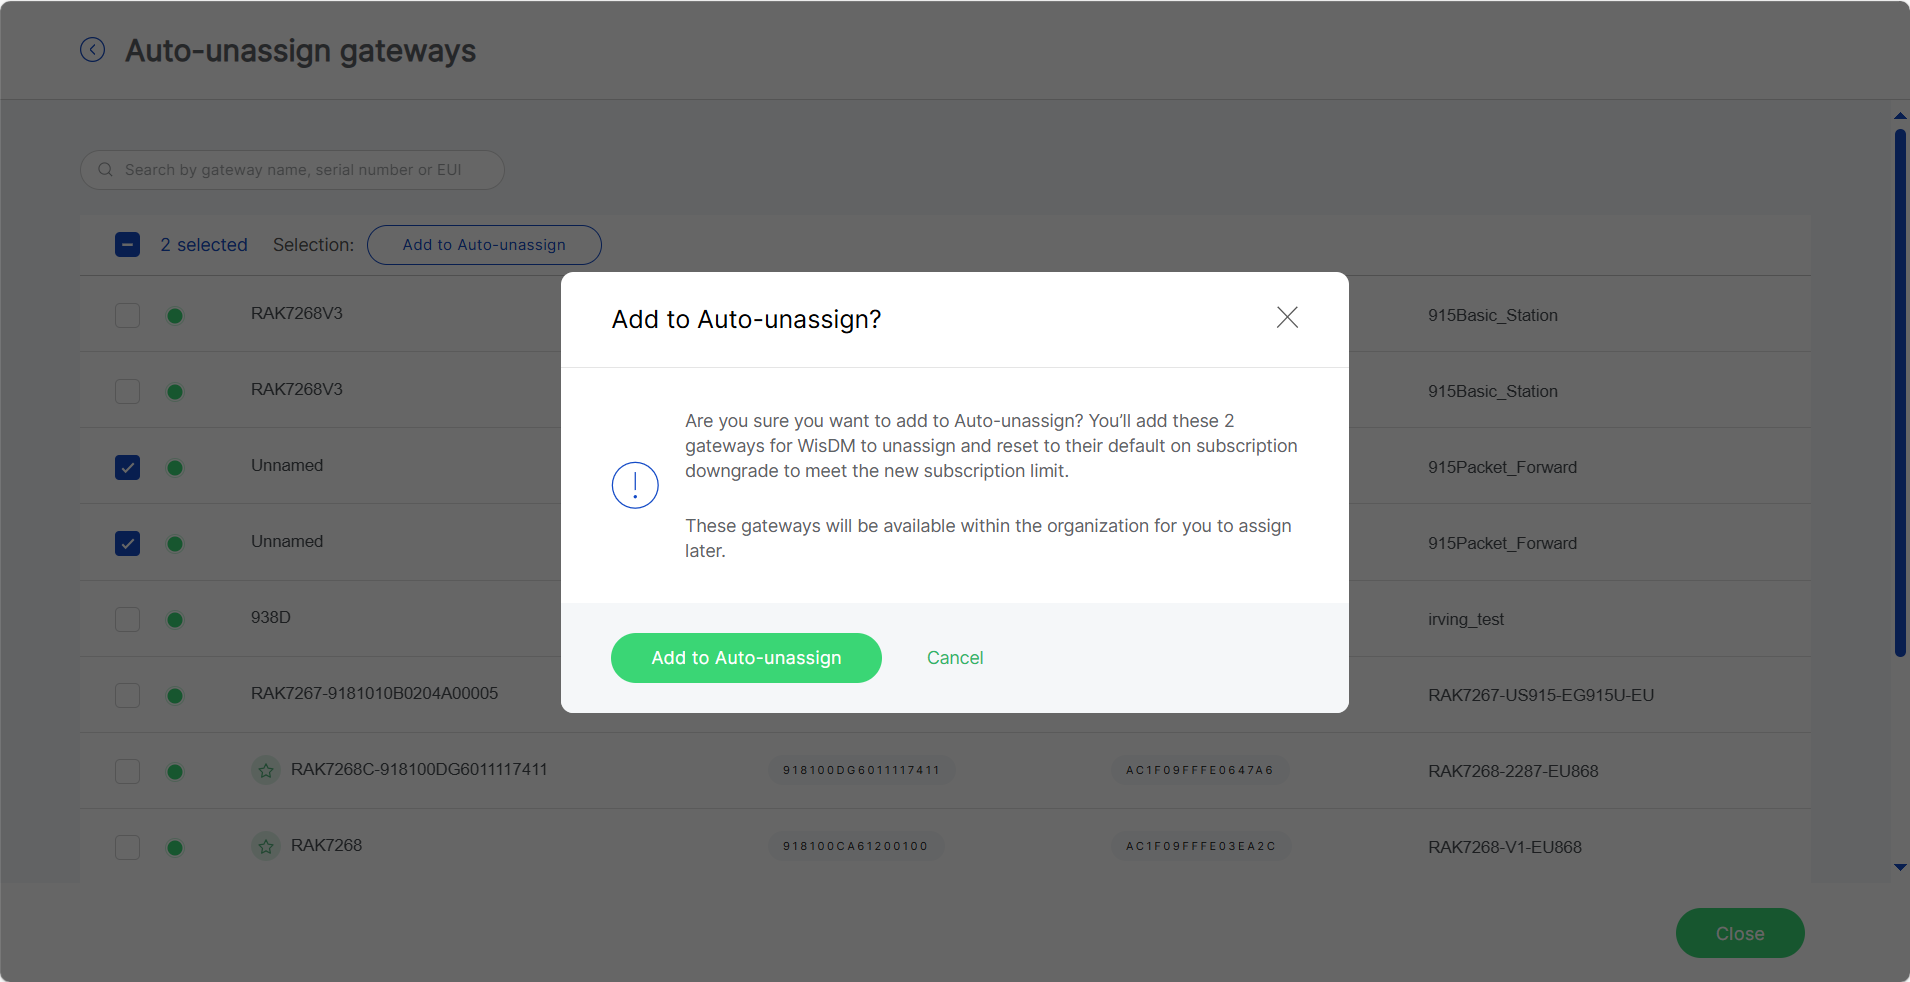 Figure 1: Confirm adding gateways to the Auto-Unassign list
The  icon next to a gateway indicates pending synchronization — the gateway has been selected for Auto-Unassign, but the update has not yet been applied.
Once completed, these gateways will appear under the Auto-Unassign list and will be prioritized for removal during a downgrade.
Remove Gateways from Auto-Unassign
- Go to Settings > Subscription.
- Click the pencil icon next to Add to Auto-Unassign.
- From the list, select the gateways currently marked for Auto-Unassign.
- Click Remove from Auto-Unassign and confirm the action.
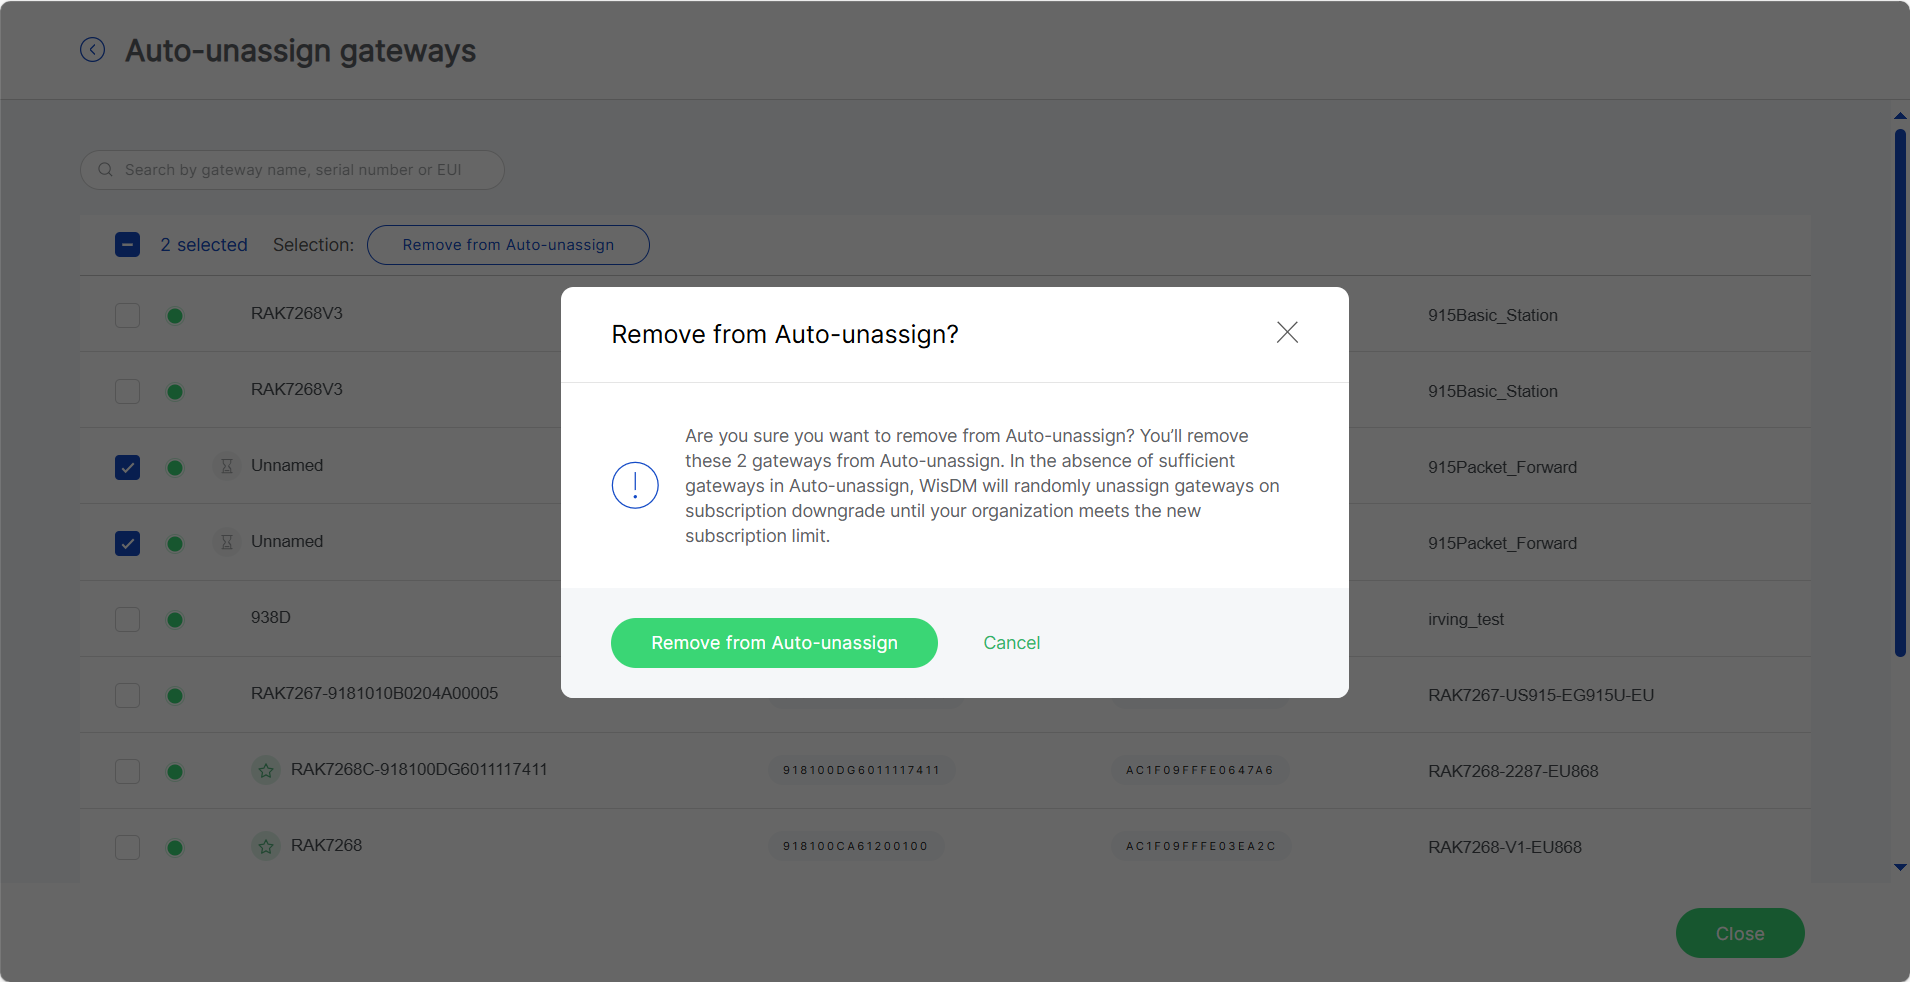 Figure 1: Remove gateways from Auto-Unassign list
Temporary Access
The Temporary Access feature allows Organization Administrators to grant RAK Support limited-time access to the Organization for troubleshooting or maintenance purposes.
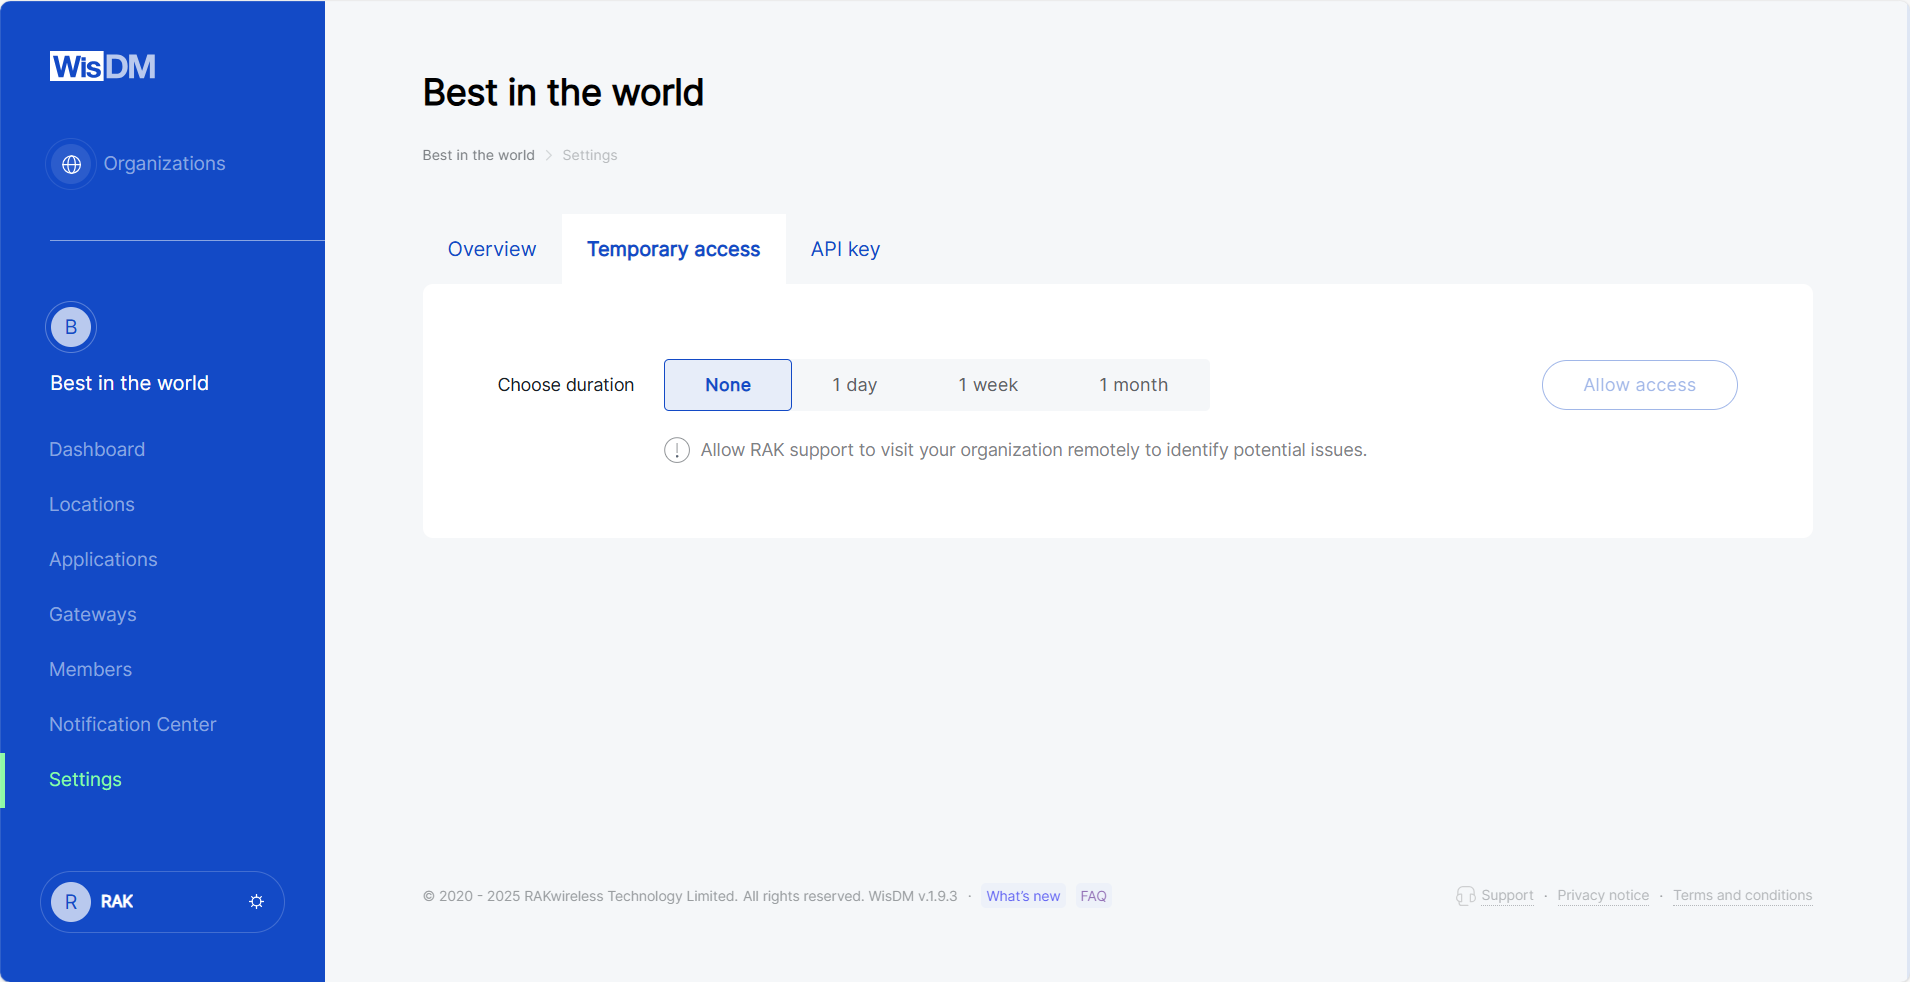 Figure 1: Temporary Access configuration interface
- Go to Settings > Temporary access.
- Select the access duration (
1 day,1 week, or1 month). - Click Allow access. The page will show the start and end time of the active access session.
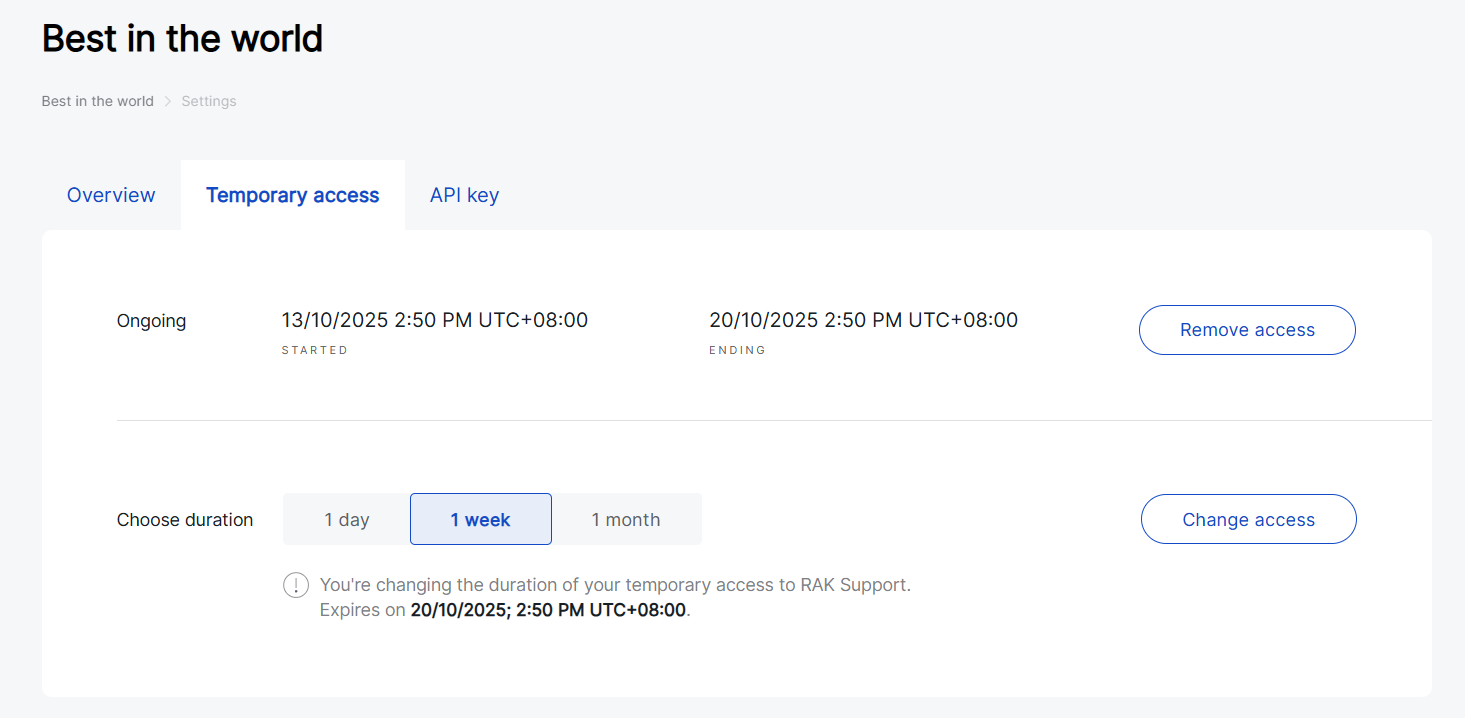 Figure 1: Granting temporary access to RAK Support
You can extend or shorten the duration by selecting a new period and clicking Change access, or Remove access at any time to terminate it immediately.
Account Profile
The My Profile Settings page allows you to view and manage the personal information associated with your WisDM account. It provides access to your RAK ID details, organization memberships, and account deletion options.
To open the Account Profile page, click your account icon located in the bottom-left corner of the WisDM sidebar, then select Your profile.
RAK ID Information
This section displays the RAK ID-linked information, which is synchronized across all RAK platforms. RAK ID data cannot be modified directly in WisDM and must be updated from the RAK ID profile page.
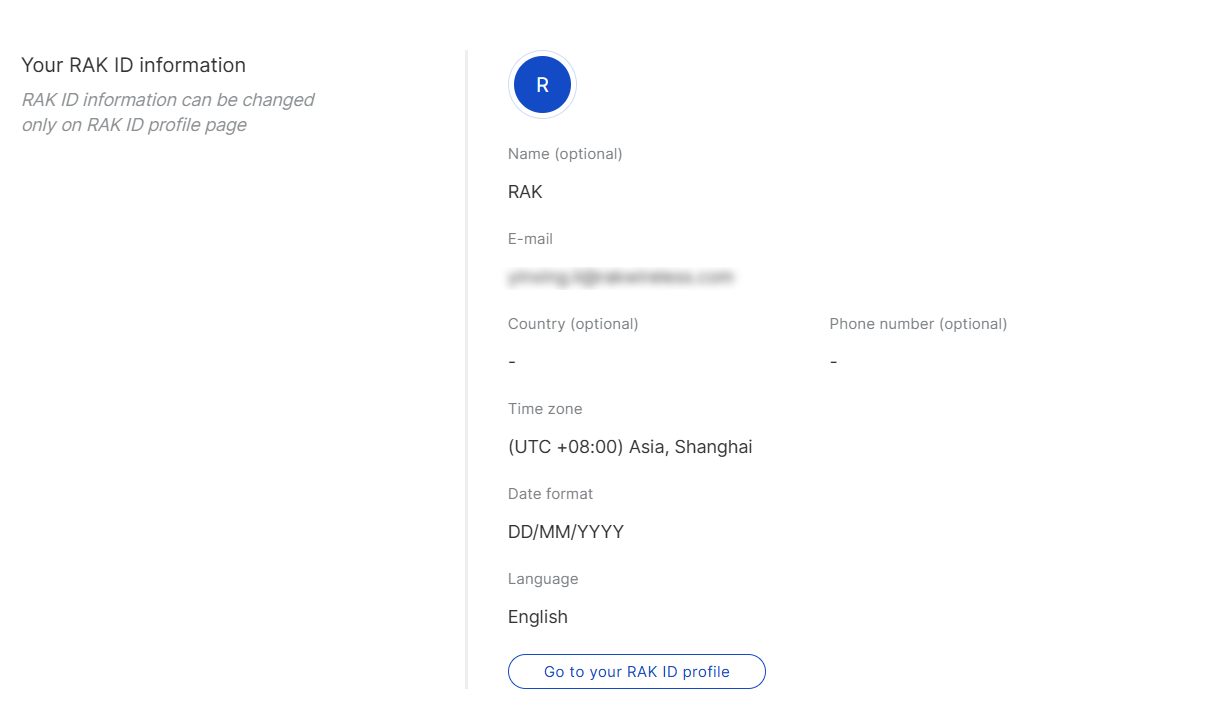 Figure 1: RAK ID Information section
- Name: The display name linked to your RAK ID
- E-mail: The email address registered with your RAK ID
- Country / Phone Number: Your contact details
- Time Zone: Your local time zone for event and log displays
- Date Format: Your preferred date format
- Language: The interface language selected in WisDM
Organizations
The Organizations section lists all organizations you belong to within WisDM.
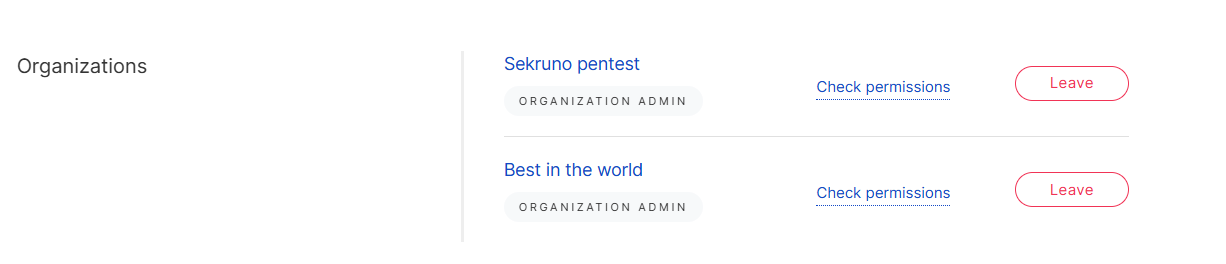 Figure 1: Organizations section overview
- Click Check permissions to view your current roles and access scopes.
- Click Leave to remove yourself from an organization.
- Leaving an organization immediately revokes your access to all its assets, including devices, dashboards, and data.
- This action cannot be undone, and if you wish to rejoin, you must be invited again by an administrator.
Delete WisDM Account
This section allows you to permanently delete your WisDM account. Before proceeding, we recommend contacting Support if you need assistance with any issues.
Deleting your account initiates a backend removal process that:
- Unlinks you from all organizations.
- Deletes your dashboards, preferences, and usage history.
- Sends a synchronization request to the RAK ID system to deactivate your WisDM access.
This process is irreversible. Once completed, all your data and organization links will be permanently removed.