RAK10702 WisBlock Indoor Comfort Node Quick Start Guide
Prerequisites
What Do You Need?
Before going through each and every step in the installation guide of the RAK10702 Indoor Comfort Node, make sure you have assembled the device following the assembly guide.
Hardware Tools
- RAK10702 Indoor Comfort Node
- USB Type C Cable
- LoRaWAN gateway in range
- Windows PC
Software Tools
Serial Terminal Application, for example Cool Term ⤴️.
What's Included in the Package
- RAK10702 Indoor Comfort Node
- Optional indoor enclosure (3D printed in SLS quality)
- RAK19024 Base Board
- RAK13013 Sensor Carrier Board
- All required WisBlock Sensor Modules
- RAK1901 Temperature & Humidity Sensor
- RAK12002 RTC clock
- RAK12010 Ambient Light Sensor
- RAK12037 CO2 Sensor
- RAK12039 Particulate Matter Sensor
- RAK12047 VOC Sensor
- Some of the air quality sensors of the RAK10702 Indoor Comfort Node require some time before they deliver usable data.
- The RAK12037 CO2 sensor might require a calibration. The calibration can be done with a reference sensor and the AT command ATC+CO2.
Product Configuration
The RAK4630 used in the RAK10702 Indoor Comfort Node comes pre-flashed with a firmware that can collect environmental air quality data. The firmware can send the sensor data over LoRaWAN or LoRa P2P and use the optional display to show the sensor data.
The guide below is based on the pre-flashed default firmware of the RAK10702 Indoor Comfort Node!
Connecting to the RAK10702 Indoor Comfort Node
To interface with the RAK10702 Indoor Comfort Node with your Windows Machine, you need to have a serial terminal too. Any serial tool will work, but in this tutorial, the Cool Term ⤴️ is used.
Once done, follow the listed steps to interface your RAK10702 Indoor Comfort Node with your computer.
-
Connect the RAK10702 Indoor Comfort Node to the USB port of a general-purpose computer using a standard USB type C Cable.
-
Test if your RAK10702 Indoor Comfort Node can now communicate with the Serial Port Tool. Configure the serial communication tool by selecting the proper port and configuring the link as listed below, then click Open.
- COM: Choose the COM Port associated with the RAK10702 WisBlock Indoor Comfort Node from the previous step. For this tutorial, the COM Port is COM4.
- Baud Rate: 115200 bps
- Data Bits: 8 bits
- Stop Bits: 1 bit
- Parity: NONE
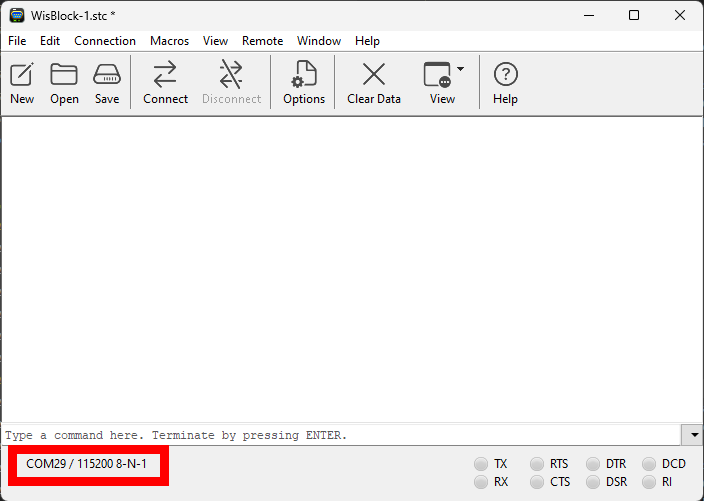 Figure 1: Connecting to the Serial Port Tool
- Verify your connection to the RAK10702 by sending the AT Command
AT+VER?. If the connection is successful, the firmware version of your RAK10702 should appear.
AT+VER=?
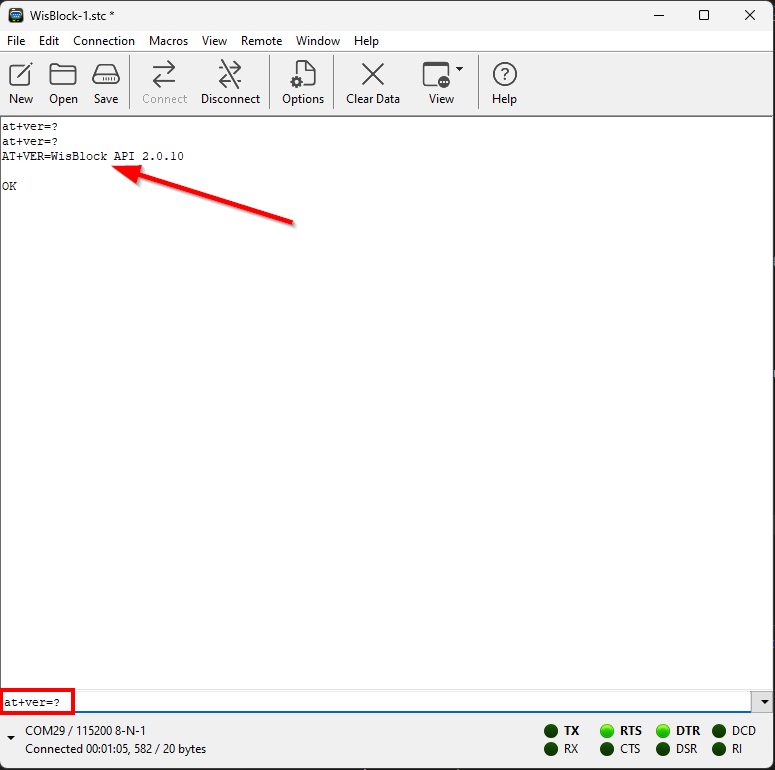 Figure 1: AT+Command Sample Serial Communication Test
Connecting to The Things Network V3
In this section, it will be shown how to connect RAK10702 WisBlock Indoor Comfort Node to The Things Stack.
First, log in to the TTNv3. To do so, head to the TTNv3 ⤴️ site. If you already have a TTN account, you can use your The Things ID credentials to log in.
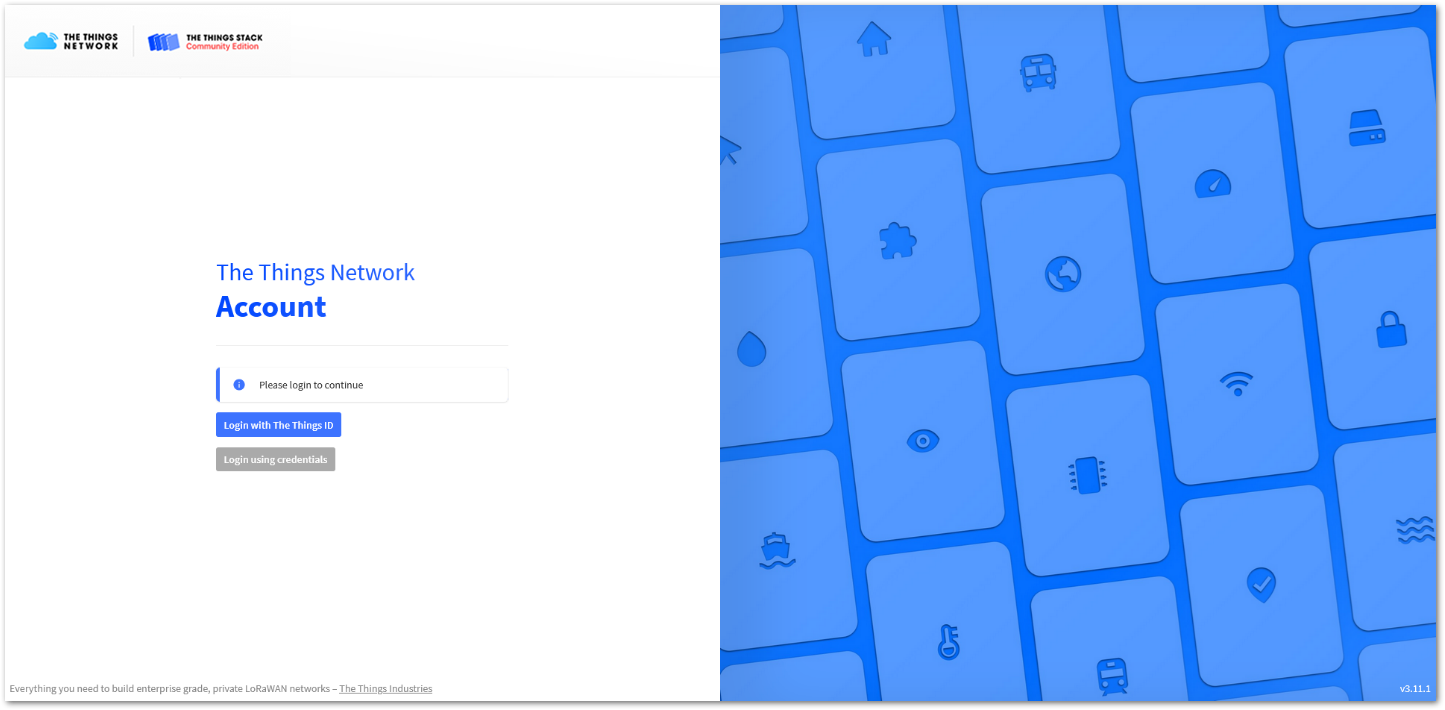 Figure 1: The Things Stack Home Page
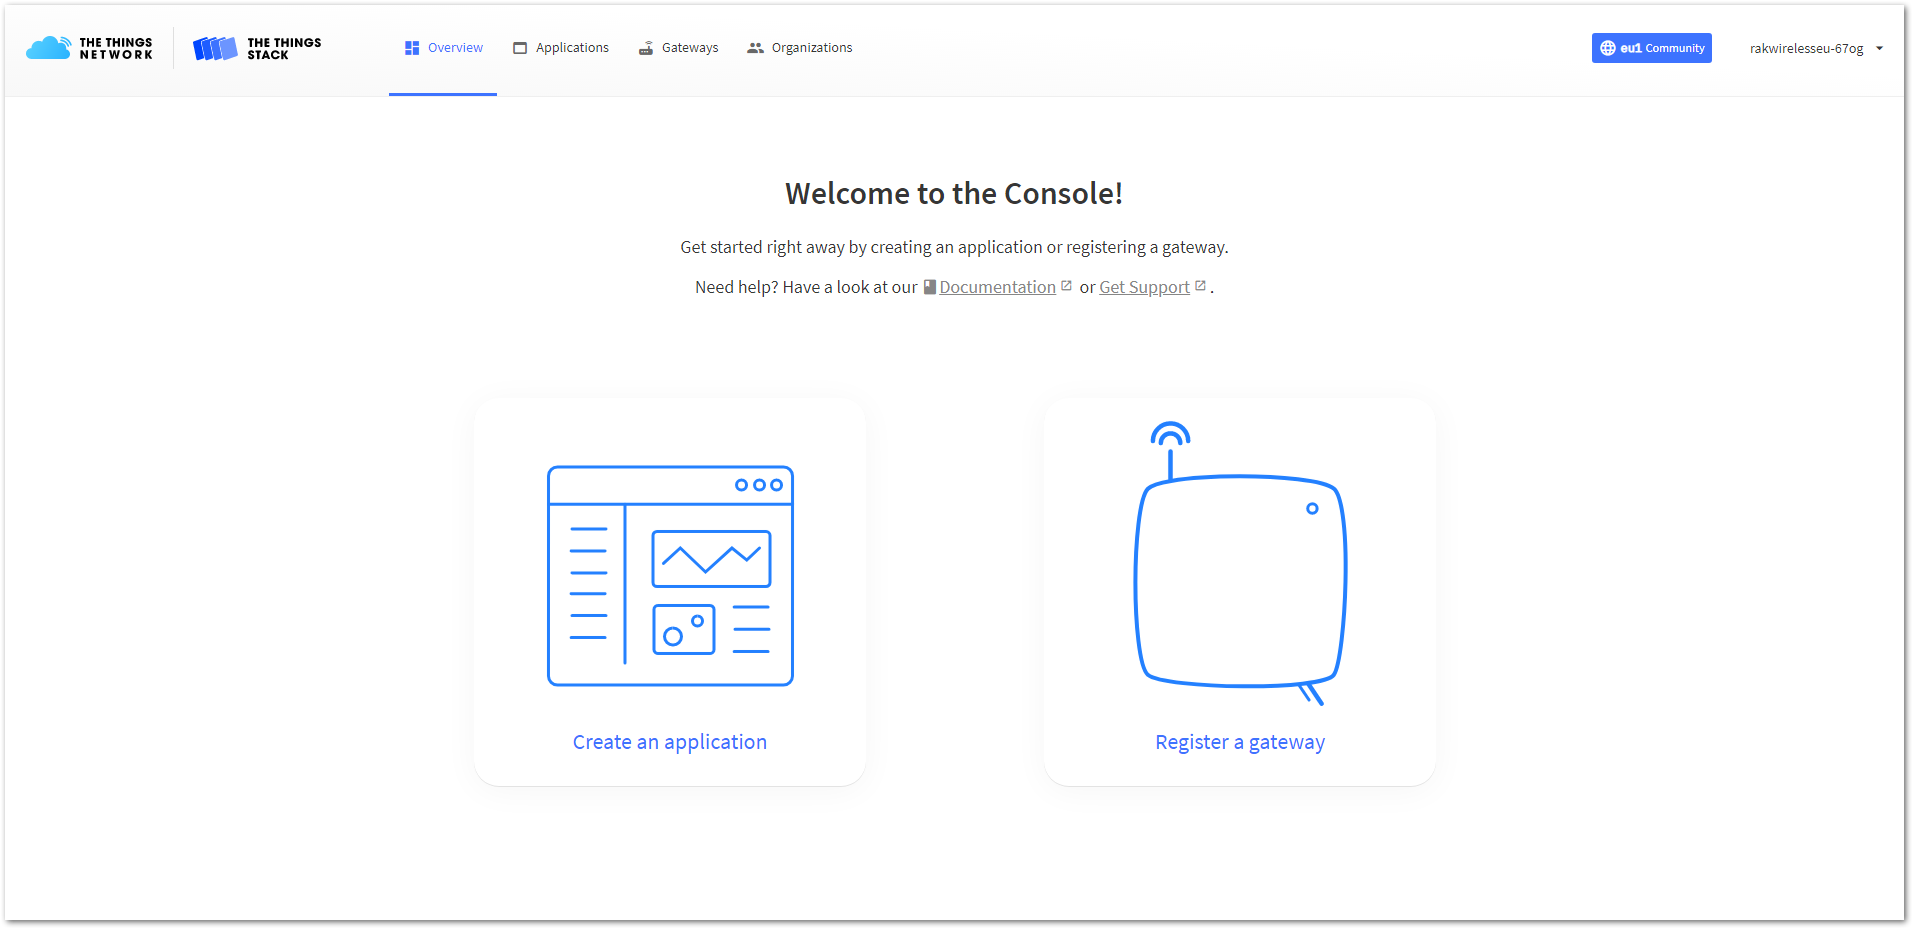 Figure 1: Console Page after a successful login
-
To connect RAK10702 WisBlock Indoor Comfort Node to TTNv3, you should already have connected a gateway in range to TTNv3. Or, you have to be sure that you are in the range of a public gateway.
-
This tutorial is for the EU868 Frequency band.
Adding an Application
- If you do not have created applications yet, to create an application, choose Create an application. If you have created applications before, navigate through Go to applications > + Add application.
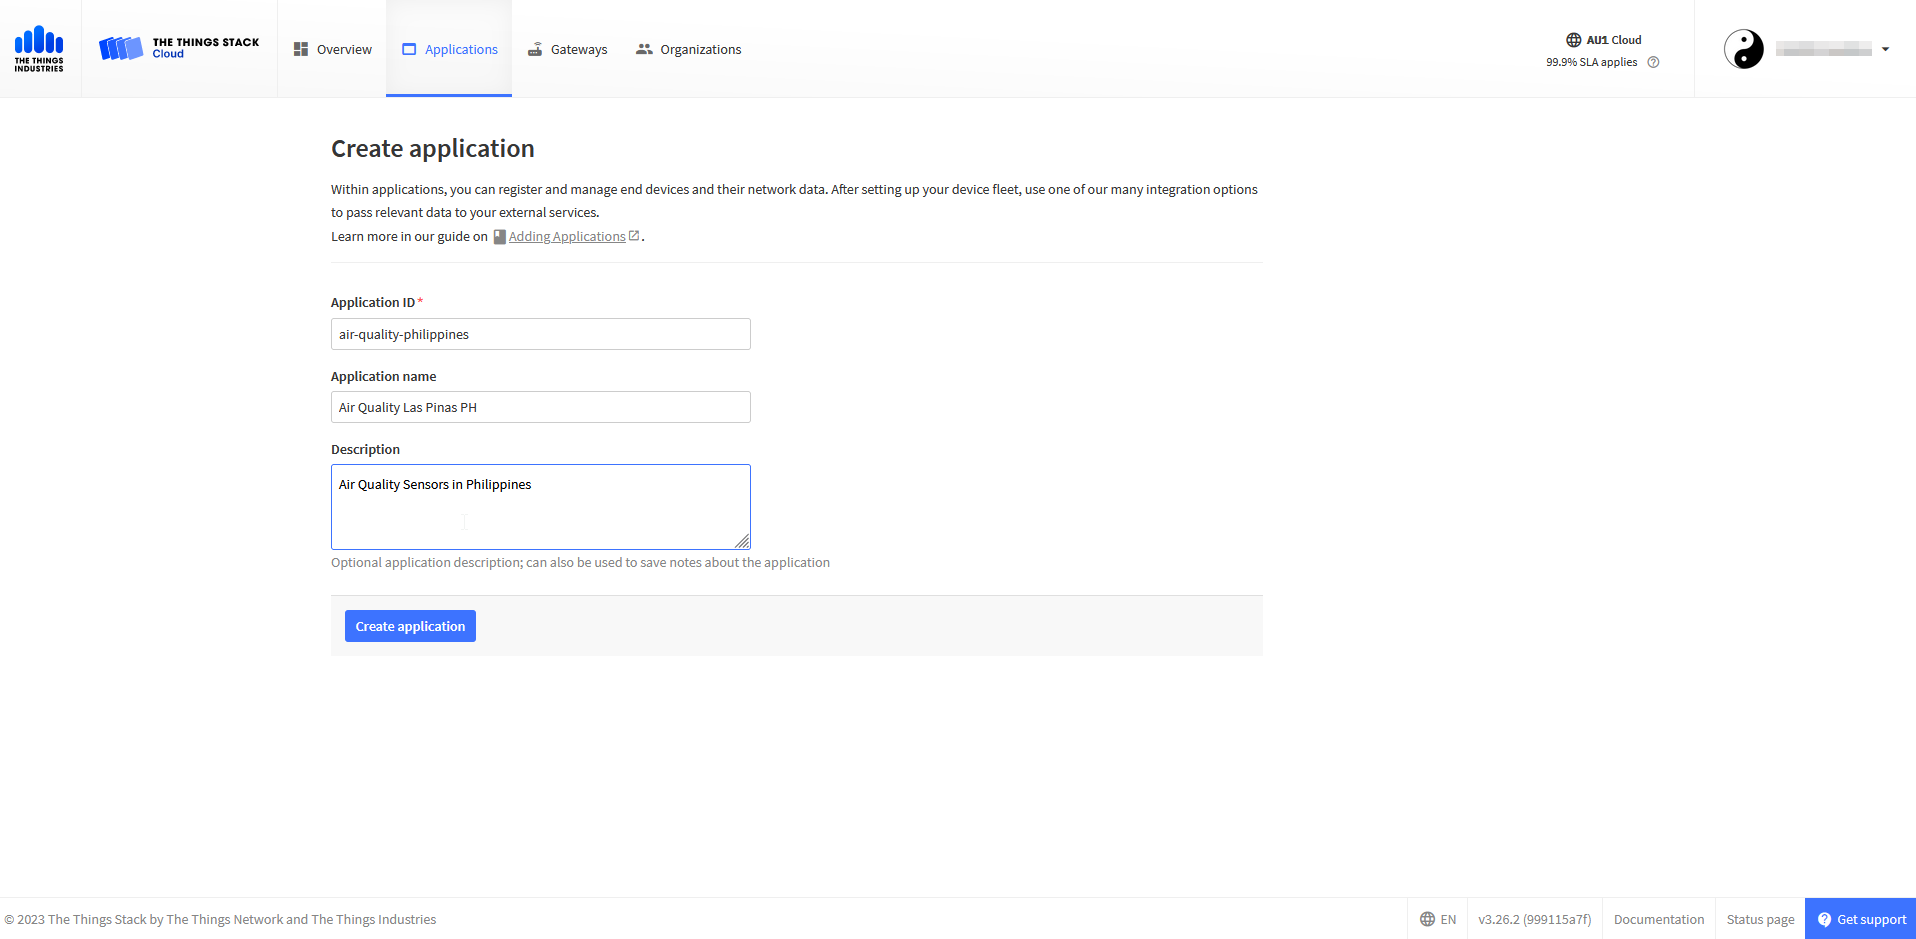 Figure 1: Create an application page
-
Fill in the needed information. After filling in, click Create application.
- Application ID - This will be the unique ID of your application in the Network. ID must contain only lowercase letters, numbers, and dashes (-).
- Application name (optional) - This is the name of your application.
- Description (optional) – Description of your application. Optional application description; can also be used to save notes about the application.
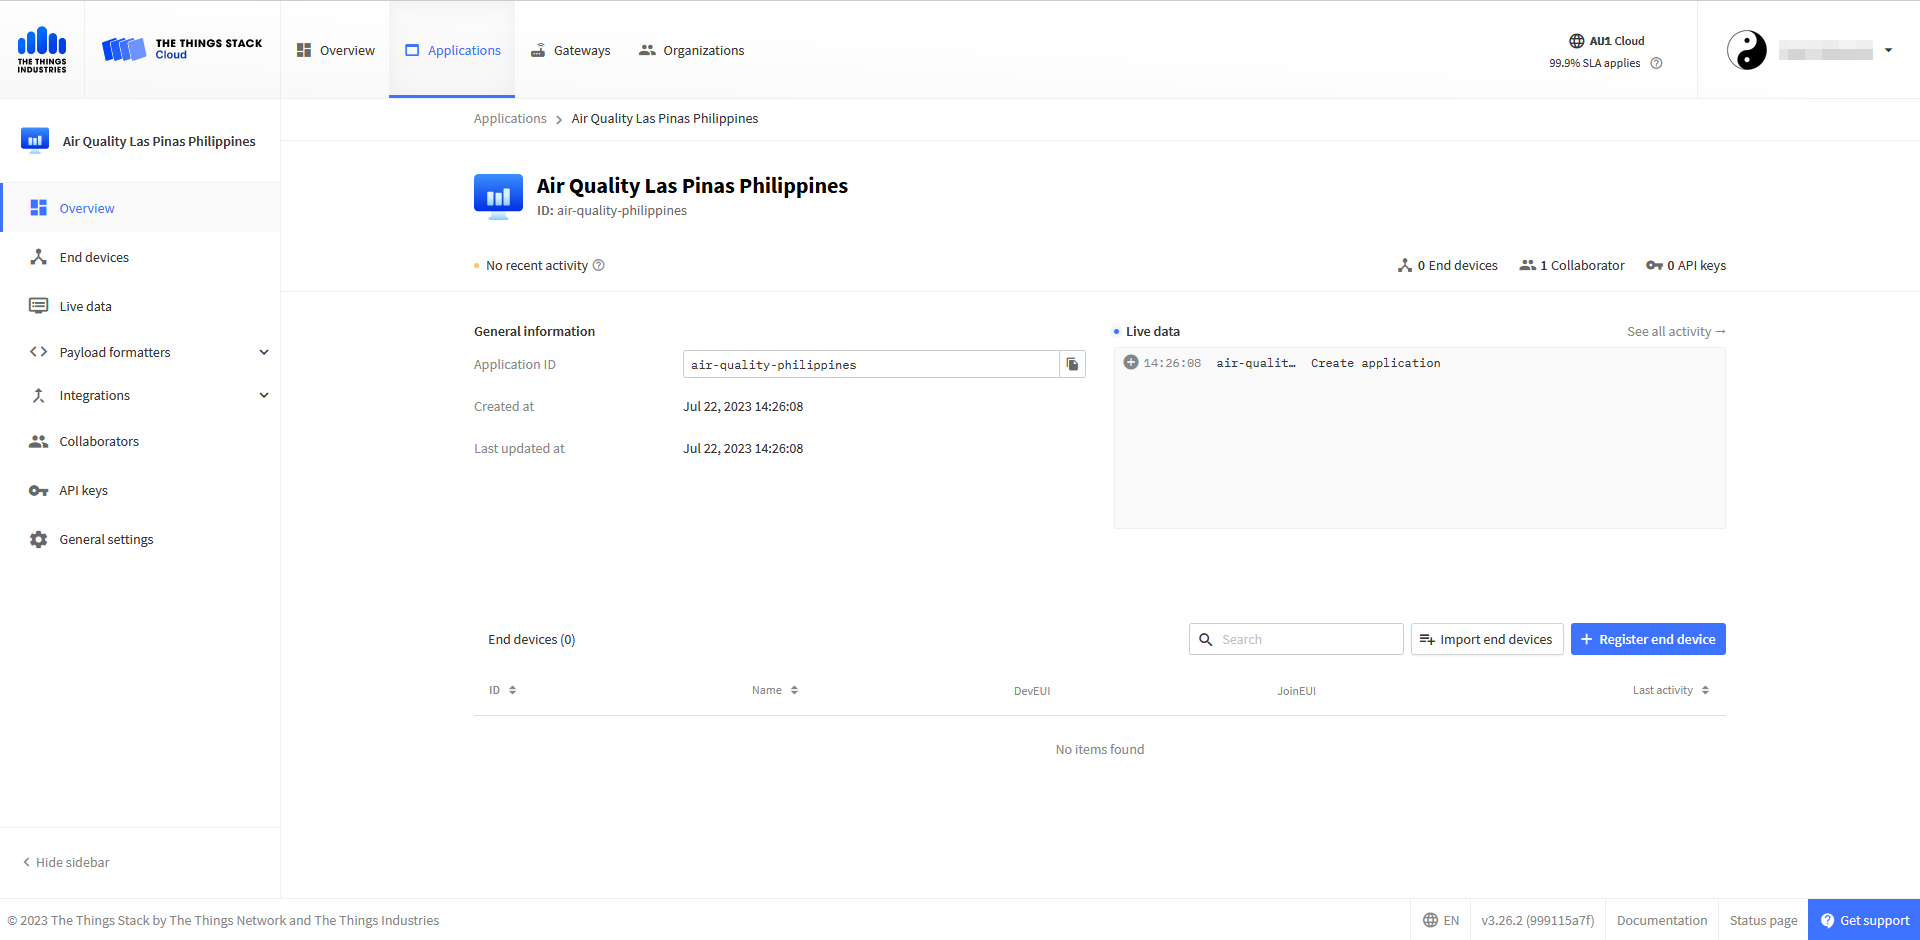 Figure 1: Create an application page
OTAA Mode
Register the Device
-
Get the settings from the device: For the device registration in TTN you will need:
- DevEUI - This is the unique identifier for your RAK10702 WisBlock Indoor Comfort Node.
- AppEUI - The AppEUI uniquely identifies the owner of the end device. It is provided by the device manufacturer.
- AppKey - The AppKey is used to encrypt data during the join process.
Connect your device via USB cable to your computer. Open Serial Port Tool, choose the correct COM port and BaudRate, and run the following command:
ATC+STATUS=?
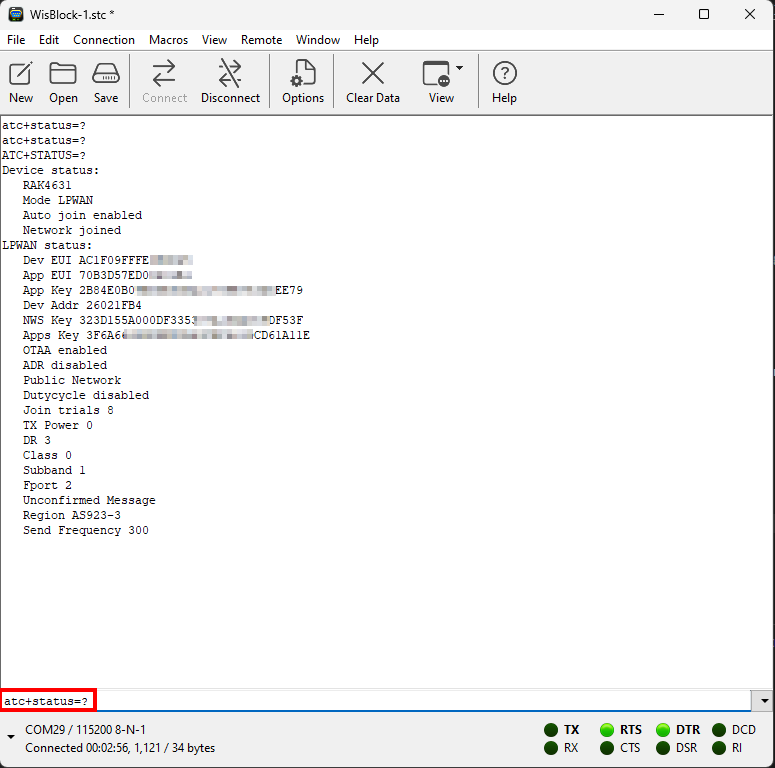 Figure 1: AppEUI of the device
Write down the DevEUI, AppEUI and AppKey, they will be needed in the next steps to register the device in TTN.
-
Back on the TTN webpage, from the Application Overview page, click on + Register end device.
-
Below the Register end device heading, you can find two options for registering a device. Choose Enter end device specifics manually.
- Choose the correct frequency plan We are using AS923-3 here.
- For the LoRaWAN version, choose LoRaWAN Specification 1.0.2 (RAK10702 WisBlock Indoor Comfort Node is LoRaWAN 1.0.2 fully compliant).
- For the Regional Parameters version choose RP001 Regional Parameters 1.0.2 revision B
- In the Provisioning information, enter the AppEUI of the device in the JoinEUI field.
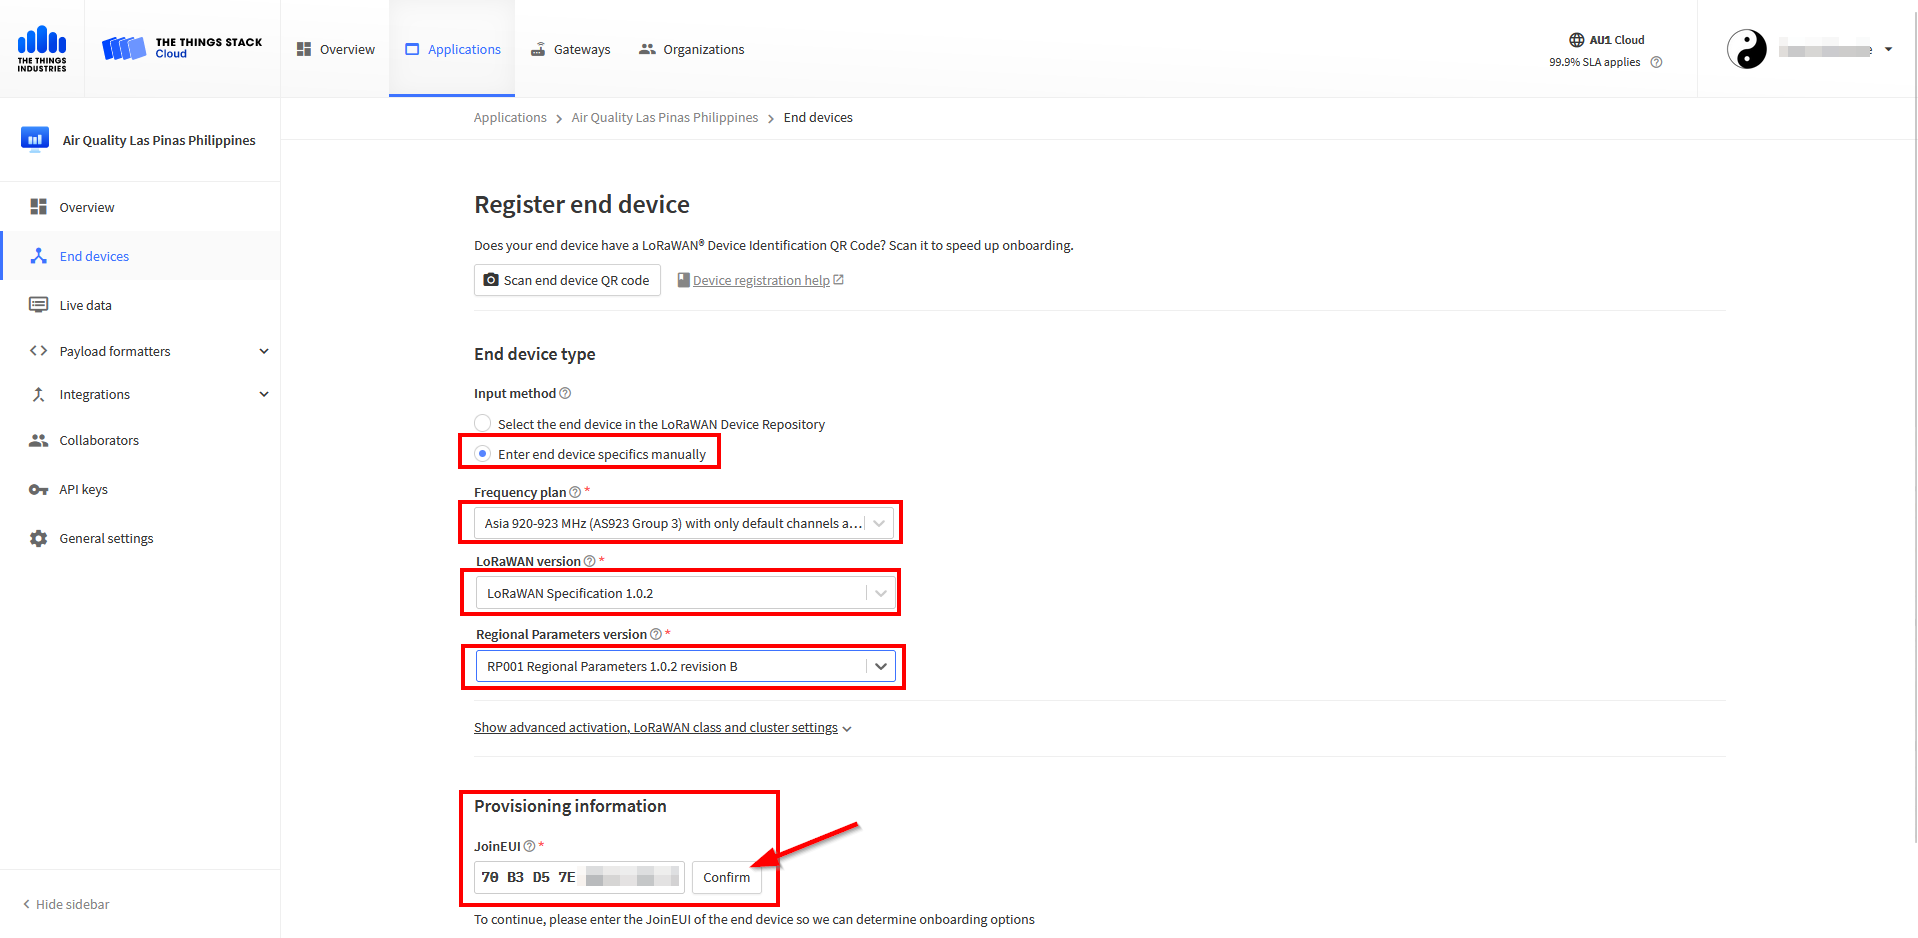 Figure 1: Adding a device
- On the same page, click on "Show advanced activation, LoRaWAN class and cluster settings"
- Choose Over the air activation (OTAA)
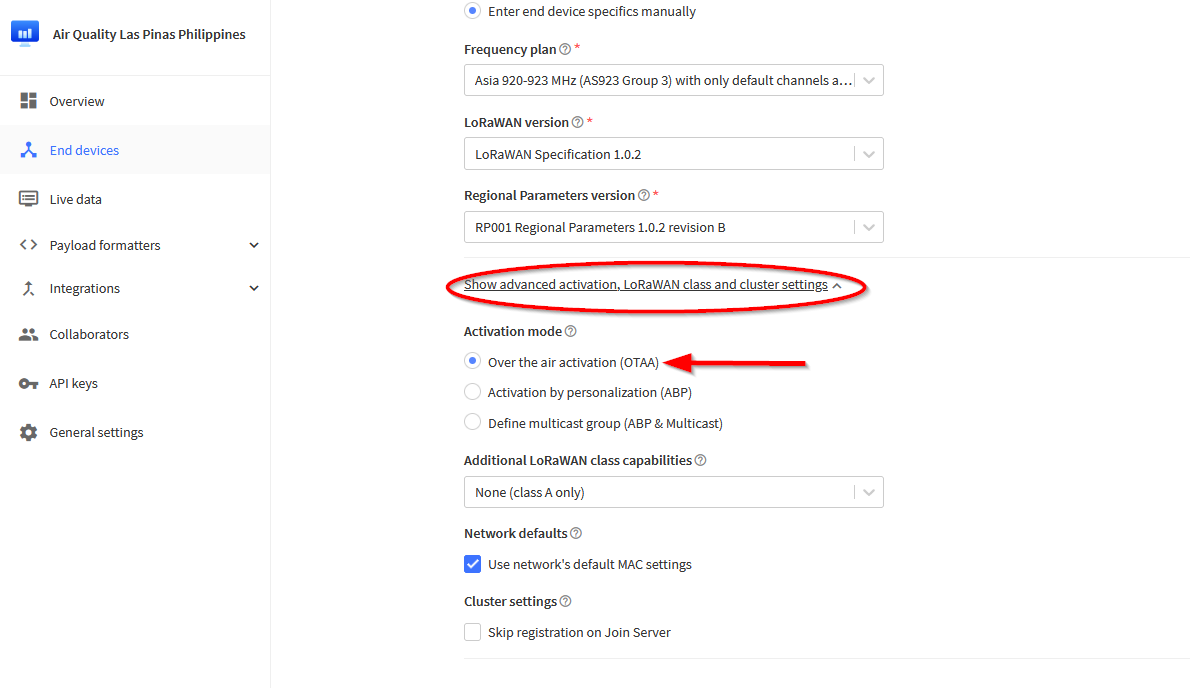 Figure 1: Registering the device in OTAA mode
- To get to the next step of the registration, click Confirm left of the JoinEUI field.
Now new fields will be shown. Use the EUI's and Key you obtained from the device before.
- Enter the DevEUI of the device in the DevEUI field
- Enter the AppKey of the device in the AppKey field.
- Optionally you can enter an End Device ID
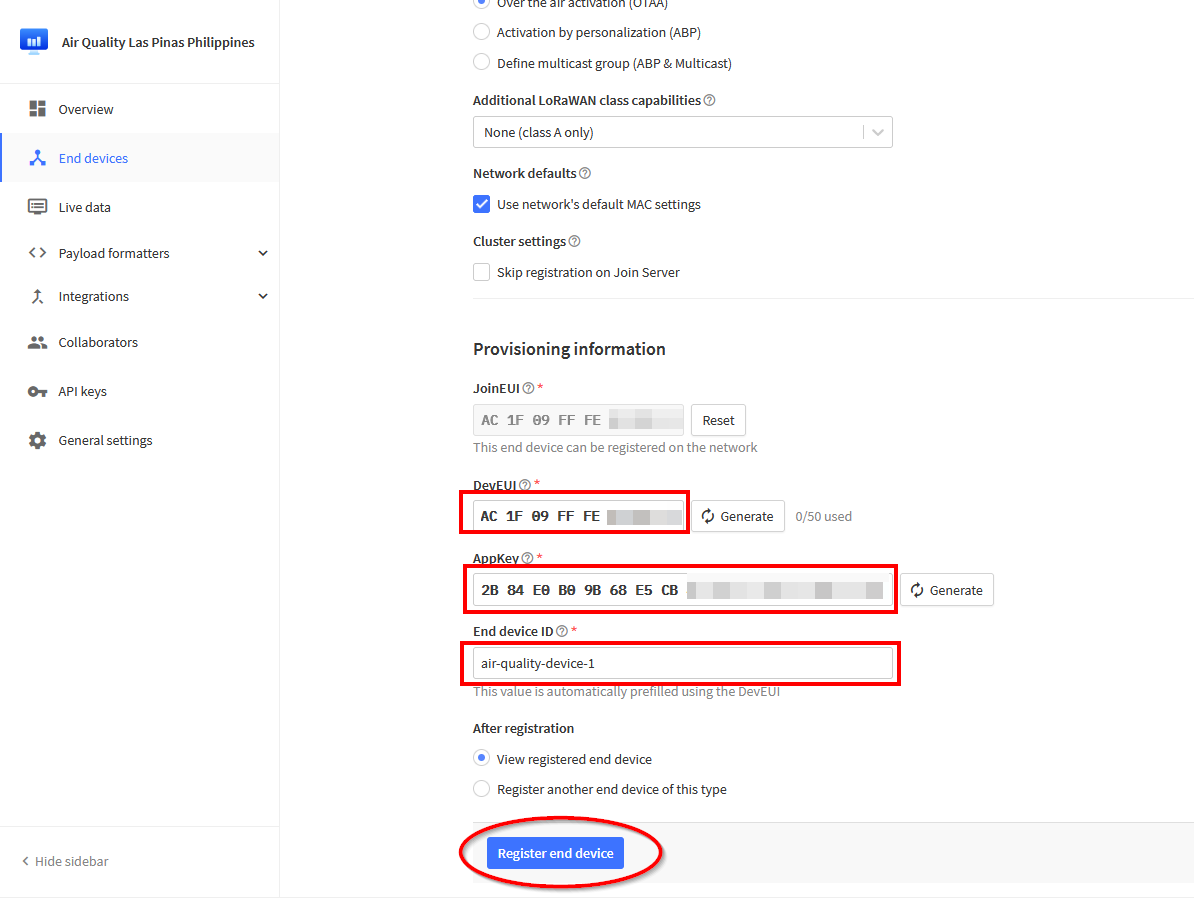 Figure 1: Basic settings for OTAA mode
-
Click Register end device.
-
Now you can see the device overview screen:
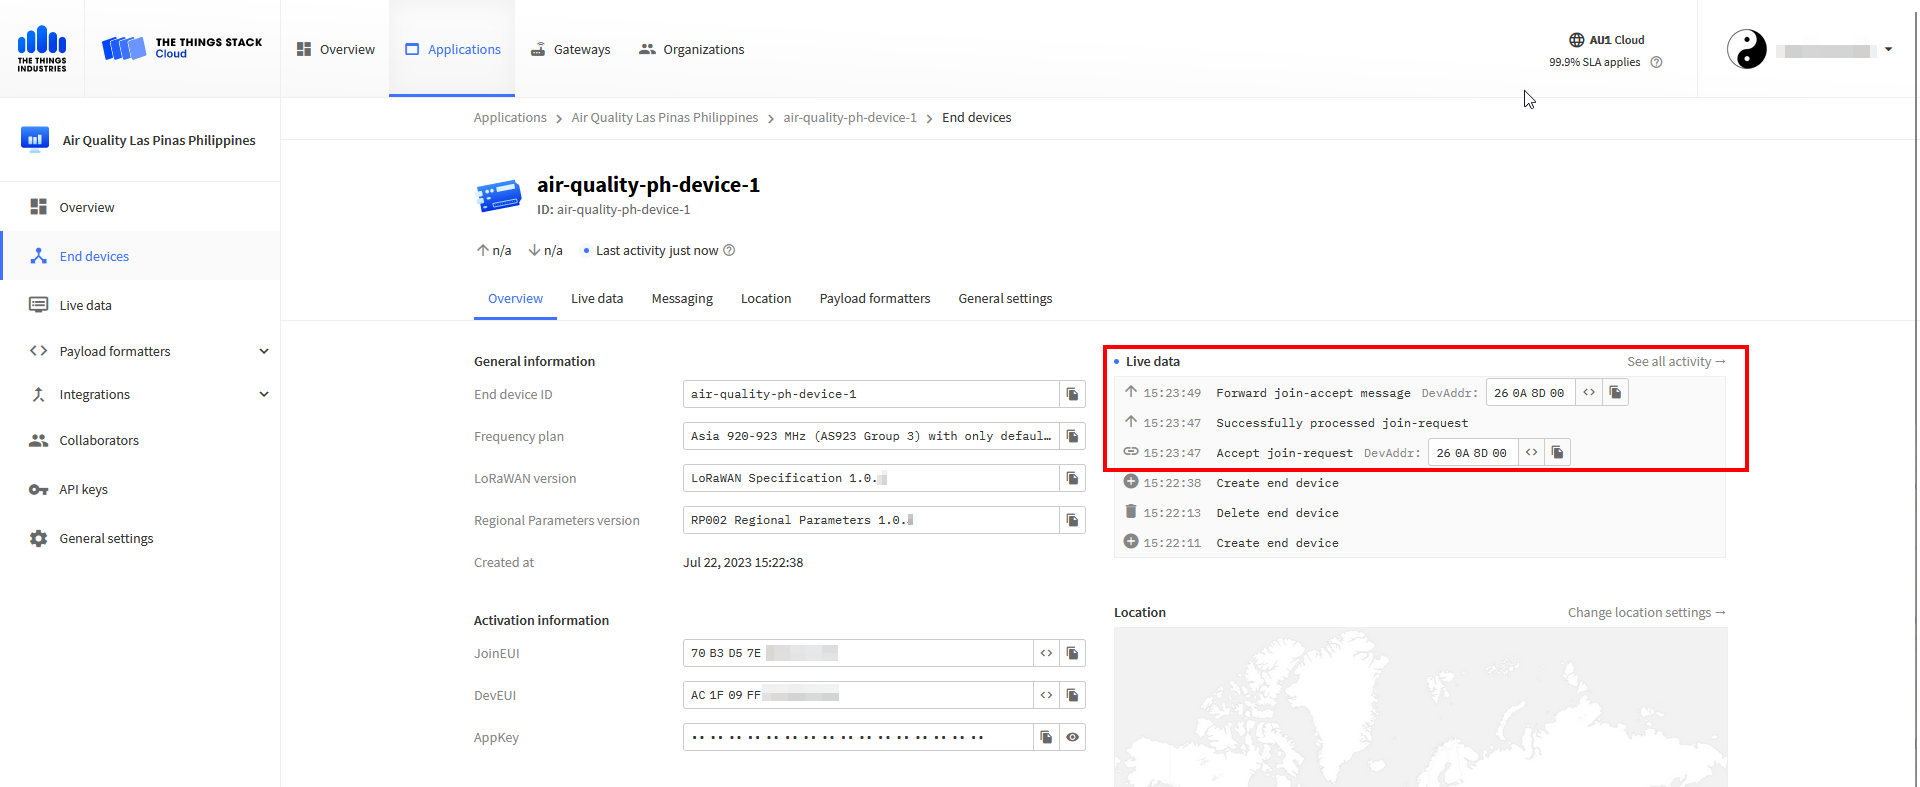 Figure 1: Basic settings for OTAA mode
-
Start the network join on the RAK10702
Connect your device via USB cable to your computer. Open Serial Port Tool, choose the correct COM port and BaudRate, and run the following command:
ATC+JOIN=1:0
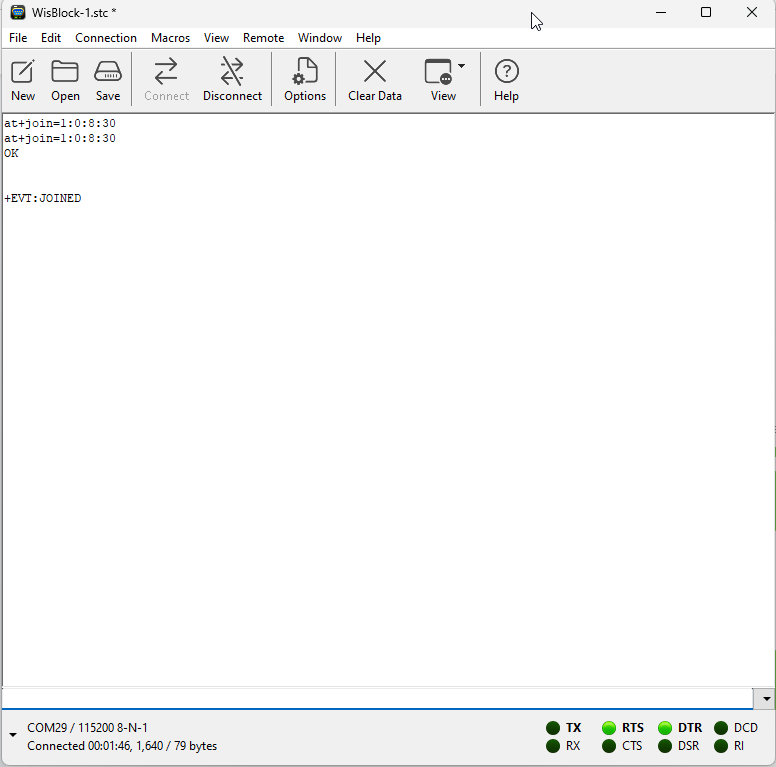 Figure 1: Join
If all the settings are done correct, you will see in the Live Data the join request and join accept messages from the device.
 Figure 1: Basic settings for OTAA mode
If you get a response in the Live data feed in The Things Stack, it means your RAK10702 WisBlock Indoor Comfort Node is successfully connected.
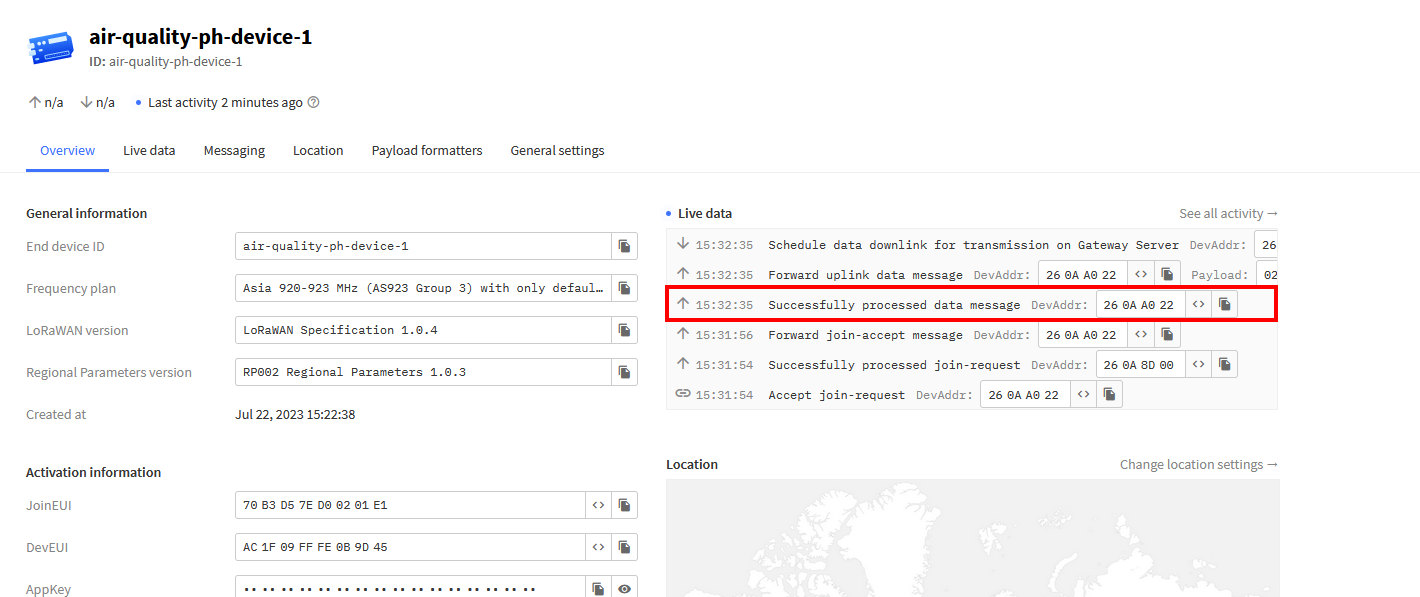 Figure 1: Sending data to The Things Stack from RAK10702 WisBlock Indoor Comfort Node
Connecting with ChirpStack V4
In this section, a practical exercise will be performed to show how to connect the RAK10702 WisBlock Indoor Comfort Node to the ChirpStack V4 platform.
In this guide, it is assumed that you are using Chirpstack V4. Setting up an application in Chirpstack V3 is different.
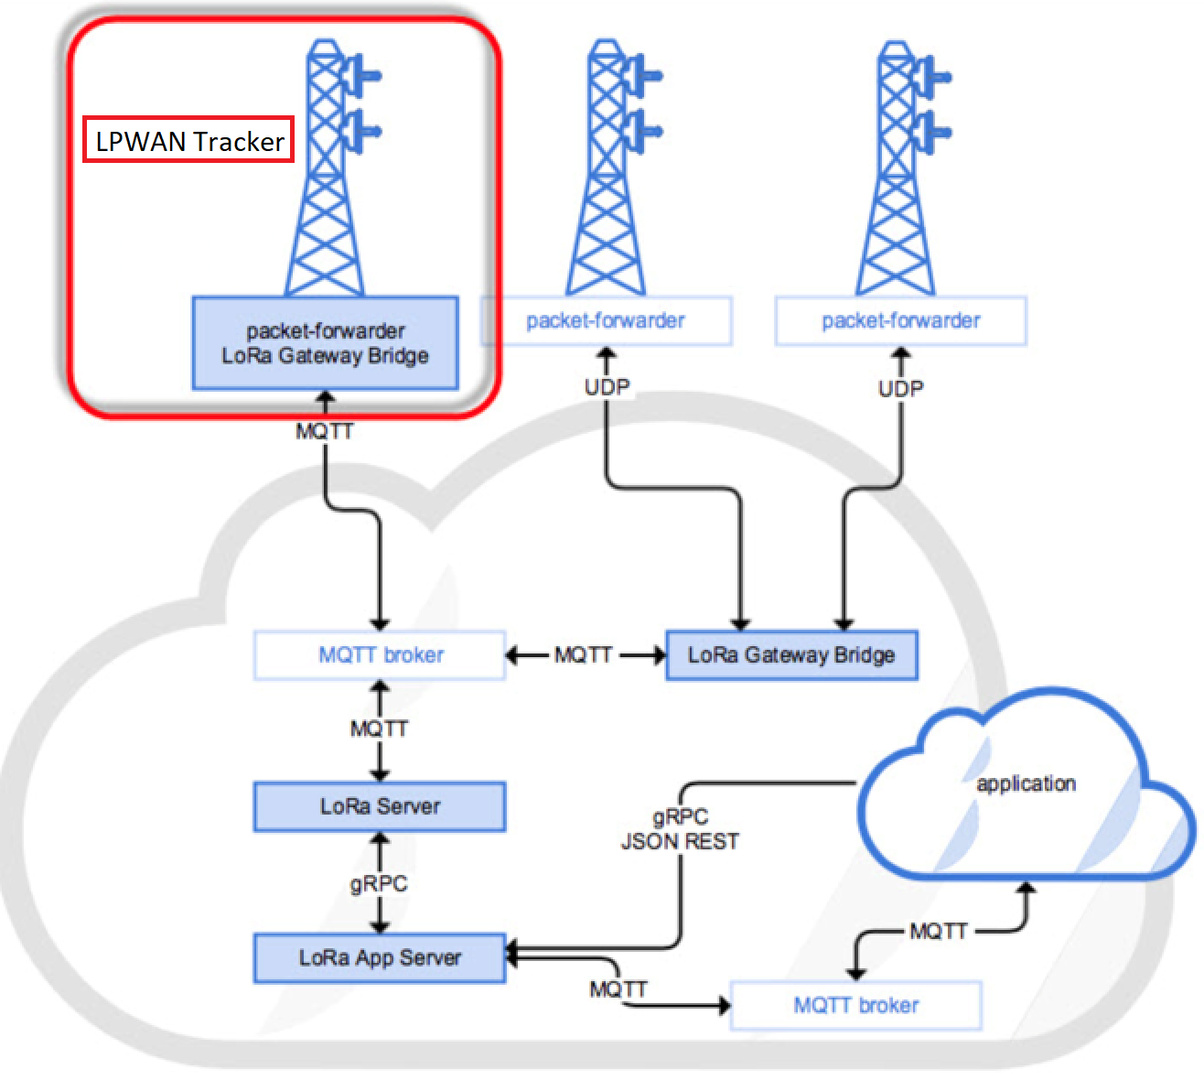 Figure 1: RAK10702 WisBlock Indoor Comfort Node in the context of the ChirpStack platform
The ChirpStack, previously known as the LoRaServer project, provides open-source components for building LoRaWAN networks. Like the case of TTN, the RAK10702 WisBlock Indoor Comfort Node is located in the periphery and transmits the data to the backend servers through a LoRaWAN gateway. Learn more about ChirpStack ⤴️.
In this guide, it is assumed that you are using a RAK LoRaWAN gateway, such as RAK7249. The gateway must be configured and registered previously to a Chirpstack deployment. For further information, check the Chirpstack documents for more details.
In this section, you need the following requirements:
- A ChirpStack deployment
- Access to a LoRaWAN gateway registered at the ChirpStack server
- Chirpstack already setup with a Network Server and Service Profile
- Serial Port Tool
- RAK10702 WisBlock Indoor Comfort Node
Sign in to Chirpstack with your username and password.
Create a New Application
- Go to the Application section, as shown in Figure 16.
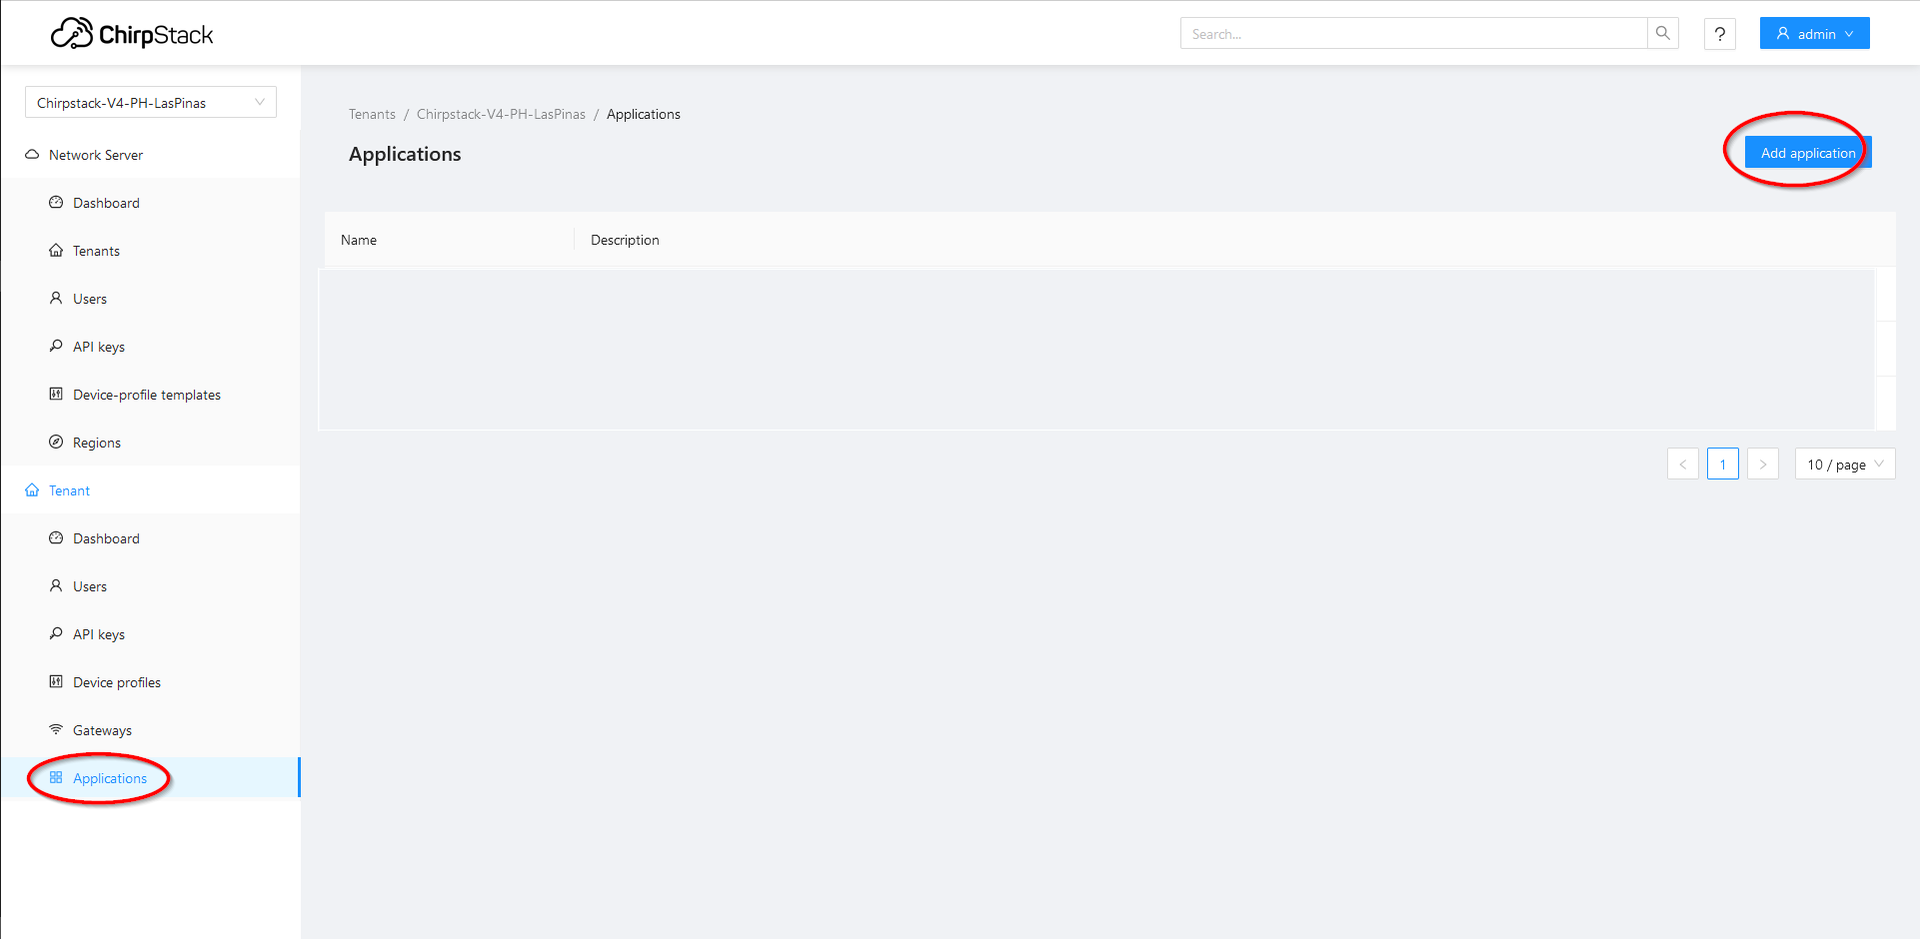 Figure 1: Application Section of ChirpStack LoRaServer
- By default, you should create a new Application, although you can reuse the existing ones. For this setup, create a new Application by clicking on the “Add application” button, and filling the required parameters, as shown in Figure 17 and Figure 18.
 Figure 1: Creating a New Application
- For this setup, create an Application named RAK-PH-AS923-3. You can choose any name that fits better for you.
- Create a Device Profile
Once you have created the application, you need to setup a Device Profile. Click on Device profiles in the menu then click Add device profile
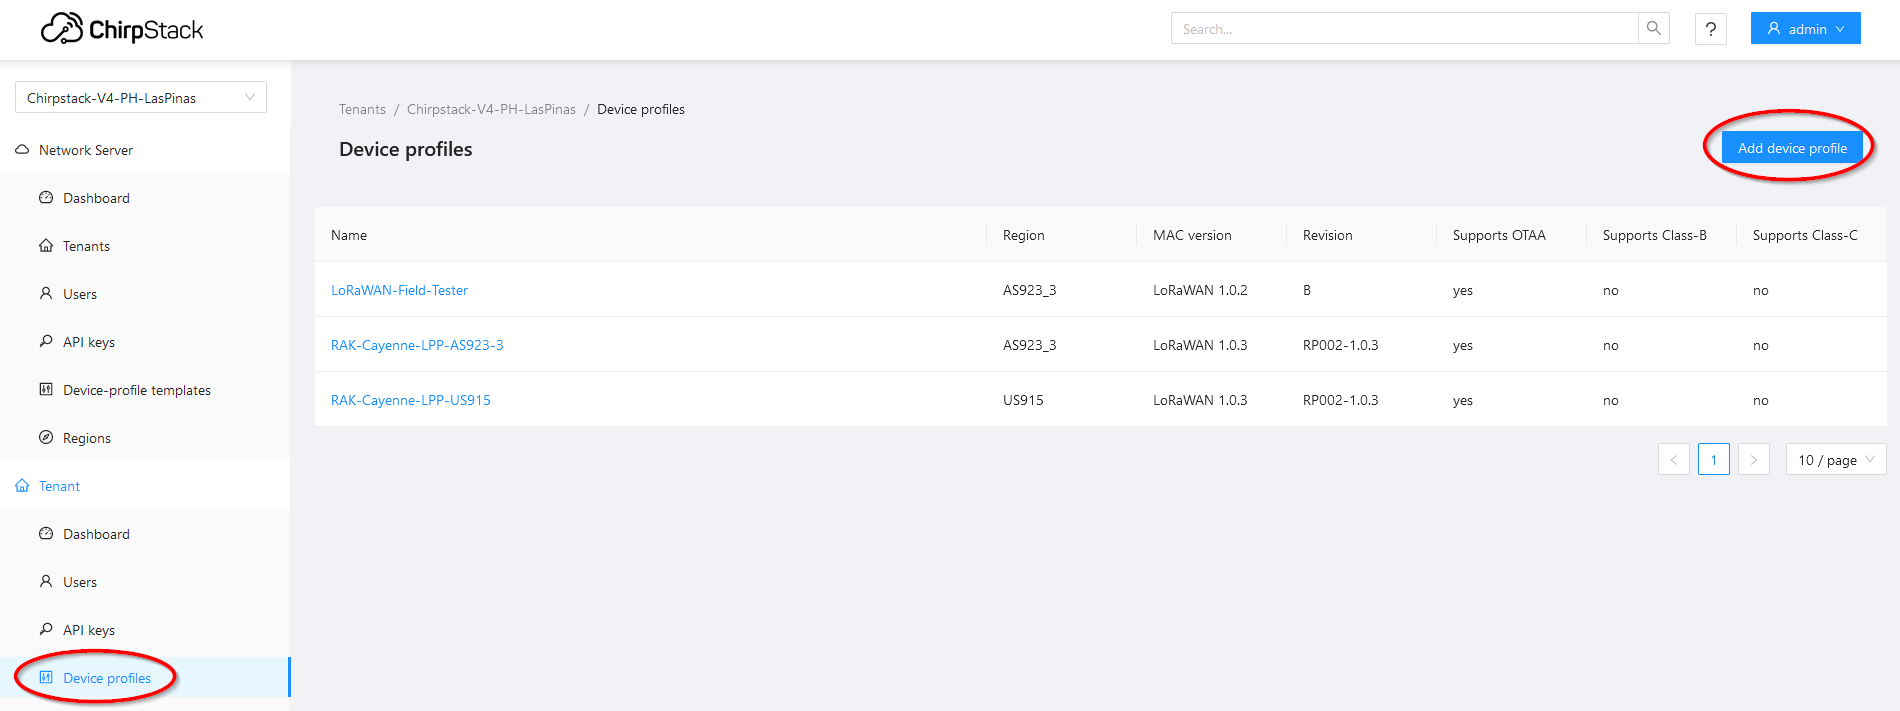 Figure 1: Adding device profile
In the Add device profile page, you have several tabs. For this tutorial, it is sufficient to fill out the information in the General tab.
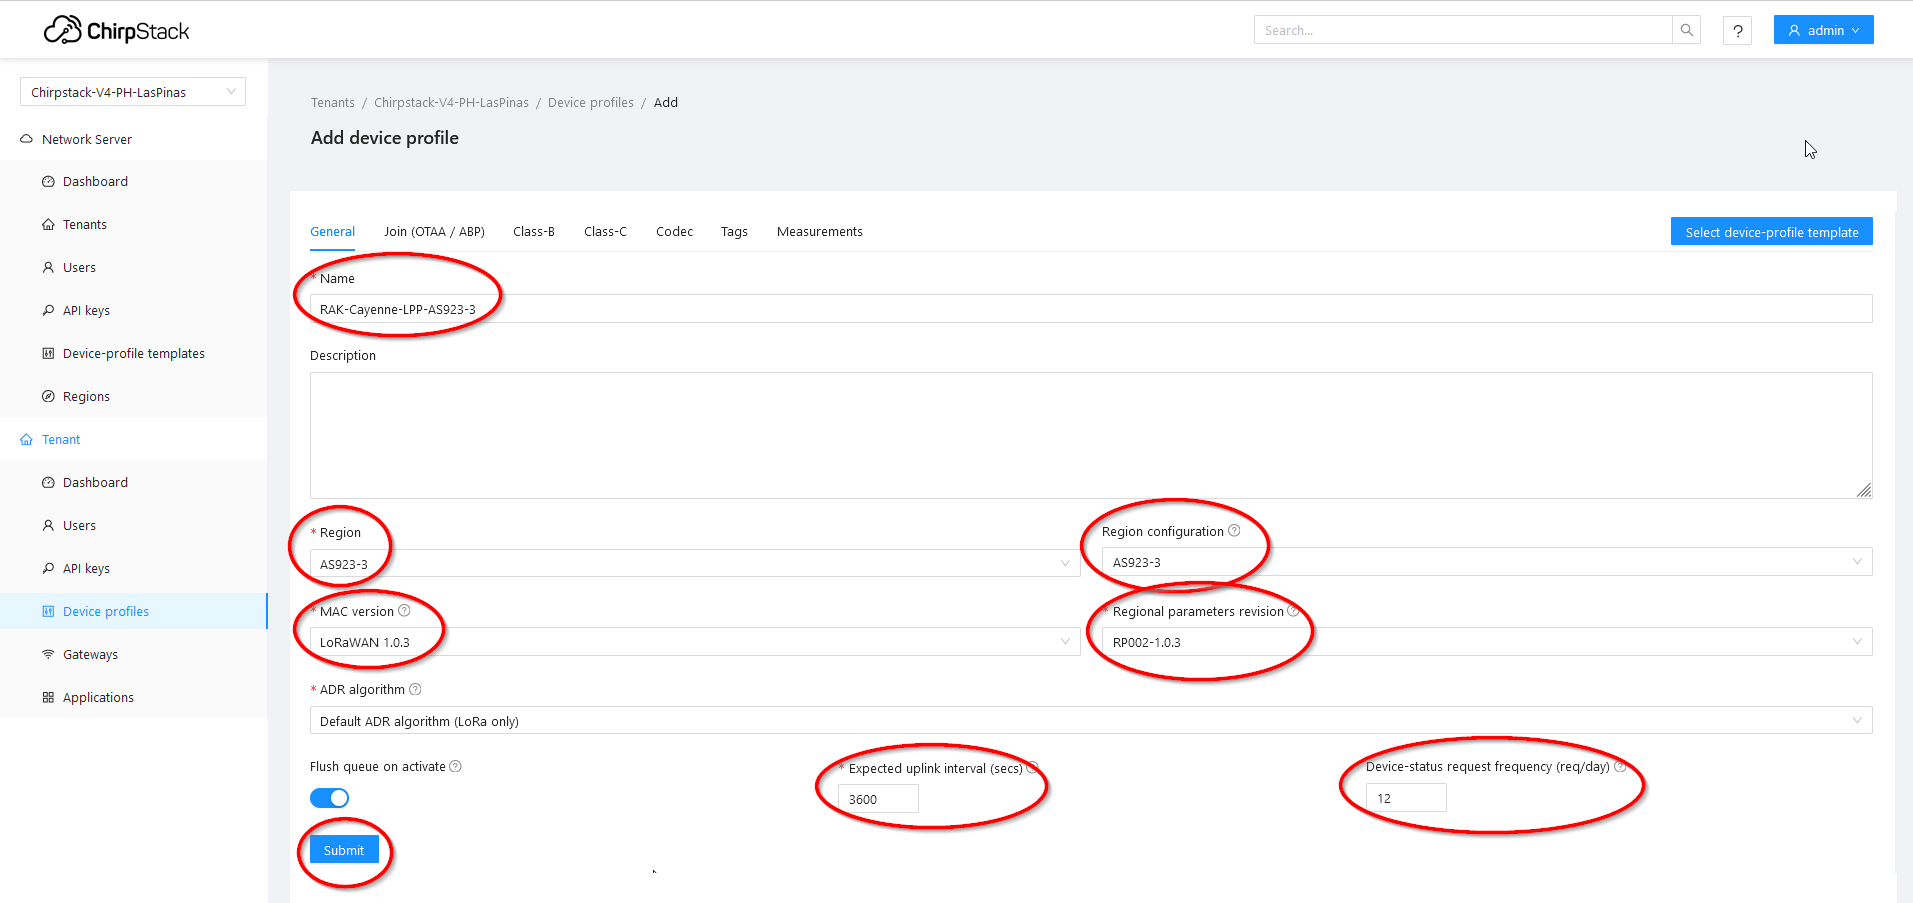 Figure 1: Filling Parameters of an Application
- Name
- Enter a unique name for this device profile. Here I have choosen RAK-Cayenne-LPP-AS923-3
- Region & Region configuration
- Select the LoRaWAN region that your device and gateway is using. Here we use AS923-3
- MAC version
- Enter the LoRaWAN MAC version. LoRaWAN 1.0.3 will work, even if the device is only supporting V1.0.2
- Regional parameters revision
- Choose RP002-1.0.3
- Expected uplink interval
- Enter here the 2 times the interval that the RAK10702 will send data. Chirpstack will mark the device as disconnected if no data was received within this value
- Device-status request frequency (req/day)
- If you want to check the device status from the server side, enter the number of check requests per day. Here we chose 12, which means Chirpstack will request a device status every 2 hours. The other settings can be left as given.
Push the Submit button.
Chirpstack can use a payload decoder to show the payload in the device events. You can find a matching decoder for the RAK10702 in our GitHub repo ⤴️.
Adding the payload decoder is not difficult. From our GitHub repo ⤴️ open the RAKwireless_Standardized_Payload.js Javascript.
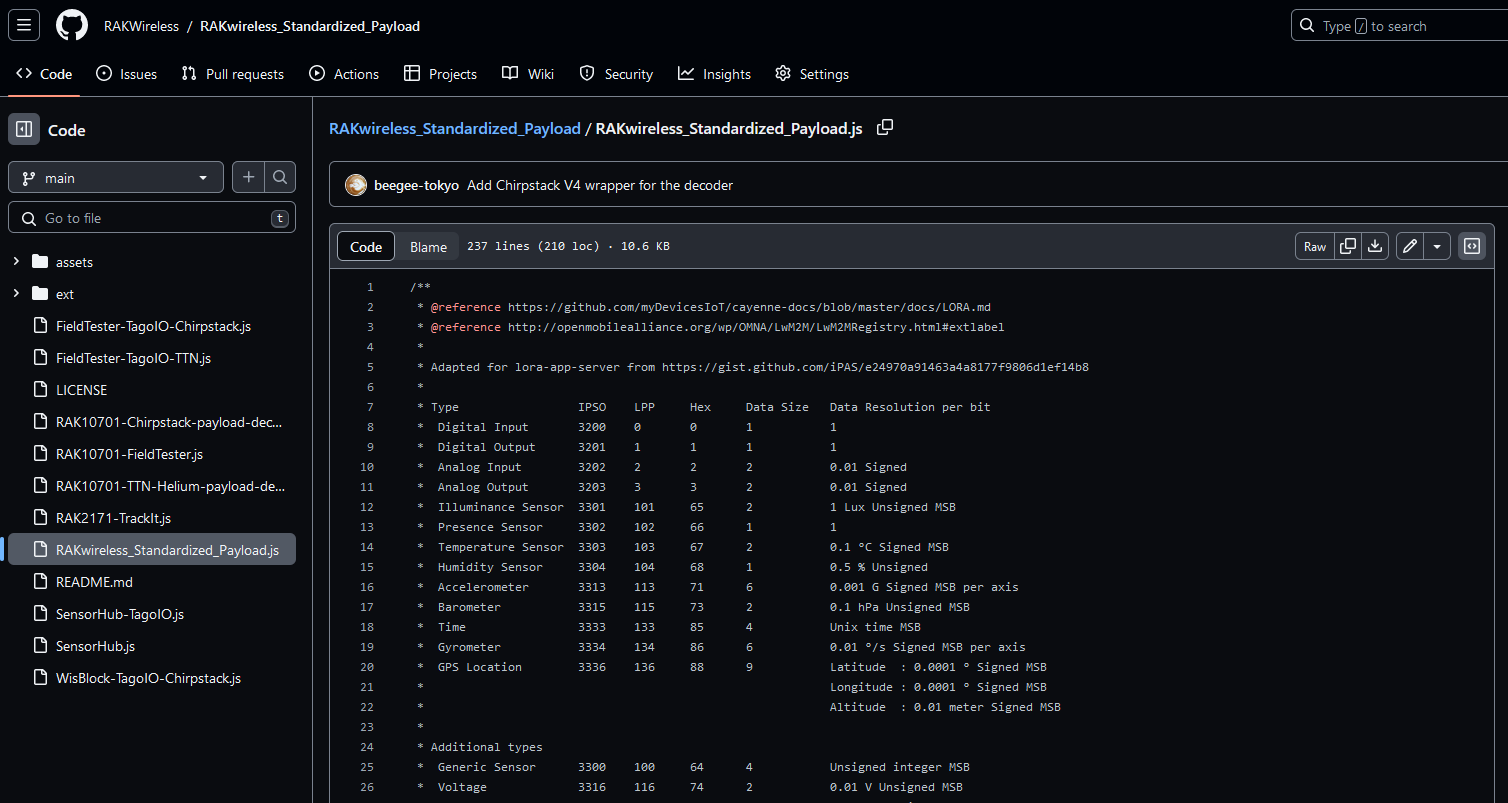 Figure 1: Filling Parameters of an Application
In Chirpstack, in the Device Profile, go to the tab Codec. Select in the Payload codec tab the JavaScript functions
Copy the content of the RAKwireless_Standardized_Payload.js ⤴️ Javascript and paste it in the Codec functions field. Make sure to overwrite any example code that is already there.
Then press the Submit button.
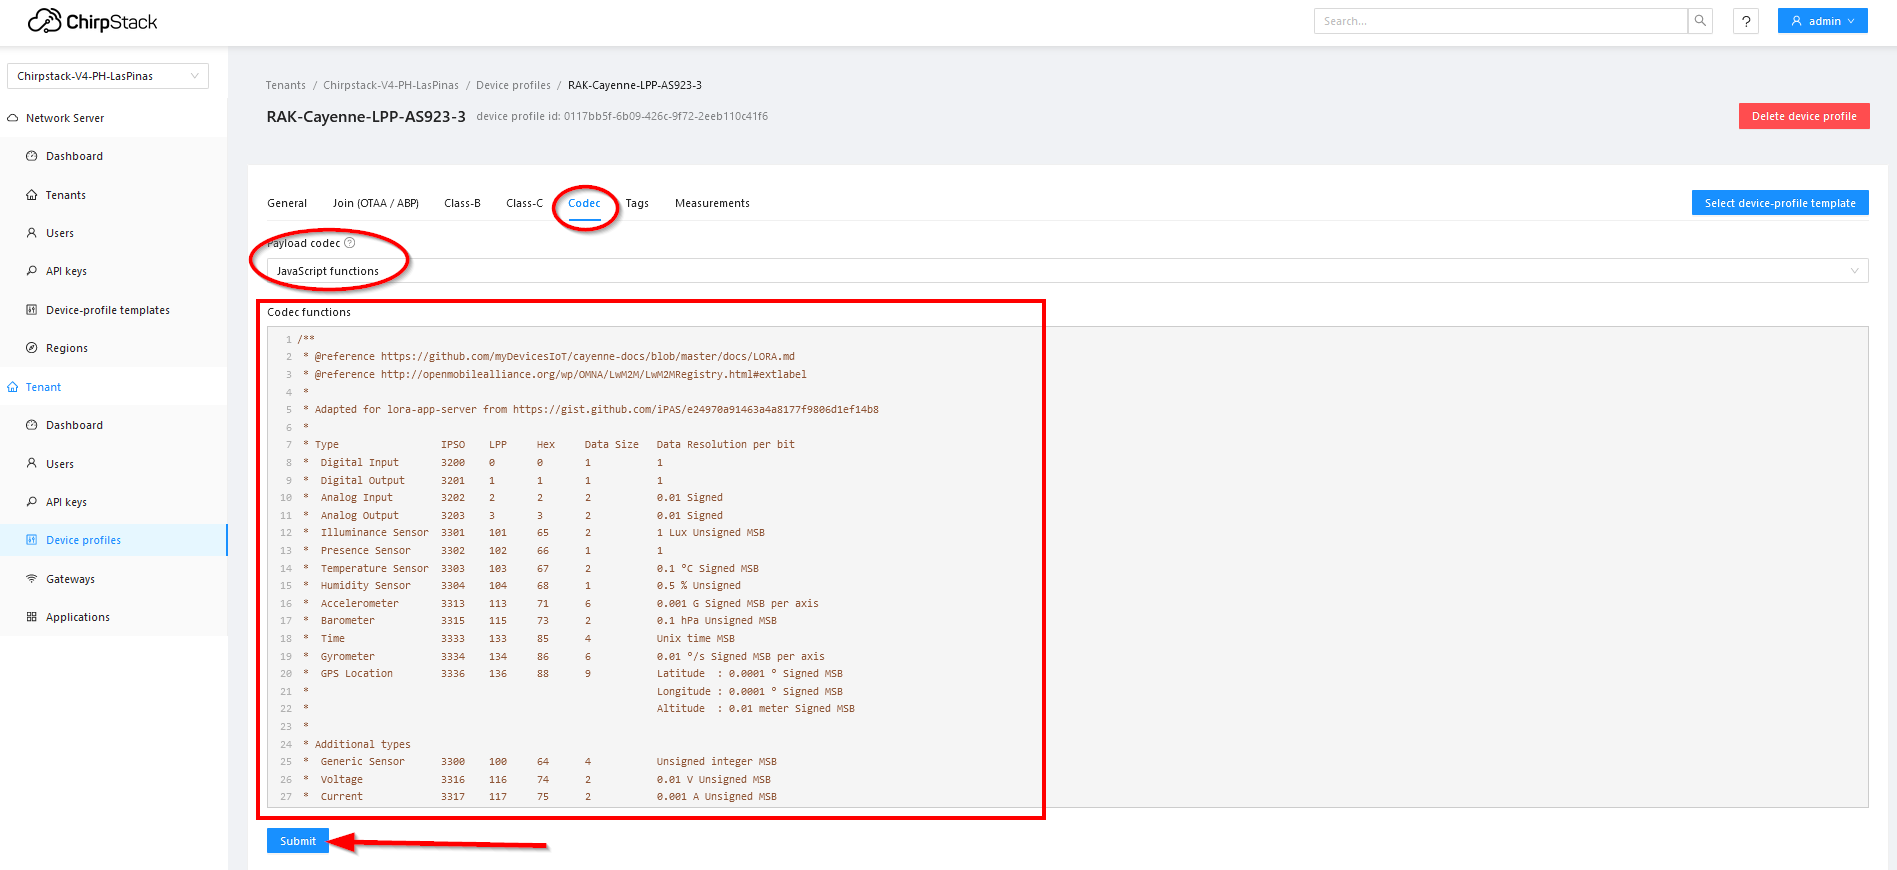 Figure 1: Filling Parameters of an Application
Register a New Device
-
Get the settings from the device: For the device registration in TTN you will need:
- DevEUI - This is the unique identifier for your RAK10702 WisBlock Indoor Comfort Node.
- AppEUI - The AppEUI is not used by Chirpstack.
- AppKey - The AppKey is used to encrypt data during the join process.
Connect your device via USB cable to your computer. Open Serial Port Tool, choose the correct COM port and BaudRate, and run the following command:
ATC+STATUS=?
 Figure 1: AppEUI of the device
Write down the DevEUI and AppKey, they will be needed in the next steps to register the device in TTN.
- Choose the Application created in the previous step, then select the DEVICES tab, as shown in Figure 23 and Figure 24.
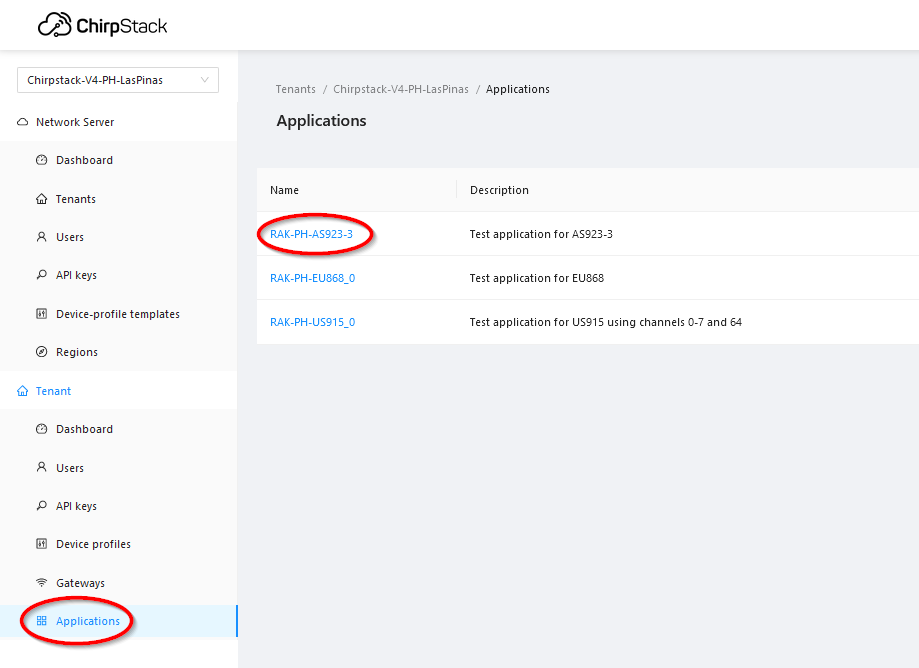 Figure 1: List of Applications Created
- Create a new device (LoRa node) by clicking on the “Add device” button.
 Figure 1: Add a New Device at Device Tab
- On the device creation page, fill in the necessary data. You can generate a Device EUI automatically by clicking the following icon, or you can write a correct Device EUI in the edit box.
- Device name and Device description: These are descriptive texts about your device.
- Device EUI (EUI64): Enter the device EUI of your RAK10702 WisBlock Indoor Comfort Node here.
- Device Profile: Select the profile you created before. Here we use
RAK-Cayenne-LPP-AS923-3
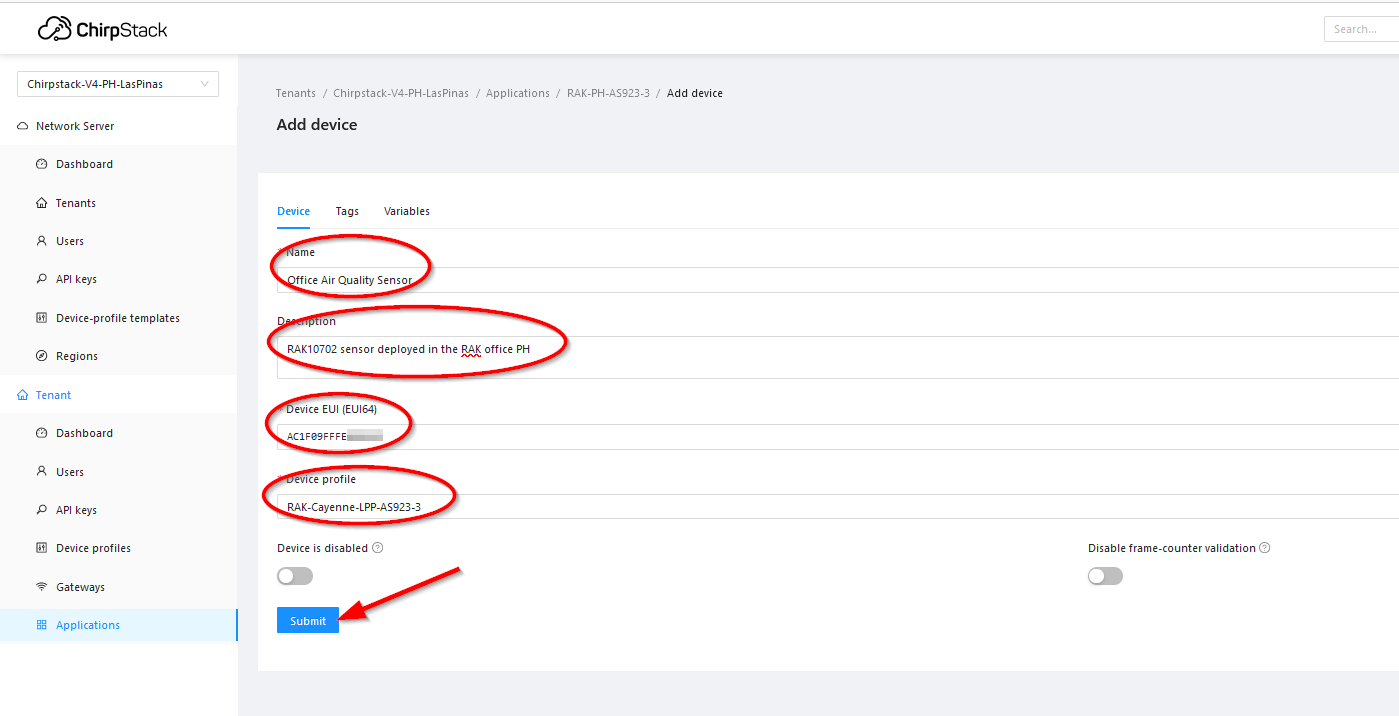 Figure 1: Add a New Device at Device Tab
Click the Submit button. A new window will open where you have to enter the AppKey value:
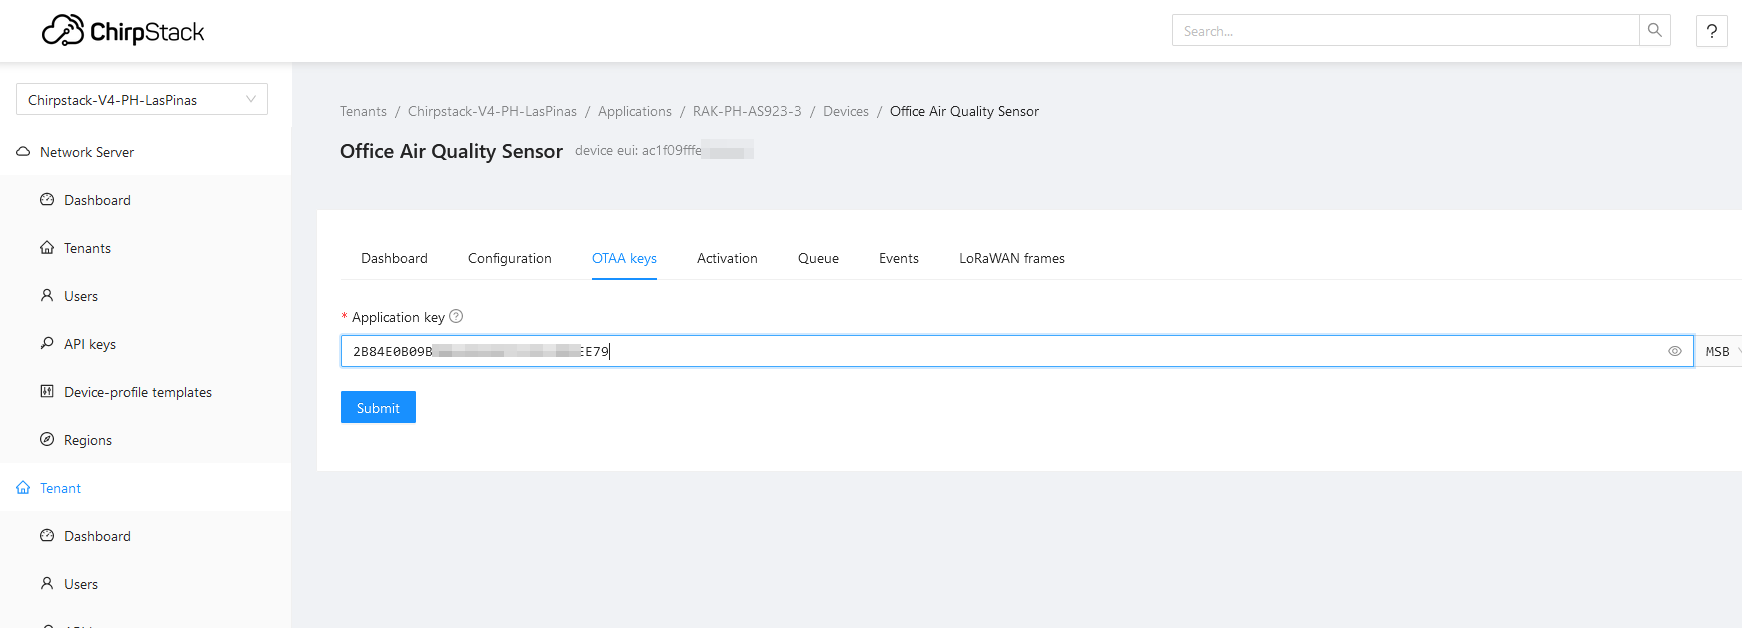 Figure 1: Add a New Device at Device Tab
Device Join
The device needs to join the Chirpstack server in OTAA mode before it can send data.
-
Start the network join on the RAK10702
Connect your device via USB cable to your computer. Open Serial Port Tool, choose the correct COM port and BaudRate, and run the following command:
ATC+JOIN=1:0
 Figure 1: Join
If all the settings are done correct, you will see in the LoRaWAN frames the join request and join accept messages from the device.
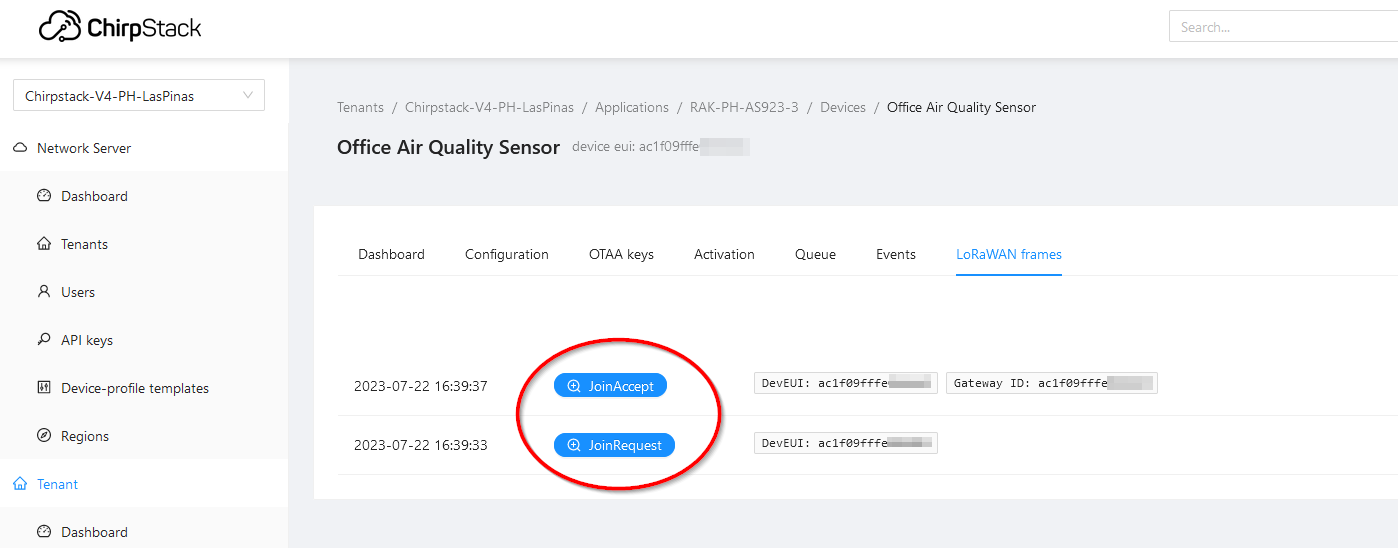 Figure 1: Basic settings for OTAA mode
Depending on your device settings, you will see after the set interval time a data packet arriving at the Chirpstack LNS.
 Figure 1: Sending data to The Things Stack from RAK10702 WisBlock Indoor Comfort Node
If you click on the up icon, you can see the decoded data that was received from the RAK10702
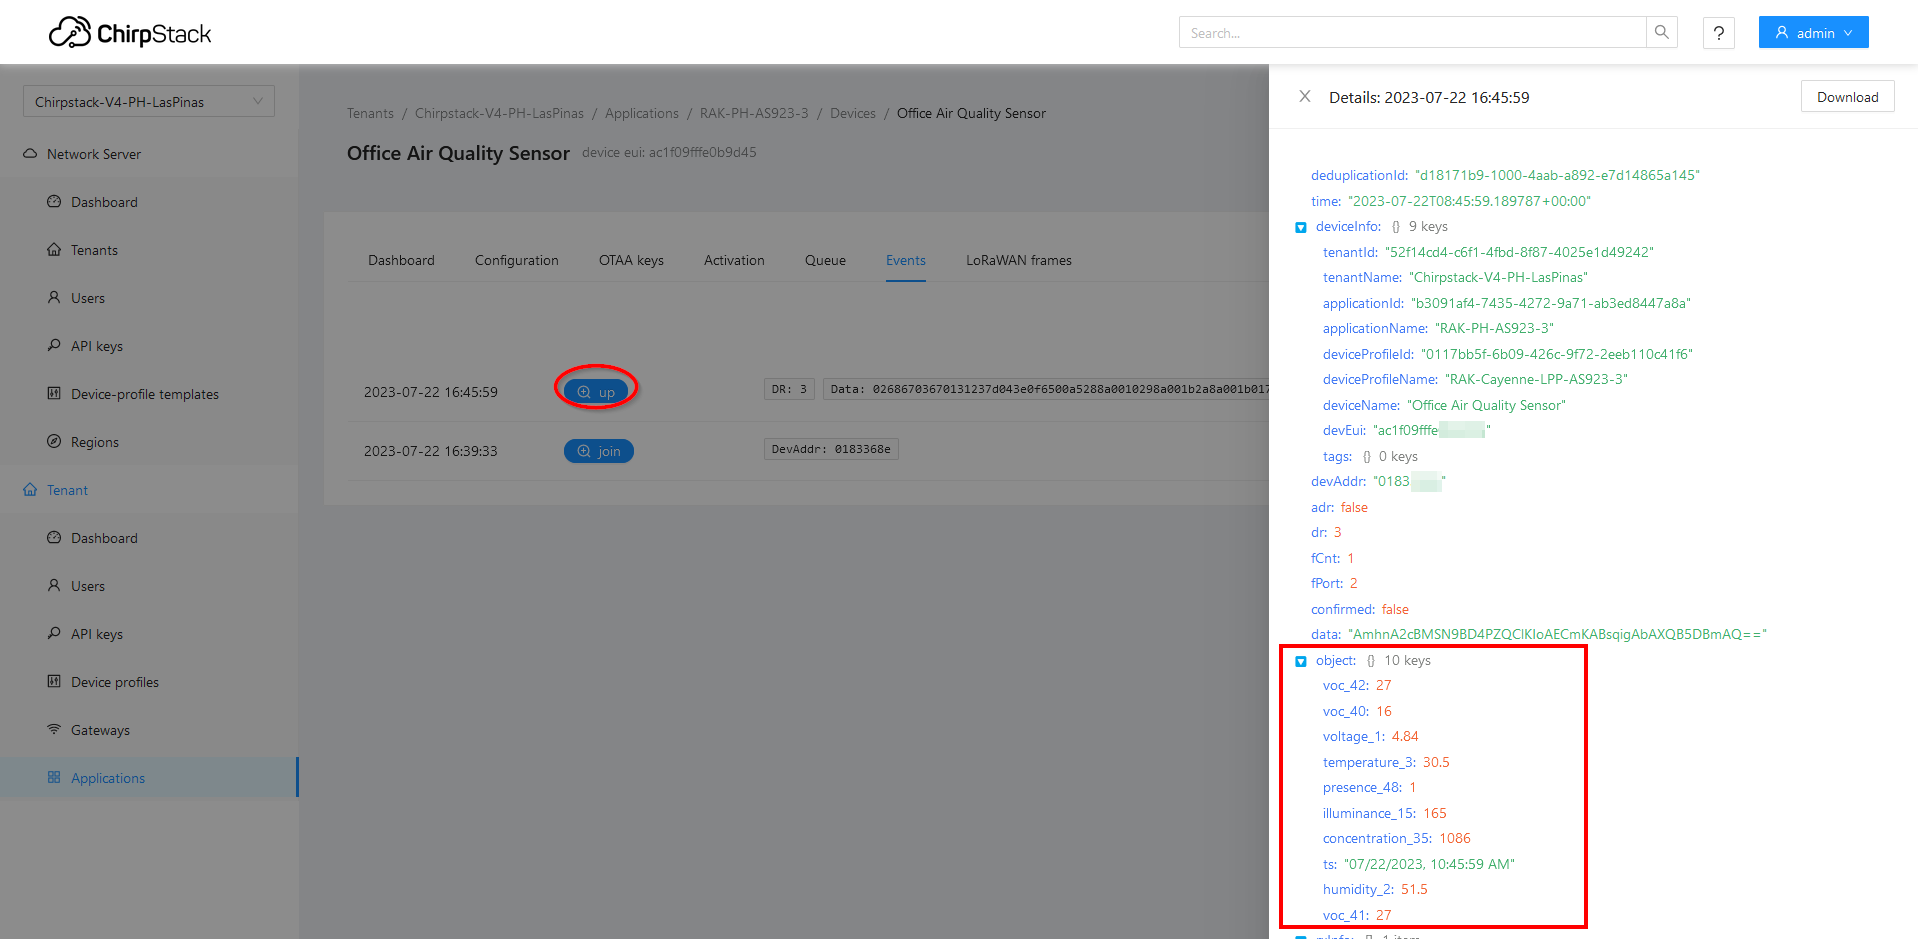 Figure 1: Sending data to The Things Stack from RAK10702 WisBlock Indoor Comfort Node
Decoding the Payload
Cayenne LPP Data Format
The Cayenne Low Power Payload (LPP) provides a convenient and easy way to send data over LPWAN networks such as LoRaWAN. The Cayenne LPP is compliant with the payload size restriction, which can be lowered down to 11 bytes, and allows the device to send multiple sensor data at a time or split into several frames.
The Data Channel uniquely identifies each sensor or actuator within a device. The acceptable range is from 0 to 64. The device developer is responsible to assign a unique channel for each of the device's sensor and actuator and conform to it across the device life cycle.
Data Types are based on the IPSO Alliance Smart Objects Guidelines, which identify each data type with an "Object ID". However, as shown below, a conversion is made to fit the Object ID into a single byte.
LPP_DATA_TYPE = IPSO_OBJECT_ID - 3200
Each data type can use 1 or more bytes to send the data similar to the following table:
| Type | IPSO | LPP | Hex | Data Size | Data Resolution per bit |
|---|---|---|---|---|---|
| Digital Input | 3200 | 0 | 0 | 1 | 1 |
| Digital Output | 3201 | 1 | 1 | 1 | 1 |
Data Format Used
The packet data is based on the Cayenne LPP packet format, but it has additional channel ID's that are not in the default Cayenne LPP specification. This was required because some sensor data did not fit into any of the existing channel ID's. The data format uses the following sensor types:
| Data | Channel No. | Channel ID | Length | Comment | Required Module | Decoded Field Name |
|---|---|---|---|---|---|---|
| Battery value | 1 | 116 | 2 bytes | 0.01 V Unsigned MSB | RAK4631 | voltage_1 |
| Humidity | 2 | 104 | 1 bytes | in % RH | RAK1901 | humidity_2 |
| Temperature | 3 | 103 | 2 bytes | in °C | RAK1901 | temperature_3 |
| Illuminance 2 | 15 | 101 | 2 bytes | 1 lux unsigned | RAK12010 | illuminance_15 |
| VOC | 16 | 138 | 2 bytes | VOC index | RAK12047 | voc_16 |
| SCD30 CO2 concentration | 35 | 125 | 2 bytes | 1 ppm unsigned | RAK12037 | concentration_35 |
| SCD30 temperature | 36 | 103 | 2 bytes | in °C | RAK12037 | temperature_36 |
| SCD30 humidity | 37 | 104 | 1 bytes | in % RH | RAK12037 | humidity_37 |
| PM 1.0 value | 40 | 138 | 2 bytes | in ug/m3 | RAK12039 | voc_40 |
| PM 2.5 value | 41 | 138 | 2 bytes | in ug/m3 | RAK12039 | voc_41 |
| PM 10 value | 42 | 138 | 2 bytes | in ug/m3 | RAK12039 | voc_42 |
| PIR sensor | 48 | 102 | 1 bytes | bool | --- | presence_48 |
- The Channel IDs in cursive are extended format and not supported by standard Cayenne LPP data decoders.
- Example decoders for TTN, Chirpstack, Helium, and Datacake can be found in the Github repo ⤴️.
Button functions
The button of the RAK10702 WisBlock Indoor Comfort Node is configured for several functions. The different functions can be activated by single or multiple push(es) of the button.
| Number of push(es) | Function |
|---|---|
| 1 | Switch the UI of the display between an simple UI and a scientific UI with detailed information of all sensor data |
 Figure 1: Iconized UI Figure 1: Iconized UI Figure 1: Scientific UI Figure 1: Scientific UI | |
| 2 | Invert the colors of the display |
 Figure 1: Inverted Figure 1: Inverted | |
| 3 | Enable BLE for debug or firmware upgrades over OTA DFU |
| 4 | Show details of the device LoRa/LoRaWAN settings |
 Figure 1: Status Figure 1: Status | |
| 9 | Restart the device |
Miscellaneous
Upgrading the Firmware
Before you start working with the RAK10702 WisBlock Indoor Comfort Node, it is recommended to keep the RAK10702 WisBlock Indoor Comfort Node updated to the latest version of the firmware. Download the latest RAK10702 Indoor Comfort Node firmware ⤴️.
Custom Firmware
Build your own RAK10702 WisBlock Indoor Comfort Node firmware with our open-source code available on the GitHub Repo ⤴️. The project structure is for PlatformIO. If you need to use ArduinoIDE, you must rename the file app.cpp to an .INO file to be able to load the file in ArduinoIDE.
You can extend the functionality of the RAK10702 WisBlock Indoor Comfort Node by using these sources. You can write, as well, your own RAK10702 WisBlock Indoor Comfort Node application based on these sources.
