RAK12002 WisBlock RTC Module Quick Start Guide
Prerequisite
What Do You Need?
Before going through each and every step on using RAK12002 WisBlock module, make sure to prepare the necessary items listed below:
Hardware
- RAK12002 WisBlock RTC Module
- Your choice of WisBlock Base
- Your choice of WisBlock Core
- USB Cable
- Li-Ion/LiPo battery (optional)
- Solar charger (optional)
Software
Arduino
- Download and install Arduino IDE.
- To add the RAKwireless Core boards on your Arduino Boards Manager, install the RAKwireless Arduino BSP.
Product Configuration
Hardware Setup
The RAK12002 is a Real-Time Clock module, part of the RAKwireless WisBlock Series, which was designed to provide real-time clock capabilities on your WisBlock projects. The RTC chip is based on RV-3028-C7 from Micro Crystal which can be interfaced via I2C.
For more information about RAK12002, refer to the Datasheet.
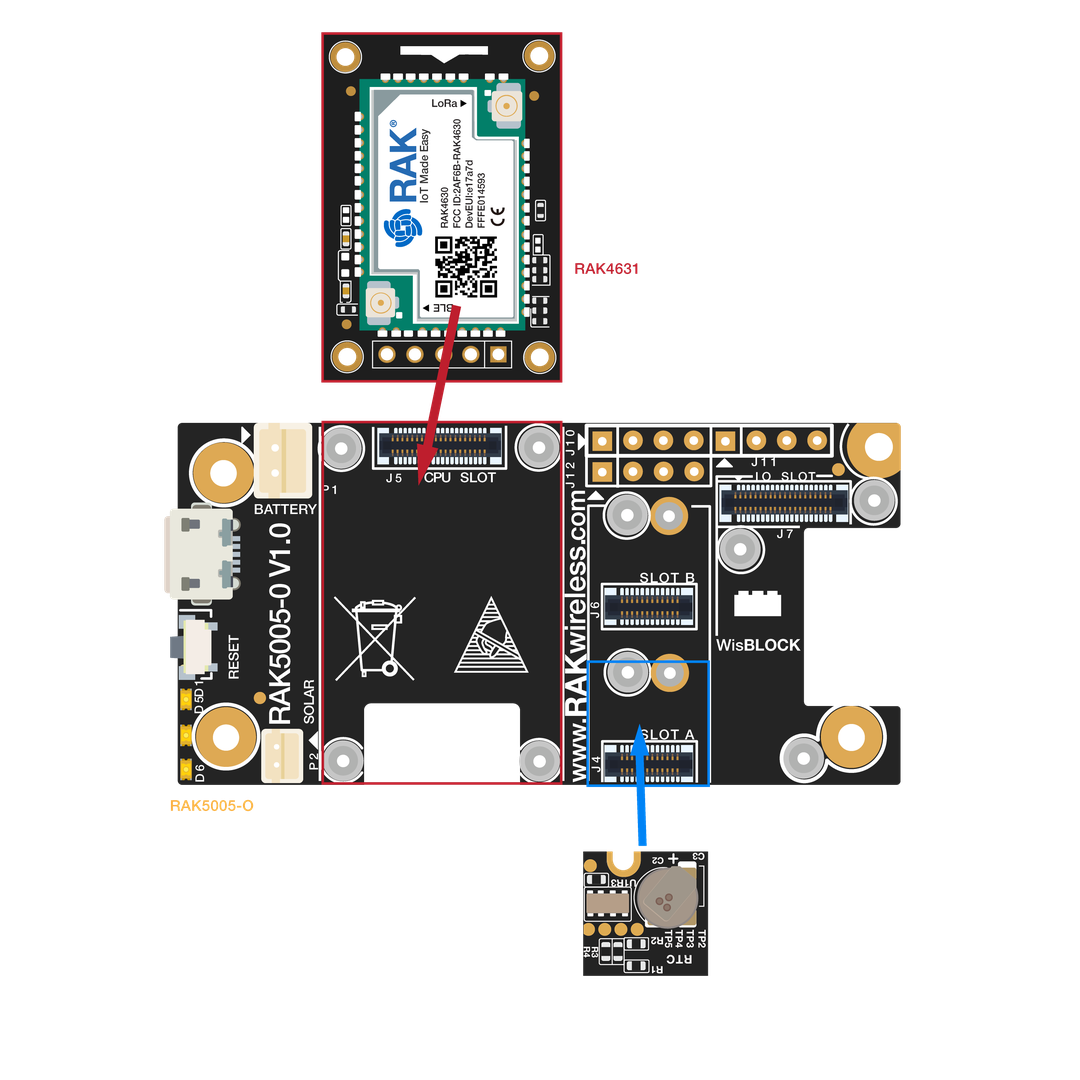 Figure 1: RAK12002 connection to WisBlock Base
- You can connect the RAK12002 to any of the WisBlock Base Board Slot A to D.
- RAK12002 has a built-in supercapacitor that can provide up to 7 days of extra timing capability in case the Li-Ion Battery is drained or disconnected.
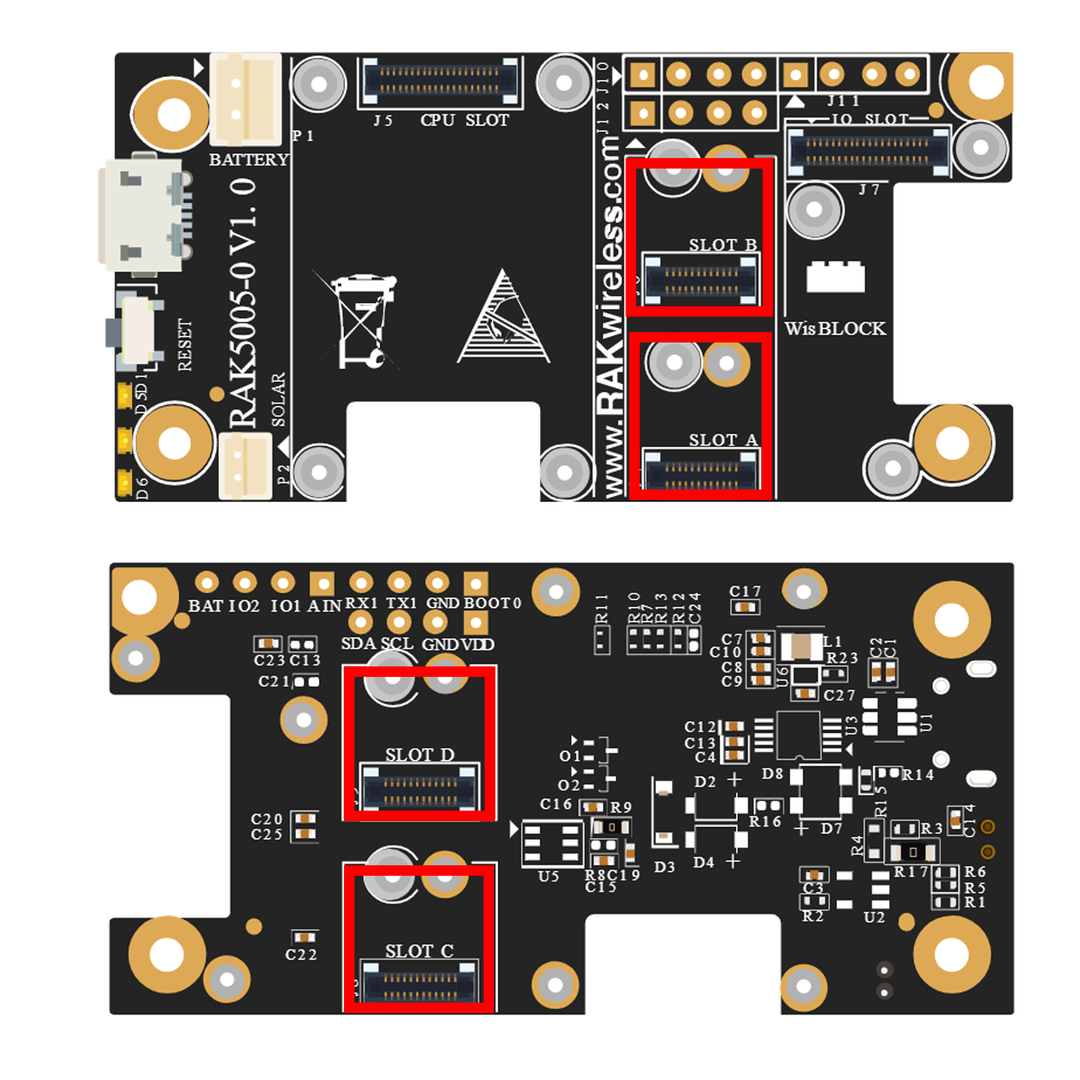 Figure 1: RAK12002 connection to WisBlock Base Slots A to D
Assembling and Disassembling of WisBlock Modules
Assembling Procedure
The RAK12002 module can be mounted on the IO slot of the WisBlock Base board, as shown in Figure 3. Also, always secure the connection of the WisBlock module by using the compatible screws.
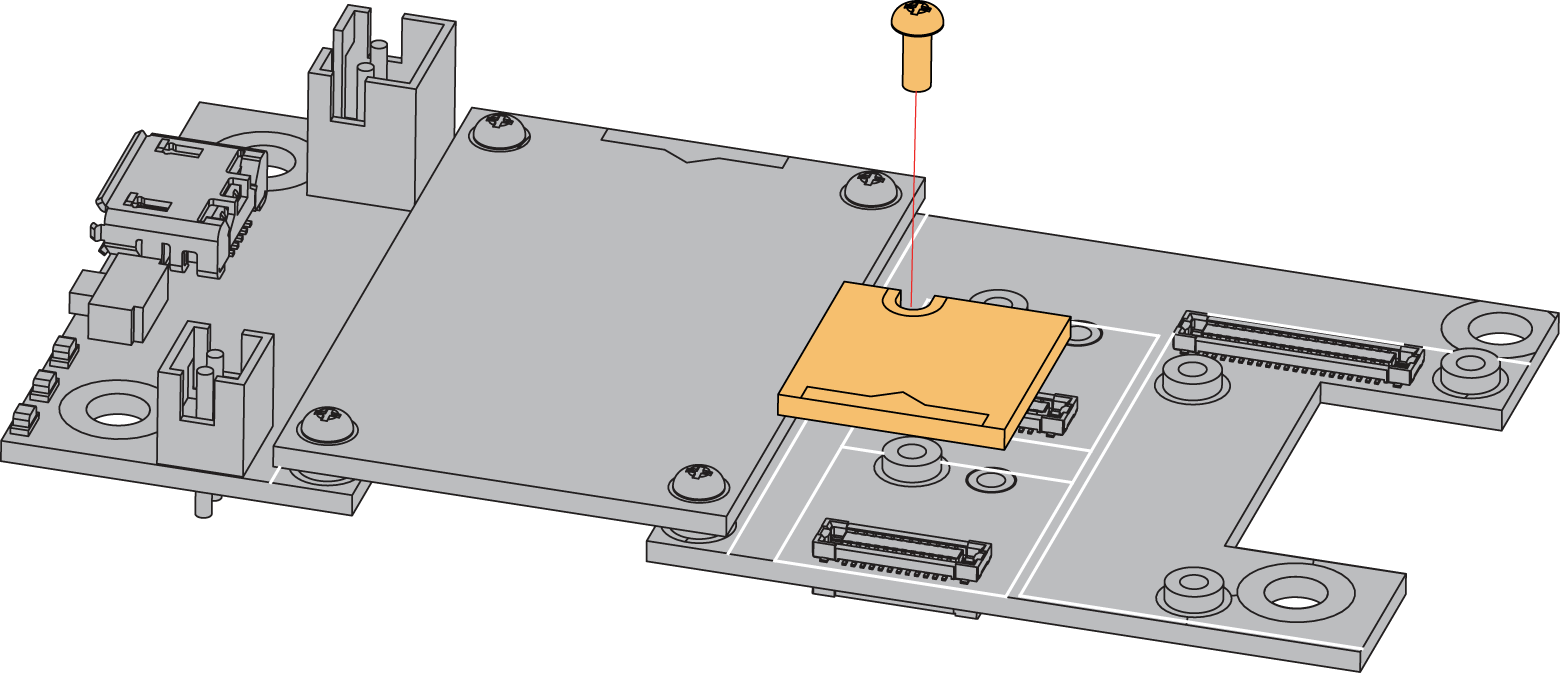 Figure 1: RAK12002 mounting connection to WisBlock Base module
Disassembling Procedure
The procedure in disassembling any type of WisBlock modules is the same.
- First, remove the screws.
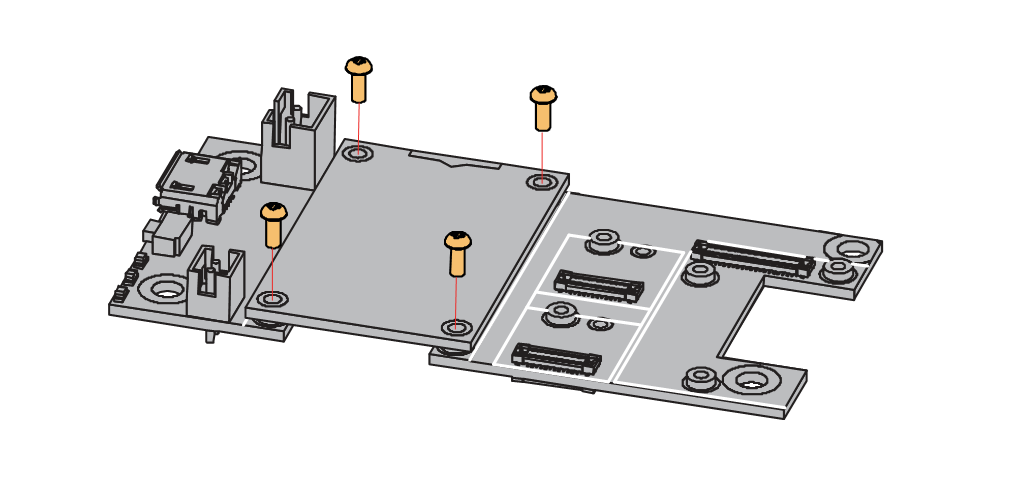 Figure 1: Removing screws from the WisBlock module
- Once the screws are removed, check the silkscreen of the module to find the correct location where force can be applied.
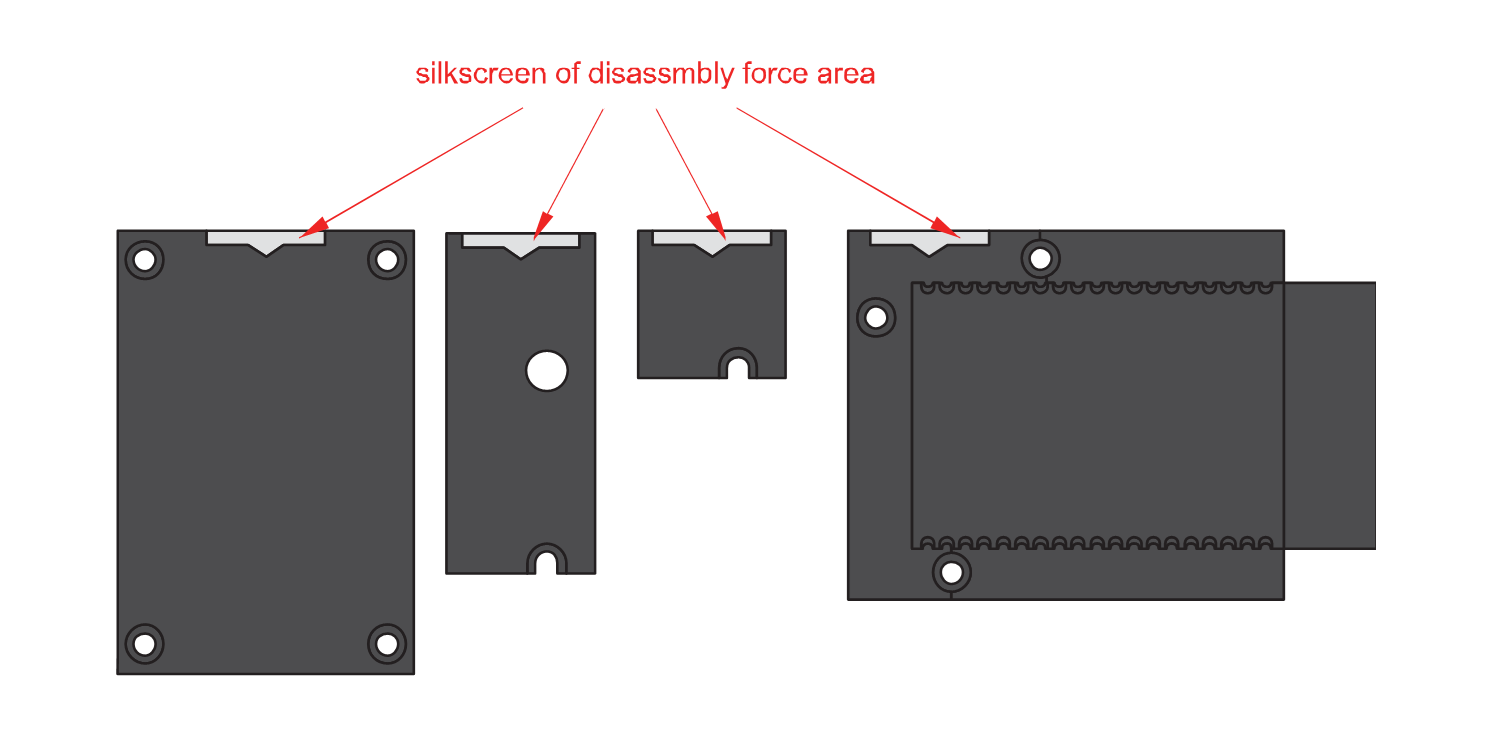 Figure 1: Detaching silkscreen on the WisBlock module
- Apply force to the module at the position of the connector, as shown in Figure 6, to detach the module from the baseboard.
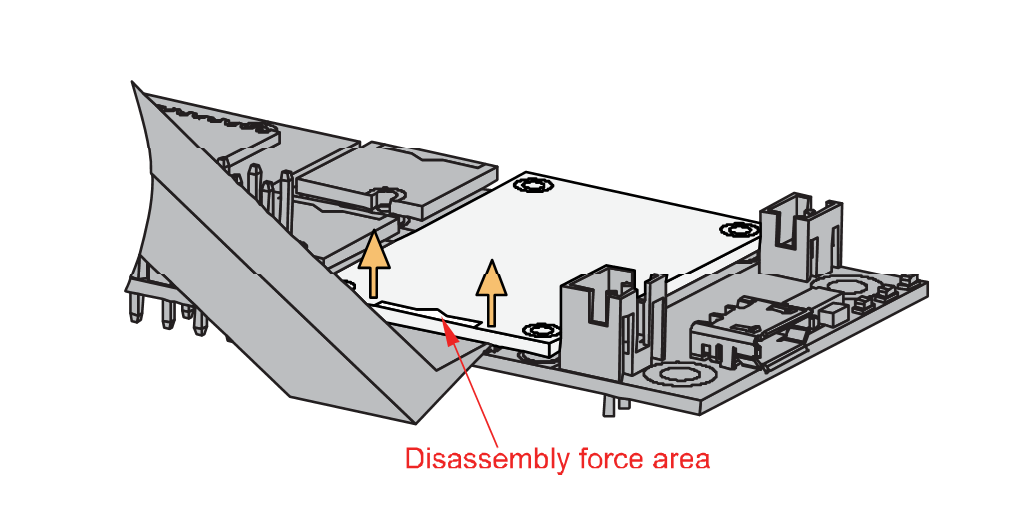 Figure 1: Applying even forces on the proper location of a WisBlock module
If you will connect other modules to the remaining WisBlock Base slots, check on the WisBlock Pin Mapper tool for possible conflicts.
Software Configuration and Example
In the following example, you will be using the RAK12002 WisBlock RTC Module to setup the time and date.
RAK12002 in RAK4631 WisBlock Core Guide
Arduino Setup
- First, you need to select the RAK4631 WisBlock Core.
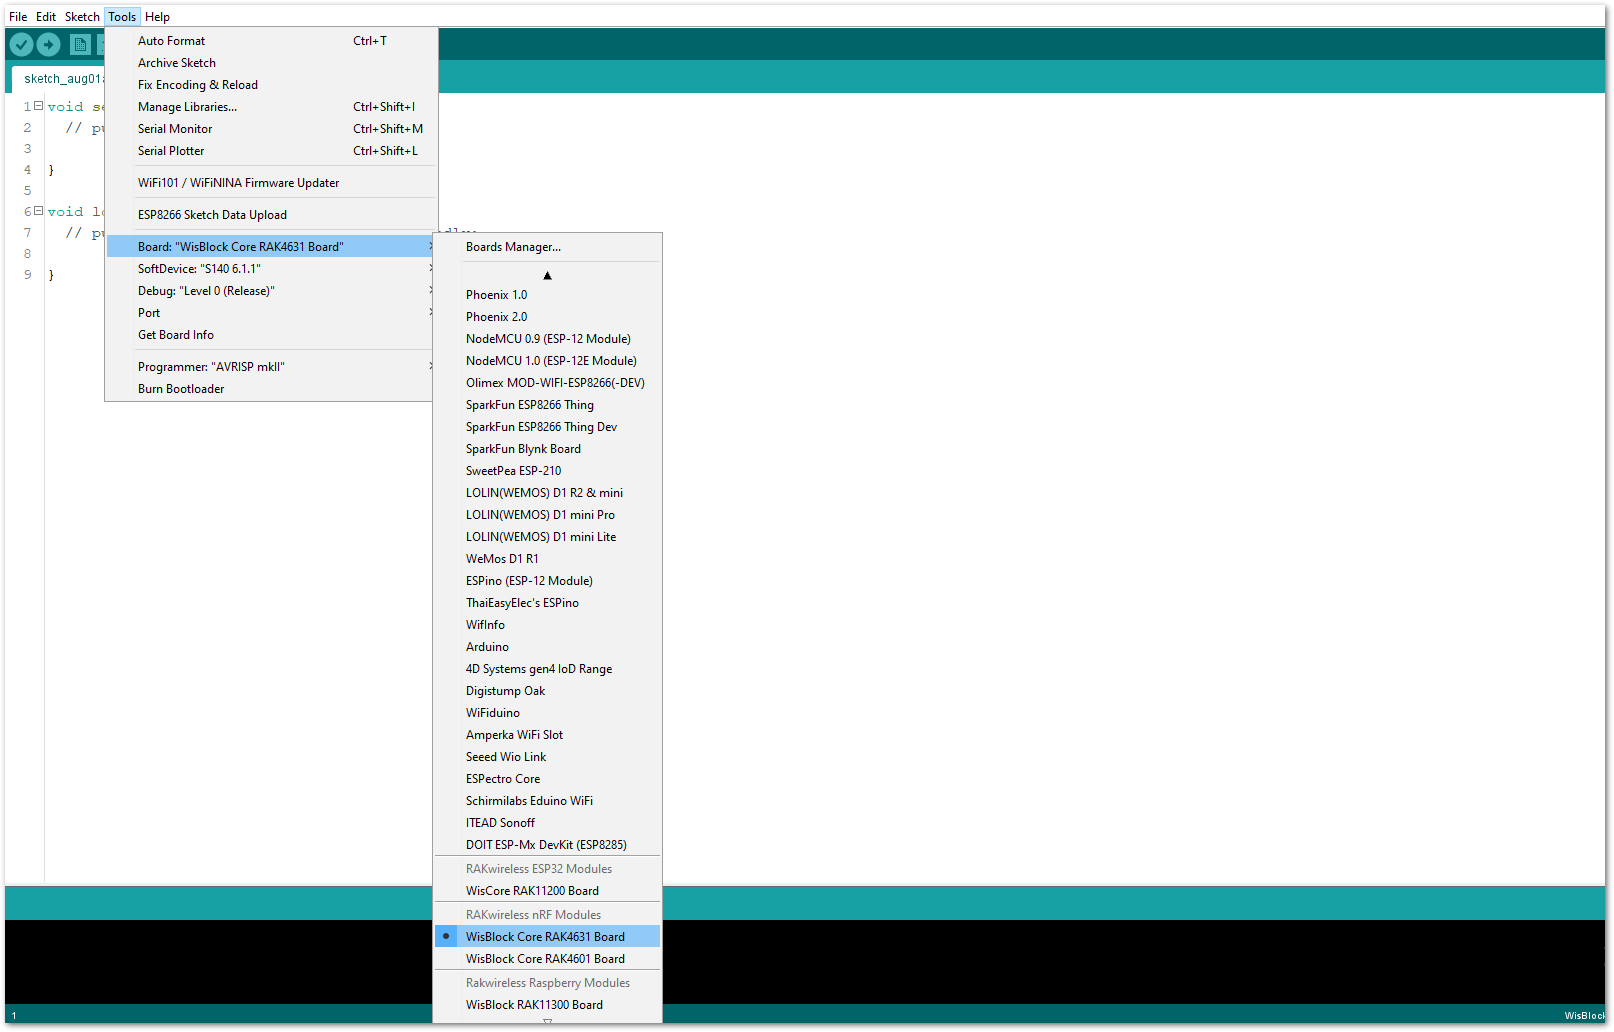 Figure 1: Selecting RAK4631 as WisBlock Core
- Next, copy the following sample code into your Arduino IDE.
Click to view the code
/**
   @file RAK12002_RTC_DateTime_RV-3028-C7.ino
   @author rakwireless.com
   @brief Set and read RTC time.
   @version 0.1
   @date 2021-04-30
   @copyright Copyright (c) 2021
**/

#include "Melopero_RV3028.h" //Click here to get the library: http://librarymanager/All#Melopero_RV3028

Melopero_RV3028 rtc;

/**
 * @brief Arduino setup function
 * @note Called once after power on or reset
 *
 */
void setup()
{
  // Initialize Serial for debug output
  time_t timeout = millis();
  Serial.begin(115200);
  while (!Serial)
  {
    if ((millis() - timeout) < 5000)
    {
      delay(100);
    }
    else
    {
      break;
    }
  }
  rtc.initDevice(); // First initialize and create the rtc device

  rtc.writeToRegister(0x35,0x00);
  rtc.writeToRegister(0x37,0xB4); //Direct Switching Mode (DSM): when VDD < VBACKUP, switchover occurs from VDD to VBACKUP

  rtc.set24HourMode();  // Set the device to use the 24hour format (default) instead of the 12 hour format

  // Set the date and time
  // year, month, weekday, date, hour, minute, second
  // Note: time is always set in 24h format
  // Note: month value ranges from 1 (Jan) to 12 (Dec)
  // Note: date value ranges from 1 to 31
  rtc.setTime(2021, 4, 6, 30, 0, 0, 0);
}

/**
 * @brief Arduino loop function
 * @note Output date and time every second
 *
 */
void loop()
{
  Serial.printf("%d:%d:%d %d/%d/%d \n",rtc.getHour(),rtc.getMinute(),rtc.getSecond(),rtc.getYear(),rtc.getMonth(),rtc.getDate());
  delay(1000);
}
If you experience any error in compiling the example sketch, check the updated code for the RAK4631 WisBlock Core Module that can be found on the RAK12002 WisBlock Example Code Repository
- Click the link to locate the library.
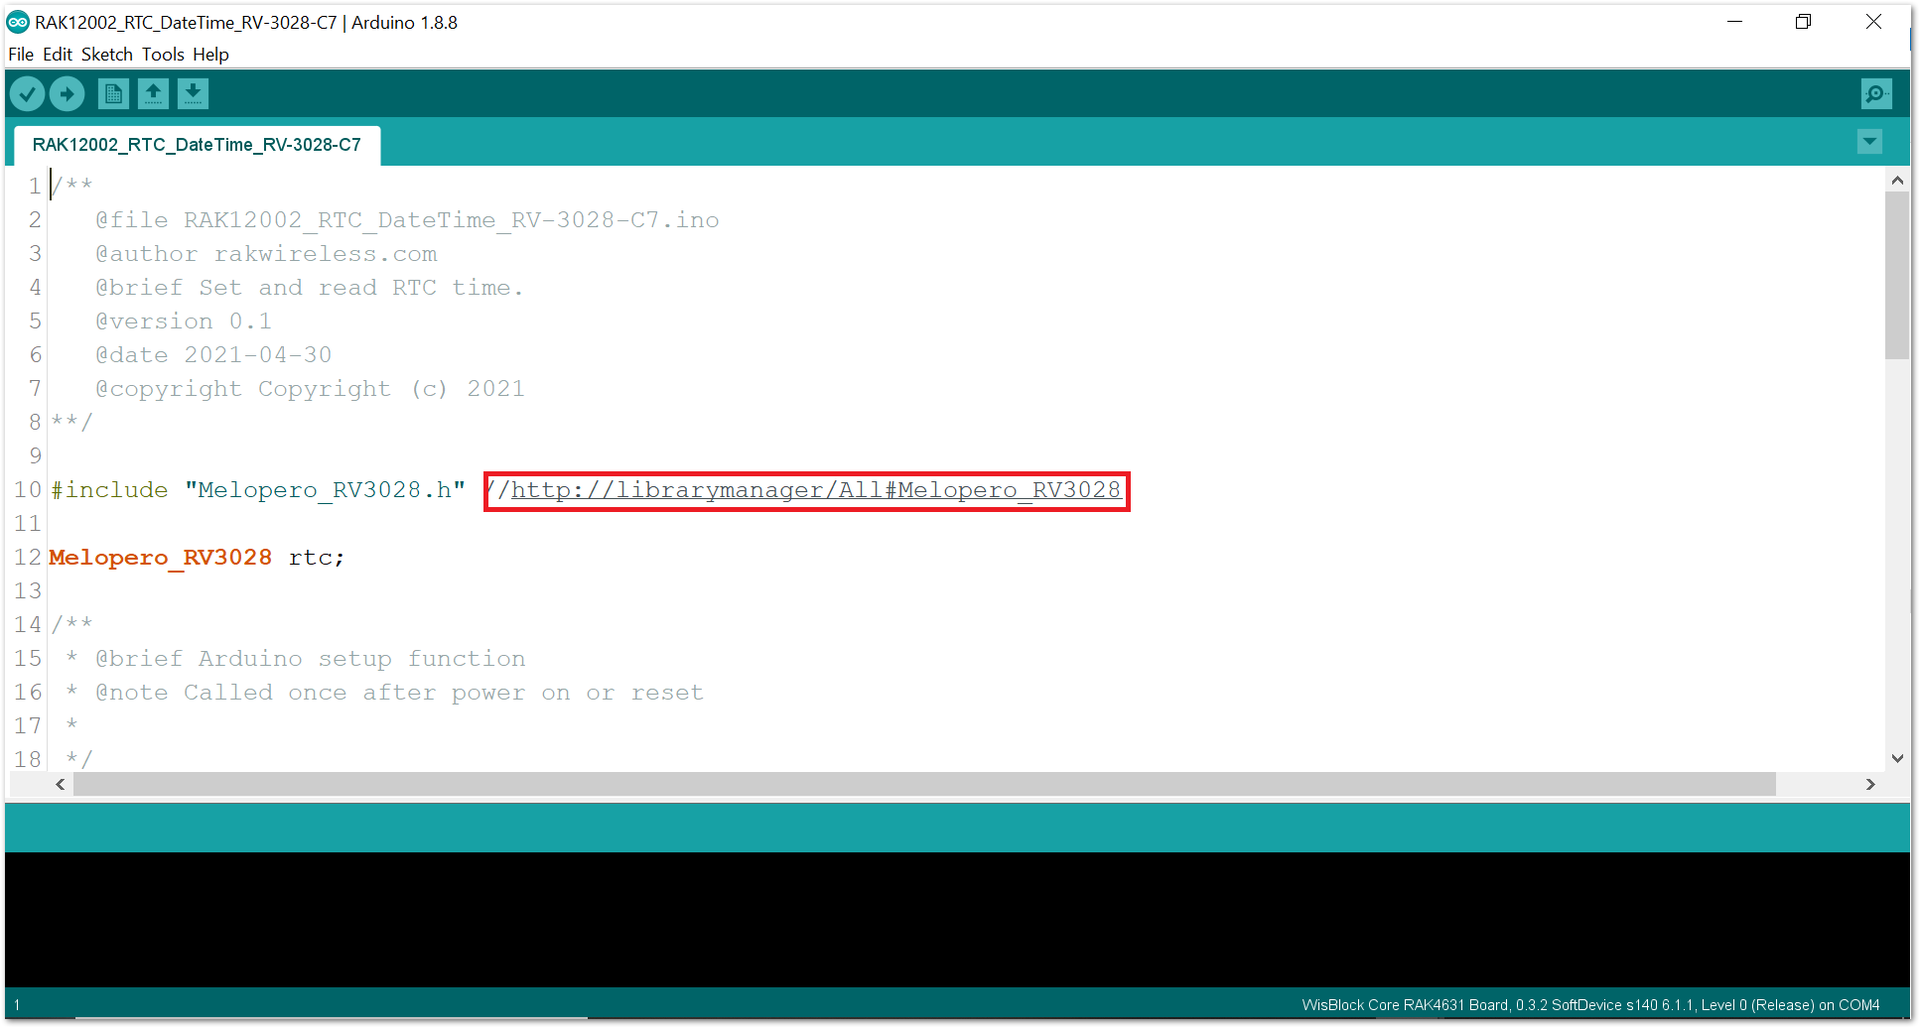 Figure 1: Locating the required library in the Library Manager
- Install the required library, as shown in Figure 9.
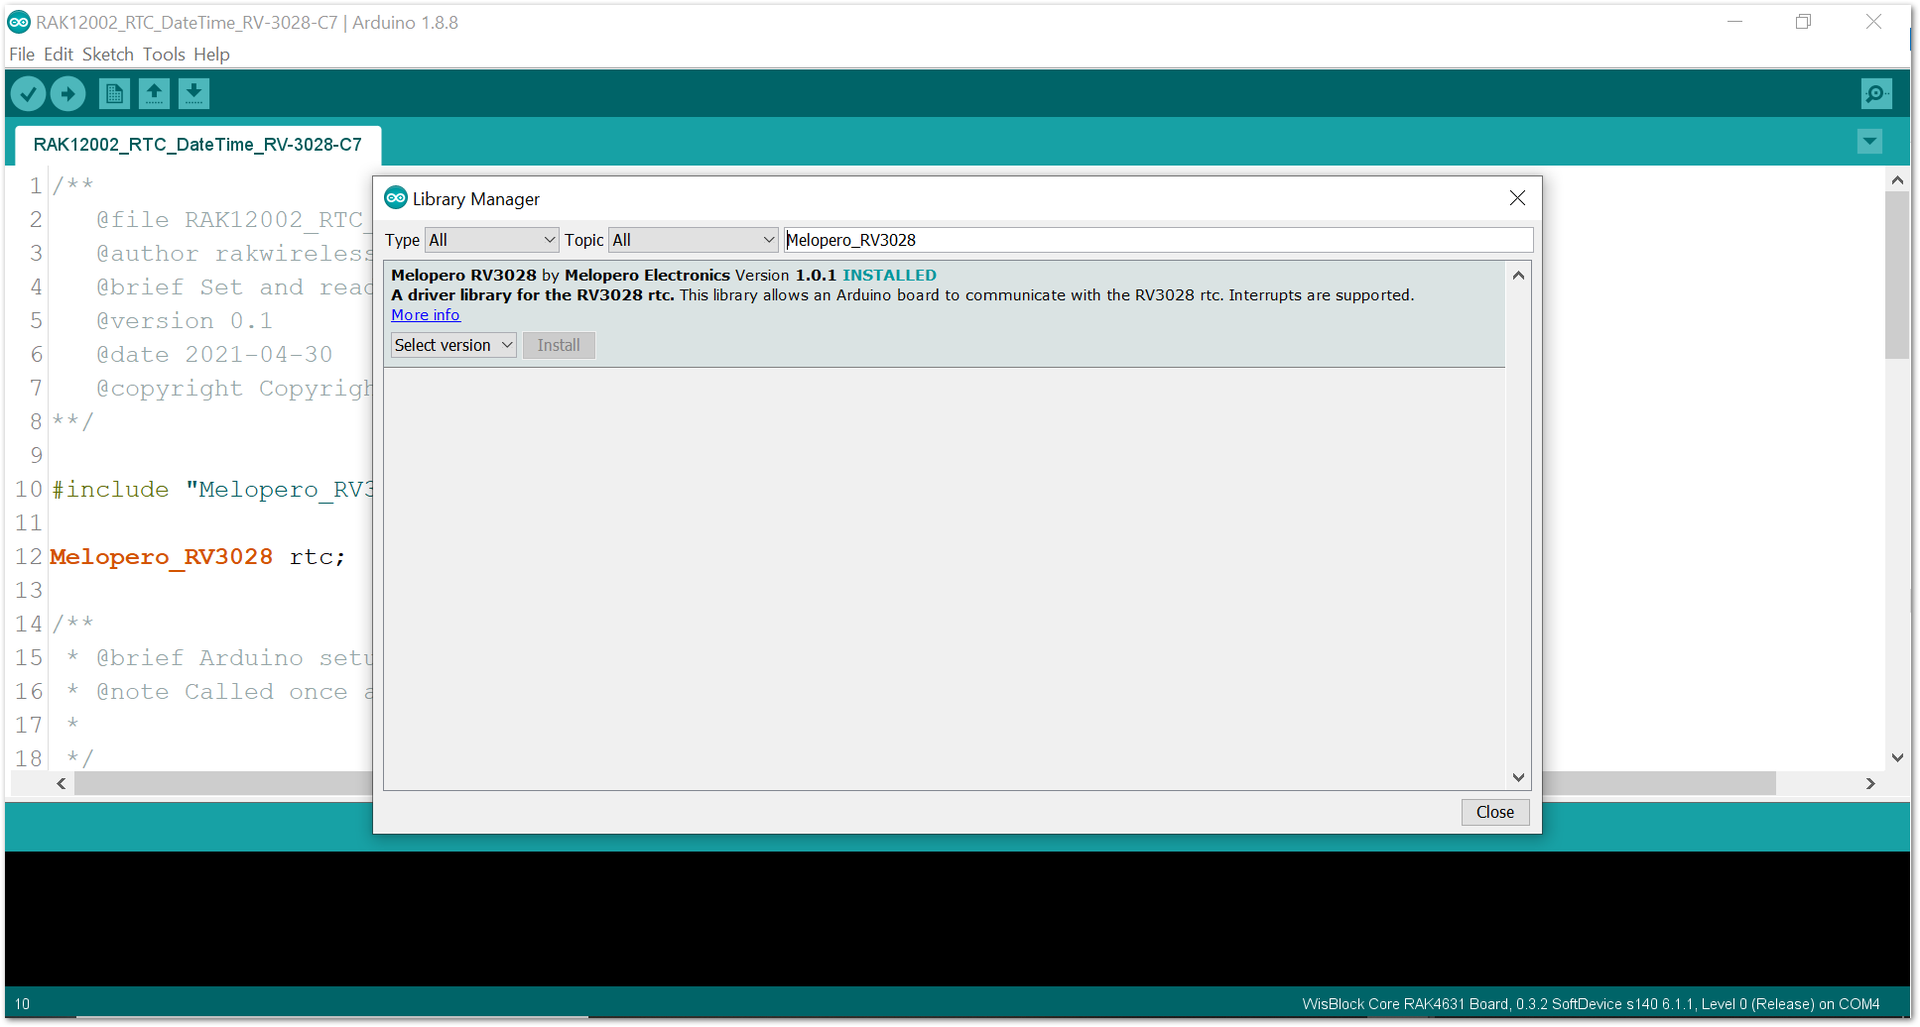 Figure 1: Installing the Library
- Select the correct port and upload your code, as shown in Figure 10 and Figure 11.
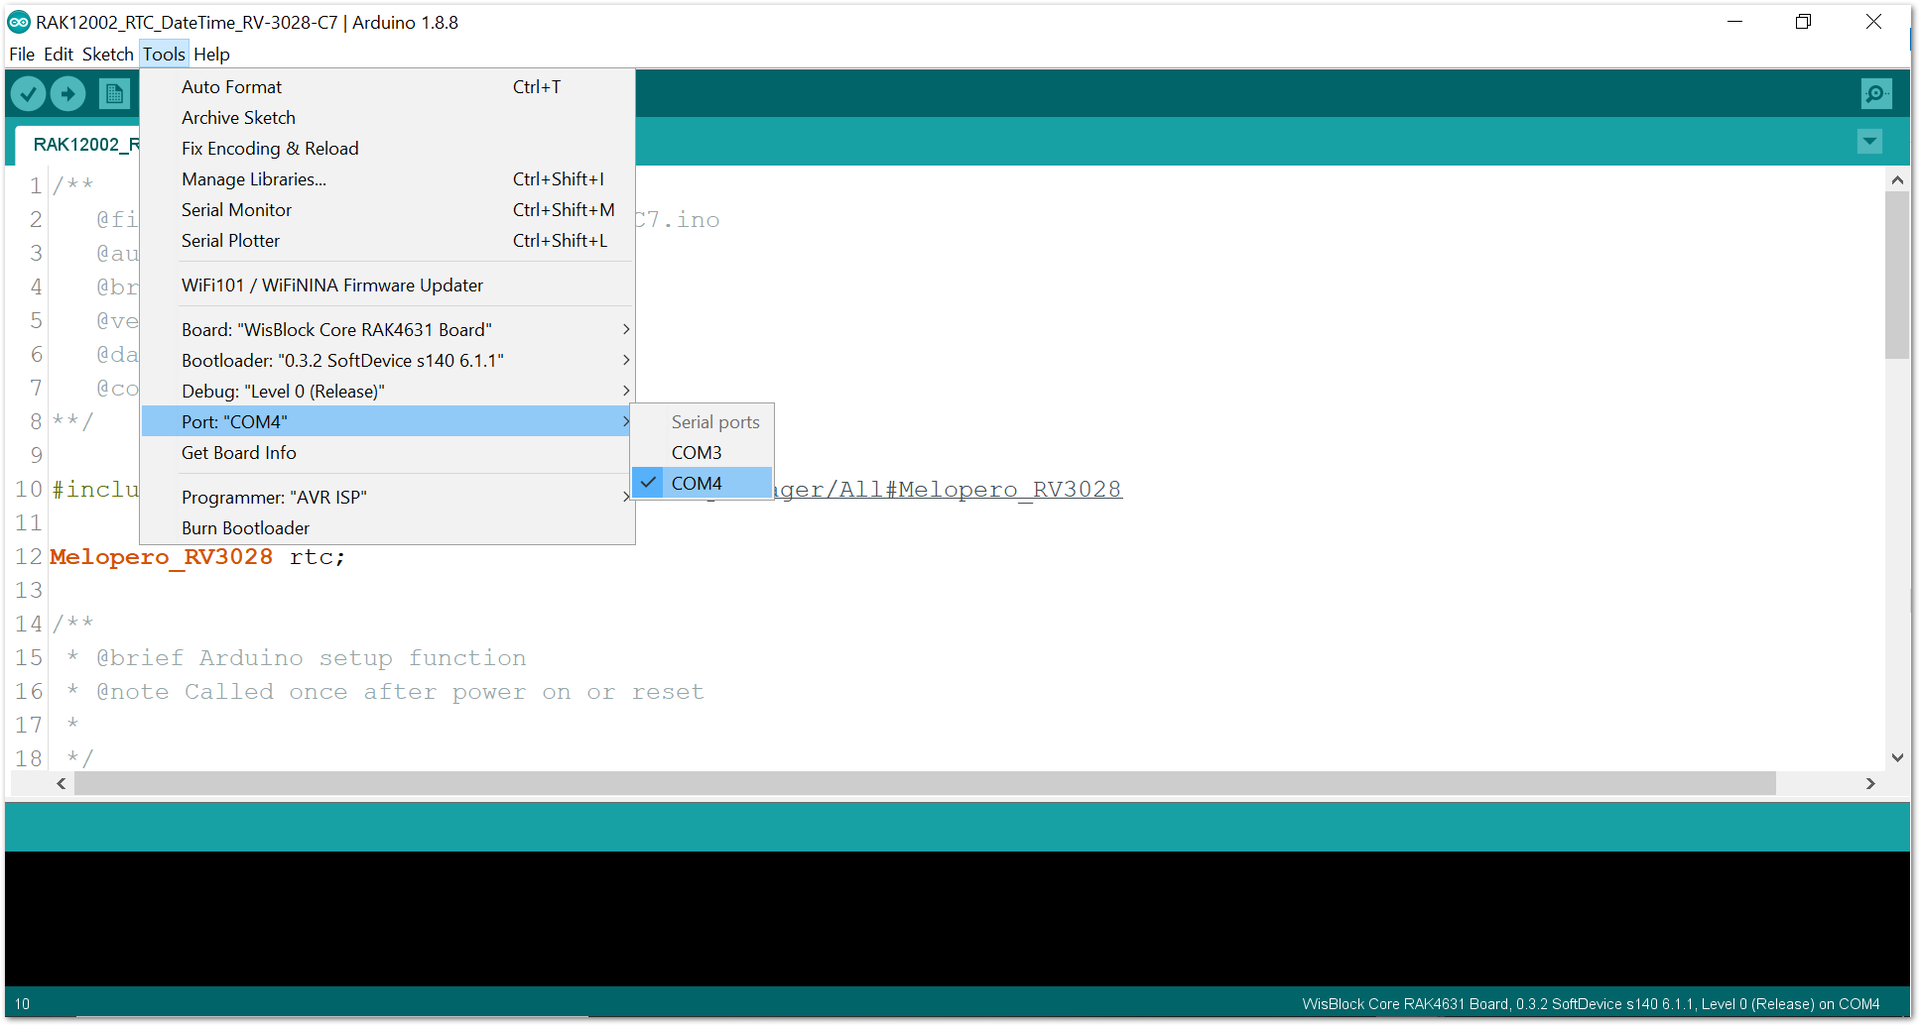 Figure 1: Selecting the correct Serial Port
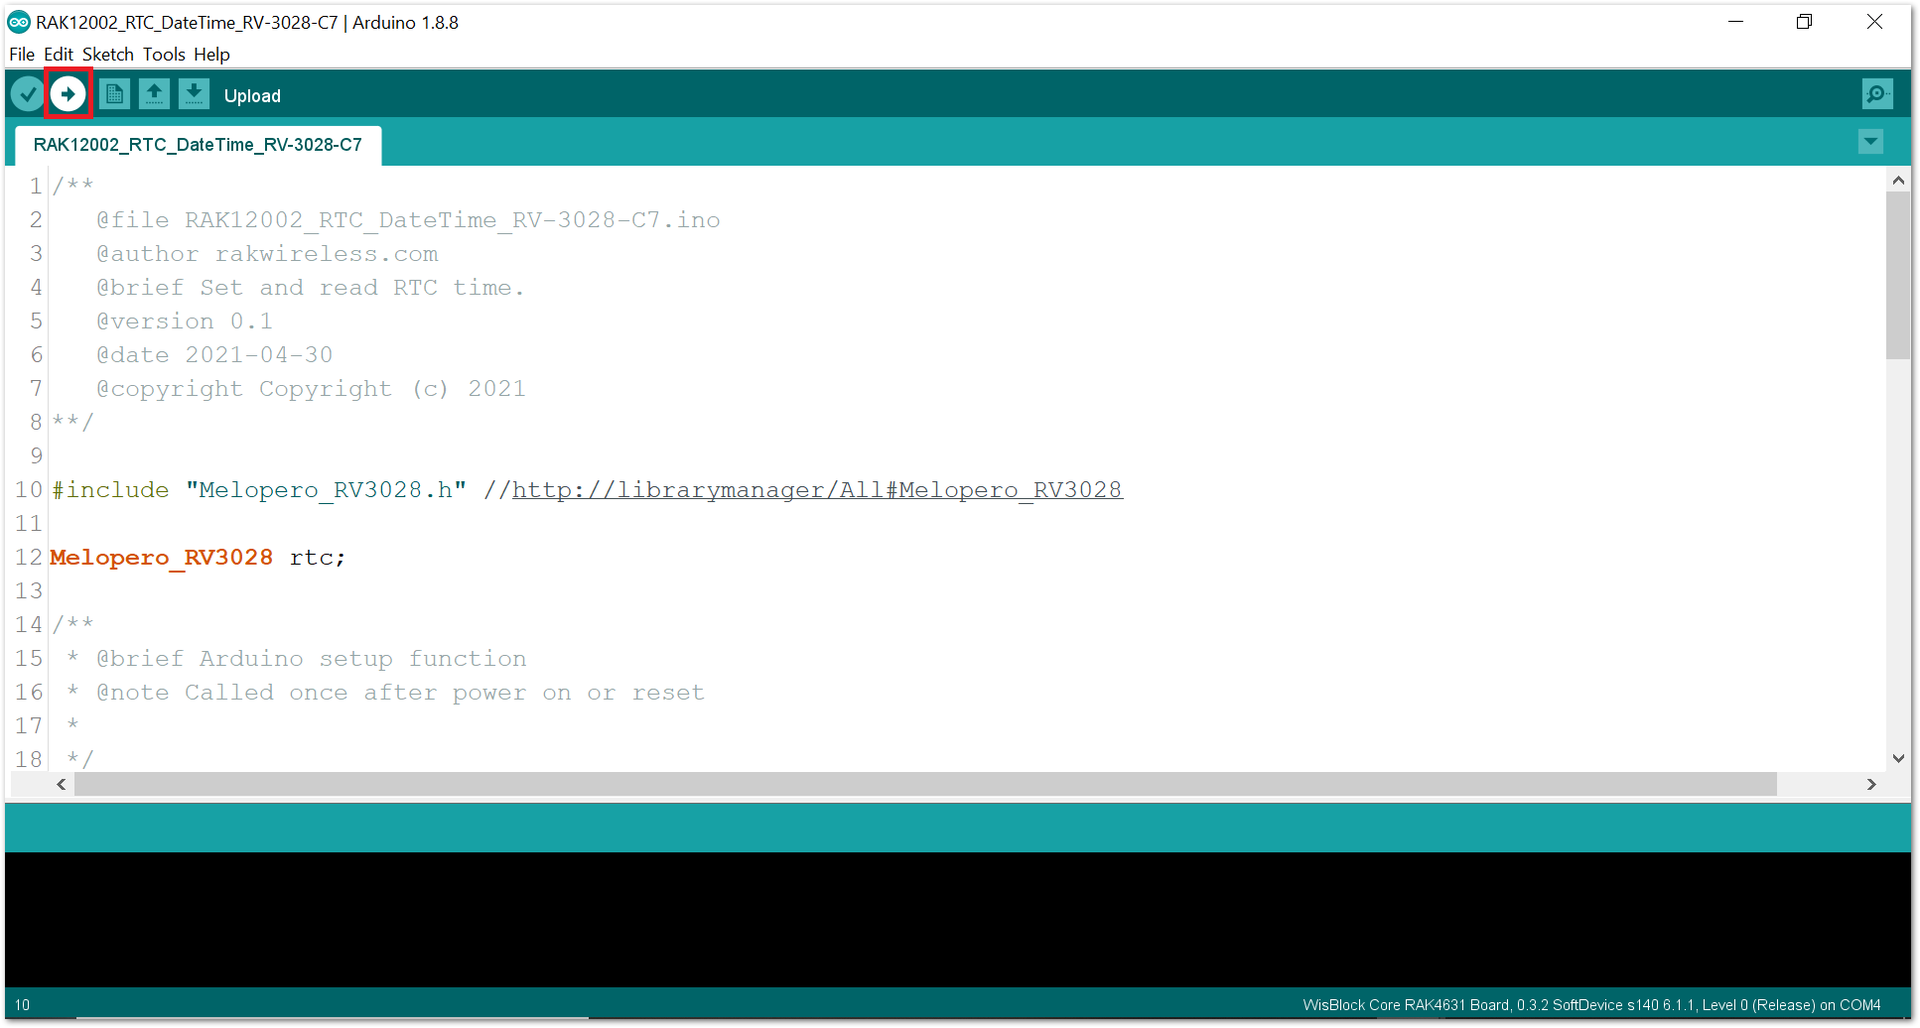 Figure 1: Uploading code
- When you successfully uploaded the example sketch, open the Serial Monitor of the Arduino IDE to see the RAK12002 date/time logs, as shown in Figure 12. You will be able to see the Time and Date in the Serial Monitor.
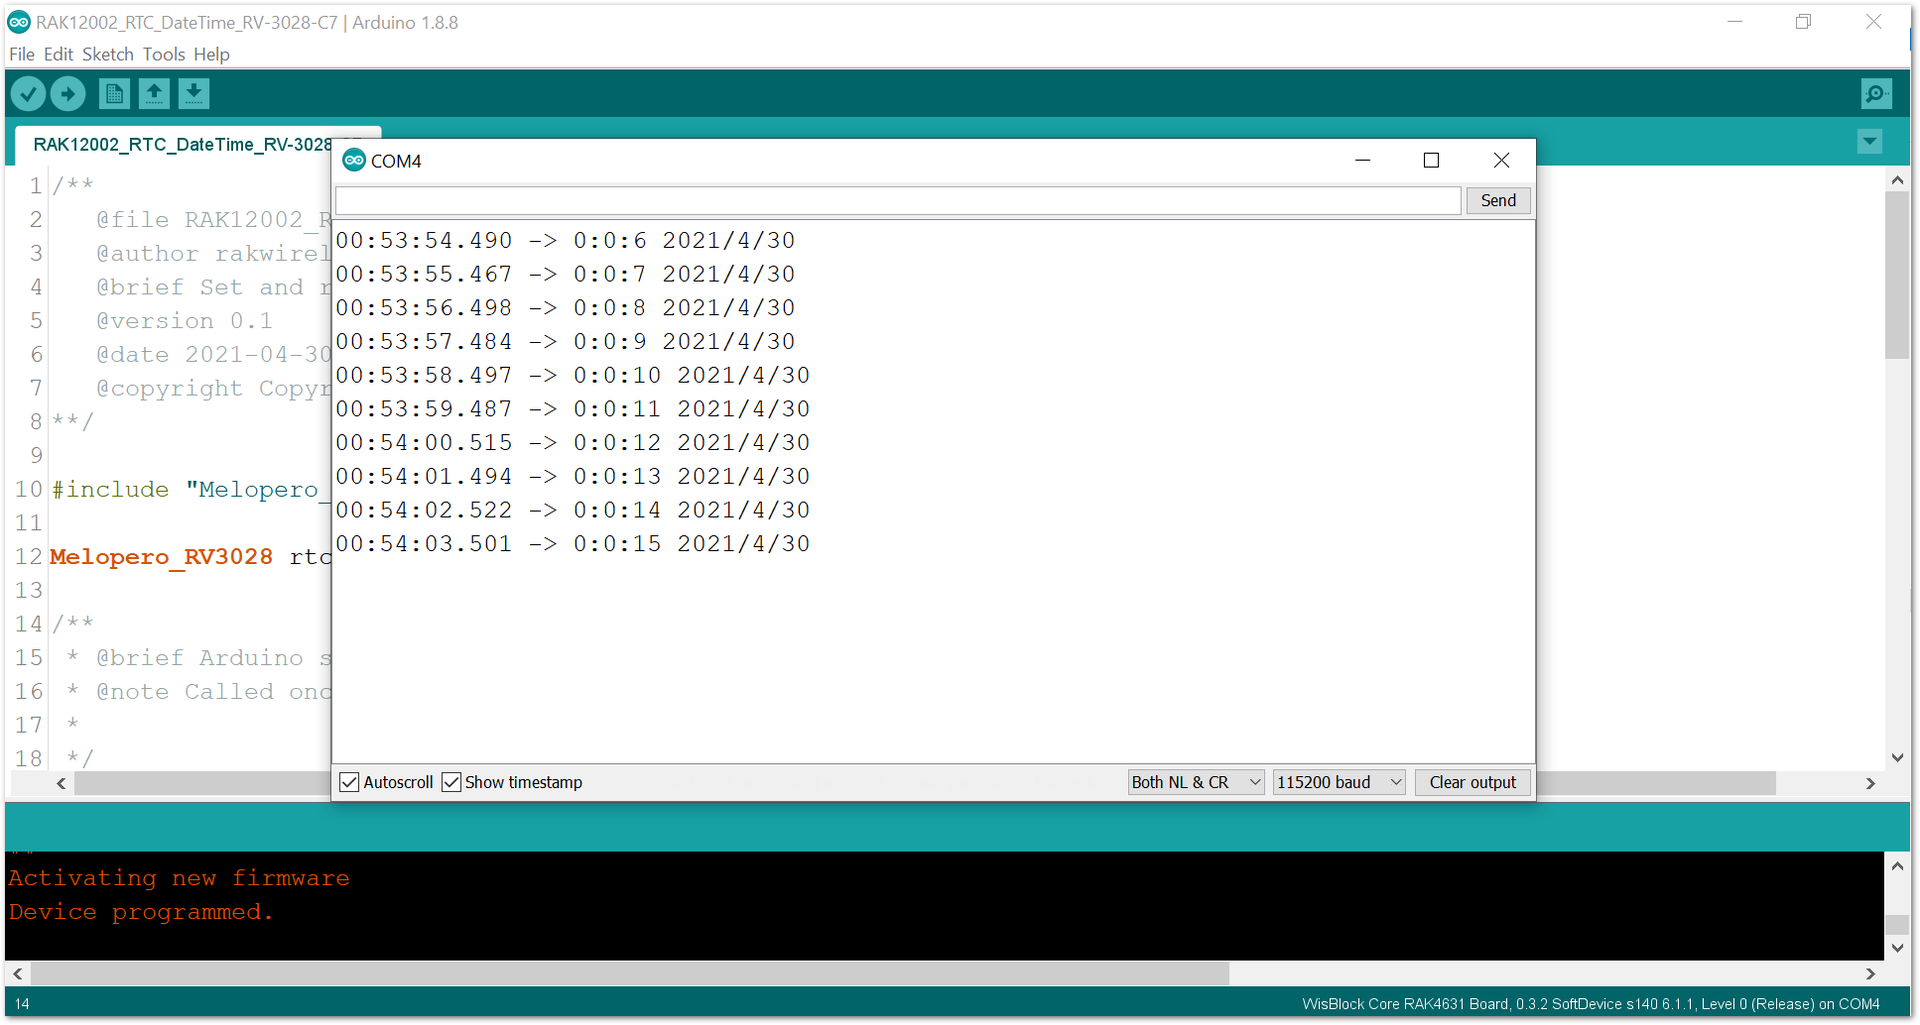 Figure 1: RAK12002 date/time logs
- You can set the time and date in the code, as shown in Figure 13 and Figure 14.
 Figure 1: Code for setting the time and date in RAK12002
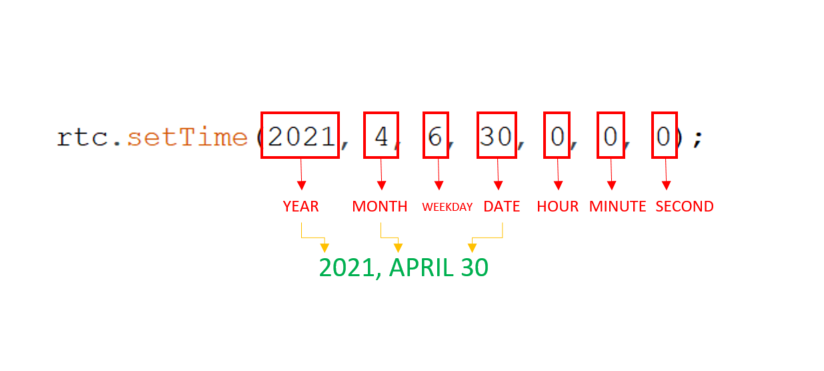 Figure 1: Time and Date format
RAK12002 in RAK11200 WisBlock Core Guide
Arduino Setup
- Select the RAK11200 WisBlock Core.
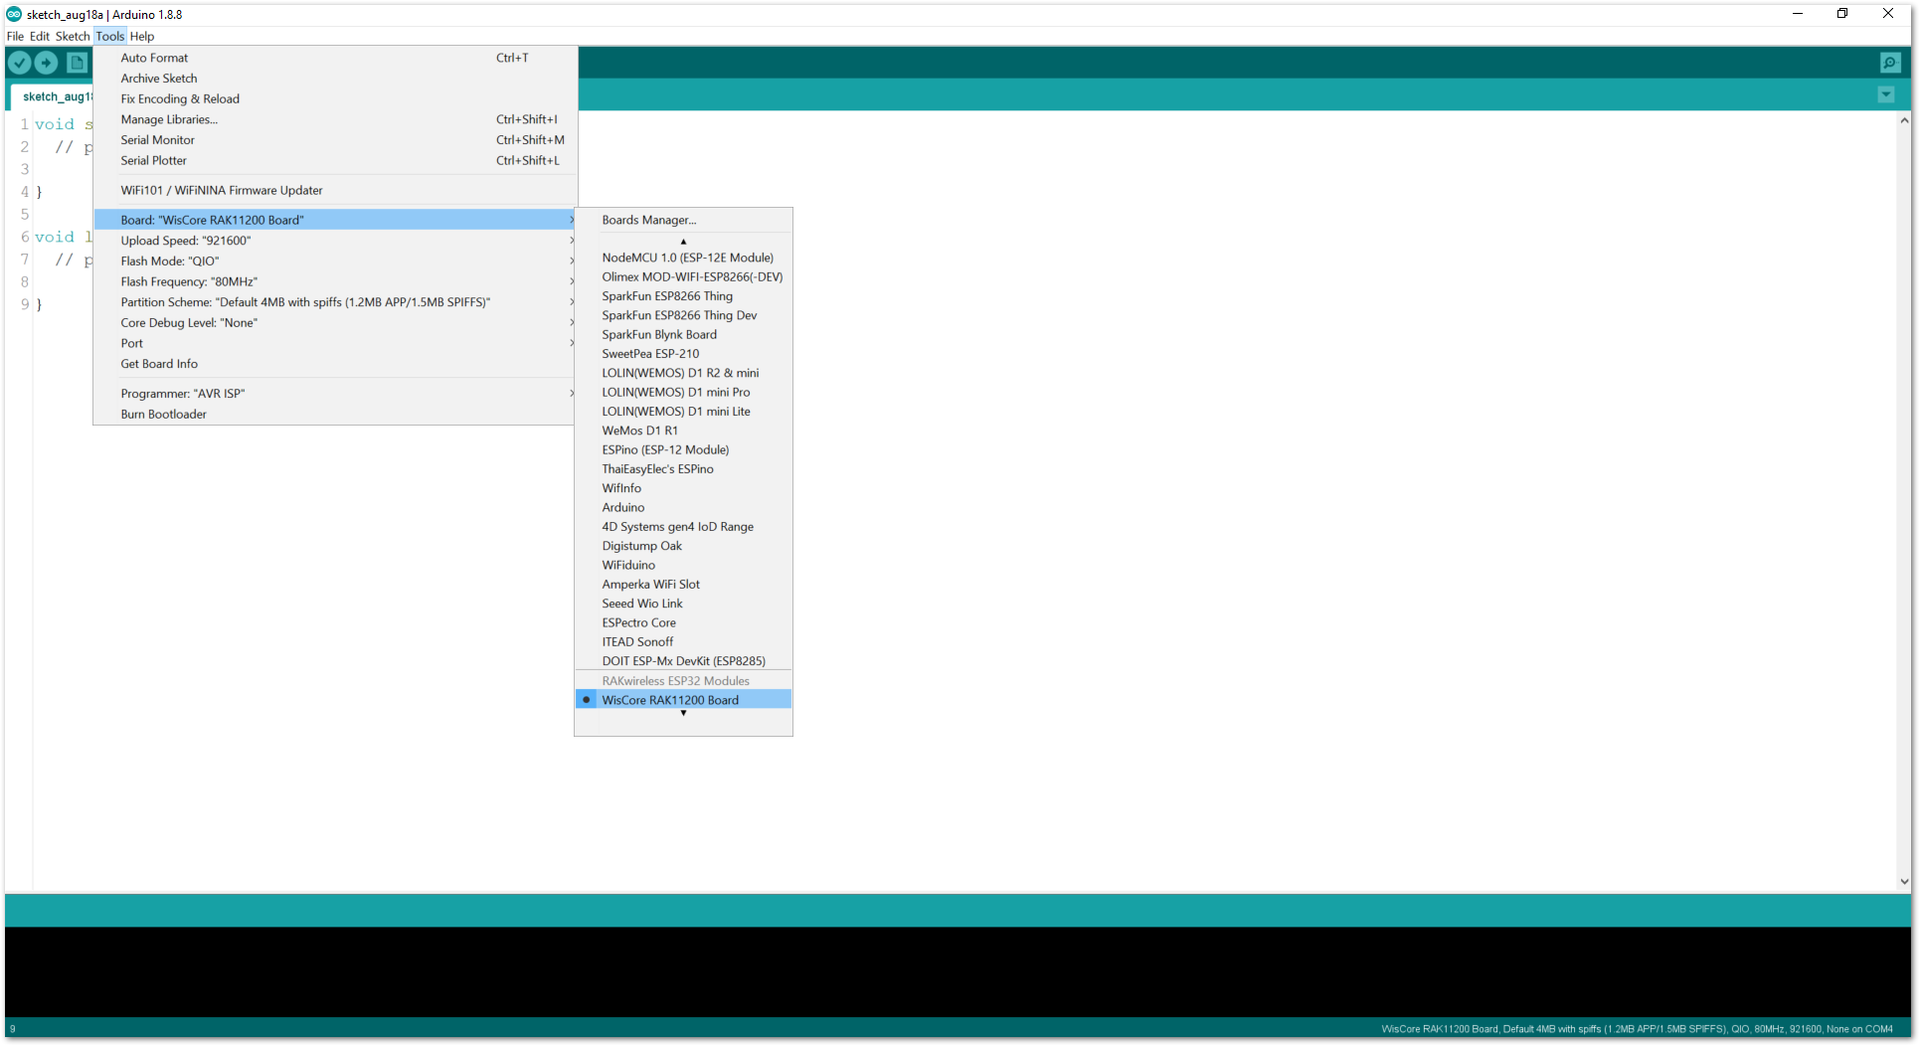 Figure 1: Selecting RAK11200 as WisBlock Core
- Next, copy the following sample code into your Arduino IDE.
Click to view the code
/**
   @file RAK12002_RTC_DateTime_RV-3028-C7.ino
   @author rakwireless.com
   @brief Set and read RTC time.
   @version 0.1
   @date 2021-04-30
   @copyright Copyright (c) 2021
**/

#include "Melopero_RV3028.h" //Click here to get the library: http://librarymanager/All#Melopero_RV3028

Melopero_RV3028 rtc;

/**
 * @brief Arduino setup function
 * @note Called once after power on or reset
 *
 */
void setup()
{
  // Initialize Serial for debug output
  time_t timeout = millis();
  Serial.begin(115200);
  while (!Serial)
  {
    if ((millis() - timeout) < 5000)
    {
      delay(100);
    }
    else
    {
      break;
    }
  }
  rtc.initDevice(); // First initialize and create the rtc device

  rtc.writeToRegister(0x35,0x00);
  rtc.writeToRegister(0x37,0xB4); //Direct Switching Mode (DSM): when VDD < VBACKUP, switchover occurs from VDD to VBACKUP

  rtc.set24HourMode();  // Set the device to use the 24hour format (default) instead of the 12 hour format

  // Set the date and time
  // year, month, weekday, date, hour, minute, second
  // Note: time is always set in 24h format
  // Note: month value ranges from 1 (Jan) to 12 (Dec)
  // Note: date value ranges from 1 to 31
  rtc.setTime(2021, 4, 6, 30, 0, 0, 0);
}

/**
 * @brief Arduino loop function
 * @note Output date and time every second
 *
 */
void loop()
{
  Serial.printf("%d:%d:%d %d/%d/%d \n",rtc.getHour(),rtc.getMinute(),rtc.getSecond(),rtc.getYear(),rtc.getMonth(),rtc.getDate());
  delay(1000);
}
If you experience any error in compiling the example sketch, check the updated code for the RAK11200 WisBlock Core Module that can be found on the RAK12002 WisBlock Example Code Repository
- Click the link to locate the library.
 Figure 1: Locating the required library in the Library Manager
- Install the required library, as shown in Figure 17.
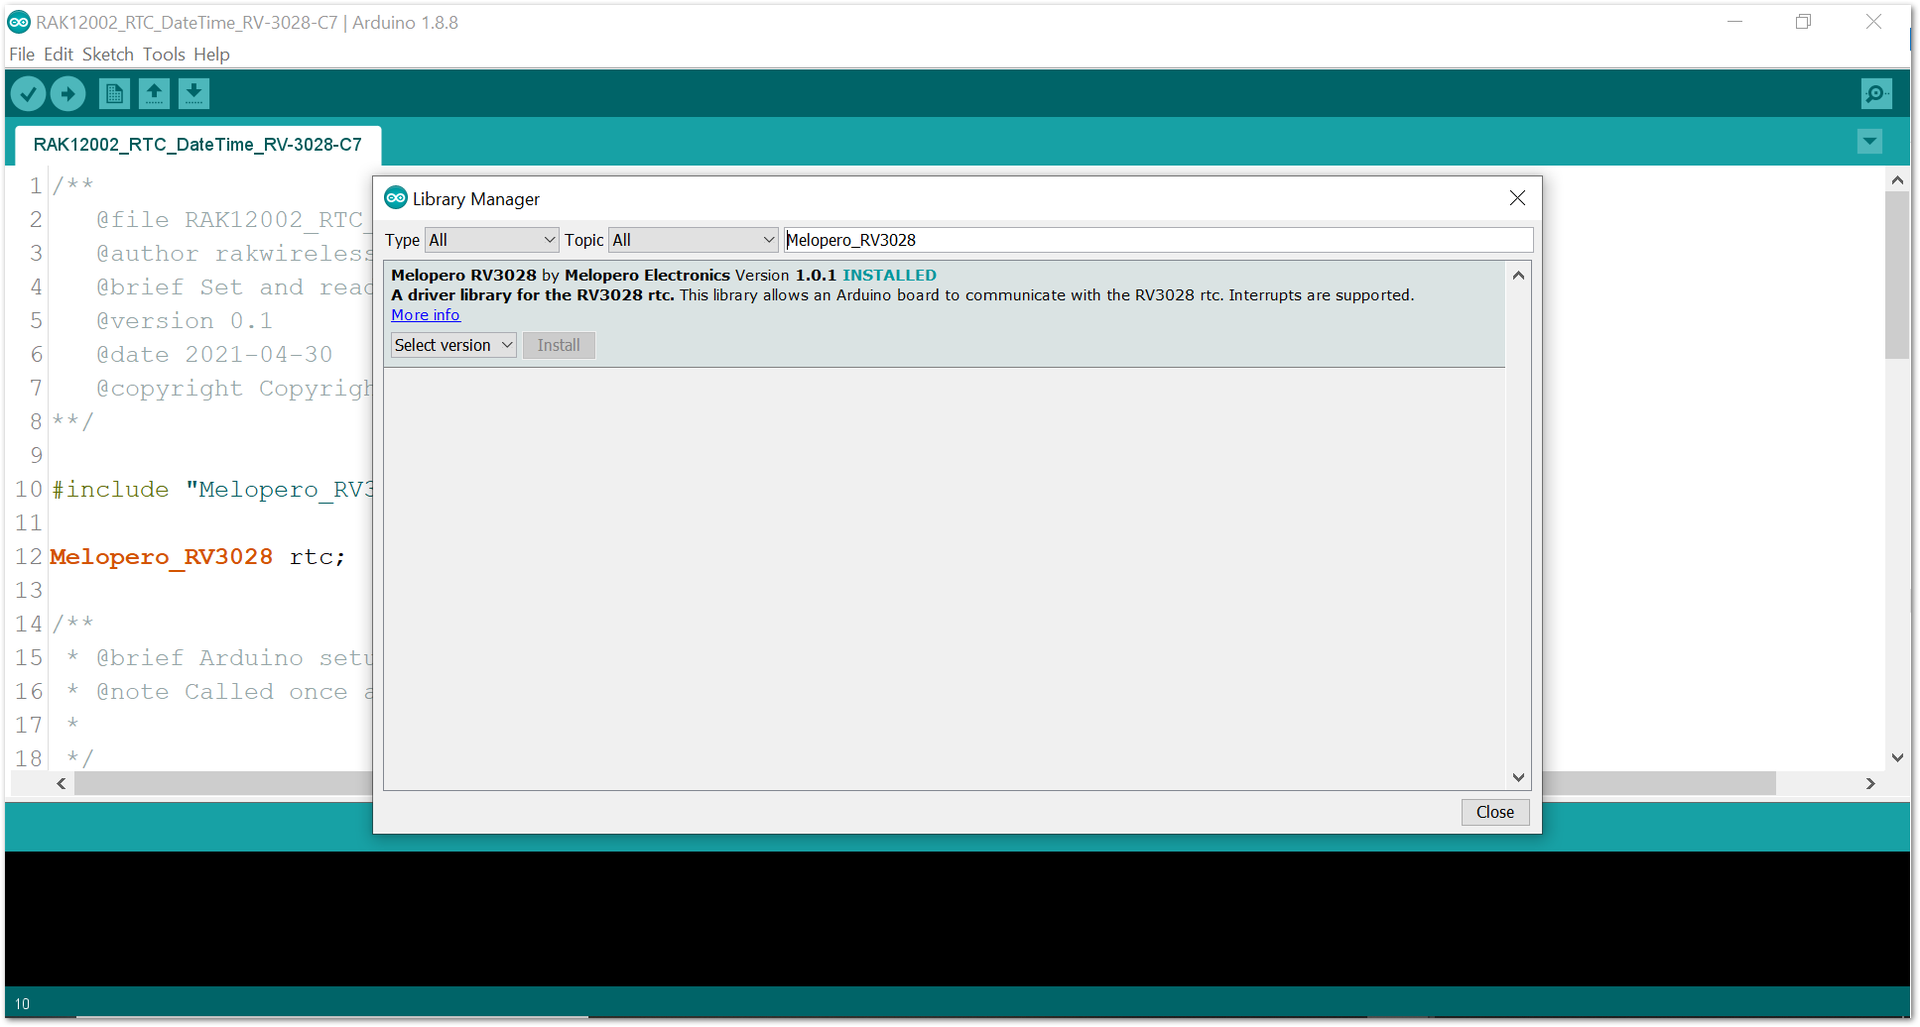 Figure 1: Installing the Library
- Select the correct port and upload your code, as shown in Figure 18 and Figure 19.
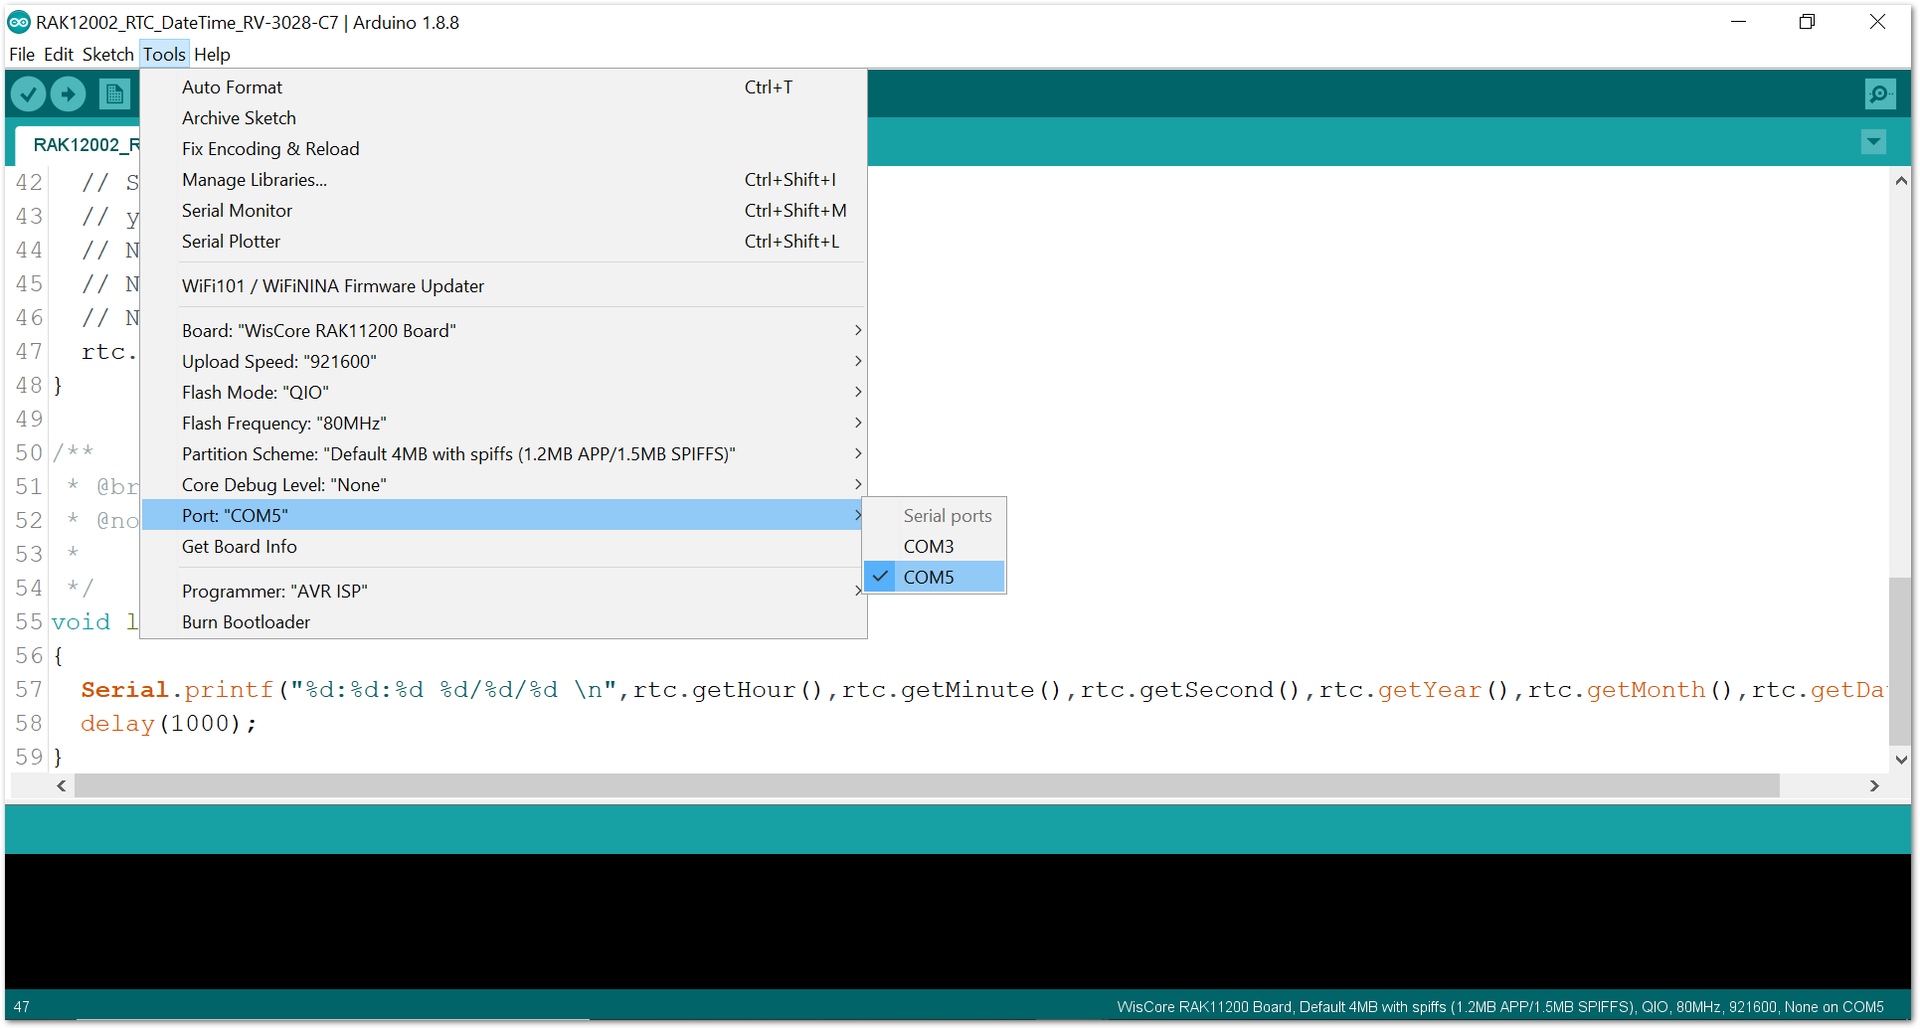 Figure 1: Selecting the correct Serial Port
 Figure 1: Uploading code
RAK11200 requires the BOOT0 pin to be configured properly before uploading. If not done properly, uploading the source code to RAK11200 will fail. Check the full details on the RAK11200 Quick Start Guide.
- When you successfully uploaded the example sketch, open the Serial Monitor of the Arduino IDE to see the RAK12002 date/time logs, as shown in Figure 20. You will be able to see the Time and Date in the Serial Monitor.
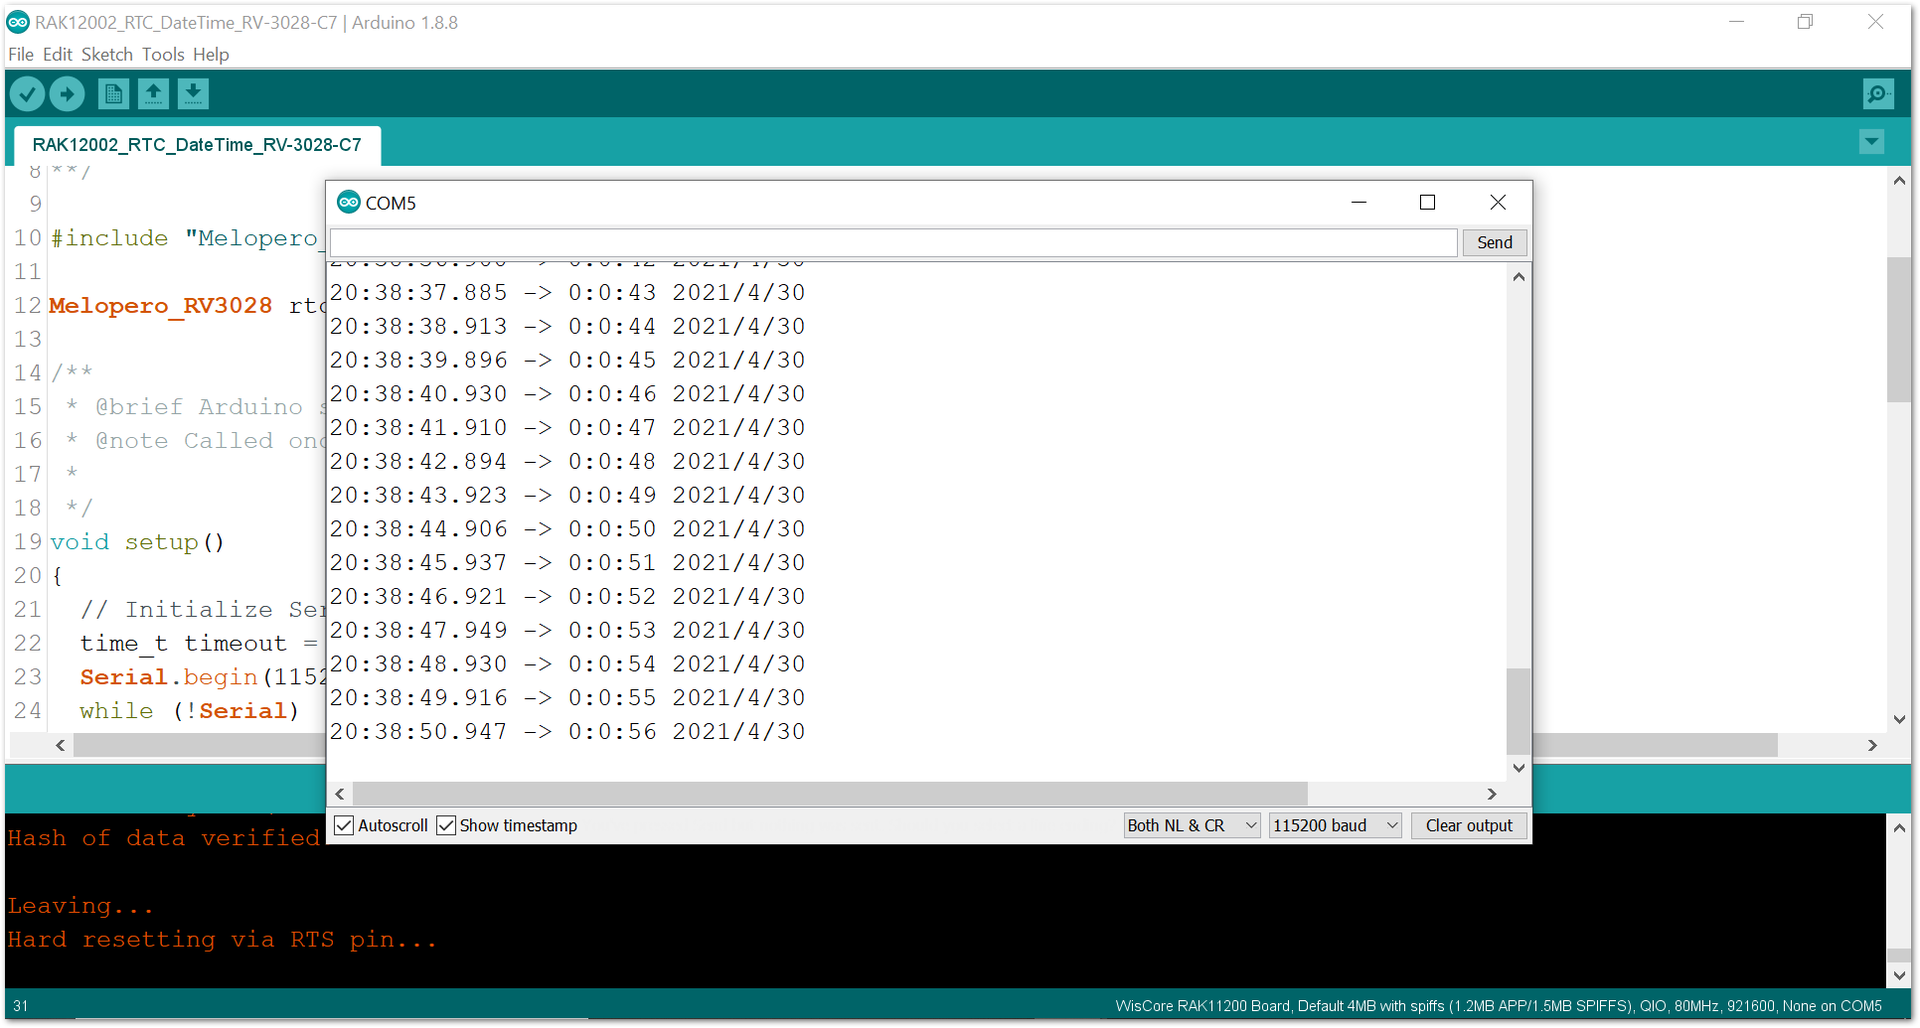 Figure 1: RAK12002 date/time logs
- You can set the time and date in the code, as shown in Figure 21 and Figure 22.
Figure 1: Code for setting the time and date in RAK12002Figure 1: Time and Date formatRAK12002 in RAK11300 WisBlock Core Guide
Arduino Setup
- Select the RAK11300 WisBlock Core, as shown in Figure 23.
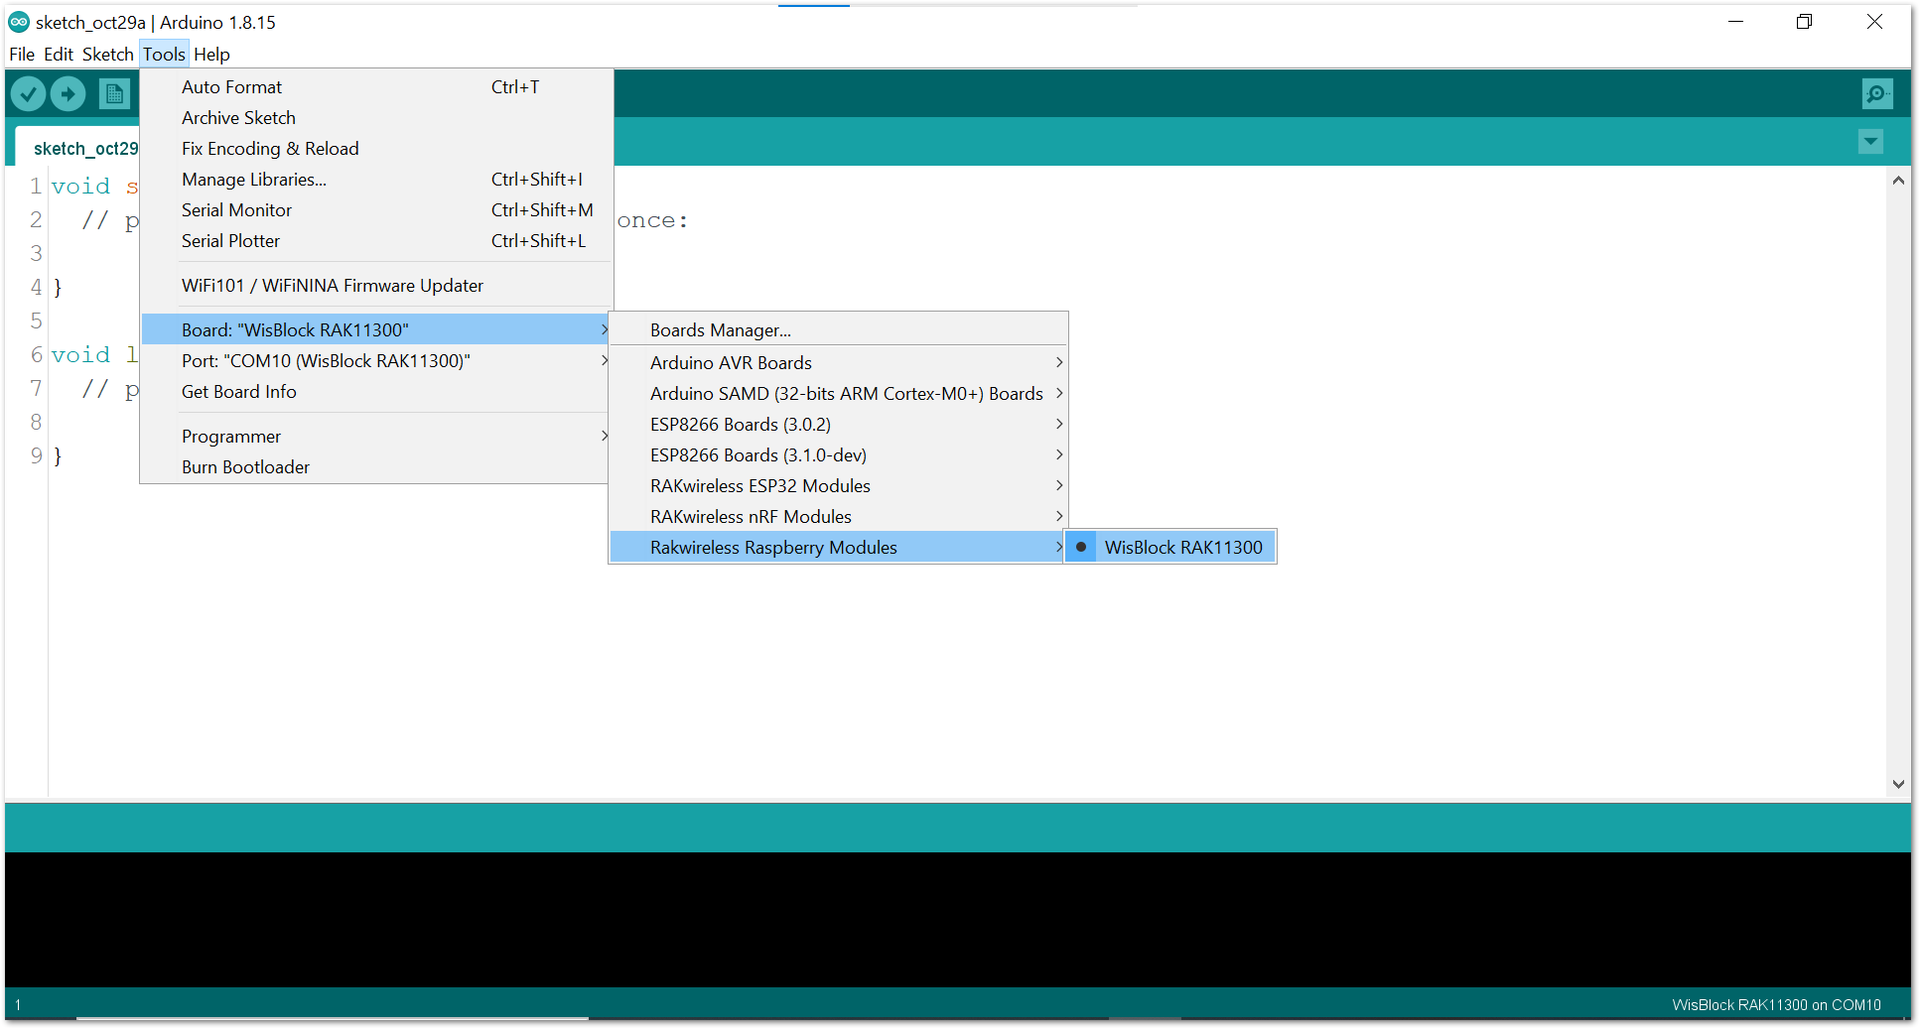 Figure 1: Selecting RAK11300 as WisBlock Core
- Next, copy the following sample code into your Arduino IDE:
/**
   @file RAK12002_RTC_DateTime_RV-3028-C7.ino
   @author rakwireless.com
   @brief Set and read RTC time.
   @version 0.1
   @date 2021-04-30
   @copyright Copyright (c) 2021
**/

#include "Melopero_RV3028.h" //Click here to get the library: http://librarymanager/All#Melopero_RV3028

Melopero_RV3028 rtc;

/**
 * @brief Arduino setup function
 * @note Called once after power on or reset
 *
 */
void setup()
{
  // Initialize Serial for debug output
  time_t timeout = millis();
  Serial.begin(115200);
  while (!Serial)
  {
    if ((millis() - timeout) < 5000)
    {
      delay(100);
    }
    else
    {
      break;
    }
  }
  rtc.initDevice(); // First initialize and create the rtc device

  rtc.writeToRegister(0x35,0x00);
  rtc.writeToRegister(0x37,0xB4); //Direct Switching Mode (DSM): when VDD < VBACKUP, switchover occurs from VDD to VBACKUP

  rtc.set24HourMode();  // Set the device to use the 24hour format (default) instead of the 12 hour format

  // Set the date and time
  // year, month, weekday, date, hour, minute, second
  // Note: time is always set in 24h format
  // Note: month value ranges from 1 (Jan) to 12 (Dec)
  // Note: date value ranges from 1 to 31
  rtc.setTime(2021, 4, 6, 30, 0, 0, 0);
}

/**
 * @brief Arduino loop function
 * @note Output date and time every second
 *
 */
void loop()
{
  Serial.printf("%d:%d:%d %d/%d/%d \n",rtc.getHour(),rtc.getMinute(),rtc.getSecond(),rtc.getYear(),rtc.getMonth(),rtc.getDate());
  delay(1000);
}
If you experience any error in compiling the example sketch, check the updated code for the RAK11300 WisBlock Core Module that can be found on the RAK12002 WisBlock Example Code Repository.
- Click the link to locate the library, as shown in Figure 24.
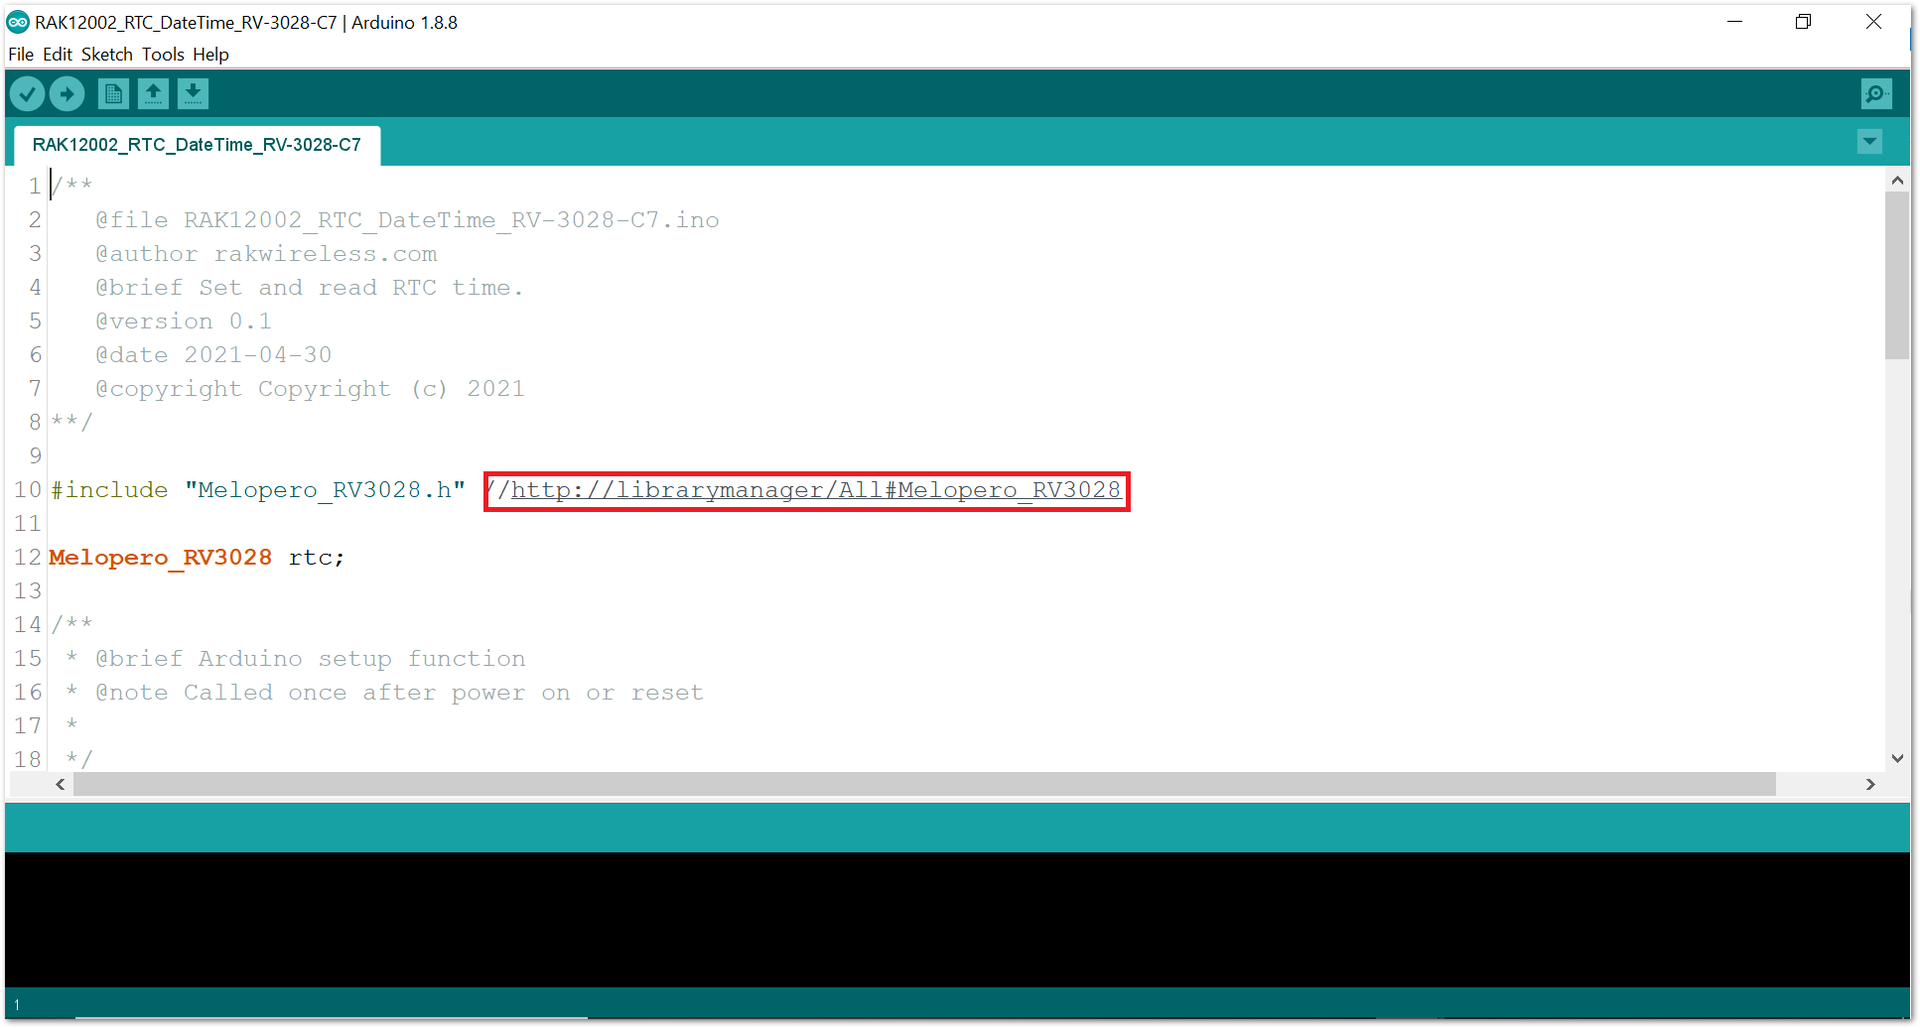 Figure 1: Locating the required library in the Library Manager
- Install the required library, as shown in Figure 25.
 Figure 1: Installing the Library
- Select the correct port and upload your code, as shown in Figure 26 and Figure 27.
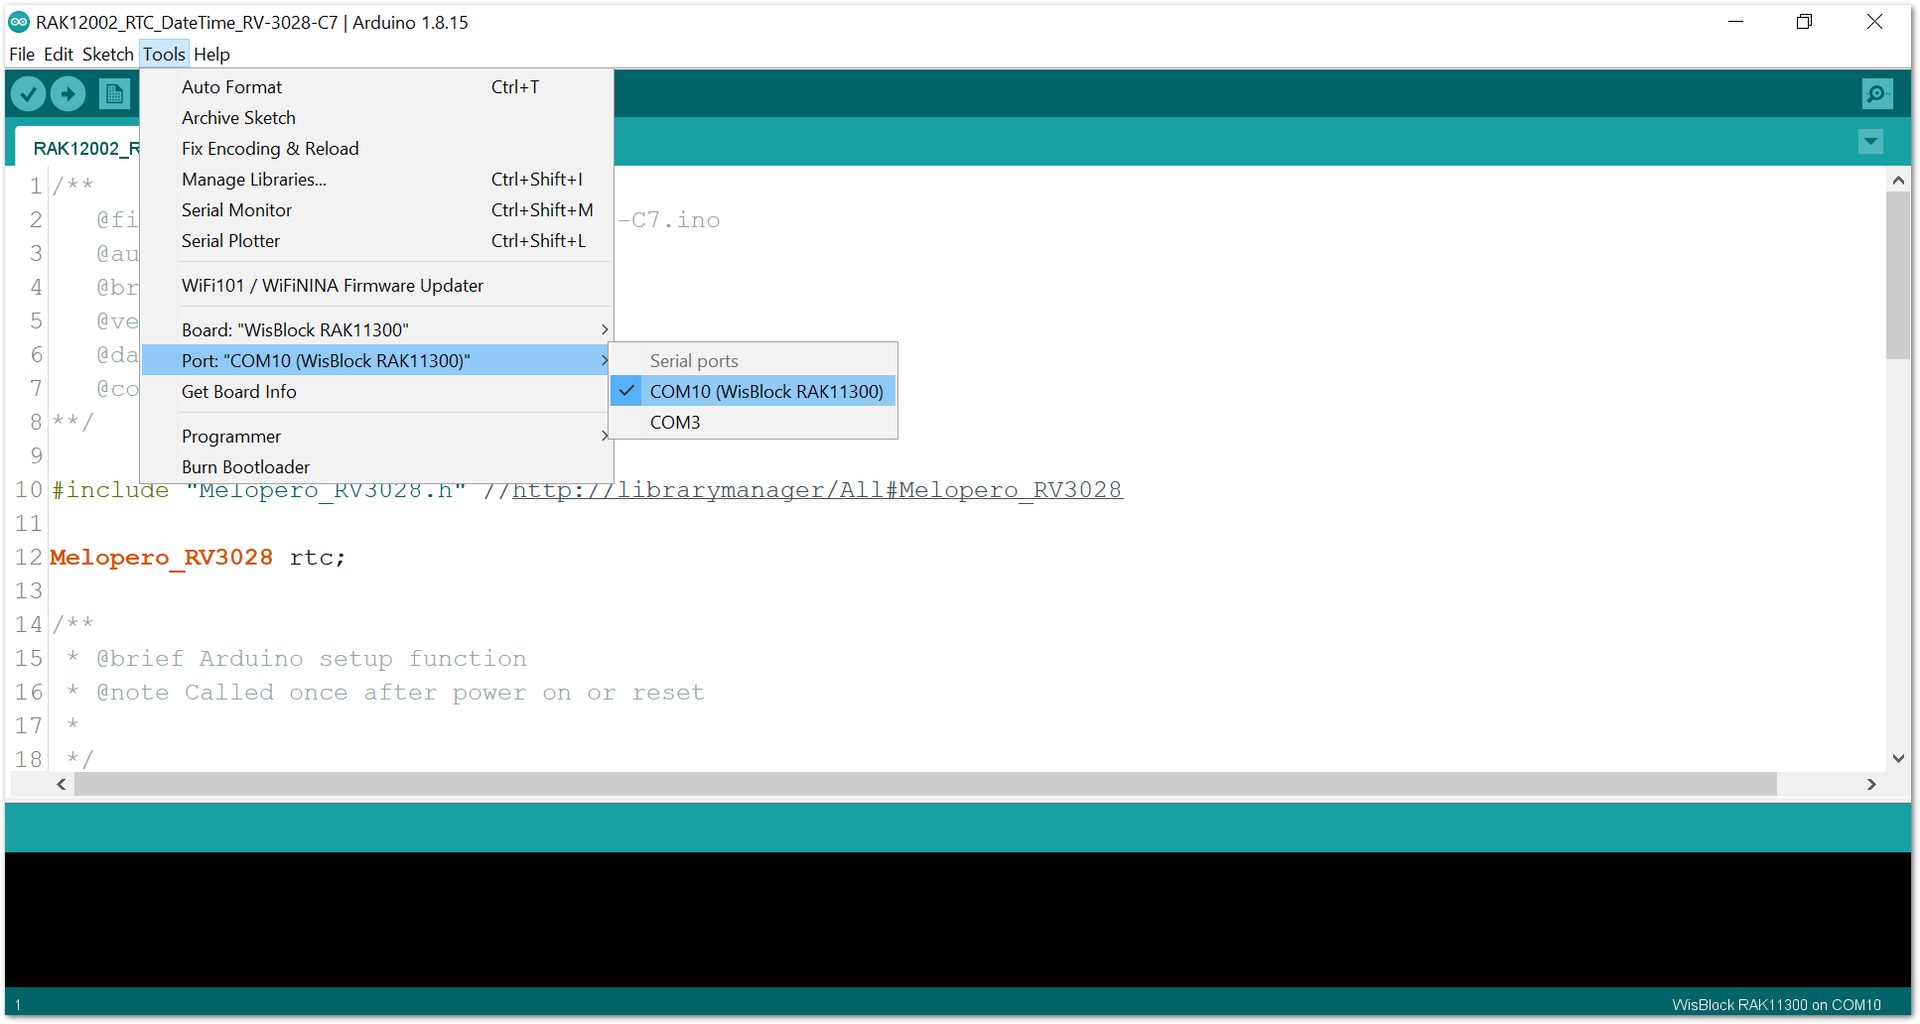 Figure 1: Selecting the correct Serial Port
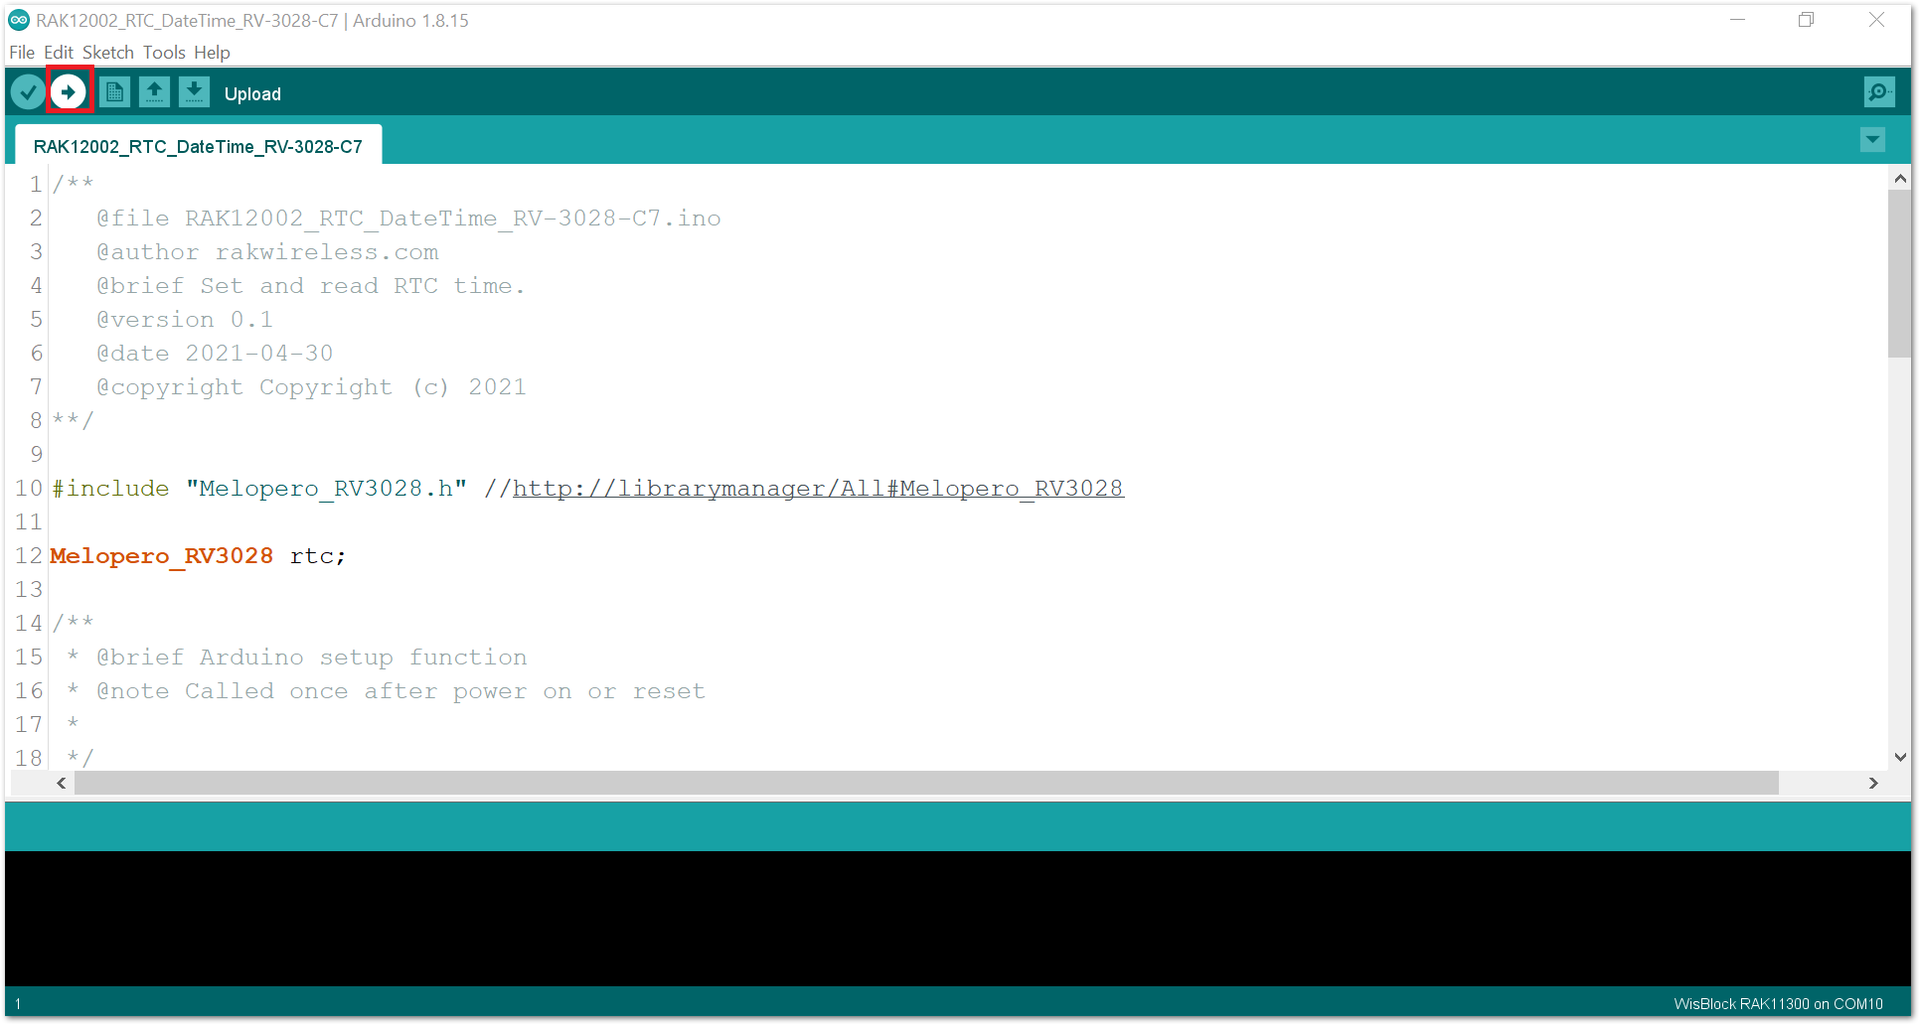 Figure 1: Uploading code
- When you successfully uploaded the example sketch, open the Serial Monitor of the Arduino IDE to see the RAK12002 date/time logs, as shown in Figure 28. You will be able to see the Time and Date in the Serial Monitor.
Figure 1: RAK12002 date/time logs- You can set the time and date in the code, as shown in Figure 29 and Figure 30.
Figure 1: Code for setting the time and date in RAK12002Figure 1: Time and Date format