RAK4631-R WisBlock LoRaWAN Module Device Firmware Upgrade
There will be situations that you need to update the firmware of your RAK4631-R. Also, there are times when you want to reupload the firmware on your device to ensure that everything is set properly.
Updating the Firmware of RAK4631-R WisBlock Core can be done via USB connection or wirelessly using BLE via OTA DFU (Over-the-Air Device Firmware Upgrade). These methods are discussed in this guide.
You can also update the firmware of the RAK4631 WisBlock Core to RAK4631-R, which supports RUI3, and vice versa.
This section covers:
- Firmware Update via USB
- Firmware Update via BLE Using OTA DFU
- RAK4631 (Arduino BSP) to RAK4631-R (RUI3) Conversion and Vice Versa
Prerequisites
- nRFutil utility program
- adafruit-nrfutil.exe (you need to unzip the downloaded file)
- nRF Connect Mobile application
- RUI3 firmware for RAK4630 Upgrade
- Latest RAK4631-R FW DFU Distribution Package
Firmware Update via USB
After connecting your RAK4631-R to WisBlock Base, you can immediately update its firmware via USB.
For Windows
- Check the FW version of your RAK4631-R. If it is not the latest firmware version (you can check the FW change logs), you can update the firmware of your device.
- Create a new folder in your
C:\drive namedRAK4631-R Update. - Download the nRFutil.exe and the latest DFU Package. Once you have downloaded both files, put them in the
RAK4631-R Updatefolder you created as shown in Figure 1.
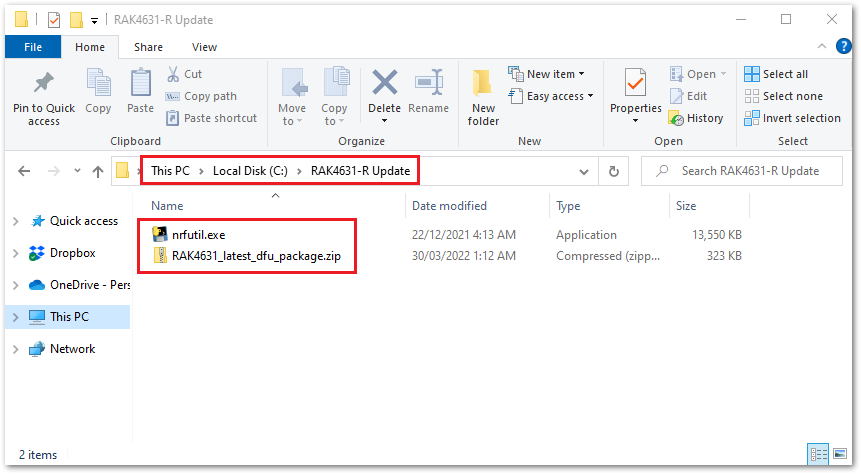 Figure 1: nRFutil.exe and RAK4631-R Latest Firmware
- Connect the RAK4631-R via USB and check whether the port has been detected in device manager. In this guide it is detected as COM32. The COM port number is not fixed and can be different depending on the PC. If no port is shown in device manager, you can try to double click reset button on the WisBlock Base and check again.
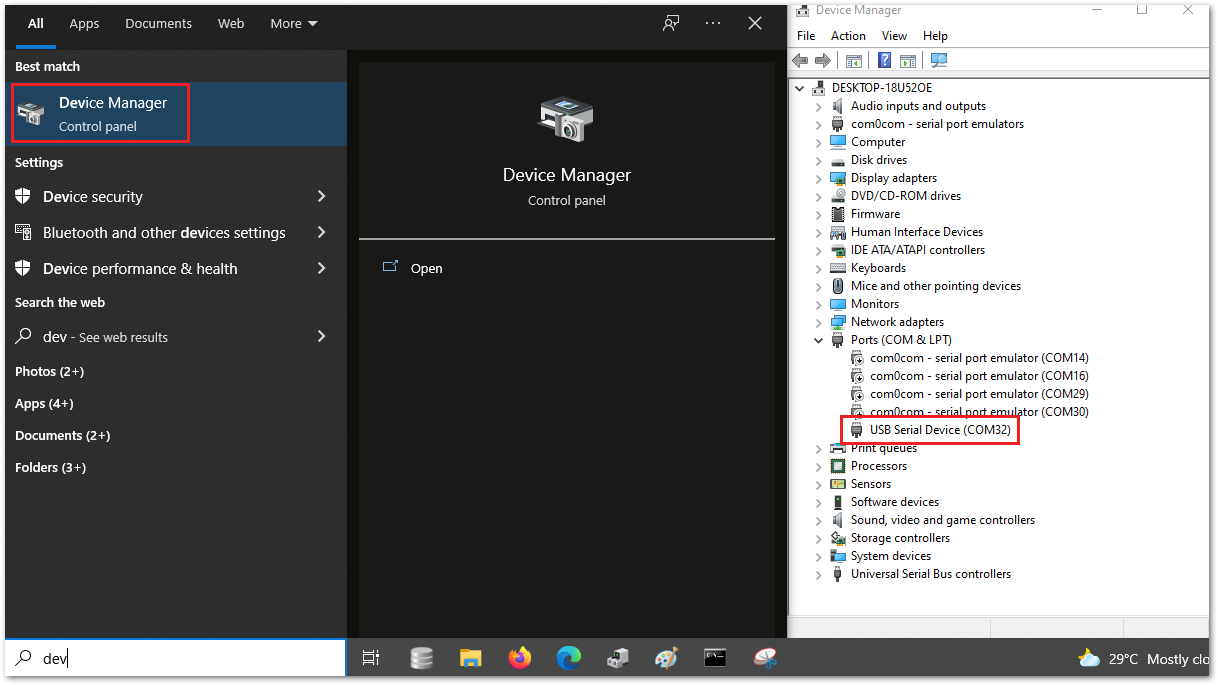 Figure 1: Checking COM Port via Device Manager
- After that, you need to send the
AT+BOOTcommand to the device. You can follow the guide on using Tera Term but instead of checking the firmware version, you have to inputAT+BOOT. You will not receive a response because the module will restart and temporarily disconnect before re-establishing the connection to Tera Term.
You have to disconnect the device connection to Tera Term or close it so that the COM port will be free when you do the firmware update on the next step. Otherwise, an error may occur during the firmware update.
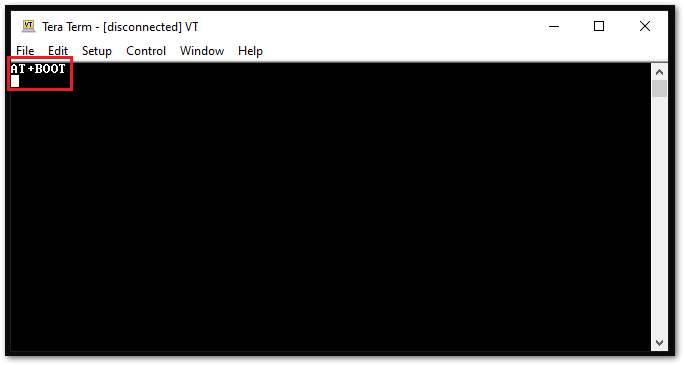 Figure 1: AT+BOOT to Initialize Boot Mode
- Next to initiating Boot mode, you can now execute the firmware update. To update the firmware, open the command prompt and ensure you're in the folder where you place the nRFutil and the latest firmware.
For this guide, it is in the RAK4631-R Update folder directory. Then, input the following:
cd C:/RAK4631-R Update/nrfutil.exe dfu serial -pkg RAK4631_latest_dfu_package.zip -p COM32
Make sure that you have the right .zip file name and COM port number to avoid errors.
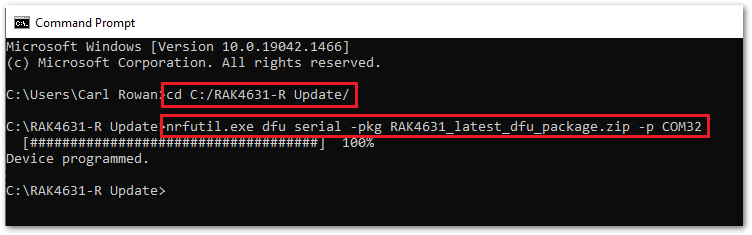 Figure 1: FW Update Using nRFutil
- You can now check if the firmware is successful updated by using
AT+VER=?command. To check the firmware version and confirm if the device is updated, follow the guide on Tera Term.
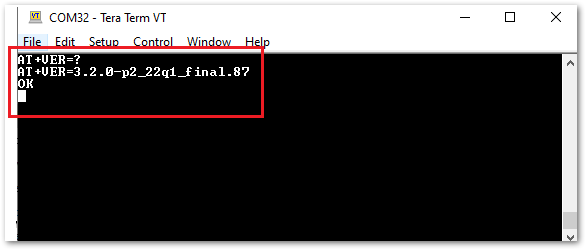 Figure 1: RAK4631-R Latest Firmware Version Check
For Linux
Perform the four steps described in the next section Setup the Linux Environment.
Setup the Linux Environment
- First, open a new terminal, then install all dependencies.
sudo apt-get update
sudo apt-get install net-tools git curl python xclip python3-pip
- The following prerequisite must be installed:
Python 3.7or later. Check your Python version, as shown in Figure 6:
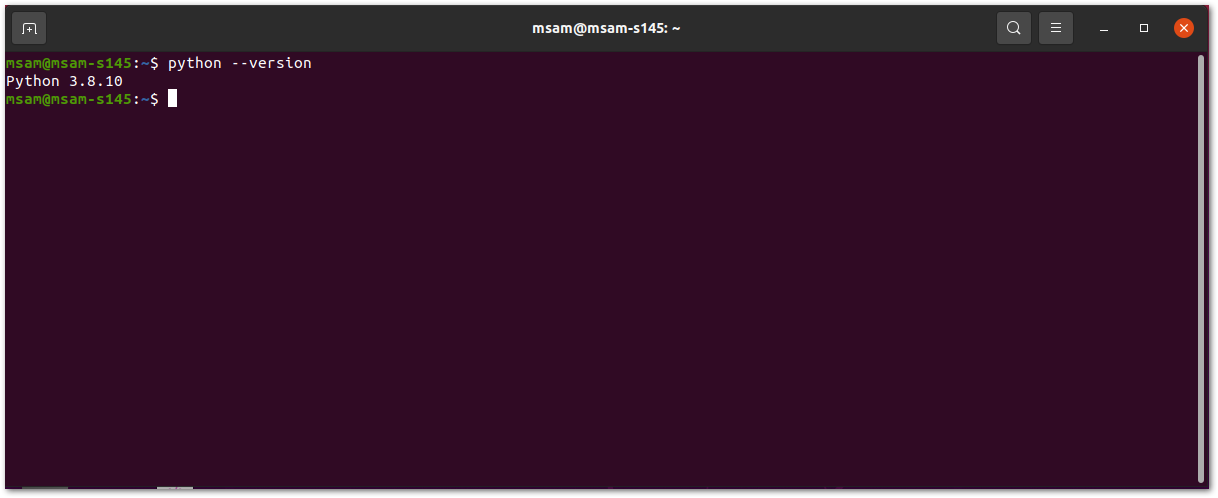 Figure 1: Check Python version
- Add
.localfolder to Linux$PATHvariable.
export PATH="$HOME/.local:$PATH"
- Now, you can install
adafruit-nrfutilandnrfutil.
nrfutil and adafruit-nrfutil are available as a package in the Python Package Index (PyPI). Execute the following commands:
sudo apt-get update
pip3 install nrfutil --user
pip3 install adafruit-nrfutil==0.5.3.post16 --user
Execute the Firmware Update via USB
- Download the zip file DFU Distribution Package.
When you connect the RAK4631-R to a Linux computer via USB, you will see the related information "cdc_acm 1-1:1.0: ttyACM0: USB ACM device" from the dmesg command.
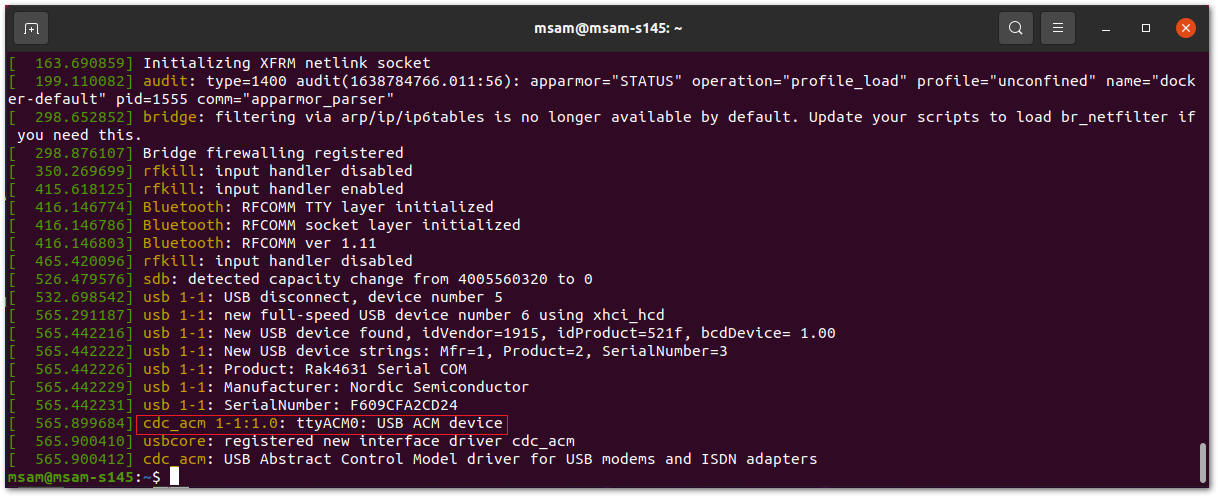 Figure 1: Checking USB CDC device using dmesg command
In this case, the RAK4631-R USB CDC device name is /dev/ttyACM0.
-
Perform the steps described in the section Setup the Device Console Port in Linux.
-
On minicom, enter the following AT command:
AT+BOOT
- Now, open the terminal shell go to the directory where you put the DFU Distribution Package. After that, execute the following command:
nrfutil dfu usb-serial -pkg RAK4631_latest_dfu_package.zip -p /dev/ttyACM0
Set Up the Device Console Port in Linux
- Install the minicom using the following commands:
sudo apt-get update
sudo apt-get install minicom
- Open the minicom terminal utility with the ttyACM0 interface.
Enter the following code: minicom -D /dev/ttyACM0
Checking the Device Firmware Version
To check the device firmware version in the minicom console, enter the following AT command:
AT+VER=?
You should see then the current FW version of the module.
For MacOS
-
Download nrfutil. Usually, the
nrfutil-mac.1file will go to the downloads folder. This section assumes any downloaded file goes to downloads folder. -
Open the terminal and go to the downloads directory or the location where you put the downloaded file. You have to change the
usernamebased on your machine. In this guide,appleis used as the user.
cd /Users/username/Downloads
- Make the
nrfutil-mac.1executable.
chmod +x nrfutil-mac.1
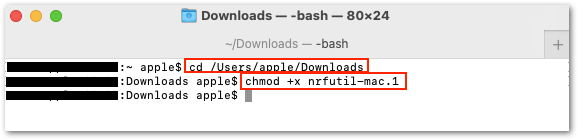 Figure 1: Download nrfutil for macOS
- You also need to determine the port name of the RAK4631-R using the command:
ls /dev/cu.*
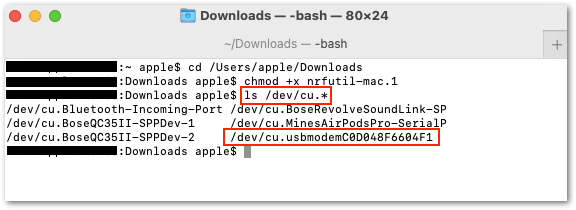 Figure 1: Check the port
-
Download the RAK4631-R Firmware. Usually, the
RAK4631_latest_dfu_package.zipfile will go to the downloads folder. -
Open a serial terminal software and run
AT+BOOTto enable bootloader mode of RAK4631-R.
AT+BOOT
- You can now execute the firmware update.
- The
nrfutil-mac.1must be on the same folder with theRAK4631_latest_dfu_package.zip. In this guide it is Downloads folder. - You should be connected on the right port. The port name in your computer might be different than the one in this guide.
- It might take a while for the update. Do not remove the USB or terminate the terminal application while doing the uploading process.
./nrfutil-mac.1 dfu usb-serial -pkg RAK4631_latest_dfu_package.zip -p /dev/cu.usbmodemC0D048F6604F1
Firmware Update Using BLE via OTA DFU
This section covers how to update your RAK4631-R firmware wirelessly via BLE. First, you need to download and install the nRF Connect developed by Nordic Semiconductor. The App is available both in Play Store and App Store.
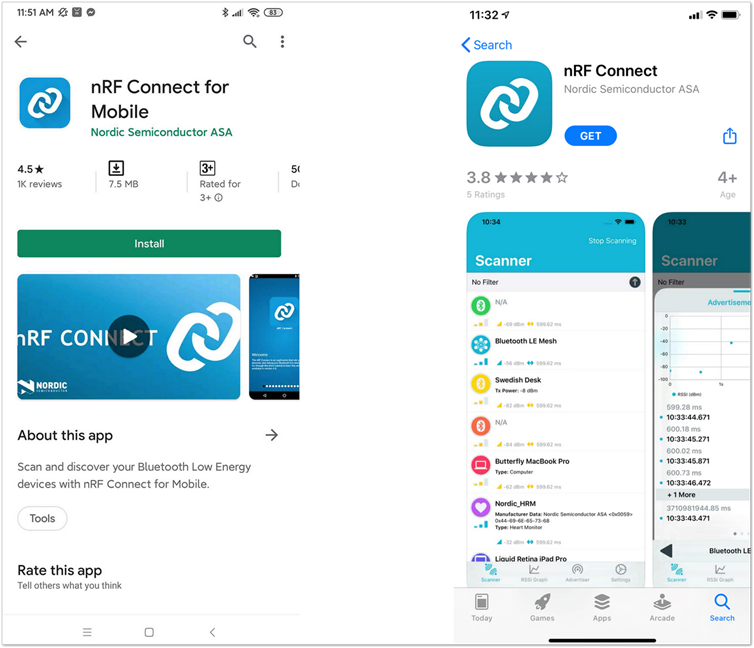 Figure 1: nRF Connect App available in Play Store and App Store
For iOS
OTA DFU over BLE
- Download the DFU package of the RAK4631-R and save it on your mobile phone.
You can upload the Distribution packet (ZIP) file to iCloud Services and download it to your smartphone.
Make sure the Bluetooth on your mobile is on.
- Press the reset button and wait for a couple of seconds.
- Open the nRF Connect mobile application. You will see all the BLE devices in range in the Scanner list.
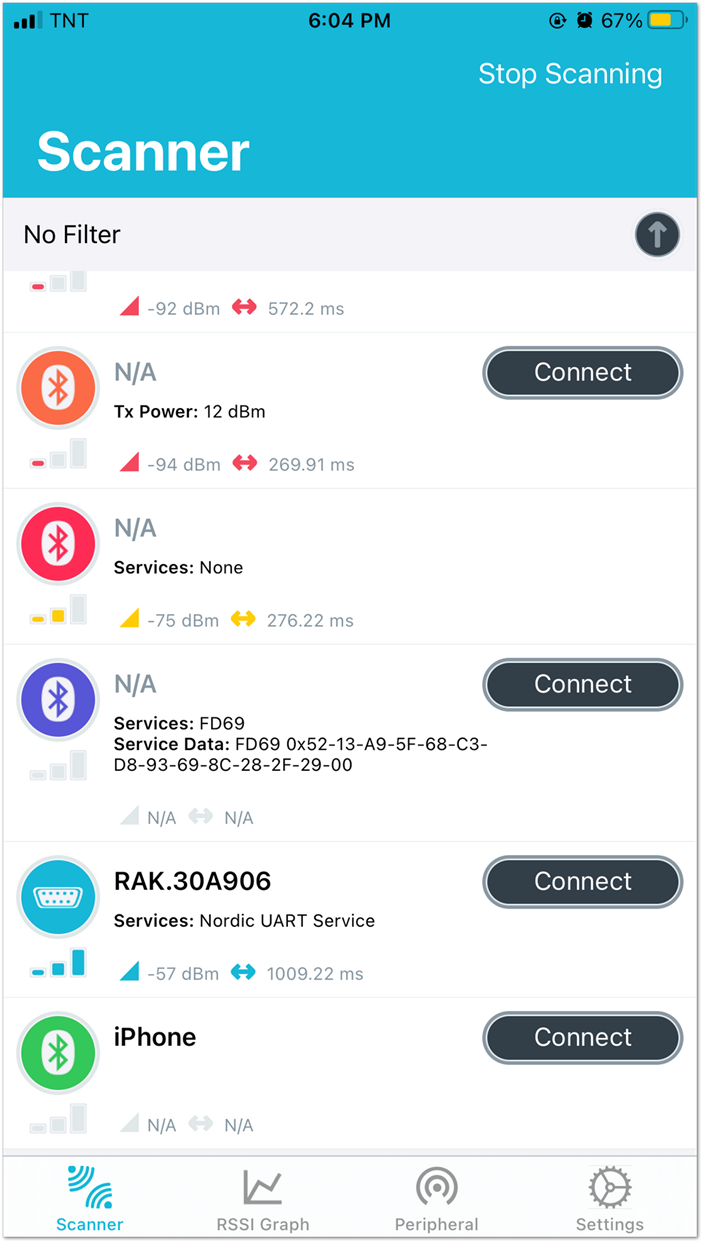 Figure 1: Available Bluetooth Devices
- Look for a BLE Device named RAK.XXXXXX in the scanner list of the app. Connect to this device and then click on the Client tab.
By default, the BLE signal of the RAK4631-R is turned off automatically if no connection is established after 60 seconds. Connect to RAK.XXXXXX immediately after pressing the reset button.
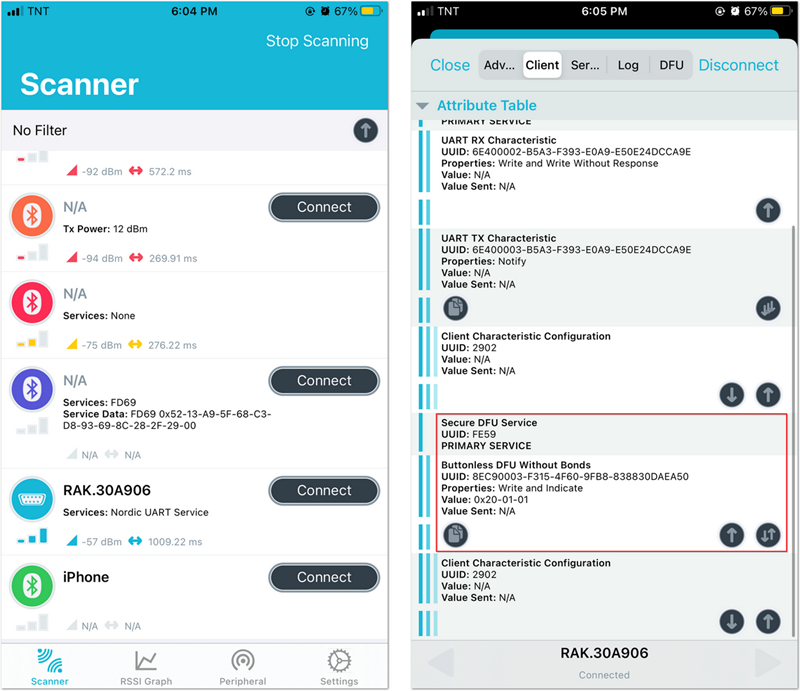 Figure 1: Secure DFU Service
- Choose "Secure DFU Service" and click the button highlighted in red, as shown in Figure 13.
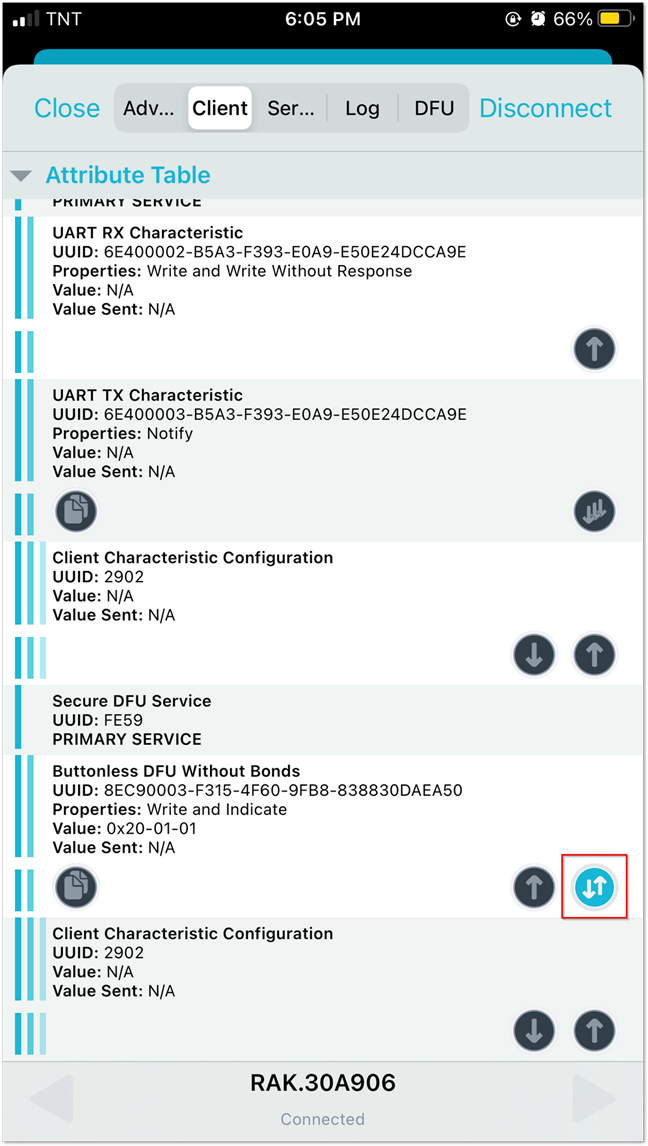 Figure 1: Buttonless DFU
- A Write Value window will pop up. Select Bool tab, move the switch from
FalsetoTruethen press Write button.
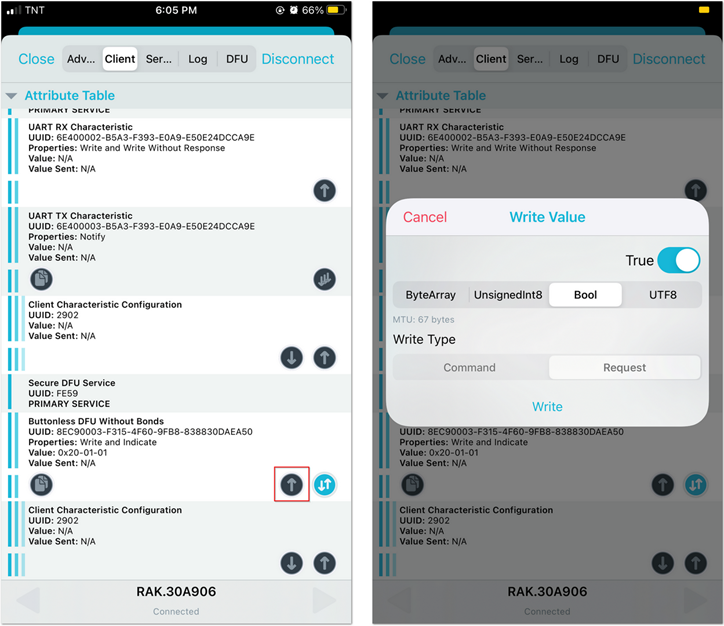 Figure 1: Resetting the Bootloader via Bluetooth
- Now, the RAK4631-R is now working in DFU Mode. In the application, you will see the default status overview of RAK4631-R.
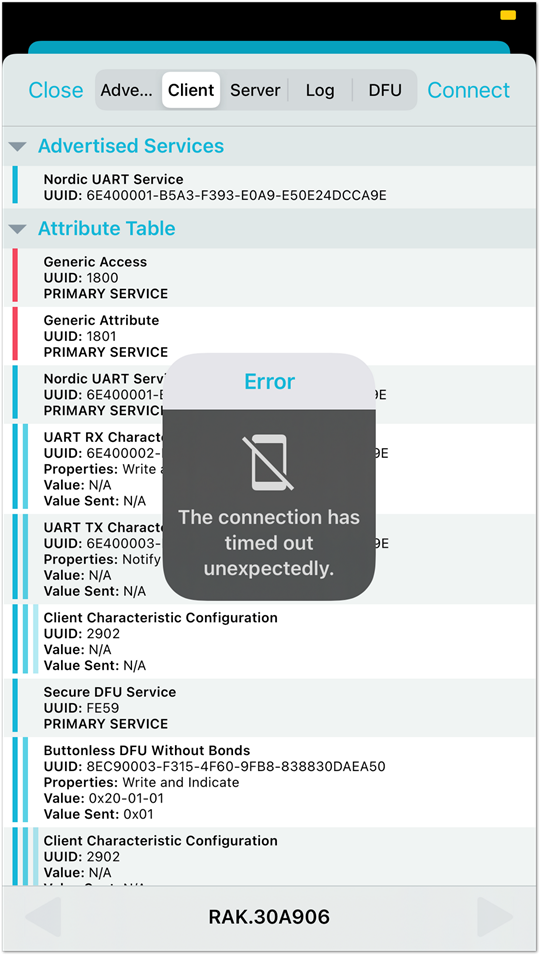 Figure 1: RAK4631-R default status overview after resetting
- In the Scanner list, find a BLE device named DfuTarg and then click the Connect button.
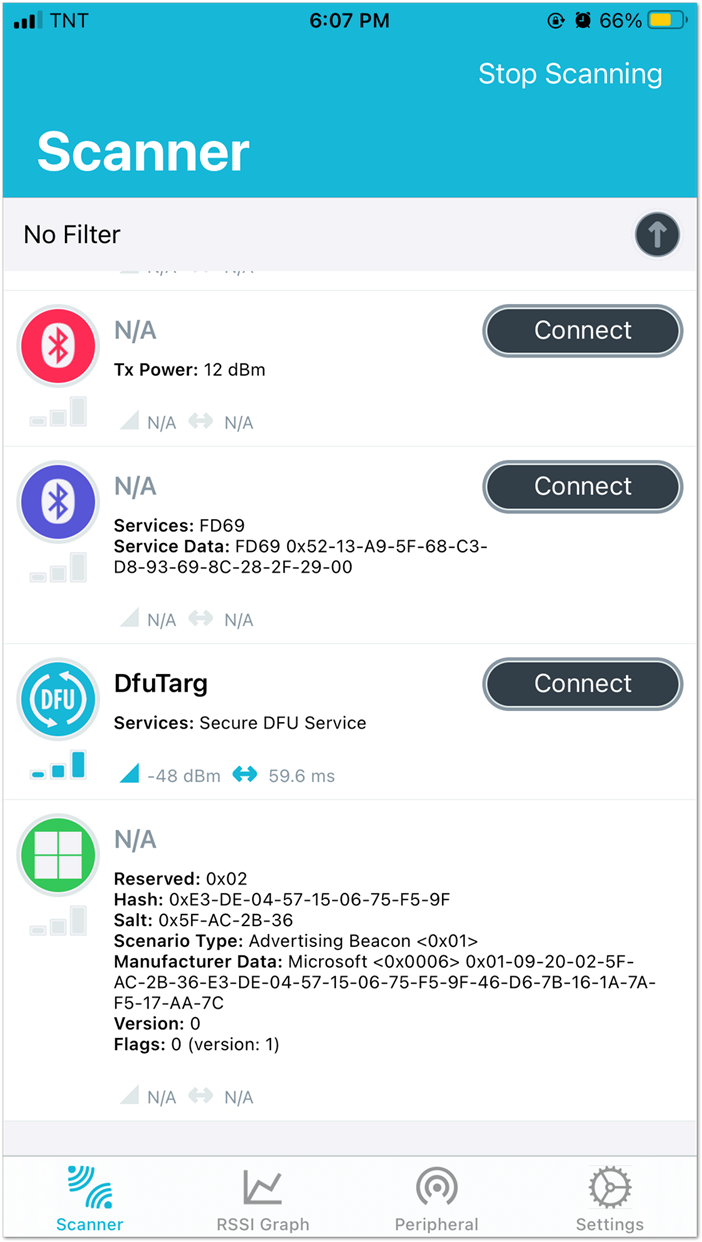 Figure 1: RAK4631-R Default Bluetooth ID after Resetting
- After connecting, select the DFU tab, then click Open Document Picker. This will prompt you to select the Distribution packet zip file of the firmware you have downloaded. Press OK, and it will automatically start to upgrade the firmware of your RAK4631-R through DFU over BLE.
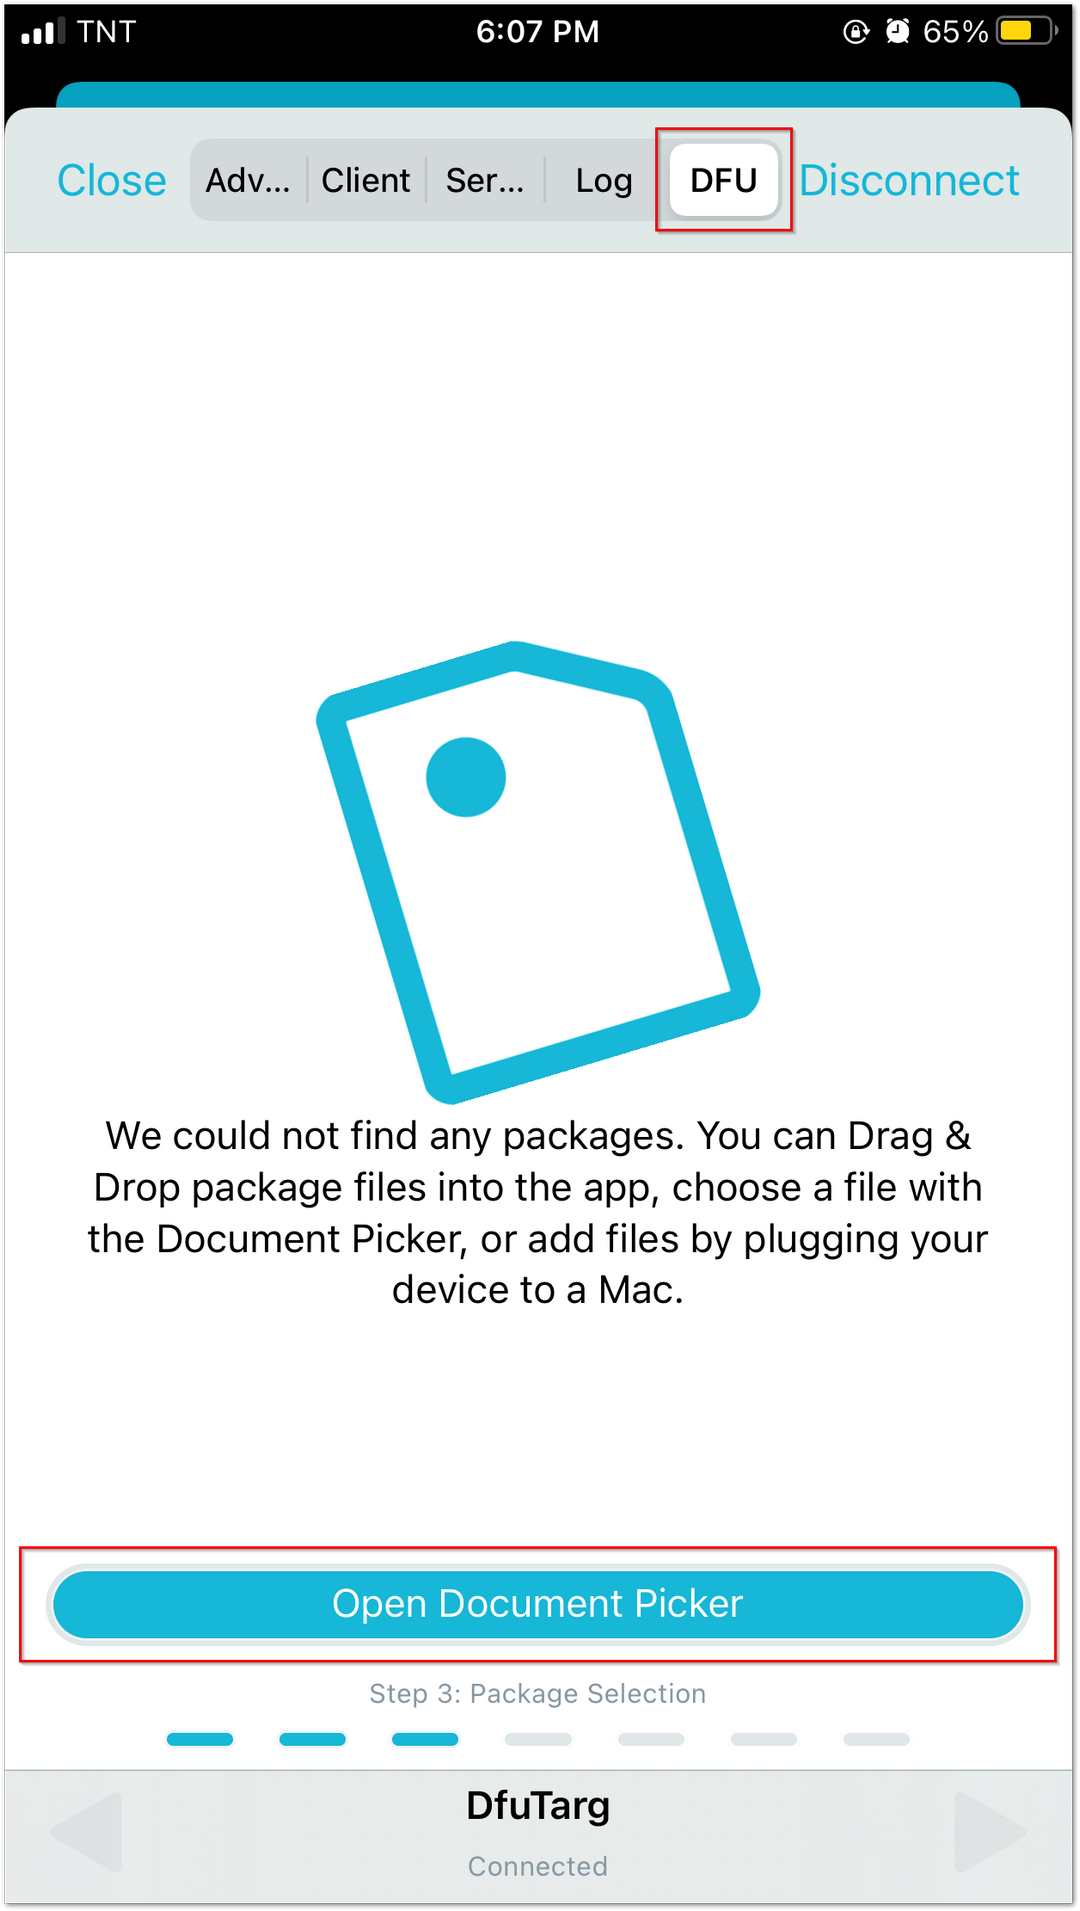 Figure 1: Distribution Packet File Type under DFU
You can upload the Distribution packet (ZIP) file to iCloud Services and download it to your smartphone.
- After the upgrade, the module restarts and the DFU connection is terminated. Now, you can use your RAK4631-R with the latest firmware.
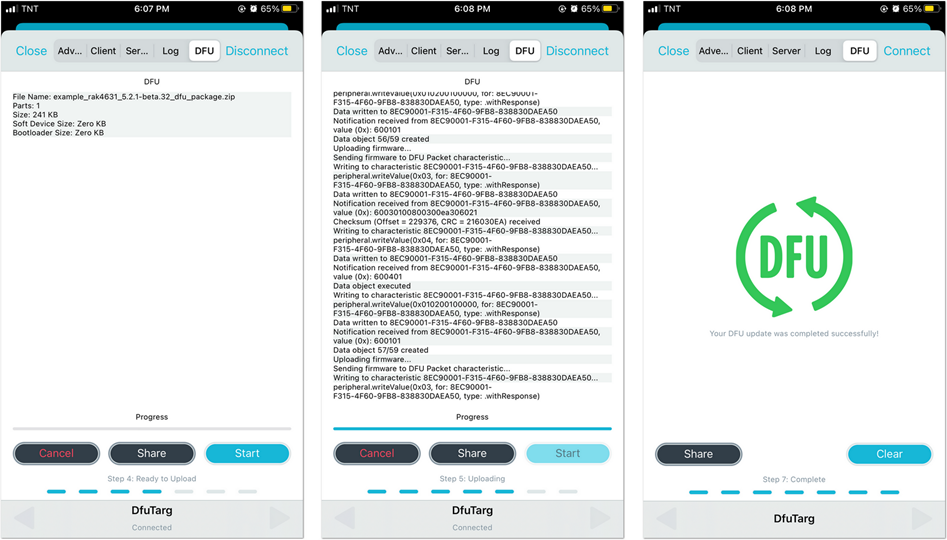 Figure 1: DFU Upgrading of RAK4631-R Firmware via BLE
For Android
OTA DFU Over BLE
- Download the DFU package of the RAK4631-R and save it on your mobile phone.
You can upload the Distribution packet (ZIP) file to Google Drive and download it to your smartphone.
Make sure the Bluetooth on your mobile is on.
- Press the reset button and wait for a couple of seconds.
- Open the nRF Connect mobile application. You will see all the BLE devices in range in the Scanner list.
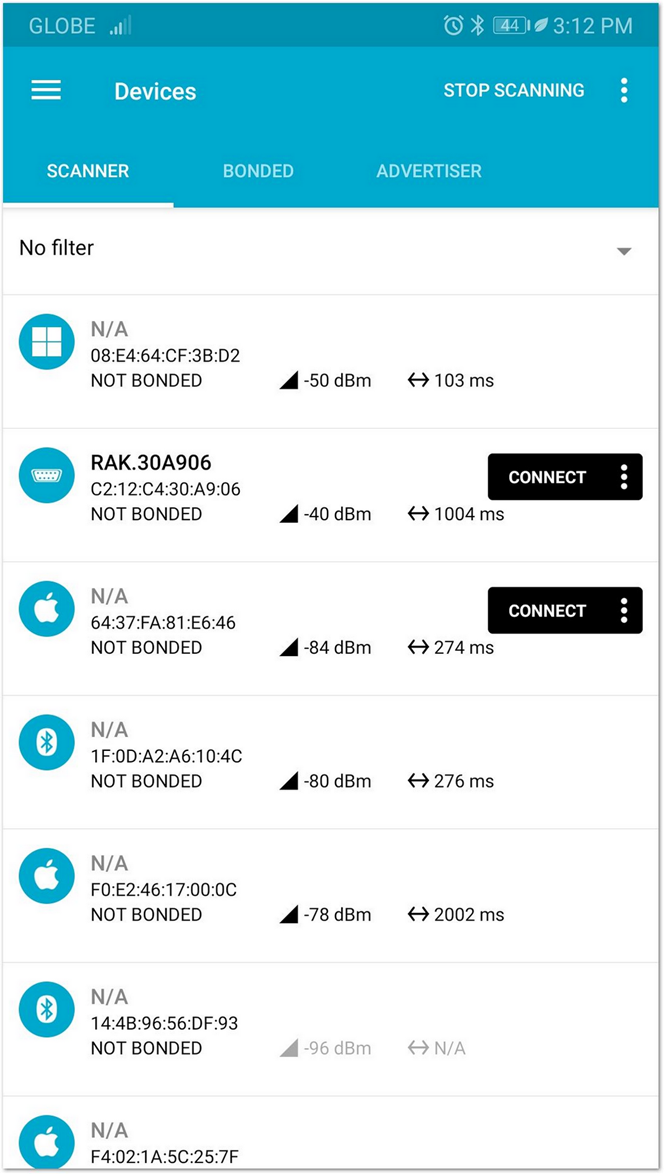 Figure 1: Available Bluetooth Devices in the Nordic App
- Look for a BLE Device named RAK.XXXXXX in the scanner list of the app. Connect to this device and then click the Client tab.
By default, the BLE signal of the RAK4631-R is turned off automatically if no connection is established after 60 seconds. Connect to RAK.XXXXXX immediately after pressing the reset button.
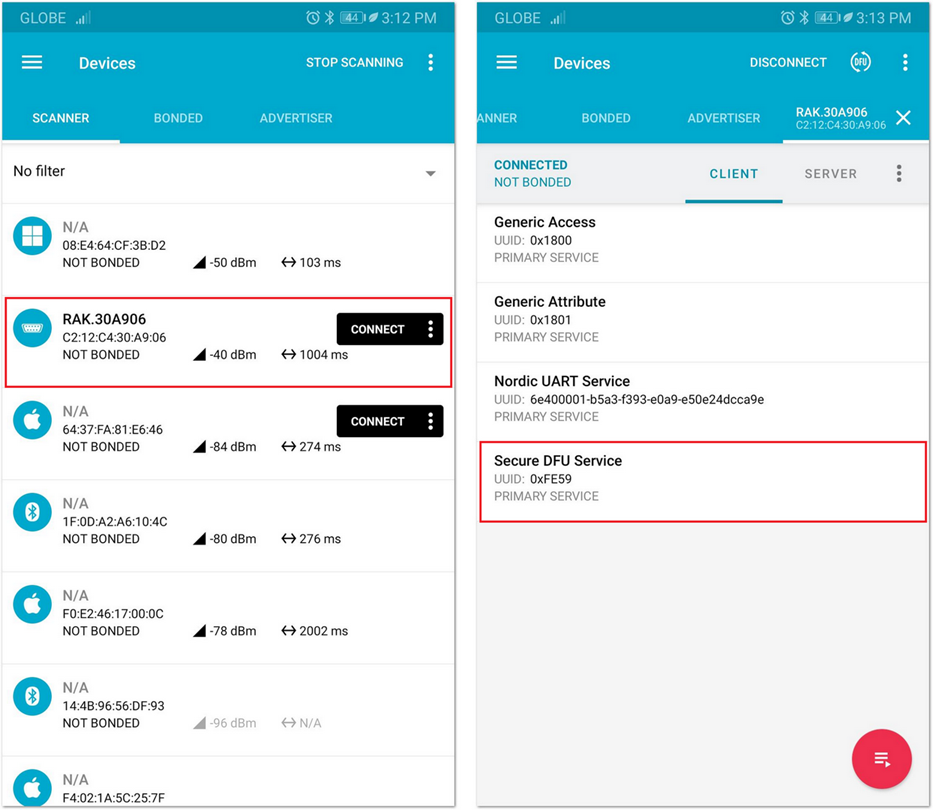 Figure 1: Secure DFU Service in the Nordic App
- Choose "Secure DFU Services" and click the button highlighted in red, as shown in Figure 21.
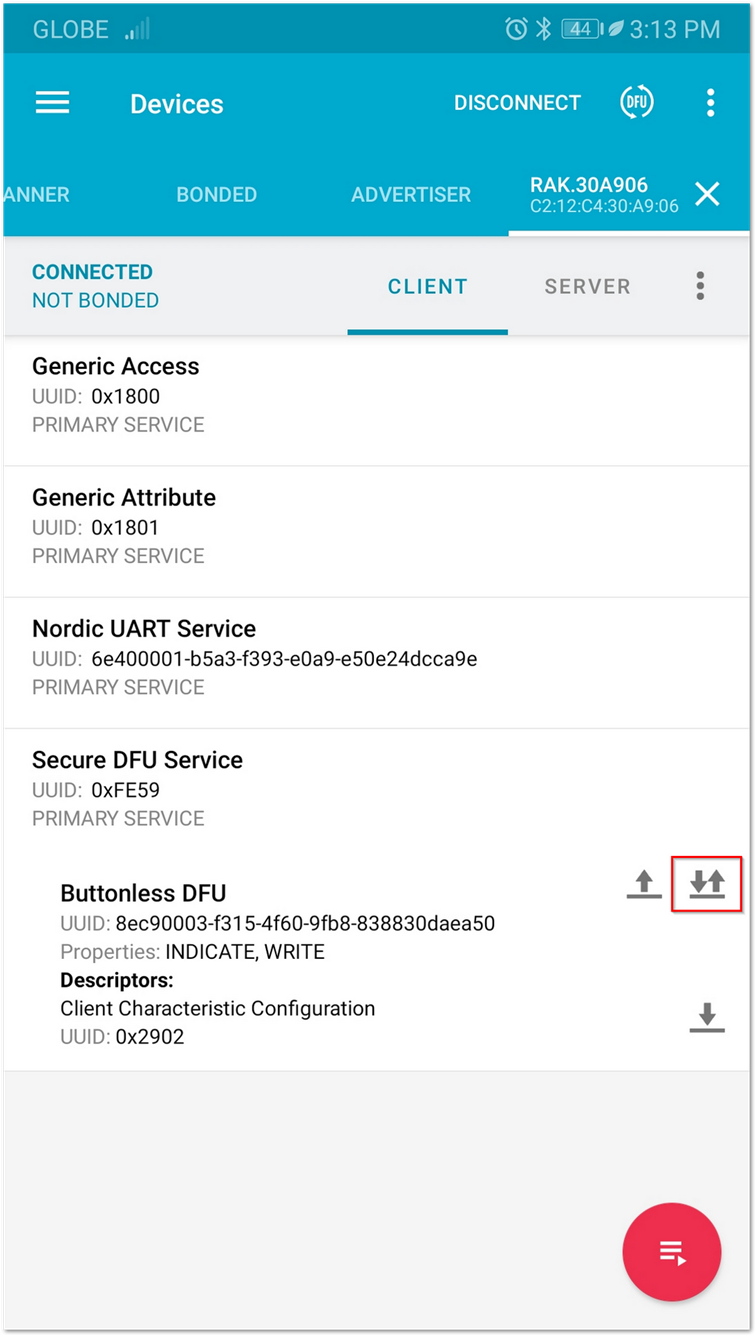 Figure 1: Buttonless DFU
-
Click the arrow up button highlighted in a red box.
-
A Write value window will pop up. Press the SEND button.
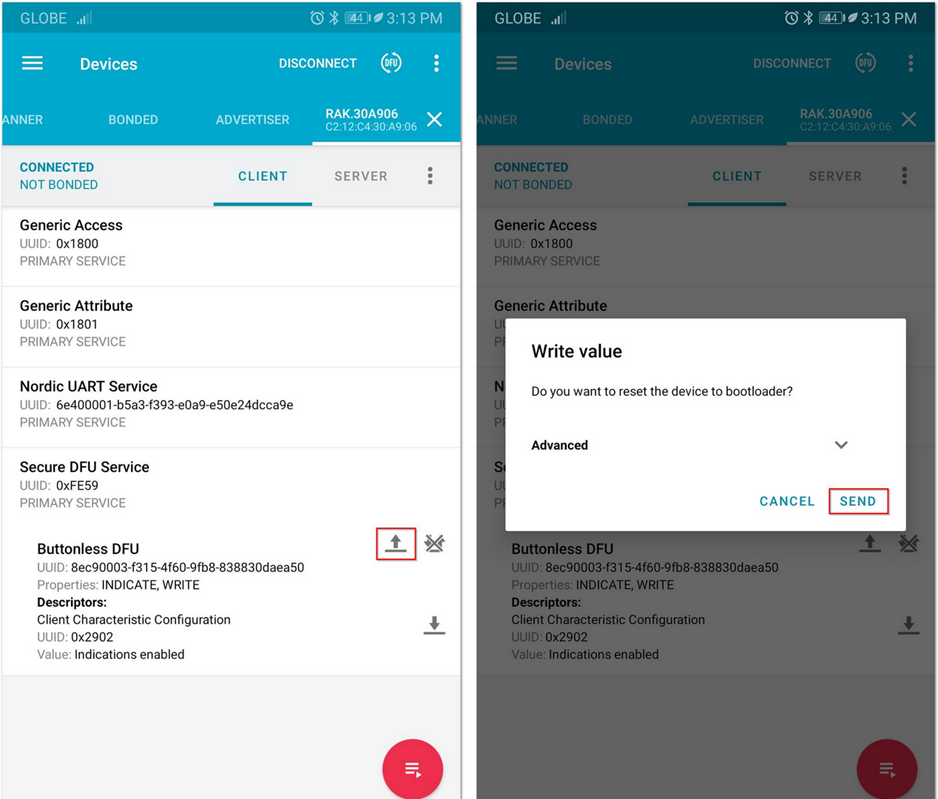 Figure 1: Resetting the Bootloader via Bluetooth
- Now, the RAK4631-R is now working in DFU Mode. In the application, you will see the default status overview of RAK4631-R.
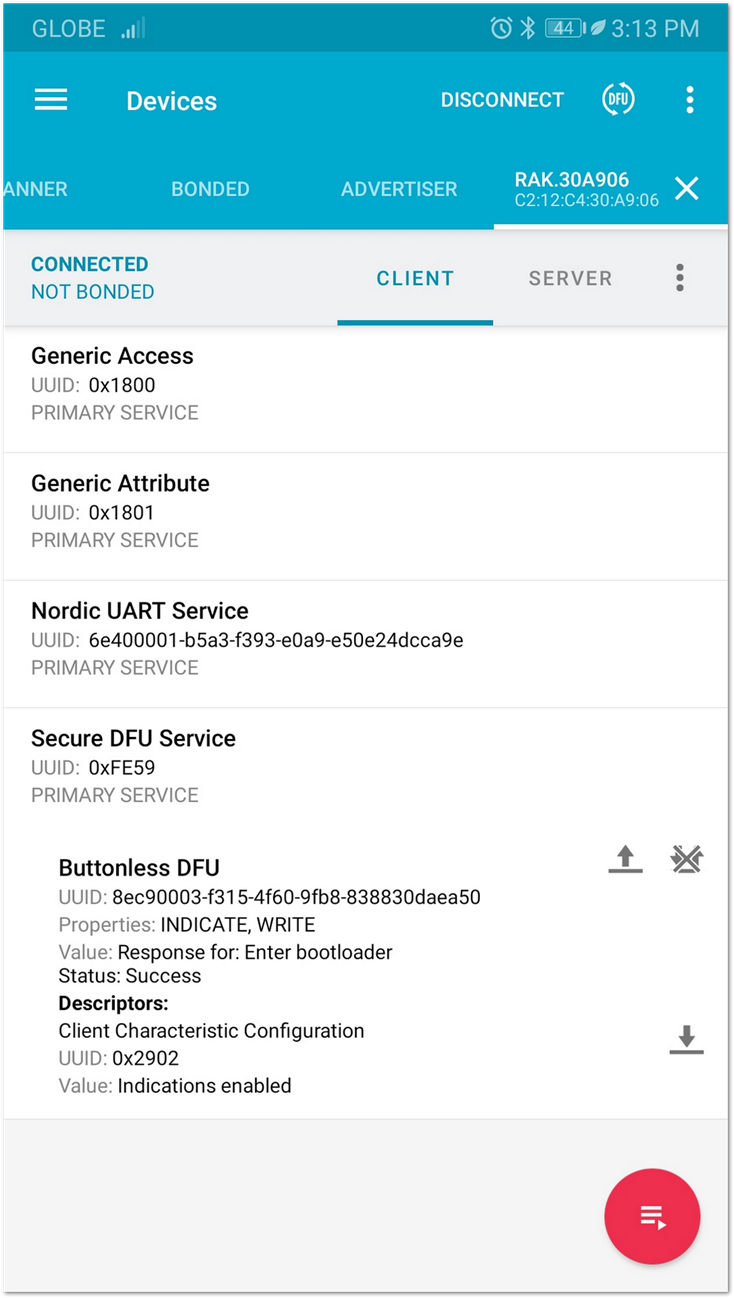 Figure 1: RAK4631-R default status overview after resetting
- In the Devices list, find a BLE device named DfuTarg and click on the Connect button.
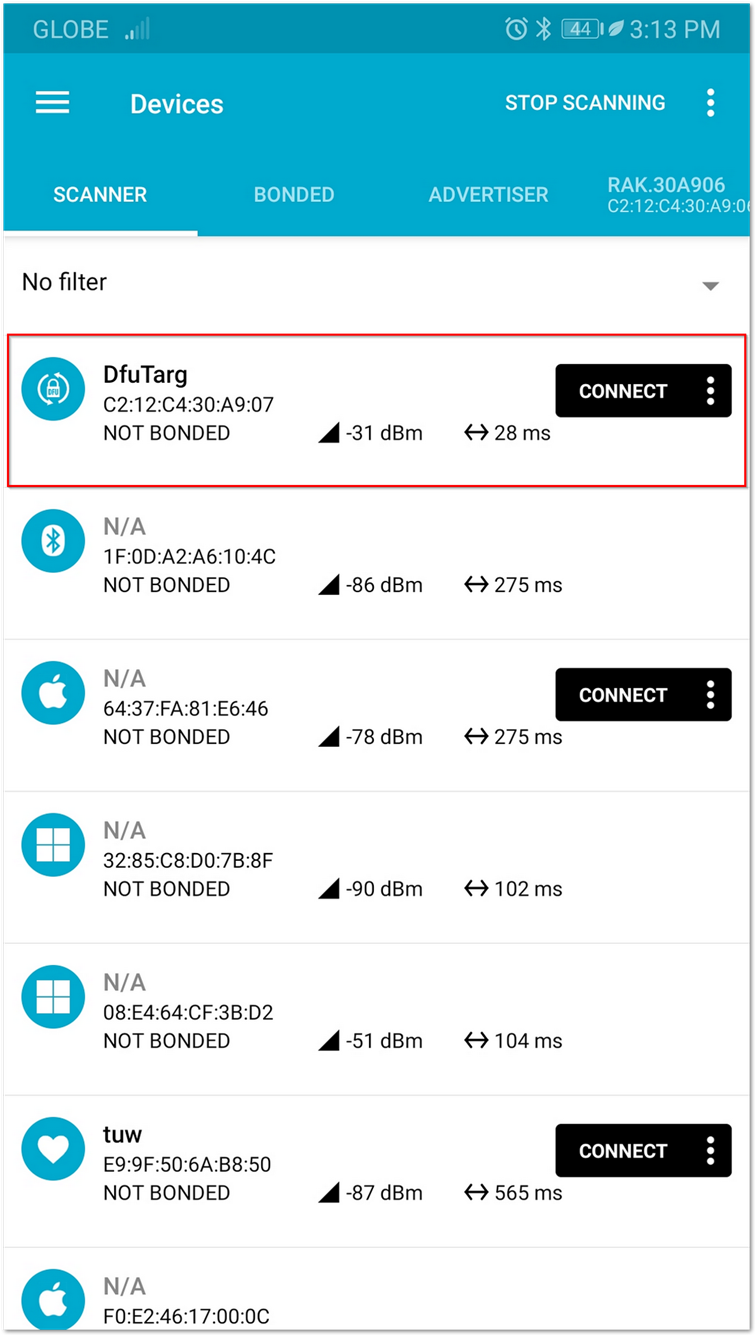 Figure 1: RAK4631-R Default Bluetooth ID after Resetting
After connecting, click on the DFU icon highlighted in red, as shown below.
- Select the Distribution packet (ZIP) and press OK. This will prompt you to select the zip file of the firmware that you have downloaded. The firmware upgrade of your RAK4631-R will start automatically through DFU over BLE.
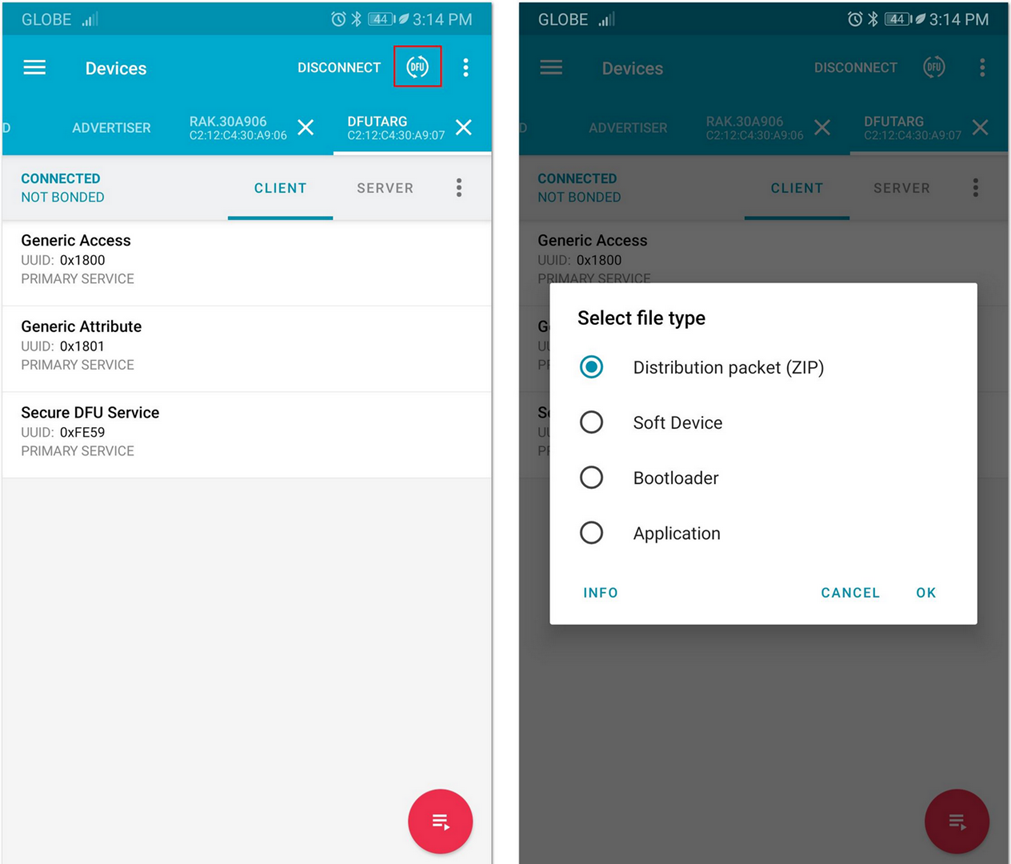 Figure 1: Distribution Packet File Type under DFU
You can upload the Distribution packet (ZIP) file to Google Drive and download it to your smartphone.
- After the upgrade, the module restarts and the DFU connection is terminated. Now, you can use your RAK4631-R with the latest firmware.
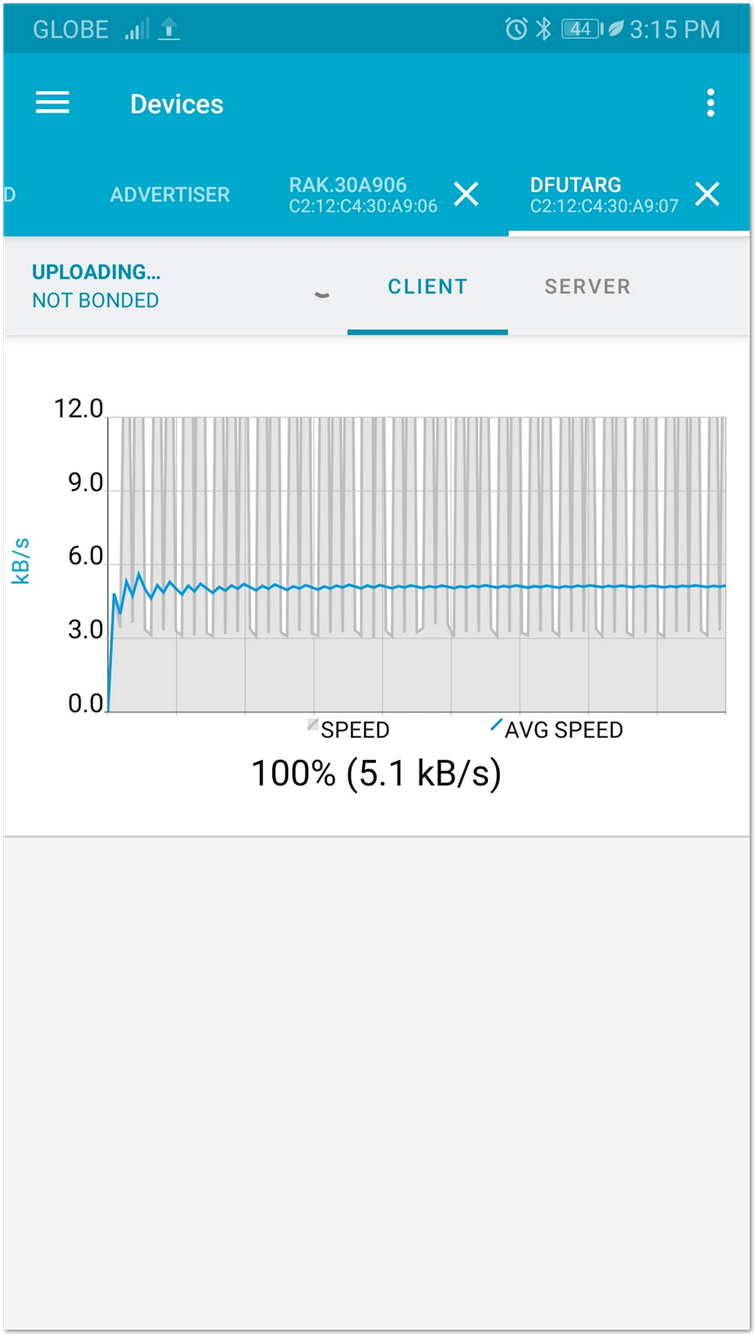 Figure 1: DFU Upgrading of RAK4631-R Firmware via BLE
RAK4631 (Arduino BSP) to RAK4631-R (RUI3) Conversion and Vice Versa
You need an external tool to reliably convert your RAK4631 firmware. You can use either J-Link or RAKDAP1 tool. Both tools are presented on this guide.
Update over JLINK
Hardware and Tools Required
- WisBlock Base Board
- WisBlock Core RAK4631
- RAK4631-R RUI3 Hex Firmware
- RAK4631 Arduino Hex Firmware (Meshtastic and Meshcore compatible)
- J-Link Debugger
- JFlash application
Install Segger
According to your version of J-Link, install the Segger software from https://www.segger.com/downloads/jlink/ . It includes many good tools for debugging the embedded device.
Connect JLink Adapter to SWD of the Module
Connect the SWD port to the PC using J-Link as shown below.
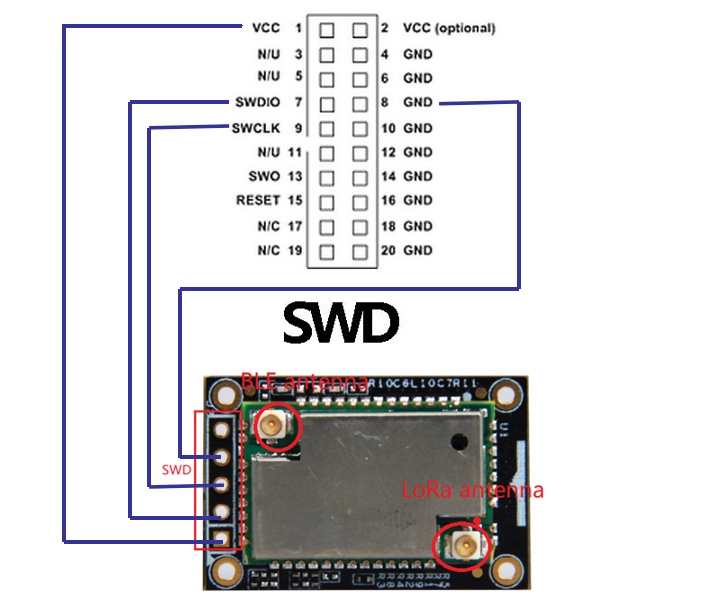 Figure 1: Checking COM Port via Device Manager
Download the New Bootloader
Follow these steps:
- Open J-Flash
- Create a new project. Choose the board as below
- Go into Target->Connect
- If you plan to use RAK4631 Arduino Firmware, which is compatible with Meshtastic and Meshcore, download the RAK4631 Arduino Hex Firmware.
- If you plan to use RAK4631-R RUI3, download the RAK4631-R RUI3 Hex Firmware.
- Drag the appropriate hex to the J-Flash
- Select Target->Production Programming.
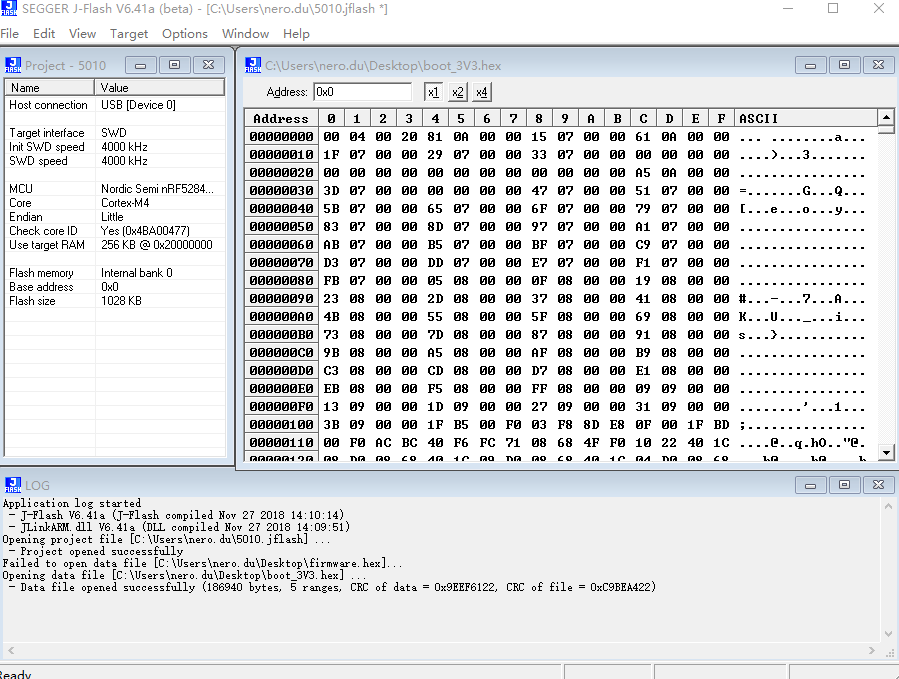 Figure 1: SWD connection
If you uploaded an RUI3 firmware, it should now respond to AT commands like AT, AT+VER=?, etc. On the other hand, if you uploaded an Arduino firmware, it should now proceed to DFU when you double click reset.
Update Over RAKDAP1
Hardware and Tools Required
- WisBlock Base Board
- WisBlock Core RAK4631
- RAK4631-R RUI3 Hex Firmware
- RAK4631 Arduino Hex Firmware (Meshtastic and Meshcore compatible)
- RAKDAP1 tool
- pyOCD
Install pyOCD
pyOCD is an open source Python package for programming and debugging microcontrollers. Refer to Quick Start Guide for detailed instructions on how to install the pyOCD tool.
Install the RAK4631 module support package using the following command:
pyocd pack --install nrf52
Connect RAKDAP1 Adapter to SWD of the Module
Use the figure below as a guide to connect RAKDAP1 SWD to RAK4631.
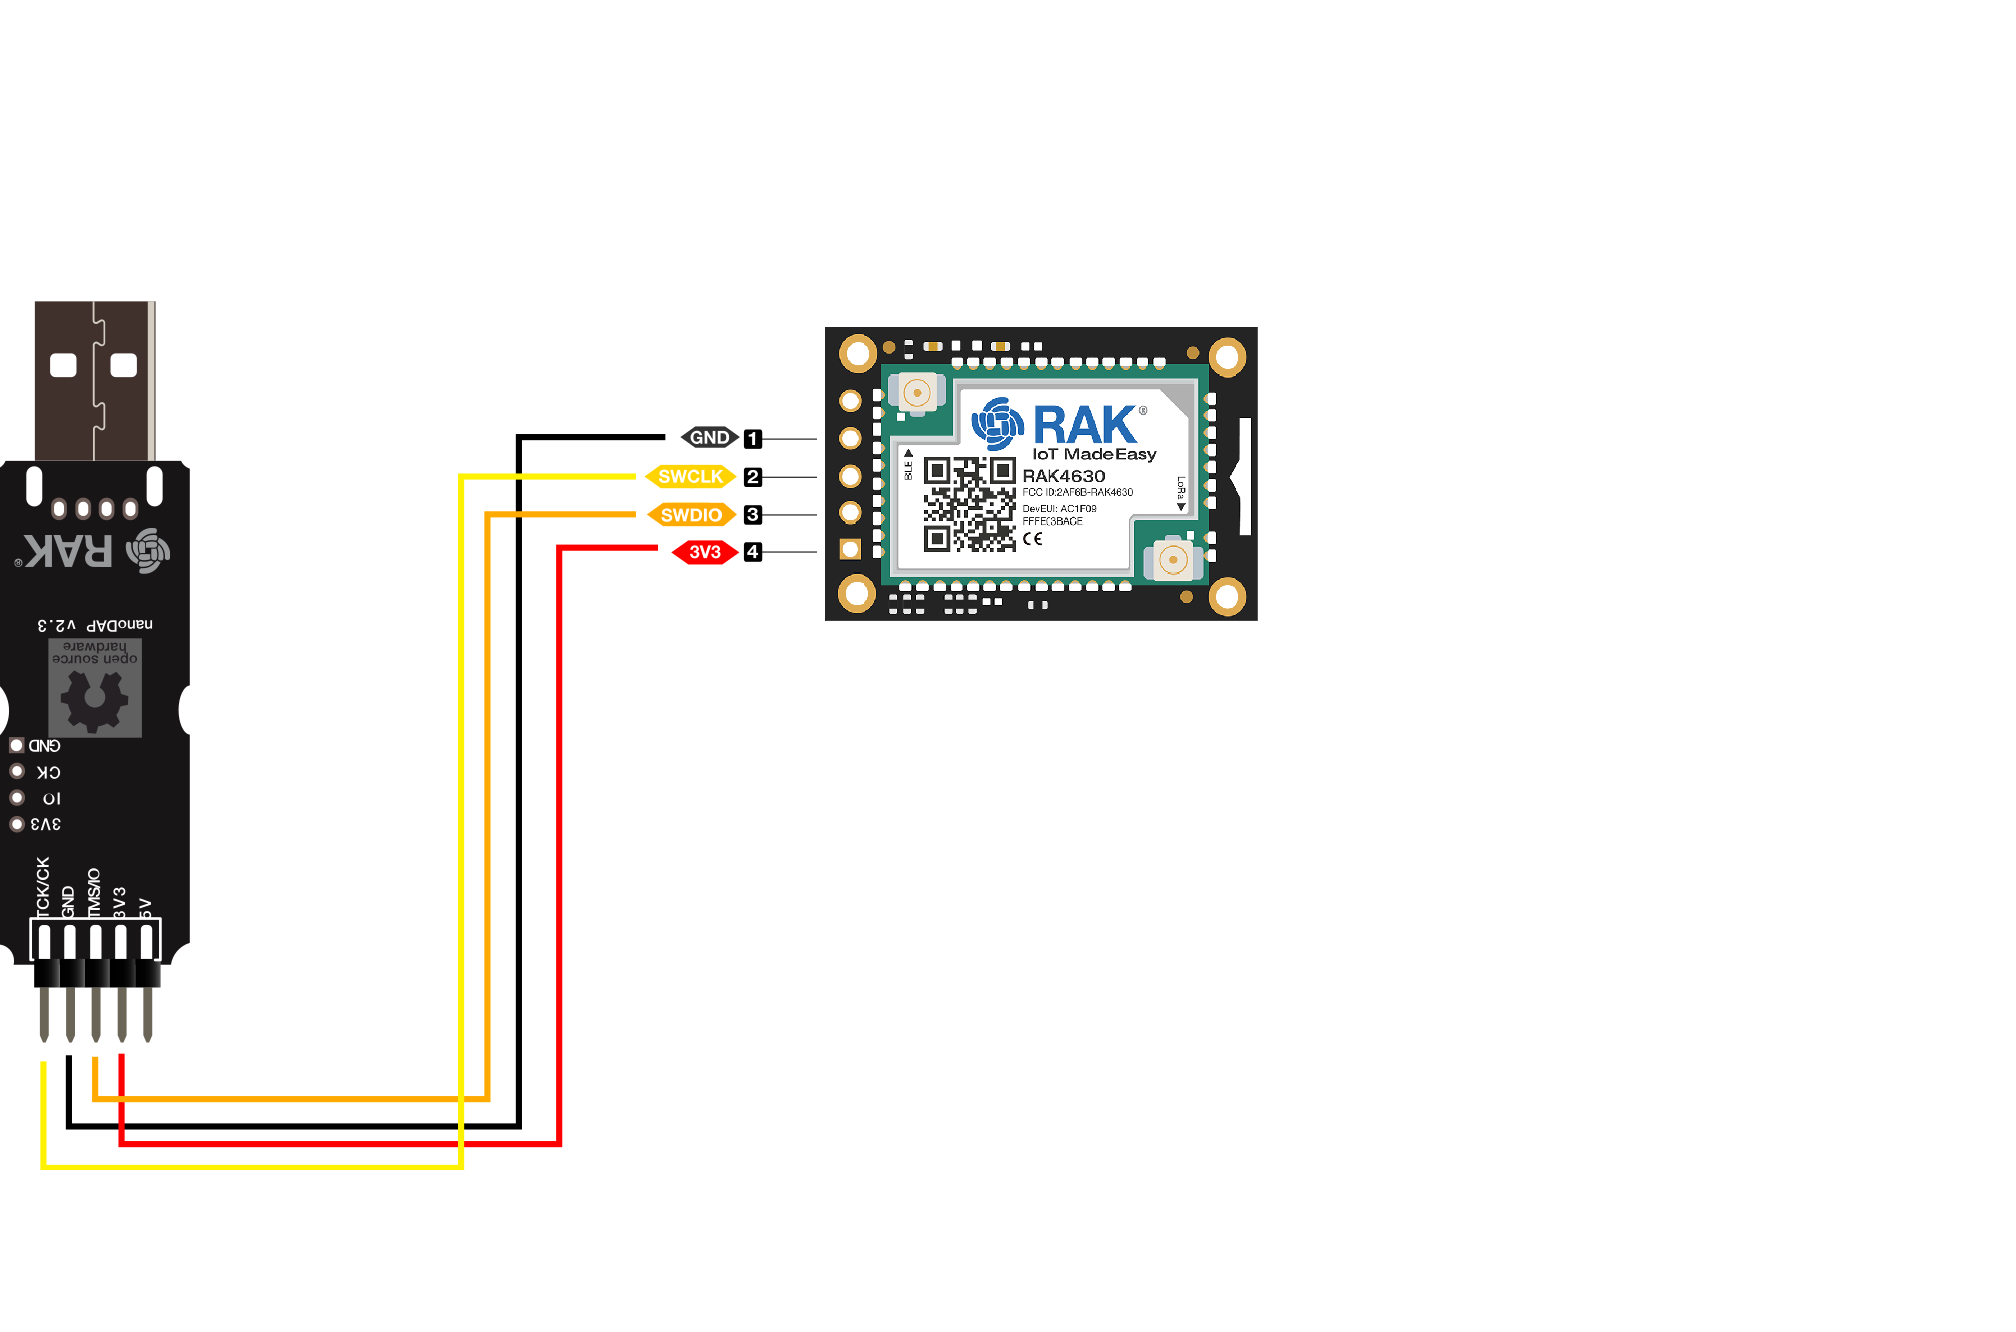 Figure 1: RAKDAP1 connection
Get the Firmware You Want to Upload
Download the latest RAK4631-R RUI3 Hex Firmware or - RAK4631 Arduino Hex Firmware (Meshtastic and Meshcore compatible).
Open the command prompt and change to the directory where you saved the bootloader.
After that, you can flash the bootloader using the command:
For RAK4631-R RUI3,
pyocd flash -t nrf52840 RAK4631_latest_final.hex
For RAK4631 Arduino,
pyocd flash -t nrf52840 rak4361-arduino.hex
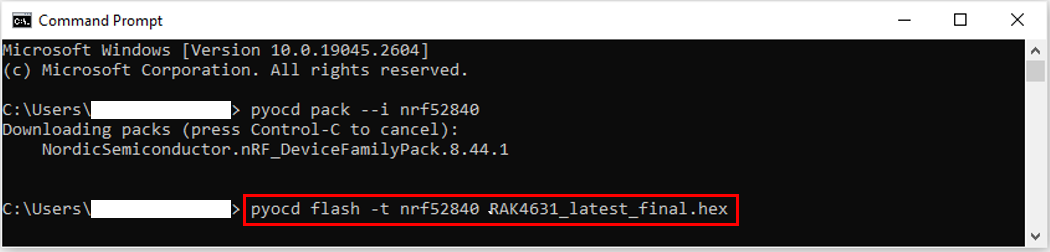 Figure 1: Flash the firmware
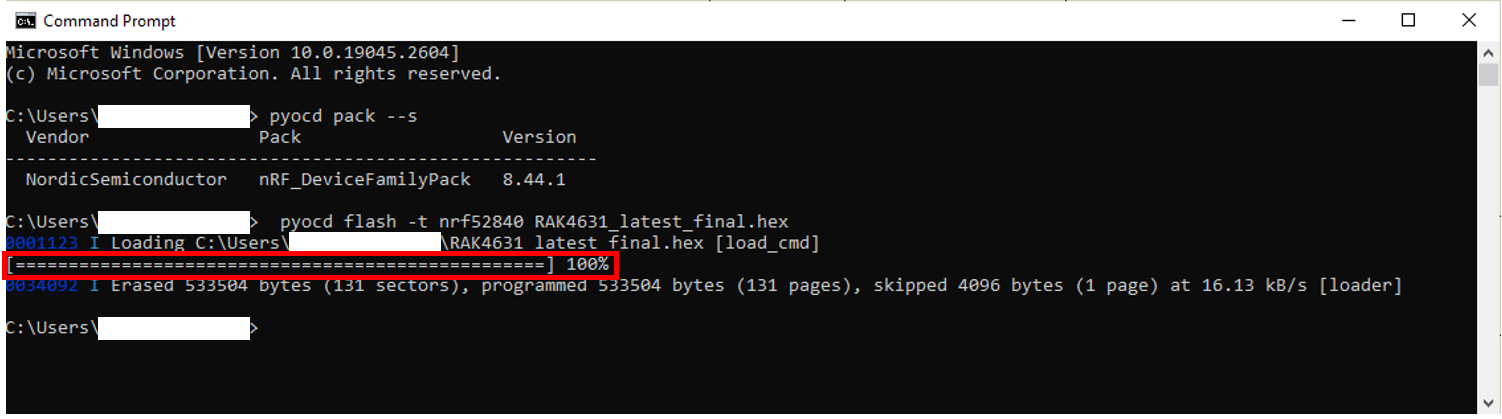 Figure 1: Firmware upload success
If you uploaded an RUI3 firmware, it should now respond to AT commands like AT, AT+VER=?, etc. On the other hand, if you uploaded an Arduino firmware, it should now proceed to DFU when you double click reset.
Miscellaneous
How to Check Firmware Version Using Tera Term
- Download and install the console UART utility Tera Term. You can also use other serial terminal tool or even the Arduino Serial Monitor.
- Connect the RAK4631-R via USB port of the WisBlock Base board.
- Check the COM port of the device using device manager. The port number is not fix and can change on different computers. If no port is detected, double click the reset button on the WisBlock Base.
Figure 1: Checking COM port via device manager- Launch Tera Term and New Connection window will open. Click on
Serialand select the correct serial port onPort. To close the window, click on the OK button. You can check the co
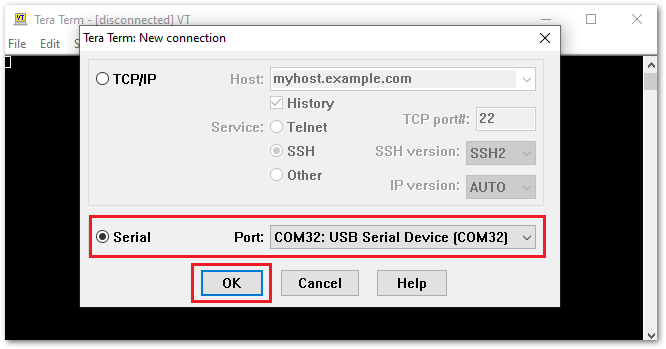 Figure 1: Tera Term New connection window
- On the Tera Term menu, select Setup -> Serial port...
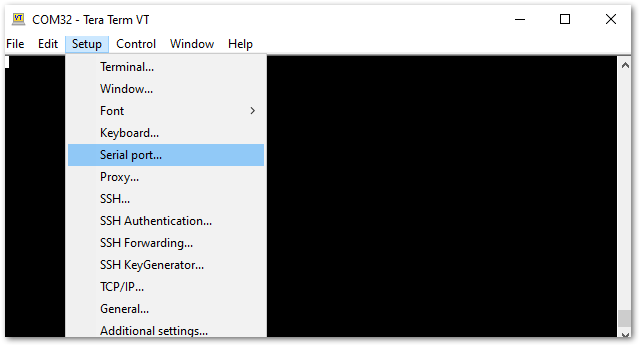 Figure 1: Tera Term Serial port selection
- Check the
Portif correct. A USB interface is used for connection so you can ignore the Baud Rate (Speed) setting. Click on the New setting button to save.
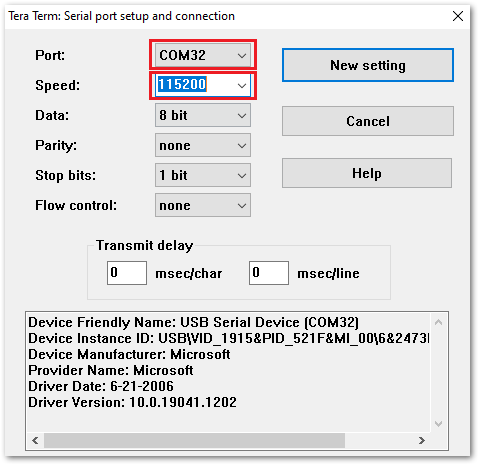 Figure 1: Tera Term Serial port Configuration
- You can now check the firmware version of your device via
AT+VER=?. You can also input firstATEcommand so you can see the command you send.
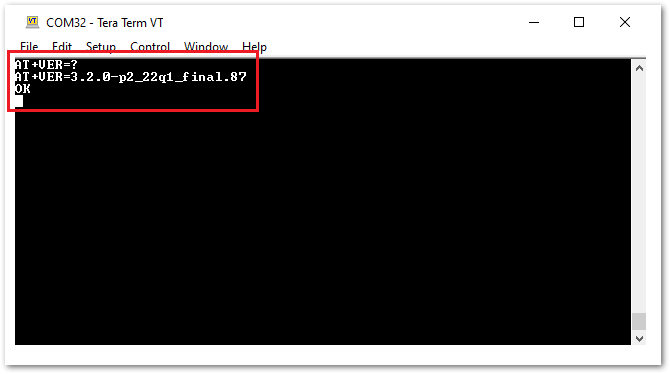 Figure 1: Get the device Firmware Version
AT+VER: get the version of the FW.
AT+VER=?

AT+VER=3.2.0-p2_22q1_final.87
Deprecated Guides
RAK4631 to RUI3 Update
This guide for updating RAK4631 to RUI3 applies only to RUI3 versions 4.1.x and earlier.
These steps are not maintained anymore and there is no guarantee that these steps will work. Use RAKDAP1 or Jlink to reliably convert your modules.
If your device is the RAK4631 WisBlock Core, you can upgrade its firmware to make it RAK4631-R. This section covers the steps on how to do the upgrade.
Converting the RAK4631 to the RAK4631-R is a two-step process. First, update the RAK4631 bootloader to make it compatible with RAK4631-R firmware. Then, update the firmware using the RAK4631-R firmware package dedicated to converting the RAK4631 to the RAK4631-R.
Using Windows
Bootloader Update via USB
- Create a new folder in your
C:\drive namedRAK4631 Bootloader to RUI v3. - Download the adafruit-nrfutil.exe (you need to unzip the downloaded file) and rui3_nrf52840_bootloader then copy both files to
RAK4631 Bootloader to RUI v3folder you created.
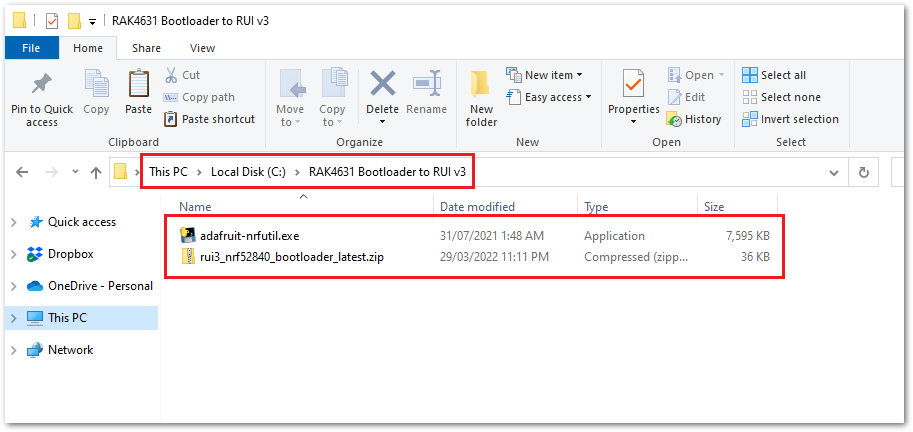 Figure 1: Adafruit-nrfutil and RUI3 Bootloader
- Connect the RAK4631-R via USB and check if port has been detected via device manager. In this guide it is detected as COM31. The COM port number is not fixed and can be different depending on the PC. If no port is shown in device manager, you can try to double click reset button on the WisBlock Base and check again.
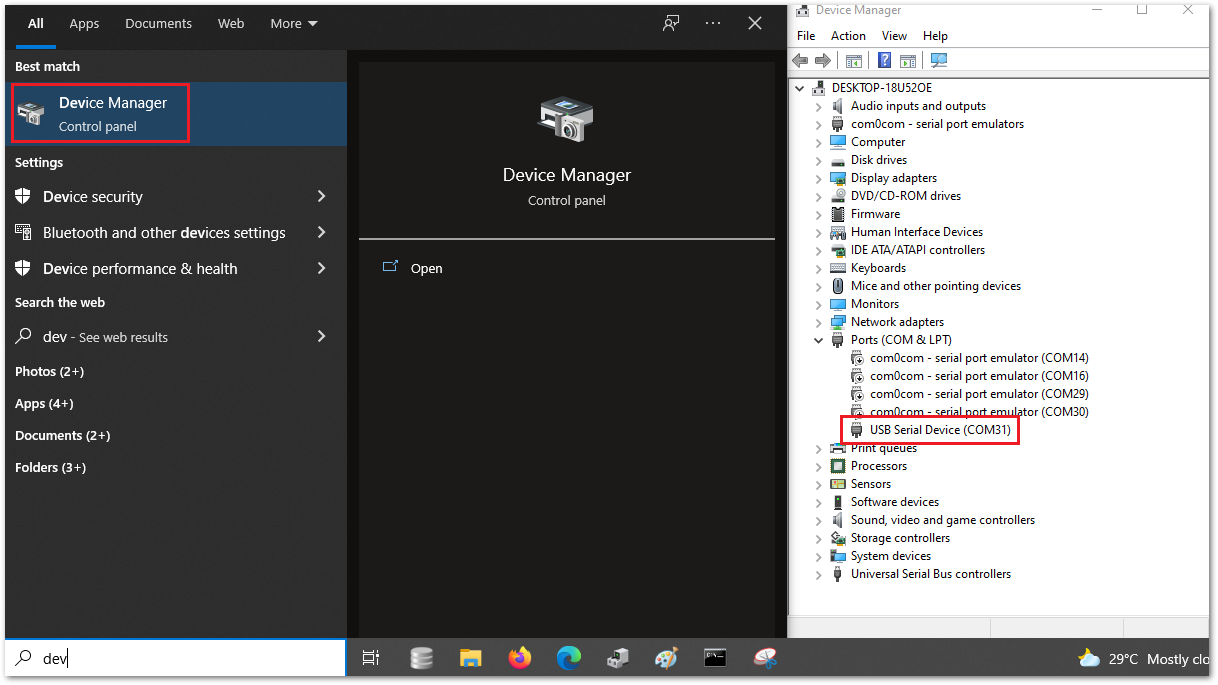 Figure 1: COM Port on Device Manager
- You are now ready to do the bootloader upgrade. Open the command prompt and change directory via
cd C:\RAK4631 Bootloader to RUI v3\. After that, you can now execute the bootloader upgrade using the command below.
adafruit-nrfutil.exe --verbose dfu serial --package rui3_nrf52840_bootloader_latest.zip --port COM31 -b 115200 --singlebank --touch 1200
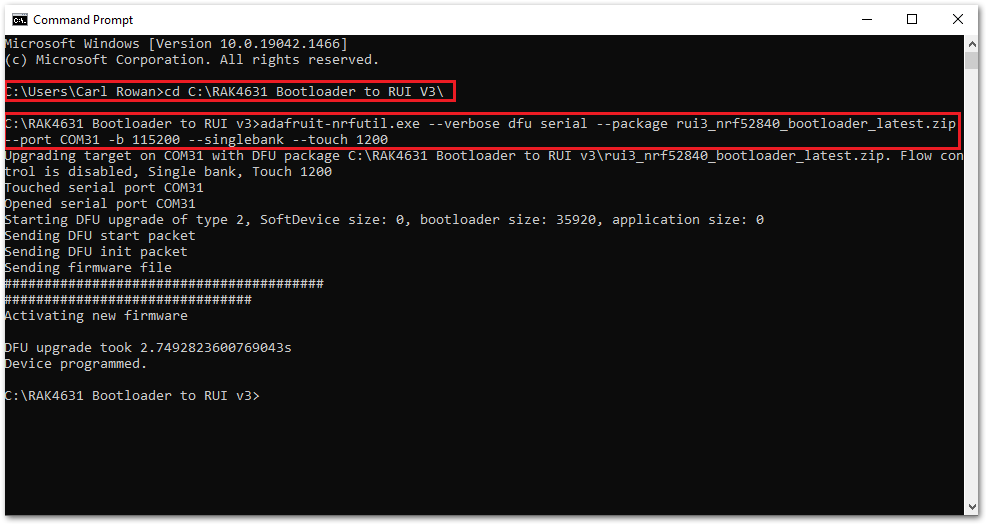 Figure 1: RUI3 Bootloader Upgrade
- After a successful bootloader upload, you are now ready to upload the RUI3 firmware on the next steps.
Firmware Update via USB
- After completing the bootloader upgrade, it will change to a new COM port number. It this guide it changed from
COM31toCOM32.
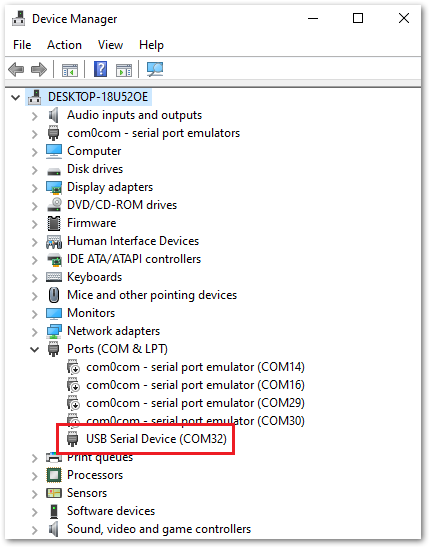 Figure 1: COM Port Change
- Download nrfutil.exe and the rui3_rak4631_latest RUI3 FW which is specifically designed for the RAK4631's conversion to RAK4631-R. Then place the two files on
RAK4631 Bootloader to RUI v3folder.
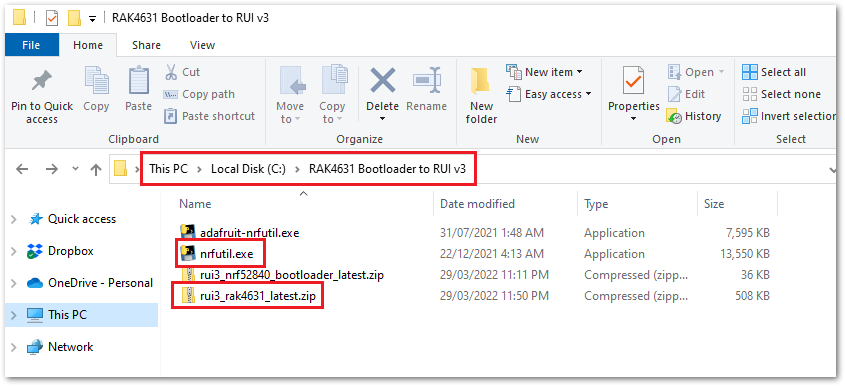 Figure 1: Nrfutil and rui3_rak4631_latest Firmware
- You are now ready to do the firmware update. Open the command prompt and change directory via
cd C:\RAK4631 Bootloader to RUI v3\. After that, you can now execute the firmware update using the command below.
nrfutil.exe dfu serial -pkg rui3_rak4631_latest.zip -p COM32
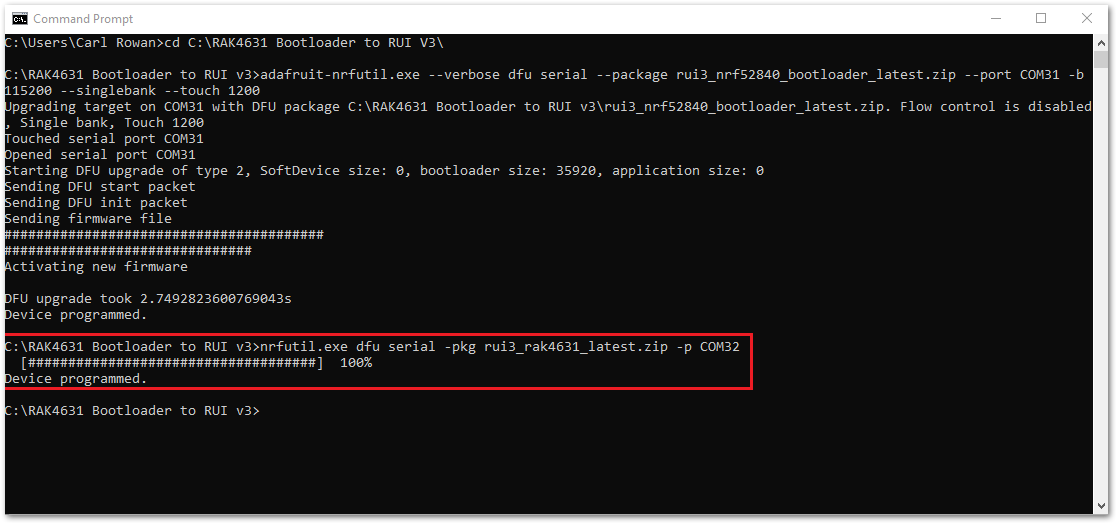 Figure 1: Firmware update via USB
- You can now check if the firmware upload is successful by checking the the firmware version using
AT+VER=?command. You can follow the guide on Tera Term to check firmware version and confirm if the device is already updated.
Figure 1: RAK4631-R Latest Firmware Version CheckUsing Linux
Perform the four steps described in the section Setup the Linux Environment.
When you connect the RAK4631-R to a Linux computer via USB, you will see the related information "cdc_acm 1-1:1.0: ttyACM0: USB ACM device" from the dmesg command.
Figure 1: Checking USB CDC device using dmesg commandIn this case, the RAK4631-R USB CDC device name is /dev/ttyACM0
Bootloader Update via USB on Linux
After determining the USB CDC device name, download the rui3_nrf52840_bootloader.
Then execute the following command:
adafruit-nrfutil --verbose dfu serial --package rui3_nrf52840_bootloader_latest.zip -p /dev/ttyACM0
The -p parameter specifies the RAK4631-R USB CDC device name.
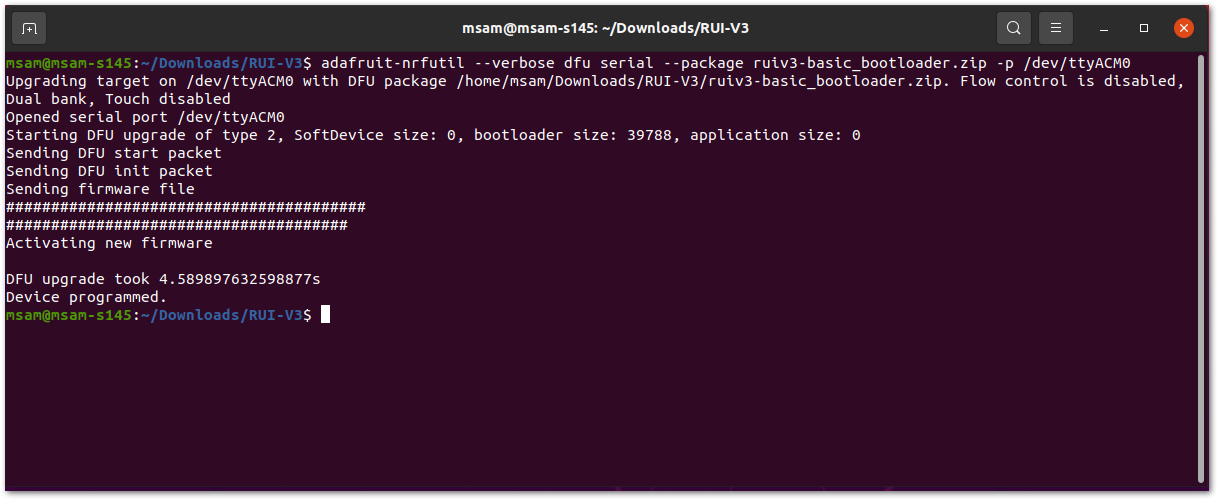 Figure 1: Bootloader update via USB
Firmware Update via USB on Linux
Download the rui3_rak4631_latest firmware.
On the download folder, execute the following command:
nrfutil dfu usb-serial -pkg rui3_rak4631_latest -p /dev/ttyACM0
The -p parameter specifies the RAK4631-R USB CDC device name.
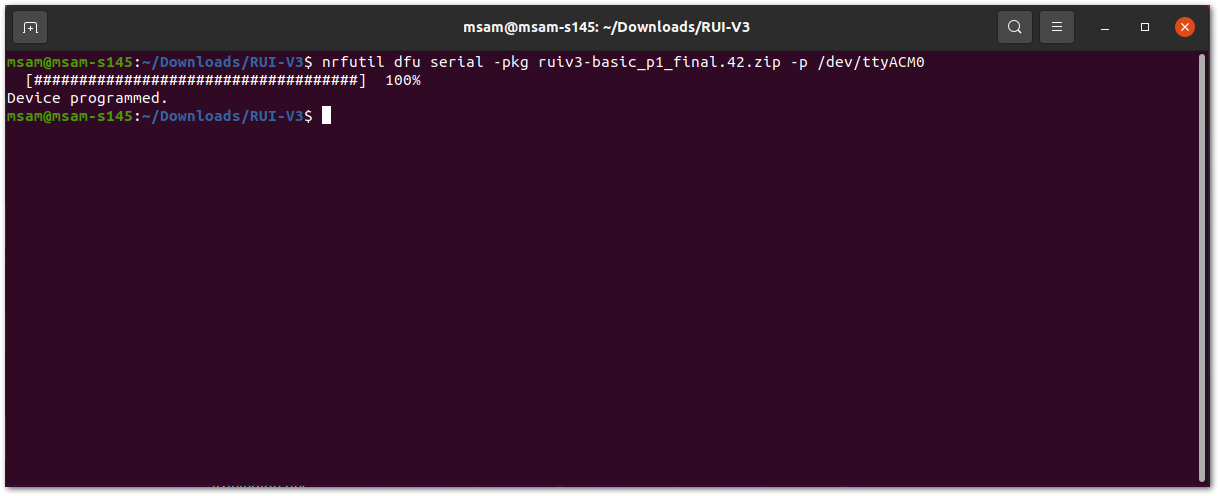 Figure 1: Firmware update via USB
Set Up the Device Console Port in Linux
Install the minicom terminal emulator utility. Open a new terminal and execute the following commands:
sudo apt-get update
sudo apt-get install minicom
Now, open minicom on USB CDC port and then send the AT+VER=? command to check the RUI firmware version.
minicom -D /dev/ttyACM0
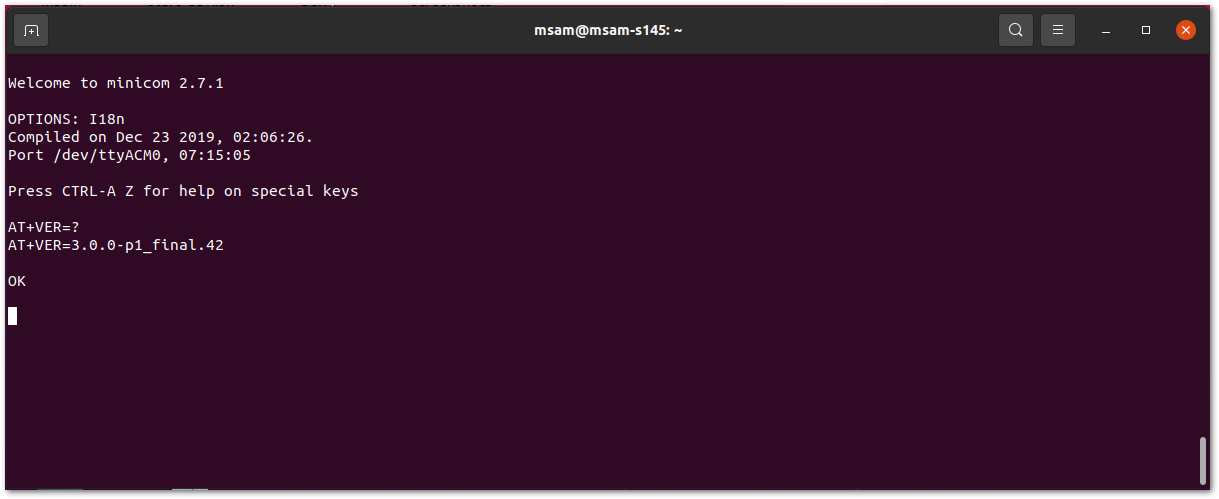 Figure 1: Minicom utility
Using MacOS
Updating the Bootloader to be Compatible with RAK4631-R FW
-
Download the adafruit-nrfutil-macos. Usually, the
adafruit-nrfutil-macosfile will go to the downloads folder. This section assumes any downloaded file goes to downloads folder. -
The next step after downloading the file is to open the terminal and go to the downloads directory or the location where you put the downloaded file. You have to change the
usernamebased on your machine. In this guide,appleis used as the user.
cd /Users/username/Downloads
- Make the
adafruit-nrfutil-macosexecutable.
chmod +x adafruit-nrfutil-macos
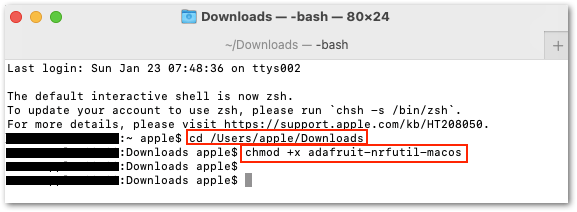 Figure 1: Download adafruit-nrfutil for macOS
- You also need to determine the port name of the RAK4631-R using the command:
ls /dev/cu.*
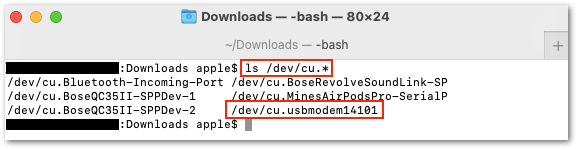 Figure 1: Check the port
-
Download the RAK4631 to RAK4631-R Bootloader firmware. Usually, the
rui3_nrf52840_bootloader_latest.zipfile will go to the downloads folder. -
You can now execute the bootloader update.
- The
adafruit-nrfutil-macosmust be on the same folder with theruiv3_nrf52840_bootloader.zip. In this guide it is Downloads folder. - You should be connected on the right port. The port name in your computer might be different than the one in this guide.
./adafruit-nrfutil-macos --verbose dfu serial --package rui3_nrf52840_bootloader_latest.zip -p /dev/cu.usbmodem14101 -b 115200 --singlebank --touch 1200
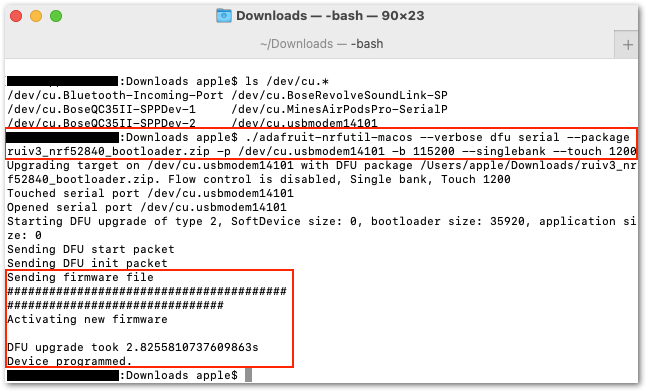 Figure 1: Successful bootloader update
RAK4631-R Firmware Upload
After updating the bootloader, you can now upload the RAK4631-R firmware by following the steps below. You have to note that the RAK4631-R firmware used in this section is a dedicated firmware designed for updating RAK4631 to RAK4631-R.
-
Download the nrfutil. Usually, the
nrfutil-mac.1file will go to the downloads folder. This section assumes any downloaded file goes to downloads folder. -
If your terminal is not yet open, open the terminal and go to the downloads directory or the location where you put the downloaded file. You have to change the
usernamebased on your machine. In this guide,appleis used as the user.
cd /Users/username/Downloads
- Make the
nrfutil-mac.1executable.
chmod +x nrfutil-mac.1
- You also need to determine the port name of the RAK4631 using the command:
ls /dev/cu.*
-
Download the RAK4631 to RAK4631-R Conversion firmware. Usually, the
rui3_rak4631_latest.zipfile will go to the downloads folder. -
You can now execute the firmware update.
- The
nrfutil-mac.1must be on the same folder with therui3_rak4631_latest.zip. In this guide it is Downloads folder. - You should be connected on the right port. The port name in your computer might be different than the one in this guide.
- It might take a while for the update. Do not remove the USB or terminate the terminal application while doing the uploading process.
./nrfutil-mac.1 dfu usb-serial -pkg rui3_rak4631_latest.zip -p /dev/cu.usbmodemC0D048F6604F1
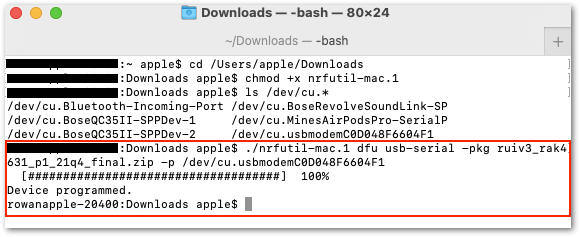 Figure 1: Successful RAK4631-R Conversion
- After the firmware upload is successful, your RAK4631 is now RAK4631-R. Open a serial terminal software and run
AT+VER=?to see the FW version.
AT+VER=3.2.0-p2_22q1_final.87
OK
RAK4631-R to RAK4631 Conversion
This guide on RAK4631-R to RAK4631 Conversion only works on RUI3 versions 4.1.x and below. These steps are not maintained anymore and there is no guarantee to work. Use RAKDAP1 or Jlink to reliably convert your modules.
You have the option to convert your RAK4631-R to RAK4631.
-
Download the necessary files needed for conversion in a common folder.
-
Create a new folder in your
C:\drive namedRAK4631 Bootloader to RUI v3and place all the conversion files you downloaded from the previous step.
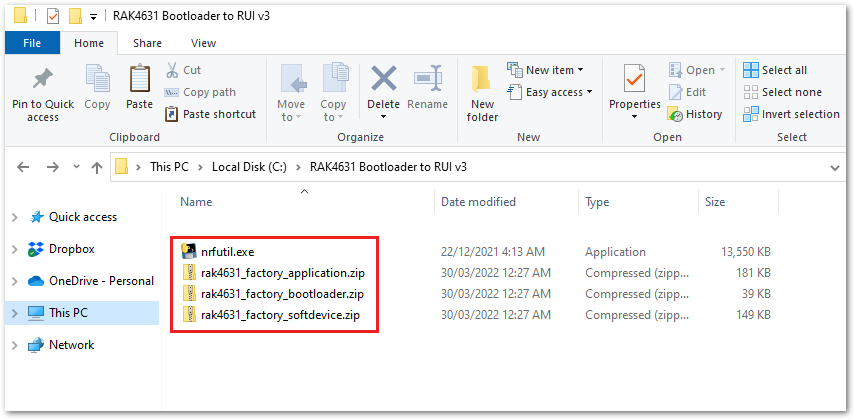 Figure 1: RAK4631-R Conversion FW files and NRFUTIL
- Connect the RAK4631-R via USB and check if port has been detected via device manager. In this guide it is detected as COM32. The COM port number is not fixed and can be different depending on the PC. If no port is shown in device manager, you can try to double click reset button on the WisBlock Base and check again.
Figure 1: Checking COM Port via Device Manager- After that, you need to send
AT+BOOTcommand to the device. You can follow the guide on using Tera Term but instead of checking the firmware version, you have to inputAT+BOOT. You will see no reply since the module will restart then will be disconnected momentarily before re-establishing again the connection to Tera Term.
You have to disconnect the device connection to Tera Term or close it so that the COM port will be free when you do the firmware update on the next step. Otherwise, an error may occur during the firmware update.
Figure 1: AT+BOOT to Initialize Boot Mode- Next to initiating Boot mode, you can now execute the firmware conversion. Open the command prompt and change directory via
cd C:\RAK4631 Bootloader to RUI v3\. - Execute the bootloader conversion using the command
nrfutil.exe dfu serial -pkg rak4631_factory_bootloader.zip -p COM5. Make sure that you have the right.zipfile name andCOM port numberto avoid errors.
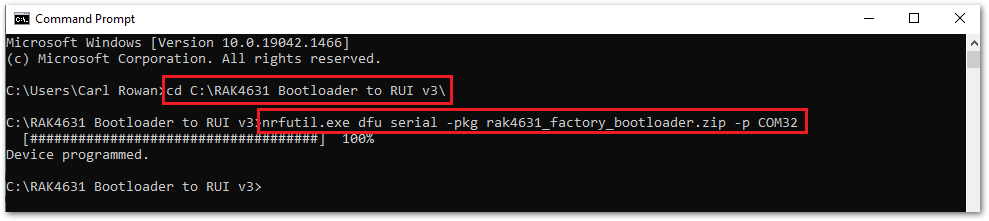 Figure 1: RAK4631-R to RAK4631 Conversion
- The previous step updated the bootloader of RAK4631. Another requirement is to ensure that the softdevice is compatible with the expected version by the Arduino BSP. To do this, execute the command
adafruit-nrfutil --verbose dfu serial --package rak4631_factory_softdevice.zip -p COM15. You also have to make sure that you have the right.zipfile name andCOM port numberto avoid errors. The COM port will likely be different compared to step 5.
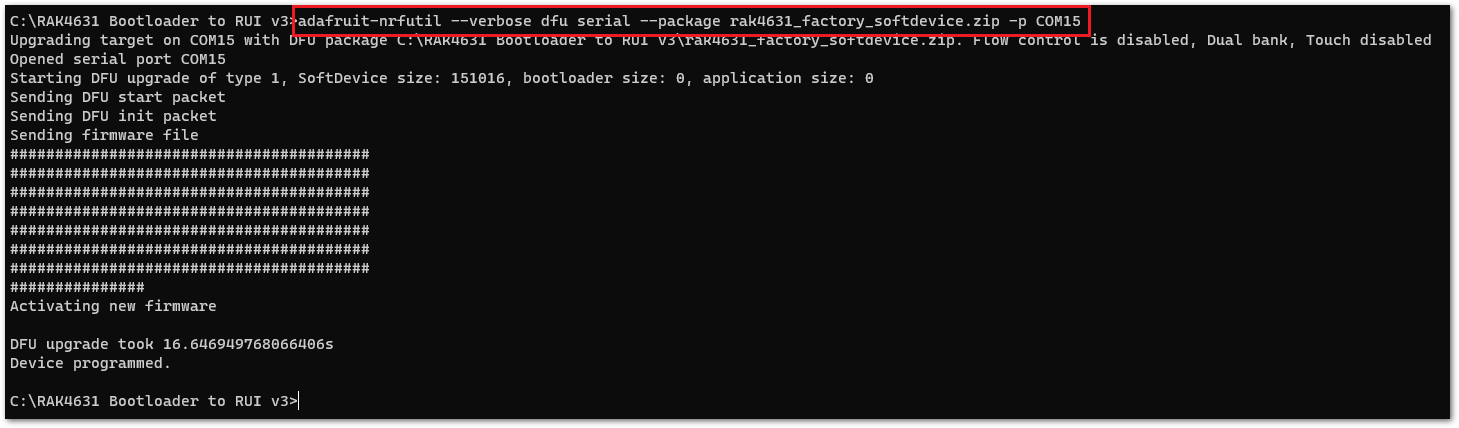 Figure 1: Updating softdevice
- After the successful upload, you can now see RAK4631 drive detected. This indicates that the device has now the Arduino BSP bootloader on it and ready to be uploaded with firmware created using the WisBlock Arduino BSP and not RUI3. You also need to check the COM port number because it will change once you convert to the Arduino BSP bootloader.
If there is no RAK4631 drive detected, try double-clicking the reset button on the WisBlock Base.
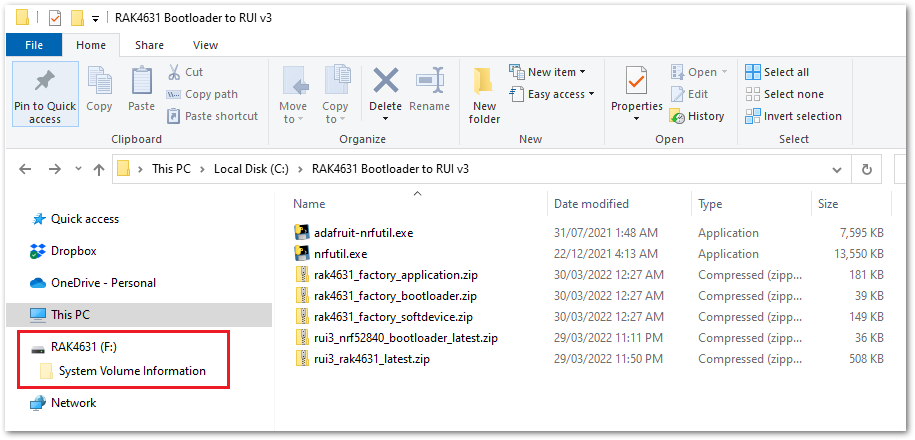 Figure 1: RAK4631 Detected


