RAK7248 AWS IoT Core for LoRaWAN® Application
This guide shows how to process LoRaWAN device messages with AWS Lambda and AWS IoT rules, configure Amazon SNS notifications, and send downlink payloads through AWS IoT Core for LoRaWAN.
Before continuing, complete the AWS gateway and device onboarding procedures in the LoRaWAN Network Server Guide. The device must be joined to the network and capable of sending uplink messages.
Application Architecture
Once setup is completed, provisioned OTAA devices can join the network and start to send messages. Messages from devices can then be received by AWS IoT Core for LoRaWAN and forwarded to the IoT Rules Engine.
The following sections use a sample Hello World application to demonstrate how to process uplink traffic.
 Figure 1: Sending Uplink Architecture
Create a Lambda Function for the Destination Rule
Create a Lambda function to decode device messages received through the destination rule.
-
Go to the AWS Lambda console.
-
In the navigation pane, click on Functions, then Create function.
-
Select Author from scratch.
-
Under Basic information, enter the function name and select a currently supported Python runtime, such as Python 3.12.
-
Click on Create function.
-
Under Function code, paste the copied code into the editor under the lambda_function.py tab.
import base64
import json
import logging
import ctypes
import boto3

# define function name

FUNCTION_NAME = 'RAK-HelloWorld'

# Second Byte in Payload represents Data Types
# Low Power Payload Reference: https://developers.mydevices.com/cayenne/docs/lora/

DATA_TYPES = 1

# Type Temperature

TYPE_TEMP = 0x67

# setup iot-data client for boto3

client = boto3.client('iot-data')

# setup logger

logger = logging.getLogger(FUNCTION_NAME)
logger.setLevel(logging.INFO)

def decode(event):
  data_base64 = event.get('PayloadData')
  data_decoded = base64.b64decode(data_base64)
  result = {
      'devEui': event.get('WirelessMetadata').get('LoRaWAN'
              ).get('DevEui'),
      'fPort': event.get('WirelessMetadata').get('LoRaWAN'
              ).get('FPort'),
      'freq': event.get('WirelessMetadata').get('LoRaWAN'
              ).get('Frequency'),
      'timestamp': event.get('WirelessMetadata').get('LoRaWAN'
              ).get('Timestamp'),
      }

  if data_decoded[DATA_TYPES] == TYPE_TEMP:
      temp = data_decoded[DATA_TYPES + 1] << 8 \
          | data_decoded[DATA_TYPES + 2]
      temp = ctypes.c_int16(temp).value
      result['temperature'] = temp / 10

  return result
def lambda_handler(event, context):
    data = decode(event)
    logger.info('Data: %s' % json.dumps(data))
    response = client.publish(topic=event.get('WirelessMetadata'
                            ).get('LoRaWAN').get('DevEui')
                            + '/project/sensor/decoded', qos=0,
                            payload=json.dumps(data))
    return response
-
Once the code has been pasted, choose Deploy to deploy the lambda code.
-
Click on the Permissions tab of the lambda function.
-
Change the Lambda Role Policy permission.
-
Under Execution role, click on the hyperlink under Role name.
-
On the Permissions tab, find the policy name and select it.
-
Choose Edit policy, and choose the JSON tab.
-
Append the following to the Statement section of the policy to allow publishing to AWS IoT.
{
"Effect":"Allow",
"Action":[
"iot:Publish"
],
"Resource":[
"*"
]
}
-
-
Choose Review Policy, then Save changes.
-
Create a test event that will allow you to test the functionality of the lambda function.
- In the drop-down, for the Select a test event, choose Configure test events.
- Enter a name for the test event under the Event name.
- Paste the following sample payload in the area under Event name:
{
"WirelessDeviceId": "65d128ab-90dd-4668-9556-fe47c589610b",
"PayloadData": "AWf/1w==",
"WirelessMetadata": {
"LoRaWAN": {
"DataRate": "4",
"DevEui": "0000000000000088",
"FPort": 1,
"Frequency": "868100000",
"Gateways": [
      {
"GatewayEui": "80029cffXXXXXXXX",
"Rssi": -109,
"Snr": 5
      }
  ],
"Timestamp": "2021-02-08T04:00:40Z"
  }
}
} -
Choose Create to save the event.
-
Navigate to the AWS IoT console, choose Test on the navigation pane, and select MQTT client.
-
Configure the MQTT client to subscribe to "#" (all topics).
-
Click on Test in the Lambda function page to generate the test event you just created.
-
Verify the published data in the AWS IoT Core MQTT Test client:
-
Open another window. Go to AWS IoT Console, select Test under Subscription Topic, enter # and select Subscribe to topic.
-
The output should look similar to this:
-
    000000000000000088/project/sensor/decoded      February 09, 2021, 14:45:29 (UTC+0800)
    {
        "devEui": "000000000000000088",
        "fPort": 1,
        "freq": "868100000",
        "timestamp": "2021-02-08T04:00:40Z",
        "temperature": -4.1
    }
Create the Destination Rule
In this section, you create the IoT rule that forwards the device payload to your application. This rule is associated with the destination created in Set Up a Destination for Device Traffic.
- Navigate to the AWS IoT console.
- In the navigation pane, choose Act, then select Rules.
- On the Rules page, choose Create.
- On the Create a rule page, enter as follows:
- Name: LoRaWANRouting
- Description: Any description of your choice.
The Name of your Rule is the information needed when you provision devices to run on AWS IoT Core for LoRaWAN.
- Leave the default Rule query statement 'SELECT * FROM 'iot/topic' unchanged. This query has no effect at this time, as traffic is currently forwarded to the rules engine based on the destination.
- Under Set one or more actions, choose Add action.
- On the Select an action page, choose Republish a message to an AWS IoT topic. Scroll down, and choose Configure action.
- On the Configure action page, for Topic, enter project/sensor/decoded. The AWS IoT Rules Engine will forward messages to this topic.
- Under Choose or create a role to grant AWS IoT access to perform this action, select Create Role.
- For Name, enter a name of your choice.
- Choose Create role to complete the role creation. You will see a "Policy Attached" tag next to the role name, indicating that the Rules Engine has been permitted to execute the action.
- Choose Add action.
- Add one more action to invoke the Lambda function. Under Set one or more actions, choose Add action.
- Choose Send a message to a Lambda function.
- Choose Configure action.
- Select the Lambda function created earlier and choose Add action.
- Then, choose Create rule.
- A "Success" message will be displayed at the top of the panel, and the destination has a rule bound to it.
You can now check that the decoded data is received and republished by AWS by triggering a condition or event on the device.
- Go to the AWS IoT console. In the navigation pane, select Test, and choose MQTT client.
- Subscribe to the wildcard topic # to receive messages from all topics.
- Send an uplink message from the device.
- You should see traffic similar as shown below:
```json
    393331375d387505/project/sensor/decoded           February 09, 2021, 14:47:21 (UTC+0800)
    {
    "devEui": "393331375d387505",
    "fPort": 1,
    "freq": "867100000",
    "timestamp": "2021-02-09T06:47:20Z",
    "temperature": 27.2
    }
project/sensor/decoded    February 09, 2021, 14:47:21 (UTC+0800)
    {
        "WirelessDeviceID": "6477ec22-9570-31d5981da021",
        "PayloadData": "AWcBEA==",
        "WirelessMetadata": {
            "LoRaWAN": {
                "DataRate": "4",
                "DevEui": "393331375d387505",
                "FPort": 1,
                "Frequency": "867100000",
                "Gateways": [
                    {
                        "GatewayEui": "ac1ff09fffe014bd5",
                        "Rssi": -103,
                        "Snr": 8.5
                    }
                ],
                "Timestamp": "2021-02-09T06:47:20Z"
            }
        }
    }
Configure Amazon SNS
You will be using the Amazon Simple Notification Service to send text messages (SMS) when certain conditions are met.
- Go to the Amazon SNS console.
- Click on the menu to open the navigation pane.
- Select Text Messaging (SMS) and choose Publish text message.
- Under the Message type, select Promotional.
- Enter your phone number (phone number that will receive text alerts).
- Enter Test message for the Message and choose Publish message.
- If the phone number you entered is valid, you will receive a text message and your phone number will be confirmed.
- Create an Amazon SNS Topic as follows:
- In the navigation pane, choose Topics.
- Select Create topic.
- Under Details, select Standard.
- Enter a name of your choice. Here, you will use "text_topic".
- Choose Create topic.
- Create a subscription for this topic:
- On the page for the newly created text_topic, choose the Subscriptions tab.
- Choose Create subscription.
- Select Protocol as SMS from the drop-down.
- Under Endpoint, enter the previously validated phone number to receive the SMS alerts.
- Choose Create subscription. You should see a "Subscription to text_topic created successfully" message.
Add a Rule for Amazon SNS Notification
Now, add a new rule to send an Amazon SNS notification when certain conditions are met in a decoded message.
-
Navigate to the AWS IoT console.
-
In the navigation pane, choose Act, then Rules.
-
On the Rules page, choose Create.
-
Enter the Name as text_alert and provide an appropriate Description.
-
Under the Rule query statement, enter the following query:
SELECT devEui as device_id, "Temperature exceeded 25" as message, temperature as temp, timestamp as time FROM '+/project/sensor/decoded' where temperature > 25 -
Choose Add action.
-
Choose Send a message as an SNS push notification.
-
Choose Configure action.
-
Under SNS target, select text_topic from the drop-down.
-
Select RAW under Message format.
-
Under Choose or create a role to grant AWS IoT access to perform this action, choose Create role.
-
Enter a name for the role, and choose Add action.
-
Select Create rule. You should see a "Success" message, indicating that the rule has been created.
Test the Rule for Amazon SNS Notification
After adding the rule for Amazon SNS notification, you should receive a text message when hitting the event.
Send an uplink message from the device. The resulting notification contains information similar to the following example:
    {
        "device_id": "393331375d387505",
        "message": "Temperature exceeded 25",
        "temp": 27.2,
        "time": "2021-02-22T07:58:54Z"
    }
Send a Downlink Payload
This section shows how to send a downlink payload from AWS IoT LoRaWAN Server to end-device.
Install the AWS SAM CLI
Follow the instruction in the online guide to install the AWS SAM CLI.
Deploy the SAM Template to AWS
Follow the instruction in the Deploy SAM template to AWS GitHub.
Send a Payload to the End Device
- Send the payload to the device.
- Go to the AWS IoT console.
- In the navigation pane, select Test, and choose MQTT client.
- Subscribe to the wildcard topic # to receive messages from all topics.
- Specify the topic to
cmd/downlink/{WirelessDeviceId}and a base64-encoded message.
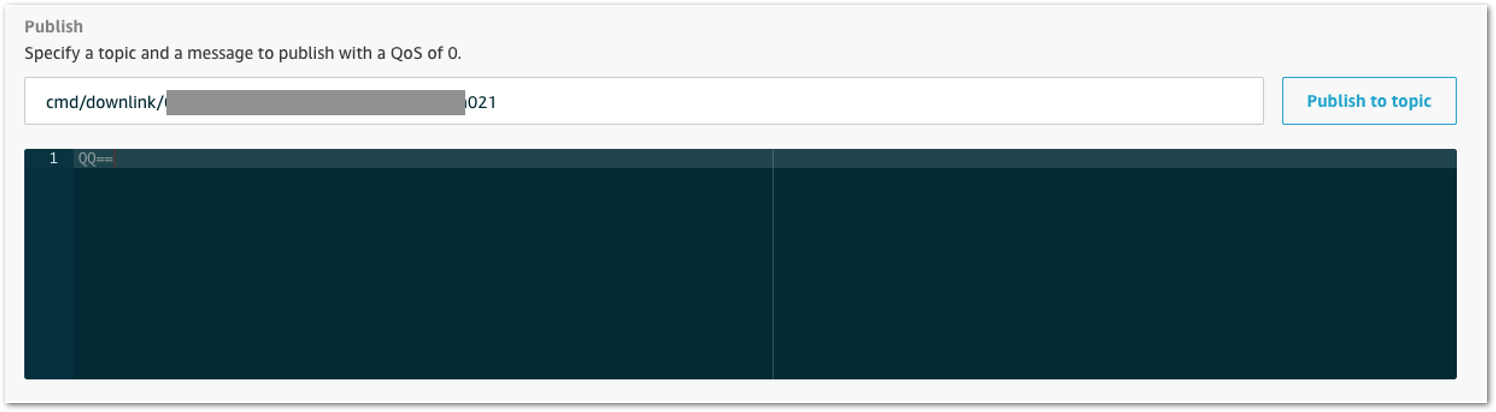 Figure 1: Specifying a topic
-
Check the downlink status in AWS:
  downlink/status/6477ec22-9570-4fea-9668-31d5981da021   February 09, 2021, 15:09:29 (UTC+0800)
  {
      "sendresult": {
          "status": 200,
          "RequestId": "4f1d36e1-8316-4436-8e9d-2207e3711755",
          "MessageId": "60223529-0011d9f5-0095-0008",
          "ParameterTrace": {
              "PayloadDate": "QQ==",
              "WirelessDeviceId": "6477ec22-9570-4fea-9668-31d5981da021",
              "Fport": 1,
              "TransmitMode": 1
          }
      }
  }
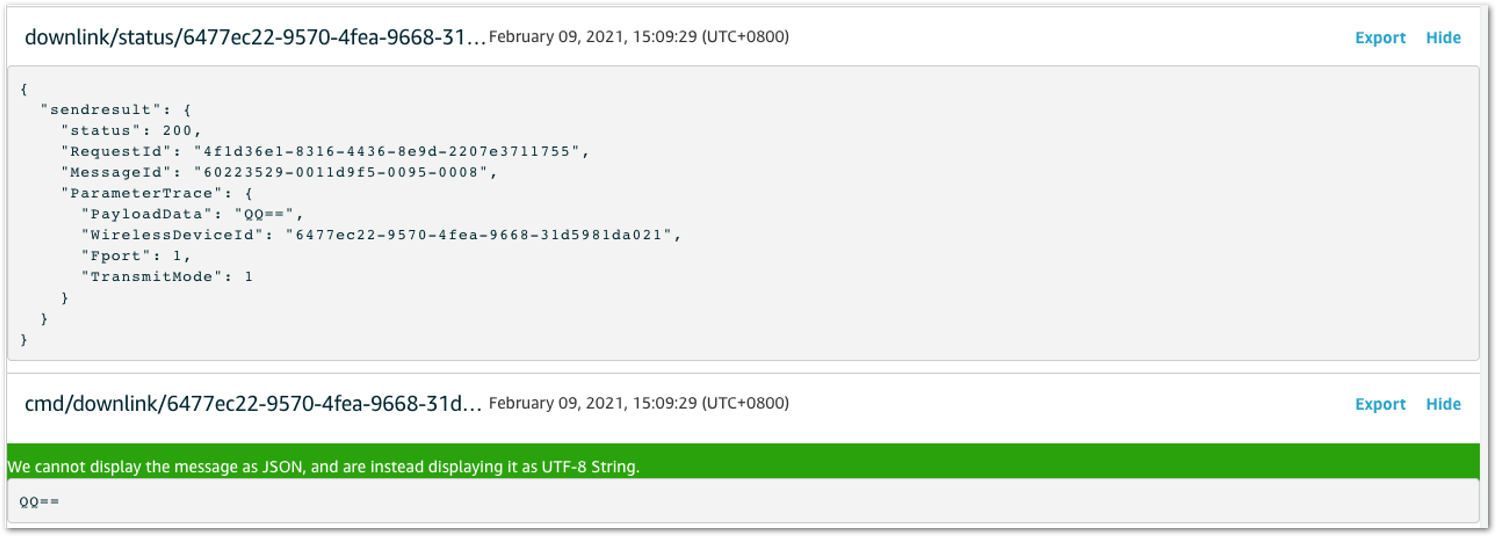 Figure 1: Traffic on AWS
- Check the device console to confirm that the downlink was received:
SYSLOG:4:LoRa rX : 41 - 14
SYSLOG:4:LoRa Tx :
IoT Analytics
You will use IoT Analytics to visually display data via graphs if there is a need in the future to do further analysis.
Create an IoT Analytics Rule
Create a Rule First-
Navigate to the AWS IoT console.
-
In the navigation pane, choose Act and then, choose Rules.
-
On the Rules page, choose Create.
-
Enter the Name as Visualize and provide an appropriate Description.
-
Under the Rule query statement, enter the following query:
SELECT * FROM 'project/sensor/decoded' -
Choose Add action.
-
Select Send a message to IoT Analytics.
-
Choose Configure Action.
-
Choose Quick Create IoT Analytics Resources.
-
Under Resource Prefix, enter an appropriate prefix for your resources, such as LoRa Choose Quick Create.
-
Once the Quick Create Finished message is displayed, choose Add action.
-
Choose Create rule. You should see a Success message, indicating that the rule has been created.
Configure AWS IoT Analytics
Set Up AWS IoT Analytics-
Go to the AWS IoT Analytics console.
-
In the navigation panel, choose Data sets.
-
Select the data set generated by the Quick Create in Create an IoT Analytics Rule.
-
In the Details section, edit the SQL query.
-
Replace the query with as follows:
SELECT devEui as device_id, temperature as temp, timestamp as time FROM LoRa_datastore -
Under Schedule, choose Add schedule.
-
Under Frequency, choose Every 1 minute, and then click Save.
Configure Amazon QuickSight
Amazon QuickSight lets you easily create and publish interactive BI dashboards that include Machine Learning-powered insights.
- Go to AWS Management console.
- From the management console, enter QuickSight in the "Search for services, features.." search box.
- Click on QuickSight in the search results.
- If you haven't signed up for the service before, go ahead and sign up, as there is a free trial period.
- Select the Standard Edition, and choose Continue.
- Enter a unique name in the field QuickSight account name.
- Fill in the Notification email address.
- Review the other checkbox options and change them as necessary. The AWS IoT Analytics option must be selected.
- Choose Finish. You will see a confirmation message.
- Choose Go to Amazon QuickSight.
- Select Datasets.
- Select New dataset.
- Select AWS IoT Analytics.
- Under Select an AWS IoT Analytics data set to import, choose the data set created in Create an IoT Analytics Rule.
- Choose Create data source, and then choose Visualize.
- Select the dataset created, then select Refresh or Schedule Refresh for a periodic refresh of the dataset.
Testing Your "Hello World" Application
Using your device, create a condition to generate an event such as a high-temperature condition. If the temperature is above the configured threshold, then you will receive a text alert on your phone. This alert will include key parameters about the alert.
You can also visualize the data set as follows:
- Go to the AWS IoT Analytics console.
- Choose Data sets.
- Select the dataset created earlier.
- Select Content and ensure there are at least a few uplink entries available in the data set.
- Go to the QuickSight console.
- Choose New analysis.
- Choose the dataset created in Create an IoT Analytics Rule.
- To see a chart of your dataset, select the following values:
- Time on the X-axis
- Value as temp (Average)
- Color as device_id.
Debugging
If you experience any issues, you can check the logs located in the /var/log/ directory.
Troubleshooting
- Unable to see the web login:
- Check that your wifi is connected to RAKWireless_XXXX.
- Try ping 192.168.230.1.


