RAK4631-R WisBlock LoRaWAN Module Demo and Example
This section assumes that you are already checked the RAK4631-R Quick Start Guide and are already familiar with the hardware and software components of the RAK4631-R. If not yet, it is highly encouraged that you check the Quick Start Guide first. There are many things you can do with RAK4631-R and the WisBlock ecosystem.
In this section, both examples for basic LoRaWAN and BLE applications are covered:
LoRaWAN Example
This example will illustrate how to use RAK4631-R as a LoRaWAN end-device.
This guide will not discuss the setup of the LoRaWAN gateways and network server. To use RAK4631-R as a LoRaWAN end-device, it needs to be within reach of a working LoRaWAN gateway registered to a LoRaWAN network server(LNS) or with a built-in network server.
Moreover, this guide will use the internal network server of the WisGate Edge RAK7268 LoRawan gateway. RAK offers various models of WisGate LoRaWAN gateways that you can buy from the RAK store.
If you are new to LoRaWAN, here are a few good references about LoRaWAN and gateways:
- LoRaWAN 101
- What is a LoRaWAN Gateway
- How do LoRaWAN Gateways work?
- Things to Consider When Picking A LoRaWAN Gateway
LoRaWAN gateway models like WisGate Edge have built-in network servers. It is also common that the LoRaWAN network server is external or in the cloud. The popular LoRaWAN network server in the cloud that you can use for free (but offers enterprise service, too) is TTN.
These are three main things you need to have a working LoRaWAN application.
- LoRaWAN Gateway (this guide uses RAK7268 WisGate Edge gateway)
- LoRaWAN Network Server (this guide uses RAK7268 WisGate Edge built-in LoRaWAN network server)
- LoRaWAN End-Device (RAK4631-R in this guide)
This LoRaWAN Example section will cover the following steps:
- Adding the RAK4631-R as end-device to the LoRaWAN network server(LNS)
- Preparing the modules RAK1901 and RAK1902 for the application example
- Uploading the LoRaWAN example (Smart_Farm) of RAK4631-R
Adding the RAK4631-R as an End-Device to the LoRaWAN Network Server
You need to have a functional RAK7268 to proceed with the next steps. The complete guide about RAK7268 WisGate Edge can be found on RAK7268 quick start guide. This section will show you how to add a LoRaWAN application to the built-in network server of RAK7268 and how to add a device to it. You need to have access on the RAK7268 console portal to perform the necessary configurations. The IP address you need to use to access the portal will depend on your type of connection to RAK7268. For example, if your RAK7268 is configured as Access Point, you can connect to it via http://192.168.230.1/.
This initial guide uses the LoRaWAN built-in network server of RAK7268, but you can use another LoRaWAN network server, as well, like TTN, Helium, AWS, etc. Those have different user interfaces, but the parameters to be configured should be the same as long as it follows the LoRaWAN specification standard.
Once you have a working RAK7268, you need to ensure that you use the built-in LoRaWAN network server(LNS). You can do this by configuring the gateway to network server mode. You need to click LoRa Network then select Network Settings.
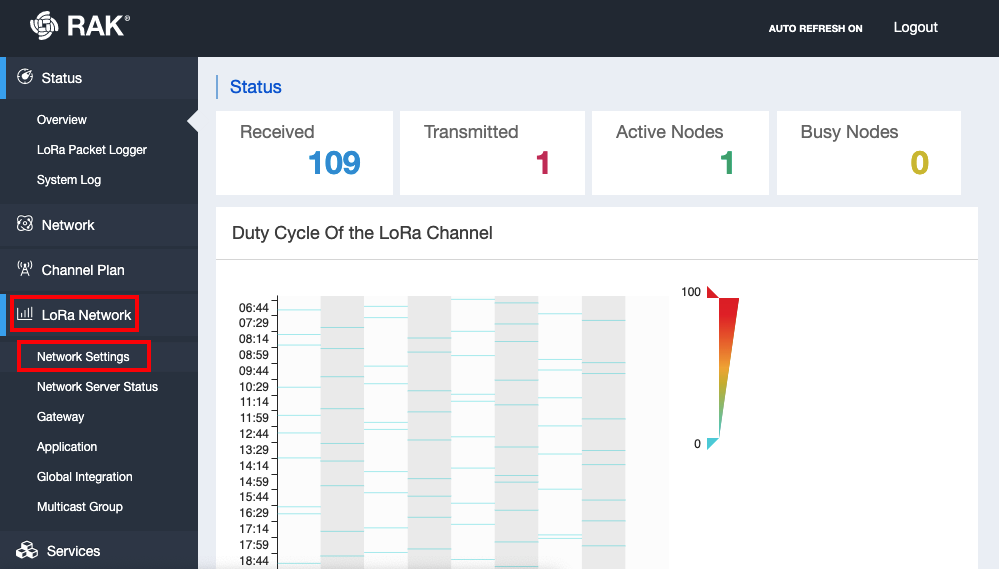 Figure 1: RAK7268 LoRa Network Settings
You need to select on the mode dropdown list Network Server and take note of the Region. The Region should be the same on the RAK4631-R code that you will compile in the later section of this guide. The region of the LoRaWAN gateway and LNS used in this guide is US915.
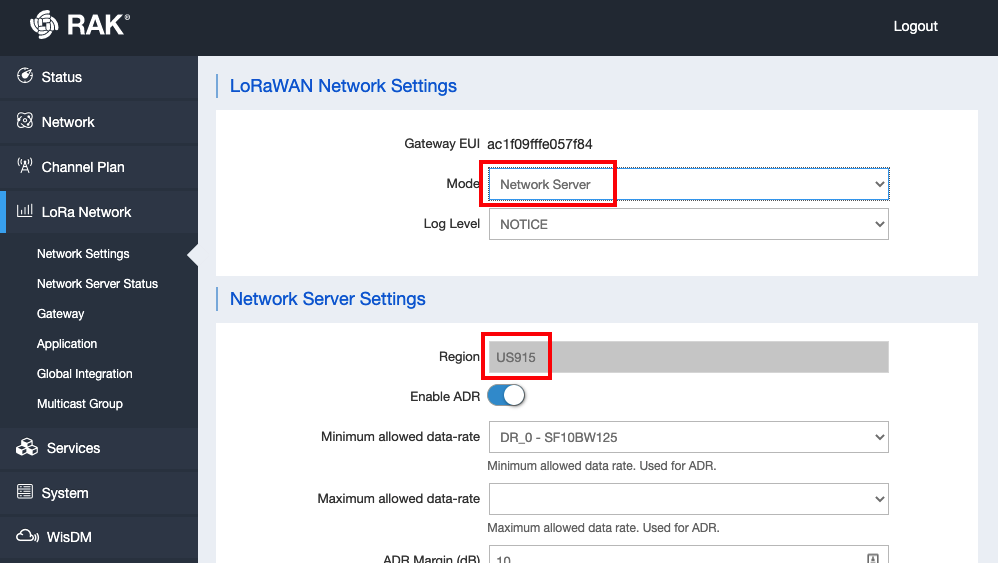 Figure 1: RAK7268 Network Server Mode
After configuring the gateway to use a built-in LoRaWAN network server(LNS), you need to add an application to the network server and register a device. You need to click Application, which will show all the LoRaWAN applications you have if there are any.
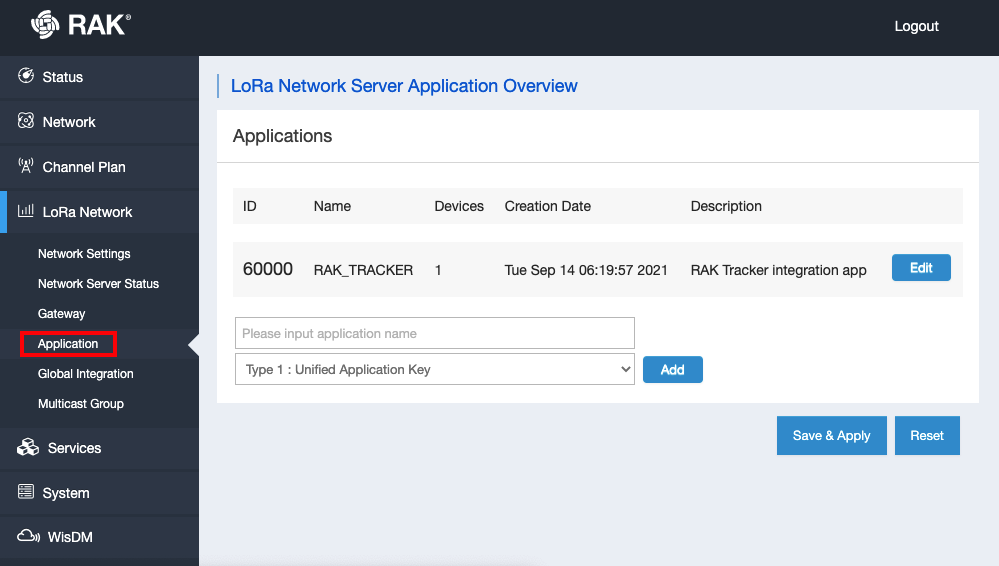 Figure 1: Accessing Application Console in the Network Server
You need to put a meaningful name for your application. For this illustration, the RAK4631-R is used, and then, you should select Unified Application Key. You can click Add and Save & Apply to proceed with the configuration of the application.
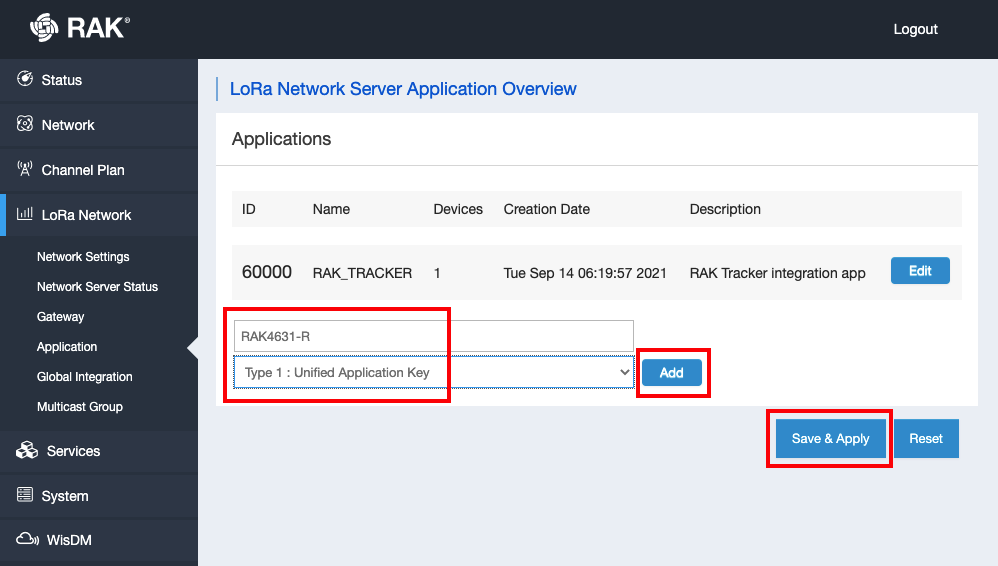 Figure 1: Adding Application to the LoRaWAN network server
Another important parameter in a LoRaWAN application is the Application Key, which is used in OTAA activation. You can manually add one, but it is advisable to let the network server generate it by clicking the generate icon button. You can also add a description to your application. After having the Application Key, you can now click Save & Apply.
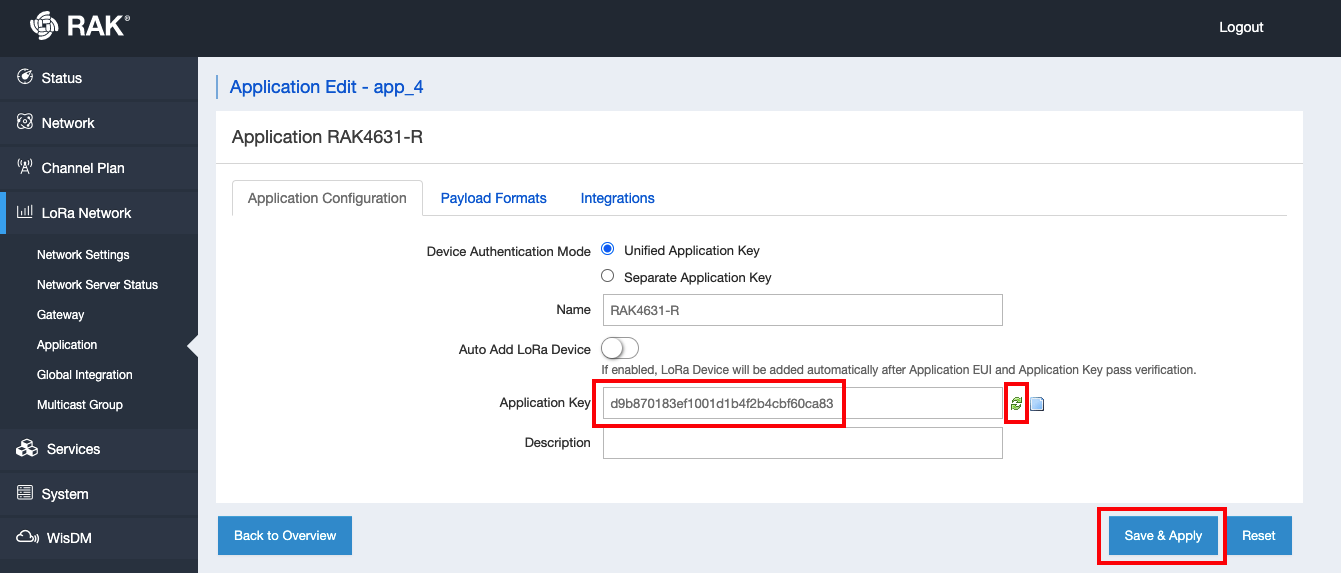 Figure 1: Configure Application Key
The new application will now be added to the application list of your network server. To register your RAK4631-R WisBlock Core as a device in that application, you need to click edit to access the application console.
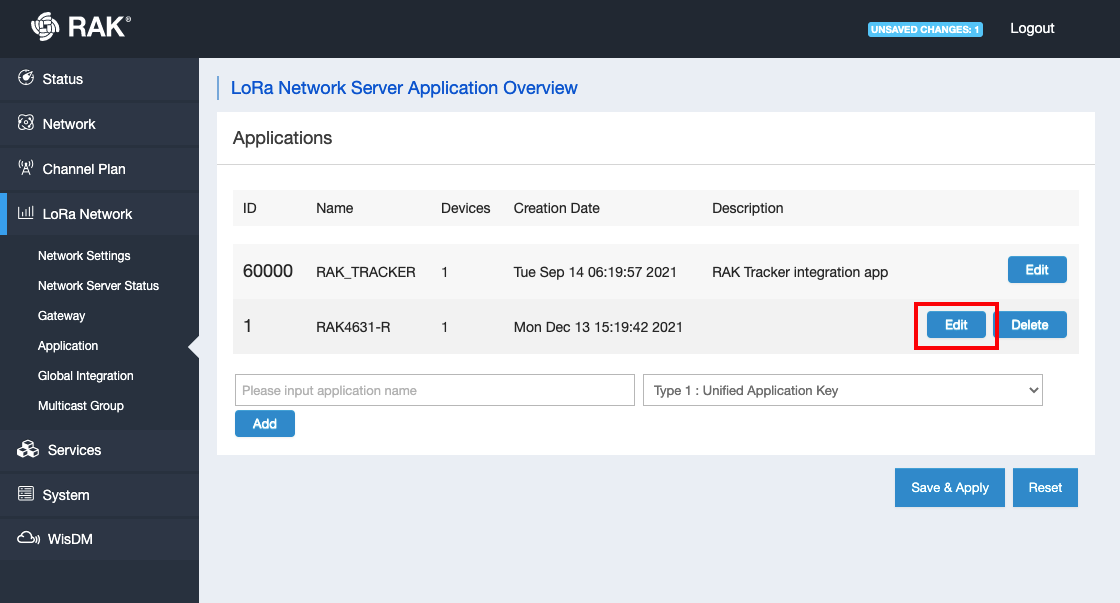 Figure 1: Access the LoRaWAN Application Console
To register your RAK4631-R WisBlock Core, you need to add its device EUI (DEVEUI) on the application console. This must be unique, and it is highly encouraged that you use the DEVEUI printed in the sticker of your RAK4631-R module. You then need to click the Add button to proceed with the next configurations.
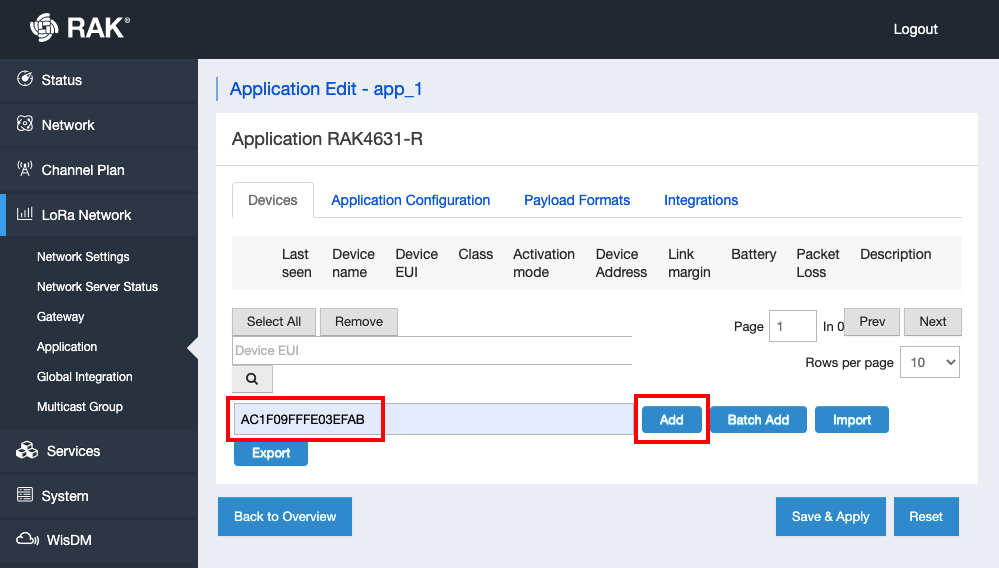 Figure 1: Adding Device to the Application
The next step is to configure the other important parameters related to LoRaWAN. You need to put a name on your device and for this case, it is RAK4631-R. Three parameters in this list that must be the same as your RAK4631-R code are the Class, Join Mode, and Application Key. On the example Arduino code in the later part of this guide, Class is default to A and Join Mode to OTAA, so you will only need to modify in the code the application key. Lastly, the LoRaWAN MAC Version must be 1.0.3. After setting up all these parameters, you must click Save & Apply.
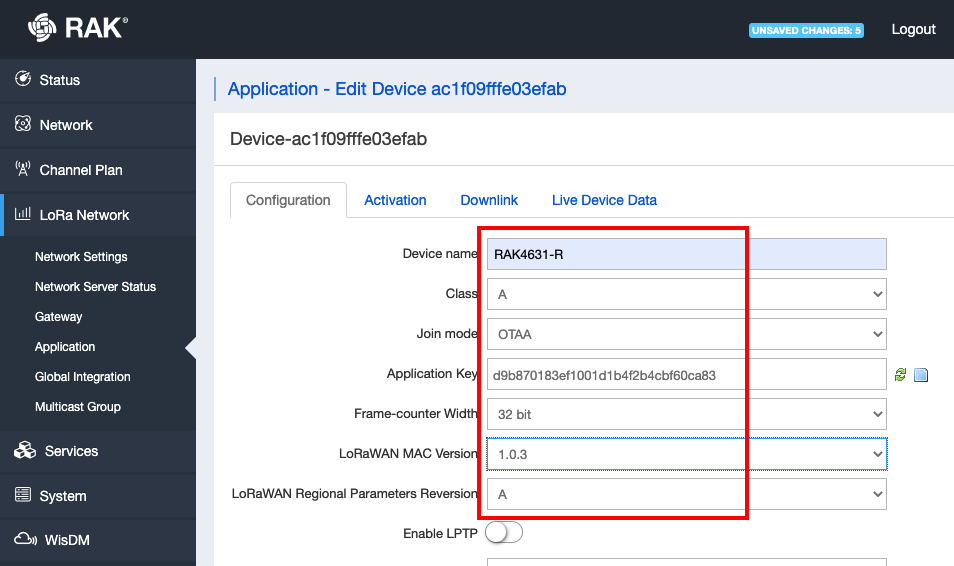 Figure 1: Configuration of the RAK4631-R as OTAA Device
The device will now be shown as a device in your application. The next step is to prepare the RAK4631-R WisBlock Core module so that it can match all the parameters in the network server.
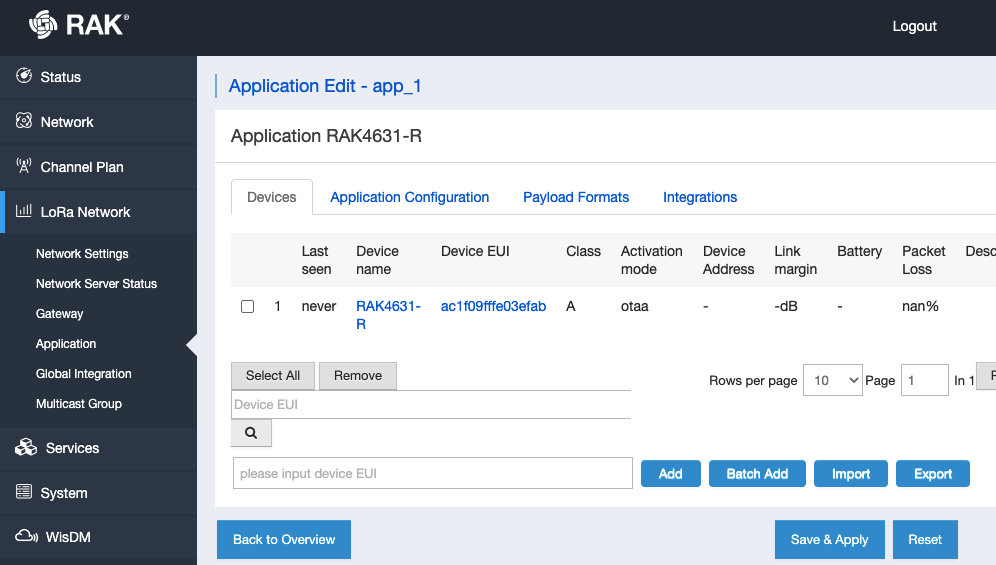 Figure 1: RAK4631-R Registered on the Network Server
Preparing the modules RAK1901 and RAK1902 to be connected to RAK4631-R
This LoRaWAN example requires RAK1901 and RAK1902 WisBlock modules to be connected on the sensor slot of the WisBlock Base where RAK4631-R is attached. If your RAK4631-R is not yet connected to a WisBlock Base board, please read the RAK4631-R Hardware Setup section on the quick start guide. This is required and you cannot skip these hardware connections.
The data coming from these sensors will be sent via LoRaWAN. Without these sensors attached, the LoRaWAN example code will fail compiling.
There are more WisBlock modules you can connect to RAK4631-R via WisBlock Base. It is not limited to RAK1901 and RAK1902. But for this example, these two modules are used for demonstration.
Refer to the hardware setup guide of RAK1901 and hardware setup guide RAK1902 for the complete instruction how to connect them in the Wisblock Base board.
Just follow the hardware setup and do not proceed with the software configurations on the quick start guides of RAK1901 and RAK1902. The LoRaWAN application example in this guide requires different libraries to the modules' quick start guides.
After you connect the modules to the WisBlock Base, you need to add the required compatible libraries for RAK1901 and RAK1902. You need to download both the RAK1901 library and RAK1902 library. Other RAK developed libraries compatible with RAK4631-R can also be found in the RAK download site.
To add the needed libraries, you need to open Arduino IDE and click Sketch, Include Library, then Add .ZIP Library.
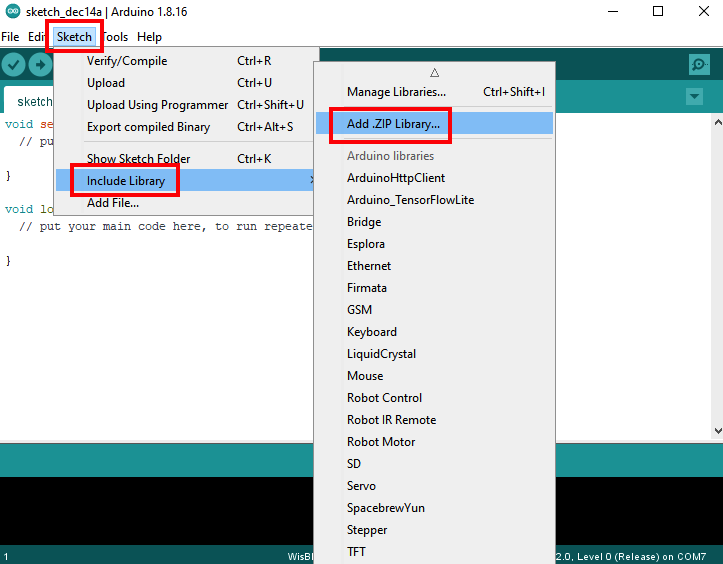 Figure 1: Adding RAK Libraries to Arduino IDE
You have to navigate on the directory where you downloaded the libraries mentioned in the previous step. You have to add both of these zip files.
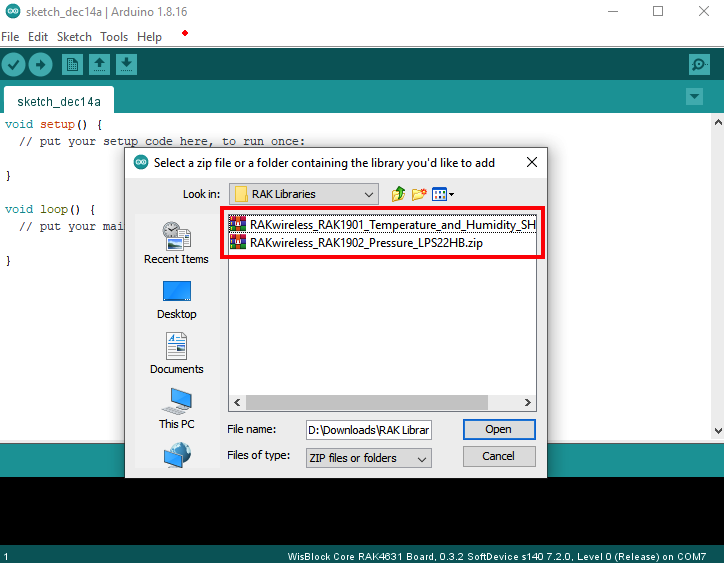 Figure 1: Adding RAK Libraries to Arduino IDE
If both libraries are successfully added, you should be able to see the example sketches for these two WisBlock modules available now in your Arduino IDE.
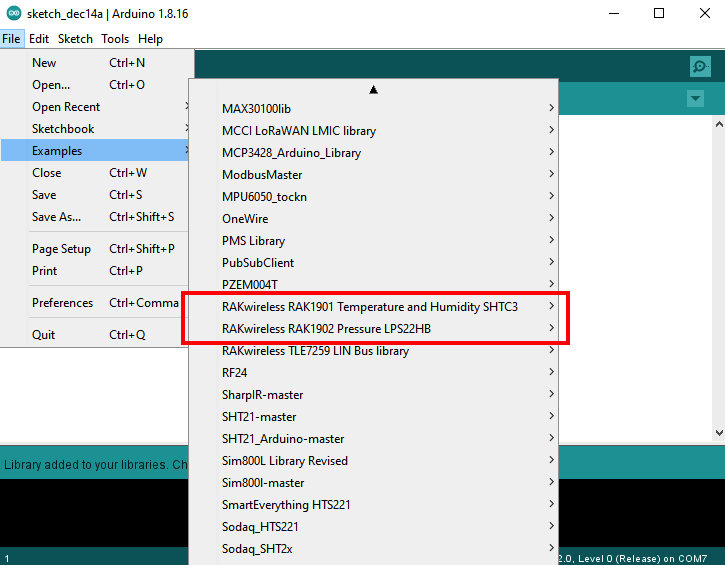 Figure 1: Adding RAK Libraries to Arduino IDE
Uploading LoRaWAN example to RAK4631-R
After successfully doing the previous steps above, you can now proceed with running the LoRaWAN application example Smart_Farm. You can access this example code under RAK WisBlock RUI examples.
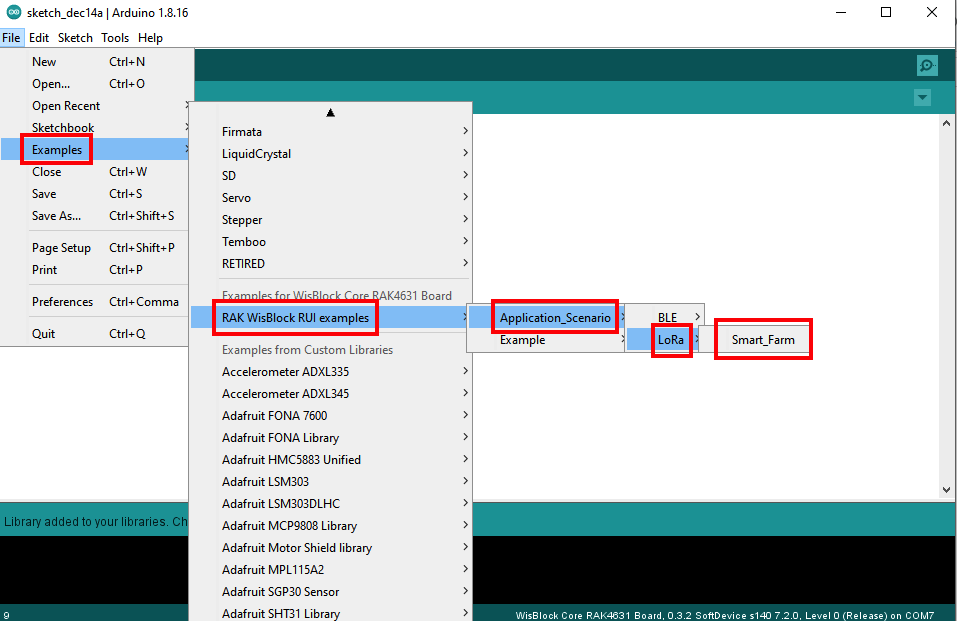 Figure 1: Opening Smart_Farm LoRaWAN Application Example
You can check the LoRaWAN application example code Smart_Farm on how it is structured and get familiar with it. There are a few things you need to modify in the code so that your RAK4631-R WisBlock Core can connect successfully to your gateway and network server.
You need to modify the device EUI (DEVEUI), application key (APPKEY), and the region.
- The device EUI (DEVEUI) should match the device EUI registered in your network server. This is the same DEVEUI in the RAK4631-R sticker if this is the one you used in your device registration in the network server. What's important is that your DEVEUI in code should match the DEVEUI in the network server application console. DEVEUI is MSB.
  // OTAA Device EUI MSB
  uint8_t node_device_eui[8] = {0xAC, 0x1F, 0x09, 0xFF, 0xFE, 0x03, 0xEF, 0xAB};
- Another important parameter to change is the application key (APPKEY). This parameter should also be the same with the APPKEY in the network server you configured in the adding RAK4631-R in the network server section.
// OTAA Application Key MSB
  uint8_t node_app_key[16] = {0xD9, 0xB8, 0x70, 0x18, 0x3E, 0xF1, 0x00, 0x1D, 0x1B, 0x4F, 0x2B, 0x4C, 0xBF, 0x60, 0xCA, 0x83};
- If the model of your RAK7268 gateway is
EU868, you do not need to modify the regional band section of the code. If you have a different one like in this guide which is US915, you have to update that as well in your code.
if(!(ret = api.lorawan.band.set(RAK_REGION_US915)))
RAK4631-R supports the following regions:
- RAK_REGION_EU433 = 0
- RAK_REGION_CN470 = 1
- RAK_REGION_RU864 = 2
- RAK_REGION_IN865 = 3
- RAK_REGION_EU868 = 4
- RAK_REGION_US915 = 5
- RAK_REGION_AU915 = 6
- RAK_REGION_KR920 = 7
- RAK_REGION_AS923 = 8
- You can also modify other parameters in the code. But to run the example code successfully, you will only need to update these three parameters.
After configuring the important LoRaWAN parameters in code, you need to ensure that you selected the RAK4631-R WisBlock Core and connected to the right COM port. If you do not see RAK4631-R in your board selection, you must check the Software Initial Guide from the quick start guide.
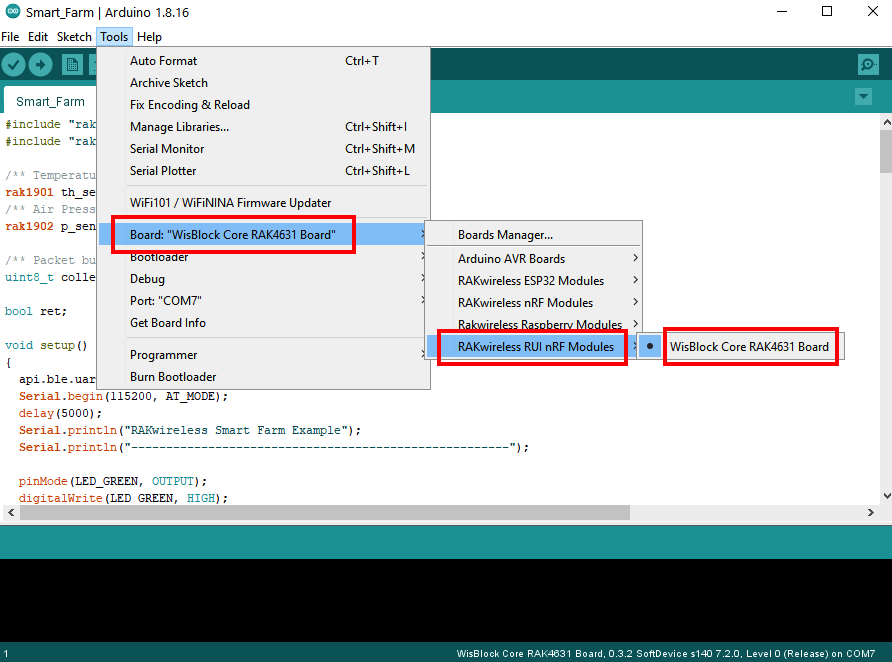 Figure 1: Selecting RAK4631-R in the Board Selection
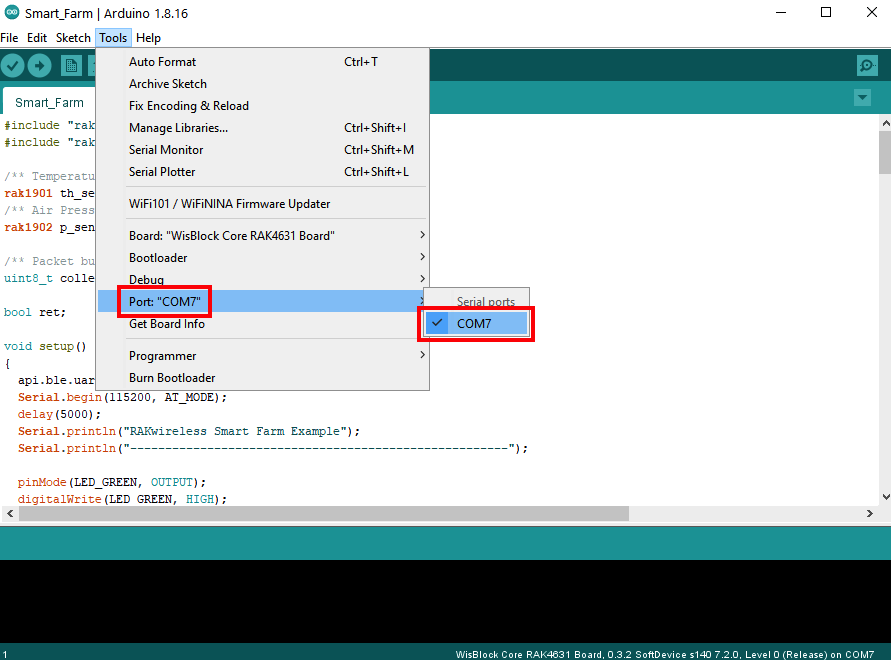 Figure 1: Selecting the COM Port
The last step is to upload the code by clicking the Upload icon. Then you must see Done uploading if everything is successful.
RAK4631-R should automatically go to BOOT mode when the firmware is uploaded via Arduino IDE.
If BOOT mode is not initiated, pull to ground the RESET pin twice (or double click the reset button if available) to force BOOT mode.
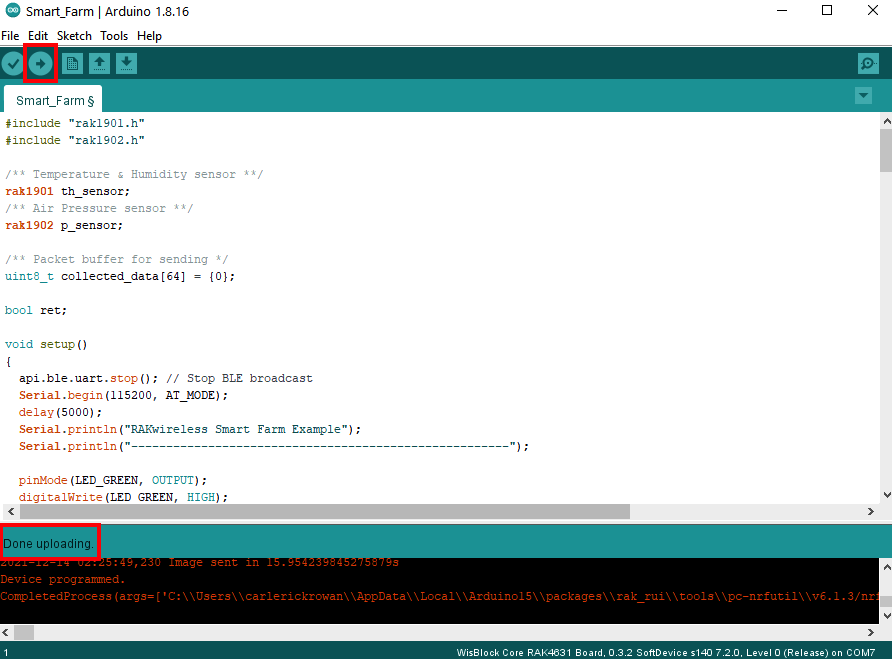 Figure 1: Successful Upload
You should now be able to see the terminal logs in the Serial Monitor of Arduino IDE. Sometimes COM port will be disconnected so you won't be able to see immediately the terminal output. You can reconnect the module or try to push the reset button on the WisBlock Base to update the terminal output.
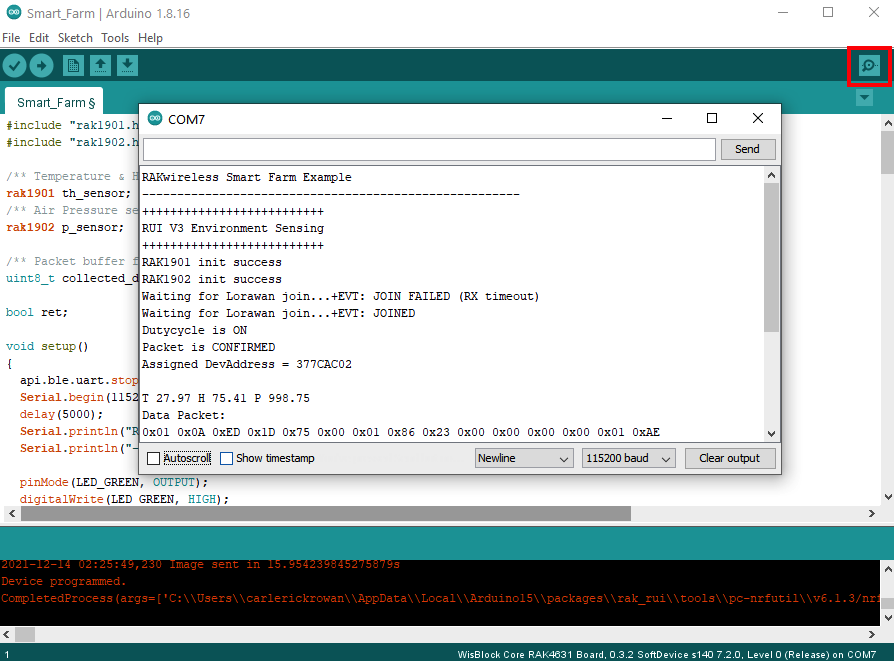 Figure 1: Terminal Logs
You can also check on the LoRaWAN network server of RAK7268 that your device is now activated.
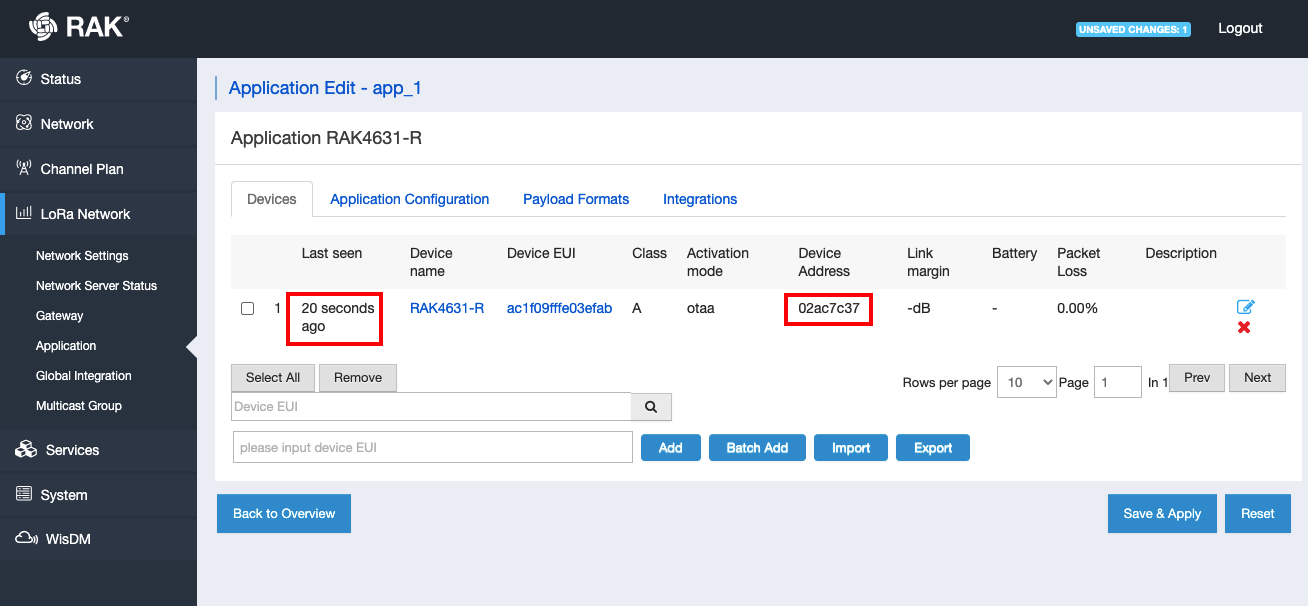 Figure 1: RAK4631-R Activated in the LoRaWAN Network Server
BLE Example
Compile a BLE with RAK1901 Sensor Example
- Open Application_Scenario then click BLE -> Environment_Detect. Example: Environment_Detect.
- Click the Verify icon to verify the sample code then the Upload icon to upload the sample code.
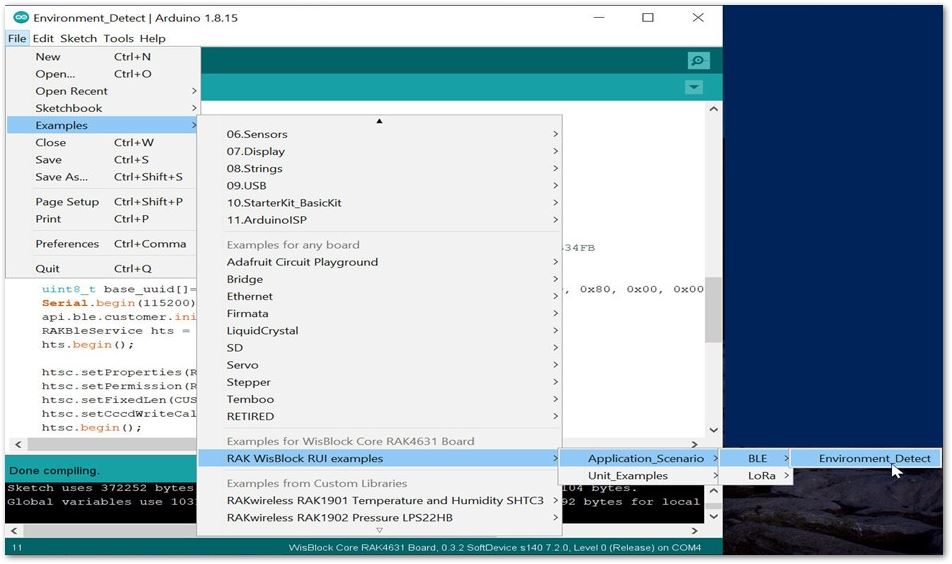 Figure 1: Open the Application Scenario
Download nRF Connect Mobile Application Over BLE
- Download and install nRF Connect for Mobile developed by Nordic Semiconductor.
- The App is available in App Store.
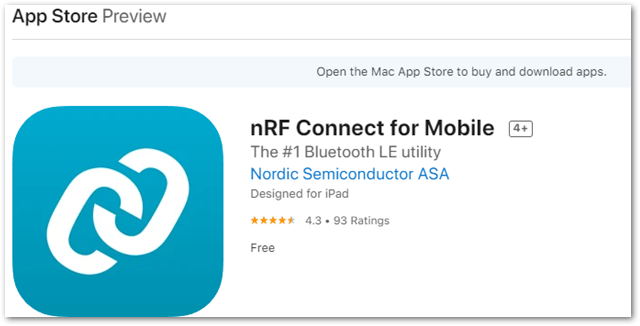 Figure 1: nRF Connect for Mobile
Download the nRF Connect Mobile Application for your iOS Phone here
- Make sure the Bluetooth on your mobile is turned on.
- Open the nRF Connect Mobile application, and you will see all BLE devices in range in the scan list.
- Press the reset button on the RAK4631-R and wait for a couple of seconds. Look for a BLE Device named "RAK" in the scan list of the app. Connect to this device, click “Client", and choose “Temperature Measurement".
This will be only visible for 60 seconds.
By default, the BLE signal of the RAK4631-R is turned off automatically if no connection is established after 60 seconds. Connect to the BLE signal of the RAK4631-R immediately after pressing the reset button.
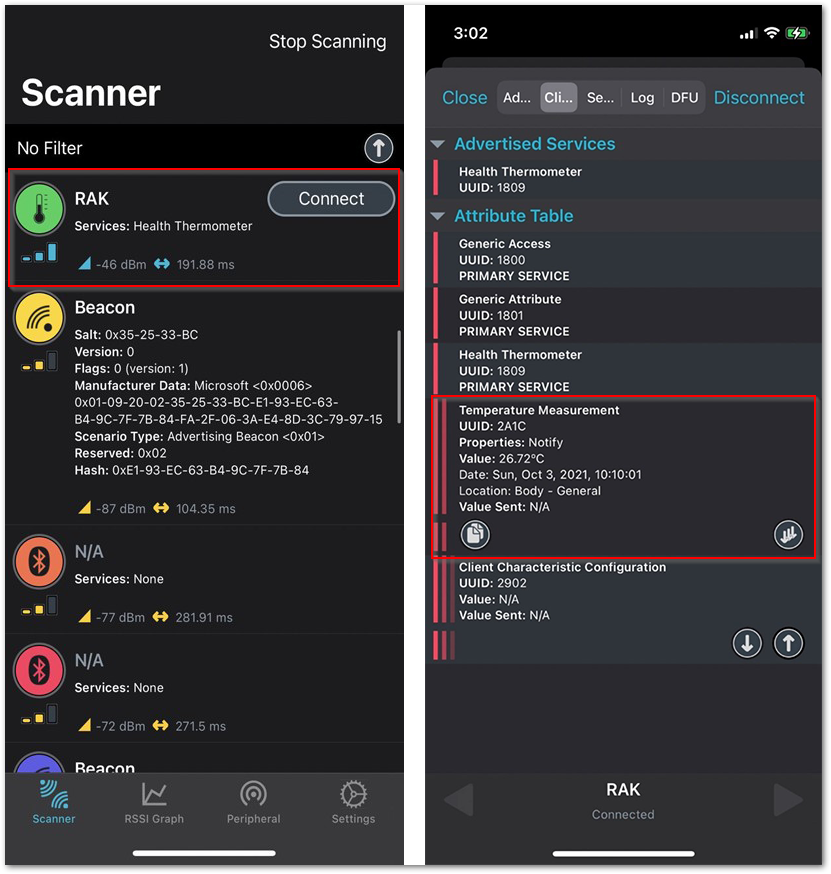 Figure 1: RAK device with Temperature Measurement
- Choose Temperature Measurement and click the button highlighted in red, as shown in Figure 22.
- It can be observed that values are updating data every 2 seconds.
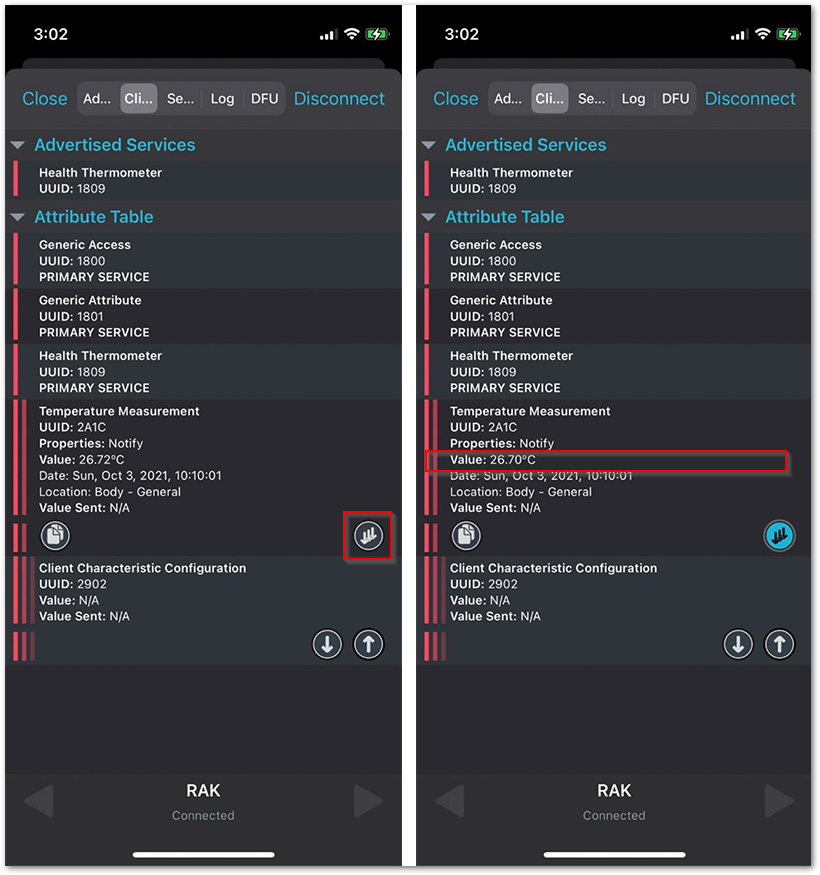 Figure 1: Temperature Measurement Value
- You can see the Serial Monitor icon and click it to connect the COM port.
- If the connection is successful and you will see the TEMPERATURE MEASUREMENT 'Notify' Enabled and notify value are updating data every 2 seconds.
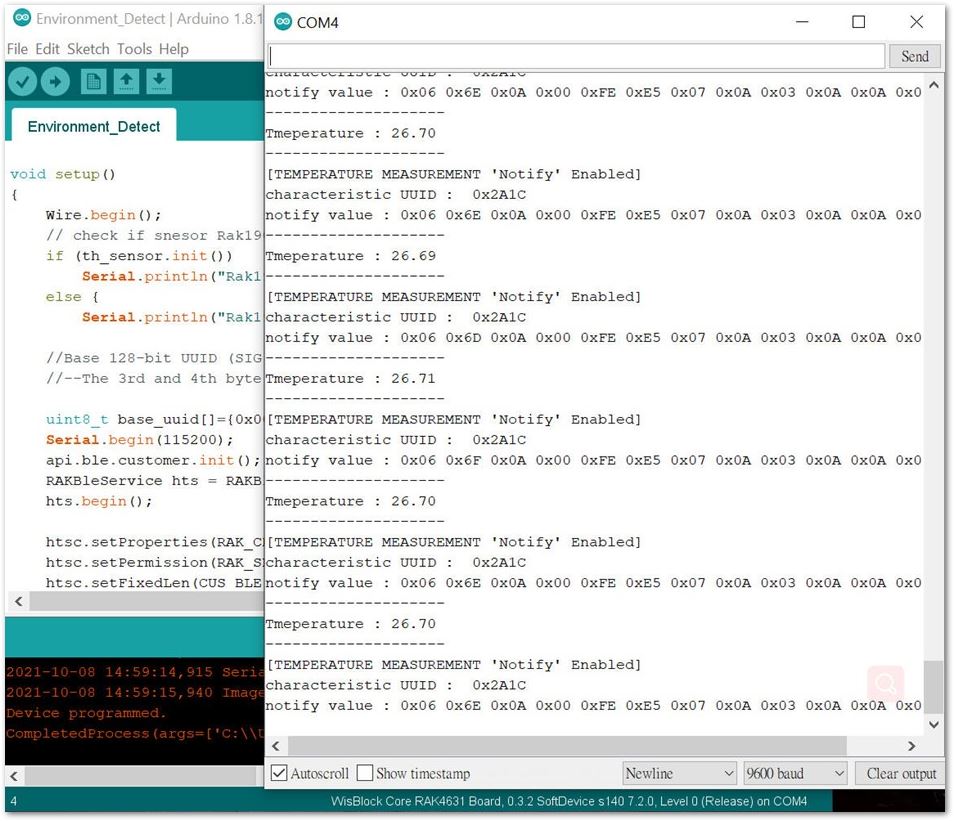 Figure 1: Updating the Temperature Measurement
 Device Firmware Upgrade (DFU) Over BLE in Arduino IDE
Compile an example to do Device Firmware Upgrade
- Open Unit_Examples ->RAK4631. Example: RAK4631.
- Print a debug message as shown below:
void setup()
{
……
  Serial.println("Example : New Version 2.0.0");
}
- Click the Verify icon to verify the sample code after the process is completed.
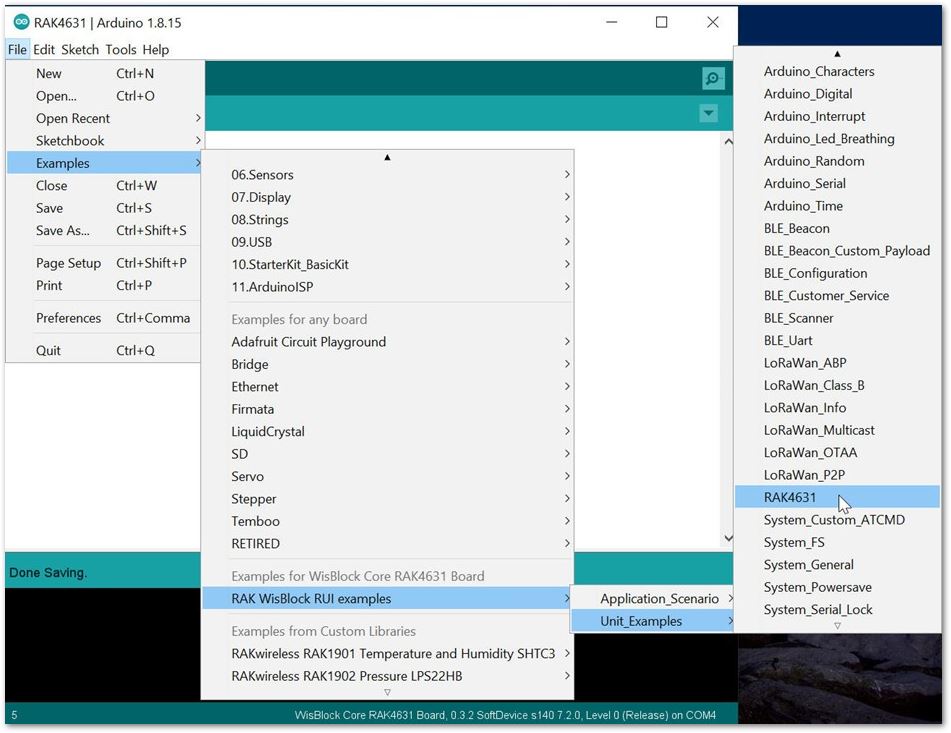 Figure 1: Open the RAK4631 Example
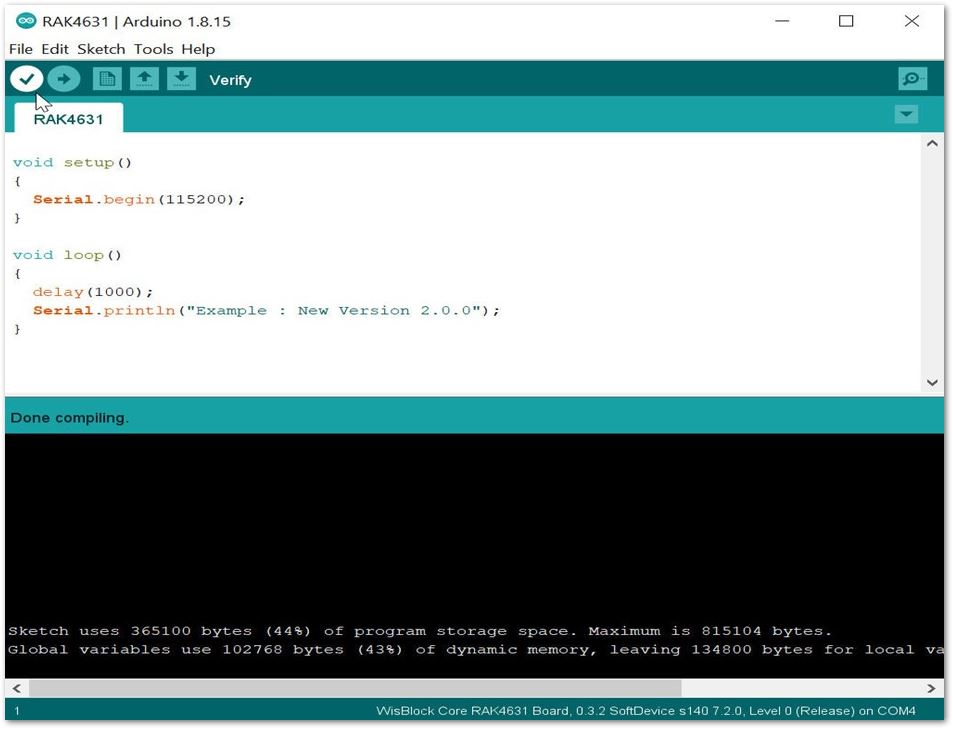 Figure 1: Compile the RAK4631 Example
The .zip file generated upon compilation can be found in a specific directory depending on your computer OS.
For Windows, you can find it in this path, C:\Users\ActualUsername\AppData\Local\Temp\arduino_build_xxxxxx\projectname.ino.zip.
Take note that the AppData folder is hidden, so you must change the setting of Windows folder options to show hidden folders.
For Linux (Ubuntu 20.04), you can find it in path /tmp/arduino_build_xxxxxx/projectname.ino.zip. It is not a hidden folder and can be accessed via file explorer or Linux shell.
For macOS, you can find it in this path, /var/folders/h8/gftf60cn2znct5wjwkwlxdd00000gn/T/arduino_build_xxxxxx/projectname.ino.zip.
The /var is under the private hidden folder. To access it, you have to open Finder in macOS, and press in your keyboard SHIFT+COMMAND+G and then you need to input directly the /var in the search textbox.
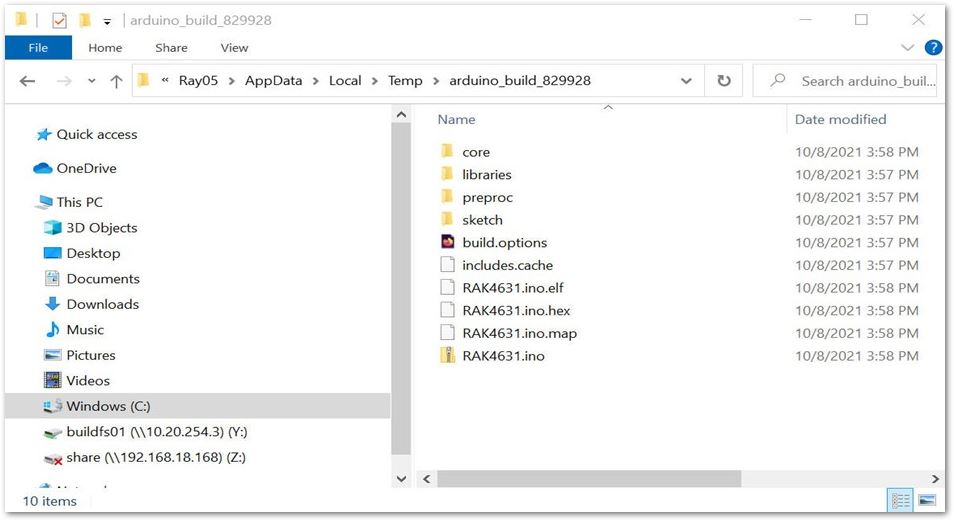 Figure 1: DFU file as RAK4631.ino.zip on Windows OS
Download DFU Package and Open nRF Toolbox
-
Download and install nRF Toolbox for BLE developed by Nordic Semiconductor. The App is available in App Store.
-
Download the DFU package of the RAK4631-R and save it on your mobile phone.
-
Make sure the Bluetooth on your mobile is turned on.
-
Open the nRF Toolbox Mobile application, and you will see Device Firmware Upgrade(DFU) in the support list.
You can upload the RAK4631.ino (ZIP) file to iCloud Services and download it to your smartphone.
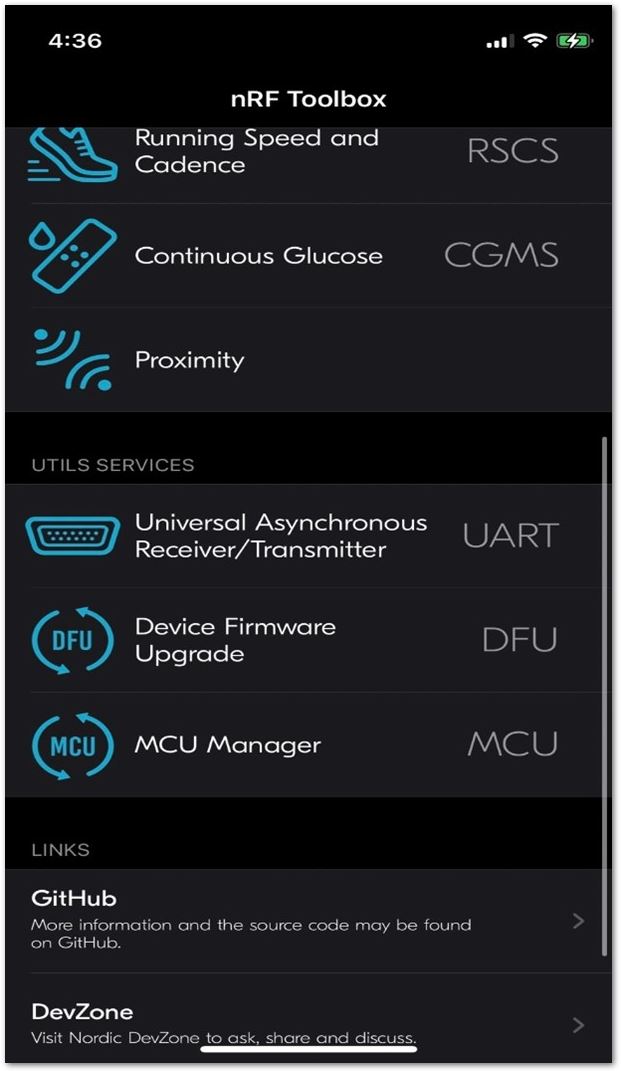 Figure 1: Device Firmware Upgrade
Connect to DFU Mode and Upgrade Firmware
- In the nRF Toolbox DFU mode to connect and scan BLE Device named "RAK.XXXXXX” in the scan list of the app.
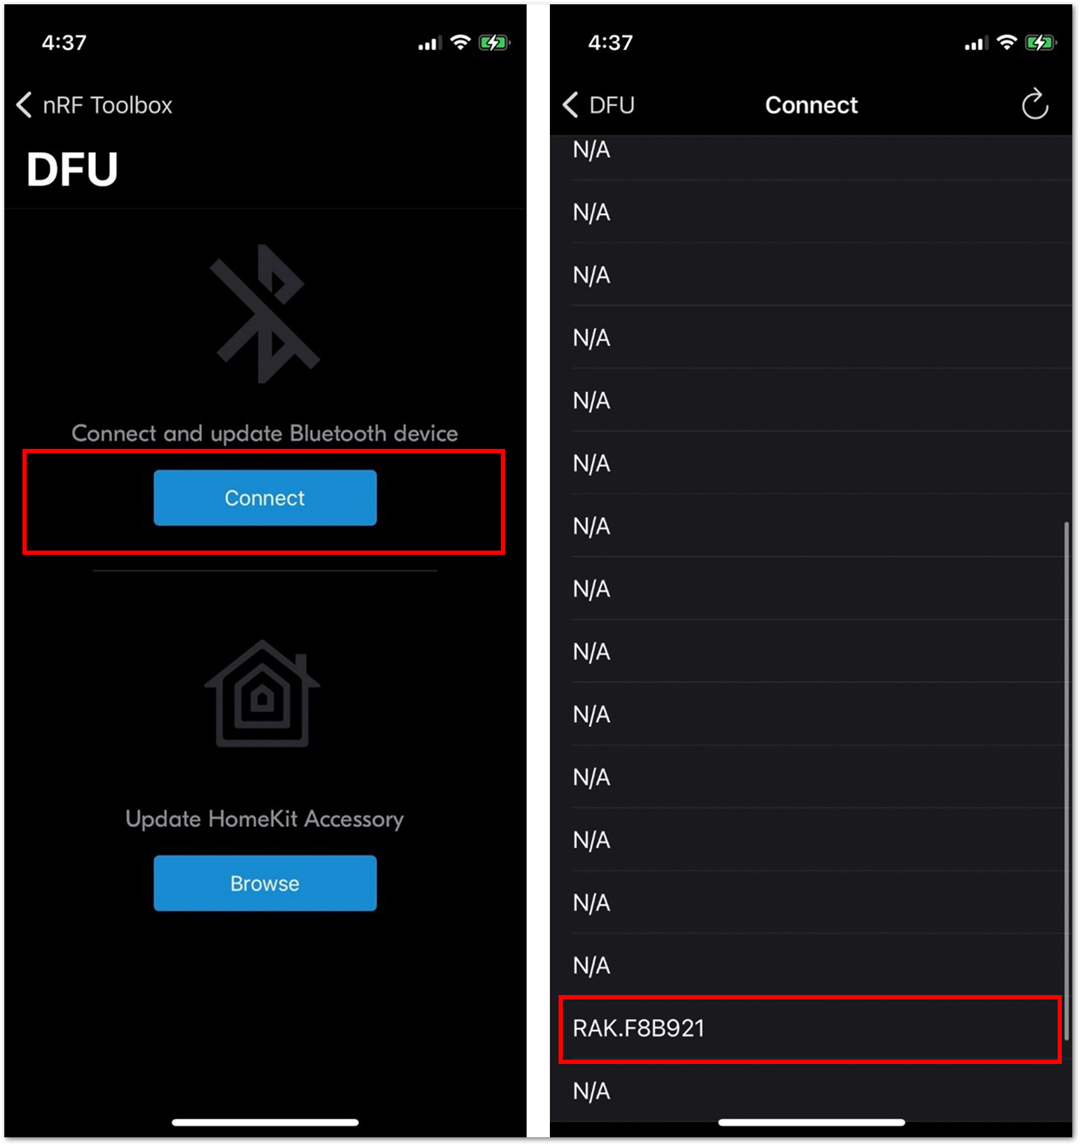 Figure 1: Connect DFU mode and Scan BLE device
- After connecting, click to Browse. Select the RAK4631.ino (ZIP) and press OK. This will then prompt you to select the zip file of the firmware that you have downloaded.
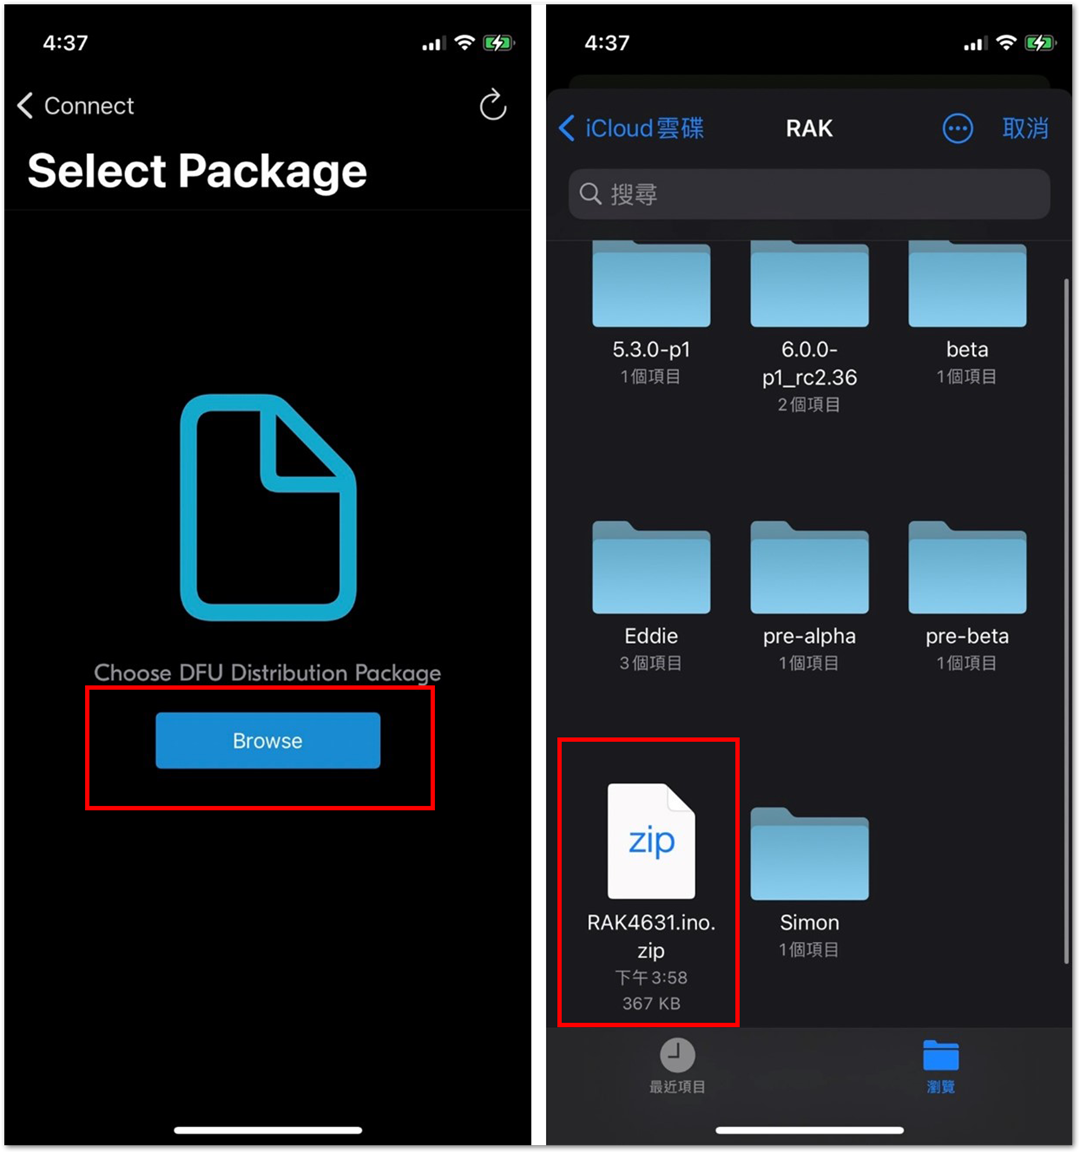 Figure 1: DFU mode Connect to scan BLE device
You can upload the RAK4631.ino (ZIP) file to iCloud Services and download it to your smartphone. https://www.icloud.com/
- Then, click to Update the firmware of your RAK4631-R through DFU over BLE. After upgrading, it will restart, and the DFU connection will be disconnected. Now, you can use your RAK4631-R with the latest firmware.
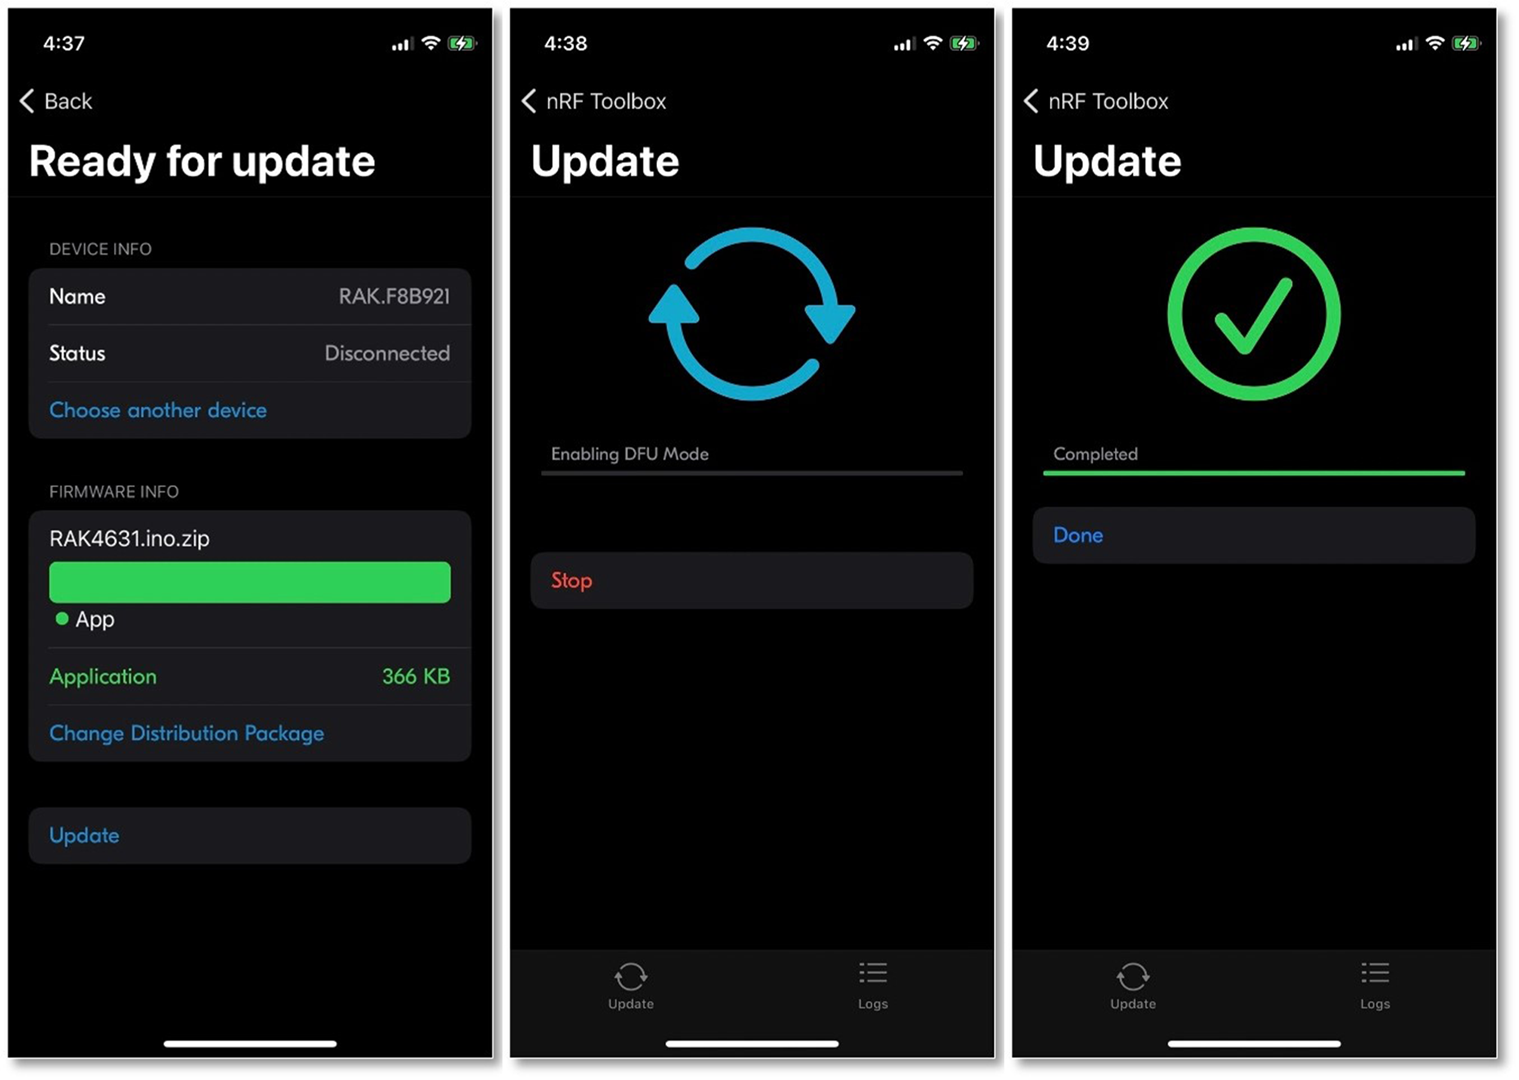 Figure 1: Update RAK4631-R Firmware via BLE
- Open the Serial Monitor icon and click it to connect COM port, the console will print "Example : New Version 2.0.0".
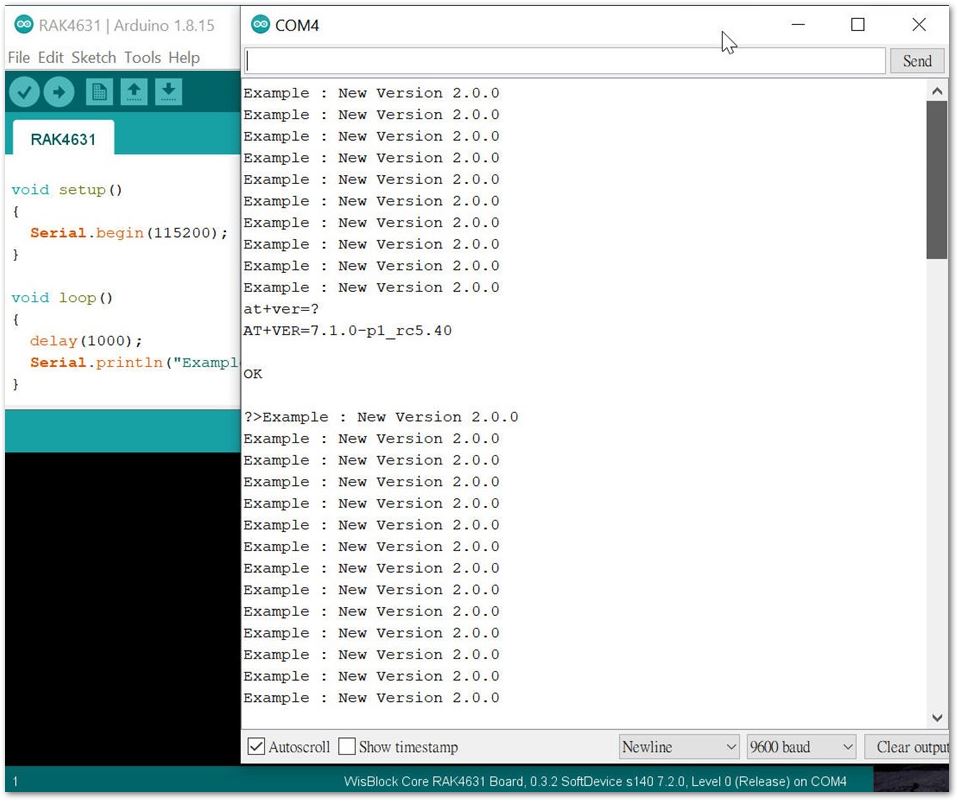 Figure 1: Serial Monitor log
Measure Battery Level Over BLE
Hardware Required
- WisBlock Base RAK5005-O
- WisBlock Core RAK4631
- WisBlock Sensor RAK1901(optional)
- WisBlock Sensor RAK1902(optional)
- A Rechargeable Battery 18650 4200mAh
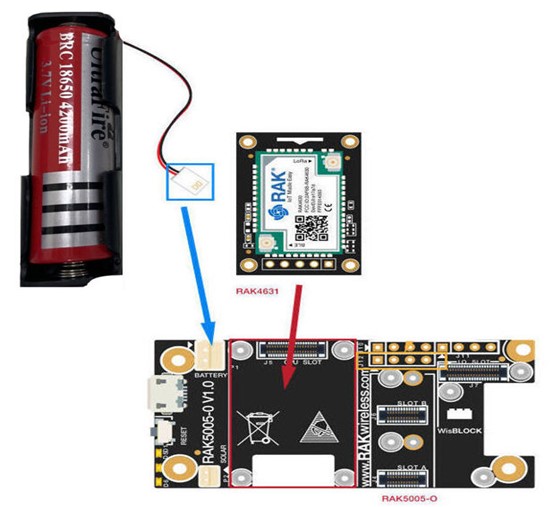 Figure 1: RAK4631-R with RAK5005-O HW Baseboard and Rechargeable Battery 18650
Connect to UART Mode and Measure the Battery Level Over BLE
- Unplug the USB connection to use a Rechargeable Battery 18650 instead.
- Refer to the Compile an Example to do Device Firmware Upgrade to Open an Example: example_rak4631. You can use the example_rak4631 to do the demonstration.
- Refer to the Download DFU package and Open nRF Toolbox and open the nRF Toolbox Mobile application. You will see Universal Asynchronous Receiver /Transmitter(UART) in the support list.
- Make sure the Bluetooth on your mobile is turned on.
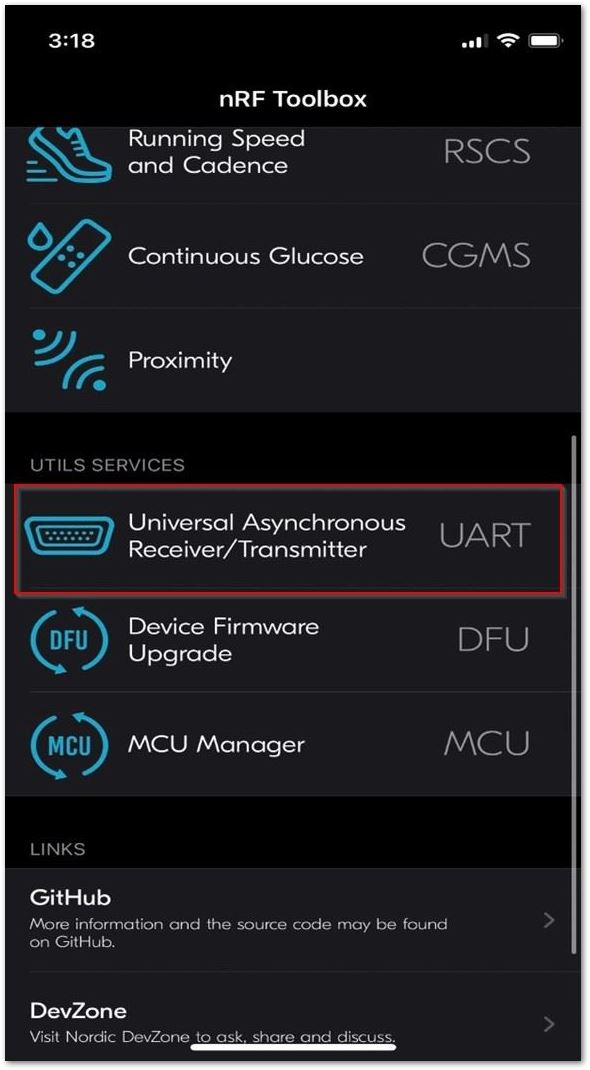 Figure 1: Universal Asynchronous Receiver /Transmitter
- In the nRF Toolbox UART mode, scan and connect to a BLE Device named "RAK.XXXXXX” in the scan list of the app.
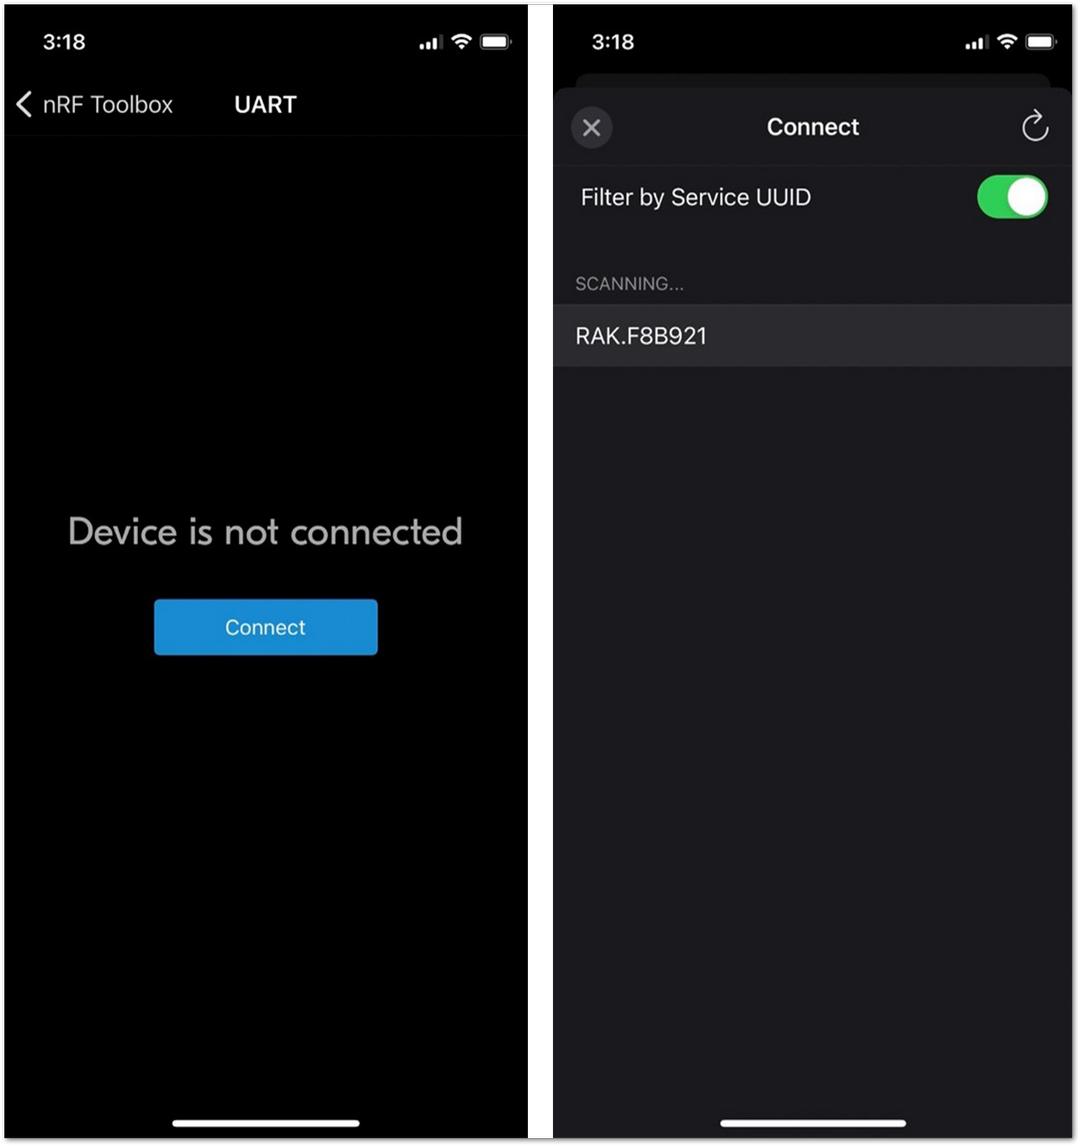 Figure 1: Connect UART mode and Scan BLE device
- After connecting, click Bluetooth Paring Request to Pair and click the empty icon to create a new command.
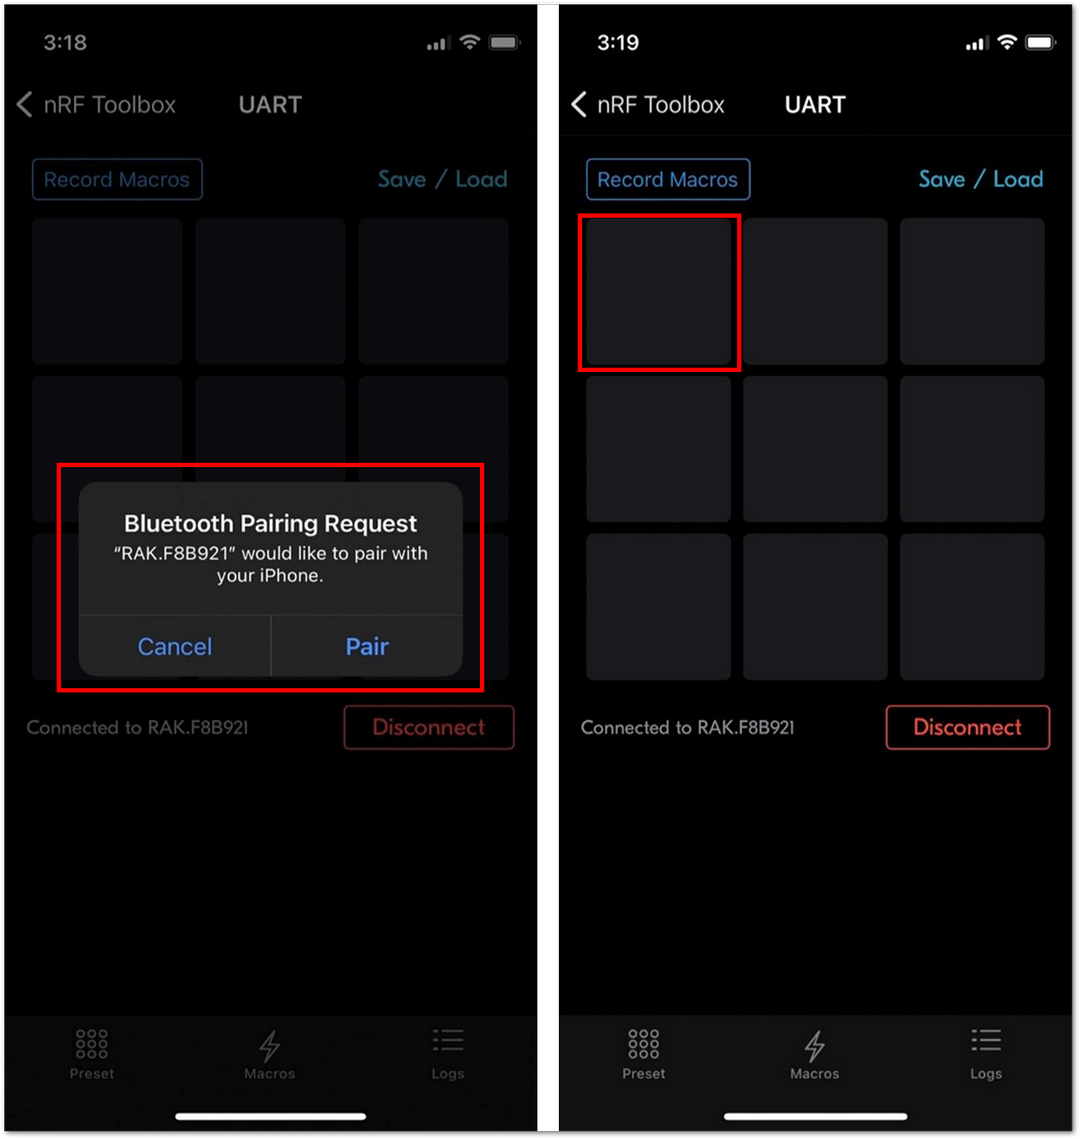 Figure 1: Click Bluetooth Paring Request to Pair
- Input AT Commands
at+bat=?and return to do Carriage Return then click Done. Follow the steps; otherwise, it will send the incorrect commands.
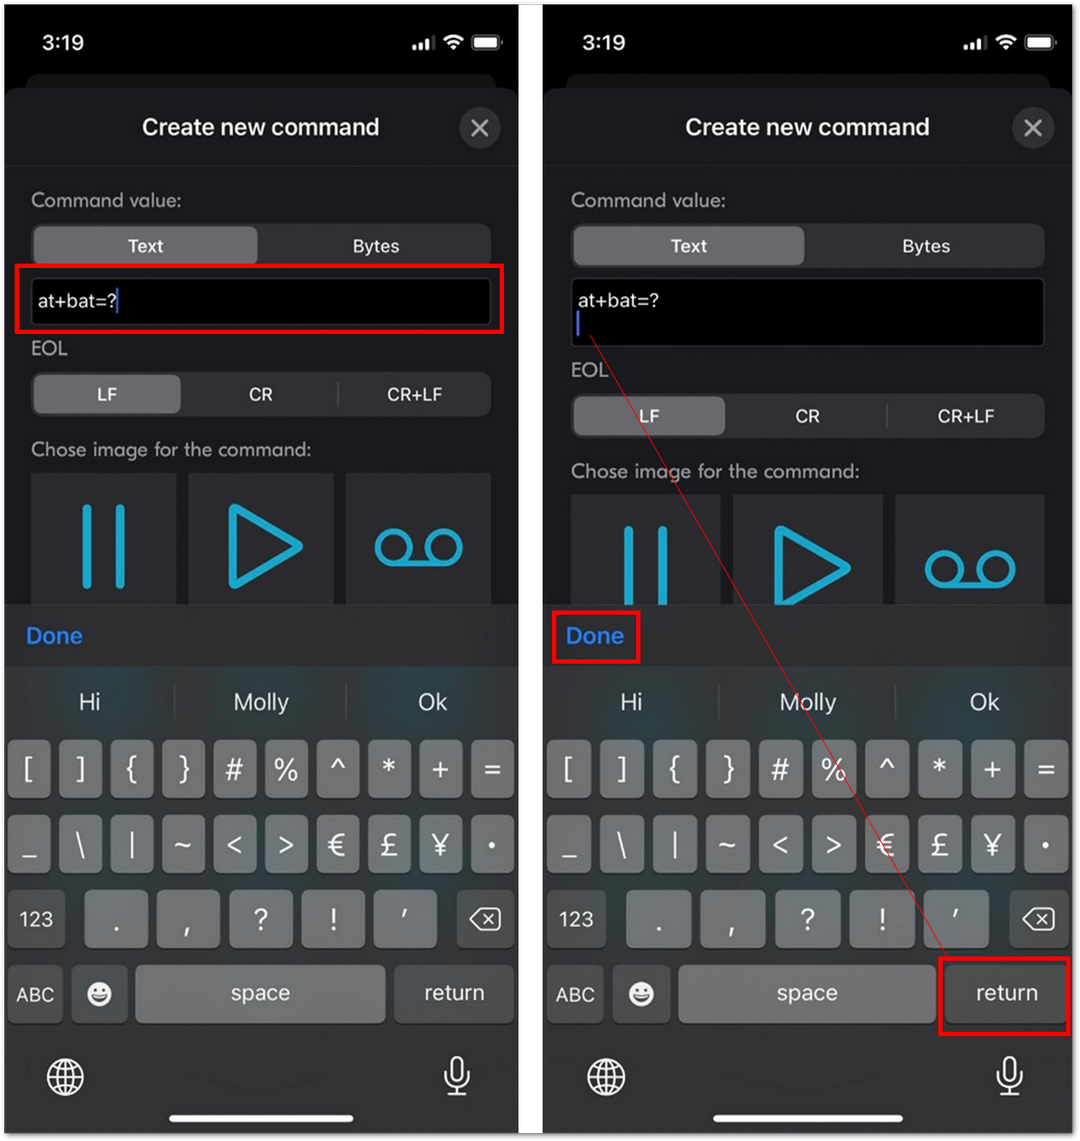 Figure 1: AT Commands with AT+BAT=?
- Click the ARROW icon to create a new icon as
at+bat=?.
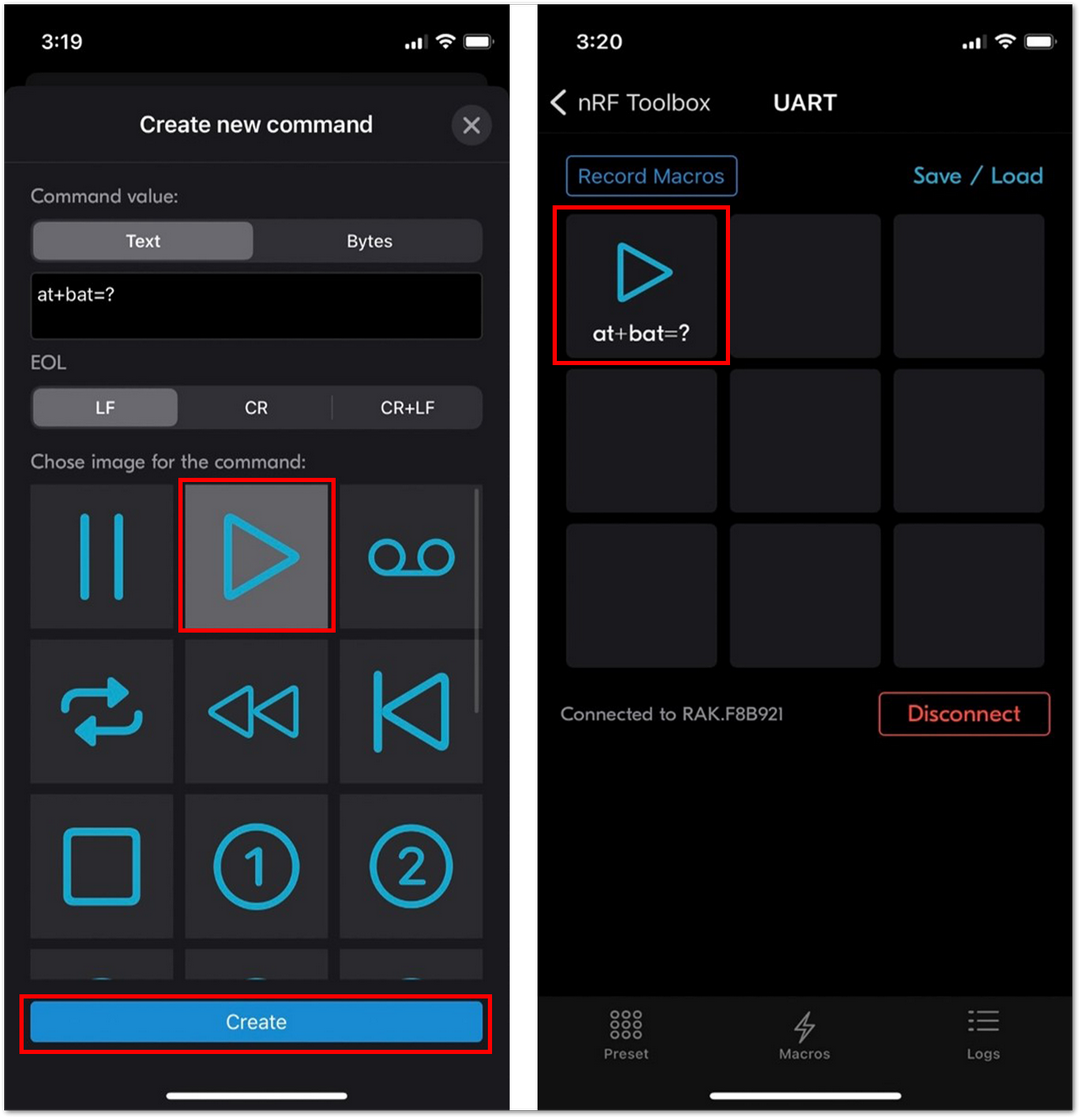 Figure 1: Click the ARROW icon to create a new one
- Click the ARROW icon and switch to Logs to check AT+BAT=Values are received or not.
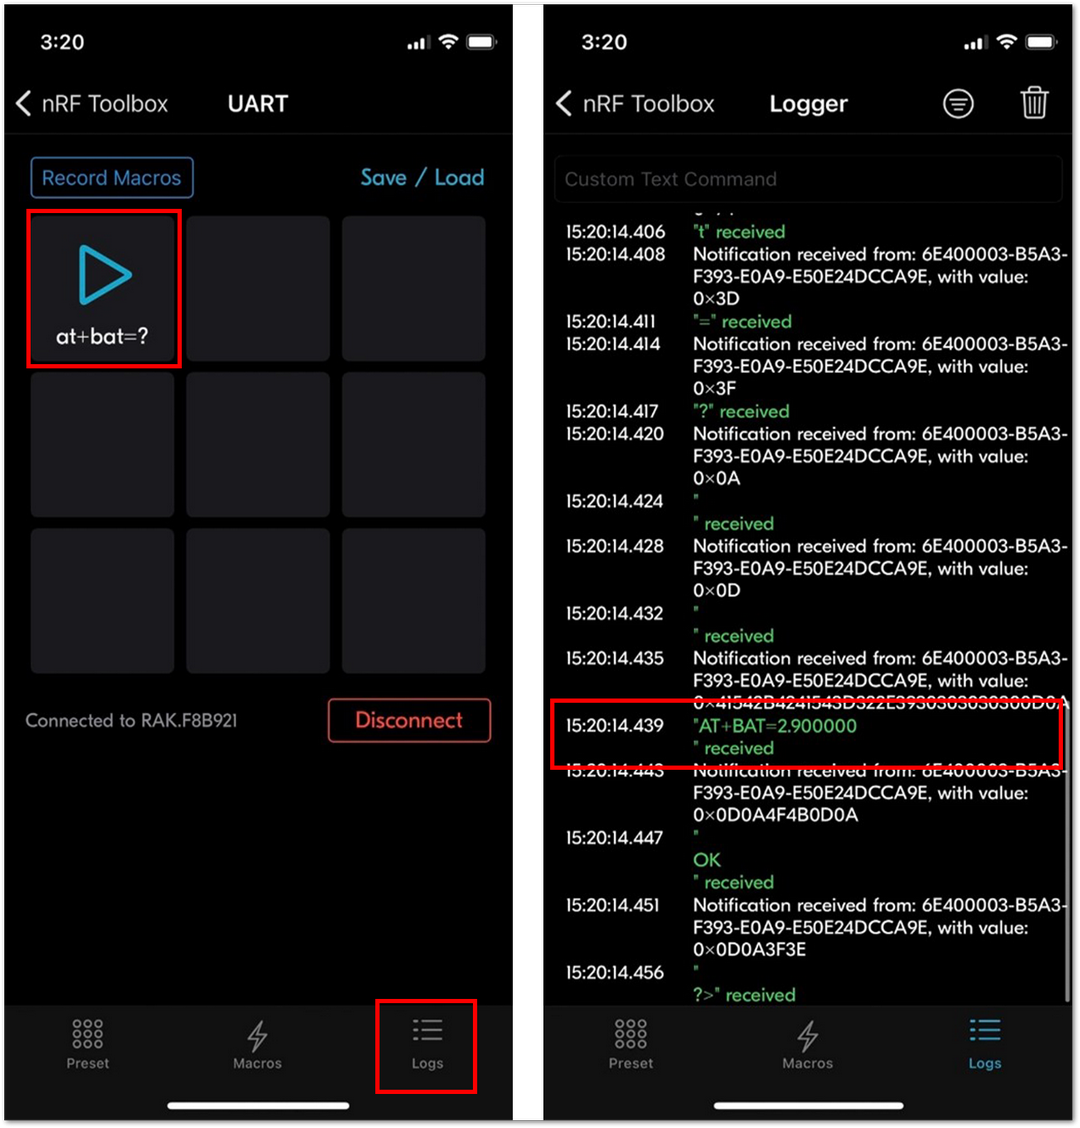 Figure 1: Click the ARROW icon to Check Battery Level in Logs