WisGateOS 2 Network Management for Edge/Soho Gateways
In the Network menu, you can configure both WAN (Wide Area Network) and LAN (Local Area Network) interfaces. The WAN section handles settings for connecting to external networks, while the LAN section manages local network connections within your environment.
WAN
The WAN menu allows you to configure each network interface on the gateway and manage the priority among multiple WAN connections. The status of each interface is indicated by a red or green light next to the interface name, showing whether the interface is available.
The list of WAN interfaces displayed may vary depending on your gateway’s hardware specifications.
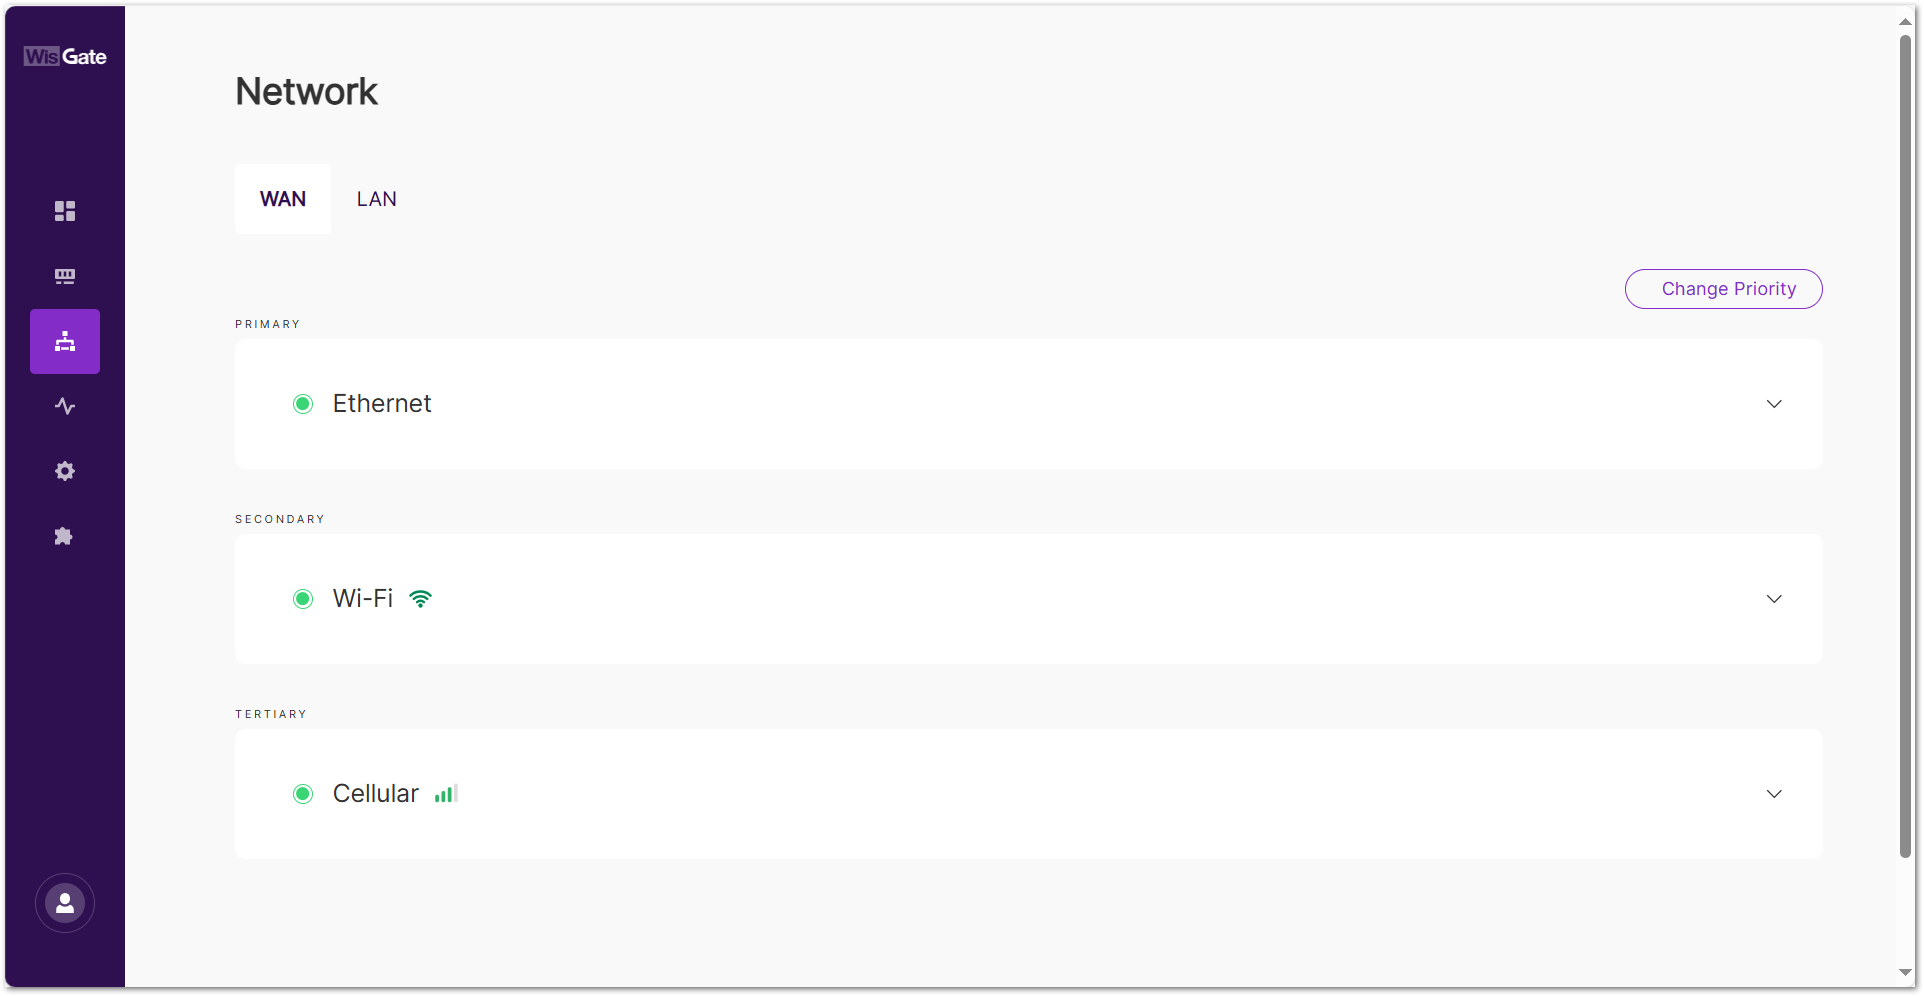 Figure 1: WAN tab
Change Priority
In a Multi-Network setup, managing WAN interface priorities ensures that the gateway seamlessly switches between available networks based on their priority, enabling continuous connectivity even in the event of network failures.
You can adjust the priority of each WAN interface to control the preferred network connection. Follow the steps below to modify the interface priority:
- Click the Change Priority button.
- Use the arrows (
 ) next to each interface name to change its priority.
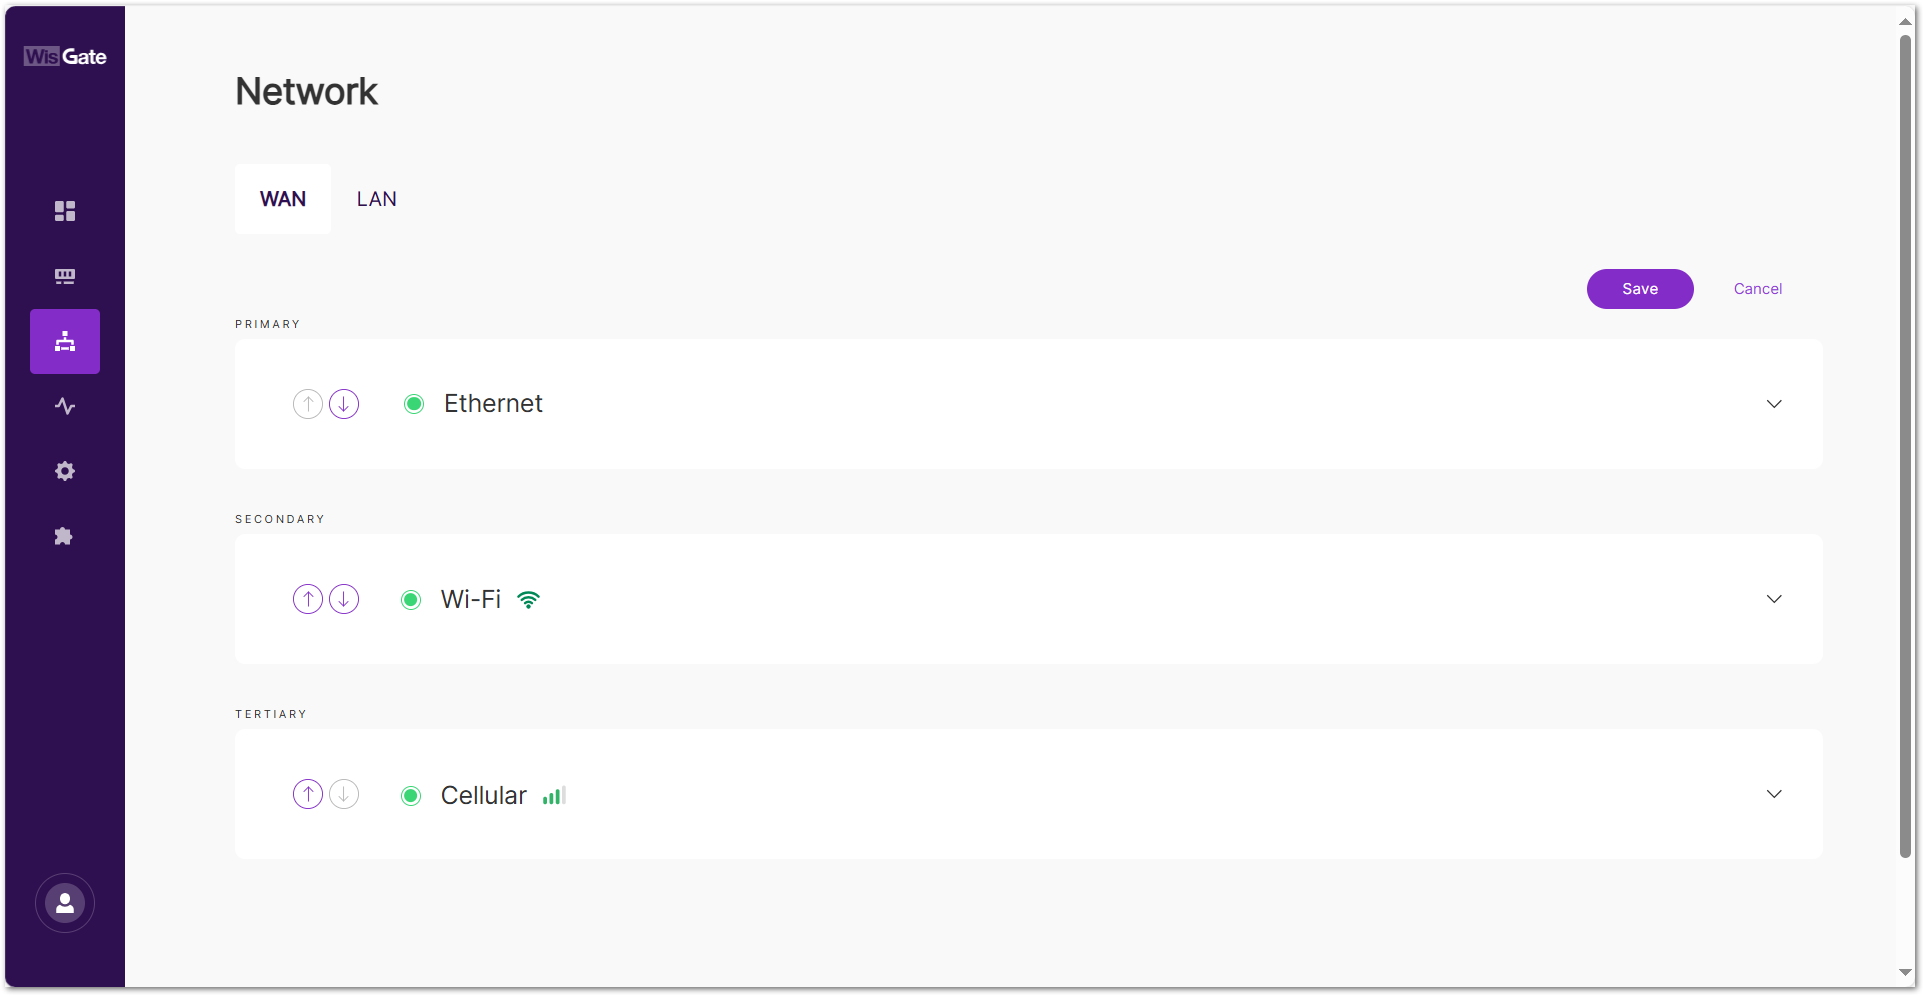 Figure 1: Editing WAN interface priority
- The upward arrow increases the priority, making that network the preferred one.
- The downward arrow decreases the priority, making it a secondary or backup network.
- Click Save.
Ethernet
Expand the interface details by clicking on the interface name or the arrow to the left of it ( ).
).
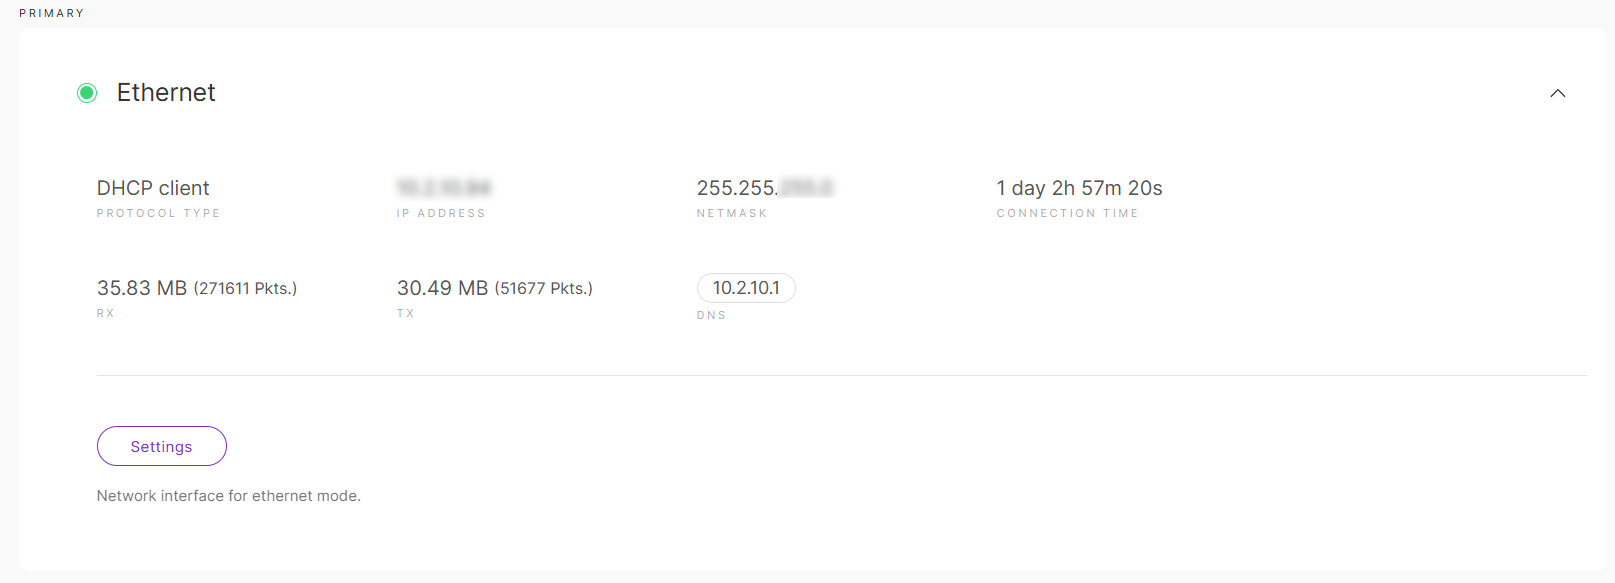 Figure 1: Ethernet
Interface Information (Ethernet)
Displays information for the connected Ethernet interface:
- Protocol type: The protocol type.
- IP Address: The IP address assigned to the gateway.
- Netmask: The gateway's network mask.
- Connection time: The duration the gateway has been connected to the interface.
- RX: Received packets.
- TX: Sent packets.
- DNS: DNS server addresses.
Settings (Ethernet)
Set up Ethernet network interfaces and tracking preferences.
General (Ethernet)
Configure basic Ethernet settings, including static IP, DHCP, and PPPoE.
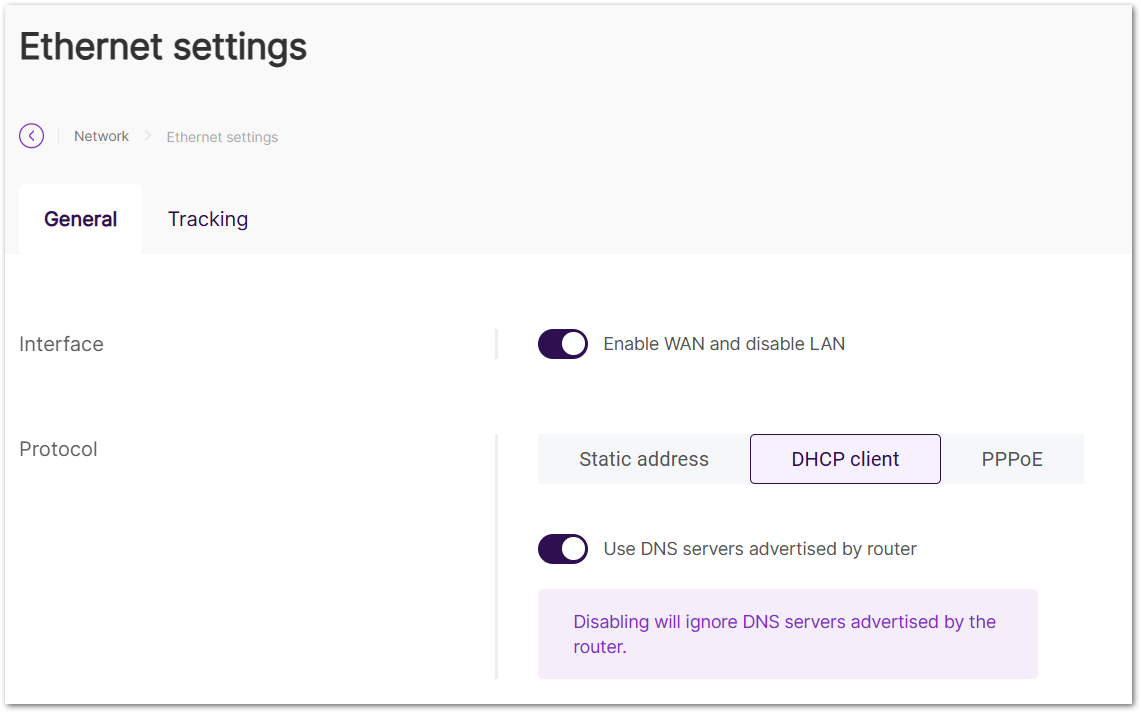 Figure 1: Ethernet settings General tab
- Enable WAN and Disable LAN: Enabling this option activates the WAN interface and disables LAN.
- Static Address: Configure a static address for the gateway.
- IPv4 Address: The static IPv4 address for the gateway.
- IPv4 Netmask: The netmask for the gateway.
- IPv4 Router: The IPv4 router address.
- DNS Server: Custom DNS server address.
- DHCP Client: Use the router's DHCP server to assign an IP address.
- Use DNS servers advertised by router: Enable this to assign DNS from the router.
- DNS Server: Add custom DNS addresses.
- PPPoE: Set Point-to-Point Protocol over Ethernet (PPPoE), usignt the PAP/CHAP Username and Password provided by your internet service provider. The DNS server advertised by router option allows the gateway to obtain a DNS address from the router. Disable this option if you want to use a custom DNS server.
Tracking (Ethernet)
Provide the mechanism for the gateway to continuously monitor the network interface's stability and automatically failover to another available interface when necessary, ensuring continuous connectivity even in case of network issues.
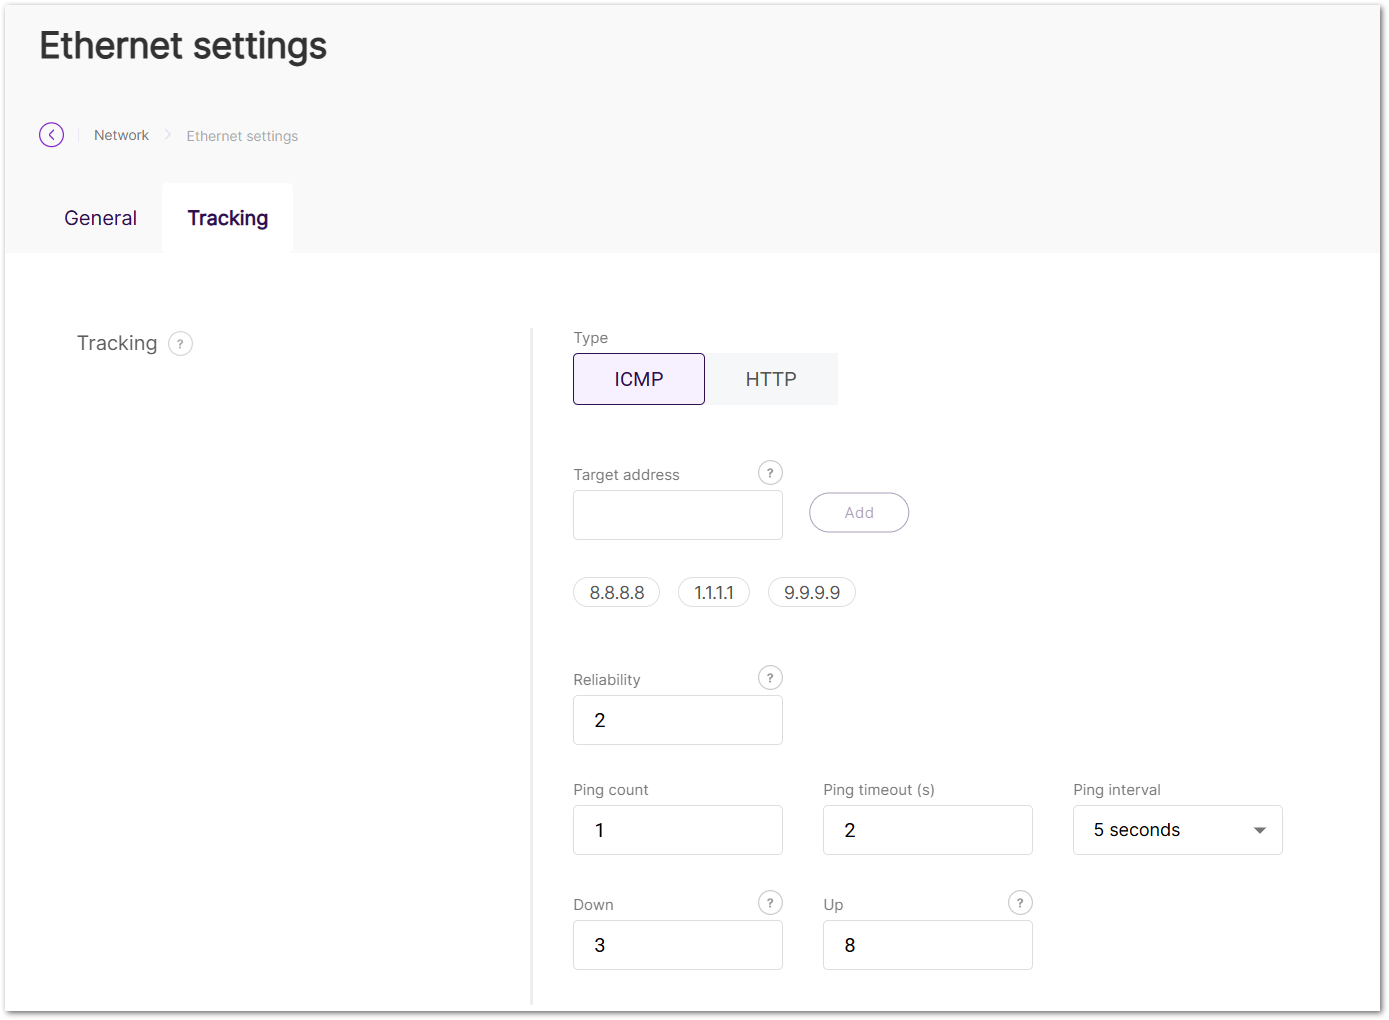 Figure 1: Ethernet settings Tracking tab
- Type: Select the method for link tracking.
- ICMP: Sends ping packets to test connectivity at the IP level.
- HTTP: Sends HTTP GET requests to confirm service availability at the application level.
- Target address
- For ICMP: Supports IP addresses and domain names.
- For HTTP: Supports domain names, full URLs, or IP addresses.
- The Target address field accepts a single input of up to 100 characters.
- Reliability: Define the minimum number of IP addresses that must respond to confirm a successful ping.
- Ping count: The number of pings to send.
- Ping timeout (s): The maximum time allowed for each ping.
- Ping interval: The interval between pings.
- Down: The number of consecutive ping failures required to confirm that the interface is down.
- Up: The number of consecutive ping successes required to confirm that the interface is up.
Wi-Fi
Expand the interface details by clicking on the interface name or the arrow to the left of it ().
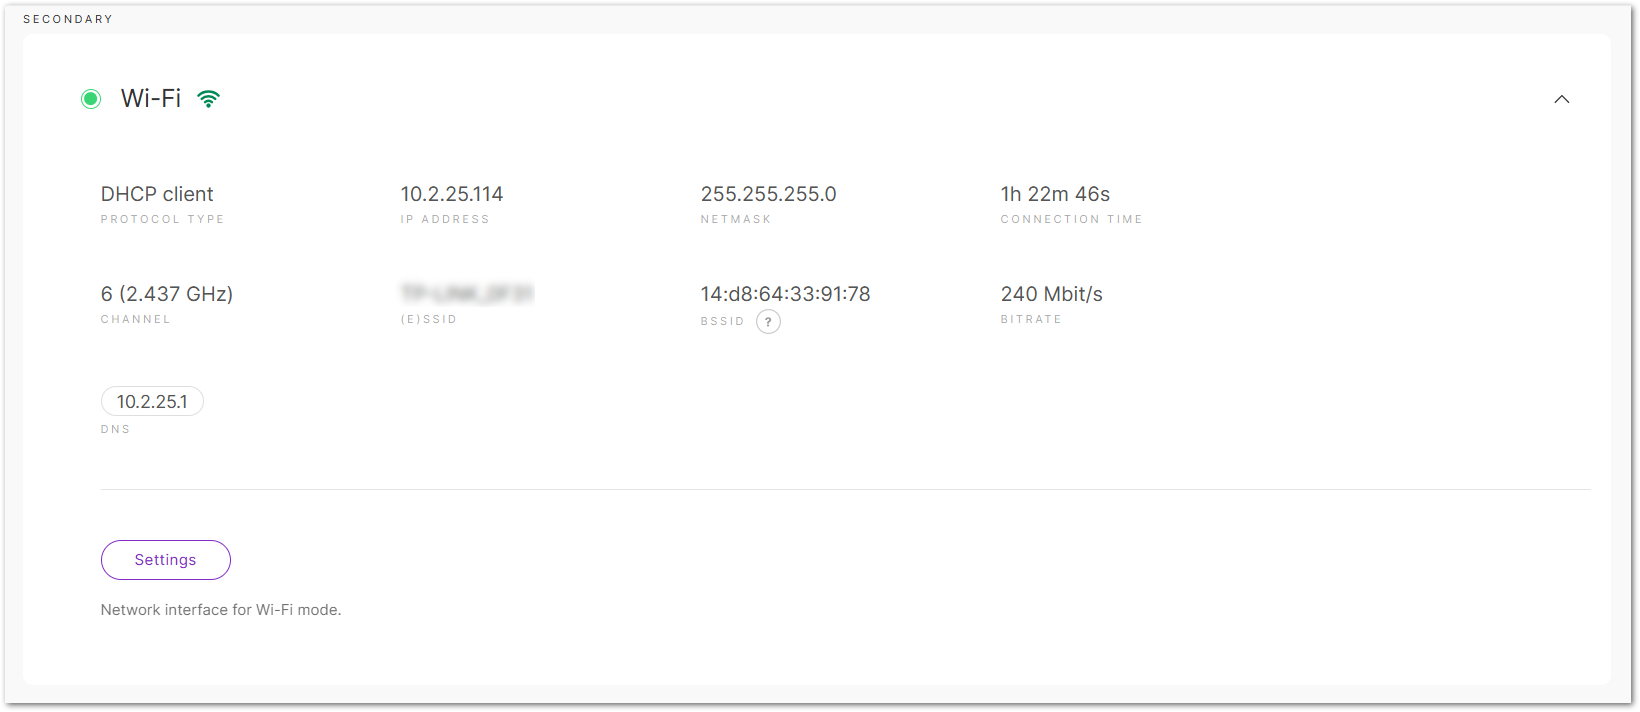 Figure 1: Wi-Fi
Interface Information (Wi-Fi)
Displays information about the connected Wi-Fi interface.
- Protocol Type: The protocol type.
- IP Address: The IP address assigned to the gateway.
- Netmask: The netmask assigned to the gateway.
- Connection Time: The duration the gateway has been connected to the Wi-Fi interface.
- Channel: The operating frequency used by the Wi-Fi network.
- (E)SSID: The SSID of the Wi-Fi network.
- BSSID: The MAC address of the Wi-Fi access point or router.
- Bitrate: The bitrate of the Wi-Fi network.
- DNS: The DNS server addresses.
Settings (Wi-Fi)
Set up Wi-Fi network interfaces and tracking preferences.
General (Wi-Fi)
Set up Wi-Fi interface configuration, including addressing, SSID, security, and related network options.
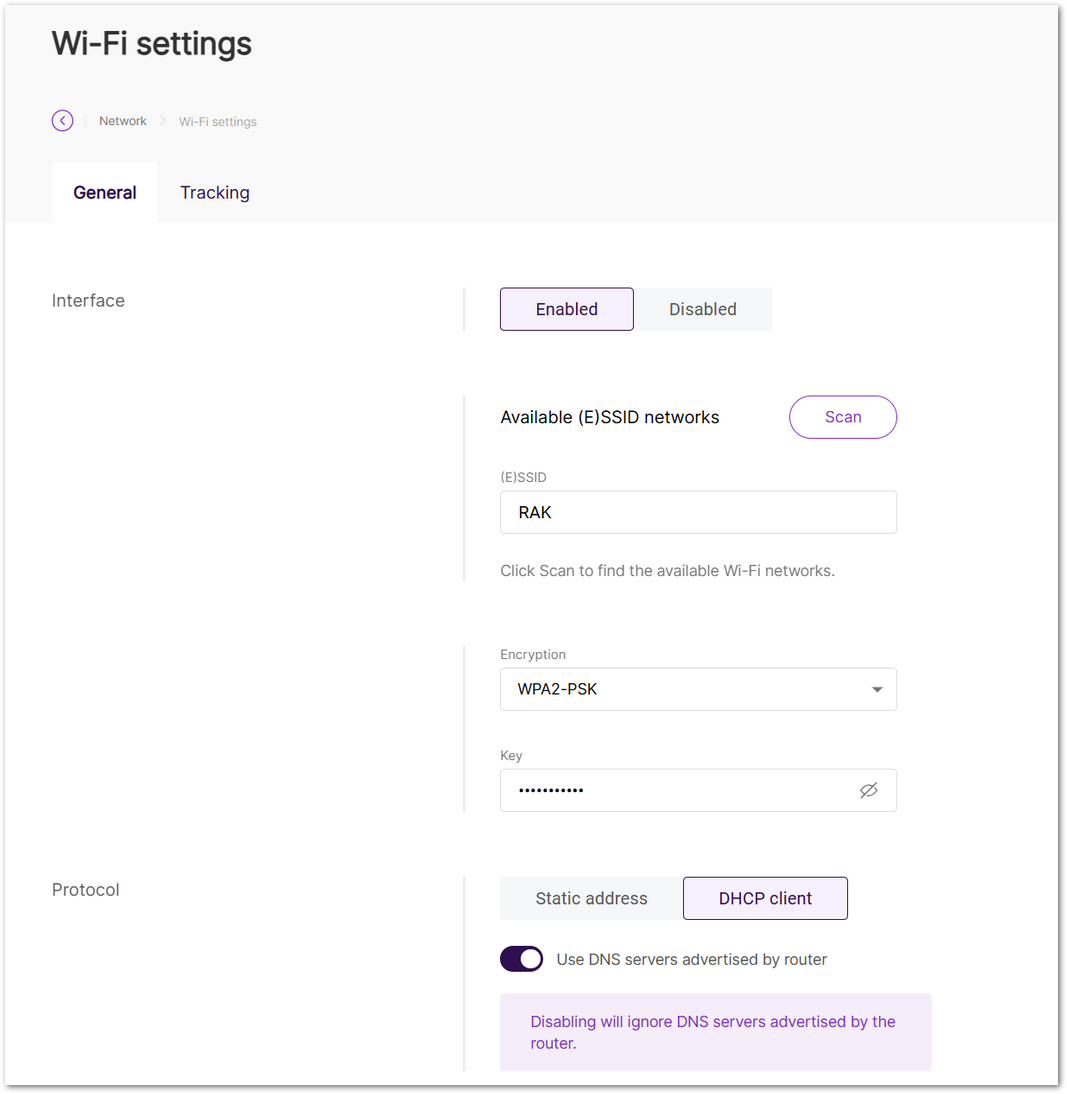 Figure 1: Wi-Fi settings General tab
- Enabled/Disabled: Enable or disable the Wi-Fi interface.
- Available (E)SSID networks: Scan for and select an available Wi-Fi network, or manually enter the details.
- (E)SSID: Extended Service Set Identifier.
- Encryption: Select the network's encryption type and enter the password. Options include No Encryption, WPA-PSK, WPA2-PSK, and WPA-PSK/WPA2-PSK Mixed Mode (recommended).
- Static address: Configure a static IP address for the gateway.
- IPv4 Address: The desired static IPv4 address.
- IPv4 Netmask: The netmask.
- IPv4 Router: The IPv4 router address.
- DNS Server: Custom DNS address.
- DHCP client: Use the router's DHCP server to assign an IP address.
- Use DNS servers advertised by router: Enable to assign DNS from the router, or specify a custom DNS.
- DNS Server: Add custom DNS addresses.
Tracking (Wi-Fi)
Monitor the health of the Wi-Fi interface by performing periodic ping tests. If the interface becomes unstable (fails too many pings), it will failover to another interface.
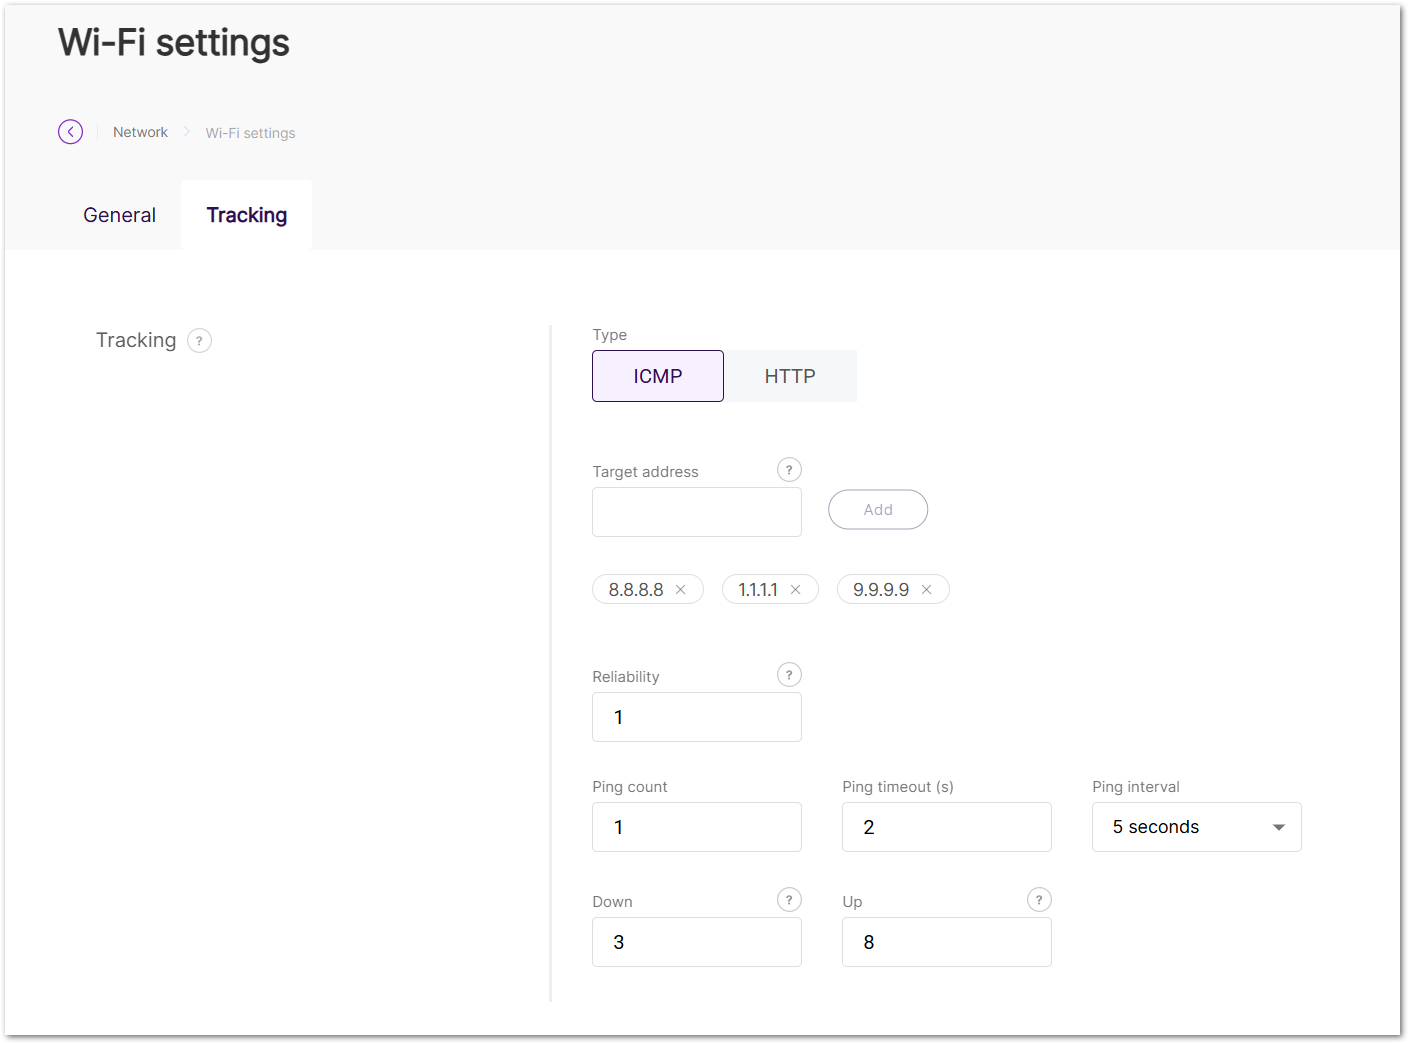 Figure 1: Wi-Fi settings Tracking tab
- Type: Select the method for link tracking.
- ICMP: Sends ping packets to test connectivity at the IP level.
- HTTP: Sends HTTP GET requests to confirm service availability at the application level.
- Target address
- For ICMP: Supports IP addresses and domain names.
- For HTTP: Supports domain names, full URLs, or IP addresses.
- The Target address field accepts a single input of up to 100 characters.
- Reliability: Define the minimum number of IP addresses that must respond to confirm a successful ping.
- Ping count: The number of pings to send.
- Ping timeout (s): The time allowed for each ping.
- Ping interval: The interval between pings.
- Down: The number of consecutive ping failures required to confirm that the interface is down.
- Up: The number of consecutive ping successes required to confirm that the interface is up.
Cellular
Expand the interface details by clicking on the interface name or the arrow to the left of it ().
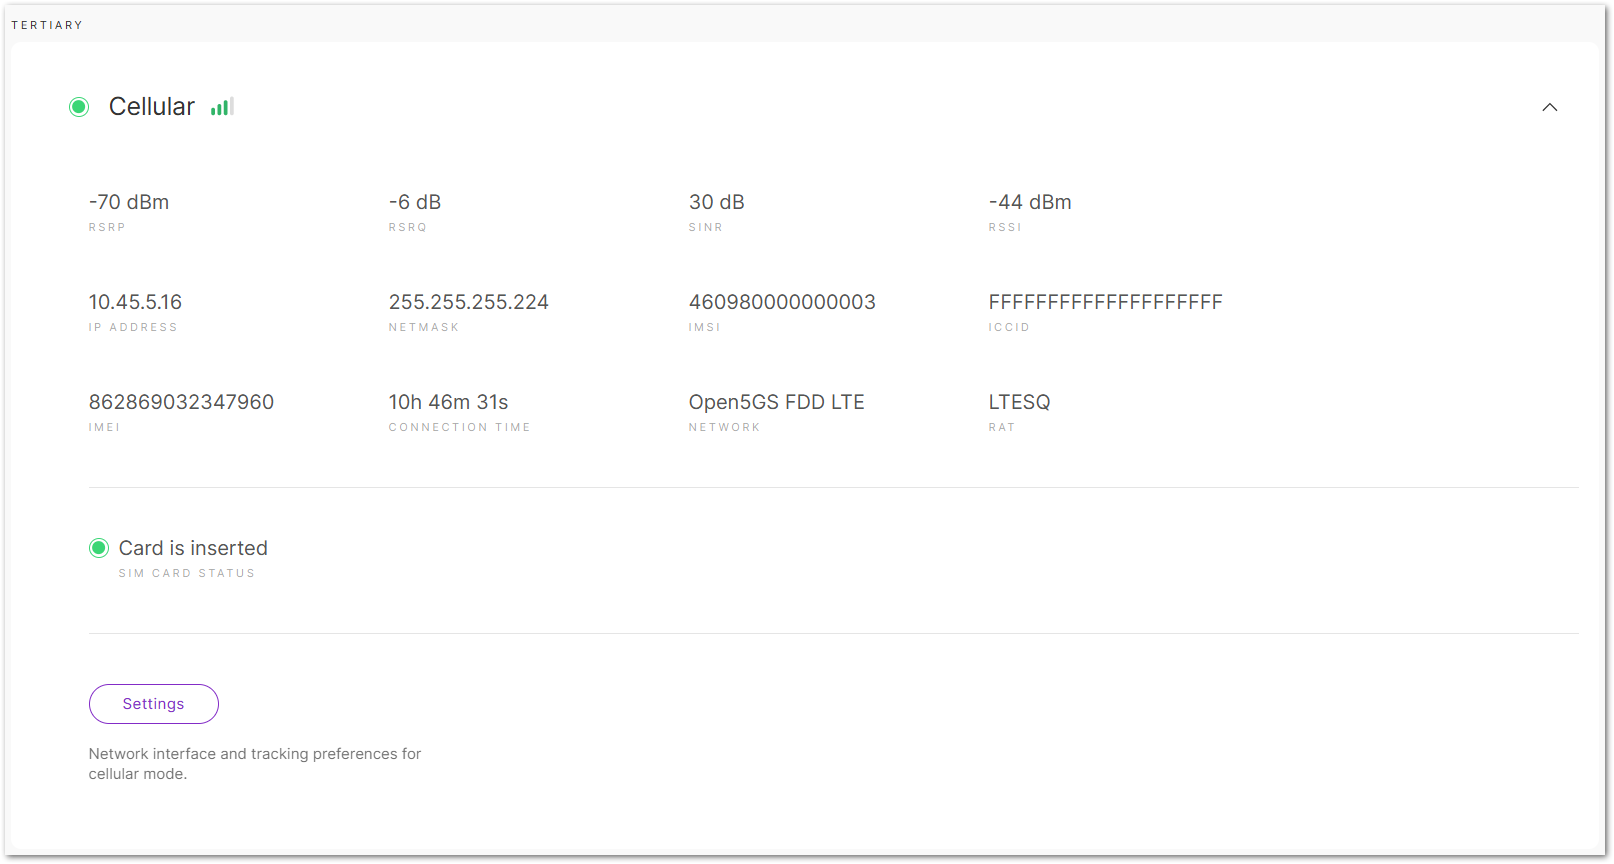 Figure 1: Cellular
Interface Information (Cellular)
Displays information for the connected cellular interface:
- RSRP: Reference Signal Received Power. Indicates the strength of the received LTE reference signal.
- RSRQ: Reference Signal Received Quality. Reflects signal quality by considering interference and signal strength.
- SINR: Signal-to-Interference-and-Noise Ratio. Measures signal quality relative to background noise.
- RSSI: Received Signal Strength Indicator. Represents the total received signal power, including interference and noise.
- IP Address: The IP address assigned to the gateway.
- Netmask: The netmask assigned to the gateway.
- IMSI: International Mobile Subscriber Identity.
- ICCID: Integrated Circuit Card Identifier.
- IMEI: International Mobile Equipment Identity.
- Connection time: The duration the gateway has been connected to the interface.
- Network: The cellular network standard.
- RAT: Radio Access Technology. Indicates the wireless technology in use.
- BAND: The frequency band being used for the cellular connection.
- SIM Card Status: The status of the SIM card.
Settings (Cellular)
Set the network interface and tracking preferences for cellular mode.
General (Cellular)
The purpose of the General settings is to configure the cellular connection to ensure the gateway can properly connect to the cellular network.
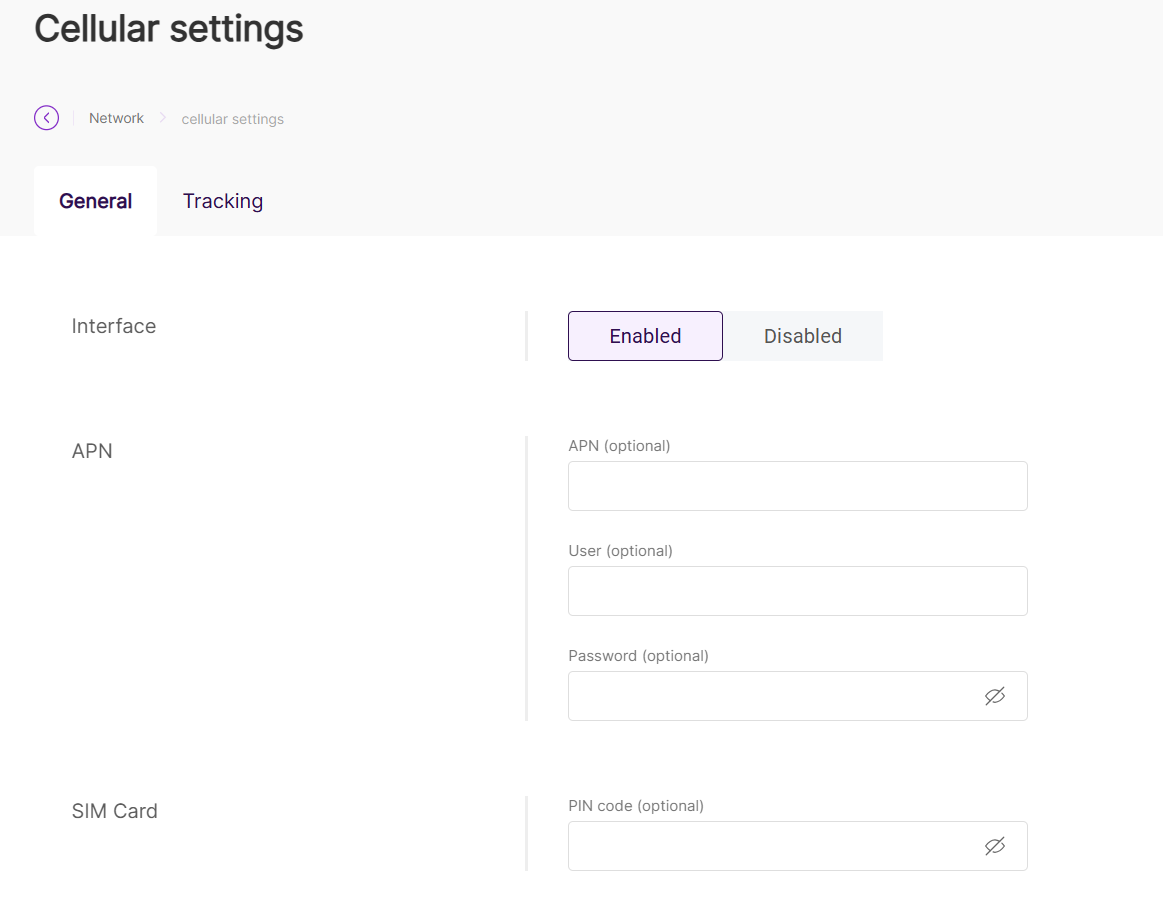 Figure 1: General settings
- Enabled/Disabled: Enable or disable the cellular interface.
- APN (optional): The Access Point Name for the connection.
- User (optional): Username for authentication (leave empty if not required).
- Password (optional): Password for authentication (leave empty if not required).
- PIN code (optional): The SIM card's PIN code (leave empty if not required).
Advanced (Cellular)
The Advanced section allows you to configure detailed cellular parameters for debugging, network optimization, or specific deployment requirements.
It is recommended to keep the default settings unless you need to troubleshoot cellular connection issues or your carrier requires specific configuration.
Click  in the Advanced section to expand the settings.
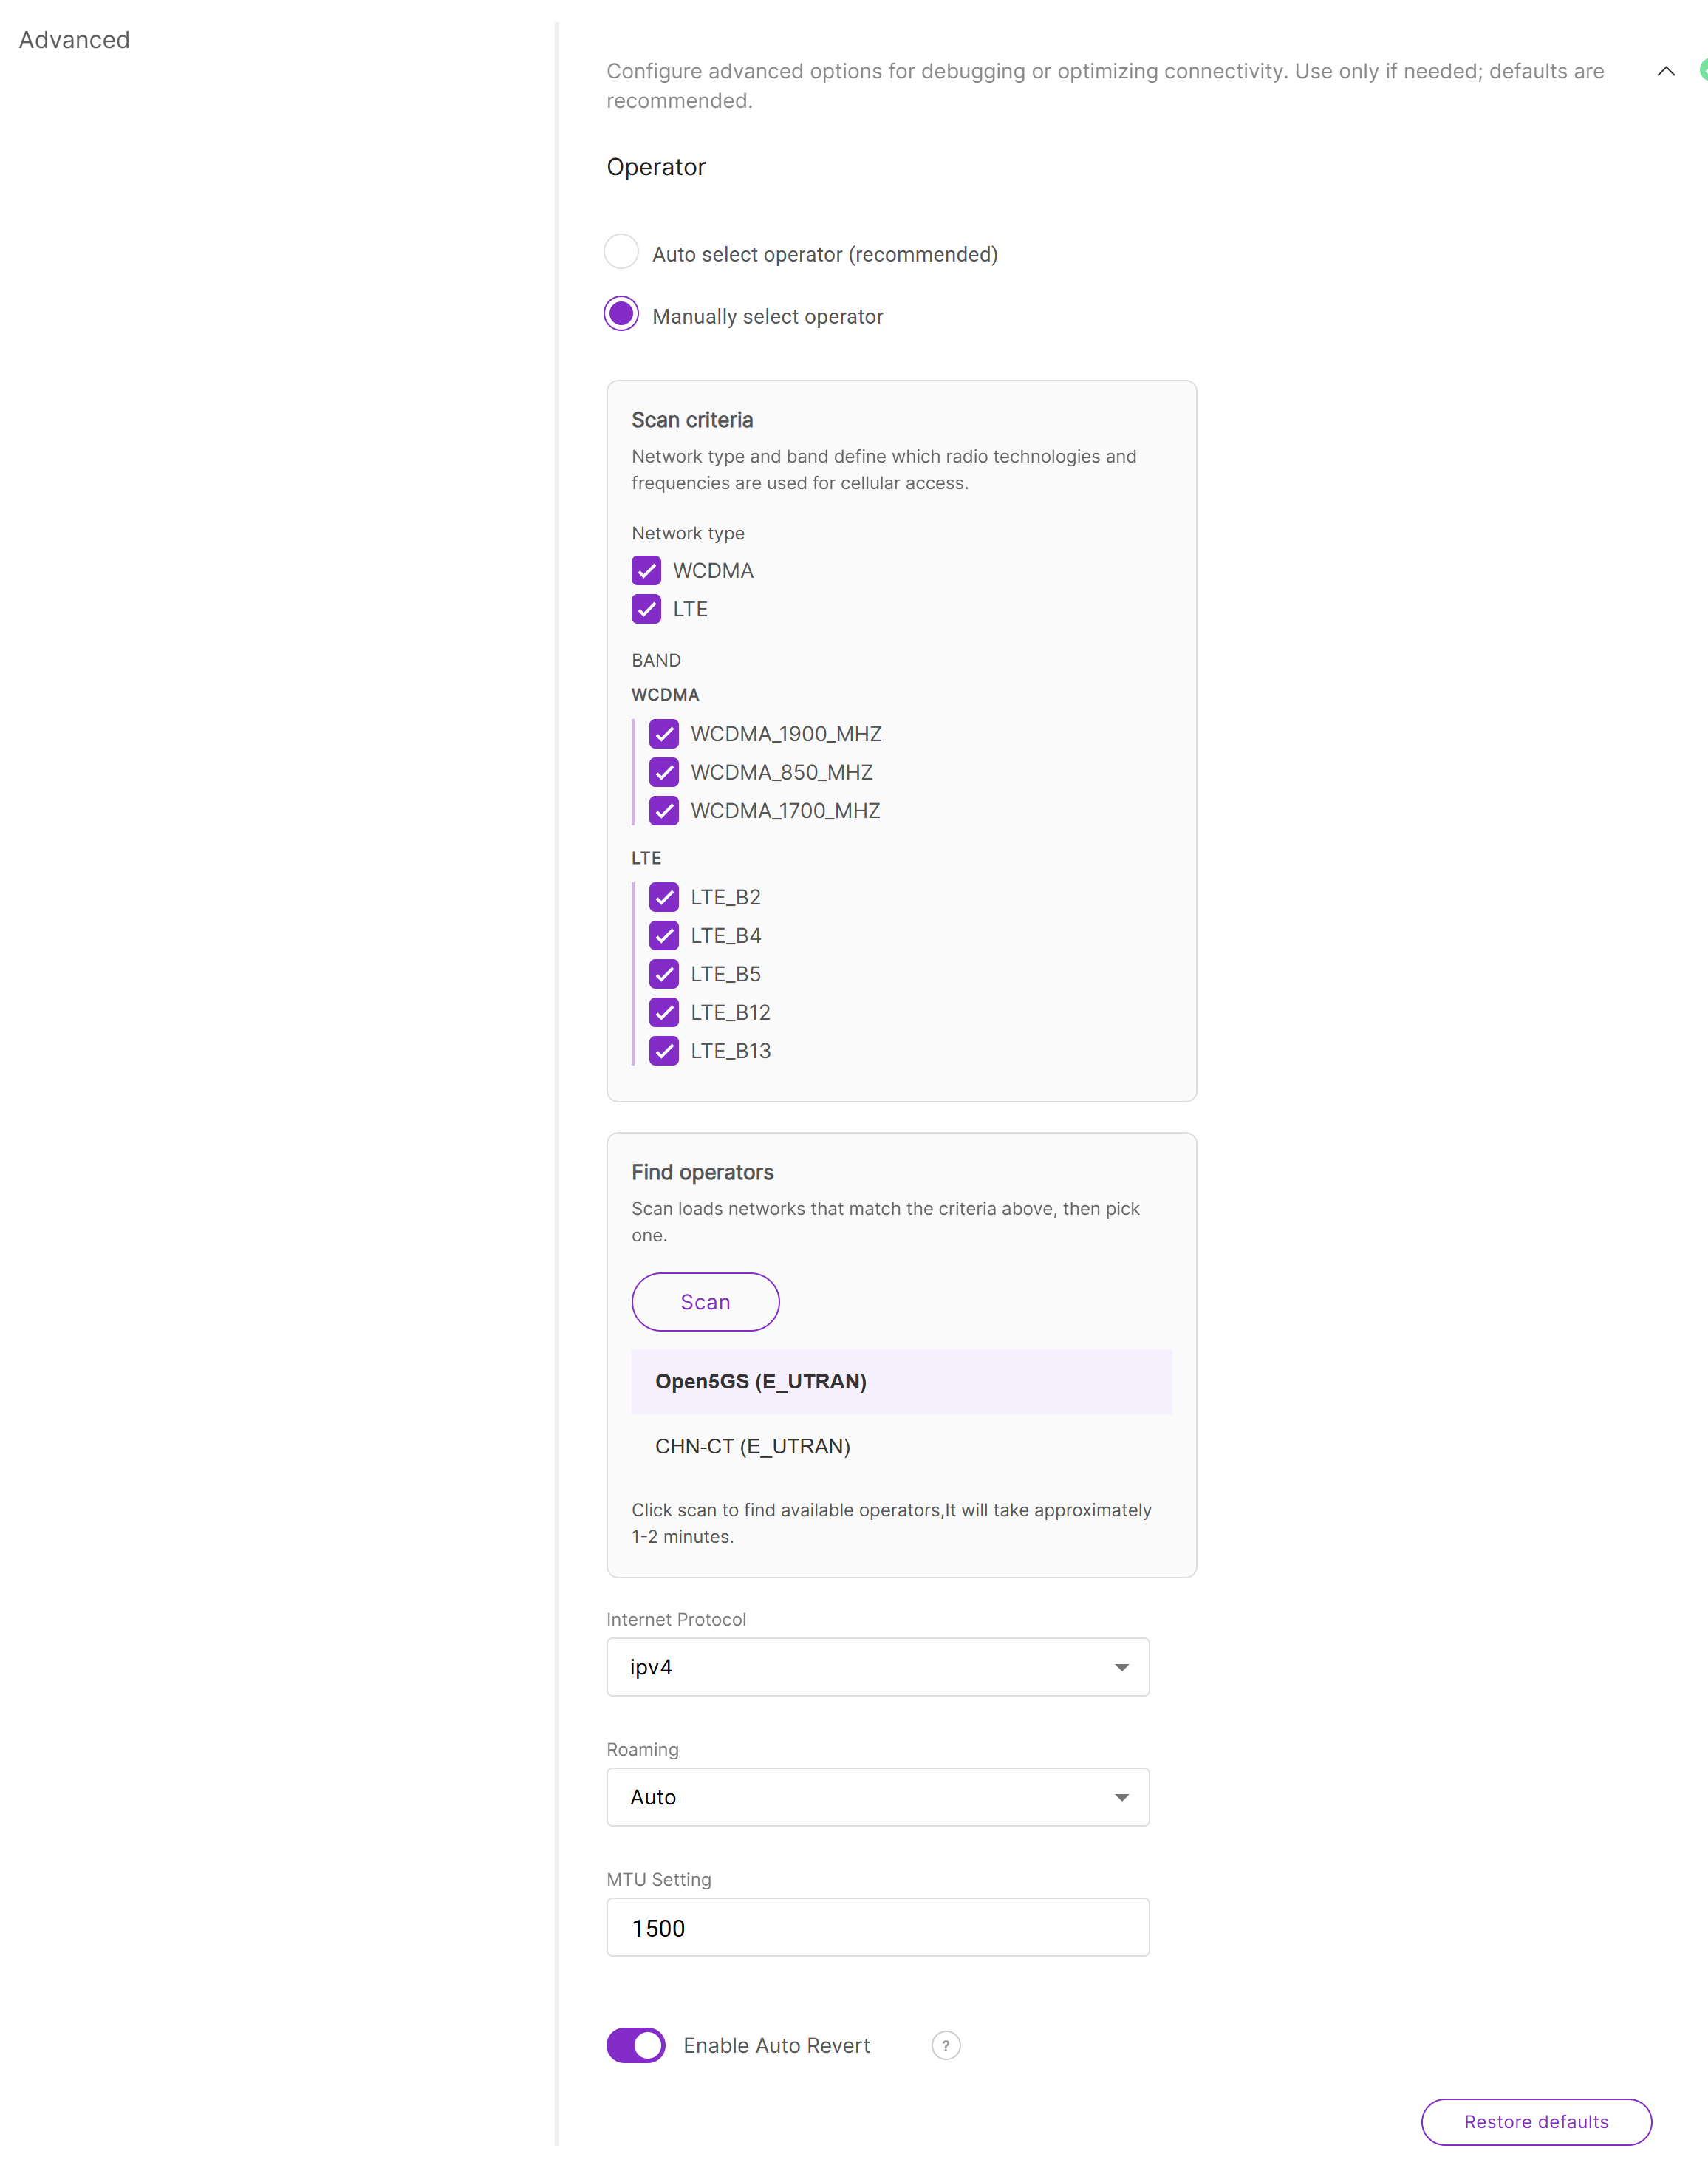 Figure 1: Advance settings
-
Auto select operator (recommended): The gateway automatically selects an available cellular operator based on the SIM card, signal quality, network availability, and carrier registration rules. In this mode, operator scanning is handled automatically.
-
Manually select operator: Allows you to manually scan for and select a specific cellular operator.
-
Scan criteria: Defines the cellular network technologies and frequency bands used when scanning for available operators. This setting is available when Manually select operator is selected.
- Network type: Defines the cellular network technologies used for scanning, such as WCDMA or LTE. Available options depend on the cellular module supported by the gateway.
- BAND: Defines the cellular frequency bands used for scanning. Available options depend on the cellular module and regional configuration. If you are unsure which bands your local carrier uses, keep the default selection or select all available bands.
-
Find operators: Scans for available cellular operators that match the selected Network type and BAND criteria. This option is available when Manually select operator is selected. Click Scan to search for available operators, then select the desired operator from the scanned list.
-
Internet Protocol: Defines the IP protocol used for the cellular data connection.
- IPv4: Uses IPv4 for the cellular connection. This is the default option and is suitable for most deployments.
- IPv4v6: Uses both IPv4 and IPv6. Select this option only when required by the carrier or SIM card provider.
-
Roaming: Controls whether the gateway is allowed to register to a roaming network.
- Auto (default): The gateway automatically handles roaming based on SIM card and network conditions.
- Enabled: Allows the gateway to register to roaming networks.
- Disabled: Prevents the gateway from registering to roaming networks.
NOTEThe available roaming options and default value may vary depending on the cellular module.
-
MTU Setting: Defines the Maximum Transmission Unit (MTU) size for cellular data packets. The supported range is 1280–1500.
-
Enable Auto Revert: Automatically reverts to the previous cellular settings if the connection is not restored within 2 minutes after the new settings are applied. It is recommended to keep this option enabled, especially when changing operator, band, roaming, or IP protocol settings remotely.
-
Restore Defaults: Resets all advanced cellular settings to factory default values.
Tracking (Cellular)
The Tracking settings ensure the gateway maintains stable connectivity by regularly testing the cellular network. If the network becomes unreliable (fails pings consecutively), the gateway will automatically switch to another available interface, ensuring continuous service.
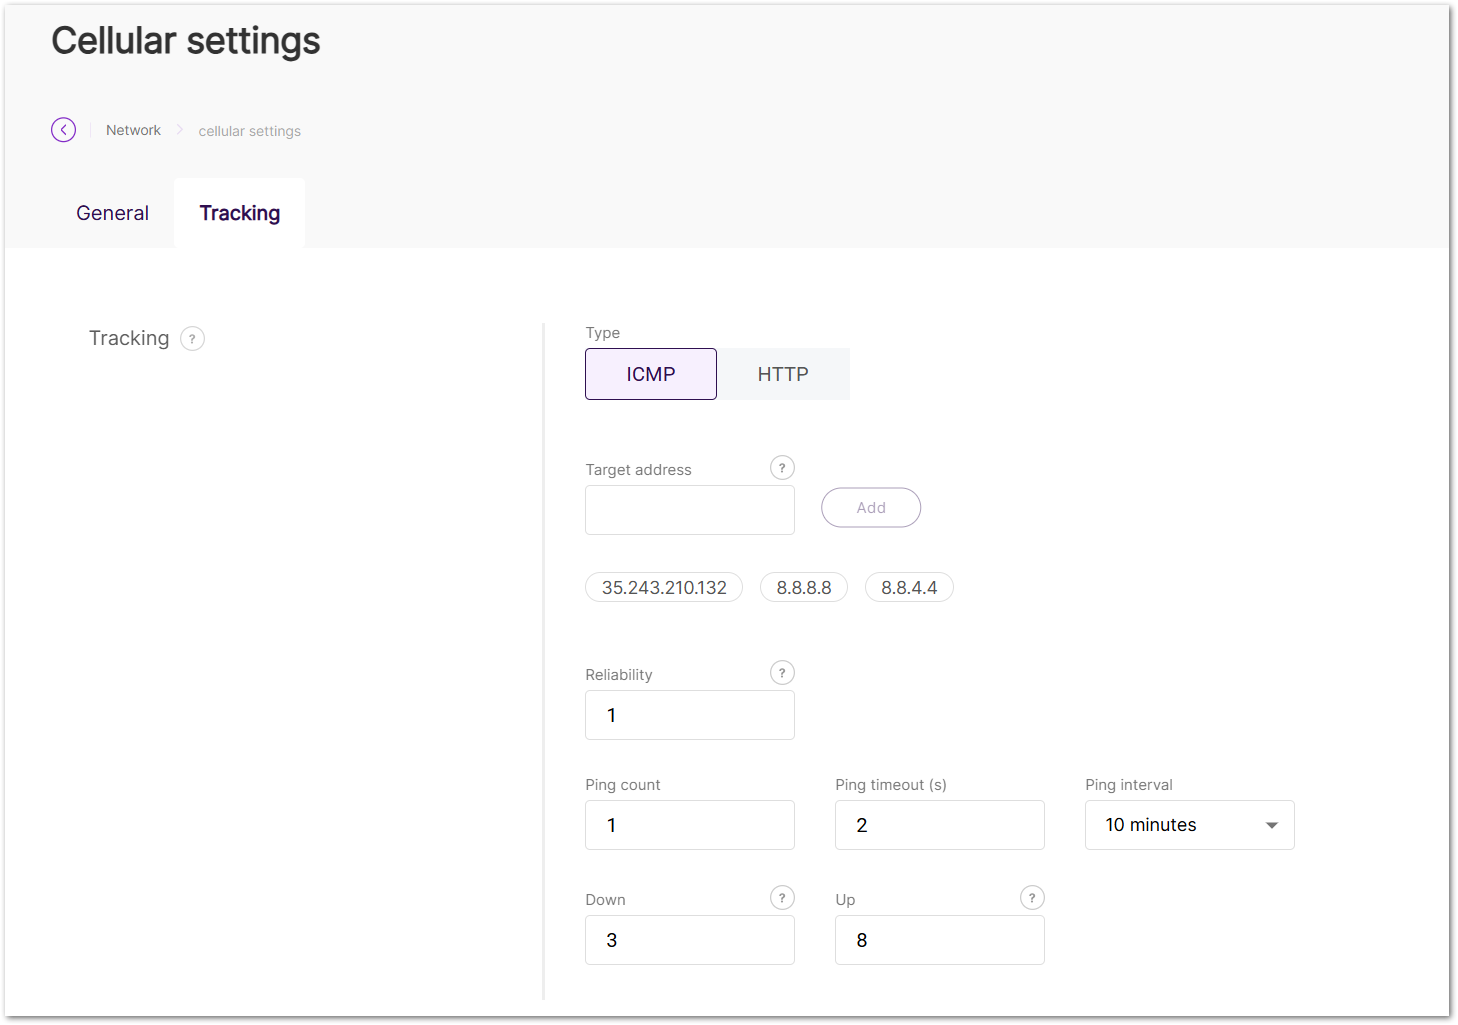 Figure 1: Cellular settings Tracking tab
- Type: Select the method for link tracking.
- ICMP: Sends ping packets to test connectivity at the IP level.
- HTTP: Sends HTTP GET requests to confirm service availability at the application level.
- Target Address
- For ICMP: Supports IP addresses and domain names.
- For HTTP: Supports domain names, full URLs, or IP addresses.
- The Target Address field accepts a single input of up to 100 characters.
- Reliability: Define the minimum number of IP addresses that must respond to confirm a successful ping.
- Ping count: The number of pings to send.
- Ping timeout (s): The time allowed for each ping.
- Ping interval: The interval between pings.
- Down: The number of consecutive ping failures required to confirm that the interface is down.
- Up: The number of consecutive ping successes required to confirm that the interface is up.
LAN
In the LAN tab, you can view and configure the settings for your Local Area Network (LAN) interfaces. The status of each interface is indicated by a red/green light, showing whether the interface is enabled or disabled.
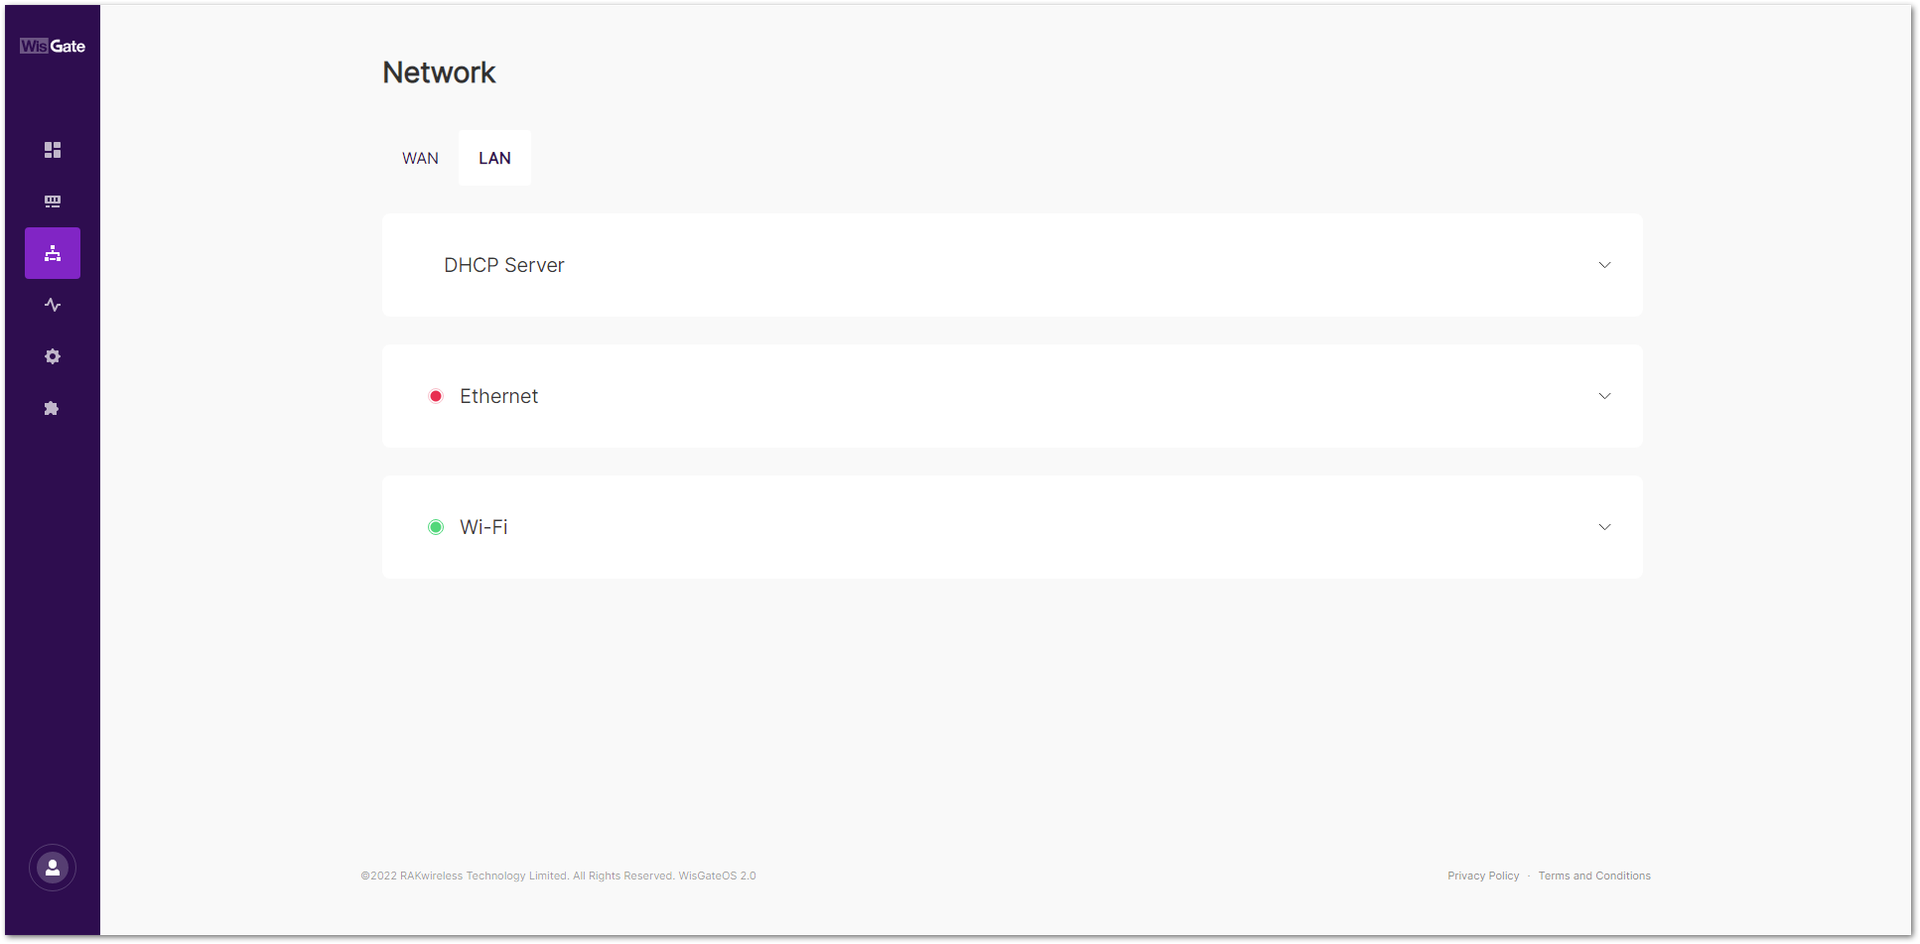 Figure 1: LAN tab
DHCP Server (LAN)
The DHCP Server section allows you to configure the gateway's LAN IP settings. The gateway has a preconfigured DHCP server that assigns IP addresses to connected devices, and you can modify these settings as needed. To expand the interface details, click on the interface name or the arrow to its left. ().
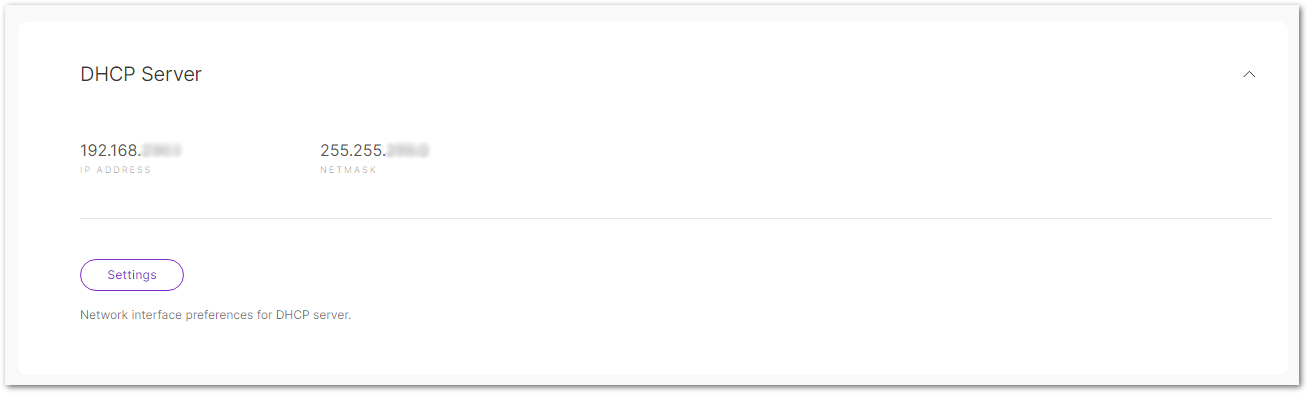 Figure 1: DHCP Server
-
IP Address: The default IP address of the gateway's DHCP server.
-
Netmask: The subnet mask for the DHCP server.
-
Settings: Set the network interface preferences for DHCP server.
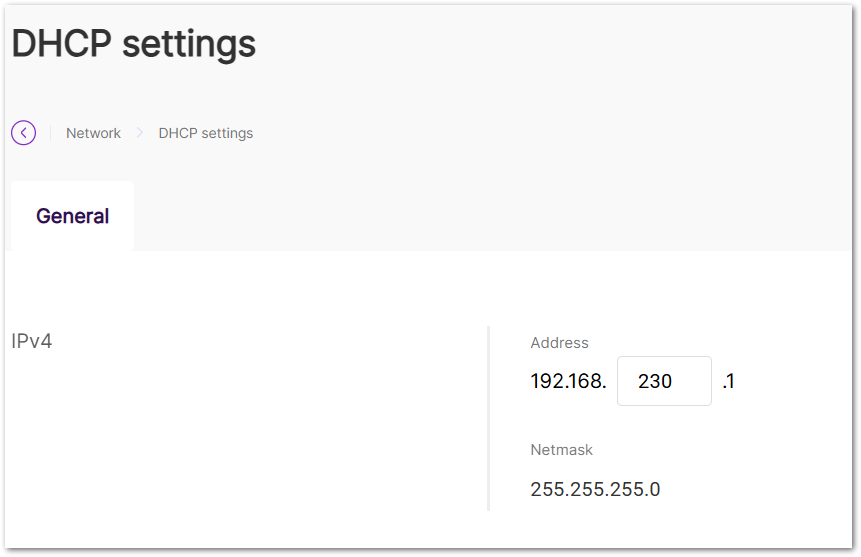 Figure 1: DHCP Settings
- Address: The IPv4 address of the LAN DHCP server.
- Netmask: The subnet mask for the DHCP server.
Ethernet (LAN)
Expand the interface details by clicking on the interface name or the arrow to the left of it ().
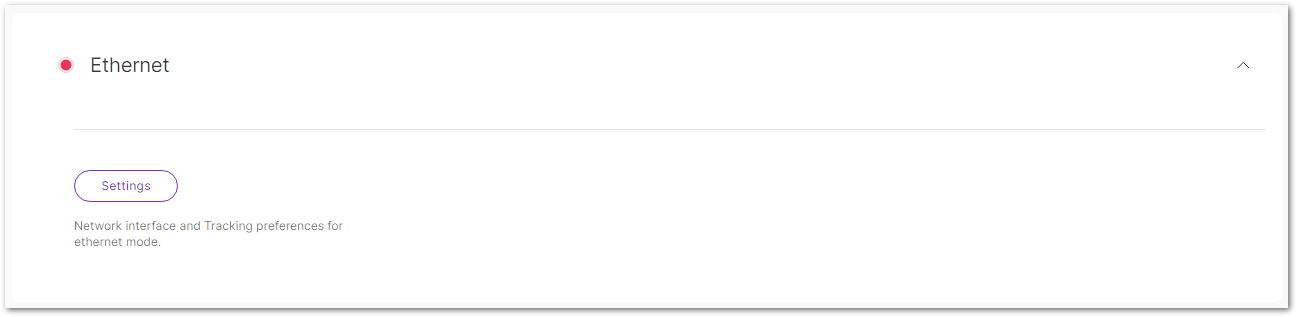 Figure 1: Ethernet
-
Enable LAN and disable WAN: Toggle this option to enable the LAN Ethernet interface and disable the WAN Ethernet interface.
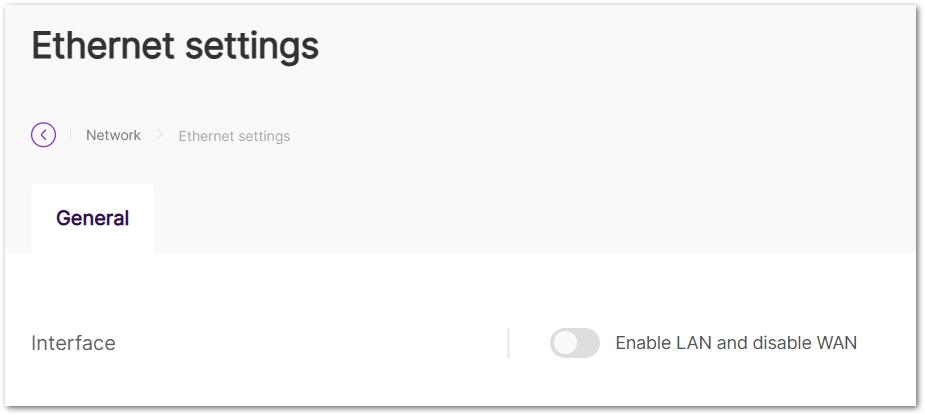 Figure 1: Ethernet settings
Wi-Fi (LAN)
Manage the settings for the Wi-Fi LAN interface in this section. The Wi-Fi interface allows the gateway to create a wireless access point (AP) for local devices to connect. Expand the interface details by clicking on the interface name or the arrow to the left of it ().
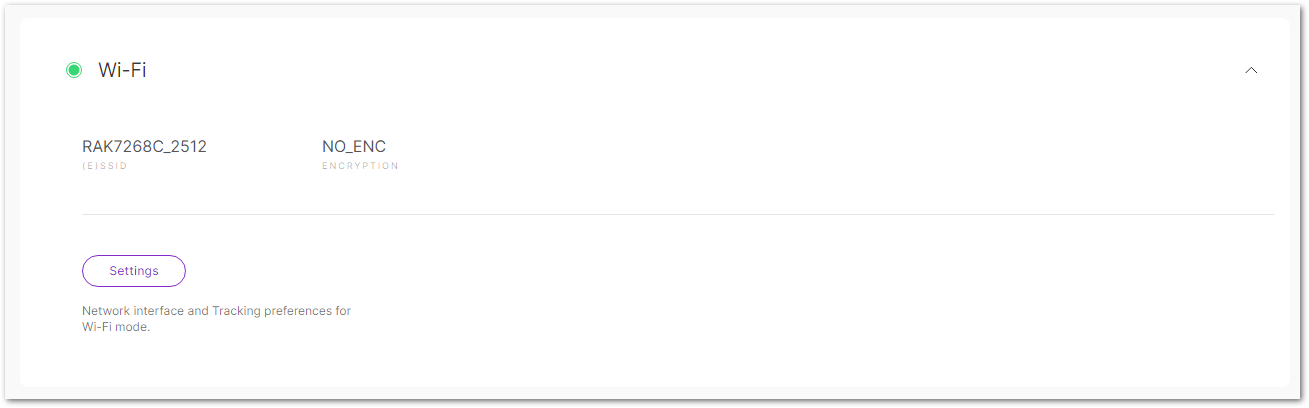 Figure 1: Wi-Fi
-
(E)SSID: The name of the Access Point (AP) provided by the gateway.
-
Encryption: The encryption method used to secure the Wi-Fi connection.
-
Settings: Set the network interface and tracking preferences for Wi-Fi mode.
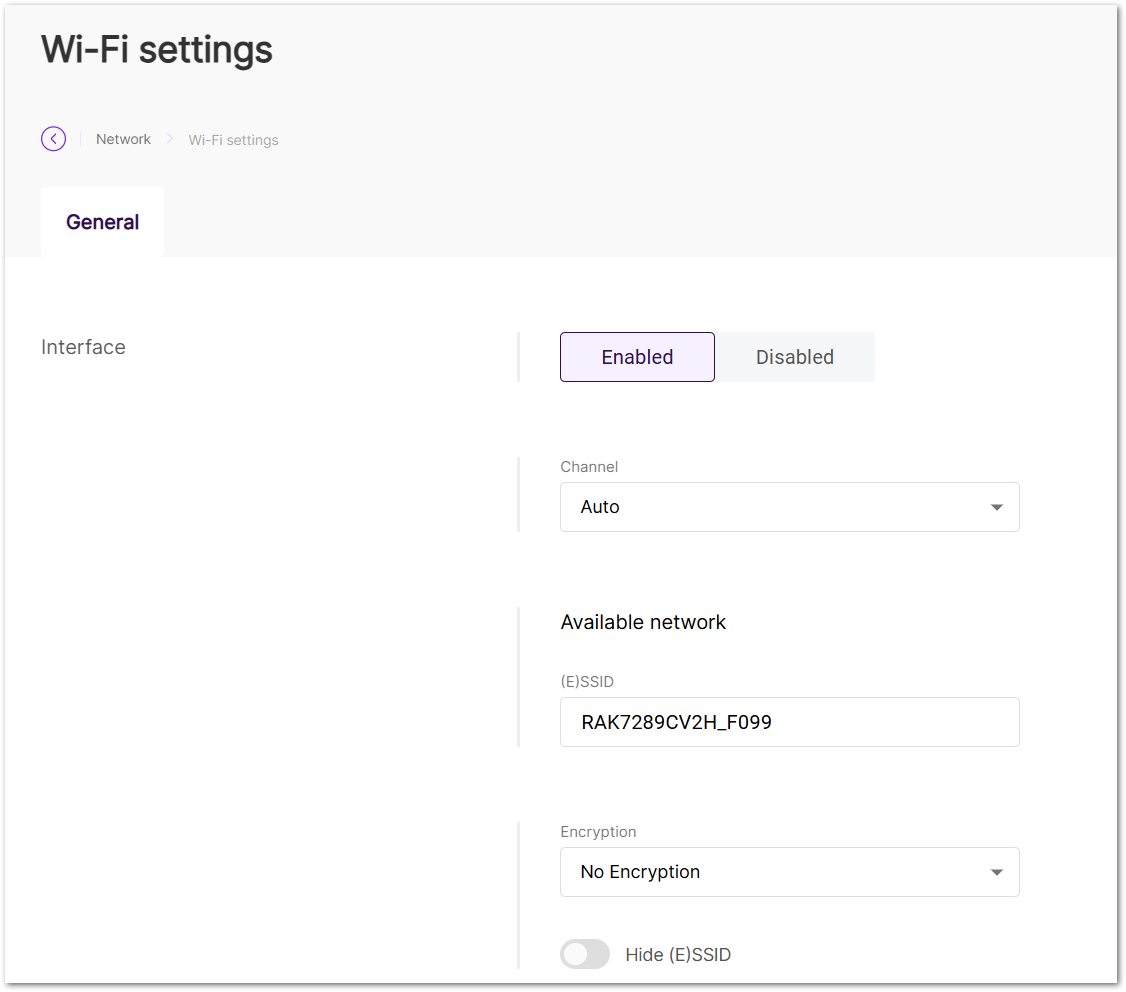 Figure 1: Wi-Fi settings
- Enabled/Disabled: Enable or disable the Wi-Fi LAN interface.
- Channel: Set the Wi-Fi channel. The default is Auto, which allows the gateway to automatically choose the optimal channel.
- (E)SSID: The SSID for the wireless AP.
- Encryption: Select the encryption type for the Wi-Fi AP. Available options include:
- No Encryption
- WPA-PSK
- WPA2-PSK
- WPA-PSK/WPA2-PSK Mixed Mode
- Key: Set the Wi-Fi password for the wireless access point. This option is available when an encryption method is selected.
- Hidden: Hide the SSID, making the AP invisible to devices scanning for networks.


