IO.Box Integration Configuration for WisNode Bridge
Integration Configuration enables Bridge IO devices to seamlessly integrate with mainstream LoRaWAN Network Servers and efficiently manage Device Profiles. It provides a streamlined workflow to onboard devices, generate payload codecs automatically, and synchronize configurations across multiple devices, significantly reducing deployment and maintenance effort.
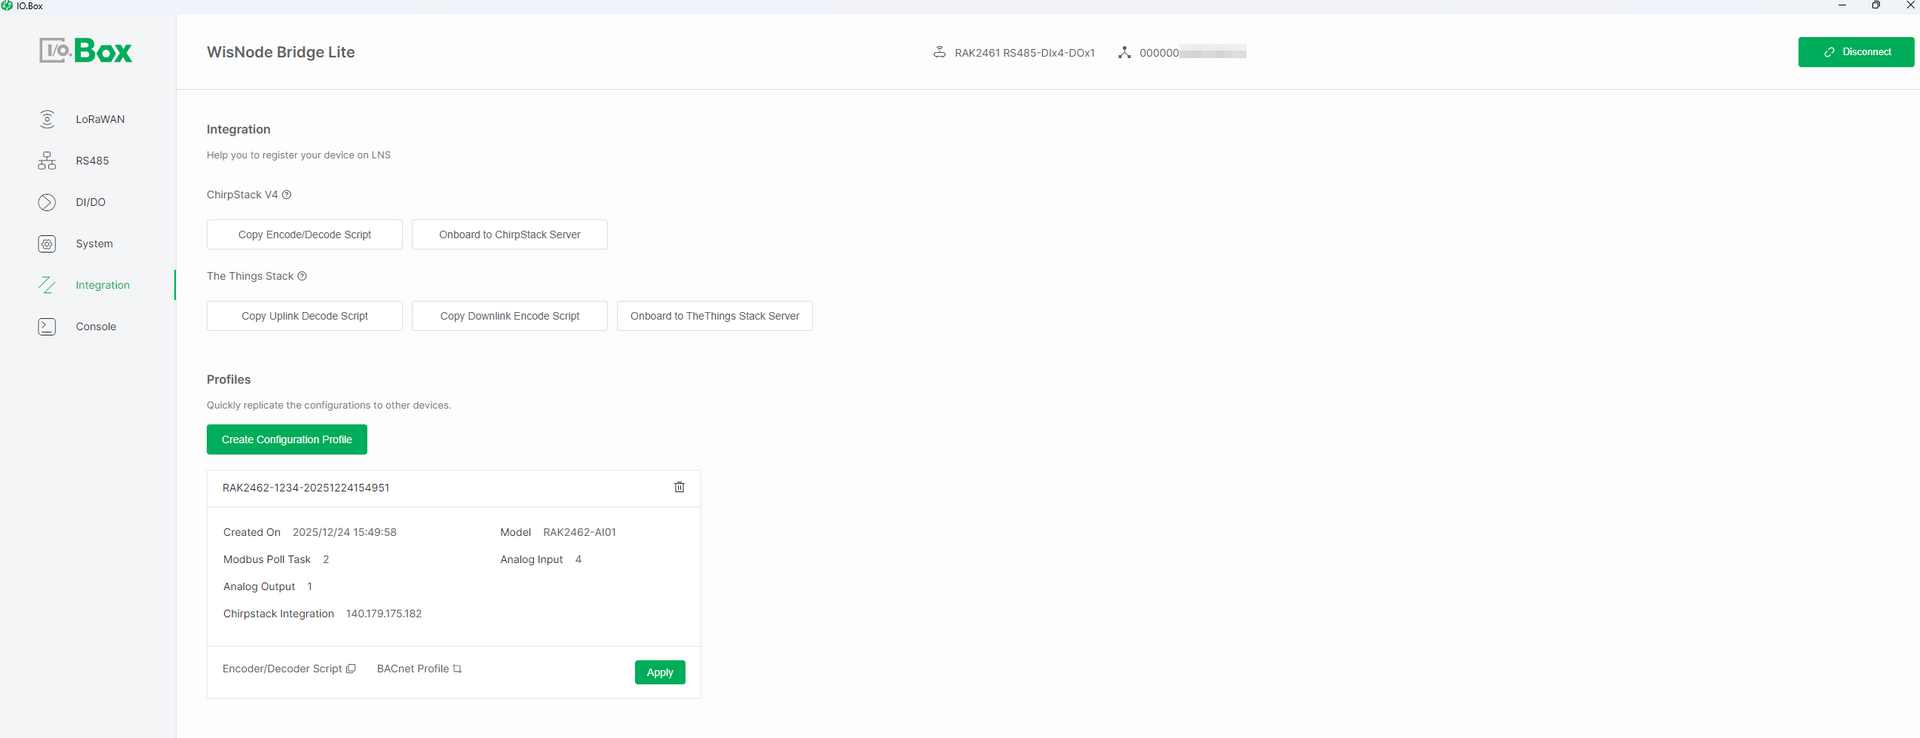 Figure 1: Integration Dashboard for IO Box
Integration with LoRaWAN Servers
Integration with LoRaWAN Servers allows Bridge IO to connect devices to external LoRaWAN Network Servers (LNS). Through the IO.Box tool, you can effortlessly onboard devices to the server and automatically generate the necessary payload codec scripts to ensure proper parsing of uplink and downlink data.
Prerequisites
Ensure that the gateway is connected to the LNS and that both the gateway and the device use the same frequency band.
ChirpStack v4 Integration
Onboard to ChirpStack Server
This feature provides a one-click onboarding capability. It allows you to add an application to your The Things Stack server and automatically registers the current Bridge IO device under the selected application, populating essential device parameters such as DevEUI and AppKey.
Additionally, it automatically generates the required Encode/Decode Script, eliminating manual device creation and reducing configuration errors.
Creating Application
- Navigate to the ChirpStack v4 menu and click Onboard to ChirpStack Server to create a device profile. Click OK.
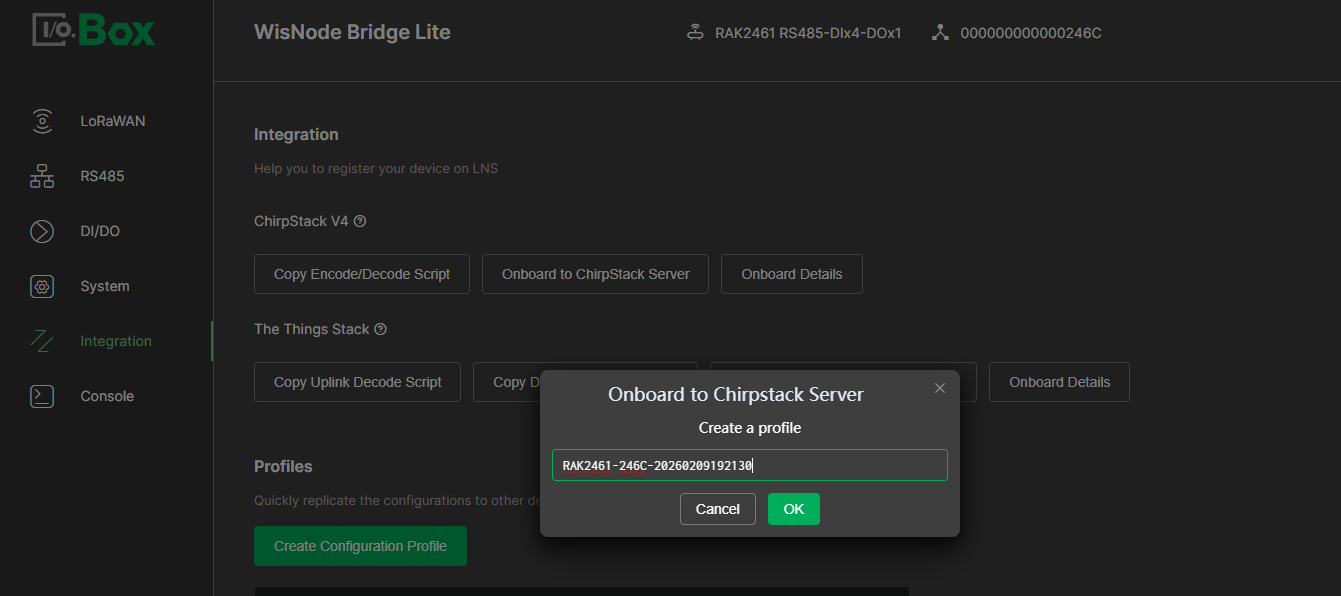 Figure 1: Create a device profile
- Click Create New to create a ChirpStack Server and configure the following parameters.
If a ChirpStack server has already been created, select the server and then create an application under it.
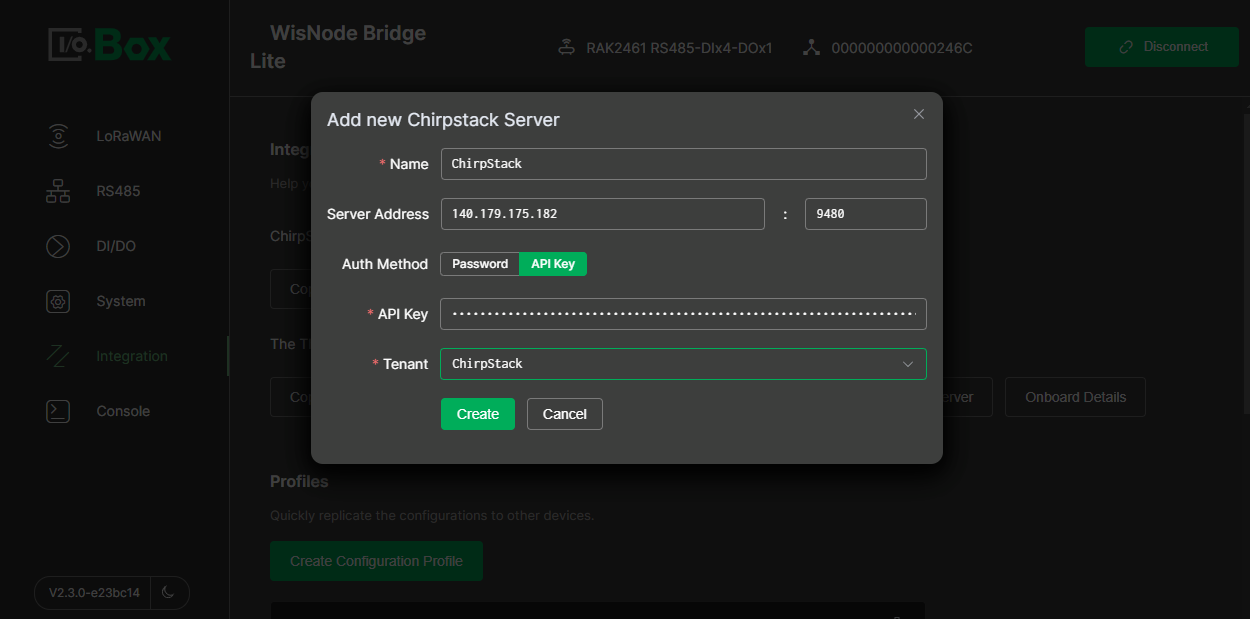 Figure 1: Add a new ChirpStack server
-
Name: The name of the ChirpStack server.
-
Server Address: The ChirpStack server address. The default port is
9480. -
Auth Method: Password or API Key. Here we use API key.
-
API Key: ChirpStack server API key. You can create one by following the steps below.
- To create a personal API key, go to Network Server > API keys in the left-hand sidebar and click Add API key.
- Enter a Name for your key and then press Submit.
- You will see the newly created API Key. Copy the key and save it in a safe place, press Back. You will not be able to see this key again in the future, and if you lose it, you can create a new one by following this same procedure.
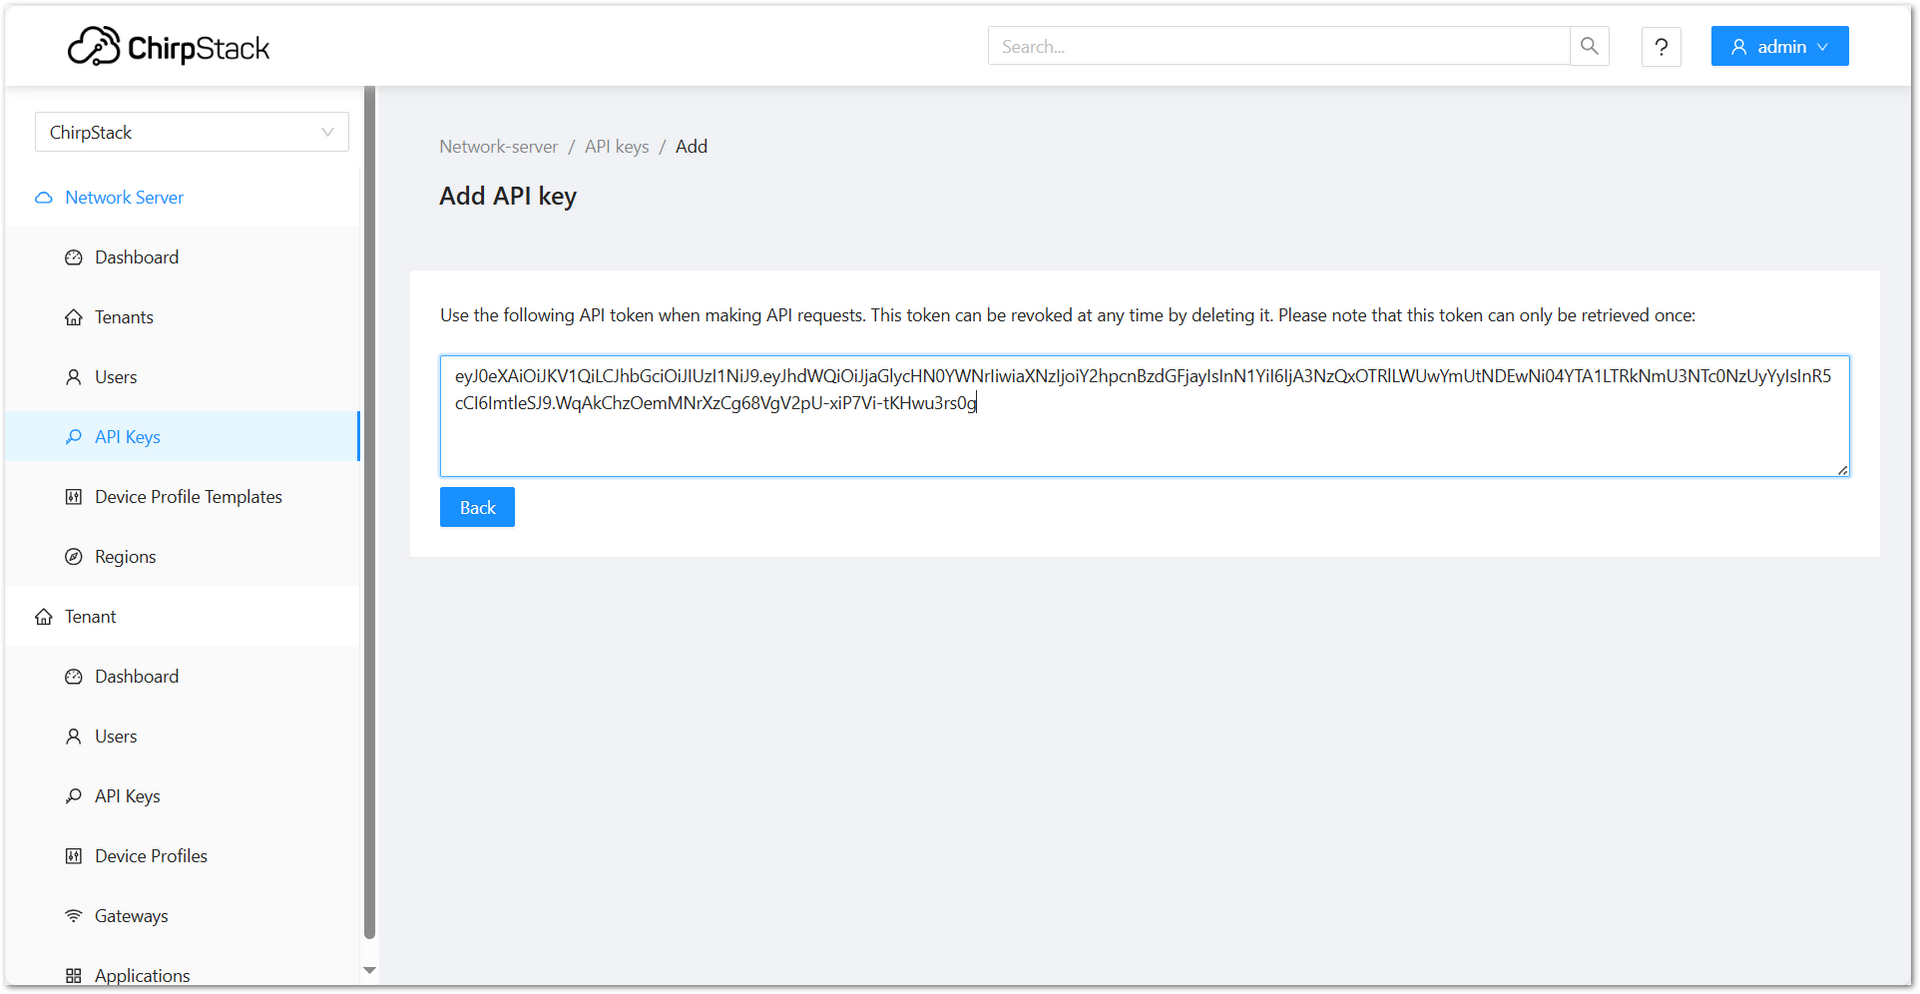 Figure 1: Add API keys
- Tenant: ChirpStack.
- Click Create to save the configuration.
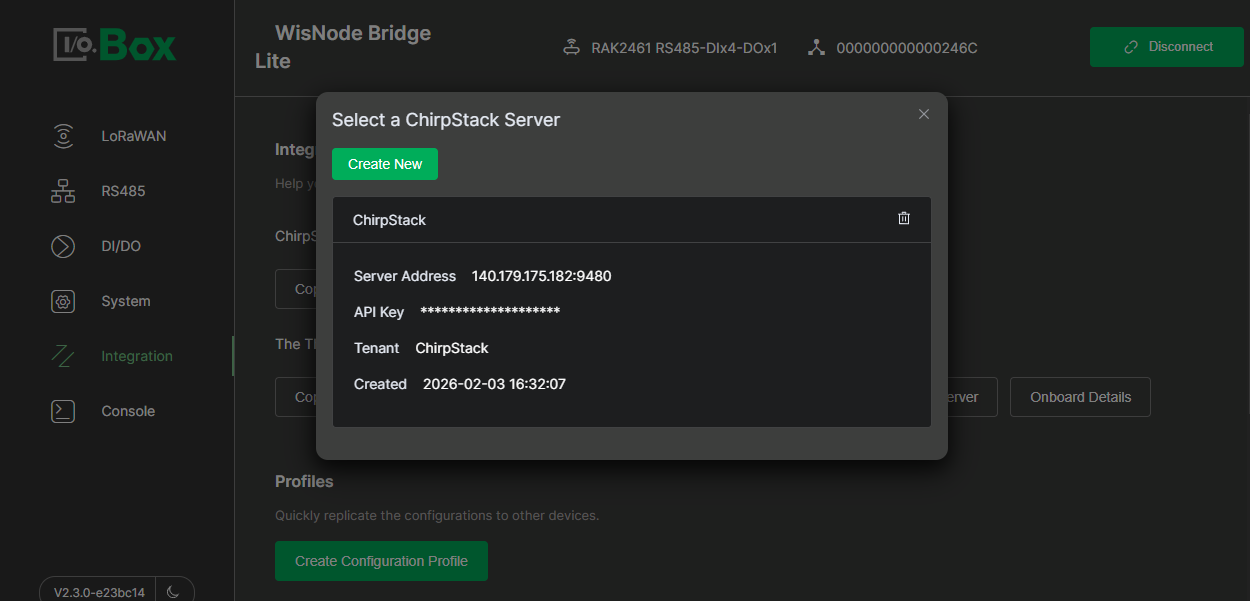 Figure 1: Save the server configuration
- Click the created server, then click Create New to create an application.
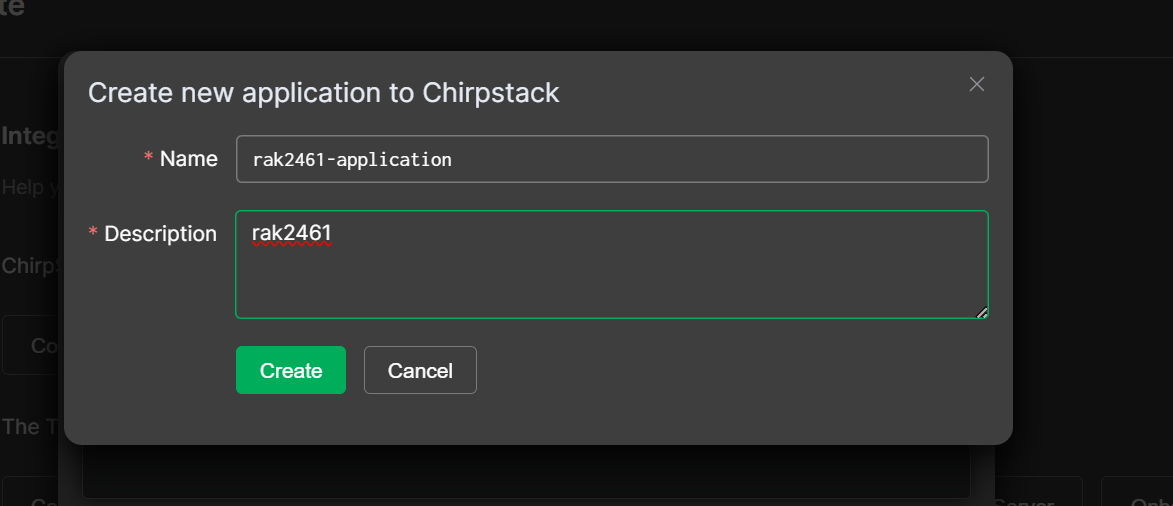 Figure 1: Create a new application to ChirpStack
- The newly created application will appear at the top of the list based on the creation time.
 Figure 1: Select a ChirpStack application
Adding the device
- Click the newly created application. In the Register End Device to Chirpstack dialog, click Create to confirm the registered device information.
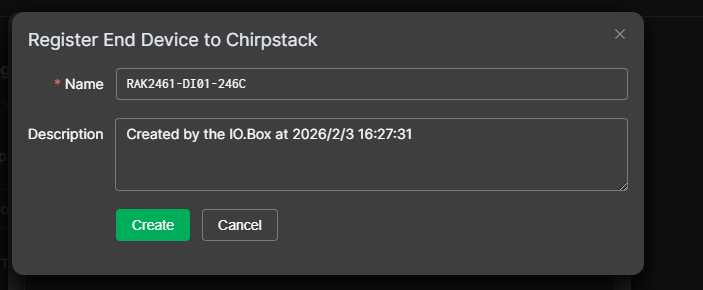 Figure 1: Register the device
- After the device is created successfully, you can view the added device in the ChirpStack.
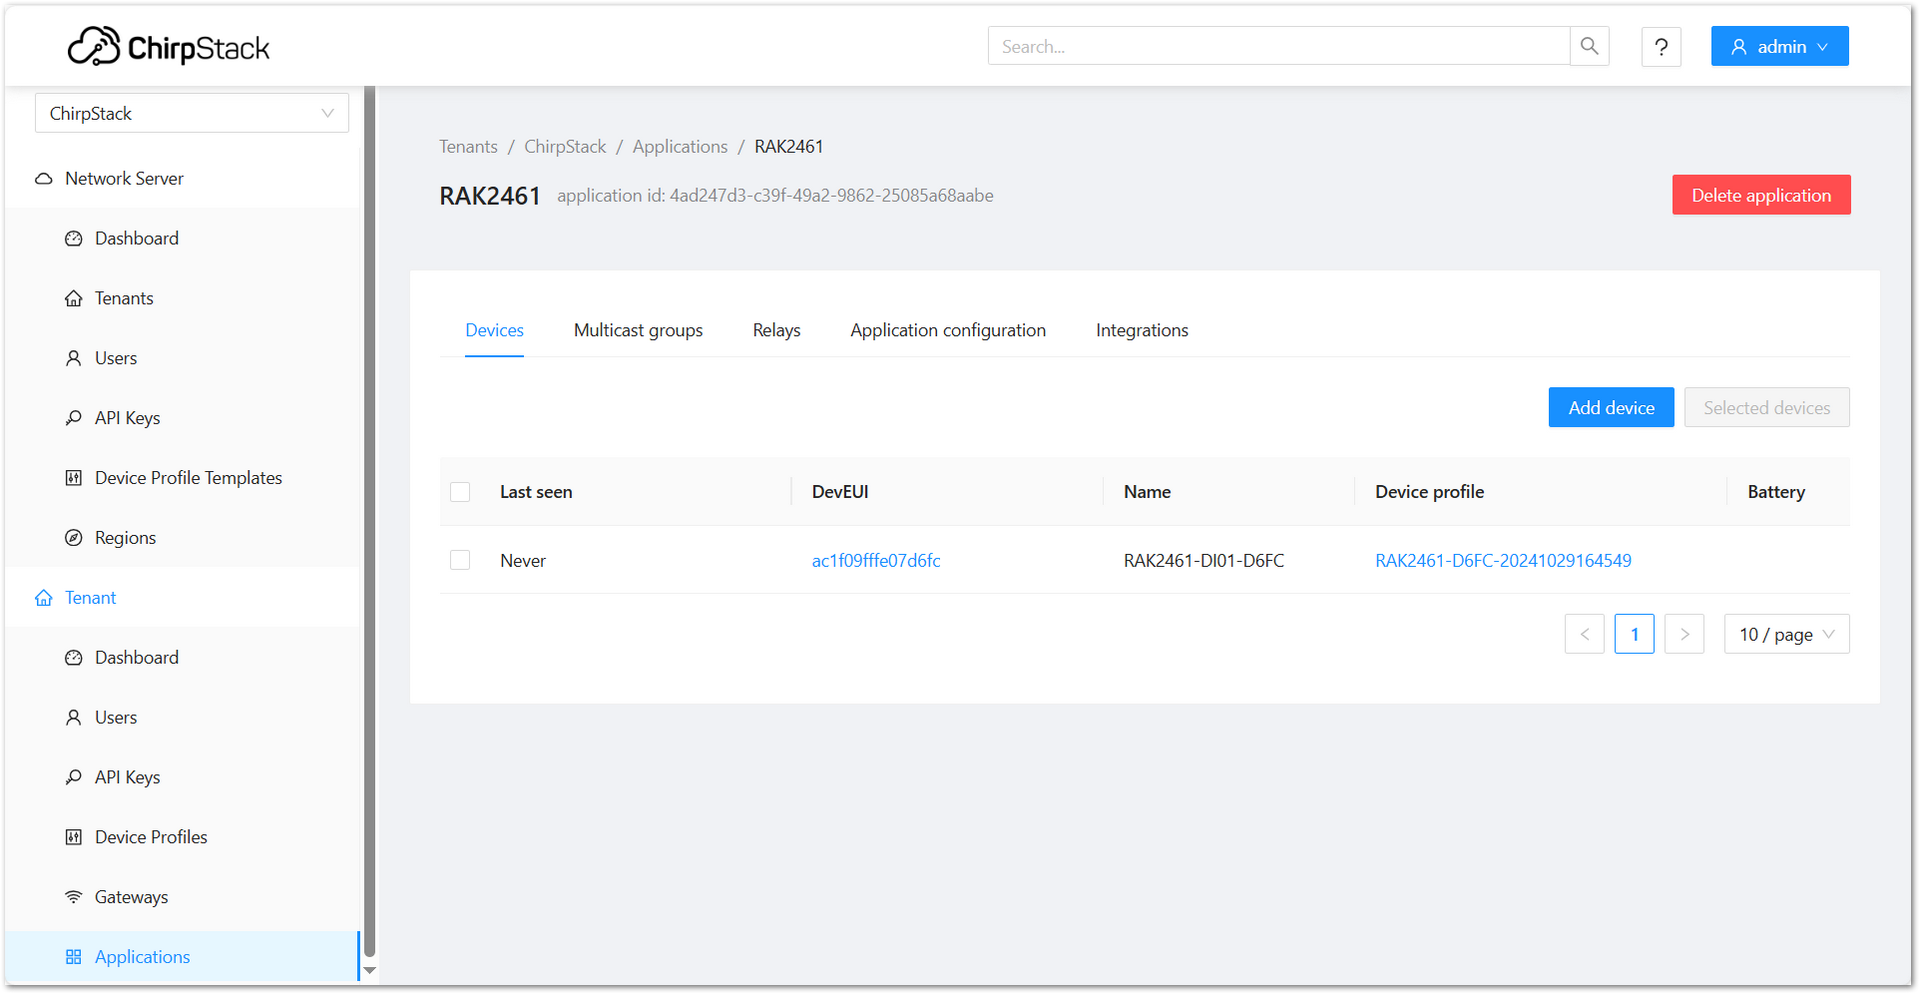 Figure 1: Added device in ChirpStack
Onboard Details (Optional)
After onboarding to a ChirpStack server, you can use Onboard Details to review the server configuration applied during onboarding. It also allows you to register the device directly to an application on the selected server.
Copy Encode/Decode Script
This feature generates the JavaScript codec functions required by the ChirpStack server. This script defines how to decode the binary payload from the device into readable sensor values and encode downlink JSON commands back into a binary payload for the device.
If the device has been registered using the Onboard to ChirpStack Server feature and the required Encode/Decode Script has been automatically generated, this step can be skipped.
-
In the Integration module, navigate to the ChirpStack v4 menu and click Copy Encode/Decode Script.
-
Paste the copied script into ChirpStack:
-
Go to the target device's Device Profile.
-
Under the Codec tab, set Payload codec to JavaScript functions.
-
Paste the script into the Codec functions editor and click Submit.
-
Decoder Update
The Decoder is updated when RS485-related settings are changed, including:
- Switching the Transmission Mode between Parsing Mode and Polling Transparent Mode.
- Modifying the name, sensor type, or unit of a Polling Task.
- Adding or deleting a Polling Task.
You can click Update Decoder to update the Decoder. After the update is completed, the ChirpStack server will use the updated decoder to decode device data.
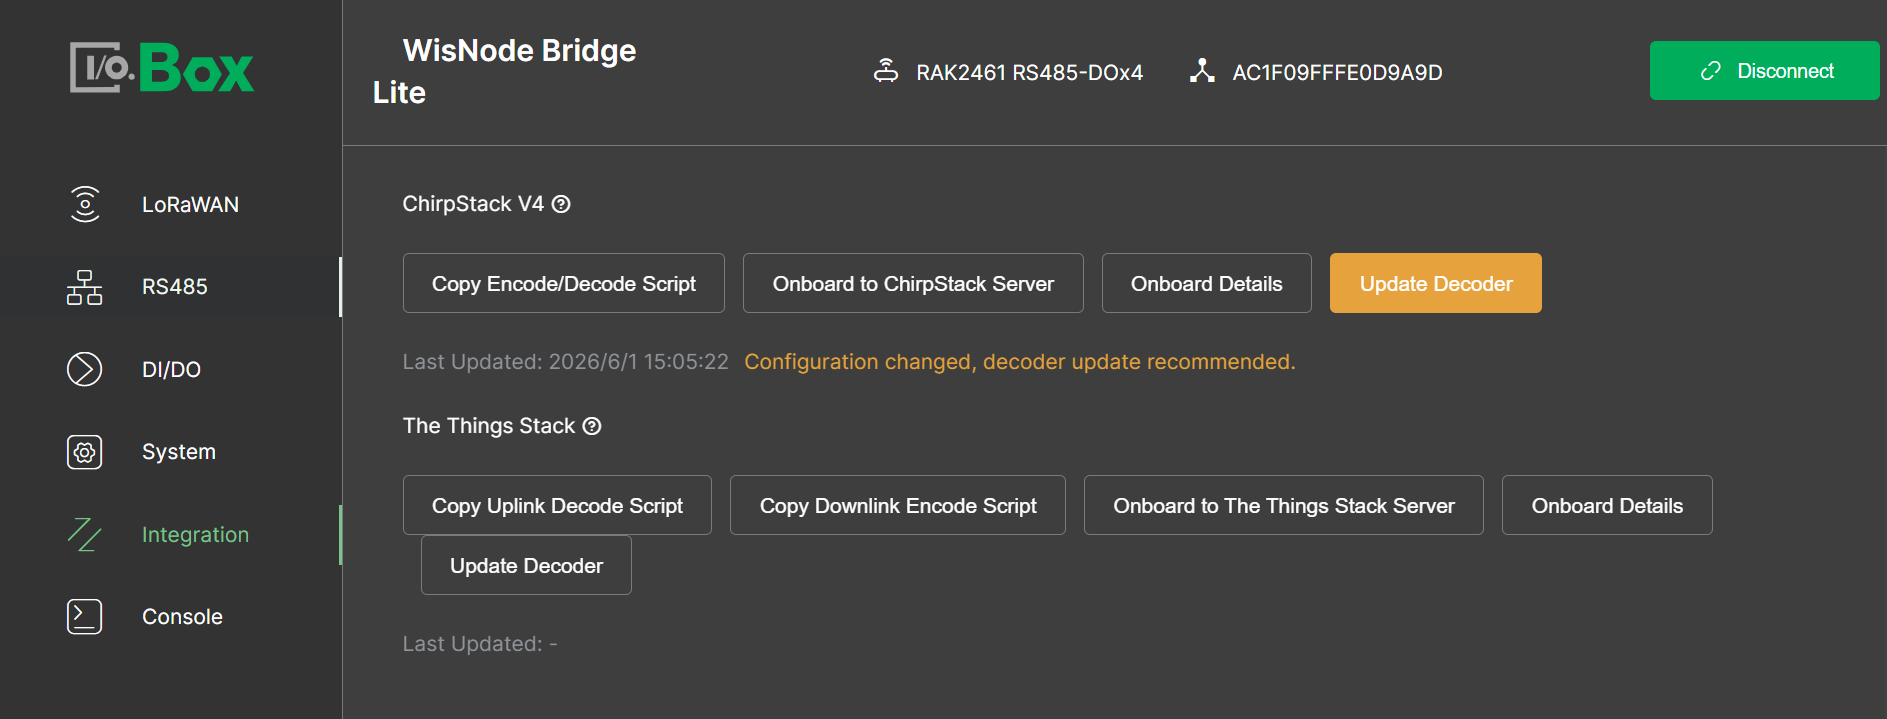 Figure 1: ChirpStack Decoder
The Things Stack (TTN v3) Integration
Onboard to The Things Stack Server
This feature provides a one-click onboarding capability. It allows you to add an application to your The Things Stack server and automatically registers the current Bridge IO device under the selected application, populating essential device parameters such as DevEUI and AppKey.
Additionally, it automatically generates the required Encode/Decode Script. This eliminates manual device creation and reduces configuration errors.
Creating Application
- Navigate to the The Things Stack menu and click Onboard to The Things Stack Server to create a device profile. Click OK.
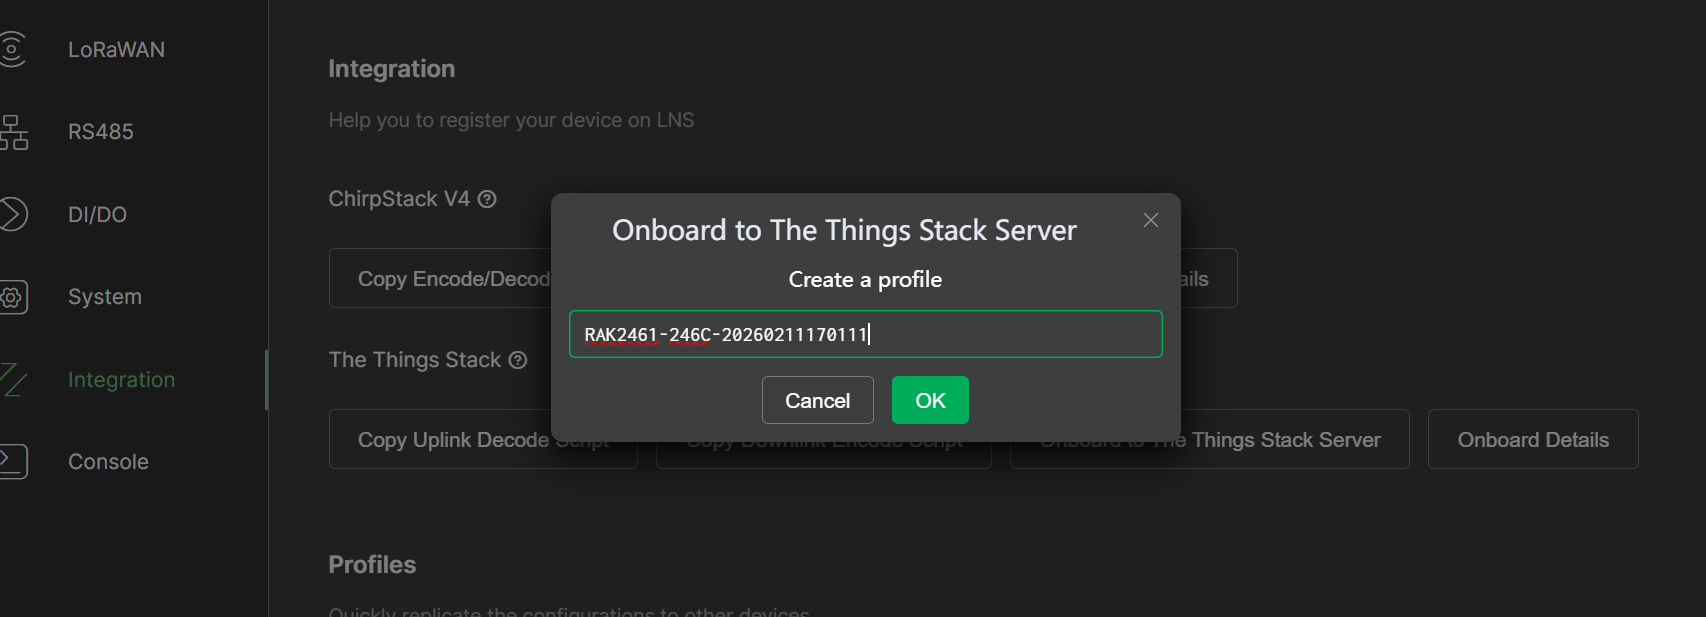 Figure 1: Create a device profile
- Click Create New to create The Things Stack Server and configure the following parameters.
If a TTN server has already been created, select the server and then create an application under it.
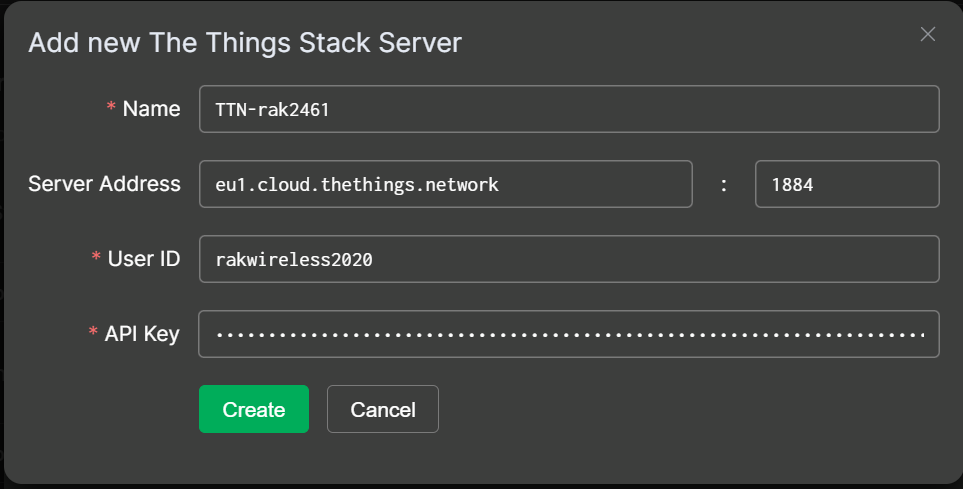 Figure 1: Add a new The Things Stack server
-
Name: The name of the The Things Stack server.
-
Server Address: The Things Stack server address. In this case, it is
eu1.cloud.thethings.network. The default port is1884. -
User ID: Your User ID, which can be obtained from Profile settings > Edit profile.
-
API Key: Your personal API key. You can create one by following the steps below.
- To create a personal API key, go to Home > User settings > API keys in the left-hand sidebar, then click +Add API key.
- Enter a Name for your key, set the Expiry date, select rights that you want to grant, and then press Create API Key.
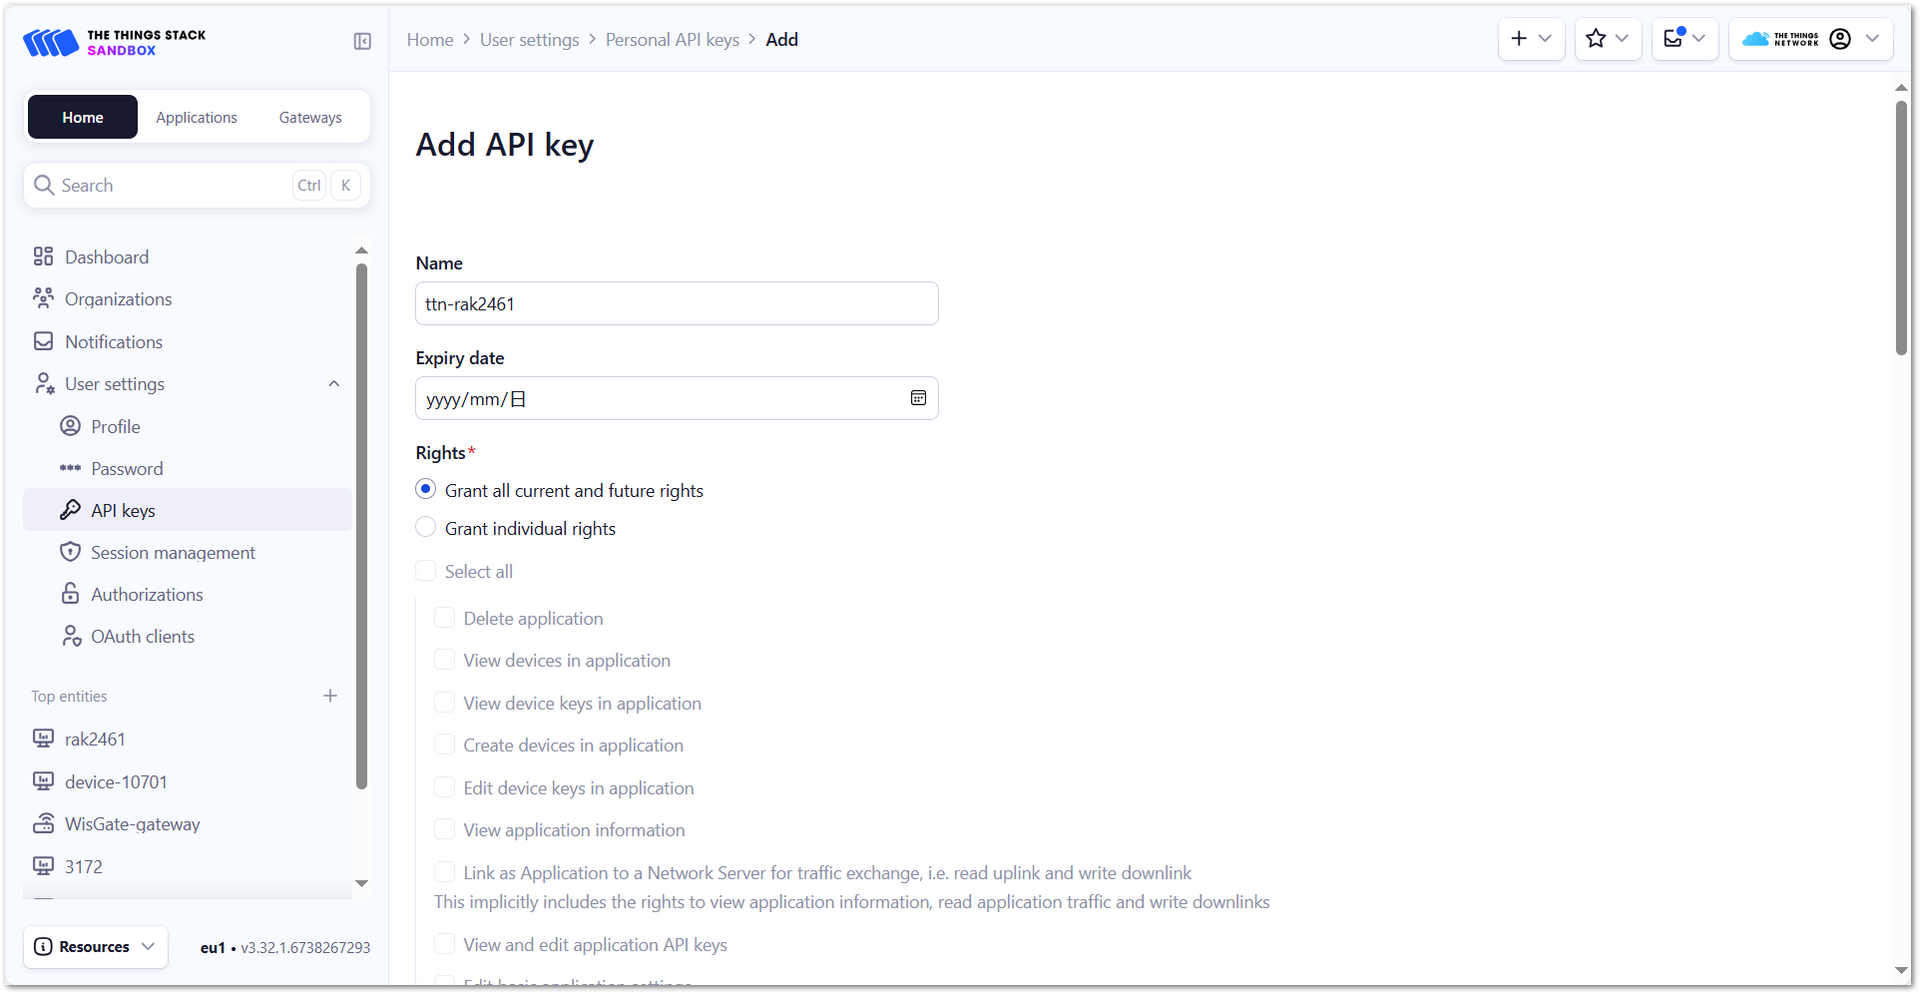 Figure 1: Add API keys
-
A screen displaying your newly created API key will appear. Copy the key using the copy button and store it securely. After saving the key, select I have copied the key to continue.
warningThis API key is displayed only once and cannot be viewed again. If the key is lost or compromised, it cannot be recovered. In that case, you must generate a new API key by repeating this procedure.
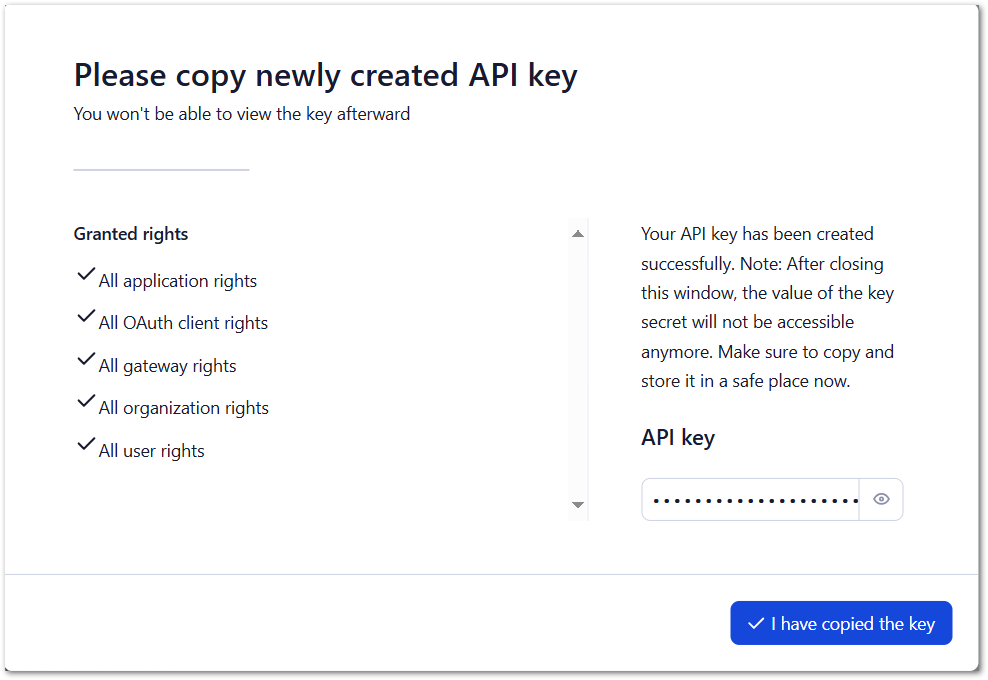 Figure 1: Copy the newly created API key
- Click Create to save the configuration.
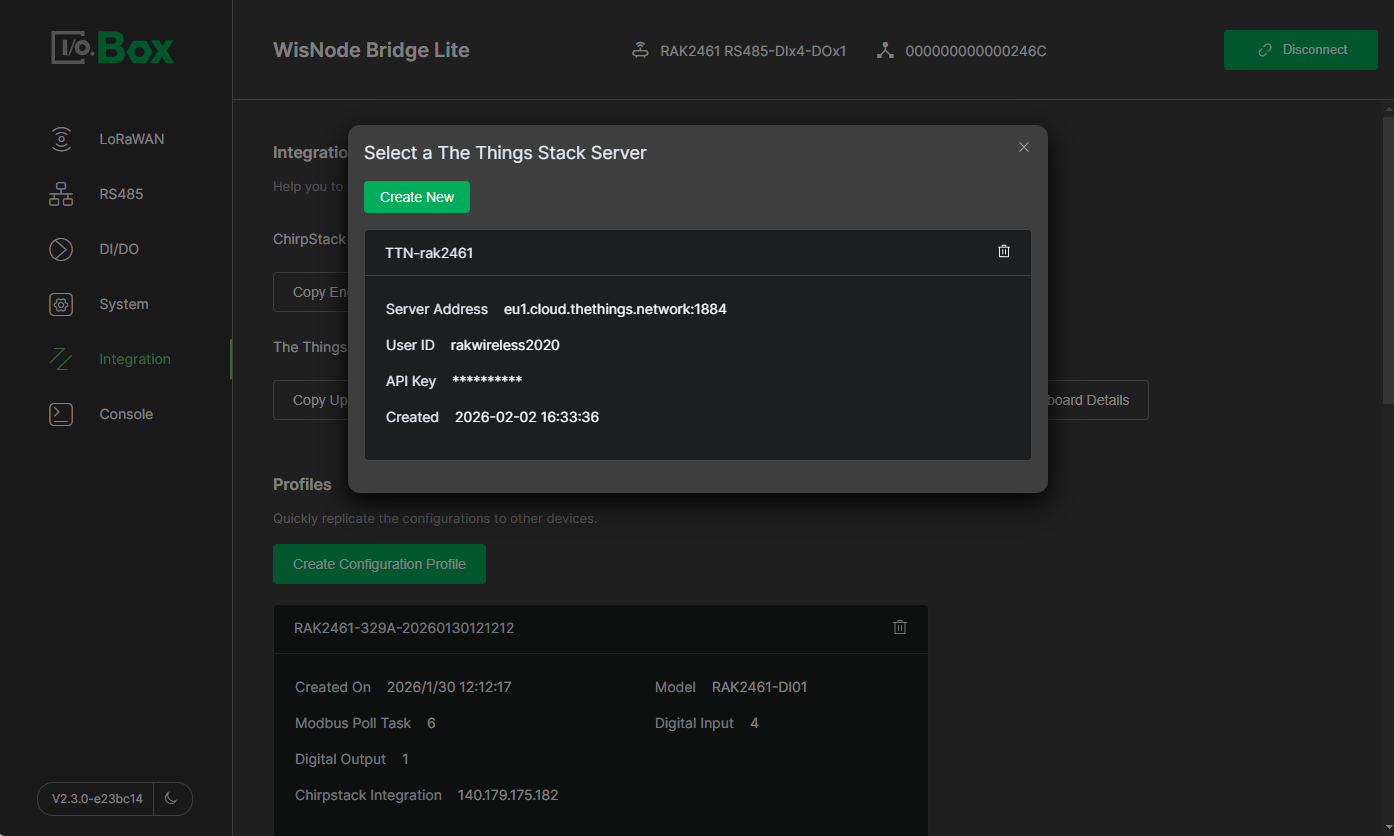 Figure 1: Select The Things Stack server
- Click the created server, then click Create New to create an application.
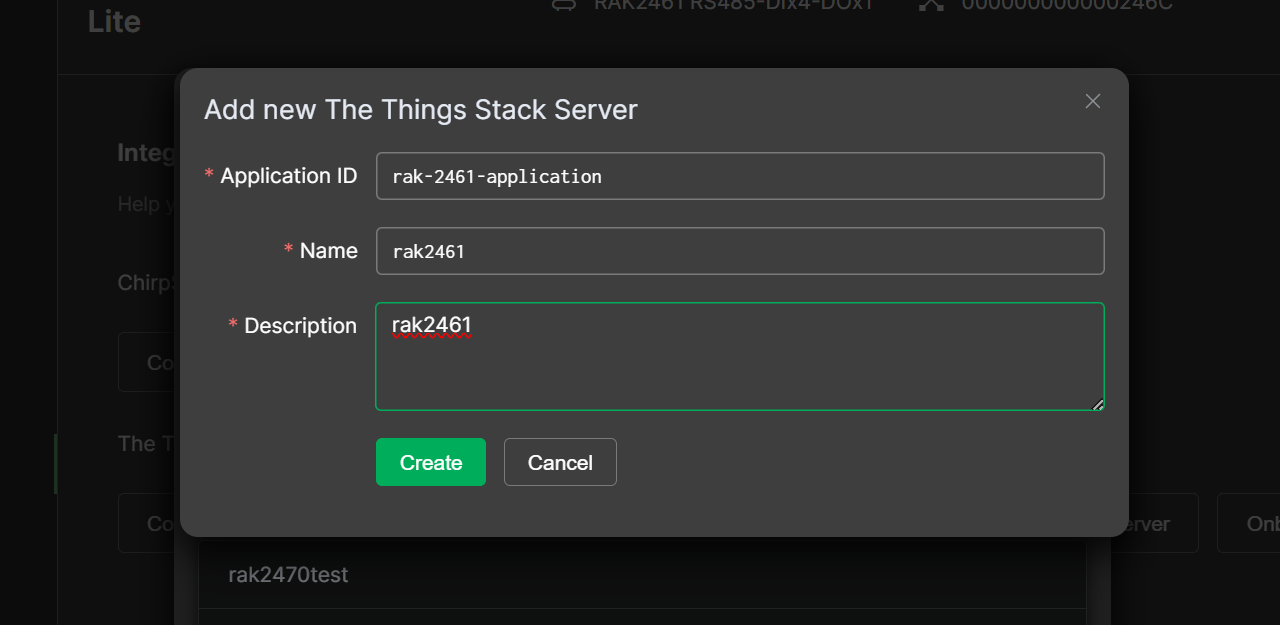 Figure 1: Create an application
- The newly created application will appear at the top of the list based on the creation time.
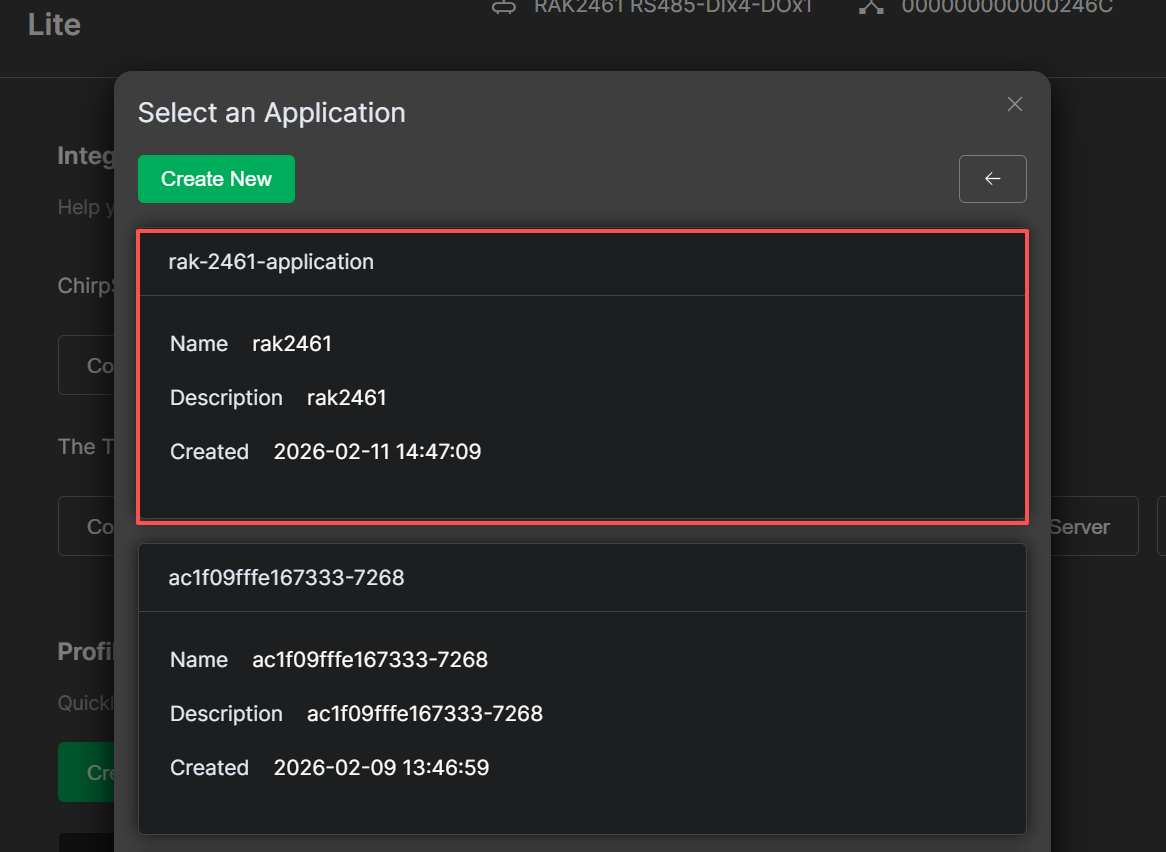 Figure 1: Select the newly created The Things Stack server
Adding the device
- Click the newly created application. In the Add New The Things Stack Server dialog, click OK to confirm the registered device information.
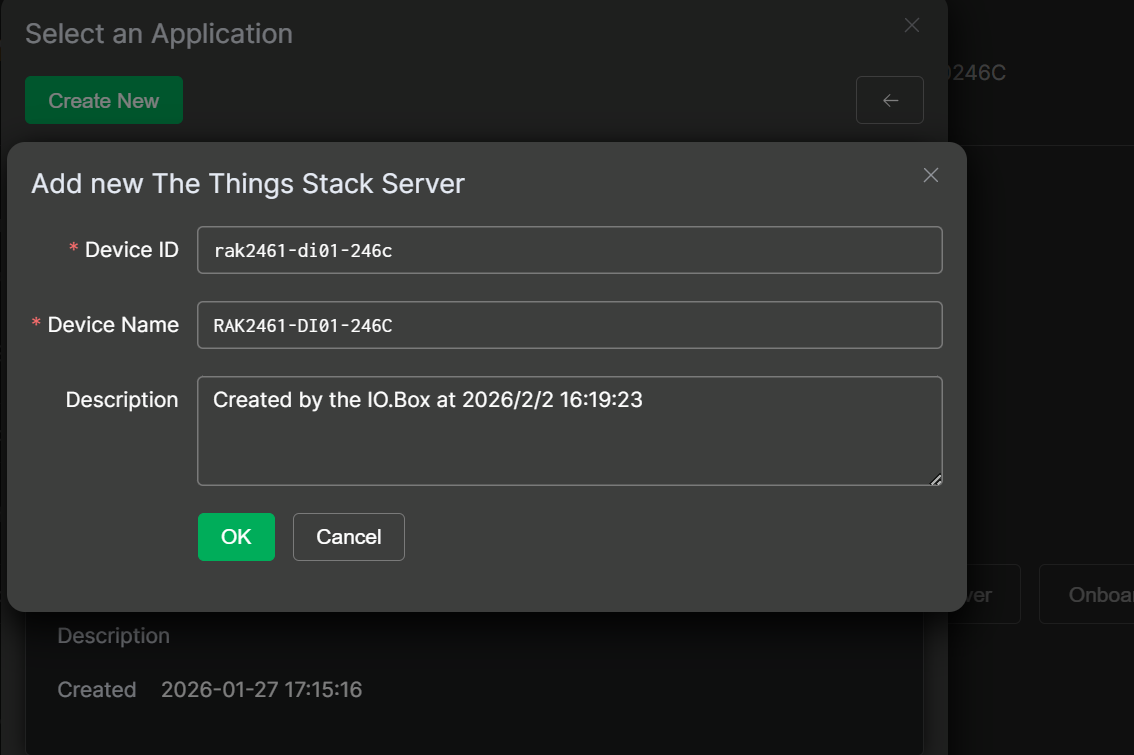 Figure 1: Register the device
- After the device is created successfully, you can view the added device in the TTN.
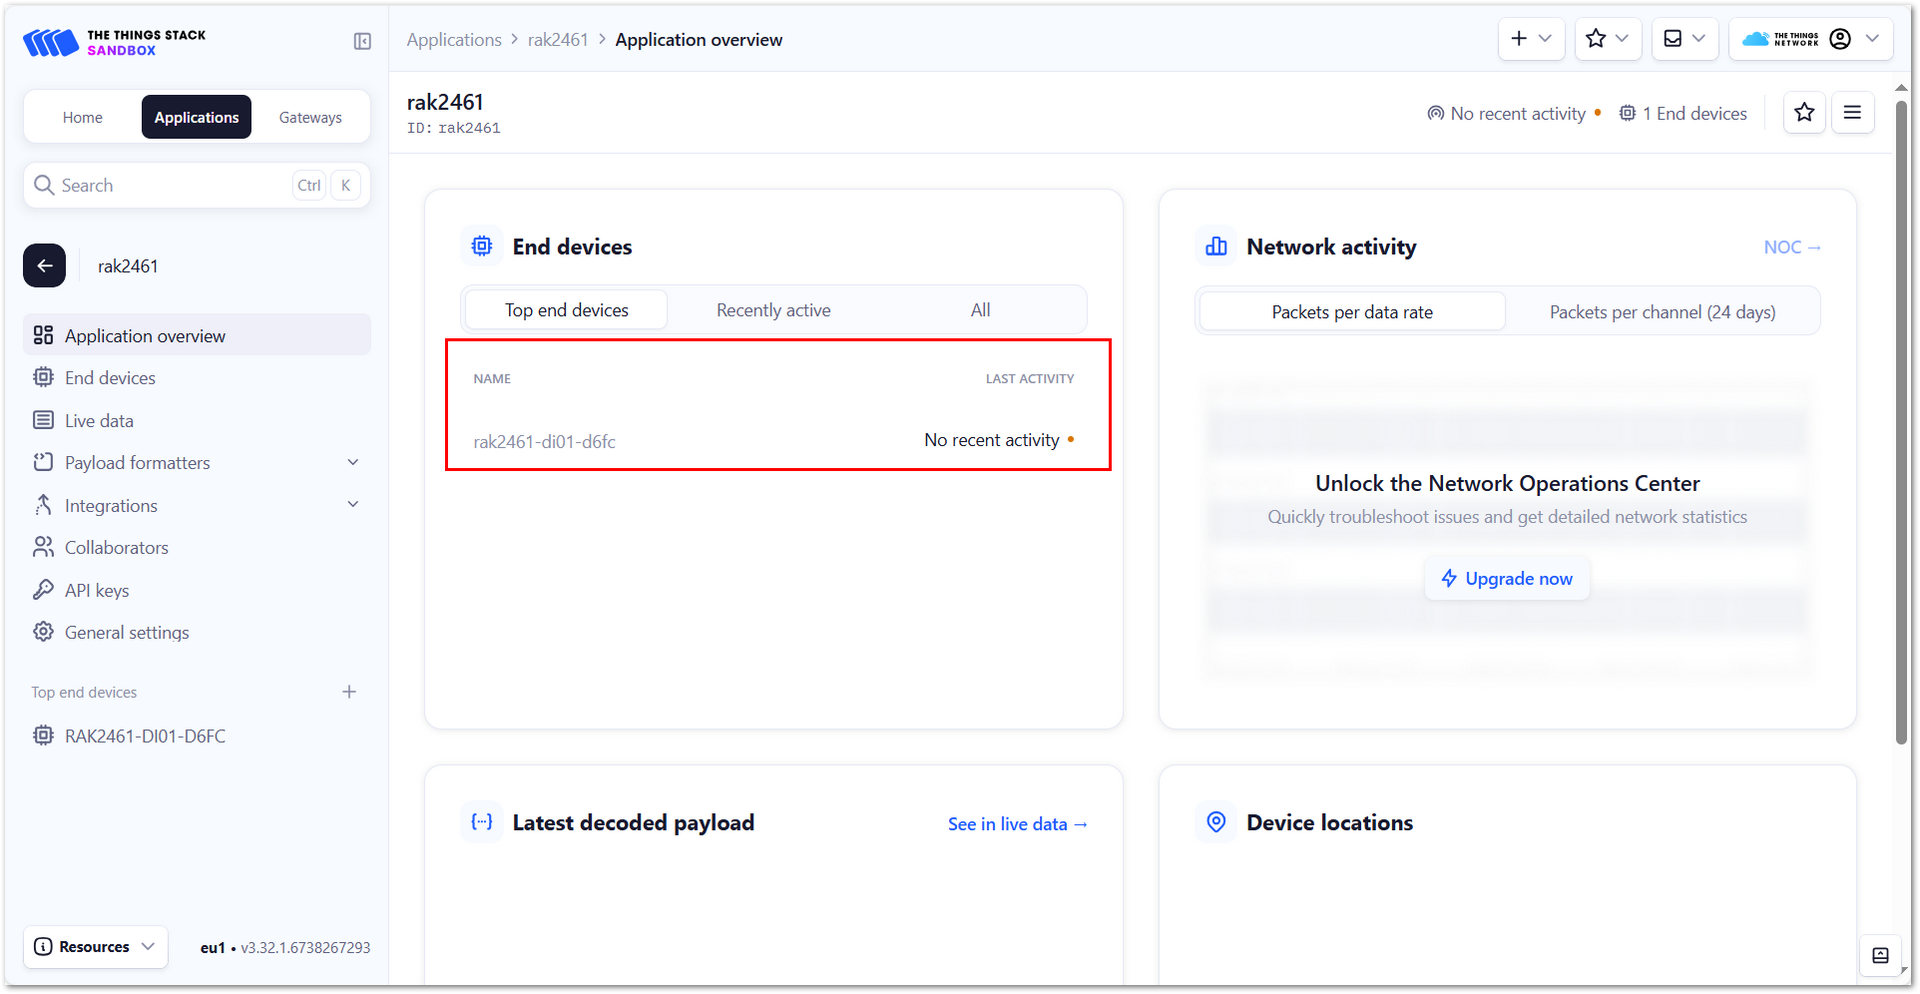 Figure 1: Successfully added the end device in the TTN
Onboard Details (Optional)
After onboarding to a TTN server, you can use Onboard Details to review the server configuration applied during onboarding. It also allows you to register the device directly to an application on the selected server.
Copy Uplink Decode/Downlink Encode Script
This feature generates the JavaScript scripts required for both the TTN server's Uplink payload formatter (to decode device-sent data) and Downlink payload formatter (to encode server commands into a device-readable format).
If the device has been registered using the Onboard to The Things Stack Server feature and the required Encode/Decode Script has been automatically generated, this step can be skipped.
-
In the Integration module, navigate to The Things Stack menu and click Copy Uplink Decode Script or Copy Downlink Encode Script.
-
Paste the copied script(s) into The Things Stack:
-
Select the target device and navigate to Payload formatters.
-
Set Formatter type to Custom JavaScript formatter.
-
For Uplink, paste the uplink decode script. For Downlink, paste the downlink encode script. Click Save changes.
-
Decoder Update
The Decoder is updated when RS485-related settings are changed, including:
- Switching the Transmission Mode between Parsing Mode and Polling Transparent Mode.
- Modifying the name, sensor type, or unit of a Polling Task.
- Adding or deleting a Polling Task.
To apply these changes, click Update Decoder. Once the process is complete, the TTN v3 Server will use the updated Decoder to decode device data.
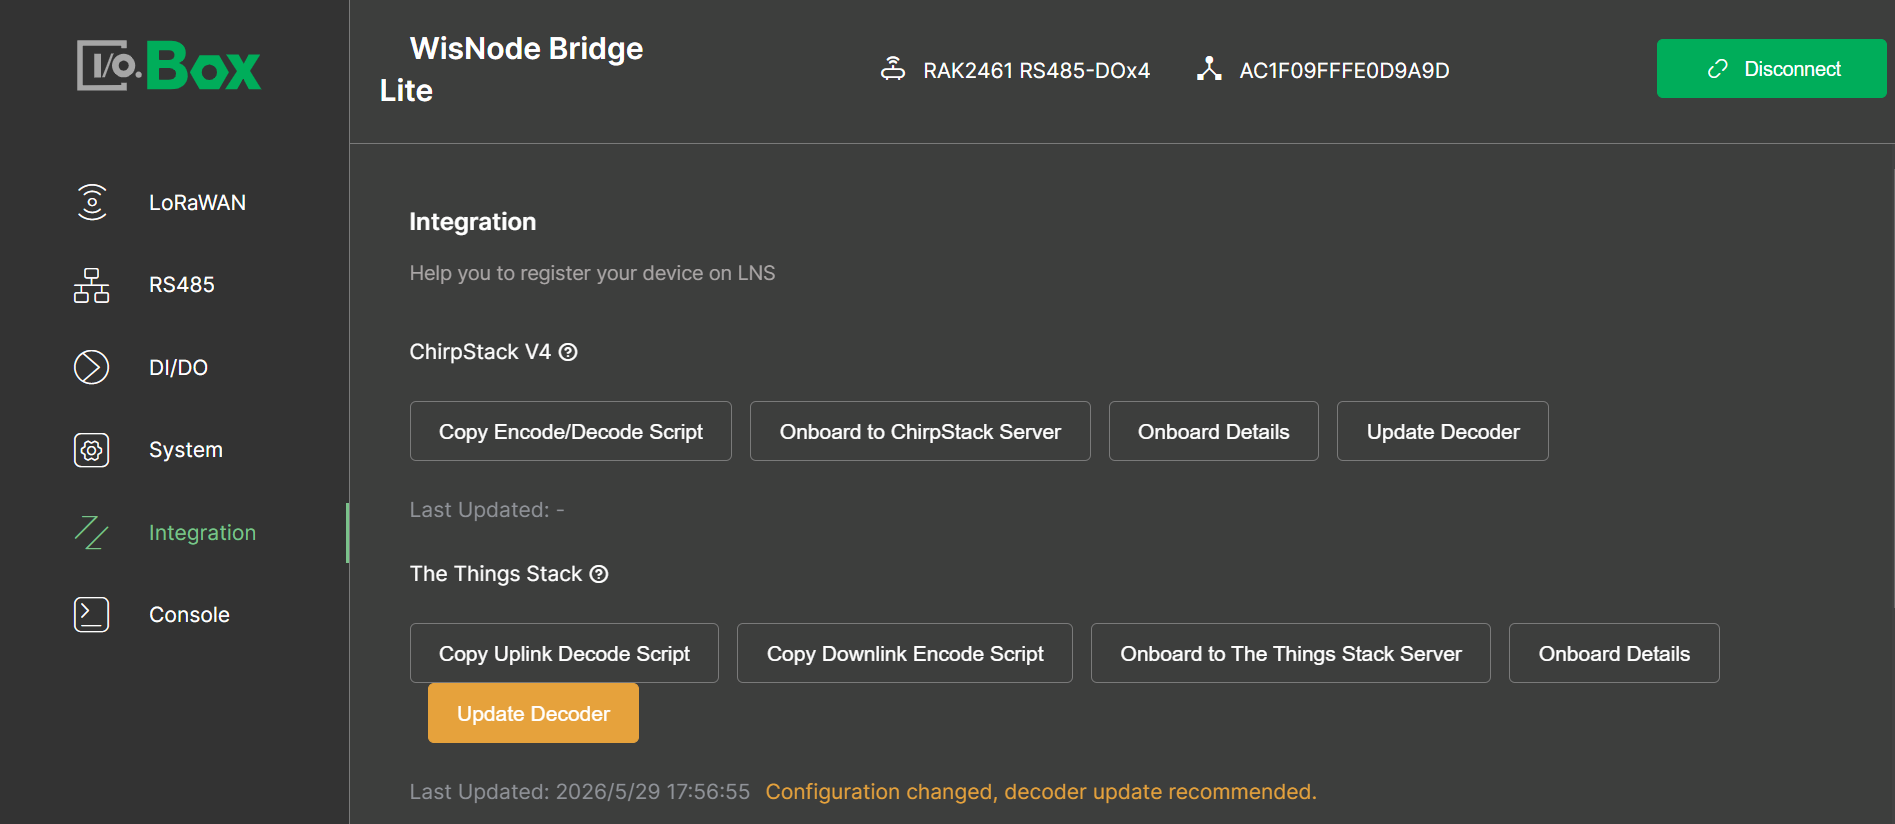 Figure 1: ttn decoder
Profiles
The Profiles feature allows you to save a Bridge IO device configuration (such as RS485 polling tasks, AI/AO calibration values, and interface settings) as a named template. It is mainly used for fast deployment across multiple devices.
- Bulk Deployment: Efficiently deploy a verified configuration to multiple devices of the same model, ensuring consistency and saving configuration time.
When performing bulk deployment, the Bridge IO device models must be identical, and their interface types and connected sensor types must also match.