RAK9105U Application Integration
Overview
This guide explains how to integrate the RAK9105U PowerLink with Datacake through The Things Stack.
After completing the integration, Datacake can be used to visualize RAK9105U uplink data and send LoRaWAN® downlink commands for remote power control.
The integration supports both RAK9105U deployment types:
- External DC power - Monitor RAK9105U output status and device information, and remotely control the switchable outputs.
- RAK Battery Plus - Monitor RAK9105U status and Battery Plus operating data, and optionally remotely control a connected device.
For the complete payload and command definitions, refer to the RAK9105U Uplink and Downlink Data Reference.
Prerequisites
Before starting, make sure the following requirements are met:
- The RAK9105U has been configured and successfully joined to The Things Stack using OTAA.
- A LoRaWAN gateway is online and forwarding RAK9105U traffic to The Things Stack.
- You have access to the application containing the RAK9105U in The Things Stack.
- You have a Datacake account.
- The RAK9105U is powered and periodically sending uplink data.
If RAK Battery Plus monitoring is required, connect RAK Battery Plus to the RAK9105U through the power and RS485 interface before verifying battery data in Datacake.
Configure the Datacake Webhook in The Things Stack
The webhook forwards uplink data from The Things Stack to Datacake.
- In The Things Stack Console, open the application containing the RAK9105U and go to Webhooks.
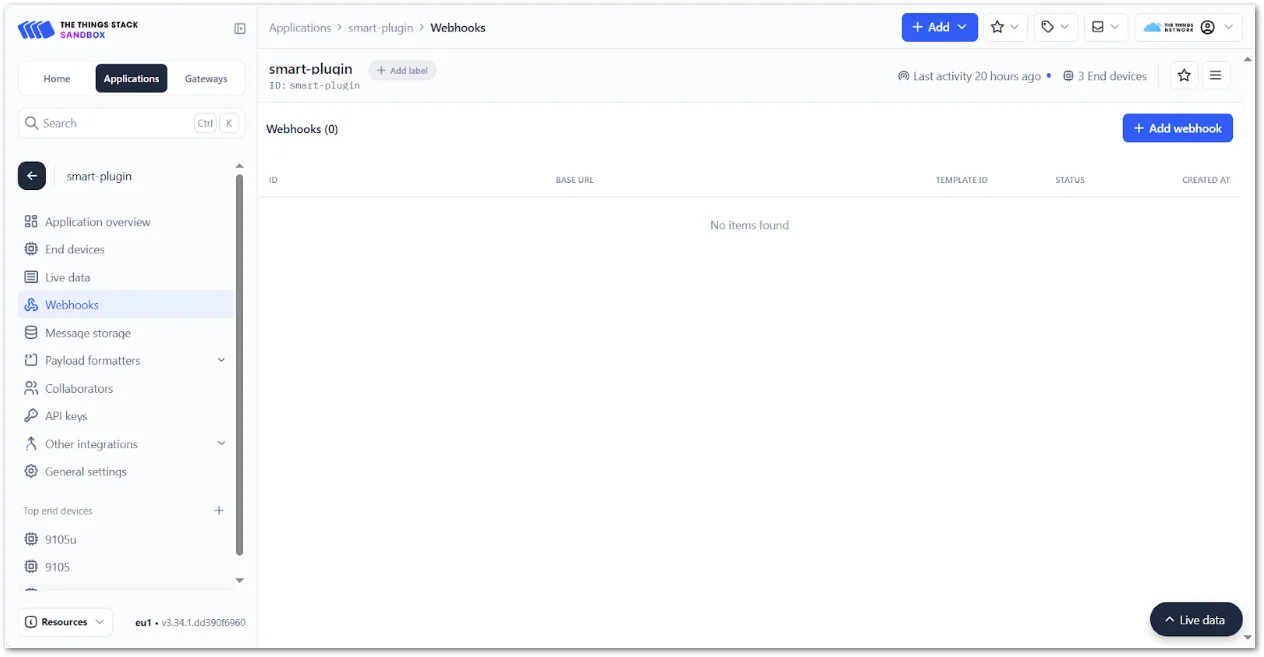 Figure 1: Datacake integration in The Things Stack
- Click + Add Webhook and select the Datacake template.
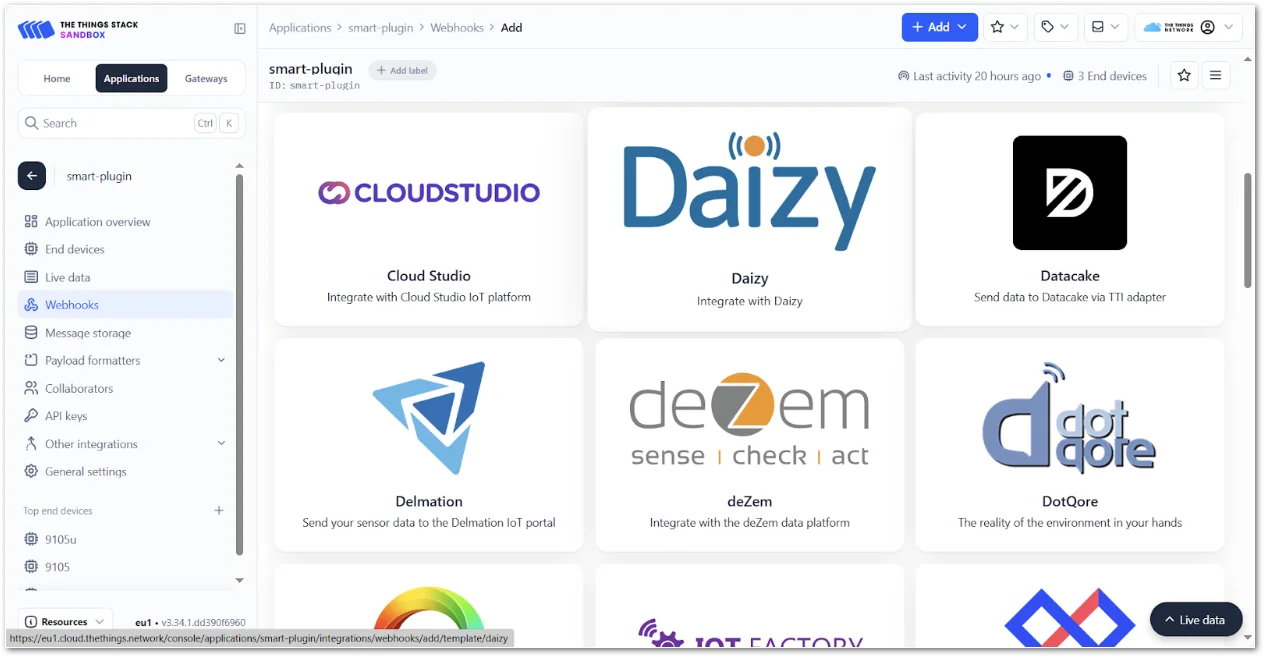 Figure 1: Add the Datacake webhook
- Log in to Datacake and go to Members > API Users.
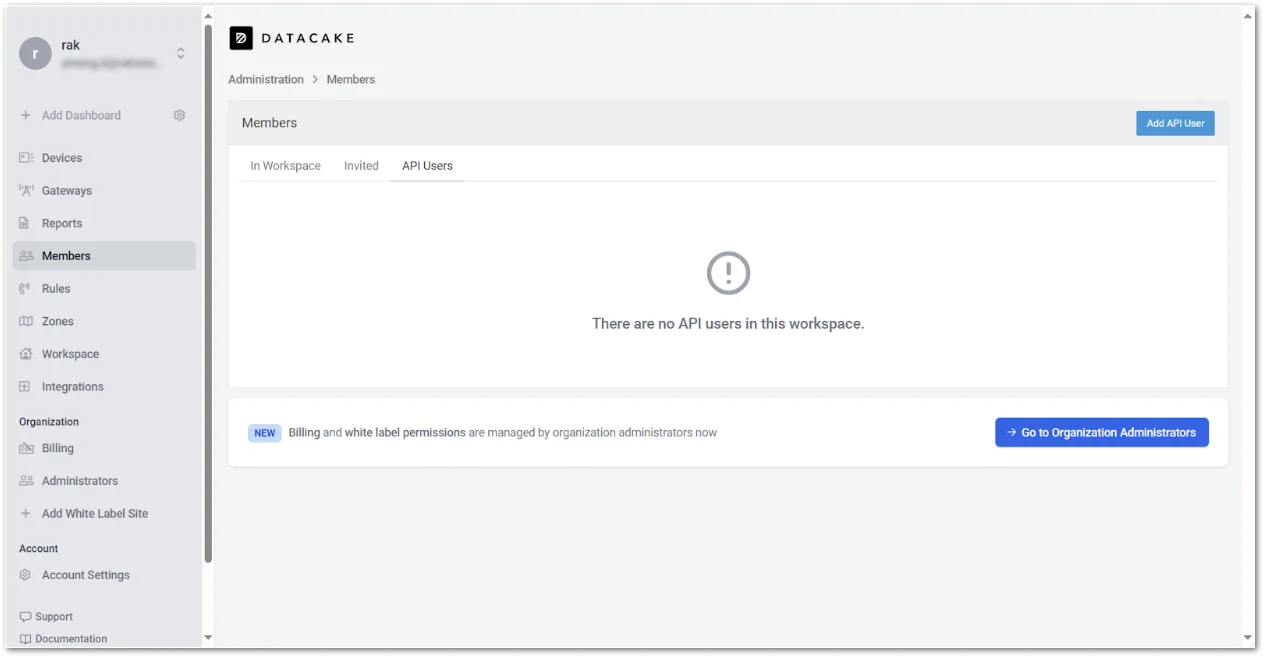 Figure 1: Datacake API users
- Click Add API User, enter a name for the API user, and configure the required permissions.
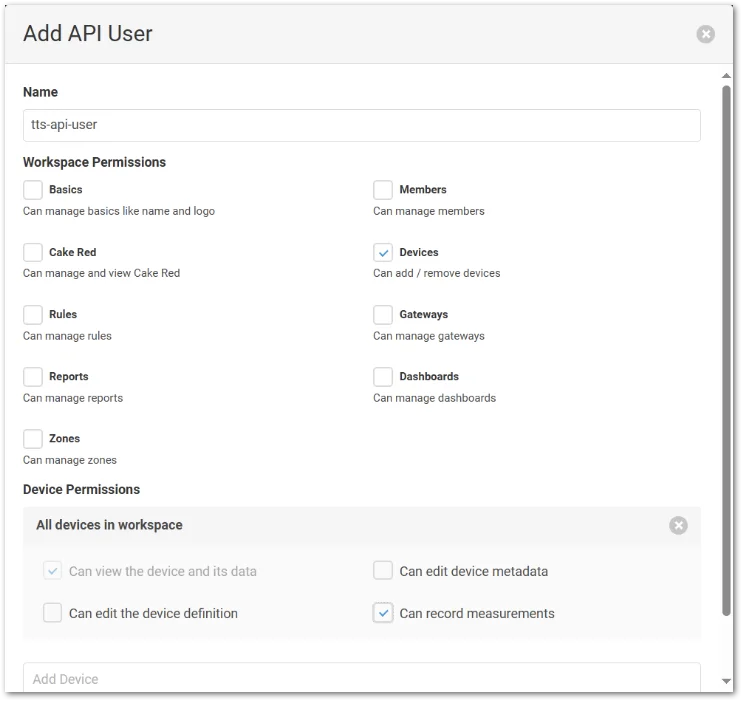 Figure 1: Add a Datacake API user
- Save the API user and copy the generated API Token.
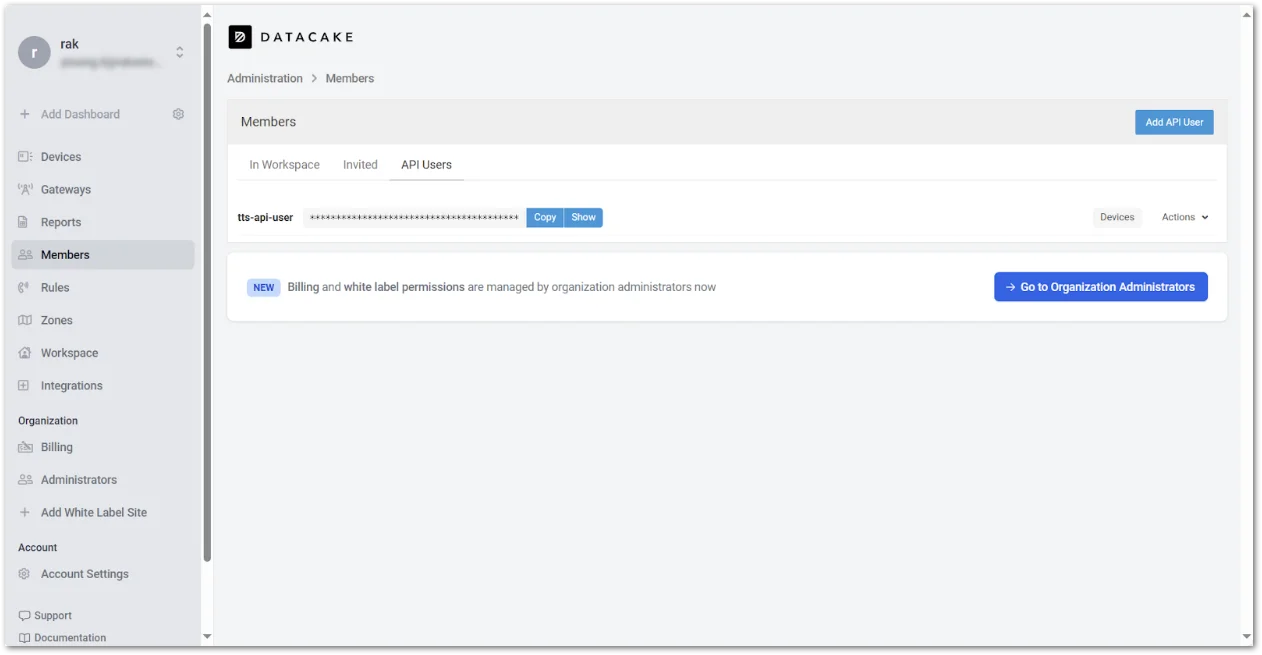 Figure 1: Copy the Datacake API token
-
Return to The Things Stack and configure the Datacake webhook:
- Webhook ID: Enter an identifier, for example
rak9105u. - Token: Paste the Datacake API token.
- Webhook ID: Enter an identifier, for example
-
Click Create Datacake Webhook.
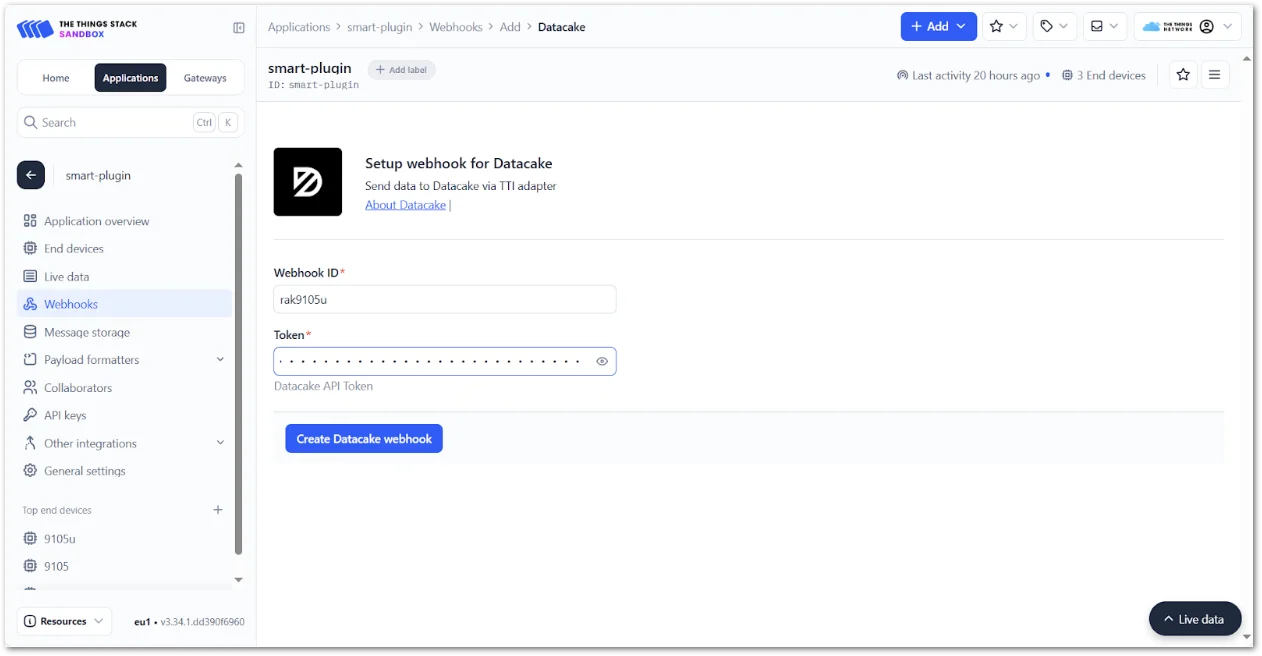 Figure 1: Configure the Datacake webhook
Add the RAK9105U to Datacake
- In Datacake, go to Devices and click + Add Device.
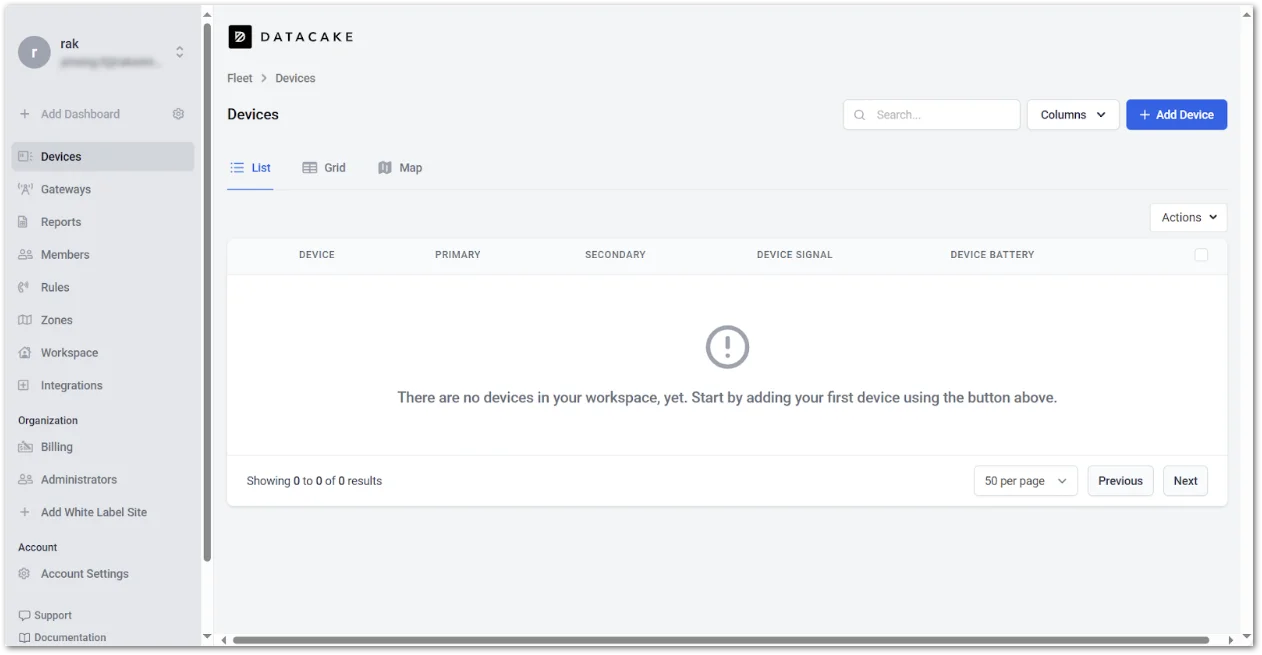 Figure 1: Add a device in Datacake
- Select LoRaWAN as the device type and click Next.
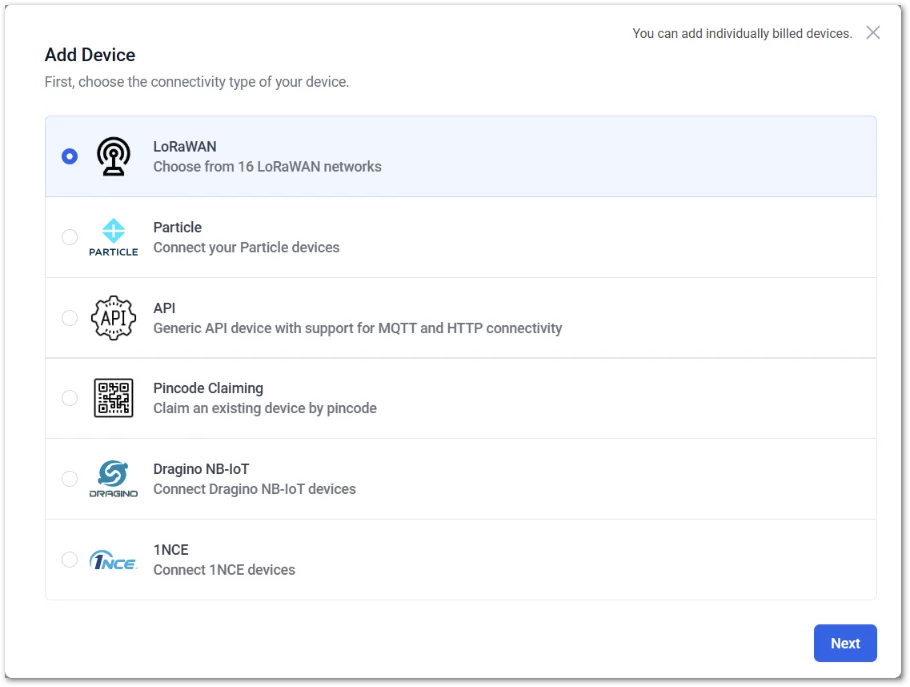 Figure 1: Select LoRaWAN connectivity
- Choose New Product, enter a product name such as
RAK9105U, and click Next.
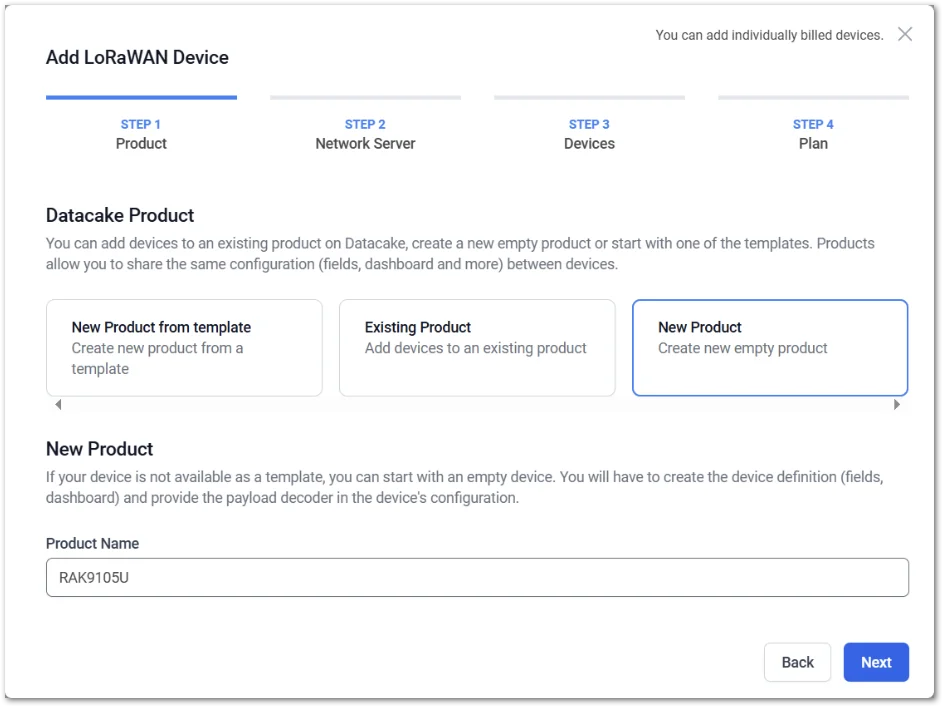 Figure 1: Create a RAK9105U product
- Select The Things Stack V3 as the network server and click Next.
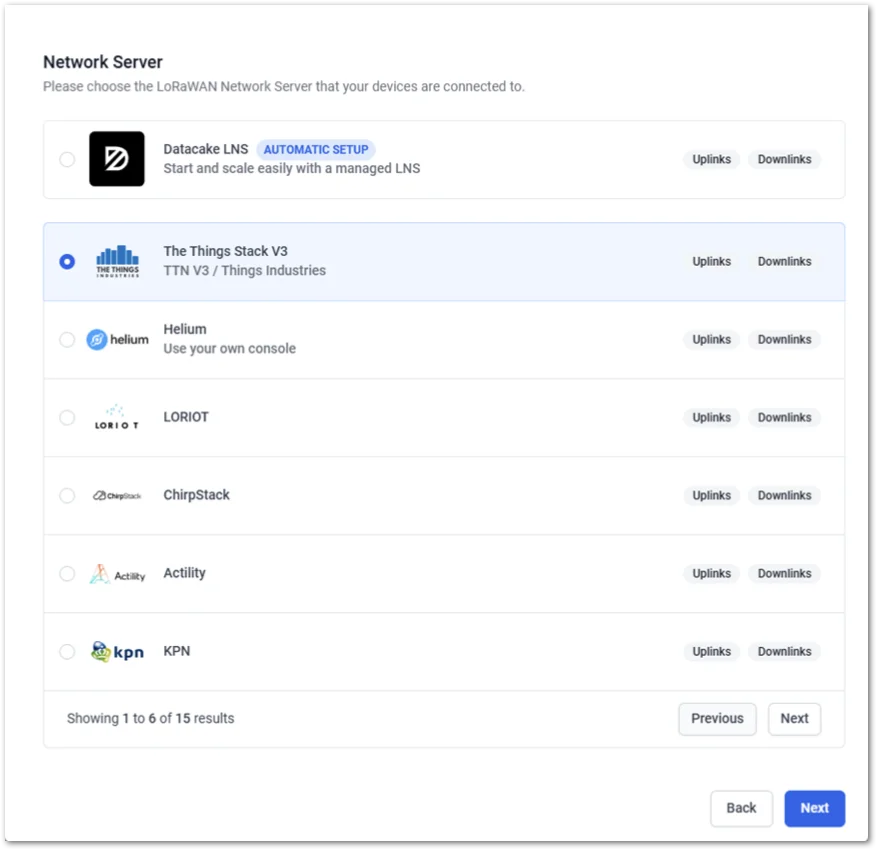 Figure 1: Select The Things Stack
-
Enter the device information:
- DEVEUI: Enter the DevEUI registered in The Things Stack.
- NAME: Enter a descriptive device name.
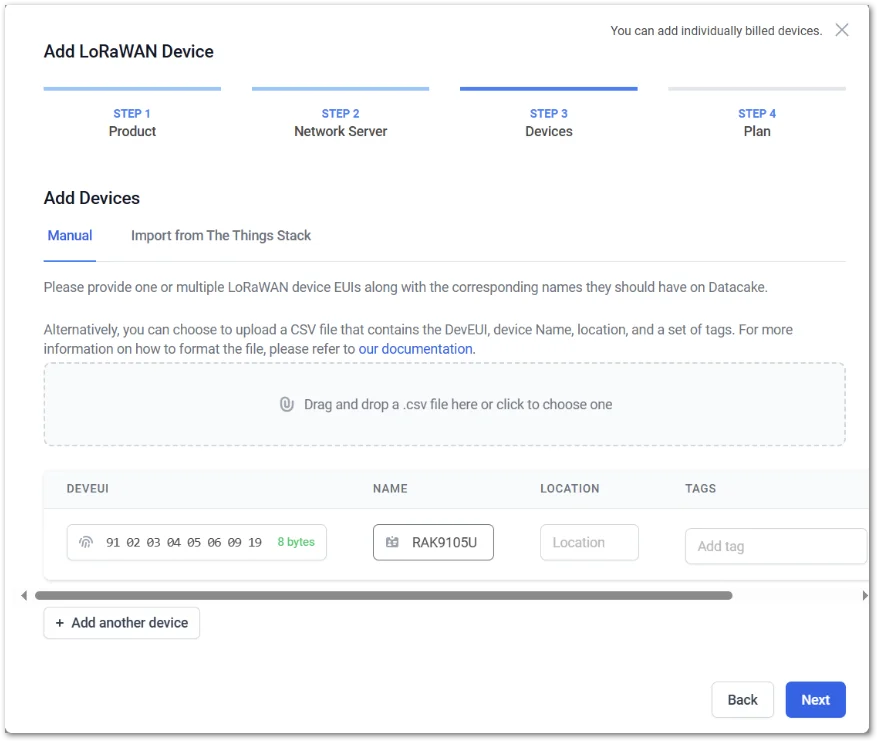 Figure 1: Enter the RAK9105U device information
- Select the required Datacake subscription plan and click Add 1 Device.
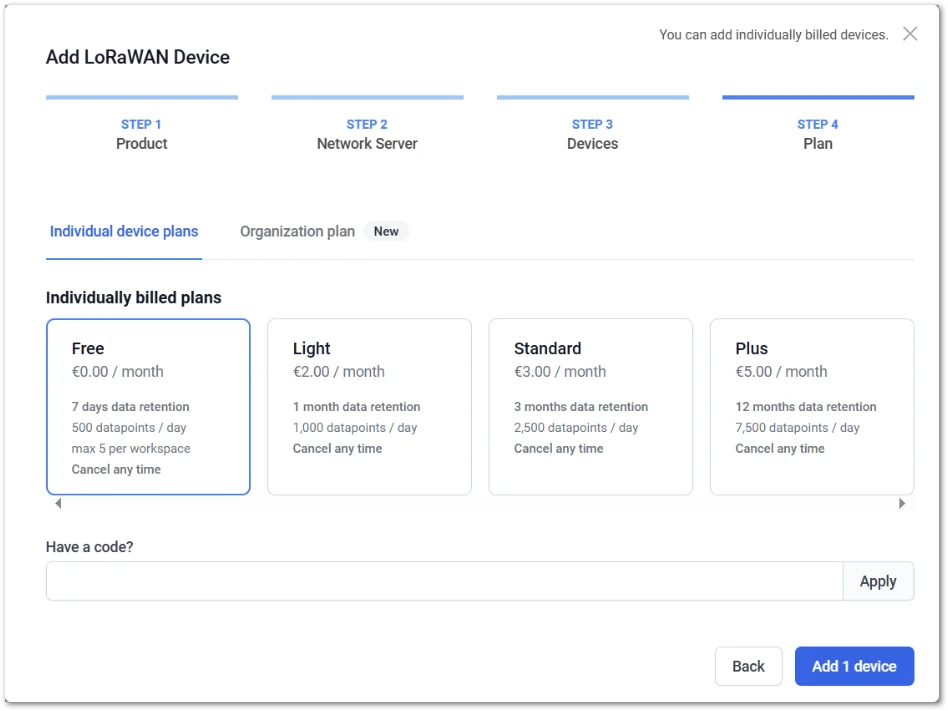 Figure 1: Add the RAK9105U to Datacake
Configure the Payload Decoder
The payload decoder converts RAK9105U LoRaWAN uplink payloads into fields that can be stored and displayed in Datacake.
The RAK9105U uses different FPorts depending on the deployment:
| FPort | Deployment | Main Data |
|---|---|---|
| 1 | External DC power | Output status and RAK9105U software version |
| 2 | RAK Battery Plus | Voltage, current, cycle count, remaining capacity, and SOC |
| 3 | RAK Battery Plus | Full-charge capacity, fault status, warning status, and battery mode |
| 4 | RAK Battery Plus | Temperature, SOH, battery status, output status, software version, and BMS boot version |
- Open the RAK9105U device in Datacake.
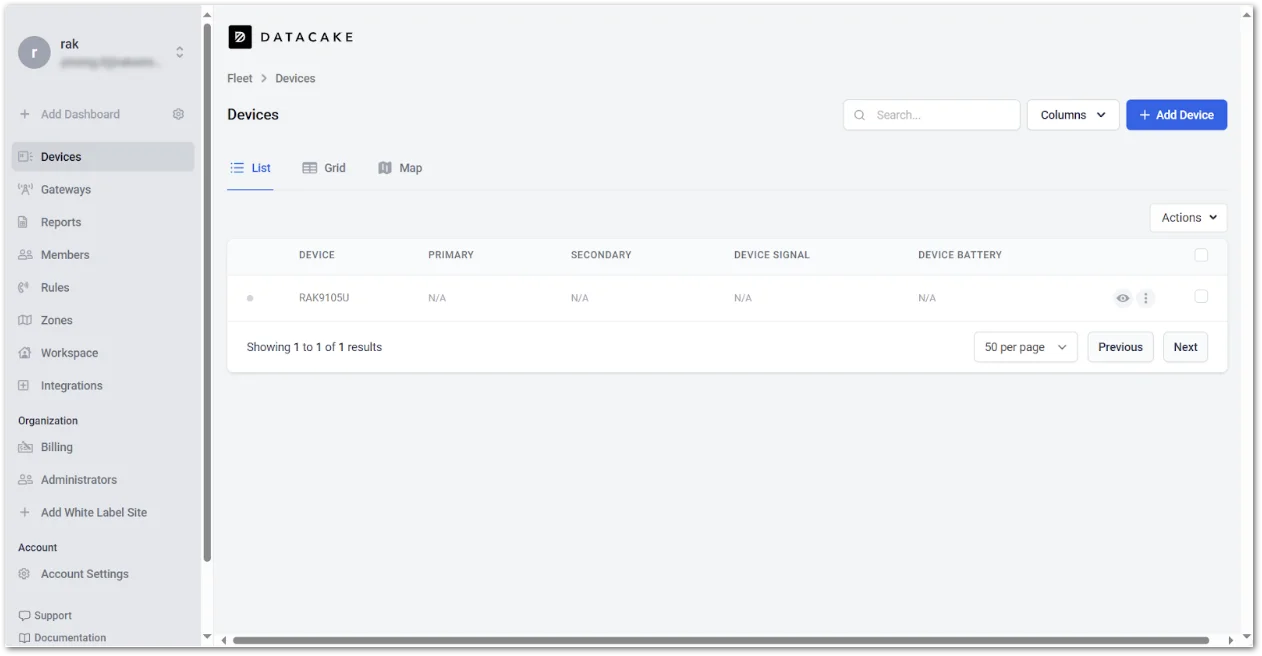 Figure 1: Open the payload decoder configuration
-
Go to Configuration and scroll to Payload Decoder.
-
Paste the RAK9105U JavaScript decoder into the editor.
Click to view the Payload Decoder code
function Decoder(bytes, port) {
  var decoded = {};

  if (!bytes || bytes.length === 0) {
    decoded.error = 'No payload received';
    return decoded;
  }

  switch (port) {
    case 1:
      decoded.outputStatus = parseOutputStatus(bytes[0]);
      decoded.softwareVersion = parseSWVersion(bytes[1]);
      break;
    case 2:
      decoded.voltage = parseU16(bytes[0], bytes[1]) * 0.01 + ' V';
      decoded.current = parseS16(bytes[2], bytes[3]) * 0.01 + ' A';
      decoded.cycleCount = parseU16(bytes[4], bytes[5]) + ' cycles';
      decoded.remainingCapacity = parseU16(bytes[6], bytes[7]) * 10 + ' mAh';
      decoded.soc = bytes[8] + ' %';
      break;
    case 3:
      decoded.fullChargeCapacity = parseU16(bytes[0], bytes[1]) * 10 + ' mAh';
      decoded.faultStatusH = parseFaultStatusH(bytes[2], bytes[3]);
      decoded.faultStatusL = parseFaultStatusL(bytes[4], bytes[5]);
      decoded.warningStatusH = parseWarningStatusH(bytes[6], bytes[7]);
      decoded.batteryMode = parseBatteryMode(bytes[8]);
      break;
    case 4:
      decoded.avgTemp = parseS8(bytes[0]) + ' °C';
      decoded.maxTemp = parseS8(bytes[1]) + ' °C';
      decoded.minTemp = parseS8(bytes[2]) + ' °C';
      decoded.soh = bytes[3] + ' %';
      decoded.batteryStatus = parseBatteryStatus(bytes[4]);
      decoded.outputStatus = parseOutputStatus(bytes[5]);
      decoded.softwareVersion = parseSWVersion(bytes[6]);
      decoded.bmsBootVersion = parseBMSBootVersion(bytes[7], bytes[8]);
      break;
    default:
      decoded.result = 'Port not recognized';
  }

  return decoded;
}

function parseU16(msb, lsb) {
  return (msb << 8) | lsb;
}

function parseS16(msb, lsb) {
  var val = (msb << 8) | lsb;
  return val > 32767 ? val - 65536 : val;
}

function parseS8(byte) {
  return byte > 127 ? byte - 256 : byte;
}

function parseSWVersion(byte) {
  return '1.0.' + (byte % 100);
}

function parseBMSBootVersion(major, minor) {
  return major + '.' + minor;
}

function parseOutputStatus(byte) {
  var out3 = (byte & 0x01) ? 'ON' : 'OFF';
  var out2 = (byte & 0x02) ? 'ON' : 'OFF';
  return 'Output 3: ' + out3 + ', Output 2: ' + out2;
}

function parseBatteryMode(byte) {
  var modes = {
    0: 'Null', 1: 'Charging', 2: 'Discharging',
    3: 'Fully Charged', 4: 'Fully Discharged',
    5: 'Protect', 6: 'Permanent Fail', 7: 'Null'
  };
  return modes[byte] || 'Unknown';
}

function parseBatteryStatus(byte) {
  var charge = (byte & 0x01) ? 'ON' : 'OFF';
  var discharge = (byte & 0x02) ? 'ON' : 'OFF';
  var full = (byte & 0x08) ? 'Full' : 'Normal';
  return 'Charge MOS: ' + charge + ', Discharge MOS: ' + discharge + ', Fully Charged: ' + full;
}

function parseFaultStatusH(msb, lsb) {
  var list = [];
  if (msb & 0x01) list.push('Battery under-voltage protection');
  if (msb & 0x02) list.push('Discharge over-current protection');
  if (msb & 0x04) list.push('Discharge low-temperature protection');
  if (msb & 0x08) list.push('Discharge high-temperature protection');
  if (msb & 0x10) list.push('Discharge short-circuit protection');
  if (msb & 0x20) list.push('Discharge over-current lock protection');
  if (lsb & 0x01) list.push('Charge over-voltage protection');
  if (lsb & 0x02) list.push('Charge over-current protection');
  if (lsb & 0x04) list.push('Charge low-temperature protection');
  if (lsb & 0x08) list.push('Charge high-temperature protection');
  if (lsb & 0x10) list.push('Charge short-circuit protection');
  if (lsb & 0x20) list.push('Charge over-current lock protection');
  return list.length ? list.join(', ') : 'Normal';
}

function parseFaultStatusL(msb, lsb) {
  var list = [];
  if (msb & 0x01) list.push('Voltage sampling AFE error');
  if (msb & 0x02) list.push('Parameter configuration error');
  if (msb & 0x04) list.push('Discharge MOS error');
  if (msb & 0x08) list.push('Charge MOS error');
  if (msb & 0x10) list.push('Voltage sampling line break error');
  if (msb & 0x20) list.push('Temperature sampling line break error');
  if (lsb & 0x01) list.push('Balancing circuit error');
  if (lsb & 0x02) list.push('Charge high-temperature protection');
  return list.length ? list.join(', ') : 'Normal';
}

function parseWarningStatusH(msb, lsb) {
  var list = [];
  if (msb & 0x01) list.push('Under-voltage warning');
  if (msb & 0x02) list.push('Over-voltage warning');
  if (msb & 0x04) list.push('Discharge over-current warning');
  if (msb & 0x08) list.push('Charge over-current warning');
  if (msb & 0x10) list.push('Discharge low-temperature warning');
  if (msb & 0x20) list.push('Discharge high-temperature warning');
  if (lsb & 0x01) list.push('Charge low-temperature warning');
  if (lsb & 0x02) list.push('Charge high-temperature warning');
  if (lsb & 0x04) list.push('Fully charged warning');
  if (lsb & 0x08) list.push('MOS high-temperature warning');
  if (lsb & 0x80) list.push('Low SOC warning');
  return list.length ? list.join(', ') : 'Normal';
} -
Click Save.
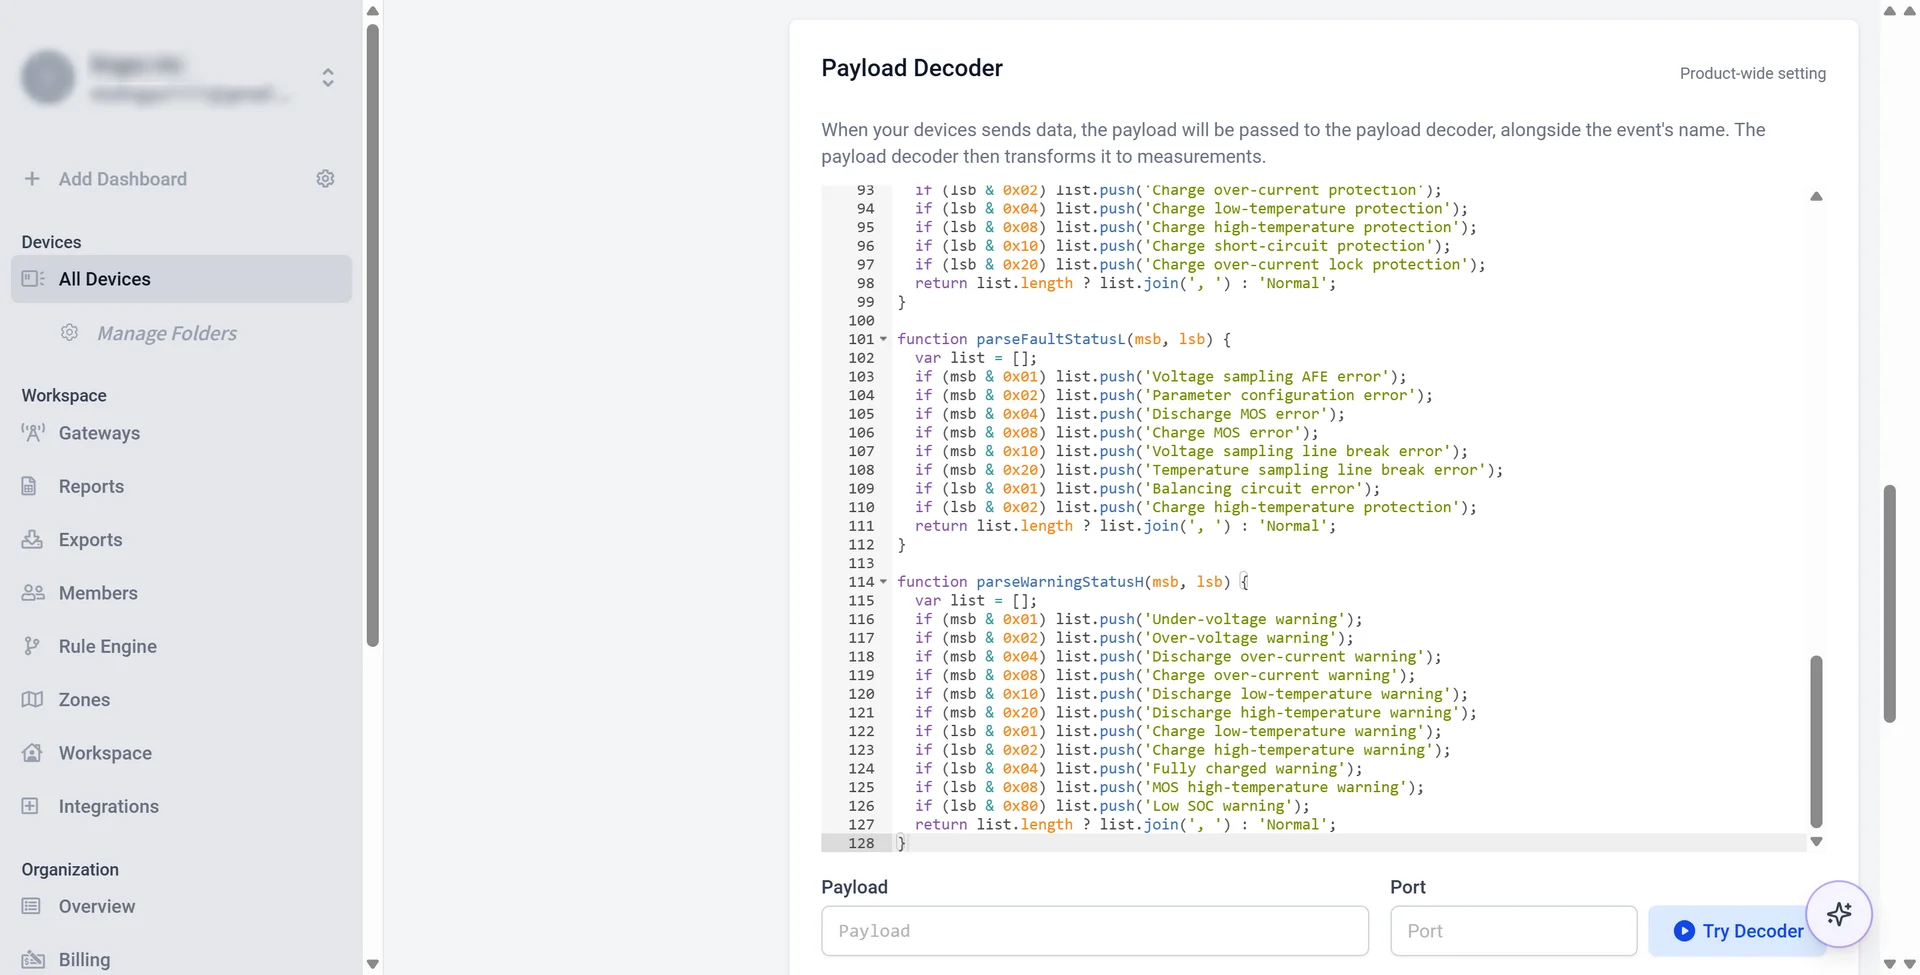 Figure 1: Configure the RAK9105U payload decoder
Create Data Fields
- Navigate to the Configuration tab and scroll down to the Fields section.
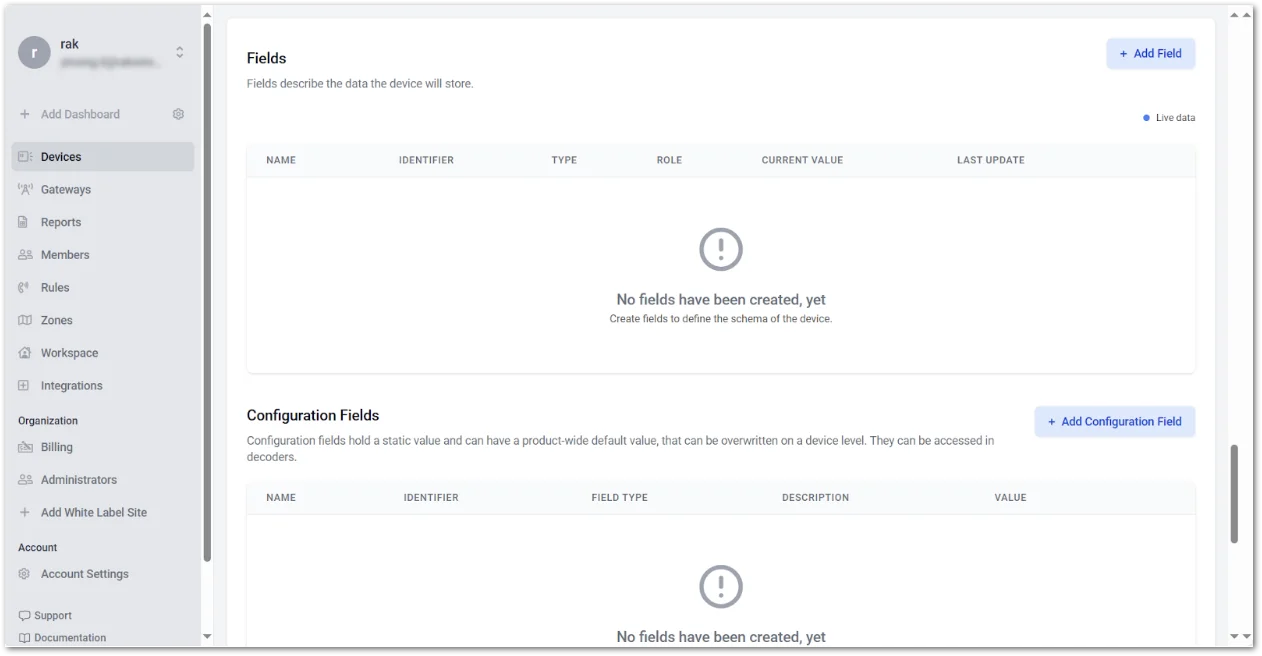 Figure 1: Fields section on Datacake
- Click + Add Field and define the field schema:
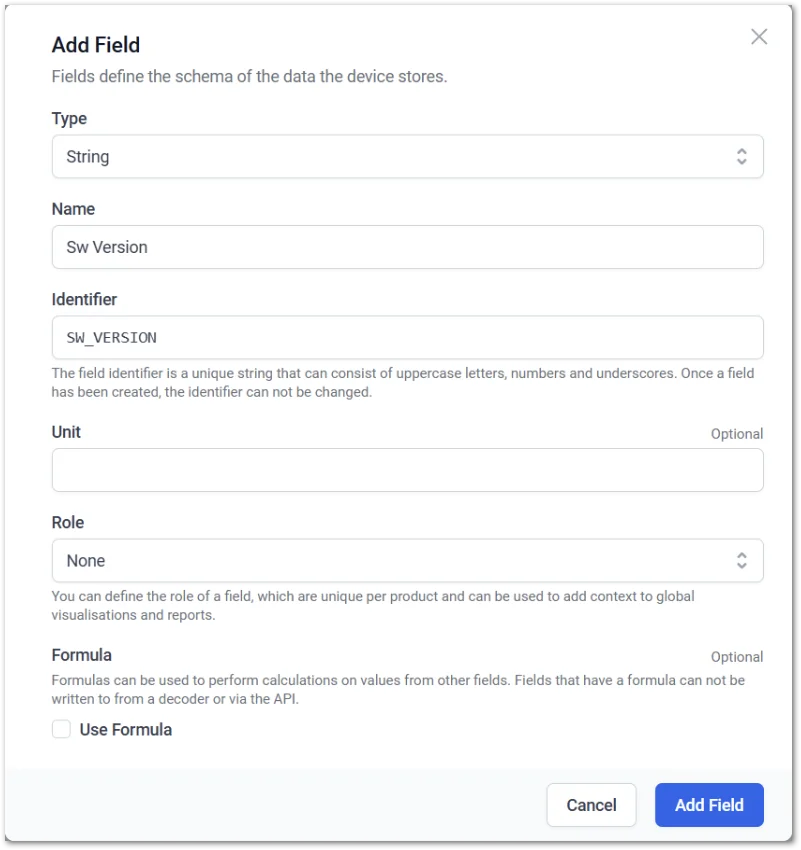 Figure 1: Add field on Datacake
- Repeat this process to add all required fields that correspond to your decoder output.
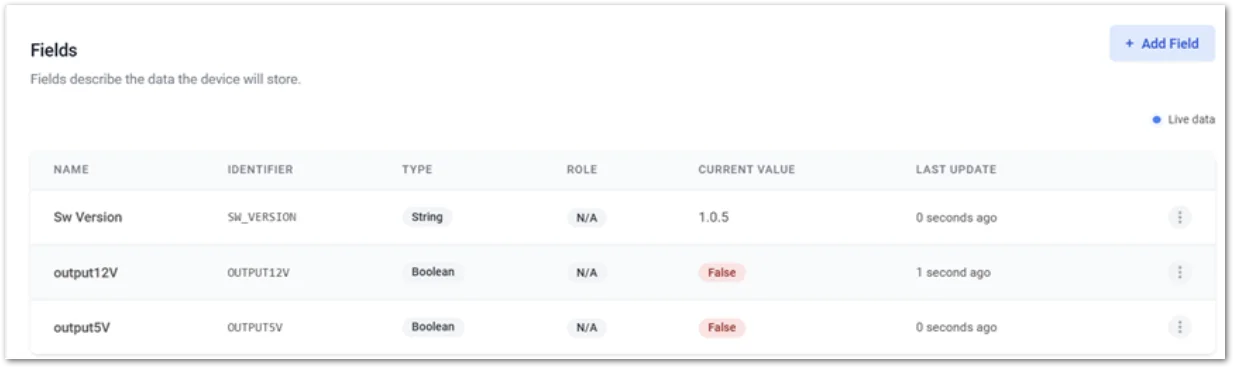 Figure 1: Add all field on Datacake
Enable Downlink Control
To control outputs remotely via LoRaWAN downlinks, configure your TTN connection in the Downlink Configuration section.
- In the Configuration tab, scroll to Downlink Configuration and click Change.
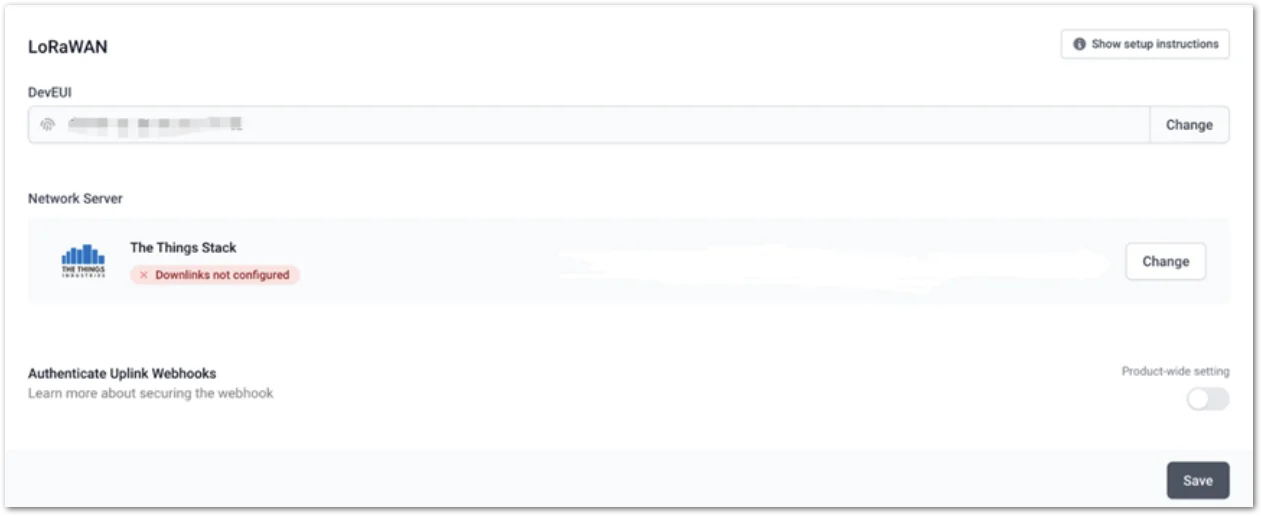 Figure 1: Downlink configuration
- Fill in the following fields:
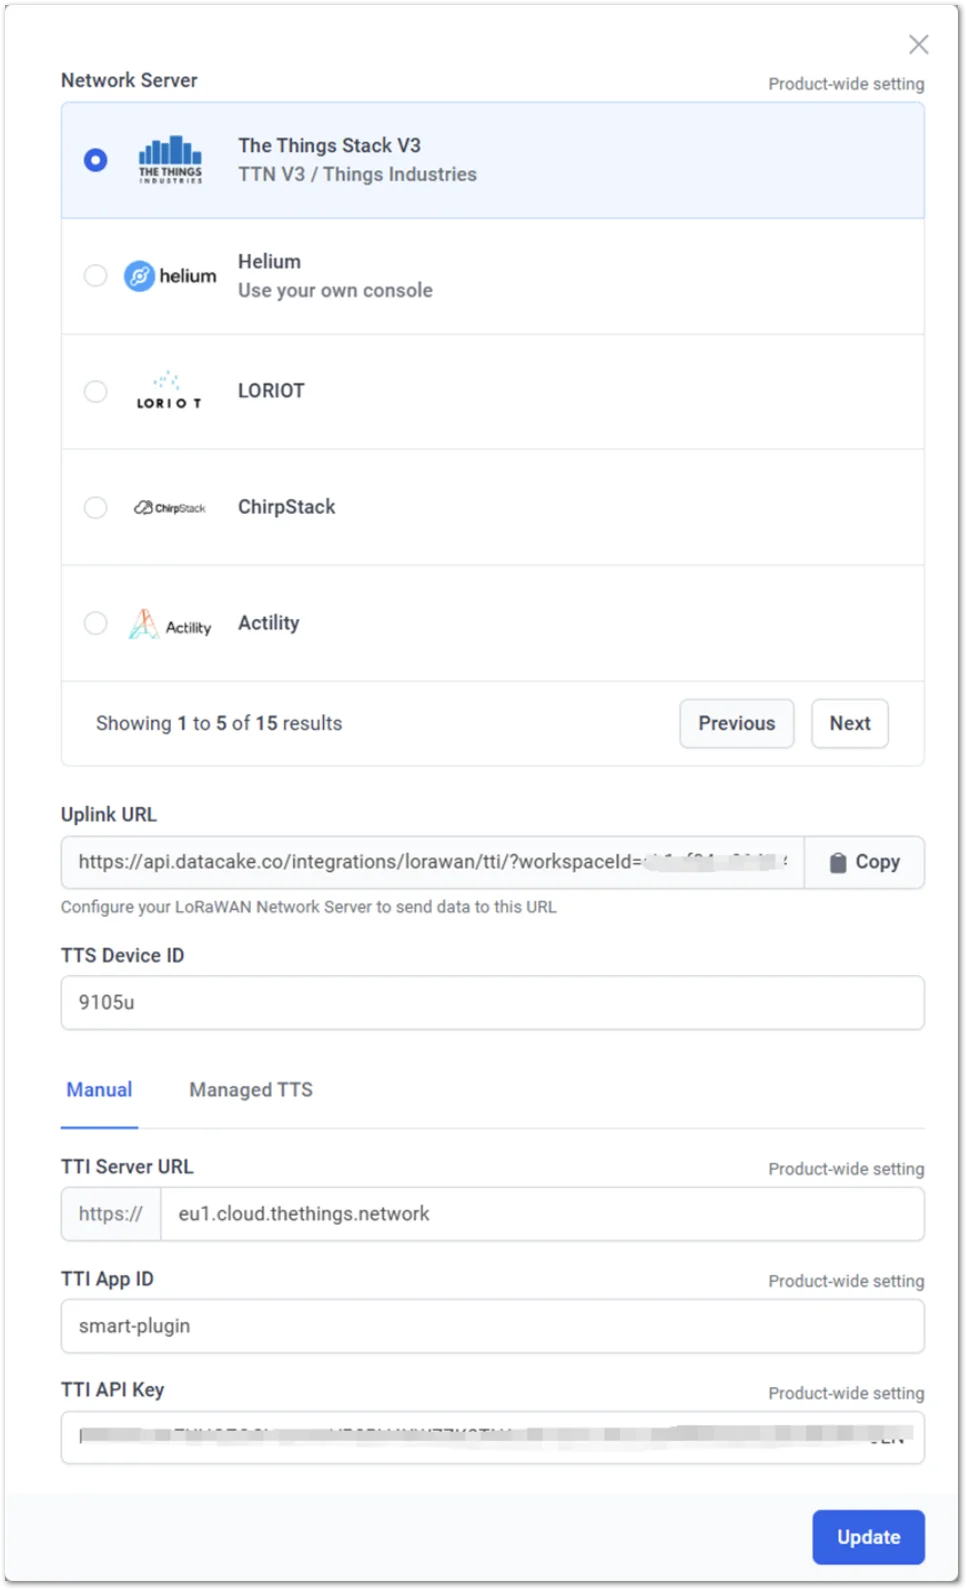 Figure 1: Downlink details
- TTS Device ID: Found in TTN > Device overview > End device ID
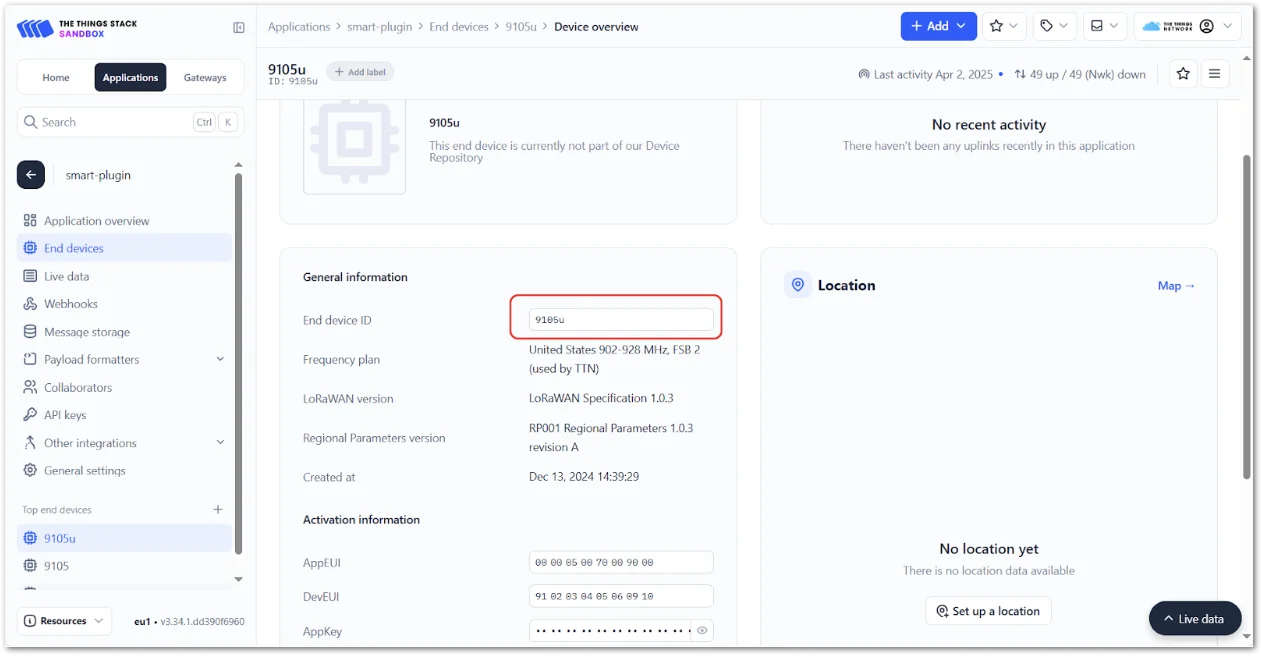 Figure 1: Downlink TTS device ID
- TTI Server URL: e.g., eu1.cloud.thethings.network
- TTI App ID: Found in TTN > Application overview > ID
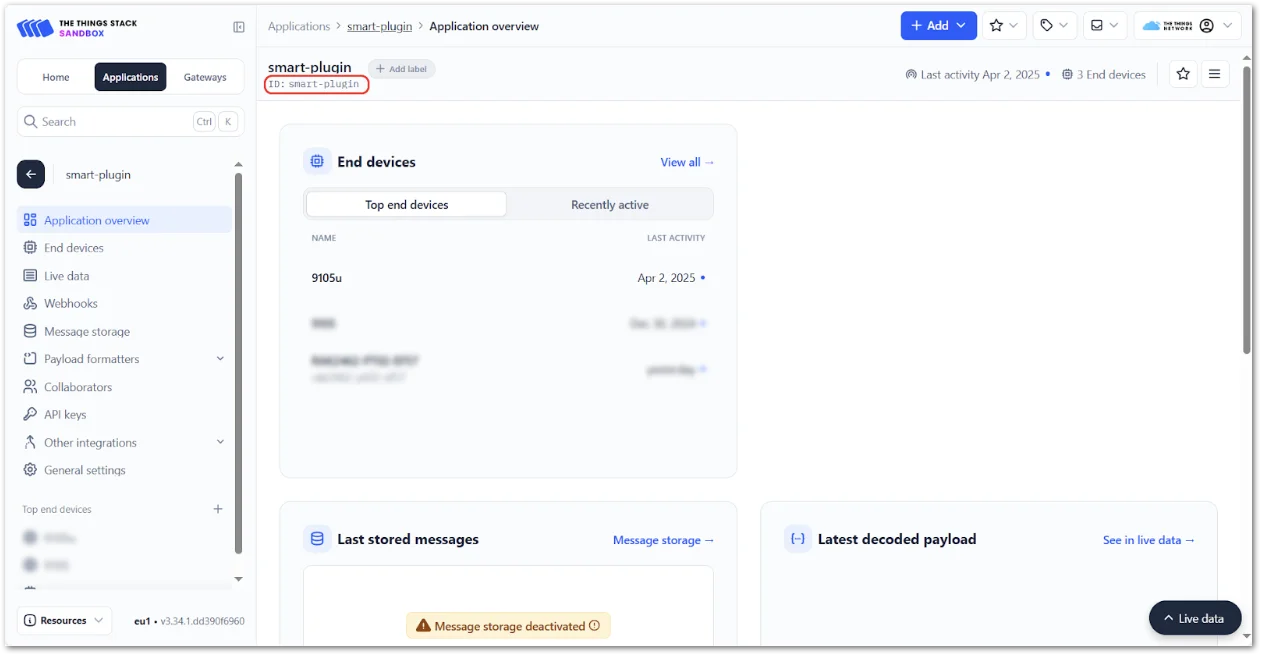 Figure 1: Downlink TTI app ID
-
TTI API Key: See instructions below to create one.
-
In the TTN Console, navigate to the application’s API keys tab.
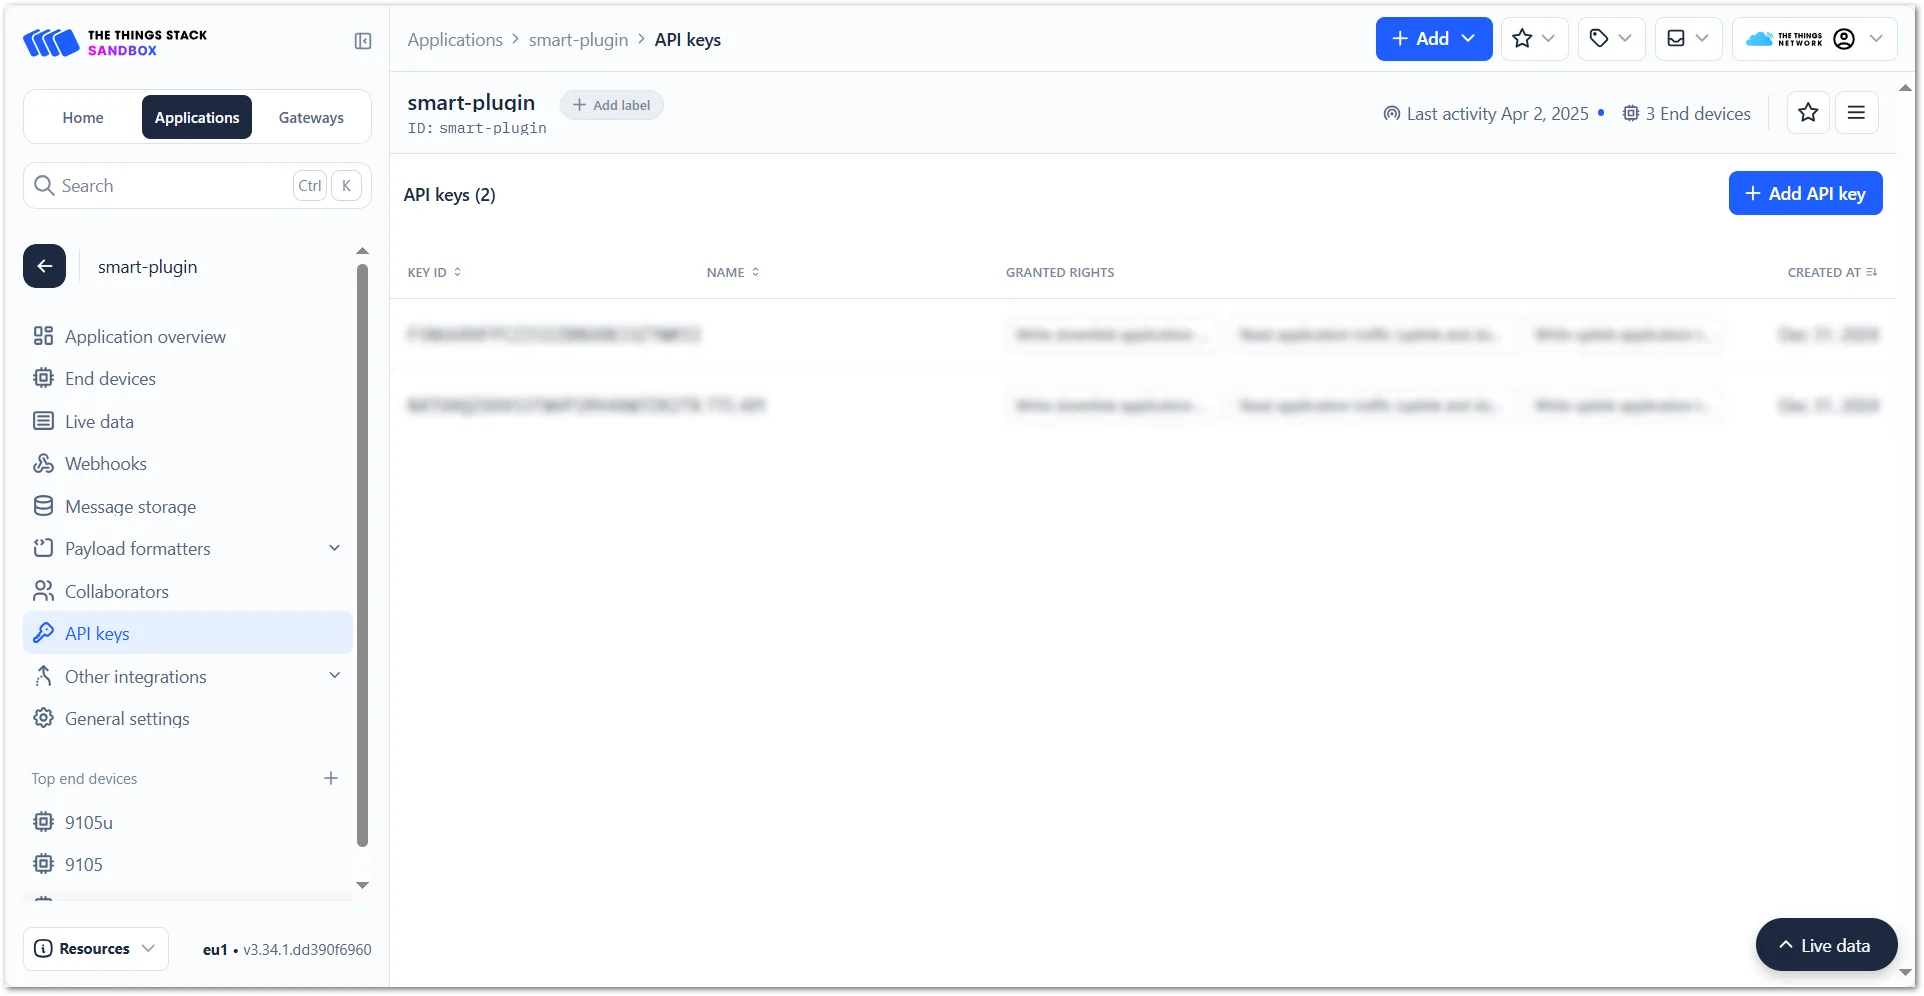 Figure 1: TTN Console API keys tab
 -
Click + Add API key. Set a name and enable permission to write downlink messages
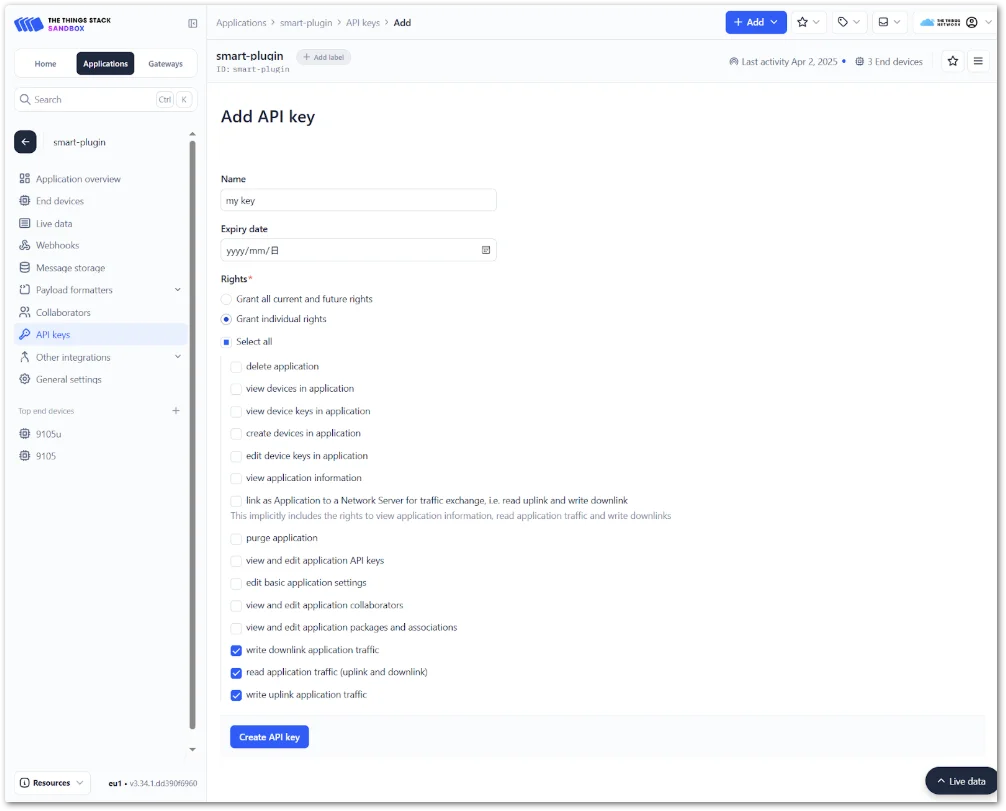 Figure 1: TTI add API keys
 -
Click Create API key.
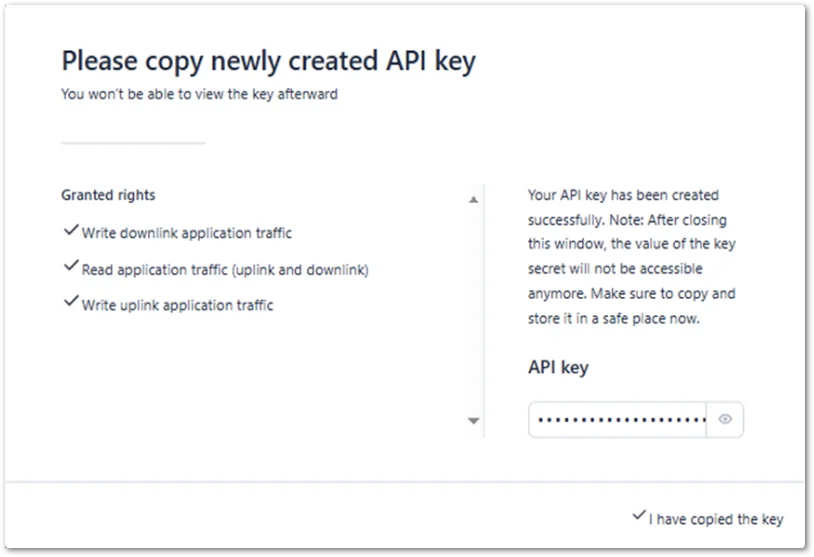 Figure 1: TTI create API keys
-
Copy the generated key immediately (it will only be shown once).
-
Paste the key into the TTI API key field in Datacake.
-
-
- Click Update to save the configuration.
Send Downlinks
This section explains how to configure and send LoRaWAN downlink commands from Datacake to the RAK9105U device, enabling remote control of power outputs via TTN.
- Open your device in Datacake and navigate to the Downlinks tab using the top navigation bar.
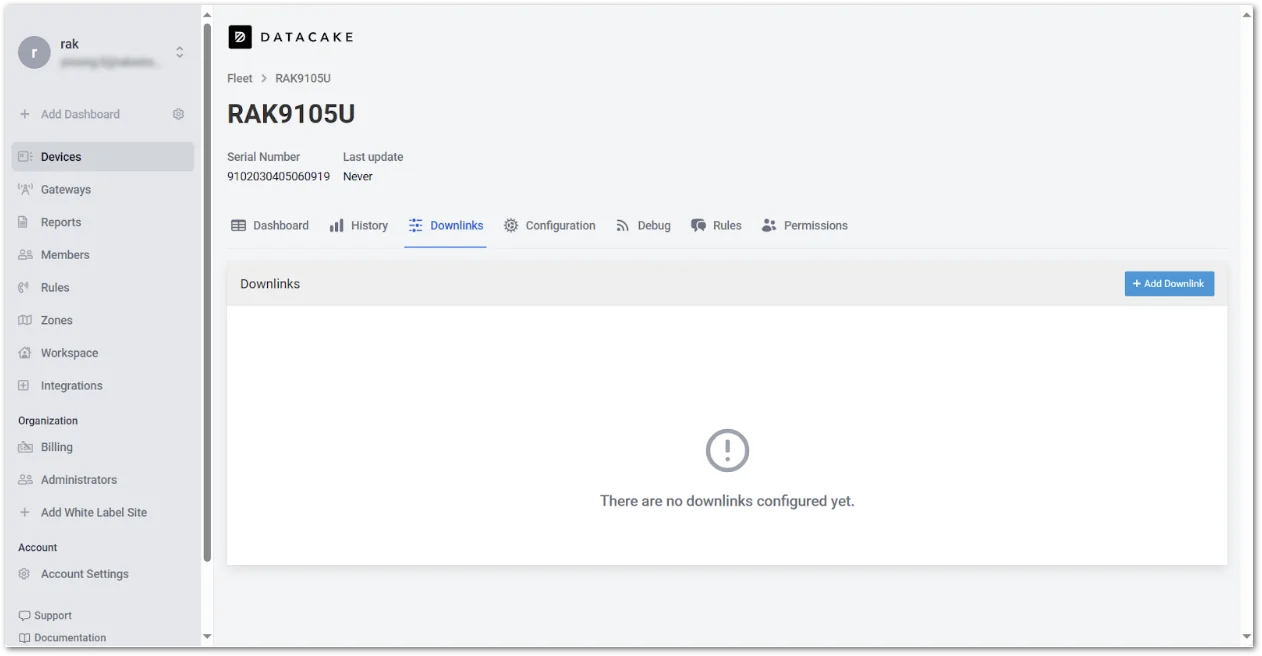 Figure 1: Downlink tab
- Click + Add Downlink, then fill in the downlink details:
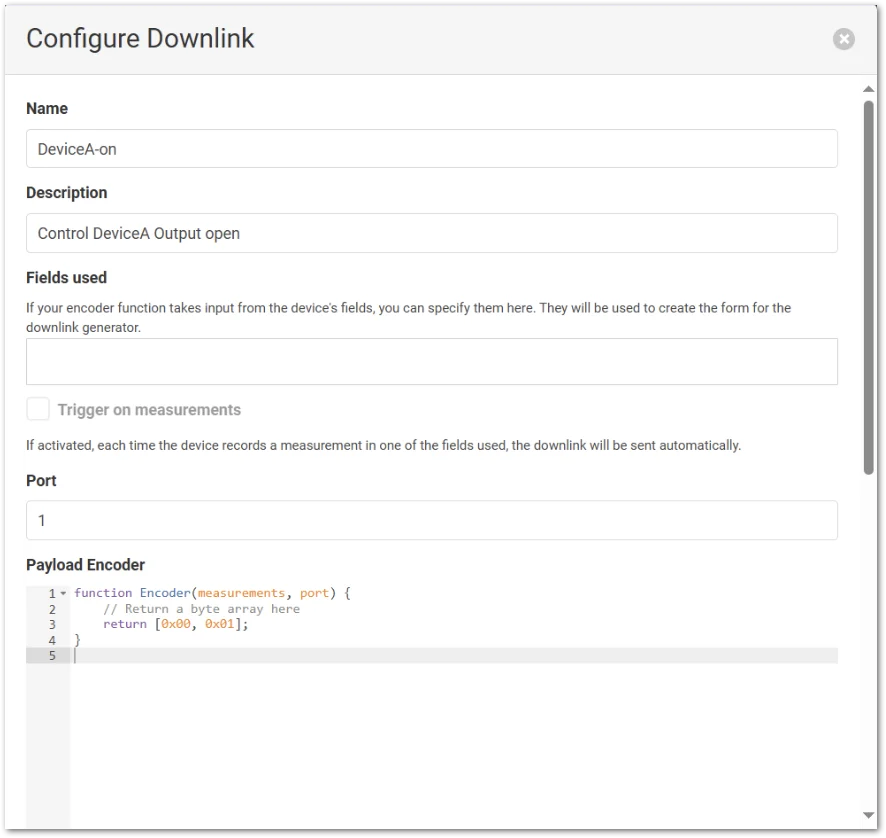 Figure 1: Downlink details 1
- Name: Enter a descriptive name for the downlink (e.g., "DeviceA-on")
- Description: Optionally, add information about what the command does
- Port: Specify the LoRaWAN port (FPort) the command will use
- Payload Encoder: Input the payload encoding logic in JavaScript. For example, to turn on Output 3 (5 V).
function Encoder(measurements, port) {
    // Return a byte array here
    return [0x00, 0x01];
}
Command Reference:
| Hex Payload | Description |
|---|---|
| 0000 | 5 V Output 3 OFF |
| 0001 | 5 V Output 3 ON |
| 0100 | 12 V Output 2 OFF |
| 0101 | 12 V Output 2 ON |
- Repeat the above steps to add other downlink commands as needed.
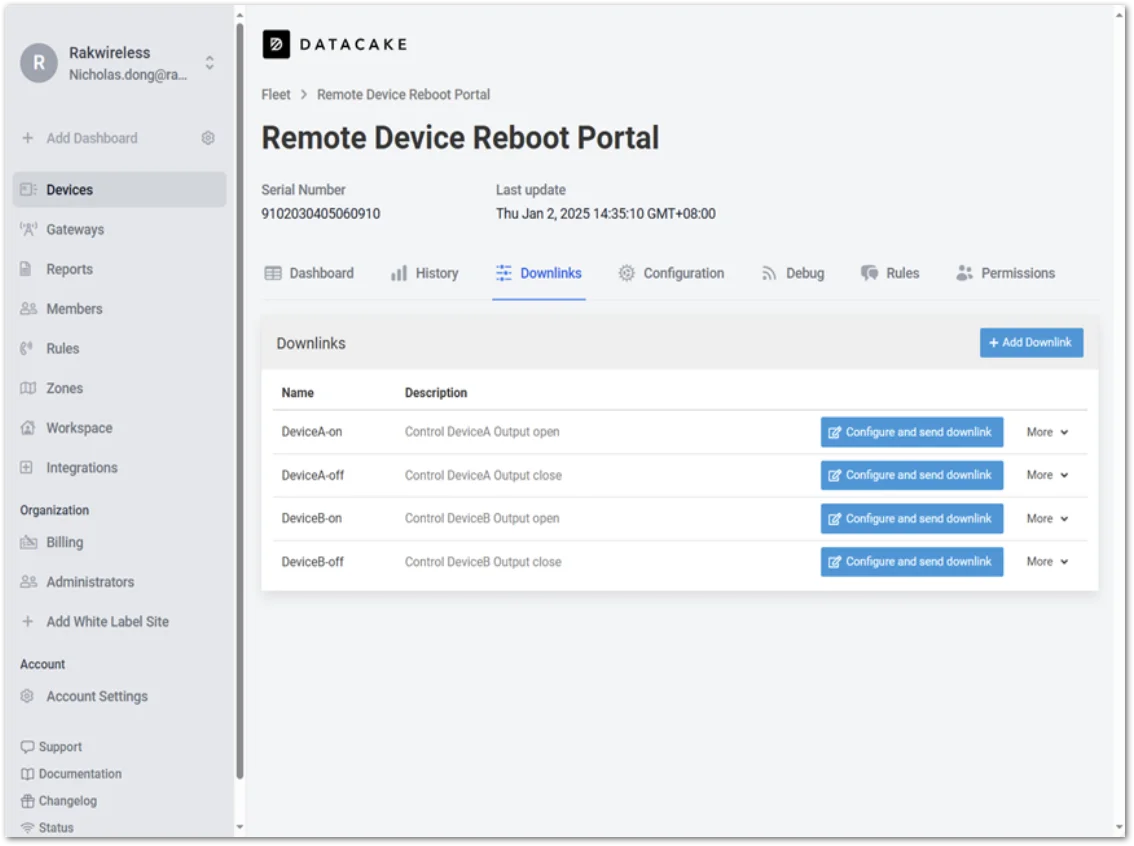 Figure 1: Add other Downlink commands
- On the Downlink list, find the command and click Configure and send downlink.
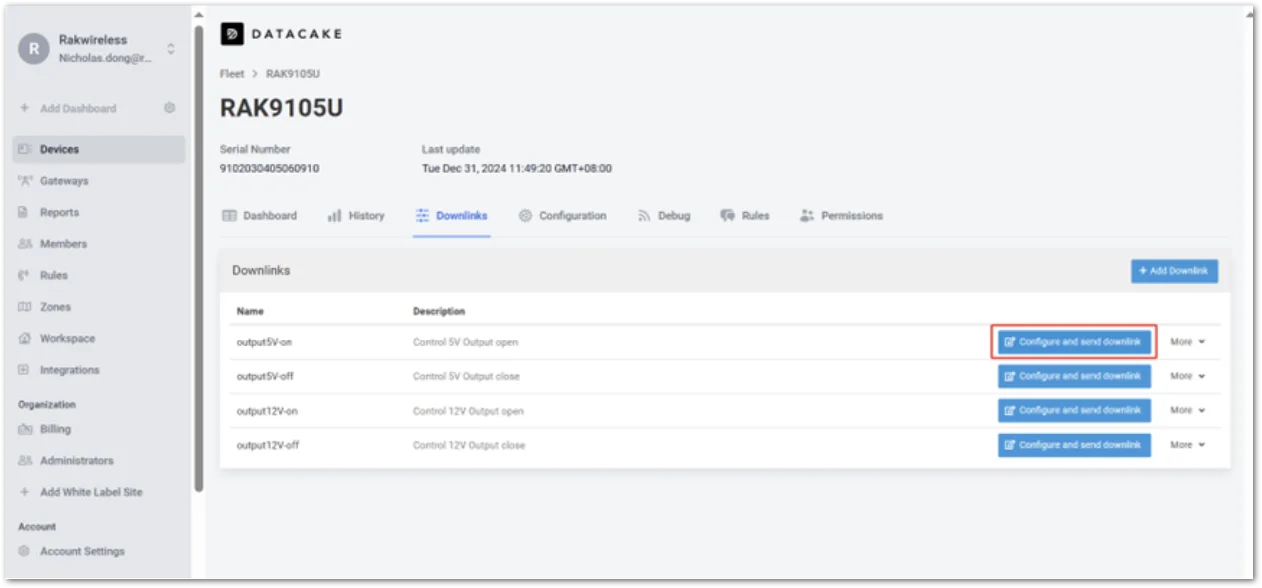 Figure 1: Configure and send downlink
- Click Save measurements and send downlink to queue the command.
 Figure 1: Save measurements and send downlink
- After sending, a green message will appear confirming: The downlink was queued successfully.
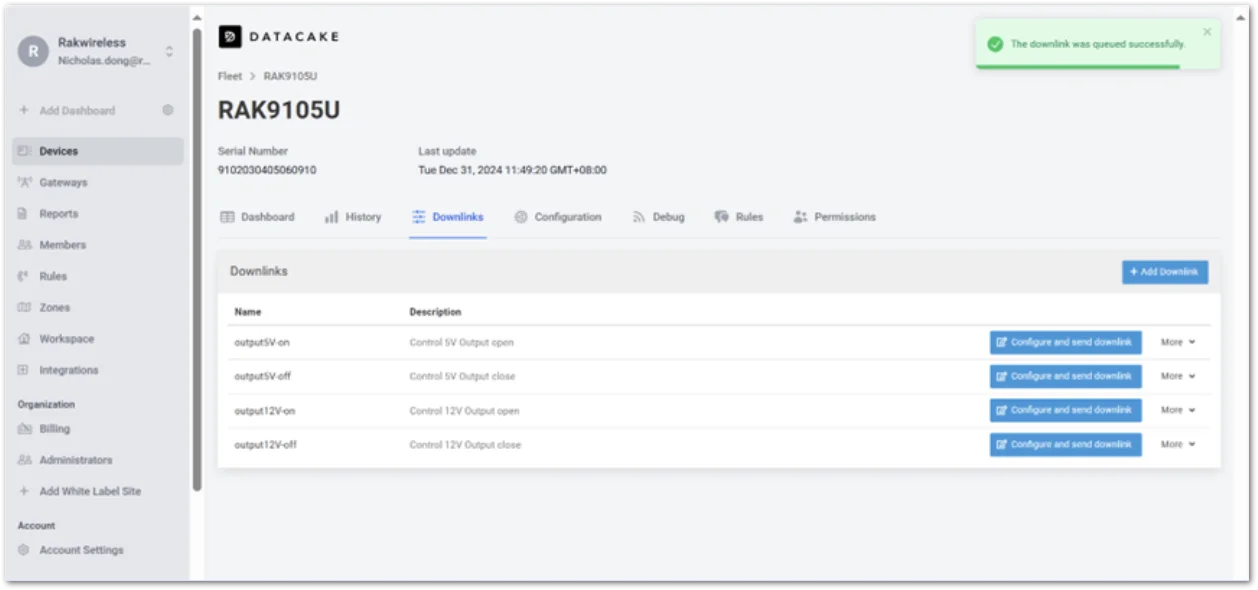 Figure 1: Downlink queued successfully
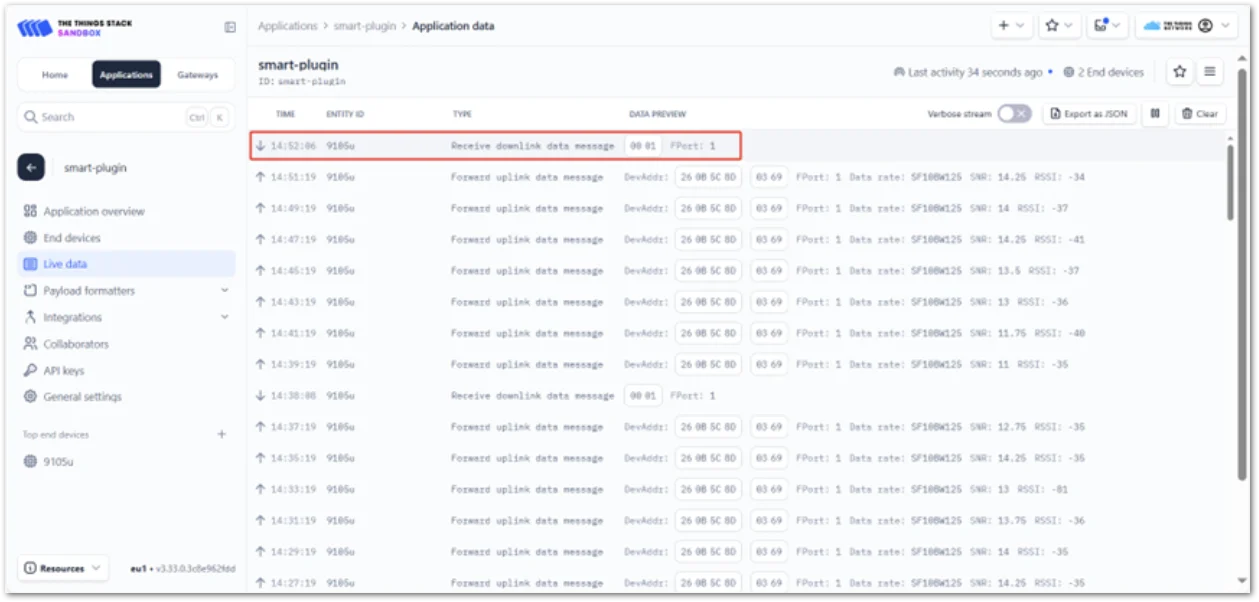 Figure 1: Downlink data preview
The status of the device shown in the dashboard is based on uplink reports. After sending a downlink, the actual device state (e.g., Output On/Off) will be updated only when the next uplink payload is received.
Build Your Dashboard
Follow these steps to visualize your device data using widgets in the Datacake dashboard:
- In Datacake, open your device and navigate to the Dashboard tab.
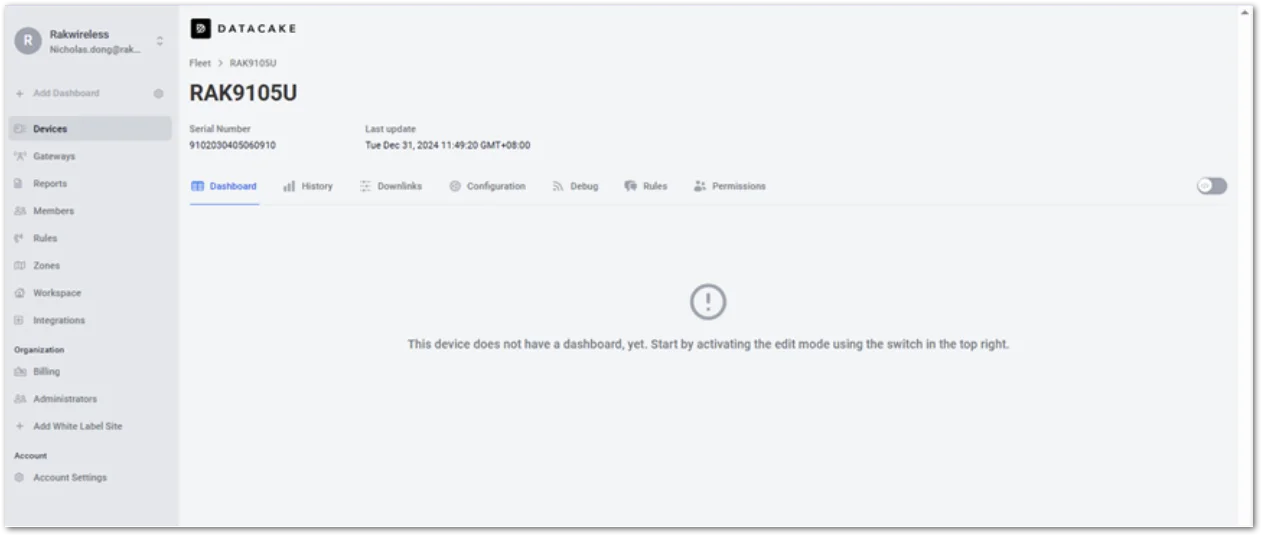 Figure 1: Datacake dashboard
- Click Edit Mode icon, then select + Add Widget.
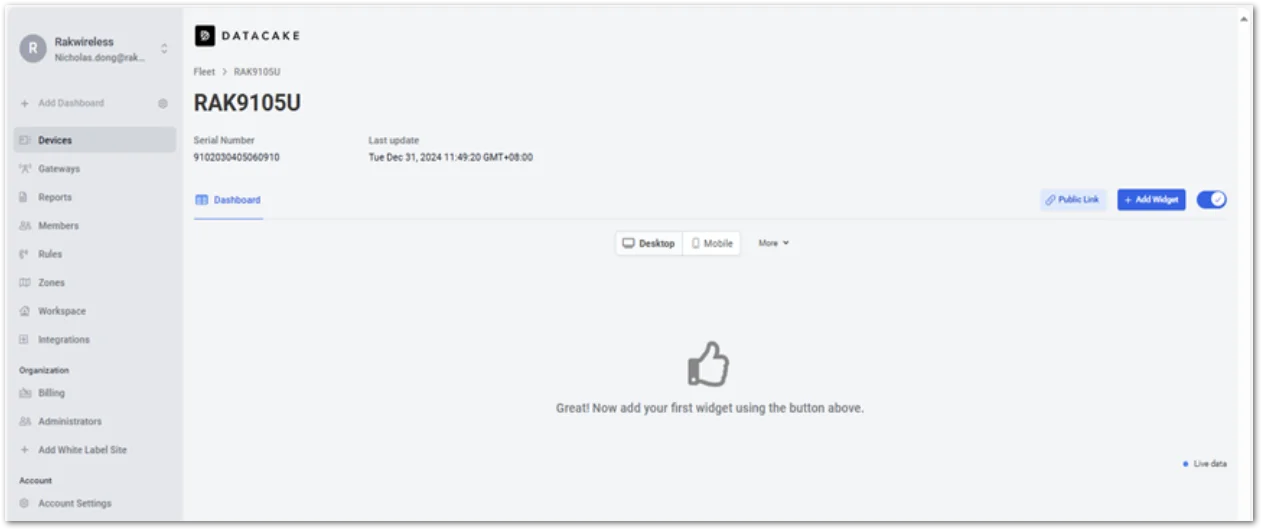 Figure 1: Dashboard widget
- Choose a widget type based on the data you want to display.
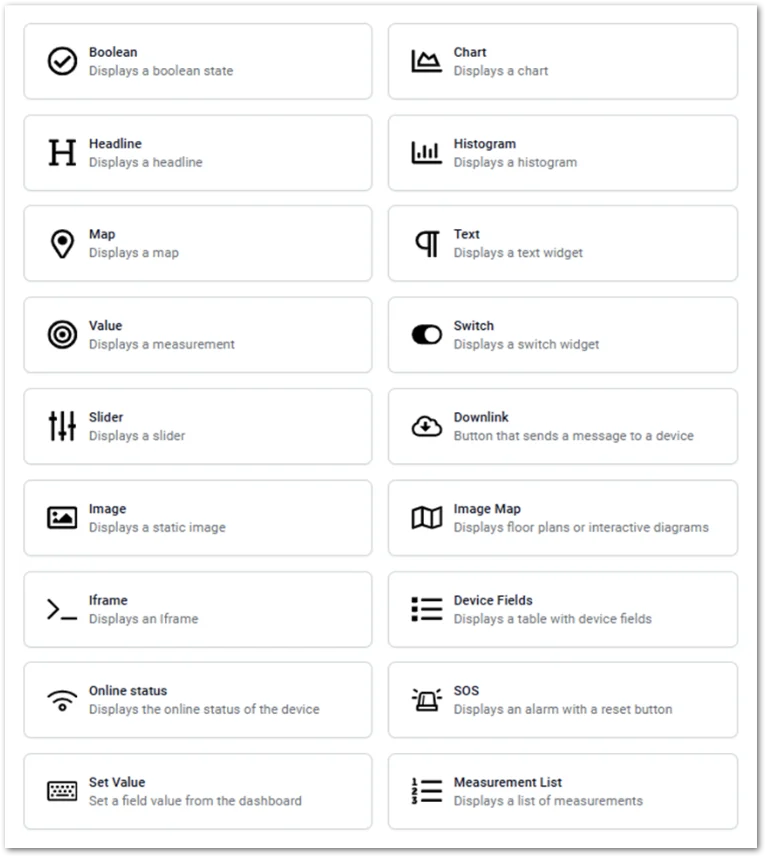 Figure 1: Choose dashboard widget type
- Configure the widget:
- Title: Set a clear title (e.g., "Device A").
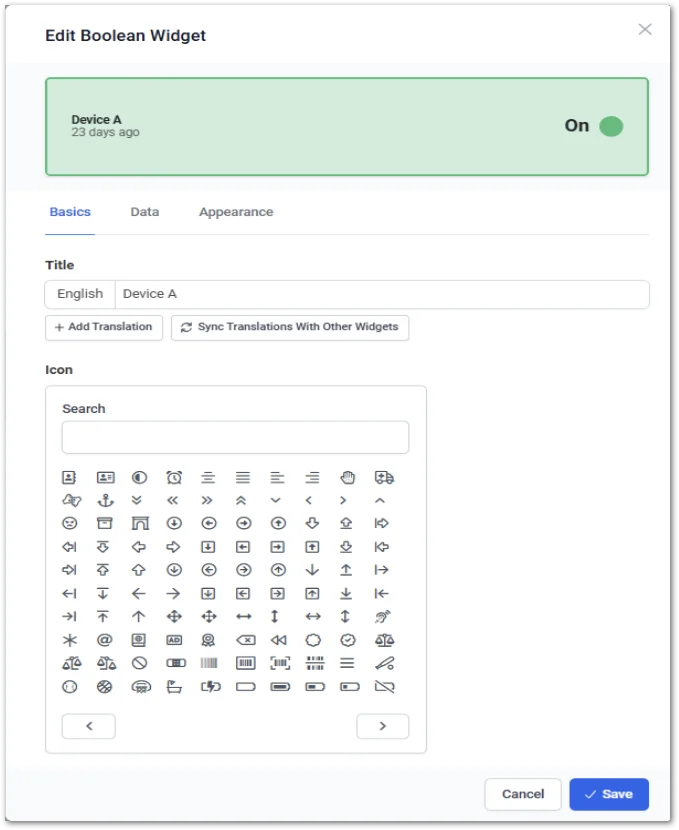 Figure 1: Dashboard widget title
- Data: Select the corresponding field (e.g., output5V).
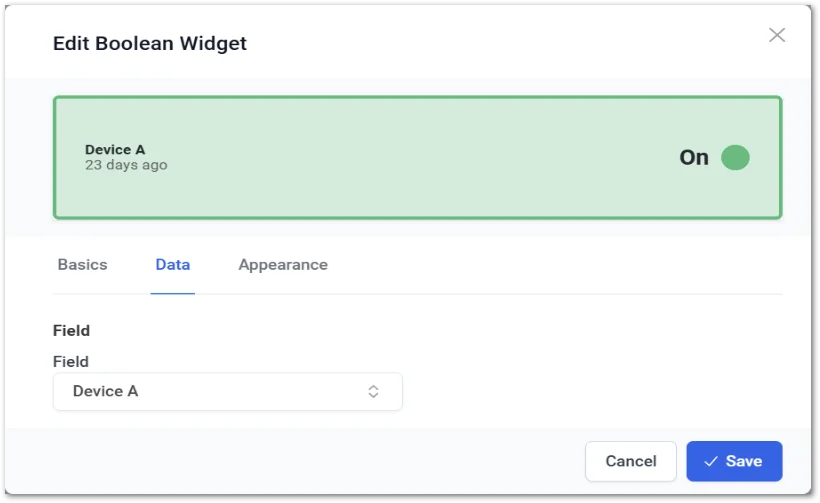 Figure 1: Dashboard data
- Appearance: Customize color, units, size, and any display logic.
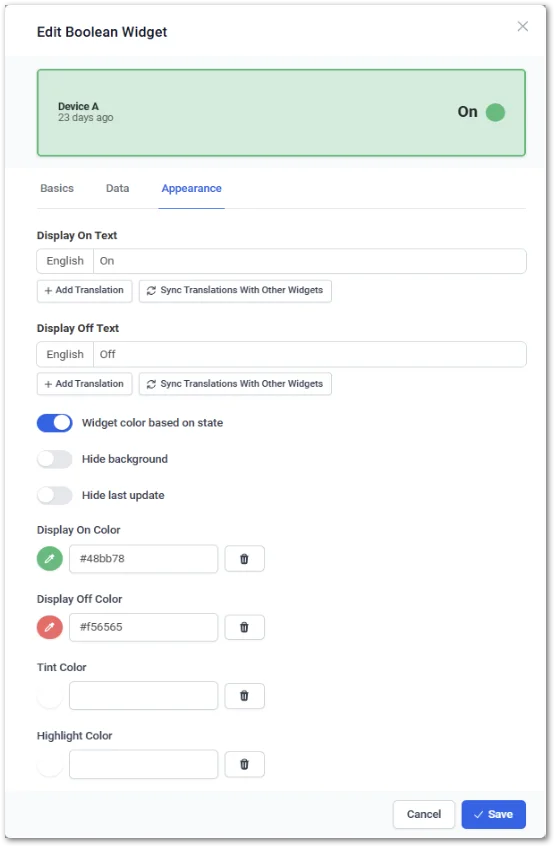 Figure 1: Dashboard appearance
- Repeat the above steps for each field you want to monitor (e.g., Device A status). Additionally, you can add control buttons to send downlink commands directly from the dashboard, such as Power on Device A.
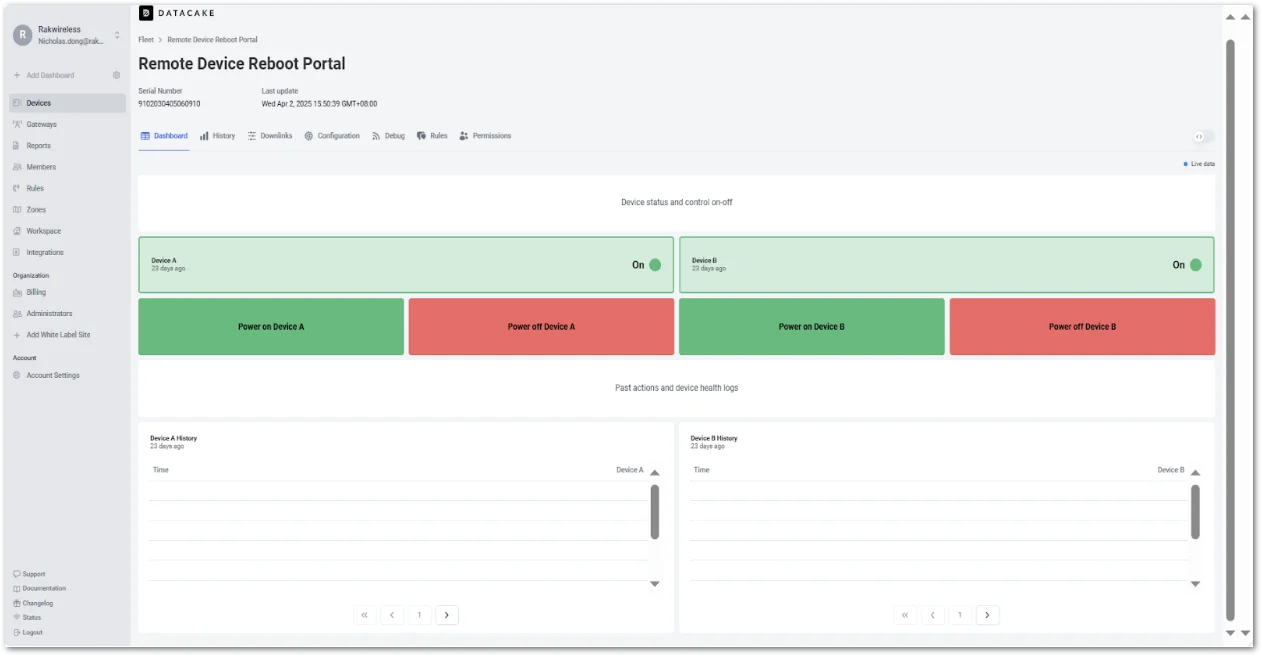 Figure 1: Add other dashboard widget
- Once set up, you can remotely control the 12 V and 5 V outputs of the RAK9105U through Datacake, enabling real-time reboot or power management of connected devices.


