RUI3 Supported IDE
RUI3 is compatible with the following IDEs (Integrated Development Environments):
Arduino IDE
Arduino Installation
Go to the official Arduino website and download the Arduino IDE. You can see the multiple versions available for Windows, Linux, and Mac OS X. Choose the correct version of Arduino IDE and download it.
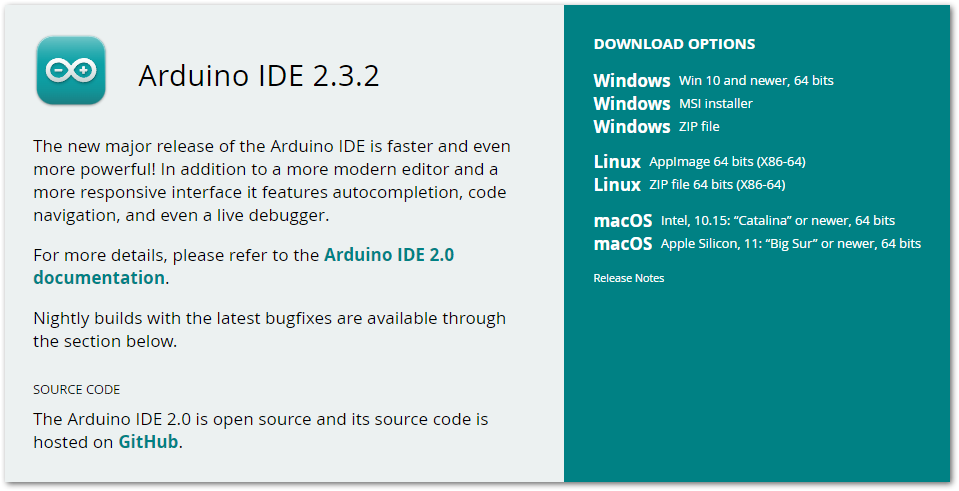 Figure 1: Arduino IDE latest version
For Windows
For Windows 10 users: Do NOT install the Arduino IDE from the Microsoft App store. Install the original Arduino IDE from the Arduino official website. The Arduino app from the Microsoft App Store has problems using third-party Board Support Packages.
- Install the Arduino IDE, which you just downloaded, on your Windows PC.
- Click I Agree, then Next to proceed.
 Figure 1: Arduino Setup License Agreement
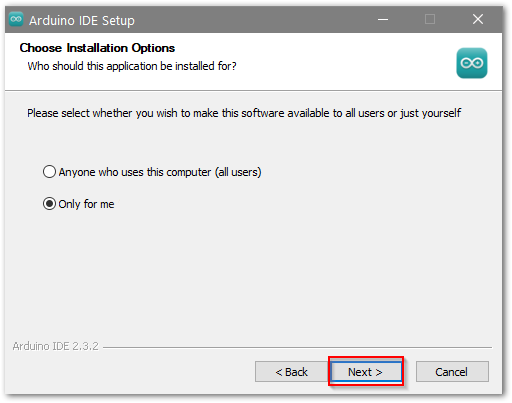 Figure 1: Arduino Setup Installation Options
- Now click the Install button.
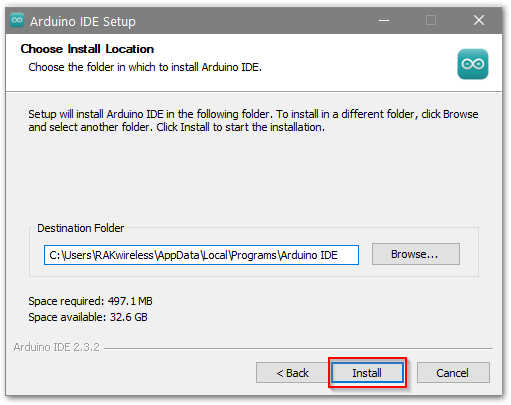 Figure 1: Installing Arduino IDE
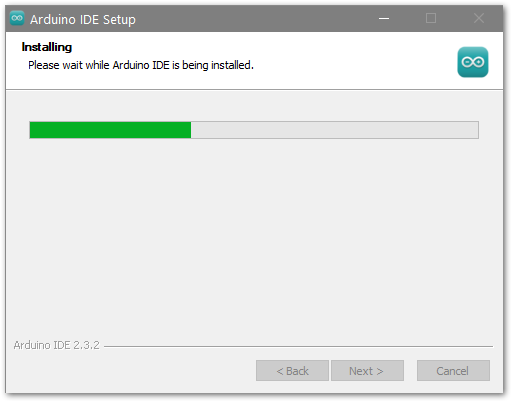 Figure 1: Ongoing Installation
- Once the Arduino IDE has been installed successfully, click the Finish button to exit the installer.
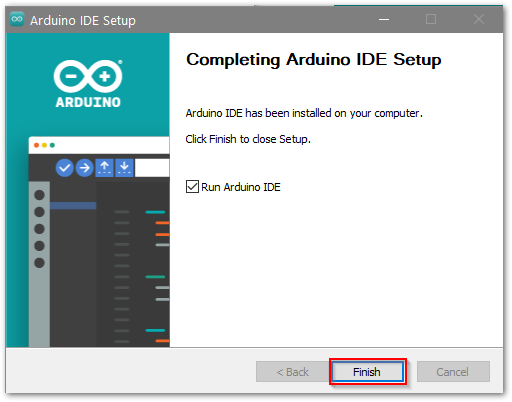 Figure 1: Successful installation
For Linux
First, you need the check the compatibility with your system and choose between the 32- bit, 64- bit, and ARM versions of the Arduino IDE for Linux.
Installing via a AppImage 64 bits (X86-64)
- After downloading the correct Arduino version, we need to first make it an executable file, you must check following this steps Right-click the file -> Click on Properties -> Select permissions tab -> Click the allow executing file as program box
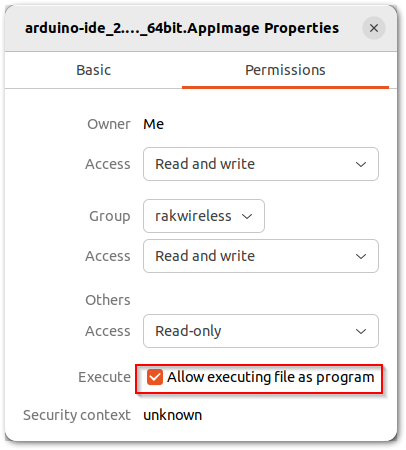 Figure 1: AppImage Properties
- Check if you have FUSE installed on your system, if not install it using this commands
sudo add-apt-repository universe
sudo apt install libfuse2
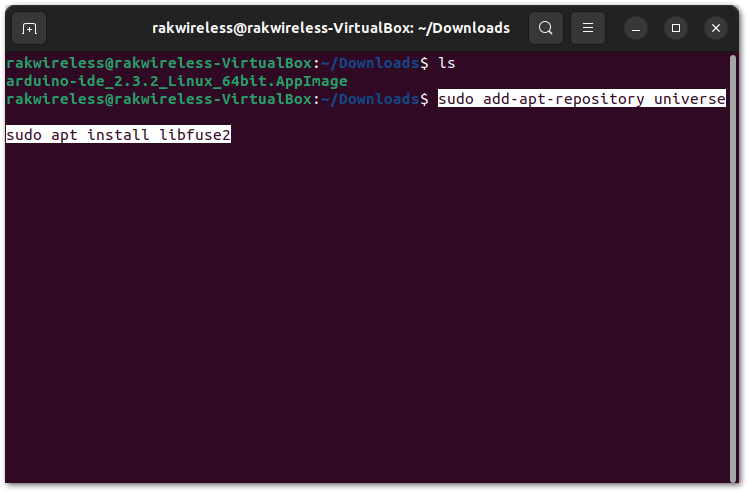 Figure 1: Fuse Install Commands
- Wait until FUSE is installed in your system:
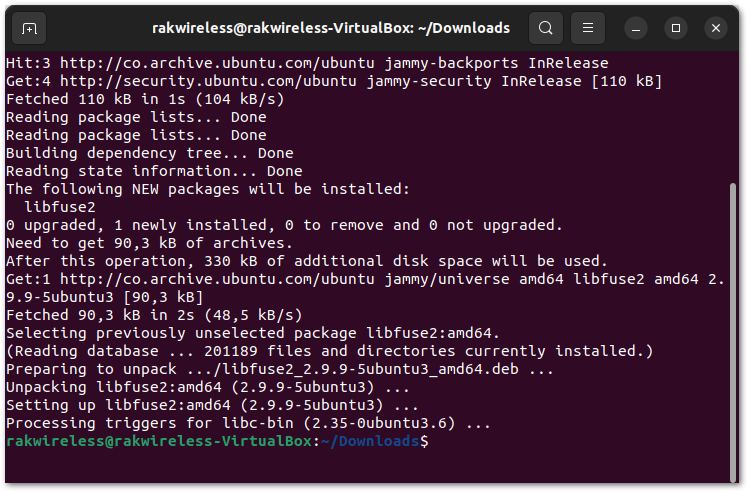 Figure 1: Fuse installed
- Double click on the AppImage and the Terms of Service window will pop up, accept the terms of service for Arduino IDE.
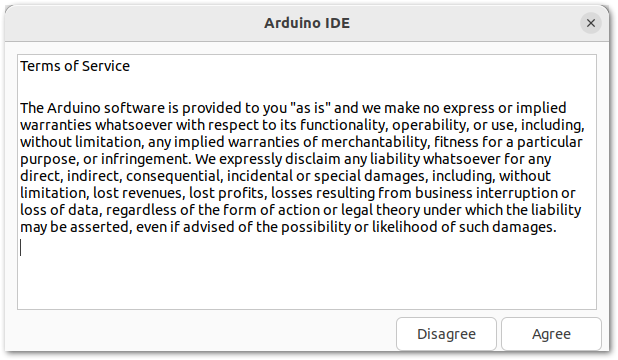 Figure 1: Arduino Terms of Service
- Wait until all the libraries are updated and the Arduino IDE is ready to use.
 Figure 1: Arduino IDE on Linux
The sudo command temporarily elevates privileges allowing the installer to complete sensitive tasks without logging in as the root user.
For Mac OS X
In Mac OS X, there is no installation process. It is just a process of decompression, then you can open Arduino IDE successfully.
Arduino IDE Parts Guide
Figure 11 shows the five (5) parts of Arduino IDE.
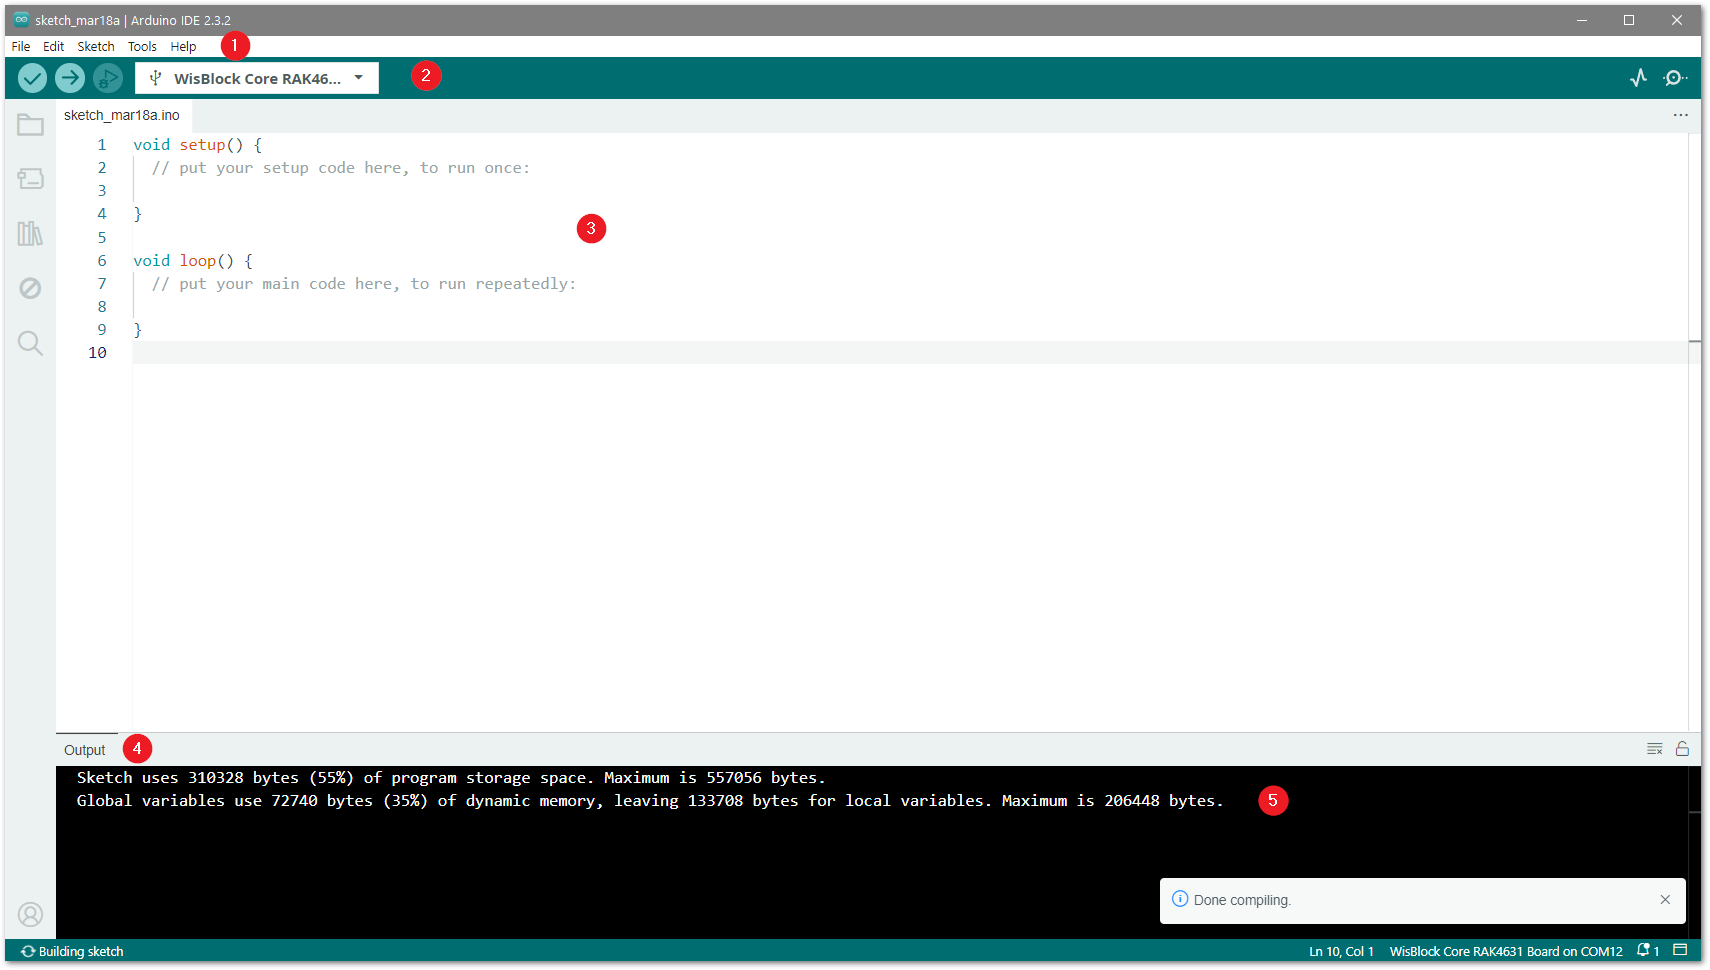 Figure 1: Arduino IDE
- IDE Option Menu
You can configure some general parameters such as the serial port, the board information, the libraries, the edit parameters, and so on.
- Operating Buttons
The operating buttons have four operations:
- Verify/Compile the source code;
- Upload the compiled code into WisBlock;
- Debugger test and debug programs in real time.
- Board Menu select the board and the port.
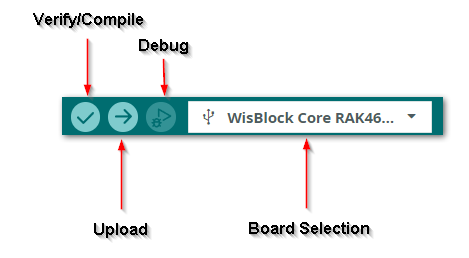 Figure 1: Operating Buttons
- Code Area
You can edit the source code, which will be compiled and uploaded into the RAK device later in this area.
-
State Area
-
Output Message Area You can see the output message in this area, whether it's failure or success information.
Software Setup
To develop your custom RUI3 firmware using Arduino IDE, you need first to install RUI3 Board Support Package using the Arduino Boards Manager. Then you can then use RUI3 Arduino APIs for your intended application.
Install RUI3 Board Support Package in Arduino IDE
- Open Arduino IDE and go to
File -> Preferences.
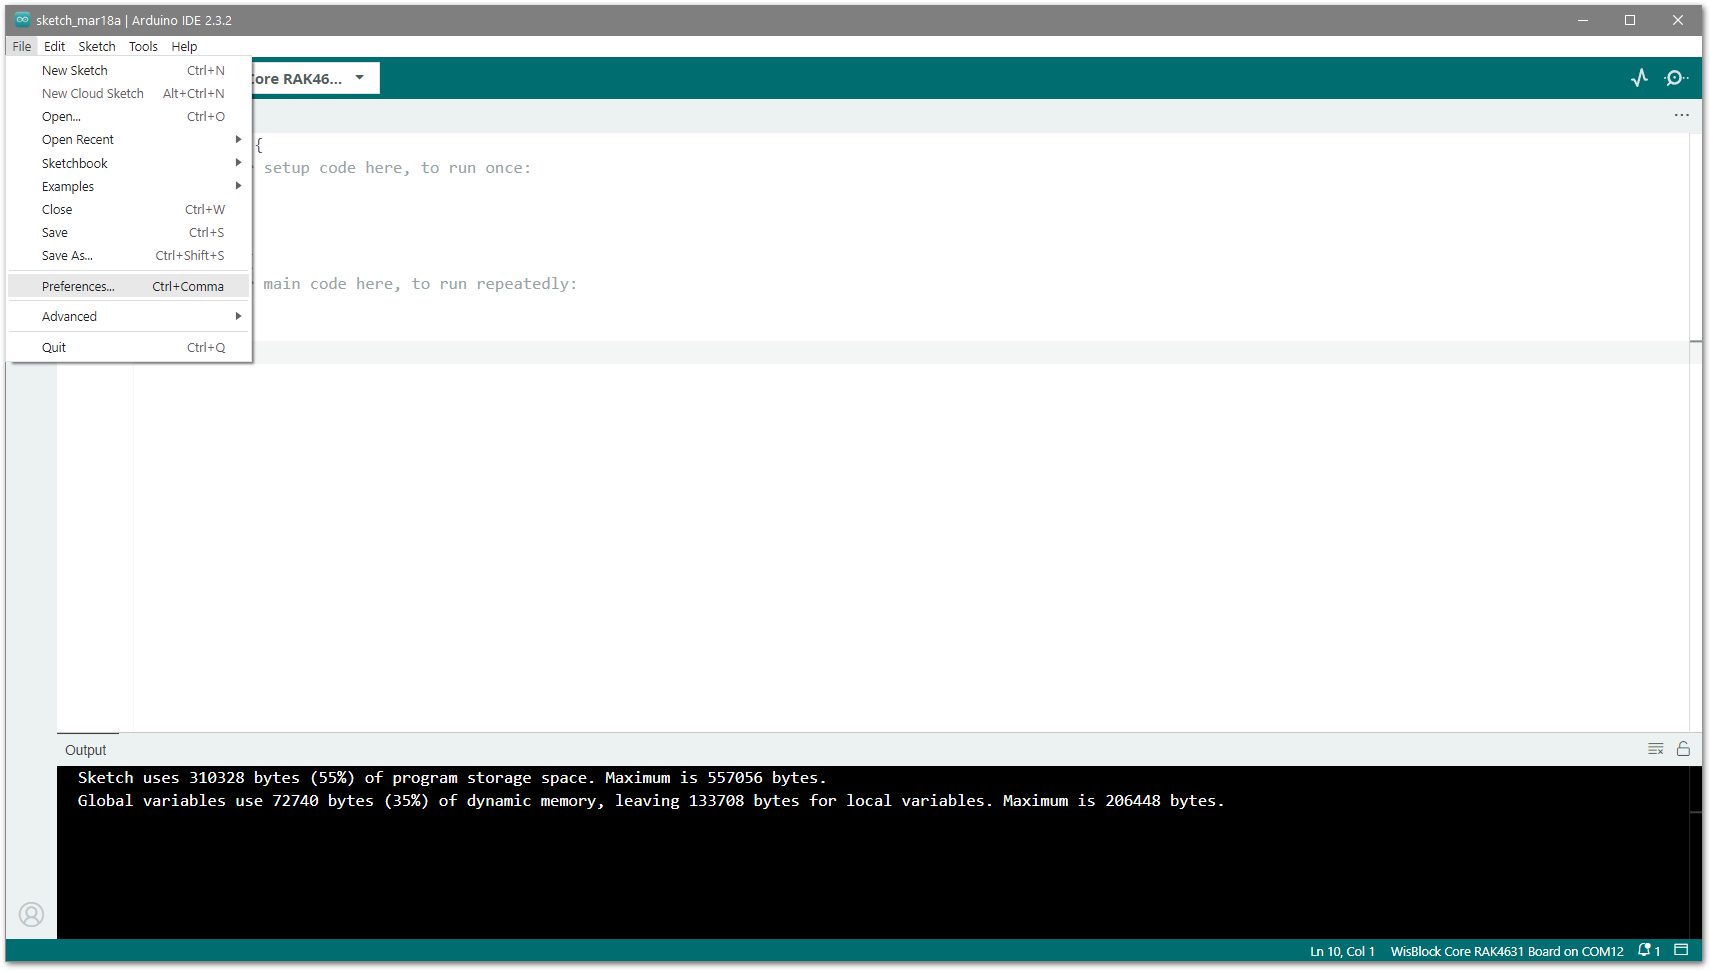 Figure 1: Arduino IDE Preferences
- To add the RUI3 Board Support on Arduino Boards list, edit the Additional Board Manager URLs. Click the icon, as shown below.
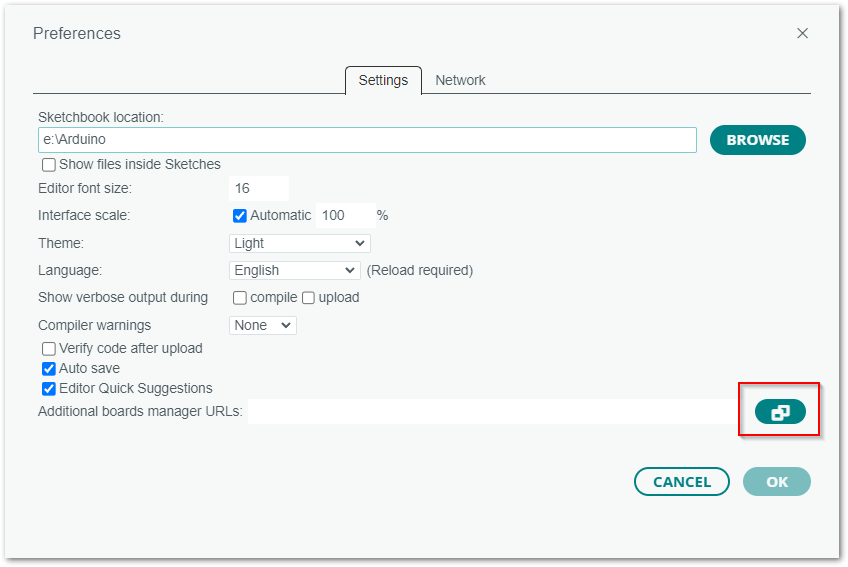 Figure 1: Modifying Additional Board Manager URLs
- Copy the URL below and paste it on the highlighted field.
https://raw.githubusercontent.com/RAKWireless/RAKwireless-Arduino-BSP-Index/main/package_rakwireless_com_rui_index.json
If there are other URLs already there, just add them on the next line. After adding the URL, click OK.
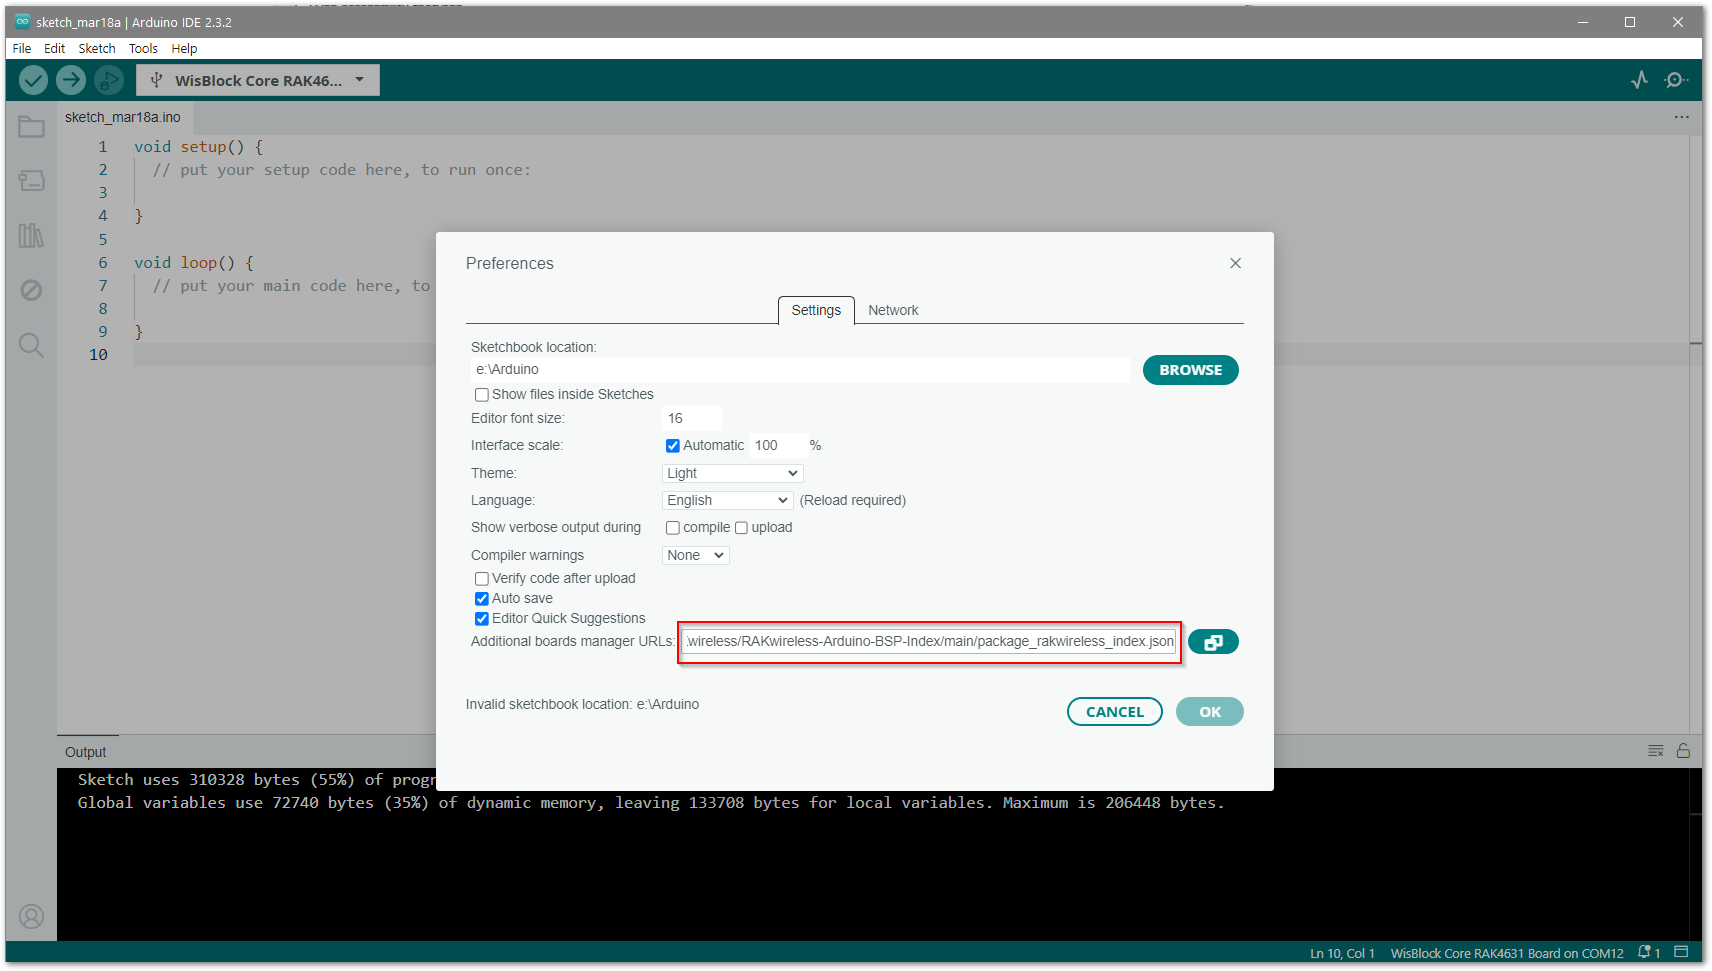 Figure 1: Add additional board manager URLs
- Restart the Arduino IDE an open the Boards Manager from Tools Menu.
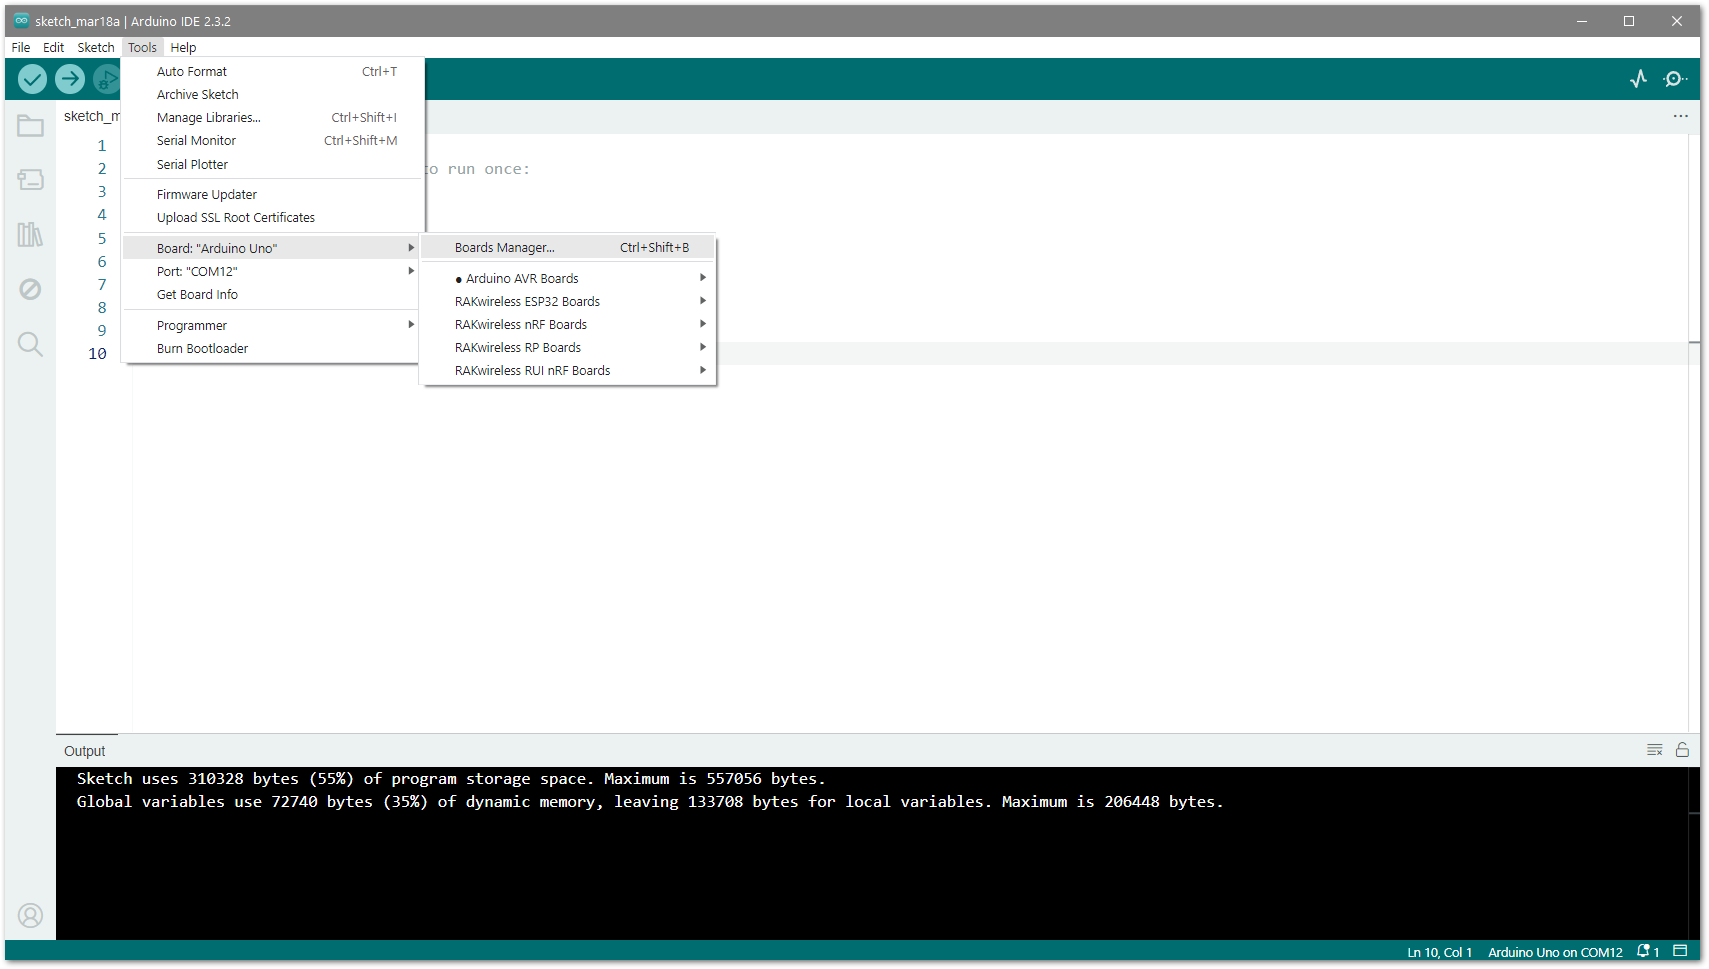 Figure 1: Opening Arduino Boards Manager
- Write
RAKin the search bar as shown in Figure 17. This will show the available RAKwireless module boards that you can add to your Arduino Board list.
 Figure 1: Installing RUI3 Board Support Package
- Now click the area highlighted in blue to choose your preferred board:
Install RAKWireless RUI nRF Boards.
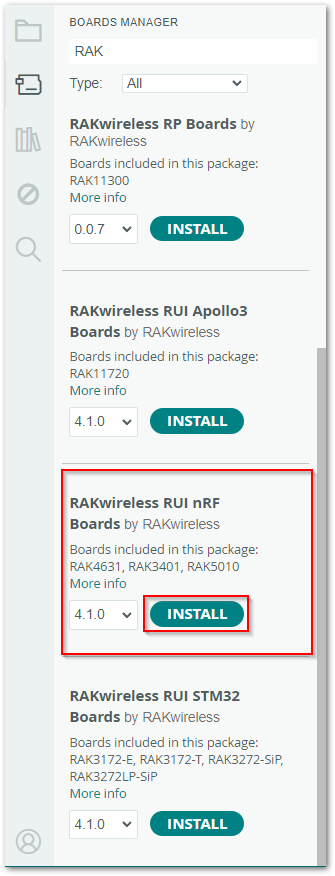 Figure 1: Installing RUI3 nRF Board Support Package
Install RAKWireless RUI STM32 Boards.
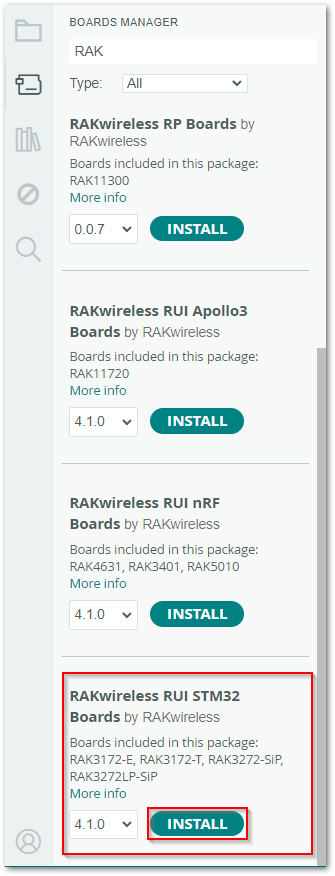 Figure 1: Installing RUI3 STM32 Board Support Package
- To finish the installation click the Install button.
Install RUI3 Libraries into Arduino IDE
You can extend the capabilities of Arduino IDE using RUI3 Libraries.
The Arduino Libraries for RUI3 are available at RUI3 Library. To use a RUI3 Library on your project you need to install the Library in the Arduino IDE as shown in the next section.
Importing a ZIP Library
This guide shows how to install the RAK1906 WisBlock Environmental Sensor RUI3 Library on Arduino IDE.
You can mount the RAK1906 to the WisBlock Base Board by following the RAK1906 Hardware Setup guide. Mounting other WisBlock Sensors uses a similar procedure.
-
Download RAK1906 RUI3 Library
.zipfile. -
Launch Arduino IDE, navigate to
Sketch -> Include Library -> Add .ZIP Library...as shown below.
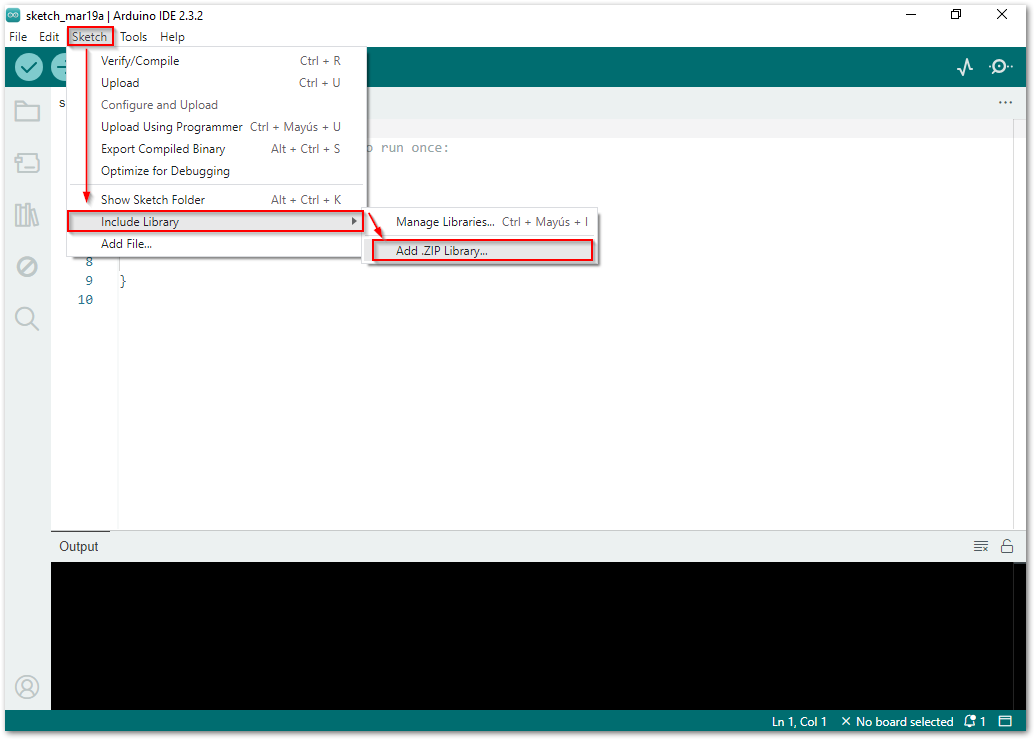 Figure 1: Include RUI3 Library
- You will be prompted to select the Library you would like to add. Navigate to the
.zipfile's location and open it.
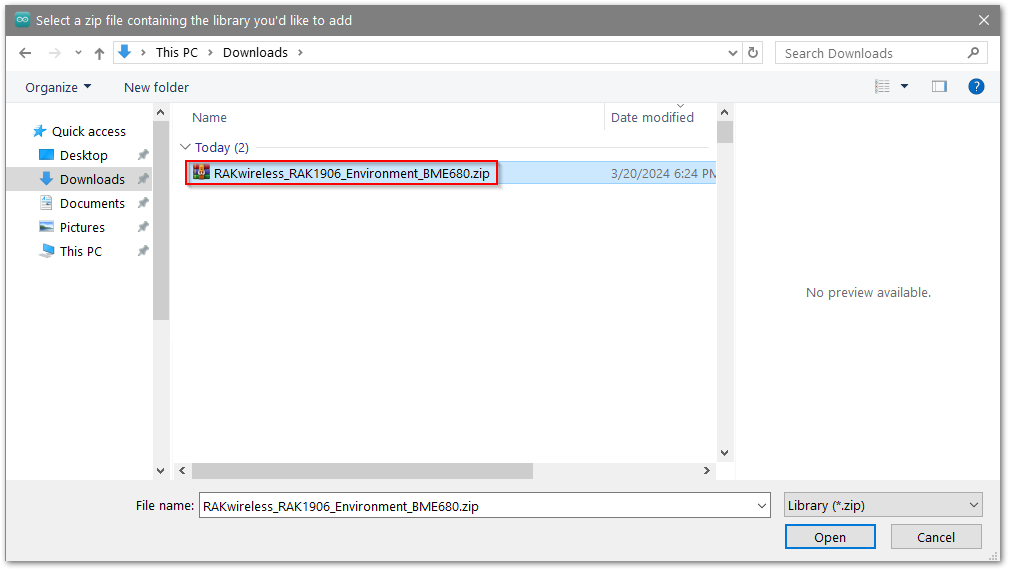 Figure 1: Select RUI3 ZIP Library
Open and Build RUI3 Library Example
- Launch Arduino IDE, navigate to File -> Examples -> RAKWireless RAK1906 Environment BME680 -> Example1_BasicReading as shown below.
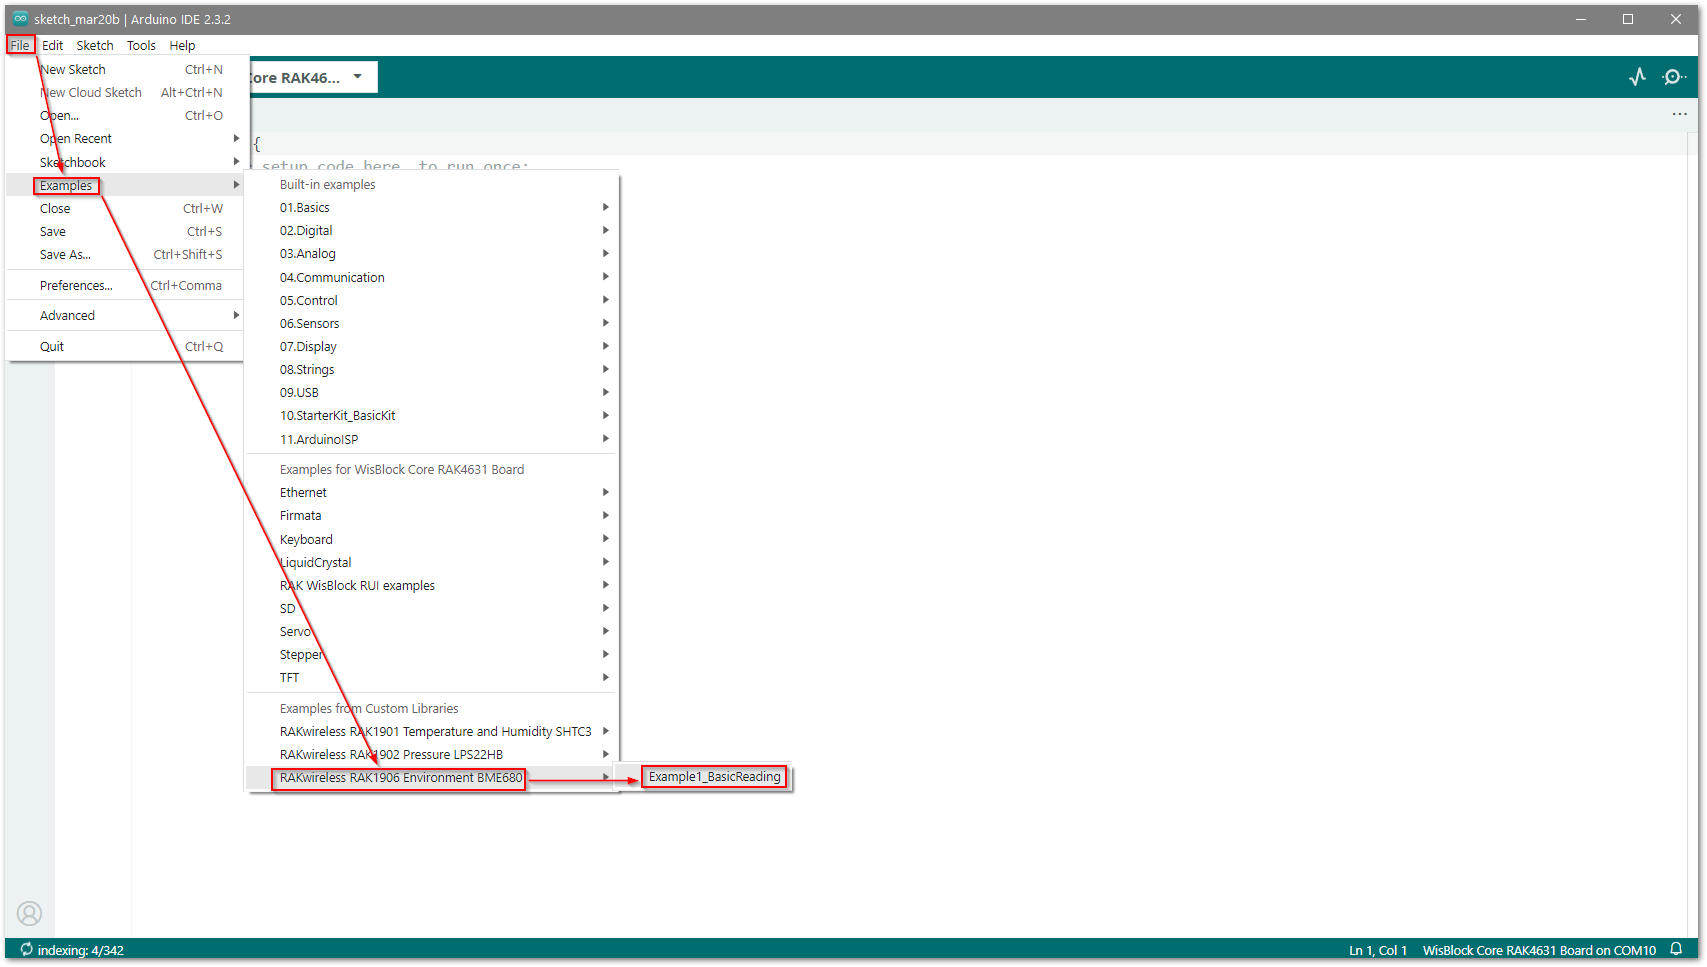 Figure 1: Open RUI3 RAK1906 Library Example
To view the Arduino Examples, you must select the RUI3 Board under Tools-> Board-> RAKwireless RUI3 board.
- Now click
Uploadbutton to build and flash the sketch.
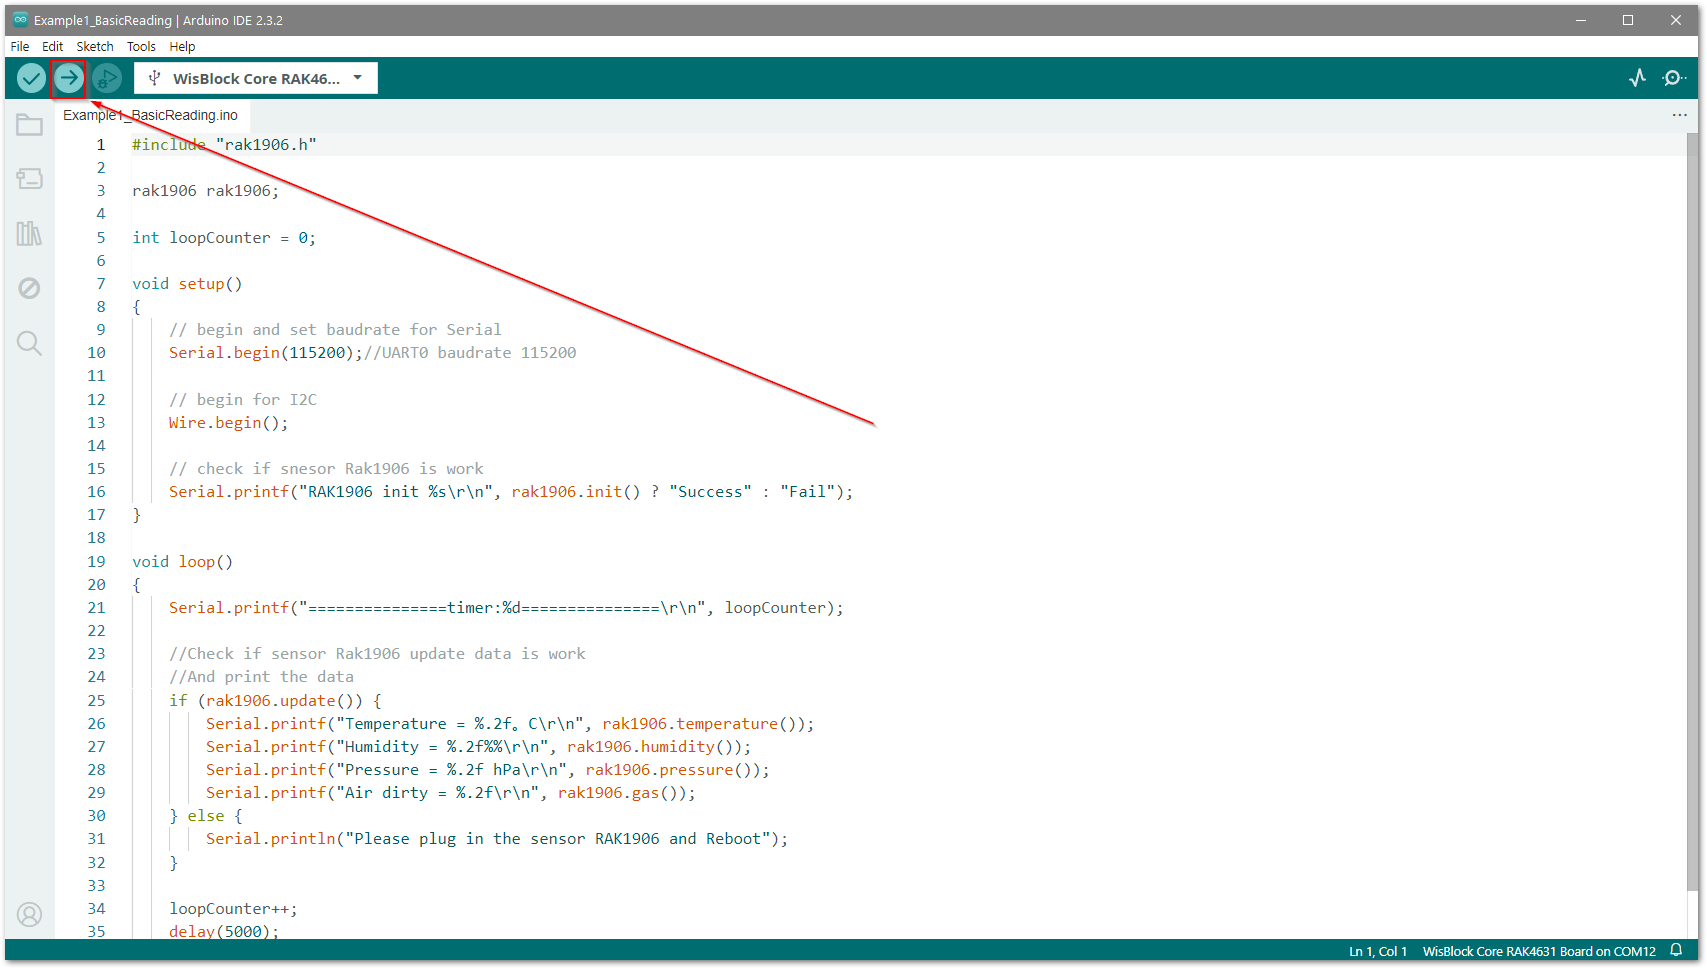 Figure 1: Build RUI3 RAK1906 Library Example
- After the build finishes, open Arduino Serial Monitor to check the RAK1906 Example logs.
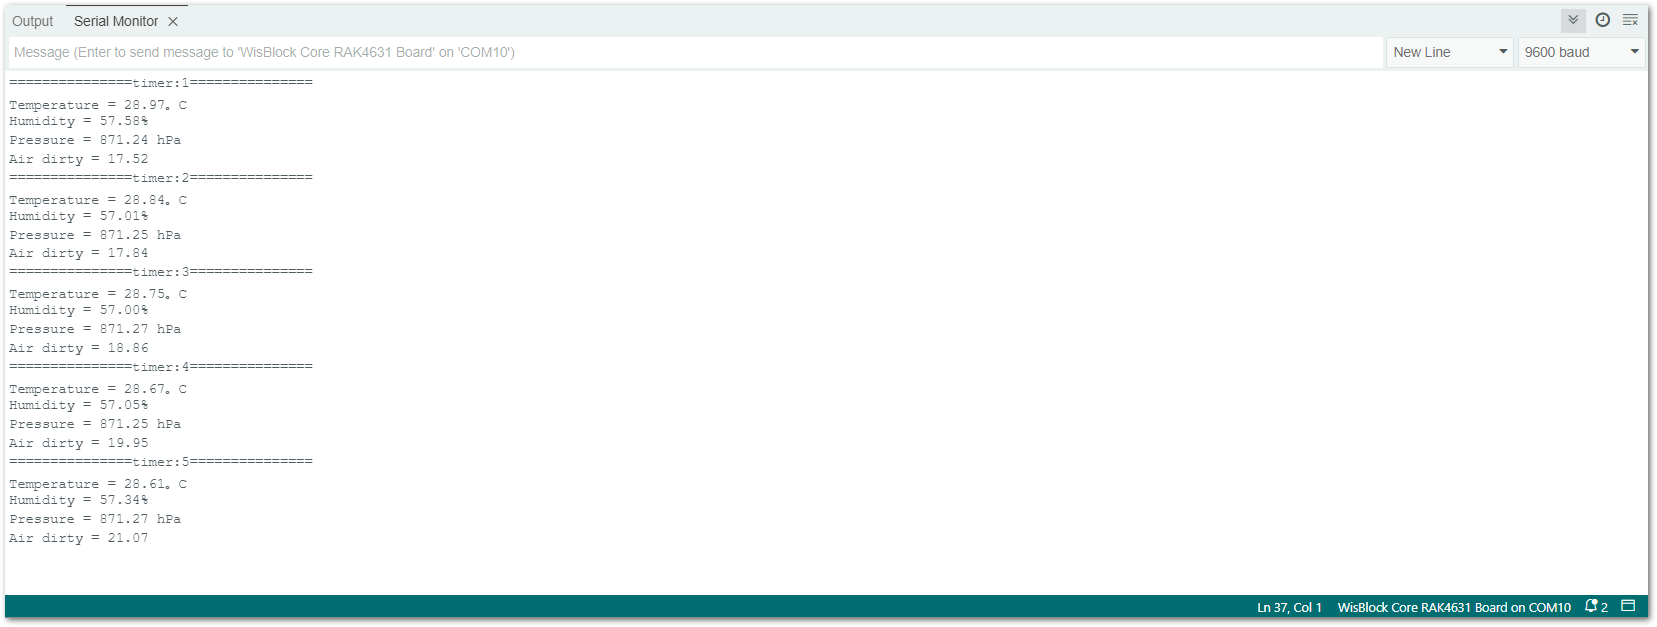 Figure 1: RUI3 RAK1906 Library Example Logs
Build Smart_Farm Monitoring RUI3 Example
This example monitors data from temperature, pressure and humidity sensor over a LoRaWAN network using the LoRaWAN RUI3 API.
- Download RUI3 Libraries:
-
Install both Libraries on Arduino IDE as described in Import a ZIP Library section.
-
Launch Arduino IDE, navigate to
File -> Examples -> RAK WisBlock RUI Example -> Application_Scenario -> LoRa -> Smart_Farmas shown below.
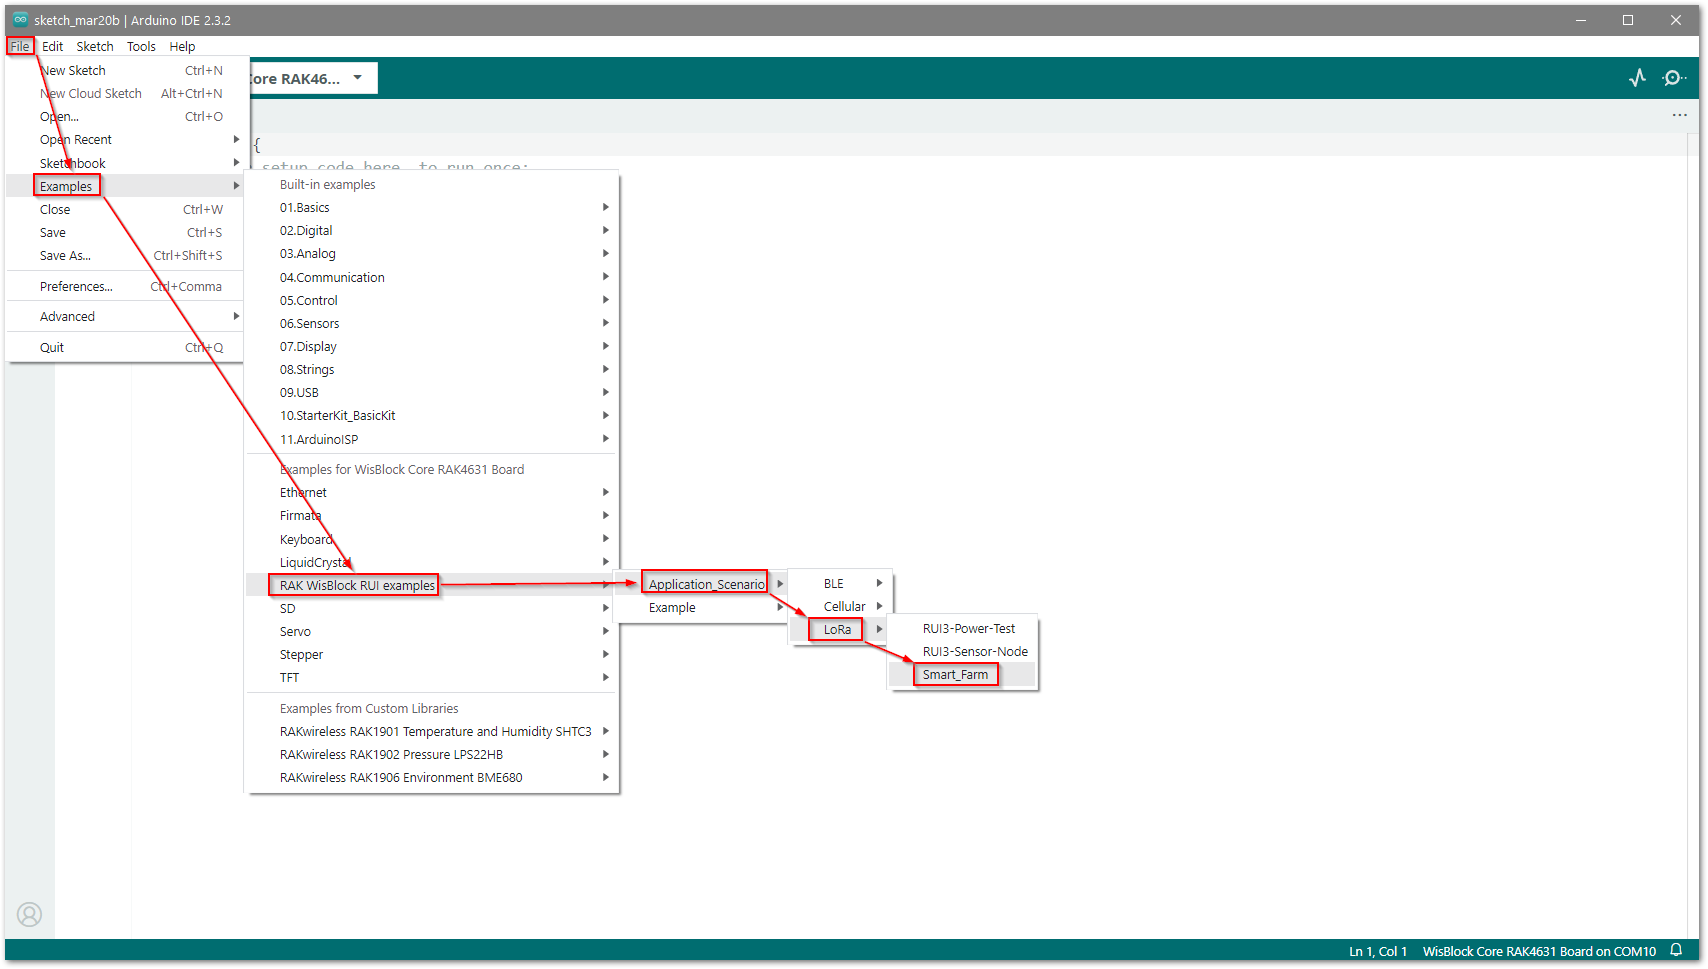 Figure 1: Open RUI3 Smart_Farm Example
- The LoRaWAN parameters below must be configured based on the Regional Band, EUIs and APPKEY from the LoRaWAN Network Server device registration. The RUI3 device must be within a working LoRaWAN gateway registered on the same LoRaWAN Network and operating at the same Regional Band as well.
#define SMART_FARM_BAND     (RAK_REGION_EU868)
#define SMART_FARM_DEVEUI   {0x01, 0x02, 0x03, 0x04, 0x05, 0x06, 0x07, 0x88}
#define SMART_FARM_APPEUI   {0x0E, 0x0D, 0x0D, 0x01, 0x0E, 0x01, 0x02, 0x0E}
#define SMART_FARM_APPKEY   {0x2B, 0x7E, 0x15, 0x16, 0x28, 0xAE, 0xD2, 0xA6, 0xAB, 0xF7, 0x15, 0x88, 0x09, 0xCF, 0x4F, 0x3E}
It is highly recommended to read the section LoRaWAN Example:
- Now click
Uploadbutton to build and flash to sketch.
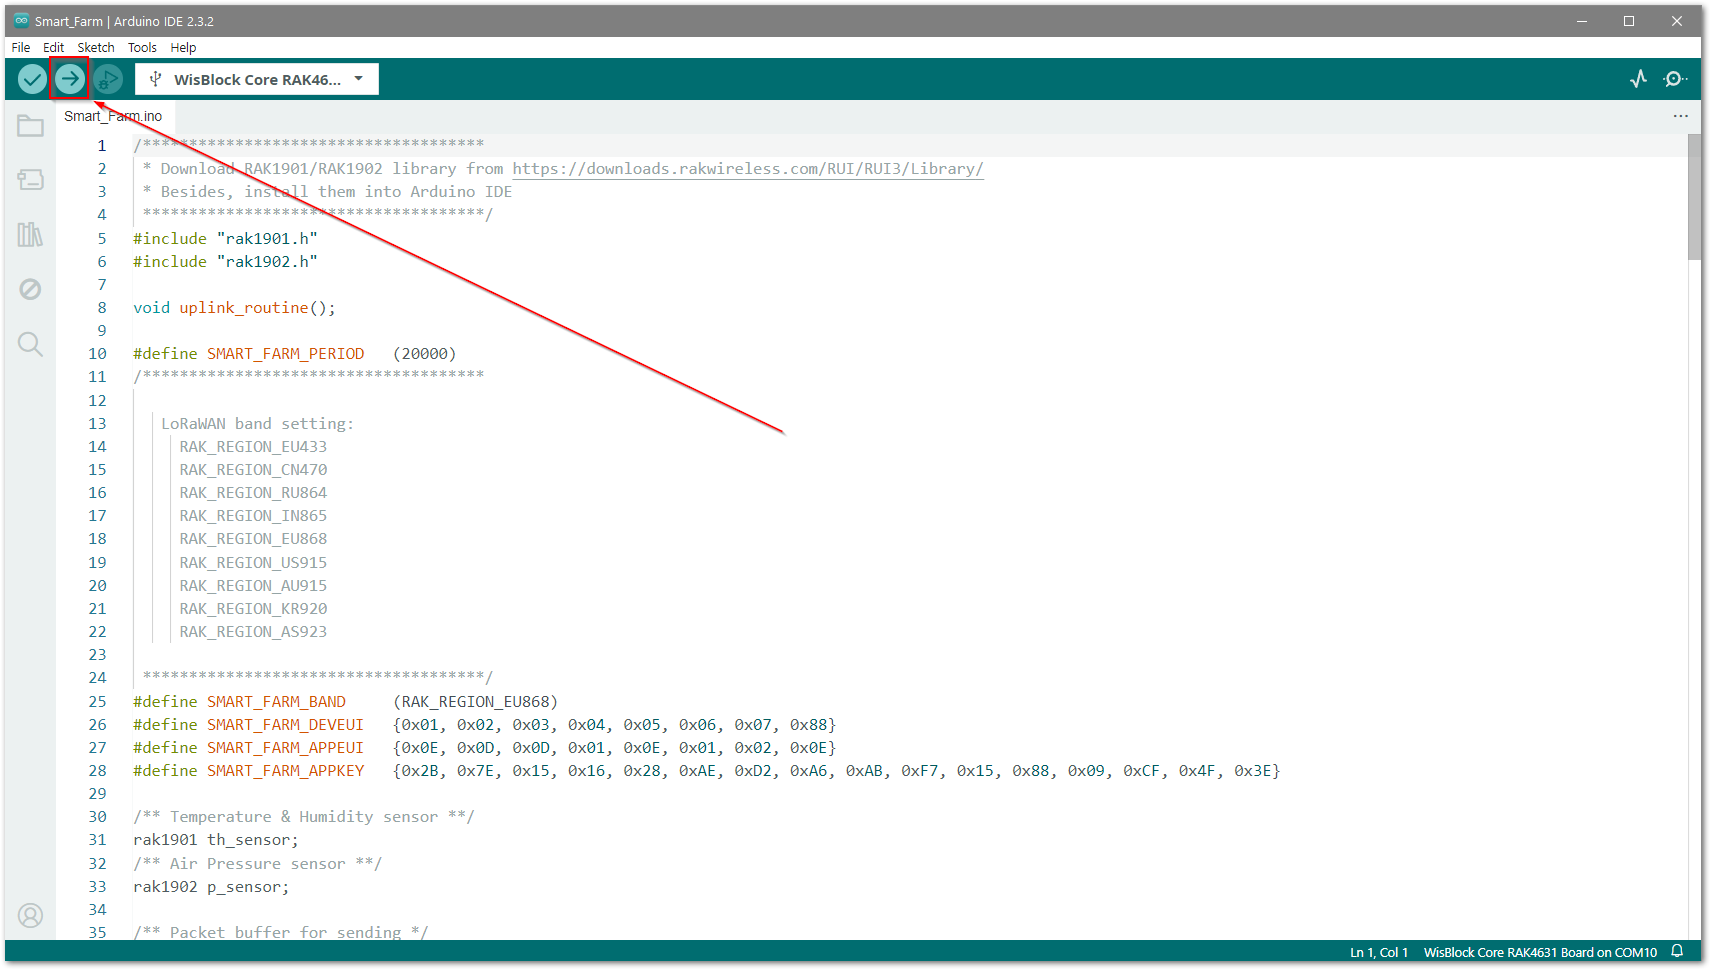 Figure 1: Build and upload RUI3 Smart_Farm Example
- After the build finishes, open Arduino Serial Monitor to check the Smart_Farm project log messages.
 Figure 1: Arduino Serial Monitor RUI3 Smart_Farm Example
Visual Studio Code (Arduino Extension)
Installation of Visual Studio Code
Download and install the official Microsoft's Visual Studio Code.
Configuring the Visual Studio Code
You can use Visual Studio Code by installing the Arduino Extension. The Arduino Extension makes it easy to develop, build, and deploy your Arduino sketches in Visual Studio Code.
- Launch Visual Studio Code and select the Extensions view by clicking on the Extensions icon.
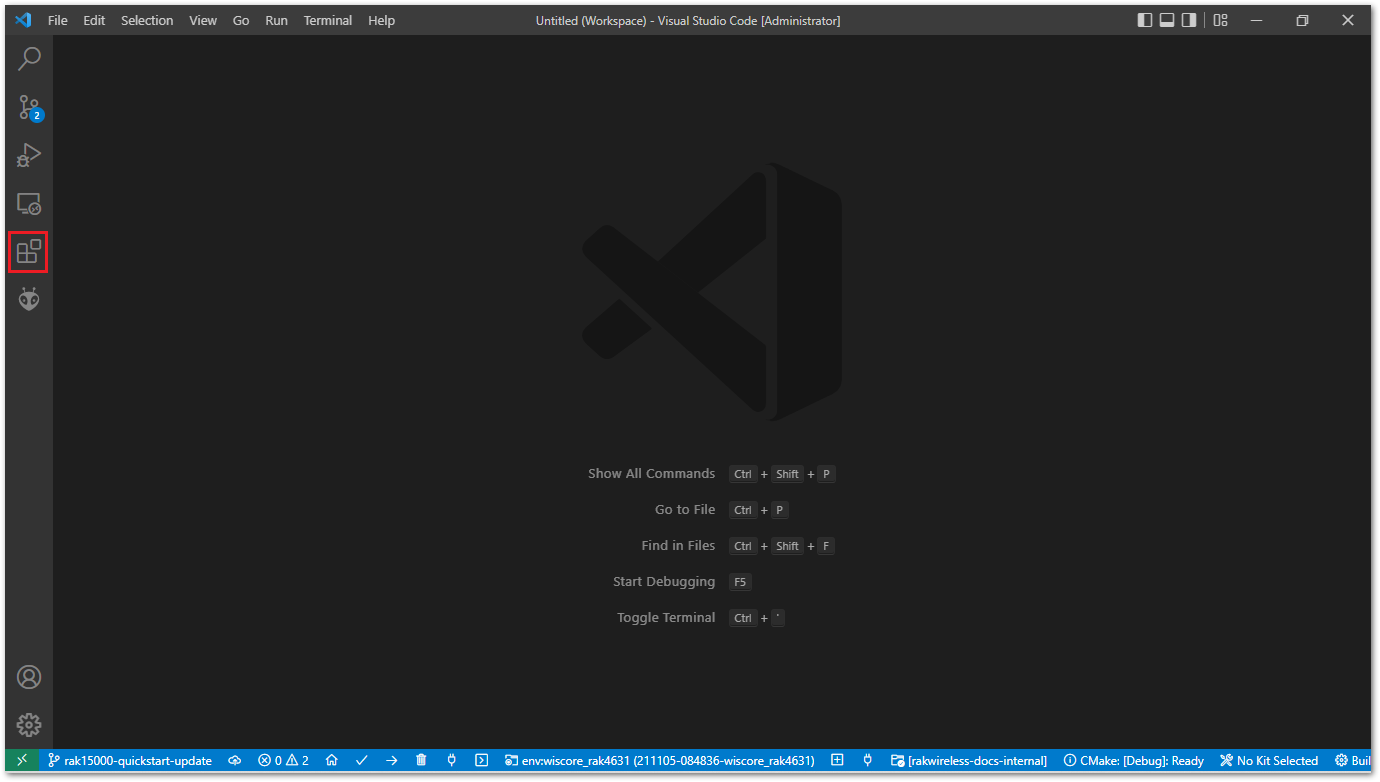 Figure 1: Visual Studio Code selecting the Extensions view
- The Extensions available are shown on the left side. On the Extensions text area, type Arduino, then click the Arduino for Visual Studio Code icon as shown in Figure 29.
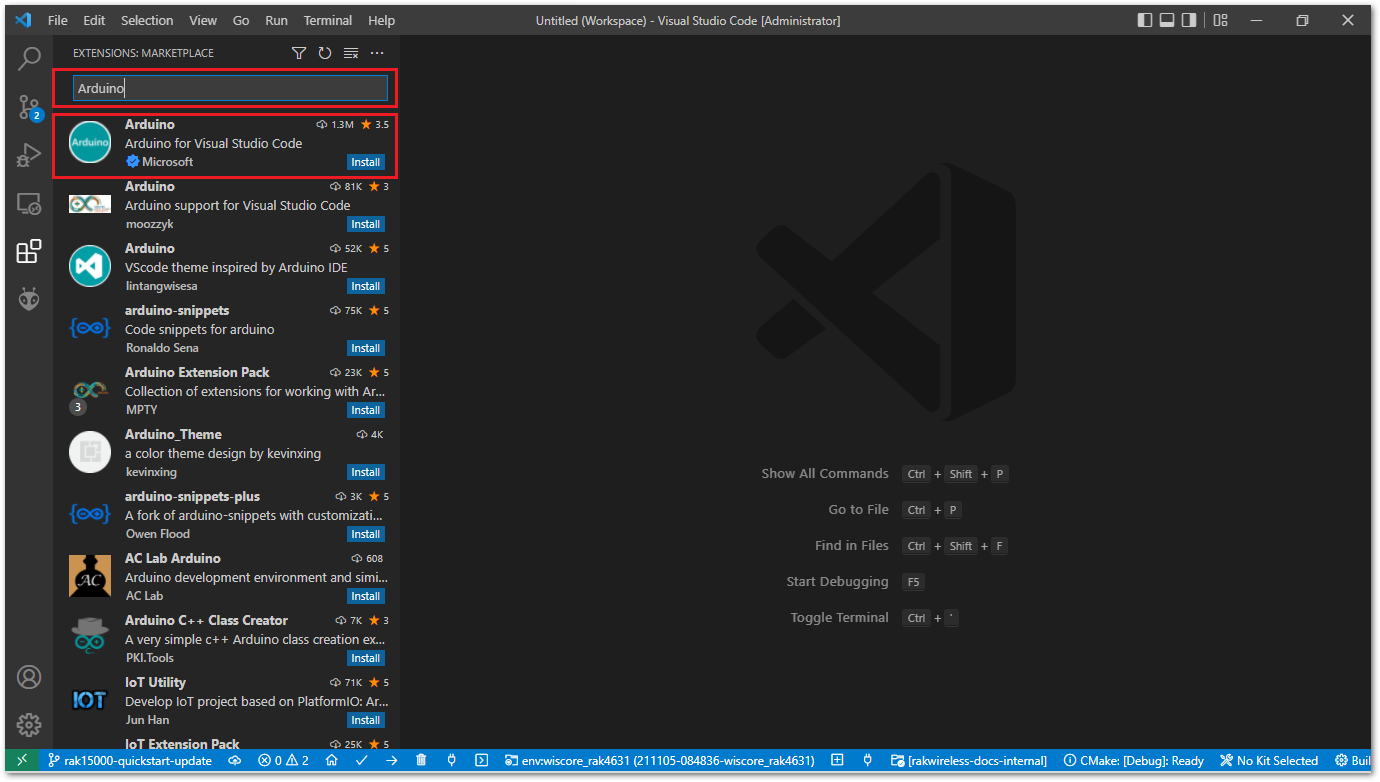 Figure 1: Arduino for Visual Studio Code Extension (Microsoft)
- Then click the Install button.
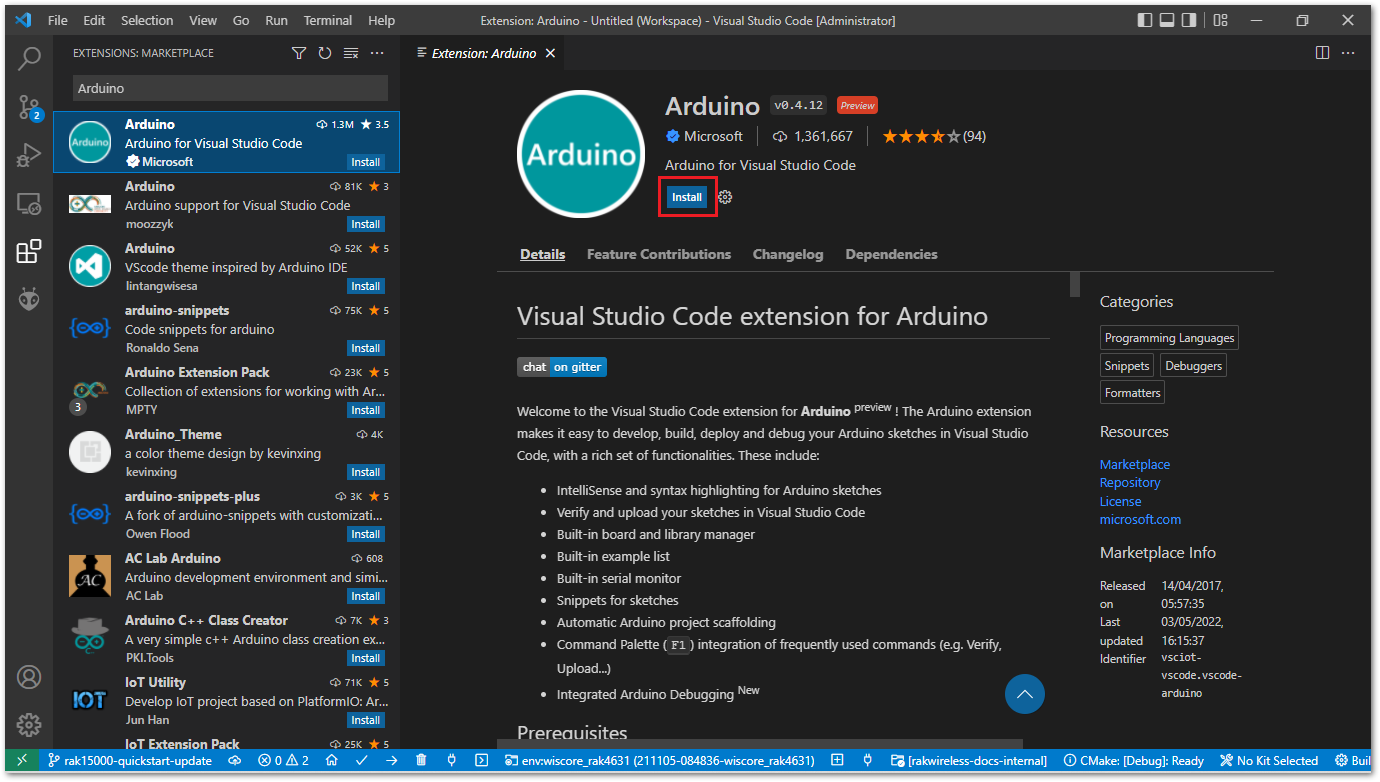 Figure 1: Installing Arduino for Visual Studio Code Extension
- To build the RUI3 examples, install the Microsoft C/C++ Extensions Pack. On the Extensions text area, type and select C/C++ Extension Pack, as shown in Figure 31. To finish, click the Install button.
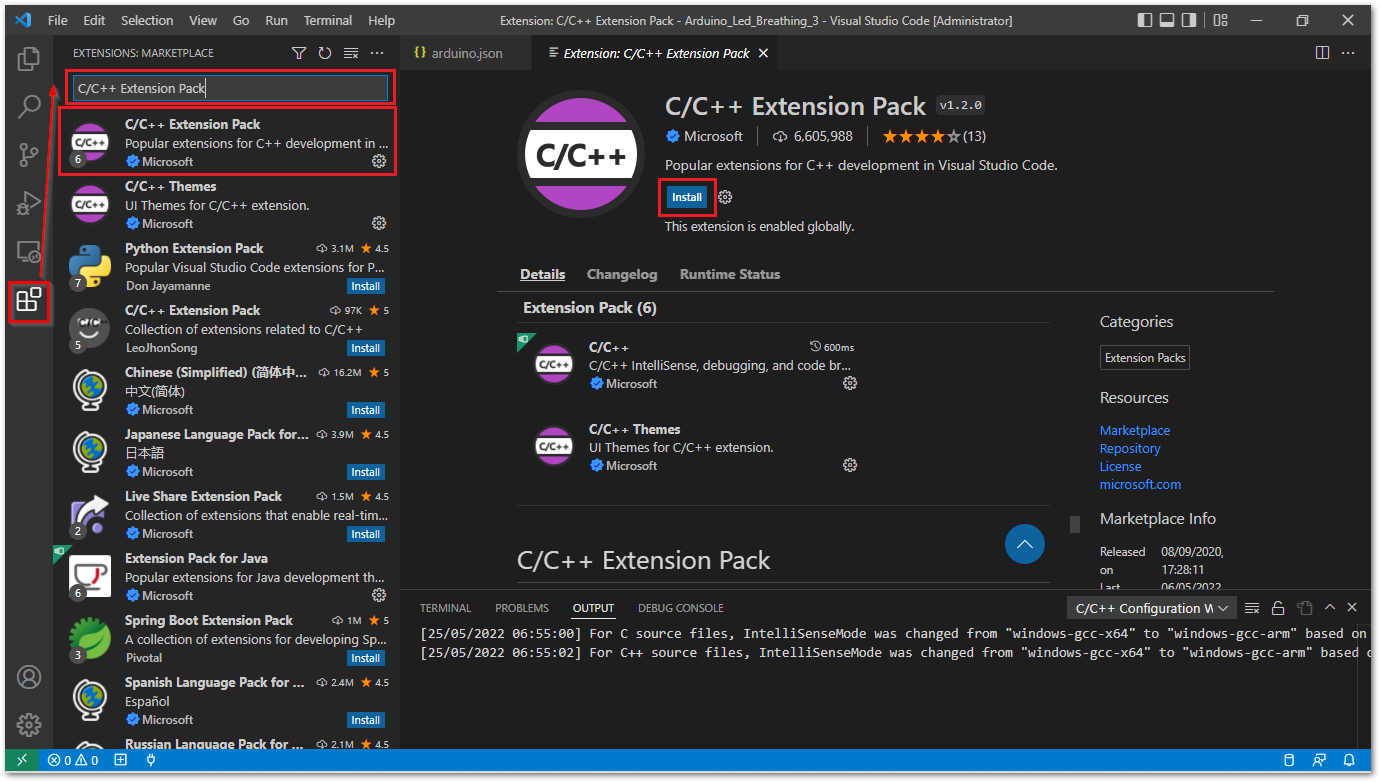 Figure 1: Installing Microsoft C/C++ Extension
- Now install the RAK BSP. Click Manage -> Settings.
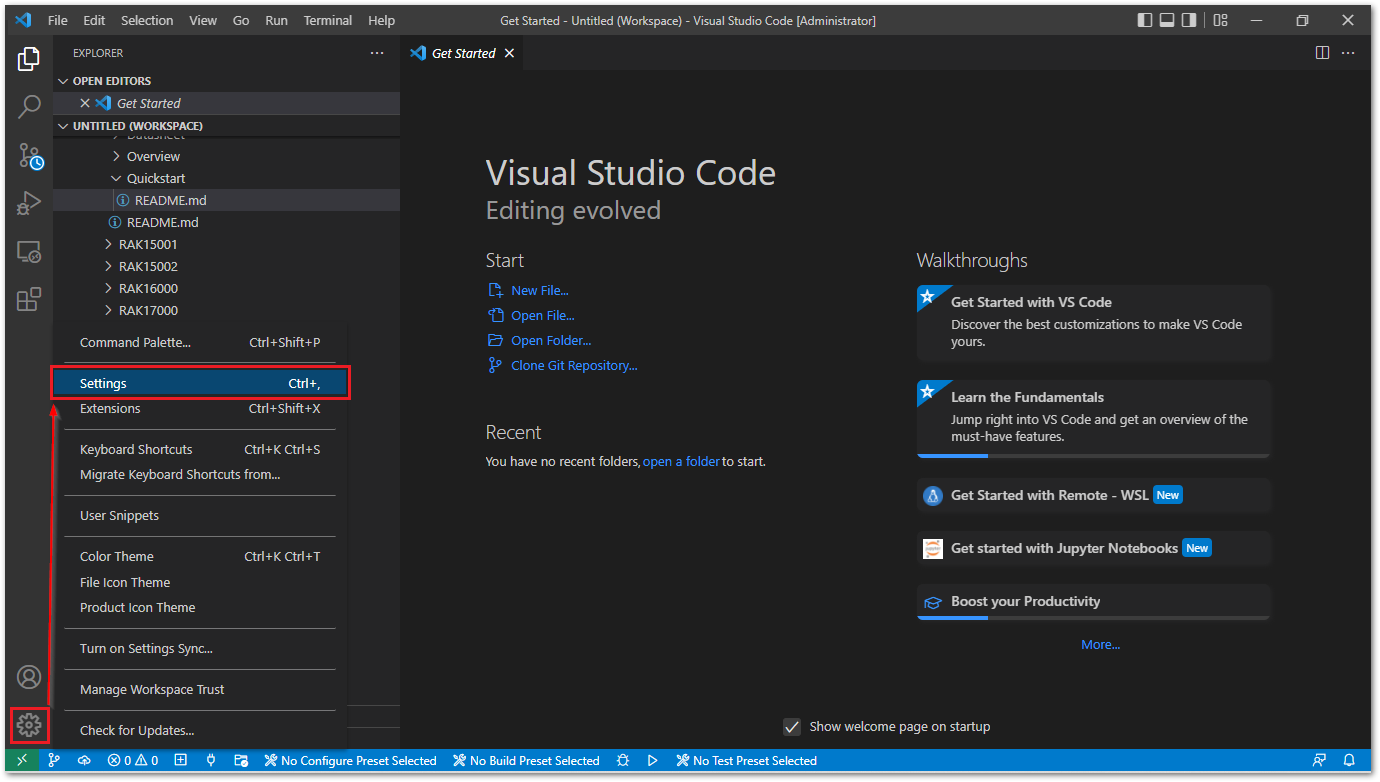 Figure 1: Configure Visual Studio Code manage settings
- On the Extensions, click Arduino Configuration then select Add Item.
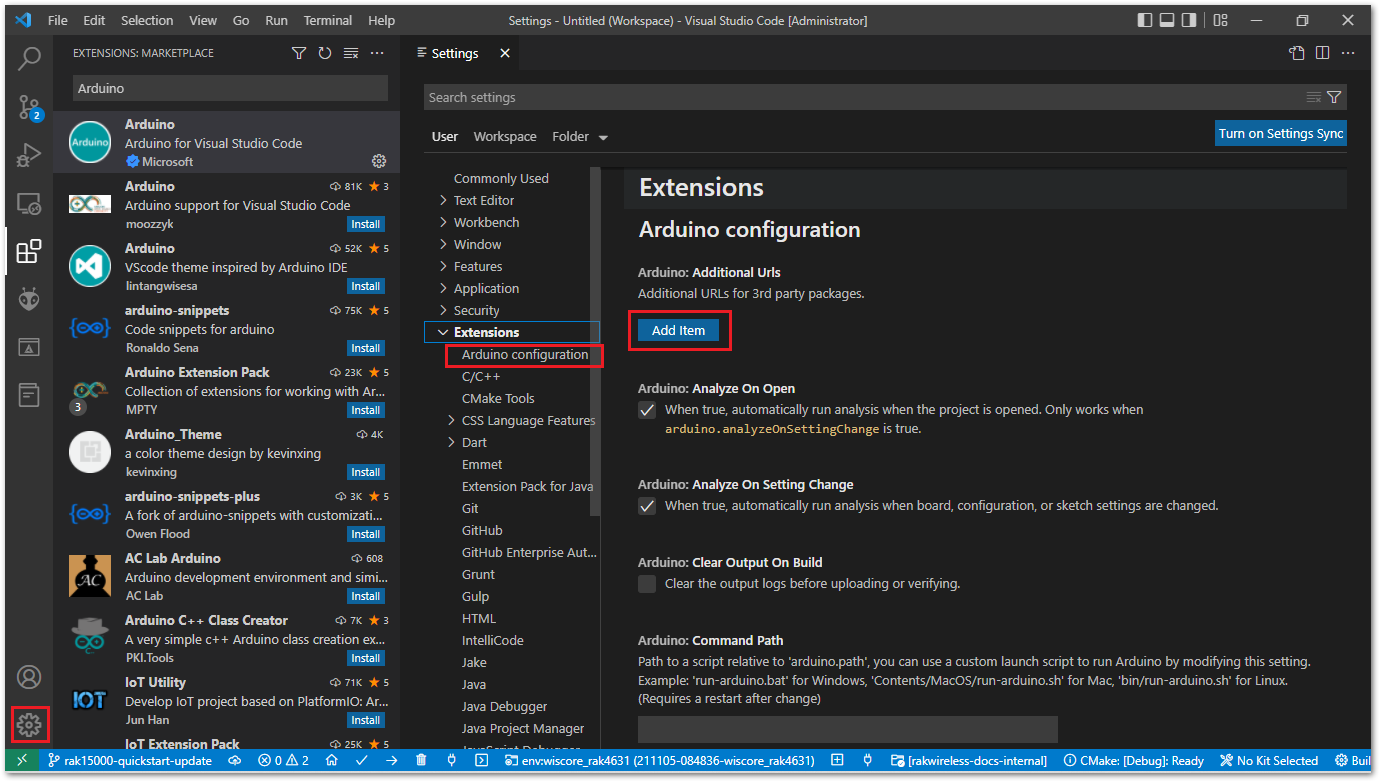 Figure 1: Configuring Arduino Visual Studio Code Extension
- Add the Arduino BSP json to the Additional URLs.
https://raw.githubusercontent.com/RAKWireless/RAKwireless-Arduino-BSP-Index/main/package_rakwireless_com_rui_index.json
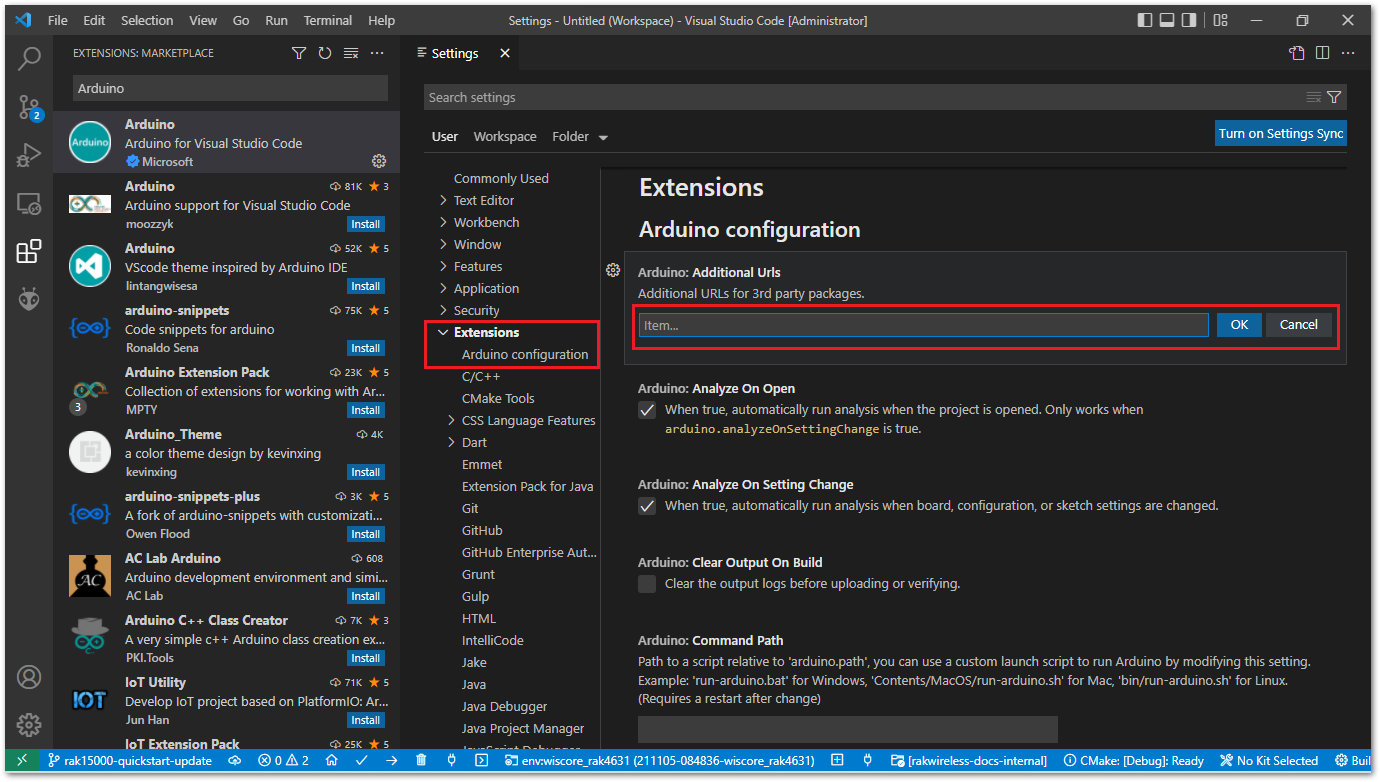 Figure 1: Arduino configuration Additional Urls
- Now configure the Board Manager for your Arduino RUI3 project using the Command Palette by typing
<CTRL><SHIFT>Por F1 key. Then type Arduino: Board Manager on the text area or choose from the list.
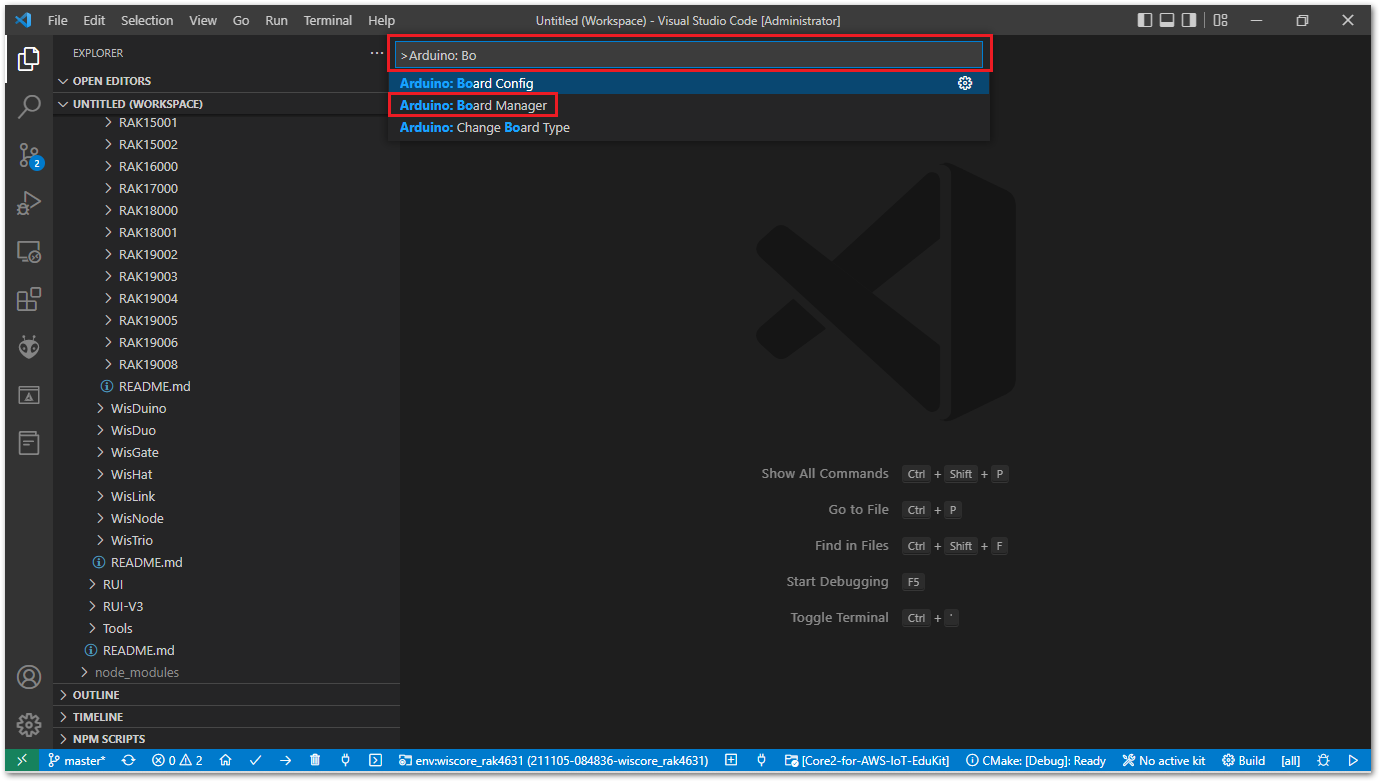 Figure 1: Arduino Board Manager
- On the Arduino Board Manager, type RAK in the text box area. Install the RUI3 BSP for your preferred RAK device by clicking on the Install button.
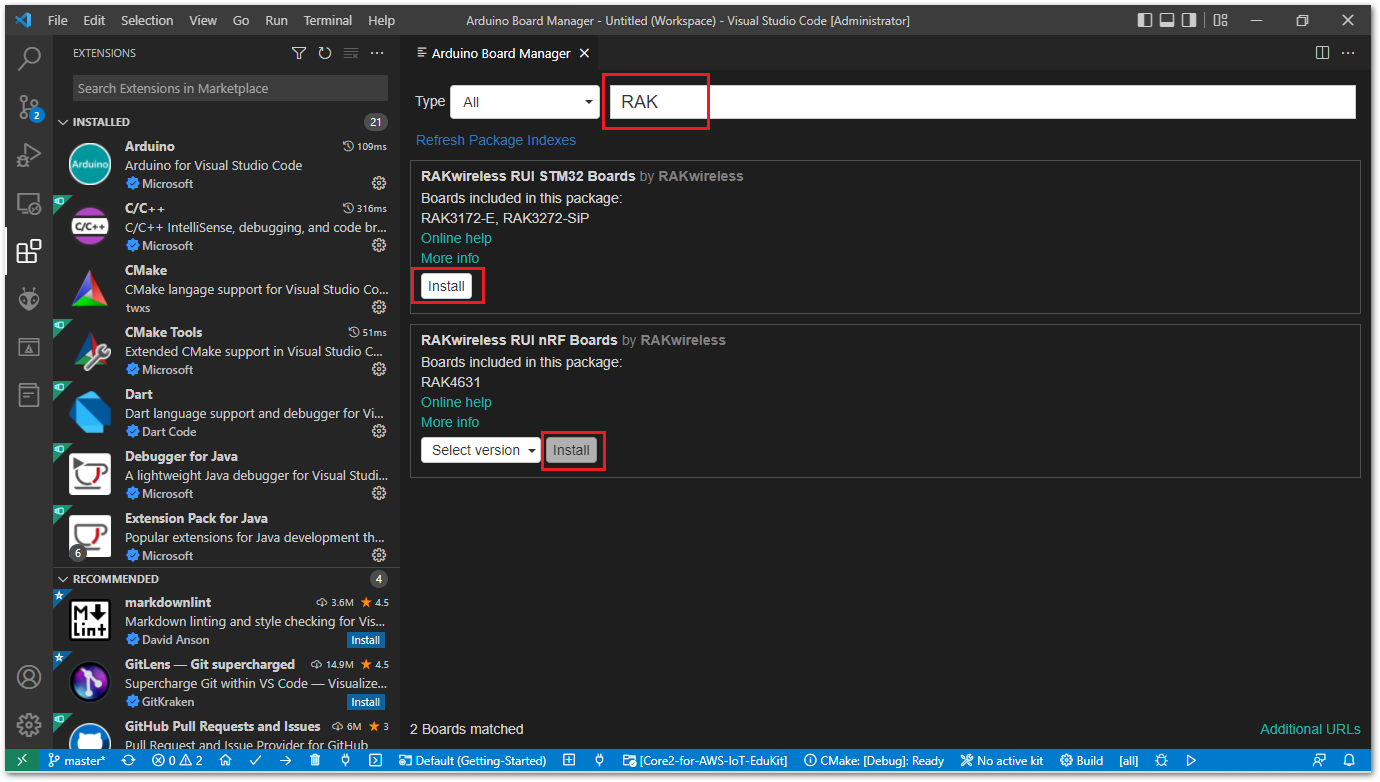 Figure 1: Configuring RAK boards on Arduino Board Manager
- In some cases, it is possible to select the version to be installed, as shown in Figure 37.
 Figure 1: Configuring Arduino Board Manager on Visual Studio Code
- If you want to change later your selected board and configure its specific settings, click the highlighted area shown in Figure 38.
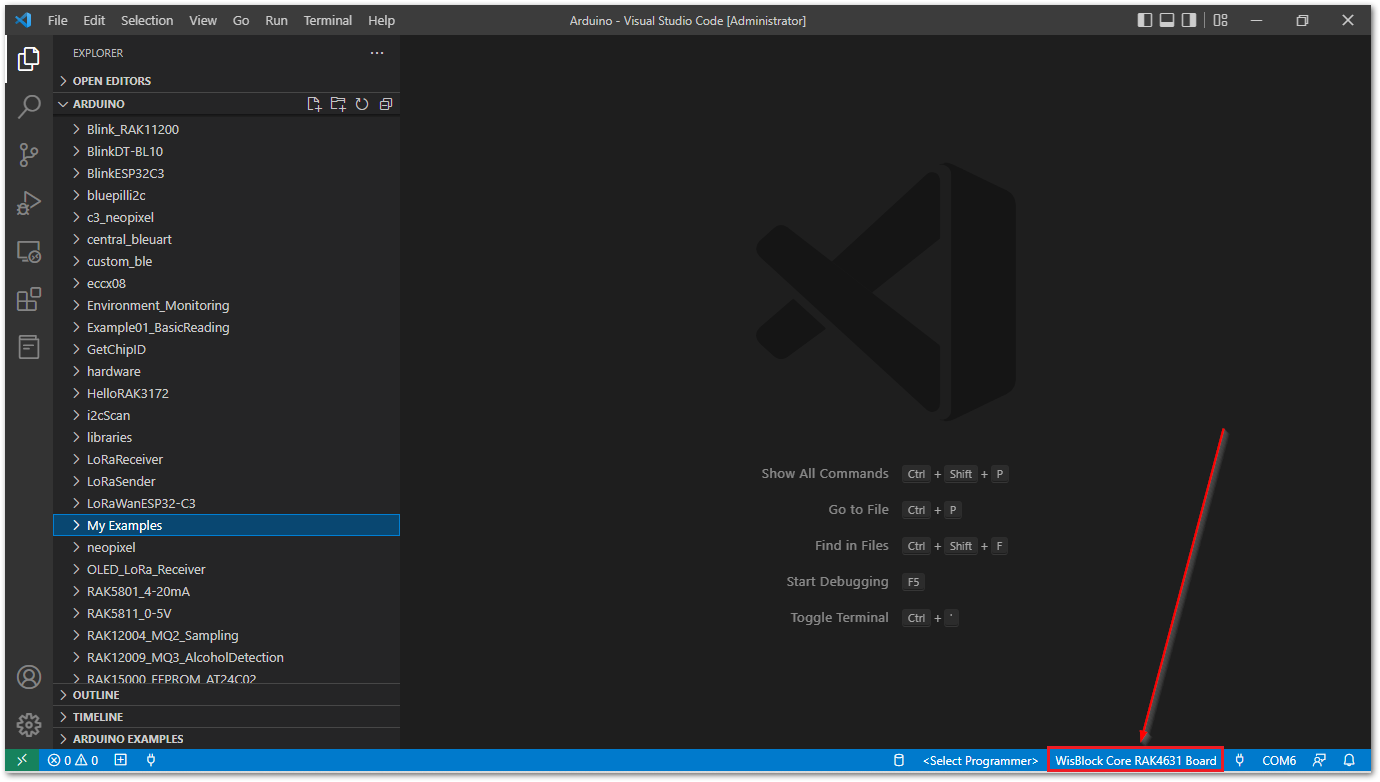 Figure 1: Modifying the Arduino Board Manager on Visual Studio Code
- To configure the serial port, connect your RAK device to the computer's USB port. Use the Command Palette by typing
<CTRL><SHIFT>Por F1 key. Then type Arduino: Select Serial Port on text area.
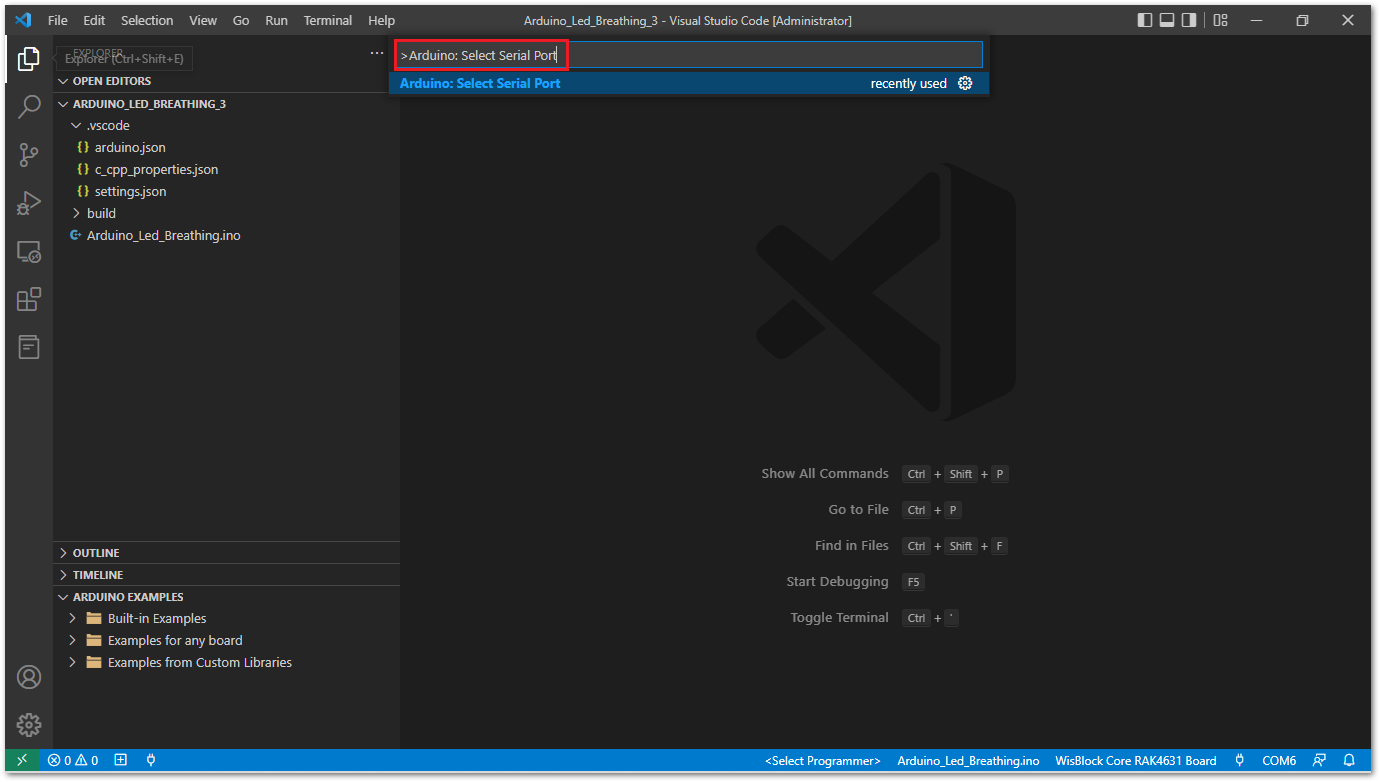 Figure 1: Select the Serial Port using extension configuration
Alternatively, you can configure the serial port by clicking the COM port, as shown in the highlighted part of Figure 40.
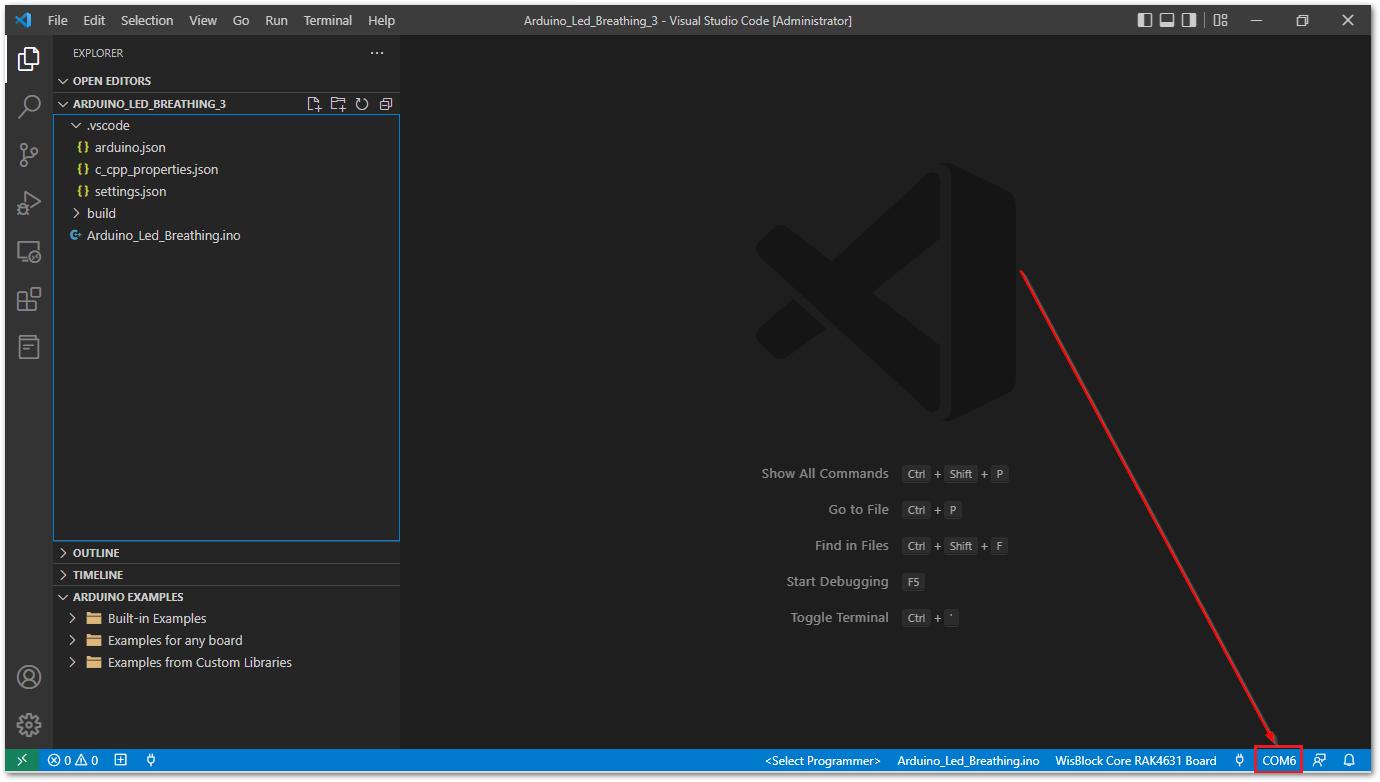 Figure 1: Selecting the Serial Port on Visual Studio Code
Building the First Sketch
- Once the BSP is installed, open the ARDUINO EXAMPLES using the Command Palette by typing
<CTRL><SHIFT>Por F1 key. Then type Arduino: Examples.
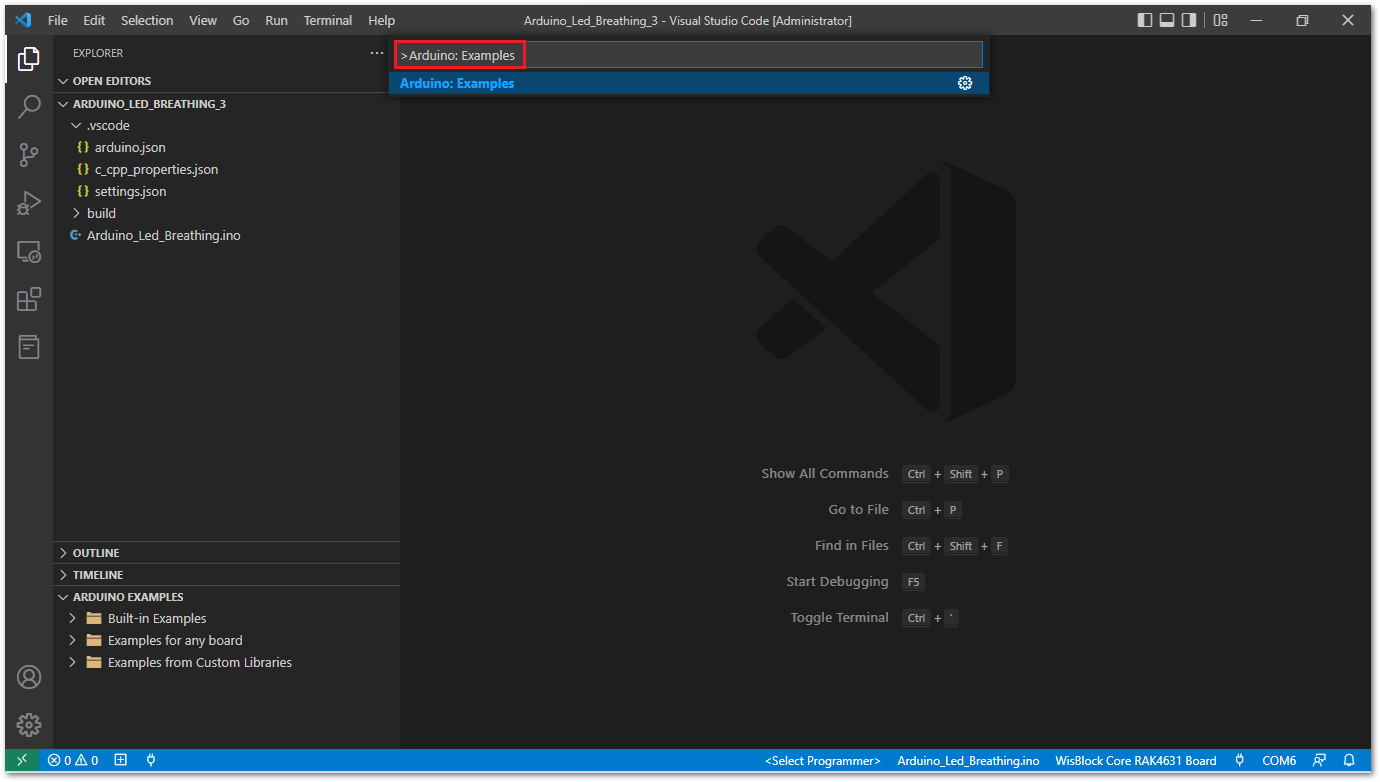 Figure 1: Open Arduino Examples
- Choose Arduino_Led_Breathing as the first example.
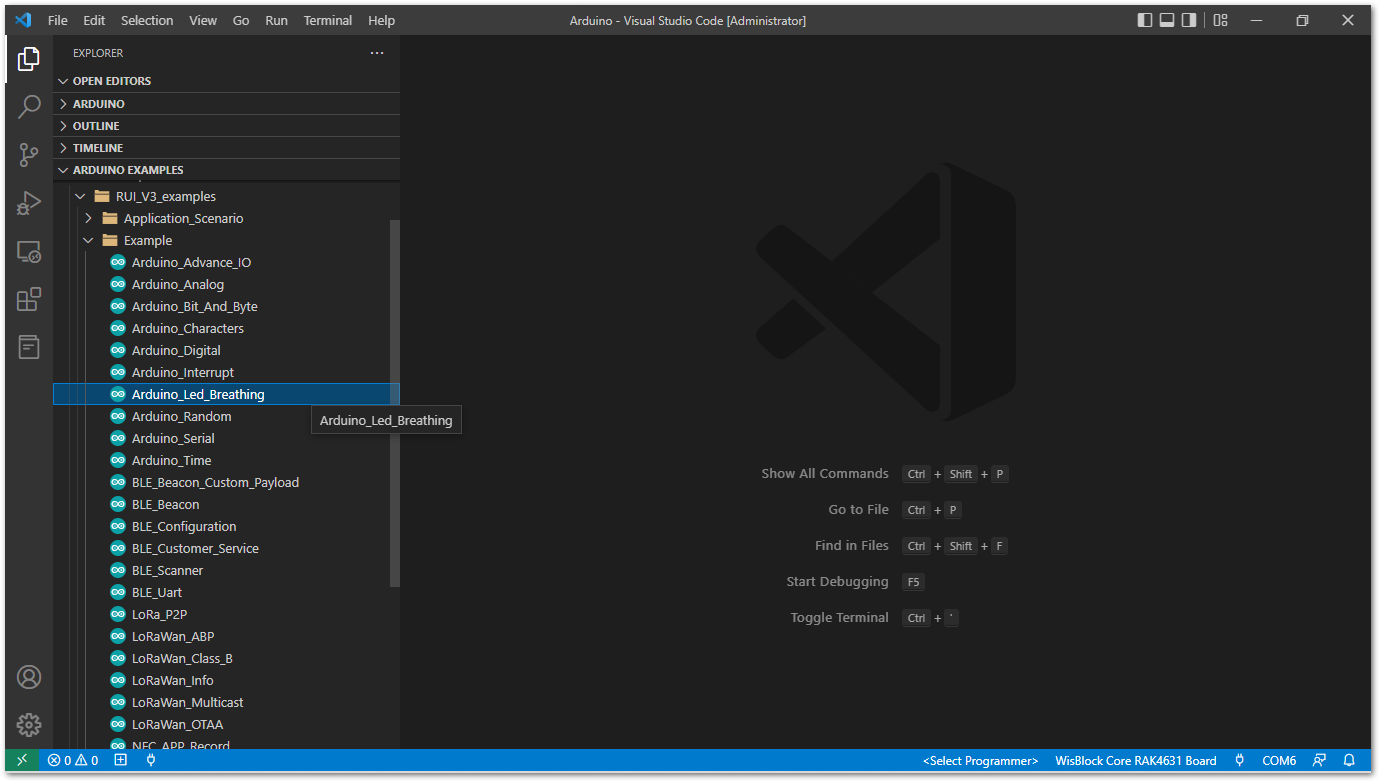 Figure 1: Open Arduino Led Breathing
- Figure 43 shows the two commonly used options for Arduino Visual Studio Code development: Upload and Verify. The icon highlighted in yellow is the Arduino Upload button, and the other one, in blue, is the Arduino Verify option.
Visual Studio Code Tips and Tricks
Command Palette
The F1 key or keyboard shortcut <CTRL><SHIFT><P> brings up the Command Palette. From Command Palette, you have access to all of the functionality of Visual Studio Code.
PlatformIO (PIO) Extension disable
If you have PIO (PlatformIO) extension installed, you need to disable it for the workspace in use. The two extensions have conflicts with each other.
Select Extensions icon and type PlatformIO on the text area. Now click the gear icon on PlatformIO, then select the Disable (Workspace) option, as shown in Figure 44.
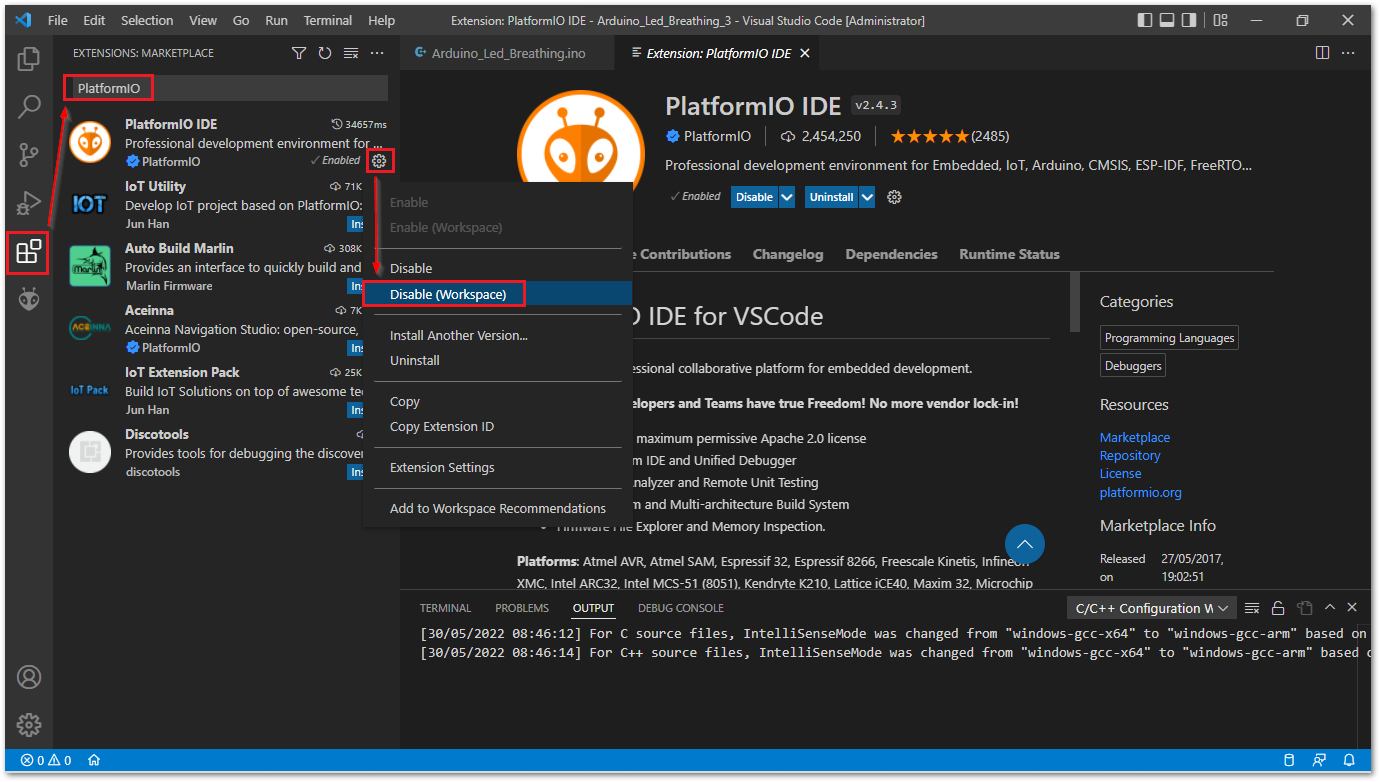 Figure 1: Disabling PIO on Visual Studio Code Workspace
PlatformIO (PIO) Extension Shortcut Conflict
Both PlatformIO and Arduino extension in Visual Studio Code use the same keyboard shortcut <CTRL><ALT><U> to compile and upload the code. You can change the Arduino Upload shortcut as follows:
- Use the Command Palette by typing
<CTRL><SHIFT>Por F1 key. Type Arduino: Upload on text area, then click the gear icon.
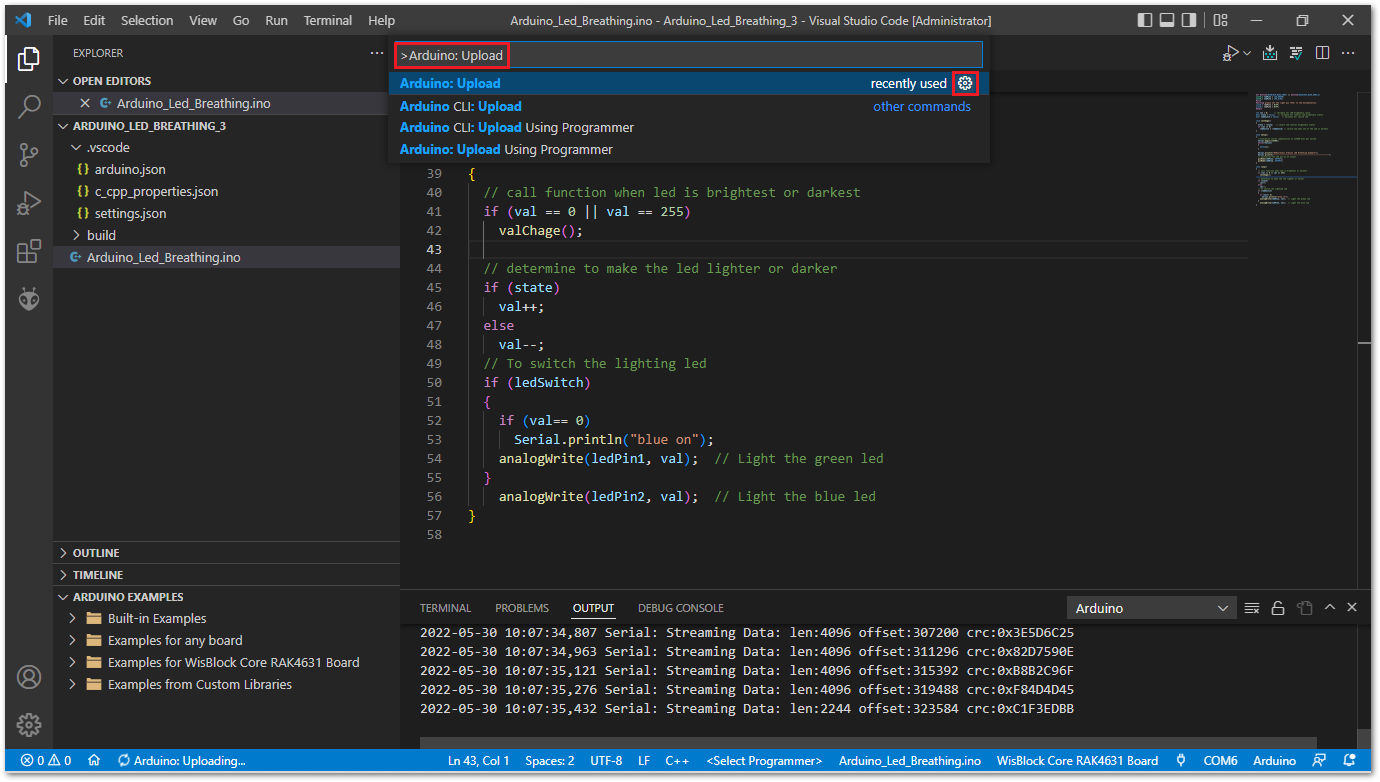 Figure 1: Open Arduino Upload shortcut
- Click the Open icon, as shown in Figure 46.
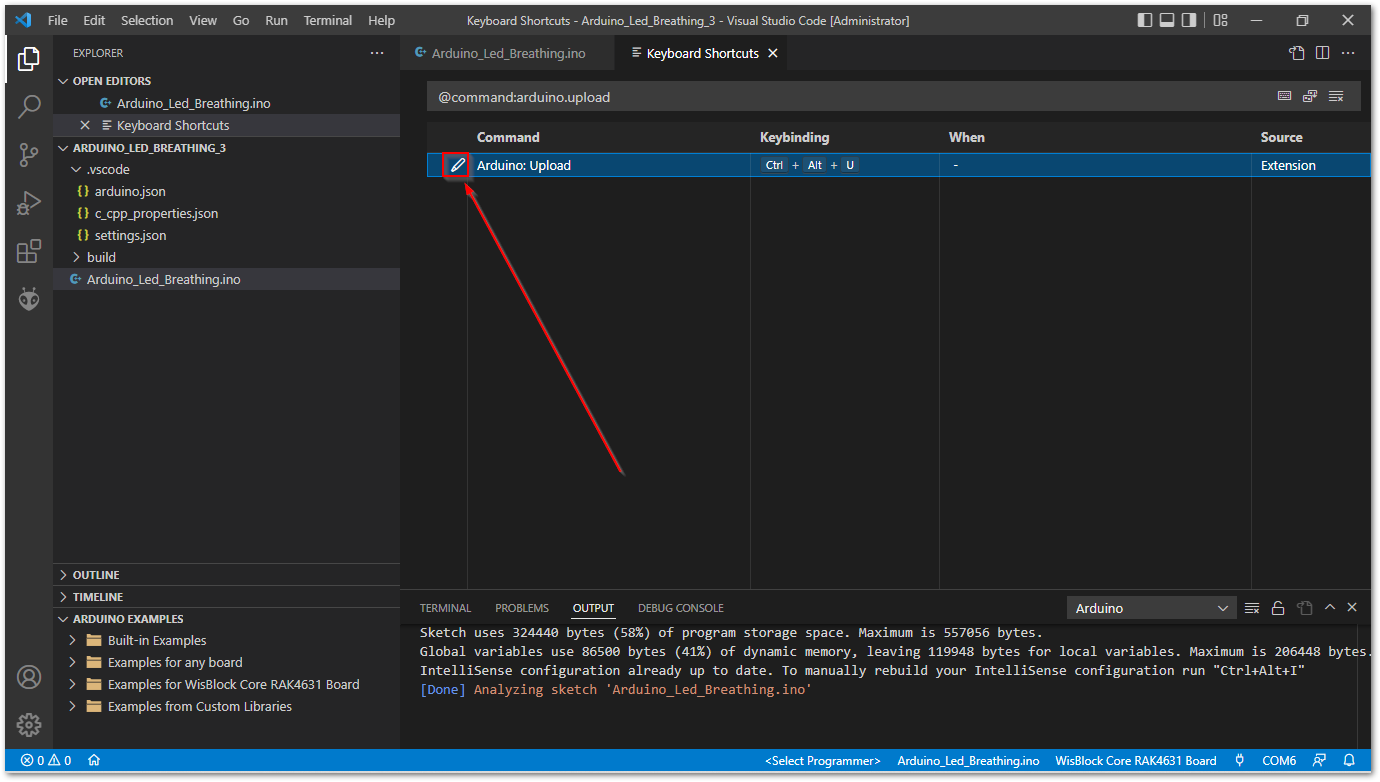 Figure 1: Edit Arduino Upload shortcut
- Type the new upload shortcut
<CTRL><ALT><F>, for example, then type<ENTER>to finish.
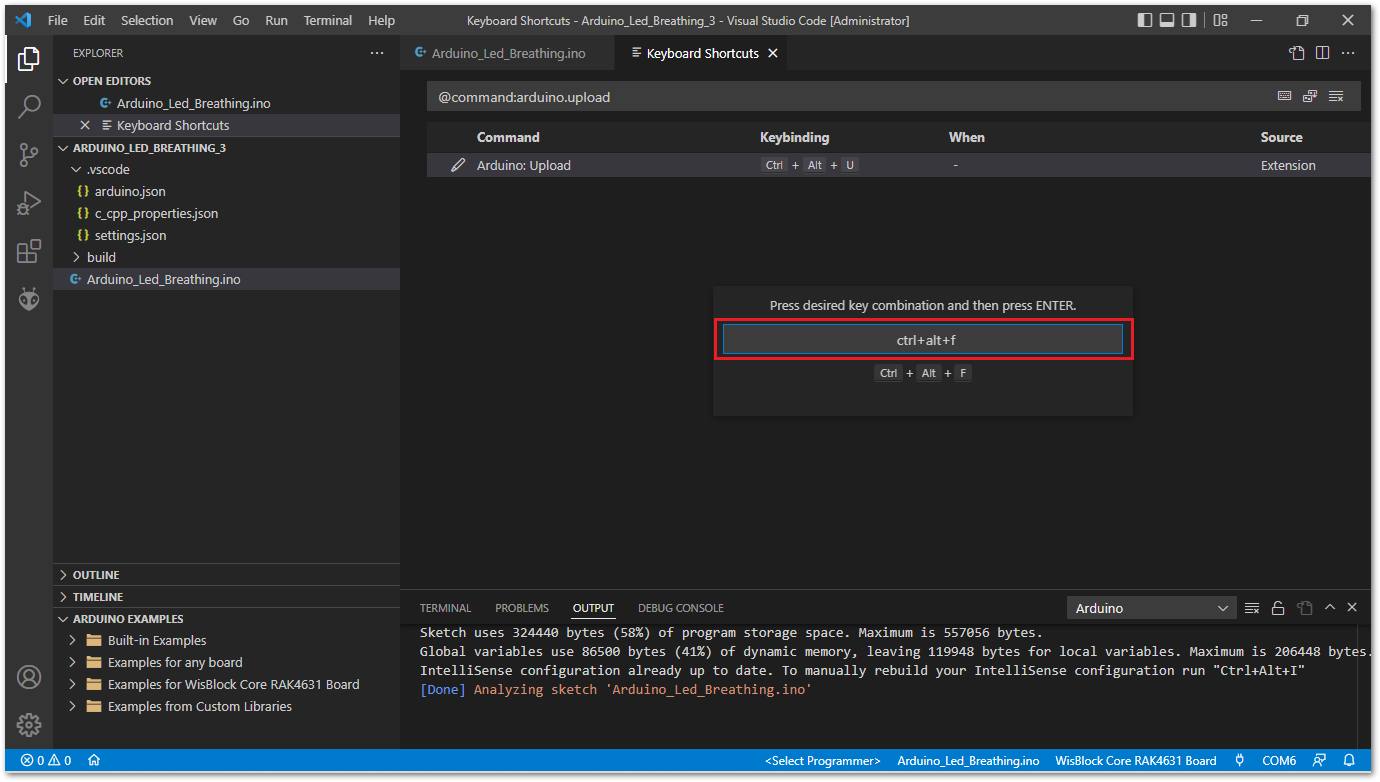 Figure 1: Save new Arduino Upload shortcut
Faster Build Configuration
For your sketch to compile faster, edit the arduino.json file in the folder .vscode of your sketch, then set the path to the build folder. Now the Visual Studio Code will compile only the changed files and not the whole source code.
"output" : "build"
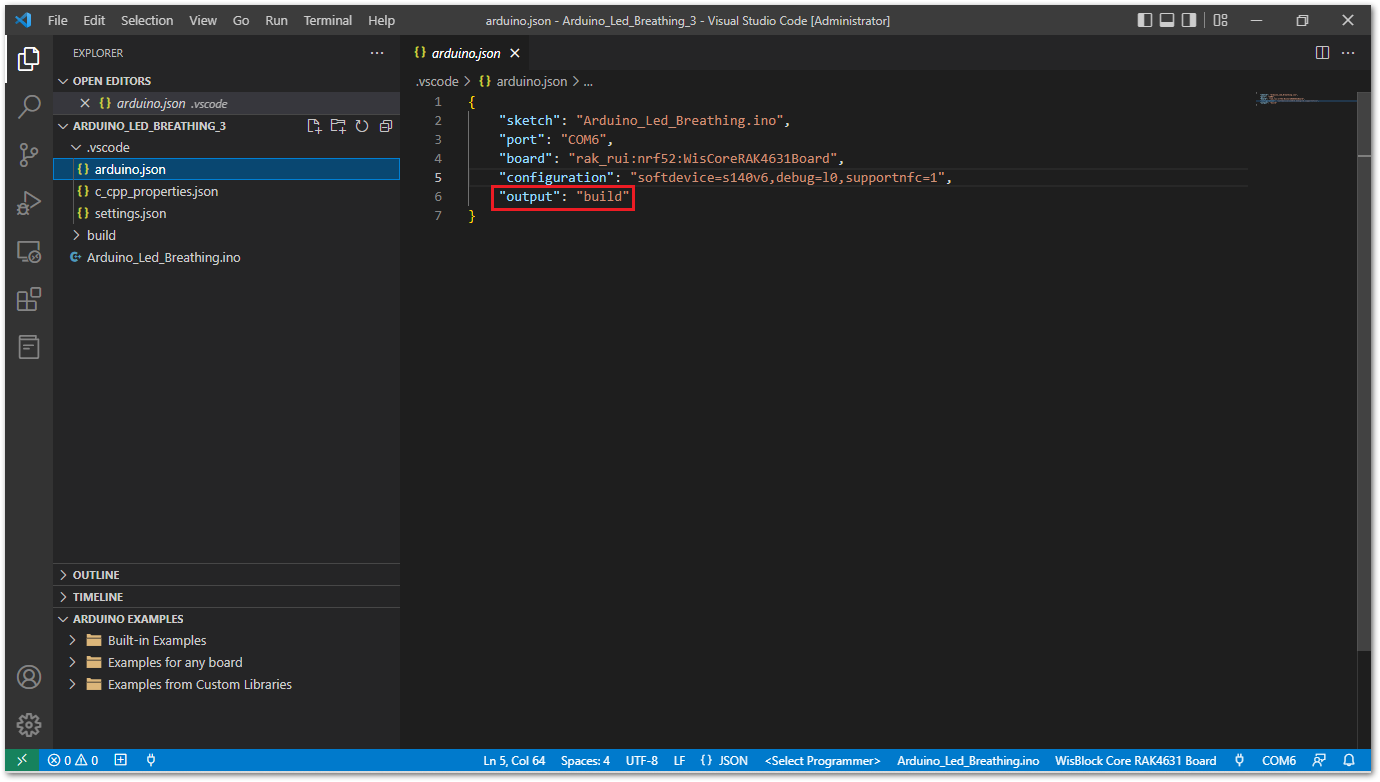 Figure 1: Configuring arduino.json file
Check the new build folder on Visual Studio Code Explorer.
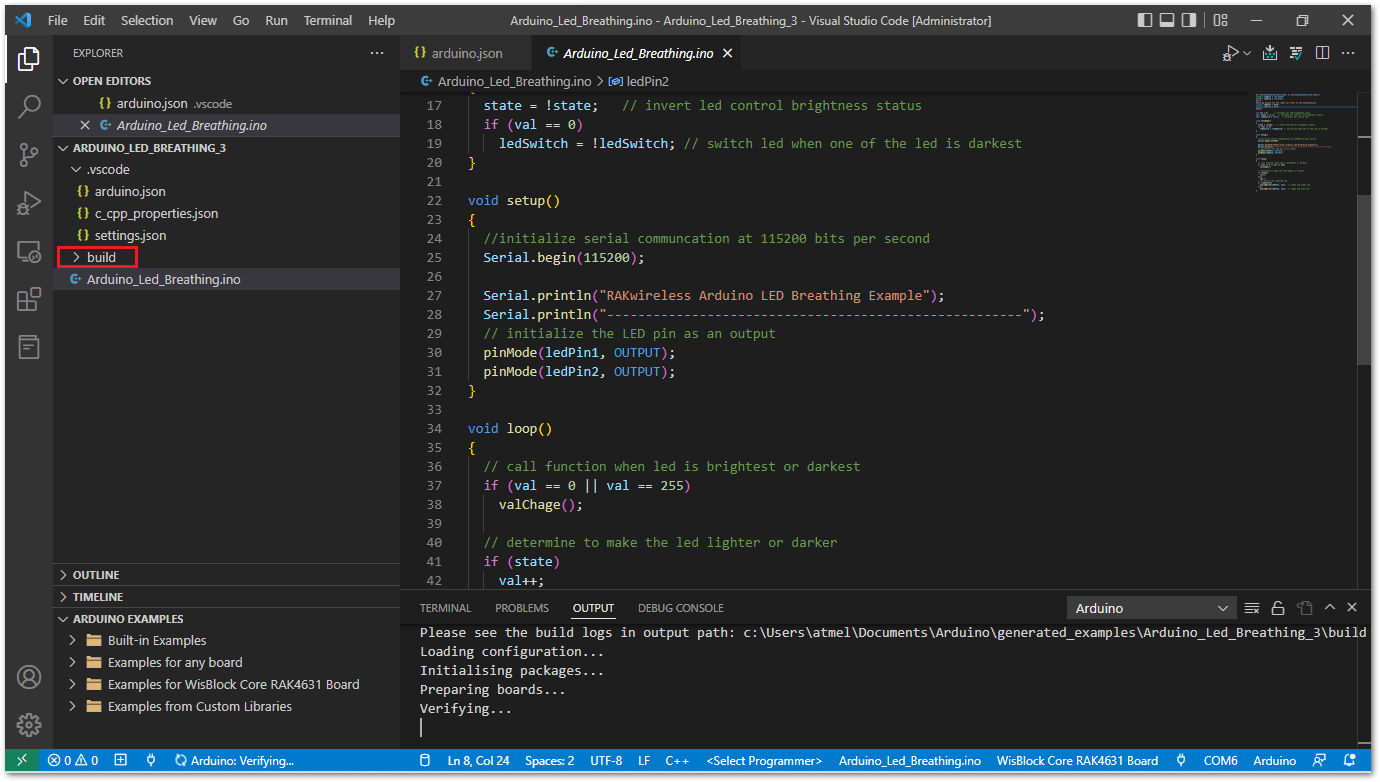 Figure 1: Arduino sketch build folder
Developing a RUI3 Library Project using Visual Studio Code IDE
Prerequisite
-
Download RAK1906 RUI3 Library.
-
Make sure the sensor is mounted as described in the RAK1906 Hardware Setup section.
Software Configuration
-
Install the Library on Arduino IDE as described in Import a ZIP Library section.
-
Launch Arduino IDE, navigate to
Sketch -> Include Library -> Add .ZIP Library...as shown below.
 Figure 1: Include RUI3 Library
- You will be prompted to select the Library you would like to add. Navigate to the
.zipfile's location and open it.
 Figure 1: Select RUI3 ZIP file
The RUI3 Library will be installed into your Arduino Sketchbook's libraries folder.
You can view your Sketchbook folder by opening Arduino IDE and navigating to File -> Preferences as shown below.
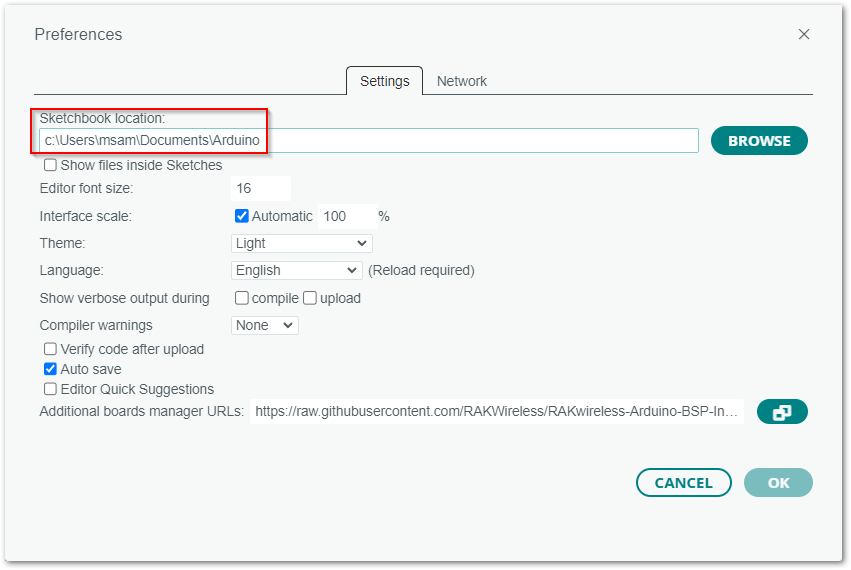 Figure 1: SketchBook Location
- Now launch Visual Studio Code and open Arduino Sketchbook folder by navigating to
File -> Open Folder....
Select the Arduino libraries folder you'd like to open in the IDE. It should be the library's top-level directory, where src and examples directories are contained. To complete the installation click the Select Folder button.
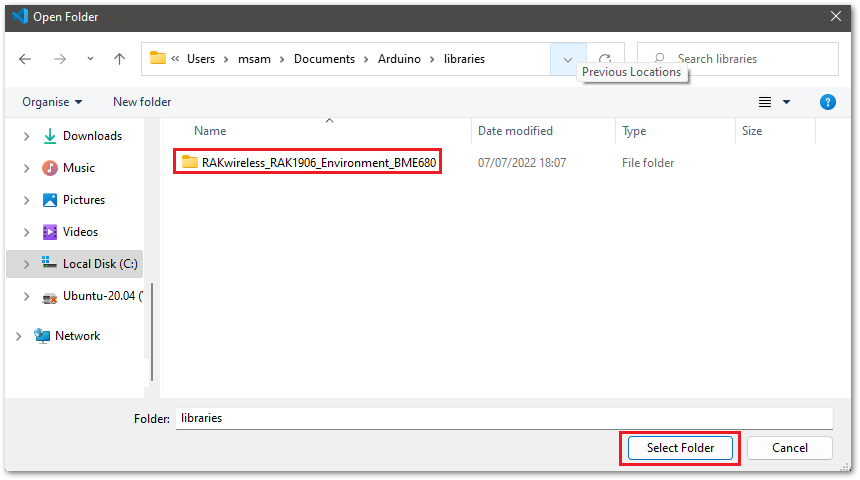 Figure 1: Arduino Library Sketch folder
- Open the RAKwireless_RAK1906_Environment_BME680 project using the Command Palette by typing
<CTRL><SHIFT>Por F1 key.
Then typeArduino: Examples.
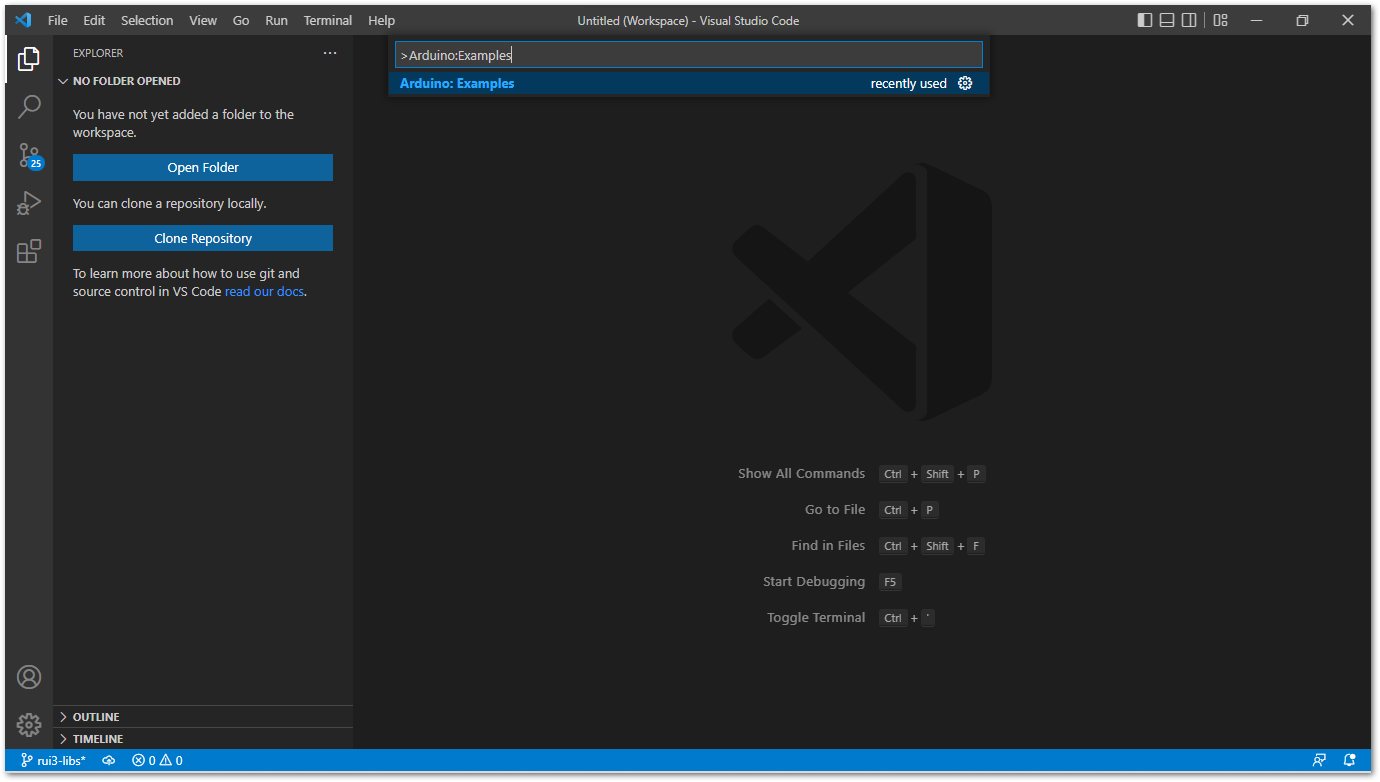 Figure 1: Select Arduino Custom Library Example
Select the Examples from Custom Library folder.
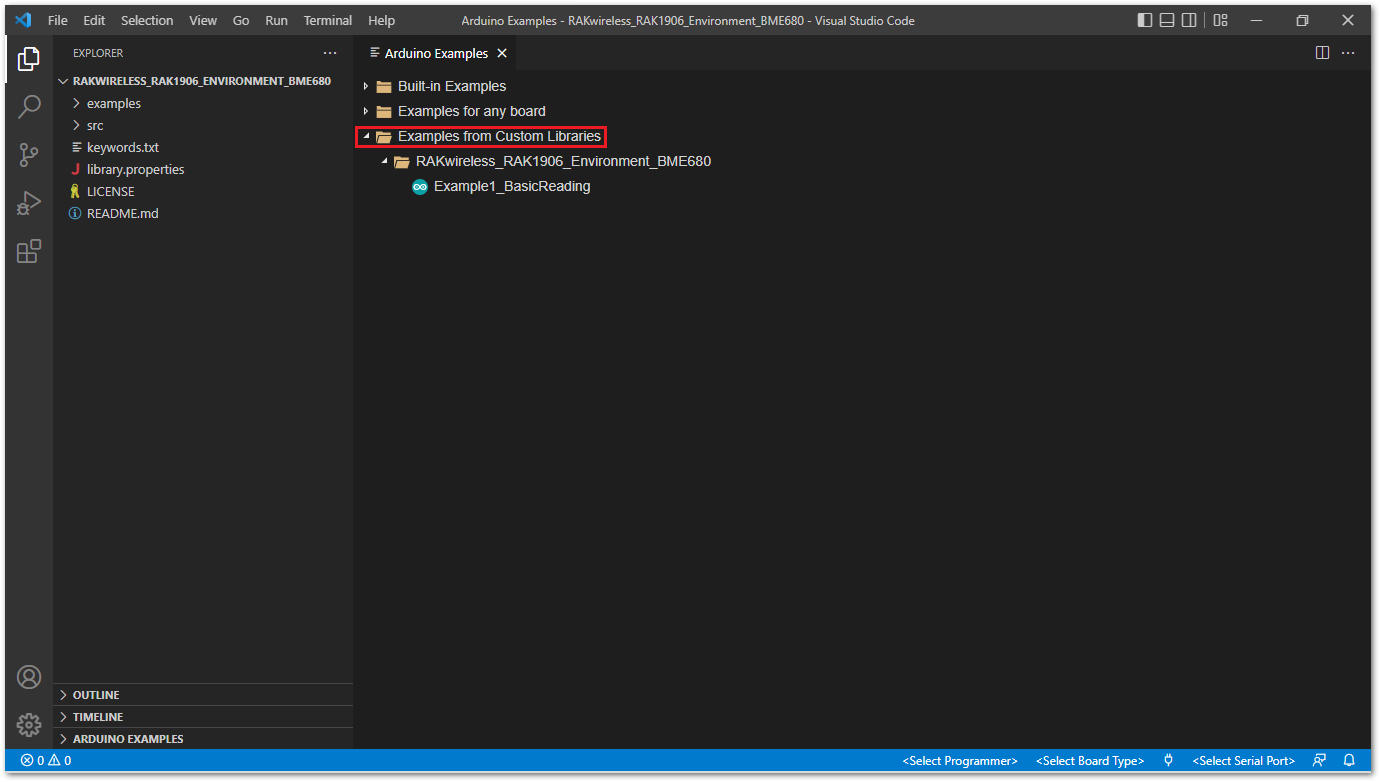 Figure 1: Open Arduino Custom Library Example
- Inside
Examples from Custom Libraryfolder, select the projectRAKwireless_RAK1906_Environment_BME680by clicking onExample1_BasicReadingicon.
A new Visual Studio Code window will open.
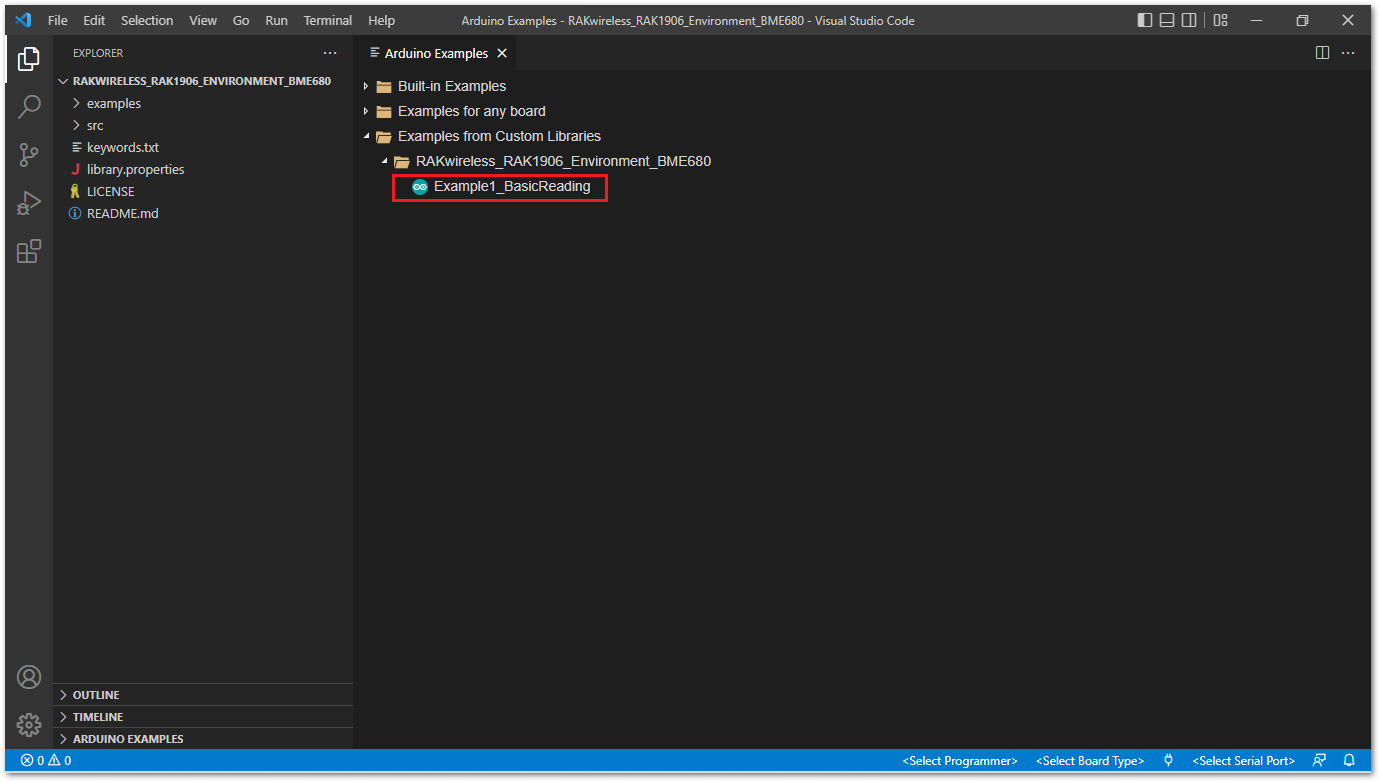 Figure 1: Open Arduino Custom Library Example
Connect your RUI3 board to USB port.
- Click
<Select Board Type>and<Select Serial Port>to configure the project.
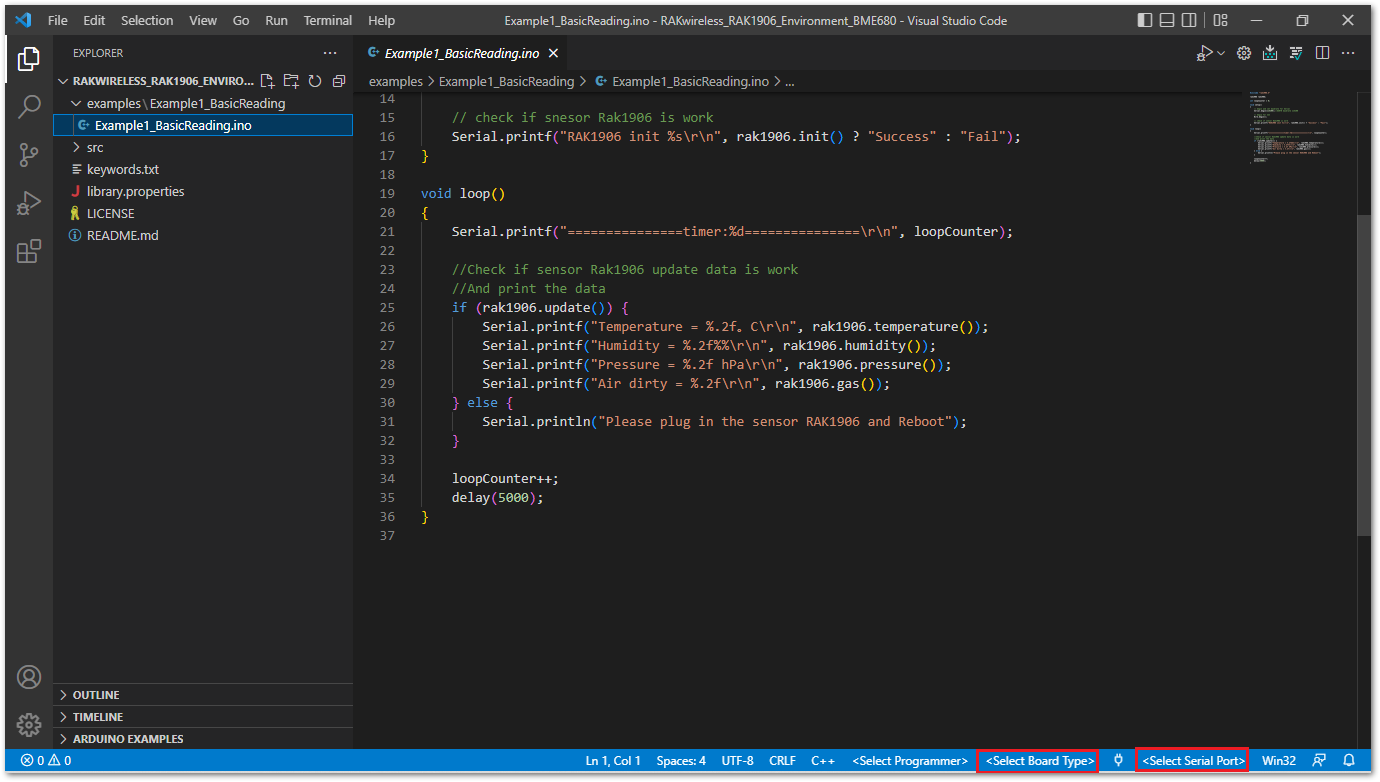 Figure 1: Configure RAKwireless_RAK1906_Environment_BME680 project
- Click
Uploadicon to build and flash the firmware.
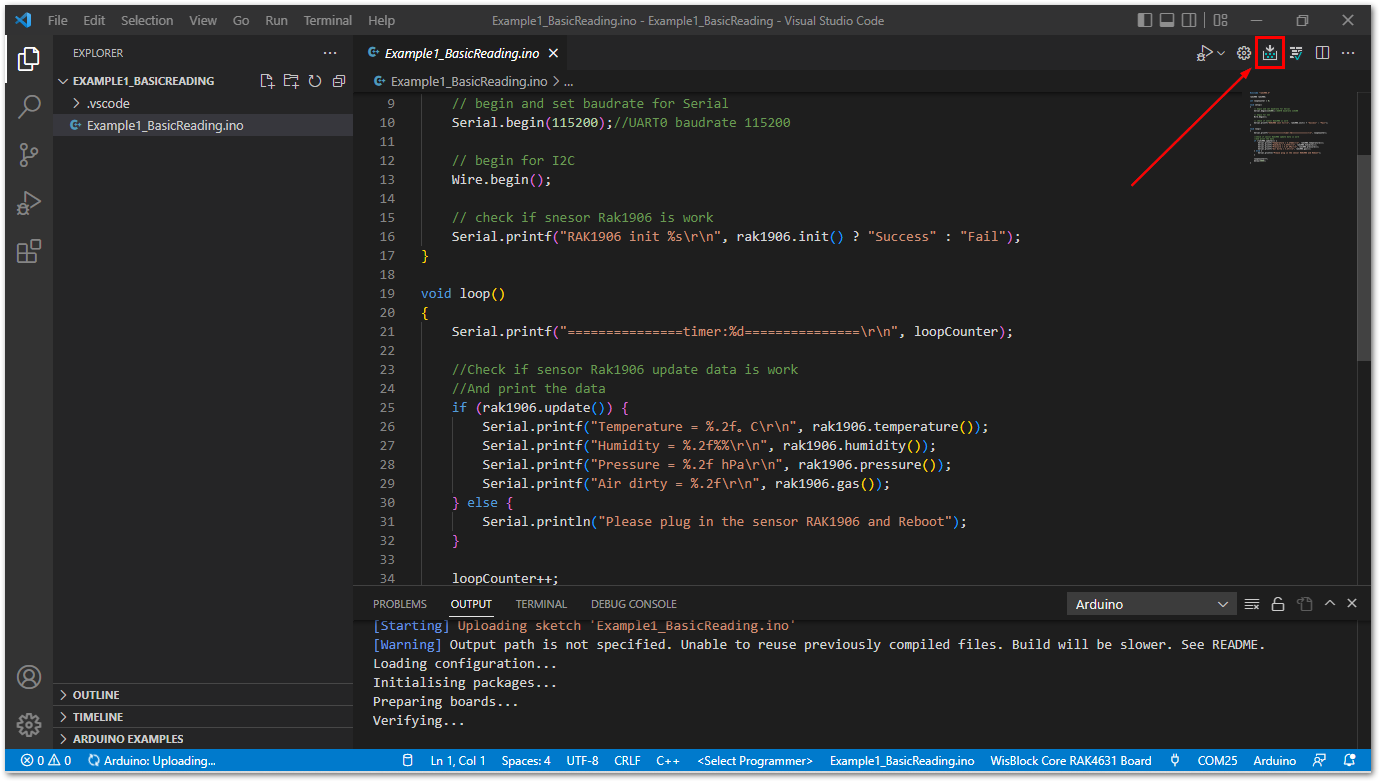 Figure 1: Build RAKwireless_RAK1906_Environment_BME680 project
Don't forget to add Faster Build Configuration to RAKwireless_RAK1906_Environment_BME680 project.
Build Smart_Farm Monitoring RUI3 Example on Visual Studio Code IDE
This example monitors data from temperature, pressure and humidity sensor over a LoRaWAN network using the LoRaWAN RUI3 API.
Prerequisite
The RUI3 device is a LoRaWAN end-device that needs to be within range of a LoRaWAN gateway. The gateway needs to be registered to a LoRaWAN network server(LNS) or with a built-in network server. It is highly recommended to read the section LoRaWAN Example:
Make sure the sensors are mounted as described in the Hardware Setup section of the Quick Start Guides.
Software Configuration
- Download RUI3 Libraries:
-
Install both Libraries on Arduino IDE as described in Import a ZIP Library section.
-
Open the Command Palette by typing
<CTRL><SHIFT>Por F1 key. Then type Arduino: Board Config on the text area or choose from the list.
 Figure 1: Arduino Visual Studio IDE Board Configuration
On Arduino Board Configuration window, click the highlighted icon to select your RUI3 board:
RAK4631
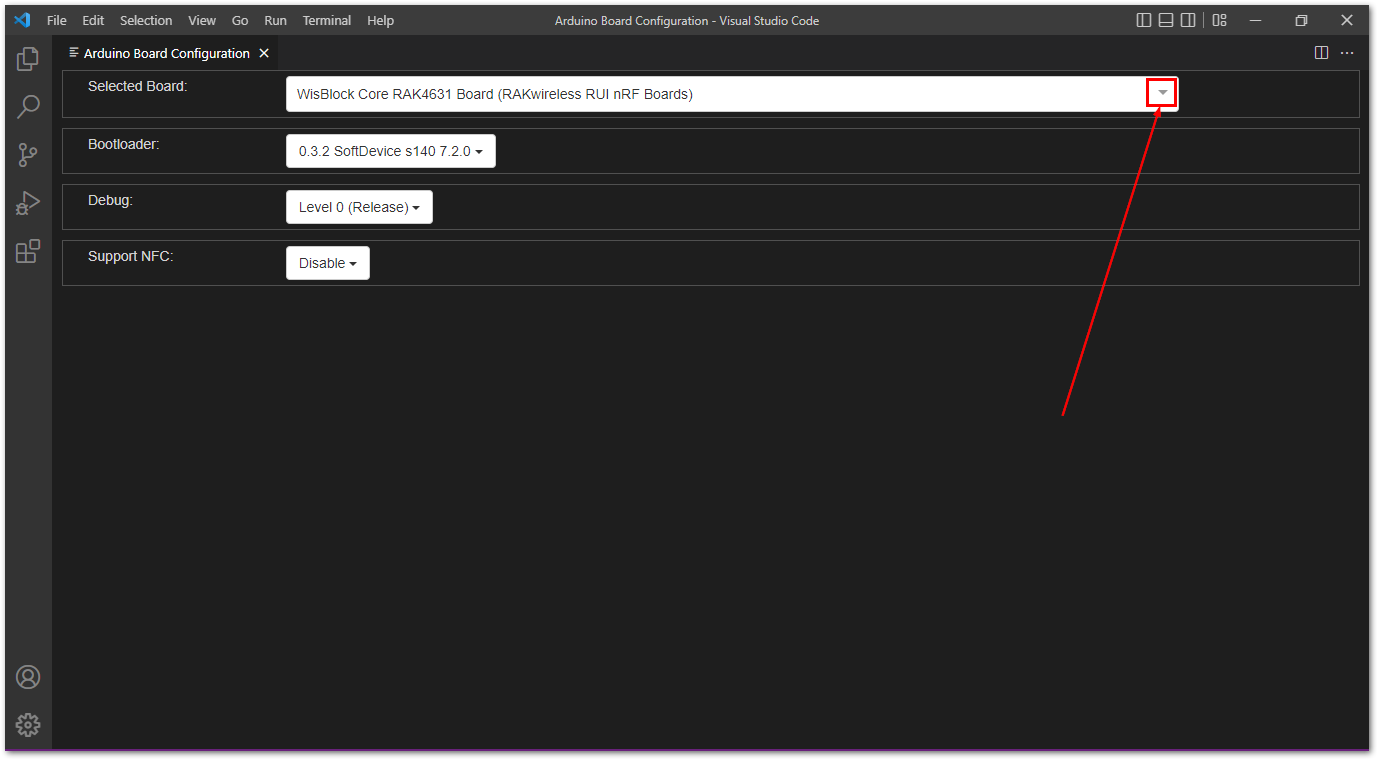 Figure 1: Arduino Board Configuration RAK4631
RAK3172
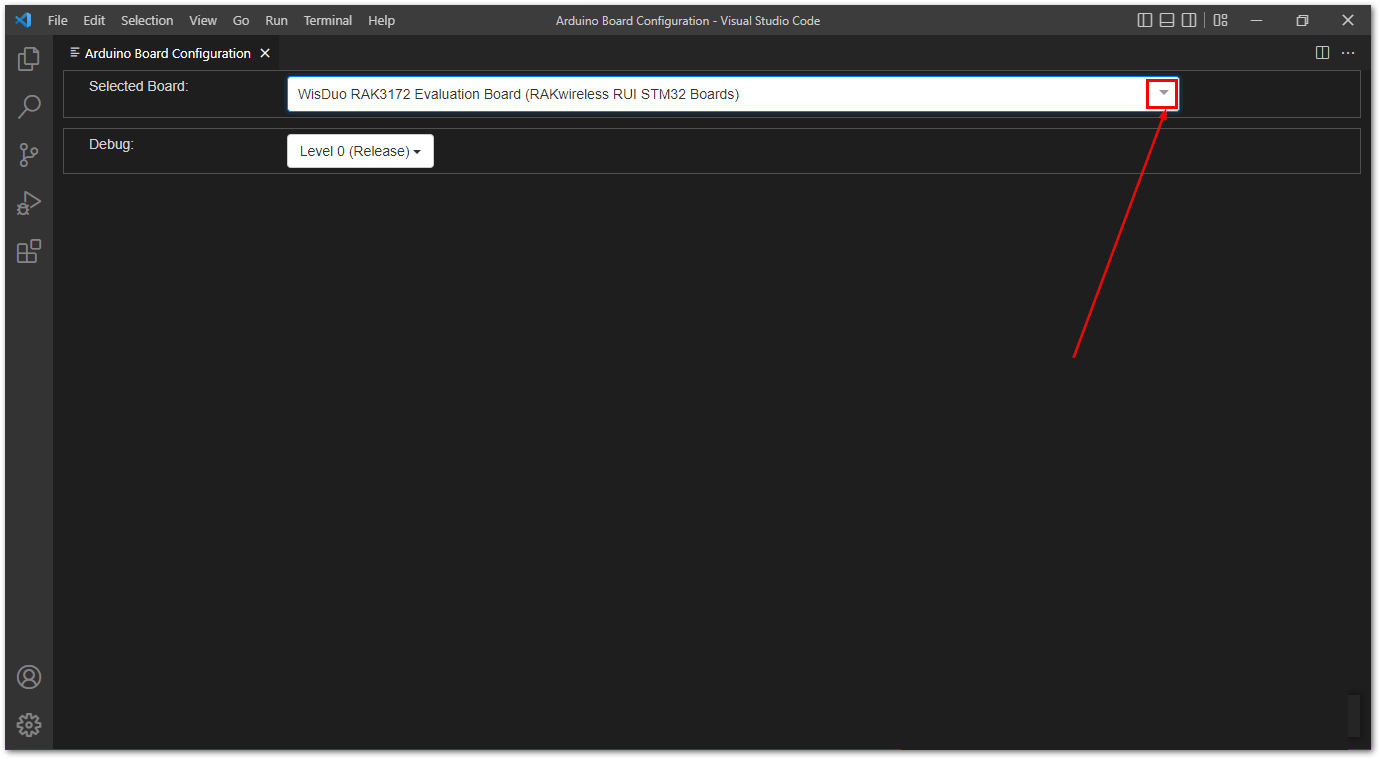 Figure 1: Arduino Board Configuration RAK3172
RAK3272-SIP
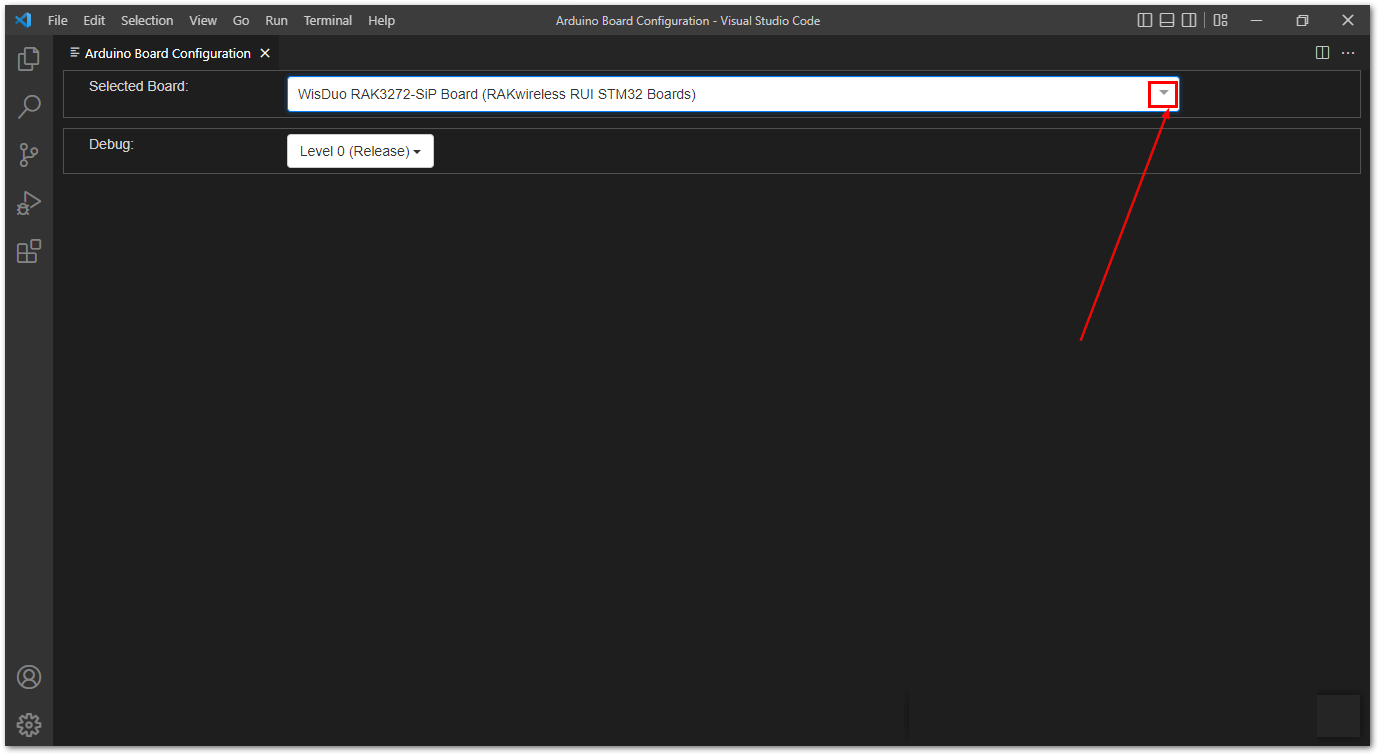 Figure 1: Arduino Board Configuration RAK3172-SIP
- Open the Command Palette again by typing
<CTRL><SHIFT>Por F1 key. Then typeArduino:Exampleson the text area or choose from the list.
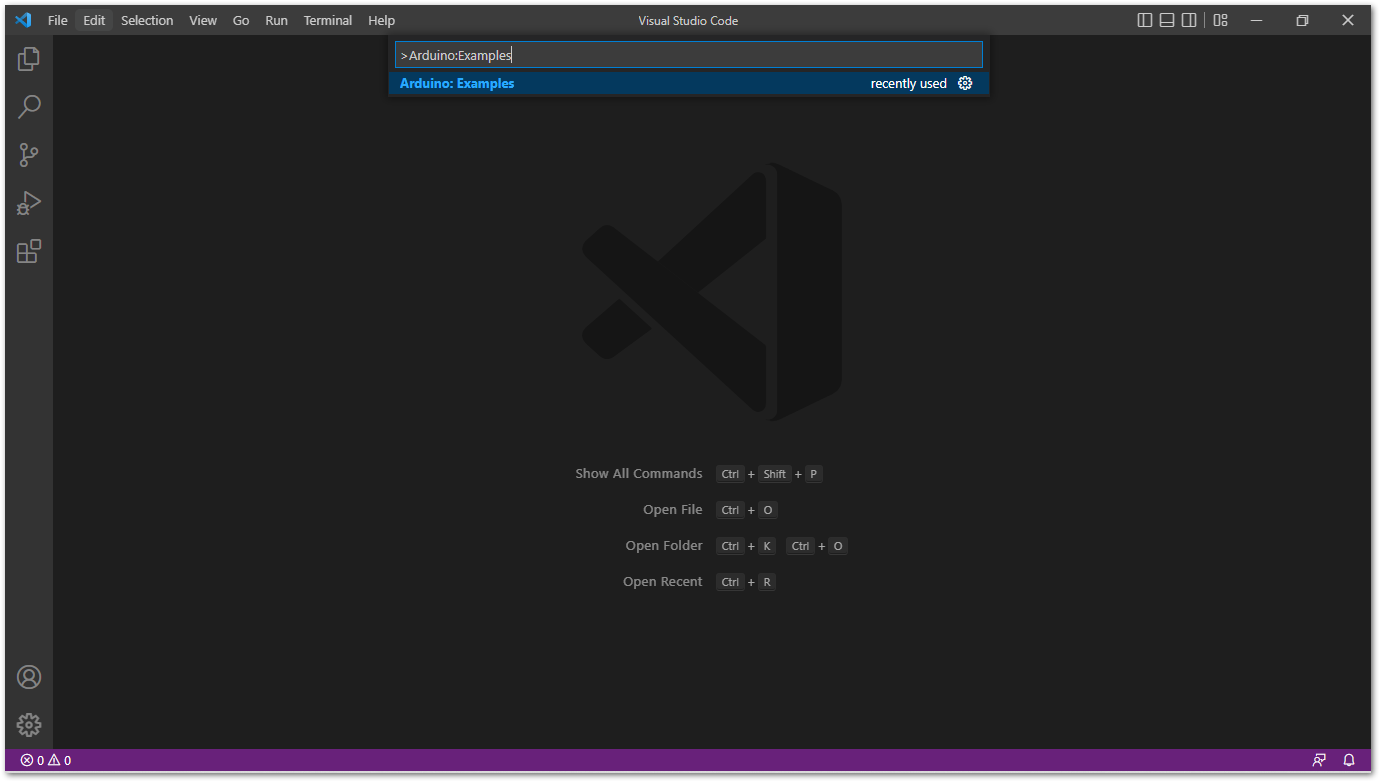 Figure 1: Open Arduino Examples
- Now check the
RUI_V3_examplesfolder of your RUI3 hardware. ClickSmart_Farmicon and a new Visual Studio Code window will open.
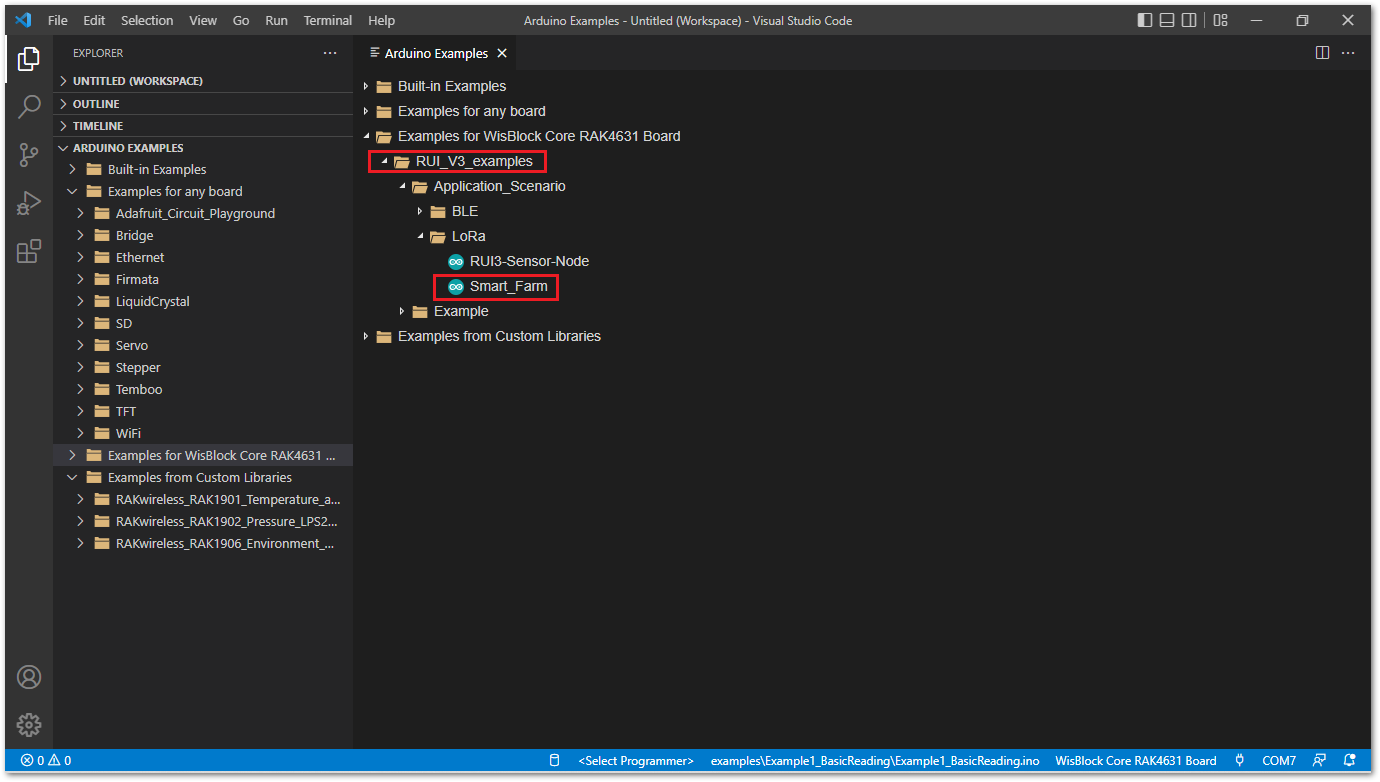 Figure 1: RUI3 RAK4631 Examples
Connect your RUI3 board to USB.
- Check the
Select Serial Porticon to configure the Serial Port of the project.
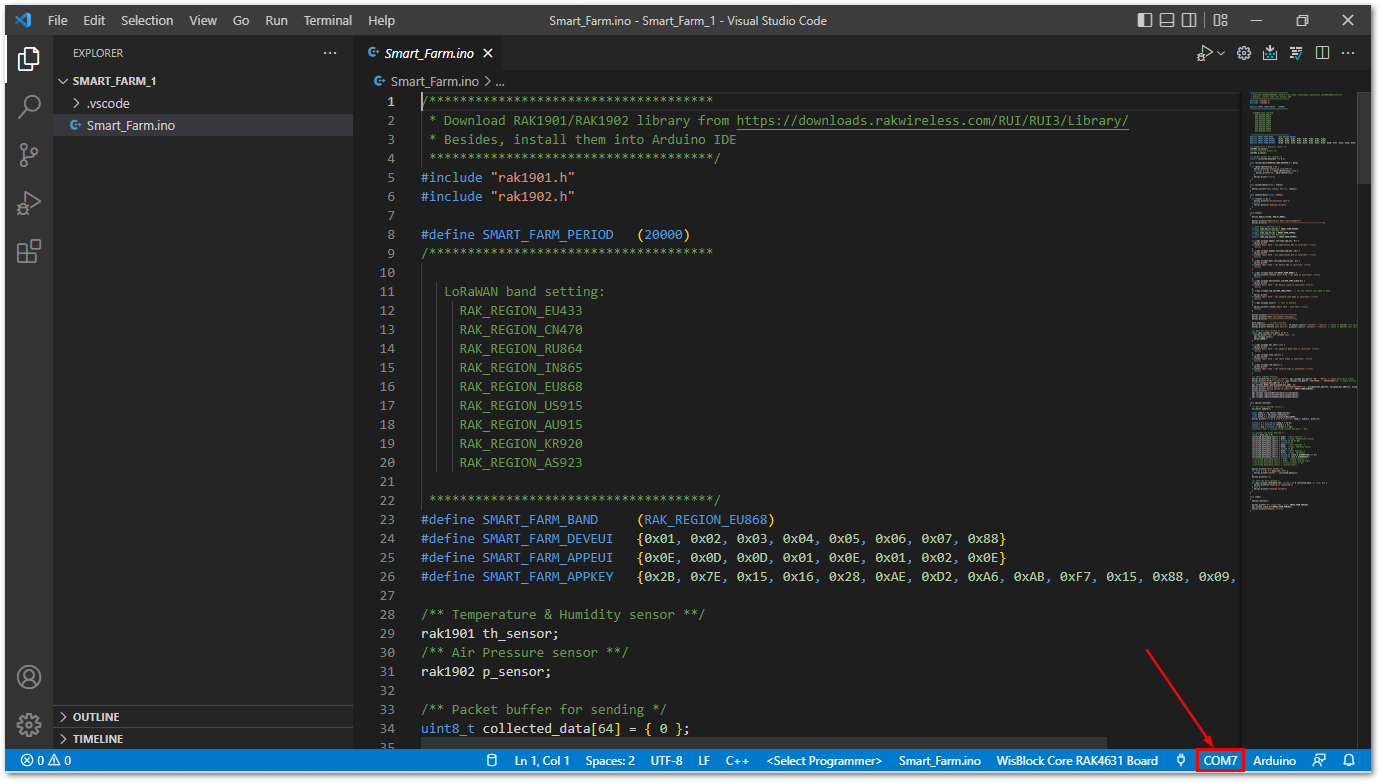 Figure 1: Smart_Farm Example configure Serial Port
- Click Upload icon to flash the
Smart_Farmexample on RUI3 hardware.
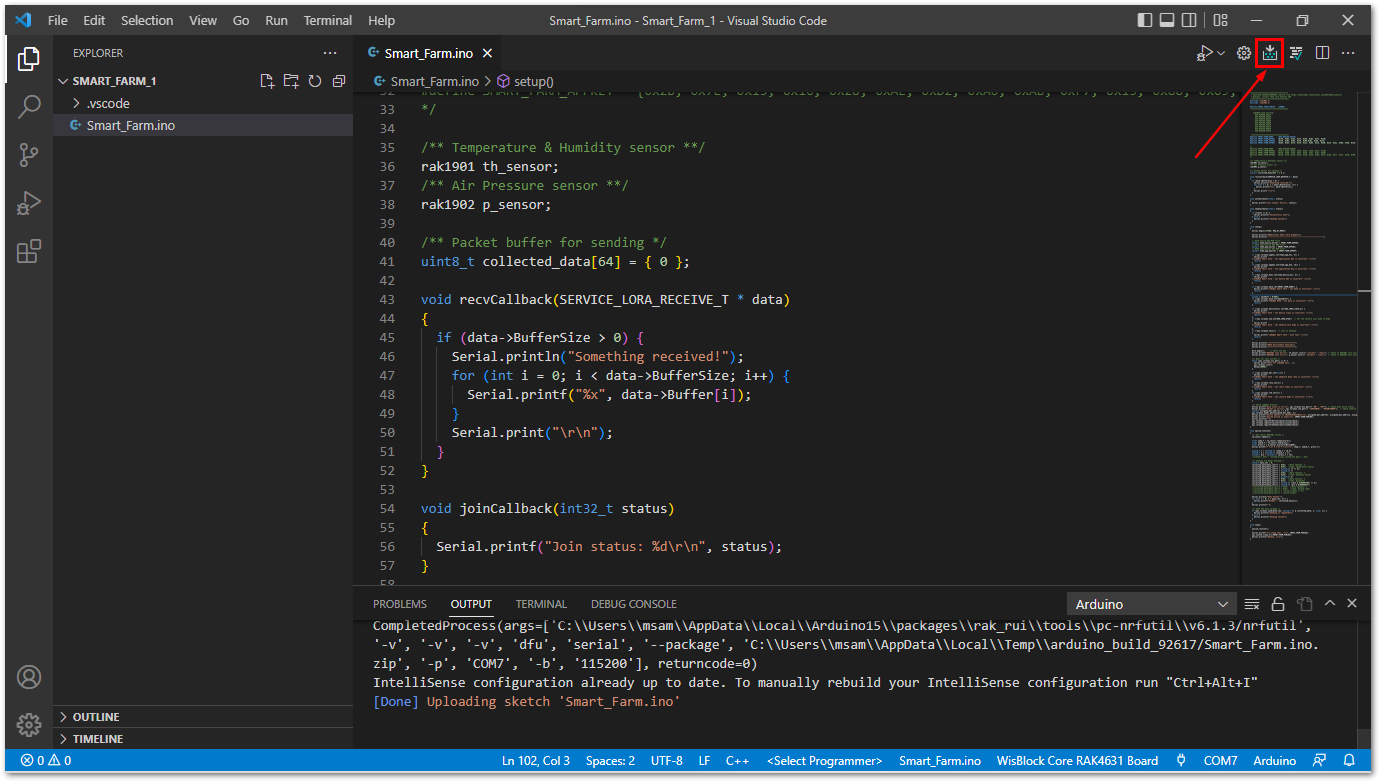 Figure 1: Upload Smart_Farm Example
Don't forget to add Faster Build Configuration to Smart_Farm project.
Visual Studio IDE
Visual Studio IDE Download and Installation
Currently we have arduino version 2.0 but we can still use arduino versions 1.6/1.8 in Visual Studio 2019 due to its long term support.
If you don't have Visual Studio IDE yet, download the installer on Visual Studio IDE Community 2019, as shown in Figure 67.
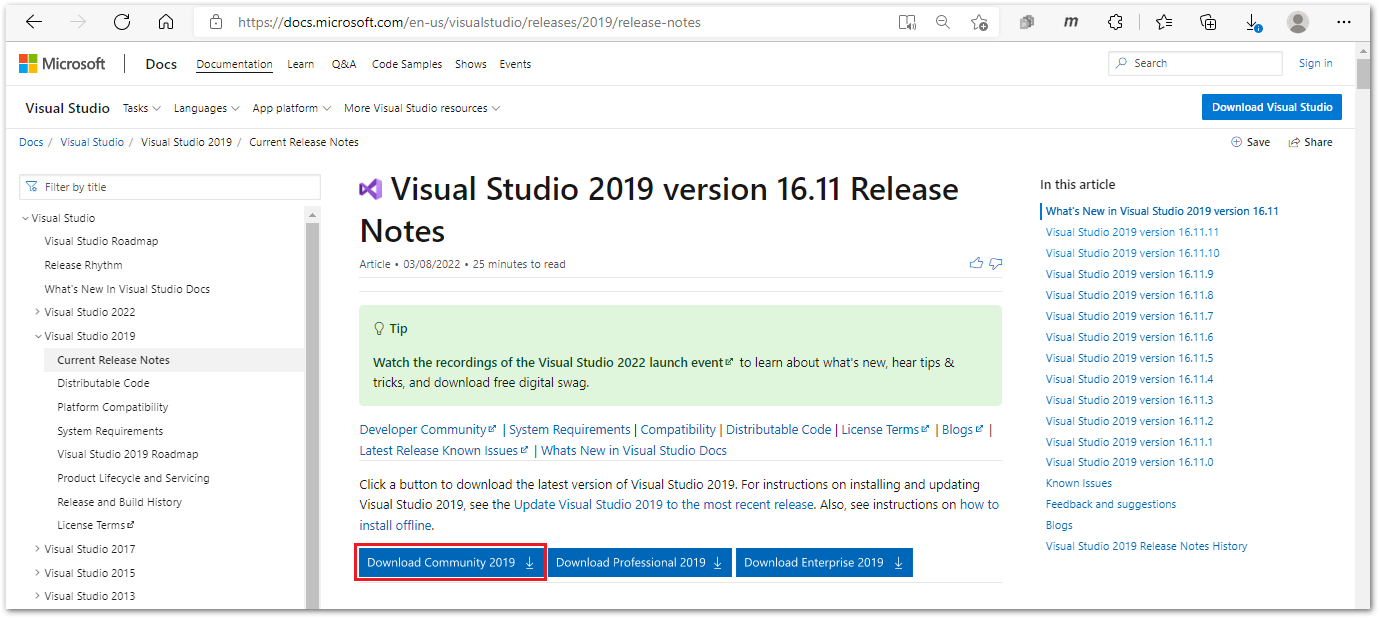 Figure 1: Visual Studio Community 2019 Release Notes
Windows Setup
- Install the Visual Studio Community 2019, which you just downloaded, on your Windows PC. Then click the Continue button.
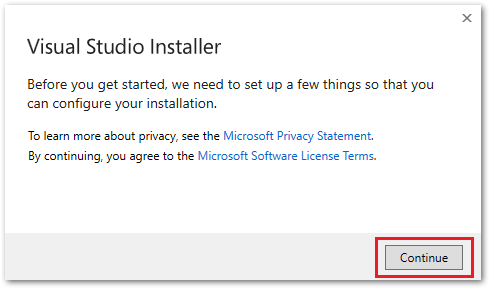 Figure 1: Visual Studio Community License
- On the next installer window, select the Desktop development with C++ tab, then click the Install button.
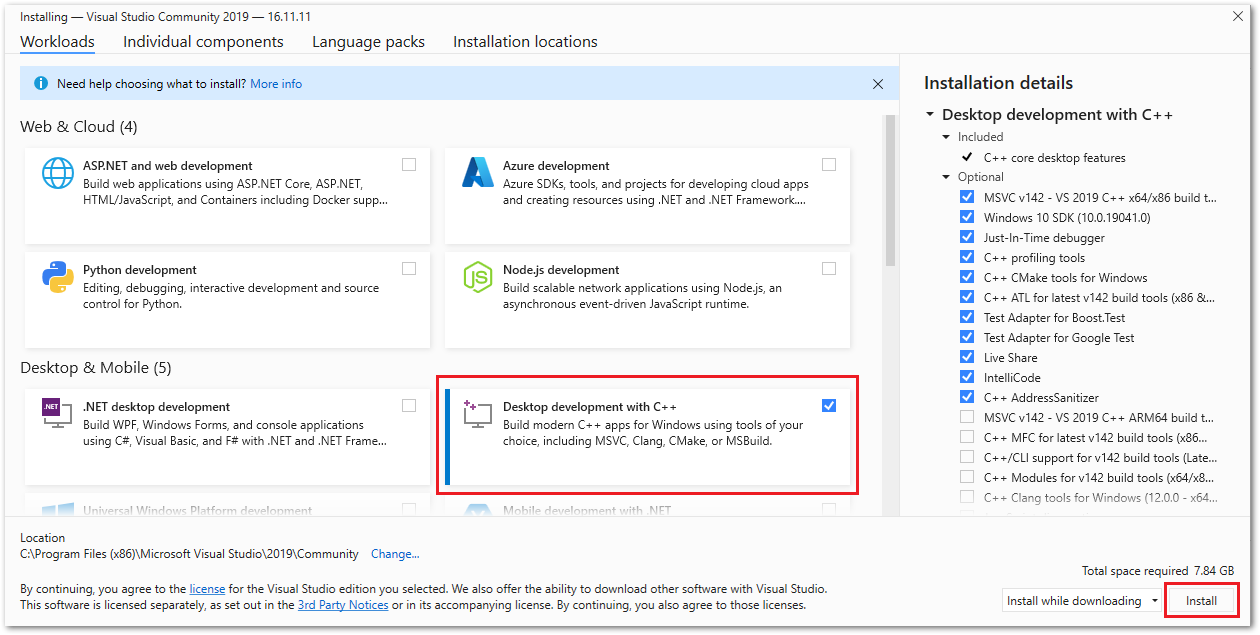 Figure 1: Visual Studio Community 2019 desktop development with C++
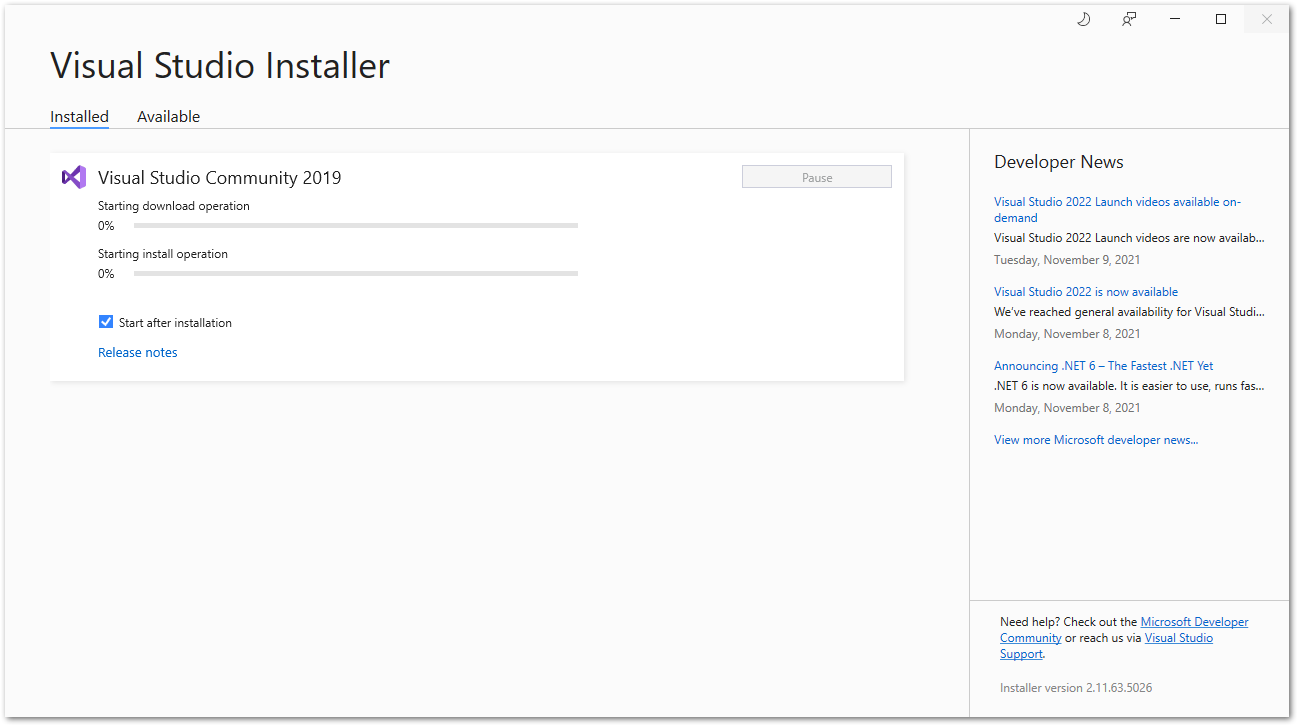 Figure 1: Visual Studio Community 2019 installer
- A reboot is required after the successful installation. Restart your computer first before you start using Visual Studio.
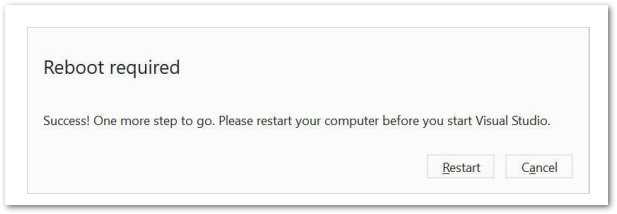 Figure 1: Visual Studio Community 2019 successful installation
-
After restarting your computer, download the Arduino IDE for Visual Studio 2019.
- Alternative link: Arduino IDE for Visual Studio 2019
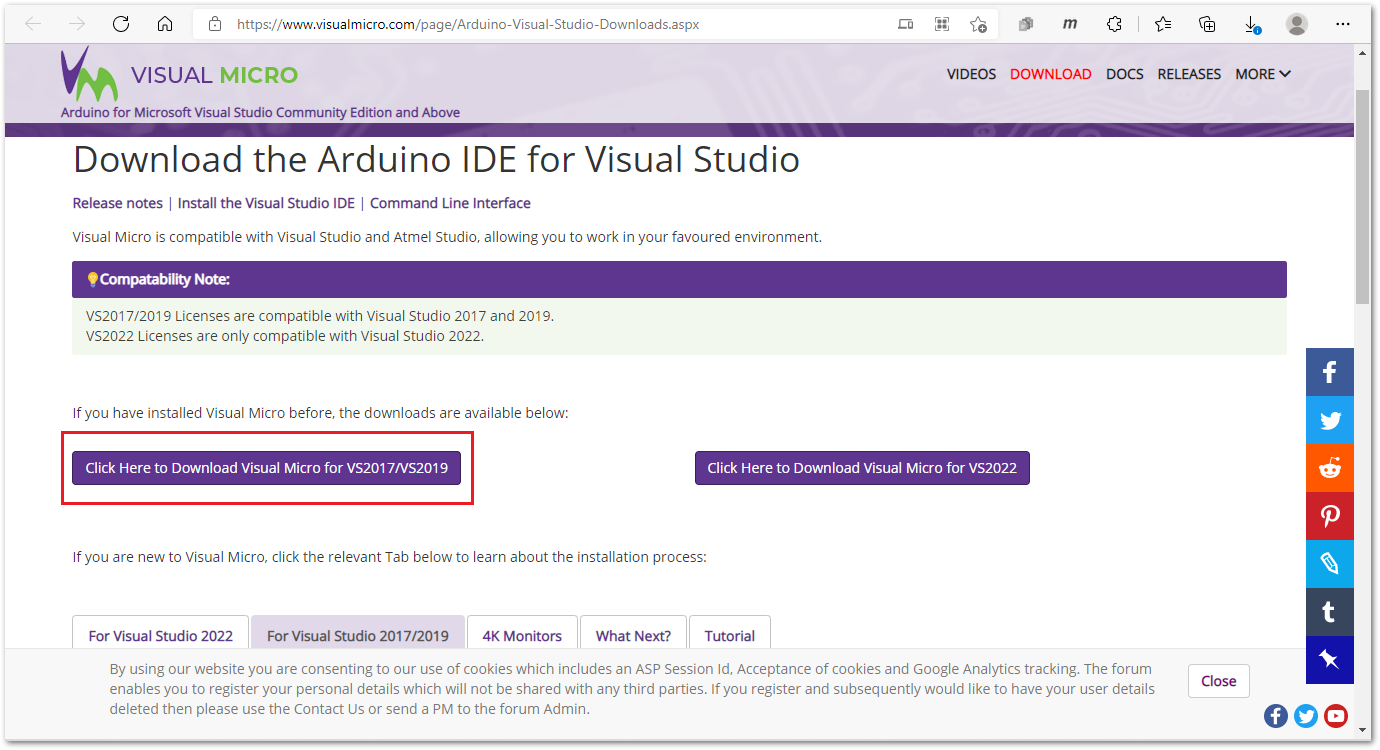 Figure 1: Arduino IDE for Visual Studio
- Click the Install button to install the Arduino IDE VSIX extension.
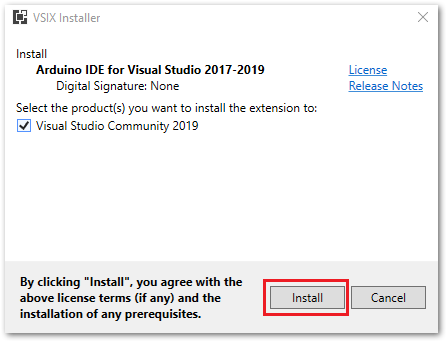 Figure 1: Arduino IDE VSIX extension install
- Arduino IDE VSIX installation completed.
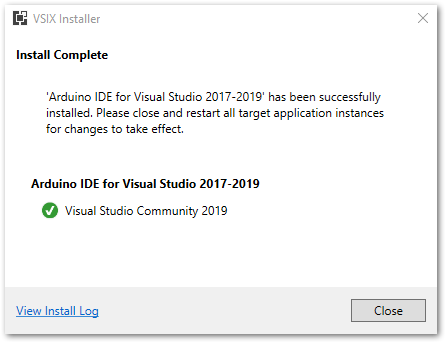 Figure 1: Arduino IDE VSIX extension successfully installed
Configuring Visual Studio Community 2019
- Open Visual Studio 2019, then click Continue without code.
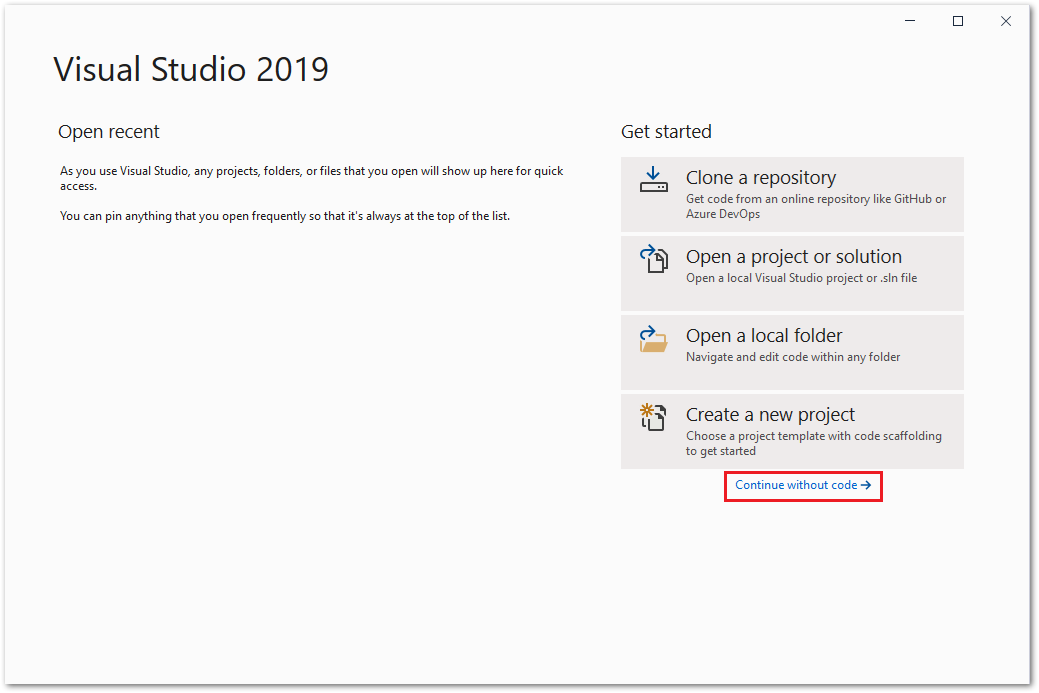 Figure 1: Open Visual Studio Community 2019 App
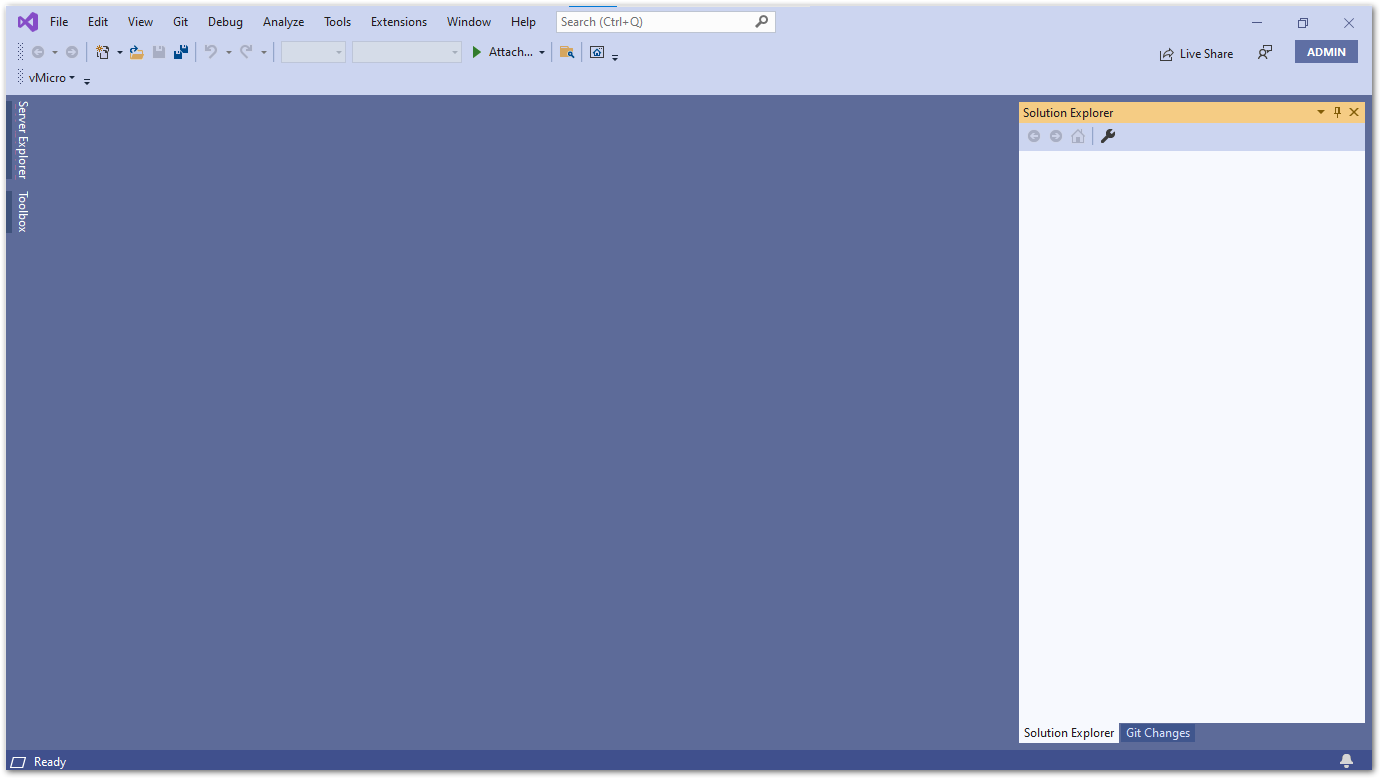 Figure 1: Visual Studio Community 2019
- In the Menu tab, click Extensions, and select vMicro -> Visual Micro Explorer.
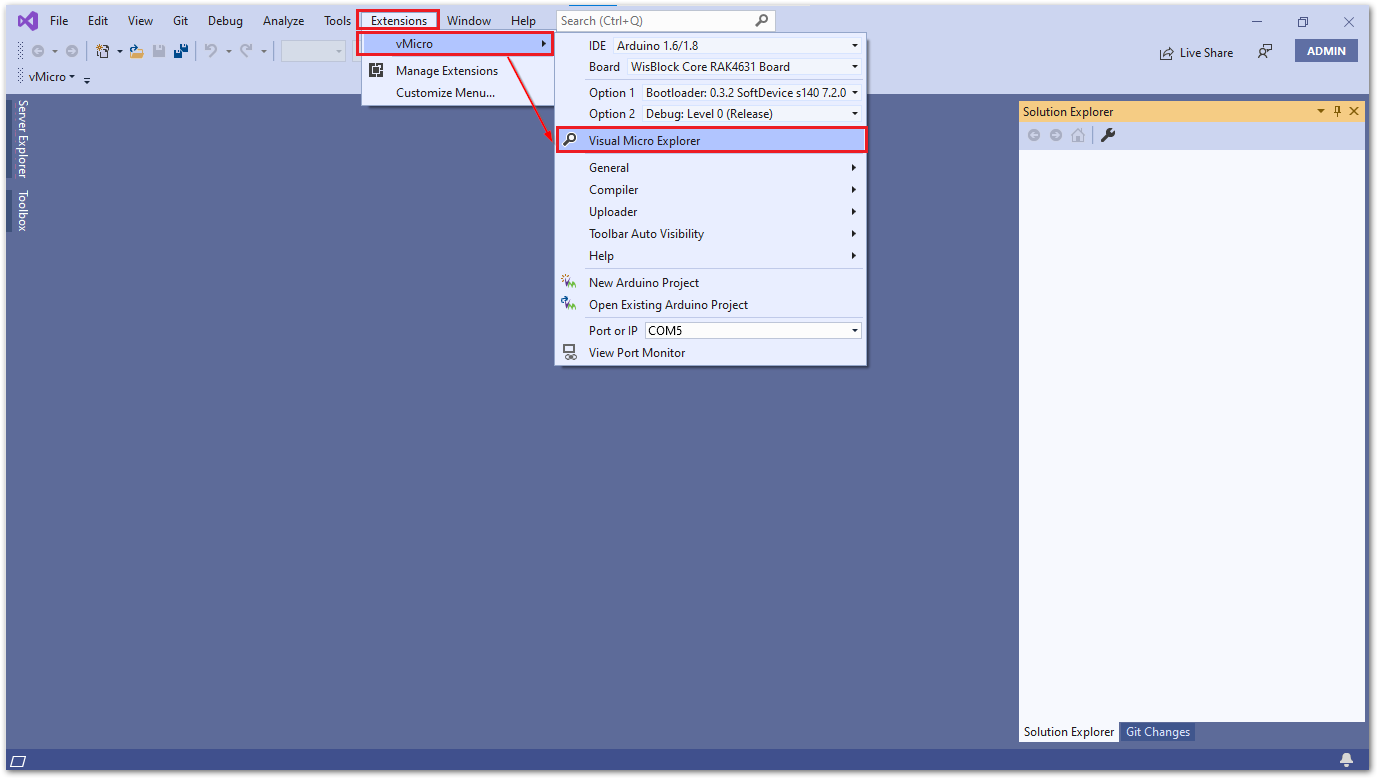 Figure 1: Visual Studio Community 2019 Micro Explorer configuration
- A Micro Explorer window appears. Under the IDE tab, select IDE Arduino 1.6/1.8, then click the IDE Locations to open the IDE Locations window.
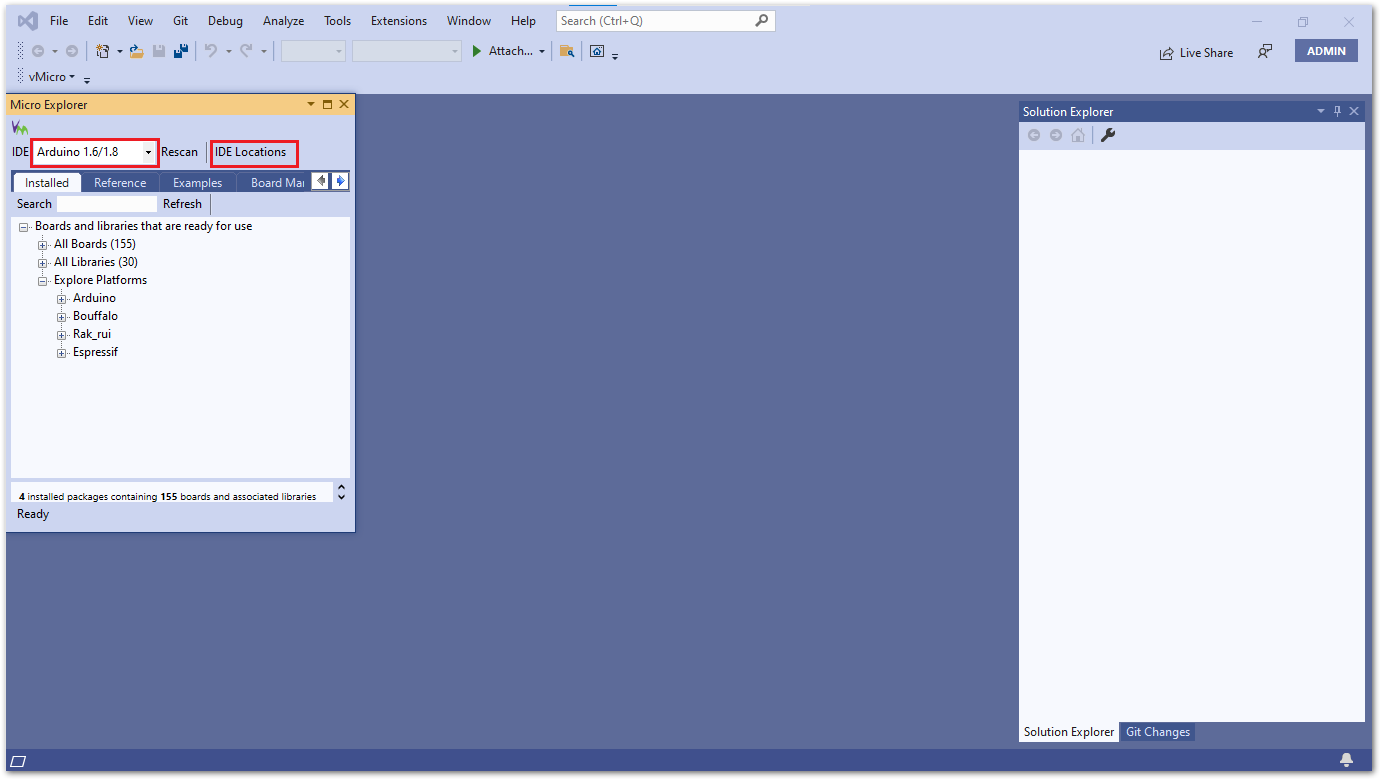 Figure 1: Visual Studio Community 2019 Micro Explorer configuration
- After that, execute the following to configure the IDE Locations:
- On the Use installed IDE field, select Arduino 1.6/1.8.
- Check if the Arduino IDE is already installed on folder
C:\Program Files (x86)\Arduino. - Copy the RUI URL below, and paste it on Optional addition boards manager urls.
https://raw.githubusercontent.com/RAKWireless/RAKwireless-Arduino-BSP-Index/main/package_rakwireless_com_rui_index.json
 Figure 1: Visual Studio Community 2019 IDE Locations configuration
- Restart the Visual Studio IDE to finish the Extension configuration.
- Open the Visual Micro Explorer on the Extensions -> vMicro -> Visual Micro Explorer.
- Click the Board Manager tab, then type RAK in the text area. The Micro Explorer screen shows all RAK platforms installed and available for installation. If there is any update, it will also be displayed.
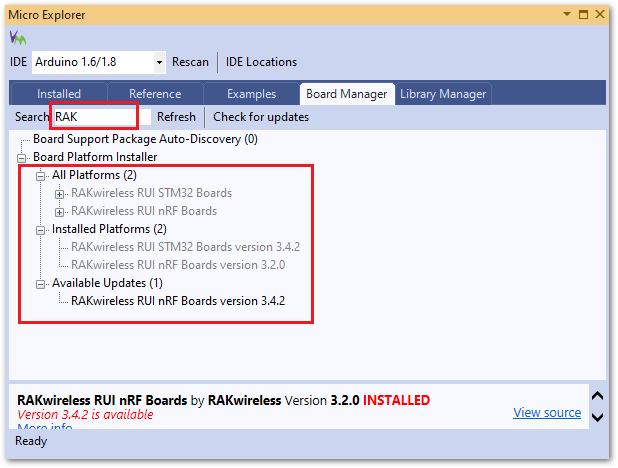 Figure 1: Visual Micro Explorer RAKwireless platform
- You can also install RAKwireless RUI Boards using the Arduino Boards Manager. The Visual Studio IDE 2019 imports Arduino IDE settings.
- Launch Arduino IDE and select Tools -> Board Manager.
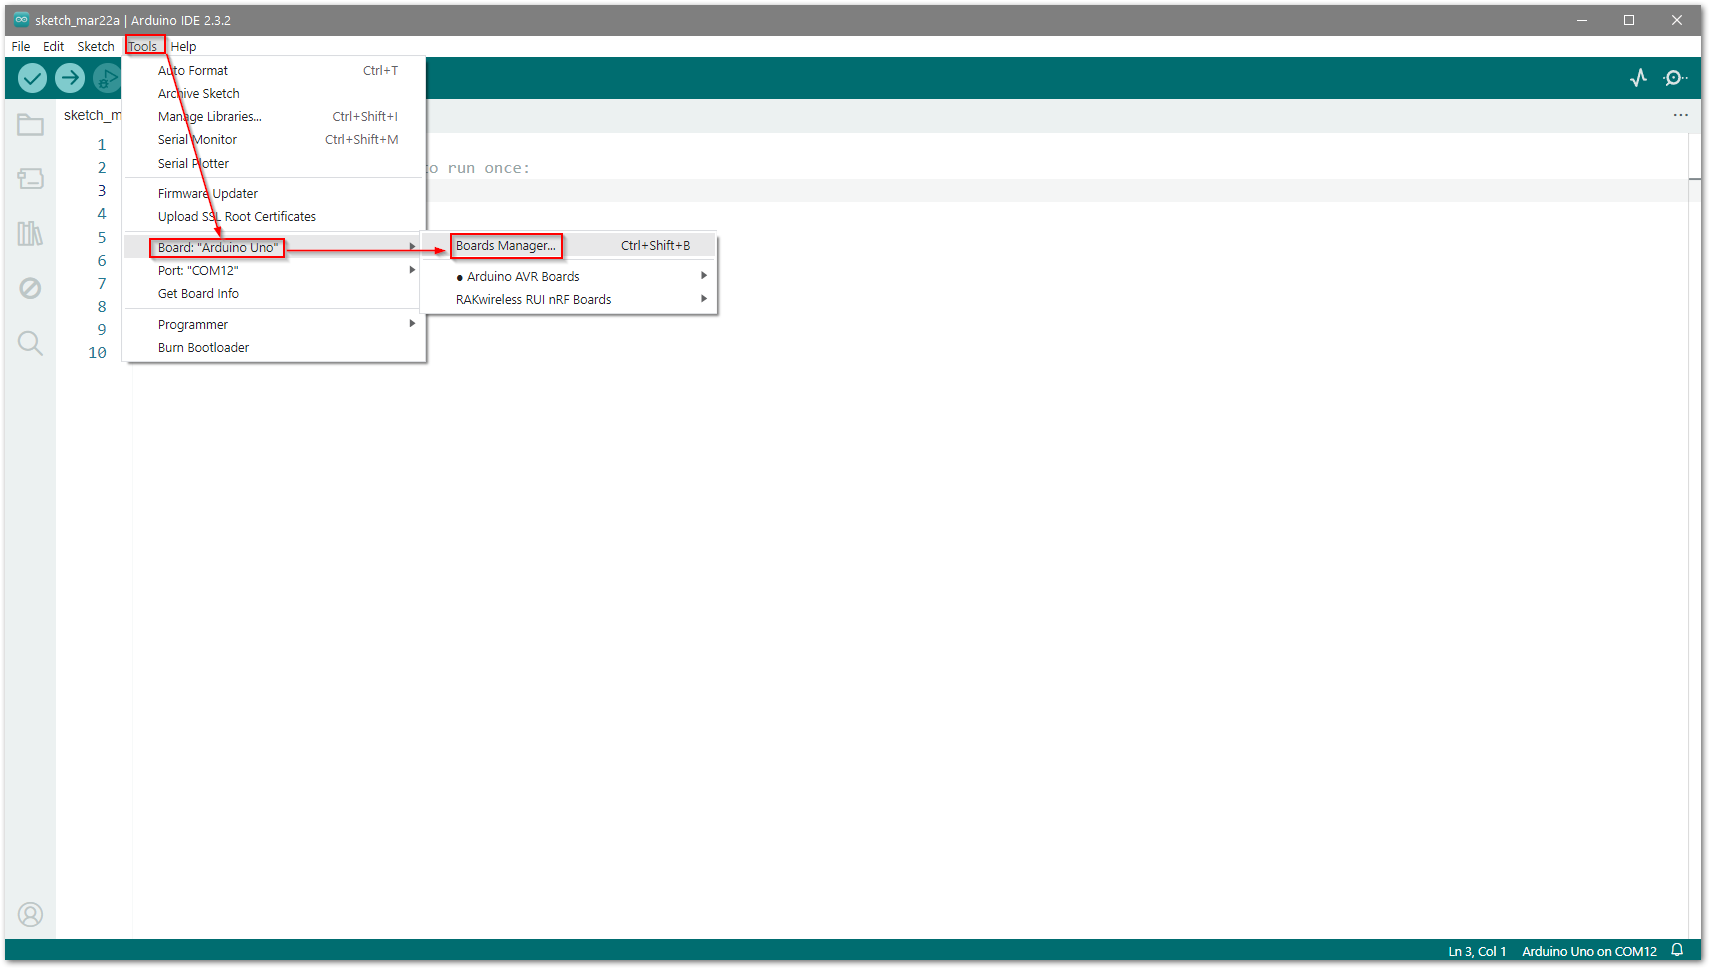 Figure 1: Arduino Tool Board Manager
- On the Board Manager window text area, type RAK and select your preferred RUI3 hardware.
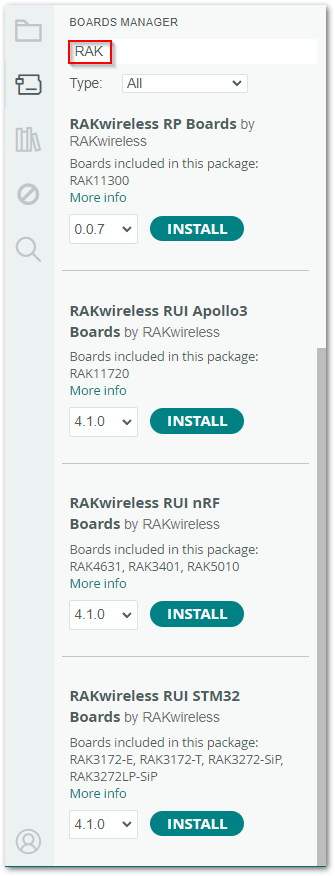 Figure 1: Arduino RAKwireless Board Manager
Now click the area highlighted in blue to choose your preferred board:
Install RAKWireless RUI nRF Boards.
Figure 1: Installing RUI3 nRF Board Support PackageInstall RAKWireless RUI STM32 Boards.
Figure 1: Installing RUI3 STM32 Board Support Package- To finish the installation click the Install button.
If the examples do not appear on the Micro Explorer window, then you need to restart Visual Studio IDE.
Compile an Example with RAK4631-R
- Launch Visual Studio IDE and select Extensions -> VMicro. Click the Dropdown icon, then scroll and select WisBlock Core RAK4631.
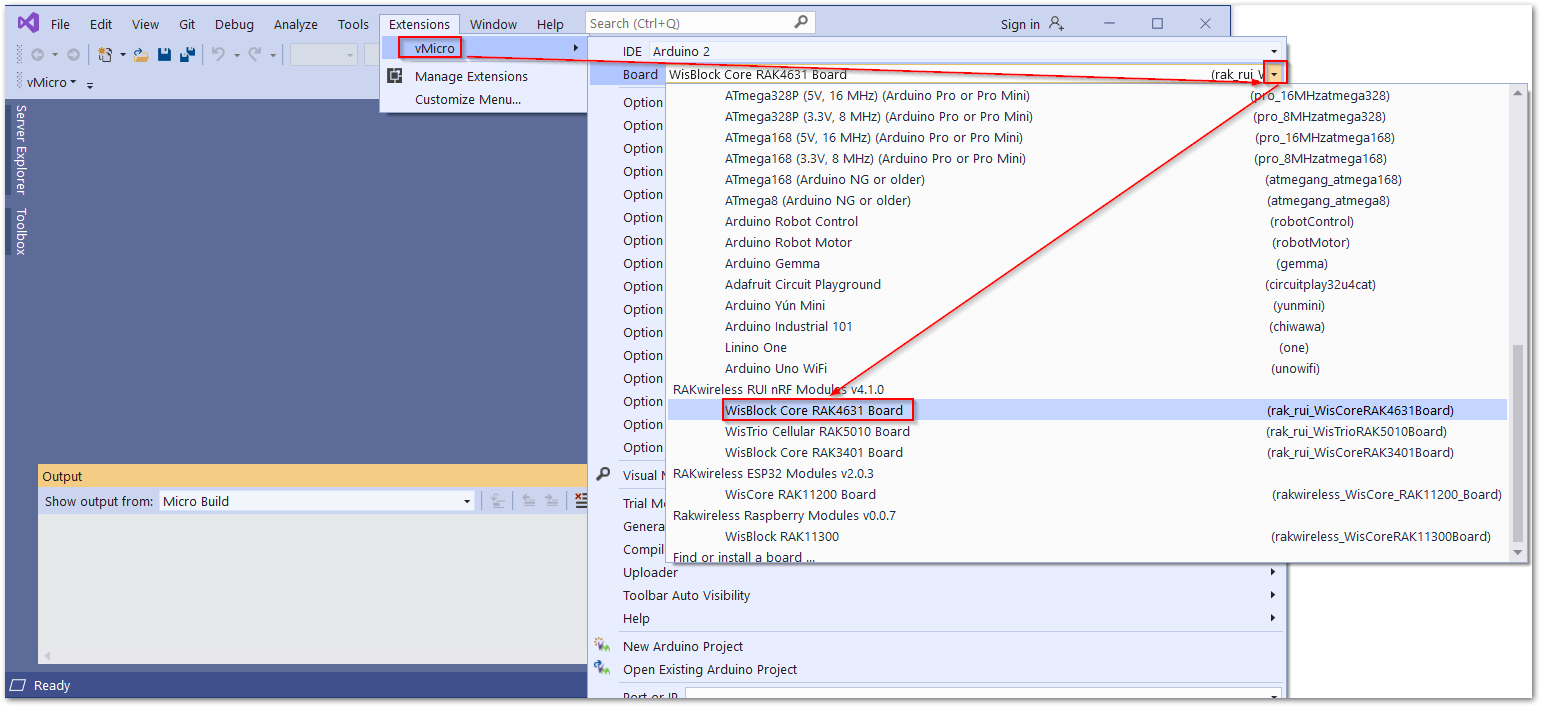 Figure 1: Arduino RAKwireless nRF
- Create a new project for RAK4631 by clicking on File -> New Arduino Project.
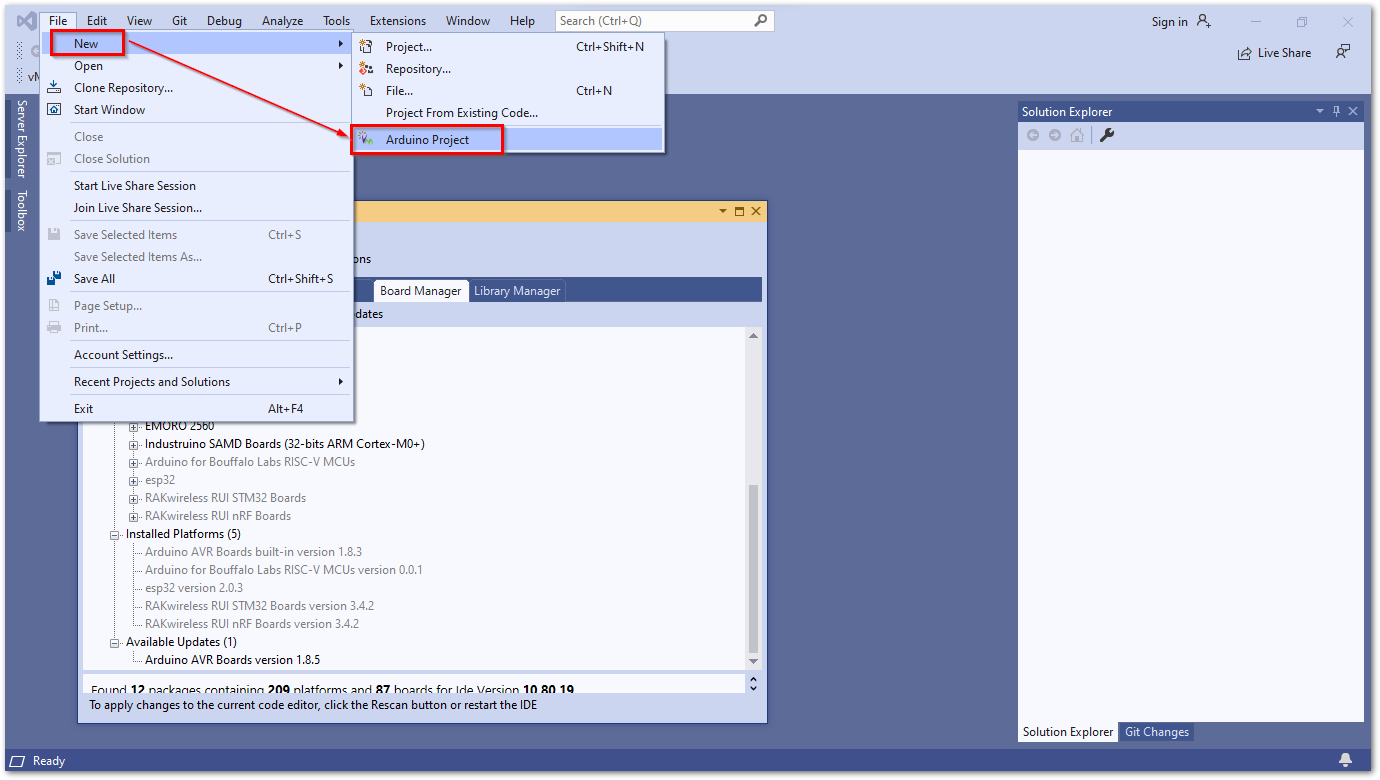 Figure 1: Creating a New Arduino project
- Open the Visual Micro Explorer window, by navigating to Extensions -> VMicro -> Visual Micro Explorer.
Figure 1: Micro Explorer window- On the Micro Explorer window, click the Examples tab and search RAK4631 on the RUI _V3_Examples folder. Now click RAK4631 to open the project.
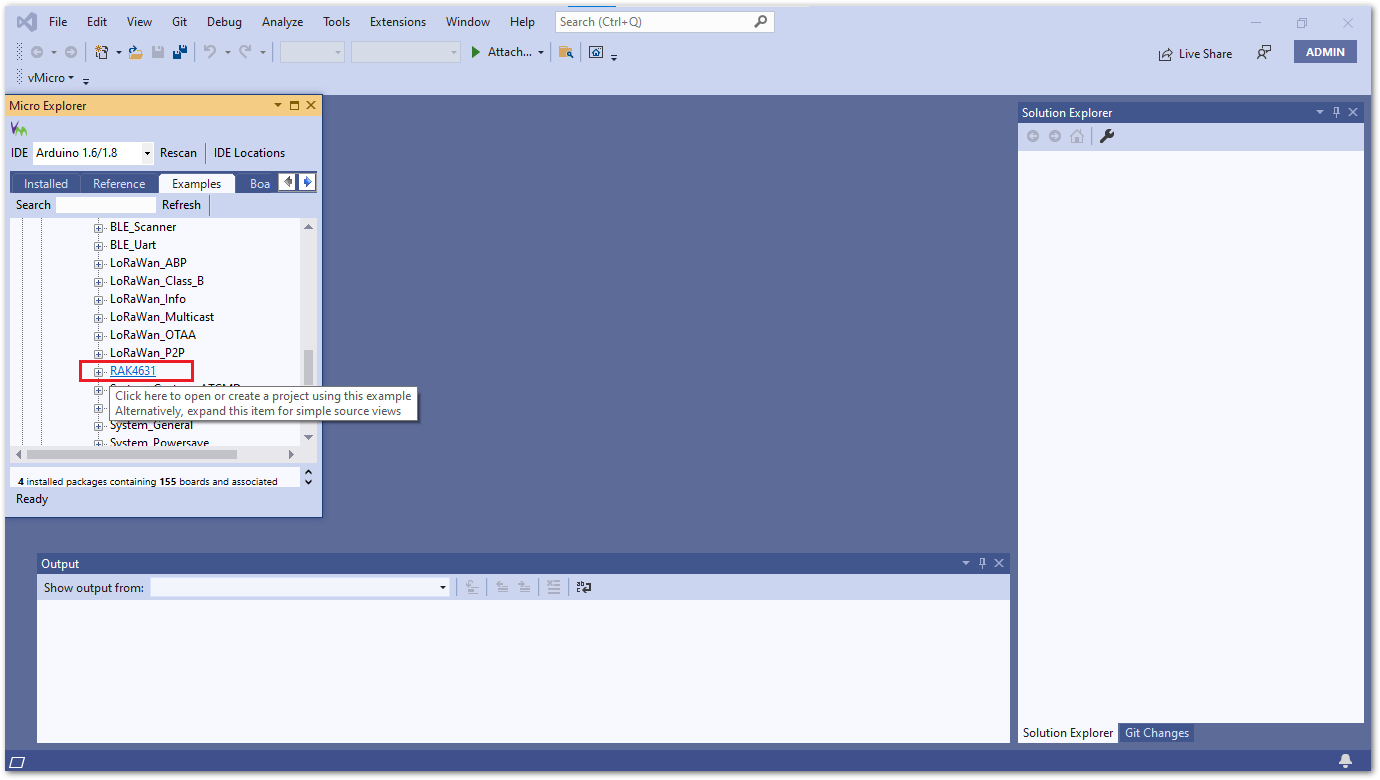 Figure 1: Micro Explorer RAK4631 example
- Click the Open Copy button,
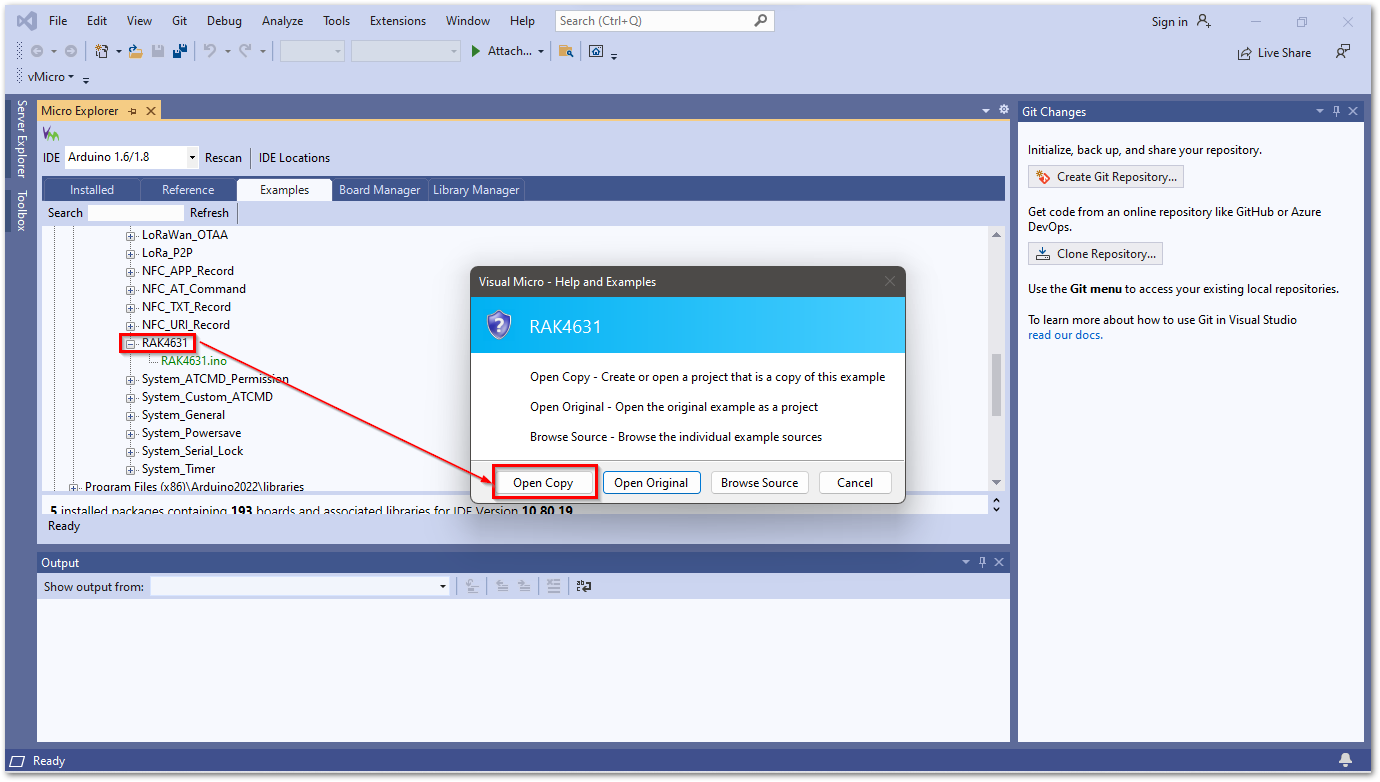 Figure 1: Visual Micro - Help and Examples
- Configure Solution, Platform, and Serial Port of the project. Click the dropdown and choose the following:
- Solution Configuration field: Release
- Solution Platforms field: x86
- Serial Port field: Choose the RAK4631-R COM port detected in the Windows Device Manager.
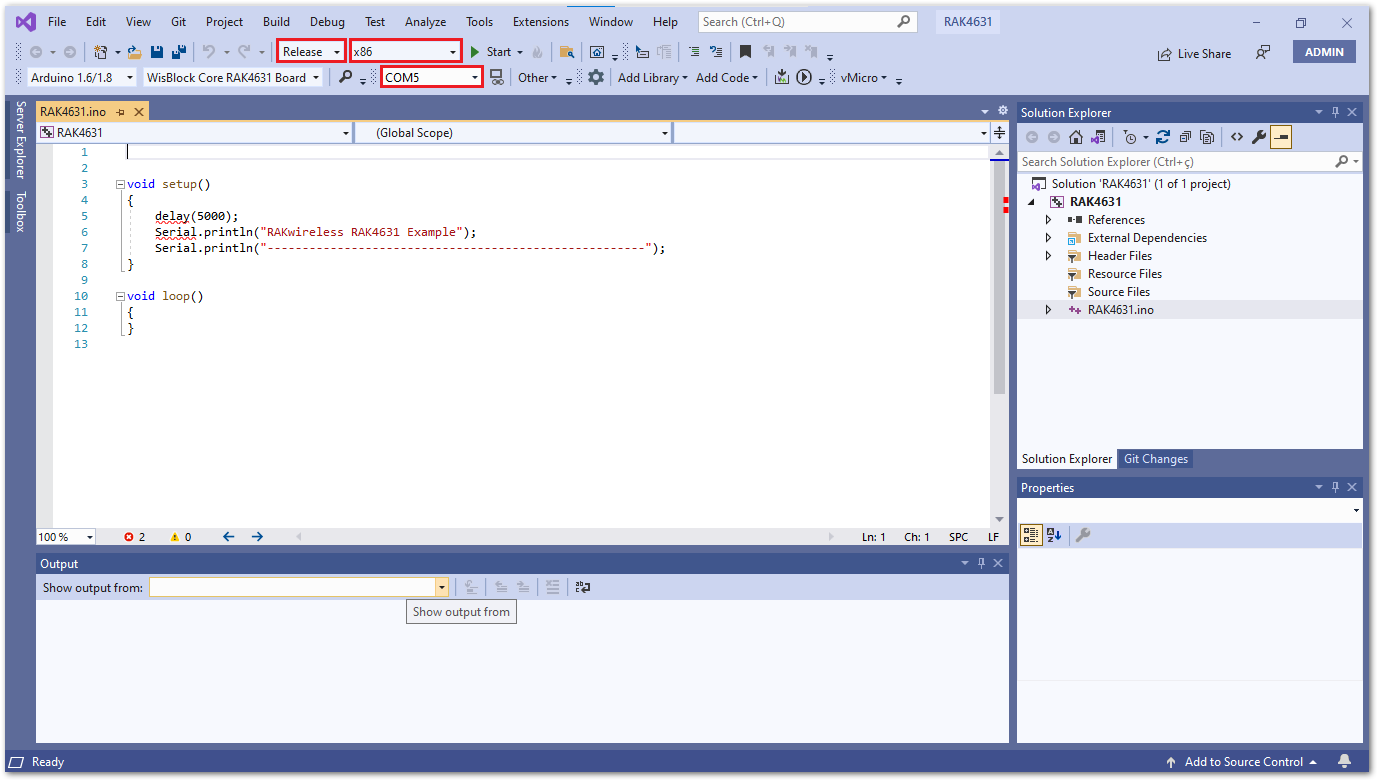 Figure 1: RAK4631.ino file
- Click the Build and Upload icon to flash the project on RAK4631-R.
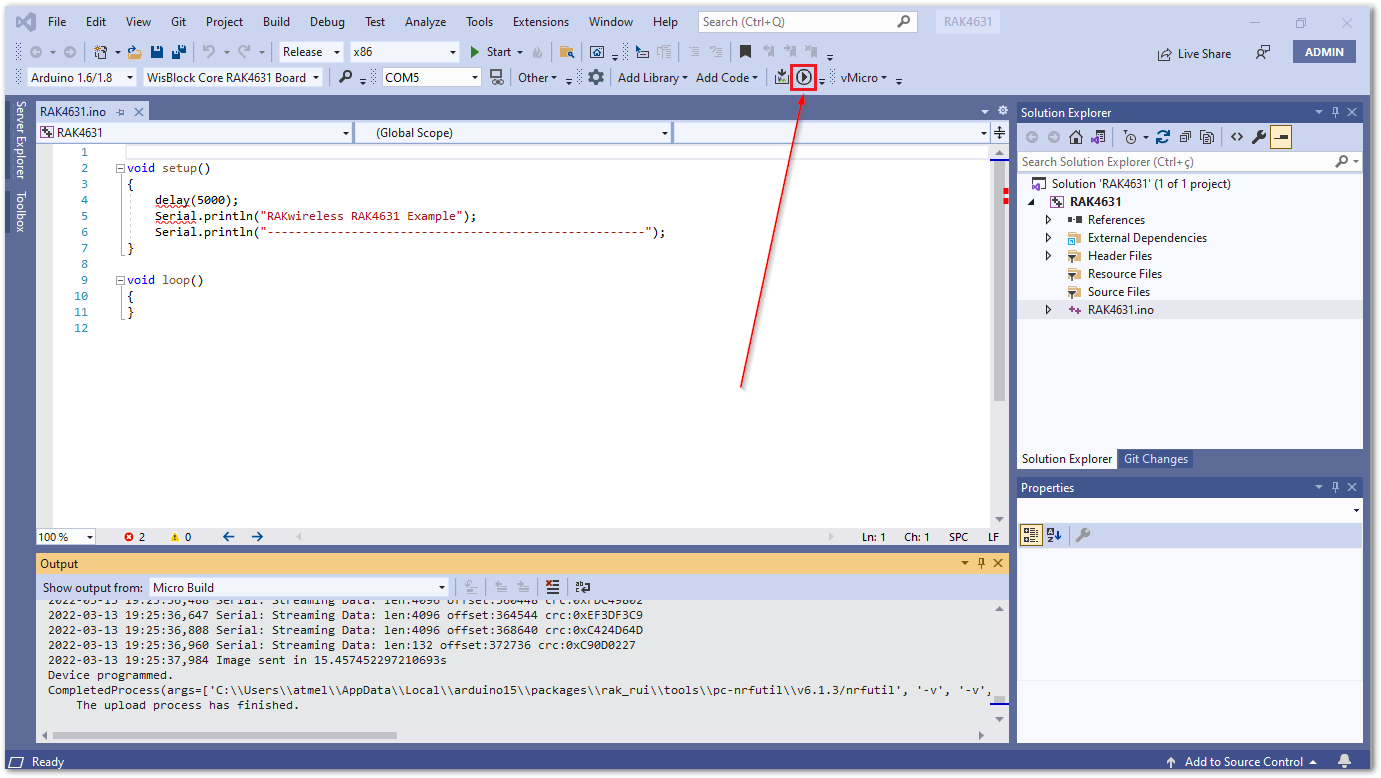 Figure 1: Build and upload the RAK4631-R project
After a successful upload, you can now use your preferred console UART tool to connect with the RAK4631-R COM port. If the connection is successful, then you will see the output messages.
- Type the following commands to check the current firmware version:
ATE
AT+VER=?
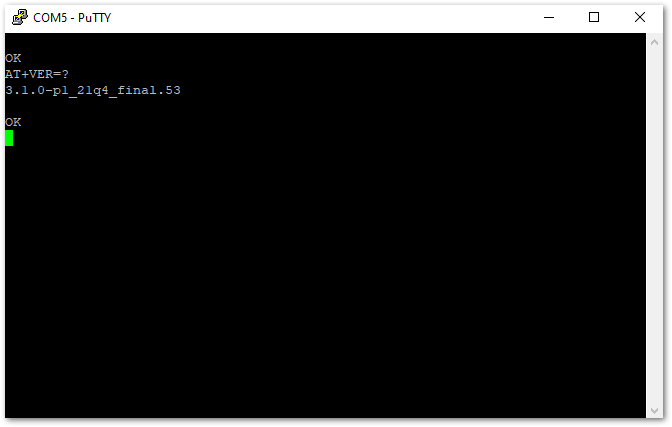 Figure 1: UART console output
Compile an Example with RAK3172
- Launch Visual Studio IDE and select Extensions -> VMicro. Click the dropdown icon, then scroll and select WisDuo RAK3172 Evaluation Board.
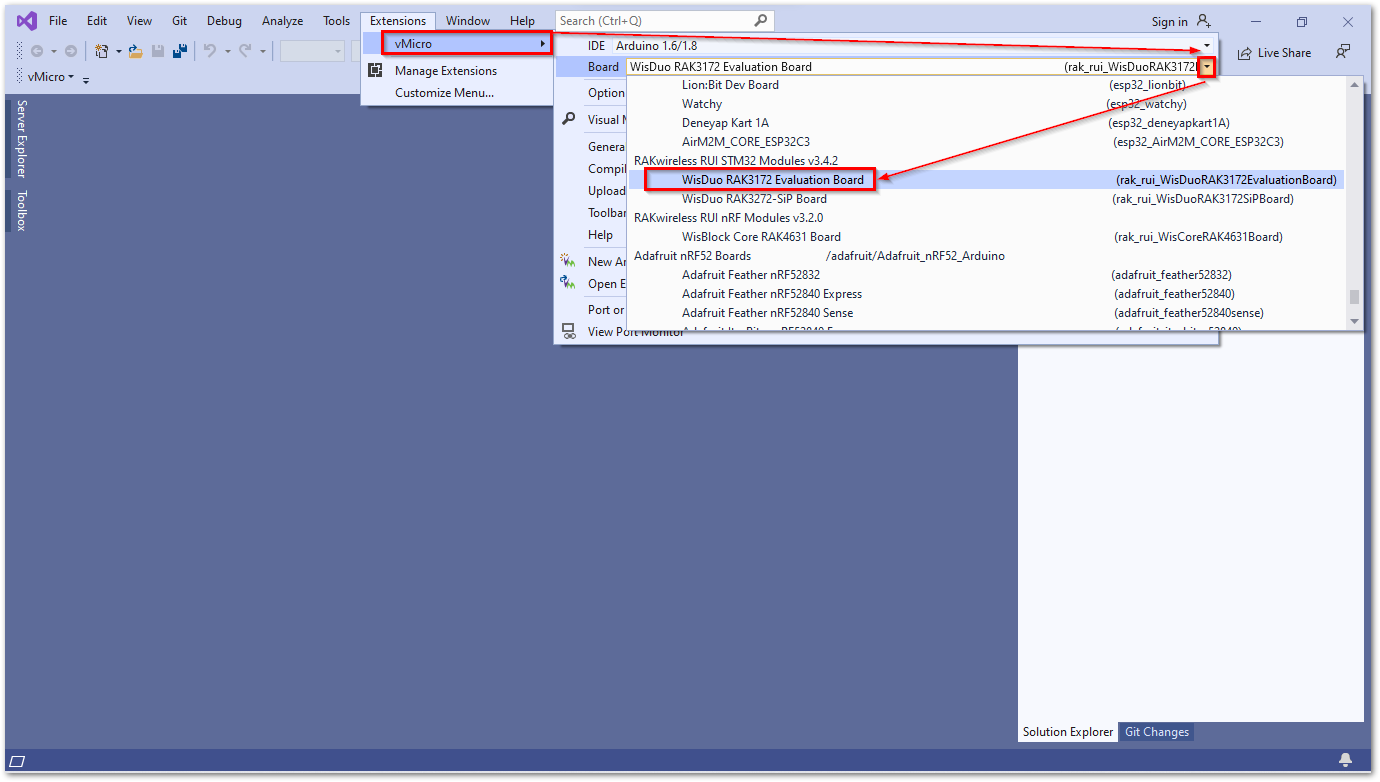 Figure 1: Arduino RAKwireless STM32
- Create a new project for RAK3172 by clicking on File -> New Arduino Project.
Figure 1: Creating a New Arduino project- Open the Visual Micro Explorer window, by navigating to Extensions -> VMicro -> Visual Micro Explorer
Figure 1: Micro Explorer window- On the Micro Explorer window, click the Examples tab and search for RAK3172 on the RUI _V3_Examples folder. Now click RAK3172-E to open the project.
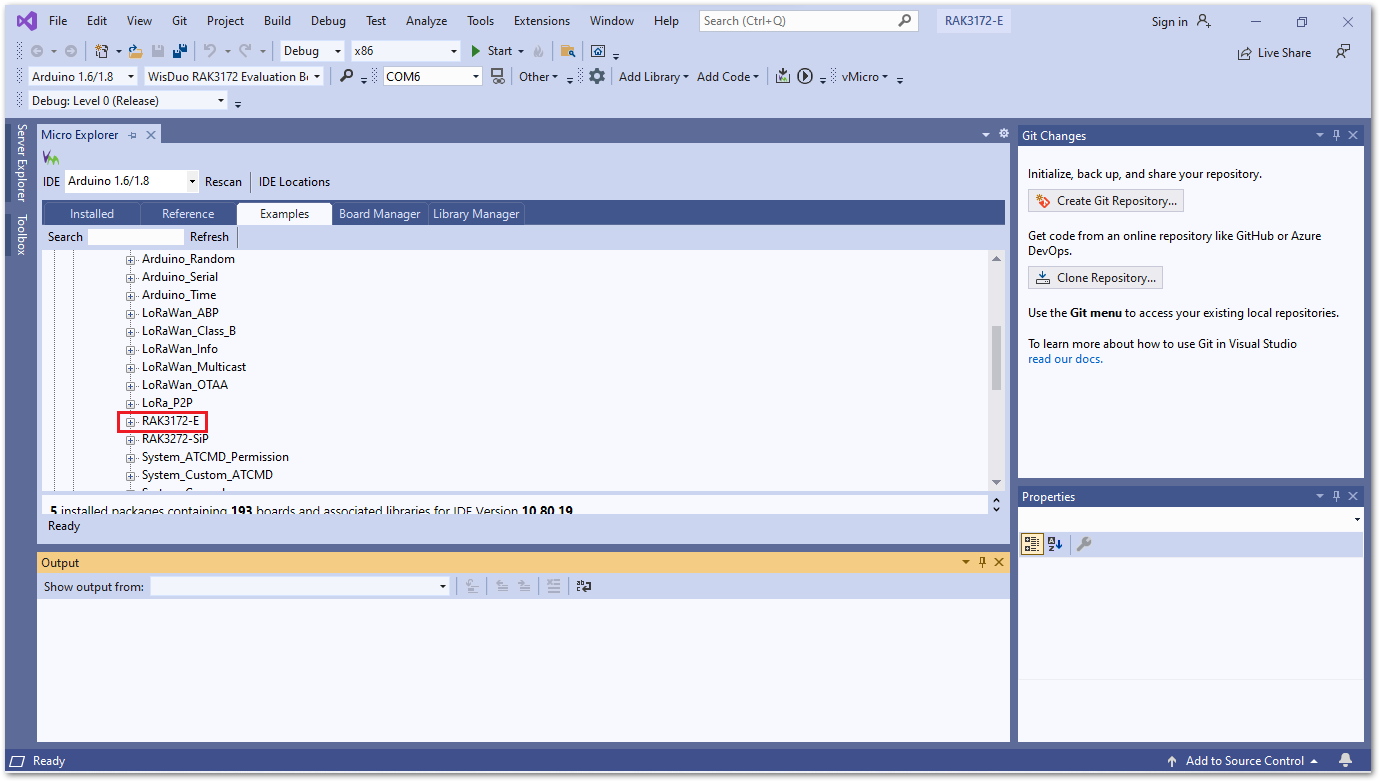 Figure 1: Micro Explorer RAK3172 example
- Click the Open Copy button.
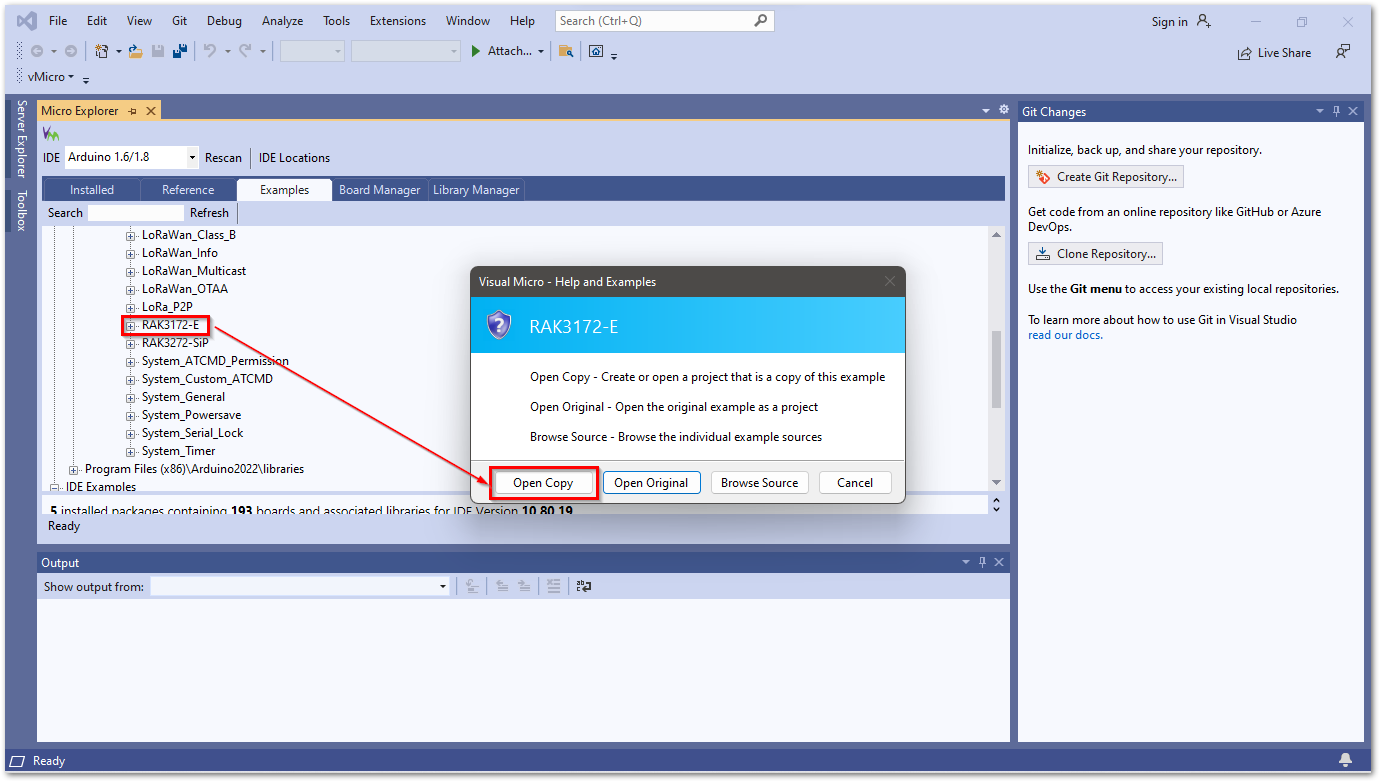 Figure 1: Visual Micro - Help and Examples
- Configure Solution, Platform, and Serial Port of the project. Click the dropdown and choose the following:
- Solution Configuration field: Release
- Solution Platforms field: x86
- Serial Port field: Choose the RAK3172 COM port detected in the Windows Device Manager.
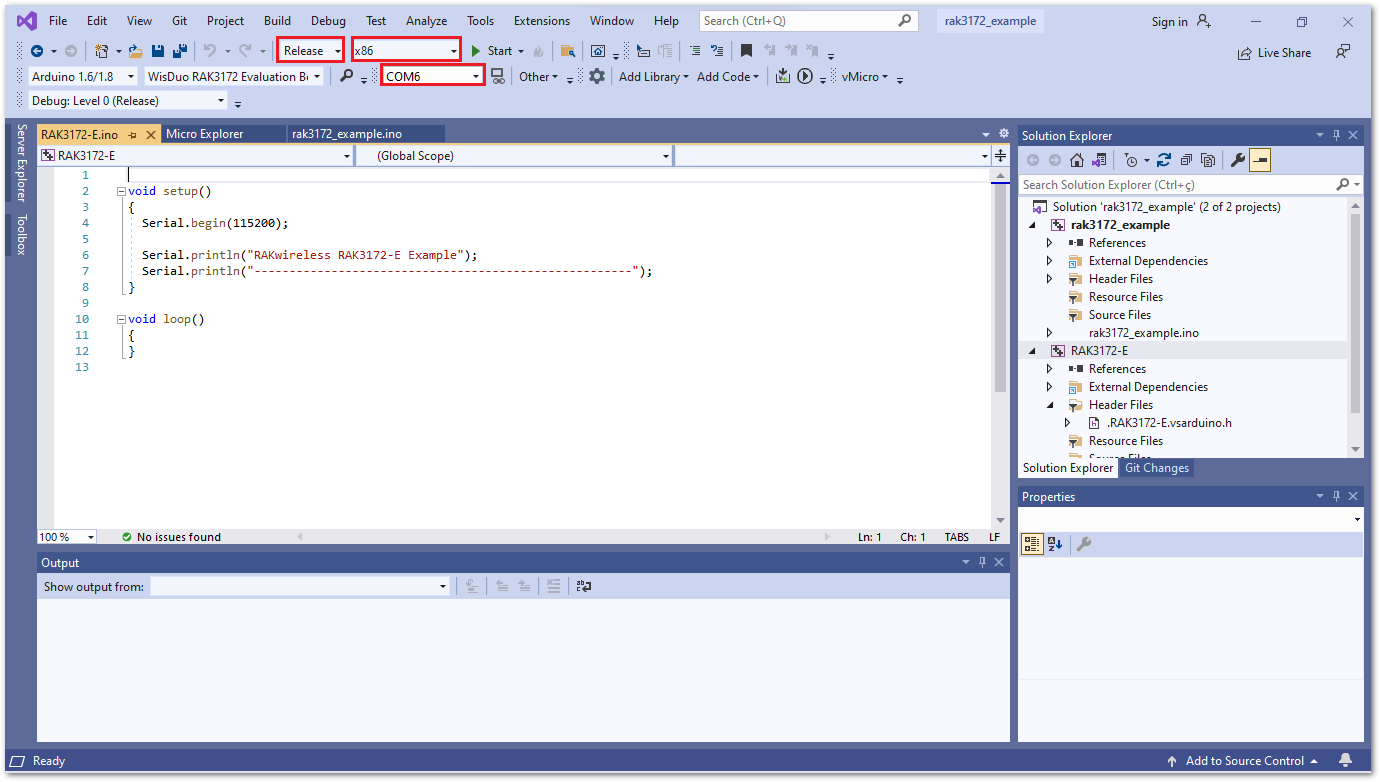 Figure 1: RAK3172.ino file
- Click the Build and Upload icon to flash the project on RAK3172.
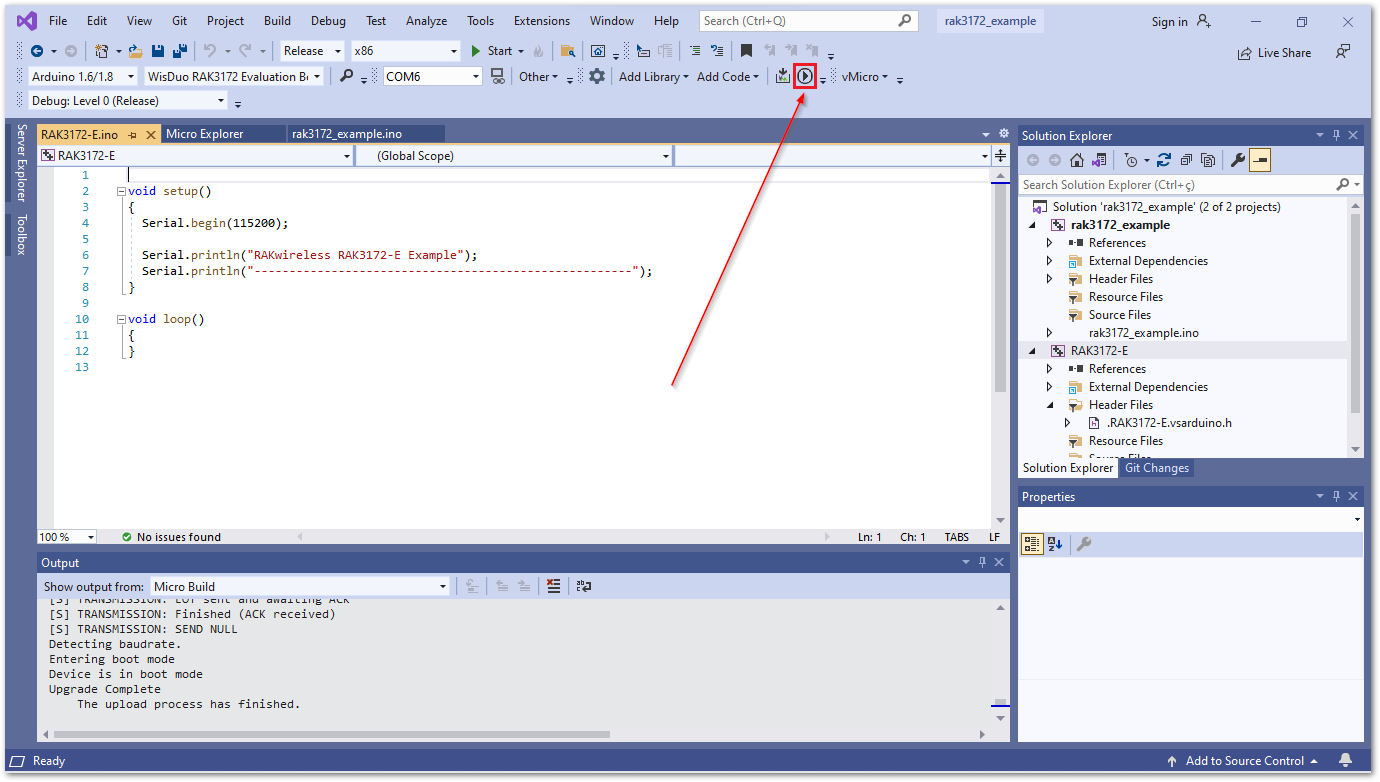 Figure 1: Build and upload the RAK3172 project
Developing a RUI3 Library Project using Visual Studio IDE
This guide shows how to install the RAK1906 WisBlock Environmental Sensor RUI3 Library on Visual Studio IDE.
You can mount the RAK1906 to the WisBlock Base Board by following the RAK1906 Hardware Setup guide. Mounting other WisBlock Sensors uses a similar procedure.
Prerequisite
-
Import RAK1906 ZIP library on Arduino IDE.
-
Make sure the sensor is mounted as described in the RAK1906 Hardware Setup section.
Software Configuration
-
Download RAK1906 RUI3 Library
.zipfile. -
Launch Arduino IDE, navigate to
Sketch -> Include Library -> Add .ZIP Library...as shown below.
Figure 1: Include RUI3 Library- You will be prompted to select the Library you would like to add. Navigate to the
.zipfile's location and open it.
Figure 1: Select RUI3 ZIP fileThe RUI3 Library will be installed into your Arduino Sketchbook's libraries folder.
You can view your Sketchbook folder by opening Arduino IDE and navigating to File -> Preferences as shown below.
 Figure 1: SketchBook Location
Build and Configure Visual Studio RUI3 Library Project
-
Connect your RUI3 board to USB port to configure the RUI3 project.
-
Launch Visual Studio IDE, then open Visual Micro Explorer by navigating to
Extensions -> vMicro -> Board. Click arrow down icon if you want to change theBoard Configuration.
Select RAK3172 Evaluation Board:
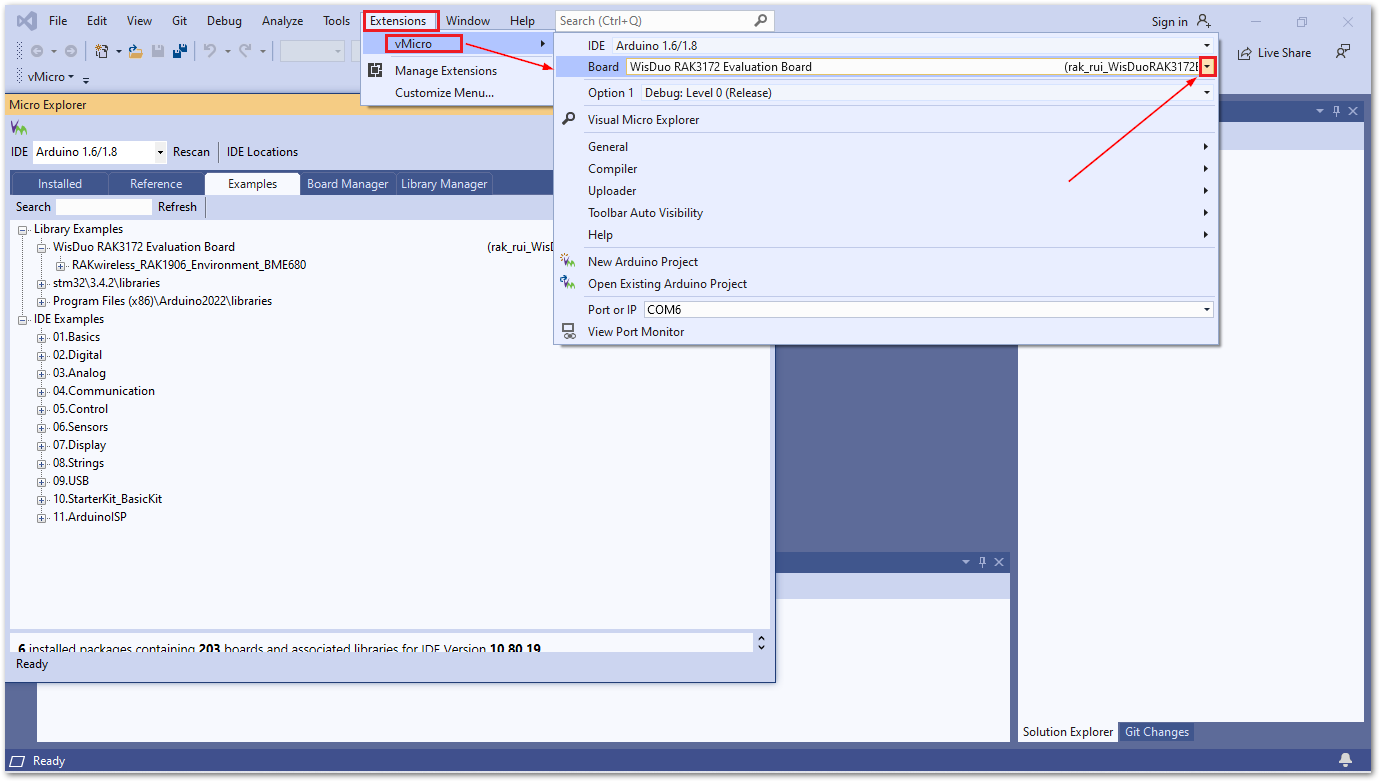 Figure 1: Selecting RAK3172 Evaluation Board
Select RAK4631 Board:
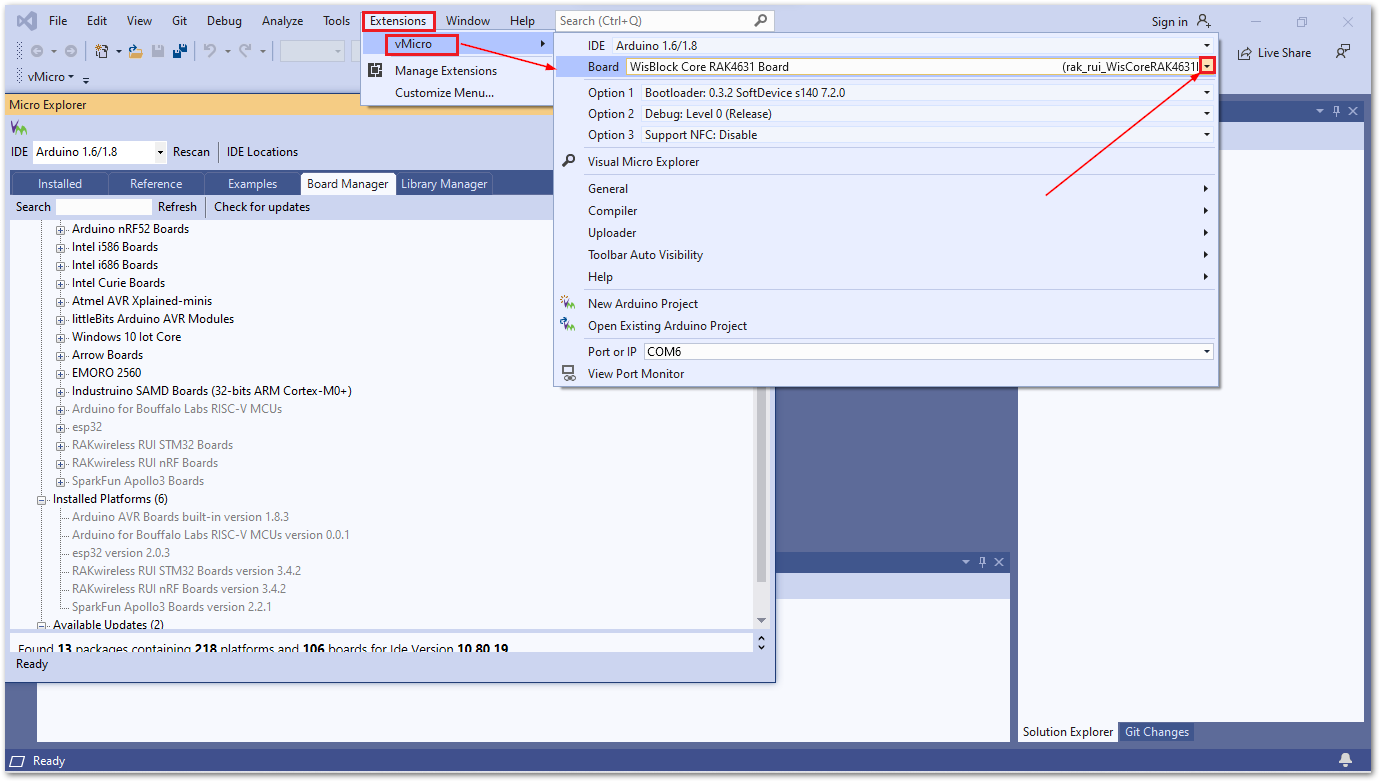 Figure 1: Selecting RAK4631 Board
- Relaunch Visual Studio IDE, then open
Visual Micro Explorerby navigating toExtensions -> vMicro -> Visual Micro Explorer.
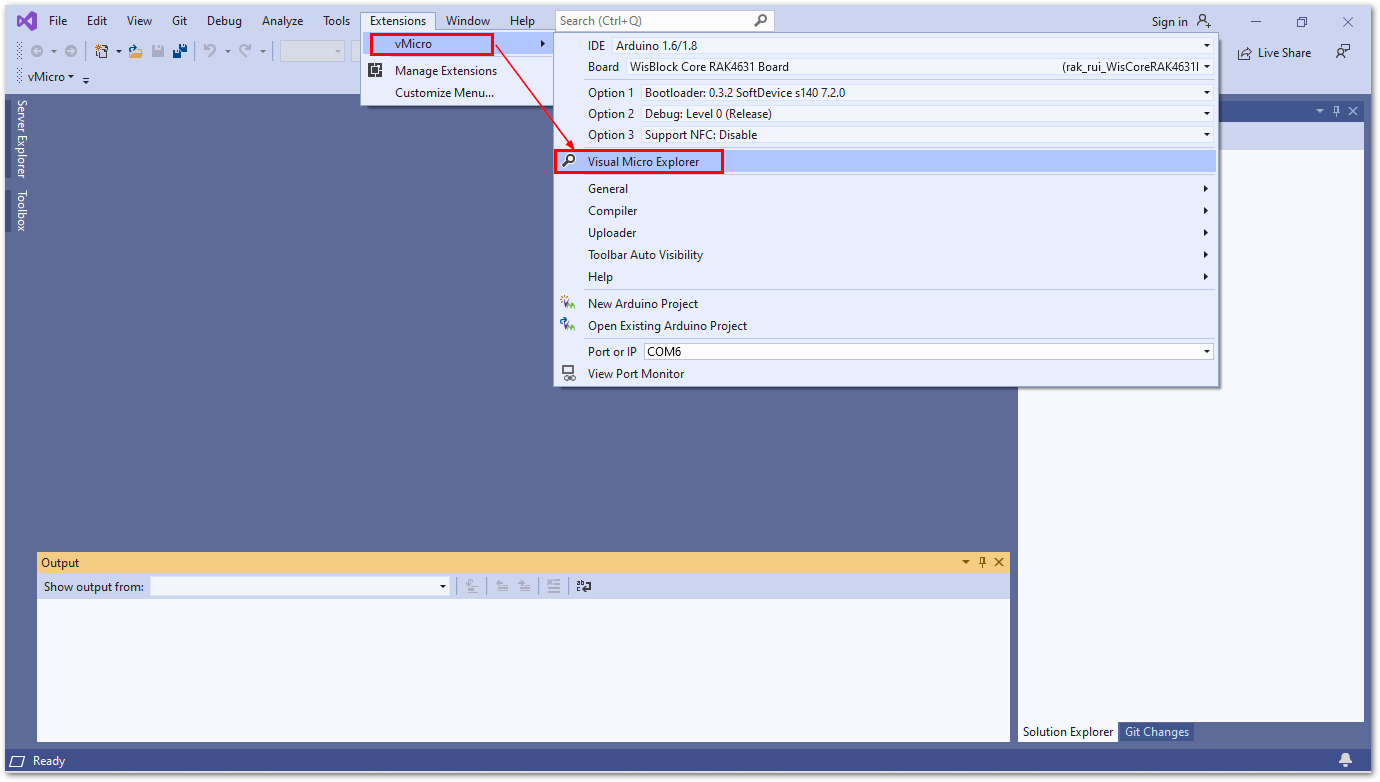 Figure 1: Open Visual Micro Explorer
- On the Micro Explorer window, click the Examples tab.
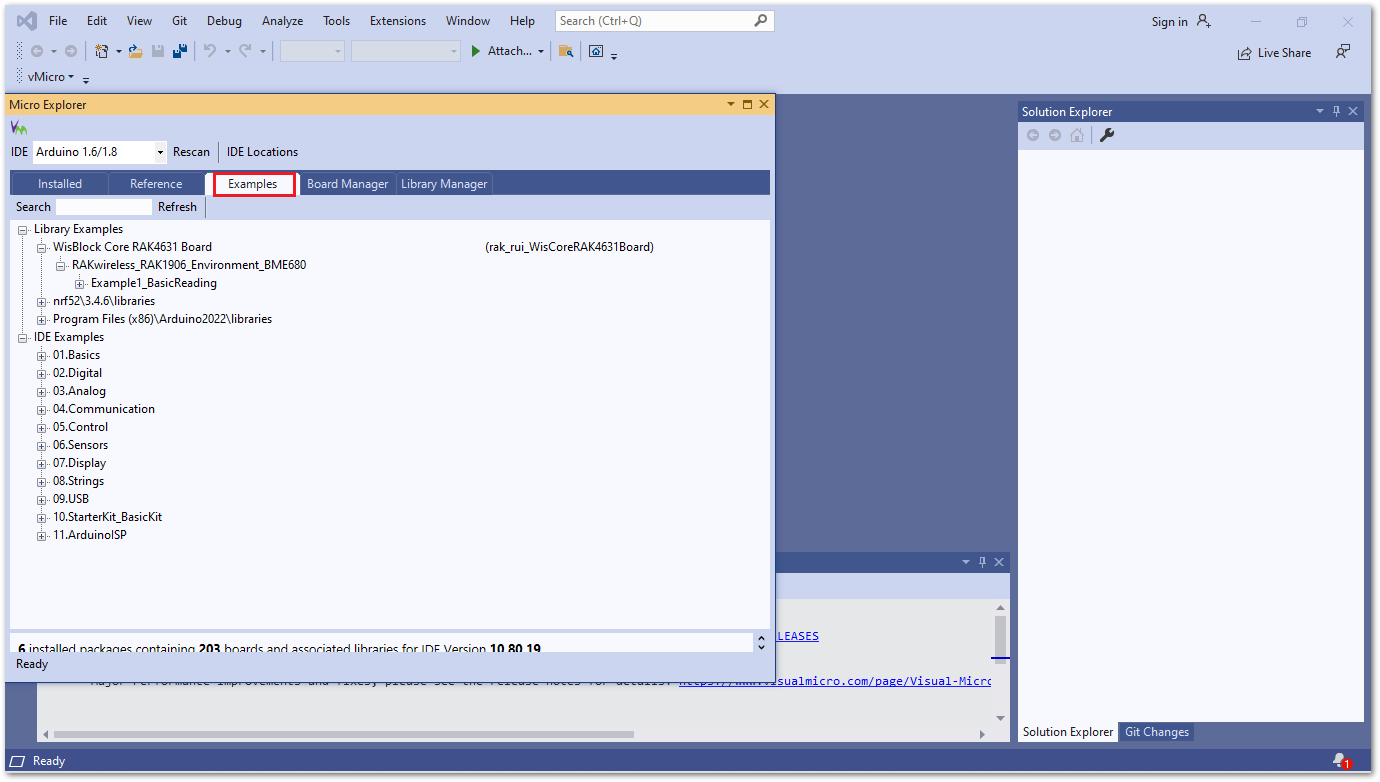 Figure 1: Visual Micro Explorer Examples
- The RUI3 examples can be located on folder
Library Examples. ClickExample1_BasicReadingto open the project on Visual Studio IDE.
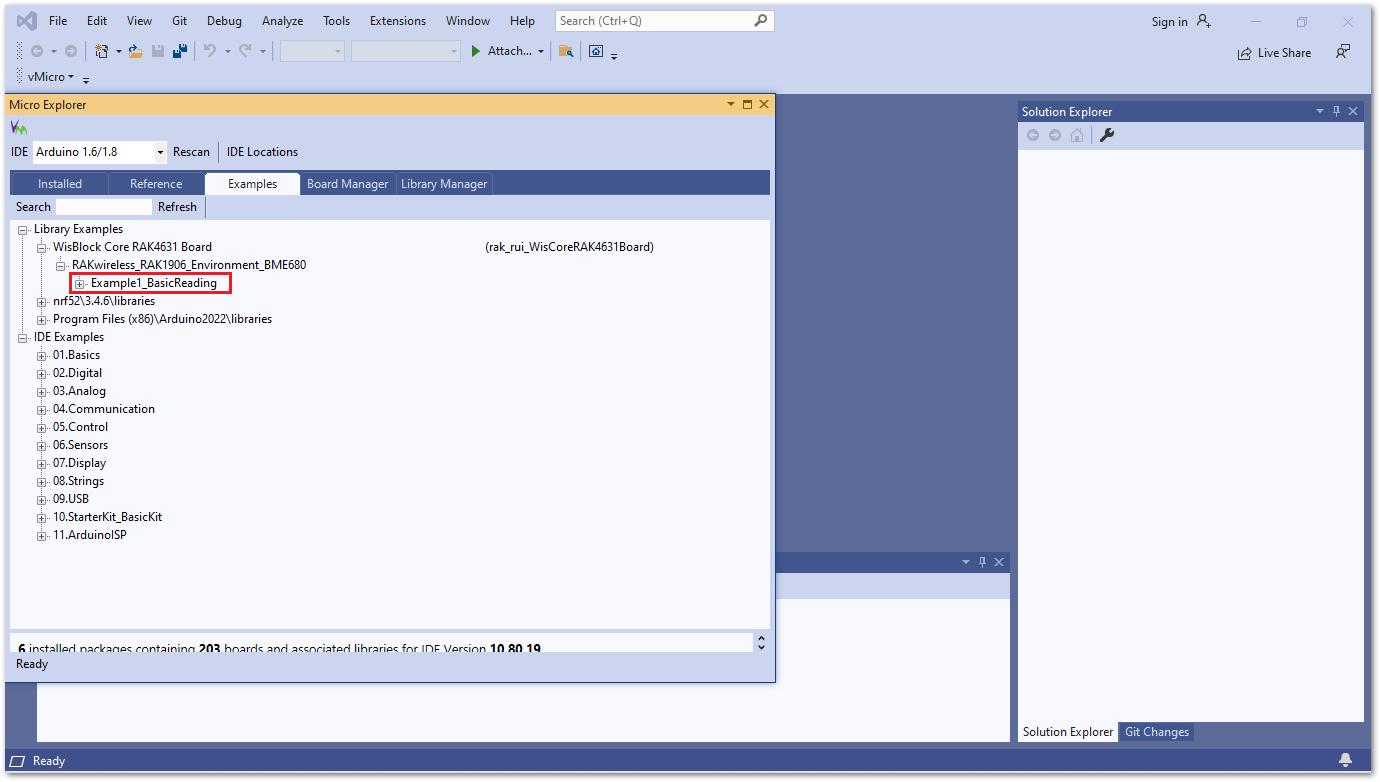 Figure 1: RAKWireless Library Examples
If the examples do not appear on the Micro Explorer window, then you need to restart Visual Studio IDE.
- Click Open Copy button to open RUI3 Library project on Visual Studio IDE.
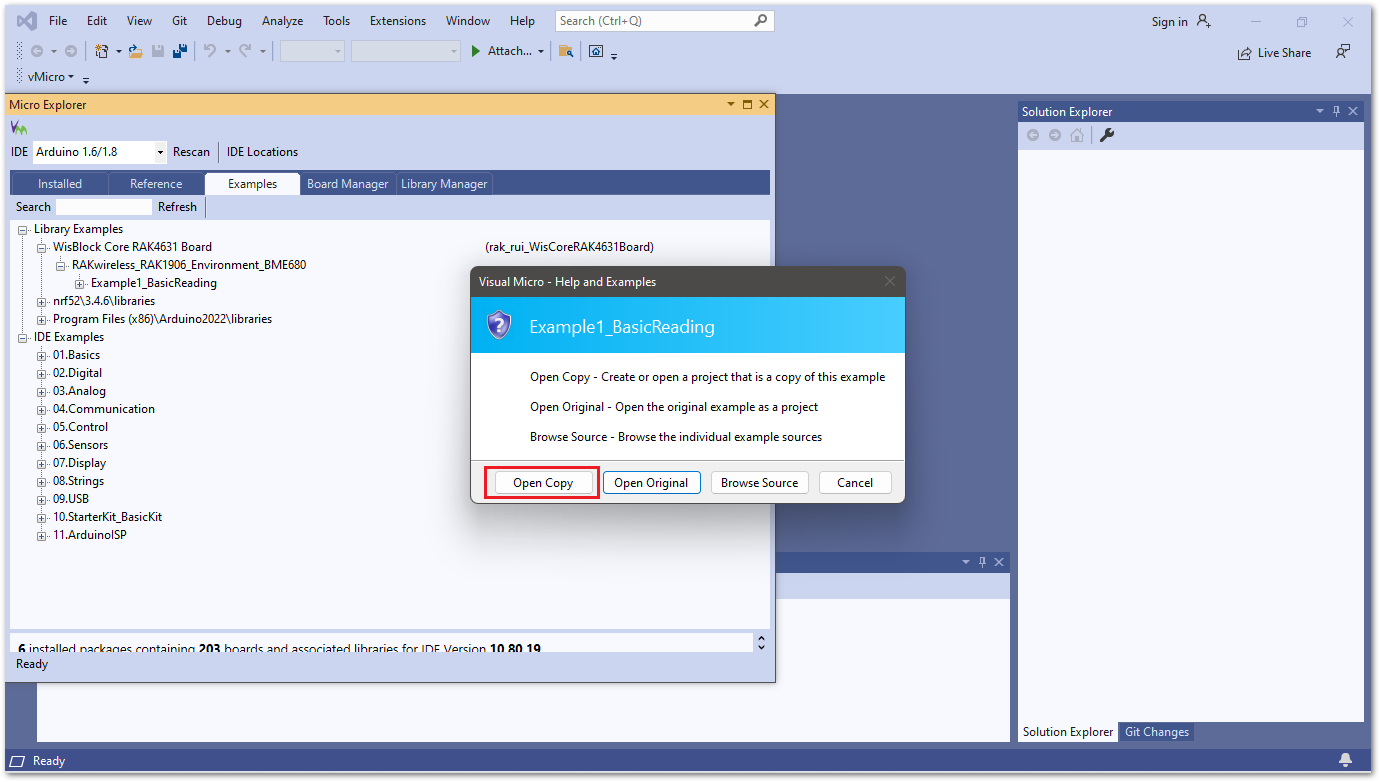 Figure 1: RUI3 Library Open Copy project
- Don't forget to configure the serial port.
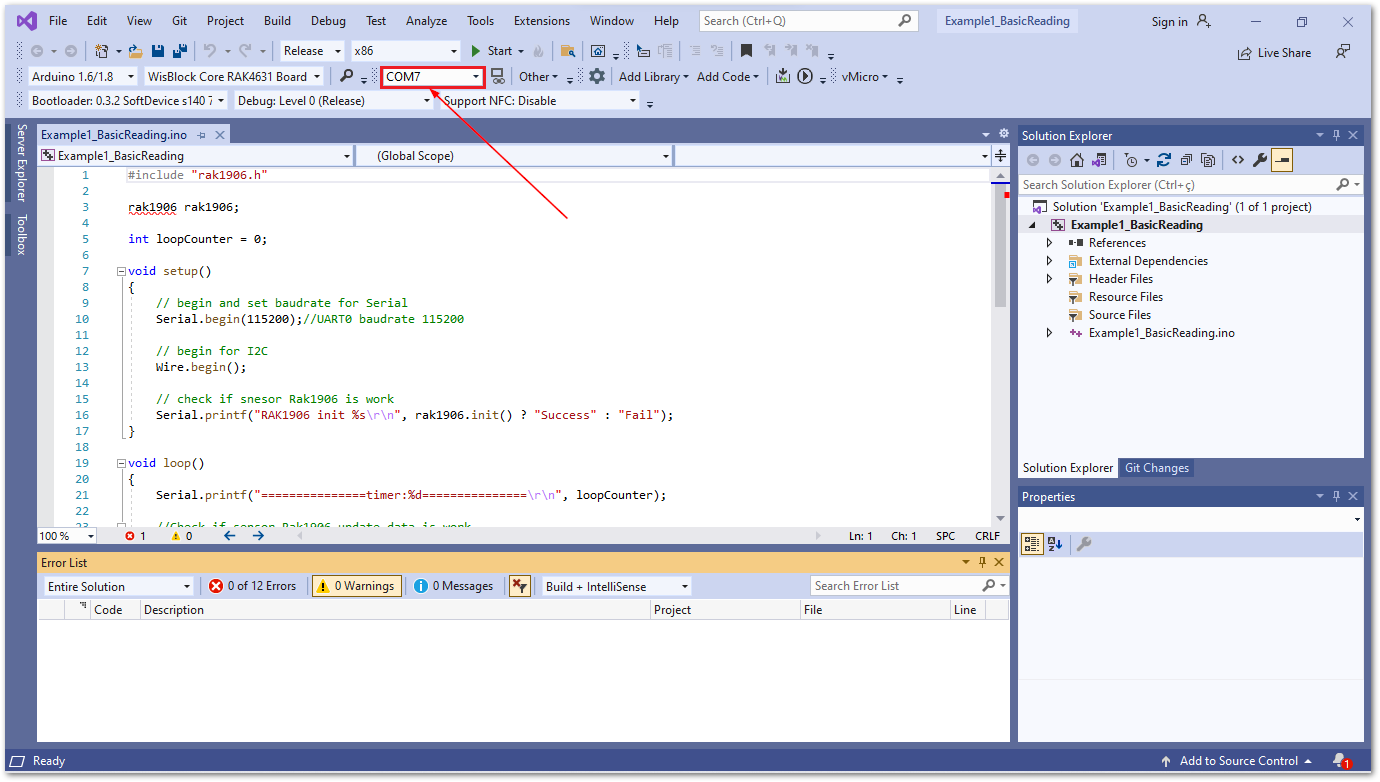 Figure 1: RUI3 Library configure Serial Port
- To flash the project on target board, click the
Build and Uploadicon.
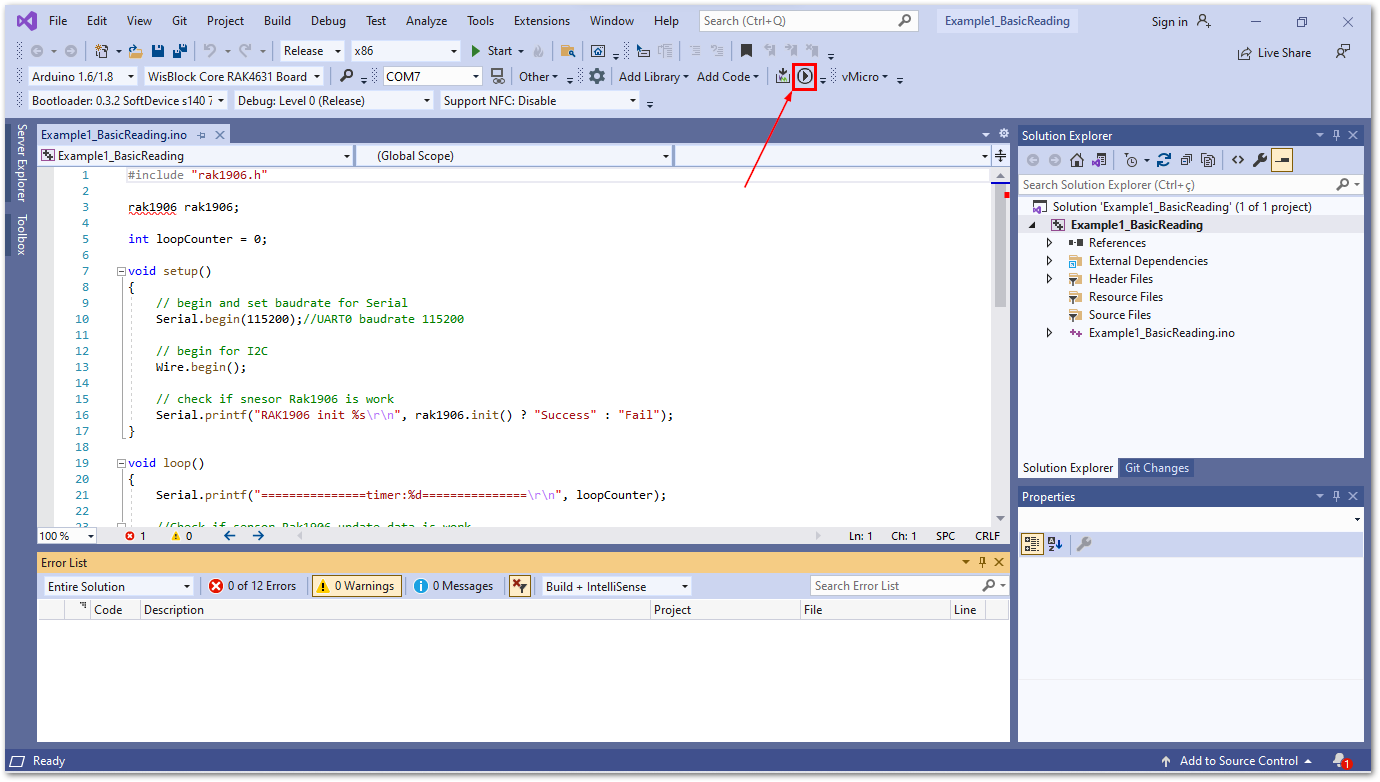 Figure 1: RUI3 Library Build project
Build and Configure Visual Studio Smart_Farm Project
-
First, install the Smart_Farm Project on Arduino IDE. The Arduino IDE VSIX extension will inherit the Arduino examples.
-
Launch Visual Studio IDE and select
Extensions -> VMicro.
Navigate toBoardoption, then click dropdown icon and select your favorite RUI3 board.
Also configure the serial port by typing onPort or IPtext area or click the dropdown icon as shown below.
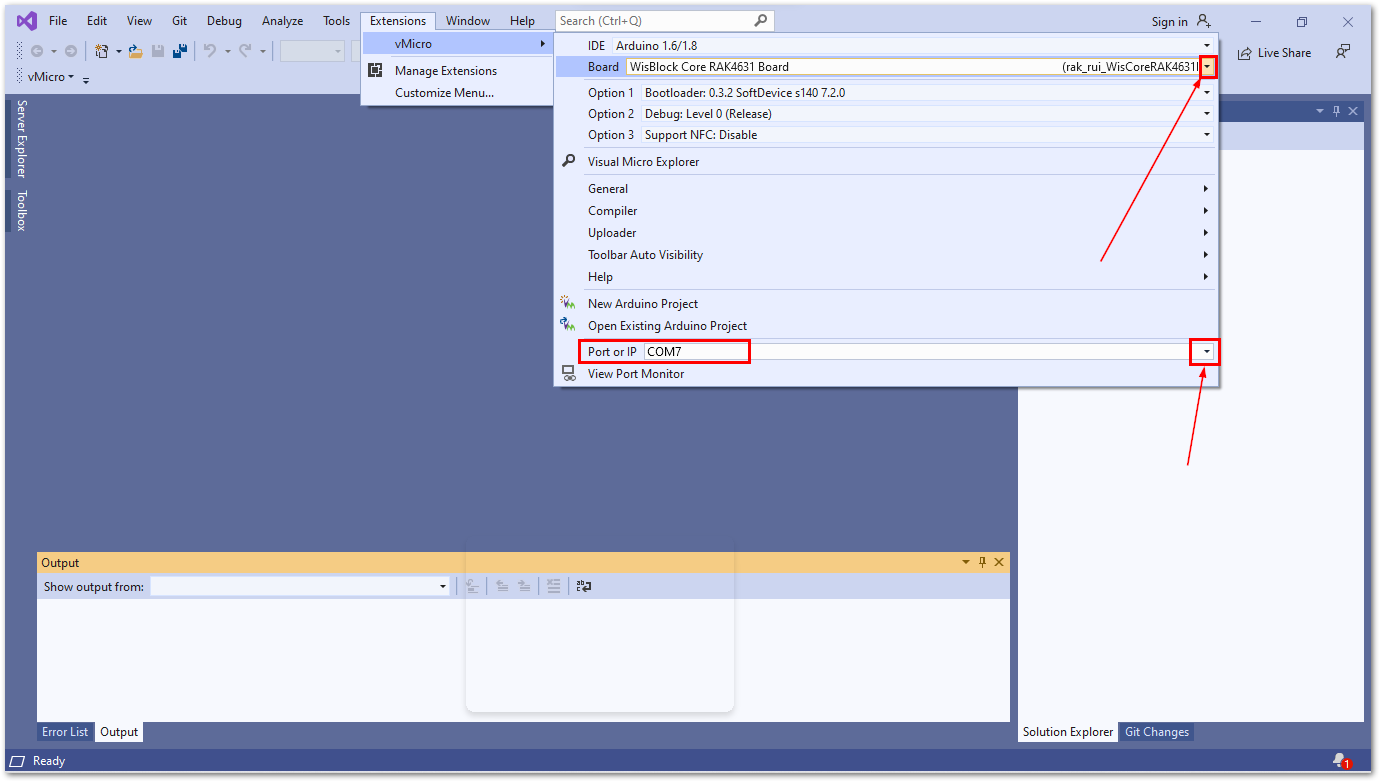 Figure 1: Configure RUI3 Project using Visual Micro Explorer
Relaunch Visual Studio IDE to update Visual Micro Explorer configuration.
- Open Visual Micro Explorer by navigating to
Extensions -> vMicro -> Visual Micro Explorerthen click theExamplestab.
 Figure 1: Visual Micro Explorer Examples
- Navigate to
RUI3_V3_examplesfolder then clickSmart_Farmas shown below.
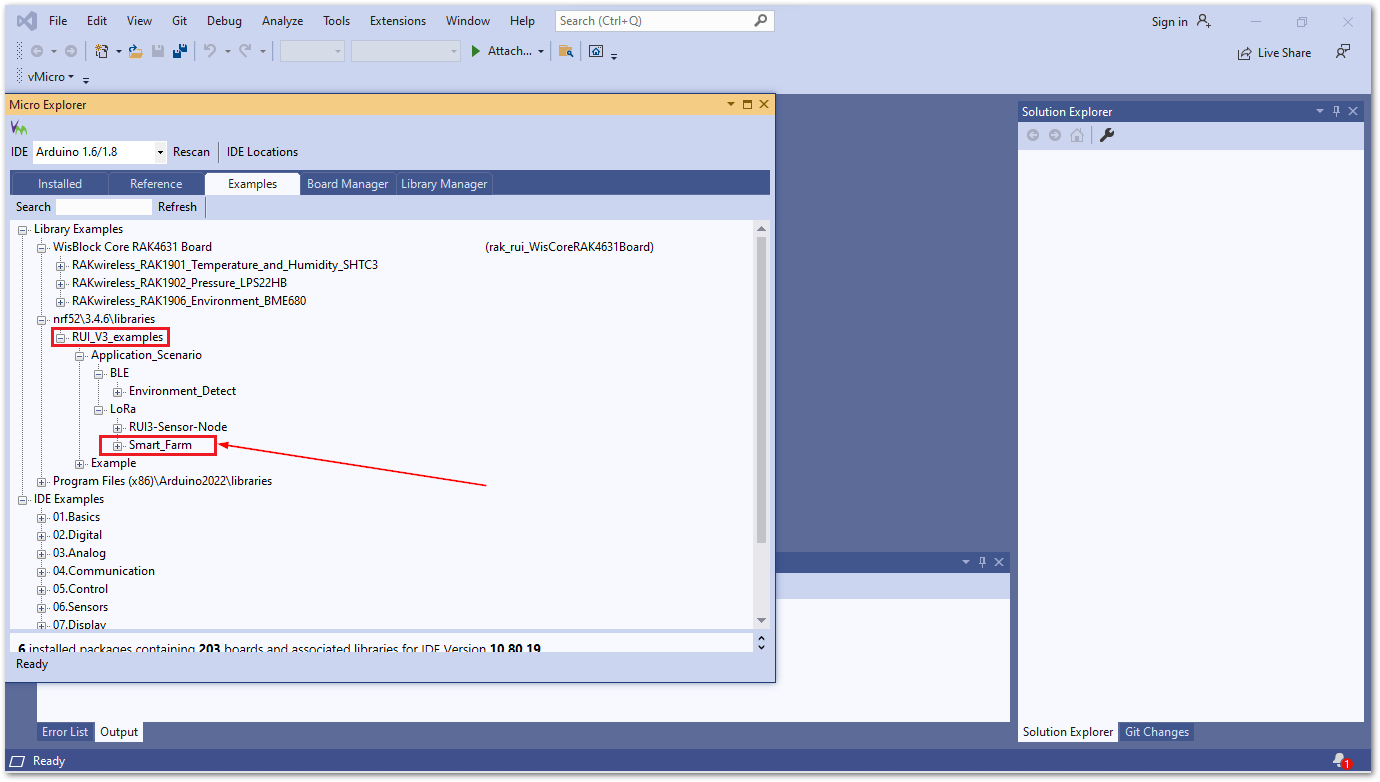 Figure 1: Visual Micro Explorer Smart_Farm Example
- Click Open Copy button to open
Smart_Farmproject on Visual Studio IDE.
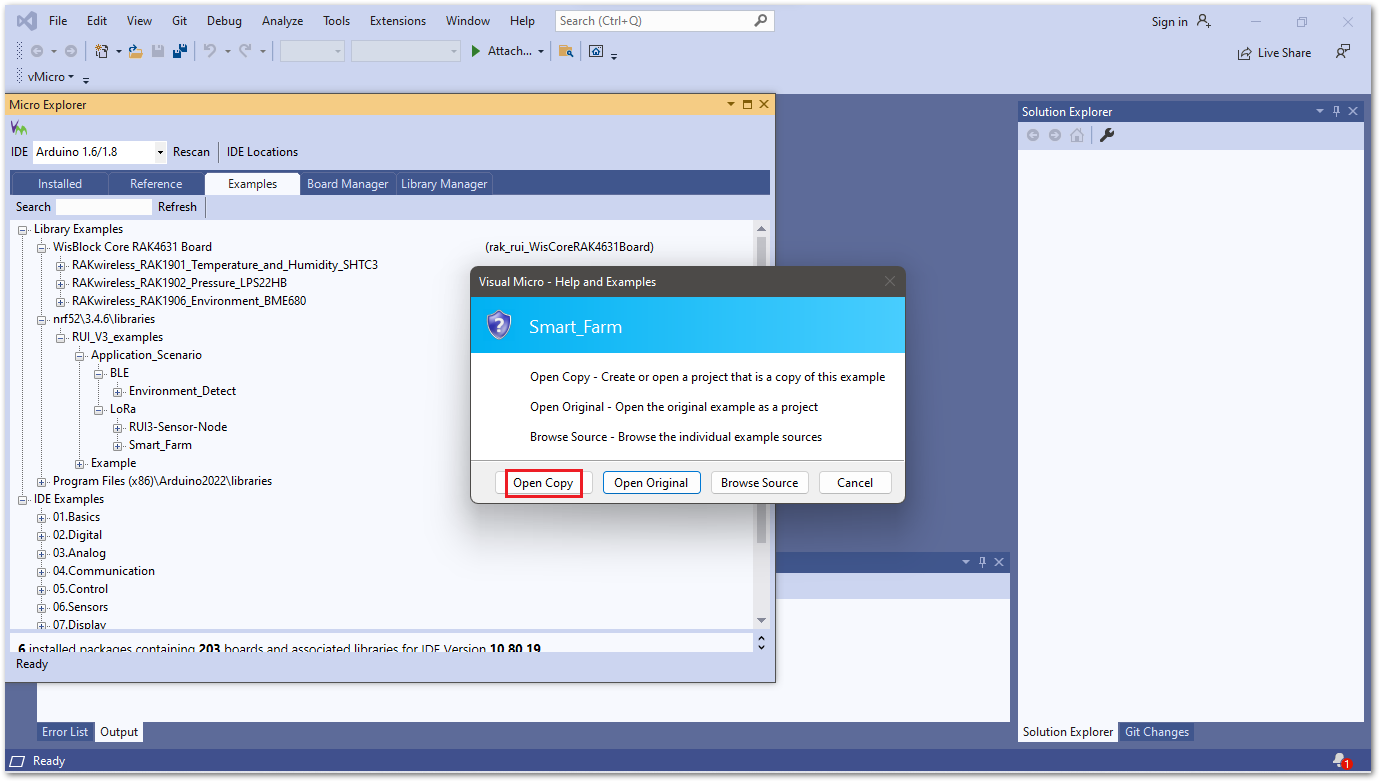 Figure 1: Open Smart_Farm Example on Visual Studio IDE
- The
Smart_Farmproject can be located onSolution Explorerwindow.
CloseMicro Explorerwindow and then clickSmart_Farm.ino
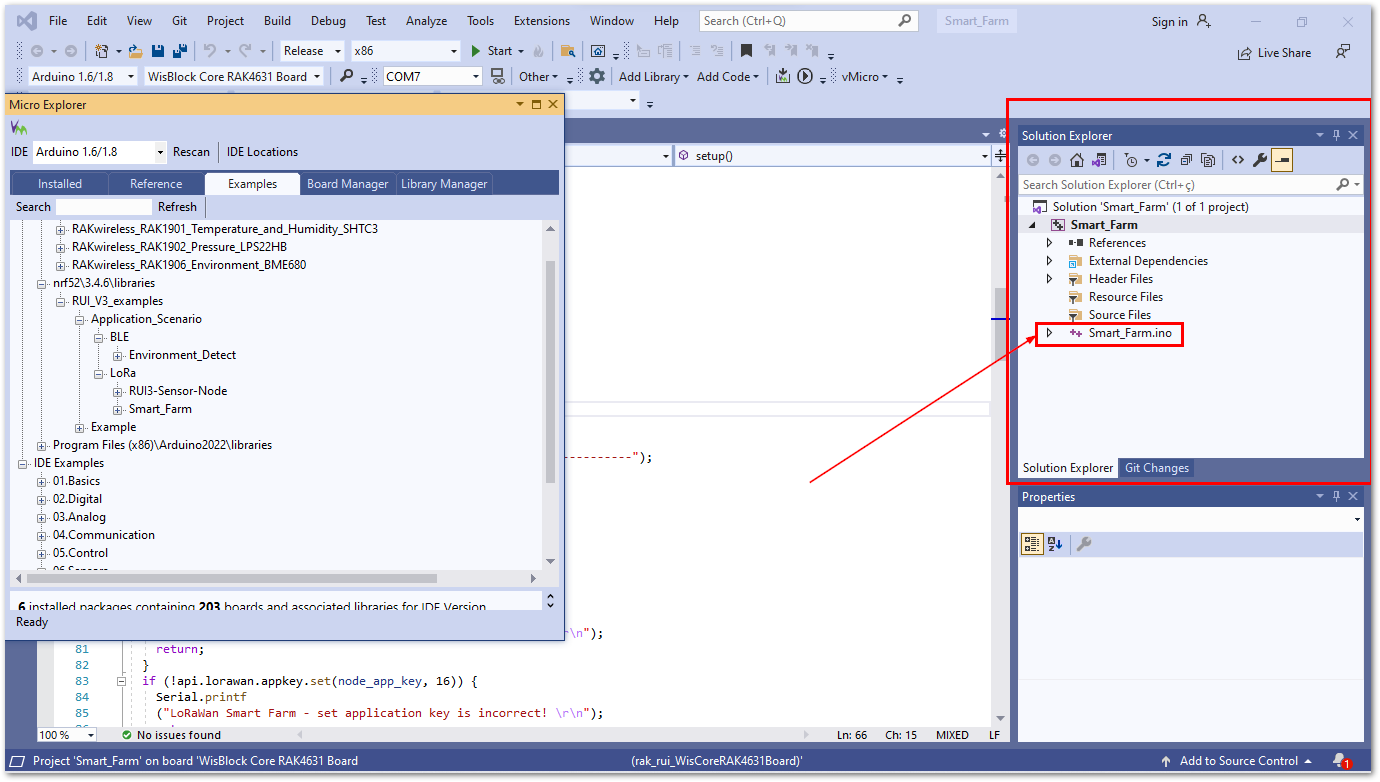 Figure 1: Visual Studio IDE Solution Explorer
- Click the
Build and Uploadicon to flash the project on RUI3 board.
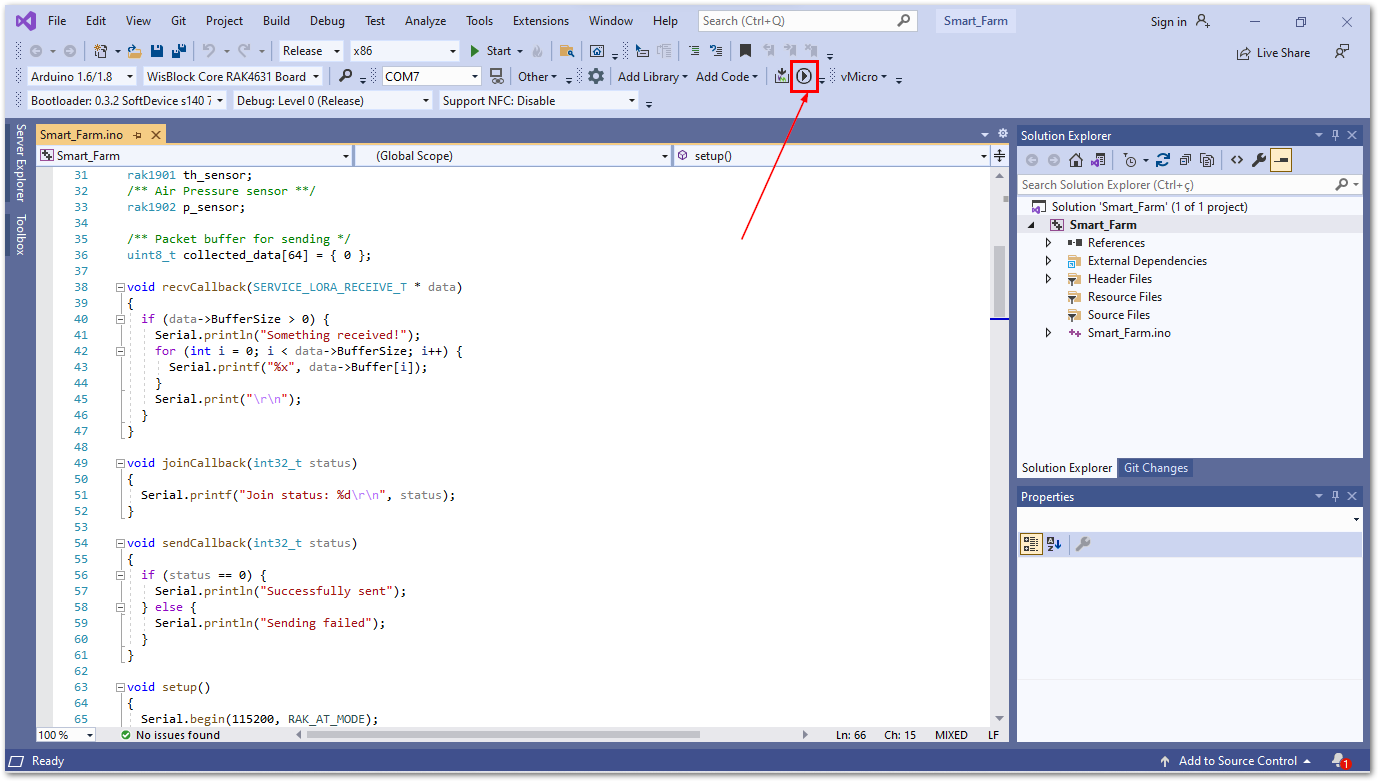 Figure 1: Build and Upload Smart_Farm project
- After the build finishes, check the
Outputwindow.
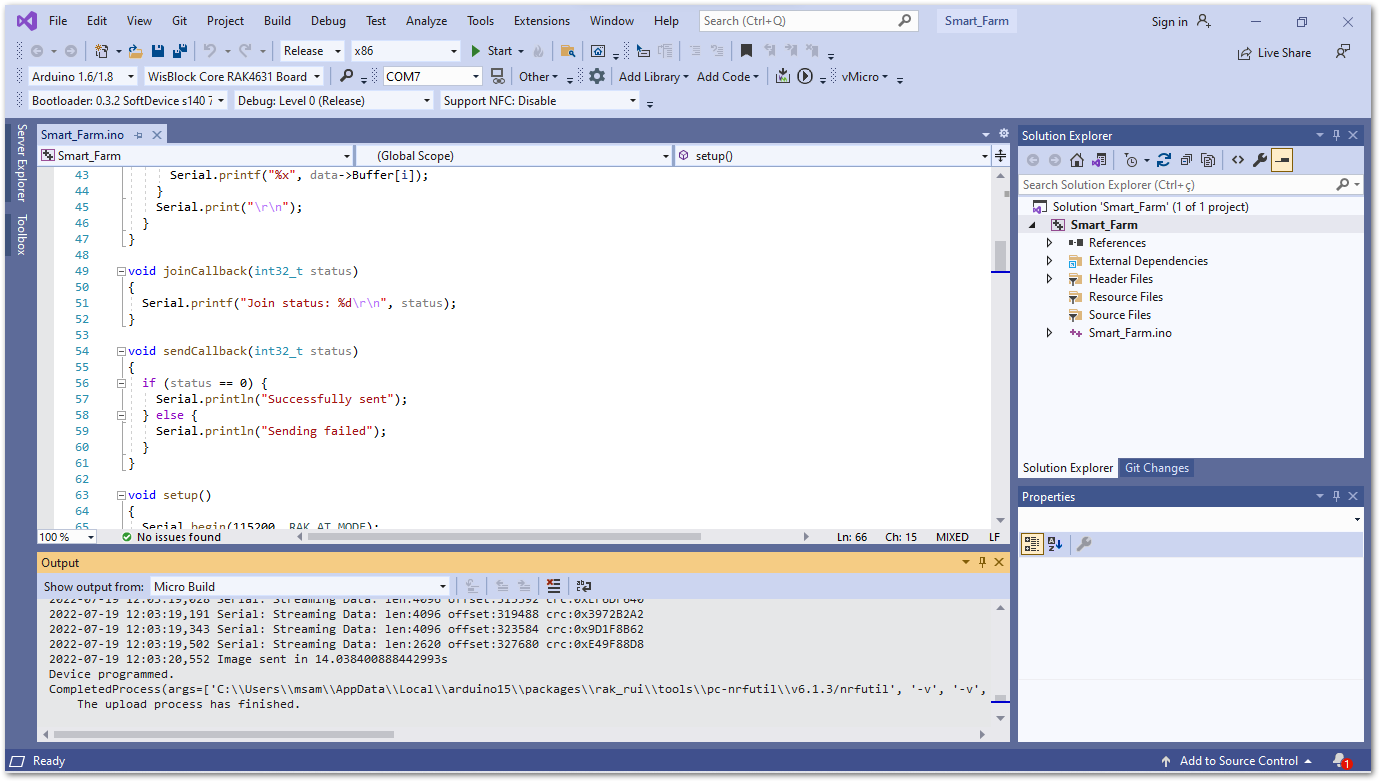 Figure 1: Successful build Smart_Farm project
If you can't find the Smart_Farm project on the Micro Explorer window, then try to restart Visual Studio IDE.