WisgateOS OpenVPN Configuration
This detailed explanation assumes that you already have an AWS EC2 Instance with Ubuntu Server 18.04 LTS running on it.
Install OpenVPN
- First, install the OpenVPN package with the command:
sudo apt install openvpn -y
- Download a certificate management tool suite. In this tutorial, Easy RSA is used.
wget https://github.com/OpenVPN/easy-rsa/archive/v3.0.6.tar.gz -O easyrsa.tar.gz
- Initialize Easy RSA to generate a CA certificate and a server certificate.
- Extract and copy easyrsa to
/etc/openvpn/easyrsa/.
sudo mkdir -p /etc/openvpn/easyrsa
tar zxvf easyrsa.tar.gz
sudo cp -rf easy-rsa-3.0.6/easyrsa3/* /etc/openvpn/easyrsa/
- Initialize the pki.
cd /etc/openvpn/easyrsa

sudo ./easyrsa init-pki
- Generate the CA certificate.
sudo ./easyrsa build-ca
- Enter the required information according to the prompt.
When asked for a password, make sure to write it down as it will be required later on.
- Generate the Server certificate.
sudo ./easyrsa build-server-full server nopass
- Generate the DH parameters file.
sudo ./easyrsa gen-dh
- Generate the
crl.pemfile.
sudo ./easyrsa gen-crl
- Generate the OpenVPN Server configuration and running files.
-
Create the OpenVPN server configuration file and fill it in.
-
Create the folder the file will reside in.
sudo mkdir -p /etc/openvpn/server
- Create the file and open it for editing.
sudo nano /etc/openvpn/server/config.ovpn
You need to change the local private_address IP with their private AWS IP.
 Figure 1: AWS Instance Private IP
You have to add an inbound rule in the AWS Security Group for UDP port 1194.
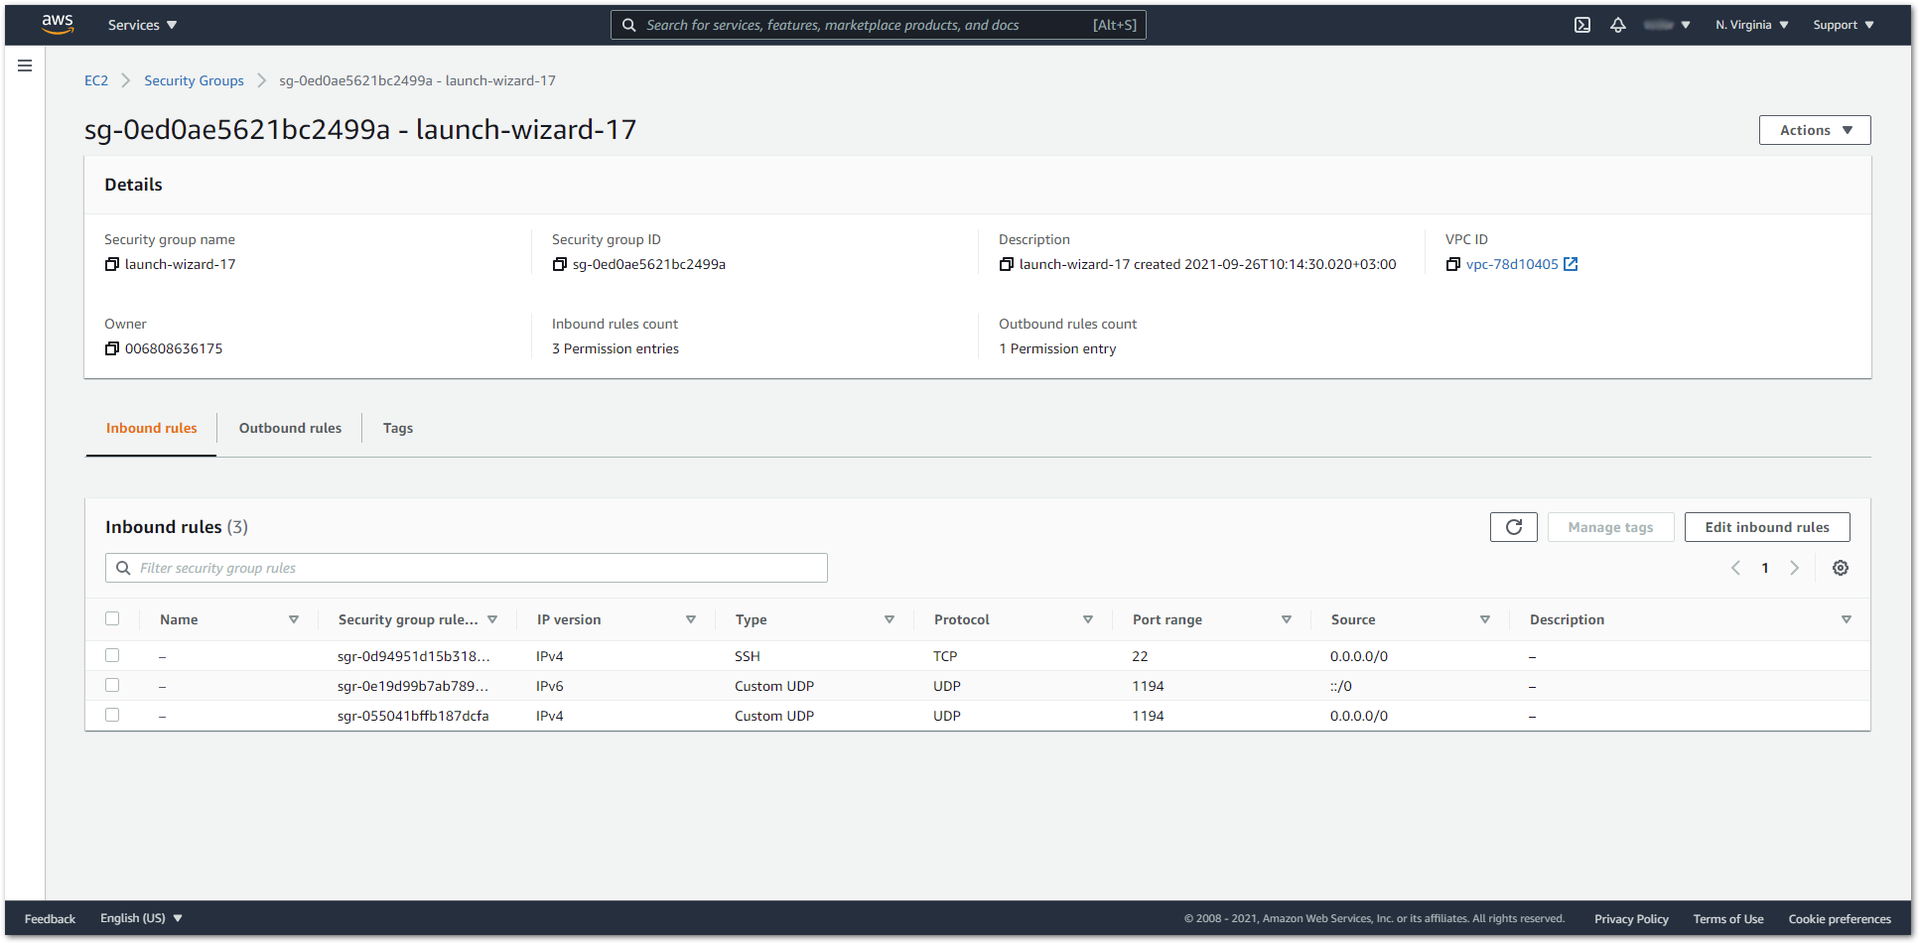 Figure 1: Security Group Inbound Rules
# openvpn server
cd /etc/openvpn/server
daemon
dev tap
proto udp
#local ipaddr to bind. Change it with Server IP.
local private_address
port 1194
server-bridge 10.0.8.1 255.255.255.0 10.0.8.11 10.0.8.100
ifconfig-pool-persist ip_pool.txt
up interface-up.sh
client-to-client
keepalive 10 120
comp-lzo
user root
group root
persist-key
persist-tun
cipher AES-256-CBC
ca /etc/openvpn/easyrsa/pki/ca.crt
cert /etc/openvpn/easyrsa/pki/issued/server.crt
key /etc/openvpn/easyrsa/pki/private/server.key
dh /etc/openvpn/easyrsa/pki/dh.pem
crl-verify /etc/openvpn/easyrsa/pki/crl.pem
status /var/log/openvpn-status-server.log
log /var/log/openvpn-server.log
verb 3
script-security 2
- Create and fill in the
interface-up.sh. This is a script that will create the virtual tap interface:
sudo nano /etc/openvpn/server/interface-up.sh
- The content must be filled in the file.
#!/bin/sh

/sbin/ifconfig $1 10.0.8.1 netmask 255.255.255.0 broadcast 10.0.8.0
- The script can be made executable by using the following command:
sudo chmod +x /etc/openvpn/server/interface-up.sh
- Start OpenVPN. If you want OpenVPN to run on instance startup, then run the command:
sudo systemctl enable openvpn
The following command will get the tap interface up:
sudo openvpn --config /etc/openvpn/server/config.ovpn
- If you want OpenVPN to execute the configuration file automatically, rename the
config.ovpntoconfig.confand move it to the/etc/openvpnfolder.
In this way, if the Operating System is rebooted, OpenVPN will automatically load the tap interface.
cd /etc/openvpn/server

sudo mv config.ovpn /etc/openvpn/config.conf
- To check whether the OpenVPN virtual interface is up, run the following command:
ifconfig tap0
You should see a similar output if the tap0 interface is up and running:
tap0: flags=4163<UP,BROADCAST,RUNNING,MULTICAST> mtu 1500
inet 10.0.8.1 netmask 255.255.255.0 broadcast 10.0.8.0
ether 3a:37:f6:5a:bb:32 txqueuelen 100 (Ethernet)
RX packets 45125 bytes 8292906 (7.9 MiB)
RX errors 0 dropped 0 overruns 0 frame 0
TX packets 16611 bytes 2205218 (2.1 MiB)
TX errors 0 dropped 0 overruns 0 carrier 0 collisions 0
- Setup the OpenVPN Management Client.
- Generate the OpenVPN Server client certificate for your PC.
In this tutorial, management will be used as the name for the client PC.
cd /etc/openvpn/easyrsa
# ./easyrsa build-client-full <client_name> nopass
sudo ./easyrsa build-client-full management nopass

# Update certificate control file
sudo ./easyrsa gen-crl
- Make the OpenVPN Client profile file.
The <ca>, <cert>, and <key> in the configuration file are the CA certificate, Client certificate, and Client secret key.
-
The CA certificate is located in:
/etc/openvpn/easyrsa/pki/ca.crt -
The Client certificate together with the Client secret key are generated in the previous step (step 4). Client certificate:
/etc/openvpn/easyrsa/pki/issued/<client_name>.crt -
Client secret key:
/etc/openvpn/easyrsa/pki/private/<client_name>.key -
Open a text editor in your PC and copy the following template, then change the
public_addressIP with their Amazon Instance Public IP. Each certificate must be added in its corresponding section by copying the content from the locations mentioned above and replacing the corresponding section in the template.
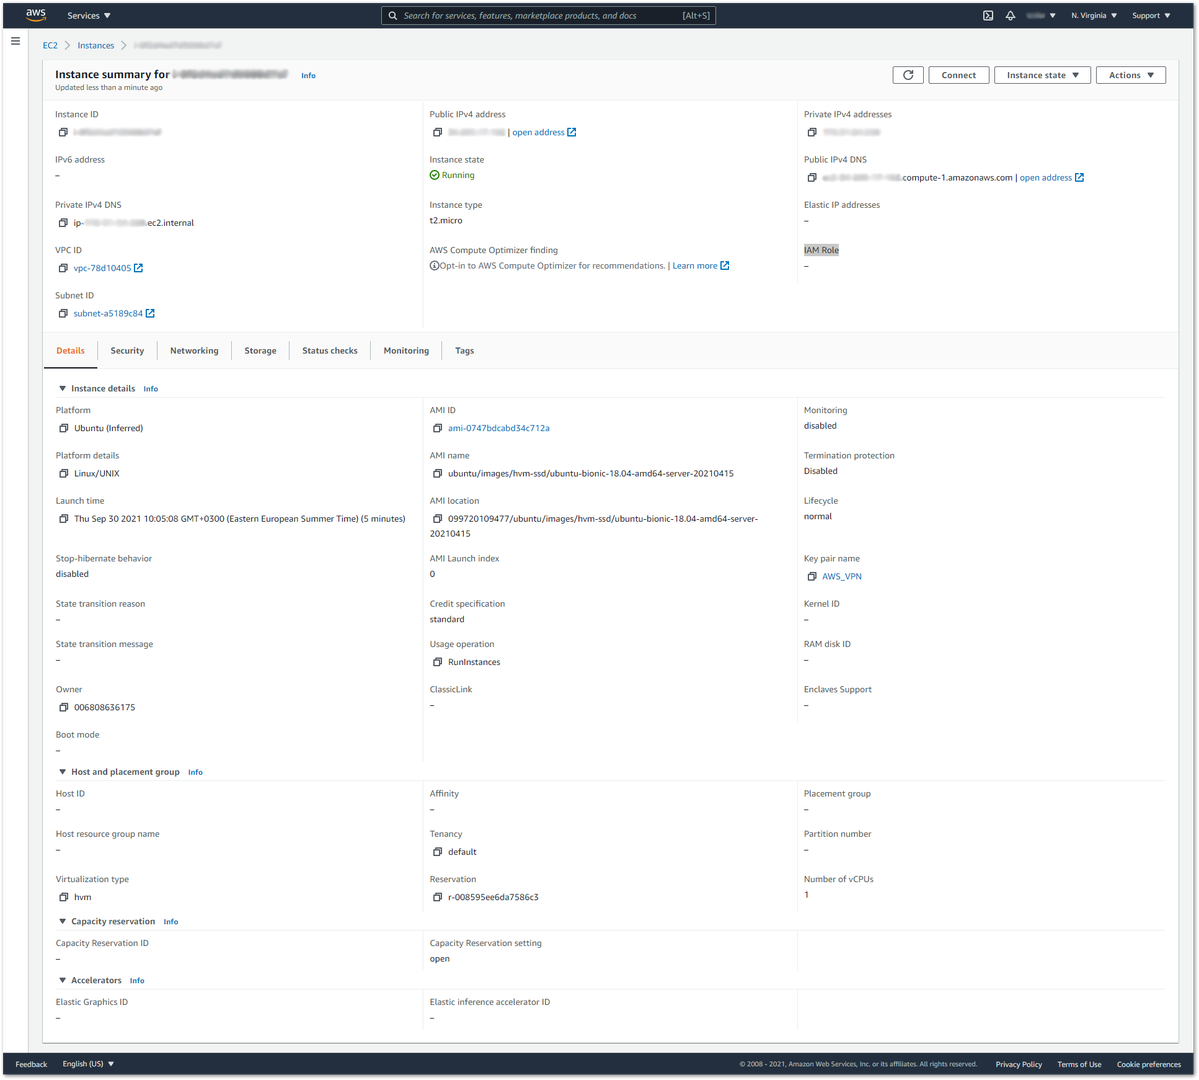 Figure 1: AWS Instance Public IP
dev tap
client
remote public_address 1194
proto udp
nobind
auth-nocache
cipher AES-256-CBC
resolv-retry infinite
persist-key
persist-tun
remote-cert-tls server
comp-lzo
verb 3
# copy from openvpn-server /etc/openvpn/easyrsa/pki/ca.cr
<ca>
-----BEGIN CERTIFICATE-----
MIIDNTCCAh2gAwIBAgIJANYEjCM+cqsxMA0GCSqGSIb3DQEBCwUAMBYxFDASBgNVBAMMC1JBS1dpcmVsZXNzMB4XDTE5MTEyNTAxMzIyOVoXDTI5MTEyMjAxMzIyOVowFjEUMBIGA1UEAwwLUkFLV2lyZWxlc3MwggEiMA0GCSqGSIb3DQEBAQUAA4IBDwAwggEKAoIBAQDZS/8PCehr3TSTvidQLFVYT5EydKDVidEUm6/yOE0BZs99kZKGn6eFmFQnBfve4mAHzPnC3amiuCh+01kf97P7MDpS/cYTdR9RB9Xng/jyBQqMVVHLbwoGIS7mQmBpV0NdU8RYKsLCARPn50eRGiL2AS6cPDSjrrj2xsBEydTsjE/95gJ7AvWQRPRoVTI9S31mY6tLrs16zydtEXWicDVaRFkvultijCmCiUhfaDE8lt1dQxd5jkvwcHtm1EBdHjyce7oXa+Og0p2c5EmTb1K2pjHZHG0jINv9lErC049g/ey7CcddDd+QBm7fqArIaov7kk+U7zKhBrTVH3dmPWEHAgMBAAGjgYUwgYIwHQYDVR0OBBYEFLd+eVD4IqyA84ABBeFupjEV0+bOMEYGA1UdIwQ/MD2AFLd+eVD4IqyA84ABBeFupjEV0+bOoRqkGDAWMRQwEgYDVQQDDAtSQUtXaXJlbGVzc4IJANYEjCM+cqsxMAwGA1UdEwQFMAMBAf8wCwYDVR0PBAQDAgEGMA0GCSqGSIb3DQEBCwUAA4IBAQABFT6ZgK7YtM5tZEfEKSCMUxfESJ+4pPN2lryZVskXtD6BfjvKkQpj3A+R6MRNloOPvZ4spAvH5fFvfI97Ts40rQjWpgPLQDEBcgBi6dzzmMSap/iw9wLtgqWFVm+LXPMHQnqBKfs2HksTlKOhiKZlvtGYfxay6kbMU35LX8WdRxx8JNvRNIDL68lLdreXB7vTKQYAvcKPo1GuZFqKV2KFxpjxzLg1BeM3U4X5k4xDQDaOHENKJO4pdWBfMLP3AAyC9wq481POhgA1R8ZAt+psYxOAB6O3A1SzDJ/df5ciPdsp1Kia0HCB2cGIZ7ZwfzPDNivH8/bTn7UOb+khvmsD
-----END CERTIFICATE-----
</ca>
# Client certificate PEM
# Copy from server /etc/openvpn/easyrsa/pki/issued/managment.crt
#
<cert>
-----BEGIN CERTIFICATE-----
MIIDTzCCAjegAwIBAgIQVm22YDcNRRzycbFHSEkkFjANBgkqhkiG9w0BAQsFADAWMRQwEgYDVQQDDAtSQUtXaXJlbGVzczAeFw0yMDAyMDUwMjI5MzZaFw0yMzAxMjAwMjI5MzZaMBcxFTATBgNVBAMMDFJBSzcyNThfNjY2NjCCASIwDQYJKoZIhvcNAQEBBQADggEPADCCAQoCggEBAK53T6vlbm4xVgM5z8fC6ul5WsdT3gfEGEOKu0MWcxq4YP0jrhXAwJV20EdUXYiFIOdf9woYvv8ANTFYHIBAT+jZrGhbhph7QSzmb1xzc3g/nGJVJAW7L10EmQ0mSsi64NTv/8Ou7wZQpqd8+FuIjDbMFJMP24GbqswG6nnhJCST1b1hfAgijK/dagRFJTcYhJcutwJrpUjhdAwVBG/GuXQwyI82WXzpqvVyfPgCb4Ek9ehHuA1Zsmgp68ChGFM+WrEZ1sETDlxlNAfsON7hihf3xYZ2iZ/6rq5RpUczJm3P9dxO74I8/dxe9TnNcIvqasxGg3jZW4UvQyATqnb+z5kCAwEAAaOBlzCBlDAJBgNVHRMEAjAAMB0GA1UdDgQWBBRQkqjMkMV4u8R0EKDDG08qjxJb4TBGBgNVHSMEPzA9gBS3fnlQ+CKsgPOAAQXhbqYxFdPmzqEapBgwFjEUMBIGA1UEAwwLUkFLV2lyZWxlc3OCCQDWBIwjPnK67dATBgNVHSUEDDAKBggrBgEFBQcDAjALBgNVHQ8EBAMCB4AwDQYJKoZIhvcNAQELBQADggEBAGDGH6+b1EGkVj//EDyJUBISWWcXC8EwmrT25TgaWDid21QQatQahriVOFHu0B7DGSJb6kw4Om8Mz+kef1v529VIip56wP4I7aVQdcTgSoVBCc0ToXxGO+EXPWc0jBwPReofMzYeaZ+hZcSHeFOYAso5aFSMfk5Z7qwYQfajZQ7AdTj2NcxH92bIv7JUzW6Xh8OcTuTzQd4J2dtJr4ObnRkYrqg27dzlV1dz73hJJIs7AXUH4wivehV3VGd95am6ejs4Hedhaw23h+pV91LmG4gdb6EPHm0JPCHbaQAbJzF75JEh0CLOlDFBK419Dgg10n0gqLkSTcp+CzNlCx7k+24=
-----END CERTIFICATE-----
</cert>
# Client key PEM
# Copy from server /etc/openvpn/easyrsa/pki/private/managment.key
#
<key>
-----BEGIN PRIVATE KEY-----
MIIEvQIBADANBgkqhkiG9w0BAQEFAASCBKcwggSjAgEAAoIBAQCud0+r5W5uMVYDOc/HwurpeVrHU94HxBhDirtDFnMauGD9I64VwMCVdtBHVF2IhSDnX/cKGL7/ADUxWByAQE/o2axoW4aYe0Es5m9cc3N4P5xiVSQFuy9dBJkNJkrIuuDU7//Dru8GUKanfPhbiIw2zBSTD9uBm6rMBup54SQkk9W9YXwIIoyv3WoERSU3GISXLrcCa6VI4XQMFQRvxrl0MMiPNll86ar1cnz4Am+BJPXoR7gNWbJoKevAoRhTPlqxGdbBEw5cZTQH7Dje4YoX98WGdomf+q6uUaVH11Ztz/XcTu+CPP3cXvU5zXCL6iIMRoN42VuFL0MgE6p2/s+ZAgMBAAECggEAGGwPNQra2IYDelQfZ+E7LQ+Vy41L6V5j3yCOcie0WSsyOH1EIztmOgX1xeZjaXbpUjo2xK0OH3gR+iRRaQqXpQrDfaBCSRoH15cyQ4jNwyl0ZLdyYXMAgE7iddrEYTD3xBcMgIH+Z63mhk+SHI4SwqDyyFtR6OS3lfPp4sHHY28rFJPXW7a10M+pxjEX+A8m3UM4VJiLy2YeklB7laJkQjHcA/Gh+sh/0NjZwCYyWWAiirATLDSa3z6N7yr3xAO/J4vEZVaGxyyJRvR4qmr0xE15xyCfQQcWdw1DpGT9uBk/4z/1Tq2sJUekzYebeENliJY3ADVsVS0JszRRHCYwGQKBgQDhRlwvrjvRP8ZCd9thssKXgkJBUSqxp8VvFtylMKy2koNq6S2S3yiGmiNWd7JxdGk+77MGmA8kTdpORMcNL9xSLMWiuMLHGEYf79TkON0ZBqN/wwuPttJG8ICWhqAjL+dDcLoqz8j4dO6FwKPoz+fVjVupXgYKfqLpm9SAD1apewKBgQDGQuyhzv0Ru7o29MDg5YZ0dwj9bV1KzlFf3DAdcX+k4Z48R50e5VhewIedA3eafy+UER63CAWLQru96sbRoGkk8aKBk9AGJPFbi4NVWWaiUA2A2WVUKkdIQsNrr2xHBTwiFPftTxWRWUT1DKgF+uHvSzBKfn13PReSKCjxzPis+wKBgQDVeW9yX5GfwOeHpTznYBa2rGFMtDXZFDssAmYkw/NnL4AJl93wCDjHFNnX3qXijYYOdecYoI/4vy3YbaSTAn+t/29pu9wX/xC0wvjjLF+Yj4nwUExsa7roLpAsFHc74PEuH2zLlQvFJknBxcONozb2T3ZFESx4VXjcFydQEzj0cQKBgANqWbs73p40lrOlqcD2E0fkWRJMlQPZ5Ar7txR6xREpFdnB/hHvL4OKW4u36JKPyFkLpnTOvZG1l5hg+AXadpU9WGhVDItejY3fLGcHAD6hlGn41McLZ2j2RXmQbxQWIgAQTmkXKK71U7vI+QgJV2UQ7YcLAMxSEBrjeDkaJ9qLAoGAEiSjuv5X0PbZpiyH6/GXYuMhFYWZnk/IwoxQW4alBIRuI7EQ+fLvrFUxikMOIsLKtKrcVLjJBgFSz4hIE9YEYnaQ5Vx+RMzTwakRJtPook55pS1HpdK7Y/0oiUOsJGCEzVj8P/e/WrhFqWPGalIJENCGBuhos/YdITFeKQ381zk=
-----END PRIVATE KEY-----
</key>
-
Save the file with the name management_client.ovpn.
-
Download and install OpenVPN Client. After the installation, you can start the OpenVPN GUI Client. You will see an icon in the taskbar.
 Figure 1: OpenVPN Taskbar Icon
- Right-click Import file.... Navigate to the
management_client.ovpnfile and open it.
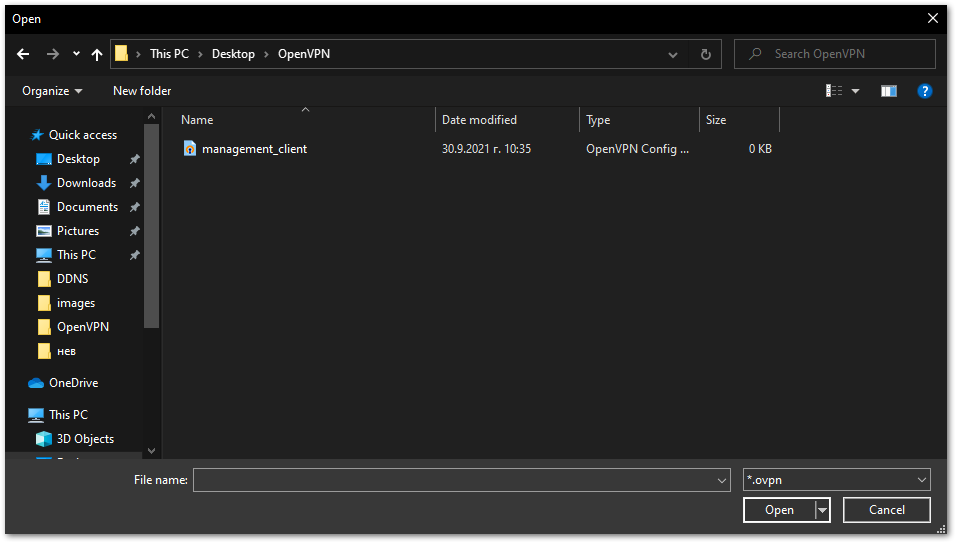 Figure 1: Importing OpenVPN Client File
- You have to make sure to go into the OpenVPN menu again and press Connect (it will not initiate automatically).
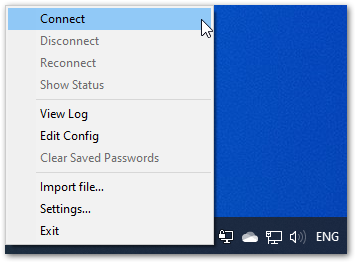 Figure 1: OpenVPN Connection Initiation
- If everything is set up properly, there will be a connection log window that will disappear after the procedure runs through.
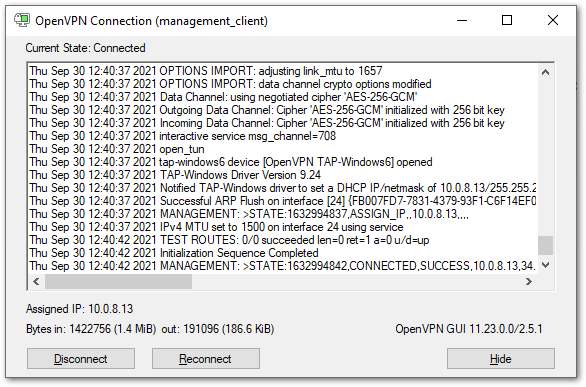 Figure 1: OpenVPN Connection Log
- The OpenVPN should now be in green, meaning the connection is successful.
 Figure 1: Successful Connection Log
- You can check which clients are currently connected to the OpenVPN Server and their corresponding IP addresses by executing the following command in your Ubuntu console:
sudo nano /etc/openvpn/server/ip_pool.txt
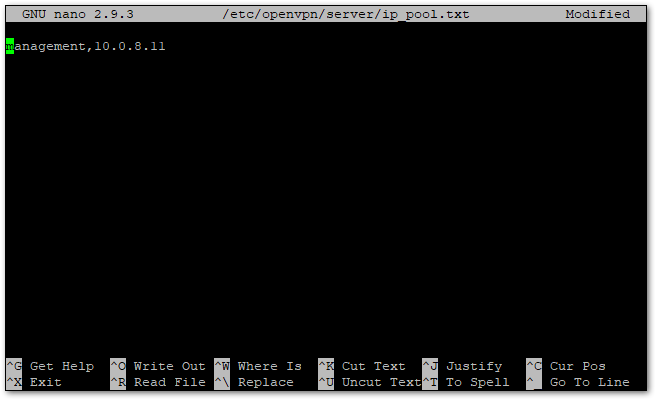 Figure 1: Successful Connection Log
There should be only one client and its IP address visible now. This is the PC connected to the OpenVPN Server. Later, the gateway also should be visible.
- Setup OpenVPN client on LoRa gateway.
The procedure for generating the keys for the gateway is the same as the one for the Management PC, with the exception of there being a different client name.
You can go through the previous steps again. Do the same procedure, not forgetting to replace the “management” name used for the client with the one for the gateway. For this tutorial, RAK7249 is used.
Once you have assembled the certificates into a single file, it needs to import the contents into the OpenVPN client section of their gateway.
-
Log into the gateway via the Web UI (locally). Make sure it still have local network access to its gateway and connect to it to access the Web UI.
-
OpenVPN is configured in the Services > OpenVPN Tunnels menu. Enter a name and press the Add button.
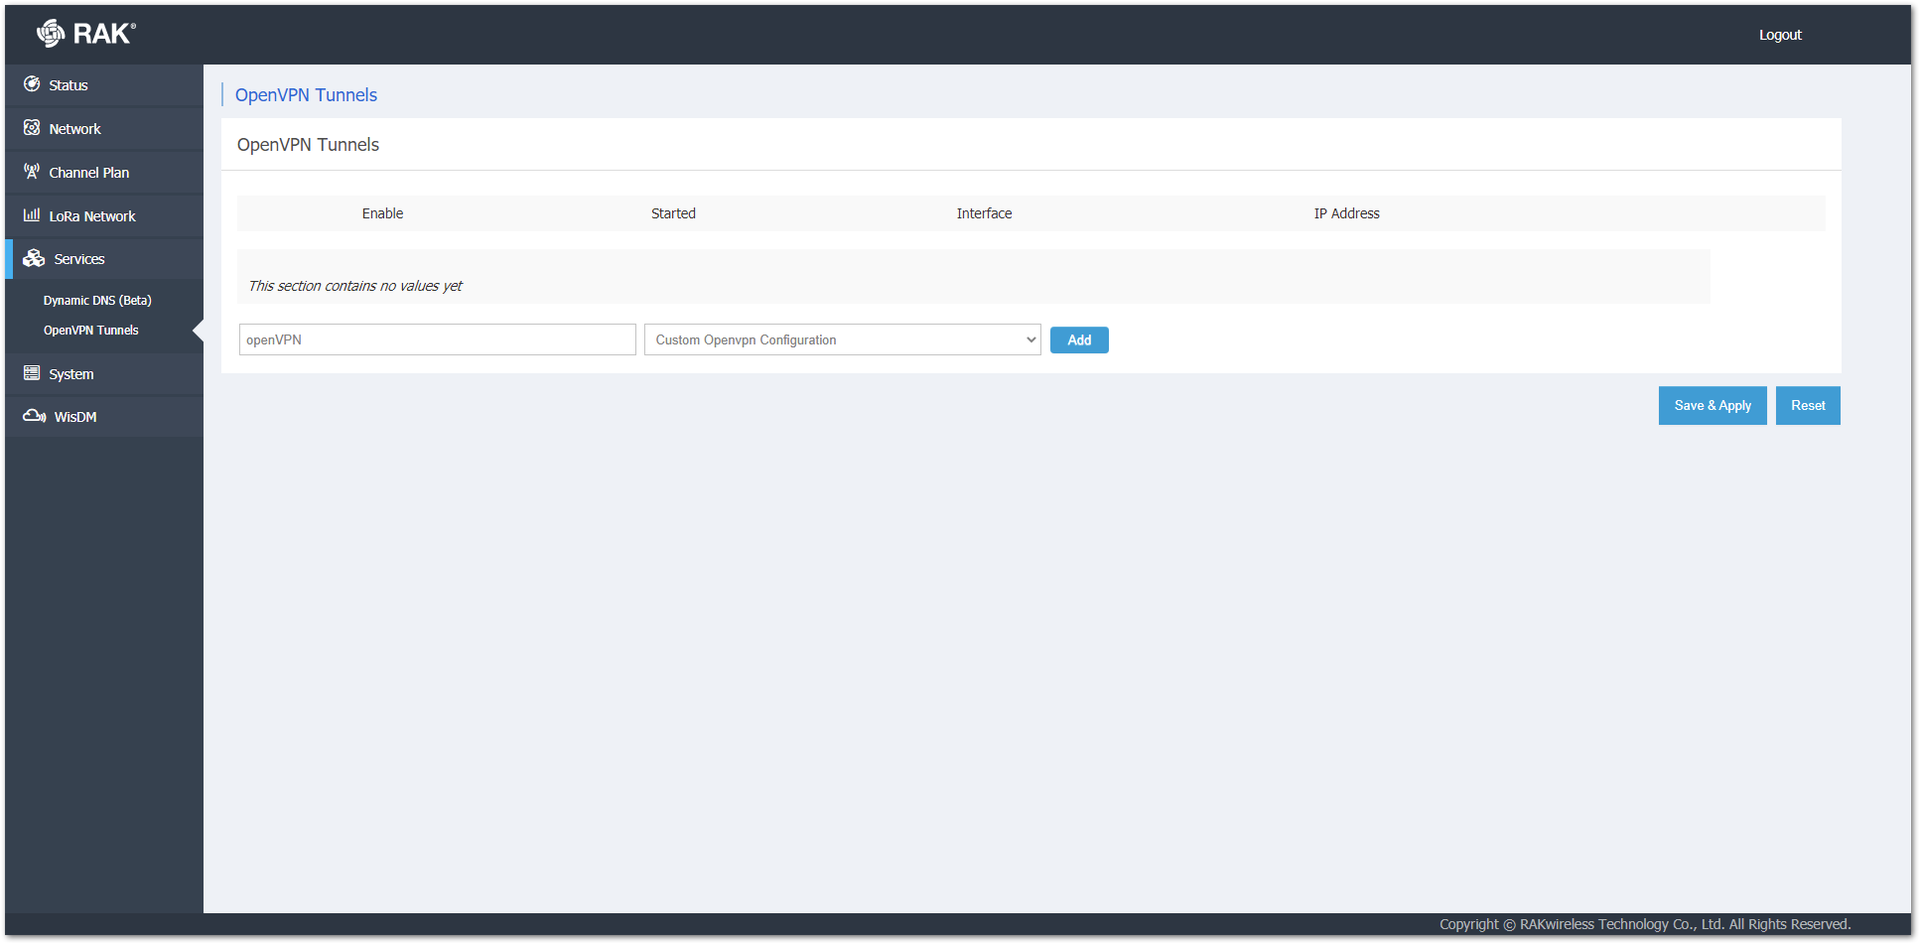 Figure 1: Creating an OpenVPN Tunnel
- In the next window, copy and paste the content of the file they created at the beginning of the previous steps (step 7) and click Save & Apply.
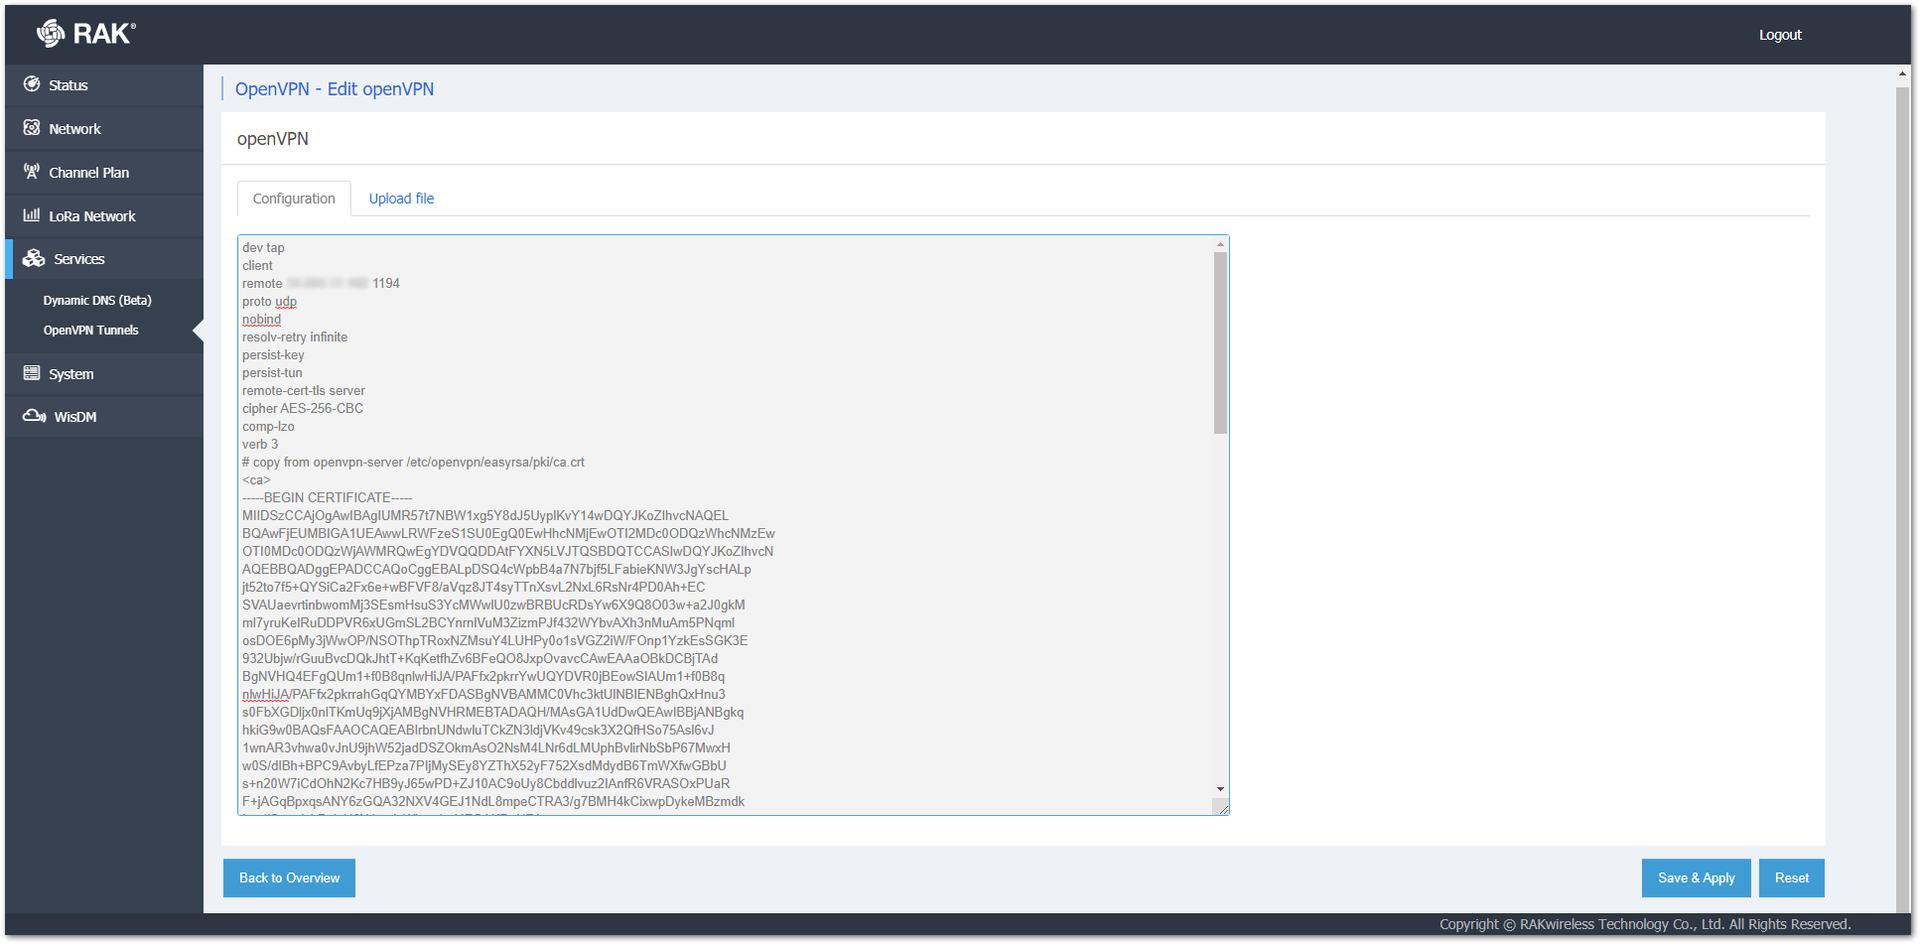 Figure 1: Importing the OpenVPN Certificate Data
- By default, after creating the tunnel, it should be enabled. You can check that in the windows.
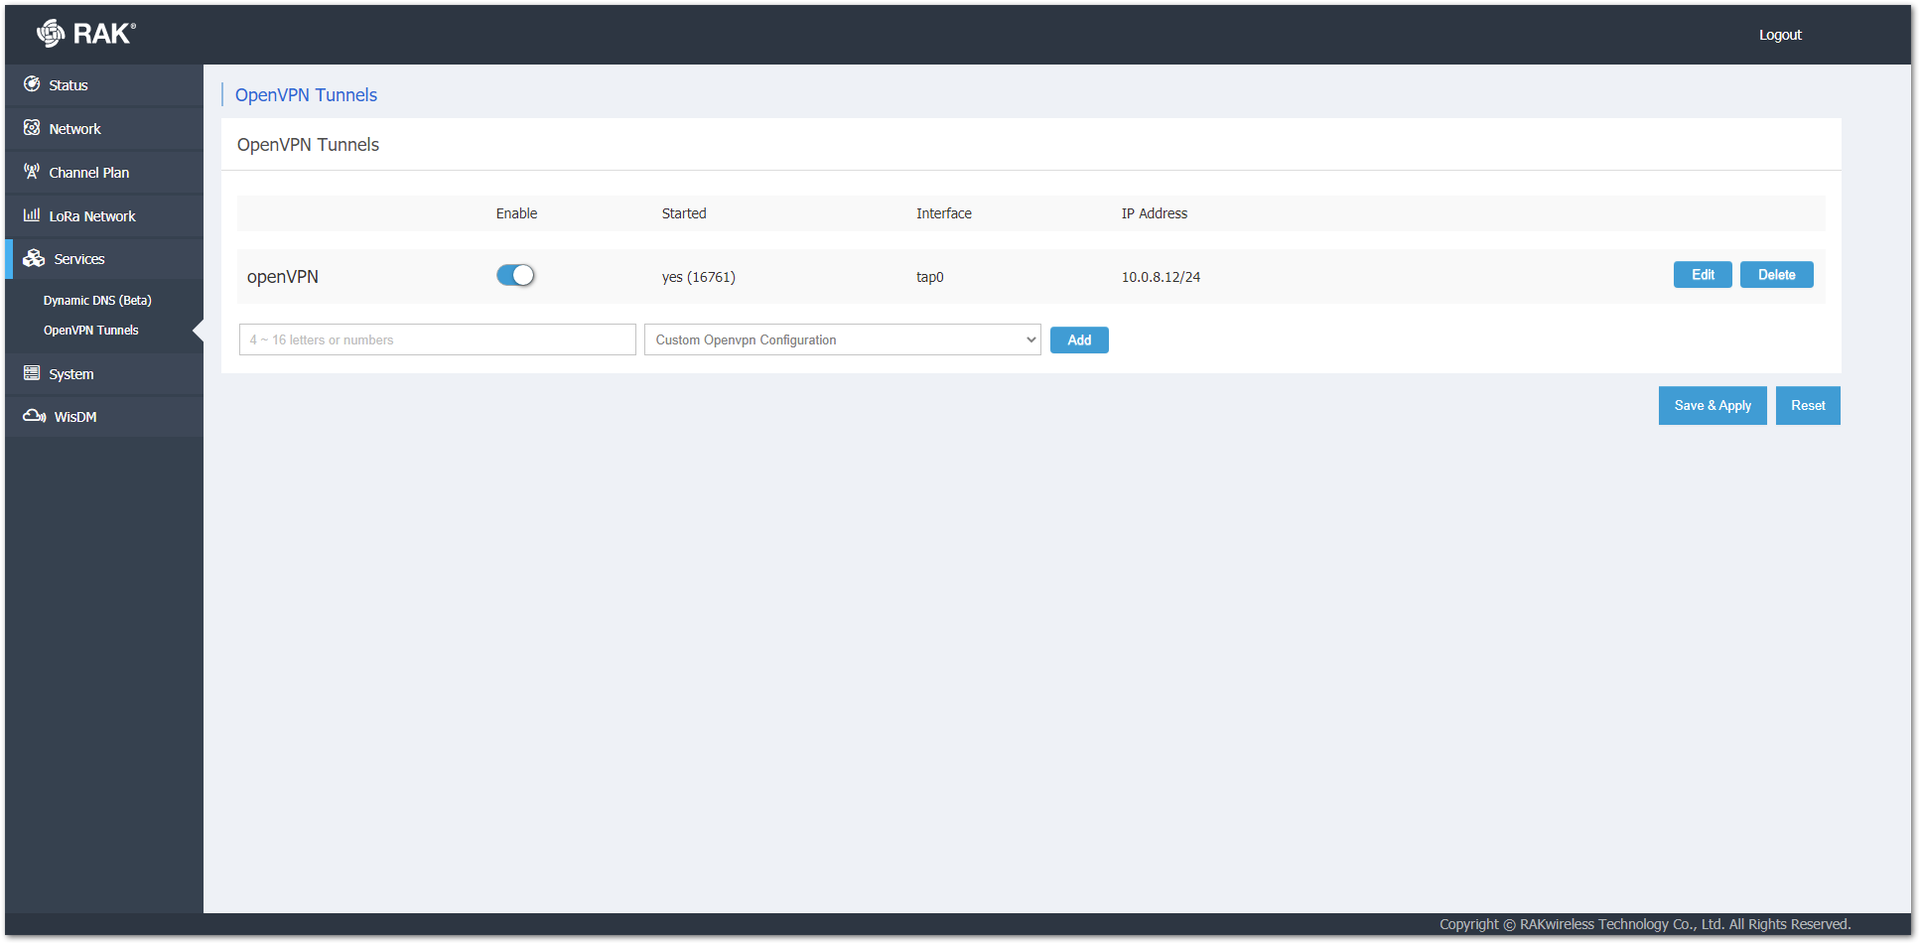 Figure 1: Enabling OpenVPN
- Check again in the client list file on the OpenVPN server for the IP address of the gateway with the command:
sudo nano /etc/openvpn/server/ip_pool.txt
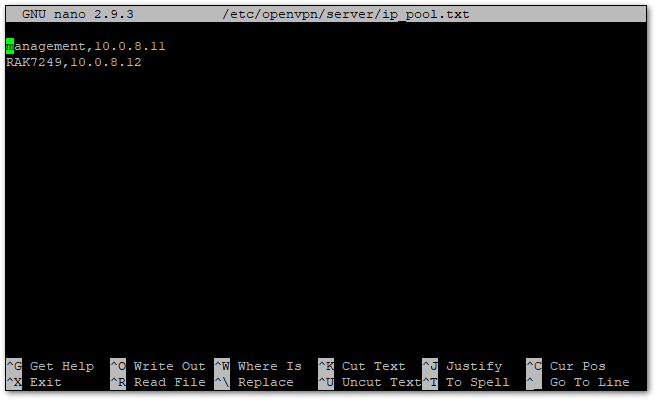 Figure 1: OpenVPN Connected Client 2
The IP address of the gateway should be in the second entry.
- Log into the Gateway (remotely).
Now, you can remotely access the gateway using the IP address assigned to it by the OpenVPN Server. This can be utilized for an SSH2 connection, the Web UI (via a browser), and many other applications.