WisDM LoRaWAN® Network Configuration
Overview
The Locations > select a target location >LoRaWAN section is used to configure how gateways in a Location connect to a LoRaWAN Network Server.
In WisDM, LoRaWAN network settings are managed at the Location level. Gateways assigned to the same Location use the Location’s LoRaWAN configuration, including the work mode, frequency plan, and server connection settings.
You can configure LoRaWAN settings when creating a new Location or update them later from the Location details page.
Configuration Methods
When configuring a Location, you can use one of the following methods:
| Method | Description |
|---|---|
| Configure manually | Select a work mode and configure the required LoRaWAN parameters step by step. |
| Apply an existing template | Apply a saved configuration template to quickly reuse common LoRaWAN settings. |
Work Modes
WisDM supports three Location work modes:
| Work Mode | Description | Best For |
|---|---|---|
| Packet Forwarder | Gateways forward LoRaWAN packets to an external LoRaWAN Network Server using Semtech UDP Packet Forwarder (GWMP) or LoRa® Gateway MQTT Bridge. | Deployments that already use an external LNS, such as ChirpStack or other compatible servers. |
| Basics™ Station | Gateways connect securely to an external LoRaWAN Network Server using the LoRa Basics™ Station protocol, including CUPS/LNS and certificate or token-based authentication. | Production deployments that require secure LNS connectivity and centralized server-side credential management. |
| Built-in Network Server | One gateway acts as the Central Gateway and runs the built-in LoRaWAN Network Server. Other gateways can work as Extender Gateways and forward packets to the Central Gateway. | Local deployments, quick pilots, private networks, or edge scenarios without an external LNS. |
During Location creation, you can select any supported work mode. After the Location is saved, work mode changes are limited. A Location configured as Packet Forwarder or Basics™ Station cannot be switched to Built-in Network Server after it is saved.
Access LoRaWAN Network Configuration
- From the left sidebar, click Locations.
- Select the target location.
- Navigate to the LoRaWAN section of the target location.
Packet Forwarder
When the Packet Forwarder mode is selected, gateways under this location will forward data to an external LNS.
 Figure 1: Packet Forwarder work mode
Frequency Plan
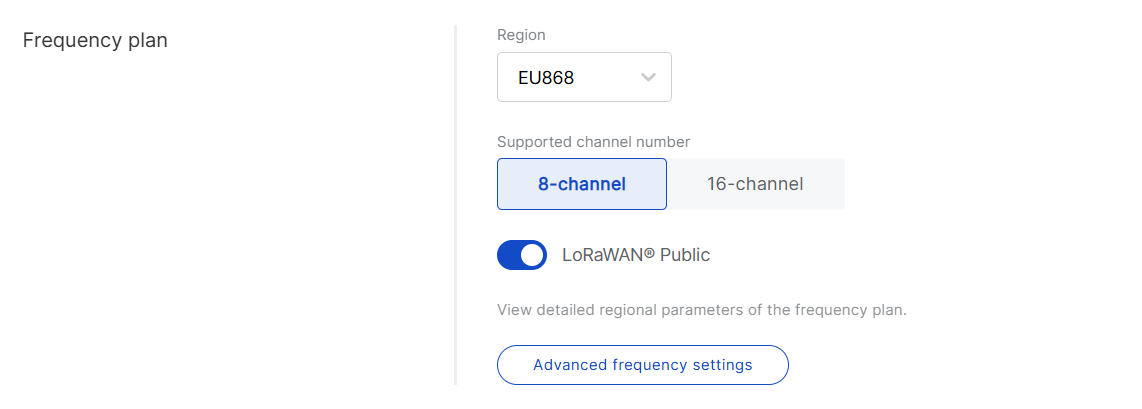 Figure 1: Frequency Plan
-
Region: Select the frequency band that corresponds to your country/region. Each region applies LoRaWAN standard limitations and default values for frequencies and channels.
-
Variation: Required only when Region is set to AS923. Select the AS923 variation that matches your deployment area, such as AS923-1, AS923-2, AS923-3, or AS923-4.
NOTEAS923-2, AS923-3, and AS923-4 are supported in the latest firmware. For gateways running firmware earlier than WisGateOS 1.2.1, select AS923-1.
-
Supported channel number: Choose between 8-channel or 16-channel based on gateway capability.
NOTEThe 16-channel gateways can be added to any location, while 8-channel gateways can only be added to 8-channel locations.
-
Conform to LoRaWAN: Defines whether WisDM uses the standard LoRaWAN regional channel plan.
- Enabled (default): WisDM uses Smart Mode. The channel settings are automatically generated based on the selected Region and LoRaWAN regional parameters.
- Disabled: WisDM switches to Proprietary Mode. You can manually configure custom channel settings for the selected Region. For detailed steps, see Proprietary Mode.
-
LoRaWAN Public: When enabled (by default), the gateway processes data from all end devices operating on the same frequency band. To create a private network, you can disable this option. The gateway will then only process data from end devices with a modified sync word set to private.
-
Advanced frequency settings: Optional. Use them only when you need to review or customize sub-bands, Multi-SF LoRa channels, Standard LoRa channels, or FSK channels.
- Frequency sub-band is required only for regions that use sub-band selection, such as CN470, US915, and AU915. The available sub-band options depend on the selected region and supported channel number.
- Multi-SF LoRa channels are required for regions where explicit channel frequencies are configured, such as EU433, EU868, IN865, AS923, KR920, and RU864.
- Standard LoRa channels are optional and are displayed only for supported regions. They can be used to configure additional LoRa channels with specific spreading factor and bandwidth settings.
- FSK channels are optional and are displayed only for supported regions. They can be used to configure additional FSK channel settings where allowed.
Proprietary Mode
When Conform to LoRaWAN is disabled, WisDM switches from Smart Mode to Proprietary Mode. In Proprietary Mode, you can manually configure the LoRa concentrator and channel parameters within the frequency range supported by the selected Region.
Switching to Proprietary Mode replaces the Smart Mode channel configuration for the current Location.
To configure custom channels:
-
Disable Conform to LoRaWAN.
-
In the warning dialog, click Confirm.
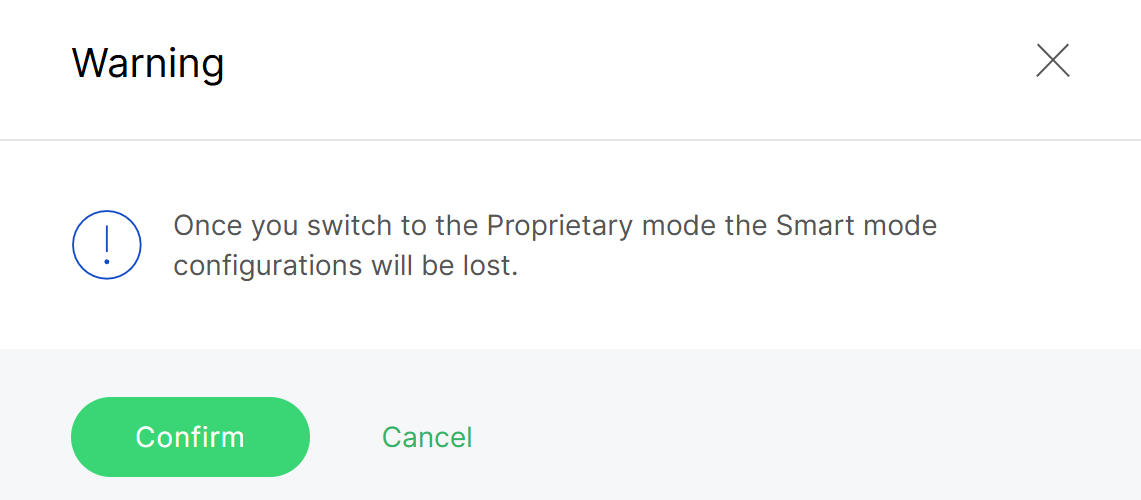 Figure 1: Switch to proprietary mode
 -
In the LoRa Concentrator section, click Edit.
-
Configure the concentrator and channel parameters.
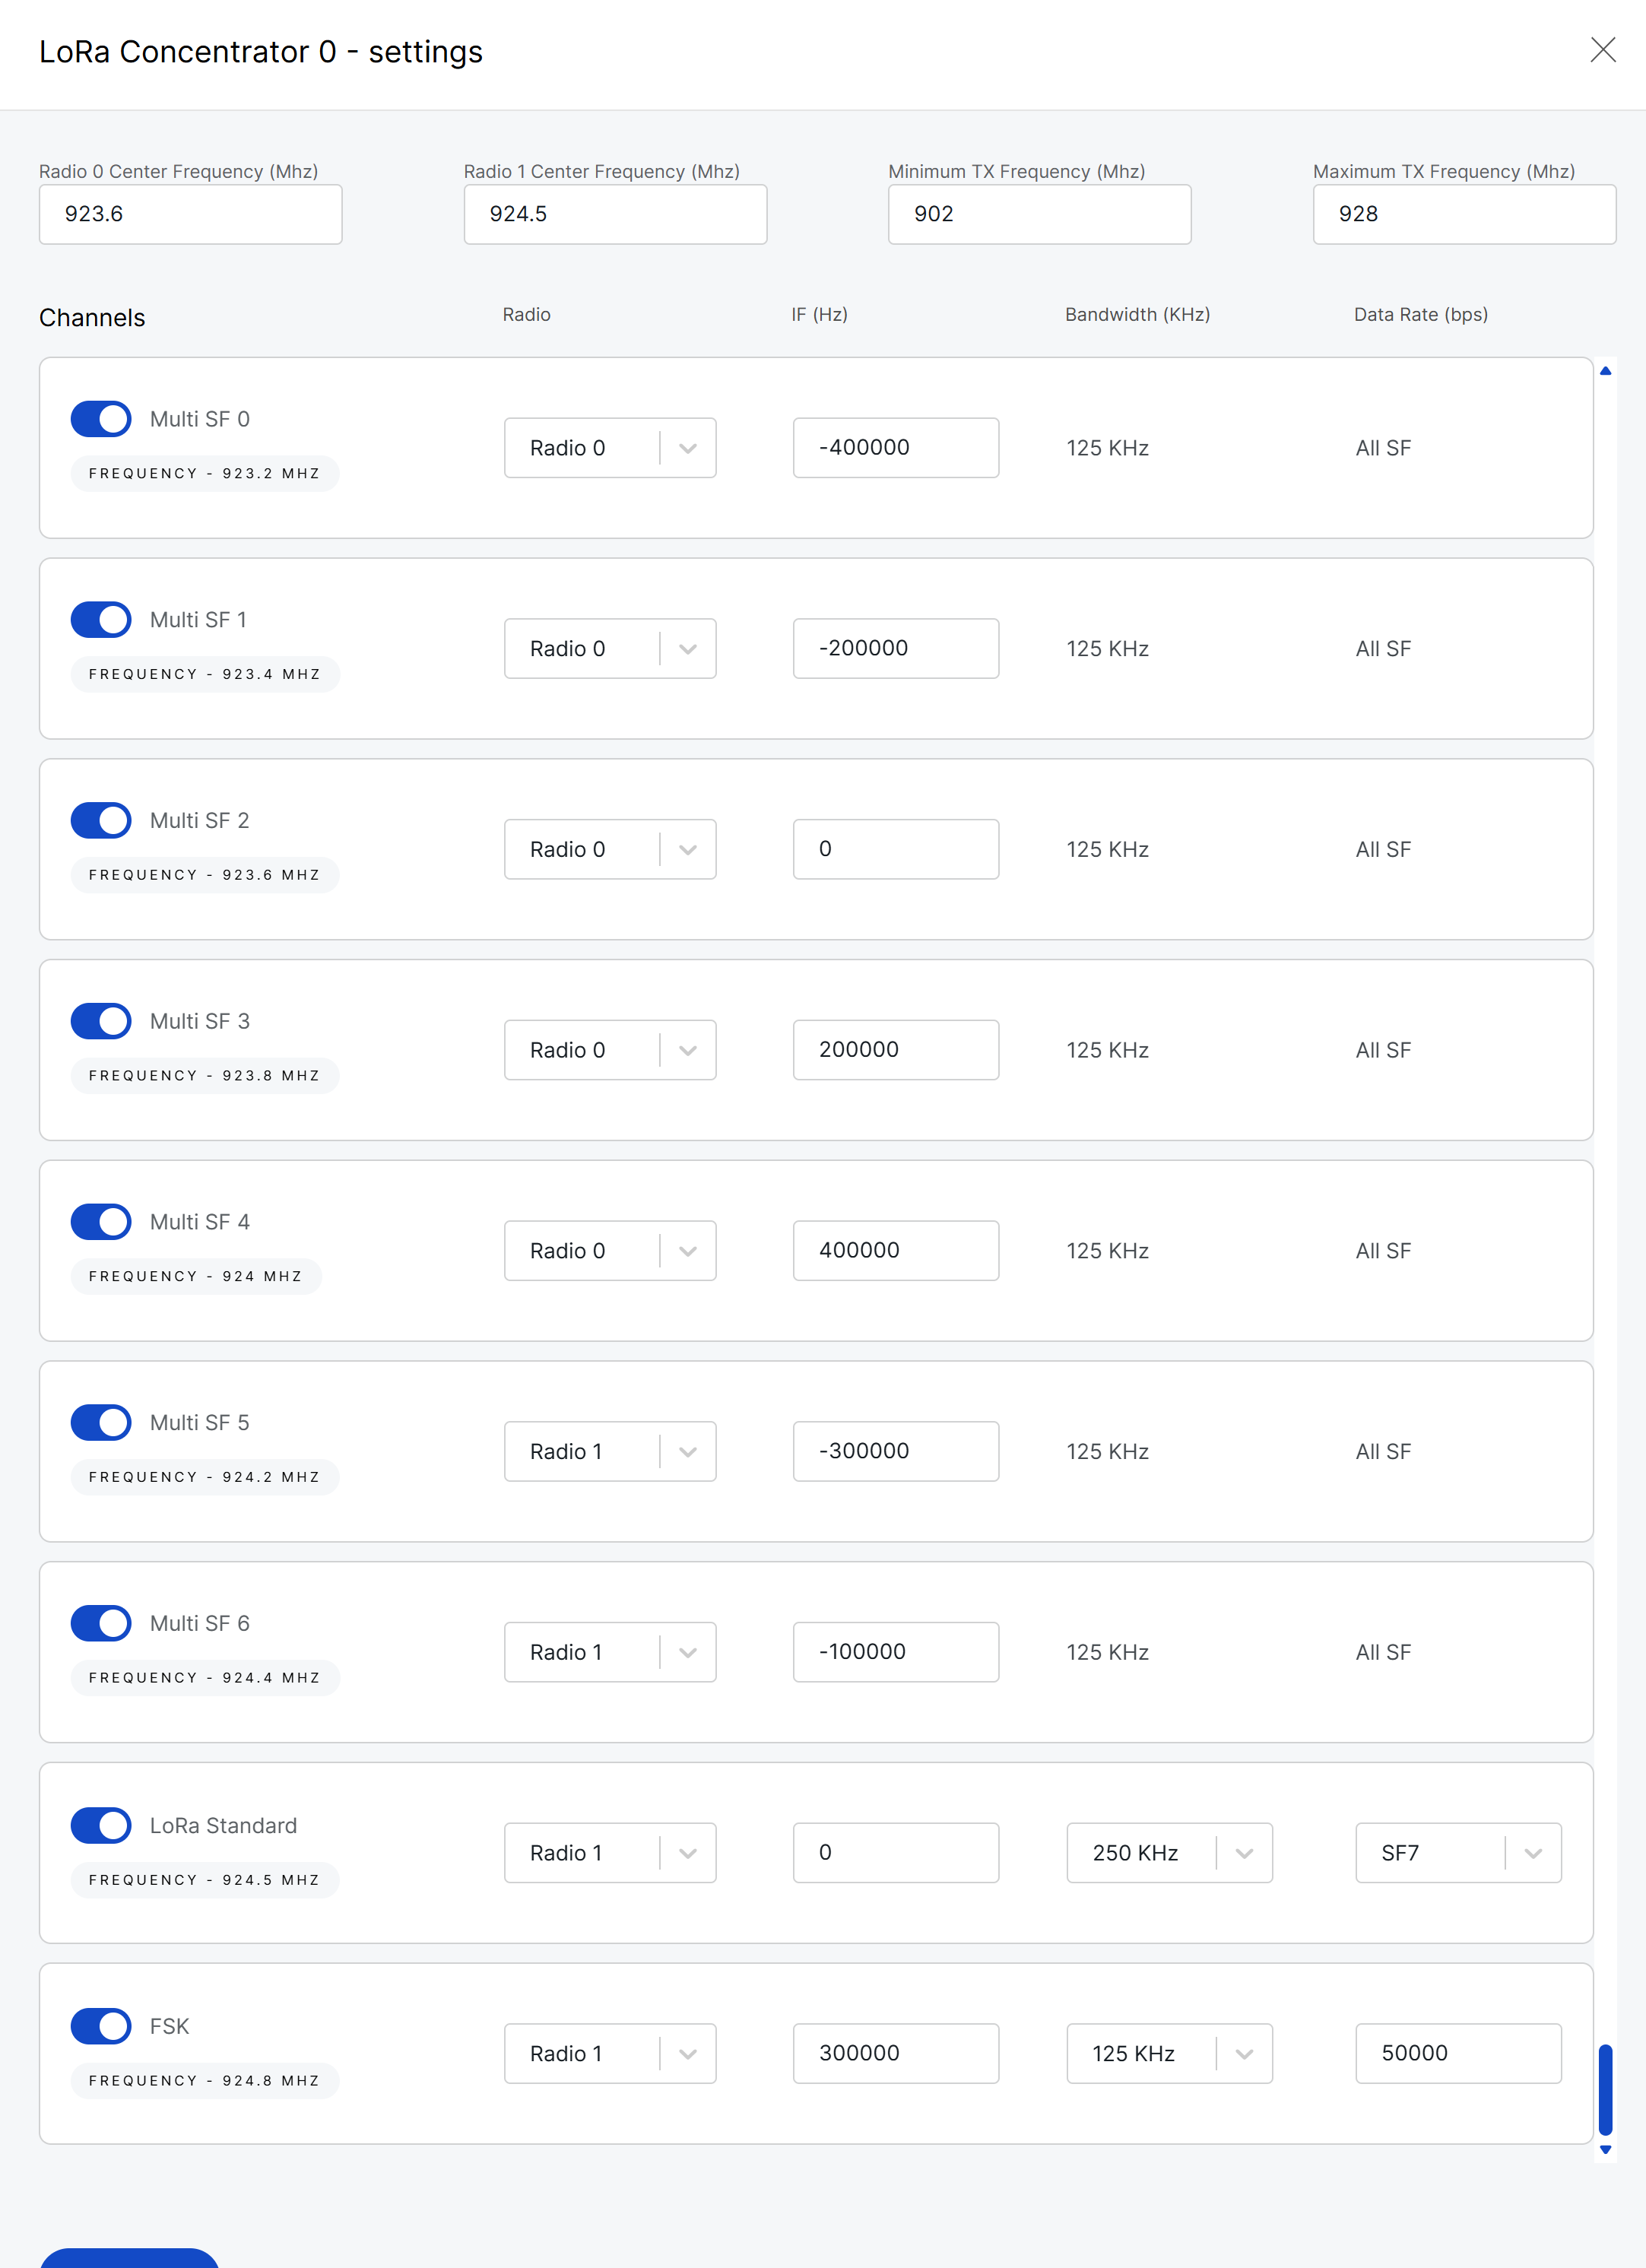 Figure 1: Concentrator and channelconfiguuration
- Radio Center Frequency: Sets the center frequency for the radio.
- Minimum TX Frequency: Defines the minimum allowed transmit frequency.
- Maximum TX Frequency: Defines the maximum allowed transmit frequency.
- Channels: Enable or disable the required channels.
- Radio: Select the radio used by each channel.
- IF: Configure the intermediate frequency offset for each channel.
- Bandwidth: Select the bandwidth for Standard LoRa or FSK channels.
- Data Rate: Configure the data rate or spreading factor, depending on the channel type.
NOTEFor 16-channel Locations, two LoRa concentrators may be available. Configure both concentrators if required by the selected Region and channel mode.
-
Click Confirm to apply the channel settings to the current page.
-
Click Save changes to save the updated Location network configuration.
Semtech UDP GWMP Protocol
When Semtech UDP GWMP protocol is selected, the following parameters are required:
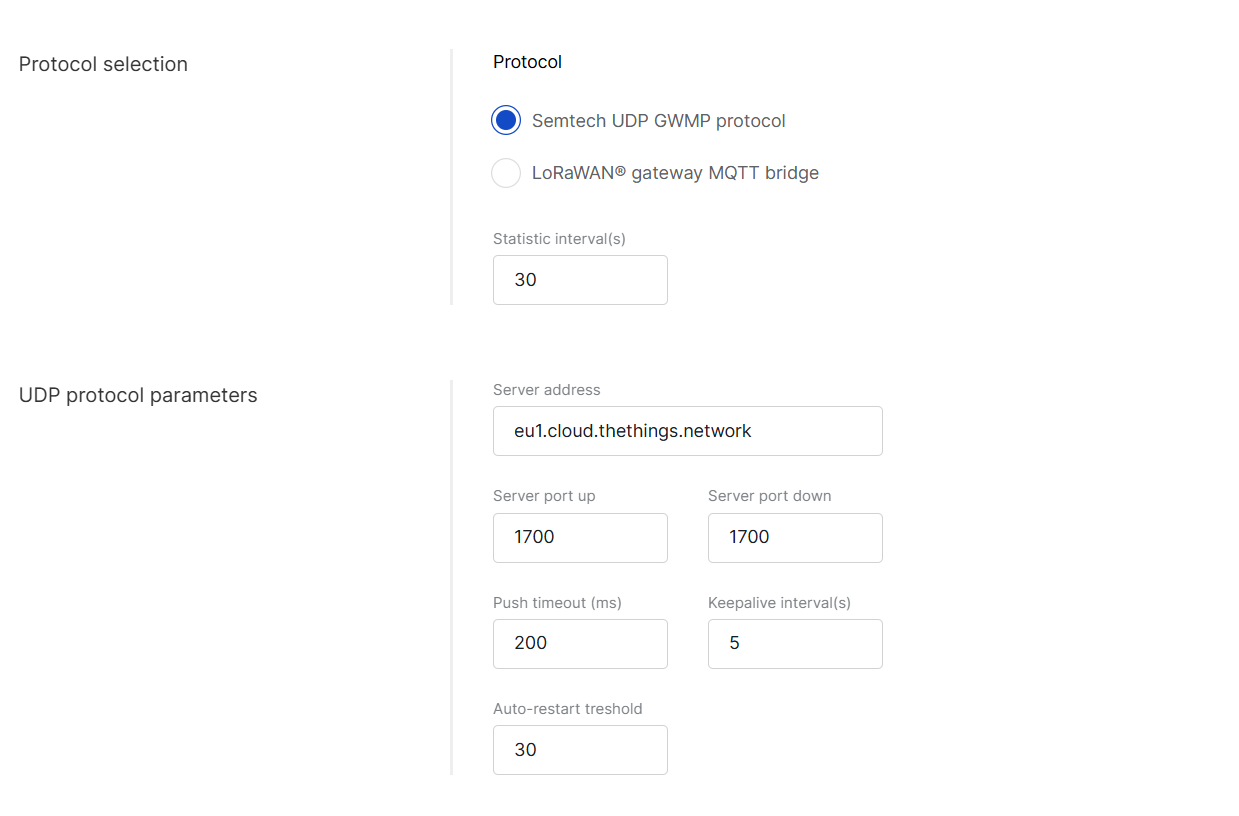 Figure 1: UDP Protocol Parameters
-
Protocol: Select Semtech UDP GWMP protocol.
-
Statistic interval (s): Specifies the interval (in seconds) at which the gateway sends status reports containing operational and packet processing statistics.
-
Server address: Enter the IP address or domain name of your LNS.
-
Server port up: Enter the uplink port used to send uplink packets to the server.
Server port down: Enter the downlink port used to receive downlink packets from the server.
-
Push timeout (ms): Set the maximum wait time for an LNS response after sending uplink data.
-
Keepalive interval (s): Determine how frequently the gateway sends keepalive messages to verify connectivity.
-
Auto-restart threshold: Defines the number of missed keepalive intervals before restarting the Packet Forwarder.
-
Auto Data Recovery: Optional. Enable it only when the deployment requires automatic recovery of gateway data forwarding after a connection interruption.
-
DGRAM MTU: Usually kept at the default value unless your network environment requires a custom UDP packet size.
LoRa® Gateway MQTT Bridge
When LoRa® Gateway MQTT Bridge is selected, the following parameters are required:
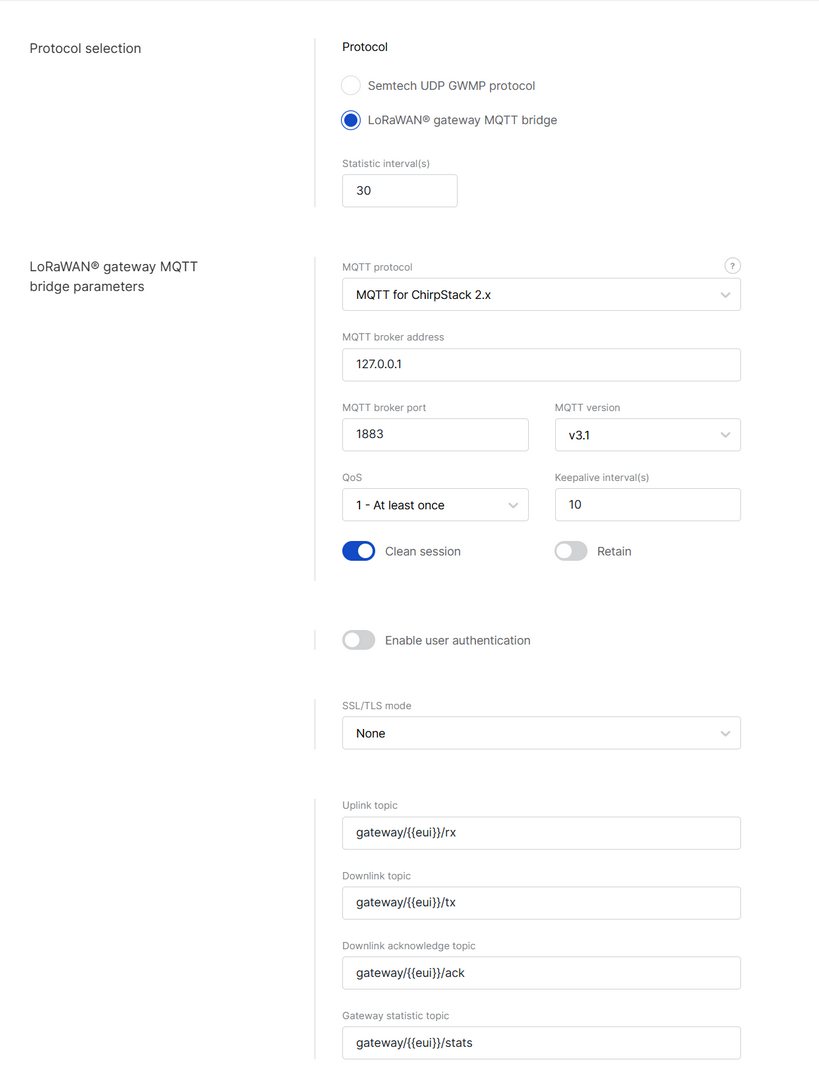 Figure 1: LoRa Gateway MQTT Bridge Parameters
- Protocol: Choose LoRa® gateway MQTT bridge.
- Statistic interval (s): Defines the interval (in seconds) at which the gateway sends status reports containing operational and packet processing statistics.
- MQTT protocol:
- MQTT for ChirpStack 3.x (JSON)
- MQTT for ChirpStack 3.x (Protobuf)
- MQTT for ChirpStack 4.x (Protobuf)
- MQTT broker address: Enter the IP address or hostname of the MQTT broker.
- MQTT broker port: Enter the MQTT broker port.
- MQTT version: Select the MQTT version supported by the broker. See the MQTT GitHub Wiki for details.
- QoS (Quality of Service):
- 0 - At Most Once
- 1 - At Least Once
- 2 - Exactly Once
- Keepalive interval (s): Interval in seconds to keep the connection alive (default:
10). - Clean session: Defines whether the broker keeps session state.
- Retain: Defines whether the broker retains the last published message.
- Enable user authentication: If enabled, enter Username and Password.
- SSL/TLS mode: Configure secure connection.
- None
- CA signed server certification
- Self-signed server certification
- Self-signed server & client certification
- TLS version: Choose between TLS v1.1 and TLS v1.2.
- Key pass phrase (optional): A password used to unlock an encrypted client private key file.
- Uplink topic/Downlink topic/Downlink acknowledge topic/Gateway statistic topic: Topics are predefined by the selected LNS profile and typically do not require changes.
Packet Filter
Packet Filter is optional. It helps reduce unnecessary LoRaWAN traffic by forwarding packets only from selected or trusted end devices.
 Figure 1: Packet Filter
- White List Mode: Disabled by default. Enable it to filter devices based on OUI and Network ID.
- OUI: Filters devices using the first 3 bytes (6 hexadecimal characters) of the DevEUI, which typically identifies the device manufacturer.
- Network ID: A number between 0 and 127 (decimal), derived from the first 7 most significant bits (MSB) of a device’s DevAddr. For example, a DevAddr starting with 0x26 (00100110 in binary) has the first 7 bits as 0010011, which equals decimal 19.
- Auto Filter: Automatically adds trusted devices to the whitelist based on Join request behavior, eliminating the need for manual configuration.
- Join Period (s): Sets the time (in seconds) after which end devices can send join requests again.
- Join Interval (s): Defines the time limit (in seconds) between two consecutive join requests from the same end device.
- Join Count 1: Maximum number of join requests allowed within the join interval.
- Join Count 2: Maximum number of join requests allowed within the join period.
- Discard Period (s): Specifies the duration (in seconds) for which end devices will remain discarded.
After completing the configuration, you can save it as a reusable template for future Locations. See Templates for details.
Basics™ Station
When the Basics™ Station mode is selected, gateways in this location use the LoRa Basics™ Station protocol to connect to an external LoRaWAN Network Server (LNS). This mode offers enhanced security and flexibility compared to the legacy packet forwarder.
 Figure 1: Basics Station work mode
Frequency Plan
 Figure 1: Frequency Plan
- Region: Select the frequency band that matches your country/region.
Frequency plan details are typically managed by the network server to which the Basics Station connects. WisDM retains Region/Channel capabilities solely for compatibility checks. It does not push frequency plans to gateways in Basics Station mode.
Basics™ Station Server Setup
 Figure 1: Basics station server setup
- Basics station server type: When configuring Basics™ Station mode, you can select from the following server types.
- CUPS-BOOT Server: Connects to CUPS only at first boot to request configuration and certificates.
- CUPS Server: Periodically connects to CUPS for configuration updates and firmware upgrade information.
- LNS Server: Forwards LoRaWAN traffic to the Network Server.
- Server URL: Enter the URL of the server that the gateway will connect to.
- Server port: Enter the server's port number.
- Authentication mode: Choose the appropriate authentication mode based on your server's requirements.
- No authentication: The server does not require authentication.
- TLS server authentication: The server requires a trust file for authentication.
- TLS server and client authentication: The server requires a trust file, certificate, and key files for authentication.
- TLS server authentication and client token: The server requires a trust file and a client token.
- Trust (CA Certificate): A file that contains the root certificate authority (CA) used to verify the server's identity.
- Use individual client keys:
- Enabled: Each gateway added to this location can use its own certificate/key/token. An individual certificate/key/token will be added when a gateway is added to the location.
- Disabled: All gateways under this location share the same certificate/key/token information. Provide the certificate/key/token here.
- Client certificate: A digital certificate used to identify the client (gateway) to the server.
- Client key: A private key used in combination with the certificate for mutual TLS authentication. If the client key is pre-installed at the factory, you do not need to upload it manually; WisDM retrieves it automatically when the gateway first comes online.
- Client token: A unique identifier used to authenticate the client without using certificates. If the token is pre-installed on the gateway, WisDM retrieves it automatically the first time the gateway comes online.
Packet Filter
Set up a packet filter to optimize bandwidth by forwarding packets only from selected devices (disabled by default).
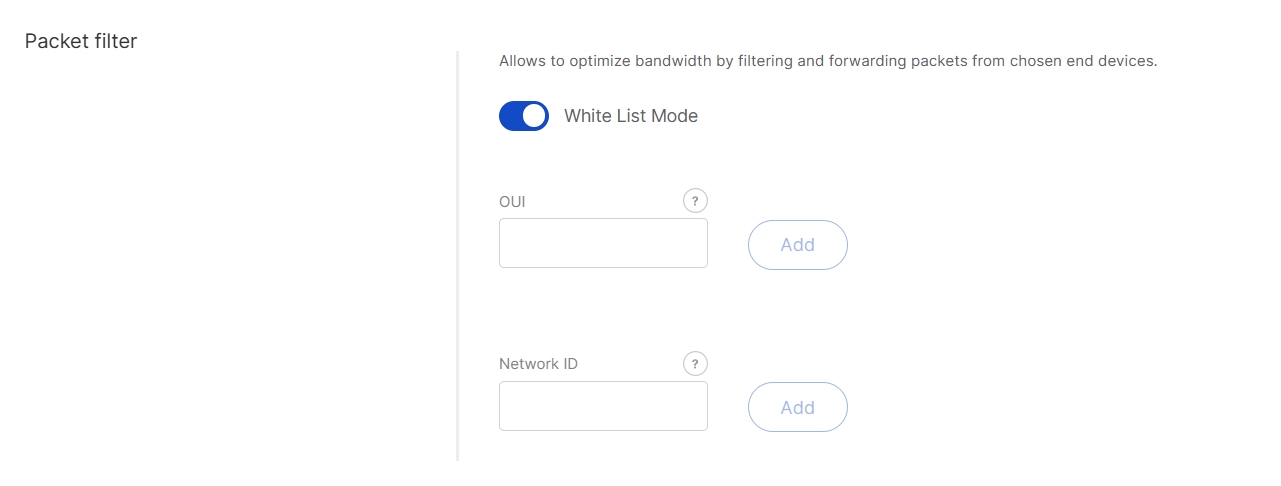 Figure 1: Packet Filter
- White List Mode: Disabled by default. When enabled, it filters devices based on their OUI and Network ID.
- OUI: Filters devices based on the first three bytes (six hexadecimal characters) of the DevEUI, which typically identify the device manufacturer.
- Network ID: A six-character hexadecimal value. Refer to the NetID and DevAddr Prefix Assignments table to determine the network.
After completing the configuration, you can save it as a reusable template for future locations. See Templates for details.
Built-in Network Server
When the Built-in Network Server mode is selected, one central gateway within the location operates as the LoRaWAN Network Server (LNS), while other gateways function as packet forwarders connected to it. This setup allows end devices to be managed directly from WisDM through the central gateway’s built-in LNS, without relying on an external network server.
 Figure 1: Built-in Network Server Work mode
Frequency Plan
Figure 1: Frequency Plan-
Region: Select the frequency band that corresponds to your country or region. Each region adheres to LoRaWAN standard limitations and default values for frequencies and channels.
-
Variation: Required only when Region is set to AS923. Select the AS923 variation that matches your deployment area, such as AS923-1, AS923-2, AS923-3, or AS923-4.
NOTEAS923-2, AS923-3, and AS923-4 are supported in the latest firmware. For gateways running firmware earlier than WisGateOS 1.2.1, select AS923-1.
-
Supported channel number: Choose between 8-channel or 16-channel based on gateway capability.
NOTEThe 16-channel gateways can be added to any location, while 8-channel gateways can only be added to 8-channel locations.
-
LoRaWAN Public: When enabled (by default), the gateway will process data from all end devices operating on the same frequency band. To create a private network, you can disable this option. The gateway will then only process data from end devices with a modified sync word set to private.
-
Advanced frequency settings: Optional. Use them only when you need to review or customize sub-bands, Multi-SF LoRa channels, Standard LoRa channels, or FSK channels.
- Frequency sub-band is required only for regions that use sub-band selection, such as CN470, US915, and AU915. The available sub-band options depend on the selected region and supported channel number.
- Multi-SF LoRa channels are required for regions where explicit channel frequencies are configured, such as EU433, EU868, IN865, AS923, KR920, and RU864.
- Standard LoRa channels are optional and are displayed only for supported regions. They can be used to configure additional LoRa channels with specific spreading factor and bandwidth settings.
- FSK channels are optional and are displayed only for supported regions. They can be used to configure additional FSK channel settings where allowed.
Network Server
Configure general settings for the built-in LoRaWAN Network Server. Default values are pre-filled.
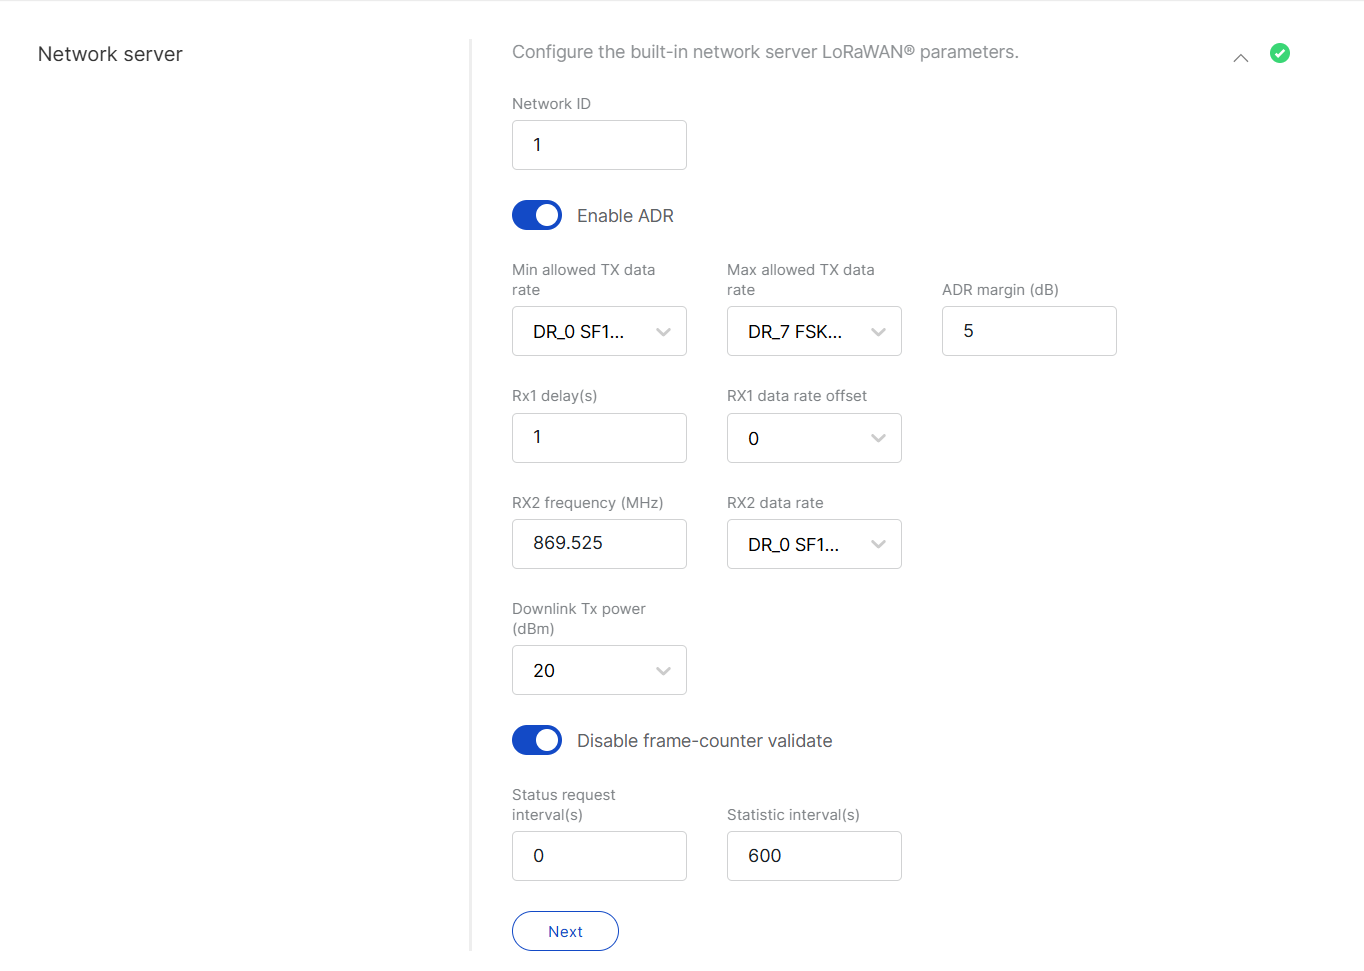 Figure 1: Network Server Parameters
- Network ID: A decimal number used to distinguish between multiple networks when deploying them.
- Enable ADR: Enables or disables Adaptive Data Rate (ADR). When enabled, the server will automatically adjust data rates, airtime, and energy consumption based on current network conditions.
- Min allowed TX data rate: Sets the minimum transmission data rate, which depends on the Region.
- Max allowed TX data rate: Sets the maximum transmission data rate, which depends on the Region.
- ADR margin (dB): Only visible when ADR is enabled. This sets the margin value in dB to prevent overestimating the data rate, which could lead to performance issues such as increased error rates and reduced range.
- Rx1 delay (s): The delay of the first receive window (RX1) in seconds.
- RX1 data rate offset: Determines the data rate for downlink frames sent in the RX1 window. By default, this is set to 0, which is identical to the uplink.
- RX2 frequency (MHz): Sets the frequency of the second receive window (RX2).
- RX2 data rate: Sets the data rate for frames sent in the second receive window.
- Uplink / Downlink dwell time limit: Valid in specific regions only.
- Downlink Tx power (dBm): Useful if you want to use a larger antenna with more gain. Permissible values range from -6 to 20.
- Disable frame-counter validate: This function toggles the frame counter validation on or off.
- Status request interval (s): This indicates how often end devices should be polled for their status log level.
- Statistic interval (s): This shows how often the statistics will be gathered.
Gateway Backend
The Gateway Backend enables MQTT-based communication between gateways within a Location, where extender gateways forward their data to a central gateway.
In most deployments, keep the default Gateway Backend settings. The default MQTT broker address is 127.0.0.1, which points to the Central Gateway itself. This allows the built-in Network Server and gateway backend services to communicate locally on the Central Gateway.
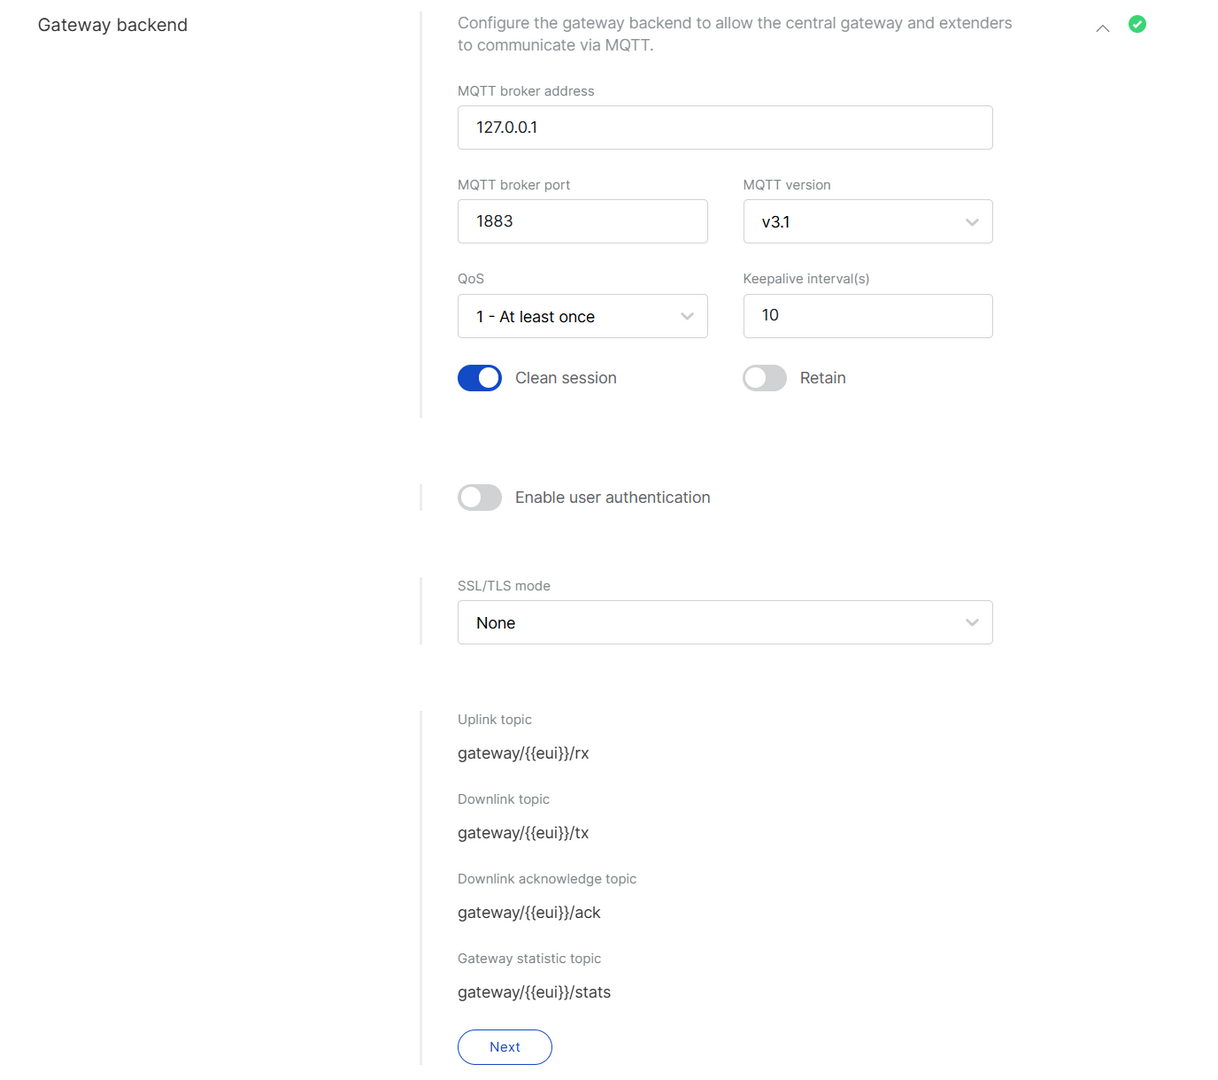 Figure 1: Gateway Backend
-
MQTT broker address: The address of the MQTT broker used by the built-in Network Server. For most deployments, keep the default value.
-
MQTT broker port: The port used by the broker (default:
1883). -
MQTT version: 3.1 or 3.1.1. See the MQTT GitHub Wiki for details.
-
QoS (Quality of Service):
- 0 - At Most Once
- 1 - At Least Once
- 2 - Exactly Once
-
Keepalive interval (s): Interval in seconds to keep the connection alive (default:
10). -
Clean session: When enabled, the broker does not store subscription or undelivered messages.
-
Retain: When enabled, the last message will be retained.
-
Enable user authentication: If enabled, enter Username and Password.
-
SSL/TLS Mode: Configure secure connection
- None
- CA signed server certification
- Self-signed server certification
- Self-signed server and client certification
-
TLS Version: Choose between TLS v1.1 and TLS v1.2.
-
Key pass phrase (optional): A password used to unlock an encrypted client private key file.
-
Uplink topic/Downlink topic/Downlink acknowledge topic/Gateway statistic topic: Predefined MQTT topics for uplink, downlink, and status updates.
Integrate with External Platforms
The Integration Interface enables you to integrate your applications with external third-party platforms by forwarding uplink data via MQTT or cloud services (e.g., AWS IoT Core) for visualization, processing, and further integration.
Generic MQTT
Connects to MQTT-compatible platforms or brokers
 Figure 1: MQTT Integration
- Enable integration interface: Enables the integration interface.
- Generic MQTT: In this configuration, the location functions as an MQTT client that publishes messages to an external MQTT broker.
- MQTT broker address: The IP address of the MQTT broker.
- MQTT broker port: The port used by the broker.
- MQTT version: 3.1 or 3.1.1. See the MQTT GitHub Wiki for details.
- QoS: Quality of Service level:
- 0 - At Most Once
- 1 - At Least Once
- 2 - Exactly Once
- Keepalive interval (s): The interval in seconds to keep the connection alive (default:
10). - Clean session: When enabled, the broker does not store session data.
- Retain: If enabled, the last published message is retained.
- Client ID: ID used to associate with the topic (auto-generated if left empty).
- Enable user authentication: If enabled, enter Username and Password.
- SSL/TLS mode: Configure secure connection
- None
- CA signed server certification
- Self-signed server certification
- Self-signed server and client certification
- TLS version: Choose between TLS v1.1 and TLS v1.2.
- Key pass phrase (optional): A password used to unlock an encrypted client private key file.
- Join topic / Uplink topic / Downlink topic / Downlink acknowledge topic / Status topic: Predefined MQTT topics used to publish messages.
AWS IoT Core
Integrates directly with AWS cloud services
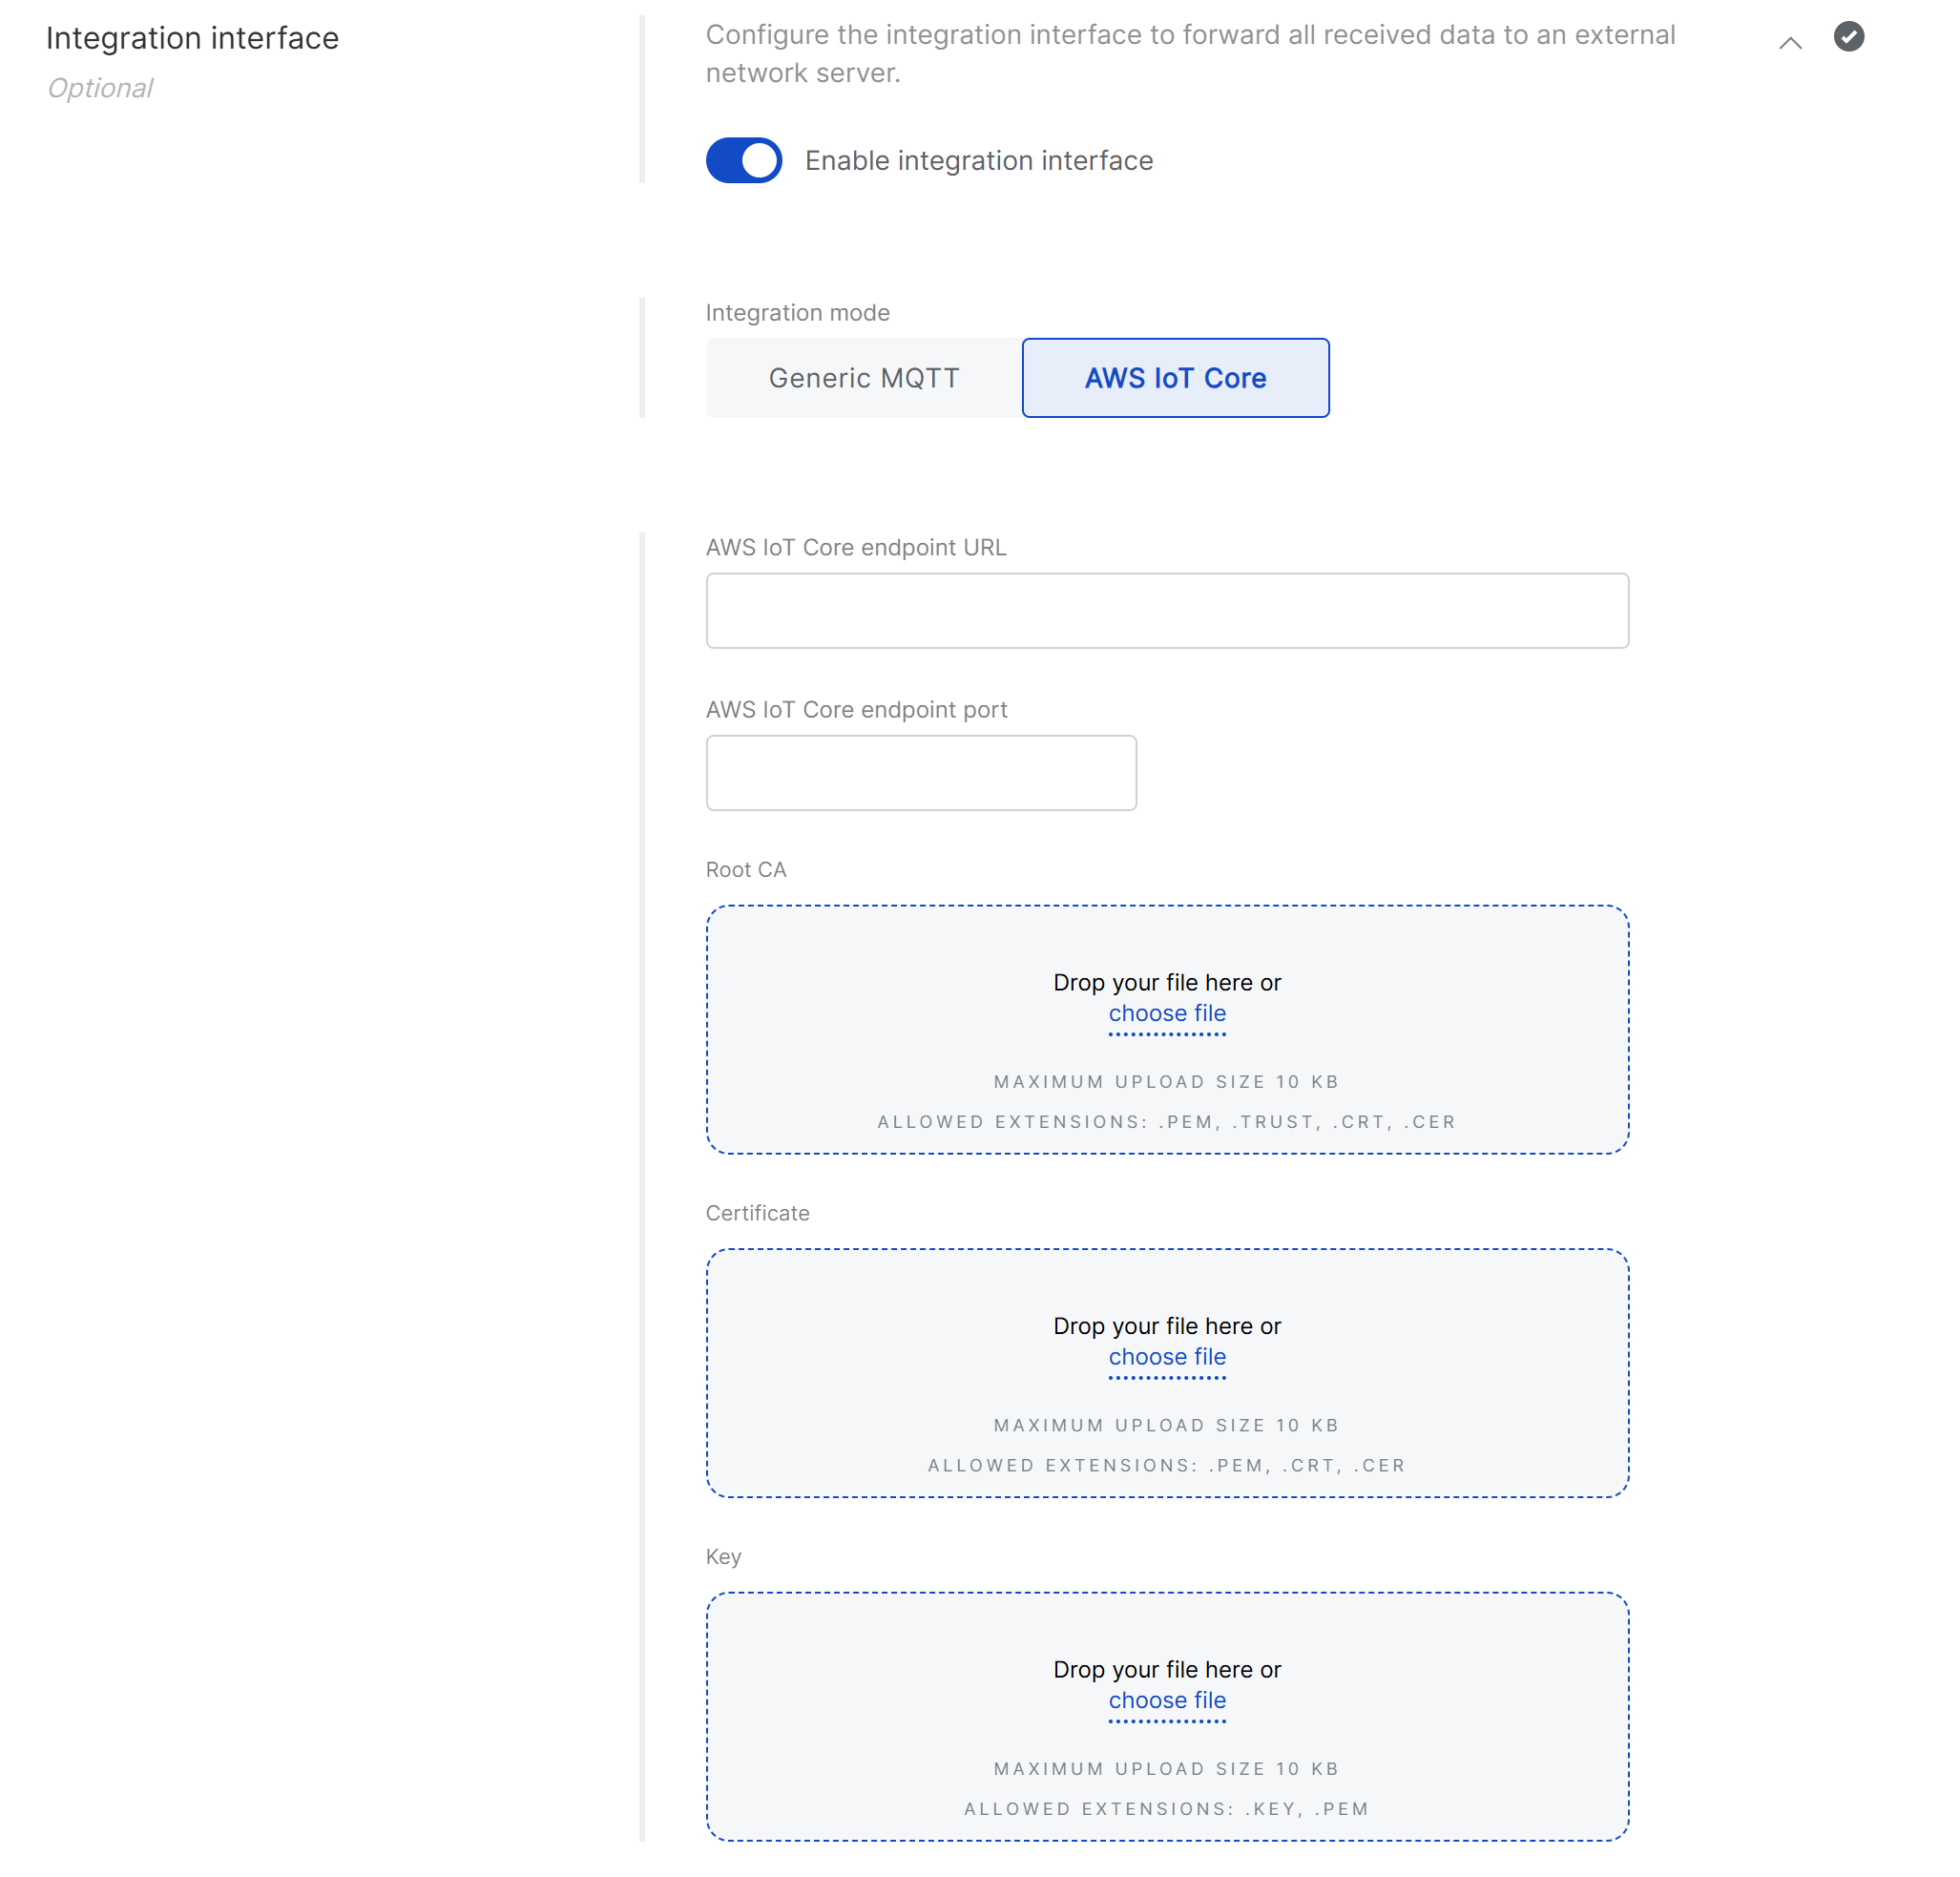 Figure 1: AWS IoT Core Integration
- AWS IoT Core endpoint URL: The AWS endpoint address.
- AWS IoT Core endpoint port: The port used by the AWS server.
- Root CA: CA certificate provided by AWS IoT Core.
- Certificate: Gateway certificate generated by AWS IoT Core.
- Key: Private key for the gateway, generated by AWS IoT Core.
After completing the configuration, you can save it as a reusable template for future Locations. See Templates for details.
Templates
WisDM allows you to save Location-level LoRaWAN network configuration as a reusable template. Templates help you quickly apply the same settings to new or existing Locations without manually entering the same parameters again.
Templates are available for all Location work modes, including Packet Forwarder, Basics™ Station, and Built-in Network Server.
Save a Configuration as a Template
After configuring a Location, you can save the current network configuration as a template.
-
Configure the Location’s LoRaWAN network settings.
-
Click Save as template.
-
Enter a template name and select the configuration groups you want to save.
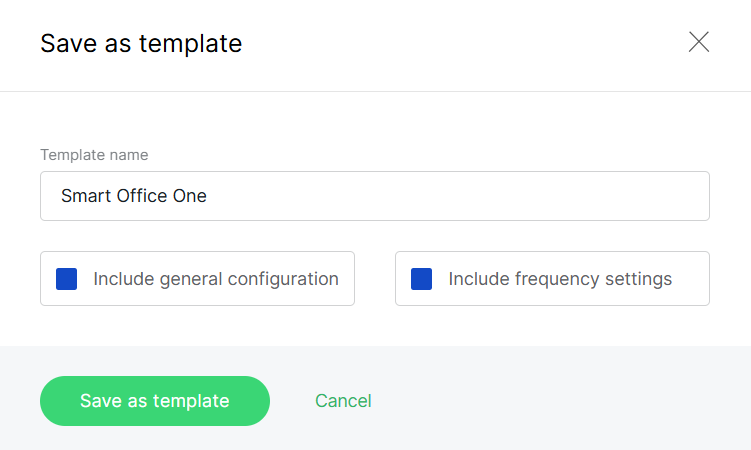 Figure 1: Save as template
Configuration Group Description Frequency Plan Saves the Region, channel number, LoRaWAN Public setting, and related channel configuration. Network Configuration Saves the selected work mode and its related server or network parameters. -
Click Save as template.
Apply an Existing Template
You can apply an existing template when creating or editing a Location.
-
In the Existing template section, click Choose.
-
Select a template from the list.
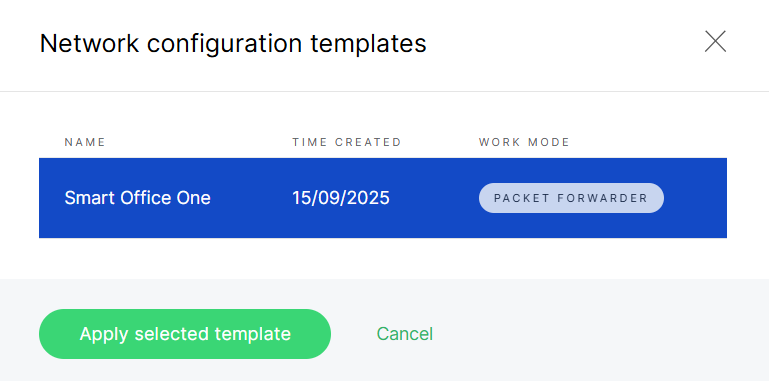 Figure 1: Select a Template
 -
Click Apply selected template.
-
Review the applied configuration. You can modify the parameters if needed.
-
Click Save changes to save the updated Location configuration.